

Page 1
1
SUNRAY VU+ SOLO and SUNRAY VU+ SOLO2 Remote control User Manual
SUNRAY VU+ SOLO and SUNRAY VU+ SOLO2 Remote control User Manual
www.dreamoem.com
Page 2
2
SUNRAY VU+ SOLO and SUNRAY VU+ SOLO2 Remote control User Manual
Chapter 1
1.0
Remote control
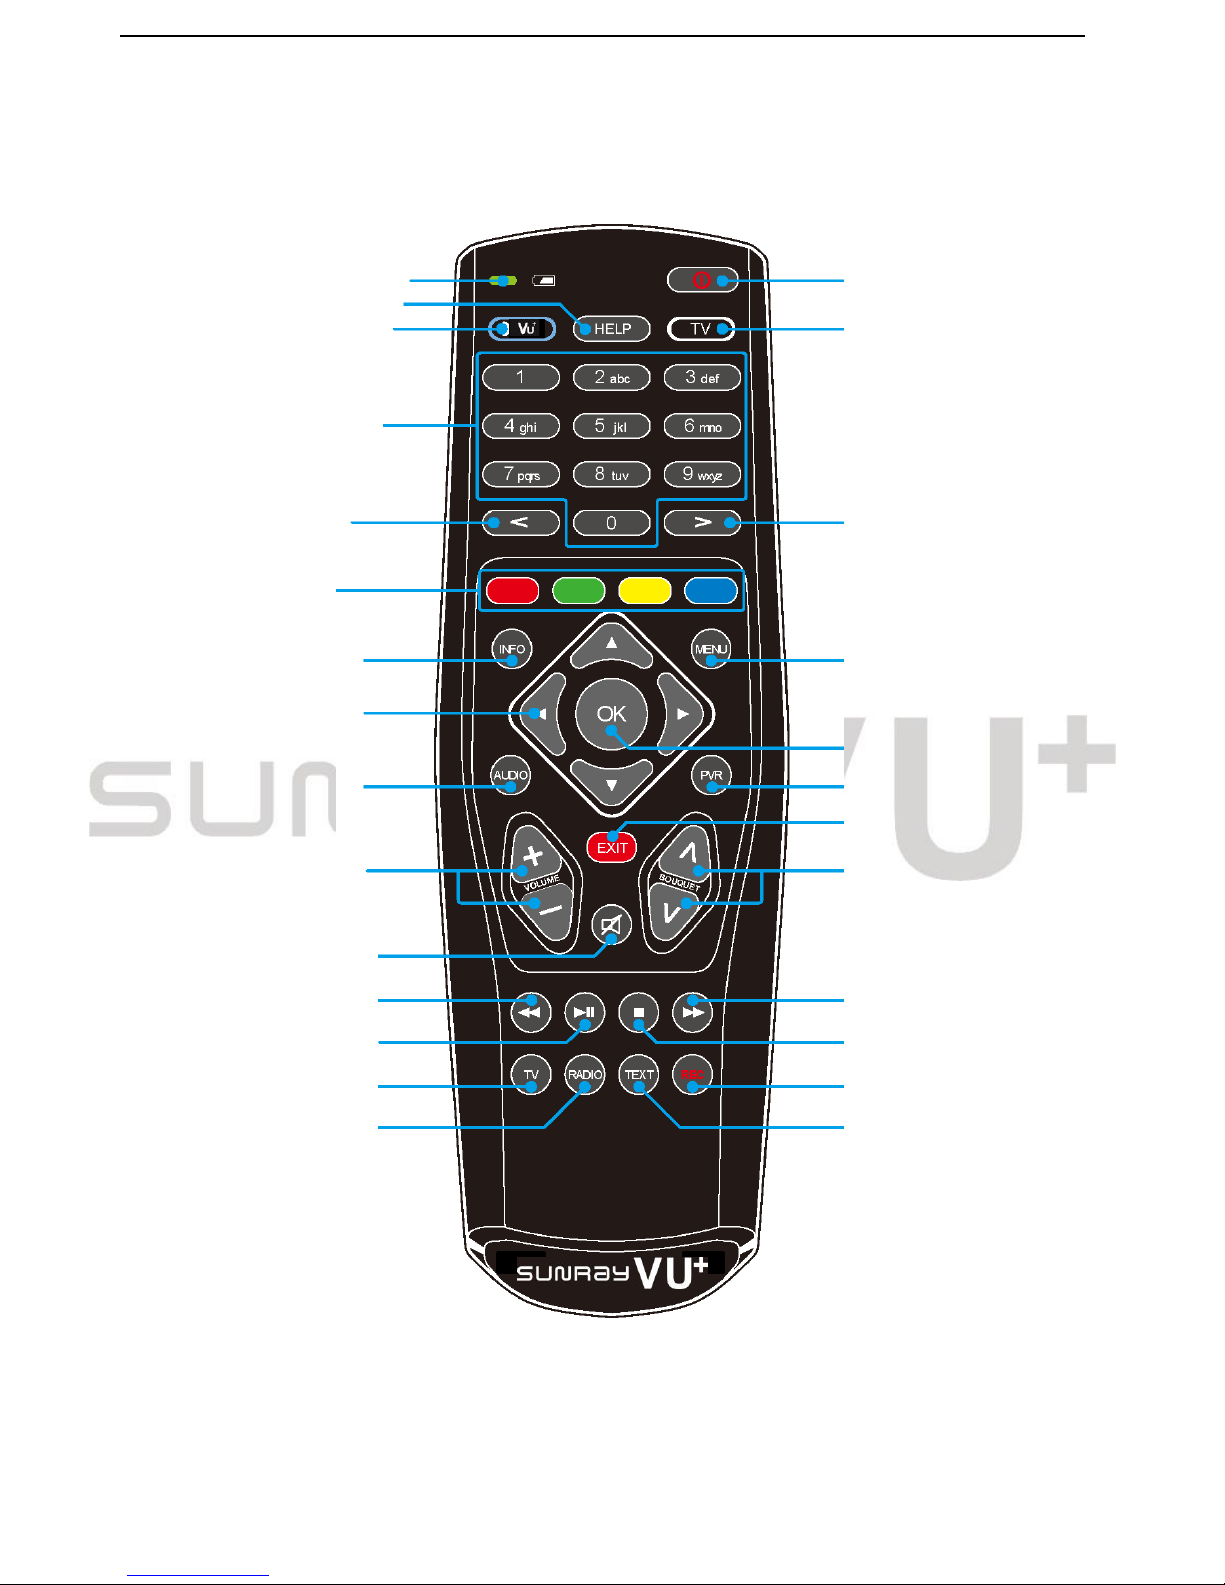
Battery charge
indicator
H
ELP-
Button
Vu+-Mode-Button
Numeric
Keypad
Arrow-Left-Button
Options-
Buttons
INFO-Button
Navigation-
Buttons
AUDIO-Button
Volume +/-
Buttons
Mute-Button
Rewind-
Button
PLAY/PAUSE-
Button
TV-Button
RADIO-Button
Standby-
Button
TV-Mode-Button
Arrow-
Right-
Button
MENU-Button
OK-Button
PVR-Button
EXIT-Button
Bouquet +/-
Buttons
Fast
Forward-
Button
STOP-
Button
Record-Button
TEXT-Button
Page 3
3
SUNRAY VU+ SOLO and SUNRAY VU+ SOLO2 Remote control User Manual
Battery
charge
indicator indicates the status of the
battery voltage.
Standby-Button The
Standby-Button
switches your SunRay VU+solo2 on and off.
VU+-Mode-Button The
VU+-Mode-Button
switches
your remote control into SunRay VU+solo2 con-
trol mode.
It
will shortly light up
once
your
press
the
button.
HELP-Button
Pressing the HELP-Button
shows
the help menu.
TV-Mode-Button The TV-Mode-Button
switches
your
remote
control
into TV control
mode
to control your
preprogrammed
TV.
It
will shortly light up
once
your
press
the button.
Numeric-Keypad
Enter a
service
number to directly
access
the option by using the Numeric
Keypad.
The
service numbers are
on the left
side
of the
service
list. The Numeric Keypad
can also be used
to
enter the teletext
page
number when you are in TV-Control-Mode and if your TV is teletext capable.
The TV station
has
to submit teletext information;
otherwise
this feature cannot
be
used.
Arrow-Left- and Arrow-Right-Button The
Arrow-Left
and
Arrow-Right-Button
enable
you to jump
back and forth
between
the last 20
channels
you
have
watched. If you
have selected a sub service.
you
can
use these
buttons to switch to the next sub service. Additionally
these
buttons can
be used
to
delete characters
during text
input.
Options-Buttons
All
possible
options are shown by the four colored dots/blocks (red, green, yello
w,
blue) and can
be
activated by the Options-Buttons.
Depending
on the menu you currently are
in
the options will
change
and will
be named
differen
tly.
INFO-Button If no OSD menu is
visible on the
screen
and you are in TV or RADIO-Mode,
pressing
the
INFO-Button
will
reveal
the EPG information of the
chose channel
if
it
is available.
MENU-Button If you
are
in TV- or RADIO-Mode,
pressing
this button will bring up the OSD main menu.
The OSD main menu
has
the following options:
You can switch to the
needed
option by
pressing
the
Navigation-Buttons (.T).
If you are in the
service
list,
pressing
the
MENU-Button
brings up the
service
menu. The
shown
options may vary
depending
on the
service
list you selected.
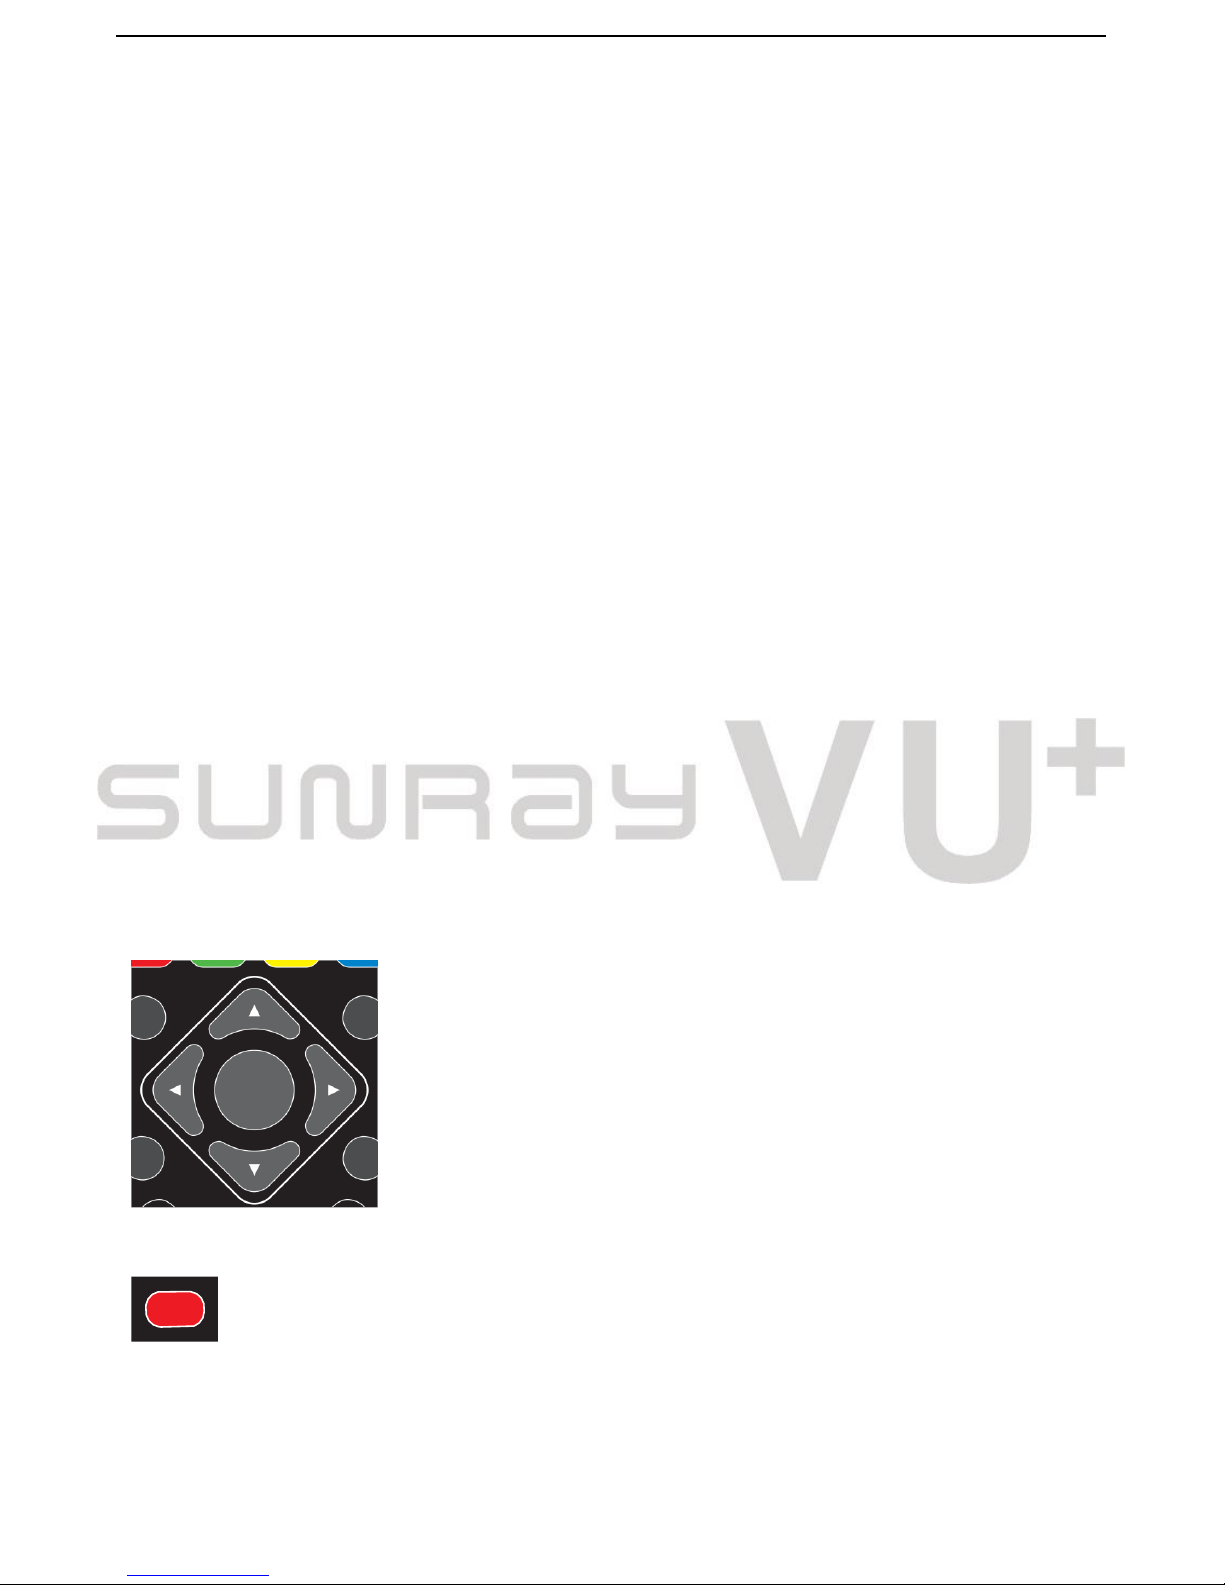
Navigation-Buttons
In
general
the
menus
are controlled using the
Navigation-Buttons
on your remote
control. To get
into a
submenu
you
have
to
press
the
OK-Button.
OK-Button By
pressing
the
OK-Button
you confirm a
selection
in the menu or
service
list navigation.
If
no OSD menu is
present on your
screen,
the infobar is
shown once
you
press
the
OK-Button.
AUDIO-Button
Pressing the AUDIO-Button
gives
an overview of the
provided
audio tracks.
PVR-Button
Pressing
the
VIDEO-Button
shows
the list of recordings.
Volume
+/-
Buttons The
Volume
+/-
Buttons control the volume of the audio.
Pressing + will
mak
e
turn
it
up and
pressing
- will turn
it
down.
EXIT-Button You can
leave
all
menus
and
service
lists by
pressing
the
EXIT-Button.
Page 4
4
SUNRAY VU+ SOLO and SUNRAY VU+ SOLO2 Remote control User Manual
Mute-Button
Pressing
the
MUTE-Button
mutes the Volume. A
crossed speaker
symbol will
appear
on
the TV
screen. Pressing
it
again
or
pressing one
of the
Volume
+/-
Buttons brings back the
audio.
The
Mute-Button
deletes a character
during text
input.
Bouquet
+/-
Buttons
Pressing
the Bouquet
+/-
Buttons will jump back and forth
between
the bou-
quets.
Rewind-Button
Use
the
Rewind-Button
to rewind during playback of a recording.
PLAY/PAUSE-Button
Use
the
PLAY/Pause-Button
to
pause
or
resume
during playback of a recording
or to activate Timeshift-Mode.
STOP-Button
Use
the
STOP-Button
to stop the playback of a recording or to stop the timeshift mode.
Fast Forward-Button
Use
the Fast
Forward-Button
to fast forward during playback of a recording.
TV-Button
Pressing the TV-Button
activates the
TV-Mo
de.
RADIO-Button
Pressing
the
RADIO-Button
activates the
RADIO-Mo
de.
TEXT-Button The
TEXT-Button
activates the Teletext.
Record-Button
Use
the
Record-Button
to start an
instant recording.
Important notes about operation
All functions of the SunRay Vu+solo2 can
be
controlled via OSD-Menu (On-Screen-Display). This
makes
the handling of the SunRay
Vu+
solo2
very
easy
for you. All options are indicated by four
colored
dots or
beams
(red,
green, yellow, blue) in the OSD-Menu and can
be
started with the
Option-Buttons
on
the Remote
Con
trol.
Depending
on the
chosen
Menu,
these
options do vary
.
INFO MEN
OK
In general the menus are controlled using the Navigation-Buttons
(
.T......)on
your remote
con
trol.
To get into a
submenu
you
have
to
press
the
OK-Button.
UDIO PVR
EXIT
All
Menus
and
Service
lists are
closed
with the
EXIT-Button.
Page 5
5
SUNRAY VU+ SOLO and SUNRAY VU+ SOLO2 Remote control User Manual
Chapter 2
TV-Mode
setup
With the SunRay VU+solo2 remote control you
have
the possibility to
control
the Sunray VU+solo2 and
your tv device with only
one
remote control. In order that your tv
device reacts
to the
signals
of the remote
control, you
have
to program
it before.
There are 3 options for programming the rcu:
1. Programming with Code
2. Programming by Learning function
3. Programming by
Scan
function
Please
read the
steps
of
each
programming method carefully,
before
you
pro
ceed.
Programming with Code
In this
programming
method a
manufacturer-specific code
is
used
(refer to
device
list on
www.dreamoem.com).
1.
Press
the
OK-Button
and the TV-Mode-Button
for ˜ 3 seconds.
2. Enter the
desired
3-digit
Code 000-999
with the
Numeric-Keypad. Now
press
the Mute- or Volume
Button in order to
check
if the tv
device responds
to the
just
entered
code. If there is no
resp
onse,
please
try
it
with the next
code
from the list,
according
to the
steps
above.
3. If
none
of the
given codes
is
suitable, please proceed
with the
chapter
“Programming
by Scan
function”.
If no
code
is
entered
within 6
seconds
or the
TV-Mode-Button
is
pressed,
the remote control
will
exit the programming
mode
automatically.
Programming by Scan function
In this programming method the
SunRay
VU+
solo2
rcu
sends every second
another
shutdown-code
to the tv
device,
until
the tv shuts off.
Use
this method of programming, if the Programming with
Code
wasn’t
successfully, or the vendor of your
specific
tv
device
isn’t listed.
1.
Press
the
OK-Button
and the TV-Mode-Button
for ˜ 3 seconds.
2. Enter 777 with the
Numeric-Keypad, in order to start the scan mode and
point the rcu
(with
ir-sensor)
into the direction of your tv device.
Page 6
6
SUNRAY VU+ SOLO and SUNRAY VU+ SOLO2 Remote control User Manual
3. As
soon as
the tv
device
shuts down (Hint:
Depending
on the type of your tv
device,
this can last
some
minutes), immediately
press
the
OK-Button
to
store
the
current
code
and
leave
the
scan-mode.
If no
code
is
entered
within 6
seconds
or the
TV-Mode-Button
is
pressed,
the remote control
will
exit the programming
mode
automatically.
Programming by
Learning
function
In this programming method the functions of the keys of your tv-remote control unit can adopted to the
dreambox
rcu
one-on-one.
Only the
VU+-
and the
TV-Mode-Button
couldn’t
be
programmed.
1.
Press
the
OK-Button
and the TV-Mode-Button
for ˜ 3 seconds.
2. Enter 888 with the
Numeric-Keypad, in order to start the Learning function.
3.
Press
the
desired
button on the
SunRay
VU+
solo2
rcu, (except the
VU+-
and the
TV-Mo
de-
Button) which you want to program.
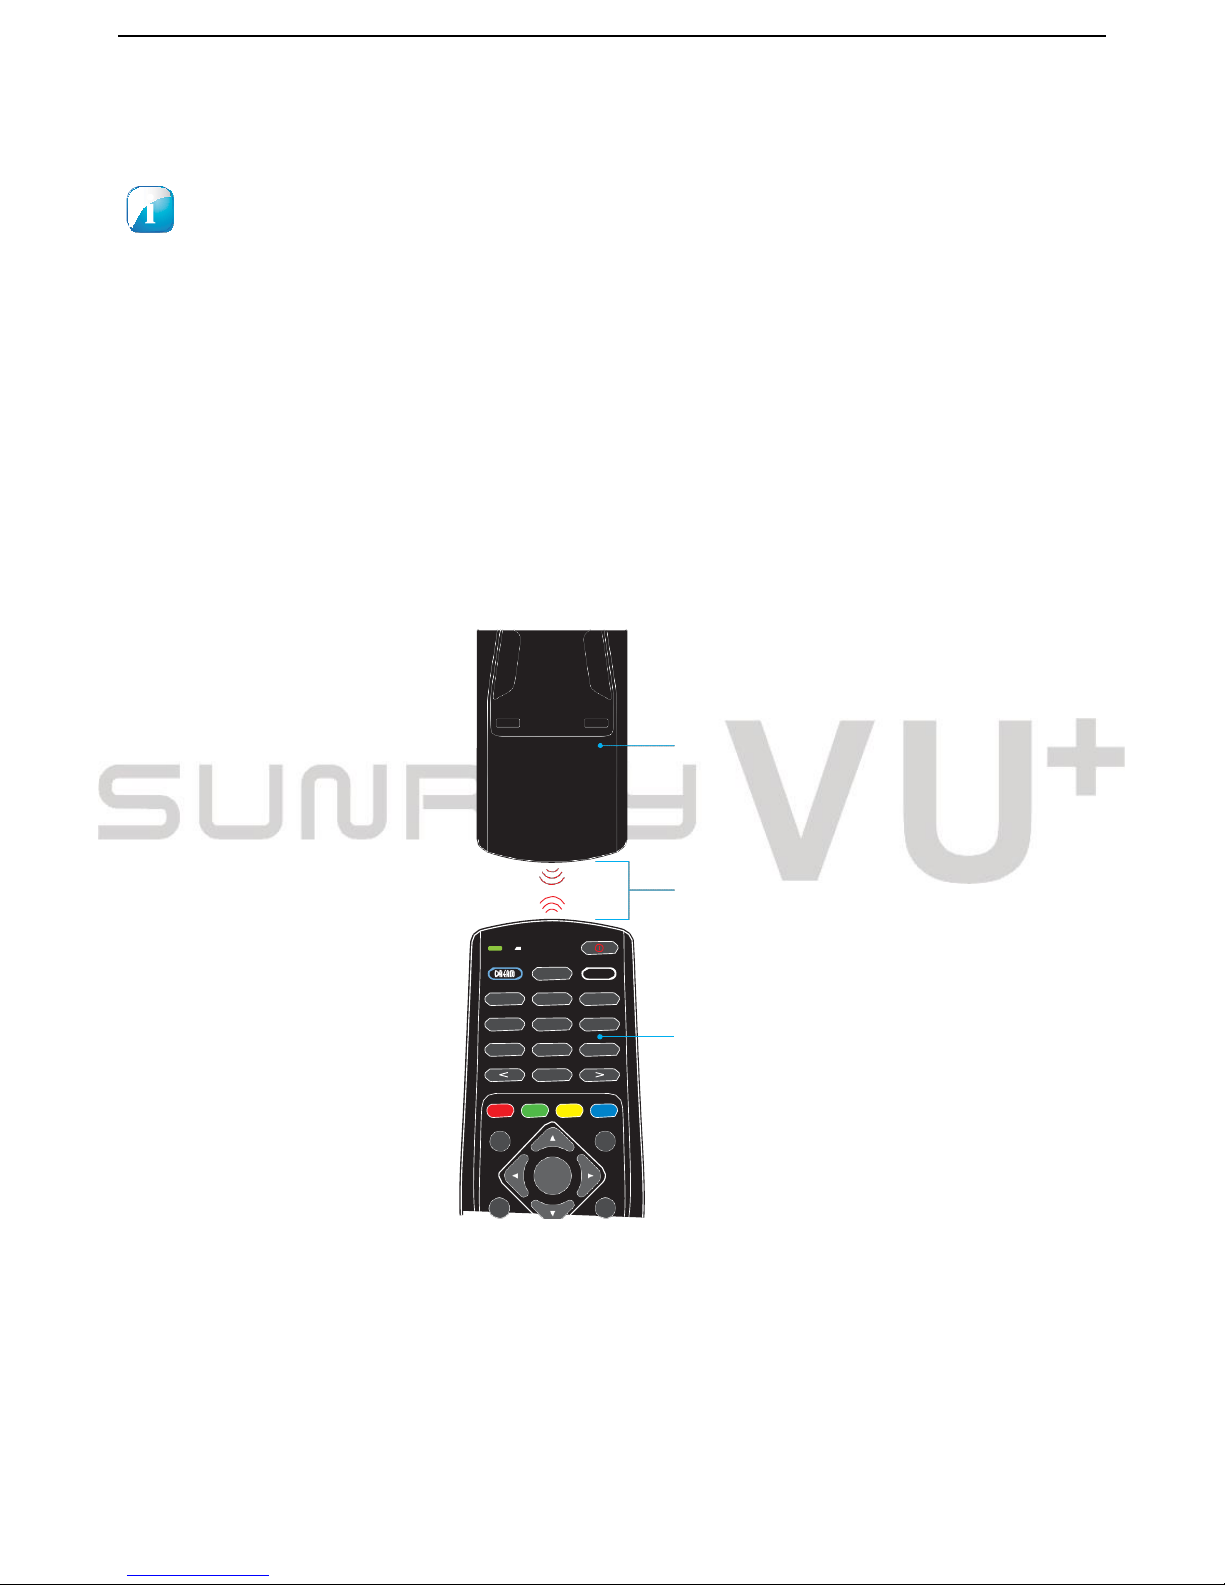
4.
Place
the
SunRay
VU+
solo2
rcu and the tv-device rcu towards
each
other at a
distance
of ˜ 3-5 cm.
Remote control
of your TV
3 - 5 cm
(1" - 2")
HELP TV
1
2 abc 3 def
4 ghi
7 pqrs
5 jkl
8 tuv
6 mno
9 wxyz
SunRay
VU+solo2
remote control
0
INFO
MENU
OK
AUDIO
PVR
5.
Press
the desired button on the tv-device rcu for 2-3 seconds.
Release
this button,
it
is now pro-
grammed.
6. If you want to program another Button or you
made
a mistake during programming, just repeat this
process
starting from step 3.
Page 7
7
SUNRAY VU+ SOLO and SUNRAY VU+ SOLO2 Remote control User Manual
If no
code
is
entered
within 6
seconds
or the
TV-Mode-Button
is
pressed,
the remote control
will
exit the programming
mode
automatically.
VU+-Mode and
TV-Mode
VU+
-Mo
dus
Press
the
VU+-Mode-Button
in order to activate the
VU+
-Mode
in your rcu. Use the two DIP-Switches
in the battery
compartment on the back, if you are going to
use more
than
one SunRay
VU+
solo2
in a single
room.
TV-Mode
By
pressing
the
TV-Mode-Button
the remote control unit
switches
to the tv-mode and the last stored
rcu-code
is used. Now you can
use
the
sunray
VU+
solo2
rcu instead of the tv-device rcu in order to control
y
our
tv-device.
Duration of lighting of the
SunRay VU+solo2
-Symbol
You
can
adjust (in
seconds)
the duration of how long the
dreambox-symbol
at the bottom is lit-up after you
once pressed
a button on the rcu.
1.
Press
the
OK-Button
and the
VU+-Mode-Button
for ˜ 3
seconds.
The
VU+-Mo
de- Button
flashes
3 times.
2.
Press one
of the
keys
0-9 on the
Numeric-Keypad. 0
means
“off”, 1-9
means
the time in seconds.
Reset the remote control
To set the remote control to the factory delivered state back, proceed as follows:
1 Press and hold the TV control button and the OK button until the TV-Mode button lights.
2 Enter 999 using the number keypad.
Support VU+ solo(or SunRay mini-solo) and VU+solo2(or SunRay mini-solo2)
Bottom of SunRay VU + solo2 remote control.
You can switch to the left, the remote control will support the SunRay VU + solo or SunRay mini-solo.
You can switch to the right, the remote control will support the SunRay VU + solo2 or SunRay mini-solo2.
Page 8

8
SUNRAY VU+ SOLO and SUNRAY VU+ SOLO2 Remote control User Manual
SunRay mini-solo
Page 9

9
SUNRAY VU+ SOLO and SUNRAY VU+ SOLO2 Remote control User Manual
SunRay VU+ solo2
Page 10

10
SUNRAY VU+ SOLO and SUNRAY VU+ SOLO2 Remote control User Manual
Chapter 3
SUNRAY VU+ SOLO2/VU+ SOLO
Remote control digit Code
Brands
Code
s
A.R. Systems
223
Acme
211
Acura
212
219
ADC
210
Admiral
209
210
214
215
Adyson
211
225
226
232
233
Agashi
232
233
Agazi
210
AGB
238
Aiko
211
212
219
223
225
226
232
233
Aim
223
Aiwa
193
Akai
212
213
216
218
219
223
226
227
231
232
233
238
Akiba
213
223
227
228
Akura
210
213
219
223
227
228
Alaron
232
Alba
211
212
213
218
219
222
223
225
227
232
237
Alcyon
224
Allorgan
226
233
Allstar
216
223
Amplivision
211
226
230
233
237
Amstrad
210
212
213
219
223
227
238
Anam
212
Anglo
212
219
Anitech
210
212
219
223
224
Ansonic
212
219
221
223
236
237
Arc en Ciel
229
Arcam
225
226
232
233
Arcam Delta
211
Aristona
216
218
221
223
231
Arthur Martin
230
ASA
209
215
Asberg
216
223
224
Astra
212
Page 11

11
SUNRAY VU+ SOLO and SUNRAY VU+ SOLO2 Remote control User Manual
Asuka
210
211
213
225
226
227
228
232
233
Atlantic
211
216
218
223
225
232
Atori
212
219
Auchan
230
Audiosonic
211
212
213
216
218
223
226
227
233
237
AudioTon
211
226
233
237
Ausind
224
Autovox
209
210
211
224
226
233
Awa
232
233
Baird
226
233
Bang & Olufsen
209
Basic Line
212
213
216
219
223
227
228
233
Bastide
211
226
233
Baur
218
220
223
Bazin
226
233
Beko
065
077
223
237
Beon
216
218
223
Best
237
Bestar
216
223
237
Binatone
211
226
233
Blacktron
228
Blackway
228
Blue Sky
213
223
227
228
Blue Star
228
Boots
211
226
233
BPL
223
228
Brandt
003
006
007
229
Brinkmann
223
Brionvega
209
216
218
223
Britannia
211
225
226
232
233
Bruns
209
BSR
217
BTC
213
227
Bush
101
Bush
034
180
184
193
212
213
214
216
217
218
219
222
223
226
227
228
233
Capsonic
210
Carena
223
Carrefour
222
Cascade
212
219
223
Cathay
216
218
223
Page 12

12
SUNRAY VU+ SOLO and SUNRAY VU+ SOLO2 Remote control User Manual
CCE
233
Centurion
216
218
223
Century
209
CGE
217
224
237
Cimline
212
219
227
City
212
219
Clarivox
218
Clatronic
210
211
212
213
216
219
223
224
226
227
233
237
CMS
232
CMS Hightec
233
Concorde
212
219
Condor
211
216
219
223
225
228
232
237
Contec
211
212
219
222
225
232
Continental Ediso
Cosmel
212
219
Crosley
209
217
224
Crown
212
216
218
219
223
224
237
CS Electronics
211
213
225
227
232
Cybertron
213
227
Daewoo
106
Daewoo
138
Daewoo
018
035
066
182
192
194
211
212
216
219
223
225
226
227
232
233
240
Dainichi
213
225
227
232
Dansai
210
216
218
223
225
232
233
Dantax
218
237
Dawa
223
Daytron
212
219
De Graaf
214
Decca
211
216
218
223
226
233
238
Denver
096
Desmet
216
218
223
Diamant
223
Diamond
232
Dixi
212
216
218
219
223
233
DTS
212
219
Dual
211
217
223
226
233
Dual‐Tec
211
212
217
226
Dumont
209
211
226
233
Dux
218
Dynatron
216
218
223
Page 13

13
SUNRAY VU+ SOLO and SUNRAY VU+ SOLO2 Remote control User Manual
Elbe
223
227
233
236
237
238
Elbe‐Sharp
238
Elcit
209
238
ELECTRO TECH
212
Elektra
228
Elin
211
216
218
219
223
225
232
Elite
213
216
223
227
Elman
217
Elta
212
219
232
Emerson
209
223
237
Emperor
228
ESC
233
Etron
212
Eurofeel
233
Euro‐Feel
210
Euroline
218
Euroman
228
232
233
237
Euromann
210
211
216
223
225
226
Europhon
211
216
217
223
226
232
233
238
Expert
230
Exquisit
223
Fenner
212
219
Ferguson
031
060
218
Fidelity
211
214
223
225
232
Filsai
233
Finlandia
214
Finlux
209
211
216
217
218
223
224
226
233
238
FIRST LINE
211
212
216
Firstline
219
223
225
226
232
233
Fisher
209
211
217
222
226
233
237
Flint
216
223
227
Formenti
209
211
217
218
224
225
232
Formenti‐Phoenix
232
Fortress
209
Fraba
223
237
Friac
237
Frontech
210
212
214
215
219
233
Fujitsu
226
233
Fujitsu General
233
Funai
210
Page 14

14
SUNRAY VU+ SOLO and SUNRAY VU+ SOLO2 Remote control User Manual
Galaxi
223
Galaxis
223
237
GBC
212
217
219
227
Geant Casino
230
GEC
211
215
216
218
223
226
233
238
Geloso
212
214
217
219
General Technic
212
219
Genexxa
213
215
216
223
227
Giant
233
GoldHand
232
Goldline
223
GoldStar
211
212
214
216
217
218
219
223
225
226
232
233
234
237
Goodmans
123
Goodmans
203
210
212
216
218
219
222
223
226
231
233
234
238
240
Gorenje
237
GPM
213
227
Graetz
215
Granada
211
214
216
218
221
222
223
224
226
230
233
238
Grandin
212
213
218
228
Gronic
233
Grundig
010
075
200
223
224
231
237
Halifax
210
211
225
226
232
233
Hampton
211
225
226
232
233
Hanseatic
211
212
216
217
218
219
223
226
228
233
236
237
Hantarex
212
219
223
238
Hantor
223
Harwood
219
223
HCM
210
211
212
219
223
226
227
228
233
Hema
219
226
233
Higashi
232
HiLine
223
Hinari
212
213
216
218
219
222
223
227
Hisawa
213
227
228
230
Hitachi
089
Hitachi
139
144
Hitachi
154
Hitachi
171
Hitachi
058
061
211
214
215
217
222
223
226
233
238
240
Hornyphon
216
Hornyphone
223
Page 15

15
SUNRAY VU+ SOLO and SUNRAY VU+ SOLO2 Remote control User Manual
Hoshai
213
227
Huanyu
211
225
232
Hygashi
211
225
226
232
233
Hyper
211
212
217
219
225
226
232
233
Hypson
210
211
216
218
223
226
228
230
233
Iberia
223
ICE
210
211
212
213
216
219
223
225
226
227
232
233
ICeS
225
227
232
Imperial
215
216
217
223
224
237
Indiana
216
218
223
Ingelen
215
Ingersol
212
219
Inno Hit
211
212
213
216
218
219
223
224
226
227
233
234
238
Innovation
210
212
Interactive
237
Interbuy
212
219
Interfunk
209
215
216
218
221
223
237
International
232
Intervision
210
211
223
226
227
228
233
237
Irradio
212
213
216
218
219
223
224
227
234
Isukai
213
223
227
228
ITC
211
217
226
233
ITS
213
216
223
225
227
228
232
ITT
212
215
ITV
212
218
223
JVC
132
JVC
155
JVC
216
222
227
Kaisui
211
212
213
219
223
225
226
227
228
232
233
Kamosonic
211
Kamp
211
225
232
Kapsch
215
Karcher
211
212
218
223
228
237
Kawasho
232
Kendo
214
223
237
Kennedy
217
KIC
233
Kingsley
211
225
232
Kneissel
223
236
237
Kolster
216
223
Page 16

16
SUNRAY VU+ SOLO and SUNRAY VU+ SOLO2 Remote control User Manual
Konka
213
227
Korpel
216
218
223
Korting
209
237
Kosmos
223
Koyoda
212
KTV
211
233
Kyoto
232
233
Lasat
237
Lenco
212
219
Lenoir
211
212
219
Leyco
210
216
218
223
LG
081
084
094
095
098
105
110
111
114
118
126
136
168
LG
136
LG
140
148
LG
164
168
LG
195
211
212
214
216
217
218
219
223
225
226
232
233
234
237
Liesenk
218
Liesenkotter
223
Life
210
212
Lifetec
210
212
219
223
227
Lloyds
219
Loewe
014
055
223
236
237
238
Loewe Opta
209
216
218
Luma
214
218
219
223
Lumatron
214
216
218
223
226
233
Lux May
216
Luxor
211
214
233
234
M Electronic
211
212
215
216
218
Magnadyne
209
217
218
238
Magnafon
211
224
225
232
238
Magnum
210
212
Mandor
210
Manesth
210
211
216
218
223
226
233
Marantz
216
218
223
Marelli
209
Mark
216
218
219
223
225
226
232
233
Masuda
233
Matsui
133
Matsui
211
212
214
216
218
219
222
223
226
231
233
238
Medion
210
212
223
Page 17

17
SUNRAY VU+ SOLO and SUNRAY VU+ SOLO2 Remote control User Manual
M‐Electronic
219
223
225
226
232
233
Melvox
230
Memorex
212
219
Memphis
212
219
Mercury
219
223
Metz
209
Micromaxx
210
212
Microstar
210
212
Minerva
224
238
Minoka
216
223
Mitsubishi
170
Mitsubishi
209
216
222
223
Mivar
211
224
225
232
233
234
235
236
237
238
239
Motion
224
MTC
232
237
Multi System
218
Multitech
211
212
214
217
218
219
223
225
226
232
233
237
Murphy
211
225
232
Naonis
214
NEC
222
233
Neckermann
209
211
214
216
218
220
223
226
231
233
237
NEI
216
218
223
Neufunk
219
223
231
New Tech
212
216
219
223
226
231
New World
213
227
NewTech
233
Nicamagic
211
225
232
Nikkai
210
211
213
216
218
219
222
223
225
226
227
232
233
Nobliko
211
224
225
232
Nokia
215
Nordic
233
Nordmende
209
215
216
Nordvision
218
Novatronic
223
Oceanic
215
230
Okano
223
237
ONCEAS
211
Onwa
227
Opera
223
Orbit
216
223
Page 18

18
SUNRAY VU+ SOLO and SUNRAY VU+ SOLO2 Remote control User Manual
Orion
062
203
212
216
218
219
223
238
Orline
223
227
Orsowe
238
Osaki
210
211
213
223
226
227
233
Osio
234
Oso
213
227
Osume
222
227
Otto Versand
211
216
217
218
220
222
223
226
231
233
238
Pael
211
225
232
Palladium
211
220
223
226
231
233
237
Palsonic
233
Panama
210
211
212
219
223
225
226
232
233
Panasonic
161
Panasonic
091
102
112
Panasonic
137
147
Panasonic
004
013
020
024
026
044
050
057
073
185
198
215
223
238
Panavision
223
Pathe Cinema
211
217
225
230
232
236
237
Pathe Marconi
229
Pausa
212
219
Perdio
223
232
Perfekt
223
Philco
209
217
223
224
237
Philharmonic
211
226
233
Philips
173
176
178
Philips
167
Philips
078
079
Philips
078
Philips
134
152
Philips
142
Philips
143
156
Philips
002
005
009
012
016
019
021
022
023
029
033
036
037
038
041
042
045
Philips
079
186
187
188
189
190
191
196
197
209
211
216
217
218
221
223
231
052
059
069
076
181
Phoenix
209
216
218
223
225
232
237
Pioneer
141
146
149
151
Pioneer
163
Pioneer
215
216
218
223
237
Plantron
210
216
219
223
Playsonic
226
233
Page 19

19
SUNRAY VU+ SOLO and SUNRAY VU+ SOLO2 Remote control User Manual
Poppy
212
219
Prandoni‐Prince
214
224
238
Precision
211
226
233
Prima
212
215
219
Profex
212
219
Profi‐Tronic
216
223
Proline
216
221
223
Prosonic
211
218
223
225
232
233
237
Protech
210
211
212
216
217
218
233
Provision
218
223
240
Pye
216
218
221
223
231
Pymi
212
219
Quandra Vision
230
Quelle
210
211
216
217
218
220
222
223
226
233
234
Questa
222
Radialva
223
227
Radiomarelli
209
223
238
RadioShack
223
Radiotone
216
219
223
237
Recor
223
Redstar
223
Reflex
223
Revox
216
218
223
237
Rex
210
214
215
RFT
209
236
237
Rhapsody
232
R‐Line
216
218
223
Roadstar
193
210
212
213
219
227
Robotron
209
Rowa
232
233
Royal Lux
237
RTF
209
Saba
006
060
068
172
209
215
238
Saisho
210
211
212
219
226
233
238
Salora
214
215
217
234
238
Sambers
224
238
Samsung
177
Samsung
080
082
083
087
093
097
104
113
116
121
Samsung
150
Samsung
135
Page 20

20
SUNRAY VU+ SOLO and SUNRAY VU+ SOLO2 Remote control User Manual
Samsung
166
Samsung
039
043
056
063
070
201
210
211
212
216
218
219
223
225
226
231
232
233
234
237
Sandra
211
225
226
232
233
Sansui
216
223
Sanyo
160
Sanyo
049
211
217
219
222
225
226
232
233
236
237
SCHAUB LORENTZ
215
Schneider
211
213
216
217
218
221
223
226
227
231
233
SEG
210
211
217
218
219
222
223
225
226
232
233
SEI
220
223
238
SEI‐Sinudyne
209
215
238
Seleco
214
215
217
Sencora
212
219
Sentra
219
227
Serino
232
Sharp
162
Sharp
131
Sharp
092
103
109
115
119
120
122
127
128
Sharp
017
028
048
051
072
222
238
Siarem
209
217
223
238
Sierra
216
221
223
231
Siesta
237
Silva
225
232
Silver
222
270
271
272
273
274
275
276
277
278
279
280
281
282
283
Singer
209
217
230
Sinudyne
209
217
218
220
223
238
Skantic
215
Solavox
215
Sonitron
226
233
237
Sonoko
210
211
212
216
218
219
223
226
228
233
Sonolor
215
220
230
Sontec
216
218
223
237
Sony
174
175
179
Sony
158
159
Sony
108
Sony
085
086
088
107
117
Sony
000
001
008
011
015
025
030
040
054
071
199
202
212
220
222
Sound & Vision
213
227
Soundwave
216
218
223
Page 21

21
SUNRAY VU+ SOLO and SUNRAY VU+ SOLO2 Remote control User Manual
Standard
211
212
213
216
219
223
226
227
233
Star Lite
219
223
Starlight
218
Stenway
227
228
Stern
214
215
Strato
219
223
Stylandia
233
Sunkai
212
227
Sunstar
219
223
Sunwood
212
216
219
223
Superla
211
225
232
233
238
SuperTech
219
223
225
231
232
Supra
212
219
Susumu
213
Sutron
212
219
Sydney
211
225
226
232
233
Sysline
218
Sytong
225
232
Tandy
211
213
215
226
227
233
Tashiko
211
214
222
225
226
232
233
Tatung
193
211
216
218
223
226
233
238
TCM
204
205
206
207
208
210
212
241
242
243
244
245
246
247
248
249
250
251
252
253
254
255
256
257
258
259
260
261
262
263
264
265
266
267
268
Teac
223
233
Tec
211
212
217
219
226
233
TEDELEX
233
Teleavia
229
Telecor
223
226
227
233
Telefunken
165
Telefunken
216
223
Telegazi
223
227
Telemeister
223
Telesonic
223
Telestar
223
Teletech
212
218
219
223
Teleton
211
222
226
233
Televideon
225
232
Televiso
230
Tensai
212
213
216
219
223
226
227
233
Tesmet
216
Page 22

22
SUNRAY VU+ SOLO and SUNRAY VU+ SOLO2 Remote control User Manual
Tevion
210
212
Texet
211
219
226
232
233
Thomson
145
157
Thomson
003
006
032
060
067
172
211
216
223
229
Thorn
218
223
240
Tokai
216
223
226
233
Tokyo
211
225
232
Tomashi
228
Toshiba
169
Toshiba
130
Toshiba
099
100
124
Toshiba
153
Toshiba
027
046
047
053
064
074
090
183
193
203
222
233
Towada
215
217
233
Trakton
233
Trans Continens
223
226
233
Transtec
232
Trident
226
233
238
Tristar
227
Triumph
223
231
238
Uher
215
216
223
224
237
Ultravox
209
211
217
223
225
232
Unic Line
223
United
218
Universum
210
216
217
218
220
222
223
224
226
233
234
237
Univox
223
Vestel
214
215
216
217
218
223
226
233
284
285
286
287
288
289
290
291
292
293
294
295
296
297
298
299
Vexa
212
218
219
223
Victor
216
VIDEOLOGIC
232
Videologique
211
213
225
226
227
232
233
VideoSystem
216
223
Videotechnic
225
226
232
233
Viewsonic
125
129
Visiola
211
225
232
Vision
216
223
233
Vortec
216
218
223
Voxson
209
214
215
216
223
224
Waltham
211
223
226
233
Page 23

23
SUNRAY VU+ SOLO and SUNRAY VU+ SOLO2 Remote control User Manual
Watson
216
218
223
227
Watt Radio
211
217
225
232
Wega
209
222
223
Wegavox
219
Weltblick
216
218
223
233
Weston
217
White Westingho
218
223
225
232
Windstar
228
Xrypton
223
Yamishi
223
226
227
228
233
Yokan
223
Yoko
210
211
212
213
216
218
219
223
226
227
232
233
237
Yorx
213
227
Zanussi
214
226
233
 Loading...