

Sunquest SQ-1220 Installation & Operation Manual

Model # SQ-1220
INSTALLATION & OPERATION
MANUAL
Read all the instructions before installing your solar heating system.
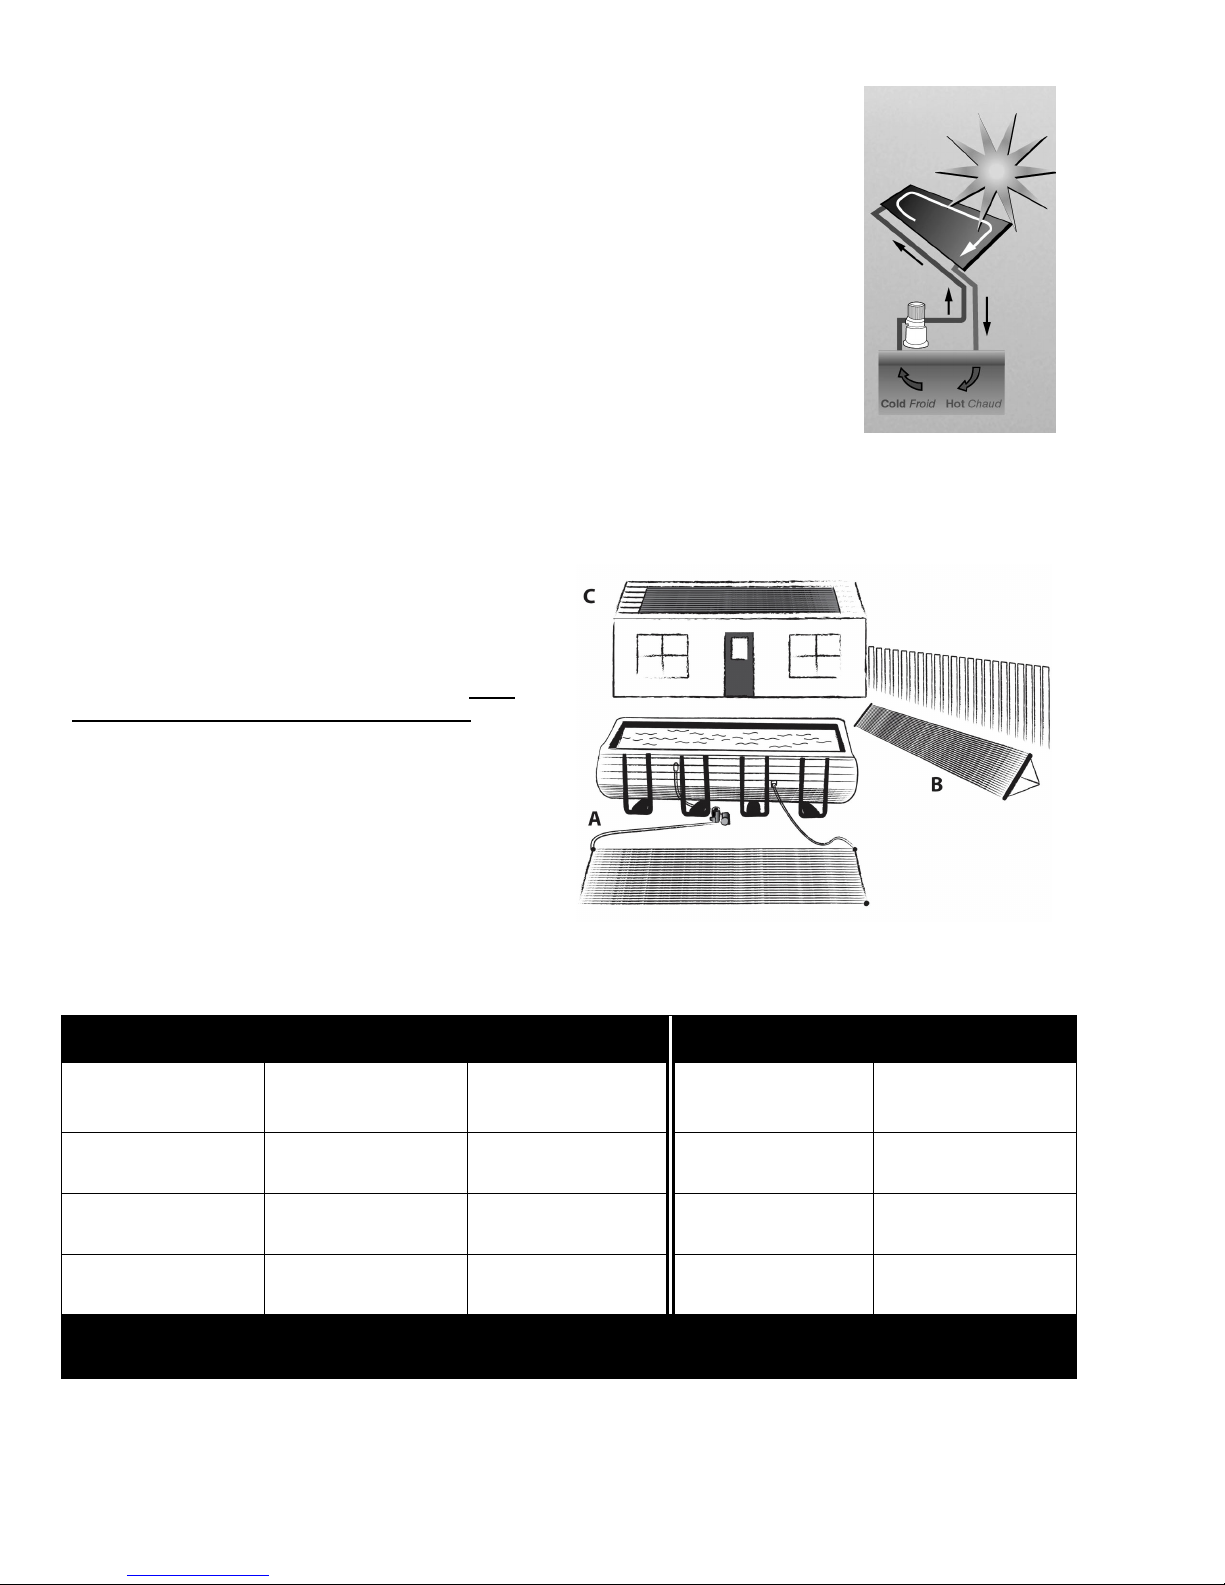
How does a solar heating system work?
1. Connect your existing pool pump to the solar panel. Your pool pump
sends cold water to the solar panel.
2. The sun heats the water in the solar panel.
3. Warm water is then returned to your swimming pool.
How well does solar heating work?
A solar heating system if sized and installed properly will raise your pool water
temperature up to 100 F / 60 C and extend your swimming season. In order to maximize
the heat, the solar panel must be exposed to sunlight as long as possible. On rainy
days and at night the solar panel must be turned off so your pool water doesn't cool.
You can purchase an optional diverter kit to accomplish this. On cloudy days, the solar
panel won't work as well. It is recommended to use a solar blanket or a Liquid Solar
Blanket. This will help maintain the heat generated by the solar panel in your pool.
Is a special pump required?
If your panel is on the ground beside your pool, you can use your existing pool pump as long as it is in good working
condition. A 1HP pump will handle a panel placed up to 9 meters (30 ft)away from your pool and one story up.
Where can the solar panel be placed?
The solar panel can be placed on the ground.
Avoid placing in high traffic areas, as it is not
recommended to walk on the solar panel. The solar
panel can also be mounted on a rack or a roof. When
mounted, the panel should preferably be facing south
and be inclined at a 300 to 450 degree angle. Don't
face the panel North, because it will not heat. A
mounting kit (part#SQ-RMK5) is required for placing
the solar panel on a rack or roof.
How many panels do I need?
Above-Ground
Round Pool
Up to 15' Up to 12'x20' 1
18' to 21' 12'x 24' to 12' x 28'
24' 16' x 25'
27' 16'x 32' to 18' x 34' 4
Above-Ground
Oval Pool
# of Panels is the minimum recommended.
More panels will give you more heat, faster.
Box Contents:
No. of Systems In-Ground Pool No. of Systems
Up to 15' x 30'
2
3
2
Up to 16' x 36' 6
Up to 20' x 40' 8
4

Qty Part # Description Qty Part # Description
1 SK-1220 SunQuest solar panel 2ft x 20ft 2 SK-FTG-D Threaded combination hose adapter
2 SK-FTG-I "O" rings
2 SK-FTG-F Threaded cap
1 SK-FTG-E Roll of Teflon tape
Optional parts
Roof Mounting Kit (SQ-RMK5) High Wind Roof Mounting Kit (SQ-HWK)
1 - SQ-RMK5 per SQ-1220 system are required for Roof For high wind areas, to be used in addition to the roof mounting
or Rack installation kit (SQ-RMK5). 1 - SQ-HWK per SQ-1220 system is required
plus one extra.
Qty Part # Description Qty Part # Description
5 SK-RMK-ST-M Coated metal strap 2 SK-RMK-BASE Mounting base
15 BOLT-Z Lag bolt 2" 2 SK-RMK-CAP Mounting Cap
Optional parts (cont.)
1 SK-RMK-ST-N32 Nylon strap 32"
1 SK-RMK-ST-V32 Vinyl strap 32"
4 BOLT-Z Lag bolt 2"
3
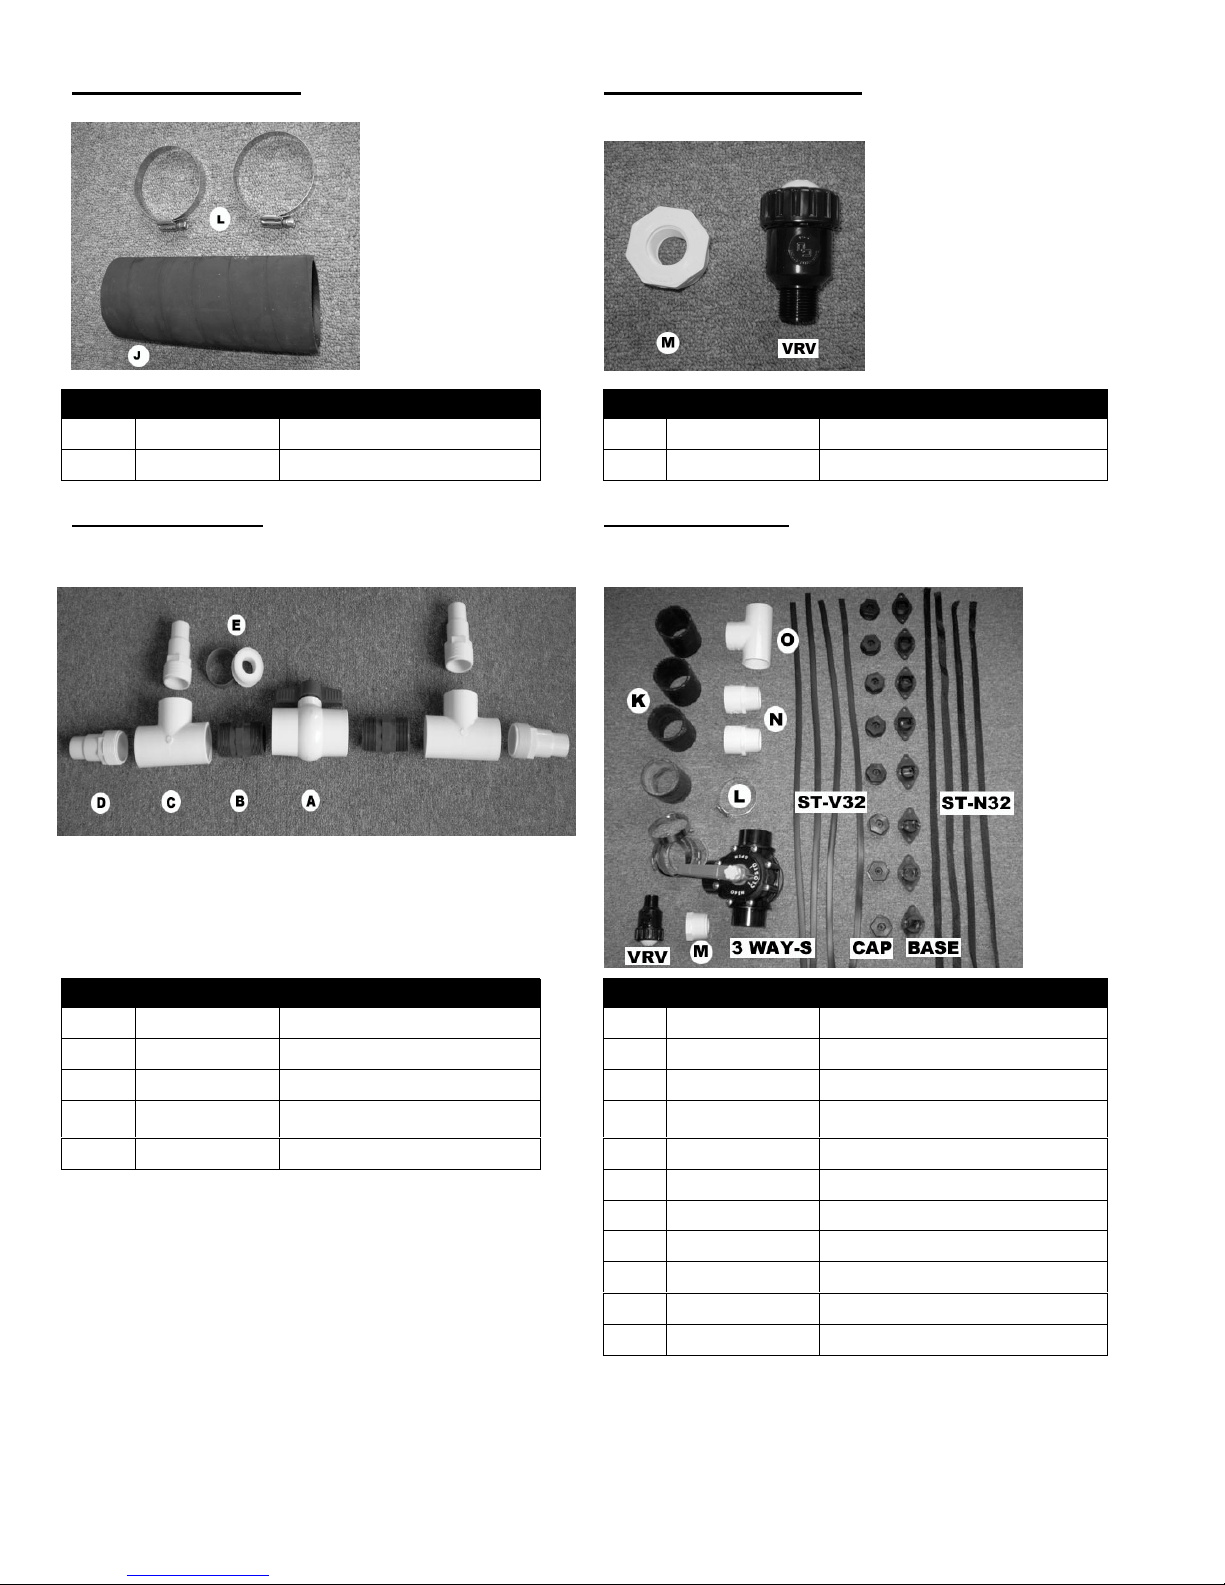
Add-on Kit (SQ-ADDON) Vaccum relief Kit (SQ-VRK)
1 SQ-ADDON required per SQ-1220 system added Facilitates drainage for winterizing roof mounted systems
Qty Part # Description Qty Part # Description
1 SK-FTG-J Rubber hose 7.5" 1 SK-VRV Vacuum Relief Valve
2 SK-FTG-L Metal collar (Hose clamp) 1 SK-FTG-M Reducer Adapter 1.5" to 0.75"
Diverter Kit (SQ-DK) System Kit (SQ-SK)
Used to turn your system ON & OFF Everything needed to connect 3 SQ-1220 systems
Includes add-on kits, vacuum relief kit, high wind kits & diverter kit
Qty Part # Description Qty Part # Description
1 SK-FTG-A Threaded 2 way valve 4 SK-FTG-K Rubber hose 3.75"
2 SK-FTG-B Threaded nipple 8 SK-FTG-L Metal collar (Hose clamp)
2 SK-FTG-C Threaded tee 1 SK-VRV Vacuum Relief Valve
4 SK-FTG-D
1 SK-FTG-E Roll of Teflon tape 2 SK-FTG-N PVC Adapter
Threaded combination hose
adapter
INSTALLATION
1 SK-FTG-M Reducer Adapter 1.5" to 0.75"
4 SK-RMK-ST-N32 Nylon strap 32"
4 SK-RMK-ST-V32 Vinyl strap 32"
8 SK-RMK-BASE Mounting base
8 SK-RMK-CAP Mounting Cap
1 VALVE-3WAY-S 3 Way Diverter Valve
1 SK-FTG-O PVC Tee
4
Additional parts required
• Flexible pool hose or rigid PVC pipe. Length dependent on distance from pool pump to solar panels.
• Metal collars (Hose clamps) - Quantity dependant on installation.
• For rack or roof placement a mounting kit (part # SQ-RMK5) is required
Tools required
• Flat head screwdriver.
• For rack or roof placement: a utility knife, a power drill and silicone sealant.
PANEL ASSEMBLY
1. Choose placement for your solar panel(s). Make sure that it will be in the sun for most of the day. The area should be
clear of sharp objects.
2. Take the panel out of the box, remove the strap from panel and let the panel sit in the sun for approximately 30
minutes so it will become flexible.
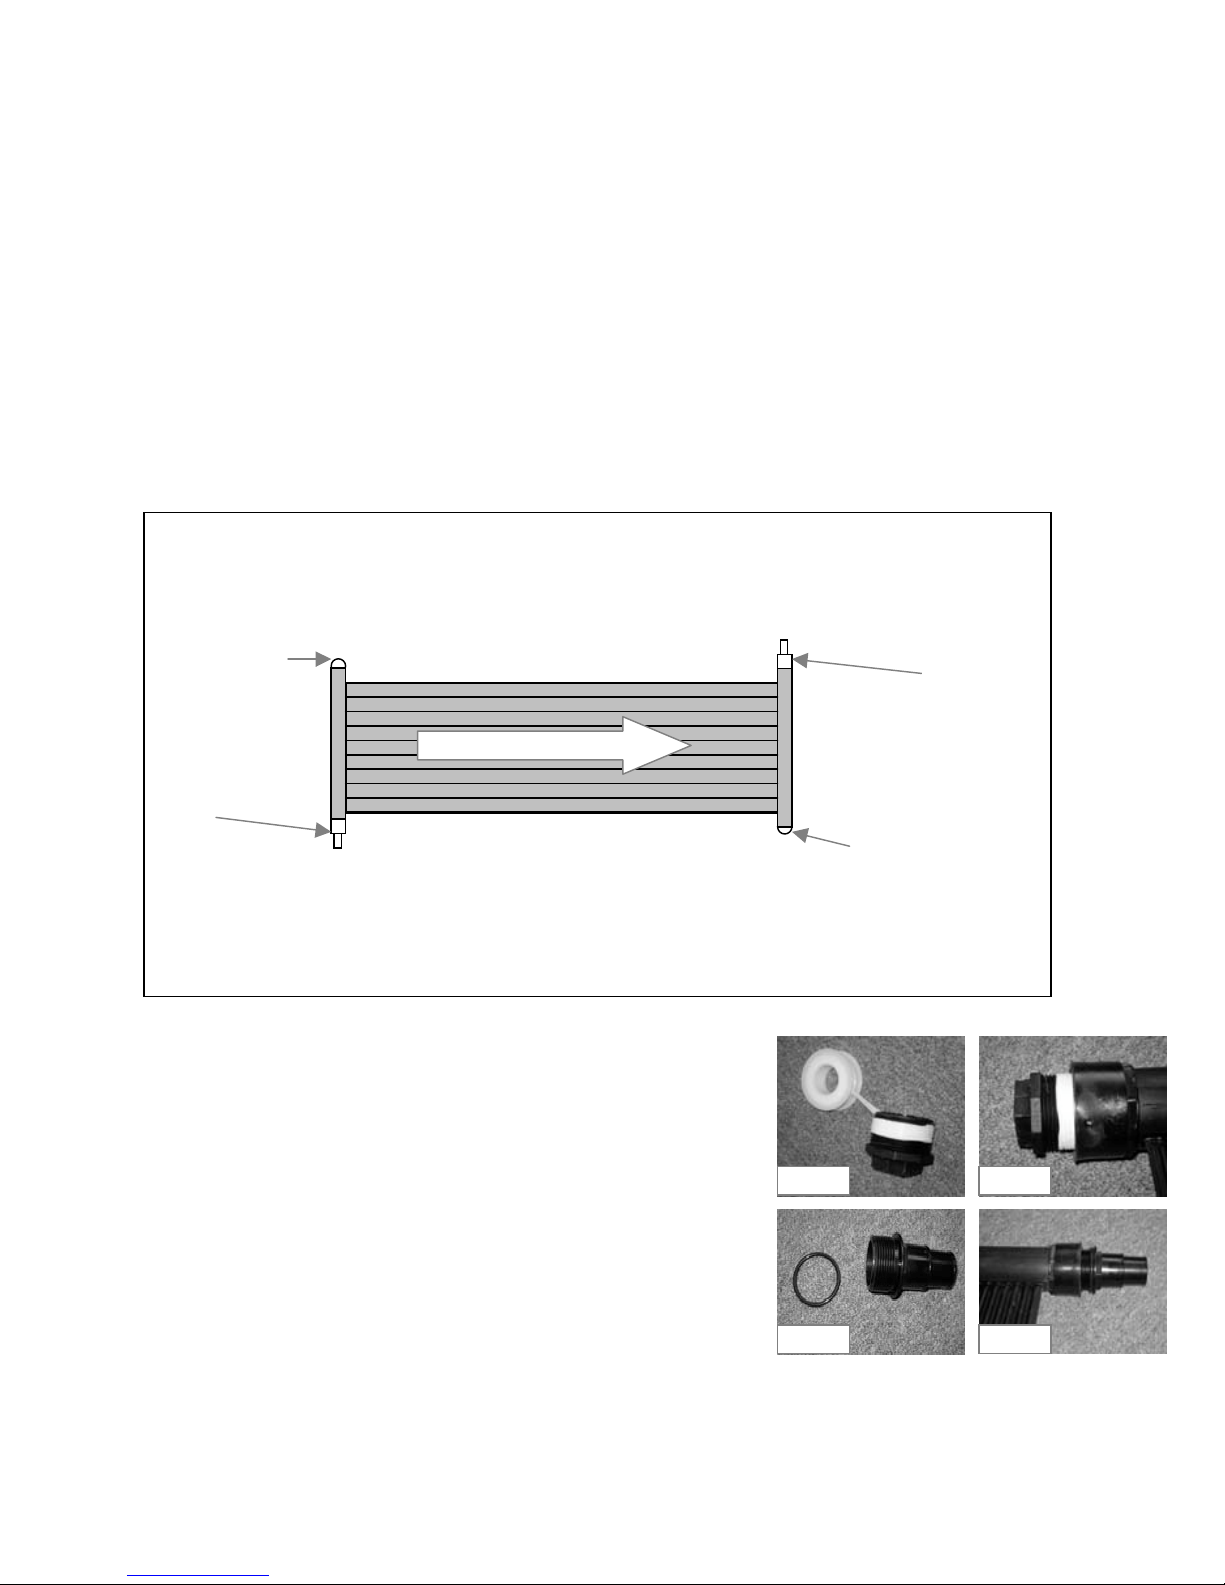
3. a) Installation: one system on ground.
Outlet
Inlet
Diagram Step 3a
• Apply Teflon tape to threads of 2 caps (SK-FTG-F )
See Fig 3a-1
• Thread 2 caps into the panels as per Diagram Step 3a.
Do not over tighten. See Fig 3a-2
• Put "O" rings (SK-FTG-I ) on both combination adapters (SKFTG-D) See Fig 3a-3
• Thread both combination adapters into the panels as per
Diagram Step 3a. Do not over tighten. See Fig 3a-4
Fig 3a-1 Fig 3a-2
Fig 3a-3 Fig 3a-4
3 b) Installation: one system on rack or roof. (Horizontal only)
5
 Loading...