

Page 1

1
─ 4/8/16CH DVR ─
User Manual HS 411S/811S/611S
This document contains preliminary information and subject to change without notice.
\
Page 2
2
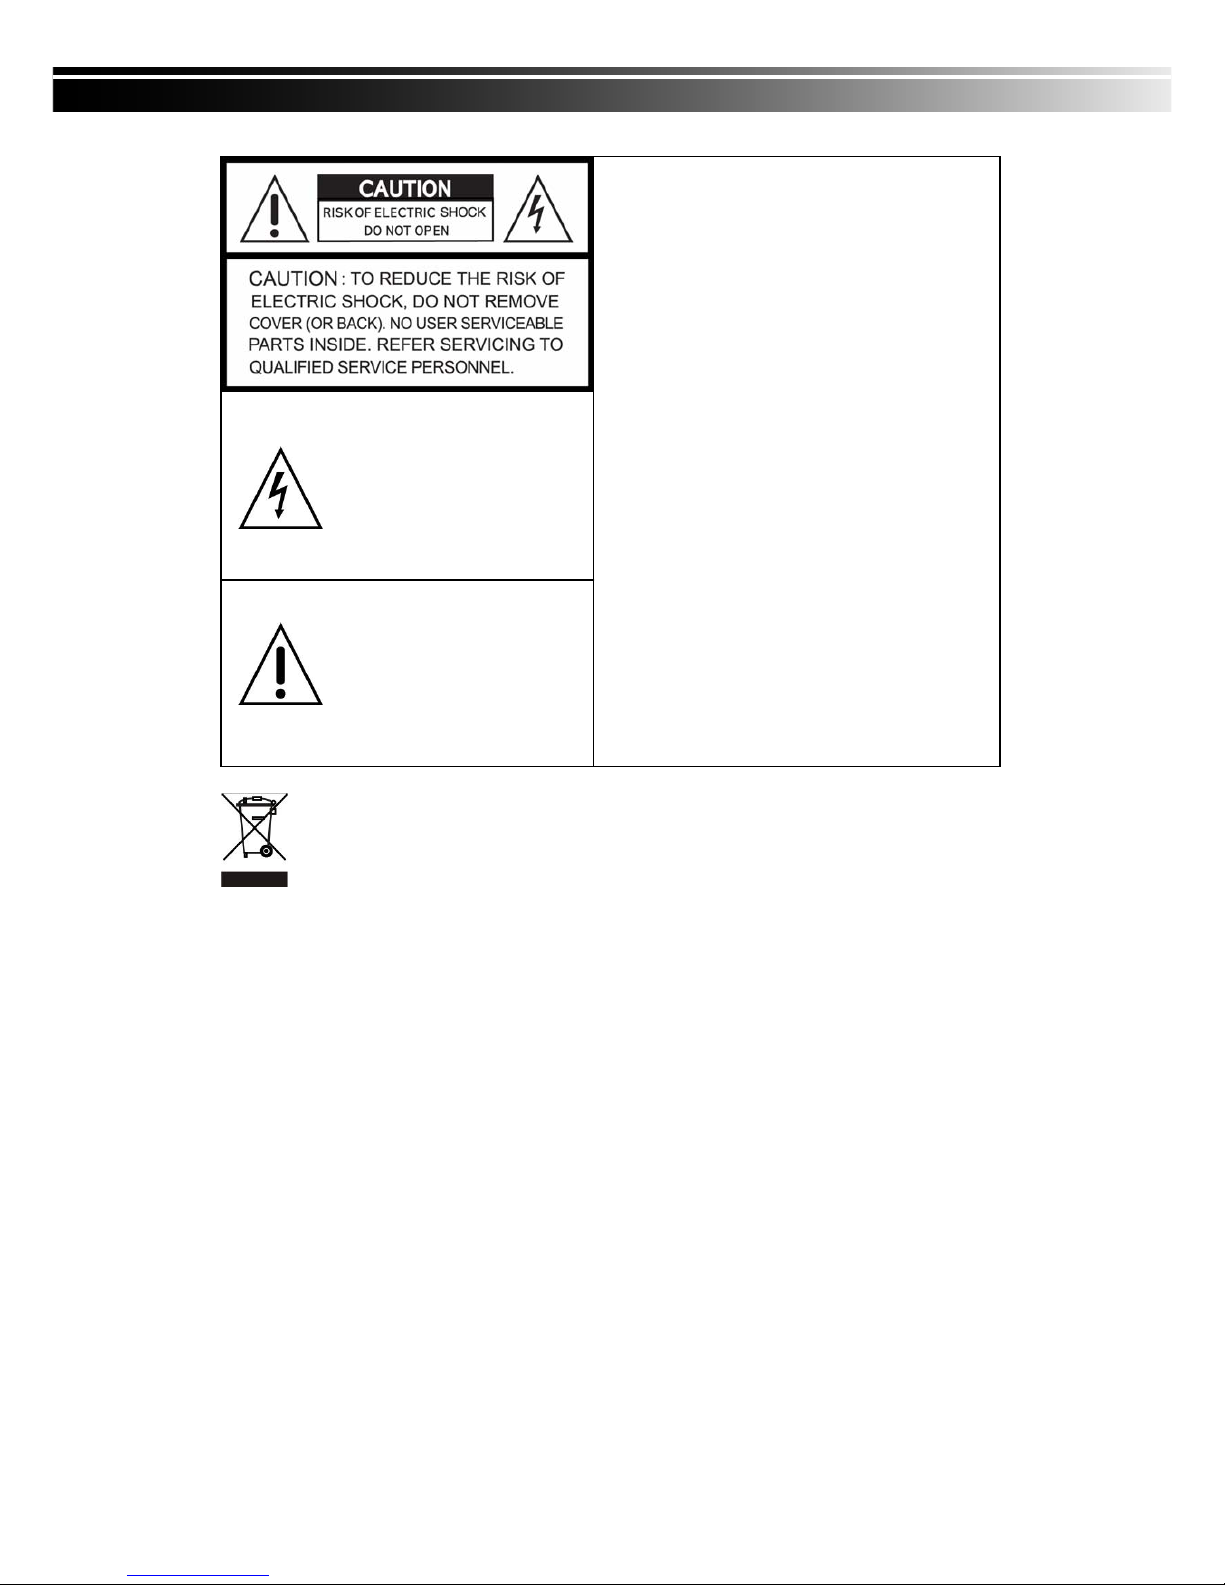
This symbol is intended to alert
the user to the presence of
unprotected “Dangerous voltage"
within the product's enclosure
that may be strong enough to
cause a risk of electric shock.
This symbol is intended to alert
the user to the presence of
important operating and
maintenance (servicing)
instructions in the literature
accompanying the appliance.
WARNING
TO REDUCE THE RISK OF FIRE OR
ELECTRIC SHOCK, DO NOT EXPOSE THIS
APPLIANCE TO RAIN OR MOISTURE.
NOTE: This equipment has been tested and
found to comply with the limits for a class digital
device, pursuant to part 15 of the FCC Rules.
These limits are designed to provide reasonable
protection against harmful interference when the
equipment is operated in a commercial
environment. This equipment generates, uses,
and can radiate radio frequency energy and, if
not installed and used in accordance with the
instruction manual, may cause harmful
interference to radio communications. Operation
of this equipment in a residential area is likely to
cause harmful interference in which case the
user will be required to correct the interference
at his own expense.
Disposal of Old Electrical & Electronic Equipment (Applicable in the European Union
and other European countries with separate collection systems)
This symbol on the product or on its packaging indicates that this product shall not be treated as
household waste. Instead it shall be handed over to the applicable collection point for the recycling of
electrical and electronic equipment. By ensuring this product is disposed of correctly, you will help prevent
potential negative consequences for the environment and human health, which could otherwise be
caused by inappropriate waste handling of this product. The recycling of materials will help to conserve
natural resources. For more detailed information about recycling of this product, please contact your local
city office, your household waste disposal service or the shop where you purchased the product.
Page 3

3
Table of Contents
CHAPTER 1 PACKING DETAIL AND INSTALLATION _____________________ 5
1-1 PACKING________________________________________________ 5
1-2 Hard Disk Installation ________________________________________ 6
2-1 FRONT PANEL CONTROLS ___________________________________ 7
2-2 16CH REAR PANEL CONNECTORS ____________________________ 8
2-3 8CH REAR PANEL CONNECTORS _____________________________ 9
2-4 4CH REAR PANEL CONNECTORS ____________________________ 10
CHAPTER 3 LIVE, PLAYBACK AND PTZ OPERATIONS _________________ 11
3-1 LIVE MODE ________________________________________________ 11
3-1.1 REMOTE CONTROLLER ________________________________ 12
3-2 PLAYBACK Mode___________________________________________ 14
3-3 PTZ Mode _________________________________________________ 16
CHAPTER 4 MAIN MENU SETUP ____________________________________ 18
4-1 RECORD SETUP ___________________________________________ 20
4-1.1 Quality & Frame Rate Setup ____________________________ 21
4-2 EVENT SETUP _____________________________________________ 22
4-2.1 MOTION SETUP _______________________________________ 23
4-2.1.1 MOTION AREA SETUP_____________________________ 24
4-2.2 SENSOR SETUP _______________________________________ 25
4-3 SCHEDULE SETUP _________________________________________ 26
4-3.1 Schedule Record Setup ________________________________ 26
4-3.2 Holiday Setup _________________________________________ 27
4-4 CAMERA SETUP ___________________________________________ 28
4-5 ACCOUNT SETUP __________________________________________ 29
4-5.1 Permission Setup______________________________________ 30
4-5.2 User Picture Setup ____________________________________ 30
4-6 NETWORKING SETUP_______________________________________ 31
4-6.1 NETWORKING SETUP __________________________________ 32
4-6.1.1 DHCP ___________________________________________ 32
4-6.1.2 LAN _____________________________________________ 32
4-6.1.3 ADSL___________________________________________ 33
4-6.2 HTTP Setup __________________________________________ 34
4-6.3 DDNS Setup _________________________________________ 35
4-6.4 Mail Setup ___________________________________________ 36
4-7 PTZ & RS485 SETUP _______________________________________ 37
4-8 SYSTEM SETUP ____________________________________________ 38
4-8.1 DISPLAY SETUP_______________________________________ 39
4-8.2 DATE/TIME SETUP _____________________________________ 40
4-8.2.1 CHANGE DATE & TIME____________________________ 40
4-8.2.2 TIME ZONE AND DAYLIGHT SAVING TIME SETUP ____ 41
4-8.2.3 INTERNET TIME SETUP ___________________________ 41
4-8.3 BUZZER & RELAY SETUP ______________________________ 42
4-8.4 SPOT SETUP__________________________________________ 43
4-9 UTILITY SETUP ____________________________________________ 44
4-10 DIAGNOSTIC ______________________________________________ 45
CHAPTER 5 BACKUP & SEARCH____________________________________ 46
5-1 BACKUP SETUP____________________________________________ 46
5-2 SEARCH SETUP____________________________________________ 47
5-2.1 EVENT SEARCH _______________________________________ 47
5-2.1.1 CRITERIA SETUP FOR EVENT SEARCH _____________ 48
5-2.2 TIME SEARCH_________________________________________ 49
Page 4

4
5-3 AP Software Installation and Setup ___________________________ 50
5-4 AP Software Operation______________________________________ 51
CHAPTER 6 SPECIFICAITONS_______________________________________ 54
CHAPTER 7 MOBILE APPLICATION INSTALLATION AND USAGE__________ 56
7-1 Mobile Application Installation and Operation for Symbian System. 5
6
7-1.1 Mobile Application Installation___________________________ 56
7-1.2 Mobile Application Operation____________________________ 56
7-1.2.1 Add New Login DVR ______________________________ 57
7-1.2.2 Logging Onto the DVR ____________________________ 57
7-1.2.3 Modify the Login Information of DVR _______________ 58
7-1.2.4 Delete the Login Information of DVR________________ 58
7-1.3 Live Monitoring Operation ______________________________ 58
7-1.3.1 Scroll the Image __________________________________ 59
7-1.3.2 Image Quality Setup ______________________________ 59
7-1.3.3 Channel Display __________________________________ 59
7-1.3.4 Size of Image ____________________________________ 60
7-1.3.5 Rotate the image _________________________________ 60
7-1.3.6 Alarm ___________________________________________ 60
7-2 Mobile Application Installation and Operation for Windows Mobile S
ystem ________________________________________________________
61
7-2.1 Mobile Application Installation___________________________ 61
7-2.2 Mobile Application Operation____________________________ 62
7-2.3 Operation under the LIVE monitoring.____________________ 62
7-2.3.1 Operation uner the LIVE monitoring for Jrviewer _____ 63
7-2.3.2 Operation under the LIVE monitoring for H264 Pocket 64
CHAPTER 8 CMS INSTALLATION AND USAGE GUIDE___________________ 64
8-1 CMS Installation____________________________________________ 64
8-2 CMS LOGIN AND ENVIRONMENT_____________________________ 66
8-3 DVRs, Groups & Events_____________________________________ 67
8-3.1 View DVR / Group List_________________________________ 68
8-3.2 View Event Logs ______________________________________ 68
8-4 Local PC Information and Control ____________________________ 69
8-5 Main Display_______________________________________________ 69
8-5.1 Audio Control _________________________________________ 70
8-5.2 eMAP Display _________________________________________ 70
8-5.3 PTZ Control___________________________________________ 71
8-6 Operation Bar______________________________________________ 72
8-6.1 User administration ____________________________________ 73
8-6.2 DVR Administration ____________________________________ 73
8-6.3 Group Administration __________________________________ 74
8-6.4 eMap Administration ___________________________________ 75
8-6.5 Remote Play __________________________________________ 75
8-6.6 HDD Playback_________________________________________ 76
8-6.7 File Playback__________________________________________ 77
8-6.8 Event Playback________________________________________ 78
8-6.9 Snapshot Data ________________________________________ 79
8-6.10 Recording Data_______________________________________ 79
Page 5

5
CHAPTER 1 PACKING DETAIL AND INSTALLATION
1-1 PACKING
1. DVR
2. IR Remote Control 3. Batteries×2 4. CD
5. Power Adaptor
Page 6
6
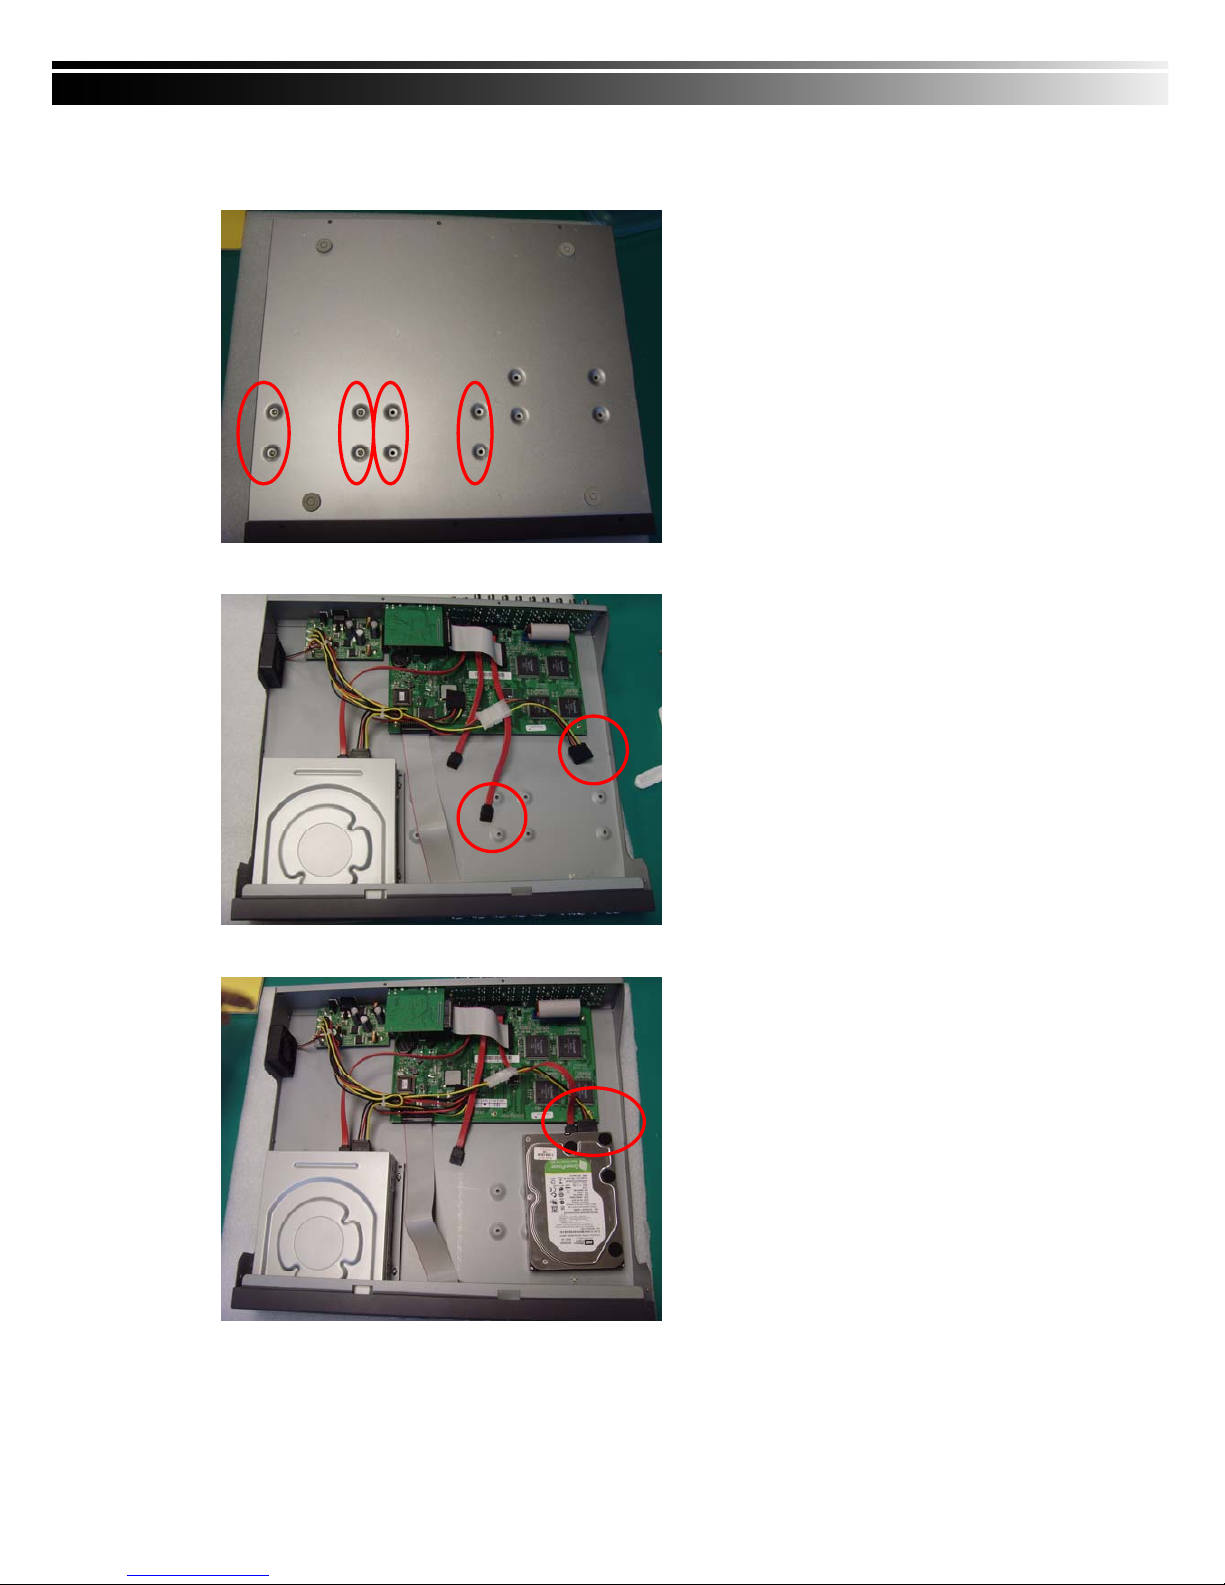
1-2 Hard Disk Installation
Step 1) Fix the HDD rack mount with the screws as indicated.
(We demonstrate how to place a HDD but you can place 2 in.)
Step 2) Connect the power and the SATA cables as indicated.
Step 3) Place the HDD on the HDD plate and screw it as indicated.
Note: After installation, please initialize Hard Disk before starting to record. For more detailed information,
please check out User Manual 4-9 System Tools for reference.
Page 7
7
CHAPTER 2 PANEL LOCATION
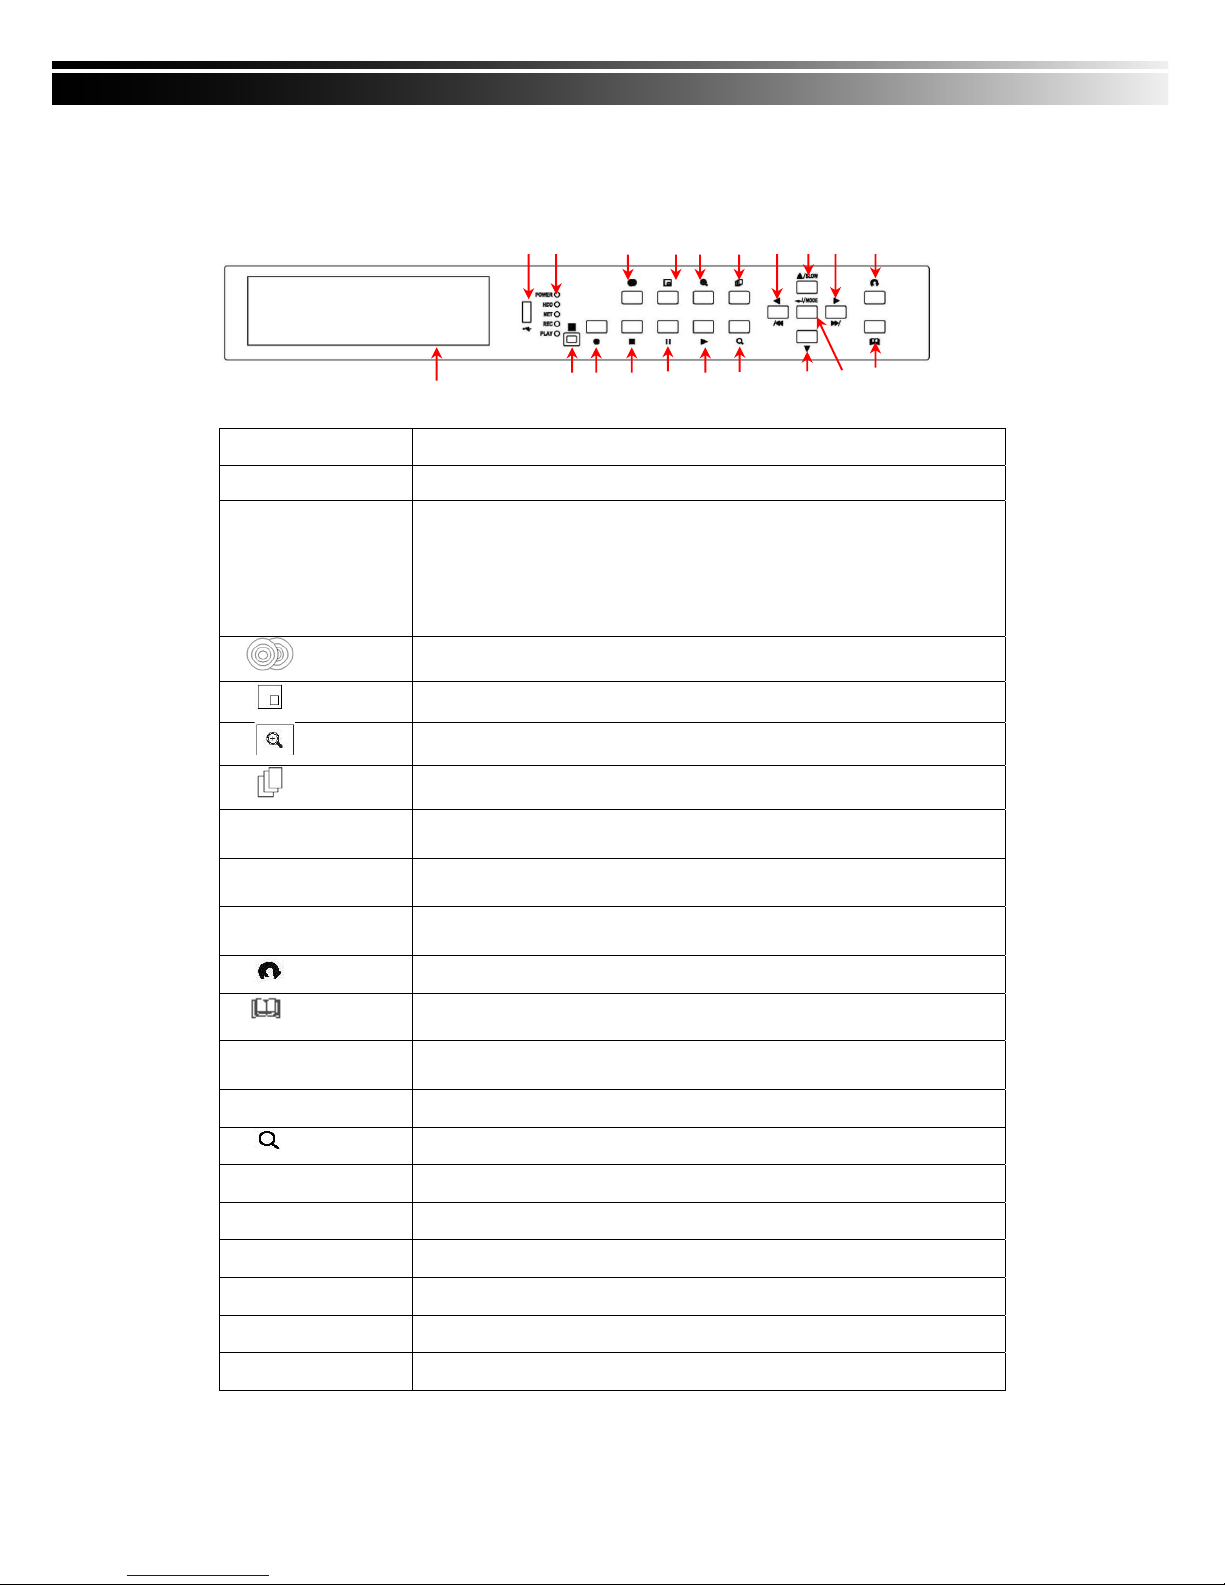
2-1 FRONT PANEL CONTROLS
Control Keys
Description
① USB 2.0 Port
Port for USB external devices.
② LED Display
POWER:Power is on.
HDD:Hard disk is in use.
NET:Remote user logged in.
REC:Recording.
PLAY:Playing back.
③ BACKUP
In LIVE mode, press to display the BACKUP menu.
④ PIP
In LIVE mode, display with picture in picture format.
⑤ ZOOM
In LIVE or PLAYBACK mode, enlarge the display of a channel.
⑥ AUTO SEQ.
In LIVE mode, cycle through all channels in full screen.
⑦W / WW
In SETUP mode, press to reduce value. In PLAYBACK mode, press to play
rewind.
⑧S / SLOW
In SETUP mode, press to move cursor up. In PLAYBACK mode, press to
slow down.
⑨X / XX
In SETUP mode, press to increase value. In PLAYBACK mode press to play
forwards.
⑩ ESC
In SETUP mode, press to return to previous page.
⑪ MENU
In LIVE mode, press to display menu.
⑫ ENTER/MODE
In SETUP mode, press to enter values. In PLAYBACK mode, switch between
full, quad, 9-channel, 16-channel display in order.
⑬T DOWN
In SETUP mode, press to move cursor down.
⑭
Display the search menu.
⑮▶ PLAY
Play back in normal speed.
⑯ ▌▌ PAUSE
In PLAYBACK mode, press to pause playback.
⑰■ STOP
In PLAYBACK mode, press to stop playing back.
⑱● REC
Start or stop recording.
⑲ IR Sensor
Input sensor for the remote control.
⑳ DVD Writer
Optional DVD-RW backup device.
⑳⑲ ⑱ ⑰ ⑯ ⑮ ⑭ ⑬ ⑫⑪
① ② ③ ④ ⑤ ⑥ ⑦⑧⑨⑩
Page 8
8
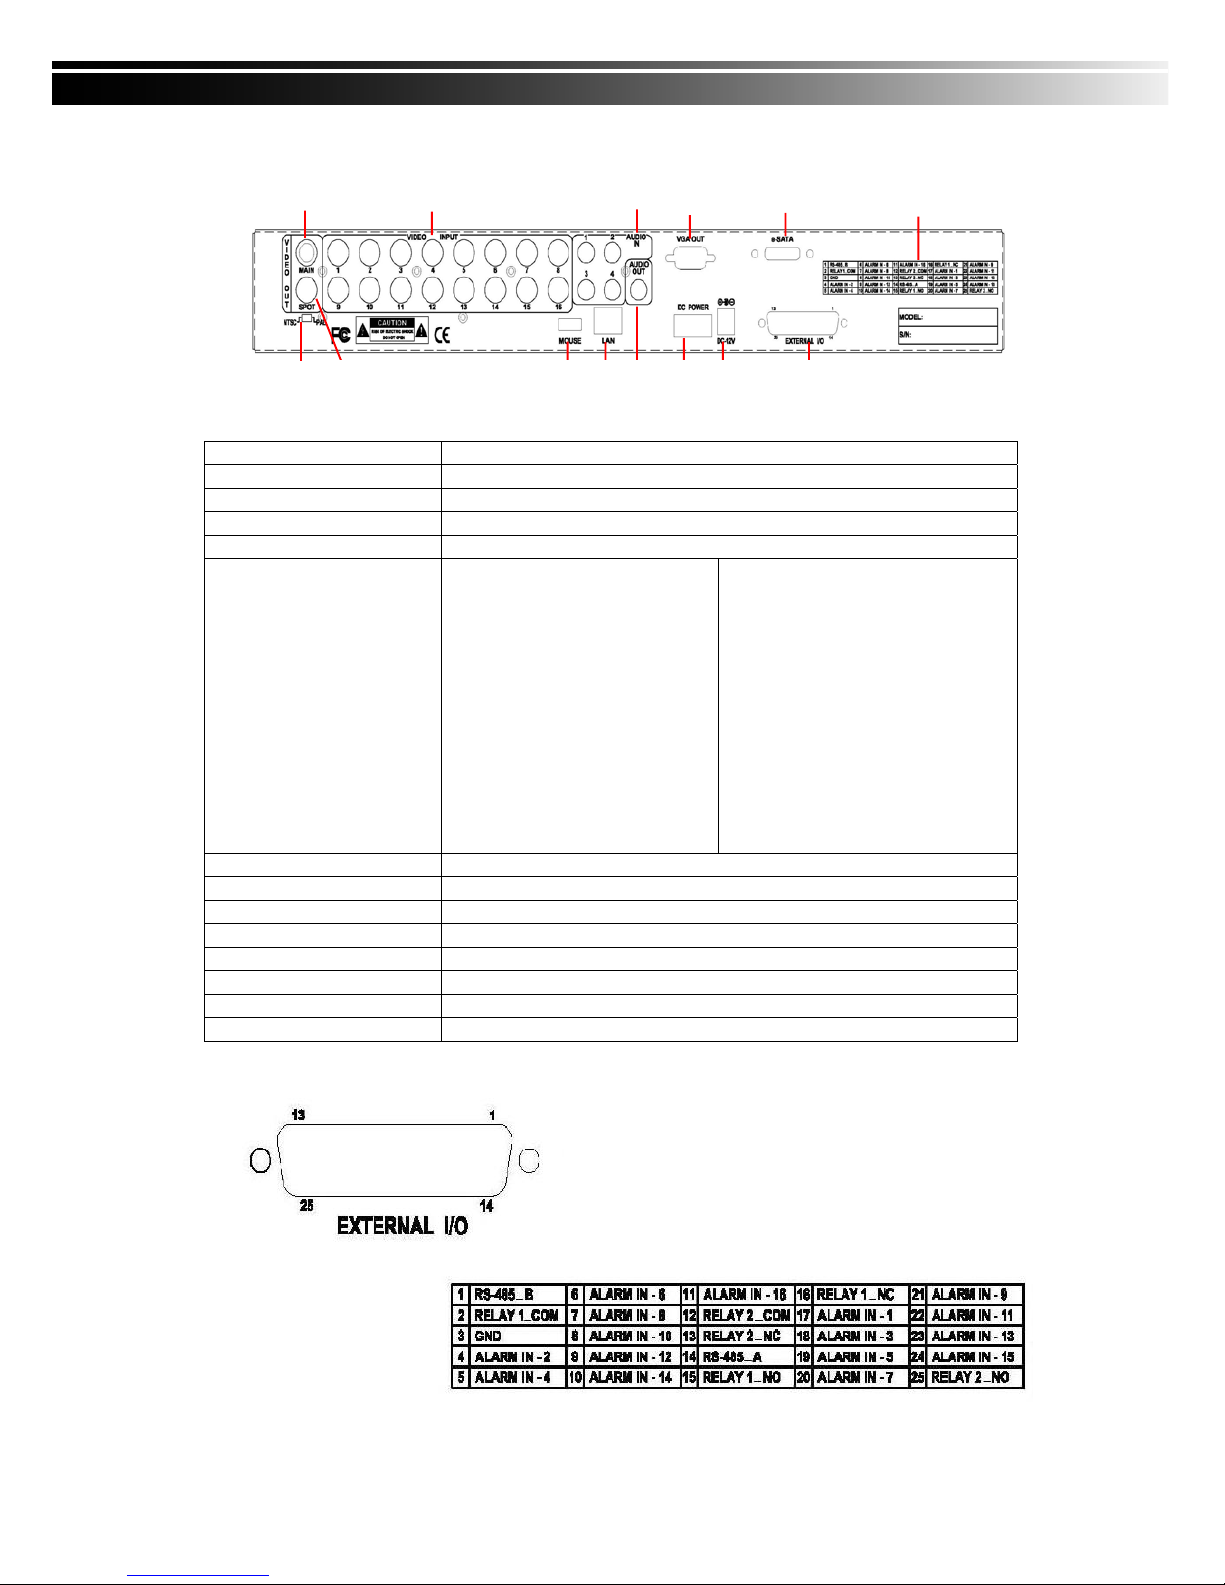
2-2 16CH REAR PANEL CONNECTORS
① MAIN monitor BNC port for the main monitor
② VIDEO INPUT BNC input ports for cameras, 16 in total
③ AUDIO IN RCA input port for audio signal. There are 4 ports available
④ VGA VGA port
⑤ e-SATA External SATA hard disks port
⑥ FUNCTION
1:RS-485 B
2:RELAY 1 COM
3:GND
4:ALARM IN CH2
5:ALARM IN CH4
6:ALARM IN CH6
7:ALARM IN CH8
8:ALARM IN CH10
9:ALARM IN CH12
10:ALARM IN CH14
11:ALARM IN CH16
12:RELAY 2 COM
13:RELAY 2 NC
14:RS-485 A
15:RELAY 1 NO
16:RELAY 1 NC
17:ALARM IN CH1
18:ALARM IN CH3
19:ALARM IN CH5
20:ALARM IN CH7
21:ALARM IN CH9
22:ALARM IN CH11
23:ALARM IN CH13
24:ALARM IN CH15
25:RELAY 2 NO
⑦ EXTERNAL I/O EXTERNAL I/O port for DB 26 flat cables
⑧ DC 12V Socket for a DC 12V input
⑨ POWER Power switch
⑩ AUDIO OUT RCA output for audio signal
⑪ LAN Network port
⑫ MOUSE Mouse port
⑬ NTSC/PAL SWITCH Switch between NTSC and PAL format
⑭ SPOT monitor BNC port to display full screen image of all installed cameras in sequence
① ②③
④
⑤⑥
⑭⑬ ⑫ ⑪ ⑩ ⑨ ⑧ ⑦
Page 9
9
① ② ③ ④ ⑤ ⑥ ⑦
⑪⑩ ⑨ ⑧
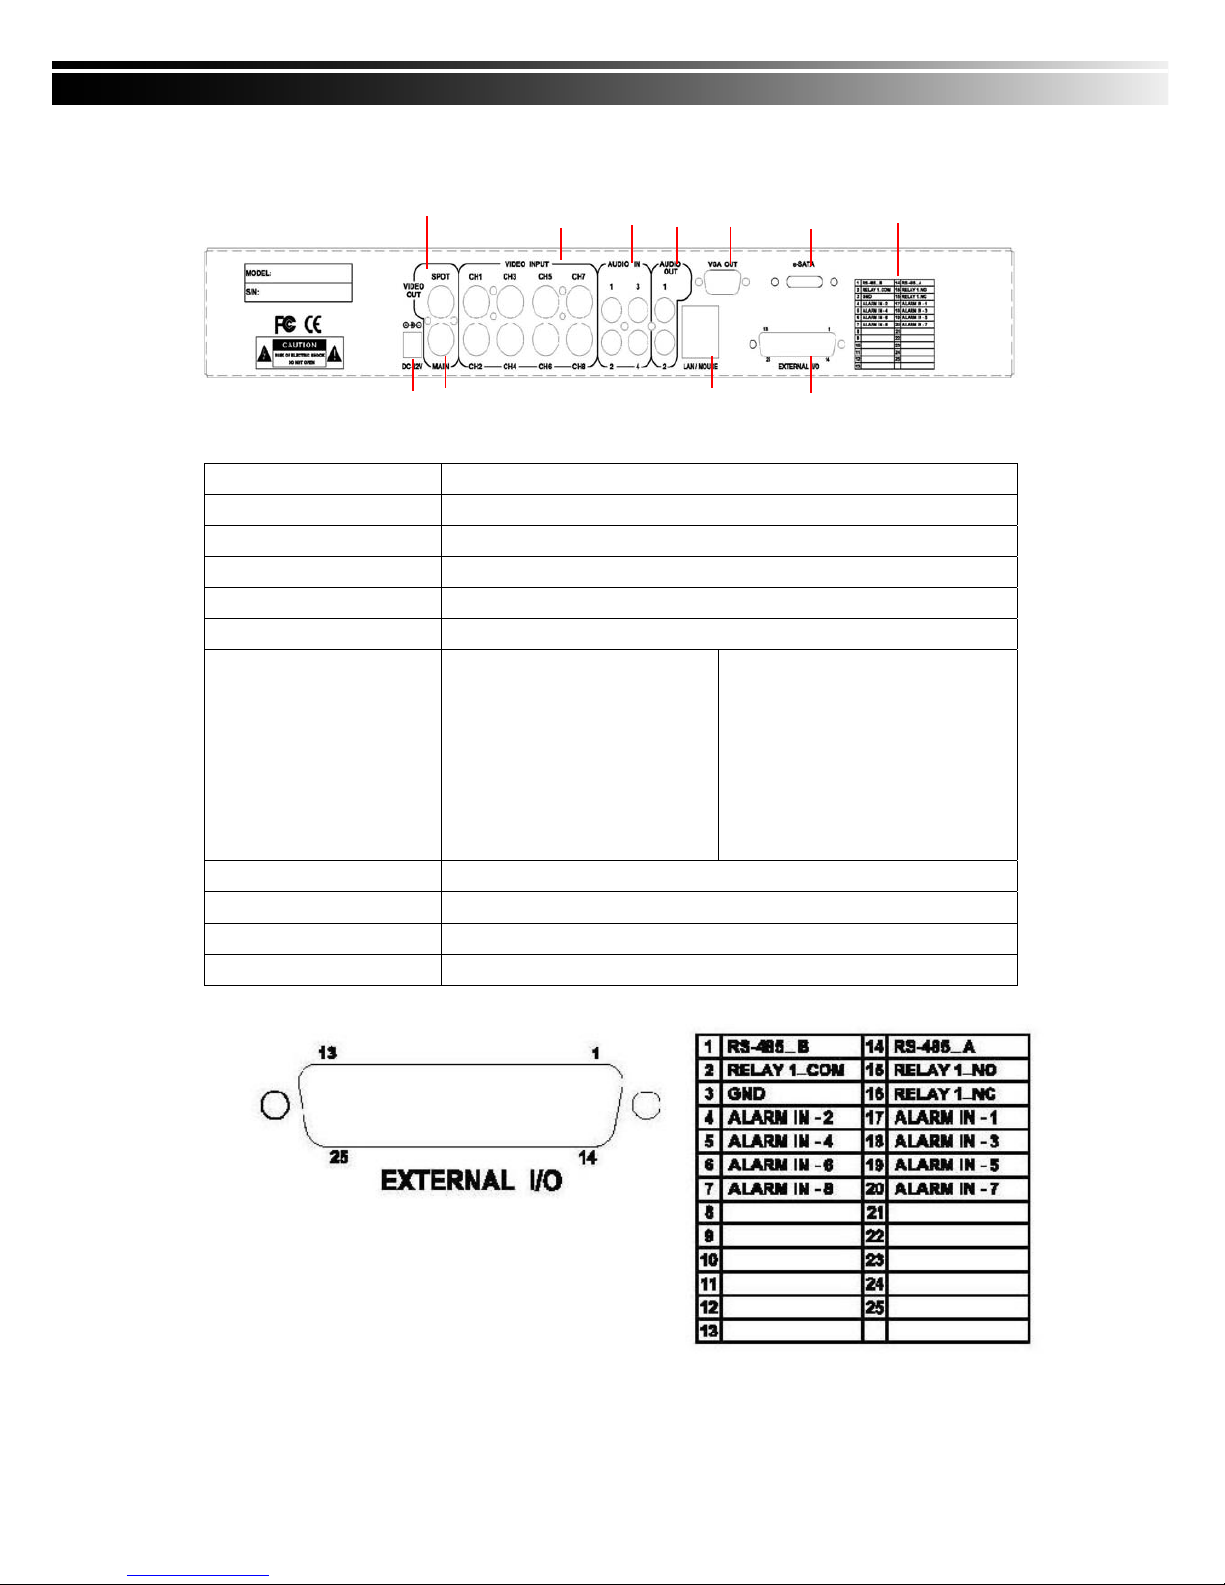
2-3 8CH REAR PANEL CONNECTORS
① SPOT monitor BNC port to display full screen image of all installed cameras in sequence
② VIDEO INPUT BNC input ports for cameras, 8 in total
③ AUDIO IN RCA input port for audio signal
④ VGA VGA port
⑤ AUDIO OUT RCA output for audio signal
⑥ e-SATA External SATA hard disks port
⑦ FUNCTION
1:RS-485 B
2:RELAY 1 COM
3:GND
4:ALARM IN CH2
5:ALARM IN CH4
6:ALARM IN CH6
7:ALARM IN CH8
14:RS-485 A
15:RELAY 1 NO
16:RELAY 1 NC
17:ALARM IN CH1
18:ALARM IN CH3
19:ALARM IN CH5
20:ALARM IN CH7
⑧ EXTERNAL I/O EXTERNAL I/O port for DB 26 flat cables
⑨ LAN / MOUSE Network and Mouse port
⑩ MAIN monitor BNC port for the main monitor
⑪ DC 12V Socket for a DC 12V input
Page 10

10
2-4 4CH REAR PANEL CONNECTORS
① SPOT monitor BNC port to display full screen image of all installed cameras in sequence
② VIDEO INPUT BNC input ports for cameras, 4 in total
③ AUDIO IN RCA input port for audio signal
④ VGA VGA port
⑤ AUDIO OUT RCA output for audio signal
⑥ e-SATA External SATA hard disks port
⑦ FUNCTION
1:RS-485 B
2:RELAY 1 COM
3:GND
4:ALARM IN CH2
5:ALARM IN CH4
14:RS-485 A
15:RELAY 1 NO
16:RELAY 1 NC
17:ALARM IN CH1
18:ALARM IN CH3
⑧ EXTERNAL I/O EXTERNAL I/O port for DB 26 flat cables
⑨ LAN / MOUSE Network and Mouse port
⑩ MAIN monitor BNC port for the main monitor
⑪ DC 12V Socket for a DC 12V input
①②③④⑤⑥⑦
⑪⑩
⑨
⑧
Page 11

11
CHAPTER 3 LIVE, PLAYBACK AND PTZ OPERATIONS
The IR remote control and mouse operate differently under each mode; this chapter describes the
functions of them under three different modes: LIVE, PLAYBACK and PTZ.
3-1 LIVE MODE
You can monitor all the channels, listen to audio signal and have some related operations under LIVE
mode. This paragraph describes the IR remote control, mouse operation and on screen graphical icons
under LIVE mode.
Note:4CH will show quad display; 8 CH will show quad and 9-channel displ ay.
Page 12

12
3-1.1 REMOTE CONTROLLER
Table 3-1.1 Remote control functions under LIVE mode
Note:MULTI ID REMOTE CONTROLLER is optional for you to purchase.
Button Name Description
1. REC Start/Stop recording.
2.
Audio Mute
3.
Fast Forward; Pause; Stop; Fast
rewind
4. BK-UP
Display backup menu
5. STATUS Display status
6. SLOW
Press this button to slow-down
playback speed
7. MODE
8. 1,2…8,9,+10
Select the channel to monitor in full
screen from 1 to 16
9. Switch to Quad/9/13/16 display
10. LOCK
Enable/Disable the keypad function on
the front panel, the remote control and
the mouse
11. PLAY
Start playing back the most recently
recorded segment
12. T-SRH Display search menu.
13.
Directions and ENTER buttons
14. MENU Display setup menu
15. ESC Return to the previous mode
16. Z+/Z- - PTZ zoom-in/out
17. IRIS+/- PTZ iris-open/close
18. F+/- PTZ focus-in/out
19. OSD Turn on/off the screen display
20. PRESENT
21. TOUR Activate PTZ pre-set tour
22. PTZ Start/Stop PTZ control
23. AUTO
IN AUTO mode, all available channels
will be cycled through in full screen
24. FREEZE Turn on/off screen freeze function
25. PIP
Turn on picture-in-picture format. Click
on the channel name can switch to
other channels
26. Zoom
Enable/Disable double screen size
display
1
2
3
4/5
6/7
8
9
10
11
12
13
14
15
16
17
18
19/20
21/22
23/24
25/26
Page 13
13
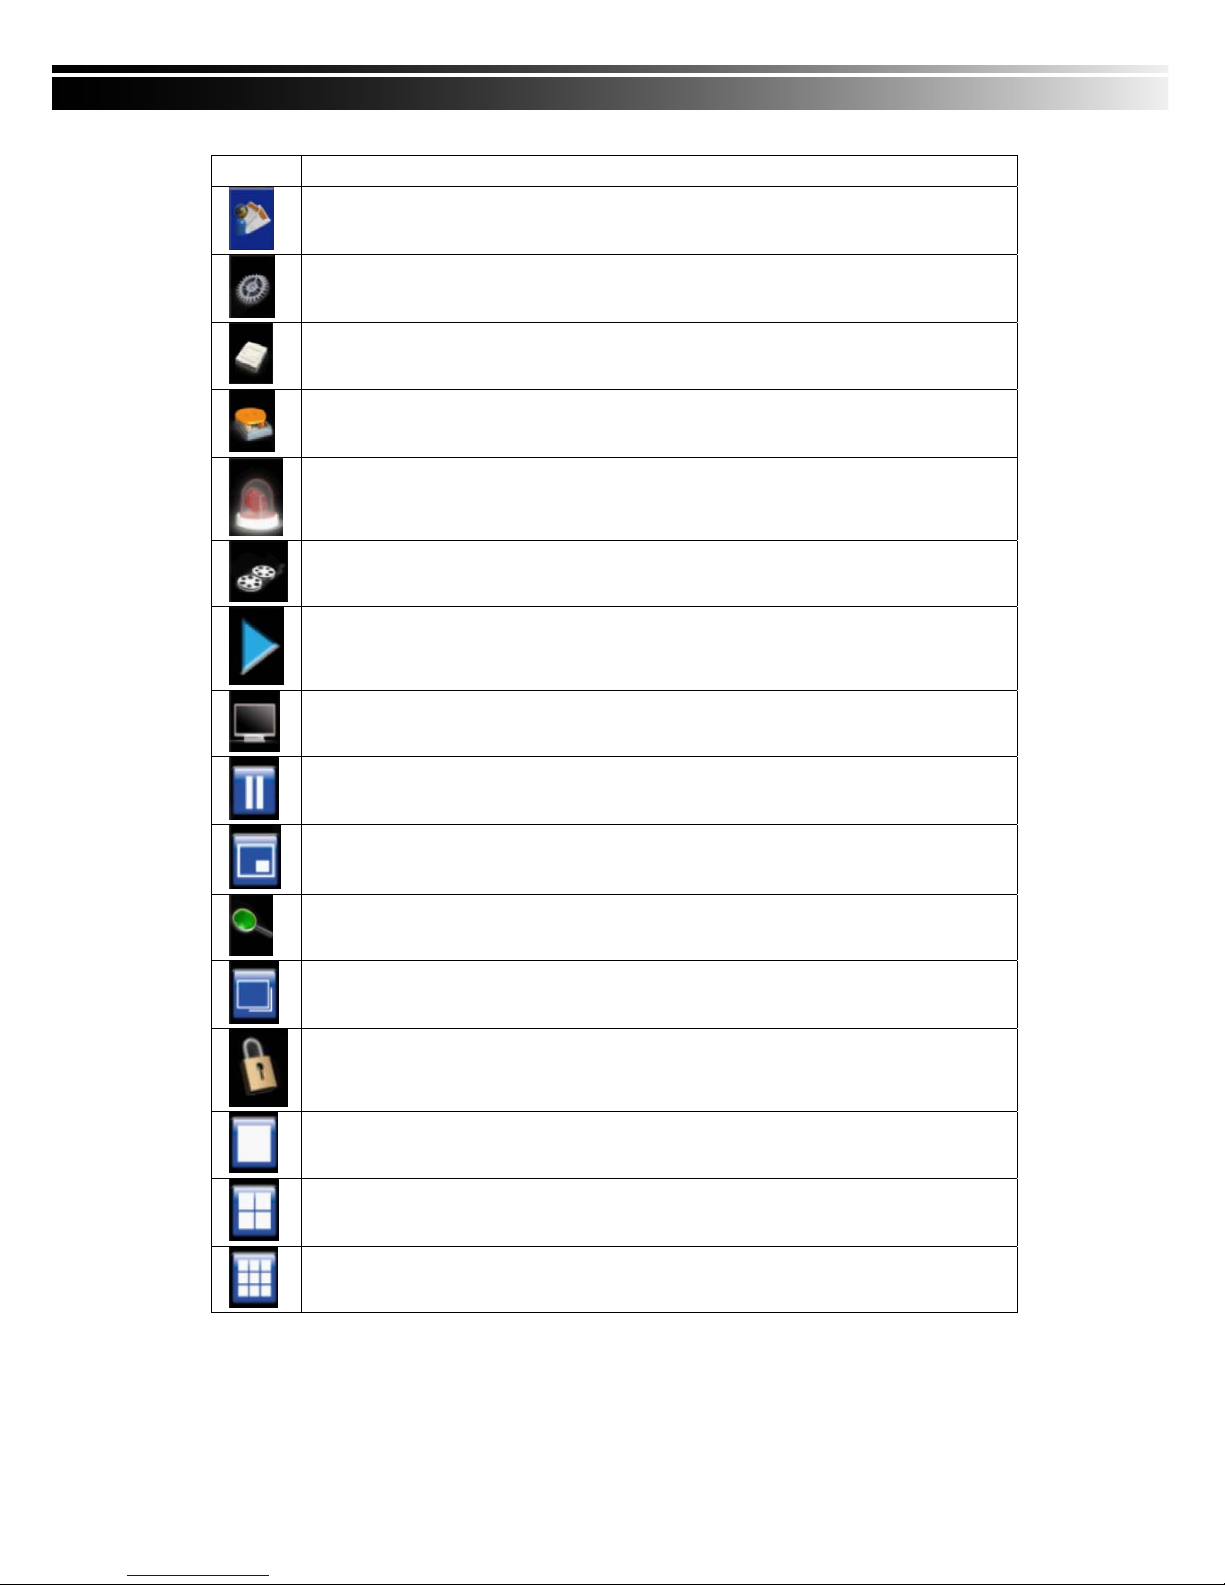
Table 3-1.2 Graphical icons that will display after right-clicking your mouse under LIVE mode.
Icon Description
Resting the cursor on this icon will bring up the following four menu icons
Main menu
Search Setup
Backup
PTZ control
Record on/off
Playback
Resting the cursor on this icon will bring up the following five display icons.
Pause
PIP, picture in picture
ZOOM, double the screen size
AUTO-Seq
LOCK, activate the key lock
Full screen display
Quad display
9-channel display
Note:4CH will show quad display; 8 CH will show quad display and 9-chan nel display.
Page 14
14
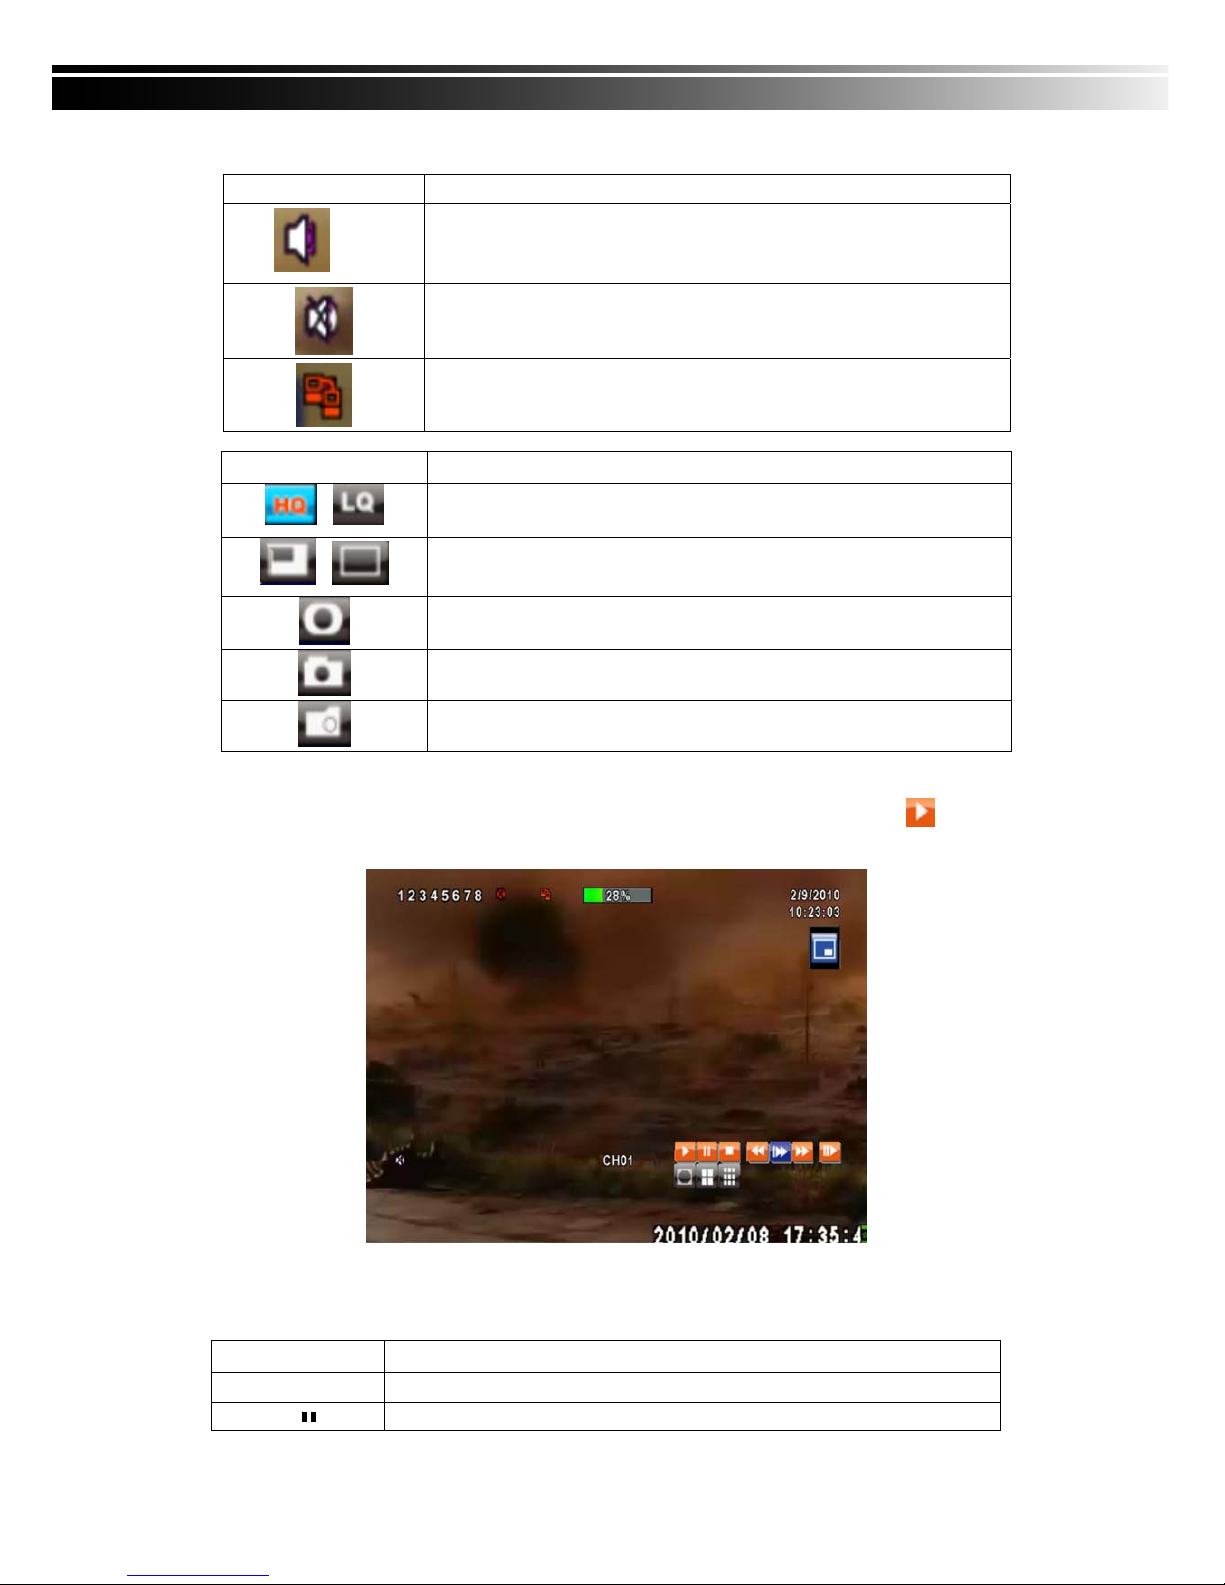
Table 3-1.3 Description of on screen graphical icons in LIVE mode
Icon Description
1~4
Live Audio is on
Live Audio is off
Connected to the LAN cable.
Icon Description
/
Image quality (High/Low)
/
Full screen
Record
Snap shot
Record and snap shot file saving path setup
3-2 PLAYBACK Mode
Switch to PLAYBACK mode by pressing “PLAY” under the LIVE mode, the graphical icon will show
up on the upper center of the screen and the operation panel ( see below picture) will show up at right
lower corner of the screen. You can drag the panel by mouse to place it on any location of your screen.
Table 3-2.1 Remote control functions under the PLAYBACK mode
Button Description
ENTER / MODE
Switch to full screen, quad, 9-channel or 16-channel display
MENU /
Turn on/off PAUSE
Page 15
15
PLAY
Play back at normal speed
/ SLOW
Play back at slower speed. The speed will be slowed to 1/2, 1/4, 1/8, 1/16 by
each pressing of the button till the slowest limitation of 1/16 of the normal speed.
Current playback speed is shown in the upper center of the screen
/
Fast rewind. Each press increases the speed to the next level. There are six
speeds: 2x, 4X, 8X, 16x, 32X and 64X
/
Fast forward. Each press increases the speed to the next level. There are six
speeds: 2x, 4X, 8X, 16x, 32X and 64X
/
Stop playback
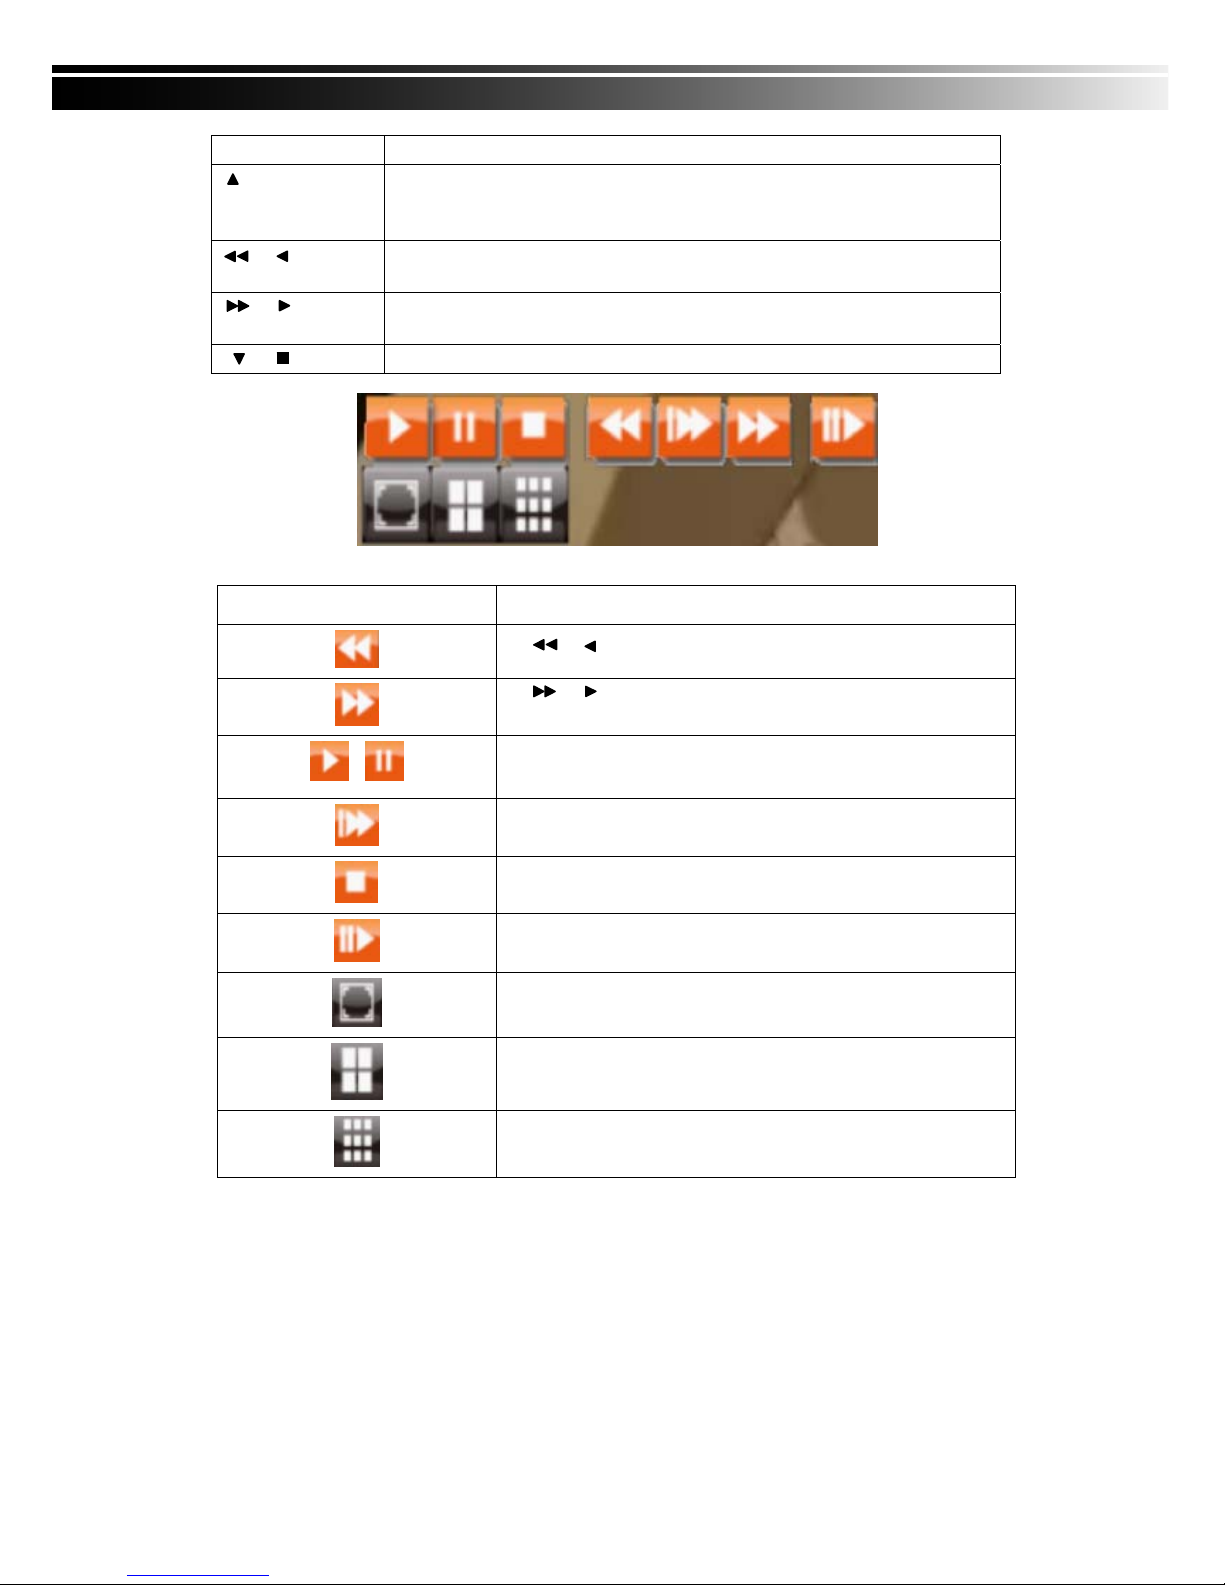
Table 3-2.2 The mouse operation under the PLAYBACK mode.
Icon Description
「 / 」 Fast rewind
「 / 」Fast forward
/
Play/pause
「▲ / SLOW」,slow playback
「▼ / ■」stop playback
Playback channel by channel with snap shot display
Full screen display
Quad display
9-channel display
Note:4CH will show quad display; 8 CH will show quad display and 9-chan nel display.
Page 16
16
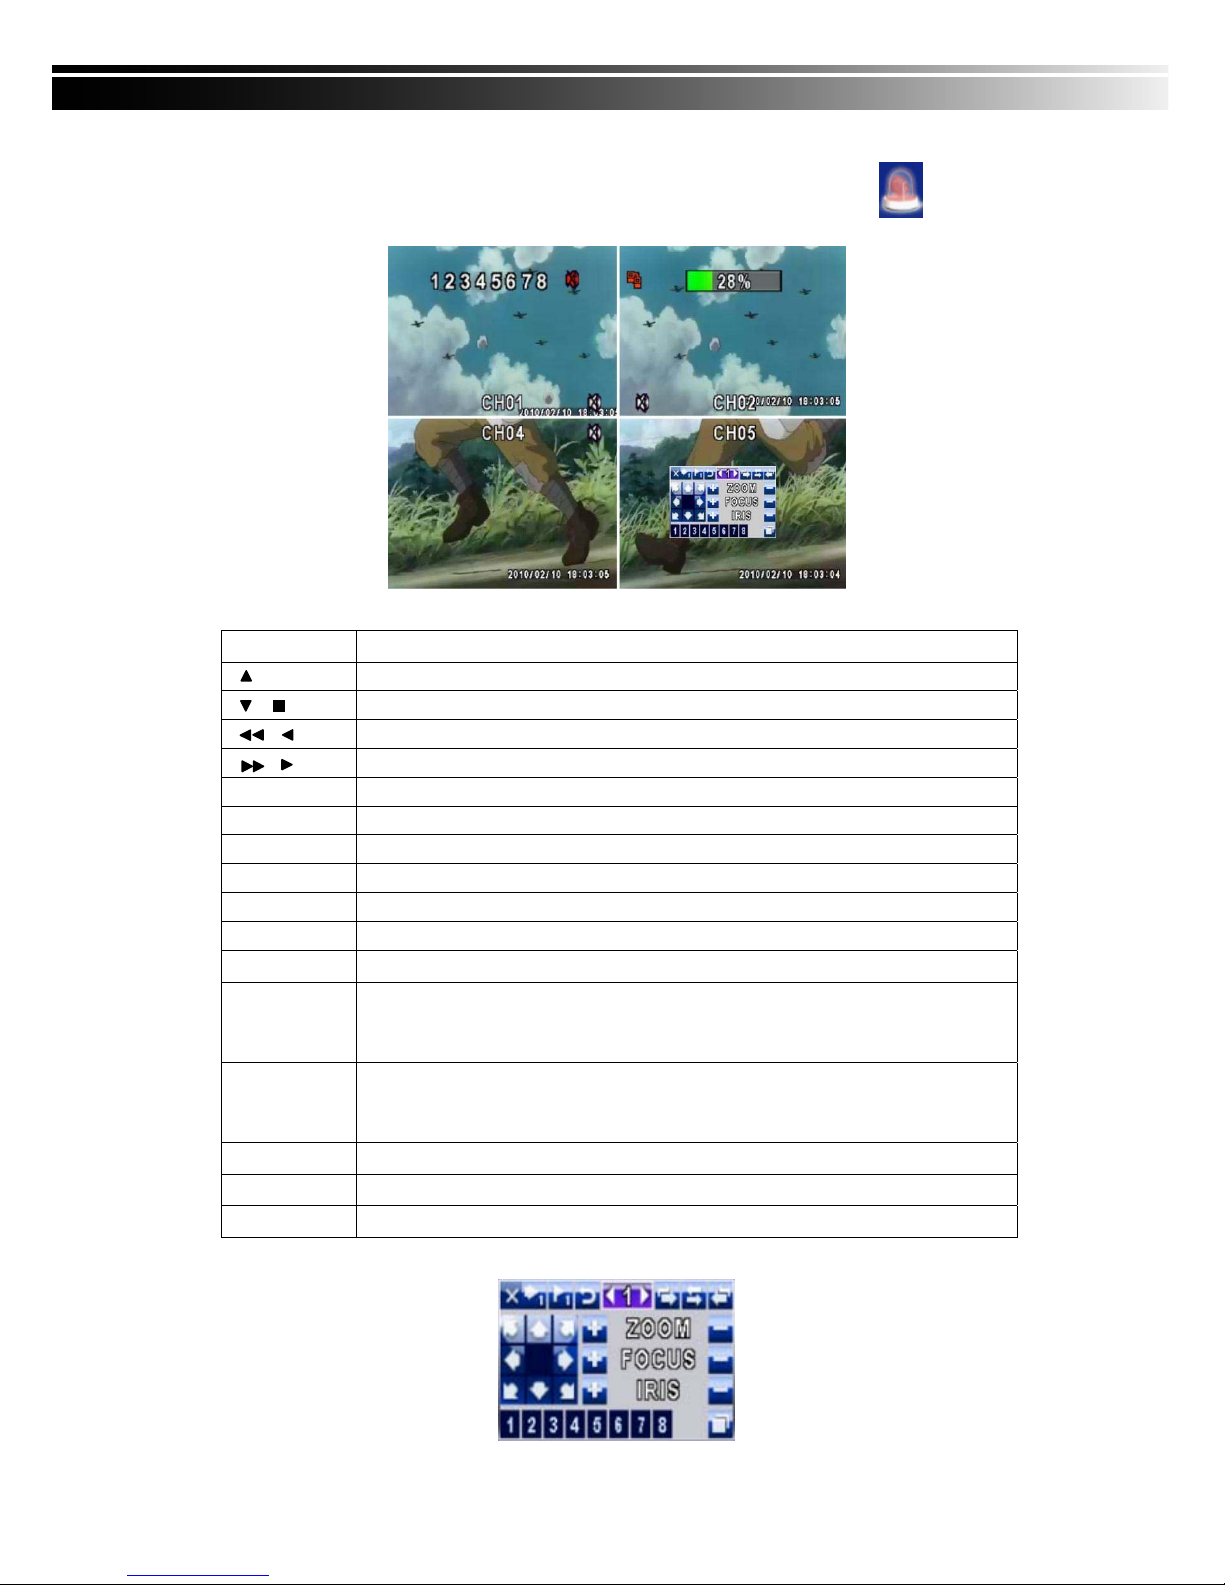
3-3 PTZ Mode
Switch to the PTZ mode by pressing “PTZ” button under the LIVE mode. The PTZ icon will appear
on upper left side of screen and the control panel will appear on the down right side of screen.
Table 3-3.1 Remote Control functions under the PTZ mode
Button
Description
/ SLOW
Move PTZ up.
/
Move PTZ down.
/
Move PTZ to the left.
/
Move PTZ to the right.
ZOOM +
PTZ zoom-in.
ZOOM -
PTZ zoom-out.
FOCUS +
PTZ focus-in.
FOCUS -
PTZ focus-out.
IRIS +
PTZ iris-open.
IRIS -
PTZ iris-close.
TOUR
Activate PTZ pre-set tour. *
PRESET+
Number
Setup the Preset location
Press “PRESET” key first then two-digit number; DVR will set the current PTZ location
at entered preset number.
PLAY+
Number
Go to Preset location
Press “PLAY” key first then two-digit number, PTZ will go to the correspondent preset
number location.
PIP
Set current PTZ location as the start of line-scan. *
FREEZE
Activate auto line-scan. *
ZOOM
Set current PTZ location as the end of line-scan.*
*PTZ communication protocols from different brands aren’t compatible 100% sometimes. Therefore,
some of these functions may be unavailable.
Page 17

17
Table 3-3.2 Mouse operation under the PTZ mode
Icon Description
Leave PTZ Mode,back to the LIVE mode
Pre-set number N. (1~64)
Go to pre-set number N.
Set current PTZ location at pre-set number N.
「TOUR」,press to activate pre-set tour*
「PIP」,Set current PTZ location as the start of line-scan. *
「FREEZE」, Activate line-scan. *
「ZOOM」,Set current PTZ location as the end of line-scan. *
To move PTZ in 360°
PTZ zoom in; PTZ zoom out
PTZ focus in; PTZ focus out.
PTZ IRIS open, PTZ IRIS close.
Below functions need support from specific PTZ manufacturer. Please check user manual of y
our PTZ for more detail.
AUX 1,「AUTO」Key + Number key「1」
AUX 2,「AUTO」Key + Number key「2」
AUX 3,「AUTO」Key + Number key「3」
AUX 4,「AUTO」Key + Number key「4」
AUX 5,「AUTO」Key + Number key「5」
AUX 6,「AUTO」Key + Number key「6」
AUX 7,「AUTO」Key + Number key「7」
AUX 8,「AUTO」Key + Number key「8」
「Backup」, Customized function。
*PTZ communication protocols from different brands aren’t compatible 100%
sometimes. Therefore, some of these functions may be unavailable.
Page 18
18
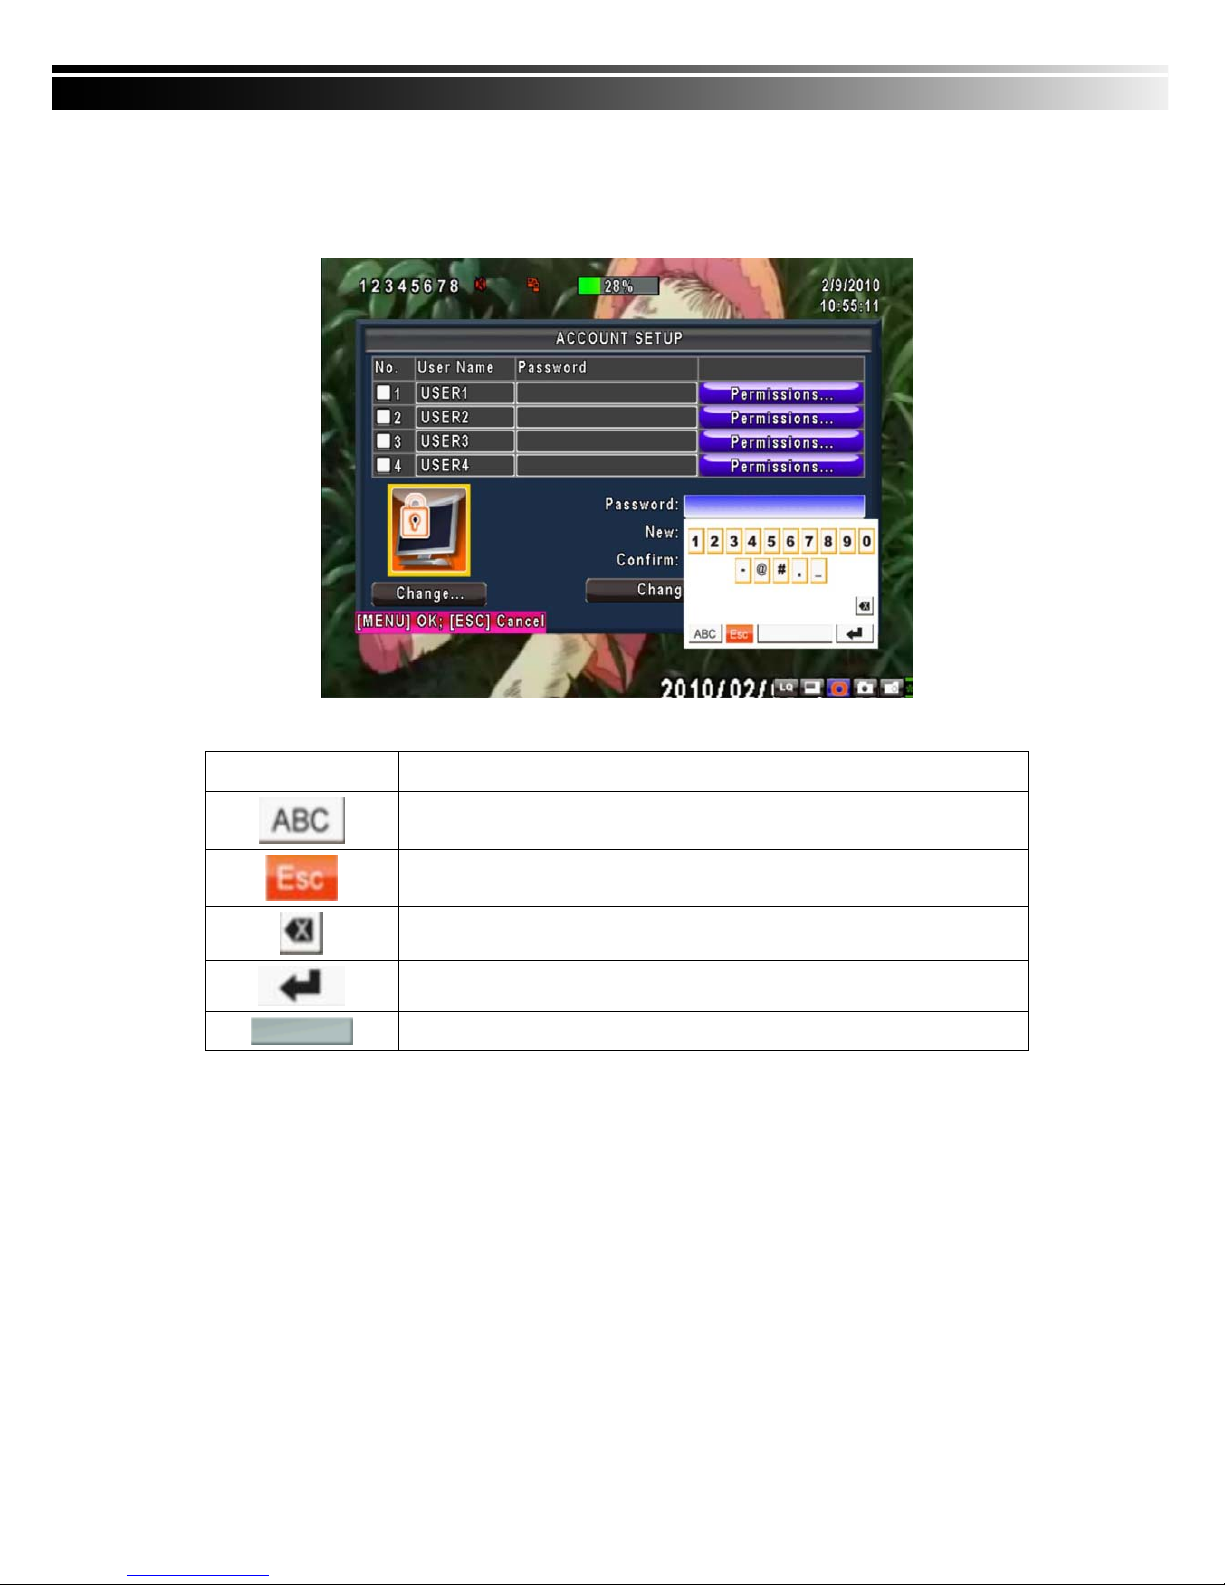
CHAPTER 4 MAIN MENU SETUP
To enter the main menu and set up DVR, log-in account and user password are required.
The default password of the administrator is “123456”. Please check the “Account Setup” for related setup
of other log-in users.
Table 4-0.1 Some definition of virtual keyboard
Item Description
Switch between numbers and letters
Press to cancel the setup, and re-choose the login account
Delete the last character
Enter to identify the password. It will enter the setup menu, If the password
is verified
Space key
Page 19
19
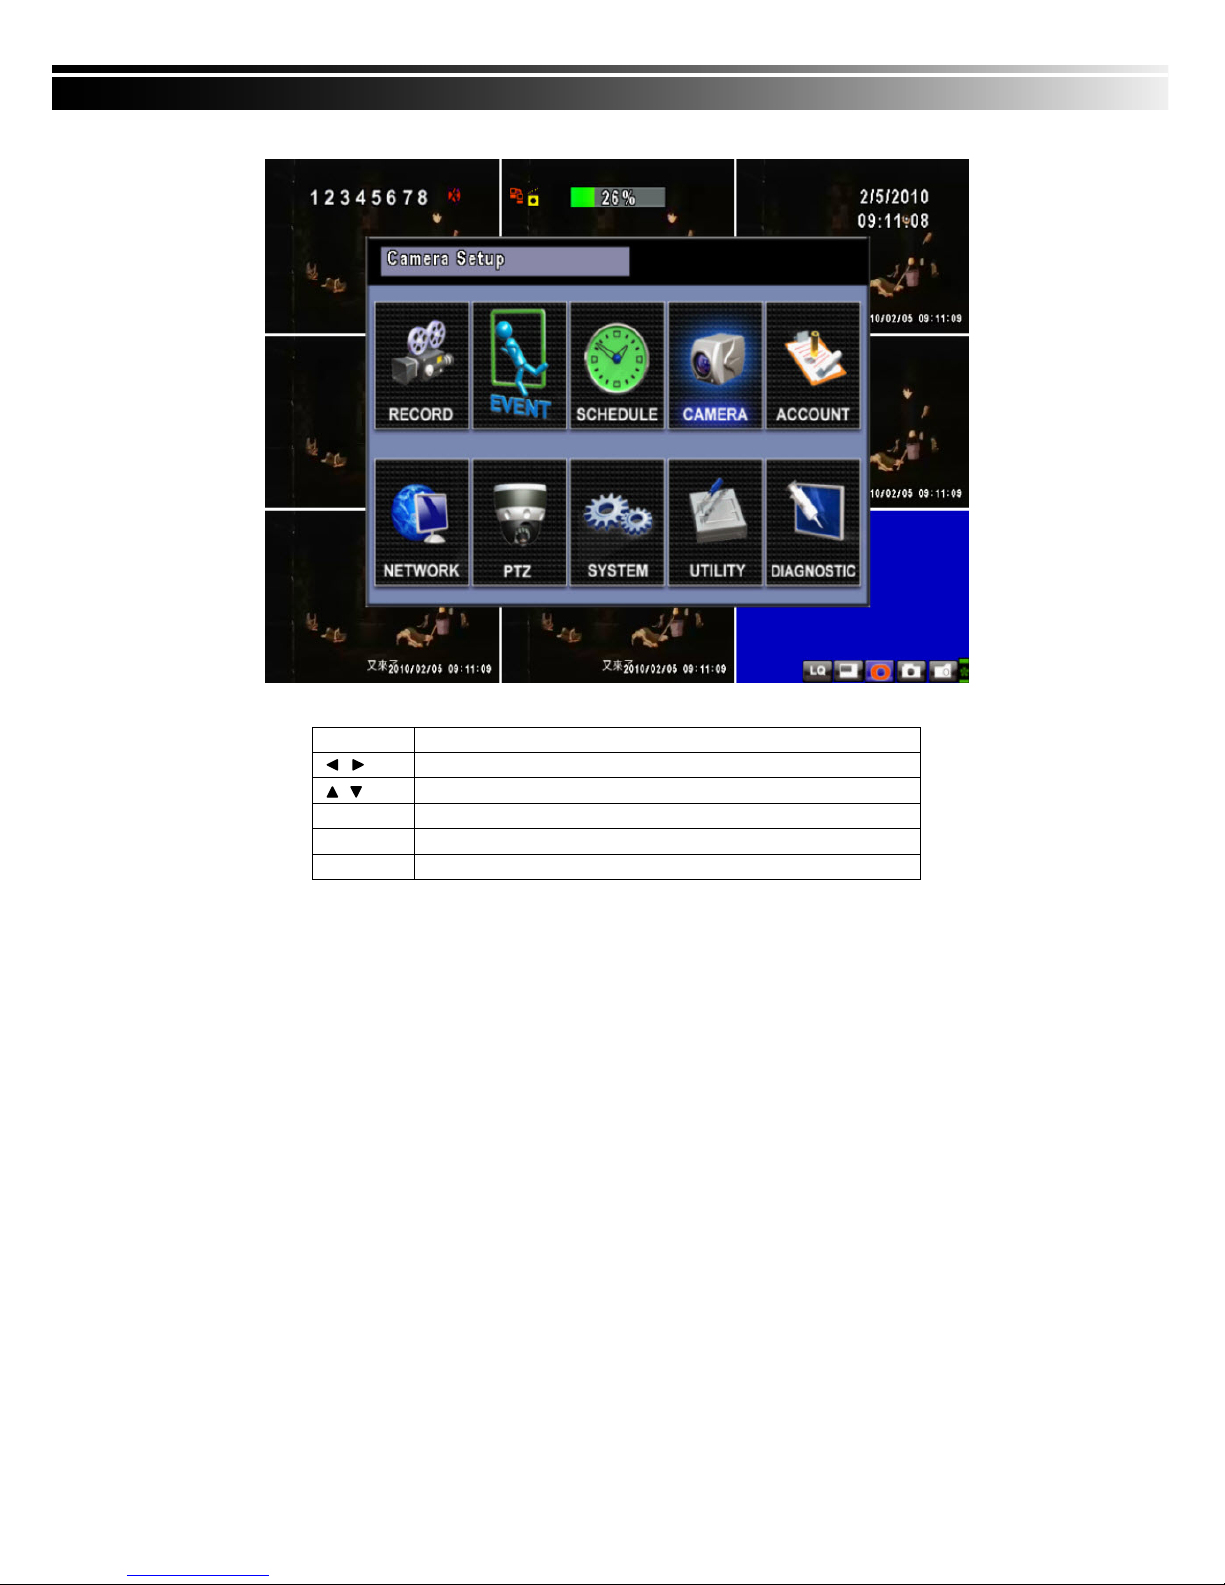
Table 4-0.2 The operation of remote control under the setting menu
Item Description
Switch to different options under one item
Switch to different items
MENU Save setup and back to LIVE mode
ESC Back to Upper level of menu without saving
ENTER Enter the menu, or display virtual keyboard
PS. The initialization of new-installed HD is required before recording, please refer to “4-9 UTILITY
SETUP” for detail.
Page 20
20
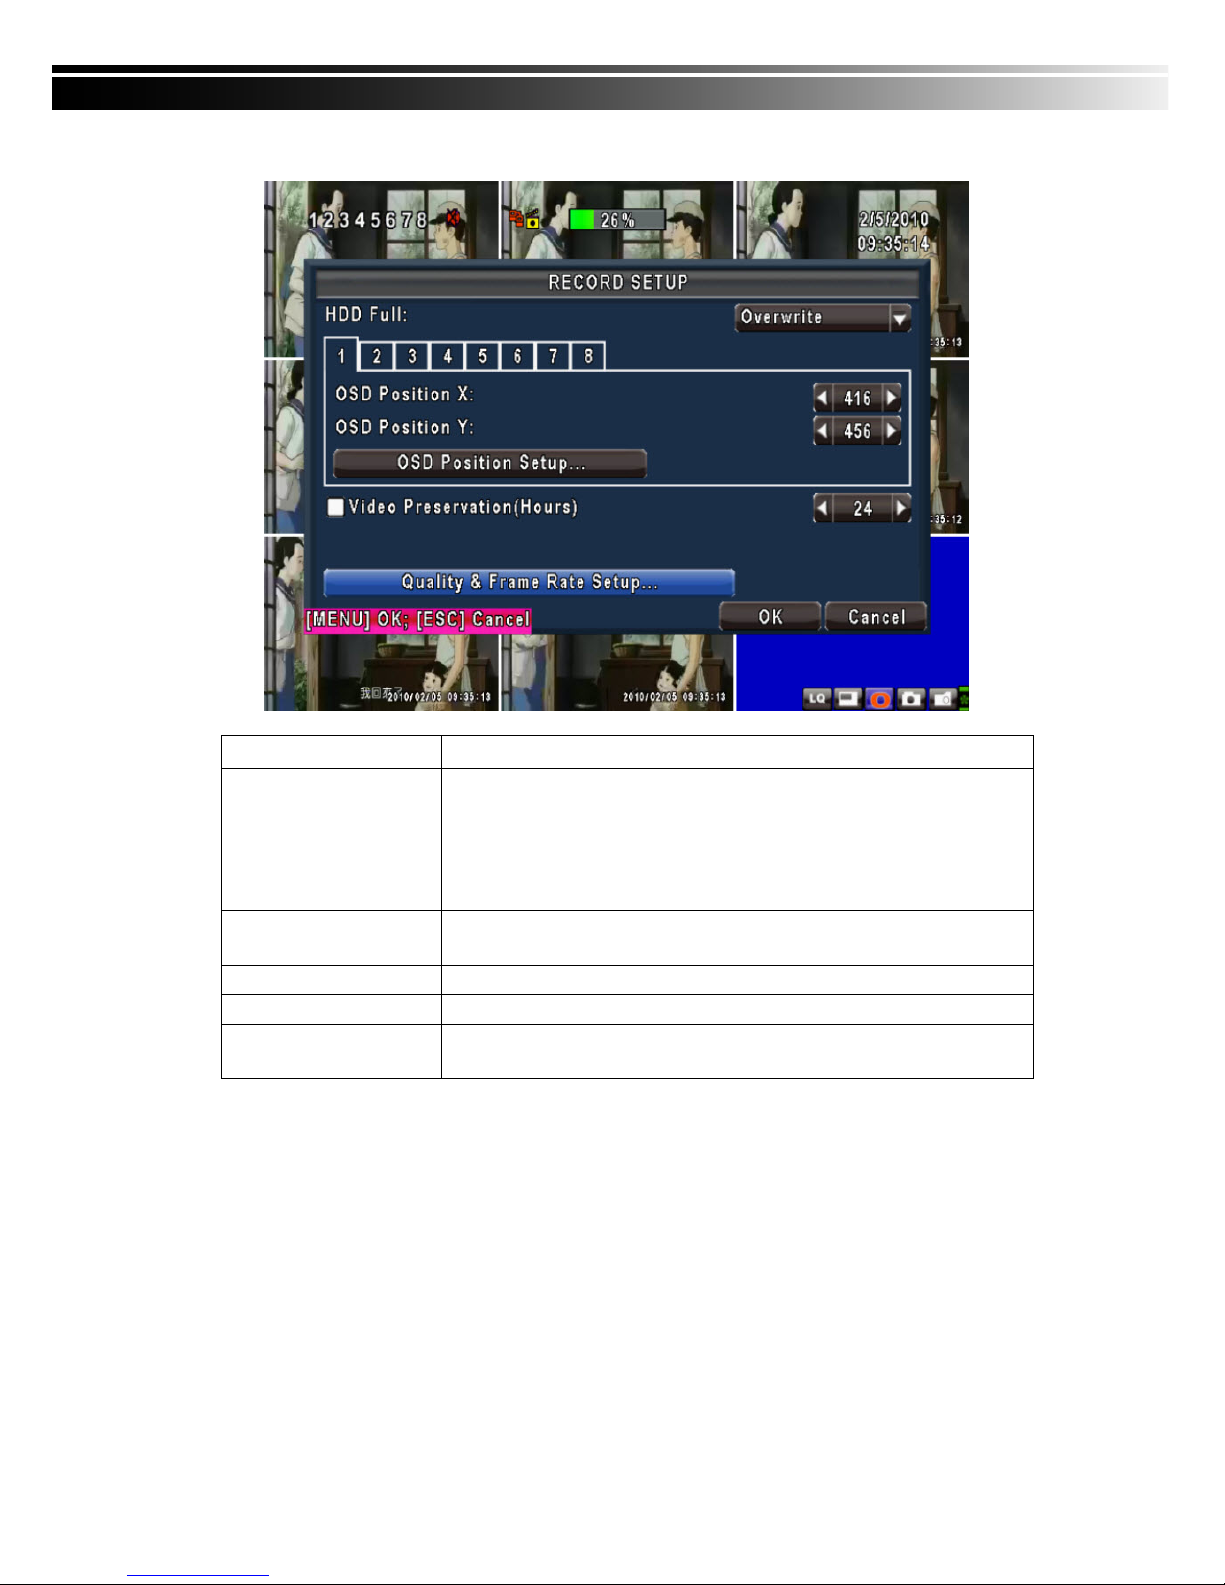
4-1 RECORD SETUP
Item Description
HDD FULL
Select STOP to stop recording or OVERWRITE to reuse the HDD when HDD
is full
「
Stop
」:
Stop Recording
「
Overwrite
」:
Start to overwrite that begin from the oldest data of HDD, and
continue to record.
Quality & Frame Rate
Setup
Setup the quality and frame rate for each channel under normal recording
and event recording type.
OSD position X
Setup OSD X axis
OSD position Y
Set up OSD y axis
Recording OSD position
setup
Set up OSD axis
Page 21
21
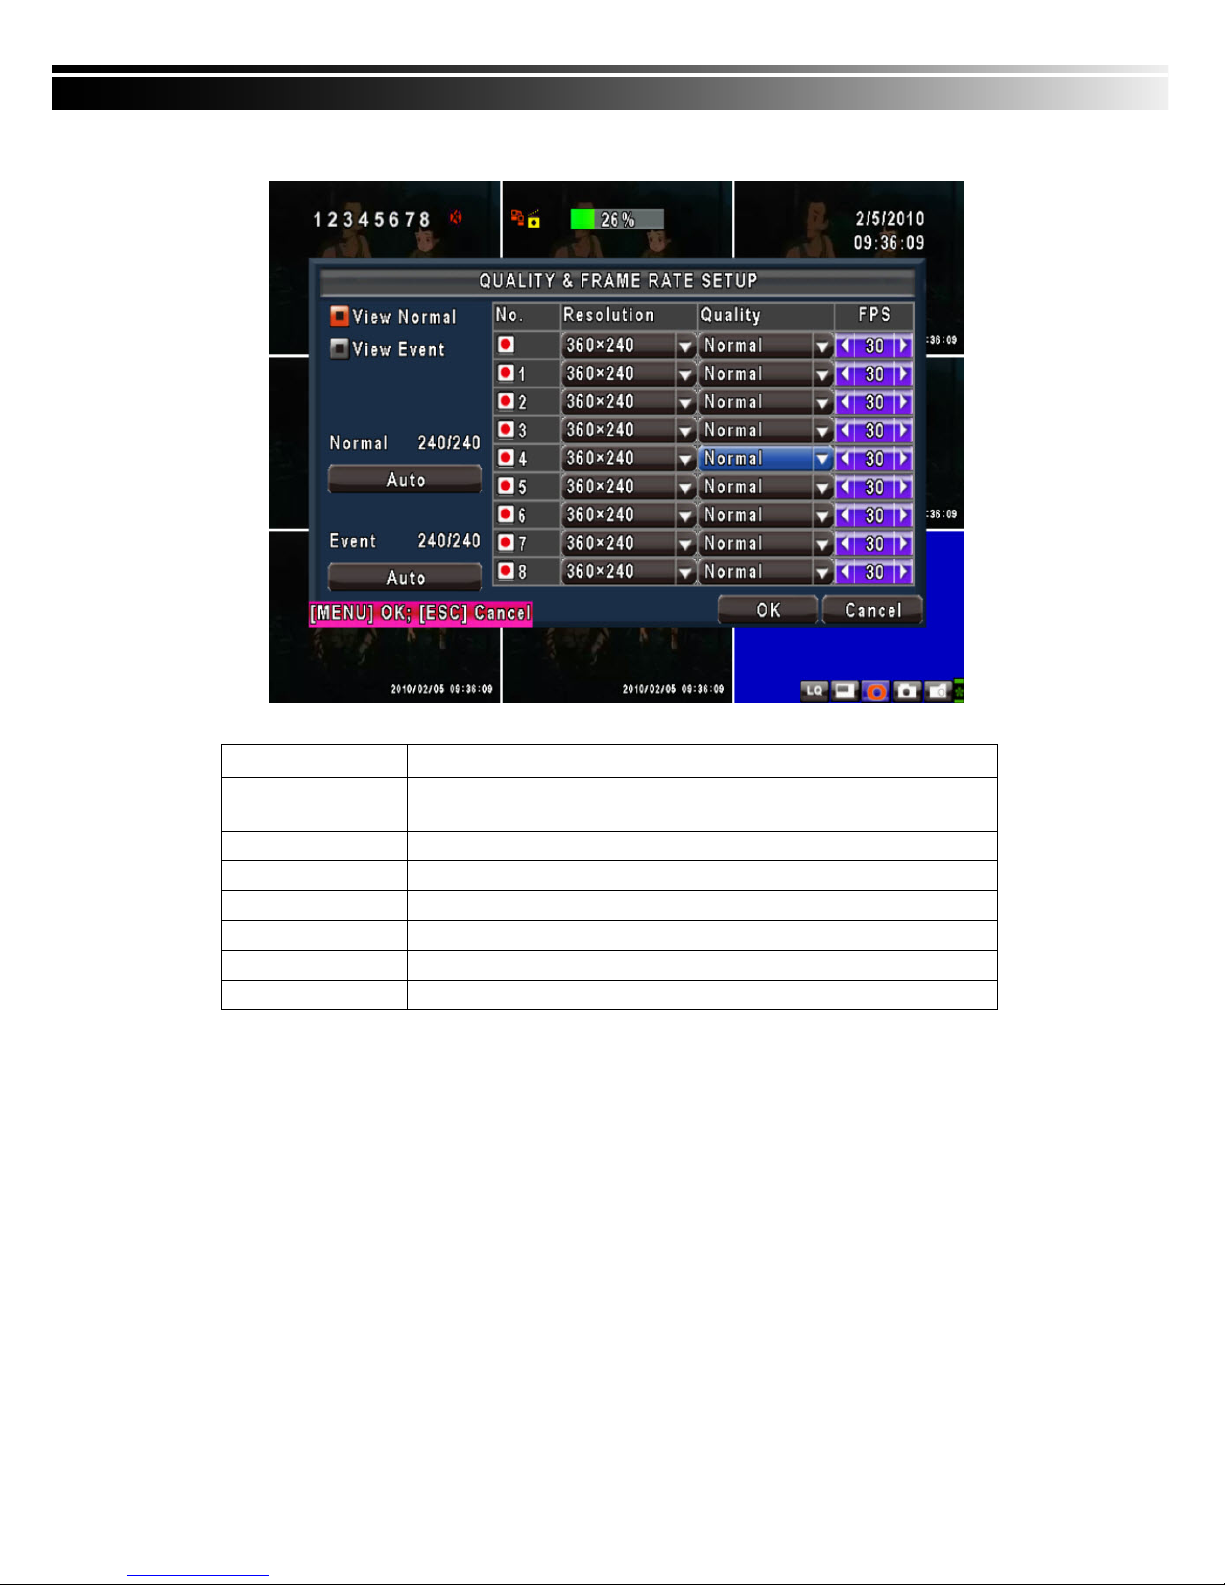
4-1.1 Quality & Frame Rate Setup
Note:4CH DVR will display 4 channels and 8CH DVR will display 8 channels.
Item Description
Normal setup/ event
setup
Select recording mode
Resolution
Select recording resolution: 320x240, 720x240, 720x480
Record Type
You can setup quality and FPS separately for record type.
No.
Check/uncheck the box enable/disable selected channel recording
Quality
Select quality: Lowest/ Low/ Normal/ High/ Highest
FPS
Select recording frame rate.
Auto
Assign each channel with its maxima accessible fps
Page 22
22
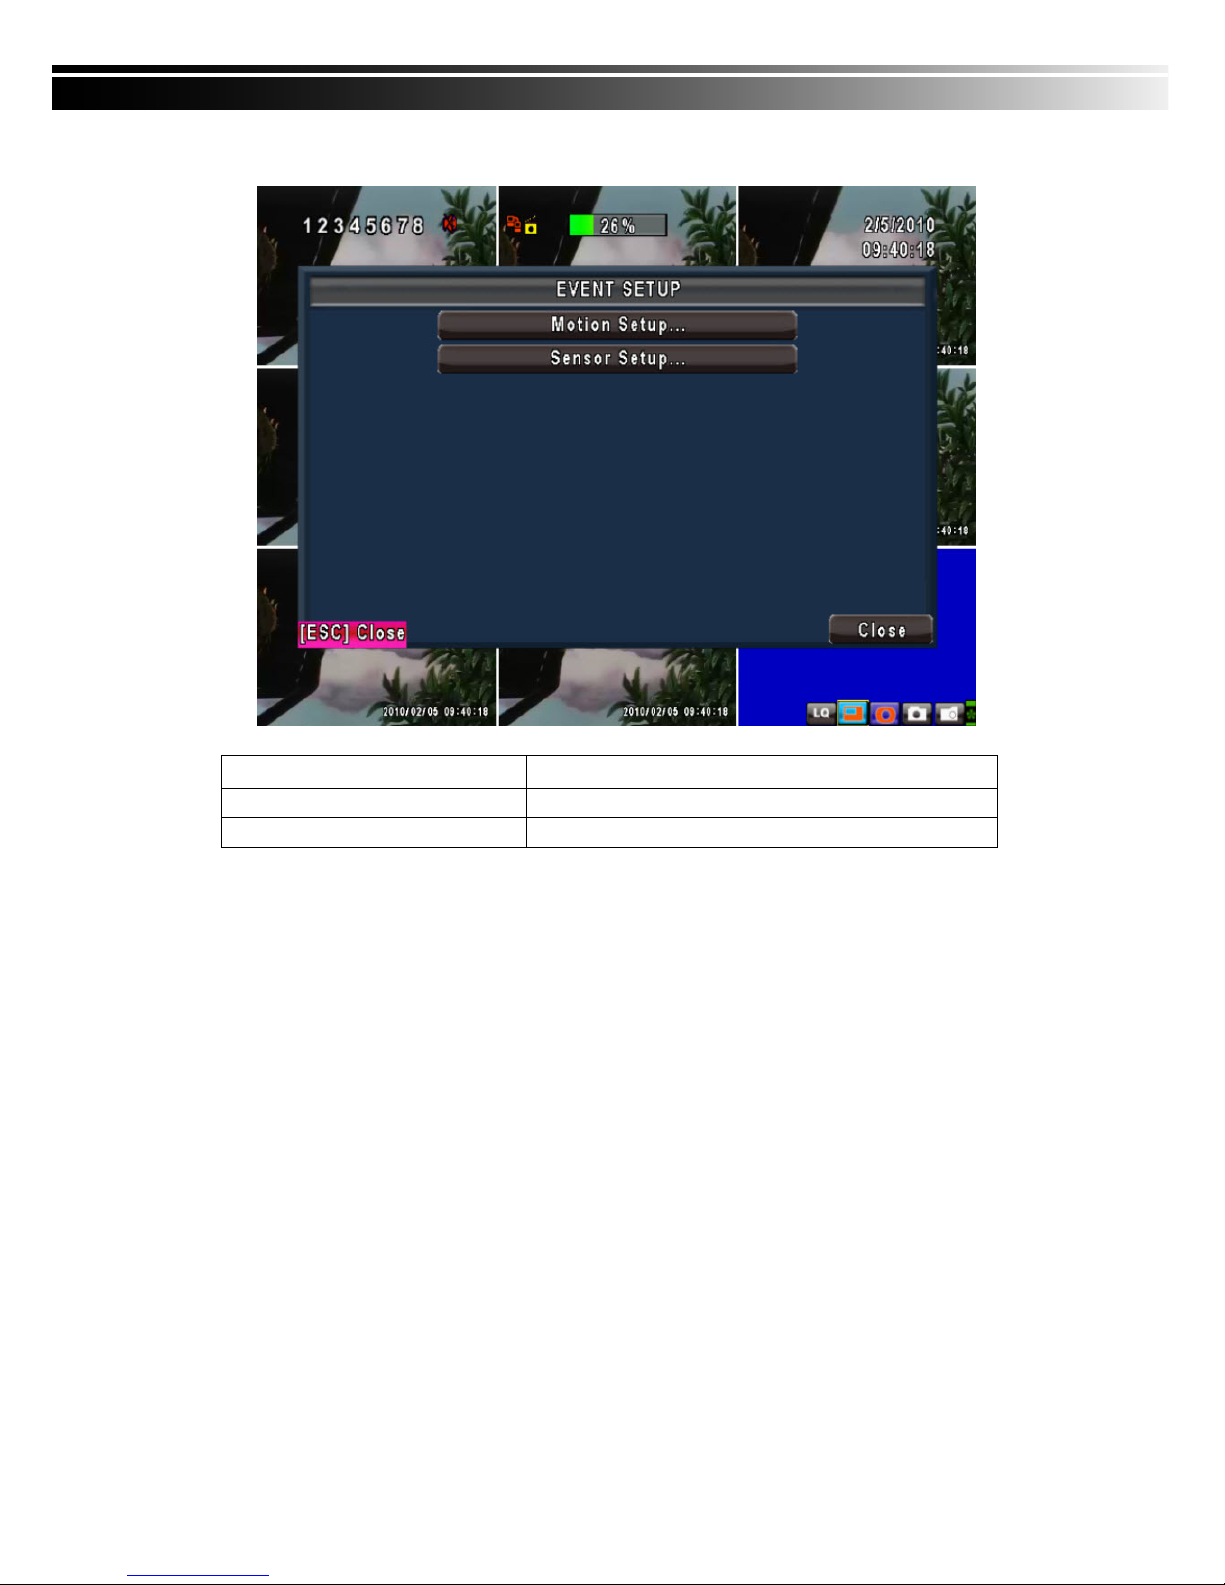
4-2 EVENT SETUP
Item Description
Motion Setup
Enter to set up motion detection
Sensor Setup
Enter to set up sensor detection
Page 23
23
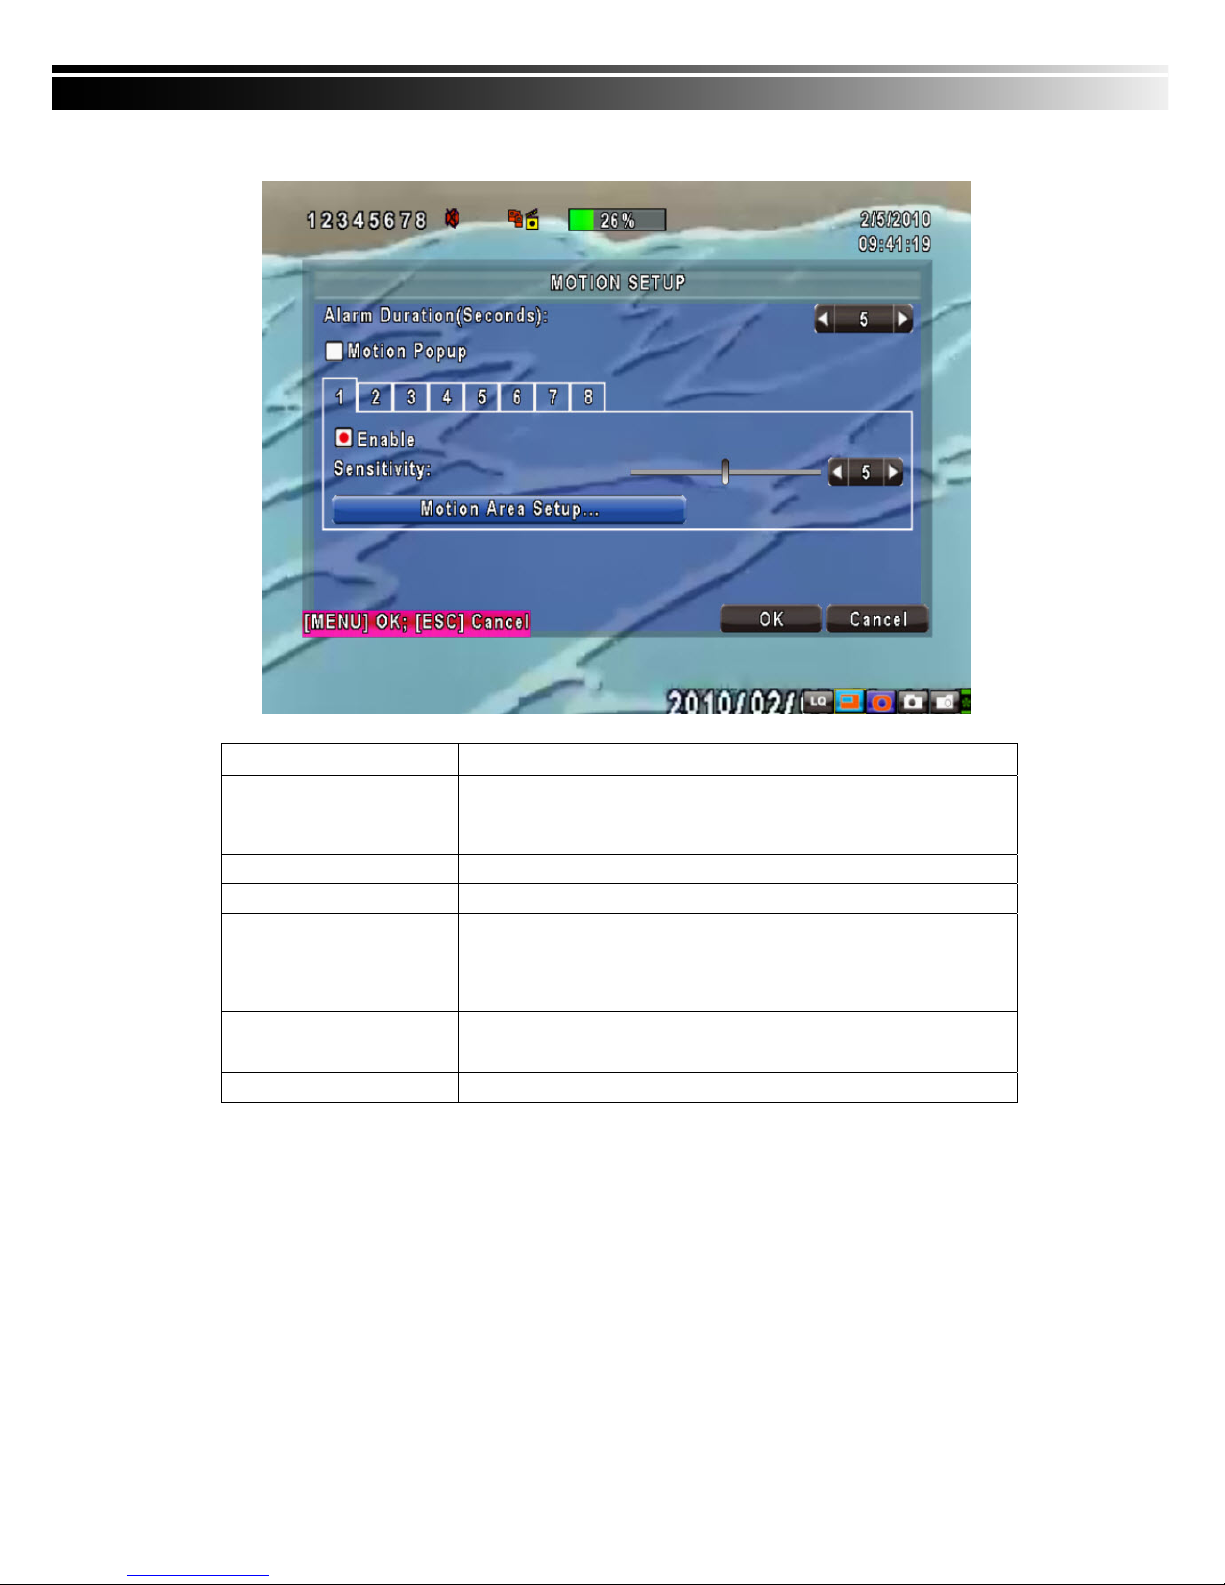
4-2.1 MOTION SETUP
Item Description
Motion Popup
Check the box to Enable/Disable popup screen function for all channels.
When motion is detected in LIVE mode, the detected channel image will
pop up in full screen display.
1~8
You can setup independently for each channel.
Selected Channel Turn
Check the box to Enable/Disable motion detection for each channel.
Object Size
Drag the white bar or press ◀ ▶ to set up Object Size from val
ue 1 to 15 for each channel. The lower value you set the highe
r sensitivity it will be. Value set up as 1, the motion will be detect
ed easiest.
Sensitivity
Drag the white bar or press ◀ ▶ to set up Sensitivity from value 1
to 15 for each channel. The lower value you set the higher sensit
ivity it will be
Motion Area Setup
Enter to setup motion detection area
Page 24
24
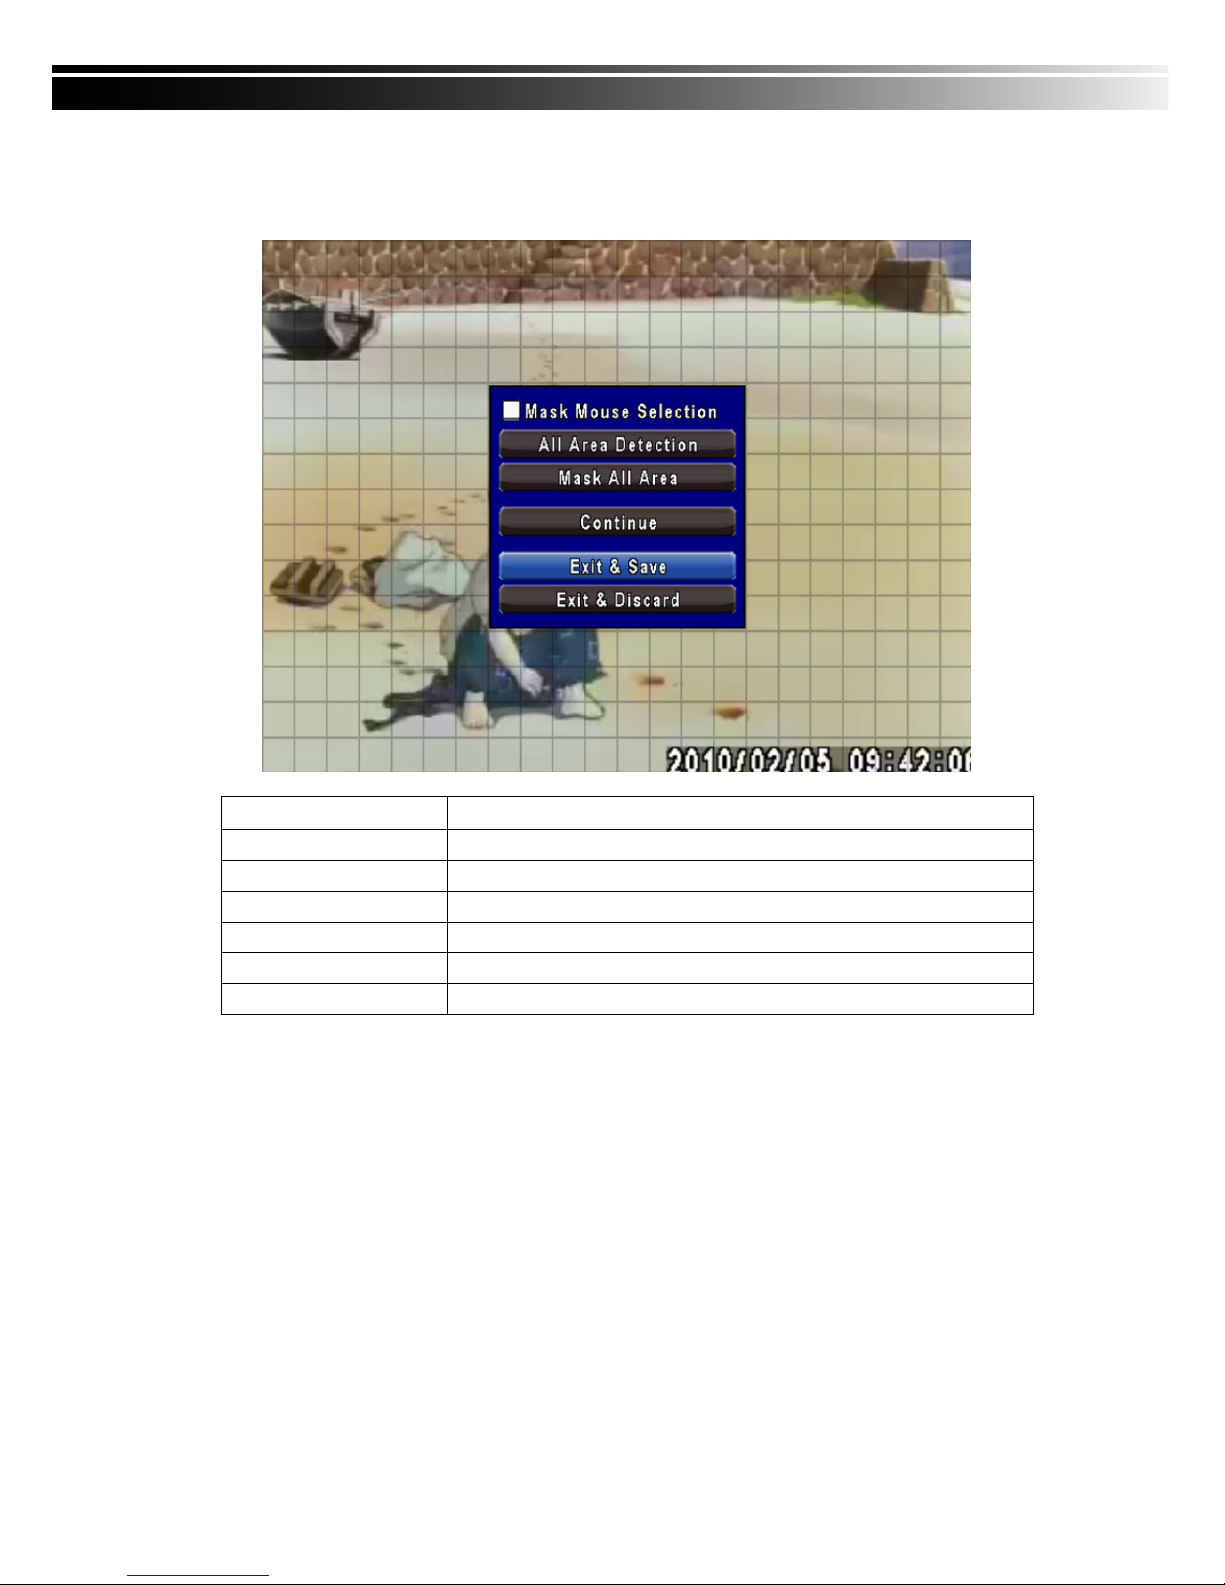
4-2.1.1 MOTION AREA SETUP
The motion detection has been divided into 16x12 grids. The default detection area is full scree
n as it marked in transparent for local DVR and purple for remote access. Areas deselected for
motion detection are marked in red for both local and remote site.
Item Description
Mask Mouse Selection
Switch between “select” and “deselect” for cursor-dragging function
All Area Detection
Select entire screen as detection area.
Mask All Area
Deselect entire detection area.
Continue
Continue setup
Exit & Save
Save setup and leave
Exit & Discard
Cancel setup and leave
Page 25
25
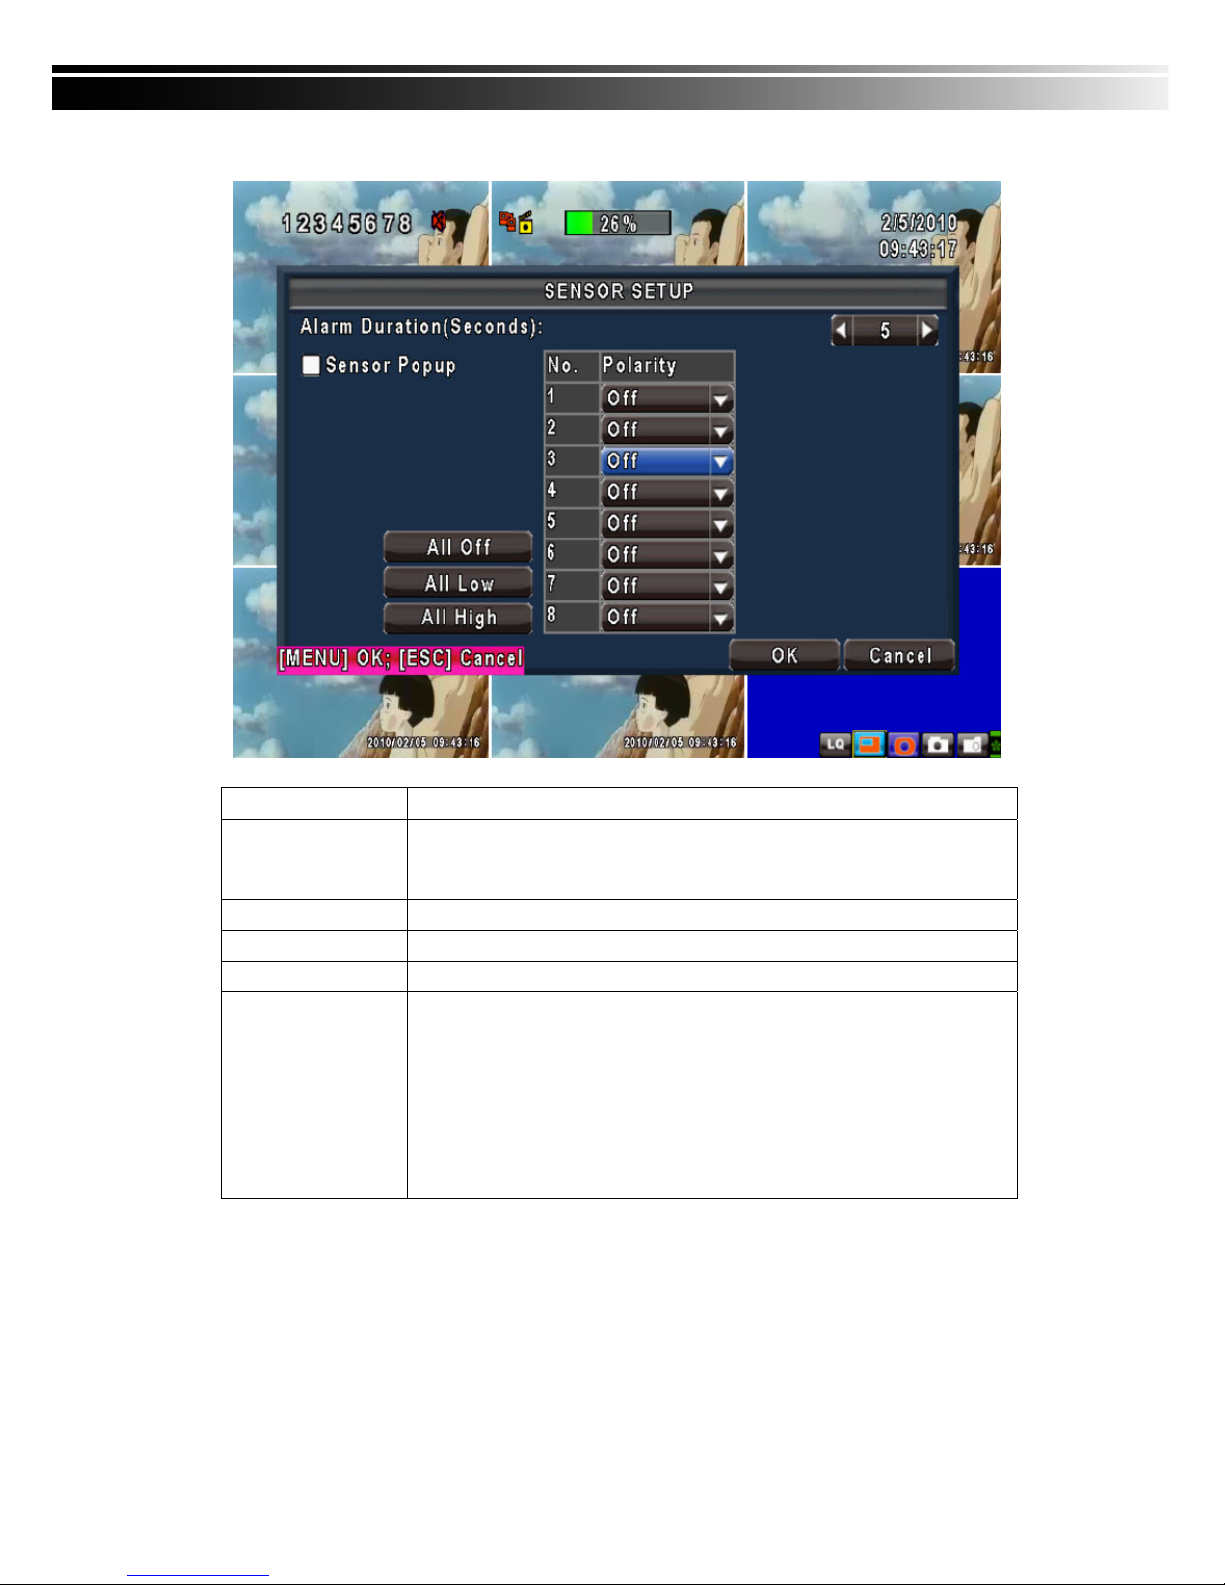
4-2.2 SENSOR SETUP
Item Description
Sensor Popup
Check the box to Enable/Disable popup screen function for all channels. When
Sensor is detected in LIVE mode, the detected channel image will pop up in full
screen display.
All Off
Set all sensor off
All Low
Set all sensor polarity low
All High
Set all sensor polarity high
Sensor Polarity
Click or press ▼ to select between HIGH, LOW voltage for triggering sensor
detection or OFF to turn off polarity for each channel
Low Polarity:Sensor has not been triggered. When connected, sensor will be
turned on..
High Polarity:Sensor has been triggered. When connected, sensor status will
be turned off..
Off :Sensor is deactivated, and will not be turned on/off.
Note:4CH DVR will display 4 channels and 8CH DVR will display 8 channels.
Page 26
26
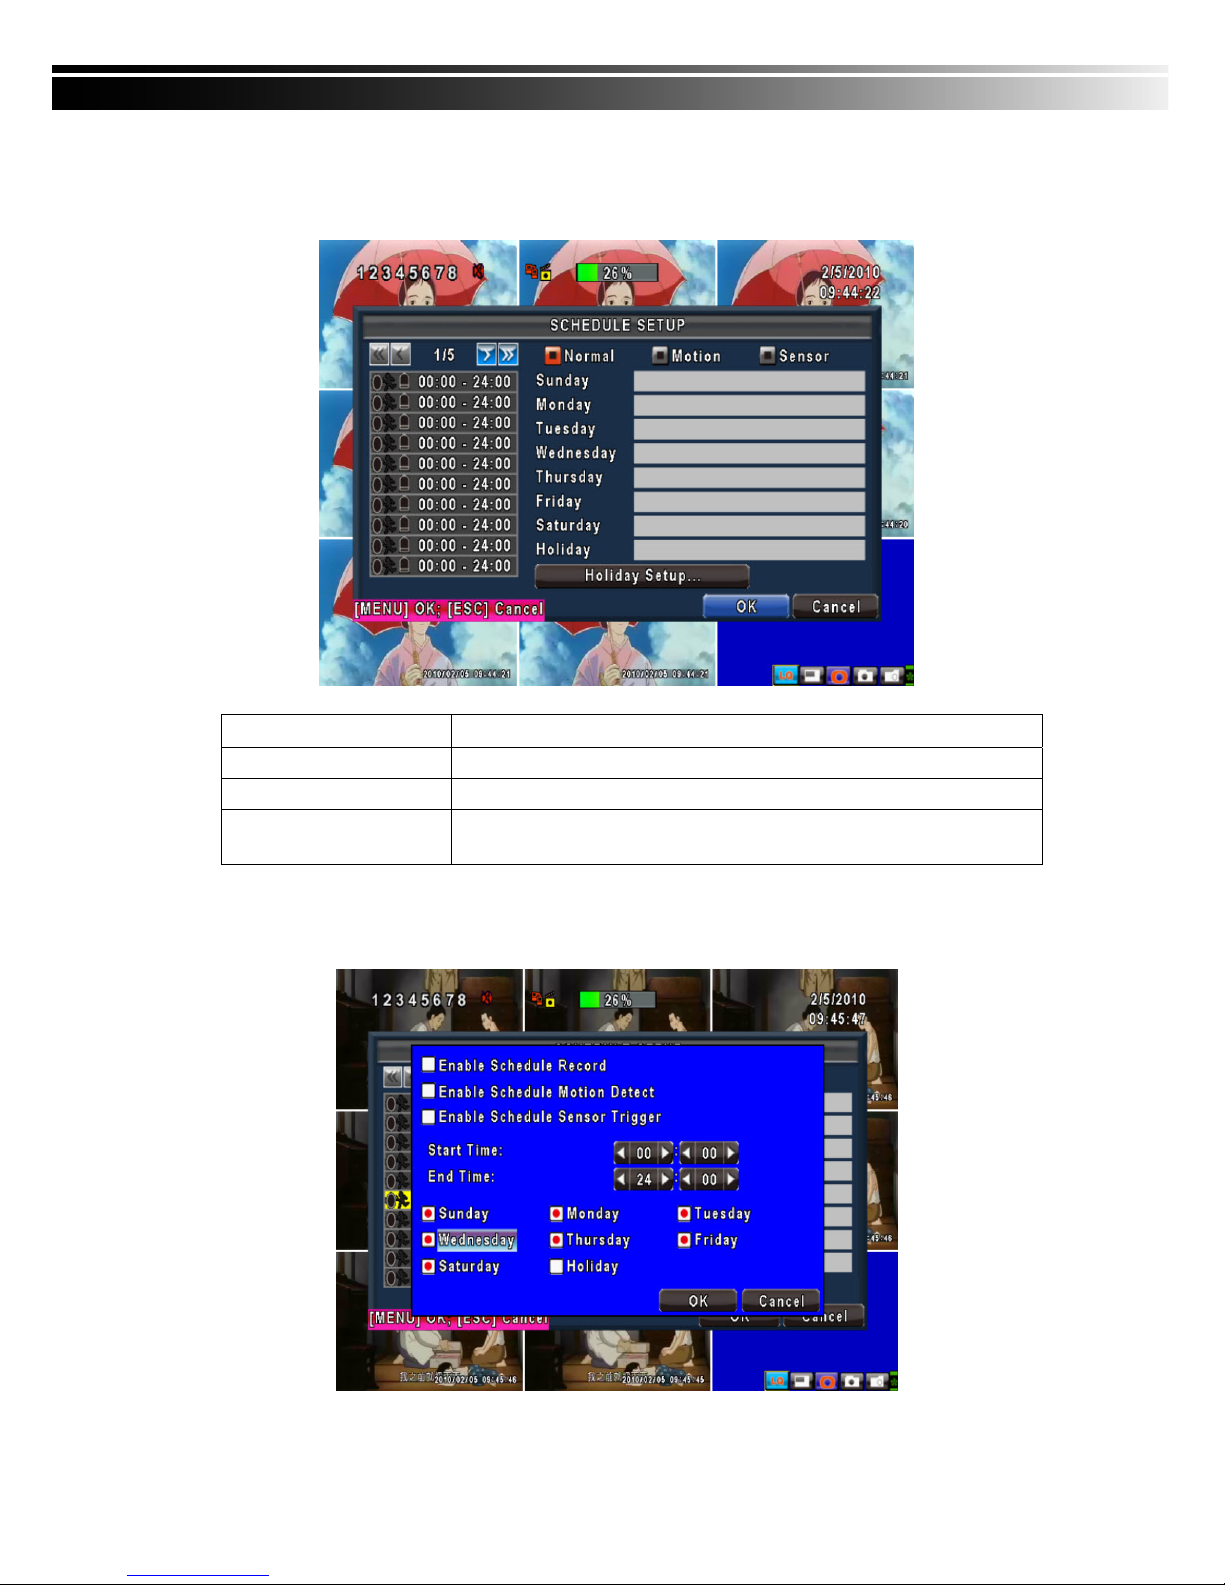
4-3 SCHEDULE SETUP
Except from starting recording manually, you can also setup the recording time by weeks and sch
edule including normal, motion detect, and sensor detect recording type.
Item Description
Page
Each page provides 10 schedules for setup. 5 pages in total.
Holiday Setup
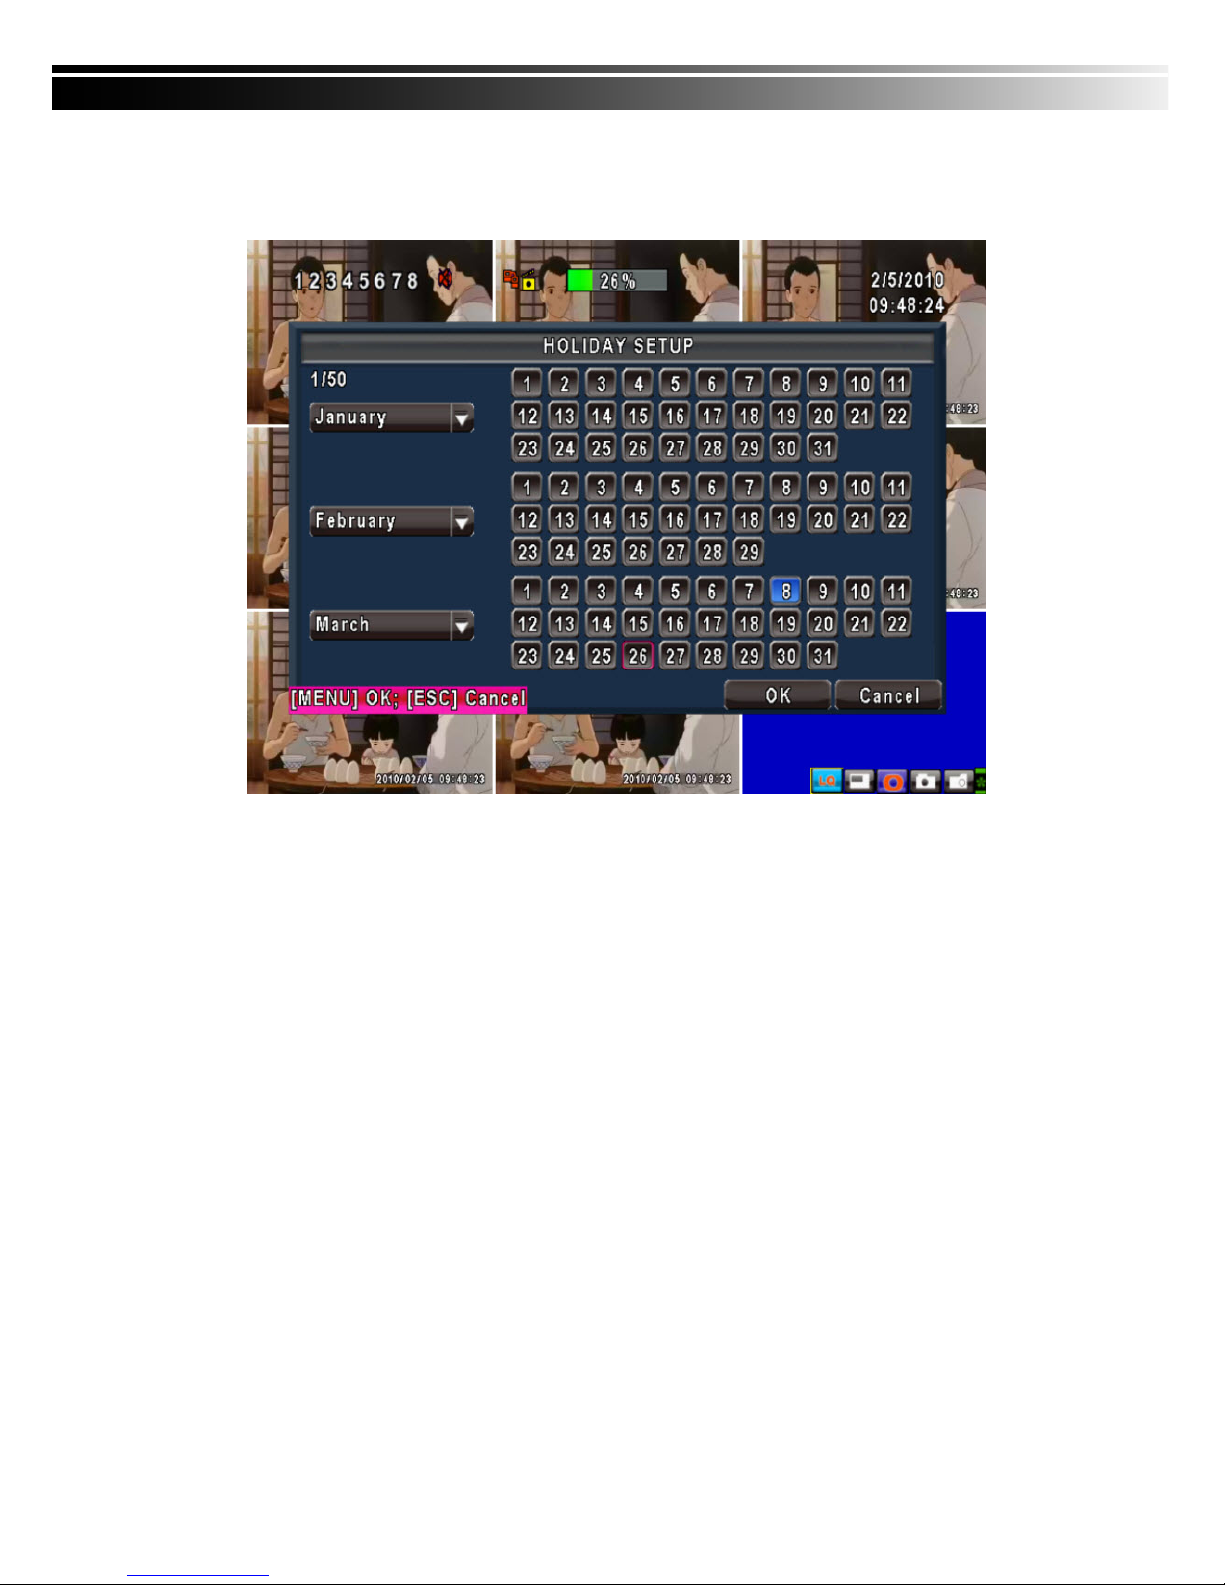
Enter to setup holiday, up to 50 days, other than weekends,.
View Event/ Motion/
Sensor Setup
View Normal/ Motion / Sensor Setup
4-3.1 Schedule Record Setup
Click on the time on the left side. The setup menu will be displayed. You can have detail setu
p by dates, Time and event.
Page 27
27
4-3.2 Holiday Setup
Since holidays are different by different country and region, you can setup the holiday of your loca
tion accordingly.
Page 28
28
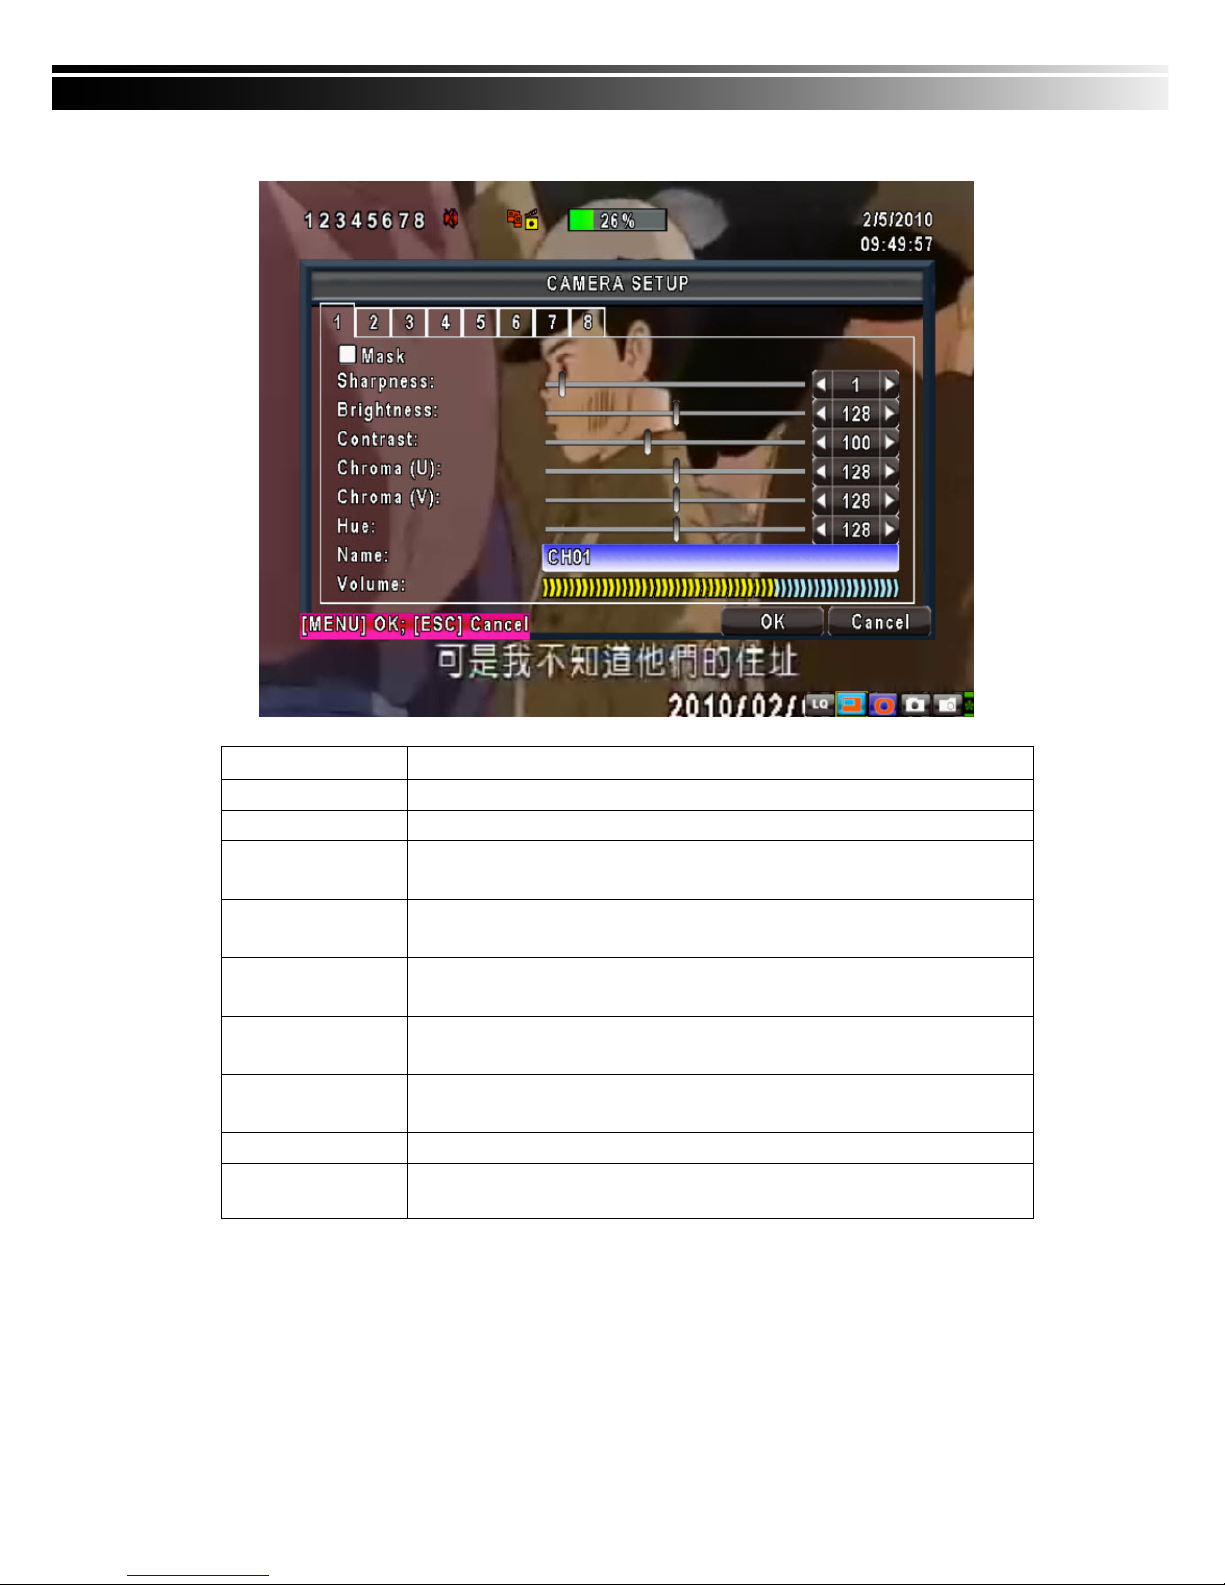
4-4 CAMERA SETUP
Item Description
1~8
You can setup independently for each channel.
Mask
Check the box to Enable/Disable mask function for LIVE mode
Sharpness
Drag the bar or press ◀ ▶ to adjust Sharpness of your camera from value 1 to
255. The default value is 128.
Brightness
Drag the bar or press ◀ ▶ to adjust Brightness of your camera from value 1 to
255. The default value is 128.
Contrast
Drag the bar or press ◀ ▶ to adjust Contrast of your camera from value 1 to 255.
The default value is 128.
Saturation
Drag the bar or press ◀ ▶ to adjust Saturation of your camera from value 1 to
255. The default value is 128.
Hue
Drag the bar or press ◀ ▶ to adjust Hue of your camera from value 1 to 255. The
default value is 128. ( This function doesn’t support at PAL system)
Name
Set up name of each channel
Volume
Audio volume for CH1 to CH 4 under LIVE mode and recording mode can be
adjusted.
Page 29
29
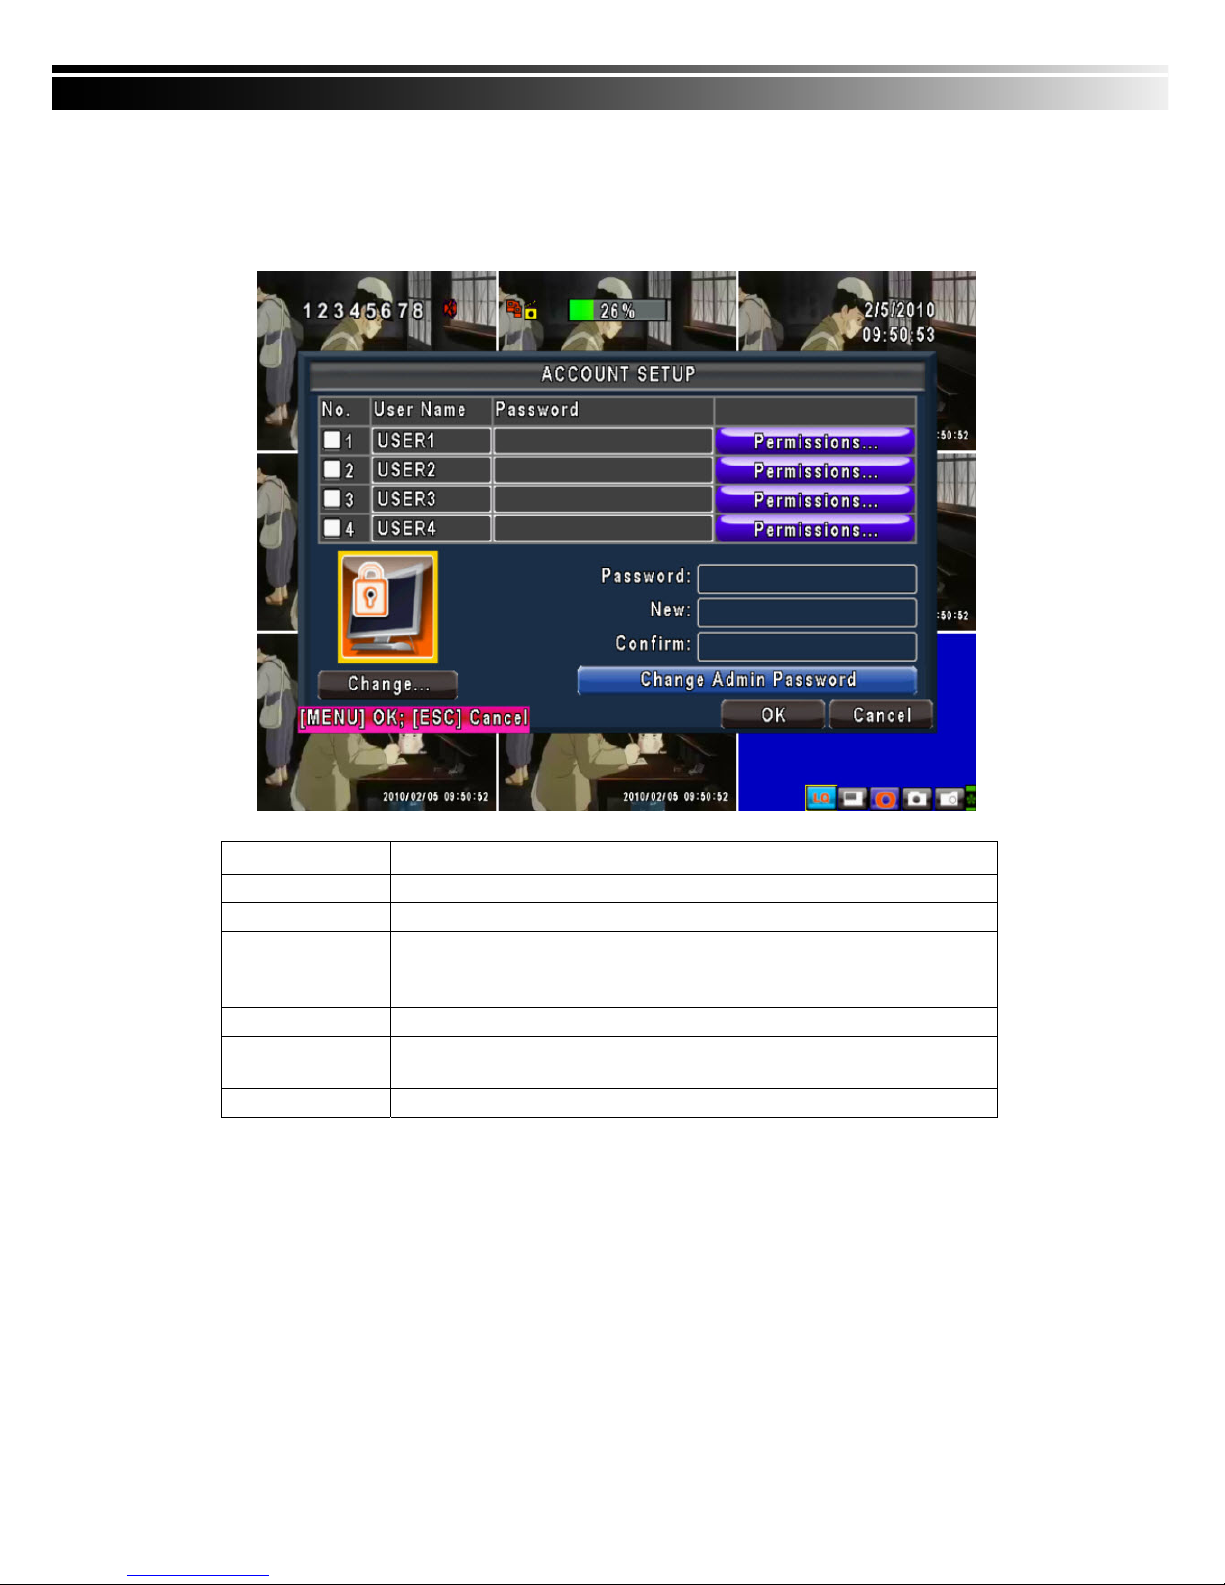
4-5 ACCOUNT SETUP
The Account Setup menu is used to provide role-based permission independently setting for each user
(maximum of 4 users) to access DVR over network. The default admin account and password is “admin”
and “123456” The default password remains the same after firmware upgrade, however, it requires 8-digits
for password length when you setup a new one
Item Description
No.
Check to activate the user’s account.
Username
Set up username
Password
Set up password for each user. Password is 8-digits required and can be
mixed by letters and numbers with case-sensitive. Letters can be mixed with
capitals or lowercases.
Permissions
Set up Permissions for each user
Change Admin
Password
Change administrator’s password
Picture
Change user’s picture
Page 30
30
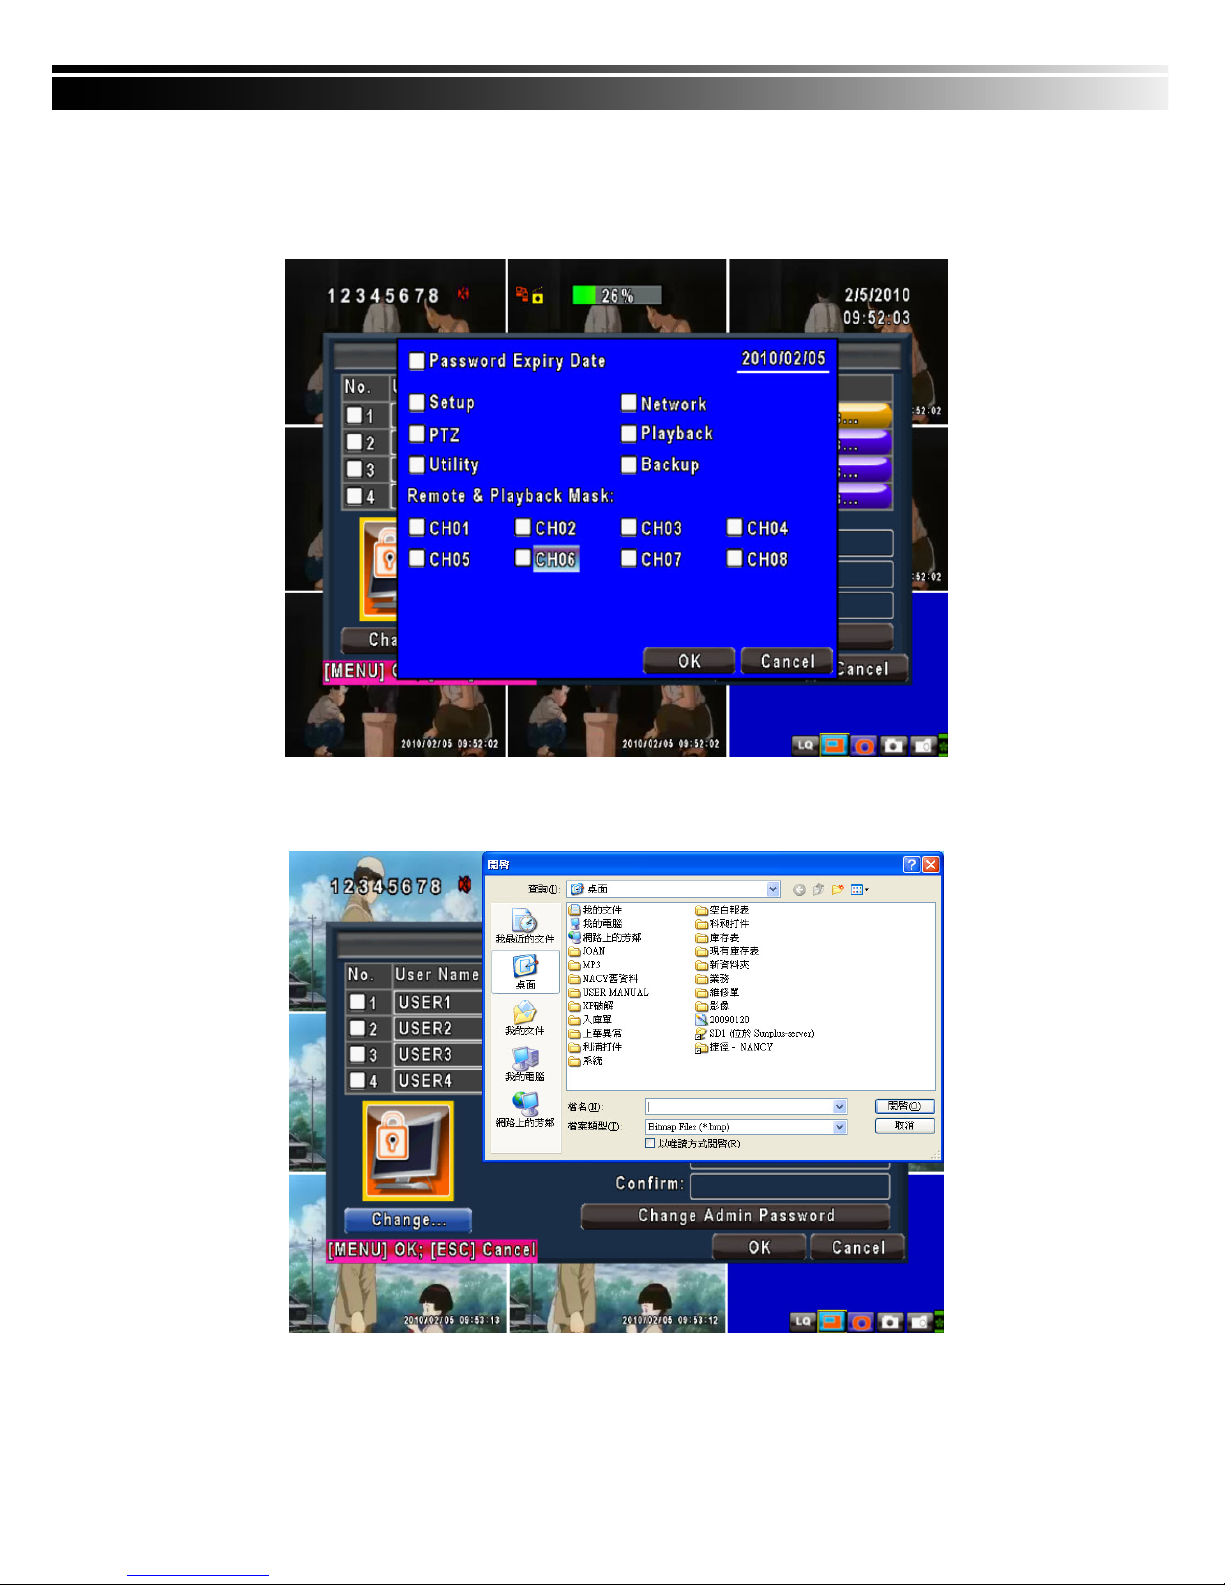
4-5.1 Permission Setup
The Account Setup is set to provide individual user (maximum of 4 users) role-based permissions,
including access to Setup menu, Network operation, PTZ function, Playback, Utility, Backup, Password
expiry date and Mask on specific channels while playing back.
4-5.2 User Picture Setup
User can select picture wished to be changed to from hard drive.
Note
:
4CH DVR will display 4 channels and 8CH DVR will display 8 channels.
Page 31
31
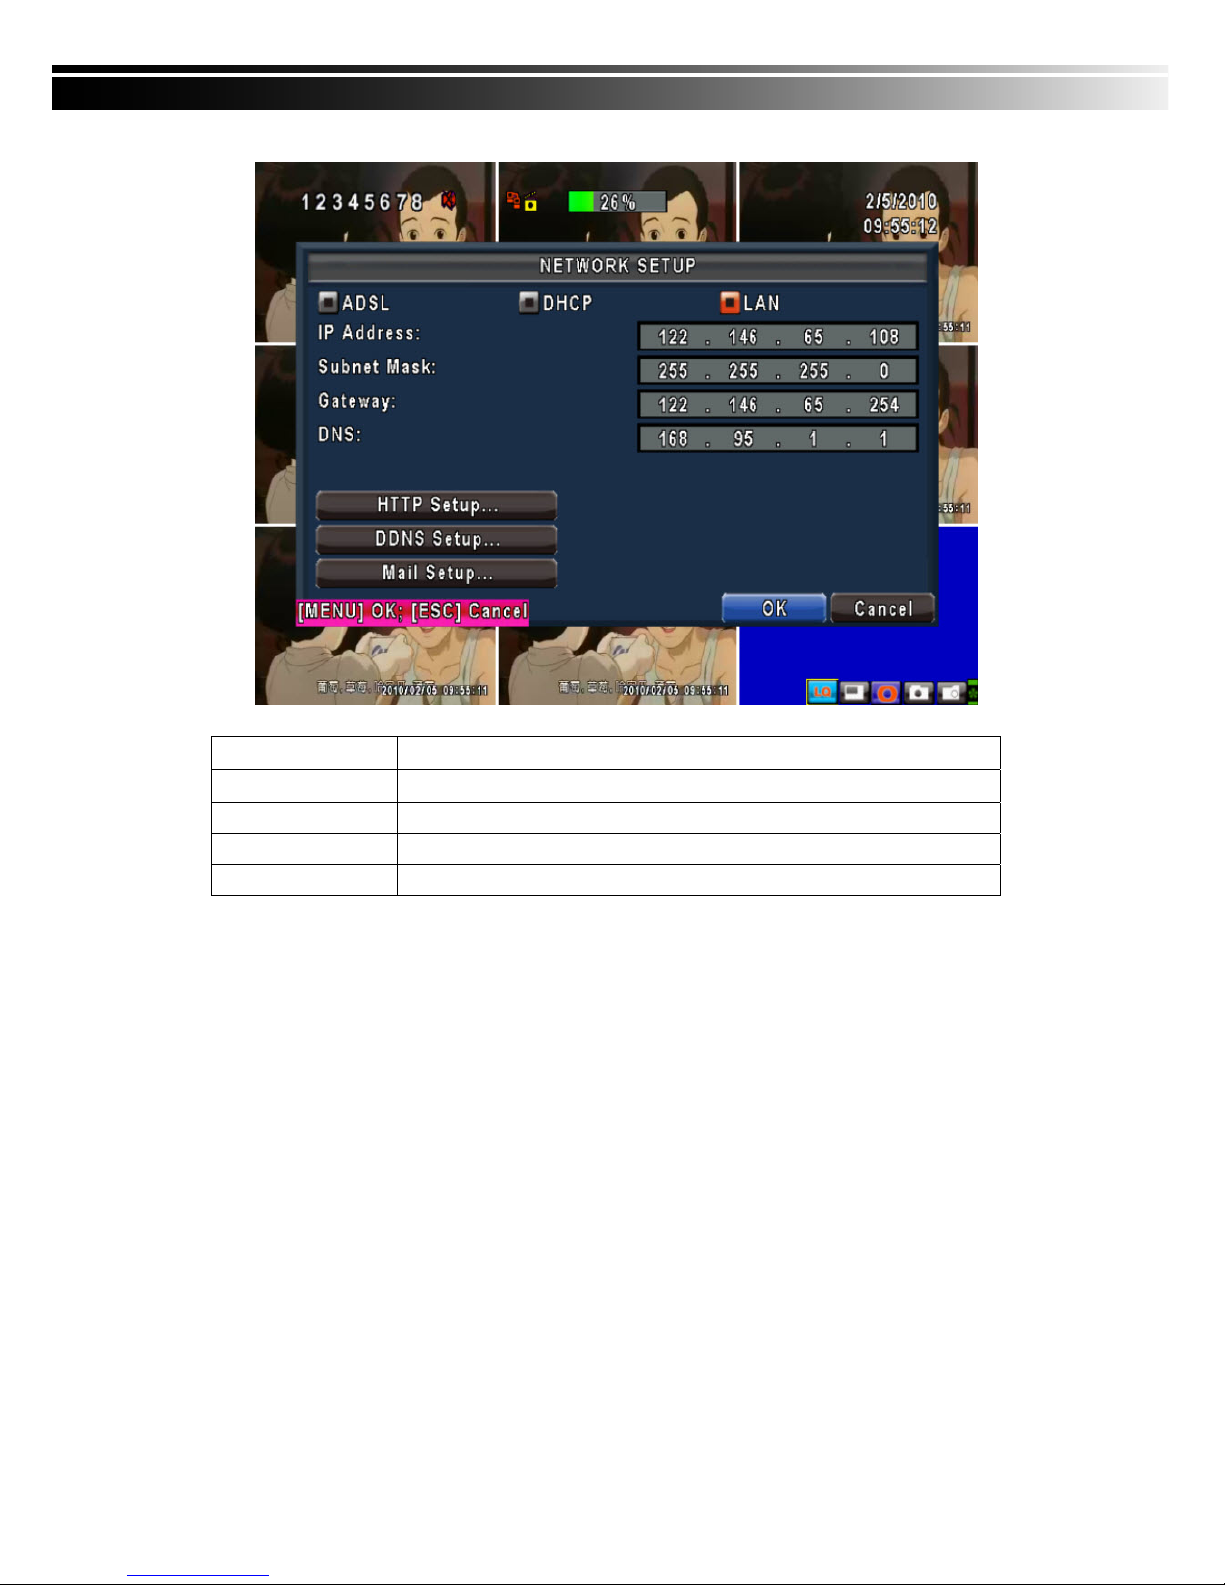
4-6 NETWORKING SETUP
Item Description
Connect type
Setup mode for network connection: (DHCP、LAN、ADSL).
HTTP Setup
Enter to set up HTTP
DDNS Setup
Enter to set up DDNS
Mail Setup
Enter to set up mail
Page 32
32
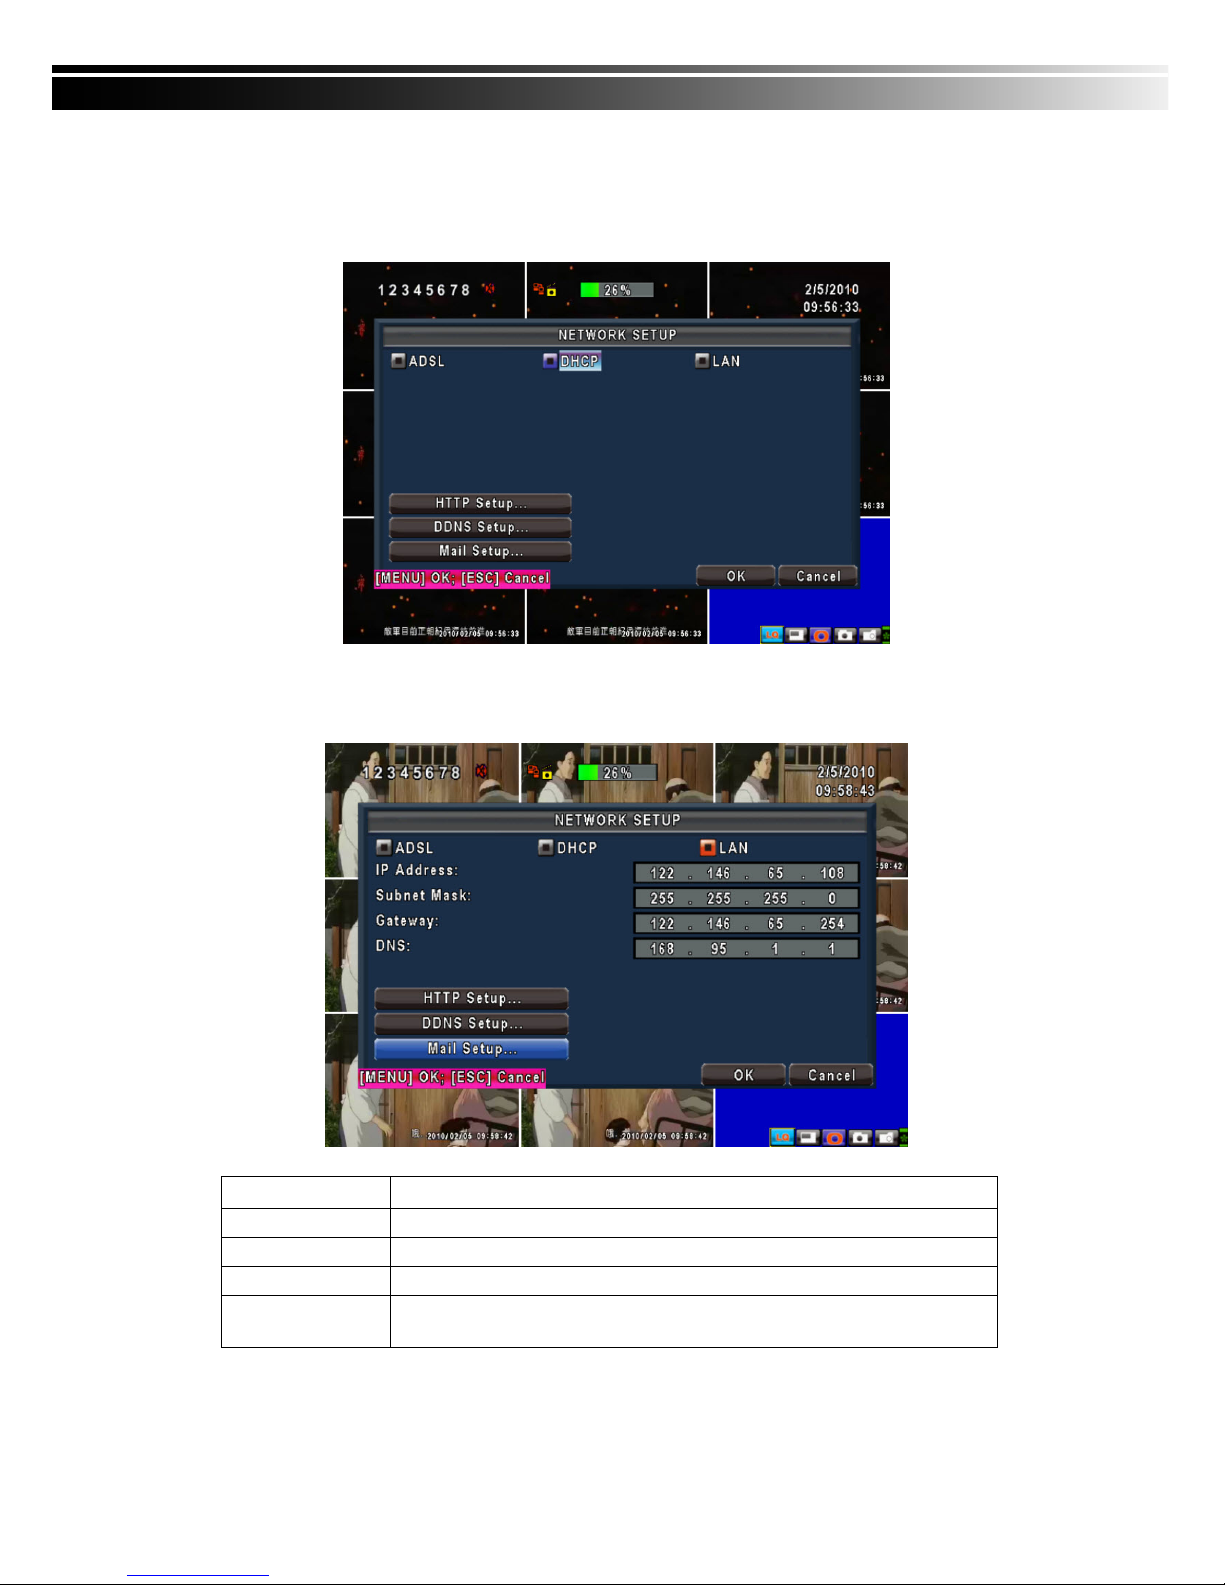
4-6.1 NETWORKING SETUP
There are three ways to connect to the network as followed.
4-6.1.1 DHCP
When DHCP is selected, IP address will be assigned by DHCP server automatically.
4-6.1.2 LAN
Select LAN for network connection, the following information is required.
Item Description
IP Address
Enter IP address provided by ISP
Subnet Mask
Enter IP address of Subnet Mask provided by ISP
Gateway
Enter IP address of Gate way provided by ISP
DNS
Enter DNS address provided by ISP. (Note: The correct DNS address must be
entered for DDNS function).
Page 33
33
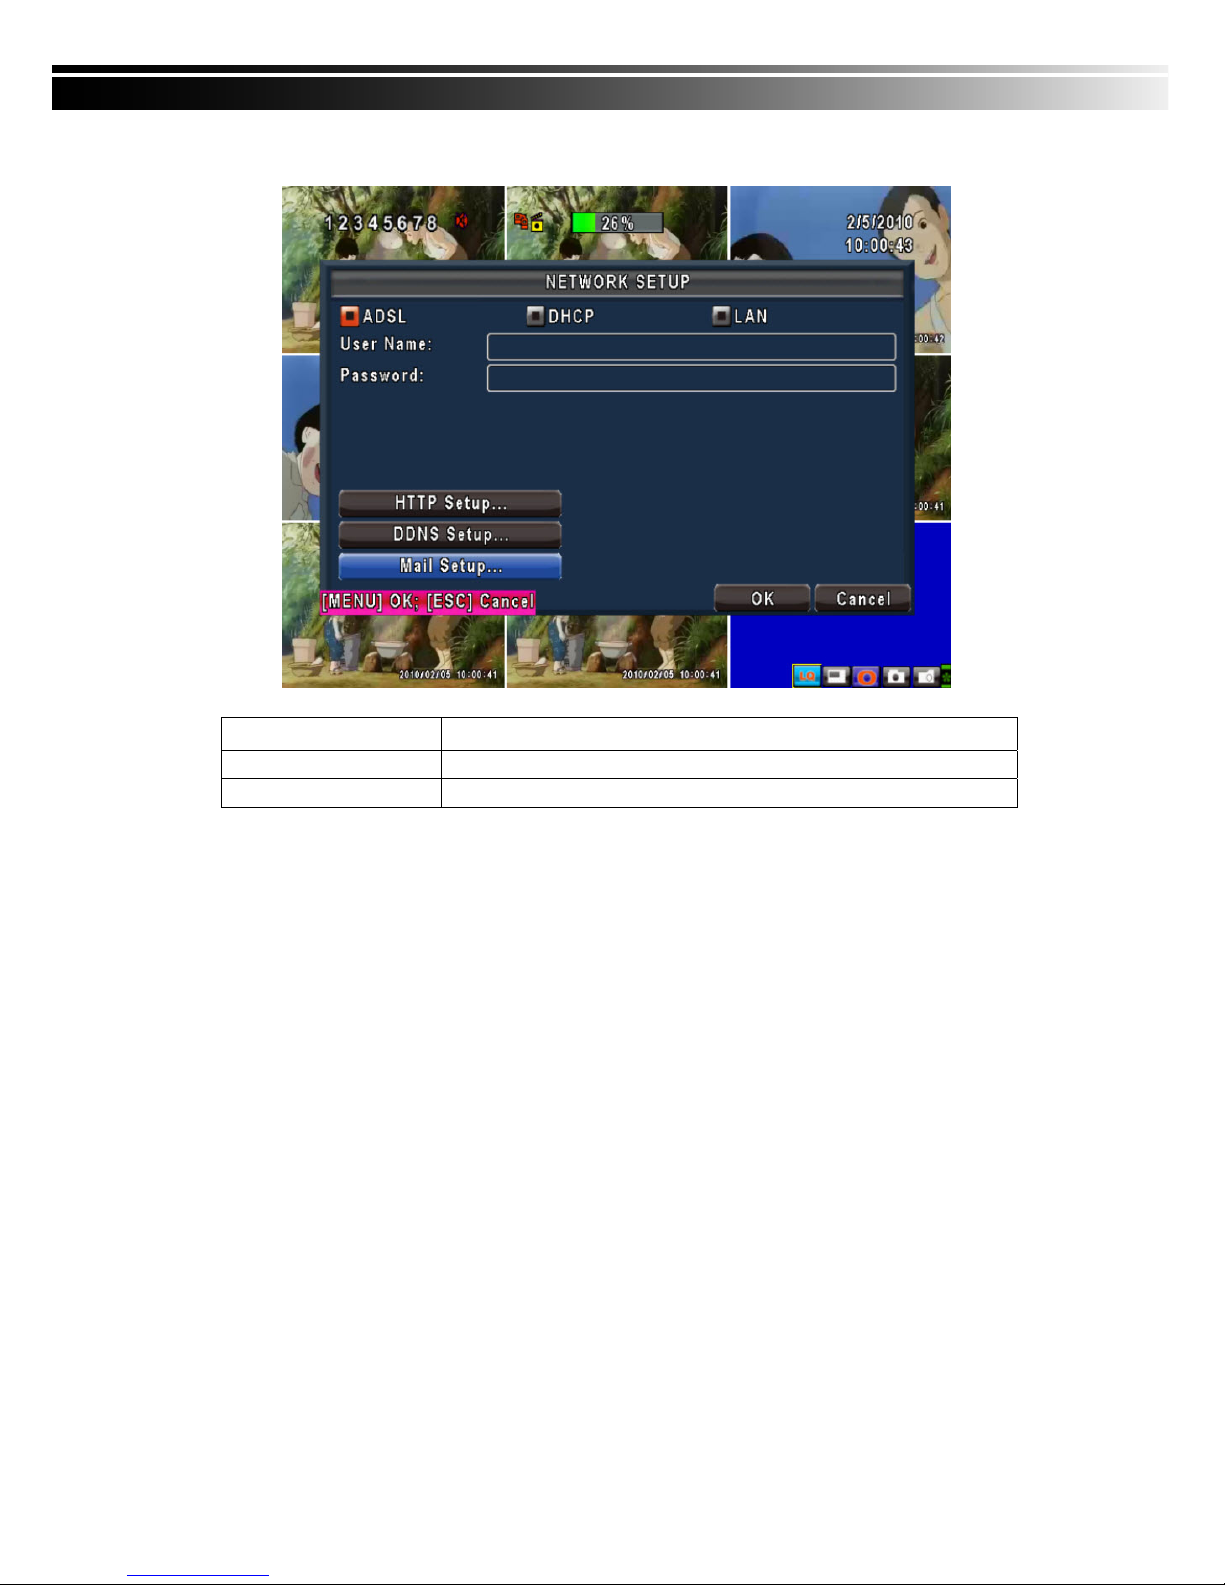
4-6.1.3 ADSL
Select ADSL for network connection, the following information is required.
Item Description
User Name
Enter user name provided by ISP
Password
Enter password provided by ISP
Page 34
34
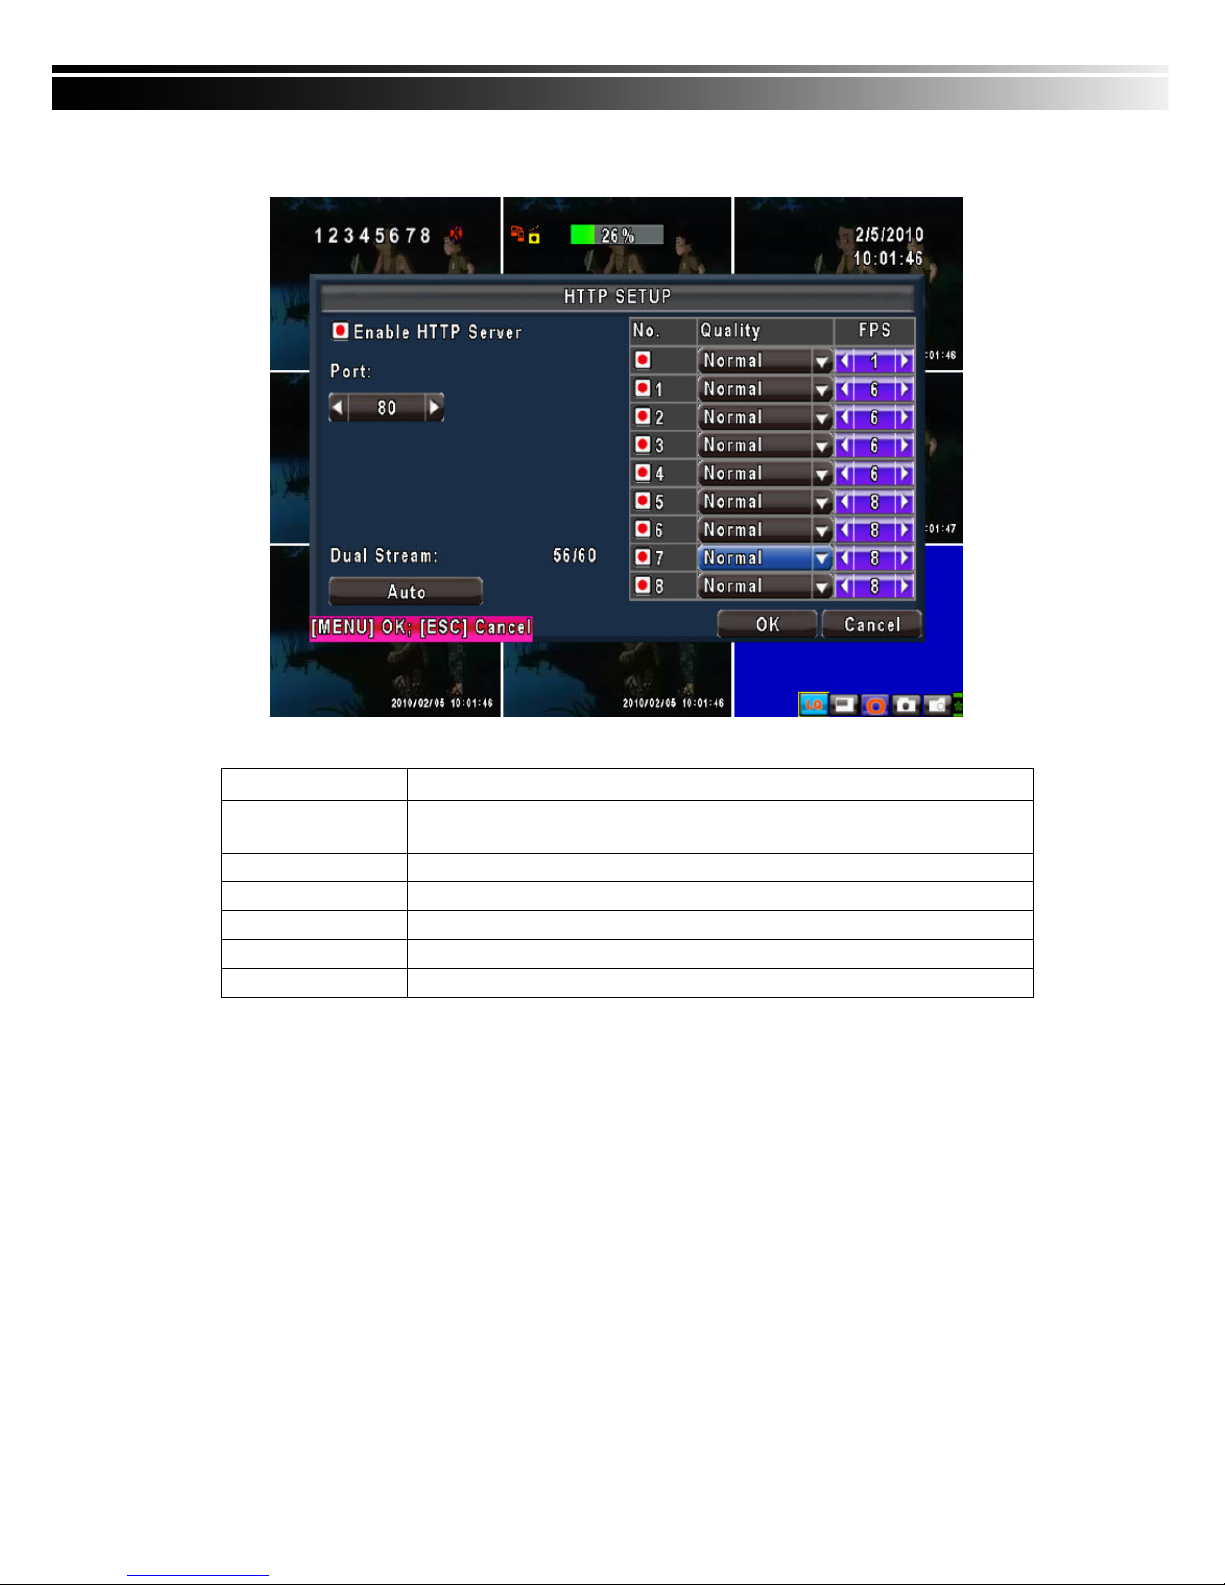
4-6.2 HTTP Setup
Item Description
Enable HTTP Server
Check to enable HTTP server. Users can remotely access into the DVR over the
network if the HTTP function is activated.
Port
Enter a valid port value from 1 up to 65000. The default value is 80.
Auto
Assign each channel with its maxima accessible fps
No.
Chanel number
Quality
Set up record quality. There are below basic, basic, normal, high, highest
FPS
Set up record FPS
Page 35
35
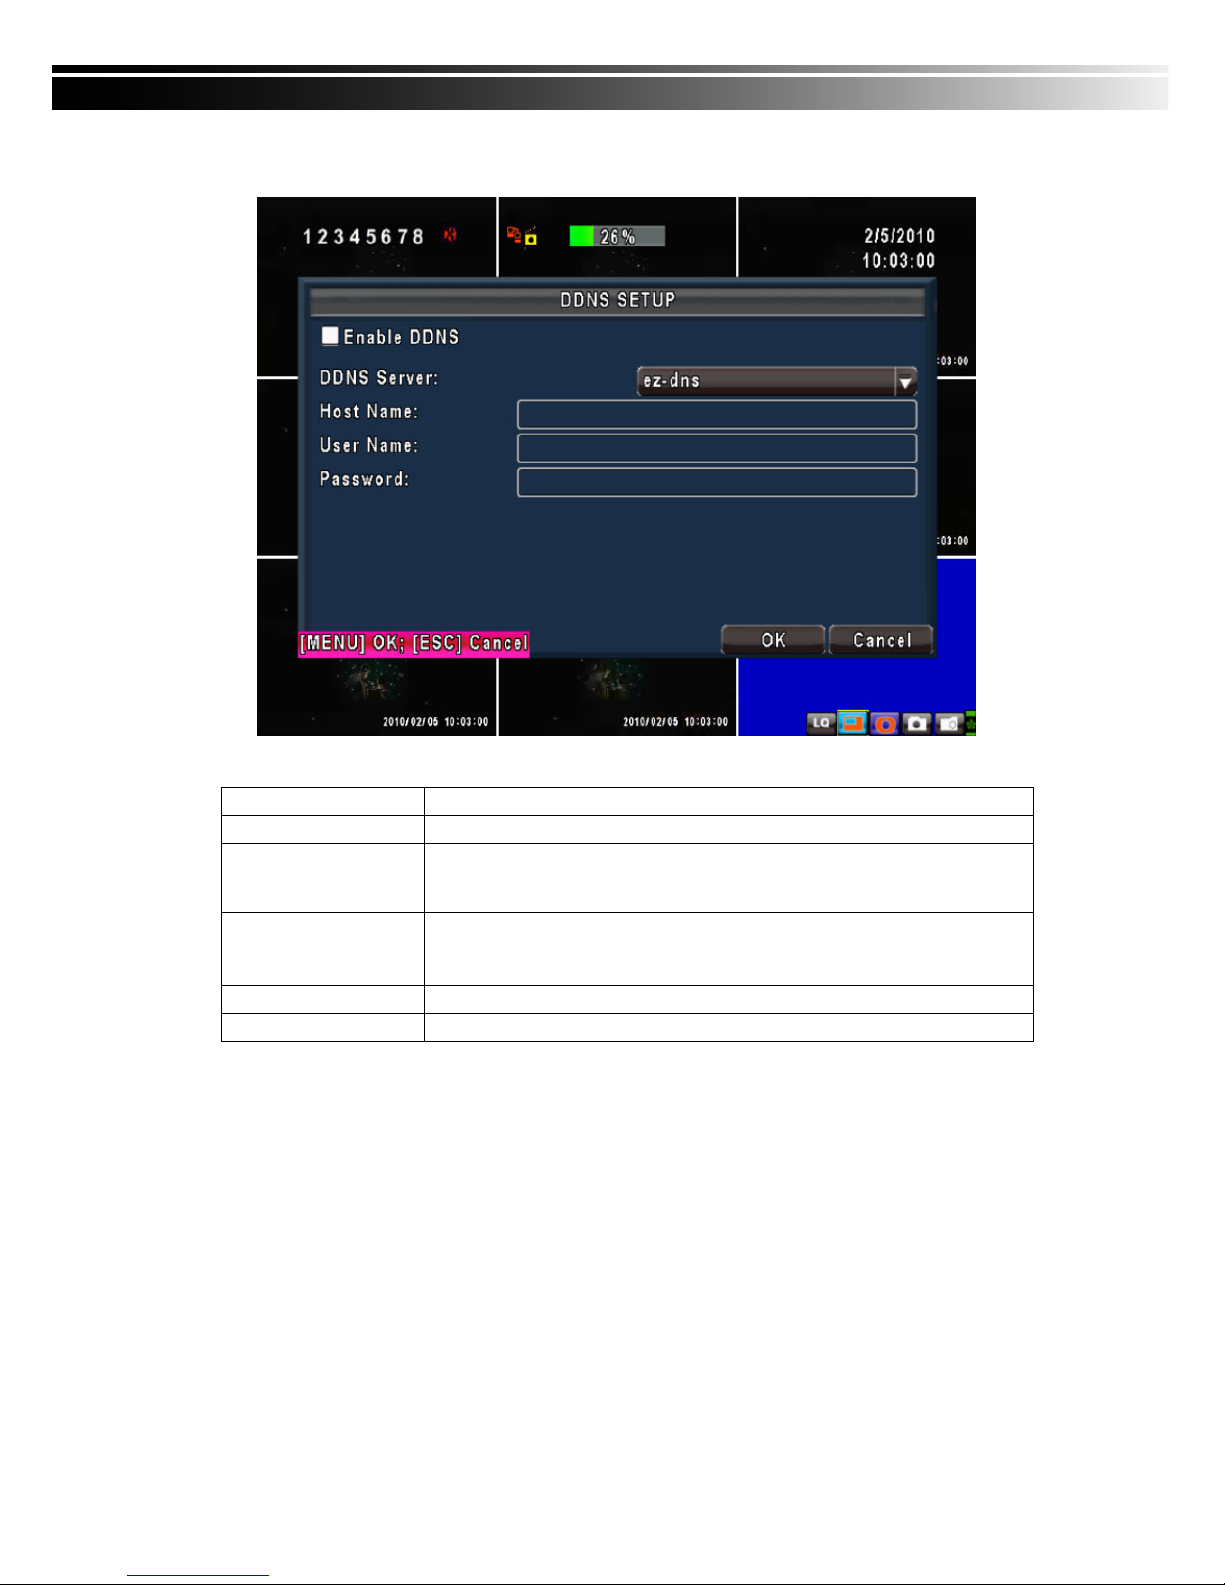
4-6.3 DDNS Setup
Item Description
Enable DDNS Enable/disable DDNS function.
DDNS Server
Enter the registered SMTP Server:
DYNDNS.ORG、NO-IP.ORG、CUSTOM.COM、3322.ORG、
I-DVR.NET*
SMTP Server Enter the completed registered SMTP Server. (Including username + Server) If
the user name is h.264 and you choose i-dvr as your server, you should enter:
h.264.i-dvr.net
User Name Enter user name.
Password Enter password.
For more detailed I-DVR.NET operation instruction, please refer to appendix I.
Page 36
36
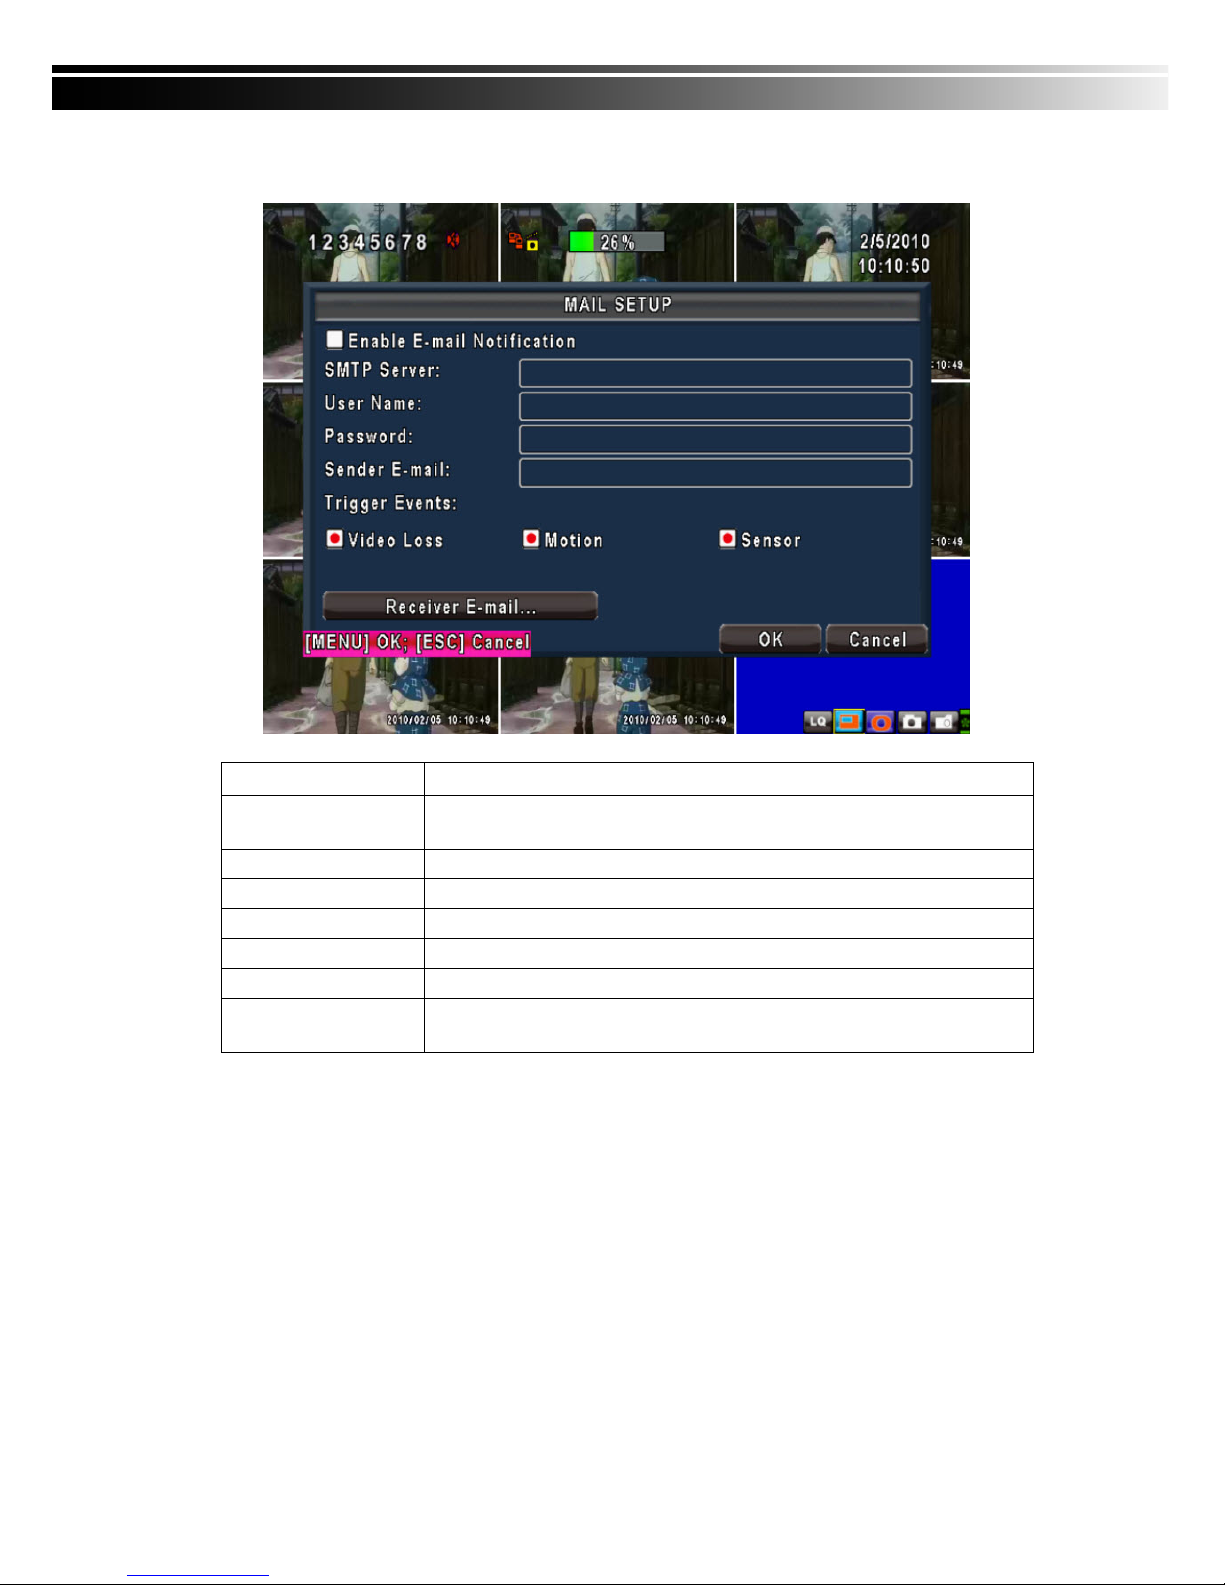
4-6.4 Mail Setup
When event occurs (VLOSS, MOTION, SENSOR), email will be sent to the receiver account automatically.
Item Description
Enable E-mail
Notification
Check the box to enable/disable E-mal Notification function.
SMTP Server
Enter to set up SMTP Serve name.
User Name
Enter to set up User Name.
Password
Enter to set up Password.
Sender E-mail
Enter to set up e-mail address of receivers.
Receiver E-mail
Enter to set up e-mail addresses for up to 10 receivers individually.
Trigger Event
Enter to select events to send out E-mail notifications when below
circumstances happen: Motion, Sensor and Vloss (Video Loss).
Page 37
37
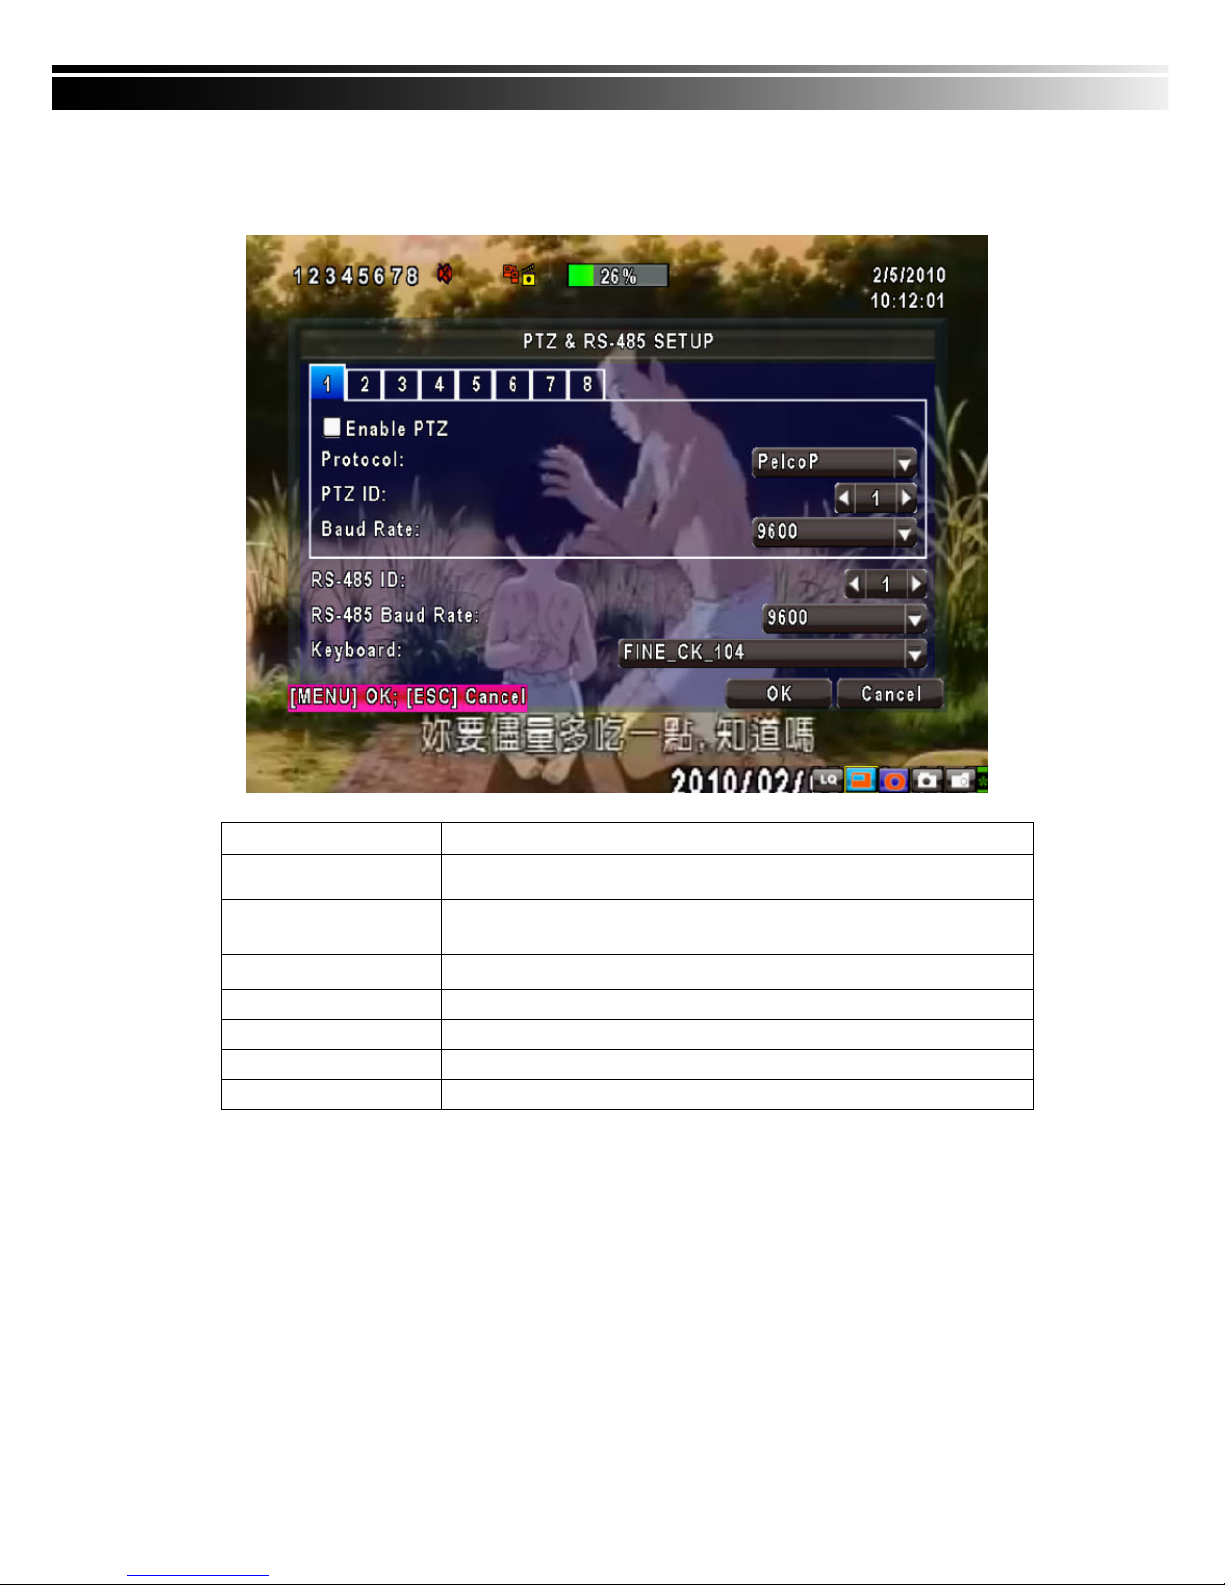
4-7 PTZ & RS485 SETUP
The DVR allows users to control PTZ functions of your camera. To enable PTZ function, the 485 cable
should be connected to the RS-485 port of DVR.
Item Description
Enable PTZ
Click the box to Enable/Disable PTZ function for each channel.
Protocol Set up the protocol of PTZ cam. The supported protocol are PELCO-P,
PELCO-D, KND, LI-LIN, SAMSUNG, LG, AVTECH.
PTZ ID
Click or press
◀ ▶ to set up PTZ ID. The valid ID value is from 1 to 64.
Baud Rate
Select Baud Rate for PTZ from 2400, 4800, 9600
RS-485 ID
Select RS-485 ID from 1 to 64
RS-485 Baud Rate
Select RS-485 Baud Rate from 2400. 4800, 9600
Keyboard
Select Keyboard. (Li-Lin)
Note:4CH DVR will display 4 channels and 8CH DVR will display 8 channe ls.
Page 38
38
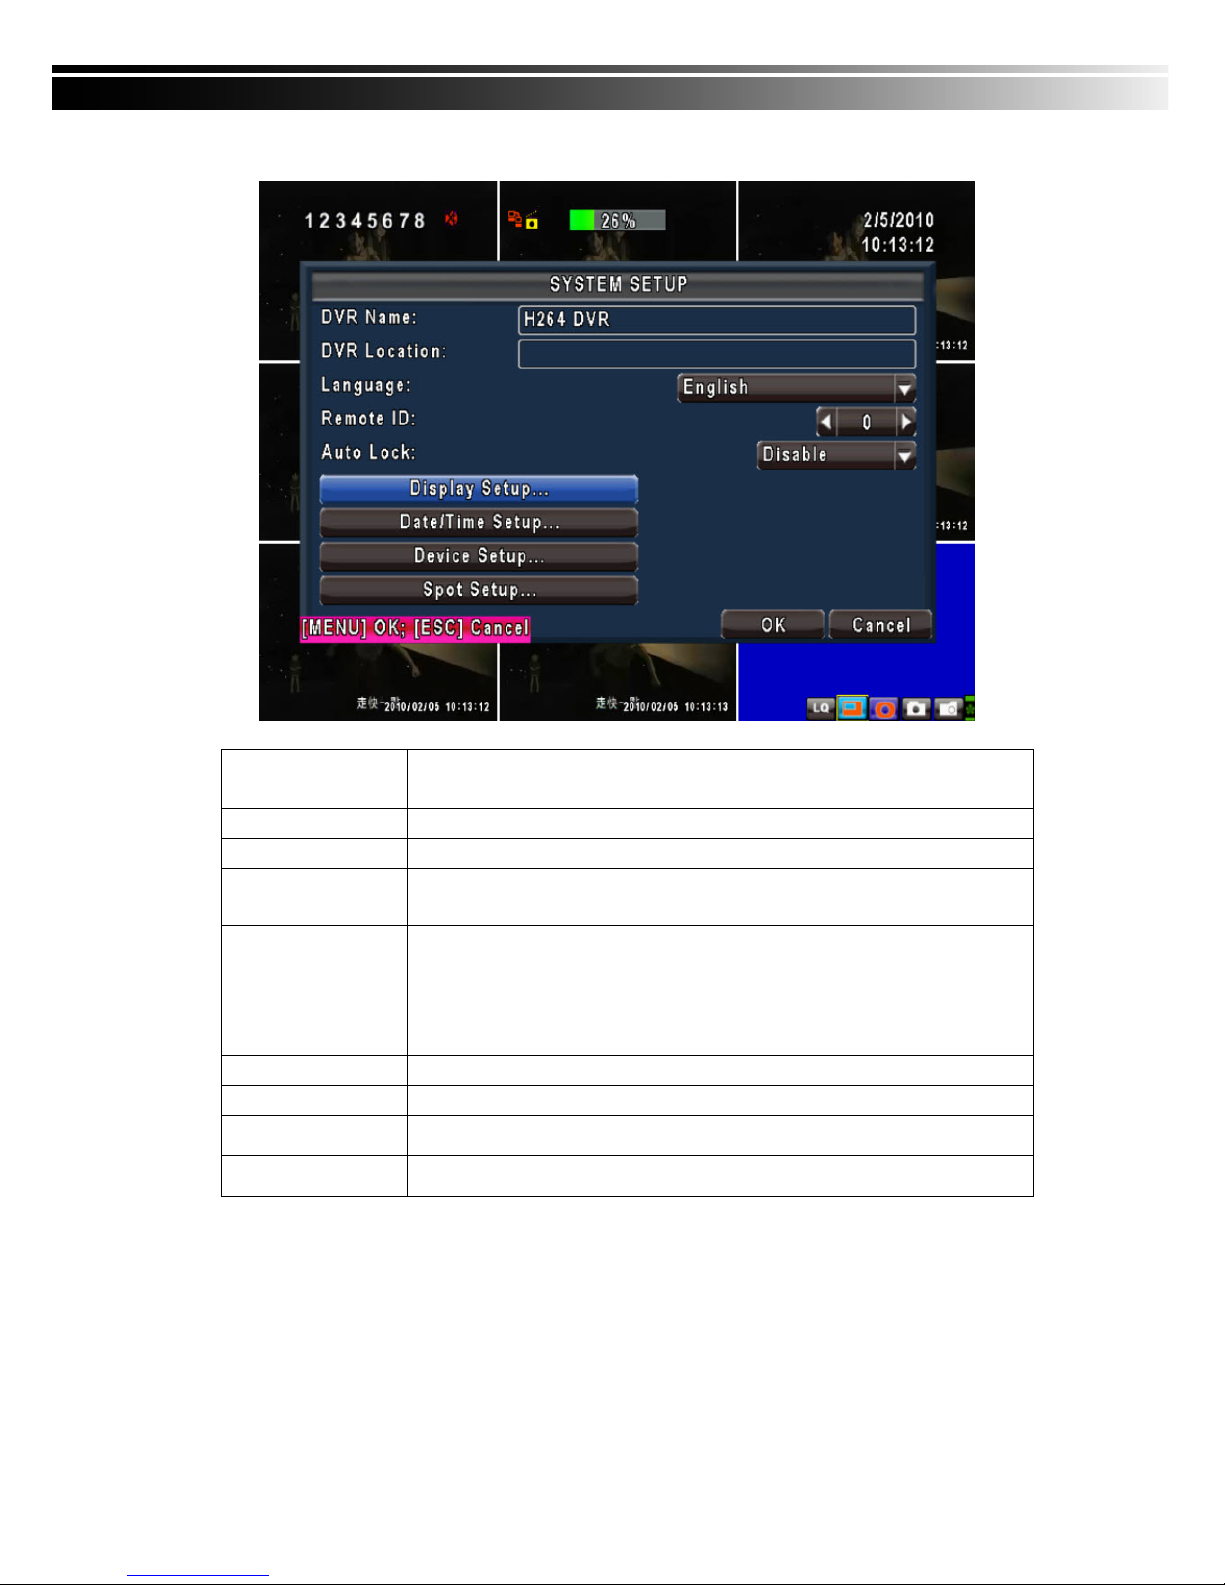
4-8 SYSTEM SETUP
Item Description
DVR Name
The name of DVR will be shown when users login from remote access.
DVR Location
The location of DVR will be shown when users login from remote access
Language
Click or press ▼ to select OSD language from English, Traditional Chinese,
Simplified Chinese, Japanese, Greek, Portuguese
Remote ID
Default ID is 1. When DVR is controlled by standard remote control, please press
“DVR1*” before using it. When more than one DVRs are purchased, the DVRs
can be numbered from 1 to 4. For instance, standard remote control can’t operate
DVR numbered 3. It only responds when “DVR3” button has been pressed
beforehand.
Display Setup
Enter to set up Display
Date/Time Setup
Enter to set up Date/Time
Device Setup
Enter to set up Buzzer & Relay
Spot Setup
Enter to set up Spot
* Default ID is ID1. If remote control malfunctions, please press, “DVR1” button to renew corresponding
DVR ID.
Page 39
39
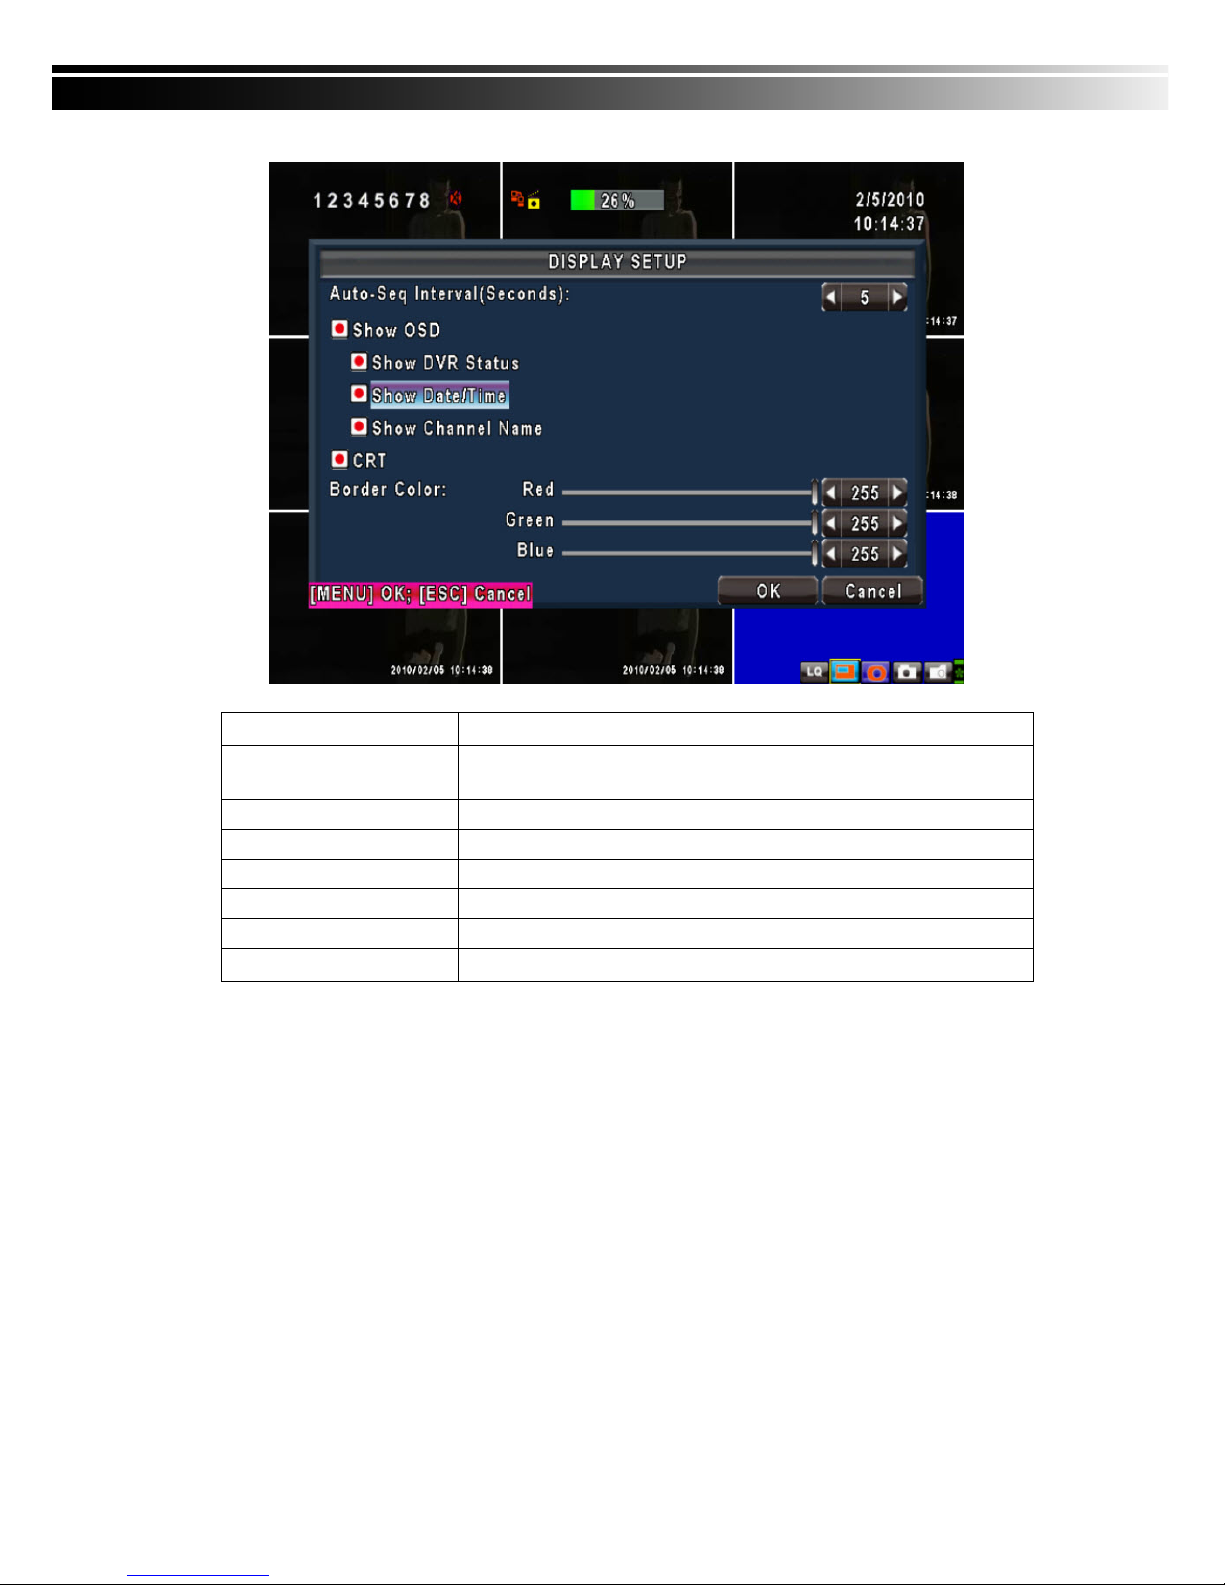
4-8.1 DISPLAY SETUP
Item Description
Auto-Seq Interval
Set up duration time in seconds for the interval between channels under
Auto-Seq mode.
Show OSD
Turn On / Off OSD display
Show DVR Status
Turn On / Off DVR illustration and record status display
Show Date/Time
Turn On / Off date and time display
Show Channel Name
Turn On / Off channel name display
Deflicker
Border Color
Set up the color of border in LIVE , PLAYBACK mode.(Red, Green, Blue)
Page 40
40
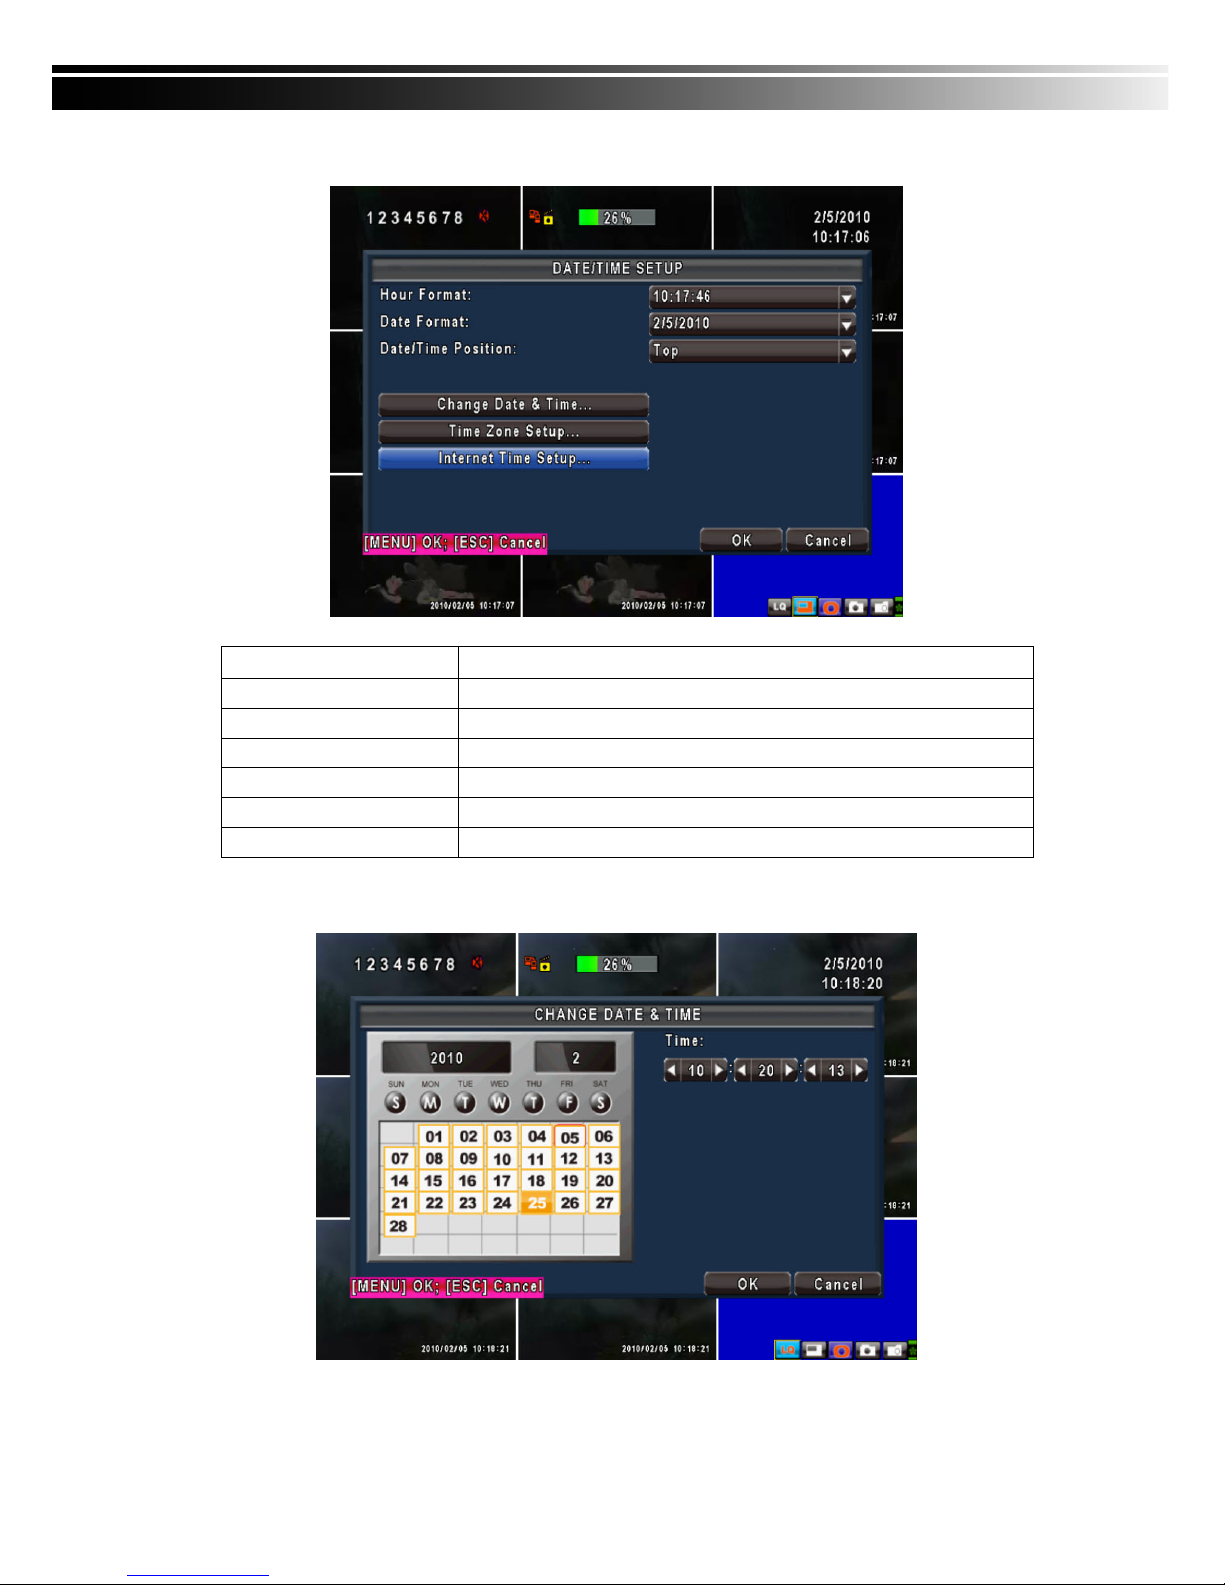
4-8.2 DATE/TIME SETUP
Item Description
Hour Format
12HOURS/ 24HOURS
Date Format
MM-DD-YY/DD-MM-YY/YY-MM-DD
Date/Time Position
Choose the position of Time and Date display
Change Date & Time
Setup time and date of DVR
Time Zone Setup
Set up GMT and Daylight Saving Time.
Internet Time Setup
Setup automatic synchronization with internet server
4-8.2.1 CHANGE DATE & TIME
Setup date and time of DVR manually according to user’s local time.
Page 41
41
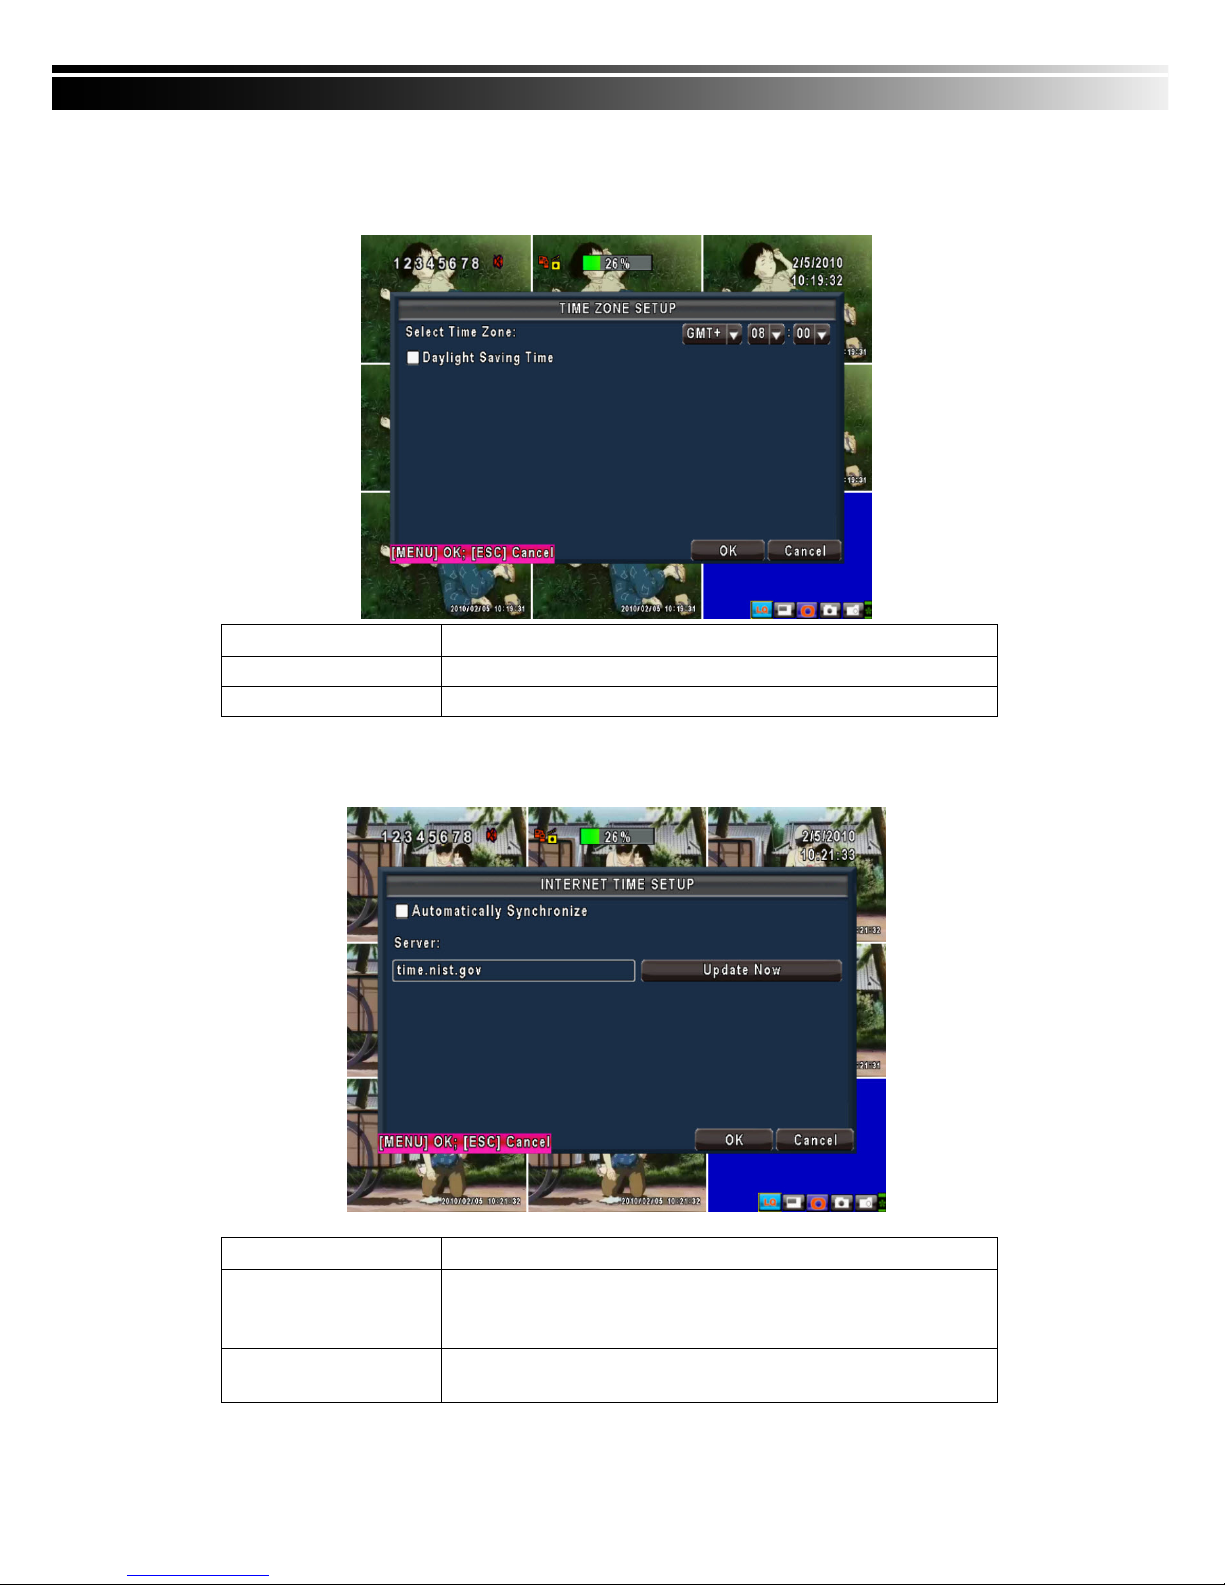
4-8.2.2 TIME ZONE AND DAYLIGHT SAVING TIME SETUP
Set up time zone and activate Daylight Saving Time function according to user’s DVR location.
Item Description
Select Time Zone
Enter to modify GMT from GMT- 13 to GMT+ 13
Daylight Saving Time
Turn on/ off Daylight Saving Time
4-8.2.3 INTERNET TIME SETUP
Synchronize your DVR time with internet time server.
Item Description
Automatic
Synchronization
Check to enable DVR automatic synchronization function. Effective by
this option selected, DVR will automatically synchronize the time upon
rebooting or by every 24 hours after booting.
Update Now
Effectively, Date and Time show on DVR will immediately correspond
with those in internet server.
Page 42
42
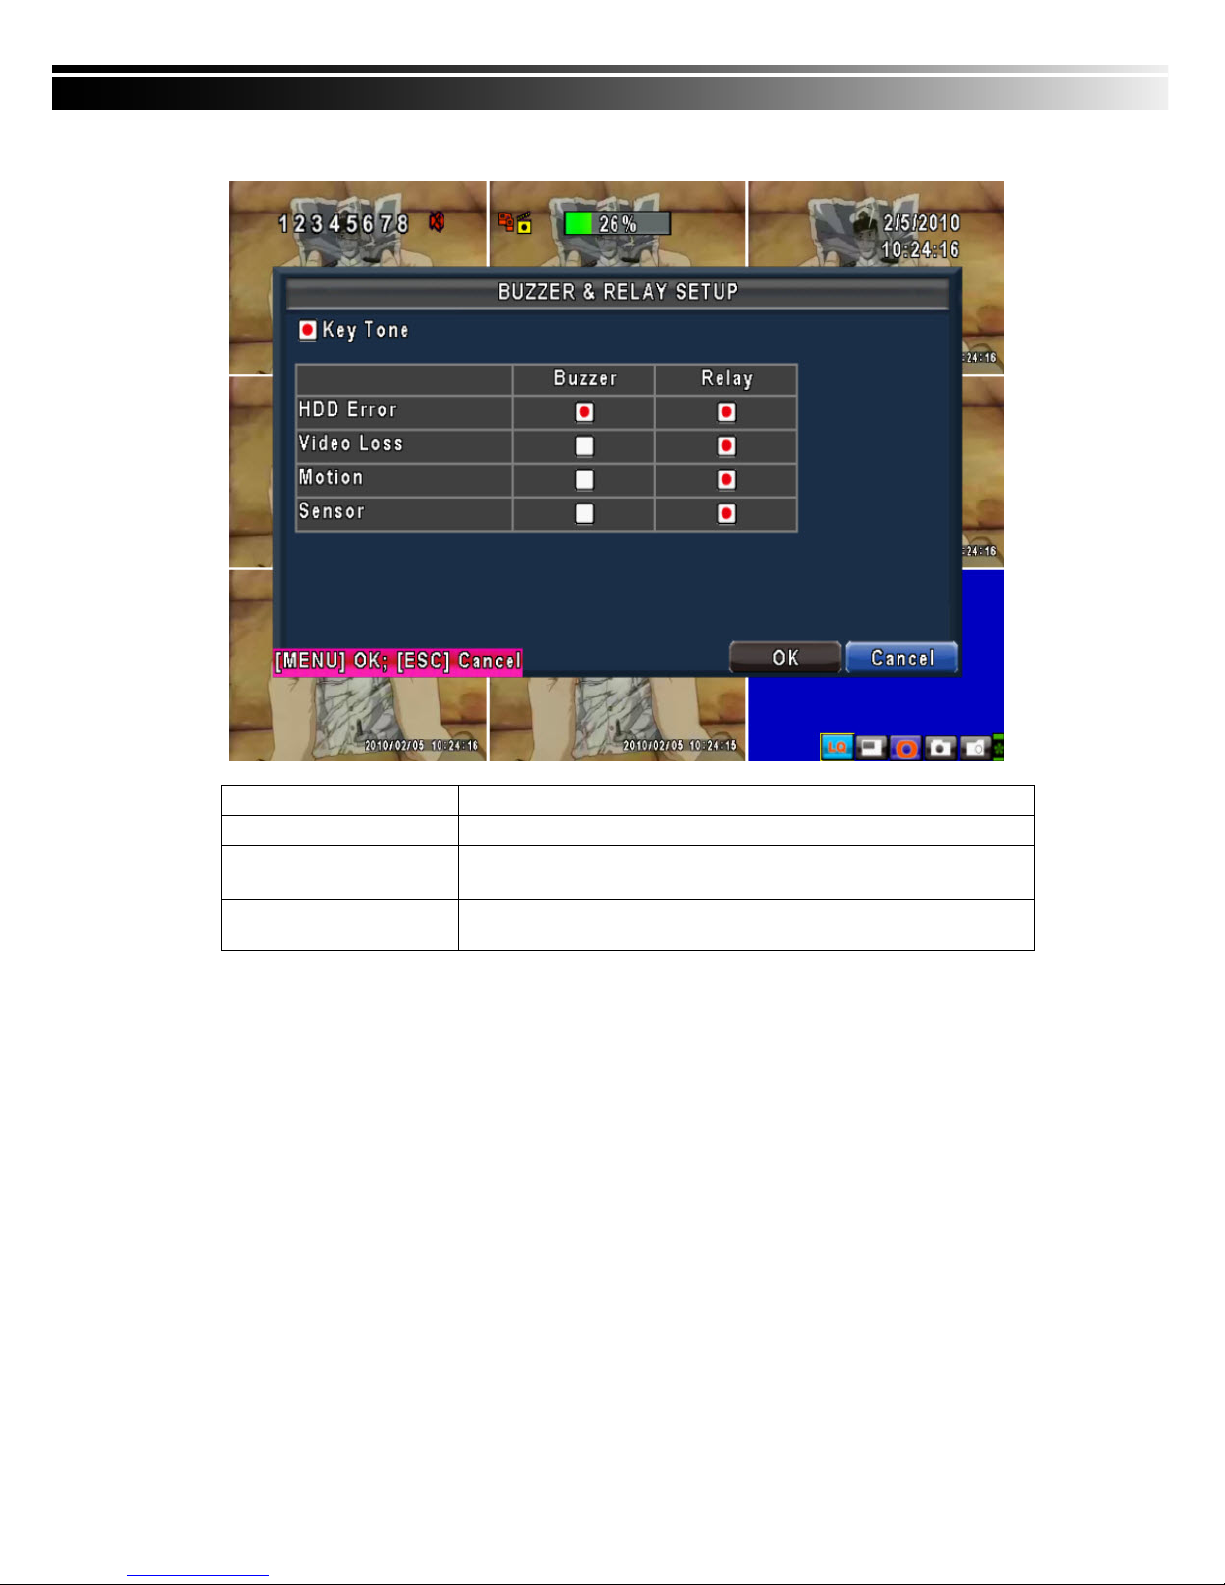
4-8.3 BUZZER & RELAY SETUP
Item Description
Key Tone
Enable/Disable keystrokes.
Buzzer
Enable/Disable buzzer operation when the alarm is triggered for sensor,
motion and vloss (Video Loss).
Relay
Enable/Disable the signal to be sent to the RELAY OUT blocks when the
alarm is triggered for sensor, motion and vloss.
Page 43
43
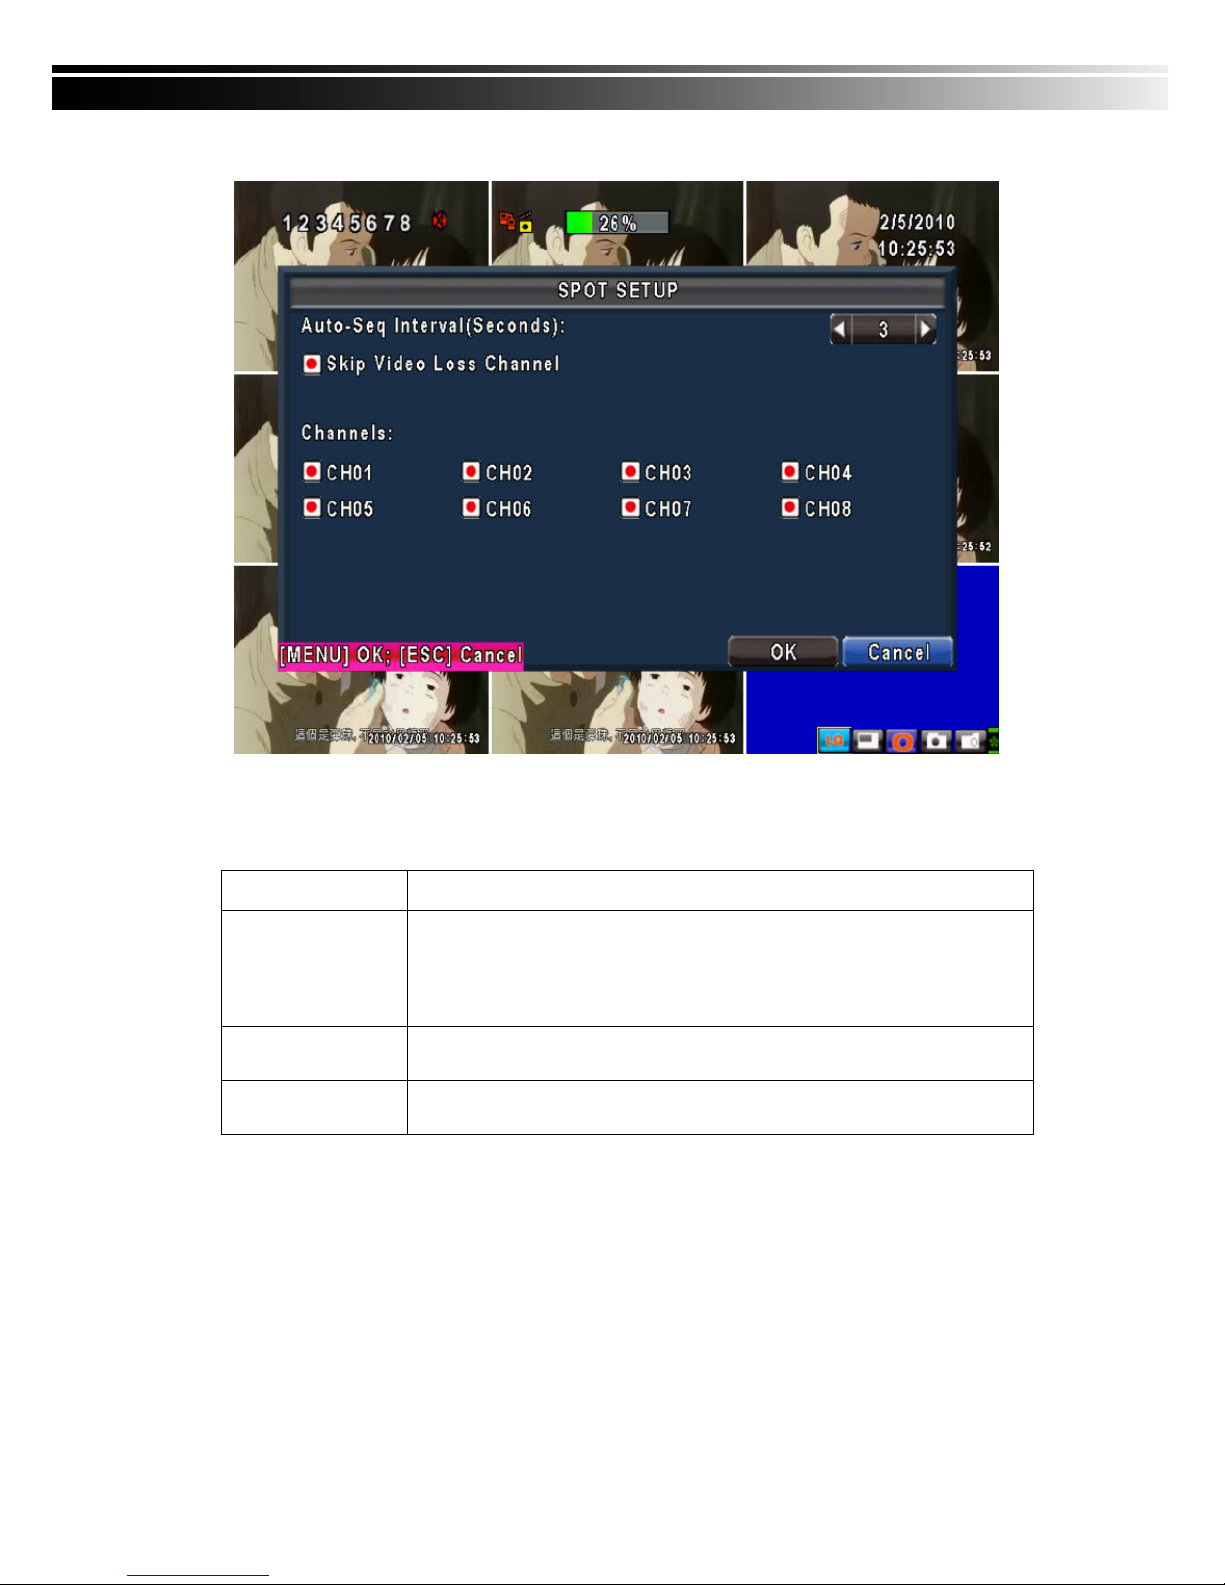
4-8.4 SPOT SETUP
The DVR has two modes of video output; one is main video output, the other is spot video output. SPOT
setup is for controlling the order of channels the system cycles through in SPOT mode. User can monitor
every channel in the SPOT mode.
Item Description
SPOT MODE
Channels display in spot for three different modes:
MANUAL: select channels to display manually.
SEQUENCE: Auto-sequence for all channels in order.
EVENT: Display channels with event occurred.
Interval (Seconds)
The duration time in seconds for the interval between channels under SPOT
mode.
Skip Video Loss
Channel
Whether to skip channels without video signal.
Page 44
44
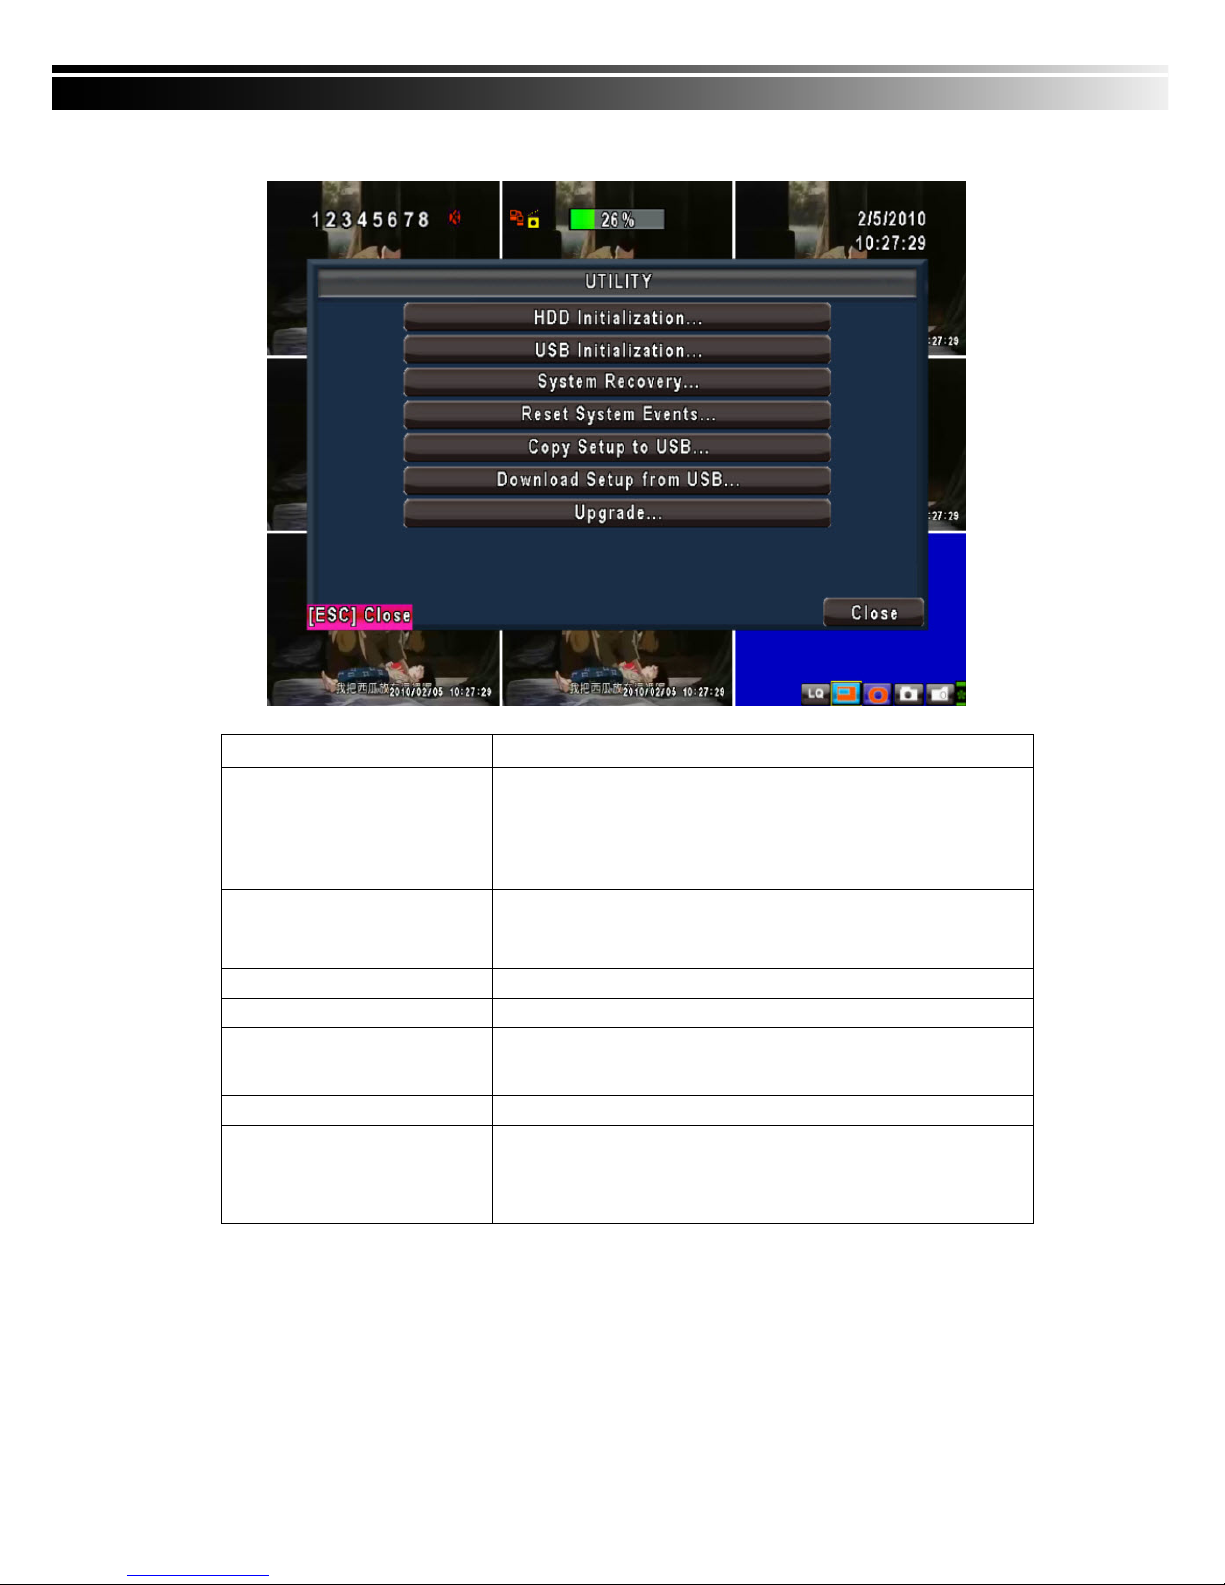
4-9 UTILITY SETUP
Item Description
HDD Initialization
Select to enter hard disk initialization menu. Please stop recording
before entering this menu. Enter the menu, system will show all the
data (model ,volume ) of HDD that installed in DVR. Check the HDD
you’d like to initialize then press “Start”. HDD initialization is
successful when the status shows “Succeed”
USB Initialization
Clean up all data on USB. Enter USB initialization and press YES to
clean up all data on your USB. The initialization is done when it’s
showed “Succeed”.
System Recovery
Restore system default values
Reset System Events
Reset all the recording events in DVR.
Copy Setup to USB
Copy configuration to a USB device. There will be a file named
“sdvr.config” on your USB.
Download Setup from USB
Download configuration from a USB device into DVR.
Upgrade
Upgrade DVR through USB.
Please stop recording and backup setup configuration before
upgrading.
System will reboot automatically when the upgrade is completed.
Notice! DO NOT TURN OFF POWER OR UNPLUG USB DEVICE DURING THE UPGRADE
as it may cause incomplete firmware upgrade and damage to the DVR.
Page 45
45
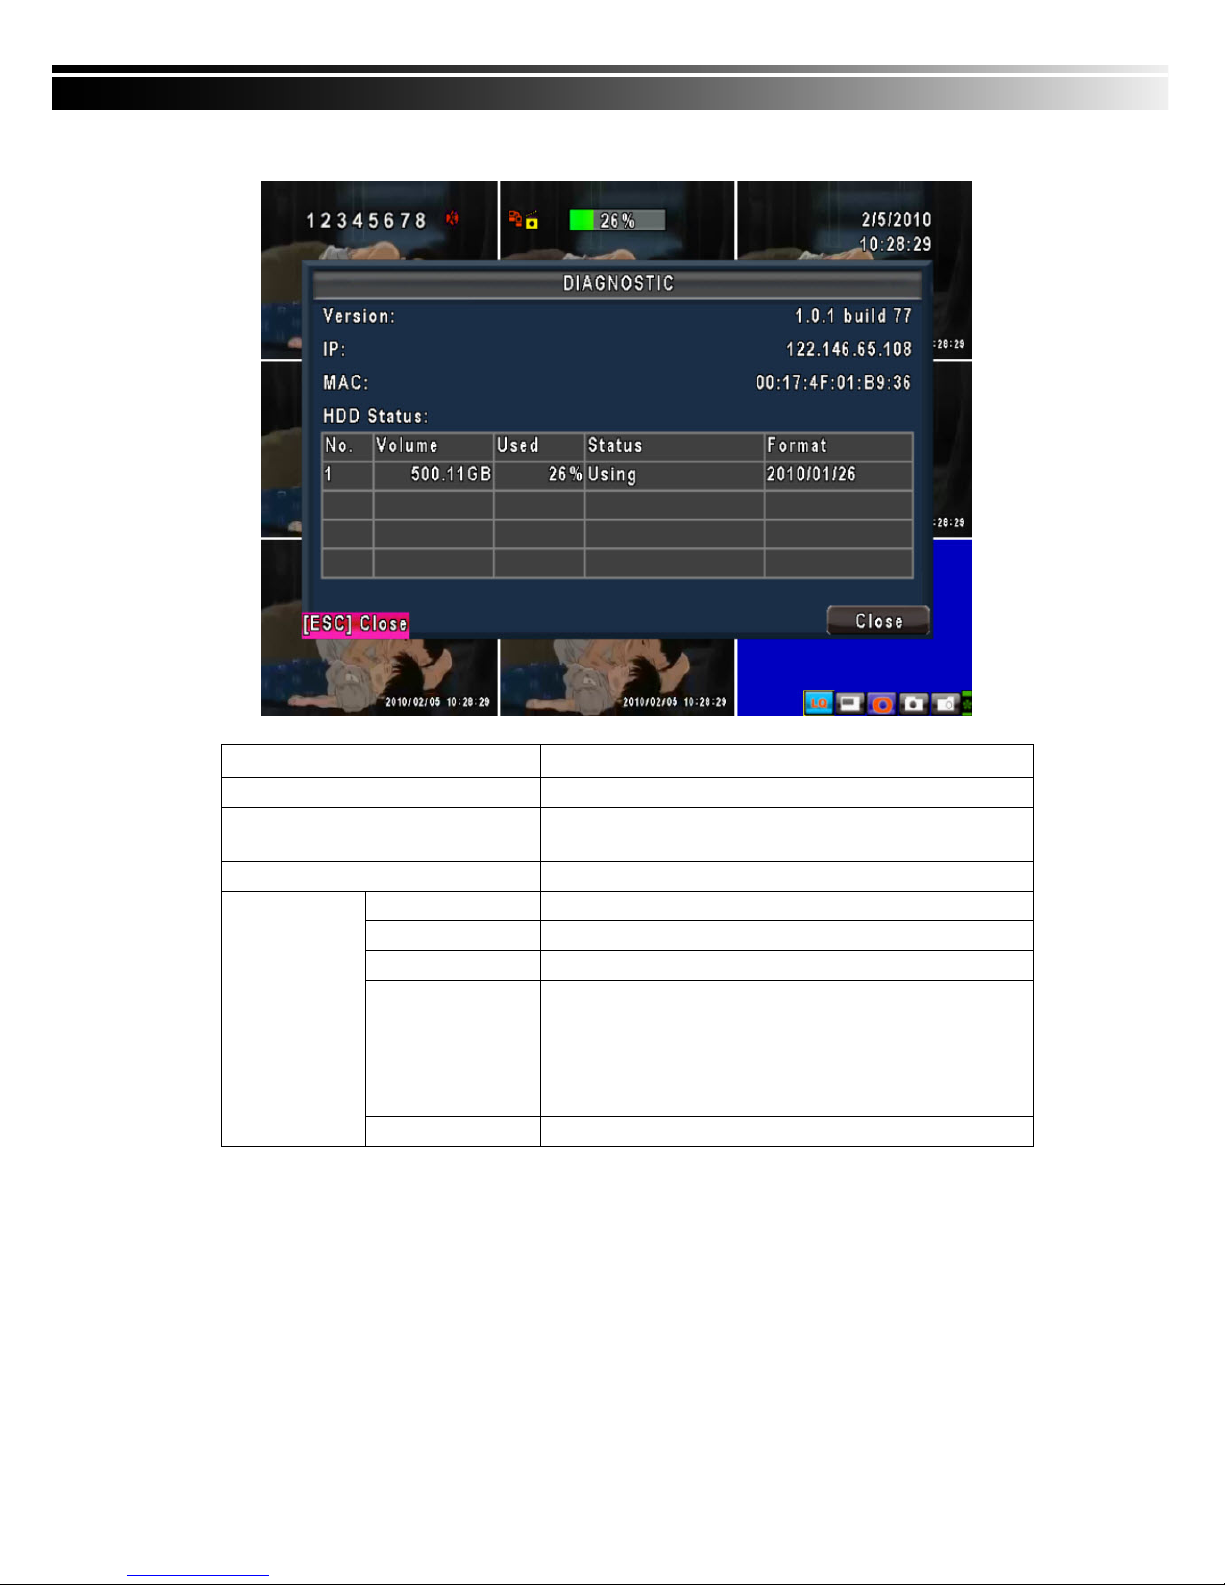
4-10 DIAGNOSTIC
Item Description
Version
The current firmware version of DVR
IP
The connected IP address of DVR. If disconnected from
network, the screen will display” NETWORK DISCONNECT”.
MAC
MAC Address of DVR
No.
HDD number
Volume
HDD Capacity
Used Rate
Percentage of space used on HDD.
Status
Shows HDD status.
USING means the HDD is being used for recording now
GOOD/BAD means the HDD has a known/unknown format for
the DVR. (Note: Please initialize your newly-installed HDD
before using it.)
HDD Status
Format Time
The latest format time of HDD
Page 46
46
CHAPTER 5 BACKUP & SEARCH
5-1 BACKUP SETUP
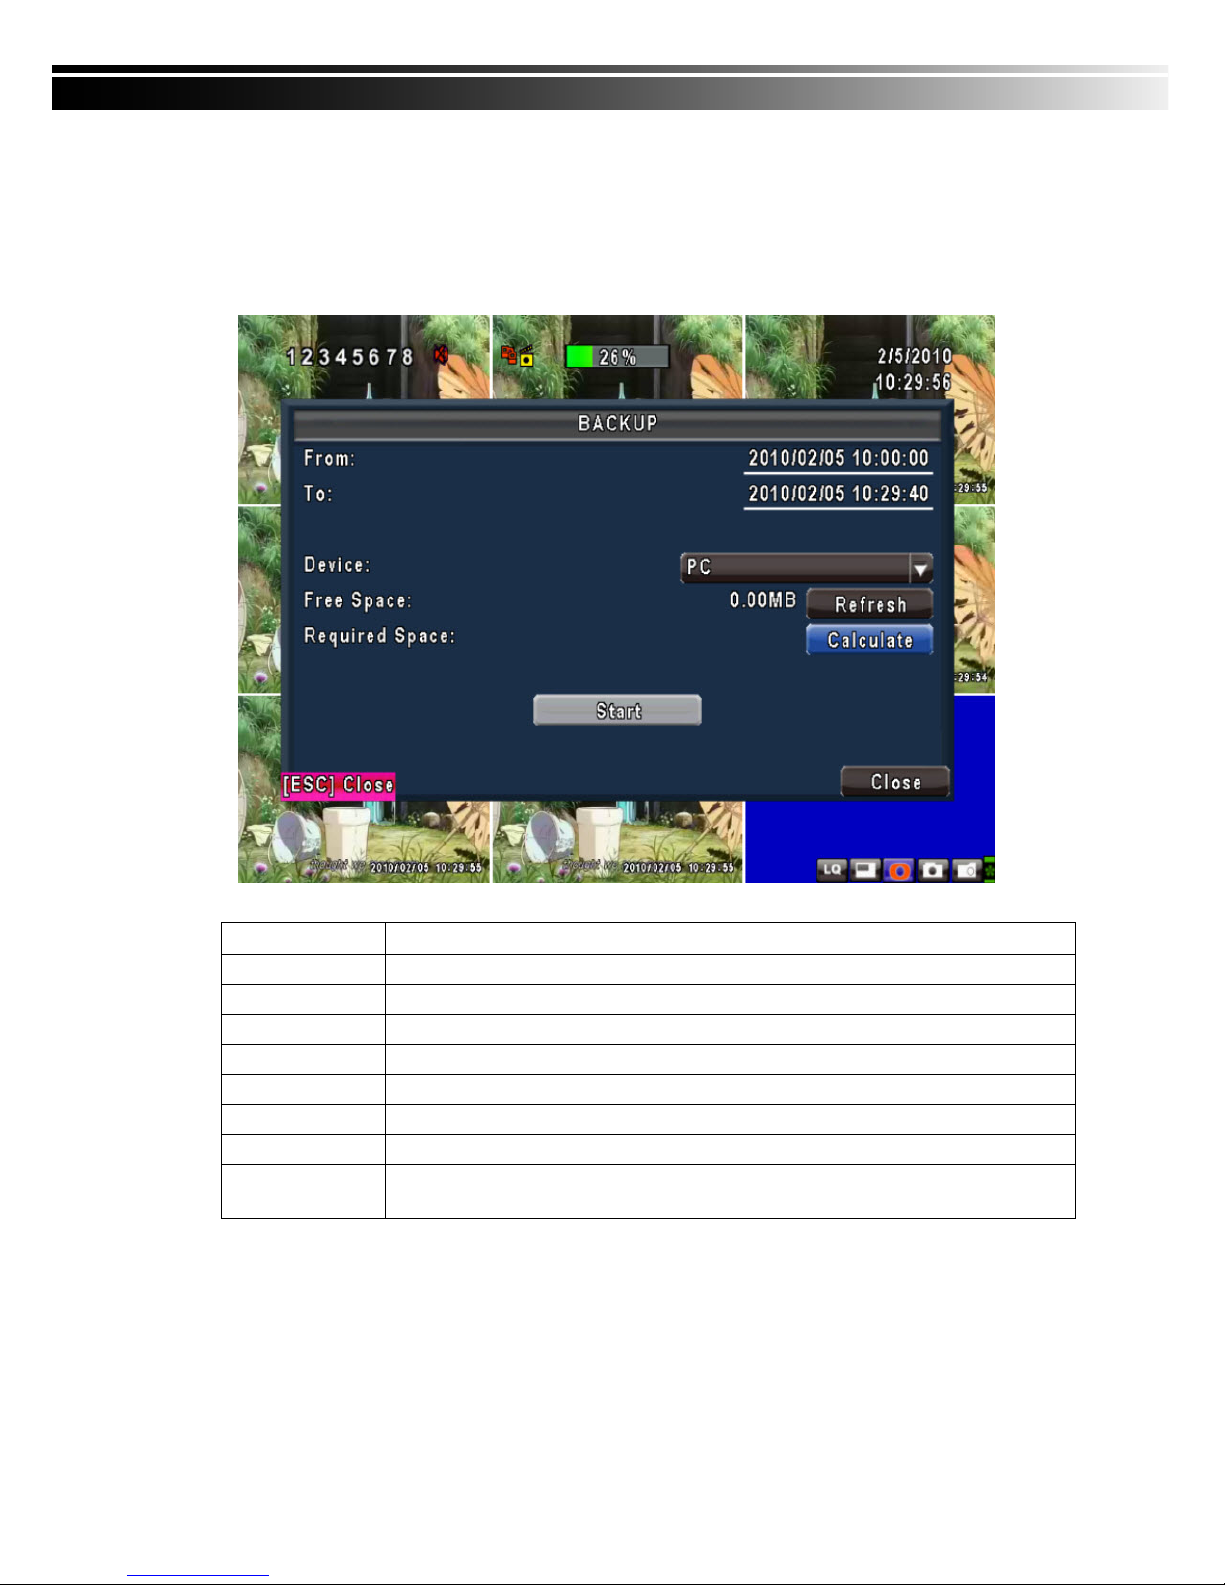
User can backup any segment of recorded data in a specified time frame. To do so, either a CD R/W or
storage device, like USB, must be connected to the DVR. Recorded data can also backup into NB/PC
through our remote access software: 「DVRemoteDesktop.exe」 and be saved in your assigned path. The
format of backup file is IRF file that can be played by both “DVRemoteDesktop.exe” and “CMS”
Item Description
From
The start time of backup file
To
The end time of backup file
Device
Select USB, CD/RW or PC as the backup device
Free Space
The available space in your backup device. (not available for PC backup)
Refresh
Recalculate the available space of backup device. (not available for PC backup)
Required Space
Show the size of the backup file
Calculate
Calculate the size of backup file
Start
Start backup operation. Be sure to calculate the size of backup file BEFORE
operating backup.
Note! Do not unplug the USB device or turn off the DVR during the backup process to avoid
unrecoverable error.
Page 47
47
5-2 SEARCH SETUP
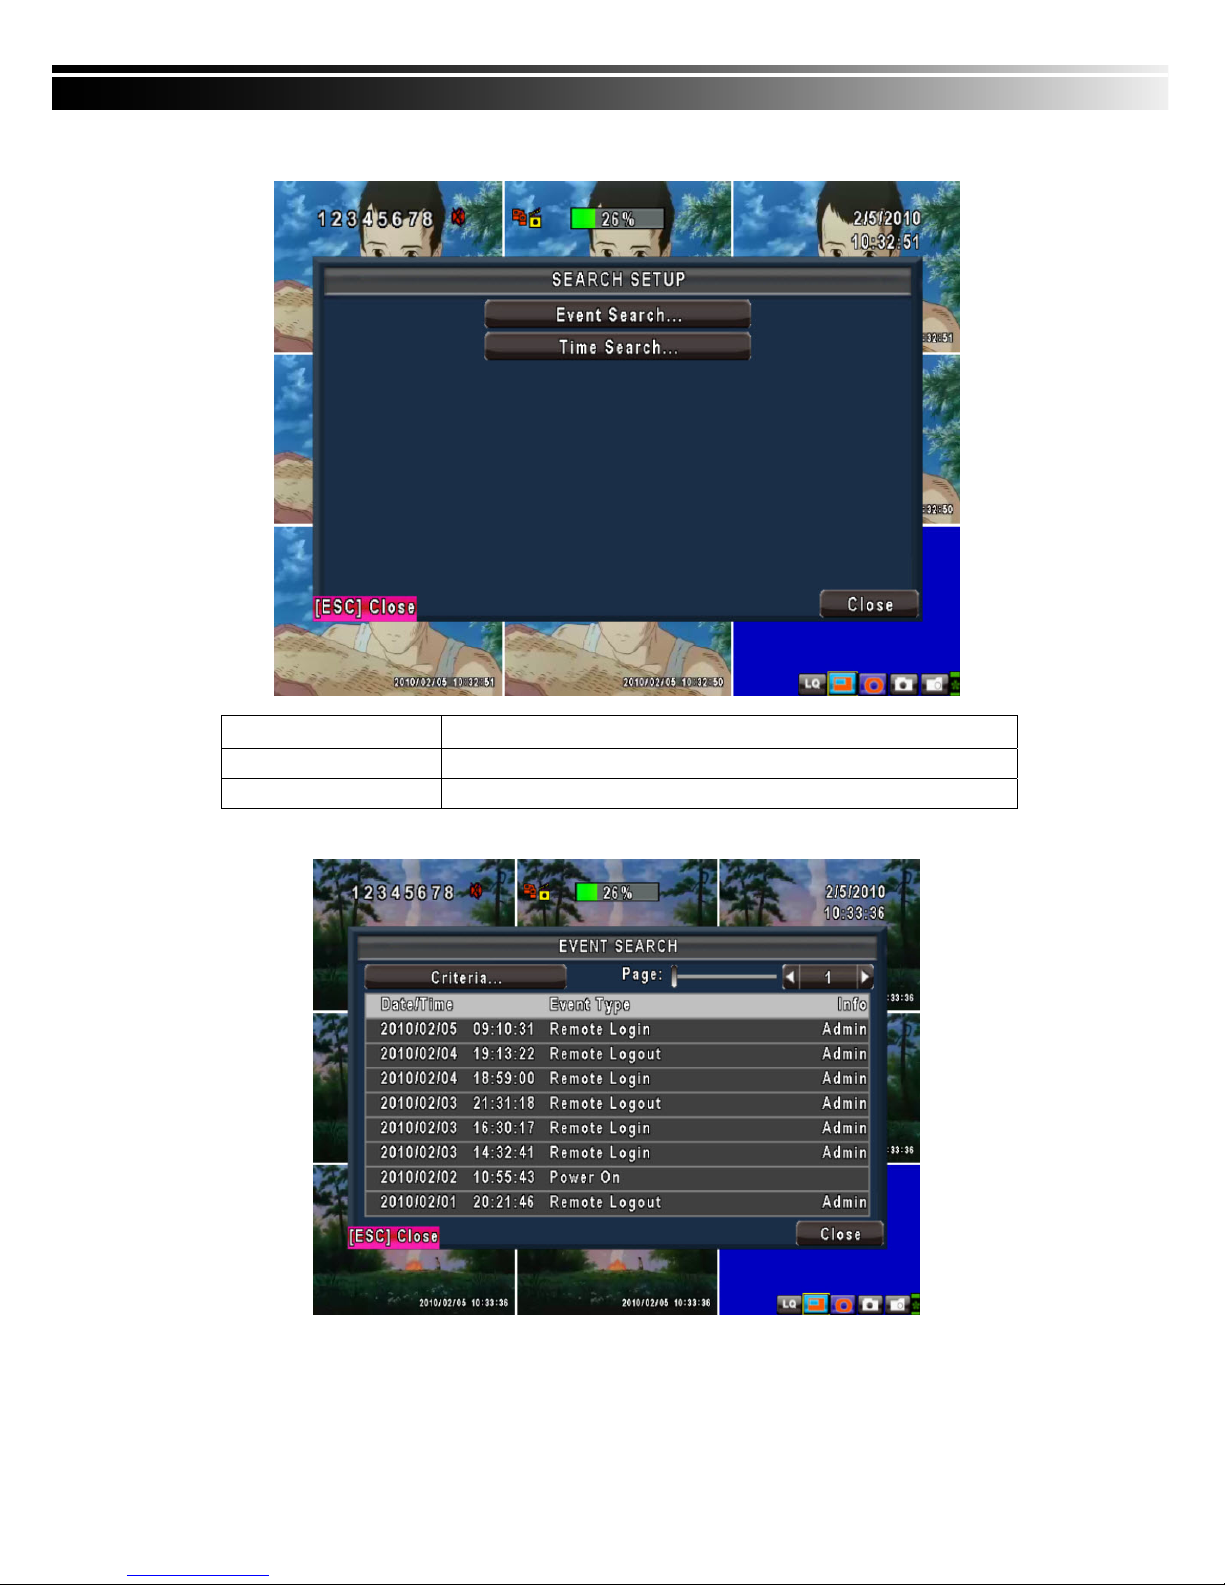
Item Description
Event Search
Event search menu
Time Search
Enter time search menu
5-2.1 EVENT SEARCH
The DVR automatically records events with type, time and channel information included.
P.S. Event Records will still be generated even when hard disk is not installed or the record function is not
activated. However, the record can’t be viewed after selecting it.
Page 48
48
Item Description
Criteria
Setup conditions of event search
Page
Switch between pages of events
Date/Time
Date/time when event occurred.
Event type, defined as following
VLOSS
Video Loss
MOTION
Motion Detected
SENSOR
Sensor Detected
REMOTEIN
user log-in over the network
REMOTEOUT
user log-out over the network
POWER ON
System Reboot
KEY LOCK
System key locked
KEY UNLOCK
System key unlocked
Event Type
System Errors
Other error message
Info
The channel where event occurs or login user
5-2.1.1 CRITERIA SETUP FOR EVENT SEARCH
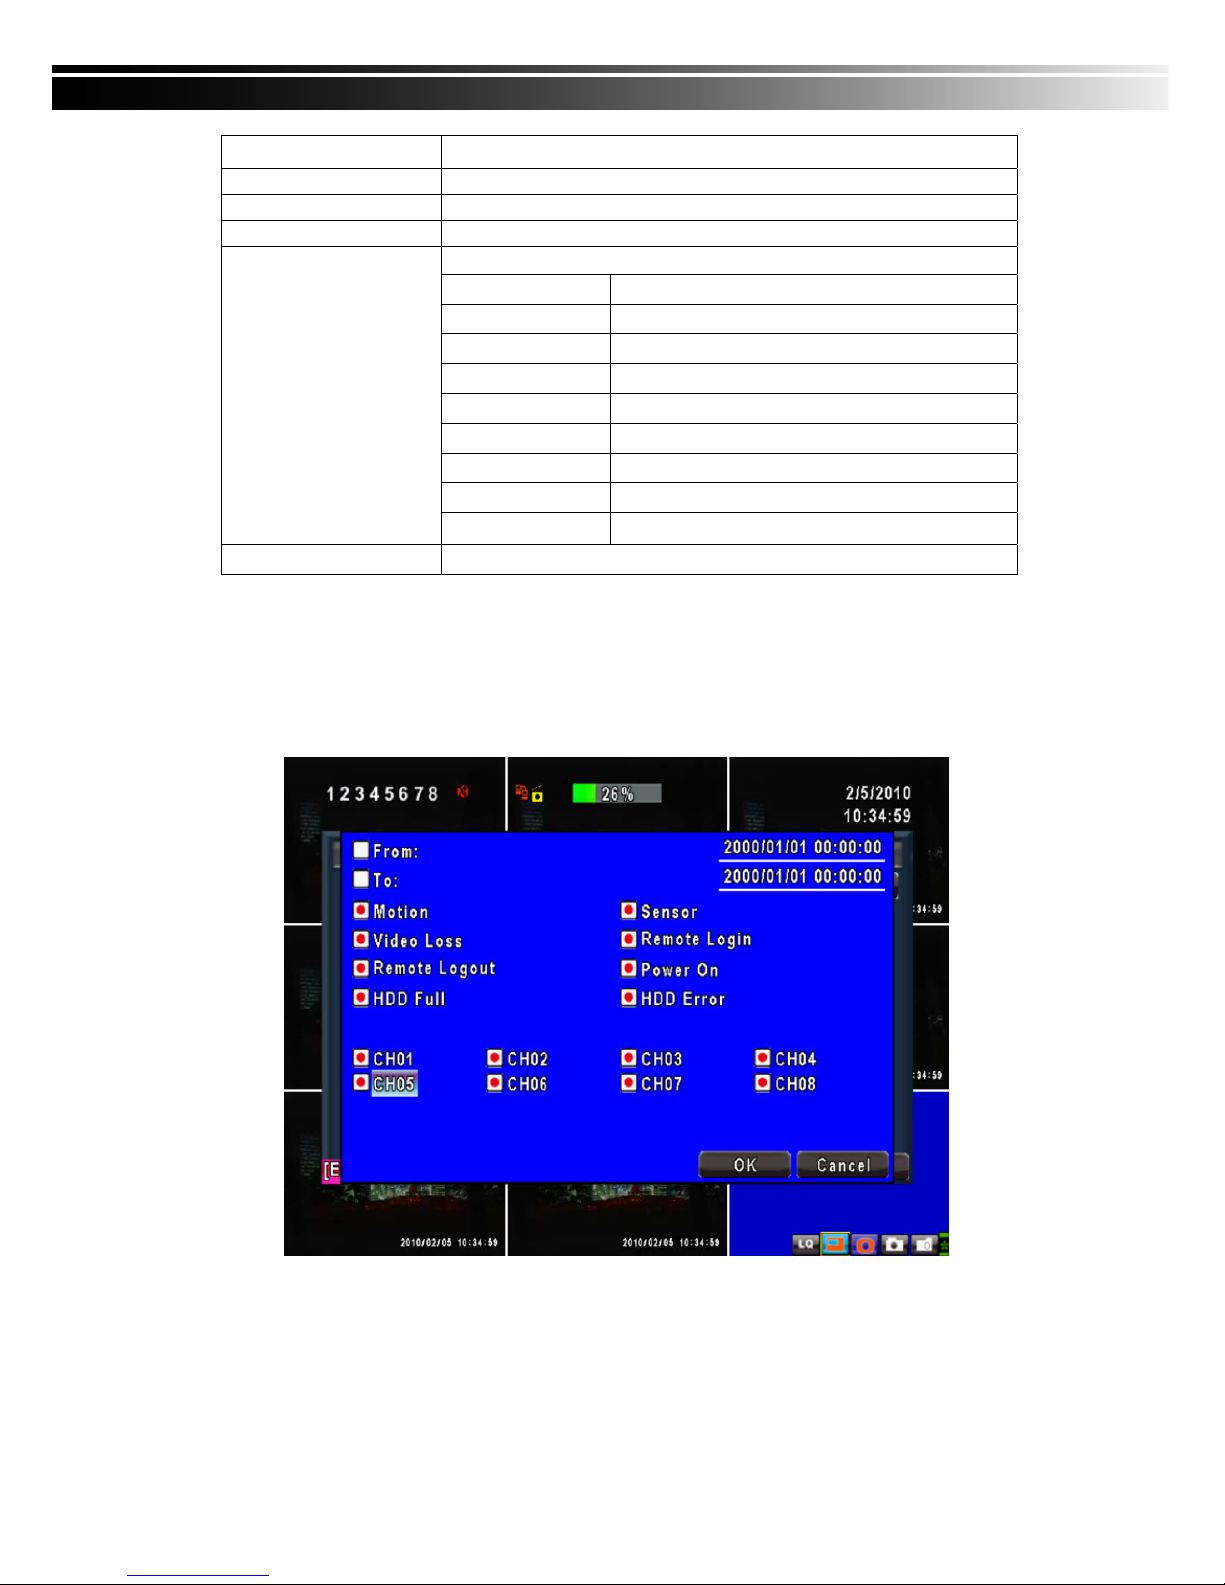
The amount of events can be numerous. Therefore, you can facilitate event sorting by setting up “criteria”.
Setup “start time” and “end time” for event search, then the search result will be limited to this specific
period of time. Only checked events and channels will be sorted in event search.
Note:4CH DVR will display 4 channels and 8CH DVR will display 8 channels.
Page 49
49
5-2.2 TIME SEARCH
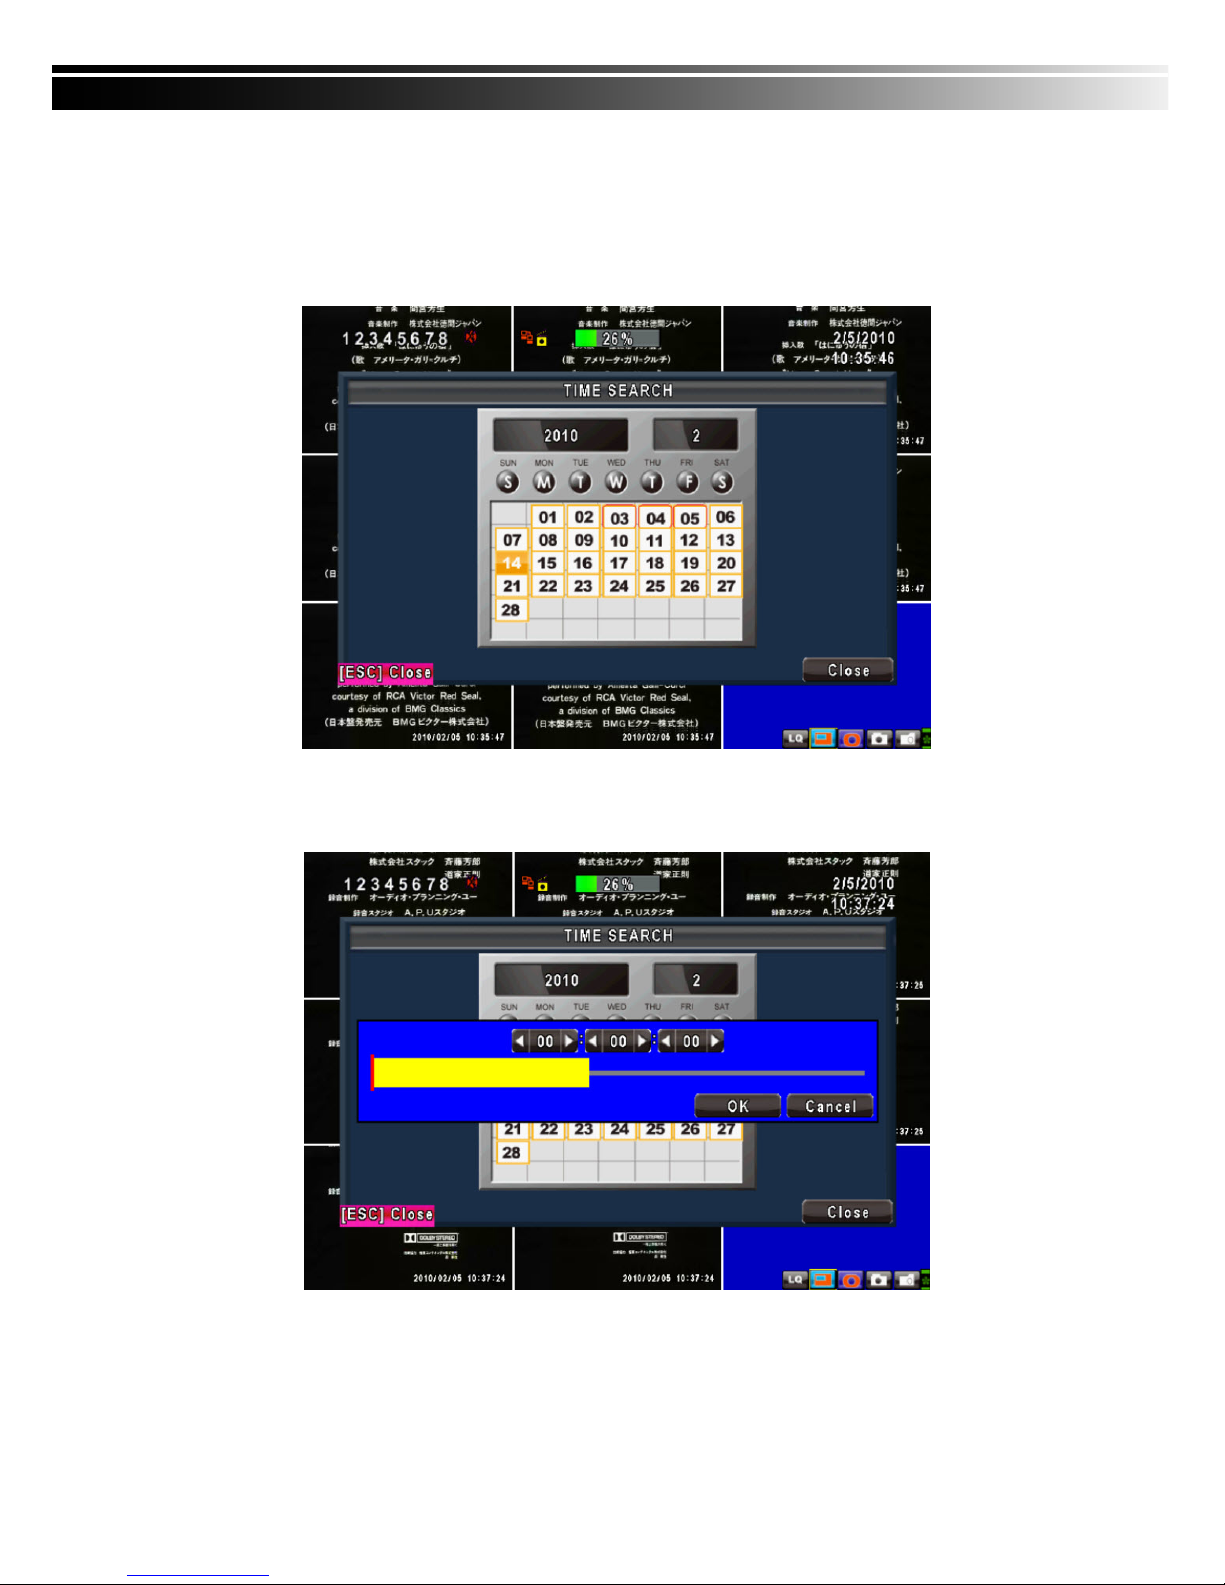
TIME SEARCH can search for the specific time of recording data to playback. Press “Enter” or left click on
the desired date to playback. Note that dates with recording data are marked with a red square “ □
“System will start playing back according to the date you selected. Calendar will be shown by using mouse
to click on “year” and “month”.
Click “date” to display recording time of that specific date with time bar. You can change time
(hour/minute/second) or click on a specific time of time bar by mouse then press “OK”. DVR will playback
the selected recording data.
AP software:「DVR Remote Desktop」can allow you to remotely access and control the DVR from PC.
Page 50
50
5-3 AP Software Installation and Setup
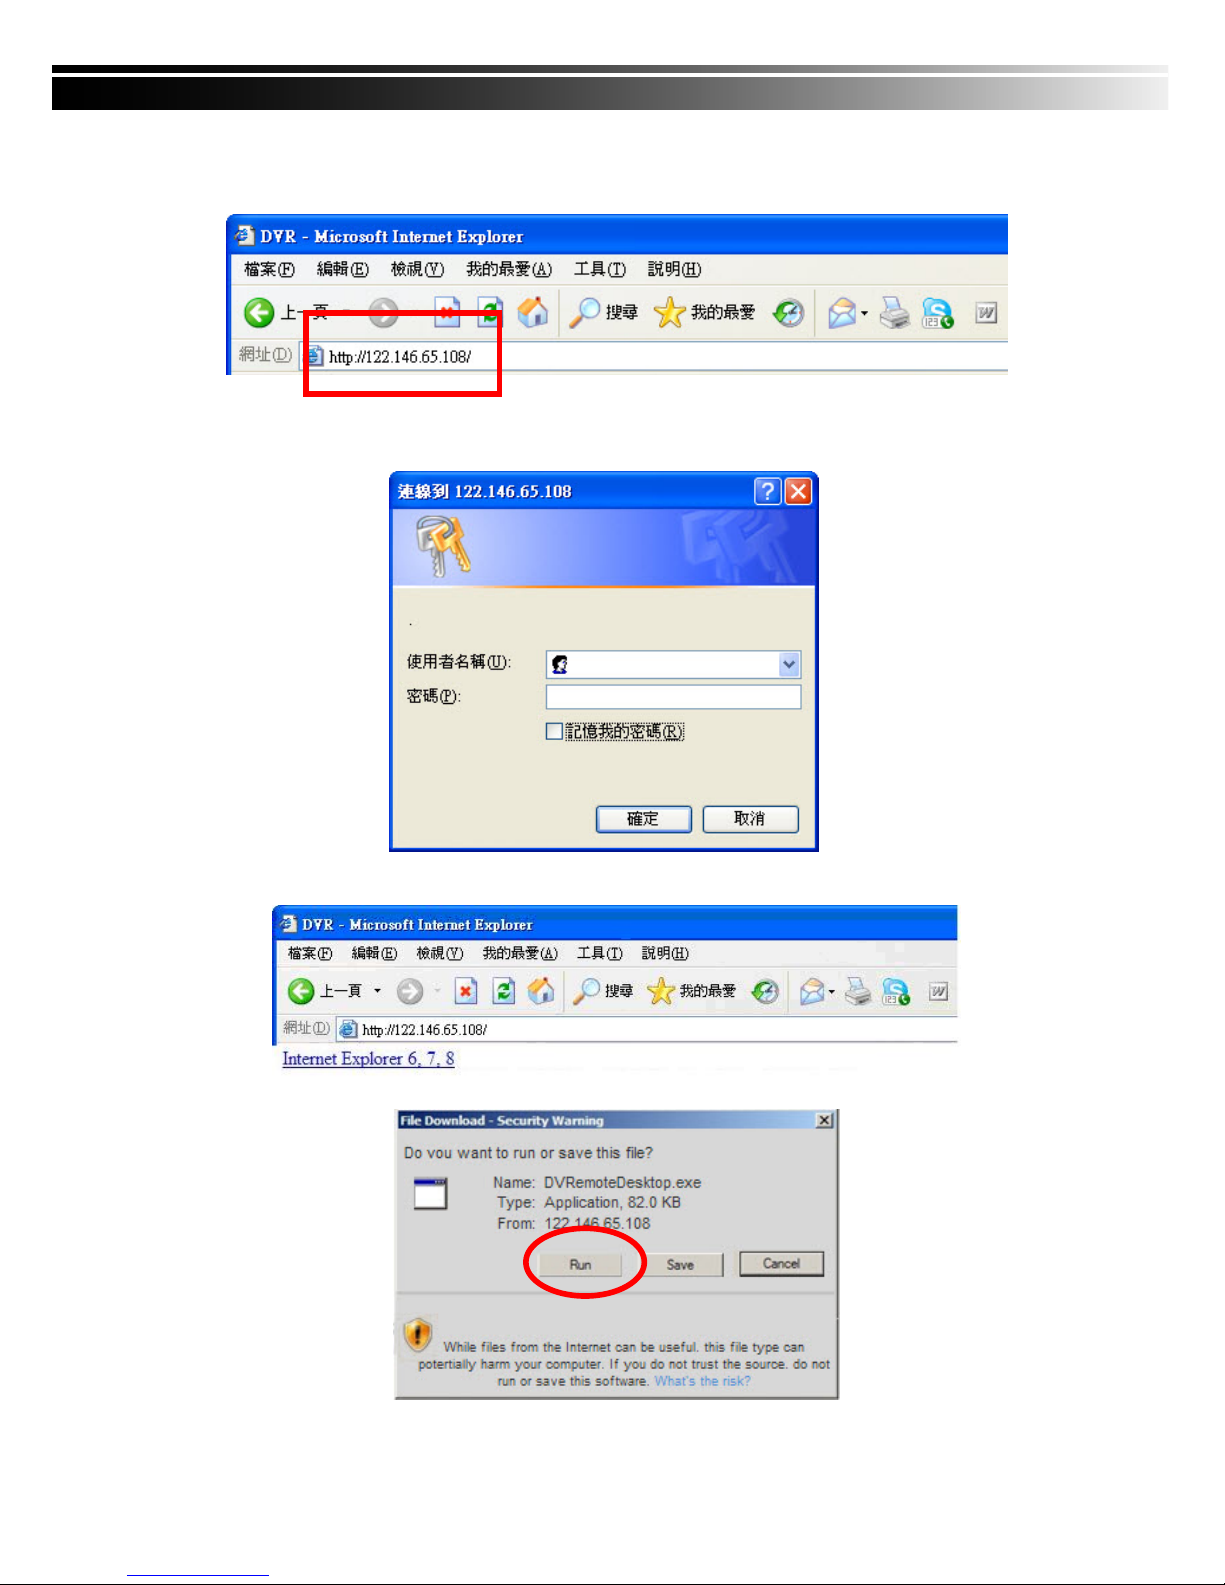
Step One:Enter the IP address of DVR in IE browser
Step Two: Windows as below will show up. Please enter the user name and password. Default user name
and password is admin/123456. Other related setup about user account and password, please
check “4-5 Account Setup. “
Step Three: Click on the link to start downloading the AP software.
Step Four: Run or Save our AP software.
Page 51
51
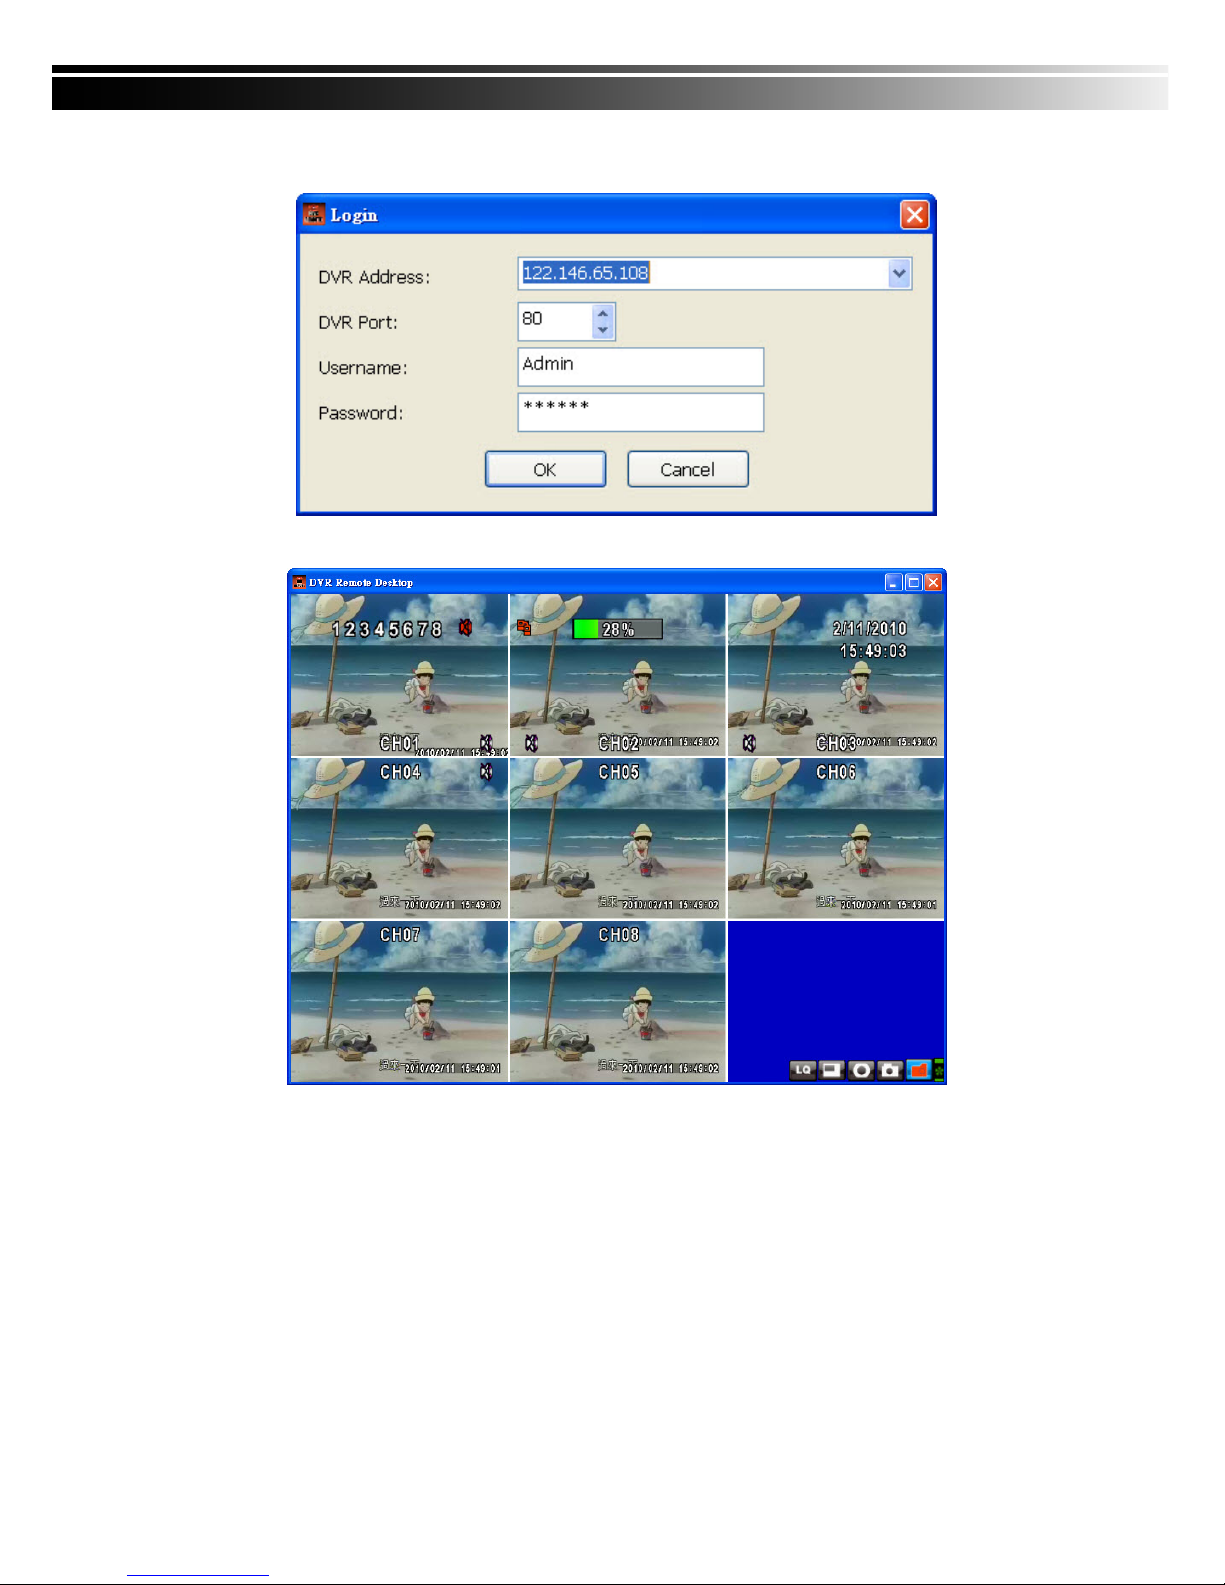
Step Five: If you choose to run the software, Start window will be shown up. Please enter information of
login DVR: IP, Port, Username and Password, or choose “Play Recorded File” to open backup
files in your PC.
Step Six: You’ve logged into the DVR
Note
:
4CH DVR will display 4 channels and 8CH DVR will display 8 channels.
5-4 AP Software Operation
Open the file “DVRemoteDesktop.exe”; enter the information of DVR “IP address”, “Port” “Username”
and “Password” and click “OK”. You should be able to login DVR successfully and start to use the software.
The default username and password is 「admin/ 123456」
“DVRemoteDesktop.exe” AP software provides some extra functions for remote users. Please check
Table 6-2.1 for detail information and Table 6-2.2 for minimum system requirements for
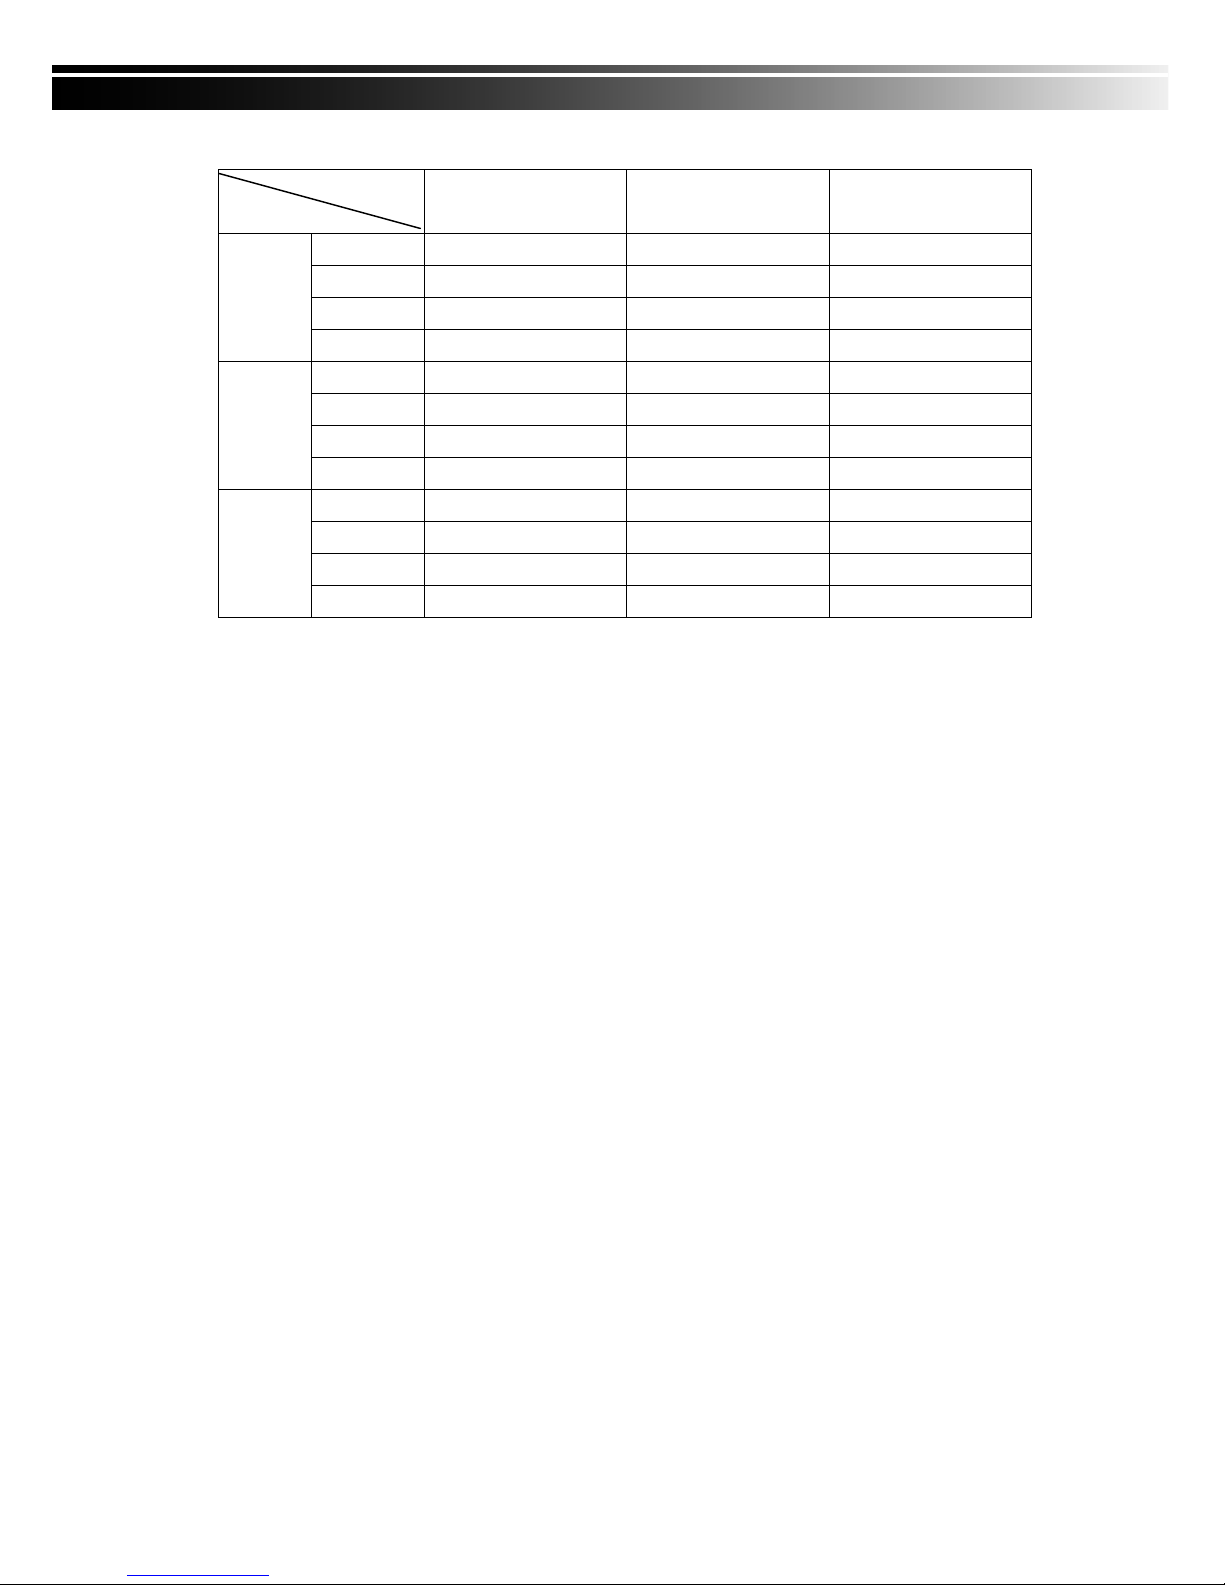
“DVRemoteDesktop.exe” operation. Table 6-2.3 is corresponding to Ethernet cable bandwidth. Please
take this table for future references when applying for Internet bandwidth or connecting to Internet.
Page 52

52
Table 5-4.1 Toolbar of AP software
File - Record to Local Record data to your PC, including LIVE and Playback.
File - Play Recorded Files Play recorded files “.irf”
File - Exit
/ Alt + F4
Close the AP software.
Edit - Channel Name
/ F2
Edit channel name of your DVR including font, size italic, and boldface
of characters. .
Edit - Reset Channel Name Reset channel name back to default.
View - Hide Caption & Menu
/ F9
Hide the Caption and Menu
View - Disable resizing
/ F10
Disable the function of resizing window.
View - Full screen
/ F11
Switch it to full screen
View- Render Filter Unable/ Disable the Bilinear function
View- Play All Frames
Unable this function will stop the audio transmission in order to
improve the playback speed quality.
View- Language Switch between languages for toolbar
Help – About Show information about software and information
Table 5-4.2 System Requirements for AP software
CPU Intel Pentium 4 above
OS
Microsoft Windows Vista、Windows XP SP2 above
RAM 512M above
VGA Card Needed to support DirectX9.0 (Above) Note 1
Others DirectX 9.0 above
Note 1:
Known VGA card that support DirectX9.0 currently:
NVIDIA: Geforce FXseries, Geforce 6series, Geforce 7series, Geforce 8series, Geforce 9series,
Geforce 200series, etc.
Or visit:
http://en.wikipedia.org/wiki/Comparison_of_Nvidia_graphics_processing_units
ATI : Radeon R300series, Radeon R400series, Radeon R500series, Radeon R600series, Radeon
R700series, Radeon HD 3xxx IGPseries, Mobility Radeonseries (9500 above), Mobility
Radeon Xseries, Mobility Radeon HDseries, or FireGL Vseries etc.
Or visit:
http://en.wikipedia.org/wiki/Comparison_of_ATI_graphics_processing_units
SiS: SiS 67Xseries, or SiS 77Xseries etc.
Or visit:
http://www.sis.com/support/support_compare.htm
Intel: 91Xseries, 94Xseries, 96Xseries, G3Xseries, or G4Xseries, etc.
Or visit:
http://en.wikipedia.org/wiki/Intel_GMA
Page 53
53
Table 5-4.3 Network Bandwidth Requirement Reference
Highest Normal Lowest
16CH 6.9~7.9Mfps 3.7~5.8Mfps 1.2~2.4Mfps
9CH 6.5~8.2Mfps 3.6~5.8Mfps 1~2.6Mfps
4CH 6.6~8Mfps 3.8~6Mfps 1.4~3Mfps
D1
1CH 6.2~7.6Mfps 3.6~5.7Mfps 1.2~2.5Mfps
16CH 3.6~5.4Mfps 1.9~3.5Mfps 890K~1.7Mfps
9CH 3.3~5.6Mfps 1.8~3.7Mfps 900K~1.6Mfps
4CH 3.4~5.1Mfps 1.8~3.8Mfps 850K~1.8Mfps
HD1
1CH 3.7~6Mfps 1.6~4Mfps 870K~1.8Mfps
16CH 1.8~3Mfps 1.2~2.2Mfps 860~1.3Mfps
9CH 1.9~2.9Mfps 1.2~2.5Mfps 750~1.2Mfps
4CH 1.6~2.5Mfps 1.1~2.4Mfps 700~1.3Mfps
CIF
1CH 1.8~2.9Mfps 1.4~2.6Mfps 720K~1.1Mfps
Resolution
Quality
Page 54
54
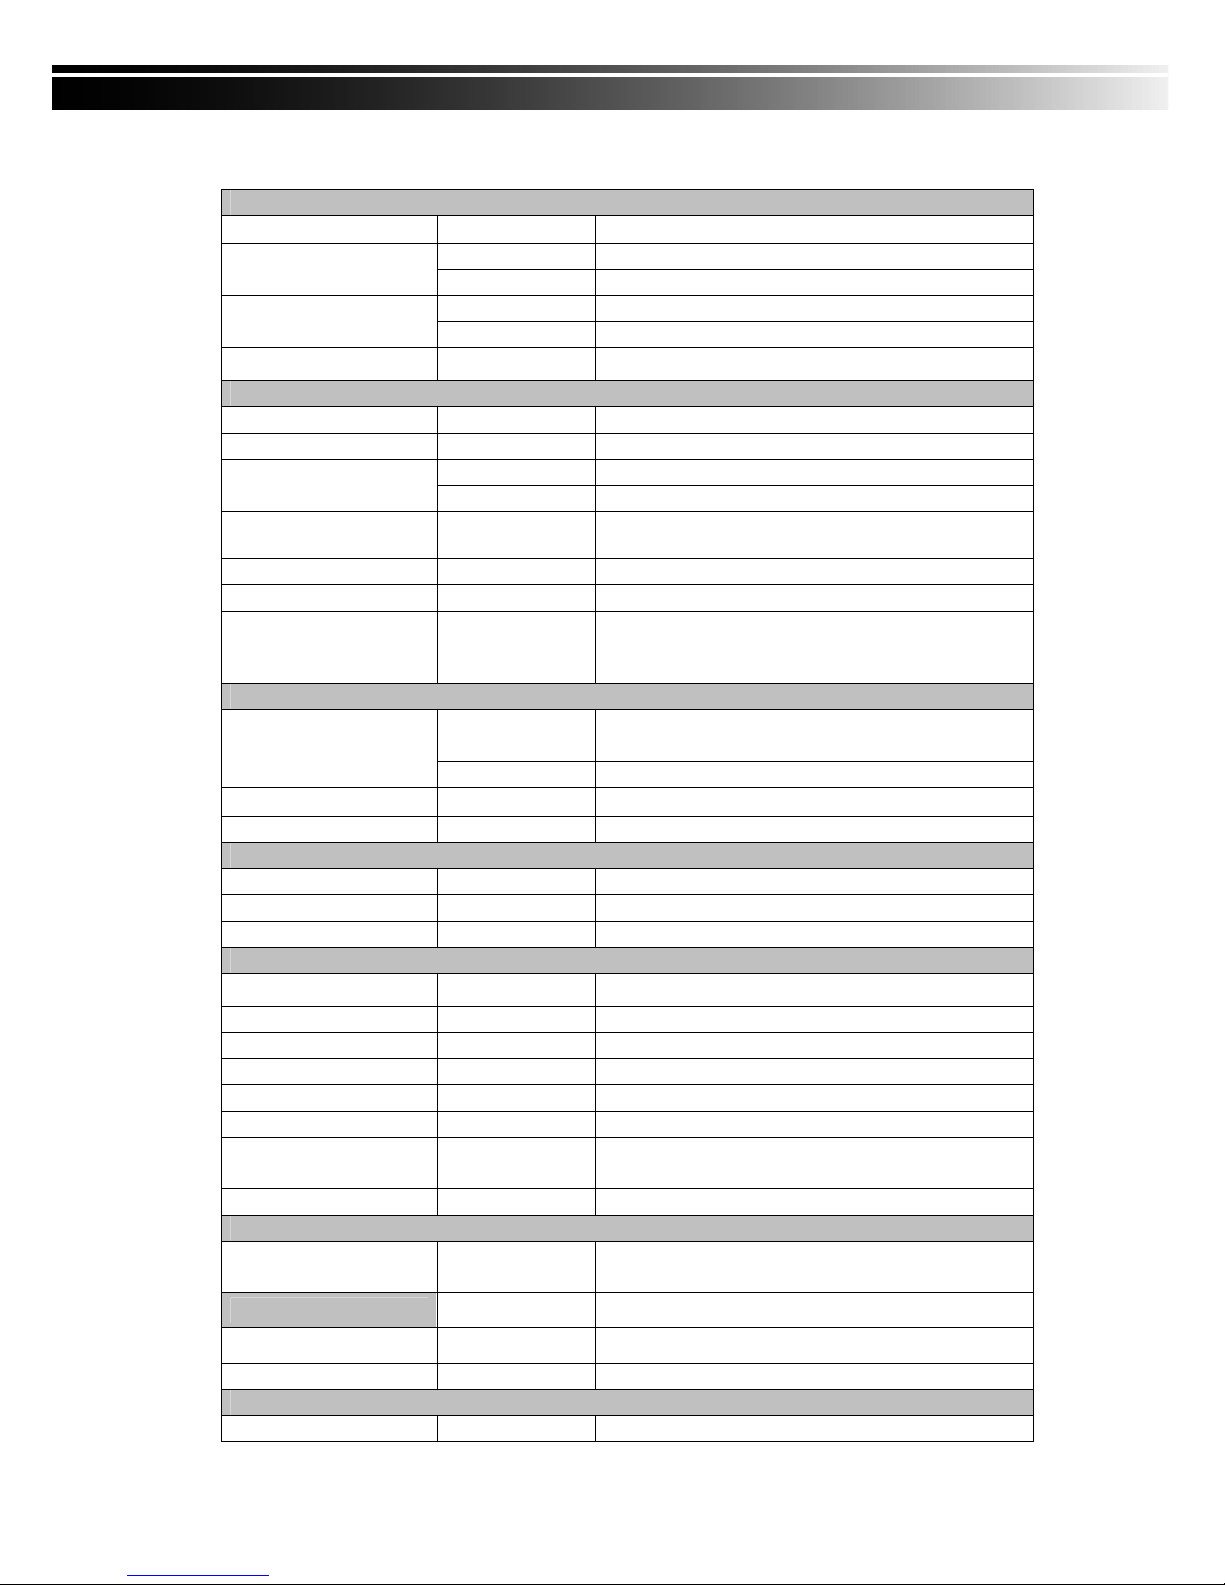
CHAPTER 6 SPECIFICAITONS
1. VIDEO
Input Level
1.0 Vp-p±10% Composite, 75Ω Balanced
NTSC 480 fps(16CH), 240fps(8CH), 120fps(4CH)
Display Speed
PAL 400 fps(16CH), 200fps(8CH) , 100fps(4CH)
NTSC 720(H) X 480(V)
Display Resolution
PAL 720(H) X 576(V)
Monitor Output
2Vp-p Composite, 75Ω Balanced
2. RECORDING
Compression Method H.264
Recording Speed Refer to table 7-1
NTSC 720 X 480, 720 X 240, 352 X 240
Recording Resolution
PAL 720 X 576, 720 X 288, 352 X 288
Quality
Independent for
each channel
Lowest/ Low/ Normal/ High/ Highest
Schedule Setup by “minute” as unit
Mode Manual / Event (Motion, Sensor) / Schedule
Method
By resolution, fps and quality
Setup fps and quality separately for normal and event
recording
3. SATA DEVICE
Internal Storage
3 HDDs or 2 HDDs + 1DVD-RW (16 CH)
2 HDDs or 1 HDDs + 1 DVD-RW (4CH/ 8CH)
Capacity
External Storage 1 HDD
Type
SATA / SATAⅡ compatible
External Bay Interface E-SATA
4. ALARM
Sensor Input 16(16CH), 8(8CH), 4(4CH)
Loop Out 1 Relay out
Motion Detection Available per each camera/ Multi-detection level
5. CONNECTIONS
Video Input BNC 16 ports (16CH), 8 ports (8CH), 4 ports (4CH)
Video Output BNC 2 port, VGA 1 port (Optional)
Audio Input RCA 4 CH
Audio Output RCA 1 CH
USB 2.0 USB memory stick, USB Mouse, USB Touch Panel
Remote Remote control, 1-to-8 remote control (optional)
External I/O
1 RS-485, 16(16CH) / 8(8CH) / 4(4CH) sensor input,
1 Relay Output
Ethernet 1 RJ45 connector, 10/100 Mbps
6. ELECTRICAL
Power Source
DC 12V / 6.25A (16CH) ,
DC 12V / 5A (8CH) , DC 12V / 5A (4CH)
7. ENVIRONMENTAL
Operation Temperature
5℃ ~ + 40℃
Humidity Less than 90%
8. PHYSICAL
Dimension 430(W) x 293(D) x 55(H) mm
Page 55
55
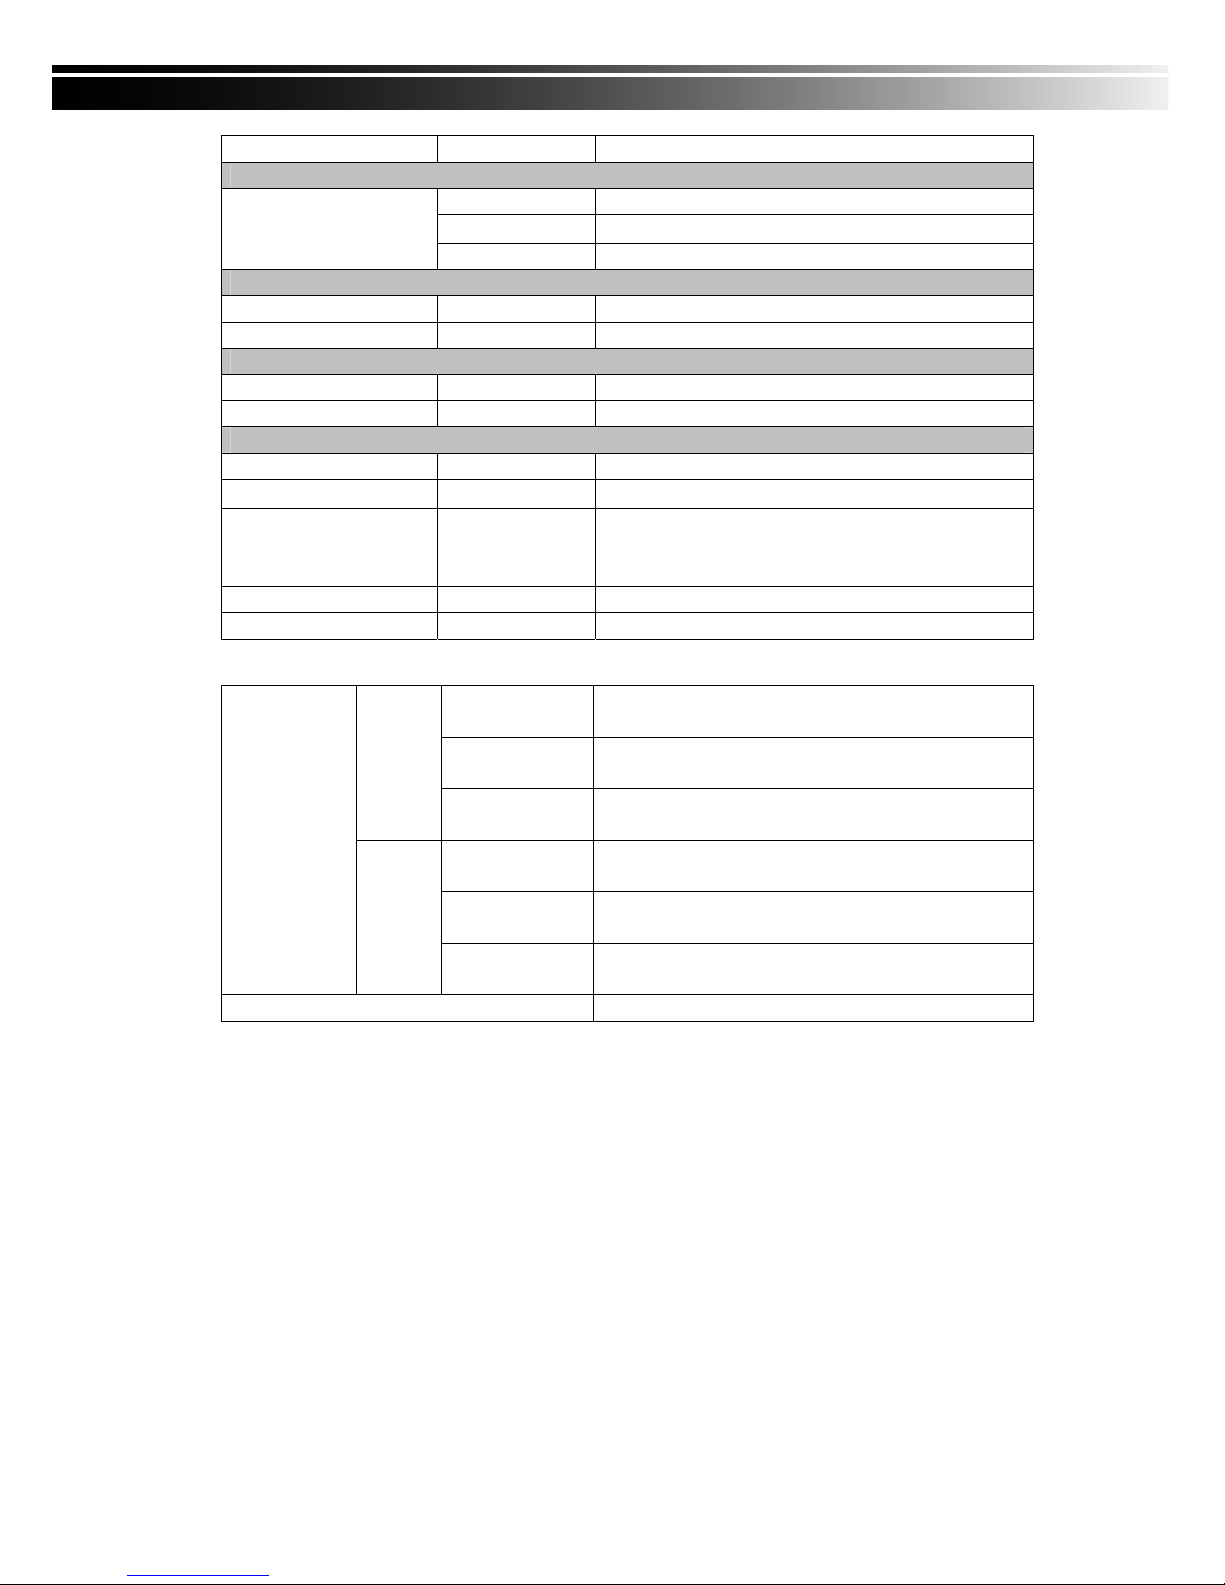
Weight 2.5kg (3.5kg including 1 HDD and CD-RW)
9. BACKUP
USB Stick Video Data, Audio
CD-RW/DVD±RW
Video Data, Audio
BACKUP
Network Video Data, Audio
10. SEARCHING & PLAYBACK
Searching Type Event/ Time
Playback speed 120 FPS
11. MULTI-REMOTE SURVEILLANCE
Monitoring Environment Web / Client Software(CMS)
Max. client Supporting multi-client (5 clients accessible)
12. OTHERS
OS Embedded Linux
Multi Task Pentaplex
Live、Record、Playback、Network、Backup
Control Device
Front Keys / Remote Control / 1-to-8 Remote
Control (Optional)
Virtual Keyboard / Mouse / AP Software
PC Viewer Direct monitoring of DVR’s HDD on PC
Numbers of event list 10240
Table 6-1
352 x 240
240fps / 16CH, 8CH
120fps / 4CH
720 x 240
120fps / 16CH, 8CH
60fps / 4CH
NTSC
720 x 480
60fps / 16CH, 8CH
30fps / 4CH
352 x 288
200fps / 16CH, 8CH
100fps / 4CH
720 x 288
100fps / 16CH, 8CH
50fps / 4CH
Recording
Speed
(Independent
setting for each
channel)
PAL
720 x 576
50fps / 16CH, 8CH
25fps / 4CH
Compression Method H.264
Page 56
56
CHAPTER 7 MOBILE APPLICATION INSTALLATION AND USAGE
You can remotely monitor all channels of DVR through your mobile device. The required mobile
application is from DVR manufacturer and it supports mobile OS for both Windows mobile 5.0 above and
Symbian.
Please confirm network function of DVR has been activated before mobile connection:
Main menu Æ Network Setup Æ HTTP Setup Æ Check the “Enable HTTP Server”
7-1 Mobile Application Installation and Operation for Symbian System.
Mobile Device:
Nokia, SonyEricsson…etc.
System requirement:
GPRS/ 3G must be provided from your telecom service.
Mobile device that supports GPRS/ 3G protocol and Java cldc1.0/midp 2.0 environment
*Please download both” DVRH264.jar” and “DVRH264.jad” to operate the function. Note tha
t users with Sony Ericsson will only need to download “DVRH264.jar.”
7-1.1 Mobile Application Installation
Please follow the steps cited below to perform the mobile device surveillance function.
Step 1: The mobile application called “DVRH264.jar” need to be installed in your mobile device.
The application can be downloaded directly from the manufacturer’s website to your mobile or;
alternatively, it can be transferred to your mobile device from the CD that packed with DVR
through Bluetooth or USB cable.
Step 2: Install the application software “DVRH264.jar” in your mobile device. It might be installed
automatically after downloading; otherwise, select it from the downloading file for installation.
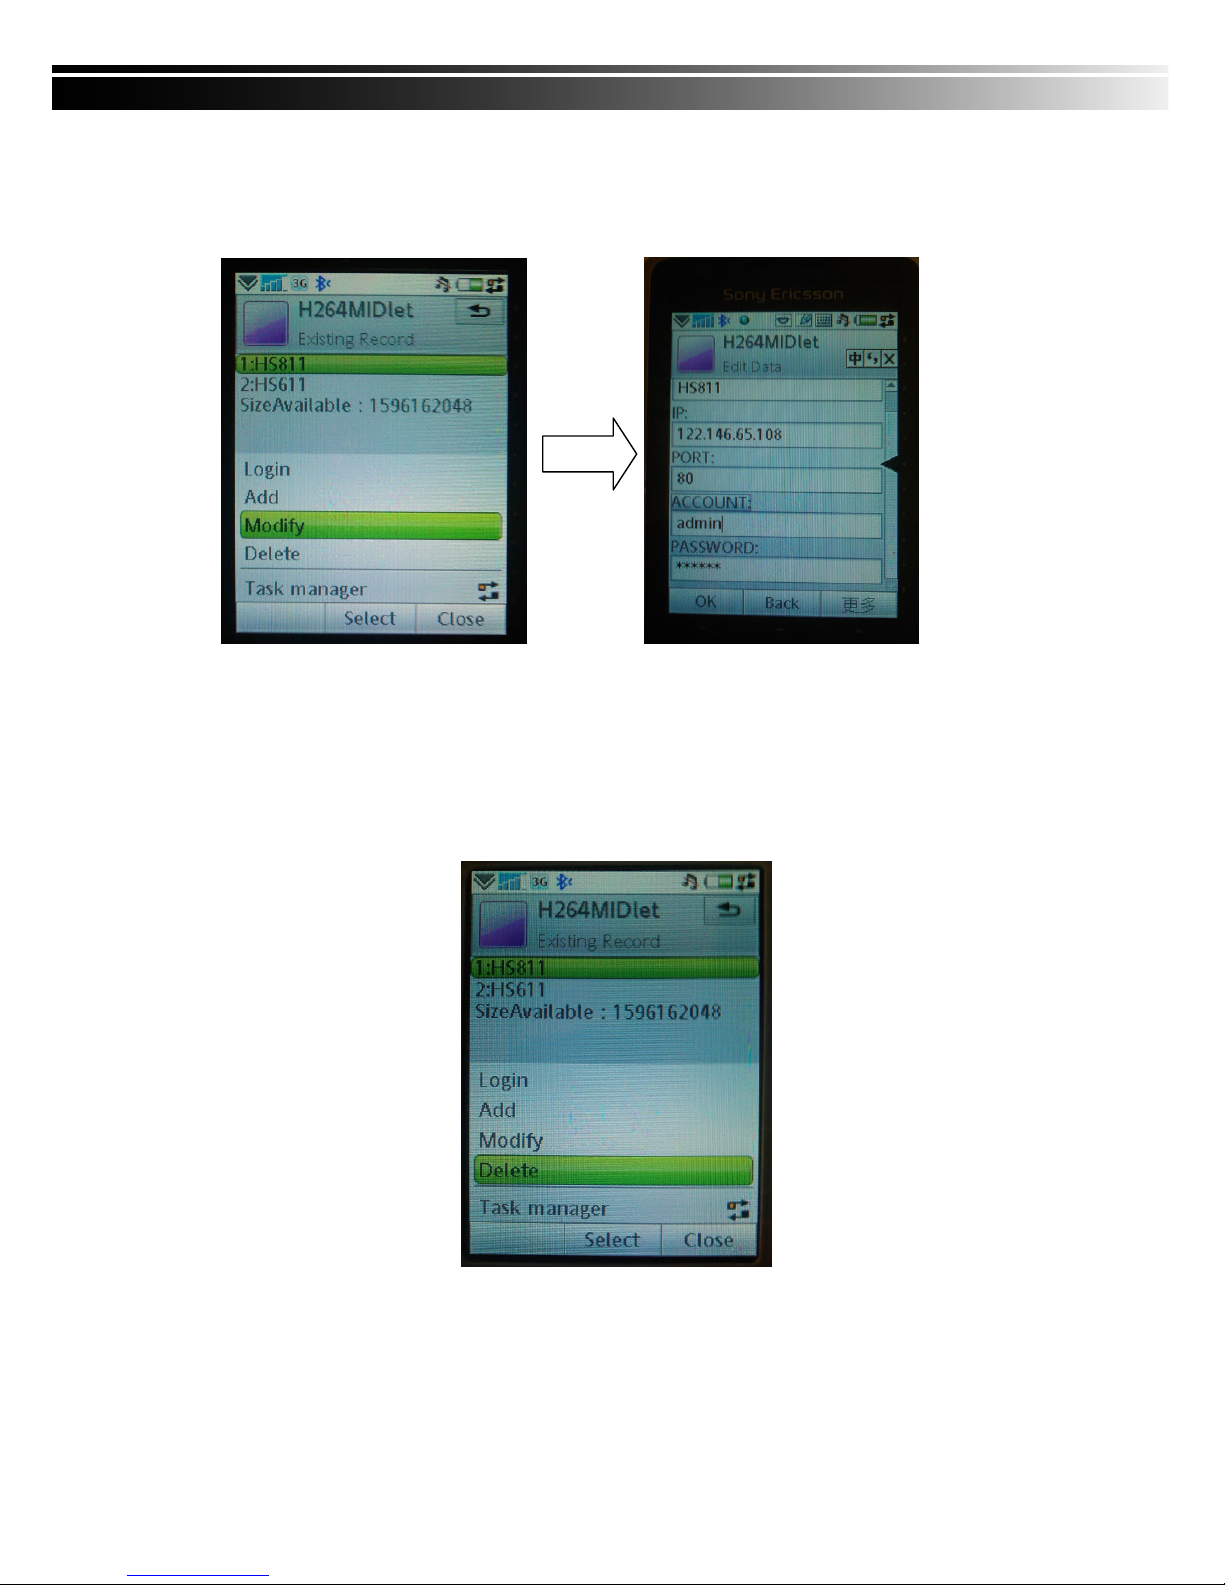
7-1.2 Mobile Application Operation
After the installation, enter the Program Files menu in your mobile
device to run a file called “DVRH264”.
Select “Menu” at the right lower corner of your mobile screen, 4
commands, Login Add Modify and Delete, will show up.
Page 57
57
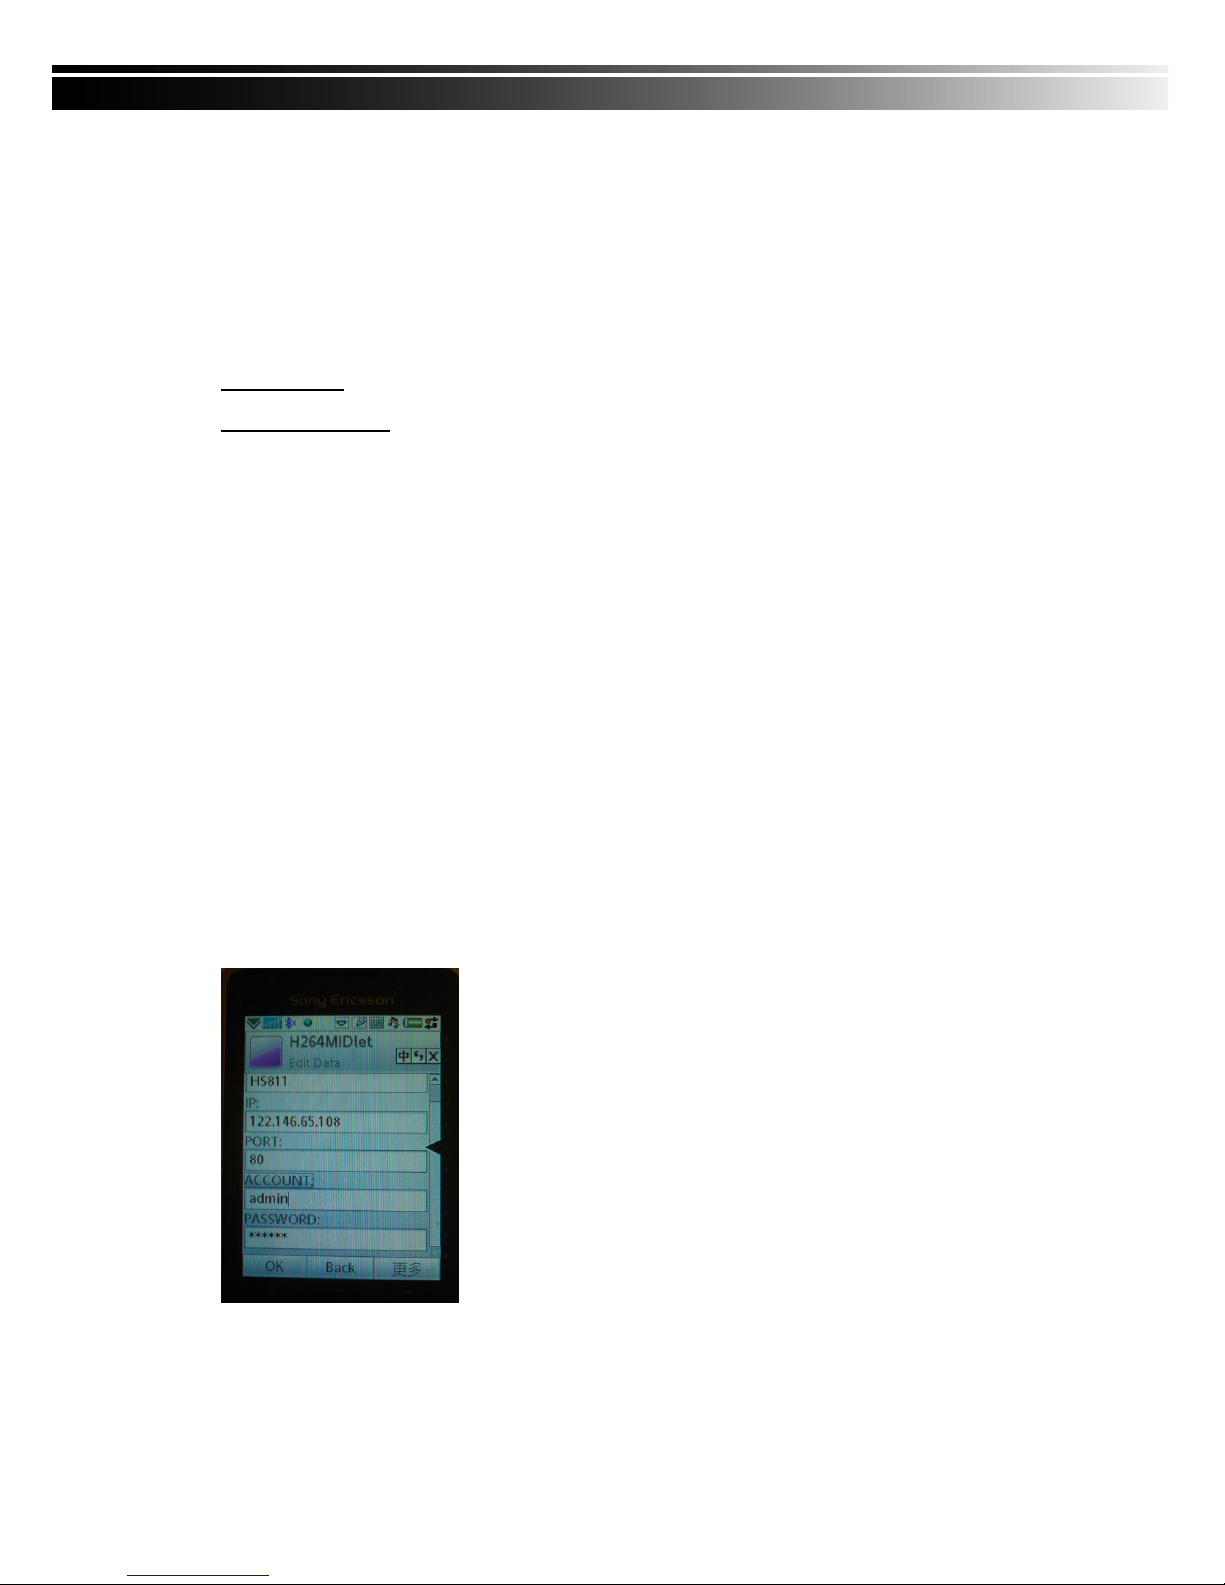
7-1.2.1 Add New Login DVR
To log into the DVR, you need to enter the logging-in DVR information. Find “Add” under the “Menu” then
enter logging-in DVR’s IP address, Port number, account name and password. Press “Add” to save this
information after entering.
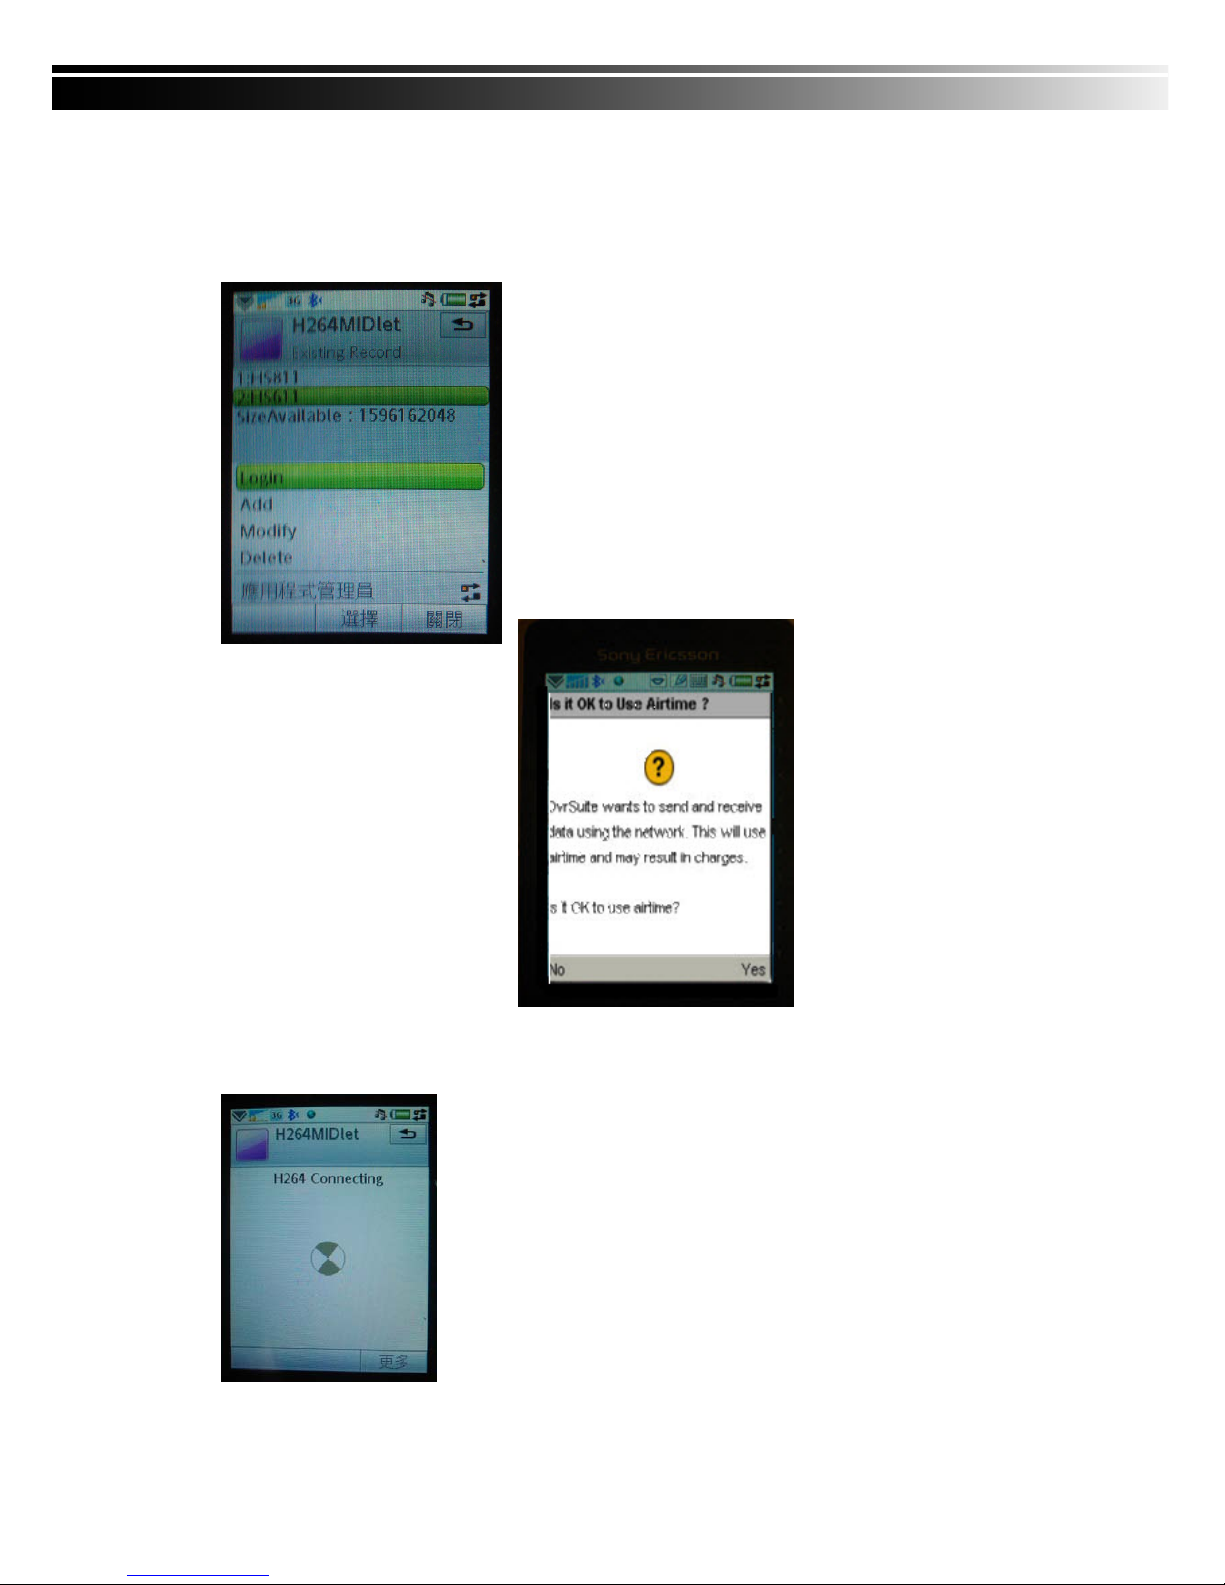
7-1.2.2 Logging Onto the DVR
Use the Login command to log onto a DVR and monitor live
images. If multiple DVRs have been added to the mobile
application, they will be listed by name, you can select one to log
onto.
A confirmation message might show up for network charge before connection. The fee rate will depend on
the telecom company and package fee you go with.
Network connectivity will take some time. It’ll be affected by networking
environment and bandwidth flow.
Live image will show up after a successful connection.
PS. The Live can not be displayed in your mobile when the reco
ding is off in
local DVR.
Page 58
58
7-1.2.3 Modify the Login Information of DVR
You can use the “Modify” command to change the login information of DVR. The dialogue is identical to
that of the “Add” command.
7-1.2.4 Delete the Login Information of DVR
“Delete” command can be used to remove the DVR information if it is no longer useful. Select the DVR on
the name list then choose “Delete”
7-1.3 Live Monitoring Operation
This paragraph describes some operation under the LIVE monitoring mode in your mobile device.
Page 59
59
7-1.3.1 Scroll the Image
You can use the keypad on your mobile device to scroll the image if it’s oversized.
Key Action
2 Scroll Up
4 Scroll Left
6 Scroll Right
8 Scroll Down
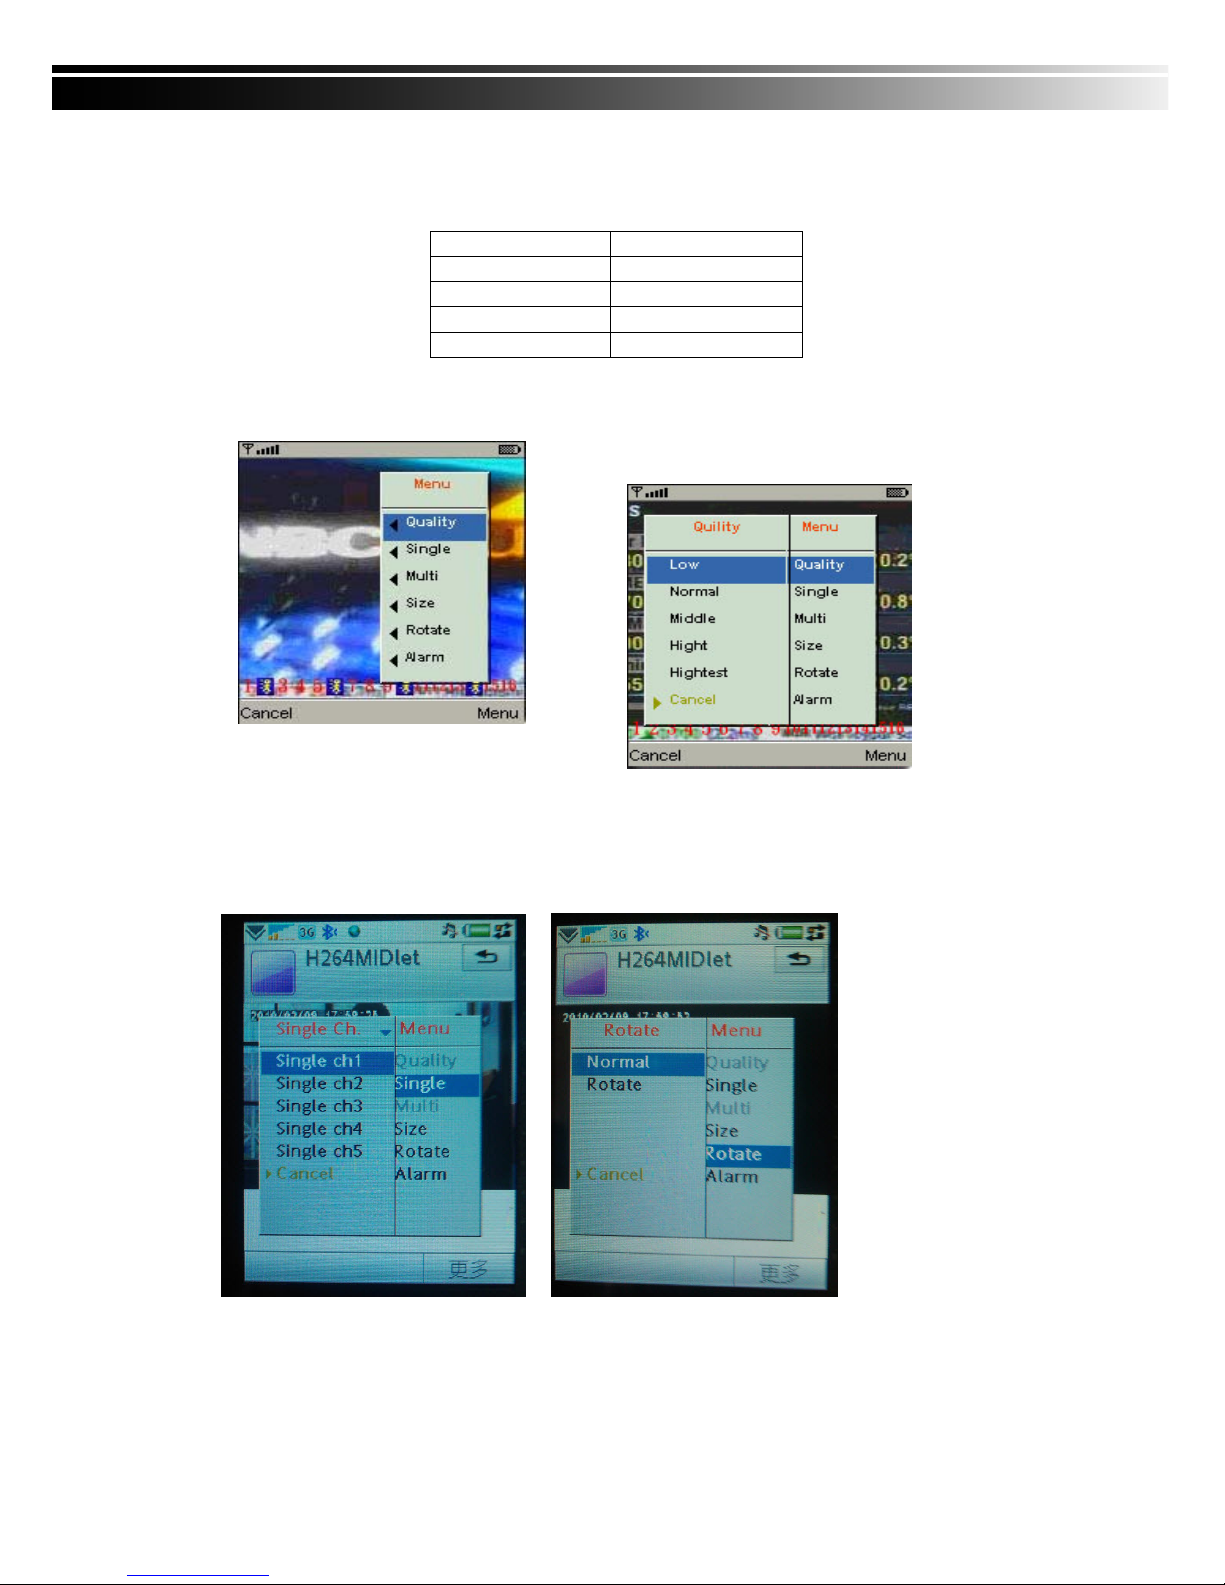
7-1.3.2 Image Quality Setup
Select “Quality” under the “Menu”
There will be 5 levels for your to choose: Low、Normal、Middle、High and Highest.
7-1.3.3 Channel Display
Select “Single” under the “Menu”, there will be all channels of your DVR in list for you to choose.
PS. The Live can not be displayed in your mobile when the recoding is off in local DVR.
Page 60
60
7-1.3.4 Size of Image
The screen size of different mobile device can be different. You can select “Size” under the “Menu” to
choose from “Original” or “Fit Screen” to resize the display image.
Item Description
Original The image will be shown in original
size.
Fit Screen The image will be shown to fit the
screen.
7-1.3.5 Rotate the image
The Live image can be displayed in normal or rotate to 90 degrees. Select “Rotate” under the “Menu” for
this operation.
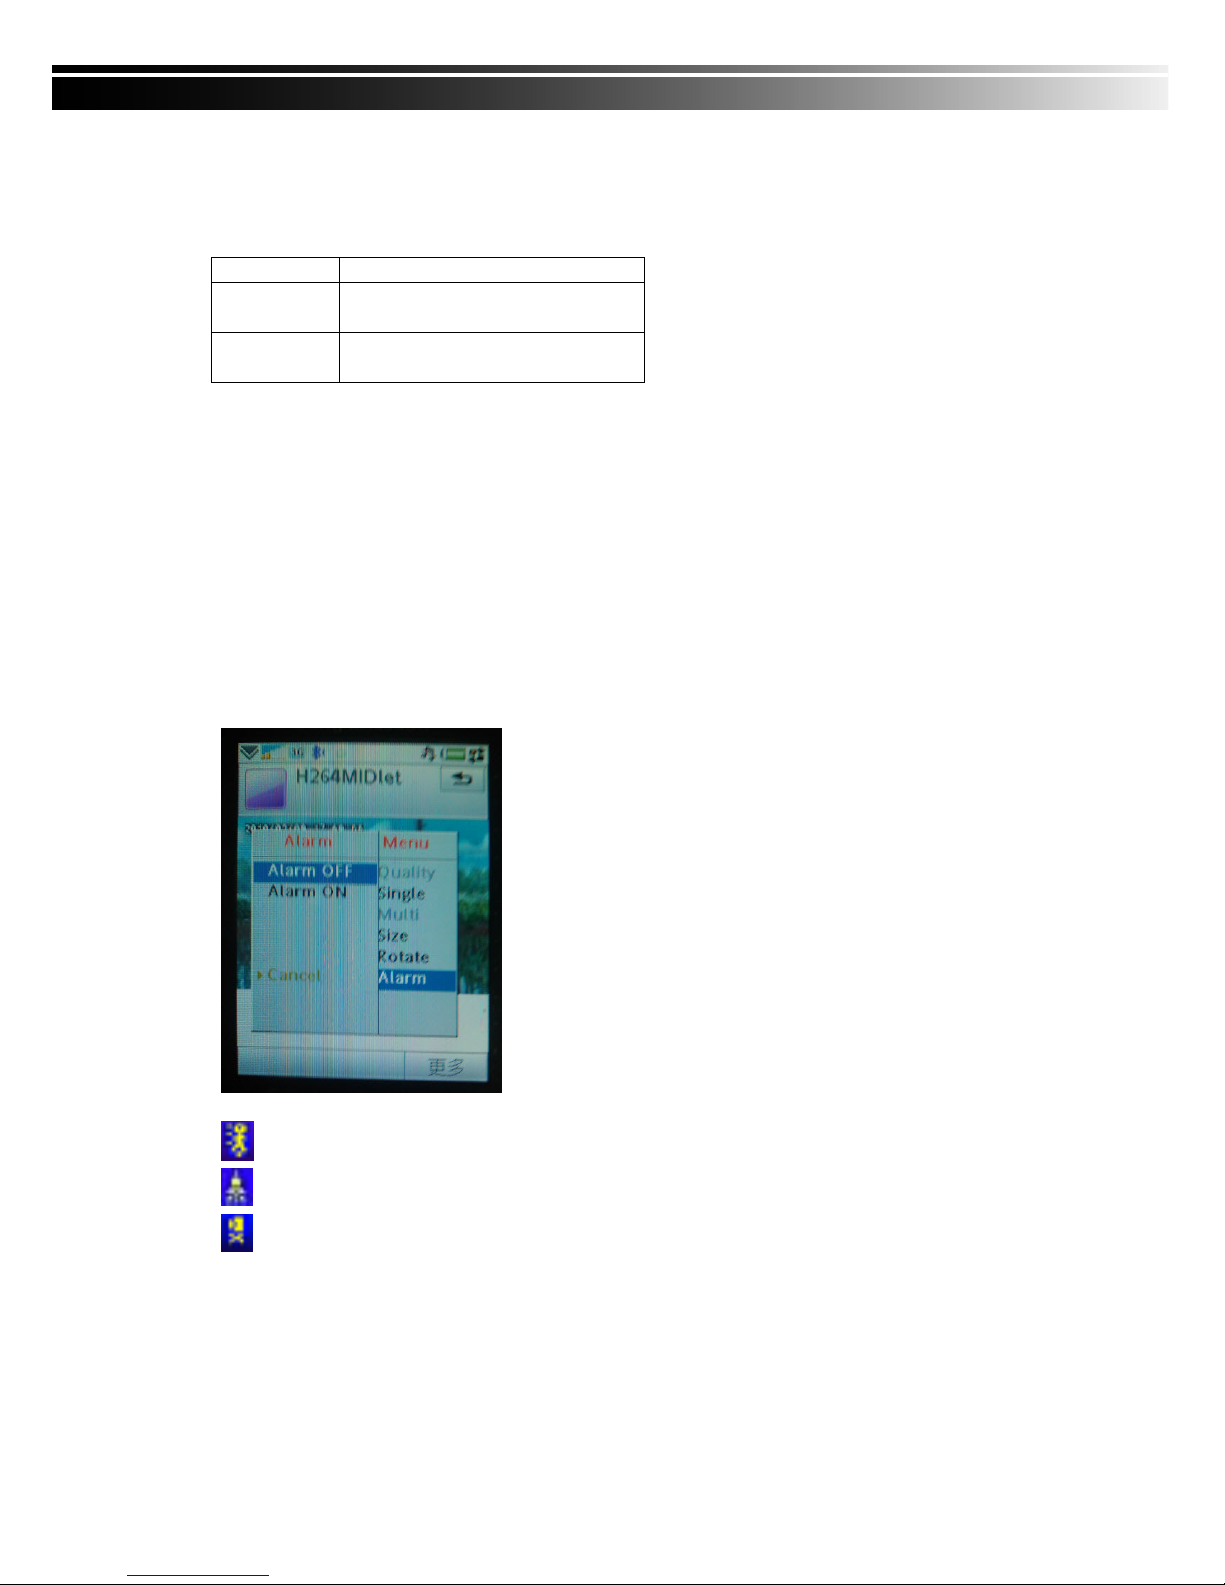
7-1.3.6 Alarm
This application not only allows you to remotely monitor through mobile device but receive the alarm that
has been triggered by events such as Motion Detected, Sensor Triggered and Vloss.
Graphical icons below will be shown on the status:
: Motion detected
: Sensor triggered
: Video loss
Select the “Alarm” under the “Menu” to switch this function on or off.
Page 61
61
7-2 Mobile Application Installation and Operation for Windows Mobile System
There are two kinds of applications for Window Mobile OS: JPEG compression and H.264 compression.
The one for H.264 compression can transfer both audio and video signal to your mobile device.
System Requirement:
Mobile device OS:Windows mobile system 5.0 above.
Mobile device need to support internet: GPRS/3G/Wifi… etc.
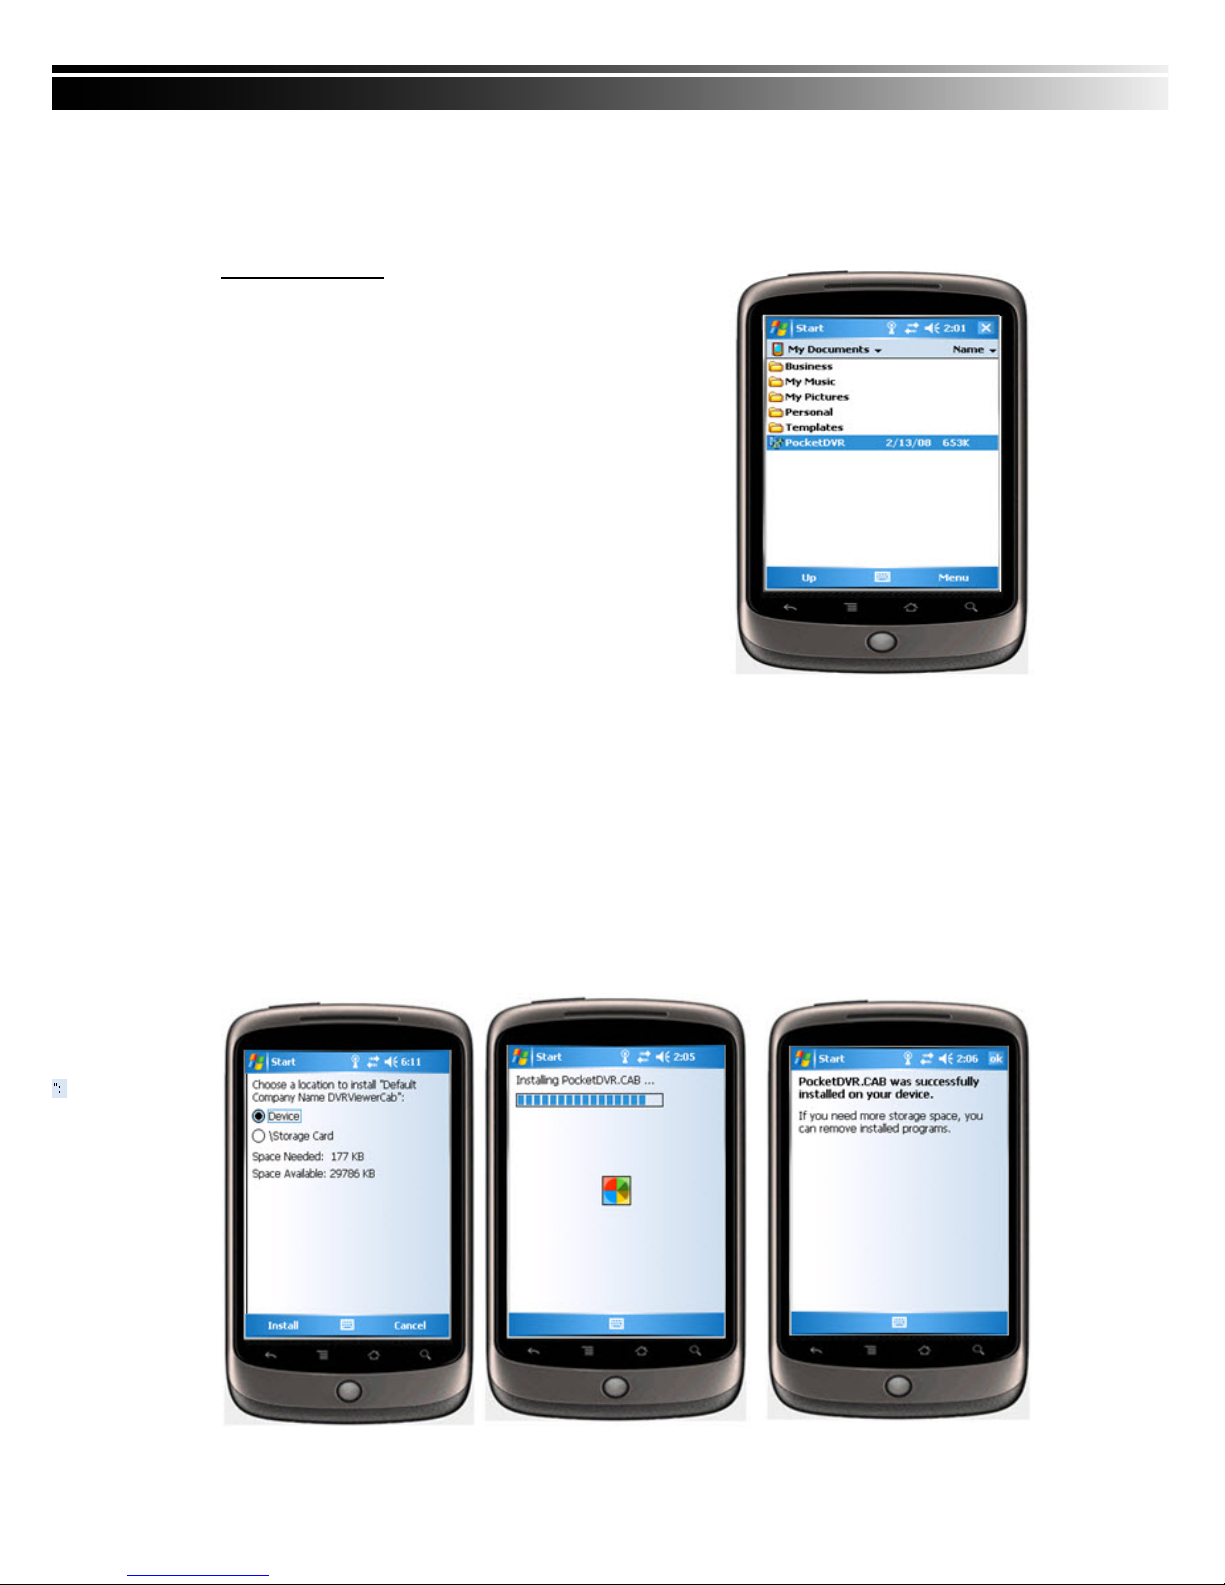
7-2.1 Mobile Application Installation
Please follow the steps cited below to perform the mobile device surveillance function on your mobile
device (mobile phone, PDA ...etc).
Step 1: The mobile application called “Jrviewer.CAB” and “H264Pocket.CAB” need to be installed in
your mobile device. The application can be downloaded directly from the manufacturer’s website
to your mobile or; alternatively, it can be transferred to your mobile device from the CD that packed
with DVR through Bluetooth or USB cable.
Step 2: Install the application software “Jrviewer.CAB” and “H264Pocket.CAB” in your mobile device,
two folders named ”Jrviewer” and “H264Pocket” will be created. It might be installed
automatically after downloading; otherwise, select it from the downloading file for installation.
Page 62
62
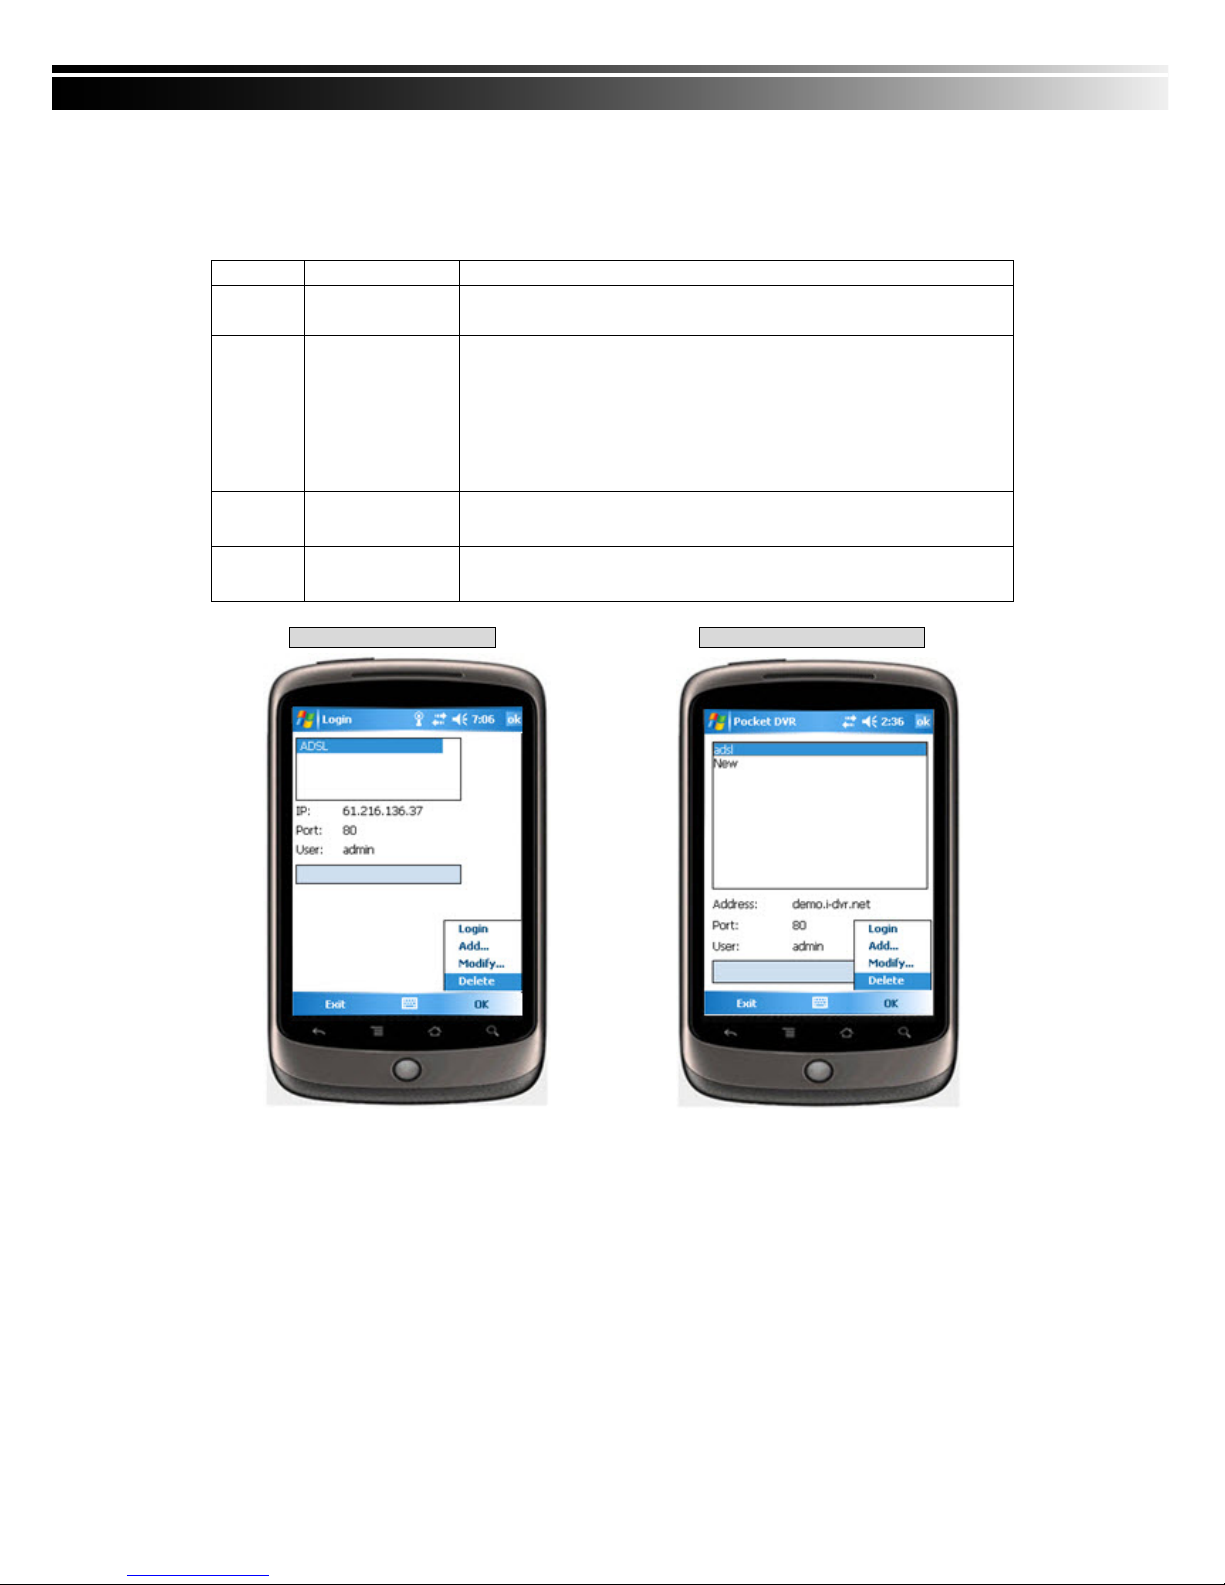
7-2.2 Mobile Application Operation
After the installation, enter the Program Files menu in your mobile device to run files named “Jrviewer”
and “H264Pocket”.
This application allows you to remotely logon and monitor DVR. Press “OK” to bring up the operation
menu, see below chart to further information.
Item Function Description
Add Add login DVR
Enter DVR’s name, IP address, Port, Account user, Password then
press “OK”
Login
Logon DVR
‧Choose the DVR that you’d like to log on , then press “OK”
‧ PS. The Live can not be displayed in your mobile
when the recoding is off.
‧ PS. Network connectivity will be affected by networking
environment and bandwidth flow. The fee rate will depend
on the telecom company and package fee you go with.
Modify
Modify Login
DVR
Choose DVR, press “Modify”, and press”OK” to save change.
Delete
Delete Login
DVR
Choose DVR and press ”Delete” to delete the DVR info.
The operation of Jrviewer The operation of H264Pocket
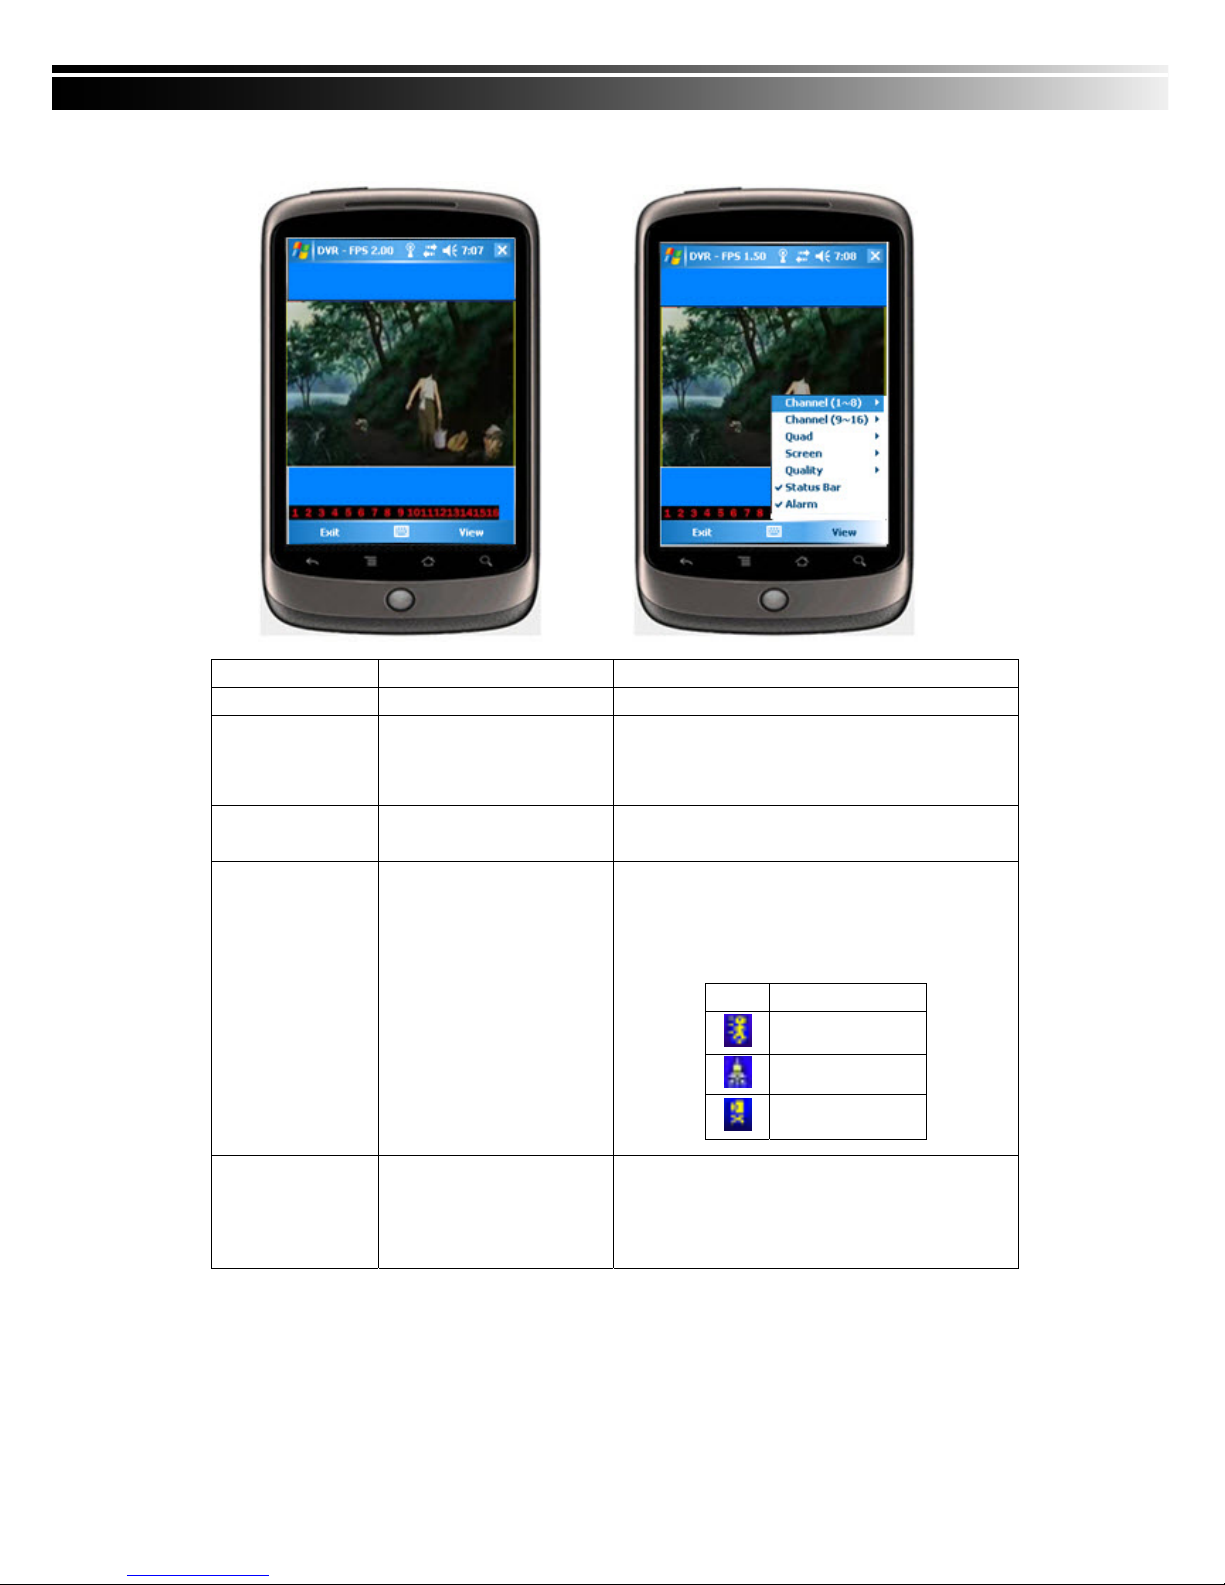
7-2.3 Operation under the LIVE monitoring.
After successful logon the DVR, press “View” to bring up operation menu. You can choose th
e channel, resize the image, choose the quality, and turn on/off the status bar, alarm, full screen
display….etc
Page 63
63
7-2.3.1 Operation uner the LIVE monitoring for Jrviewer
Item Function Description
Channel 1~16 Display for CH 1~16
Choose from CH1~16 to display
Screen Size of image
Original:image size as original
Stretch :stretch the size as full screen
Fit: resize the image to fit the screen
Quality Quality
Change the quality of image. Please note the better
quality, the slower data transfer rate.
Status Bar Status Bar
Graphical icons indicated below will be shown on
the status bar if there is event such as motion
detected, sensor triggered and video loss to be
detected on any channel. You can also uncheck the
“Status Bar” to inactivate this function.
Icon Description
Motion Detect
Sensor Trigger
V-Loss
Alarm Alarm
Alarm through your mobile device can be triggered
if there is event to be detected. You can also
uncheck the “Alarm” under the “View” to inactivate
this function.
Page 64
64
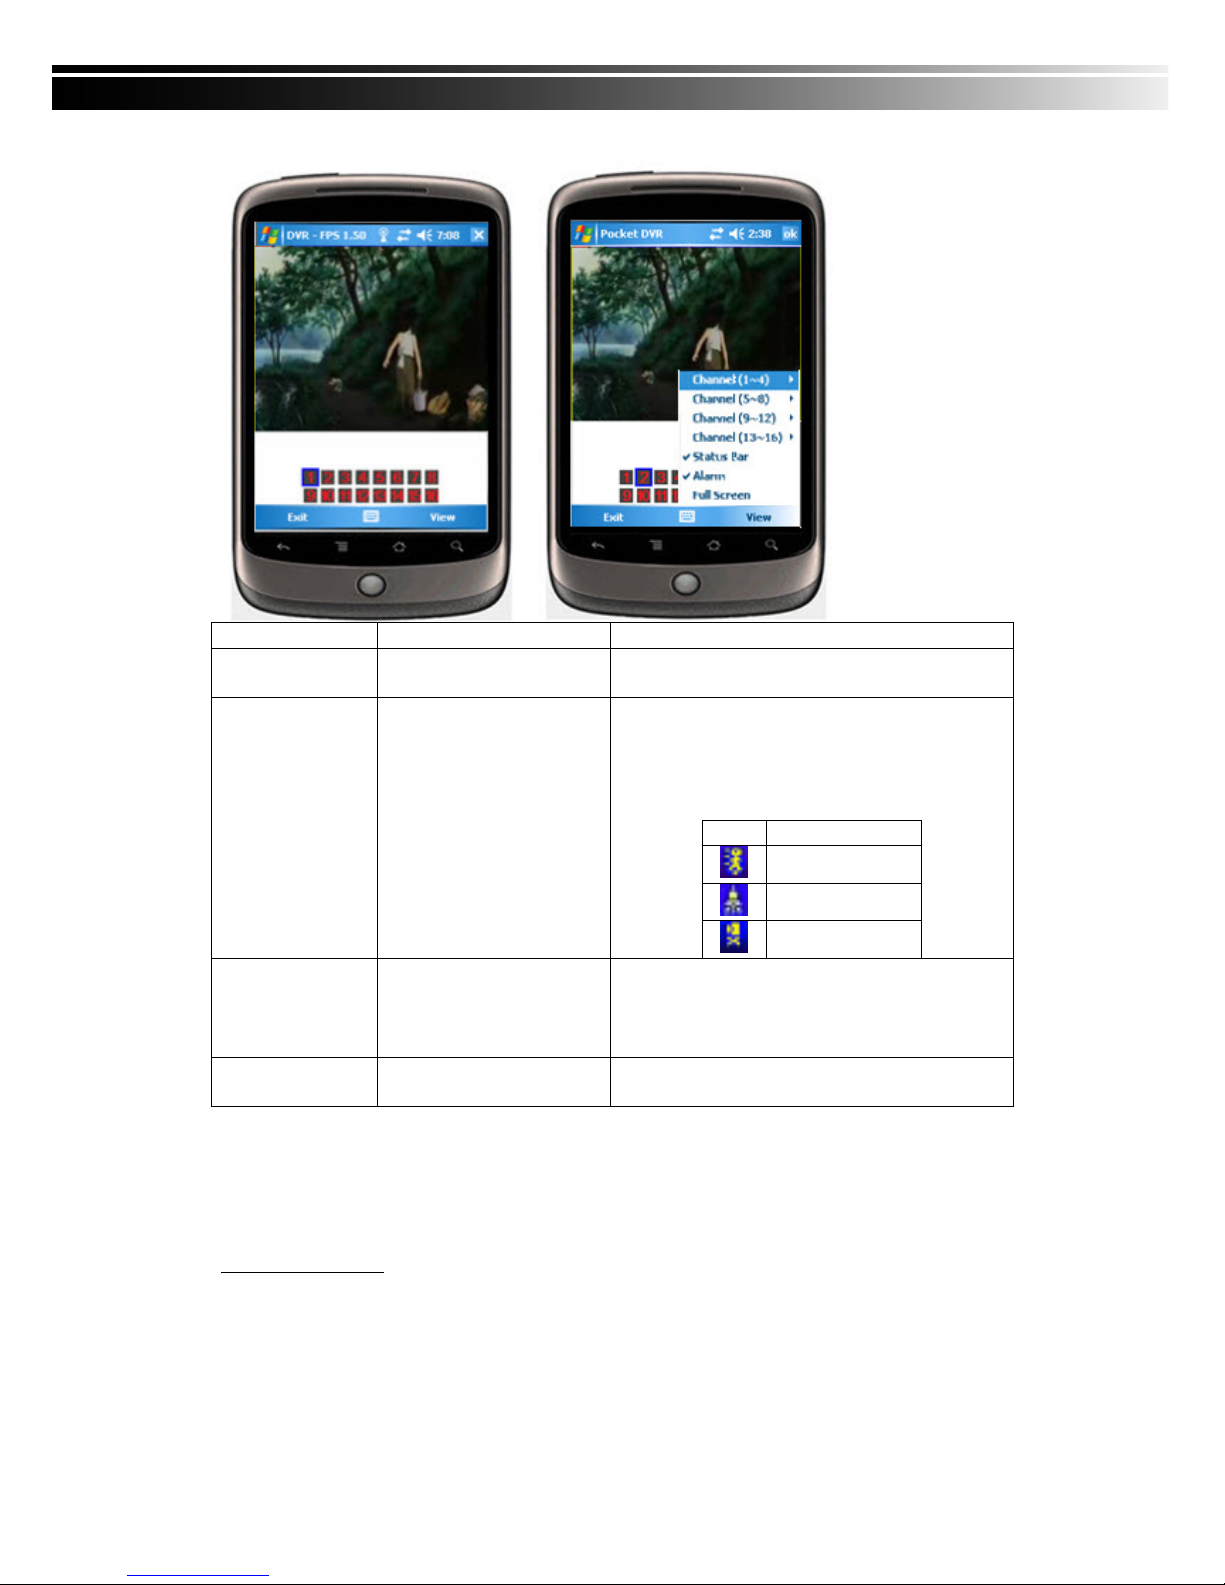
7-2.3.2 Operation under the LIVE monitoring for H264 Pocket
Item Function Description
Channel 1~16 Display for CH 1~16
Choose from CH1~16 to display. CH1~4 can
receive audio signal.
Status Bar Status Bar
Graphical icons indicated below will be shown on
the status bar if there is event such as motion
detected, sensor triggered and video loss to be
detected on any channel. You can also uncheck
the “Status Bar” to inactivate this function.
Icon Description
Motion Detect
Sensor Trigger
V-Loss
Alarm Alarm
Alarm through your mobile device can be triggered
if there is event to be detected. You can also
uncheck the “Alarm” under the “View” to inactivate
this function.
Full Screen Full screen display
You can choose one channel to display in full
screen by check this function.
CHAPTER 8 CMS INSTALLATION AND USAGE GUIDE
8-1 CMS Installation
System Requirement:
*Intel Pentium 4 processor or equivalent.
*Microsoft Windows Vista、Windows XP、Windows 2003 Server.
*Besides OS and other required APs, there will be 512MB remaining memory needed or above. *
512MB memory above.(500M requested for group DVR connection and 180M for single DVR)
*
20MB HD space. Recording and image capturing require extra space for storage.
*VGA Card needs to support DirectX9 and function well while running it. Please refer to p55
Note 1.
Page 65
65
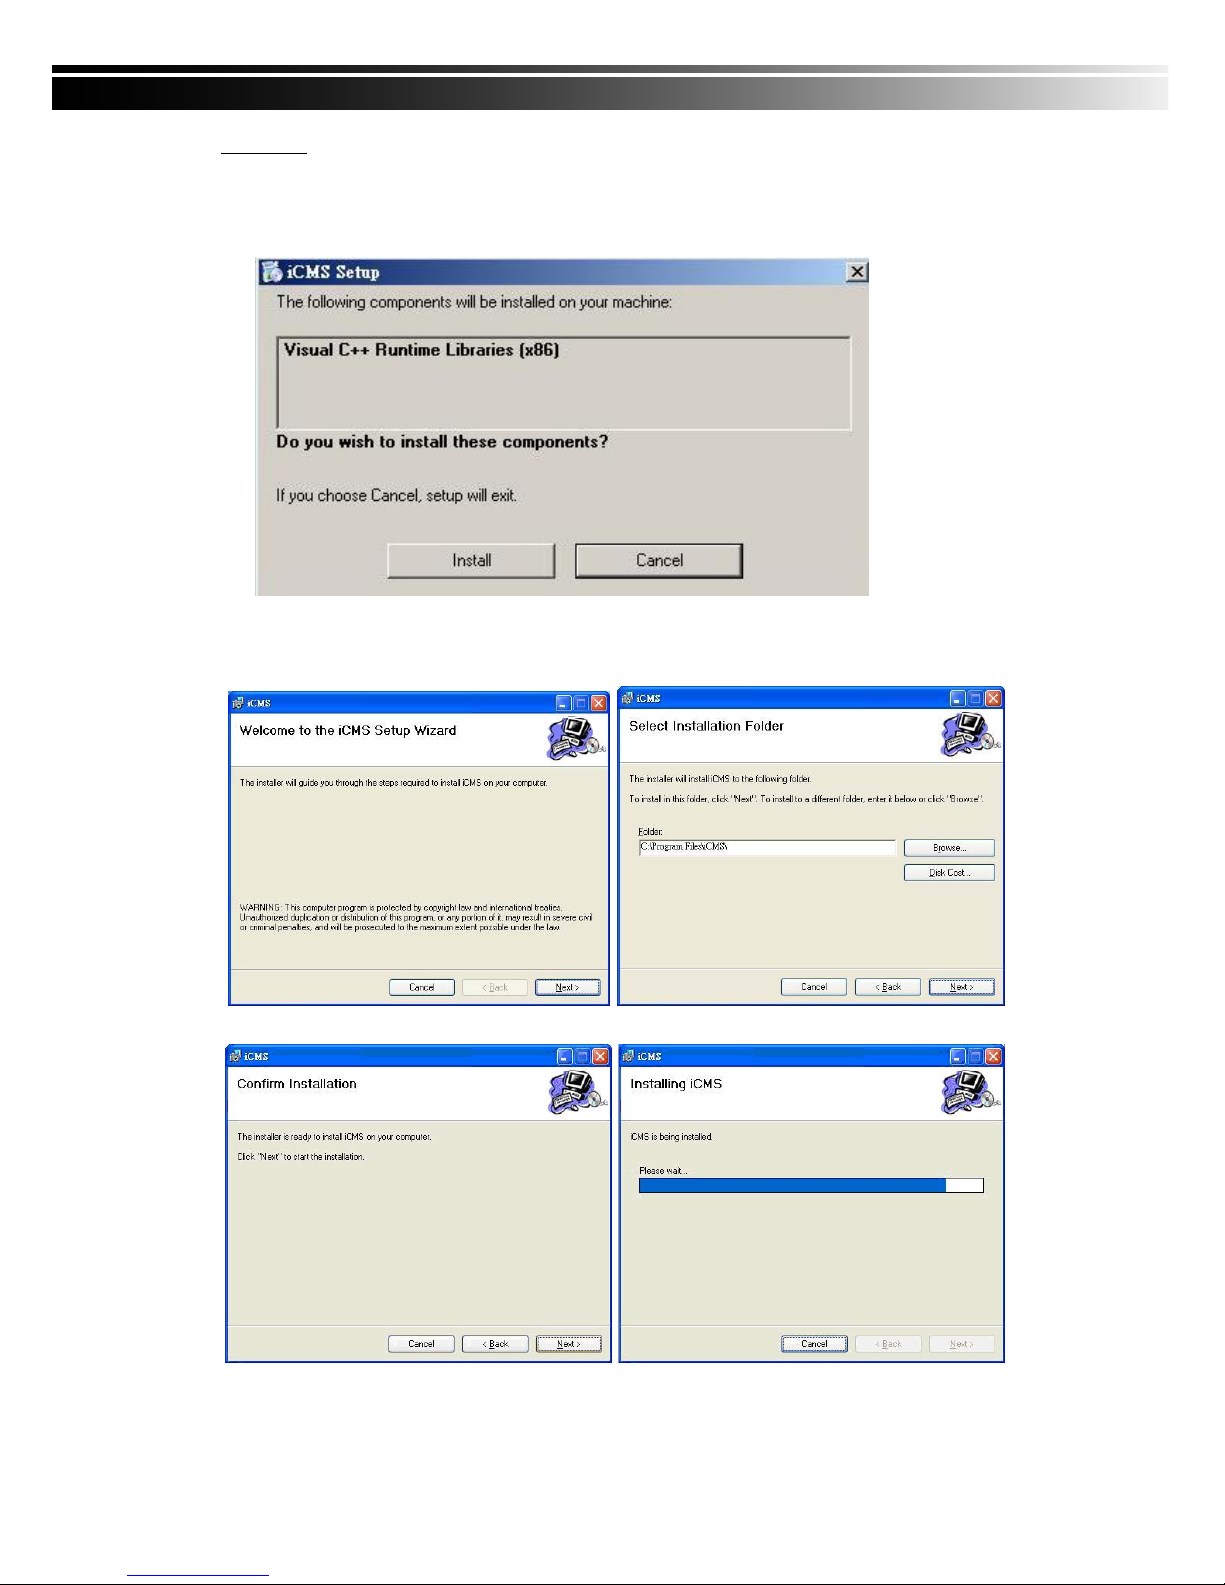
Installation:
1. Connect to the manufacturer’s website and download the CMS software.
2. Decompress and execute “setup.exe”.
3. If “Visual C++ Runtime Libraries” has not been installed before in the operating PC, the following sign
will suggest an installation automatically.
4. Select “Next”, and then select “Browse” to change installation path if needed. To check available
space on hard disk, please select “Disk Cost” then please select “Next” to the next step.
5.”Confirm Installation” window shows. Select ‘Next’ then the installation starts.
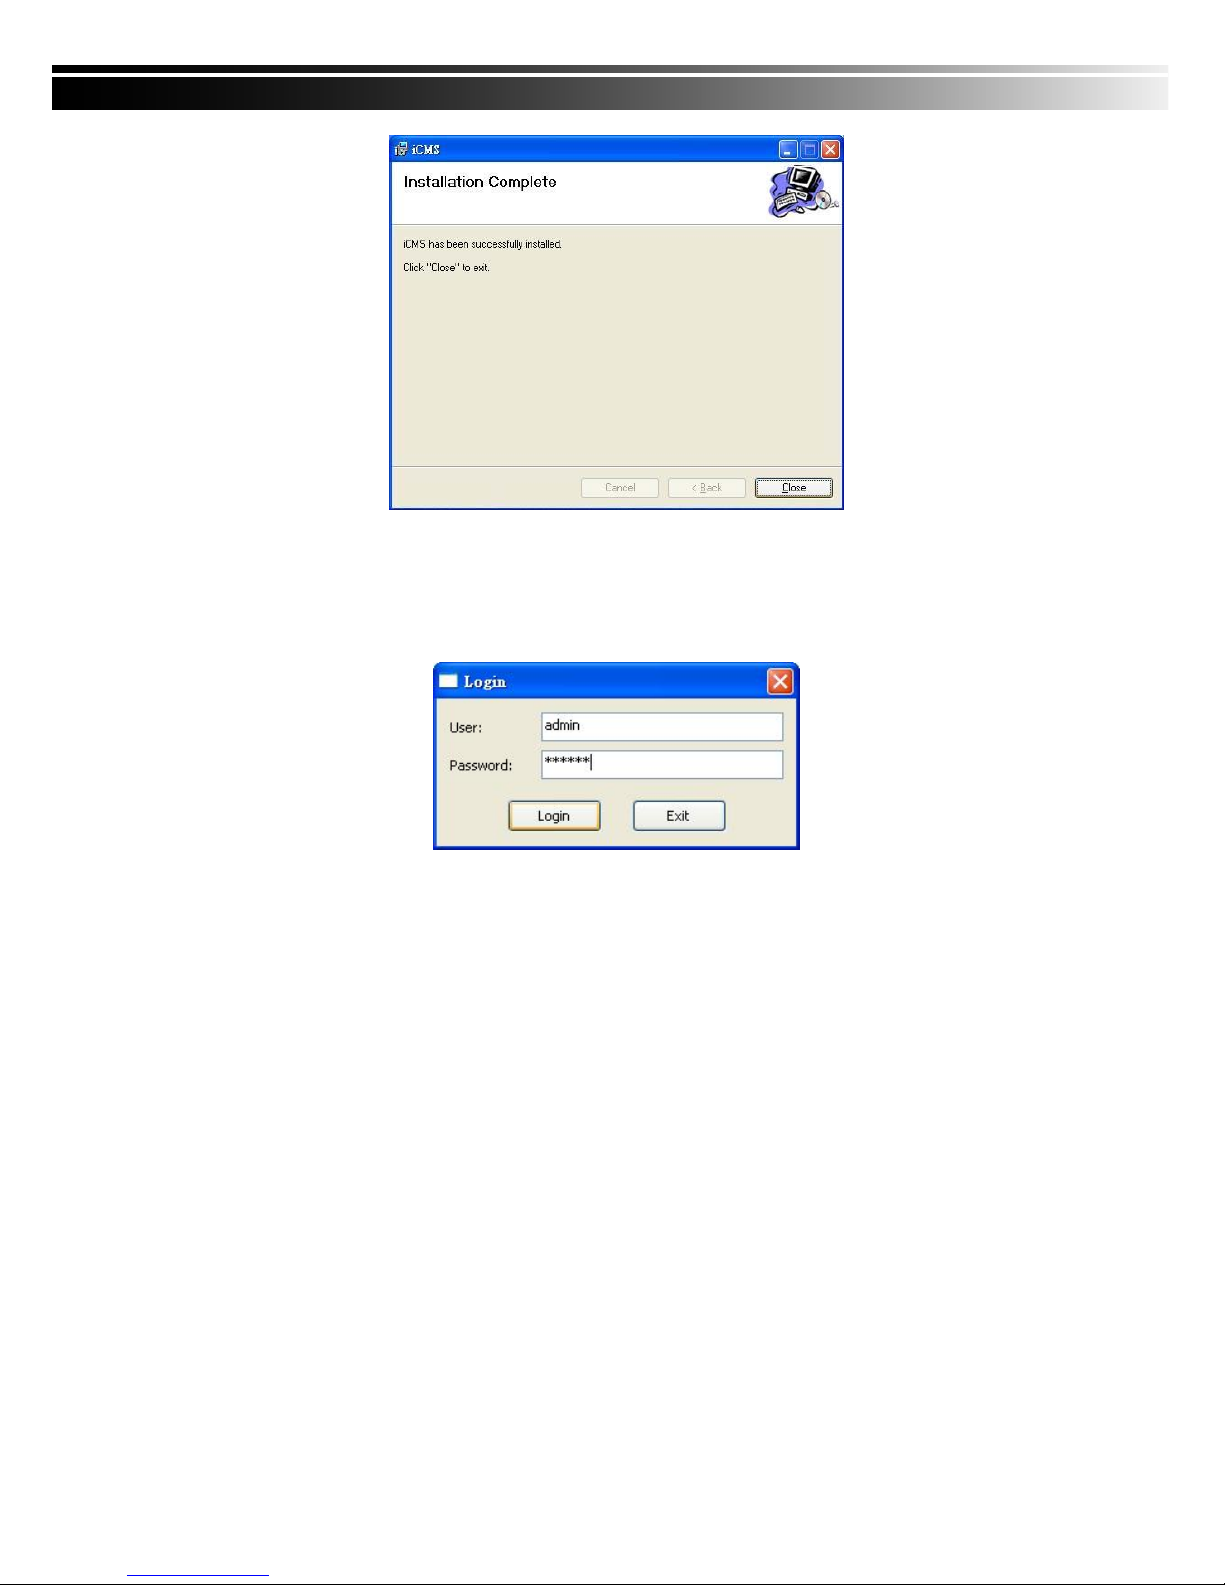
6. Select ‘Close’ to finish installation when the “Installation Complete” window shows.
Page 66
66
8-2 CMS LOGIN AND ENVIRONMENT
To enter CMS, the administrator’s user name and password are required. The defaults are ‘admin’ and
‘123456’.
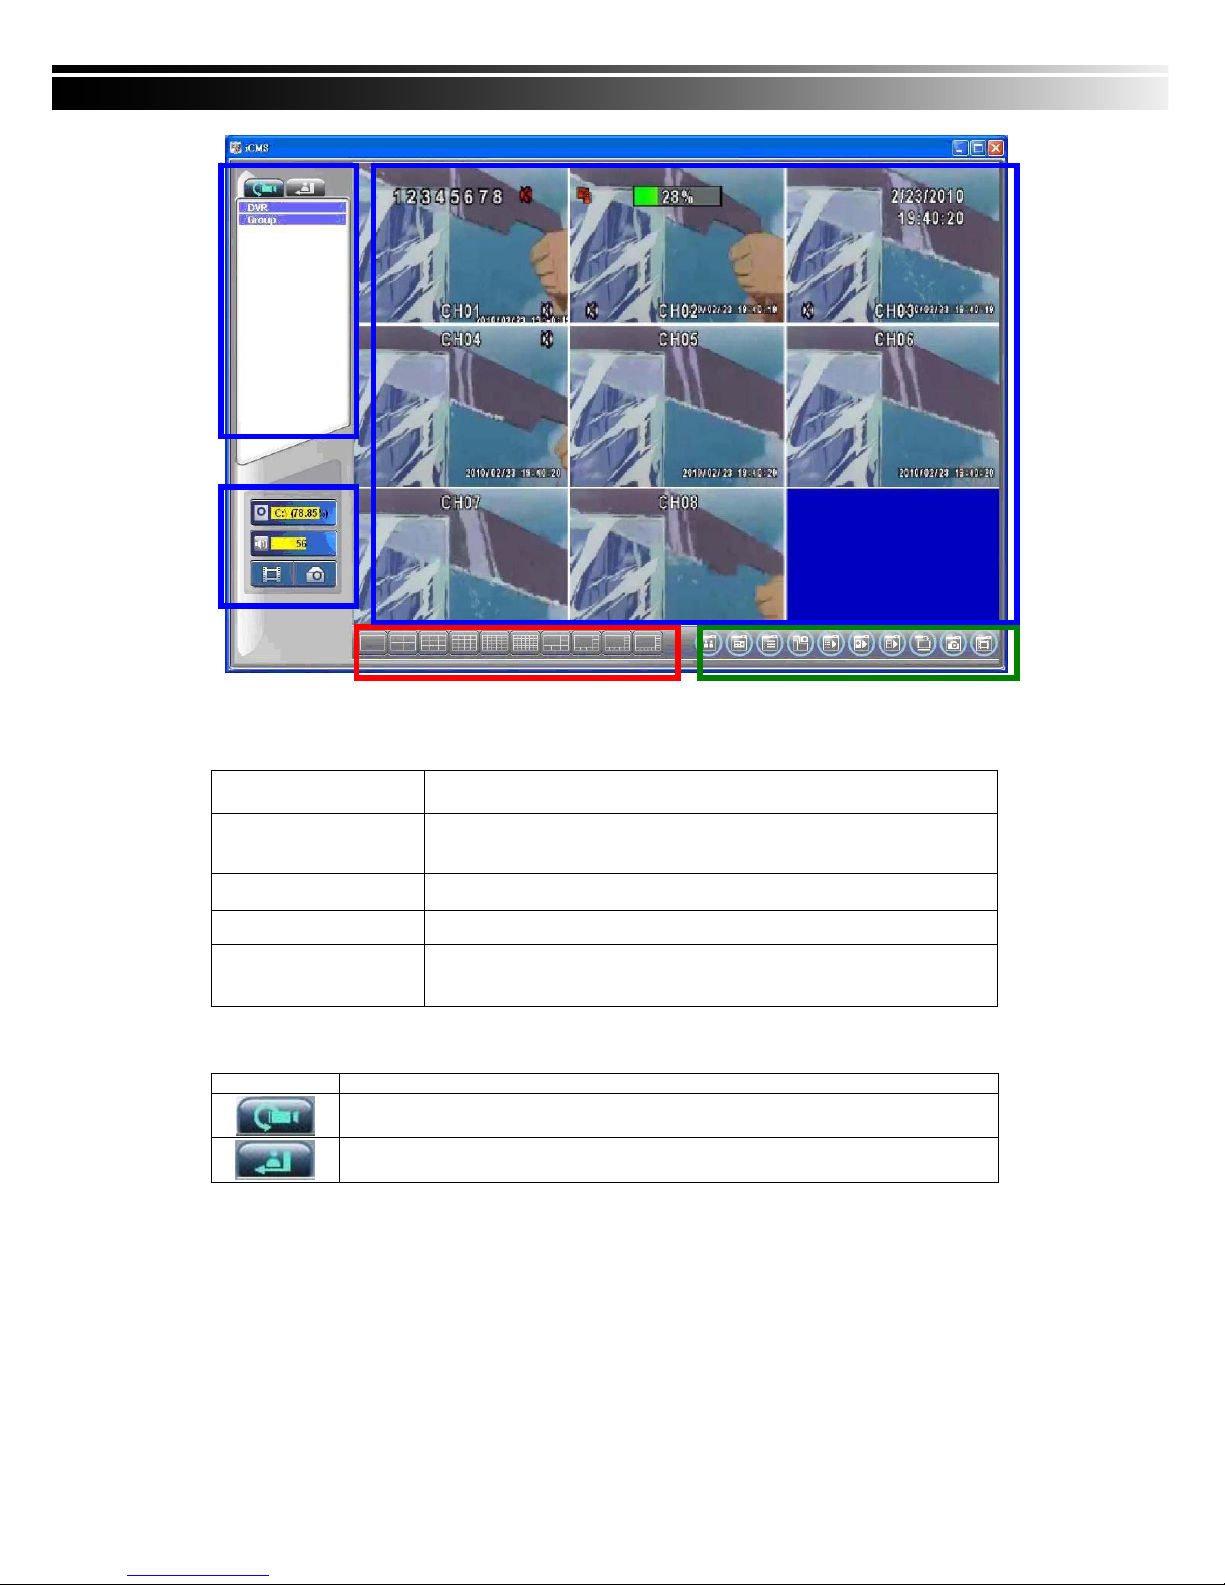
After successful login, the following image shows on your screen:
Page 67
67
① DVRs, Groups & E
vents
Information about DVRs, groups and events. See “93 Information List” for more detail.
② PC information an
d control
Information about local PC’s hard disk, volume, recording...etc.See “9
-4 PC Information and Control” for more detail.
③ Main Display Live image display area. See “9-5 Main Display” for detail.
④ Display Modes
Several choices of display modes supported by CMS.
⑤ Operation Bar
A set of 10 operations are provided by CMS. See “ 9-6 Operation Bar” for
detail.
8-3 DVRs, Groups & Events
Icon Description
View list of logged in DVR/ Group.
View Logs: list all the event information of DVR
①
③
④
⑤
②
Page 68
68
8-3.1 View DVR/Group List
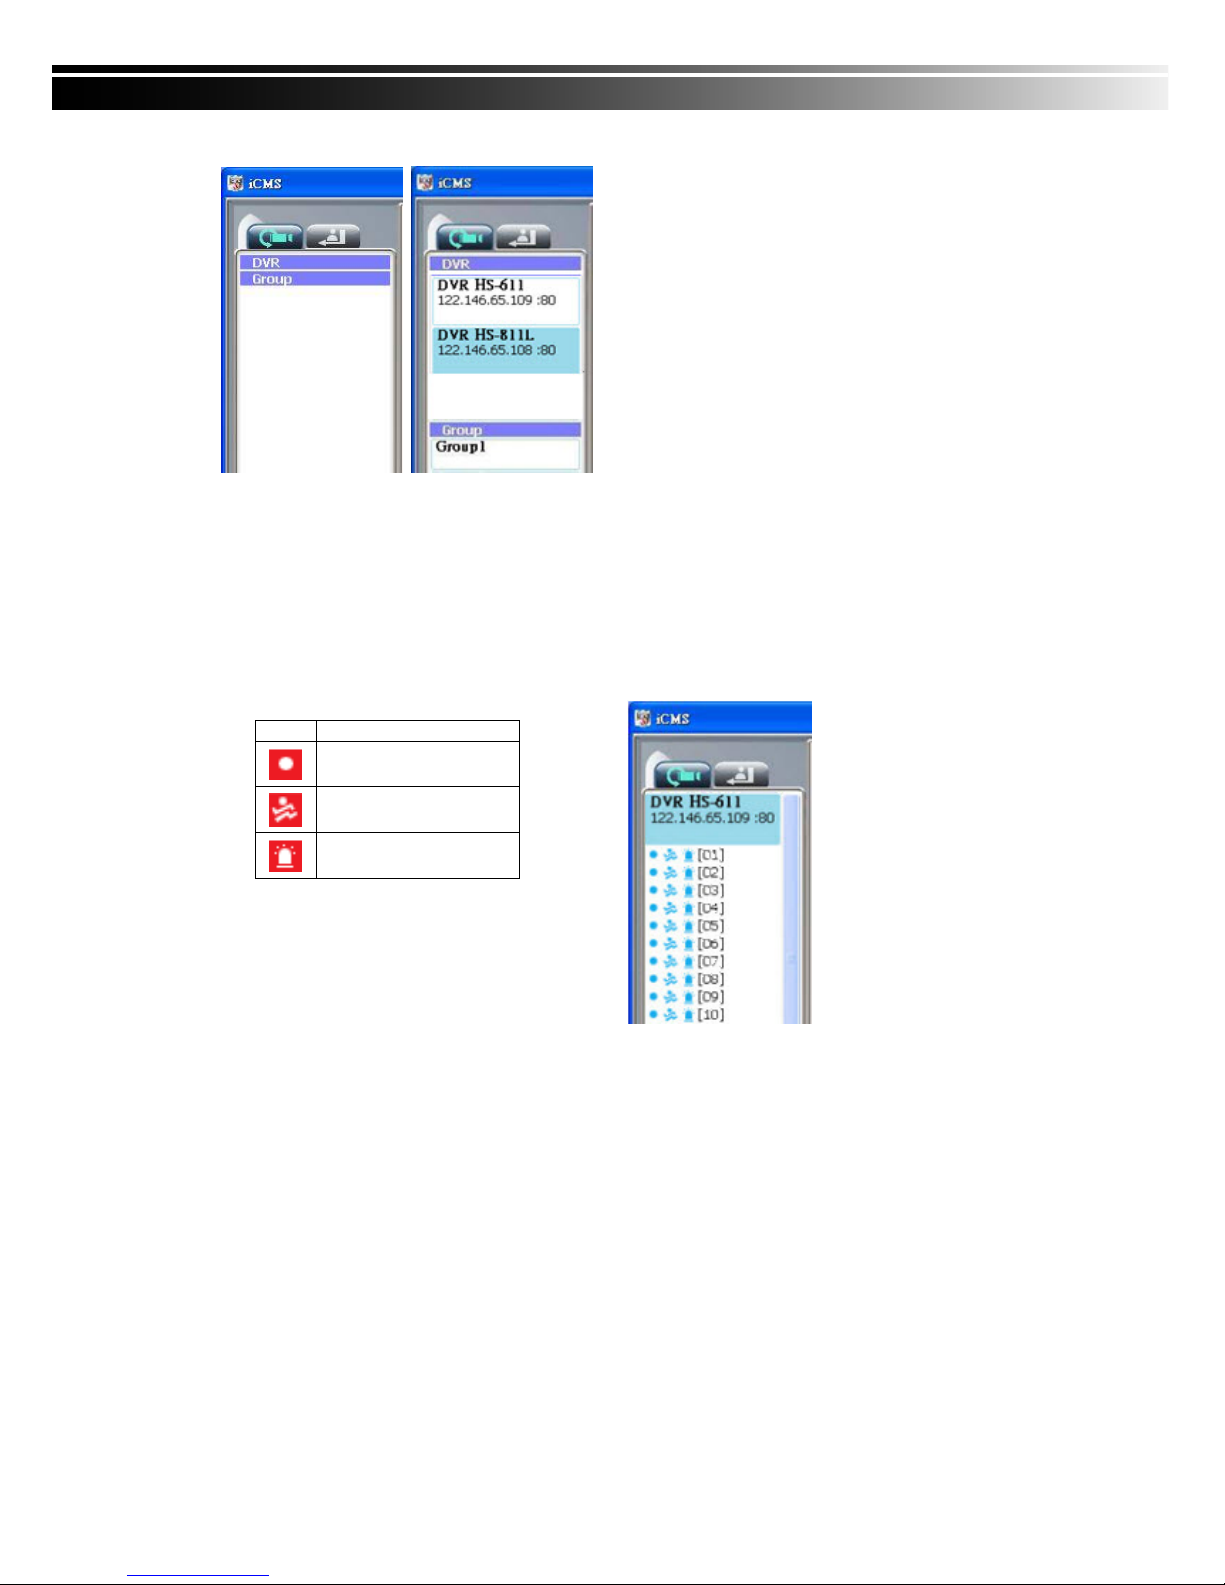
Single left click on ‘DVR’ or ‘Group’ will expand/collapse the entire DVRs and groups list.
On the DVR list, double left click on a connected DVR will show its image in main display. See “9-6.2
DVR Administration” for further information.
On the Group list, double left click on a group will sho w live ima ge from the cha nnels of the grou p in
the main display. See “9-6.3 for Group Administration” for further information.
Left-clicking on a connected DVR will expand/collapse status of its all channels as below:
Icon Description
Video Loss
Motion Detected
Sensor Triggered
8-3.2 View Event Logs
Under this page, all the events of a DVR can be expanded/collapsed in the order of Remote in/R
emote out, Video Loss, Motion, Sensor, Others (Power Reset, Key Lock, Key Unlock, HD Full).
Page 69
69
8-4 Local PC Information and Control
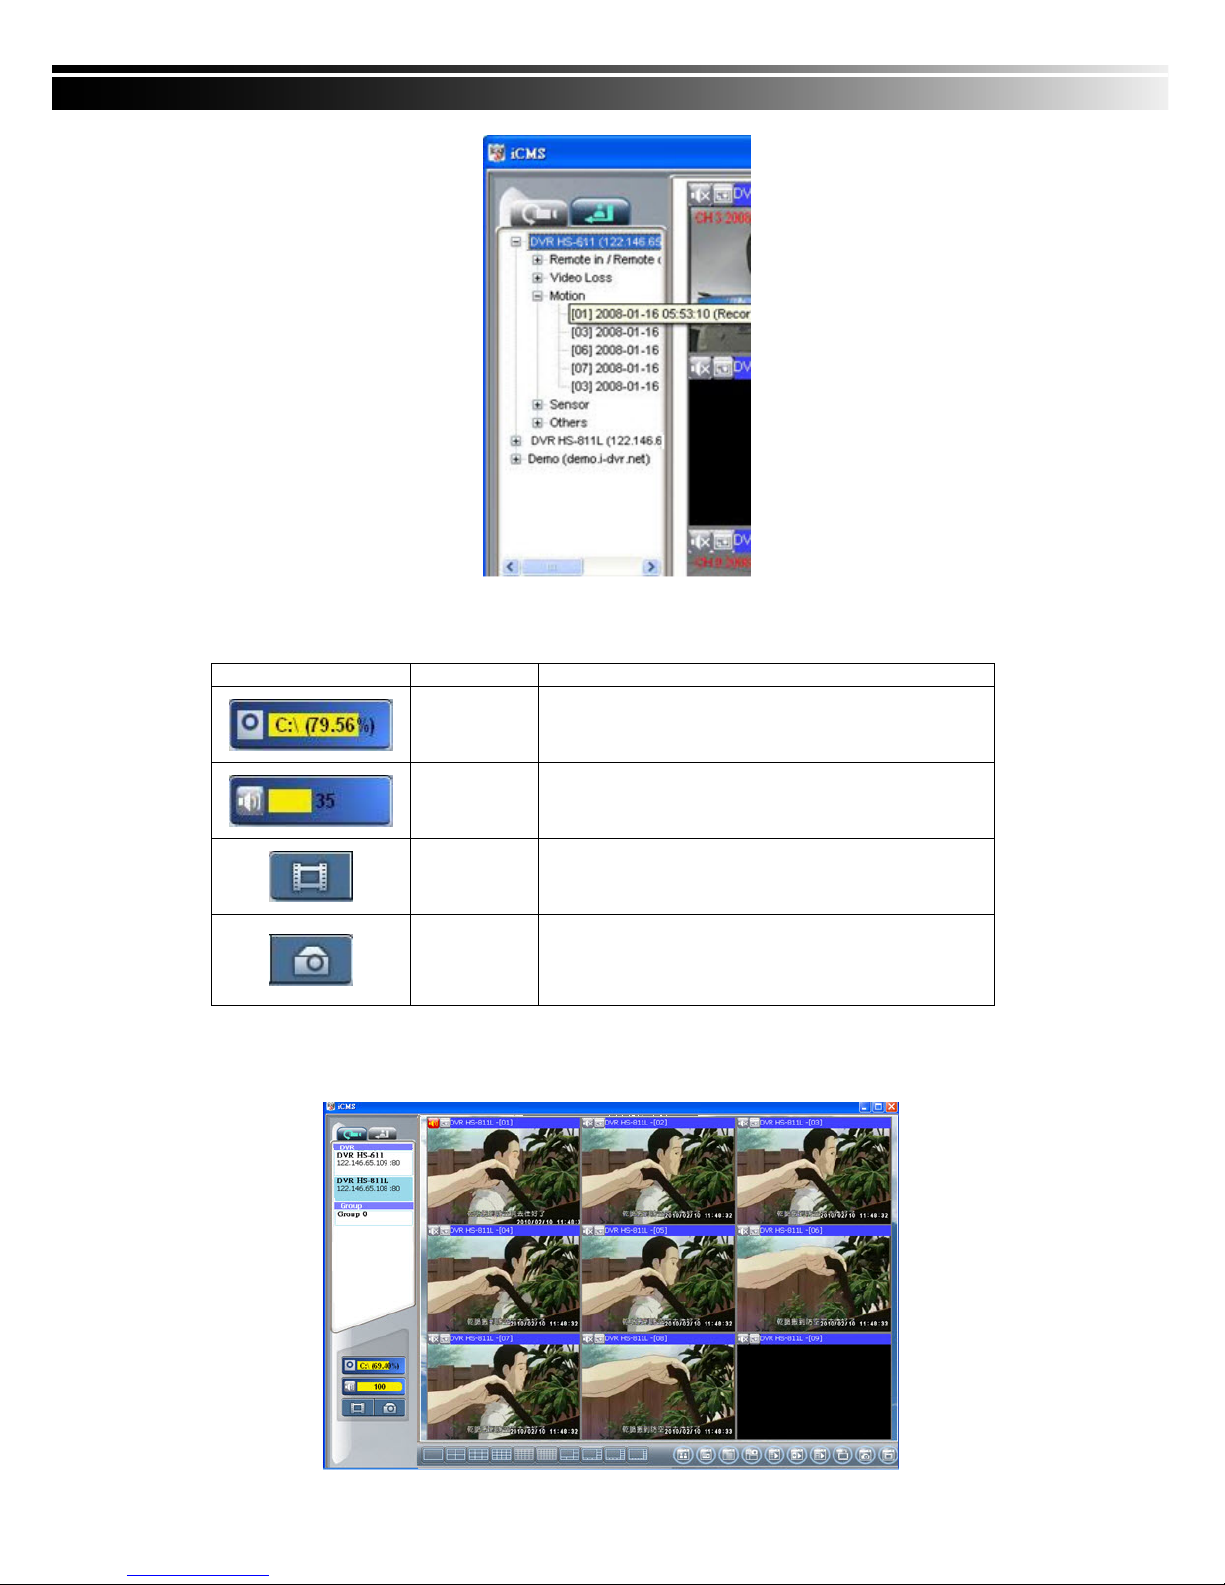
Located at the left lower corner of the screen, please see the chart below:
8-5 Main Display
The main display area is where the live image of DVR is shown. You can drag to change the location of
screen for each channel and turn on/off audio signal with mouse-click.
Icon
Function Description
HDD info
Shows the ratio of available space / HDD capacity of C:\
drive (where CMS is installed).
Volume PC volume or playback volume control bar.
Recording
Record live image to local PC storage. To view locally
stored data, use “Record” under the operation bar.
Also see “9-6.6 recording data” for detail.
Snapshot
Take snapshot to save in local PC storage. To view all
the snapshots you’ve taken, please go to ” Snapshot”
under the operation bar. See “9-6.5 Snapshot data” for
detail.
Page 70
70
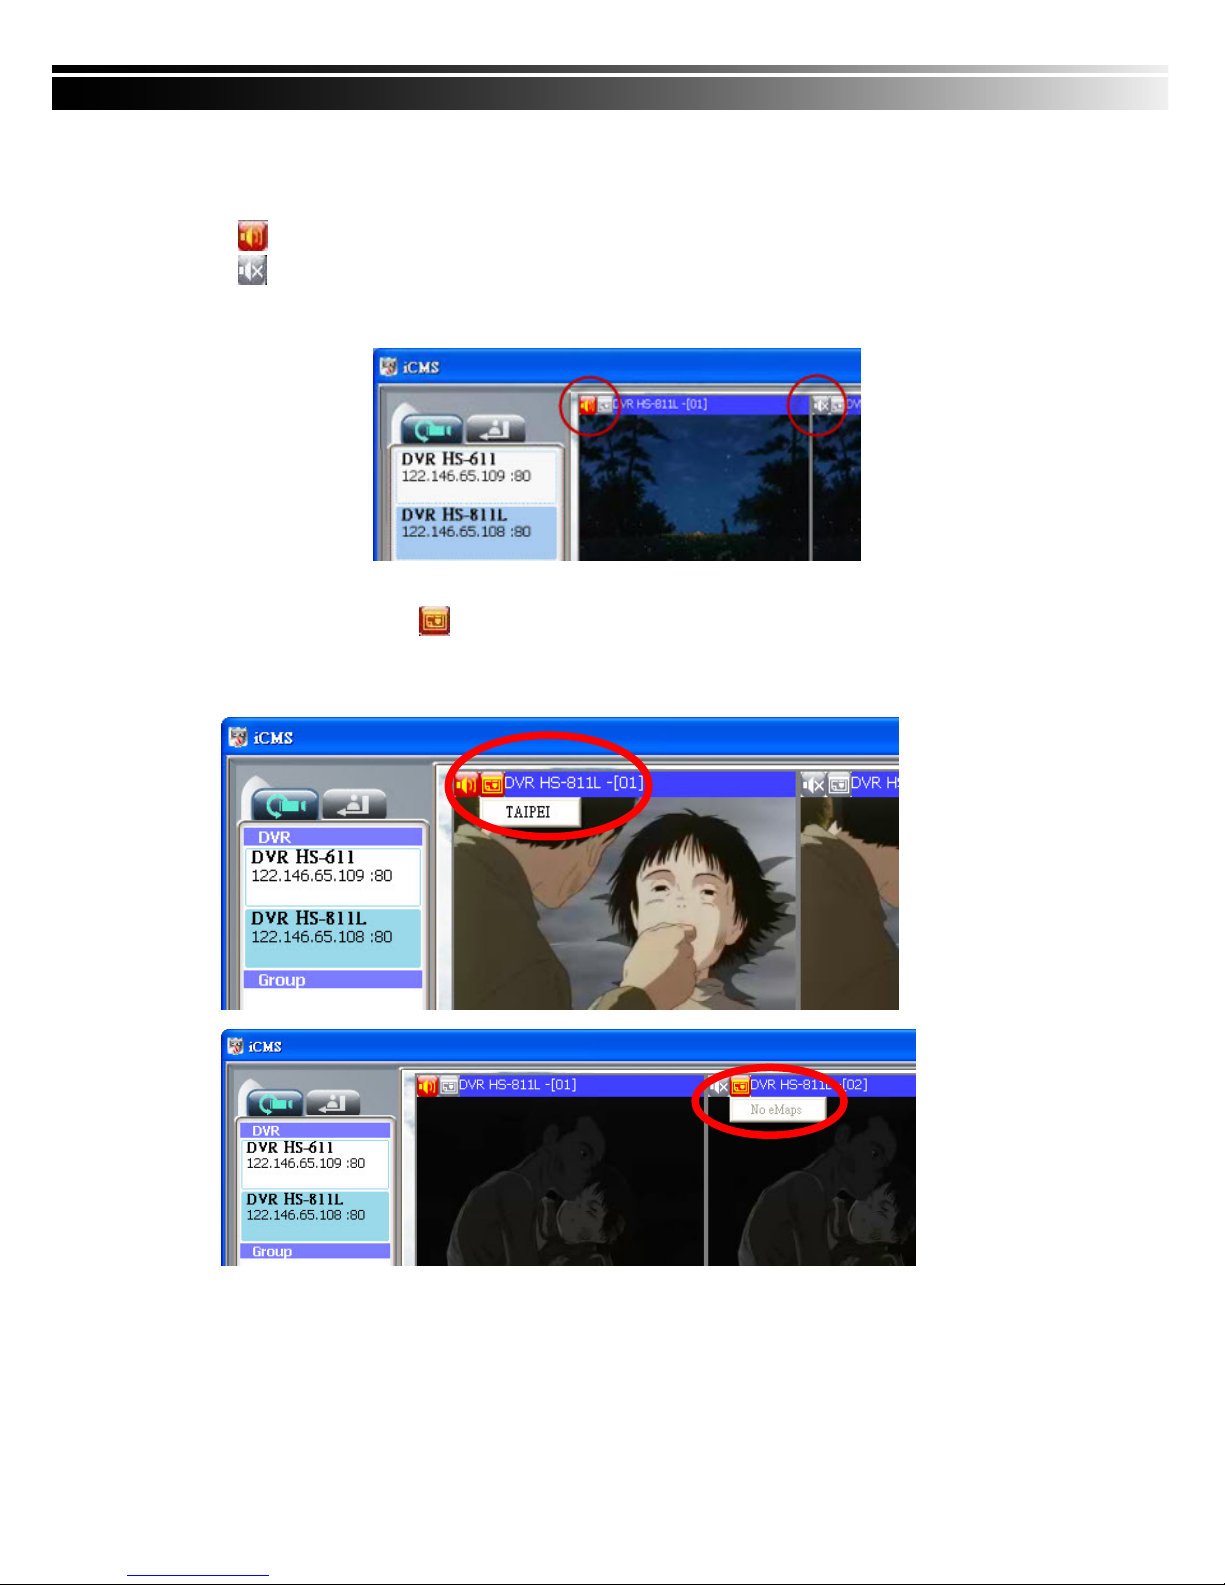
8-5.1 Audio Control
In live mode, you can turn on/off the audio signal of Ch1~Ch4:
「
」Audio signal is On
「
」Audio signal is Off
Turn on/off by clicking on the graphical icon, please note there can allow only one channel’s audi
o signal to be on at one time.
8-5.2 eMAP Display
In Live mode, pressing will bring the e-MAP drag-down menu. If the channel has been set
up to use e-MAP, the menu will show all the e-MAP titles that have been entitled to this chan
nel; otherwise, “No eMaps” will be shown. Please check “9-6.4 eMAP administration” for set
up information.
Page 71
71
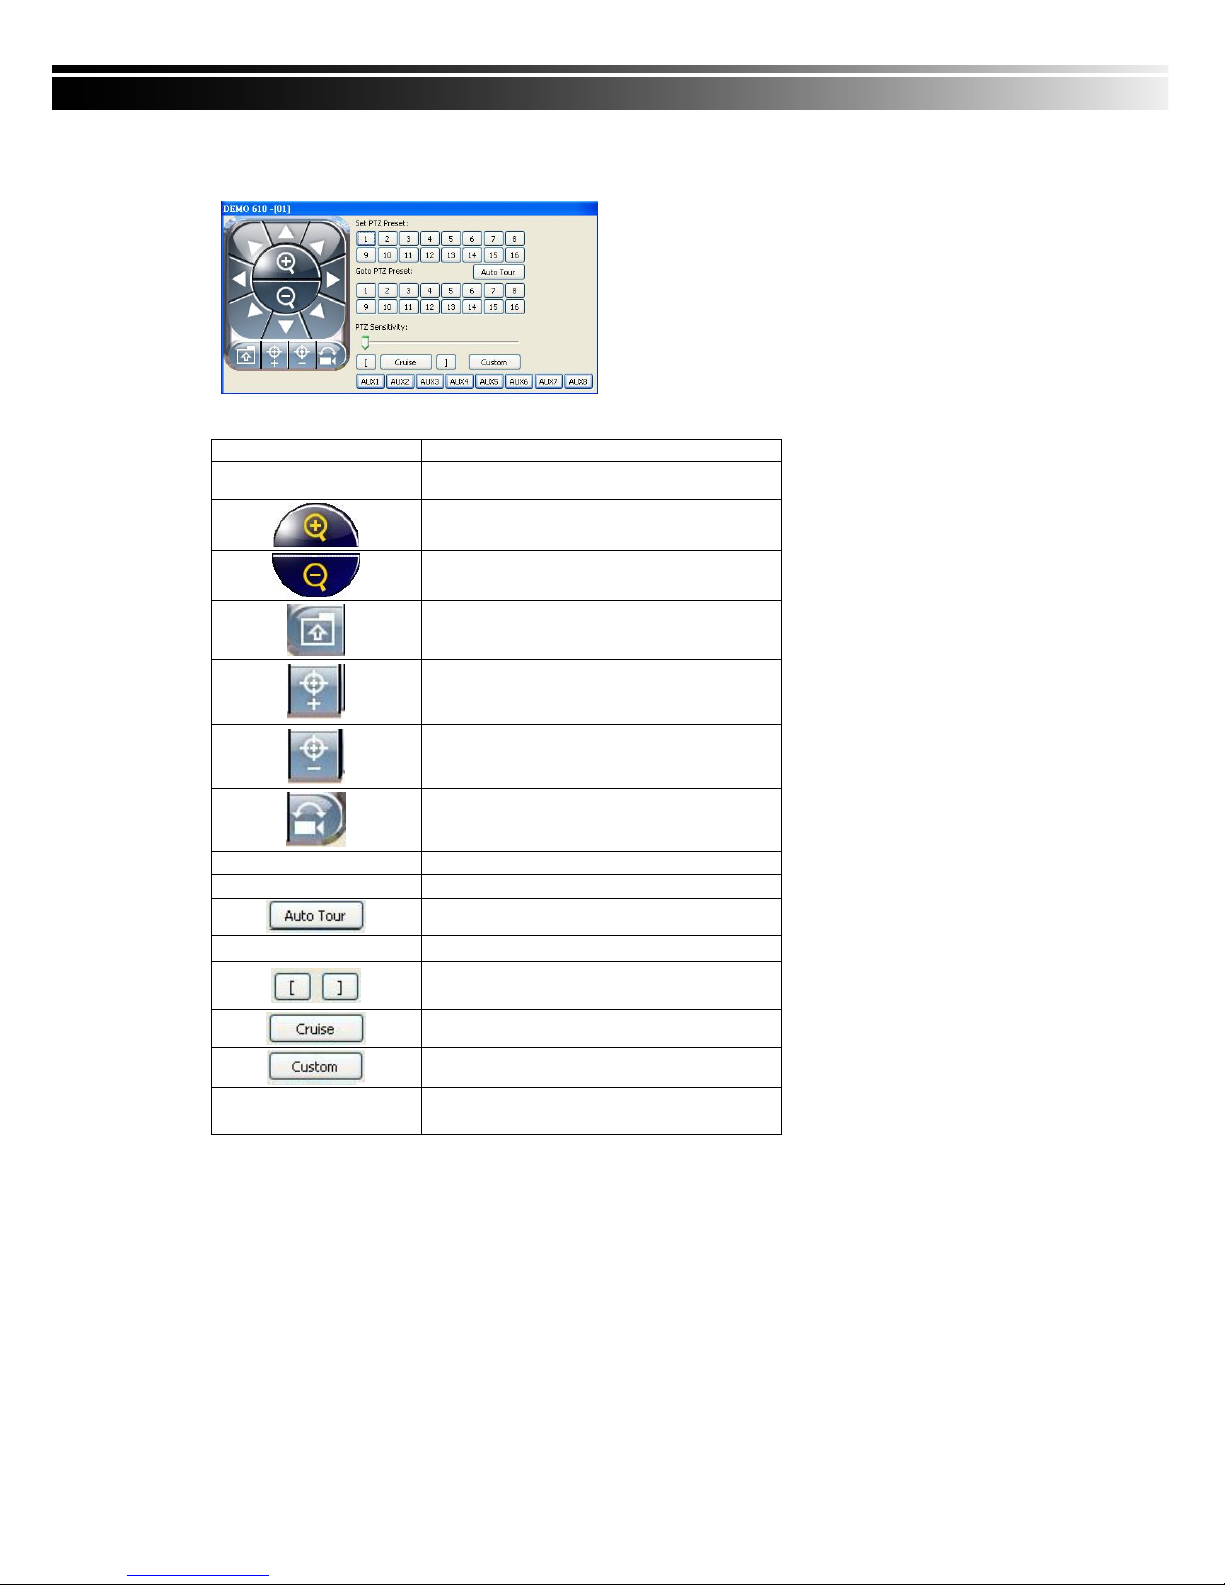
8-5.3 PTZ Control
In the main display, right click on the channel will bring up PTZ control panel as below.
*PTZ communication protocols from different brands aren’t compatible 100% sometimes. Therefore,
some of these functions may be unavailable.
Icon Description
8 direction key Rotate the PTZ
ZOOM+:Zoom in
ZOOM : Zoom out
Setup the PTZ spot as pre-set N.
FOCUS+ : Focus in
FOCUS-:Focus out
Move to pre-set N.
Set PTZ Preset Setup 16 pre-set N.
Goto PTZ Preset Move to specific pre-set N.
Activate auto pre-set tour*
PTZ Sensitivity
Setup PTZ sensitivity*
Setup the “start” and “end” of liner scan.
*
Activate the liner scan cruise.*
Customization function
AUX 1~8 ( For customi
zation)
AUTO+1 ~ AUTO+8
Page 72
72
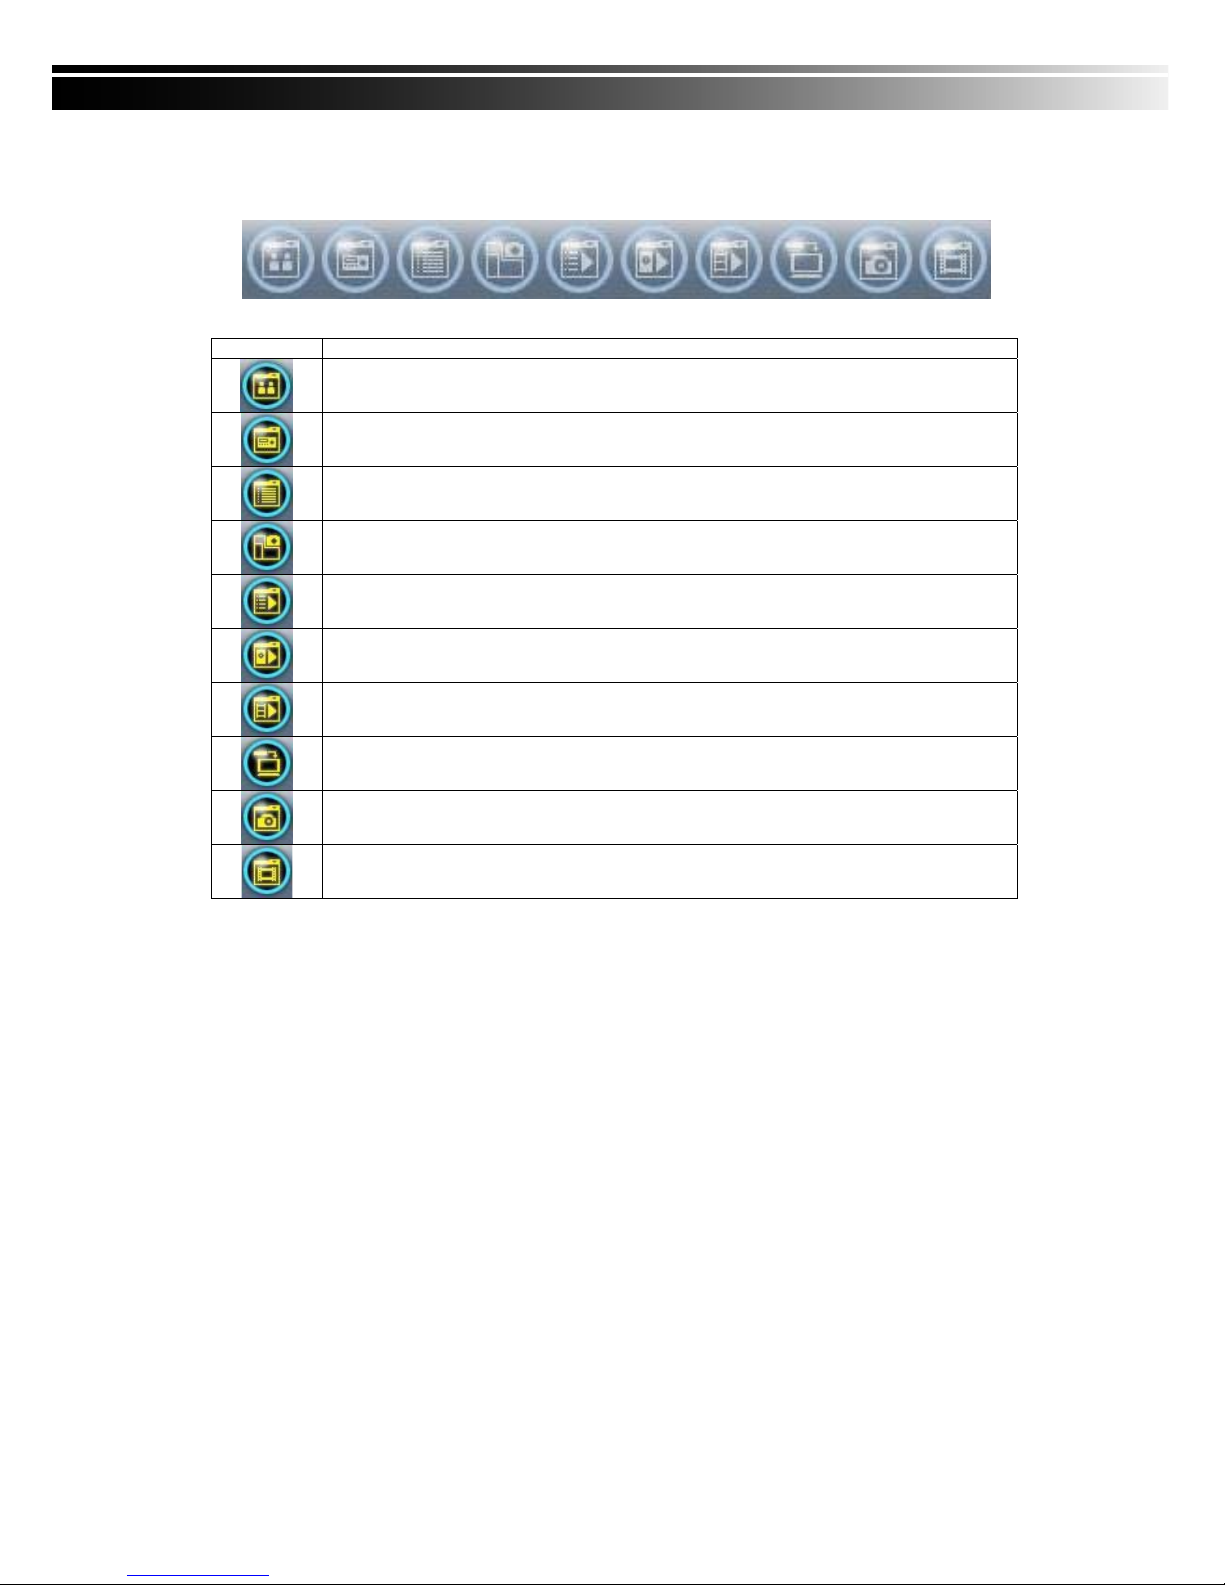
8-6 Operation Bar
10 Operations to be listed as below:
Table 9-6.1 description of 10 operations:
Icon Description
User Administration. Please see “9-6.1 User administration”
DVR Administration. Please see “9-6.2 DVR Administration”
Group Administration. Please see “9-6.3 Group Administration”
eMap Administration. Please see “9-6.4 eMap Administration”.
Remote Playback. Please see “9-6.5 Remote Playback”.
HDD Playback. Please see “9-6.6 HDD Playback”
File Playback. Please see “9-6.7 File Playback”
Event Playback. Please see “9-6.8 Event Playback”
Snapshot Data. Please see “9-6.9 Snapshot Data”
Recording Data. Please see “9-6.10 Recording Data”
Page 73
73
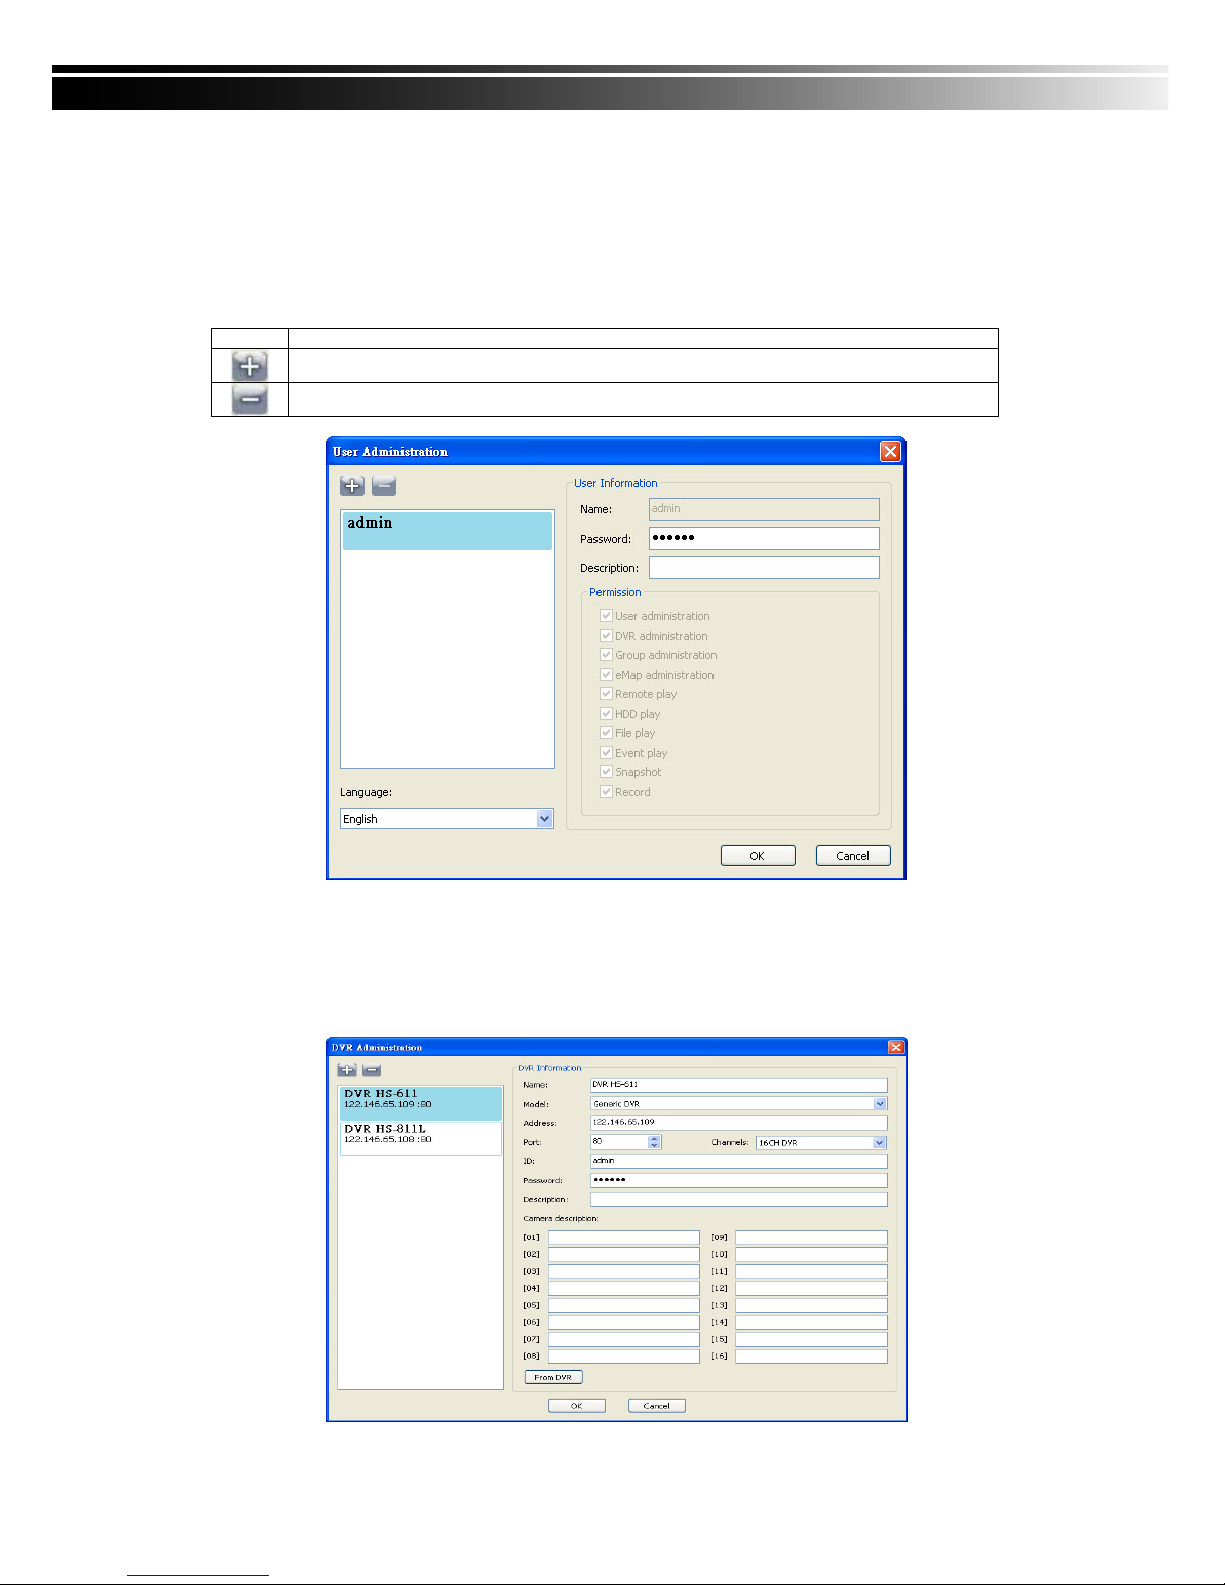
8-6.1 User administration
Before the CMS can be used on a PC, user accounts should be added with proper authority. Each user
should also be assigned a password and optionally a description. If a user does not have certain authority
assigned, he/she will not be able to operate the corresponding function on the Operation Bar. The default
is none of the authority is assigned. The administrator should assign proper authority to each user. These
user accounts can be deleted or edited later on.
Select “OK” to save the setup.
Icon Description
Add a user account. The default authority is with none permission.
Delete a user account.
8-6.2 DVR Administration
DVR connections can be added to or deleted from the CMS and their information can be edited. DVR’s
channel names can be entered here or downloaded from the DVR by pressing ‘From DVR’. Select
“OK” to save the information.
Page 74
74
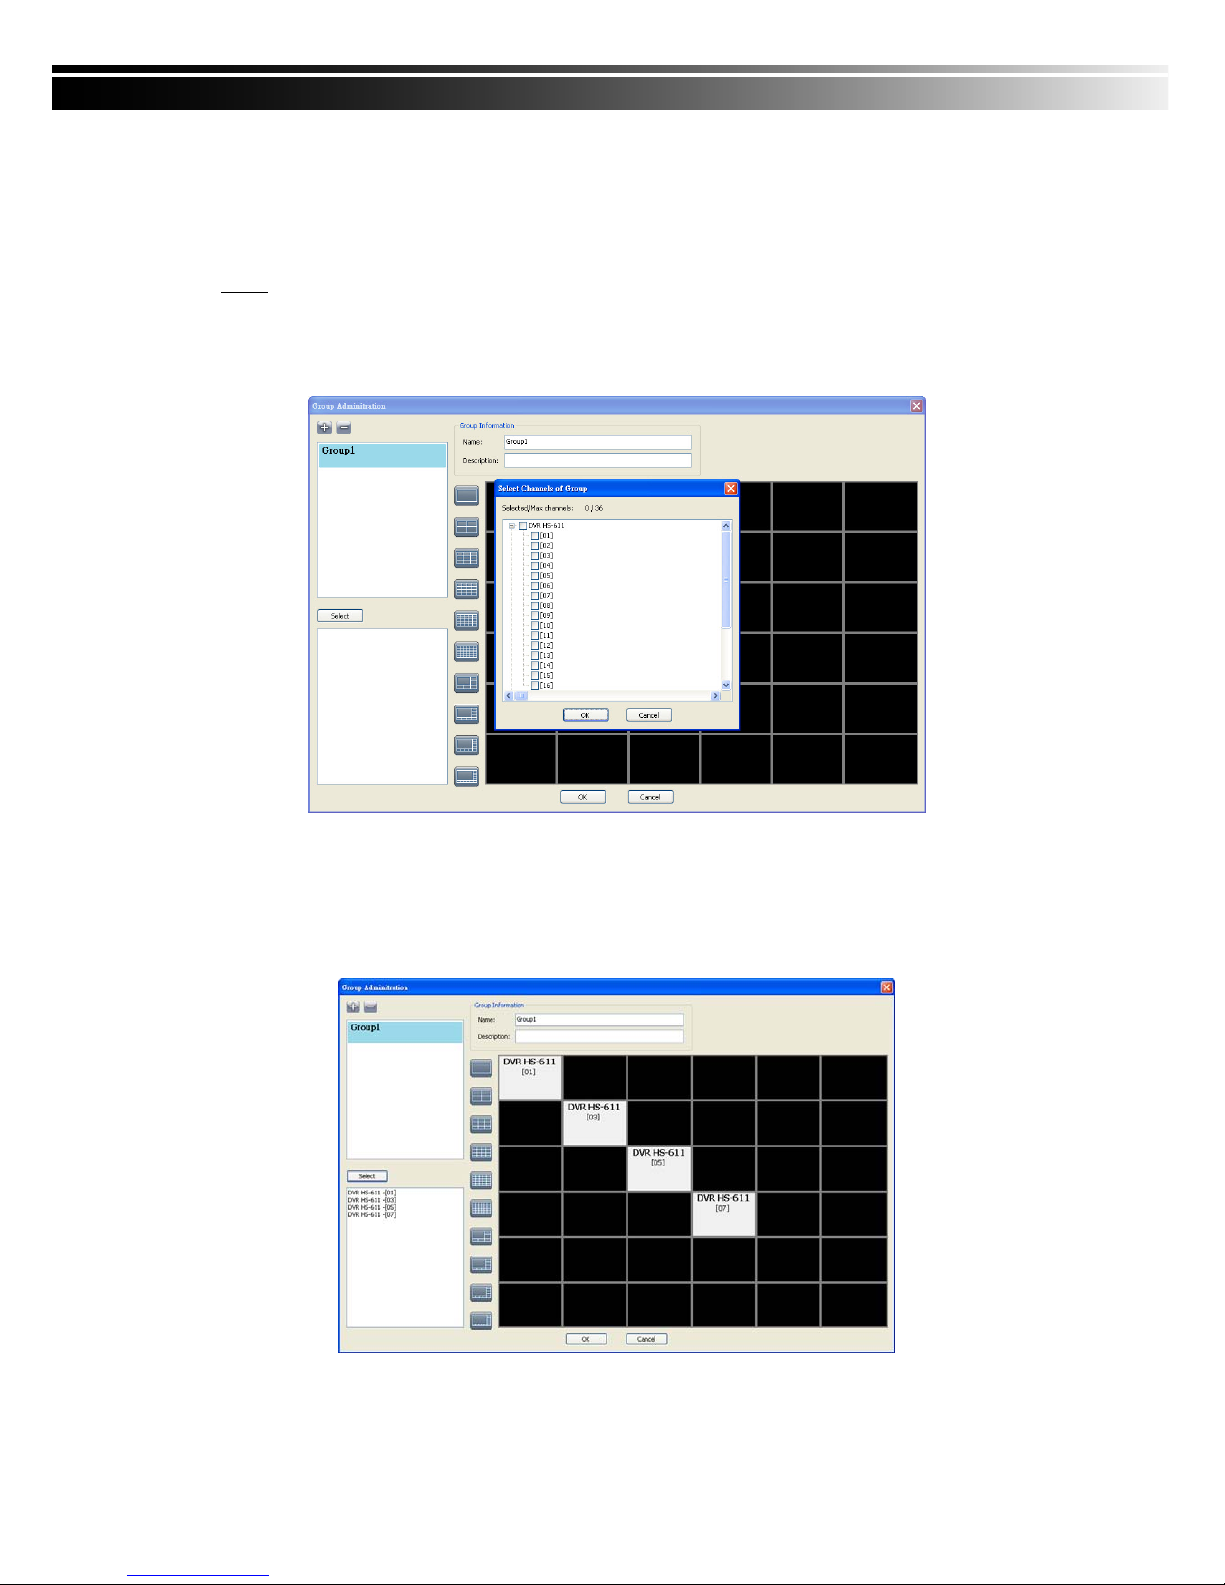
8-6.3 Group Administration
A ‘Group’ means a set of video channels from one or many DVRs, which means, user can organize
channels from different DVRs to be set in a group. This function allows you to monitor and manager
channels from multiple DVRs easily and flexible.
Steps:
1. Add a new group and set its name and description.
2. Click ‘Select’ which will bring up a new window.
3. Check the specific channels that you’d like them to be included in the group. To include all channels of
a DVR, just check the DVR.
4. Click “OK” to return to the previous window.
5. Select a display mode.
6. Drag a channel from the lower left panel into the main display to a preferred location. Or, change the
channel location in the main display by mouse dragging.
7. You can ‘Select’ again to add other channels, but the un-saved channel locations will be lost.
8. Click “OK” to save the setup.
Page 75
75
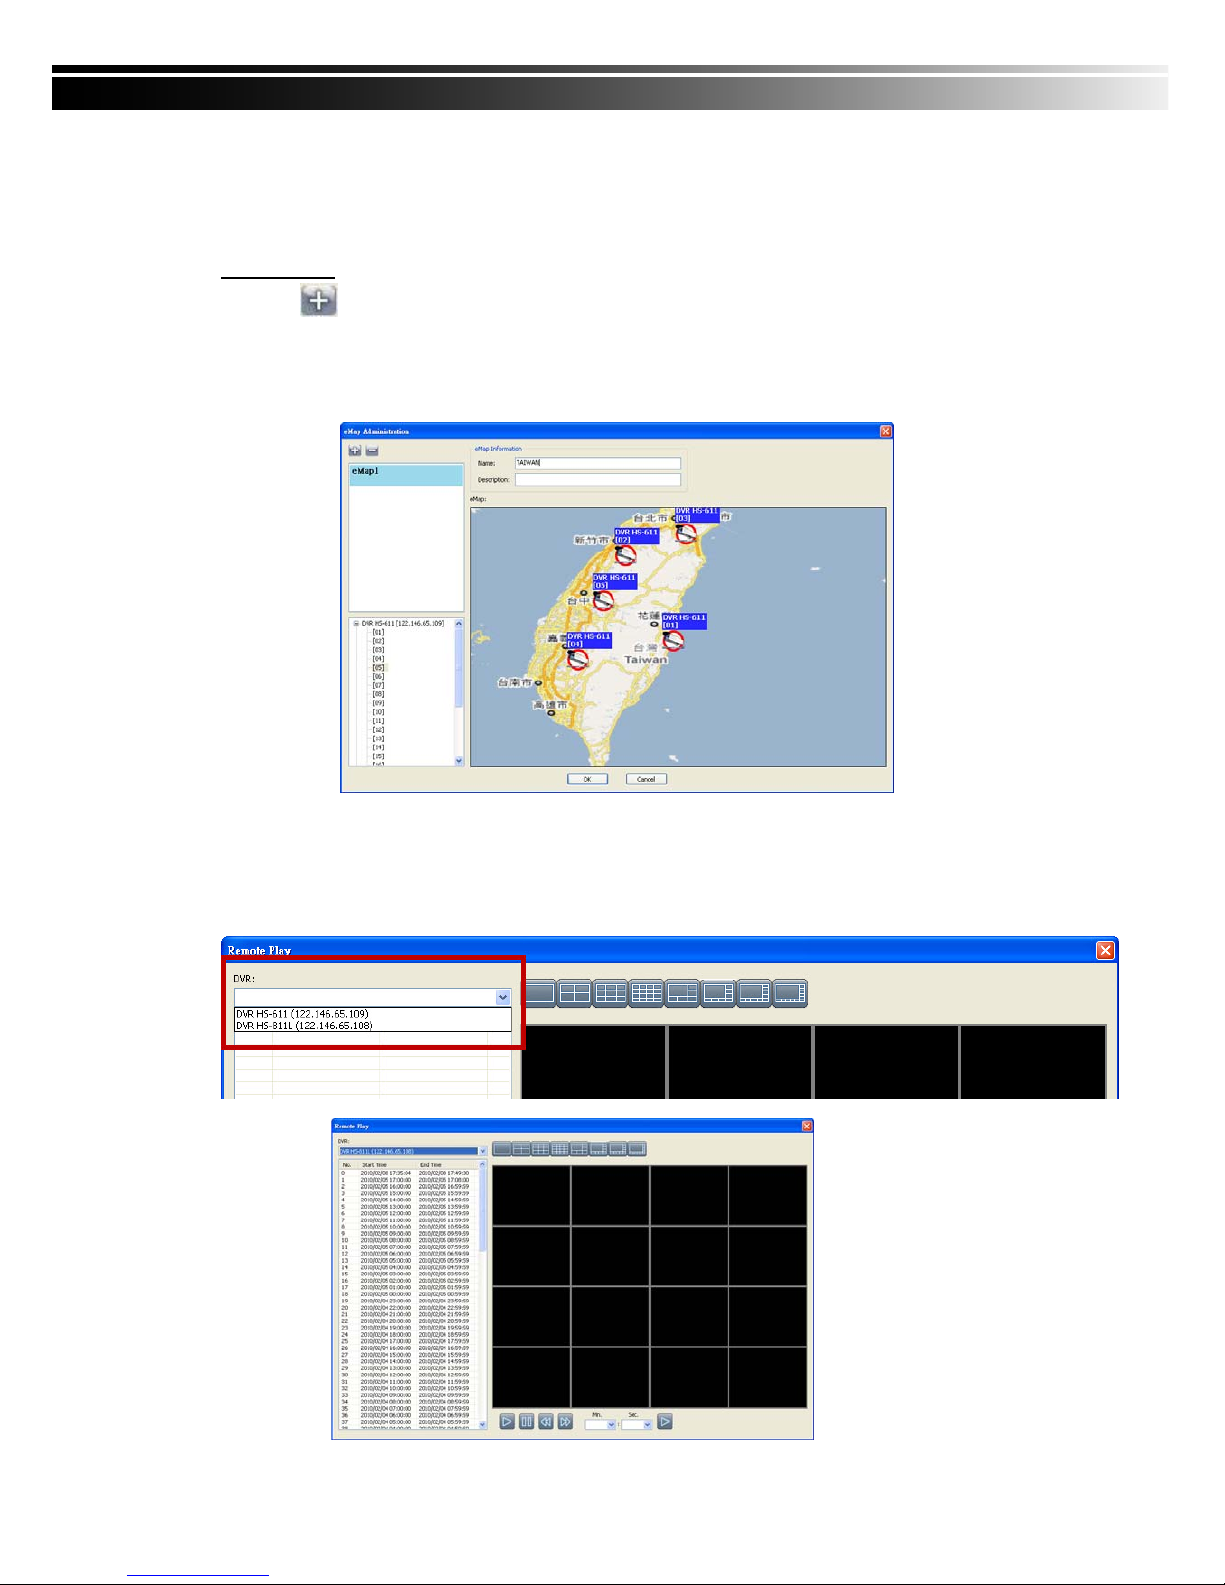
8-6.4 eMap Administration
If geographical locations are relevant, or if it is desired to use a picture as the background, eMap can be
used for the purpose. With eMap, the background picture can be picked by the user and channels from
multiple DVRs can be placed and dragged around on the picture.
Steps to follow:
1. Click
and a path for the picture will be prompted.
2. Select a picture, click OK and the picture will show in the right panel.
3. Drag channels in the left lower corner onto the picture to any position.
4. To delete a channel already on the picture, right click the channel and click ‘Remove’.
5. Click OK to save.
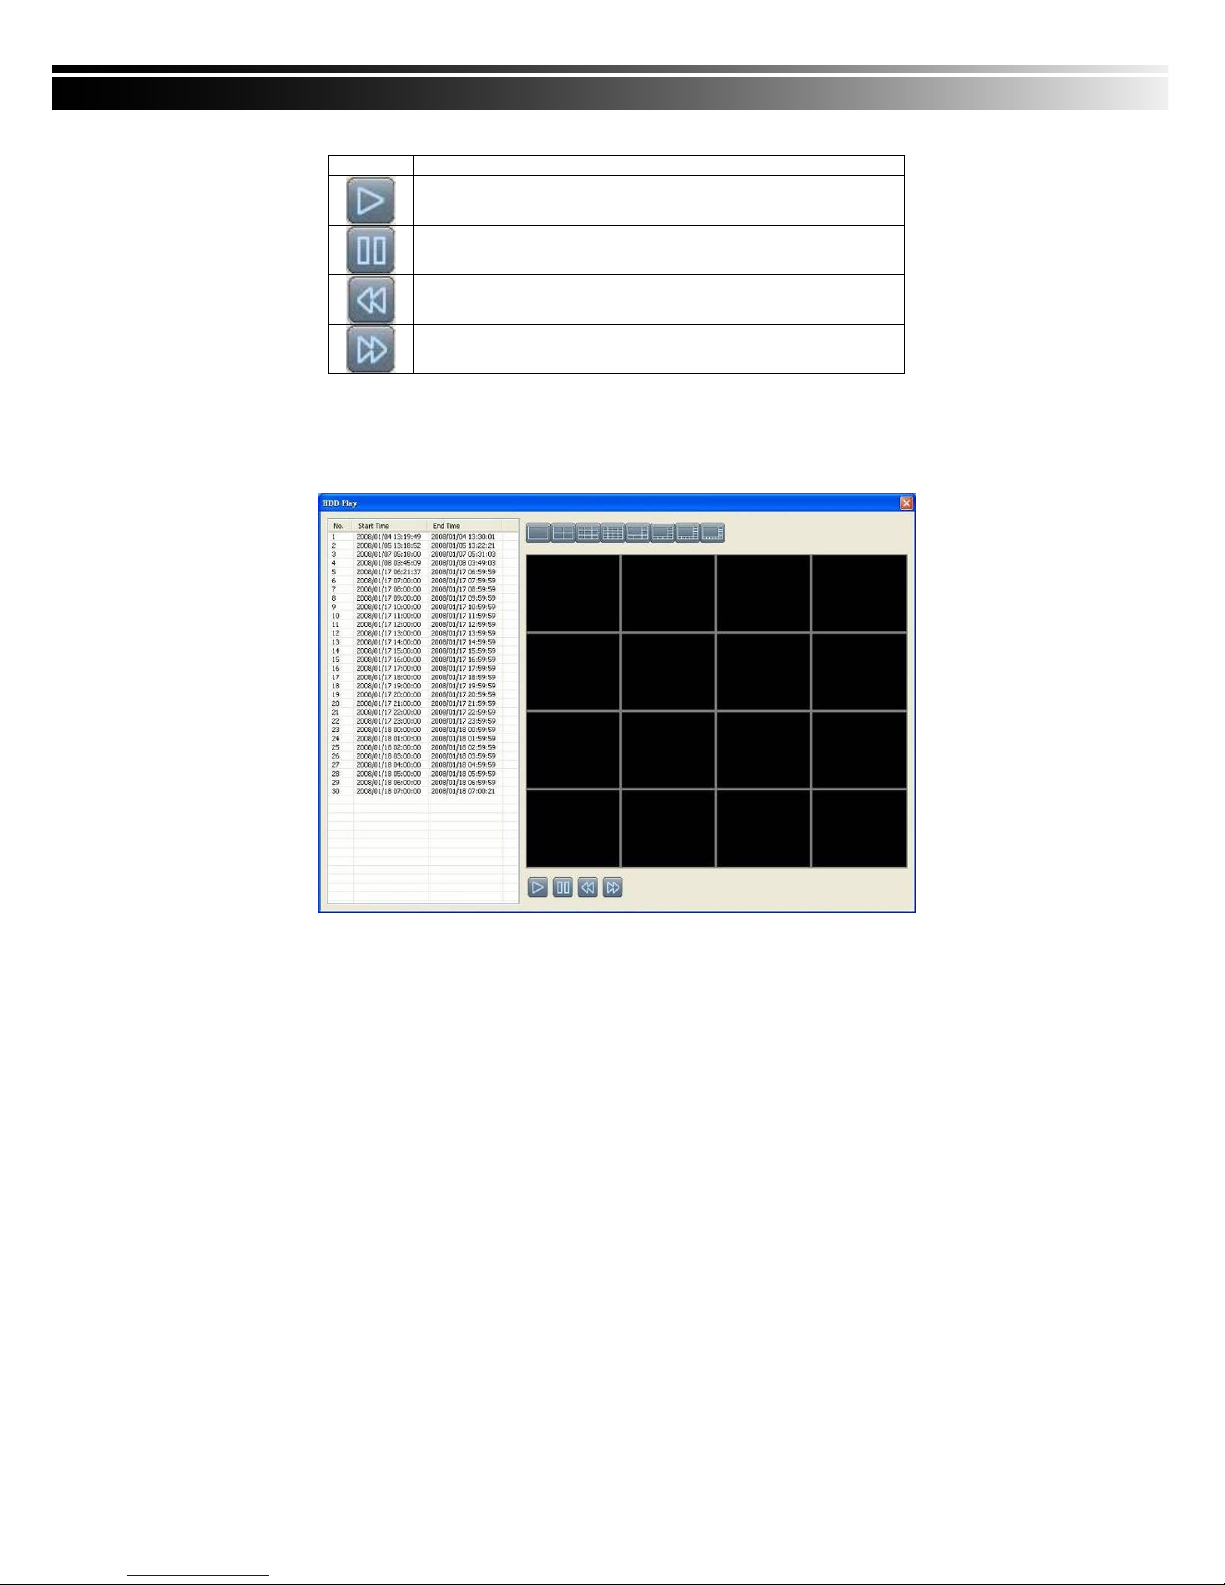
8-6.5 Remote Play
Video images recorded on a DVR can be displayed on a remote CMS. With Remote Play function, select a
DVR and a display mode on top of the screen. After the recorded segments are listed below, double click
on one to show its image on the right.
Page 76
76
Icon Description
Start playing.
Pause.
Fast forward.
Fast rewind.
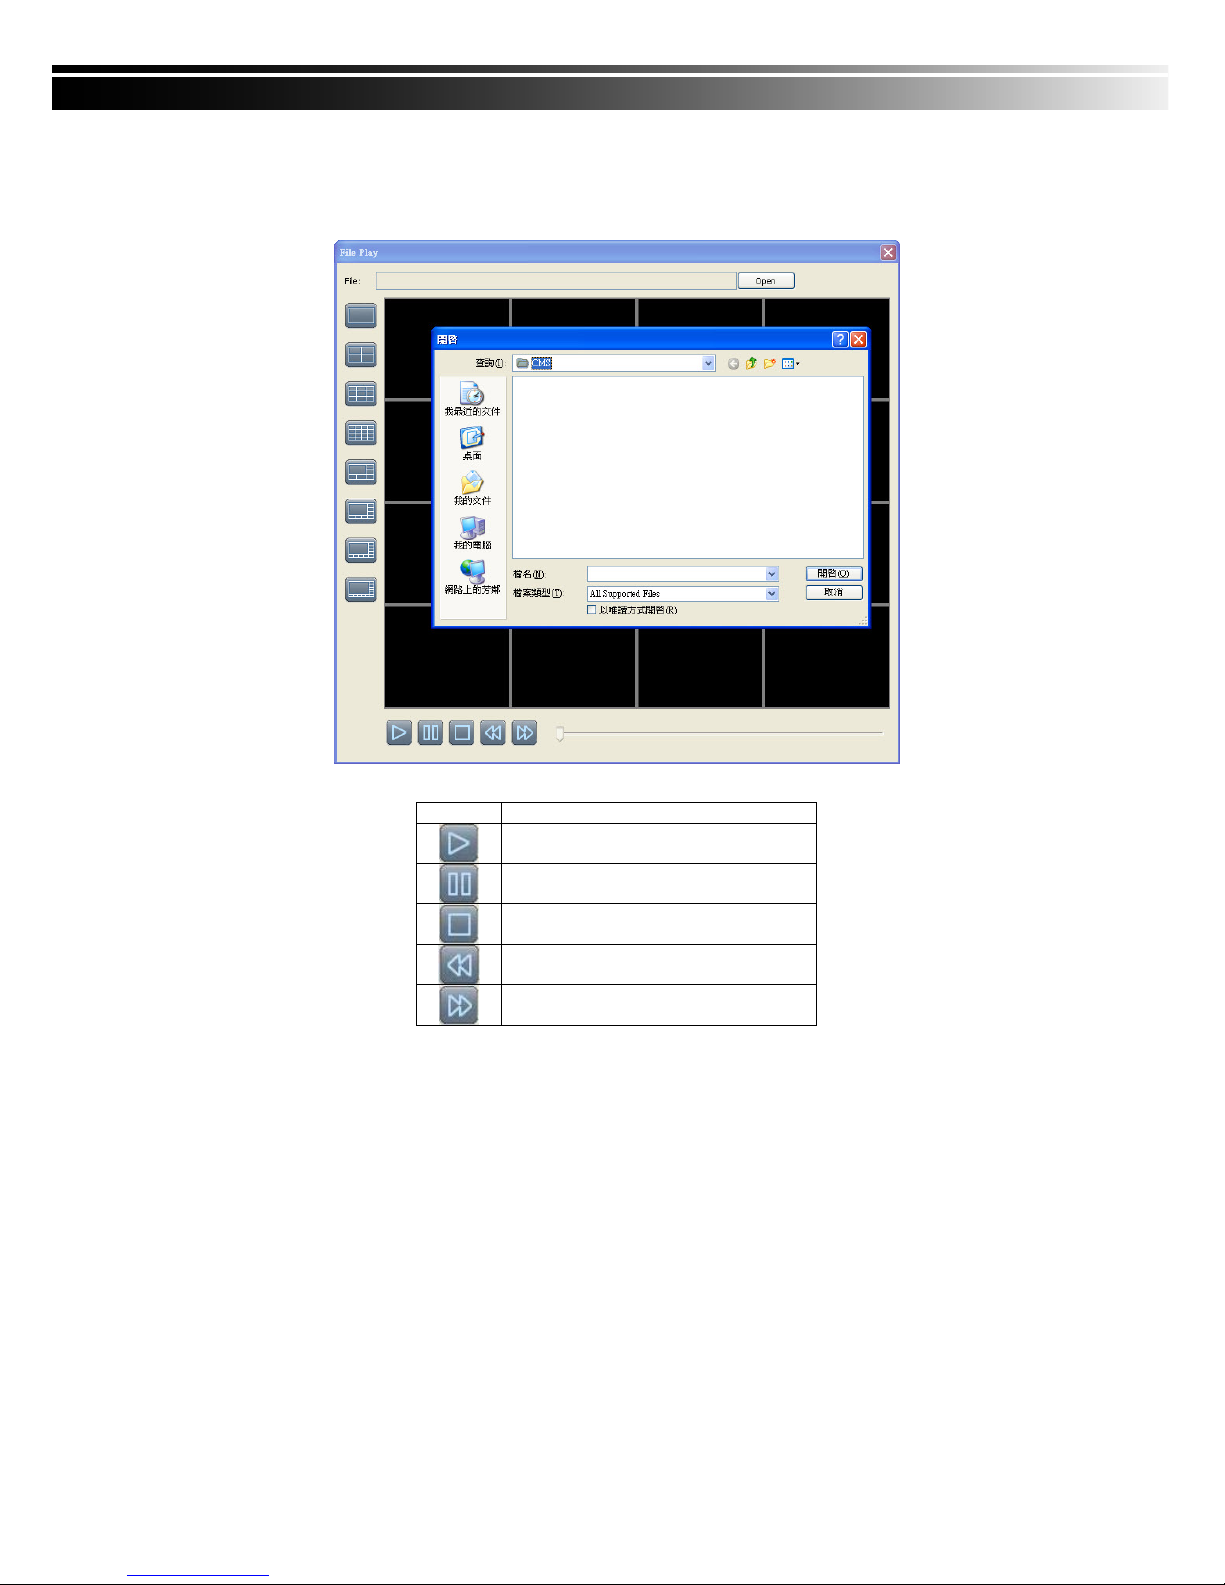
8-6.6 HDD Playback
You can directly play the recording data in the HDD that’s uninstalled from DVR by CMS. See the picture
below, the left part of screen is recording data in list that’s separated by hour and the right part is main
display. You can change the display modes and play files fast forward or rewind.
Page 77
77
8-6.7 File Playback
You can play the recorded .irf files by “File Play” in CMS. It allows you to change the display m
ode, forward or rewind the file and drag the time bar.
Icon Description
Start Playback.
Pause.
Stop playback.
Fast forward.
Fast rewind.
Page 78
78
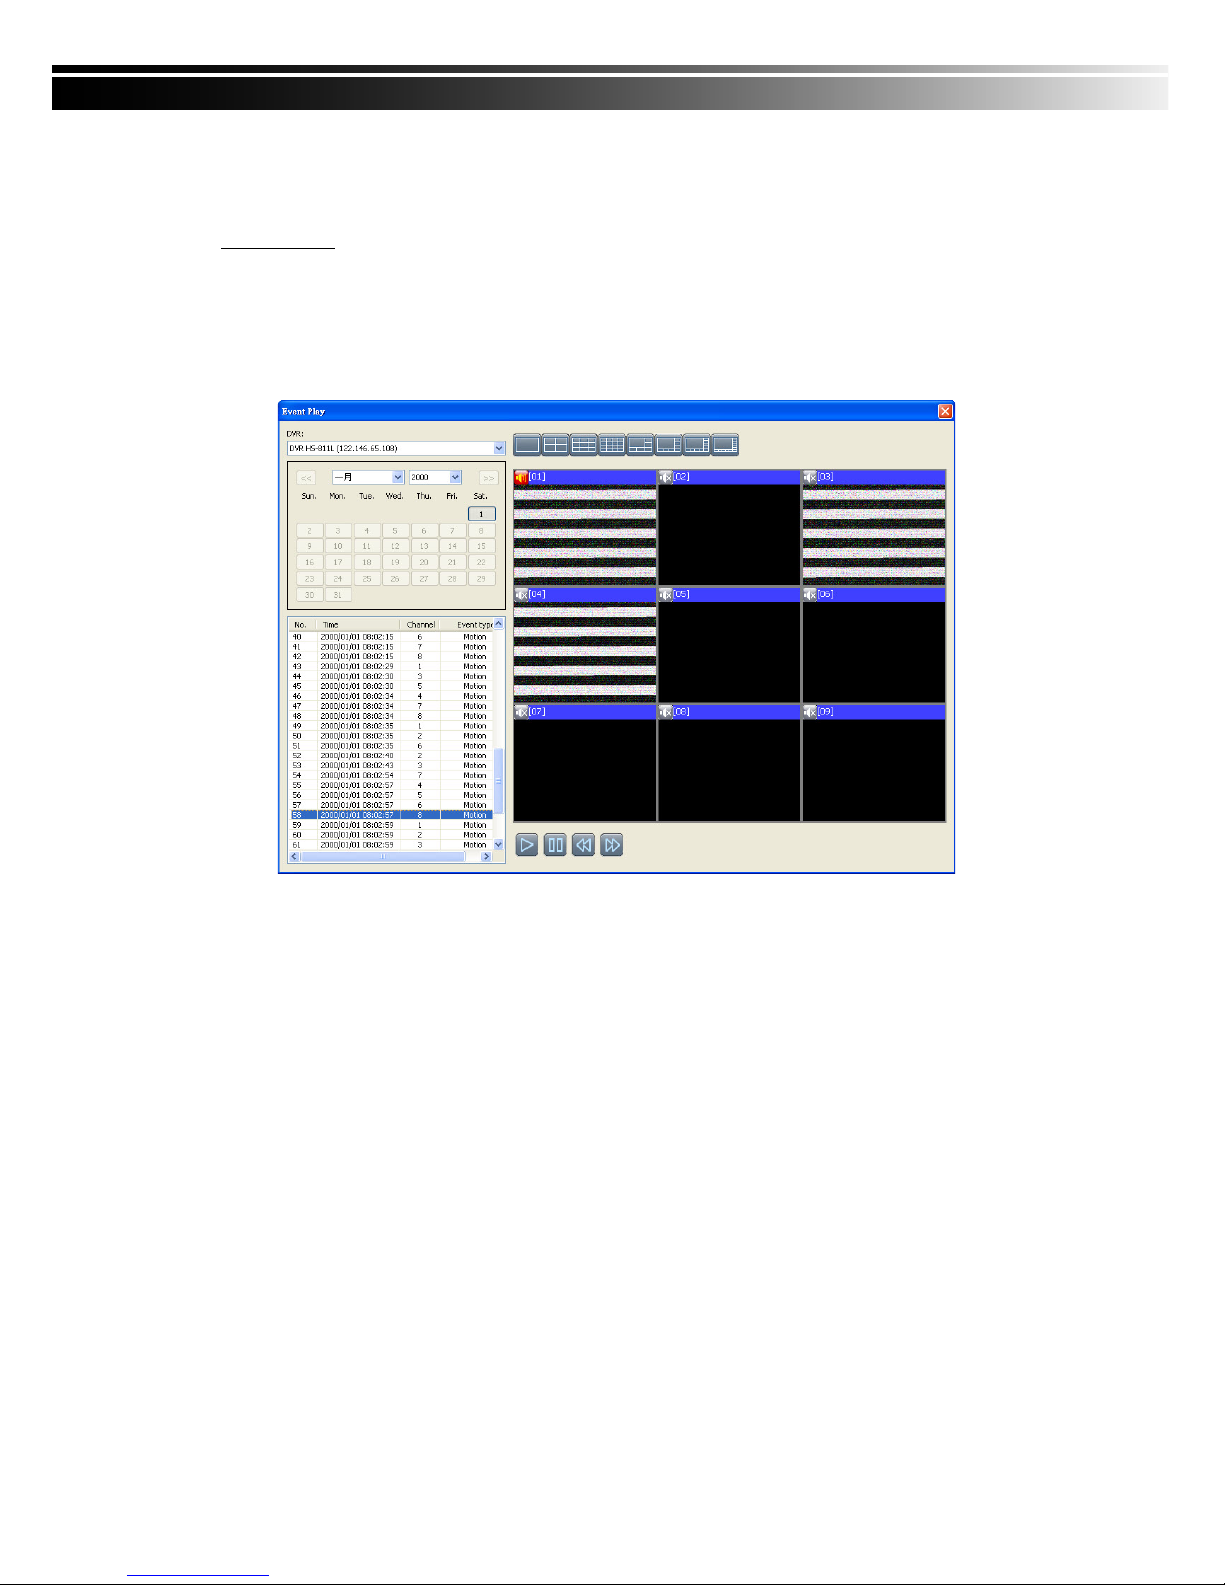
8-6.8 Event Playback
Event recordings on the DVR can be played back in CMS.
Steps to follow:
1. Select a DVR and a display mode.
2. Select a date.
3. Double click an event and play back the images on the right.
Use buttons at the bottom to control the playback.
Page 79
79
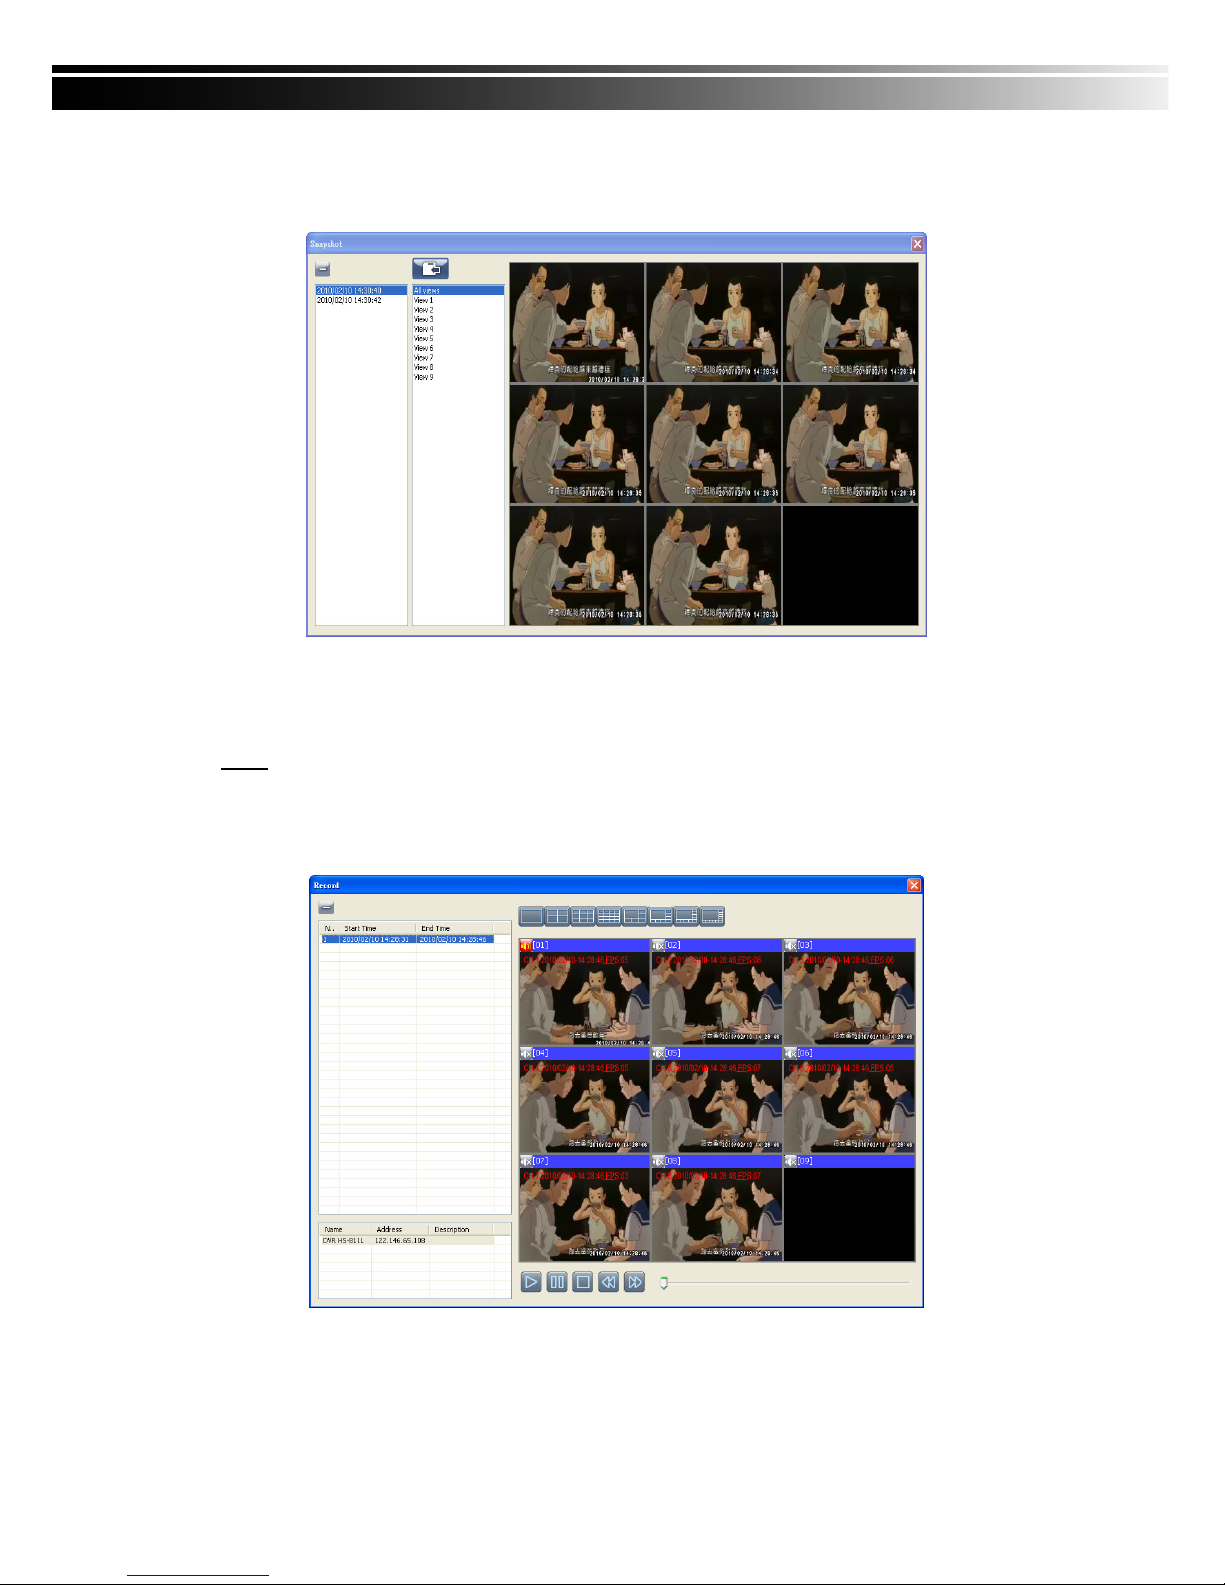
8-6.9 Snapshot Data
It can display all the snapshots you’ve taken in line in “Snapshot Data”. You can review, delete or save as
other files here.
8-6.10 Recording Data
It can play all the recording files you’ve recorded in line in “Recording Data”. You can play or delete them
here.
Steps:
1.Choose the recording time at upper left corner, it will be played on the main display.
2.You can choose the display mode.
3.Time bar will be shown at right lower corner, please drag the time bar to specify the recor
ding time you’d like to play.
 Loading...