

Page 1

1
SUP80230C Series
Thermal Printer
Manual
VERSION 1.1.01
August 2010
Copyright of this manual remains with Sunphor, reproduction of any section of this manual is prohibited
without prior written permission of Sunphor.
While all care has been taken to ensure the accuracy of this user manual, the continual development of
this product may reflect some inaccuracies.
Sunphor takes no responsibility for the inaccuracies and will endeavour to update this user manual
periodically. Further assistance can be supplied by your local dealer..
Page 2

2
Notes
1. The printer is to be installed on a flat dry surface.
2. Do not store the printer in hot and humid conditions.
3. The printer’s power adapter is to be connected to a stable power supply of 240-Volts, please do not use
other devices on the same power socket, to avoid voltage fluctuations.
4. Avoid water or conductive material (for example: metal). If water is present on the surface please turn off
the power immediately.
5. Please ensure that a thermal paper roll is always inserted in the printer to avoid damaging the printing
roller and the printer head.
6. If you do not intend to use the printer for a long time, please disconnect the printer's power adapter.
7. Please ensure that your printer is serviced and repaired by a qualified technician. No responsibility is
taken for misuse and/or non-qualified servicing.
8. The power adapter that comes with this printers is specifically designed to be only used with the printer,
please do not use an alternative power adapter.
9. In order to ensure print quality and longevity of your printer, please ensure that only quality thermal
paper rolls are used.
10. Please make sure the printer power is turned off before plugging in the power cord or the data cable,.
11. Please keep this manual in a safe place, where it can be accessed easily and used for your reference.
Application Area
² Electronic Cash Register POS System Docket Printing
² Electronic Funds Transfer EFTPOS Systems Docket Printing
² All retails outlet tax invoice, and lay-by (lay away) dockets
² All accounting reports in 80mm format
² Measuring instrument information in 80mm format
² All other reports in 80mm format Tax, single-bill printing
Page 3
3
Main Feature
² Print high-quality, low cost
² Low-noise, high-speed printing
² Supports cash drawer release
² Small and lightweight
² Easy paper loading, ease of use and maintenance
² Built-in data buffer (when printing can receive print data)
² Communication interface optional parallel port or serial port
² Enlarged character printing, adjustable characters for line spacing
² Supports different densities bitmap and downloaded graphics
² Supports faster bitmap printing
² The driver printing (mode), implements and calls from the inbuilt word-bank for high-speed printing
² Low power consumption, Low operating costs (no ribbons or ink cartridges)
² Compatible ESC / POS print commands set
Technical Parameters:
Print method Line thermal
Print speed 230 mm / sec
Paper width 79±0.5mm
Print Density 576 dot/line
Cutter Full auto cutter
Characters size
ANK Character, Font: A: 12*24dots
FontB:9*14dots Simplified/Traditional:24*24dots
Print Command Compatible ESC/POS Command
Interface Type USB / Serial / Parallel / Lan
Reliability 160KM
Barcode Type
UPC-A/UC-E/JAN13(EAN13)/JAN8(EAN8)/CODE39/
ITF/CODABAR/CODE93/CODE128
Printing paper thick 0.06-0.08MM
Adapter Voltage Input
AC 110V/250V,50-60Hz
Adapter Voltage output DC 24V/2.5A
Page 4

4
Printer Input Voltage DC 24V/2.5A
Cashbox Control DC 12-24V/1A
Operating Temperature
0-45℃, Humidity:10-80%
Storage Temperature
-10-60 , Humidity℃ :10-90%
Connection the printer (Switch off first)
a. Connect the power adapter cable to the printer power interface
b. Connect the data cable from the PC to the printer port interface
c. Connect the cashdrawer cable to the printer's cashdrawer interface
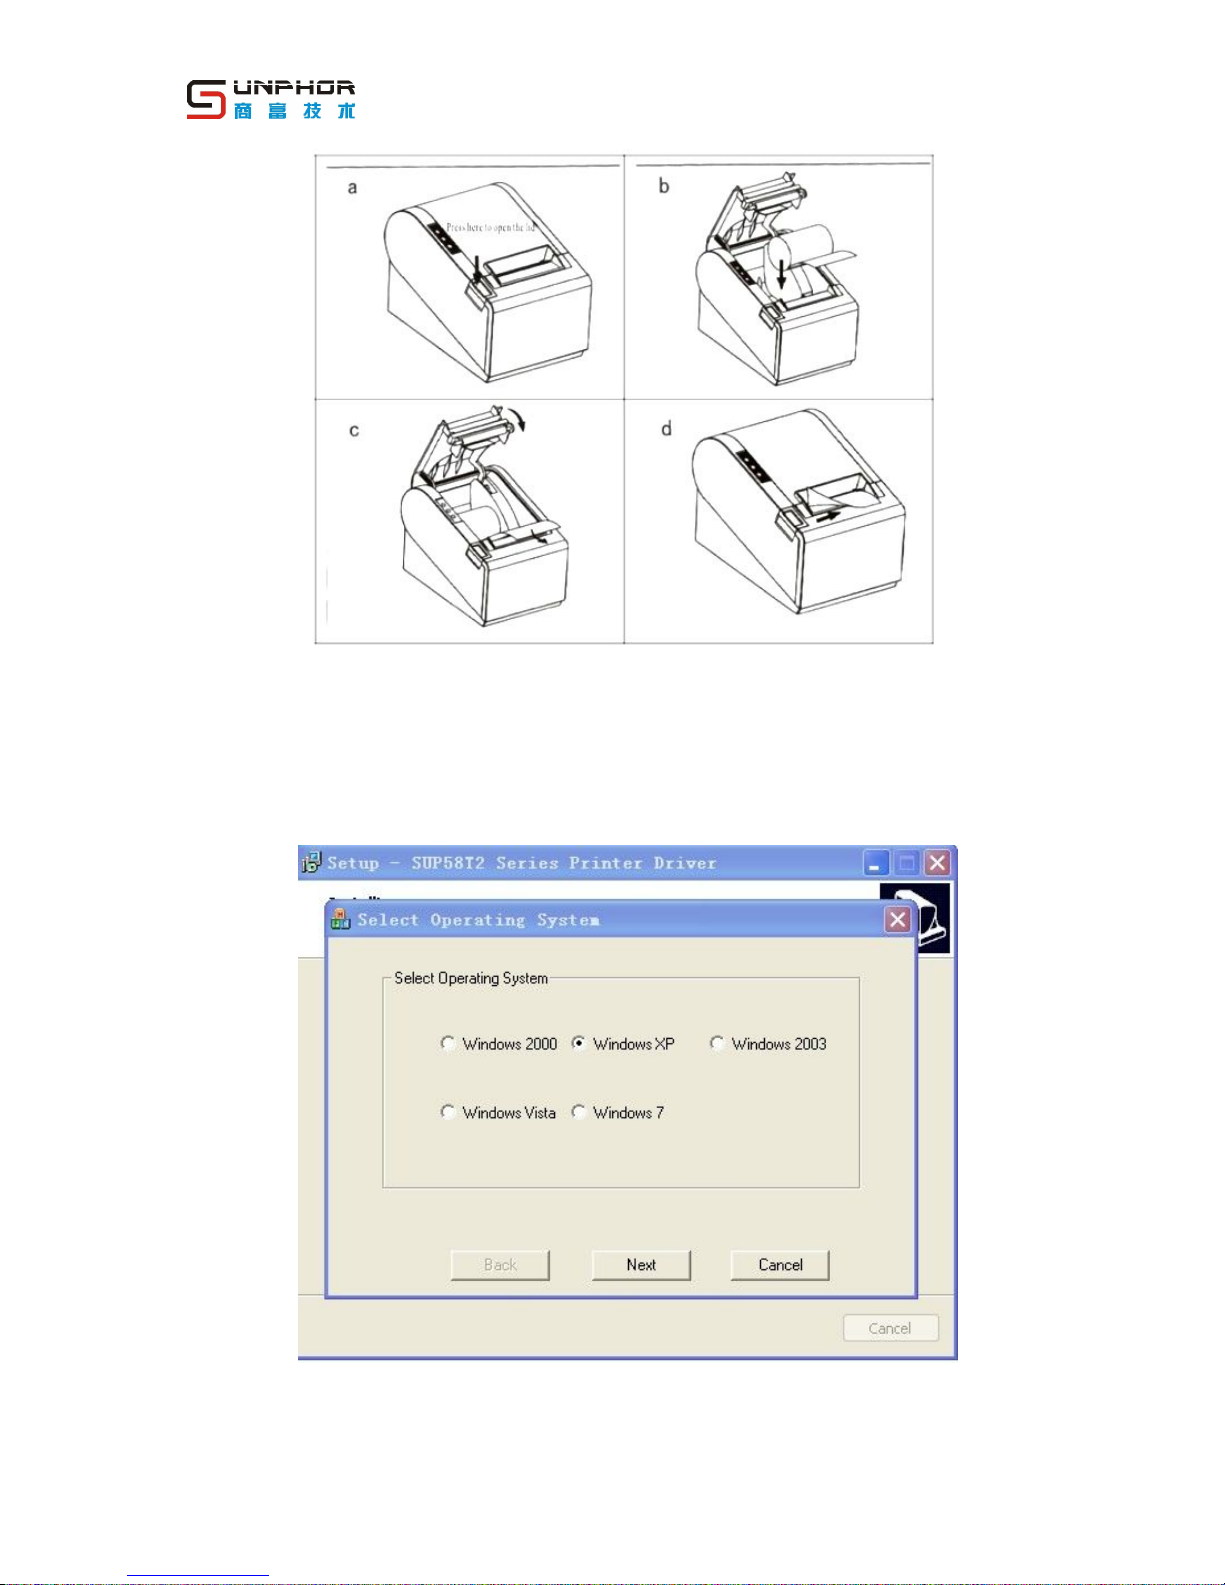
Installation of paper roll (see next image)
a. Open the printer cover by pressing the release button on the front left-side of the printer.
b. Insert the thermal paper roll and note the direction in the image, to ensure the roll is correctly inserted .
c. Pull a small amount of the thermal paper roll in the direction of the paper cutter until it is showing on the
outside of the printer, before closing the lid.
d. Close the top lid, then tear the excess paper, so that it is level with the paper cutter.
Page 5
5
Installation of Printer drive
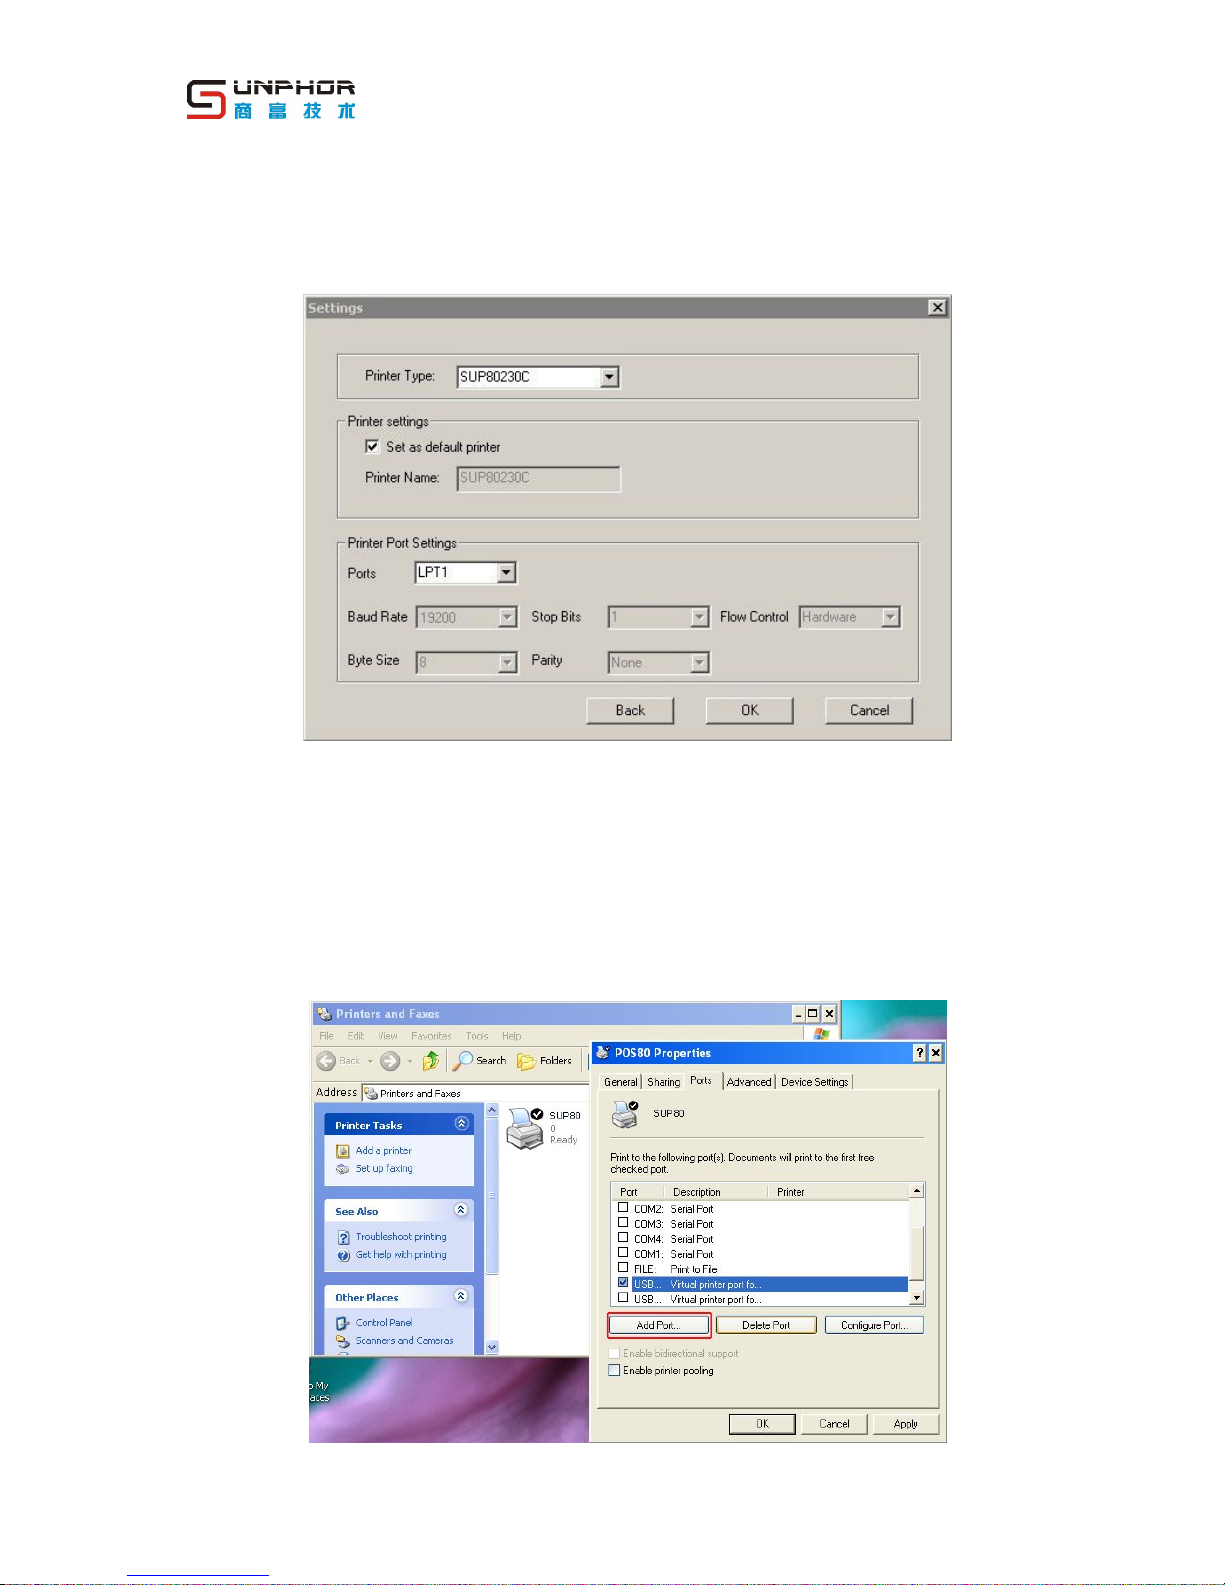
1. Insert the driver CD, open the driver folder ”SUP80230C Driver”. Double-click the “setup.exe”. Select
your operating system. Click next to continue installation. See the following image:
Page 6
6
2. Select ”SUP80230C” and click OK to finish the installation. See the following image:
3. Auto open the “SUP80230C Properties” panel at the last step of installation, or Click Start> Control
Panel> Printers and faxes> to open the printer properties window, and select the appropriate “Port”
(USB, Serial or Parallel). For the LAN port, you may need a new port; click “Add Port...”, See the
following image:
Page 7

7
4. Choose “Standard TCP/IP Port”, and click “New Port”, See the following image:
5. Select “Add Standard TCP/IP Printer Port Wizard”, click “Next” to continue the installation.
See the following image:
Page 8

8
6. Print the Self-Test to obtain the original IP Address of the Printer.
Follow these steps to print the Self-Test:
1. Correctly load the thermal paper.
2. Press the “FEED” button, then turn on the power switch, when both the “ERROR” light and the
“PAPER” light come on, release the “FEED” button.
3. The printer will automatically print the Self-Test docket
4. Find the original IP address on 6th line of the docket. See the following image:
7. Enter the IP address, and click “Next” to continue the installation.
Page 9

9
8. Add the standard TCP / IP Printer Port Wizard, select the device type, and then click “Next” to
continue the installation, See the following image:
9. Click “Finish” to complete the installation, as shown:
Page 10
10
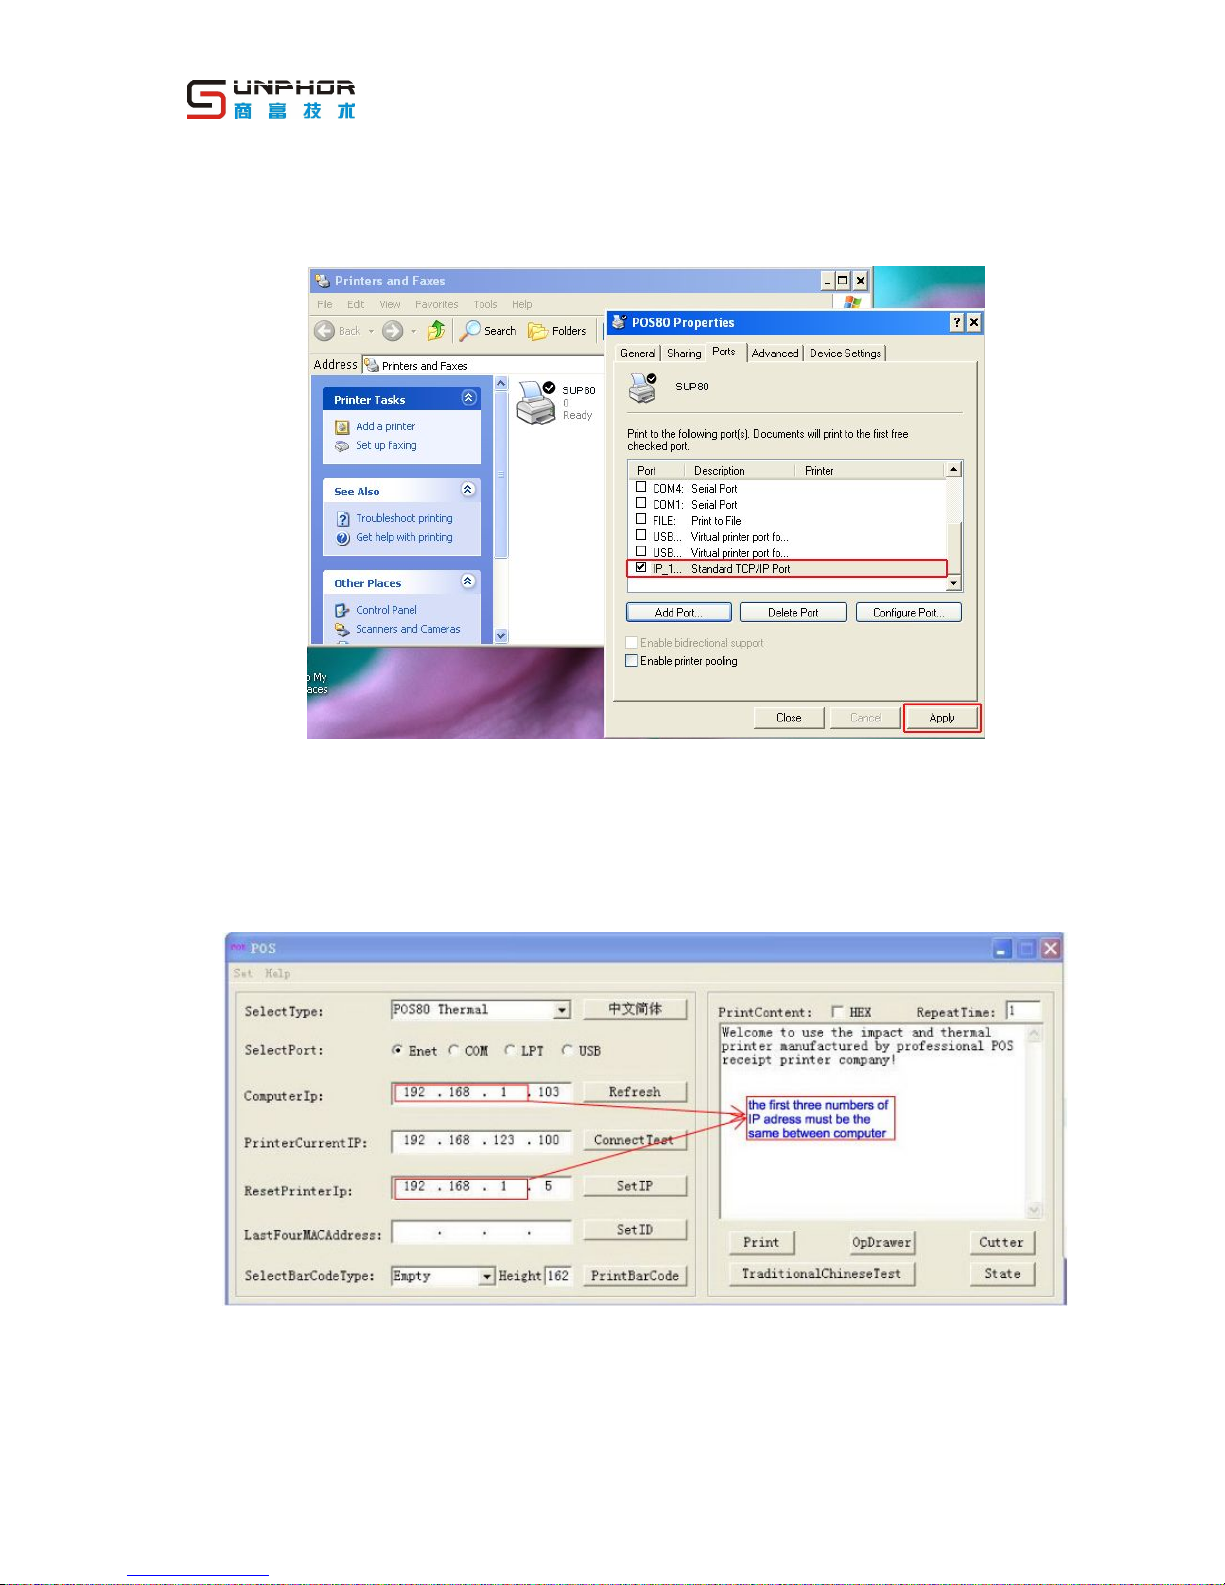
10. Select "Properties", click on the port, and then select the correct IP port address, click Apply, you can
now print a test page, as shown:
Note:
1> The first three numbers of IP address should be the same between computer and printer. The
last number should be different. Then the Printer can work properly. If not, please reset your
computer IP address. Or run “IP config” program in the driver CD to reset Printer IP address.
Image instruction:
Page 11

11
Clean of printer
When the printer has the following conditions, you should clean the print-head:
1. The printer does not print clearly and the thermal paper is Ok
2. The page-test printing is not crisp and clear
3. Paper feed is noisy
Printer cleaning steps are as follows:
1. Turn of the power to the printer and open the top cover. Remove the thermal paper roll.
2. If the printer was just printing then wait for the print head to cool down.
3. With a soft cotton cloth dipped in ethanol (please make sure there is no dripping), wipe the thermal
printer head gently and remove any dust or stains.
4. Wait for the complete evaporation of any ethanol, then place the Thermal paper roll back in the printer
and close the top cover, then print a test docket.
Notice
1. When doing maintenance on the printer, make sure the power is turned off.
2. Don't allow your hands or any metal object to touch the surface of the printer head. Beware that metal
tools can damage the rubber roll, the sensor and other components in the printer.
3. Don't use any solvents on the components of the printer.
4. Do not turn on the printer until all cleaning agents are fully dried.
 Loading...