

Sunphor SUP58T1, SUP58T2, SUP58T3 User Manual

58mm Thermal Printer Series
Manual
(SUP58T1/ SUP58T2/ SUP58T3)
VERSION 2.0.01
July 2010
Copyright of this manual remains with Sunphor, reproduction of any section of this manual is prohibited
without prior written permission of Sunphor.
While all care has been taken to ensure the accuracy of this user manual, the continual development of
this product may reflect some inaccuracies.
Sunphor takes no responsibility for the inaccuracies and will Endeavour to update this user manual
periodically. Further assistance can be supplied by your local dealer.
1

Content
Notes ........................................................................................................................................... 3
Application Area ....................................................................................................................... 3
Main Feature ............................................................................................................................. 4
Technical Parameters ............................................................................................................... 4
Connection of the printer….…………………………………………………………………..5
Installation of paper roll……………………………………………………………………….6
Driver Installation…………………………………..………………………………………….6
Baud Rate Setting(for computer)……………………………………………………………..8
Configuration Program “Iprinter.exe”……………………………………………………...10
Set or Change Printing Logo………………………………………………………………...12
Set or change language code page …....................................................................................14
Set Baud Rate (only for Pos58)……………………………………………………………..15
Set Repeat mode (only for Pos80)…………………………………………………………..15
IP Address Tool “Printer.exe” …………………………………………………………….. . 16
Set or Change Printer’s IP Address ....................................................................................... 16
Change the printer ID ........................................................................................................... 19
Self-test Operation .................................................................................................................. 19
Printer Cleaning ...................................................................................................................... 19
Other Notice ............................................................................................................................ 20
2

Notes
1. The printer is to be installed on a flat dry surface.
2. Do not store the printer in hot and humid conditions.
3. The printer’s power adapter is to be connected to a stable power supply of 240-Volts, please do not use
other devices on the same power socket, to avoid voltage fluctuations.
4. Avoid water or conductive material (for example: metal). If water is present on the surface please turn off
the power immediately.
5. Please ensure that a thermal paper roll is always inserted in the printer to avoid damaging the printing
roller and the printer head.
6. If you do not intend to use the printer for a long time, please disconnect the printer's power adapter.
7. Please ensure that your printer is serviced and repaired by a qualified technician. No responsibility is
taken for misuse and/or non-qualified servicing.
8. The power adapter that comes with this printers is specifically designed to be only used with the printer,
please do not use an alternative power adapter.
9. In order to ensure print quality and longevity of your printer, please ensure that only quality thermal
paper rolls are used.
10. Please make sure the printer power is turned off before plugging in the power cord or the data cable,.
11. Please keep this manual in a safe place, where it can be accessed easily and used for your reference.
Application Area
² Electronic Cash Register POS System Docket Printing
² Electronic Funds Transfer EFTPOS Systems Docket Printing
² All retails outlet tax invoice, and lay-by (lay away) dockets
² All accounting reports in 80mm format
² Measuring instrument information in 80mm format
² All other reports in 80mm format Tax, single-bill printing
3

Main Feature
² Print high-quality, low cost
² Low-noise, high-speed printing
² Supports cash drawer release
² Small and lightweight
² Easy paper loading, ease of use and maintenance
² Built-in data buffer (when printing can receive print data)
² Communication interface optional parallel port or serial port
² Enlarged character printing, adjustable characters for line spacing
² Supports different densities bitmap and downloaded graphics
² Supports faster bitmap printing
² The driver printing (mode), implements and calls from the inbuilt word-bank for high-speed printing
² Low power consumption, Low operating costs (no ribbons or ink cartridges)
² Compatible ESC / POS print commands set
Technical Parameters:
Print method Line thermal
Print speed 90 mm / sec
Paper width 58mm
Print Density 384 dot/line
Characters size
Print Command Compatible ESC/POS Command
Interface Type USB/Serial/Parallel
Reliability 100KM
Barcode Type JAN13(EAN13)/JAN8(EAN8)/CODE39
ANK Character, Font: A: 12*24dots, 1.5(W)*3.0(H) mm
Simplified/Traditional:24*24dots,3.0(W)*3.0(H)mm
Printing paper thick 0.06-0.08MM
Adapter Voltage Input
AC 110B/220V,50-60Hz
4
Adapter Voltage output DC 12V/3A
Printer Input Voltage DC 12V/3A
Cashbox Control DC 12-24V/1A
Working Temperature
Saving Temperature
0-45℃, Humidity:10-80%
-10-60℃, Humidity:10-90%
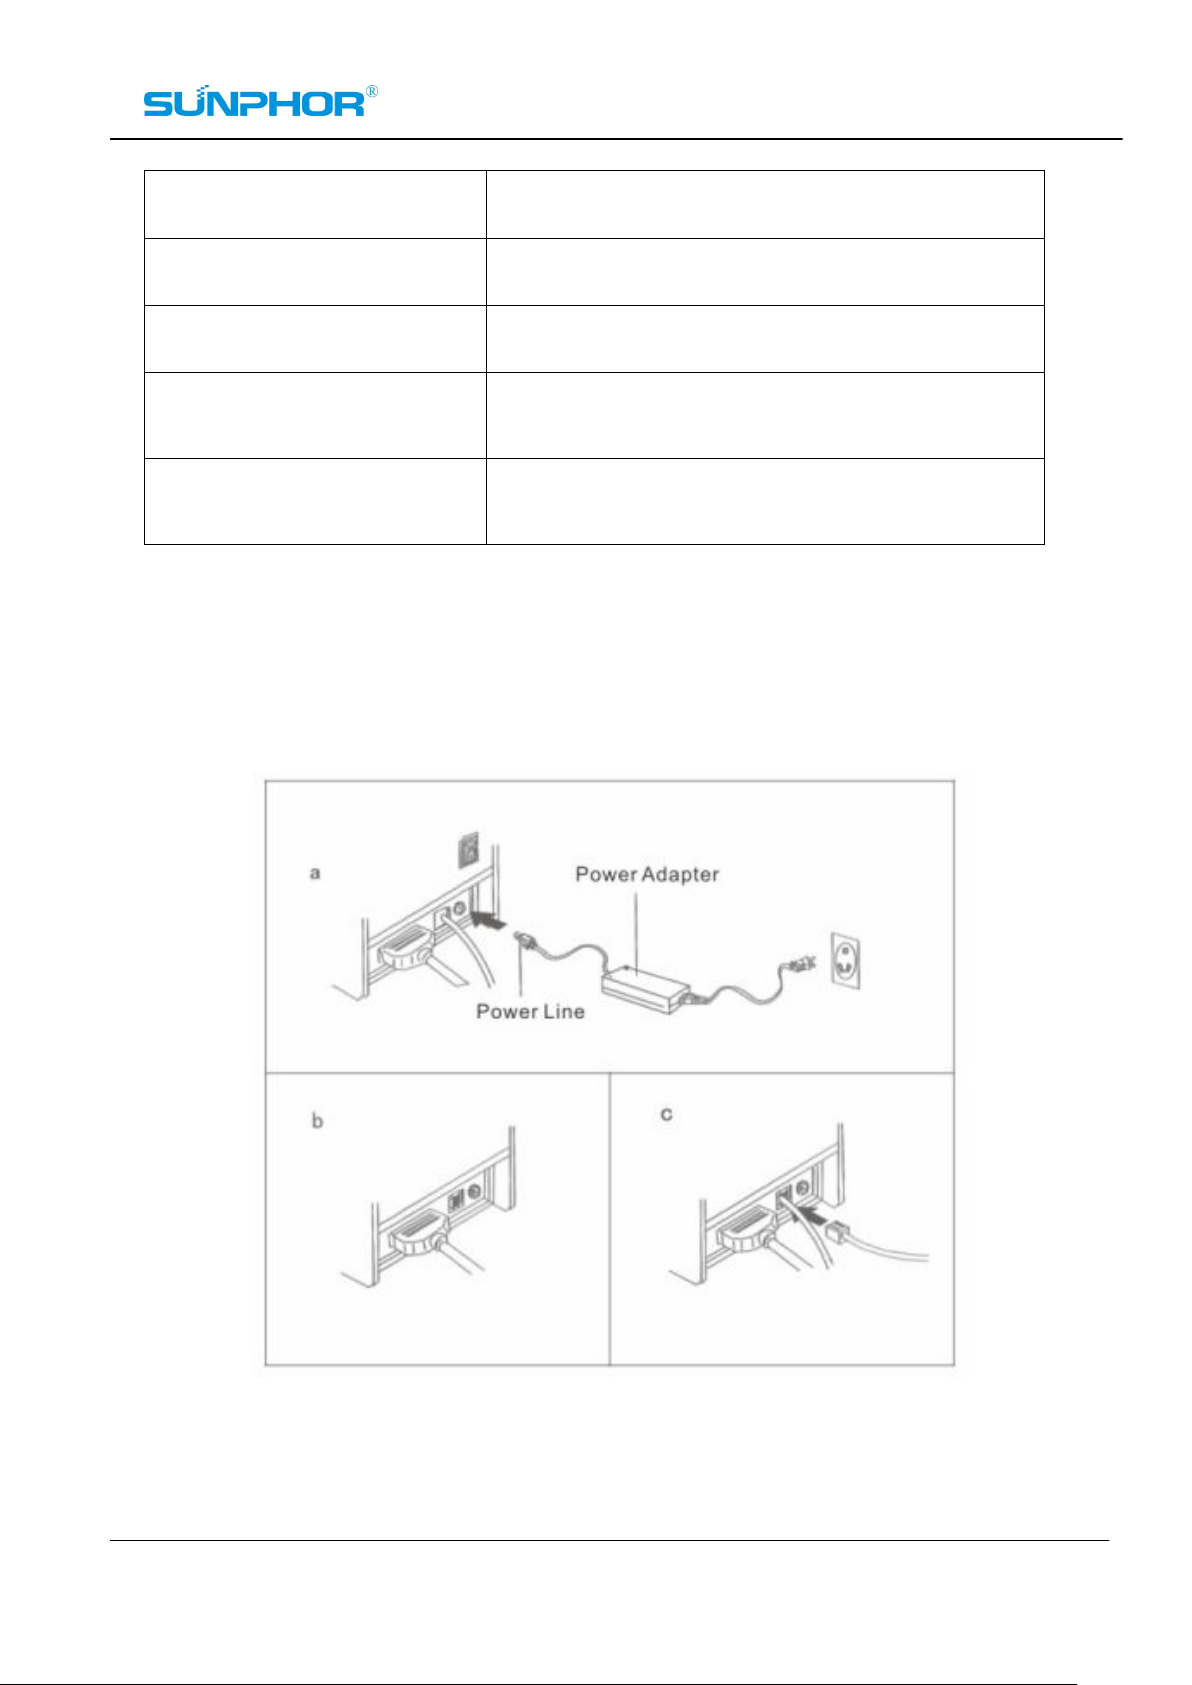
Connection of the printer (Switch off first)
a. Connect the power adapter cable to the printer power interface
b. Connect the data cable from the PC to the printer port interface
c. Connect the cash drawer cable to the printer's cash drawer interface
5

Installation of Paper Roll
a. Open the printer cover by pressing the release button on the front right-side of the printer.
b. Insert the thermal paper roll and note the direction in the image, to ensure the roll is correctly inserted .
c. Pull a small amount of the thermal paper roll in the direction of the paper cutter until it is showing on the
outside of the printer, before closing the lid.
Driver Installation
SUP58T2 series printer driver: I. direct to install the diver procedures on WIN9X/2K/NT/XP; II. using serial
and parallel direct to drive. III. Run the driver installation in diver CD.
1. Add a printer on “printer and scan” panel, and specify the driver files to drive disk. Just call the Print
command in the program can begin print. upon this way, actually used by WINDOWS own print
program, put the character into a pattern dot matrix method to print
2. Serial port and Parallel port direct drive
Upon this way, no need to install supplier driver, the data(by byte) just needs to be sent directly to the
port by command .The printer will print the character by line printing form instead of page form after
transferring using internal font. It is more convenient.
3. Insert the driver CD open “Sup58T2 driver” directory, Double-click the “setup.exe”. Select your
operating system. Click next to continue the installation. See the following image:
6
 Loading...