

Universal MMC/RS232 Interface
The BTX SmartConnect can be used to communicate between third-
party automation systems and BTX’s MMC RF motors and controls.
The SmartConnect can control units individually or as groups, and
is operated via RS232 input. Once the input is executed, a wireless
MMC RF radio command is sent to the automated BTX window
coverings system.
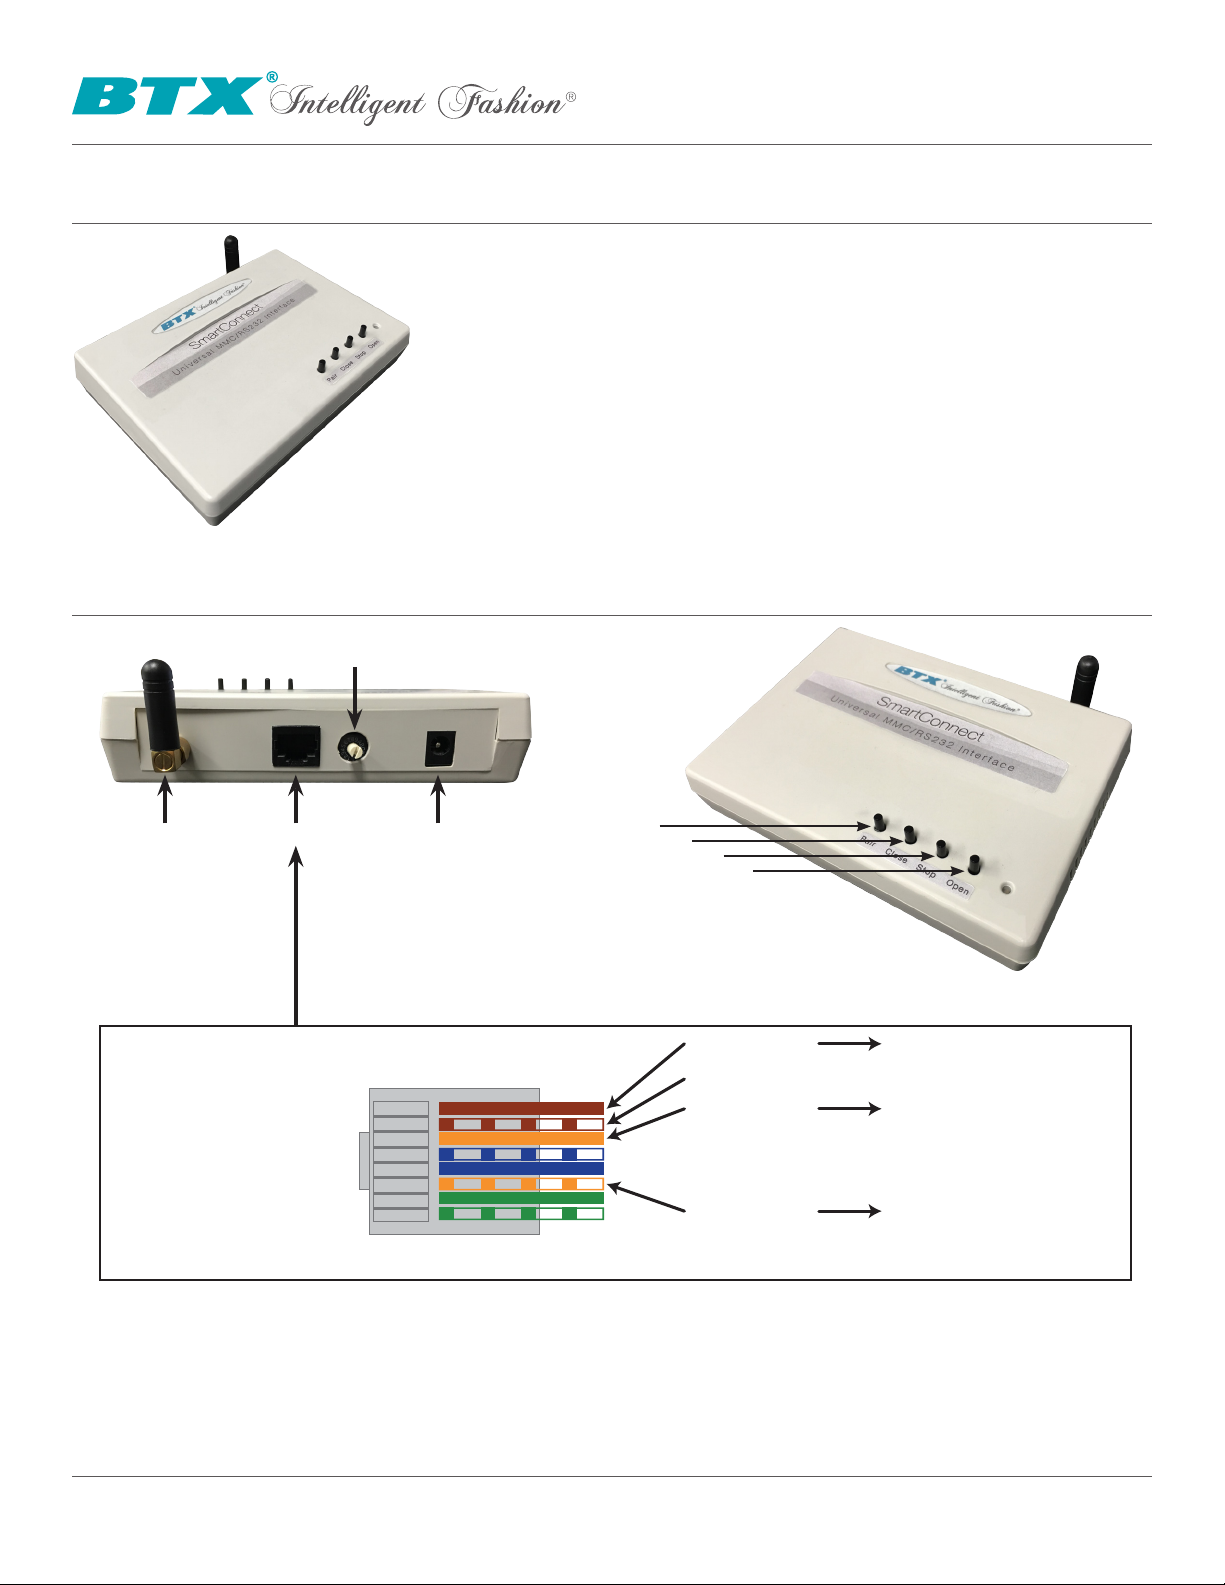
Layout & Connections
RF Channel Dial
BTX SmartConnect
Antenna RS232 Input Power
RS232 Pin-Out
(Shown Tab-side Down)
Pin 8
Pin 1
Pair
Close
Stop
Common
Common
RS232 RX
RS232 TX
Open
To RS232 Ground
To RS232 TX
To RS232 RX
BTX Window Automation - 2016 SmartConnect Instructions
© 2016 BTX Intelligent Fashion, LLC
(800) 422-8839 | www.btxinc.com
1

BTX SmartConnect
Operation
A. Initial Setup
1. Connect a 12V DC transformer (included) to the receptable on the back of the control box. The
LED will light up green to indicate power.
2. Be careful not to mount or enclose SmartConnect on or in metal, as this may effect radio
reception
3. Set the MMC RF receiver or motor in its Pairing Mode. Refer to the installation and programming
instructions for the relevant product for this procedure.
4. Using the RF Channel Dial, select the channel to be paired. Letters A through E stand for
channels 10 through 14, and channels 0 and F represent all channels. Briefly press the Pair
button (5 sec max), the window treatment will jog to indicate the channel has been learned.
Please note that current protocol only supports up to 14 channels.
5. Repeat the steps above for each channel or product to be memorized, up to 14.
6. To test the control operation, simply press the UP, STOP, or DOWN buttons on the front of the
SmartConnect. The window treatment should move appropriately. The LED will flash red to
indicate the radio signal has been transmitted.
B. RS232 Operation
1. The BTX SmartConnect interface uses the following communications settings: 9600 Baud, 8 Data
Bits, 1 Stop Bit, No Parity
2. Set the RF Channel Dial to position 1
3. The basic format for communication is as follows:
[SmartConnect Address] [Motor Channel] [Command] [Transmission Time]
The SmartConnect Address is 01.
The Motor Channel is always a two-digit number; 01 through 14.
Transmission Time is not a required entry.
See the following chart for command detail.
# Commands (low/HIGH case) Command Description Button Description
1 c/C
2 d/D
3 s/S
4 u/U
5 a/A
6 b/B
7 e/E
8 f/F
9 t/T
10 p/P
11 n/N
12 m/M
13 x/X
Travel to CENTER Favorite Position
Travel DOWN or CLOSE
STOP System
Travel Up or OPEN
Travel to A Favorite Position
Travel to B Favorite Position
Erase All (Set motor to Factory Default)*
Unlearn (ERASE) Selected Channel*
CHANGE DIRECTION (mech limit motor) or
ENTER PROGRAMMING MODE (electronic limit motor)
CHANGE DIRECTION (electronic limit motor)*
PAIR Motor** or
Set UPPER LIMIT*
Touch Control ON***
Set LOWER LIMIT*
Touch Control OFF***
Enter to PAIRING MODE
Close+Stop (3-5ceconds)
Open+Stop (3-5ceconds)
Open+Close (3-5ceconds)
*Motor must be in Programming Mode
**Motor must be in Pairing Mode
***Only applies to Tumo Drapery motors. Motor must be in Programming Mode.
BTX Window Automation - 2016 SmartConnect Instructions
© 2016 BTX Intelligent Fashion, LLC
(800) 422-8839 | www.btxinc.com
Center
DOWN or Close
Stop
UP or Open
A
B
A+B (3-5ceconds)
A+Center (3-5ceconds)
B+Center (3-5ceconds)
Stop (3-5ceconds)
2

BTX SmartConnect
Operation - Continued
Command Entry Formatting
[SmartConnect Address] [Motor Channel] [Command] [Transmission Time]
Example: 0105U;
01 = SmartConnect Address
05 = Motor Channel
U = Execute “UP” command
; = Semicolon marks the end of a comman
Note: Transmission Time is not used in this example, and is not required be default.
Several additional examples are below:
All motors UP (Channel 01 through 14): 0100U;
Motor at Channel 1 UP: 0101U;
Motor at Channel 5 DOWN: 0105D;
Motors at Channel 10 and 14 STOP: 0110S;0114S;
Motors at Channel 8 Travel to Position A & 0108A;0109B;
Channel 9 Travel to Position B
Additional Notes:
• Uppercase and Lowercase letters can be used interchangeably
• If using the Transmission Time feature, any two digits in the command string after the
command code represents length of transmission. For example, if you use 0107U22;, this
means that the UP command for Channel 7 will be transmitted for 22 seconds
• Up to 7 successive commands can be entered in a single line of the control terminal at a time
• Channel 00 means all 14 channels should run
Electrical Specifications
Power
9 - 15V DC, 200mA
20mA draw for each SmartConnect
Frequency
433.92 MHz
*Motor must be in Programming Mode
**Motor must be in Pairing Mode
***Only applies to Tumo Drapery motors. Motor must be in Programming Mode.
BTX Window Automation - 2016 SmartConnect Instructions
© 2016 BTX Intelligent Fashion, LLC
(800) 422-8839 | www.btxinc.com
3

BTX SmartConnect
FCC Caution
§ 15.19 Labelling requirements.
This device complies with part 15 of the FCC Rules. Operation is subject to the
following two conditions: (1) This device may not cause harmful interference, and (2)
this device must accept any interference received, including interference that may
cause undesired operation.
§ 15.21 Information to user.
Any Changes or modifications not expressly approved by the party responsible for
compliance could void the user’s authority to operate the equipment.
§ 15.105 Information to the user.
Note: This equipment has been tested and found to comply with the limits for a Class
B digital device, pursuant to part 15 of the FCC Rules. These limits are designed to
provide reasonable protection against harmful interference in a residential installation.
This equipment generates uses and can radiate radio frequency energy and, if not
installed and used in accordance with the instructions, may cause harmful interference
to radio communications. However, there is no guarantee that interference will not
occur in a particular installation. If this equipment does cause harmful interference to
radio or television reception, which can be determined by turning the equipment off
and on, the user is encouraged to try to correct the interference by one or more of the
following measures:
-Reorient or relocate the receiving antenna.
-Increase the separation between the equipment and receiver.
-Connect the equipment into an outlet on a circuit different from that to which the receiver is connected.
-Consult the dealer or an experienced radio/TV technician for help.
BTX Window Automation - 2016 SmartConnect Instructions
© 2016 BTX Intelligent Fashion, LLC
(800) 422-8839 | www.btxinc.com
4
 Loading...