

Page 1
Micro-Computer Induction Cooktop
SR-1884SS
INSTRUCTION MANUAL
Thank you for your purchase.
Please read thoroughly before initial use and keep in a safe place for future reference.
Page 2

1
INDEX
Important safeguards….…………………………...
2
Specifications……………………………………….
2
Product configuration & Control panel.………….
3
Operation…………………………………………...
4
Timer setting…………………………………..…...
4
Lock function....……………………………..……...
5
Selecting the proper cookware.………….……….
5
Care and maintenance….…………………………
5
Error code..…………..……………………………..
6
Troubleshooting……….……………………….…..
6
Warranty…………………………………………….
7
Important Notice
Do not operate appliance if the power cord shows any signs of damage, or if appliance works intermittently or
stops working entirely.
1. A short power-supply cord should be used to reduce the risk resulting from becoming entangled in or
tripping over a longer cord.
2. If a longer extension cord must be used:
(1) The marked electrical rating of the extension cord should be at least as great as the electrical rating of
the appliance.
(2) The cord should be arranged so that it will not drape over the countertop where it can be pulled on by
children or tripped over unintentionally.
This appliance has a polarized plug (one blade is wider than the other). To reduce the risk of electric shock,
this plug is intended to fit into a polarized outlet one way only. If the plug does not fit fully into the outlet,
reverse the plug. If it still does not fit, contact a qualified electrician. Do not modify the plug in any way.
Warning: Changes or modifications to this unit not expressly approved by the party responsible for compliance
could void the user's authority to operate the equipment.
NOTE: This equipment has been tested and found to comply with the limits for a consumer ISM equipment,
pursuant to Part 18 of the FCC Rules. These limits are designed to provide reasonable protection against
harmful interference in a residential installation. This equipment generates, uses, and can radiate radio
frequency energy and, if not installed and used in accordance with the instructions, may cause harmful
interference to radio communications. However, there is no guarantee that interference will not occur in a
particular installation. If this equipment does cause harmful interference to radio or television reception, which
can be determined by turning the equipment off and on, the user is encouraged to try to correct the
interference by one or more of the following measures:
· Reorient or relocate the receiving antenna.
· Increase the separation between the equipment and receiver.
· Connect the equipment into an outlet on a circuit different from that to which the receiver is connected.
Consult the dealer or an experienced radio TV technician for help.
·
Page 3

2
IMPORTANT SAFEGUARDS
Read all instructions.
Do not touch hot surfaces
Close supervision is necessary when any appliance is used by or near children.
Unplug from outlet when not in use and before cleaning.
Do not operate any appliance with a damaged cord or plug; or after the appliance malfunctions or has been damaged
The use of accessory attachments not recommended by the manufacturer may cause injuries.
Do not allow cord to hang over the edge of table or counter; or touch hot surfaces.
Do not place on or near a hot gas or electric burner, or in a heated oven.
Do not use appliance for anything other than intended use.
Use of an extension cord is not recommended. If needed, use an extension cord of 14 gauges on diameter not longer
Extreme caution must be used when moving an appliance containing hot oil or liquid.
If glass plate is broken or cracked, stop using the unit immediately. Turn unit off, unplug and contact Sunpentown.
Do not place metallic objects such as utensils and lids on the plate to avoid the vessel being heated.
Do not attempt to disassemble the unit and perform any services.
Do not use the appliance with an external timer or separate remote-control system.
This appliance is not to be used by children or persons with reduced physical, sensory or mental capabilities or lack of
Children should be supervised to ensure that they do not play with the appliance.
Changes of modification not expressly approved by the party responsible for compliance could void the user’s
To avoid scalding and foul fumes produced by cleaning solutions on a hot surface, wait for the unit to cool
Place cooktop on flat surface and keep a clearance of 4 inches all around for proper ventilation. If air inlet or outlet is
Do not place paper or cloth in between the cooktop and cookware.
Due to the magnetic heating of the unit, keep objects that may be affected away, such as credit card, watch, etc.
To prevent damage to your cookware, do not heat an empty pan.
Do not place one cooktop on top of another.
Do not place on or near a hot gas or electric burner or in a heated oven. If the surrounding temperature is high, unit
Do not use cookware of inferior enamel, synthetic material, china or aluminum. DO NOT USE PLASTIC WRAP.
Never heat an unopened can on the cooktop as it may explode.
The ceramic plate will retain heat from the cookware; never touch the ceramic plate immediately after cookware is
Plug cooktop in a dedicated 15-amp outlet. Do not share the outlet with other appliances.
Do not damage the ceramic plate. Be careful not to drop anything onto the ceramic plate. If the plate is broken or
Household use only and do not immerse in water. Do not use outdoors.
in any way. Return appliance to the Sunpentown for examination, repair or adjustment.
than 10 feet.
Cleaning solution or spillovers may penetrate the plate and cause an electric shock.
experience and knowledge; unless they have been given supervision or instruction concerning use of the appliance
by a person responsible for their safety.
authority to operate the equipment.
considerably before cleaning.
blocked, the internal temperature will rise and cause unit to overheat and shutoff during cooking.
will shut off.
removed. Wait a few minutes and allow unit to cool.
cracked, stop using immediately. Turn unit off and unplug.
SPECIFICATIONS
Model SR-1884SS
Voltage 120V ~/ 60Hz
Power consumption 1650W (max)
Dimension 11W x 14.25D x 2.5H in.
Net Weight 5.55 lbs
Power range 100W - 1650W
Temperature range 100°F ~ 390°F
Page 4

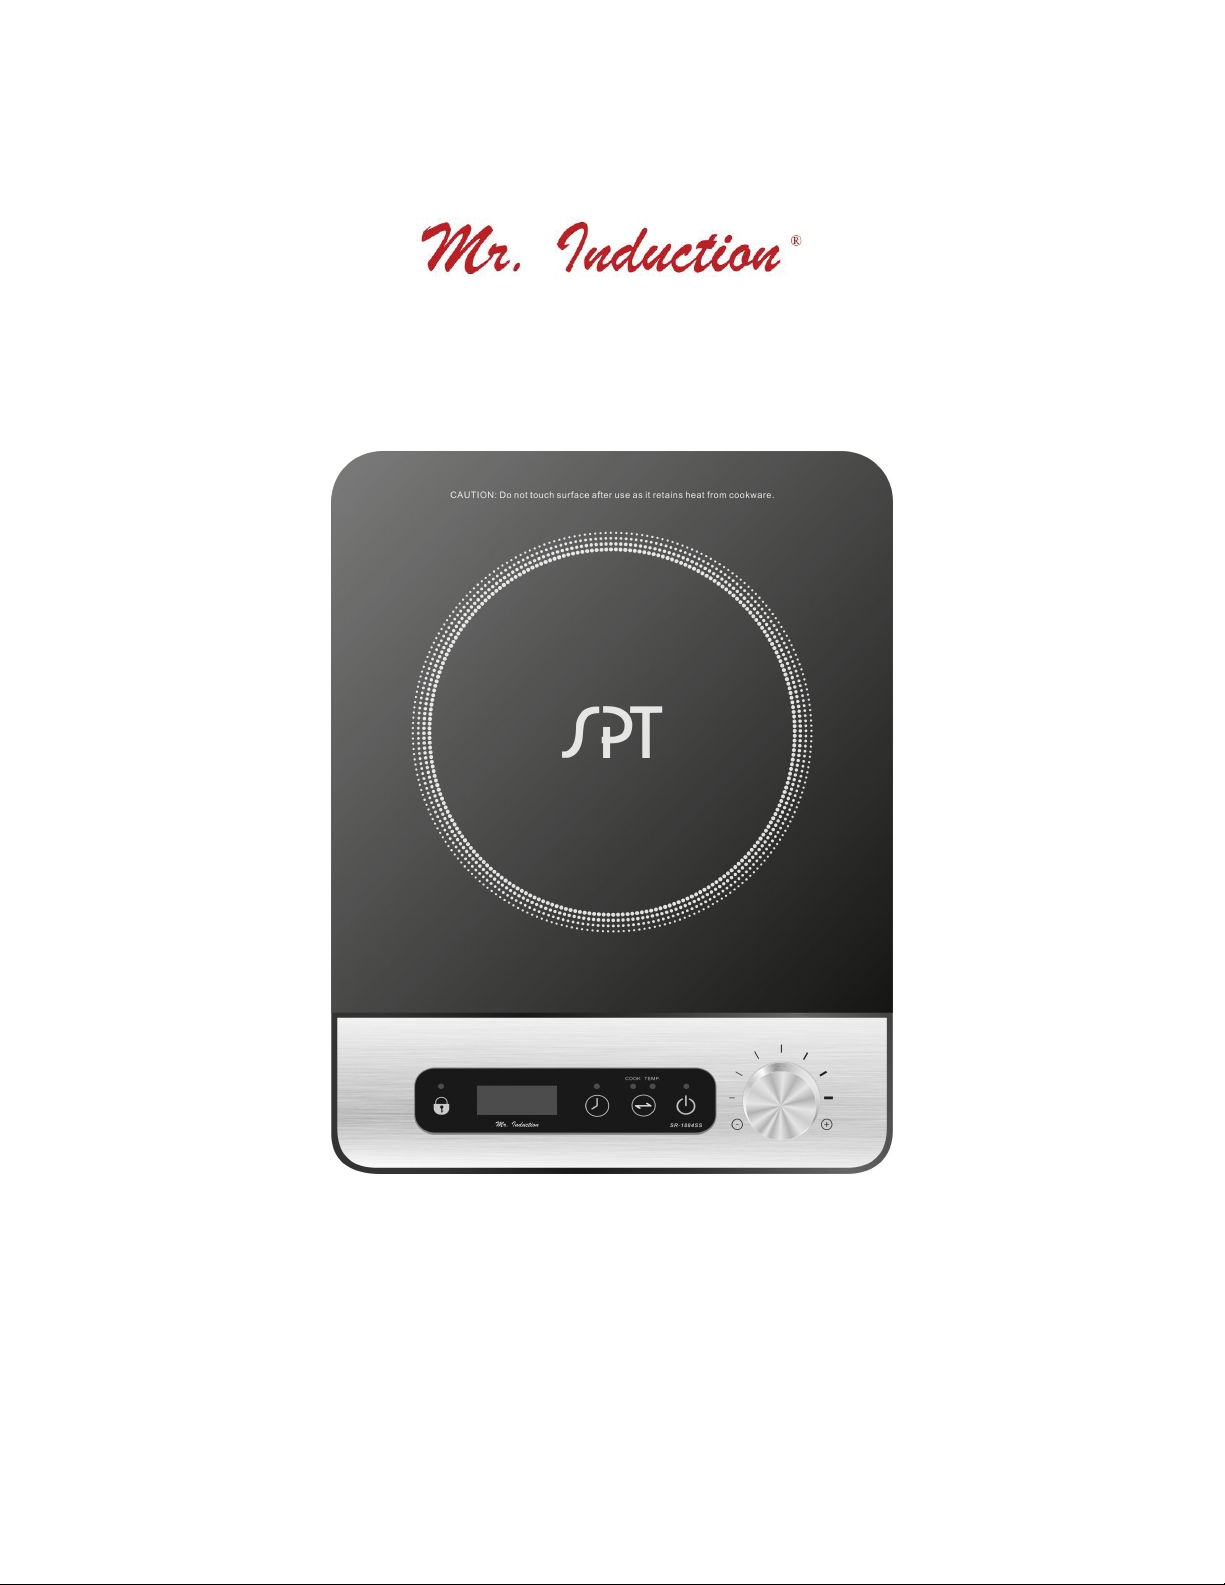
3
PRODUCT CONFIGURATION & CONTROL PANEL
Power Cord
Exhaust Vent
Ceramic Plate
Control Knob
Child
Lock
Display:
Power – Temperature - Timer
Power
Function
Control Knob
Turn left (counterclockwise) to:
decrease power / temp
set Hour for timer
Turn right (clockwise) to:
increase power / temp
set Minute for timer
Control Panel
Timer
Page 5

4
COOK Mode: Heat is constantly added at the selected power level.
13 COOK levels (wattage): 100,200,300,400,500,650,800,950,1100,1250,1400,1550,1650W
o 100W = 650W intermittently heat for 1 second and stop for 6 seconds.
o 200W = 650W intermittently heat for 2 second and stop for 5 seconds.
o 300W = 650W intermittently heat for 3 seconds and stop for 4 seconds.
o 400W = 650W intermittently heat for 4 second and stop for 3 seconds.
o 500W = 650W intermittently heat for 5 seconds and stop for 2 seconds.
13 TEMP settings (°F): 100, 120, 140, 160, 180, 190, 210, 230, 250, 280, 320, 350, 390
Temperature may vary slightly at different sections of the pot.
Factors such as ambient temperature, type of cookware and food content may cause temperature
1. Plug power cord to power source and unit will beep once and the Power indicator will flash. This
2. Place a suitable cookware in the center of the cooking zone.
3. Touch the Power key and display will show [----] and Power indicator remains lit. Appliance is now
4. Touch the Function key to select desired mode (Cook or Temp) to begin operation. If function is
5. Turn the Control Knob to adjust cooking level or temperature setting.
6. Touch the Power key again to stop operation.
(factory default is set at 800W)
Note: unit’s lowest possible power is 650 watts, thus the five low power settings (100W, 200W, 300W,
400W and 500W) cannot be actually achieved, but “simulated”:
TEMP Mode: Unit will heat to and maintain at selected temperature.
(factory default is set at 210°F)
variance up to 20°F ±.
OPERATION
indicates power is connected and unit is in standby mode.
in selection mode.
not selected within 60 seconds, the fan will run for few seconds and unit will return to stand by
mode. Cooking temperature or power setting cannot be set without first selecting the mode.
Page 6

5
TIMER SETTING
1. Turn unit on and set desired operation and level setting.
2. Touch the TIMER key, display will show default [00:00] and Timer indicator will illuminate.
3. Turn the Control Knob counter-clockwise to set the number of hours (1-9). Turn the Control Knob
4. After setting, touch TIMER key again to confirm or wait until the display stops flashing.
5. The display will alternate between set temperature/power and remaining time.
6. At the end of countdown, unit will stop operation, beep once and return to standby mode.
7. To cancel Timer, touch and hold the Timer key.
1. Touch the LOCK key to lock the control panel, the Lock indicator will illuminate.
2. When locked, none of the keys will respond.
3. To cancel lock function, touch and hold the Lock key for 3 seconds.
The base of the cookware must be of a ferrous metal (metal that can be magnetized): Cast iron,
Base of cookware should be between 4.75 to 10.25 inches; bottom should be flat.
A simple test to check if cookware will be compatible is to take a small magnet and place it to the
Unplug unit from power source. Wait for surface to cool down before cleaning.
Wipe ceramic plate and exterior surface with a soft damp cloth. If excessively dirty, soak cloth in a
Clean the air vent regularly with a small brush.
Never immerse the unit in liquid or wash under running water.
clockwise to set minutes (1-59). Max is 9 hours and 59 minutes.
LOCK FUNCTION
Note: panel can be locked while in standby mode.
SELECTING THE PROPER COOKWARE
enameled iron, steel and stainless steel.
bottom of pan. If the magnet firmly sticks, the cookware is compatible.
These type of cookware will NOT work with inductions: Glass, copper, aluminum, ceramic, cookware
with a concaved bottom, bowl-shaped cookware or those with a diameter smaller than 4.75 inches.
CARE & MAINTENANCE
mild detergent and water mixture.
Page 7

6
The fan continues to run for couple minutes after operation for heat dissipation. To prolong the life
of the unit, wait for the fan to stop before unplugging from power source.
Is cooktop firmly plugged into a correct outlet?
Is cooktop plugged in a dedicated outlet?
Has the unit been dropped or handled roughly? If so, contact customer
Was there a power shortage?
There may have been a power shortage at the facility where the unit is
Check if another appliance is drawing from the same circuit.
Check if the fan is still running.
Are the air vents blocked? Check if dust or grease is clogging the vents.
Make sure enough clearance is around the unit.
Timer was set and unit finished the countdown.
Unit overheated and the auto shut-off protection kicked in. Wait for unit to
Are you using an extension cord? Any use of an extension cord over 10
It is possible that the internal coil supports may have been “dropped” due
Is base of cookeware convex/concave shaped or dented?
Pan is smaller than 4.75” or larger than 10.25”.
Pan may not be centered.
The fan will continue to run until unit is completely cooled down. This is a
ERROR CODE
E0 Internal circuit error Contact customer service
E1 No cookware or incompatible cookware used
E2 Internal overheat Wait for unit to cool down and restart
E3 Over-voltage Contact customer service
E4 Under-voltage Contact customer service
E5 Top plate sensor open / short circuit Contact customer service
E6 IGBT sensor open circuit / short circuit Contact customer service
E7 Top plate overheat Wait for unit to cool down and restart
TROUBLESHOOTING
PROBLEM CHECK POINTS
No power or unit
does not respond
Unit suddenly stops
heating during
normal operation
Pan does not get
hot enough even
though temperature
is set on high
Pan cooks
unevenly or does
not maintain heat
level
Fan continues to
run after unit is
turned off
service
being used and starving the unit of power. This may also occur if you are
not using a dedicated circuit.
cool down. Check for error code in the display.
feet will affect the power from reaching the cooktop.
to the unit being mishandled or frequently moved. Please contact
customer service.
safety feature and designed to help preserve the life of the cooktop.
Page 8

7
Your Guarantee
Sunpentown must be notified of the fault.
Proof of purchase must be presented to Sunpentown’s nominated representative.
The warranty will be void if the product if modified, misused or repaired by an unauthorized
The warranty after repair will not be extended beyond the original one-year period.
All replacement parts will be new or reconditioned.
Parts, which are replaced, become the property of Sunpentown.
The warranty applies for the use of the product in the USA only.
Warranty does not include freight charges.
Damage due to installation error, product abuse and/or misuse.
Incidental or consequential damage caused by possible defects with this product.
Labor cost incurred for the installation and/or removal of a possible defective unit.
Damage to product caused by improper power supply voltage, accident, fire, floods or acts of
Failure of product resulting from unauthorized modifications to the product.
Improper installation or failure to perform the necessary maintenance.
Normal wear and tear on parts or replacement of parts designed to be replaced.
Damage to personal property from use of product.
Replacement or repair of household fuses, circuit breakers, wiring or plumbing.
If this product is found to be faulty as a result of faulty materials or workmanship within one year from
date of purchase, it will be repaired free of charge.
This guarantee is subject to the following terms:
person.
What is NOT COVERED:
nature.
This GUARANTEE is in addition to your Statutory Rights
SUNPENTOWN INTERNATIONAL INC.
14625 Clark Ave. City of Industry, CA 91745
Tel: 800-330-0388
service@sunpentown.com
www.sunpentown.com
 Loading...