

Page 1
Stand Fan
Model SF
-
1465
INTRODUCTION
Thank you very much for your purchasing the
SUNPENTOWN Stand Fan. Please read the instructions
carefully and keep for future reference.
Owner’s Manual
SUNPENTOWN INTERNATIONAL INC.
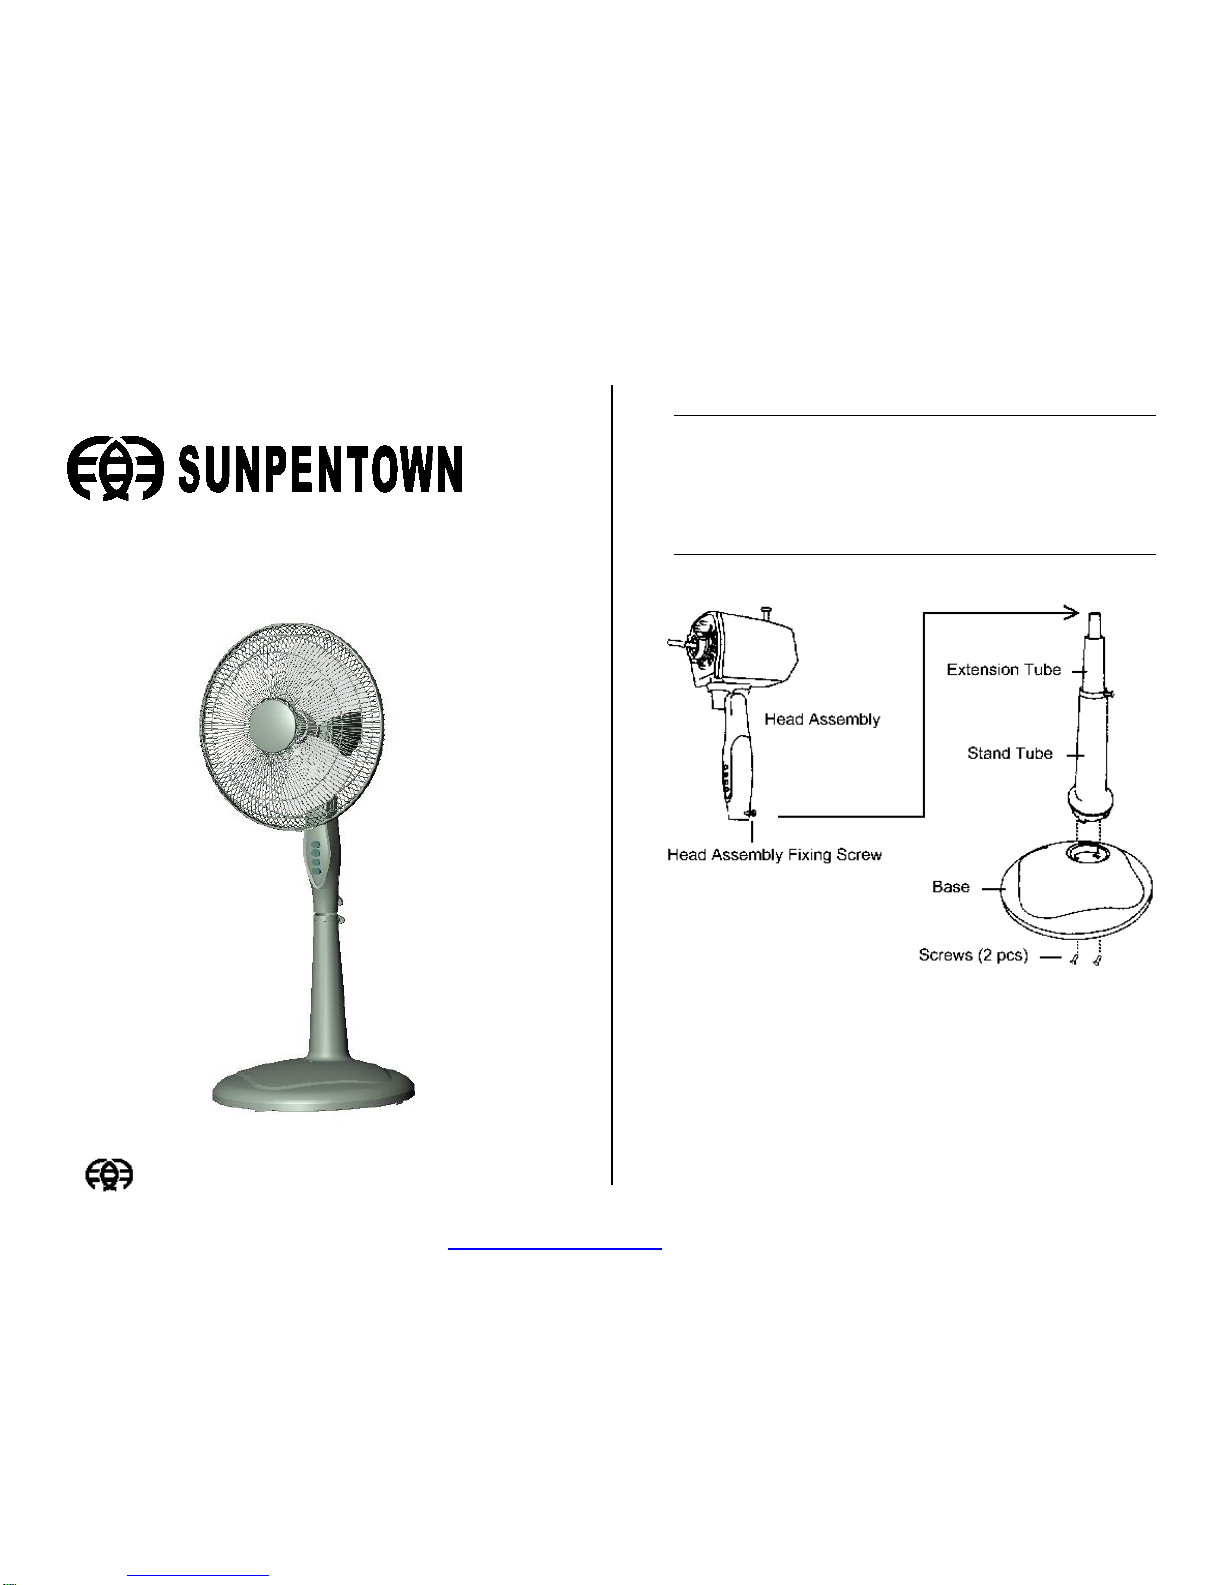
ASSEMBLY
Step 1: Release the two Screws on the bottom of the
Stand Tube.
Step 2: Put the Stand Tube into the Base, and fasten the
two Screws.
Step 3: Put the Head Assembly into the Extension Tube,
and fasten the Fixing Screw.
PDF created with FinePrint pdfFactory trial version http://www.pdffactory.com
Page 2
IMPORTANT SAFETY INSTRUCTIONS
Please read all instructions before using this product.
Save these instructions for easy reference. When using
electrical appliances, basic precautions should always be
followed to reduce breakage, risk of fire, electric shock
and injury to persons including the following:
l Do not use the fan outdoors.
l Never use the fan unless it is fully assembled.
l Do not use the fan under the following conditions: 1)
High temperature of over 104F. 2) High humidity. 3)
Steam filled room.
l Do not push finger or any object through the grilles
and do not touch the fan blade during use; especially
be aware children and infants around during use.
l Take care that curtains or other objects are not
sucked
into the fan during operation.
l Do not spray the fan with insecticide, which will
damage the surface of the fan.
l The fan has a polarized plug (one blade is wider than
the other). To reduce risk of shock, this plug is
intended to fit in a polarized outlet only one way. If the
plug does not fit fully in the outlet, reverse the plug.
Do
not attempt to defeat this safety feature.
l Unplug from wall outlet before servicing.
OPERATION
The control buttons are marked as follows:
0 = OFF
1 = Low fan speed
2 = Medium fan speed
3 = High fan speed
SETUP
Your Stand Fan was thoroughly inspected and tested at
the factory prior to packaging. Visually inspect it upon
removal from its packaging. Return the unit if it shows any
signs of damage or mishandling.
WARNING: To avoid fire or shock hazard, the Stand Box
Fan should ONLY be plugged into a polarized 120 Volt
AC outlet.
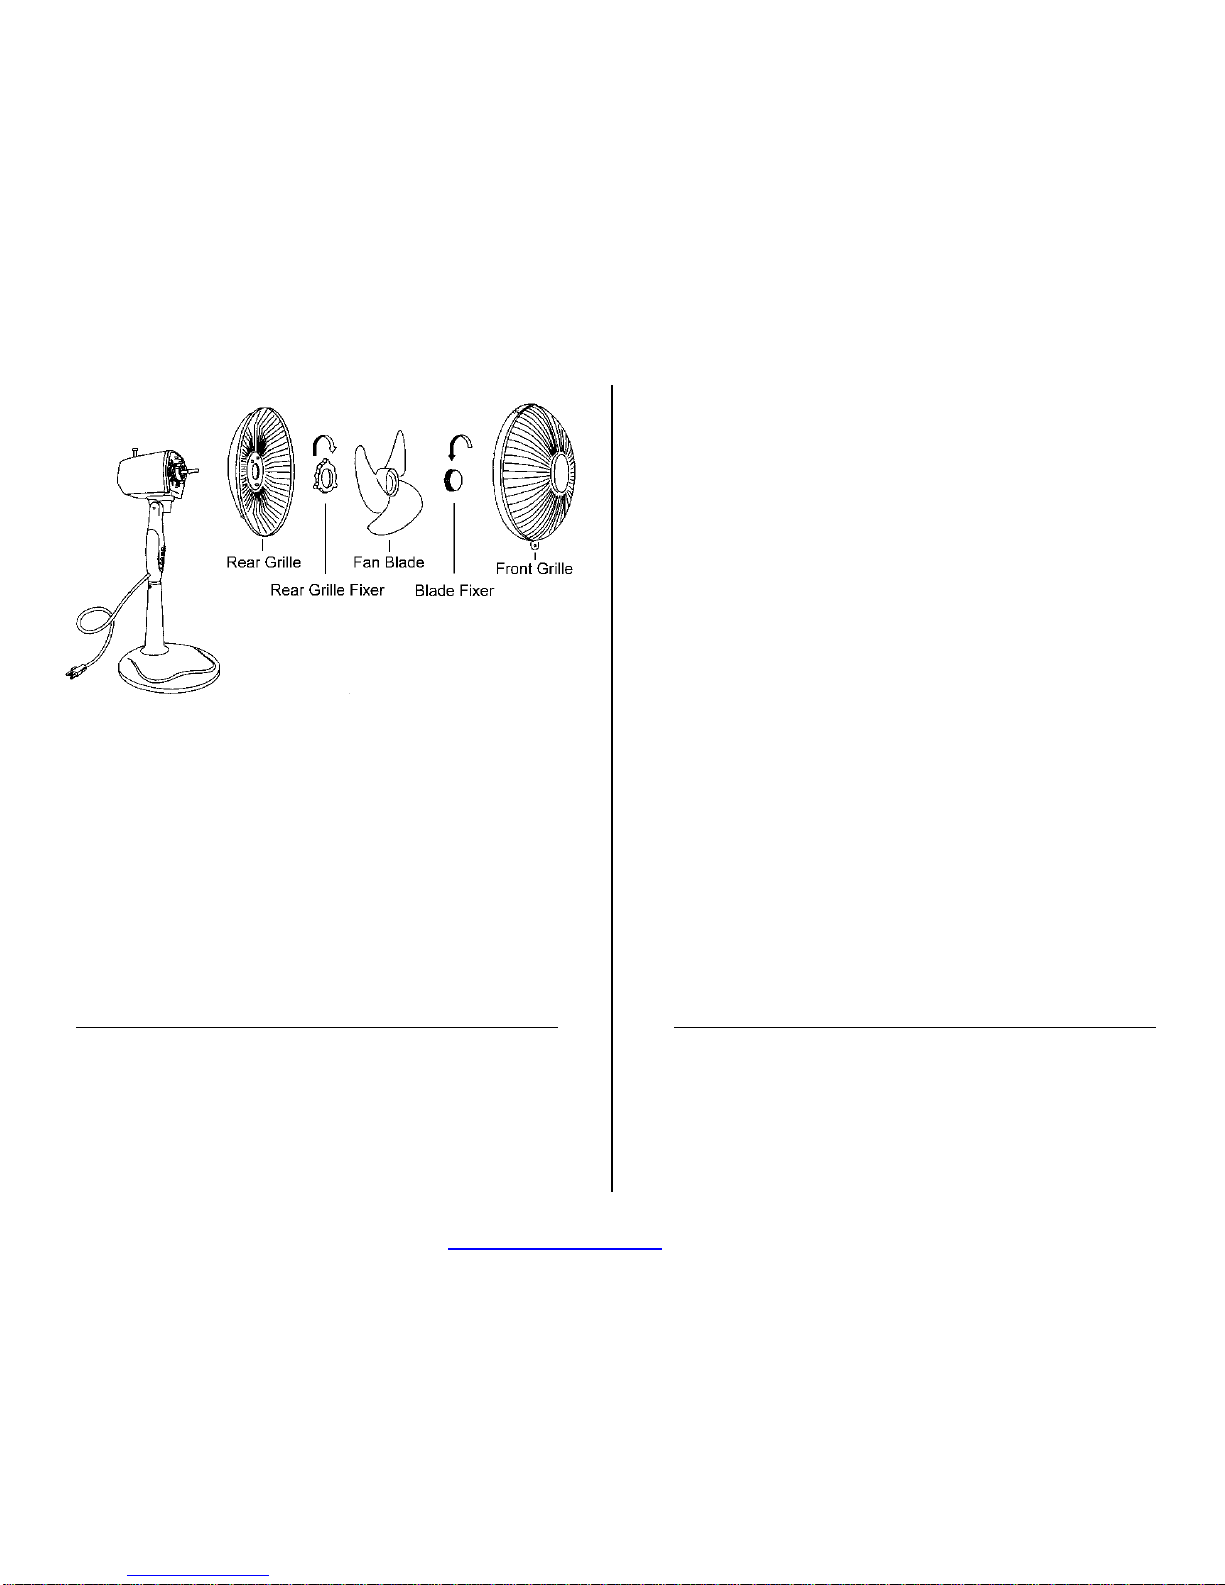
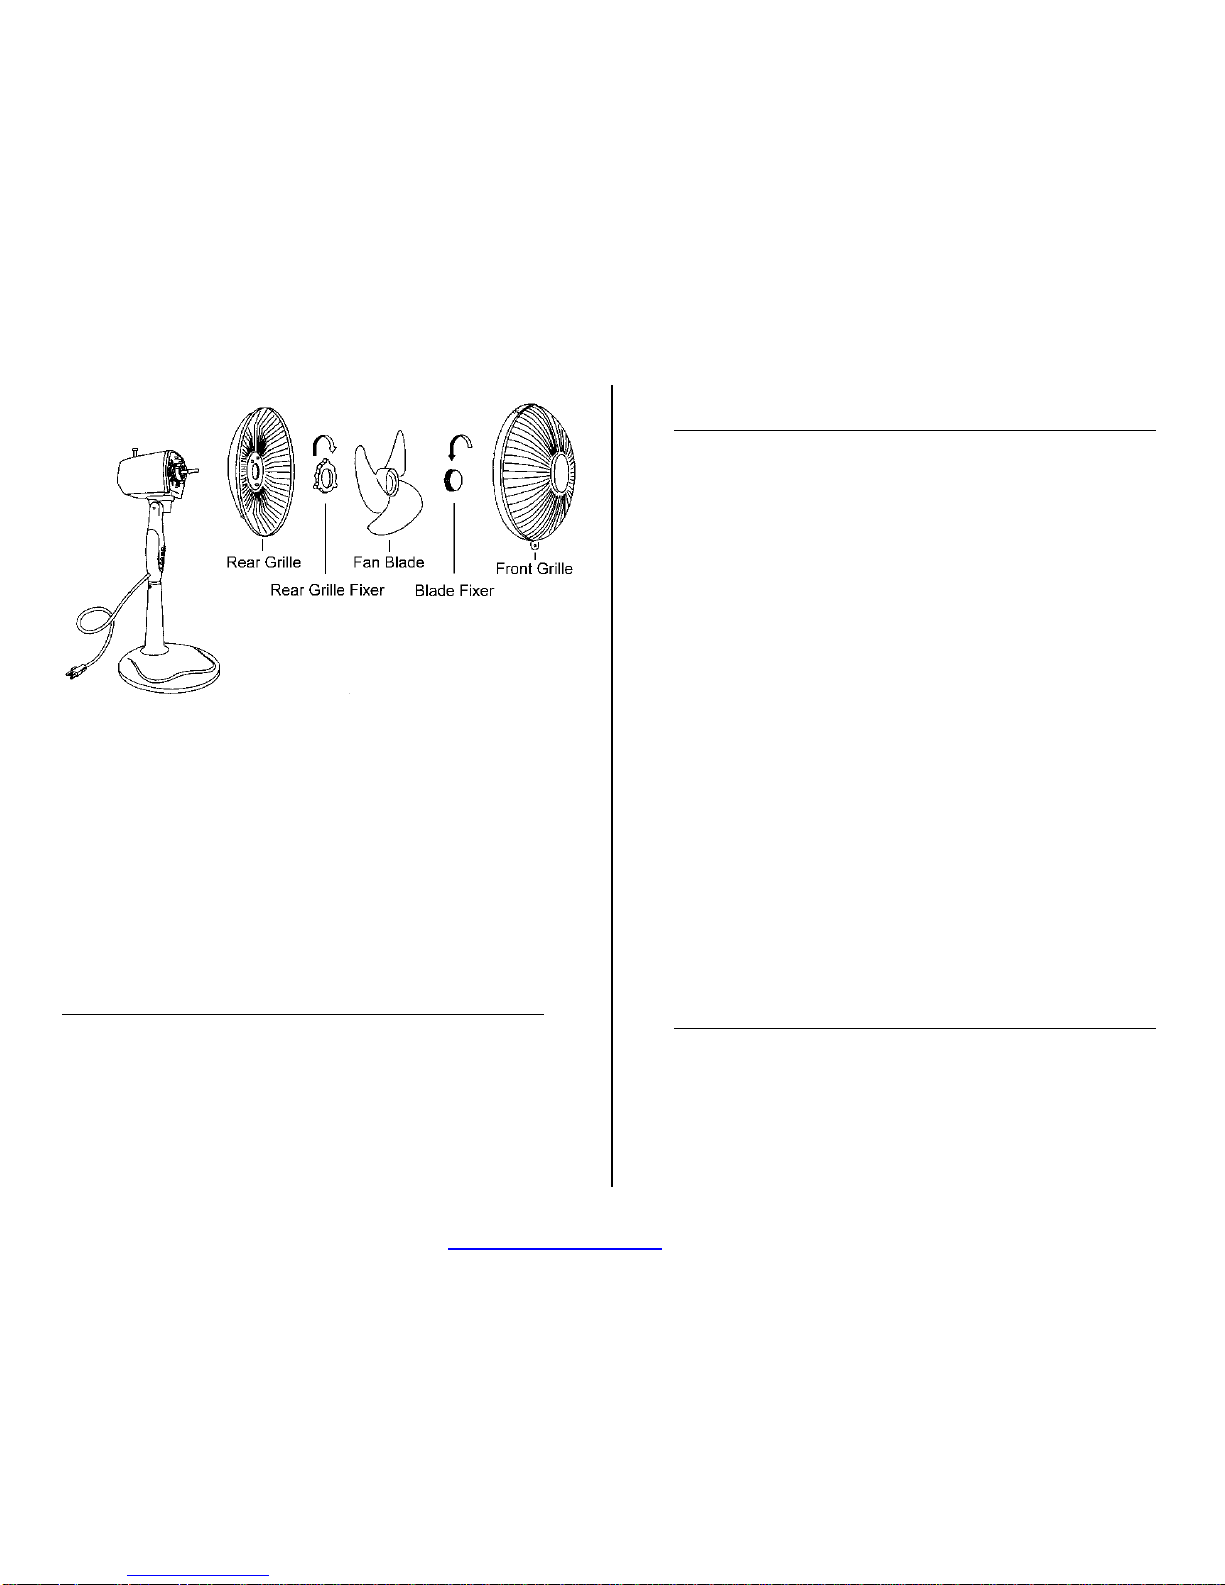
Step 4: Install the Rear Grille.
Step 5: Screw the Rear Grille Fixer to fasten the Rear
Grille
Step 6: Install the Fan Blade onto the motor shaft.
Step 7: Screw the Blade Fixer to secure the Fan Blade
on the motor shaft.
Step 8: Attach the Front Grille to the Rear Grille.
PDF created with FinePrint pdfFactory trial version http://www.pdffactory.com
Page 3
CLEANING THE UNIT
1. Turn the Stand Fan OFF and unplug from power
outlet.
2. Uninstall the Front Grille, Blade Fixer, Fan Blade,
Grille Fixer and Rear Grille.
3. Clean the parts with a moistened soft cloth only. DO
NOT pour or splash water on the unit or use any
abrasive type cleaner on it. Clean all external
surfaces, especially the Grilles and fan blade.
4. Reassemble the Stand Fan completely. Never use
the fan unless it is fully assembled.
TECHNICAL SPECIFICATIONS
CUSTOMER ASSISTANCE LINE
If you experience a problem, please see the warranty for
information. Please DO NOT attempt to repair this unit
yourself. Doing so, will void your warranty and could cause
damage to the Stand Fan or personal injury to yourself. If
you have any questions concerning this appliance, please
call:
1-626-581-1818
Length 13 inch
Width 18 inch
Height 42 inch
Weight 9.7 lb
Input voltage 120 volts AC, 60Hz
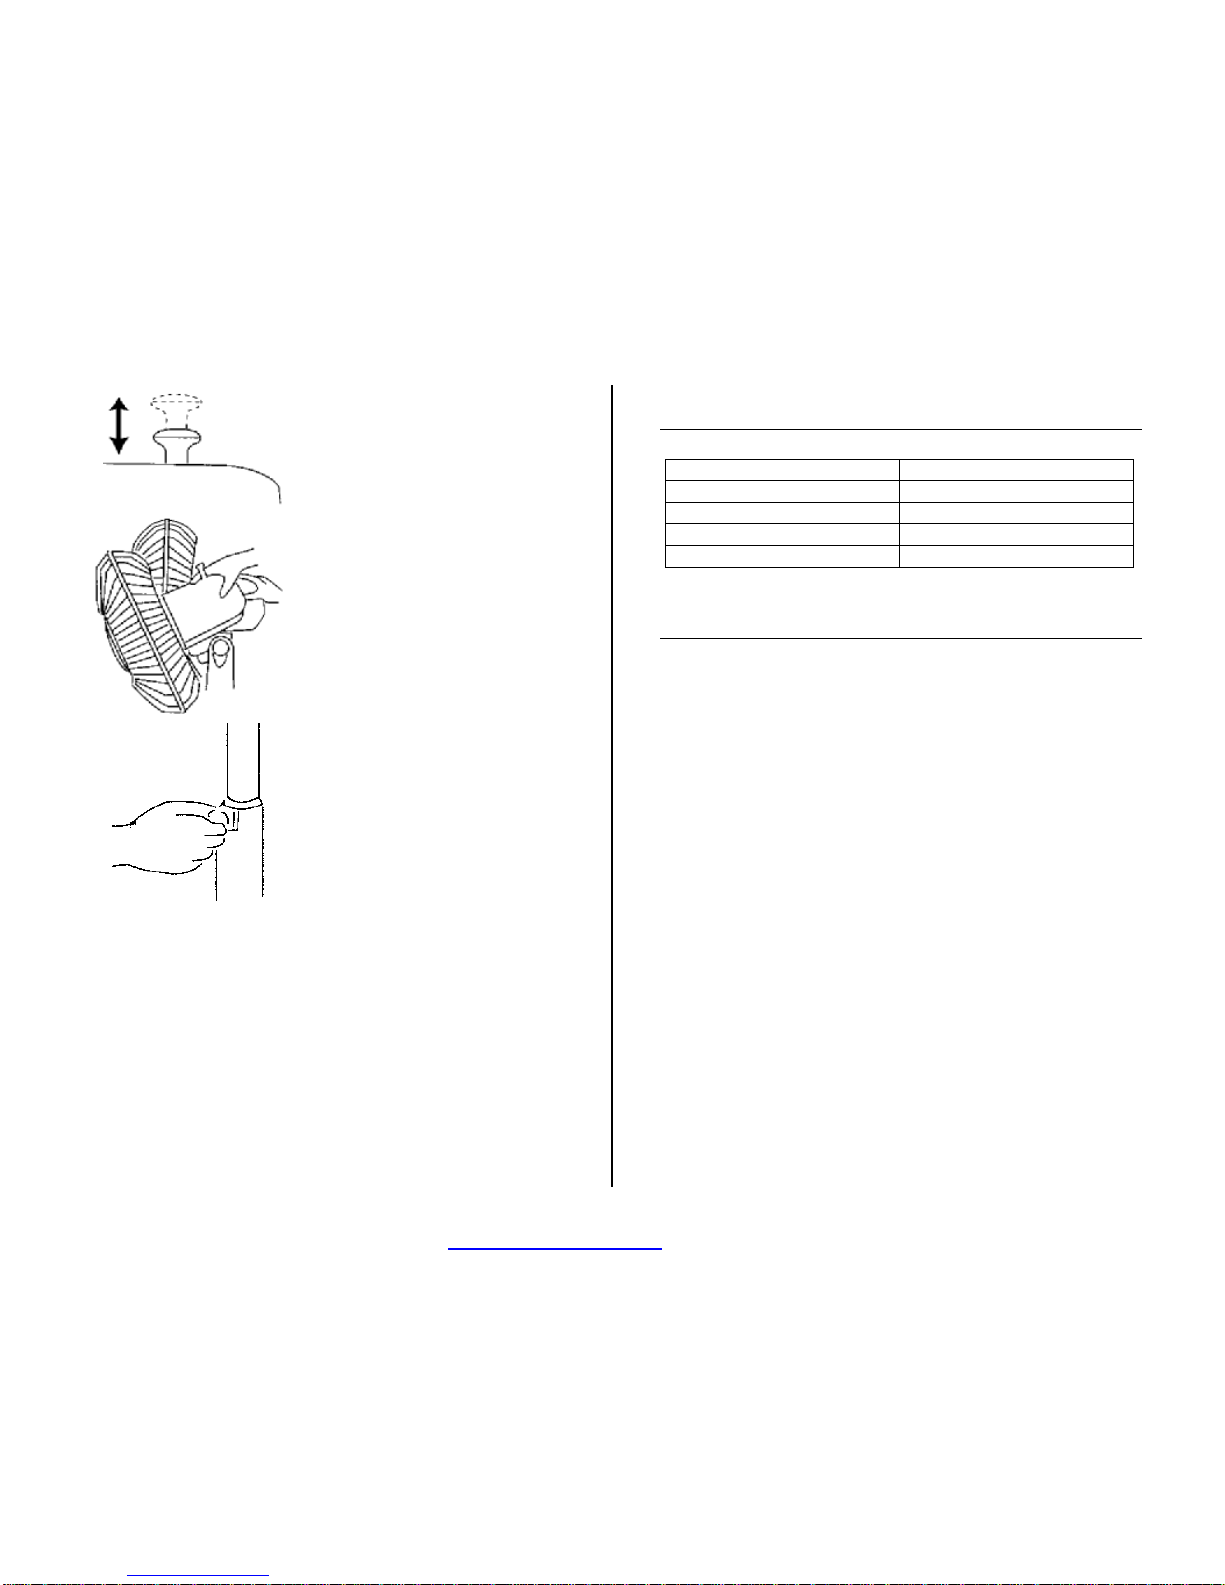
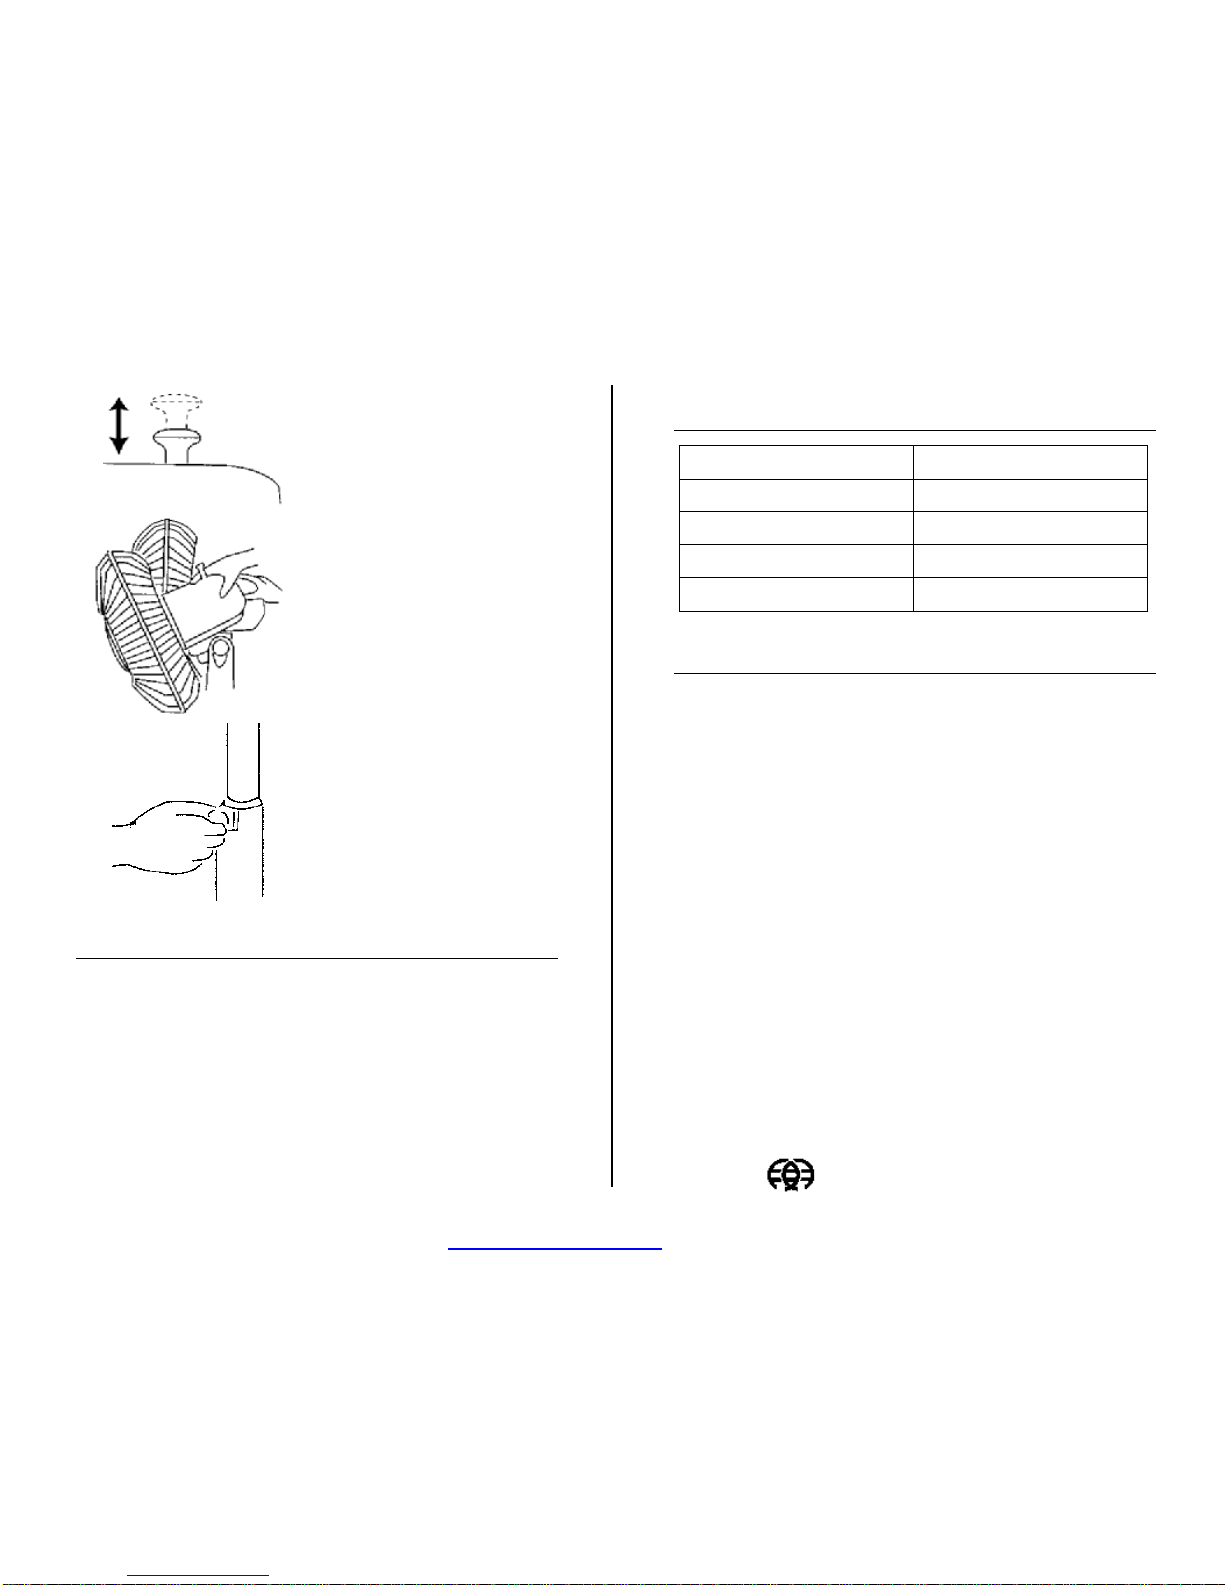
Fan Head Oscillation:
Press down the Oscillation
knob.
Fan Head Fixed:
Pull up the Oscillation knob.
The angle of elevation of
Fan Head is adjustable:
Up: 15。
Down: 15。
Adjust the height of the fan:
Release the screw between
the extension and stand
tubes, then adjust the height
of the extension tube.
Fasten the screw again after
finishing the adjustment.
PDF created with FinePrint pdfFactory trial version http://www.pdffactory.com
Page 4

SUNPENTOWN INTERNATIONAL INC.
If this product is found to be faulty as a result of faulty
materials or workmanship within 1 year from date of
purchase, it will be repaired or replaced free of charge.
This guarantee is subject to the following terms:
1. Sunpentown must be notified of the fault.
2. Proof of purchase must be presented to
Sunpentown’s nominated representative.
3. The warranty will be void if the product is modified,
misused or repaired by an unauthorized person.
4. The guarantee after repair or replacement will not
be extended beyond the original one-year period.
5. All replacement parts or units will be new or
reconditioned.
6. Parts or units, which are replaced, become the
property of Sunpentown.
7. The warranty applies for the use of the product in
the USA.
8. Warranty does not include freight charges.
This GUARANTEE is in addition to your Statutory Rights.
Please keep this warranty for your record. DO NOT return
it.
YOUR GUARANTEE
PDF created with FinePrint pdfFactory trial version http://www.pdffactory.com
Page 5
14”立扇
型號: SF-1465
使用手冊
尚朋堂股份有限公司
謝謝您選用尚朋堂電扇。使用前請詳閱本說明
書,閱畢後將之妥善的保存以便日後參閱。
簡介
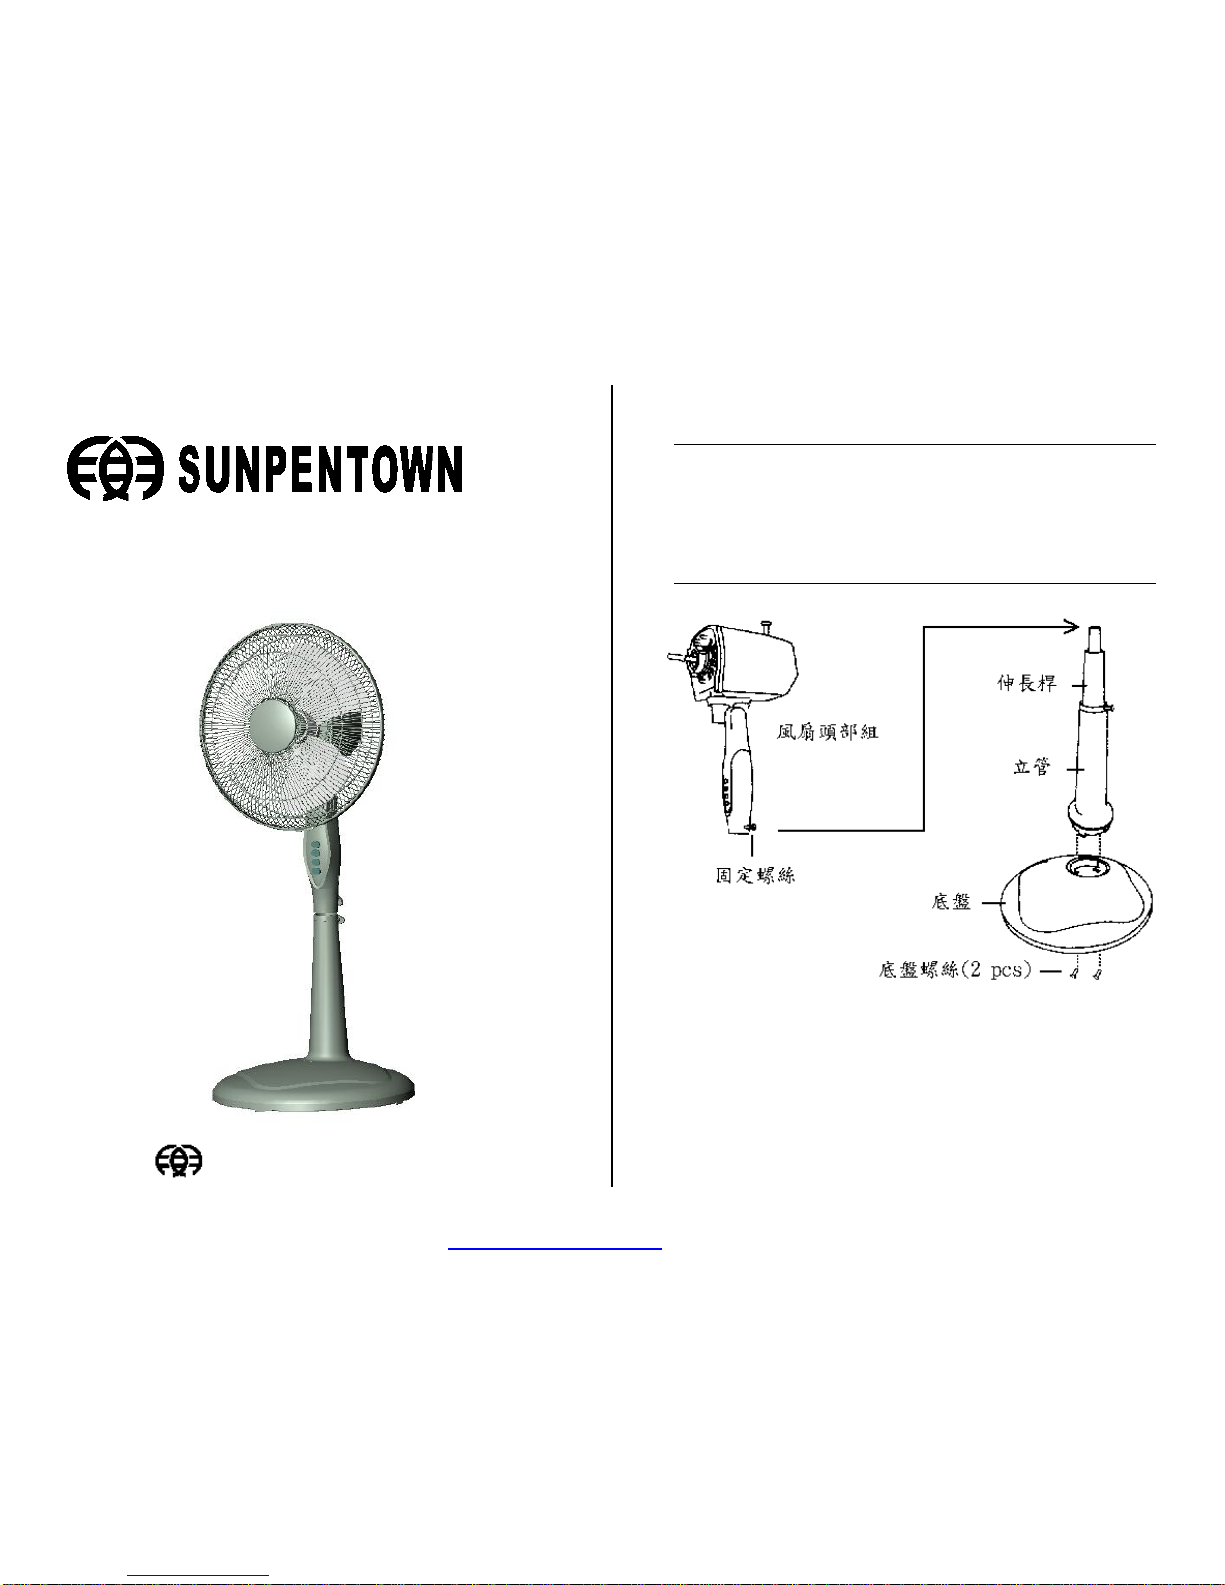
裝配
1. 鬆開底盤底部的兩顆底盤螺絲。
2. 將立管插入底盤之凹洞,重新鎖緊兩顆底盤螺
絲,以結合底盤及立管。
3. 將風扇頭部組底部之凹口,對準伸長桿放入。
鎖緊固定螺絲以結合風扇頭部組與伸長桿。
PDF created with FinePrint pdfFactory trial version http://www.pdffactory.com
Page 6
4. 將後網裝上風扇頭部。
5. 將網束鎖上,固定後網。
6. 將扇葉對準軸心裝上。
7. 將扇葉束環鎖上,固定扇葉。
8. 將前網裝上,與後網結合。
測試
您的電扇在出廠前均經過嚴格的品質管制及測試。
若有任何運轉或操作不良的狀況,請立即退回修
理。
注意:為避免危險,本電扇只可使用於 AC 120 V
之插座。
重要安全指示
使用前請詳閱本說明書,閱畢後將之妥善的保存以
便日後參閱。為避免損壞機體、造成火災、觸電或
傷及人員。請依循下列之重要安全指示使用本電
扇:
l 請勿在室外使用。
l 在所有零件未完全安裝時,請勿使用。
l 請勿使用於下列環境: 1)溫度高於 104F 2)高
溼度的環境 3)蒸氣充滿室內
l 請勿在易燃的氣體或蒸氣附近使用。
l 運轉時,請勿將手指或異物伸入前後網內,勿碰
觸扇葉,尤其需特別防範兒童發生此類危險。
l 請勿讓異物經由出風口或入風口進入機體。
l 請勿噴灑殺蟲劑於機體表面上,否則將破壞機體
表面。
l 本電扇之插頭為有極性插頭(插頭片一寬一
窄),應配合插於有極性之插座以避免觸電之危
險。
本電扇的基本操作如下
0 = 關
1 = 低速
2 = 中速
3 = 高速
操作
PDF created with FinePrint pdfFactory trial version http://www.pdffactory.com
Page 7
需頭部自動擺動時:
將抽管壓下。
需頭部固定時:
將抽管拉起。
電扇頭部之俯仰角度可
調整。調整範圍:
往上:15。
往下:15。
調整風扇高度:
鬆開伸長桿調整螺絲,
調整至所需的高度後,
再鎖緊伸長桿調整螺
絲。
清潔保養
1. 關掉電源並將插頭拔離插座。
2. 依序拆下前網、扇葉束環、扇葉、網束及後網。
3. 以一柔軟濕布擦拭機體及所有零件。切勿將水直
接沖於機體上或使用具侵蝕性的清潔劑。仔細清
潔機體表面,特別是前後網及扇葉。
4. 清潔過後,裝上所有的零件,並繼續使用。未完
全裝配完畢之前,請勿使用本電扇。
規格尺寸
機身長度
13 inch
機身寬度
18 inch
機身高度
42 inch
重量
9.7 lb
適用電壓
120 volts AC, 60Hz
尚朋堂股份有限公司
顧客服務電話
若產品損壞,請與服務人員聯絡,由專人為您維
修。請勿嚐試自行維修,否則易造成產品的進一步
損壞,甚至對人體造成傷害。
若對本產品有任何疑問,顧客服務電話為:
1-626-581-1818
您的保證卡:
自購買日起一年內免費維修,條件如下:
1. 提出尚朋堂認可經銷商的發票。
2. 產品若遭改裝,不當使用或經未認可人員修理,則
保證無效。
3. 保證期內的修理不延長原保證期限。
4. 保證只限美國本土使用。
5. 保證不含送修運費。
敬愛的貴客,請保留此卡不要寄回
PDF created with FinePrint pdfFactory trial version http://www.pdffactory.com
 Loading...