

Page 1
SD-9241SS-Stainless Steel
SD-9 W-White241
Dishwasher Features...............................1
Safety Instructions..................................2
Grounding Instructions
Electrical Connection
Proper Use
Parts Identification..................................3
Dishwasher Features
Faucet Adapter Assembly
Installation............................................4 - 5
Unpacking
Positioning
Electrical Requirements
Connecting the Dishwasher
Disconnecting the Dishwasher
Operating Instructions....................6 - 10
Control Panel
Loading the Dishwasher
Detergent Dispenser
Rinse Aid Dispenser
Wash Cycle Table
Starting a Wash Cycle
Changing the Wash Program
How to Use the All-in-1 Program
Maintenance......................................11 - 12
Cleaning Instructions
Protect Against Freezing
Keeping the Dishwasher in Shape
Troubleshooting...............................13 - 14
Page 2

This el ec tric dishwasher has the common ch aracteristic s of other hou se-hold d ishwashers, as
well as thes e unique specialties:
Time delay feature
Allows you to program t he operat ion to begin at a later
time, between 1 to 24 hou rs. Program to ru n during offpeak ho urs helps r edu ce ele tricit y c ost.
Er ror alarm
Fa ult c odes d isplay would inform th e user of
abnormal status of the mach ine .
Rinse aid Warn ing I ndicator
When th e rin se ai d is running low, a rell re minder
will be d isplaye d on the panel. Th is ensures the
machine continues to oper ate at optimum p erform ance.
Stainless steel tub
6 wash programs
Choose fro m 6 was h cycles, based on load and soi led
level :A ll-in -1, Hea vy, Normal, Light, Ri nse and Sp e ed.
The manufacturer, follo wing a policy of constant
development and up-dating of the product, may
make mod ications with out giving prior notice.
1
Page 3
This appliance must be grounded. In the event of a malfunction or breakdown, grounding will reduce the risk
of electric shock by providing a path of least resistance of electric current. This appliance is equipped with a
cord having an equipment-grounding conductor and a grounding plug. The plug must be plugged into an
appropriate outlet that is installed and grounded in accordance with all local codes and ordinances.
WARNING! Improper connection of the equipment-grounding conductor can result in risk of electric shock.
Check with a qualied electrician or service representative if you are in doubt whether the appliance is
properly grounded. Do not modify the plug provided with the appliance. If it does not t the outlet, have a
proper outlet installed by a qualied electrician.
DO NOT USE AN EXTENSION CORD OR AN ADAPTER PLUG WITH THE APPLIANCE.
DO NOT, UNDER ANY CIRCUMSTANCES, CUT OR REMOVE THE THIRD GROUNDING PRONG.
This dishwasher is designed for operation on an adequately wired individual 110V, 60Hz. Use
required fuse 15 amps. Fuse electrical supply is required - copper wire only. Time delay fuse or circuit
breaker recommended and provide separate circuit serving only this appliance.
Do not abuse, sit on, or stand on the door or dish
rack of the dishwasher.
Do not touch the heating element during or
immediately after use.
Do not wash plastic items unless they are marked
dishwasher safe or the equivalent. For plastic
items not so marked, check the manufactures
recommendations.
Use on ly de t er gent and rin se ad d itives design ed
for an autom at i c dishwas her. Never u se soap ,
laun dry detergent, o r hand washing detergen t
in your dis hwasher. Keep t hese p rod ucts out of
chi l dre n s reach.’
Keep child away from detergent and rinse aid, keep
child away from the open door of the dishwasher,
there could still be some detergent left inside.
The doo r sh oul d n ot be l eft i n the open positi on
sinc e this coul d presen t a trippin g hazar ds.
During i nstallat i on, t he power su ppl y mus t n o t
be exce ss iv ely or dange rous ly be nt or attened.
Do not tamper with controls.
The app l ian ce is not intended for use b y youn g
chi l d re n or inrm pe r son s without supervision .
Dishwasher detergents are stron gly a lkal i ne, they
can be extre mel y danger o us if sw allowe d .Avoid
contact with skin and eyes an d ke ep c hildren awa y
from the di s hw a she r when t he door is open.
Do not operate your dishwasher unless all
enclosure panels are properly inplace. Open the
door very carefully if the dishwasher is operating,
there is a risk of water squirting out.
Do not place any heavy objects of stand on the door
when it is open. The appliance could tip forward.
When lo ading it ems to be was hed :
1) L ocate sh arp i t em s so that they ar e not likely to
dam age the door seal;
2) L oad sha r p knives with th e han dle s up to re d uc e
the risk of cu t-type in juries.
When us ing y our dishwash er, you s hou ld pre vent
plast ic it em fr om c ont actin g with heating el eme nt.
If the sup pl y cord i s d amaged , it must be repla ced
by th e manufactu rer or its se rvic e ag e nt or a
similarly qualied pers on in order to avoi d a
hazard.
Please d ispose of pack ing m ate rials proper l y.
Use the dishwasher only for its intended function.
Remove the door to the washing compartment when
removing an old dishwasher from service or discarding it.
Youn g chil dren shou ld be su pe rvis ed to en sure that
they do n ot play wi t h the app li anc e .
Check that t he detergent receptable is em pty afte r
completion of th e wash cycle.
2
Page 4
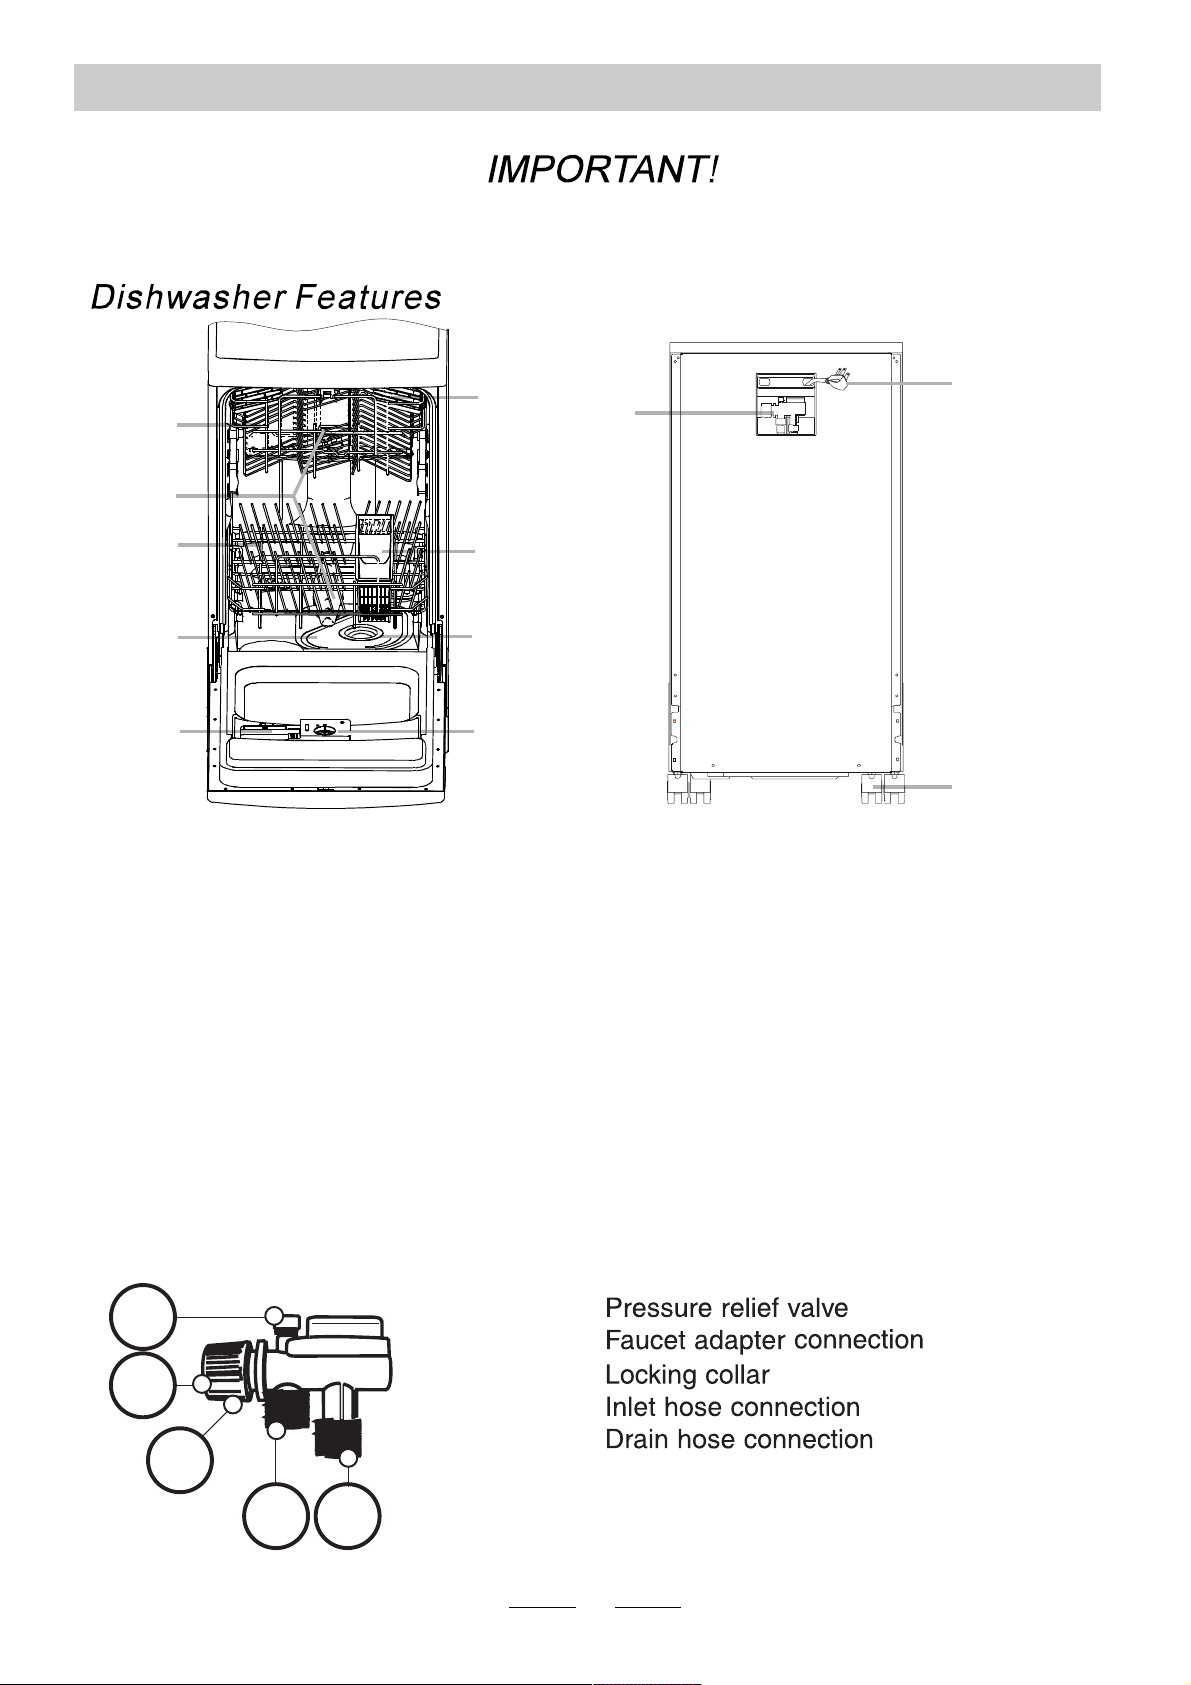
PARTS IDENTIFICATION
To get the best performance from your dishwash er, read all operating instructions be f ore using
it for the rst time.
1
2
3
4
5
Front View
(Door Open)
Up per Bas k et
1 4
Sp ra y Arms
2
Lower Bas k et
3
Main Filte r
De terg ent Dispens e r
5
Cu p Sh elf
6
6
7
8
9
10
Silv erware Ba ske t
7
Coarse F ilter
8
Rins e Ai d Di spe nser
9
11
12
Ba ck View
Fa ucet Ad apt er Assembly (Quick Connec t)
10
Po wer Cord
11
Caster
12
FAUCET ADAPTER ASSEMBLY (QUICK CONNECT)
Your dishwasher comes equipped with a Faucet Adapter Assembly (#10 above) The faucet adapter
is to be installed on the faucet. This adapter is located on the back of the dishwasher. The faucet adapter
is compatible with faucets inclusive of either male (outside) or female (inside) threaded faucet connections.
1
1.
2.
3.
2
4.
5.
3
4
5
3
Page 5

INSTALLATION
Attention:
The installation of the pipes
and electrical equipments
should be done by professionals.
Warning
Electrical Shock Hazard
Disconnect electrical power before
installing dishwasher.
Failure to do so can result in death
or electrical shock.
Unpacking
Have at least two people to move and install the dishwasher to prevent personal injuries.
Remove all packaging materials: shipping tape, foam pieces, etc. before use. Do not use
sharp instruments, rubbing alcohol, ammable uids or abrasive cleaners. Check and
make sure all parts necessary for installation are included. If parts are missing, please
contact Sunpentown at 1-800-330-0388. The dishwasher must be placed on a level and
at surface that can support the weight when the dishwasher is fully loaded.
Positioning
The dishwasher is equipped with water supply and drain hoses that can be positioned to the
right or the left to facilitate proper installation. Make sure water supply/faucet connection is
within reach of the hose assembly (3 ft).
Electrical Requirements
Read all safety precautions listed at the beginning of the manual. Make sure the
electrical outlet is within reach of the power supply cord. It is recommended
to not use receptacles that can be turned on/off by a switch or pull chain.
Refer to the rating label and be sure the voltage and frequency corresponds to the
power supply. Use a dedicated circuit that is rated for 10 amps.
The dishwasher is equipped with a power supply cord with a 3-prong grounding plug.
The cord must be plugged into a mating 3-pronged wall receptacle. If a mating wall
receptacle is not available, it is the personal responsibility of the customer to have a
properly grounded, 3-pring wall receptacle installed by a certied electrian.
· DO NOT use an extension cord or an adapter plug with this appliance.
WARNING!
· DO NOT, under any circumstances, cut or remove the ground-prong.
· Improper connection of the connection of the equipment grounding conductor can result in
electric shock.
· Check with a qualied electrician or service representative if you are in doubt whether
the appliance is properly grounded.
4
Page 6

Connecting the Dishwasher
Remove the Faucet Adapter by pulling back the locking collar
on the Quick Connect; while pulling the Faucet Adapter in the
opposite direction.
Locking Collar
The Faucet Adapter is compatible with either female
(inside) or male (outside) threaded faucet connections:
· If your faucet is “female” type, both rubber washers
must be installed inside the faucet adapter.
· If your faucet is “male” type, use only one rubber
washer. Remove the second rubber washer.
Installing Quick Connect to faucet
1. Screw the Faucet Adapter onto (or into) the
faucet. Check for leaks (use Teon or plumbers
tape to eliminate any leaks if necessary).
2. Attach the Quick Connect assembly onto the
Faucet Adapter - pull down on the locking collar,
while pushing the Quick Connect upwards onto
the Faucet Adapter.
3. Release the locking collar when the Quick
Connect Assembly snap onto the Faucet
Adapter. Verify connection is secure.
4. Slowing turn on water and check for any signs
of water leak. If leak is located, immediately
turn off the water supply and repair leak.
IMPORTANT
- Once you turn on the water supply (even if turned off immediately), the inlet hose will be pressurized.
- To relieve the water pressure (make sure water supply is turned off), press and hold the red
pressure relief button on the Quick Connect until the ow of water stops.
WARNING
Failure to relieve water pressure before disconnecting the Quick Connect may result in back-pressure
over-spray. The temperature of incoming water may be very hot, and back-pressure over-spray can
cause severe burns and/or scalding.
Disconnecting the Dishwasher
1. Turn off water supply at the faucet.
2. Disconnect the power supply cord.
3. Release water pressure: press and hold the red Pressure Relief Valve until ow of water stops.
4. Disconnect the Quick Connect by pulling down on the locking collar and release from Faucet Adapter.
5
Page 7

OPERATING INSTRUCTIONS
1
1
Disp lay window: Pro gram rem aining time,
del a y tim e, running indicator, fau l t co des
and etc.
Delay Button : Pr ess to p rogram de lay st art.
2
Pr ogra m indicator ligh ts: Ind ic a tes the
3
se l ec t ed wa s h cycle.
Wash Program Se lector : Pre s s to select one
4
of the si x pro g rams.
1
2
5
4
3
8
Rins e aid low warnin g l ig ht.
5
Po wer in dicato r light.
6
Power s wi t ch: To turn on/ off the p ower supply.
7
Star t /Pa use butto n: To start the s el ected
8
washing progr am or pause the washin g program
when the ma chin e is wor kin g .
6
7
Loading the Dishwasher
The following items are not suitable for wash in the dishwasher:
- Cutlery with wooden, horn china or mother-of-pearl handles and wooden platters
- Plastic items that are not heat resistant
- Older cutlery with glued parts, bonded cutlery items or dishes
- Pewter or copper items
- Crystal glass
- Steel items subject to rusting
- Very small items as they may fall out the basket
- Items made from synthetic bers
Items of limited suitability:
- Silver and aluminum - tends to discolor after washing
- Glazed patterns may fade
CUTLERY BASKET
Flatware should be placed in the cutlery basket with handles at the bottom. Knives and other sharp
utensils should be placed with handles up, but make sure the tips do not extend through the bottom.
If the rack has side baskets, spoons should be loaded individually into slots. Longer utensils should
be placed horizontally at the front of the upper rack.
6
Page 8

UPPER RACK
The upper rack is designed to hold more delicate and lighter dishware such as glasses, coffee and
tea cups and saucers, as well as plates, small bowls and shallow pans (as long as they are not too
dirty). Position the dishes and cookware so that they do not get moved by the spray of water. The
upper rack can be lifted (or lowered) by removing and placing the rack into different rails. This
makes room for either rack to accomodate different size items.
Cups
1
Saucer
4
1
3
2
3
2
2
Glas ses
3
LOWER RACK
We recommend placing large items which are most difcult to clean into the lower rack: pots, pans,
lids, serving dishes and bowls, as shown in the gure below. It is preferable to place serving dishes
and lids on the side of the racks in order to avoid blocking the rotation of the top spray arm.
Pots, s erv ing bo wl s, et c , must a lwa ys be placed top d own .
Deep pots should b e sla nte d to allow water to ow out.
The botto m rack fe ature fo ld do wn tine r ows t o accomod ate larg e r pots a nd pans .
3
5
8
4
6
7
6
9
Serv ing bowl
4
Fruit bowl
5
Brea d and butter plates
6
Serv ing plate
7
Dinner plates
8
Silverware bas ket
9
FOR BEST PERFORMANCE
- Scrape off food particles before loading.
- Soften remnant of burnt food in pans
- Place cups, glasses, bowls, pots/pans face down.
- Curved items, or those with recesses, should be loaded at a slant so water can furn off.
- Allow sufcient space between items to allow water and detergent to reach each surface.
- Ensure glasses and stemware are secure and balanced.
- Ensure breakable items are not sitting on metal cutlery which can chip the dishes.
- Do not overload the dishwasher.
WARNING
- To prevent damage, do not remove glass and cutlery from the dishwasher immediately after
end of a program. Allow the dishware to return to room temperature
7
Page 9

Detergent Dispenser
To prevent formation of deposits, do not add too much detergent. This dishwasher has specially
designed water softener.
This unit uses less detergent and rinse aid than most conventional dishwashers. In general, only
one tablespoon of detergent is needed for a normal wash load. Add more detergent as needed for
heavily soiled loads. The amount of detergent can also vary due to differences in water hardness.
To determine the water hardness in your area, contact your local water utility company. The harder
the water, the more detergent may be needed. Remember, you should adjust the amount of
detergent by small amounts until you nd the correct amount.
The dispenser must be relled before the start of each wash cycle and always add detergent just
before starting the dishwasher, otherwise it could get damp and not dissolve properly.
Use only detergent specically made for use with dishwashers.
Button
Dishwas h er de ter gent i s corr os ive!
To remove ha rd water s pots, try t h e fo l l owi ng:
Re move a ll me tal dishware , such as cutlery, pans, et c.,
from th e di shwashe r.
Do n ot ad d d etergent.
Po ur two c ups of v inegar in to a bow l an d set the bo wl face
up on t he lower rack of the di shwashe r.
Ru n the di she s thr ough a norm al wash pr og ra m .
If this doesn't wo r k, tr y the same proce ss with 1 / 4 cup of
citri c acid crys tals instead of v i negar.
Take care to ke e p it out of rea ch of c hildren .
Rinse Aid Dispenser
Indicator
Dispenser cap
Adjustable setting
To ope n the dispenser, turn the cap to th e "open"
(left) ar r ow and l ift it out.
Pour t h e rinse aid into the dispense r, be ing
ca reful not to o ver ll .
To replace, align ca p with open arrow and turn
clockwise to close
“ ”
Th e rinse aid i s rel ease d during the nal rins e to prevent wa ter from
fo rmi ng dro p lets on your di shes t h at c a n leave s pot s and s treaks.
It also impro ves d ry ing by allowing water to “s hee t” off th e dis hes .
Your dishw ashers are designed t o use liquid rinse aids. The ri nse a id
dispe nse r is locate d inside the doo r next to the detergent d isp enser.
To ll the disp e ns er, op en th e c a p and pour t h e r i n se aid in t o t h e
dispenser until the leve l indic a t o r t u r n s c o m p letely black. Th e
di spenser h ol ds about 100ml of liquid rinse aid.
Be ca reful not to overll the disp e nser, because t h is c oul d cau se over
su dsin g. Wi pe away an y spil ls wi t h a dam p cloth .
Don't forg e t to replace t he c ap before you clo se the dishwasher door.
If you ha ve so f t water, you m ay not nee d r ins e aid for it ma y
ca use a w hite lm to de ve lop on y our dishe s.
Adjusting Rinse Aid Dispenser
A measured am ount of rinse ai d i s re l ea s ed durin g the nal ri nse. As w ith det e rge n t, th e amo unt
of rinse ai d needed for your dish e s depends on the hardness o f th e water i n your area. Too much
rinse aid ca n result in lather of fo aming and caus e clo udi ness or steaks on your dishes. If the
water in yo ur area is ve r y so f t, you may not need r ins e aid . If y ou d o, y ou can dilute the rinse ai d
with an equal a mo unt of water.
Th e ri n se aid dispenser ha s fou r settings. Always start w ith the dis penser set on " 2 ". If spot s and
poor dr yin g are probl ems, increase the amount of ri n se aid di spen s ed by remo v in g t he dispenser
Adjustable setting
lid and r ot a t ing t he dial to "3". If t he di shes s til l are no t dr ying prop e rl y o r are spot t e d, a d ju s t th e
di al to"4". Rell when the Rinse Aid Wa rning Li g ht il lumi nates.
8
Page 10

All in 1
Heavy
For all s oiled loa ds, s uch as
pots , pa n s,c asserole dis h es
and dishes t hat have been
sitt i ng wi th dried foo d on them
for a wh ile.
For t he h eaviest soiled
loads , suc h as pots, pans,
casse role dishes and dish es
that ha ve be en sittin g with
dried food on them for a
while .
Pr e- wa s h
Pr e- wa s h
was h 136 F
( )
Rins e 154 F
Dryi ng.
Pre-w ash
Pre-w ash (1 22 )
Wash (1 36 )
Rinse
Rinse (149 )
Dryin g
°
( )
°
°
°
F
°
F
F
All in1
18 g
130
135
0.6
0.58
3.7
4.6
Pre- wash
Wash (136 )
Rins e
Rins e ( 149 )
Dryi n g
Pre-w ash
Wash (1 22 )
Rinse
Rinse
Dryin g
Pre-Wash
Pre-Wash
Pre-Was h
Wash
Rinse (131 )
Dryin g
°°F
(140 F)°°
(122 F)F°
°
F
F
18 g
18 g
18g .
115
100
25
65
0. 545
0.43
0.05
0.32
3.65
3.67
1.9
2.75
No r mal
(AHA M)
Light
Rinse
Sp eed
Fo r nor mall y soiled loads ,
su ch as , pl a tes,gl ass es
an d lig htly s oi l ed pa ns.
st andard da ily cycle.
Fo r ligh tly so iled loa ds,s uch
as pl ates,glasses ,bow l s and
lig htl y soiled pa ns.
For dishes that j ust need a
quick rin se.
A shorter was h for li ghtly
so iled loa ds .
po ts
Starting a wash cycle:
Once the dishwasher is loaded, follow these instructions to start the wash cycle:
1. Ensure the dishwasher is properly connected to power supply.
2. Ensure the water supply is properly connected and is turned on to full pressure.
4. Add detergent and check Rinse Aid is full.
5. Close the door and press the ON/OFF button to turn on the dishwasher.
6. Press the PROG button to select desired program: All-in-1 -> Heavy -> Normal -> Light ->
Rinse -> Speed.
7. If you wish delay the start time, press the DELAY button to set (1 to 24 hours)
8. Press the START/PAUSE button to begin the wash cycle.
Changing the Wash Program
You can change the wash program if the unit just started and only ran for a short time.
Otherwise, detergent may have been released and water drained. If this is the case, the
detergent dispenser must be relled.
Open the door slightly, press and hold the PROG button for 3 seconds. Press PROG button
again to select desired mode. Close the door.
9
Page 11

Forgot to Add a Dish?
A forgotten dish can be added any time before the detergent cups opens:
1. Open the door slightly to pause the cycle.
2. After the spray arm stops spinning, you can open the door completely.
3. Add forgotten dishes.
4. Close the door and dishwasher will resume operation after 10 seconds.
At the End of the Wash Cycle
When wash cycle has nished, the dishwasher will buzz for 8 seconds.
1. Turn the unit off by pressing the ON/OFF button.
2. Shut off water supply and open the door.
3. Leave the door ajar and wait for a few minutes before unloading. This will allow the dishes to
cool and assist in the drying process. Dishes that are still hot are more susceptible to breakage.
WARNING!
It is dangerous to open the door when washing, because the hot water may scald you.
Your dishwasher has an “All-in-1 Program” which needs no rinse aid but an “All-in-1” tablet.
10
Page 12

MAINTENANCE
Filter System
Filter System
Filter System
For your convenience, the drain pump and ltering system are placed within easy reach inside
For your convenience, the drain pump and ltering system are placed within easy reach inside
For your convenience, the drain pump and ltering system are placed within easy reach inside
the tub. There are three components of the lter system: Main Filter, Coarse Filter and Fine lter:
the tub. There are three components of the lter system: Main Filter, Coarse Filter and Fine lter:
the tub. There are three components of the lter system: Main Filter, Coarse Filter and Fine lter:
1. Main Filter
Food and soil particles trapped by this lter are pulverized by a special jet on
the lower spray arm and washed down the drain.
2
1
Cleaning the Filters
The lters efciently removes food particles so the wash water can be recycled during a wash
cycle. For best performance and results, the lter assembly must be cleaned regularly. Remove
the lter assembly per instructions below and rinse clean under running water. Use a soft cleaning
brush or old toothbrush to clean the Coarse and Fine Filters. Reassemble in reverse order.
2. Coarse Filter
Larger items, such as pieces of bone, that could block the drain are trapped here.
3
To remove items caught in this lter, gently squeeze the tabs on the top and lift out.
3. Fine Filter
This lter holds soil and food residue in the cylindrical base and prevents it from
being redeposited on the dishes.
1
Step 1: Turn the lter counter-
2
3
Step 2: Lift the Main Filter Step 3: Lift the Fine Filter
clockwise and lift upwards
WARNING!
- Inspect lters after each use.
- When cleaning, do not knock or bang the lters to remove residues. This could contort the
lters and reduce performance of the dishwasher.
- Never run the dishwasher without lter assembly in place.
- Improper placement of the lter or damaged lter may reduce the unit’s performance and
may cause damage to dishes and/or utensils.
- The entire lter assembly should be cleaned at least once a week.
Cleaning the Spray Arm
It is necessary to clean the spray arms regularly for hard water chemicals will clog the spray
arm jets and bearings. To remove the spray arm, screw off the nut to take out the washer on
top of the spray arm and remove arm. Wash with soapy and warm water and use a soft brush
to clean the jets. Carefully reinstall making sure the rotary movement is not impeded.
Cleaning the Dishwasher
The control panel can be cleaned by using a slightly dampened cloth. Dry thoroughly with a
soft towel.
The exterior can be wiped with a towel and mild detergent solution. Wipe clean and follow
with a good appliance polish wax.
Never use sharp objects, scouring pads or harsh cleaners on any part of the dishwasher.
11
Page 13

Protect Against Freezing
If your dishwasher is left in an unheated place during the winter months, please follow these
procedures after each wash:
1. Turn off the dishwasher.
2. Turn off water supply and disconnect water inlet hose from the water valve.
3. Drain water from the inlet hose and water valve (use a pan to catch the water).
4. Reconnect the water inlet hose to water valve.
5. Remove the plastic sump cover in the bottom of tub and use a sponge (or towel) to soak up
water in the sump
Cleaning the Door
Use only a soft damp cloth with warm water to clean the edge around
the door. To avoid penetration of water into the door lock and electrical
components, do not use a spray cleaner of any kind.
WARNING: Abrasive agents and some paper towels may scratch or
leave marks on the surface.
Keeping Your Dishwasher in Shape
After Every Wash
Turn off the water supply and leave door slightly open so moisture and odors are not trapped inside.
Remove the Plug
Before cleaning or performing maintenance, always remove the plug from the socket. Do not take risks.
No Solvents or Abrasive Cleaning
Never use abrasive cleaners or solvents to clean the dishwasher. Use only a dampened soft towel
with warm water. To remove spots or stains on the interior surface, you may use a cloth dampened
with water and a little white vinegar.
Clean Filters Regularly
Clean the lters regularly to prevent clogs and odors.
Clean the Door Seals
Food that gets trapped in the seals may cause odor to form. Periodic cleaning with a damp sponge
will prevent this from occuring.
Moving the Dishwasher
If the dishwasher must be moved, try to keep it in the upright position. If absolutely necessary,
it can be positioned on its back.
Storage or Vacation Time
It is recommended you run a wash cycle with the dishwasher empty. Disconnect from power and
turn off water supply. Remove any remaining water in the sump area with a sponge. Leave the
door slightly open. This will help the door seal to last longer and prevent odors from forming
inside the dishwasher.
12
Page 14

'
Fuse blown, or the
circuit breaker tripped
Replace fuse or reset circuit breaker. Remove any other
appliances sharing the same circuit with the dishwasher
Power supply is not
turned on
Water pressure is low
Some audible sounds are
normal
Utensils are not secure
in the baskets or something
small has dropped into
the basket
Motor hums Dishwasher has not been used regularly. If you do not use it
Improper detergent
Spilled rinse agent Always wipe up rinse agent
Make sure the dishwasher is turned on and the door is
closed securely.
Make sure the power cord is properly plugged into the
wall socket.
Check that the water supply is connected properly and
the water is turned on.
Sound from soft food shredding action and detergent cup
opening.
To ensure everything is secured in the dishwasher.
often, remember to set it to ll and pump out every week,
which will help keep the seal moist.
Use only dishwasher detergent to avoid suds.
When this occurs, open the dishwasher and let suds
evaporate. Add 1 gallon of cold water to the tub. Close
and latch the dishwasher, then Start the wash
cycle to drain out the water . Repeat if necessary.
spills immediately.
Detergent with
colorant was used
Rinse agent dispenser
is empty
Improper program
Improper rack loading Make sure that the action of the detergent dispenser and
•
Extremely hard water
Low inlet
temperature
Overloading the
dishwasher
Improper loading
Old or damp powder
detergent
Empty rinse agent
dispenser
Incorrect dosage of
detergent
Make sure that the detergent is one without colorant.
Make sure that the rinse agent dispense is lled.
Select stronger program
spray arms are not blocked by large dishware.
• To remove spots from glassware:
- Take out all metal utensils out of the dishwasher.
- Do not add detergent.
- Choose the longest cycle.
- Start the dishwasher and allow it to run for about
18 to 22 minutes, then it will be in the main wash.
Open the door to pour 2 cups of white vinegar
into the bottom of the dishwasher.
Close the door and let the dishwasher complete
the cycle. If the vinegar does not work: Repeat
as above, except use 1/4 cup (60 ml)of citric acid
crystals instead of vinegar.
13
Page 15

Combination of soft
water and too much
detergent
Tea or coffee stains using a solution of 1/2 cup of bleach and 3 cups warm water
Use less detergent if you have soft water and select a
shorter cycle to wash the glassware and to get them clean.
to remove the stains by hand.
You have to wait for 20 minutes after a cycle to let the heating
elements cool down before cleaning interior; to preven scalding.
Iron deposits in water
can cause an overall lm
Hard water minerals To clean the interior, use a damp sponge with dishwasher
Dial is not in the
'
position
Dishes block detergent
cups
Normal phenomenon
Aluminum utensils have
rubbed against dishes
This is normal A small amount of clean water around the outlet on
Overll dispenser or rinse
aid spills
OFF
You have to call a water softener company for a special lter.
detergent and wear rubber gloves. Never use any other cleaner
than dishwasher detergent for the risk of foaming or suds.
Turn the Dial to
OFF position and slide the door latch to the
left.
Re-load the dishes properly.
There is some steam coming through the vent by the door
latch during drying and water draining.
Use a mild abrasive cleaner to eliminate those marks.
the tub bottom at the back of the tub keeps the water
seal lubricated.
Be careful not to overll the rinse aid dispenser.
Spilled rinse aid could cause oversudsing and lead
to overowing. Wipe away any spills with a damp cloth.
Dishwasher isn t level
Long inlet time.
Long heating time,
unit not reaching the required temperature
'
Make sure the dishwasher is level.
Faucets is not opened, or water intake is restricted,
or water pressure is too low.
Malfunction of temperature sensor or of heating element.
14
Page 16

Your Guarantee
If this product is found to be faulty as a result of faulty materials or workmanship within one year
from date of purchase, it will be repaired free of charge.
This guarantee is subject to the following terms:
· Sunpentown must be notied of the fault.
· Proof of purchase must be presented to Sunpentown's nominated representative.
· The warranty will be void if the product if modied, misused or repaired by an unauthorized person.
· The warranty after repair will not be extended beyond the original one-year period.
· All replacement parts will be new or reconditioned.
· Parts, which are replaced, become the property of Sunpentown.
· The warranty applies for the use of the product in the USA only.
What is NOT COVERED:
· Warranty does not include freight charges.
· Damage due to installation error, product abuse and/or misuse.
· Incidental or consequential damage caused by possible defects with this product.
· Labor cost incurred for the installation and/or removal of a possible defective unit.
· Damage to product caused by improper power supply voltage, accident, re, oods or acts of nature.
· Failure of product resulting from unauthorized modications to the product.
· Improper installation or failure to perform the necessary maintenance.
· Normal wear and tear on parts or replacement of parts designed to be replaced.
· Damage to personal property from use of product.
· Replacement or repair of household fuses, circuit breakers, wiring or plumbing.
This GUARANTEE is in addition to your Statutory Rights
SUNPENTOWN INTERNATIONAL INC.
14625 Clark Ave. City of Industry, CA 91745
Tel: 800-330-0388
service@sunpentown.com
www.sunpentown.com
15
 Loading...