

Page 1
SD-2201S
SD-2201W
Page 2
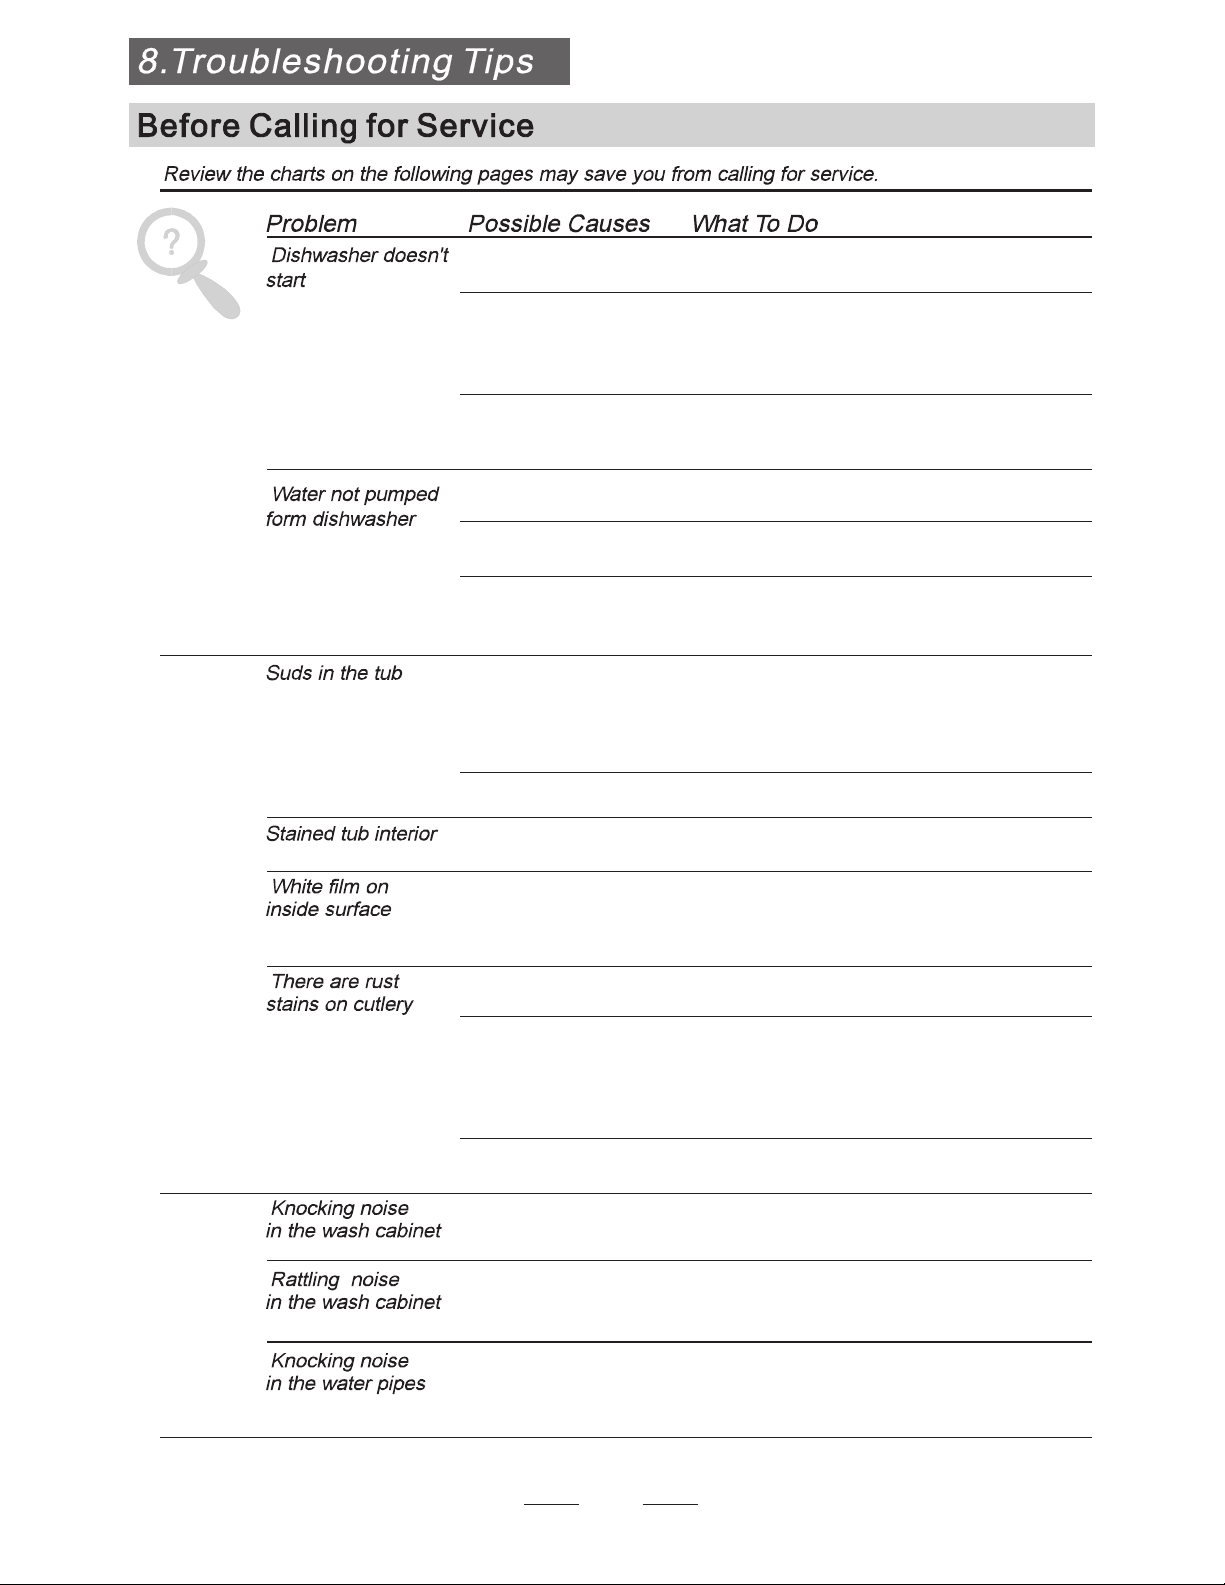
To re vie w the section on Tr oub leshooting Tips
will help you to solve some co mmon problem s
by yourself .
Dea r Cu sto mer,
Pleas e caref ully reading it before us in g the d is hwa sher
will he lp you to u se and maintain the dishw asher p roperly.
Pass it on to any s ubseq uent ow ner of the applianc e.
Thi s ma nual contains sec ti ons of Safe ty Instructions,
Ope rating In struc tio ns ,In sta ll ati on Instructions and
Troubles hoo ti ng Tip s, et c.
Th e man ufacturer, followi ng a policy of c onsta nt
developmen t and u pdating of the produc t, may
make modific ation s wit ho ut gi vi ng prior not ice.
Keep it to refer to at a later da te.
If you can not re solve t he tr oubles by your self ,
please ask f or the he lp of pro fessiona l te chnicians.
Dishwasher Fea tur es............ .. ..... ... ..... ......... ...3
At tenti on before or after loading the Dish washe r
Ba skets .................. ... ....... ........ .......... ..... ... ....6
Filtering Sy stem....... ..... ... ....... ... ..... .......... .....11
Ca rin g fo r the D ishwa she r.. ........ ........... ....... ..12.
A Fi ll th e Ri nse Aid Dispenser............... .......... 4ʙ
B Fu nct ion of De tergent .... ........ ....... ... .. ..... ... .4ʙ
Lo ading the Ba sket... ... ... .......... ..... ... .......... ..... .7
Cutlery Bask et........ ........ .......... ....... ... ..... ...... 8
Was h Cycle Table..... ..... ... .......... ..... .......... ..... 9
Tur ni ng on the A ppl ian ce... .......... .................. . 9
Chang e the Pro gramm e.... ........ .. .......... ......10.. ..
At the En d of the Was h Cycle....................... ....1 0
Po sit ioning the Appl iance ... ... ....... ..... . .......... 14..
Water Conn ectio n..... ..... ... .......... ........ ... ..... ..14.
About P ower Connection........ ........ ........ . ......14.
Connection of D rain Hoses... ........ .......... ....... 16.
St art of dishw as her... ............. ... .. ... ..... .. . ..... 16.. . .
Before calling for se rvi ce. ... .......... ..... ........ . ... .17.
Error c odes.. ..... ............. ..... .......... . .......... ....1 8.
Techni cal inform ati on ............. ... .. ............ .....19..
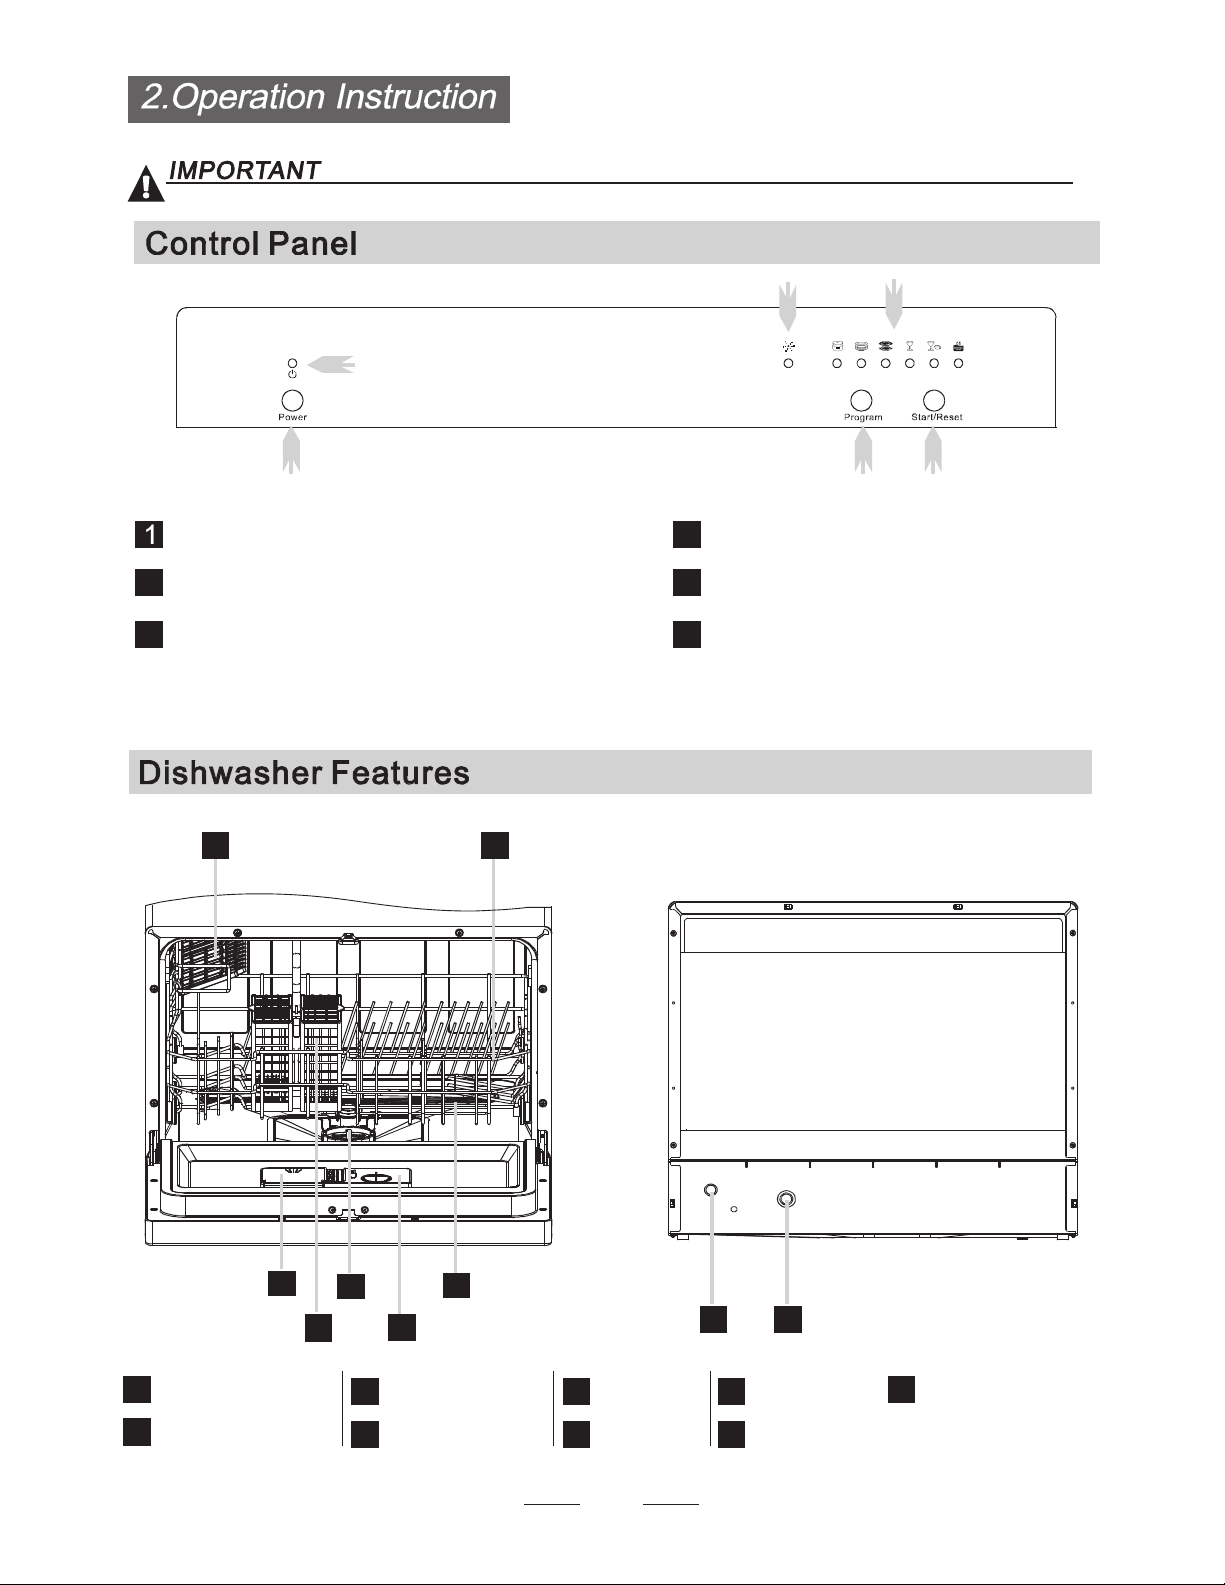
Control P anel.. .................. ... ..... .......... ... .. ...... ..3
Page 3
1
This appliance must be grounded. In the event of a
malfunction or breakdown, grounding will reduce
the risk of electric shock by providing a path of
least resistance of electric current. This appliance
is equipped with a cord having an equipmentgrounding conductor and a grounding plug.
The plug must be plugged into an appropriate outlet
that is installed and grounded in accordance with
all local codes and ordinances.
Keep children away from detergent and rinse aid, keep
child away from the open door of the dishwasher,
there could still be some detergent left inside.
ren
Do not abuse, sit on, or stand on the door or dish
rack of the dishwasher.
Do not touch the heating element during or
immediately after use.
(This instruction is only applicable to machines
with a visual heating element.)
Do not wash plastic items unless they are marked
dishwasher safe or the equivalent. For plastic items
n
ot so marked, check the manufacturer's
recommendations.
Us e only deter gent and rinse additives
de sig ned for an automa tic d ishwa sher.
Ne ver u se s oap , laundry dete rg ent , or hand
wa shi ng dete rg ent in your dishwas her. Keep
these p roducts out of t he reach of ch ildren.
During insta lla tion, t he p owe r su ppl y mus t no t
be exce ssively or dangerously b ent or fl atten ed.
Th e door shoul d not be le ft in the open p osi tion
since this could pr es ent a tr ipp in g hazards.
Do not tamper with controls.
Do not place any heavy objects of stand on the
door when it is open. The appliance could tip
forward.
When loadi ng items to be washed:
1) Loca te sharp ite ms so tha t they ar e not likely
to damage t he door seal ;
2 Warn ing: Knives and other utensils wi th
shar p points mu st be loaded in the ba sk et
with their poi nt s down or p laced in a
ho rizon ta l pos iti on.
)
When us ing you r dishw asher, you should
preve nt plas tic items from c oming into contac t
with heating elemen t.(This instruction is onl y
appli ca ble to machines wi th a visual heat ing
element.)
If the supply co rd is dam aged, it mus t be replaced
by the manu facturer or its se rvice agent or a
si milarly qu alifi ed person in order to avoid a
hazard.
Please dis pose of packing materials pr operl y.
Use the dishwasher only for its intended function.
Remove the door to the washing compartment when
removing an old dishwasher from service or discarding
it.
Dishwasher detergent s are stron gly alkaline, they
can be e xtremely dangerous if sw allowed. Av oid
con ta ct wi th skin an d eyes an d keep child ren awa y
fro m the dishwa she r when the doo r is open.
Ch eck th at the detergent re ceptible is empty
after completion of the wash c ycle.
The app liance is to b e co nne cted to t he water
mains u sin g new hose se ts and th at old ho se- set s
sho uld not be re use d.
The max imum nu mber of place settings to be
washed is 6.
The max imum pe rmissible in let w ater pr essur e is
1Mpa.
The min imu m pe rmissible in let w ater pressur e is
0.04Mpa.
Children should be supervised to ensure that they do
not play with the appliance.
This appliance is not intended for use by persons
(including children with reduced physical, sensory or
mental capabilities, or lack of experience and
knowledge ,unless they have been given supervision
or instruction concerning use of the appliance by a
person responsible for their safety.
)
When using your dishwasher, follow the precautions listed below:
Do not operate your dishwasher unless all
enclosure panels are properly in place. Open
the door very carefully if the dishwasher is
operating, there is a risk of water squirting out.
Improper connection of the equipment-grounding
conductor can result in a risk of electric shock.
Check with a qualified electrician or service
representative if you are in doubt whether the
appliance is properly grounded. Do not modify the
plug provided with the appliance; If it is not fit for
the outlet. Have a proper outlet installed by a
qualified electrician.
Page 4
before us in g it for the f irst time.
To get th e best performance from you r dishwas her, read all op erating inst ructions
'SP OU WJ FX
Filte r assem blyDetergent Dispenser
Cup She lf
Cutlery Bask et
Rinse Aid Dispenser
Inlet pipe con nector
Drain pipe connecto r
Sp ray Arms
Basket
1
5
6
7
8
9
3
2
4
2
1
5
3
6 7
4
2
#BD L 7JFX
8
9
1
2
3
4
5 6
4
2
3
5
6
Po wer Button: To turn on/of f the power s upply.
Po wer Light : To be on w hen the ON/OFF Button
is P res sed dow n.
Rinse Aid Warning Li ght : To be on when t he
rin se a id dispenser needs to be ref il led .
Washing Pr ogram Selector: Pres s the but to n
to sele ct wash cycles
Program indi cator l ight.
Sta rt/Reset But ton: Pres s this bu tto n to s tart
or p aus e th e dishw asher, the pr ocess pil ot
lamp wi ll be bl inking when st artin g.
Page 5
3
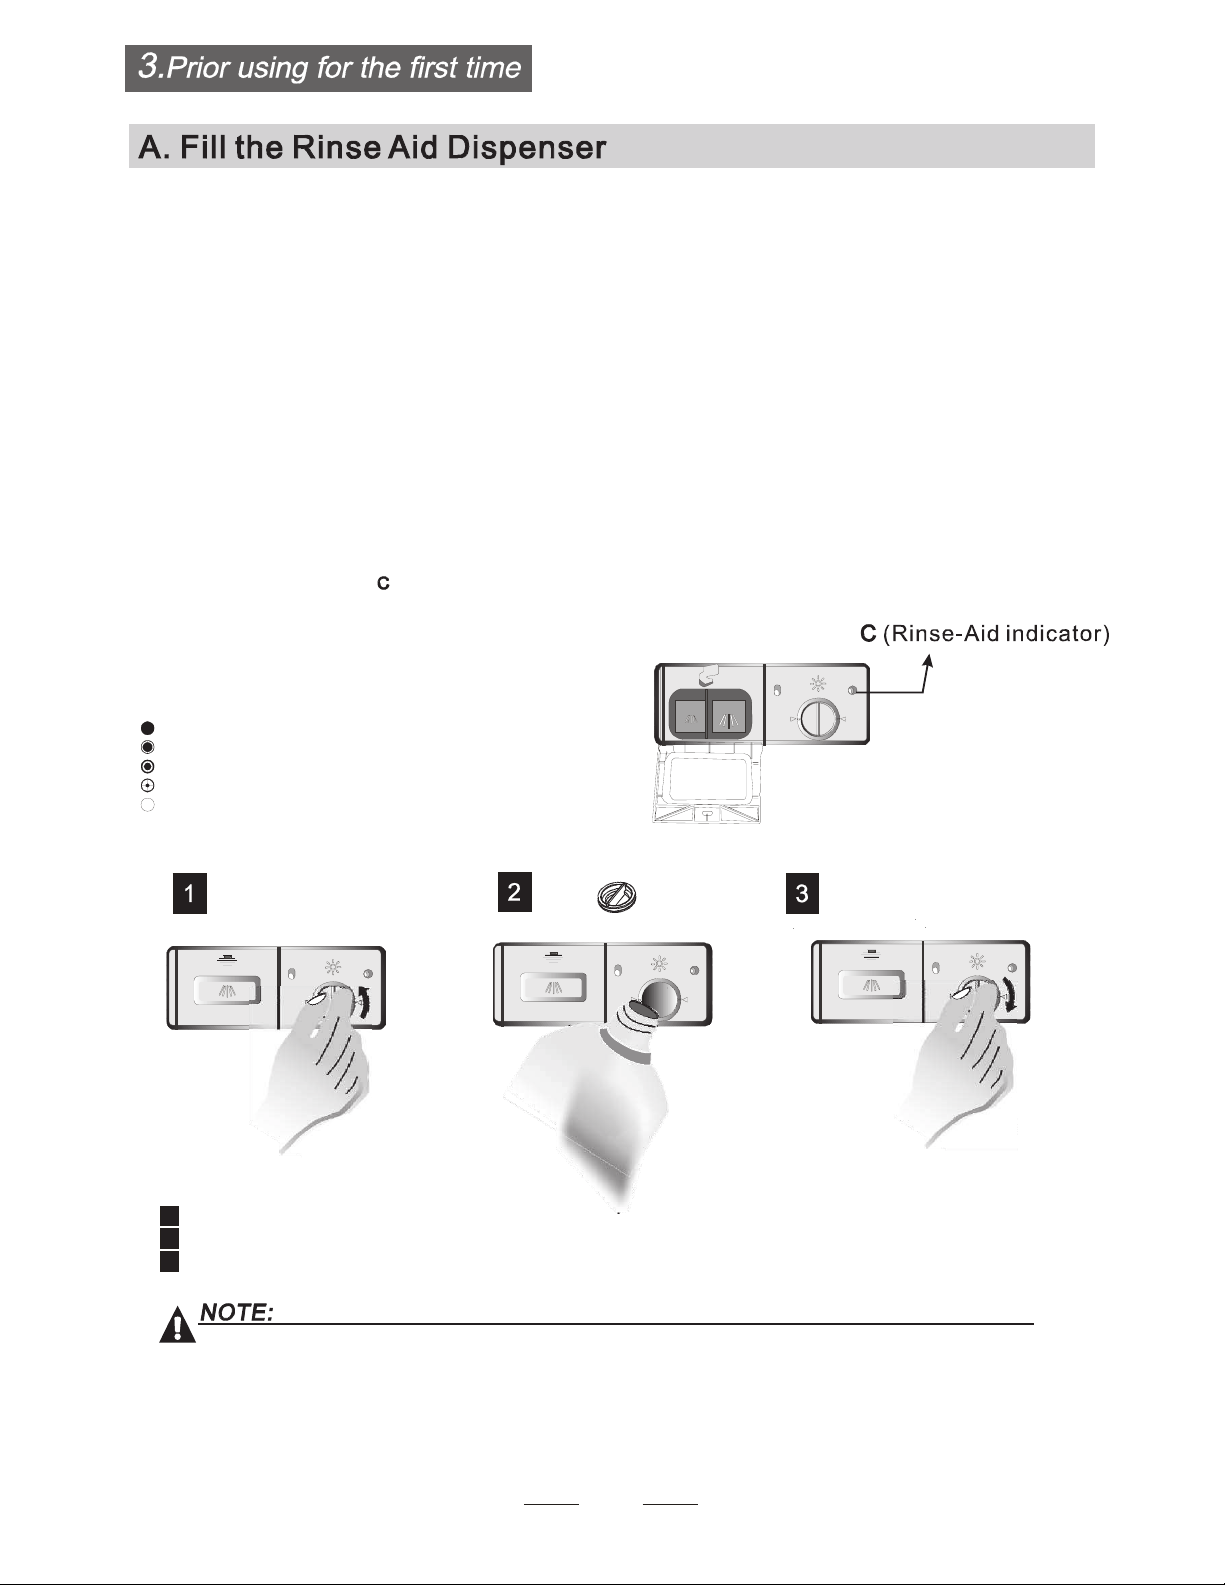
Th e rinse aid is rele ased during the final rinse to prevent wat er from forming drop let s on your dishes. Tha t can leave
spots and streaks. It also improve s drying by allow ing wat er t o she et o ff the dishe s. Your dishwasher is d esigned to
use liquid rin se aids. The r inse aid dispense r is l ocated inside the do or next to the d eterg ent d is pense r. To fill the
dispenser, open the ca p and pour the ri nse ai d into the dispense r unt il t he level indicato r turns c ompletel y bla ck.
Th e vol ume of the rin se aid container is about 110 ml.
Rinse Aid Dispenser
Function of Rinse Aid
Rinse aid is autom at ically add ed duri ng the last ri nse, en surin g thoro ugh rinsing, and spot an d st rea k free dr ying.
As the ri nse aid dimin ishes, the siz e of th e black dot
on the rinse a id leve l indic ator chang es, as illu strated below.
Ful l
3 / 4 ful l
1 / 2 ful l
1 / 4 ful l - Shoul d refill to e lim in ate spotting
Empty
When to Refill the Rinse Aid Dispenser
If th ere is no rinse-aid war ning ligh t in the contr ol panel, yo u can jud ge th e am ount of r ins e-aid b y the color
of the op tical l evel indicat or located next to the cap. When th e rinse-aid co nta iner is full, the whole
indicator will be dark .As the r inse-aid di minishes , the siz e of th e dark do t de creases. You s hould neve r let
the rinse ai d get below 1 / 4 full .
Attention!
Only use bra nd ed rinse aid for dishwasher. Never fill t he rinse aid dis penser wit h an y other subs tances
(e.g. Di shw asher cleaning agent, liquid deterge nt) . This would damage the applian ce.
To ope n the di spens er, t urn the cap to the " open" ( left) ar row and lif t it out.
Po ur the rinse aid into the dispenser, being c are fu l not to overfill.
Re place the ca p by in serting it aligned with "ope n" arro w and turnin g it to the clo sed (right) a rro w.
1
2
3
du ring the next wash.
Don't for get to re place the cap be fore you close dis hwasher door.
Clean up any rinse aid s plit during fi lling w ith an abso rbent cl oth to av oid excess iv e foaming
Page 6
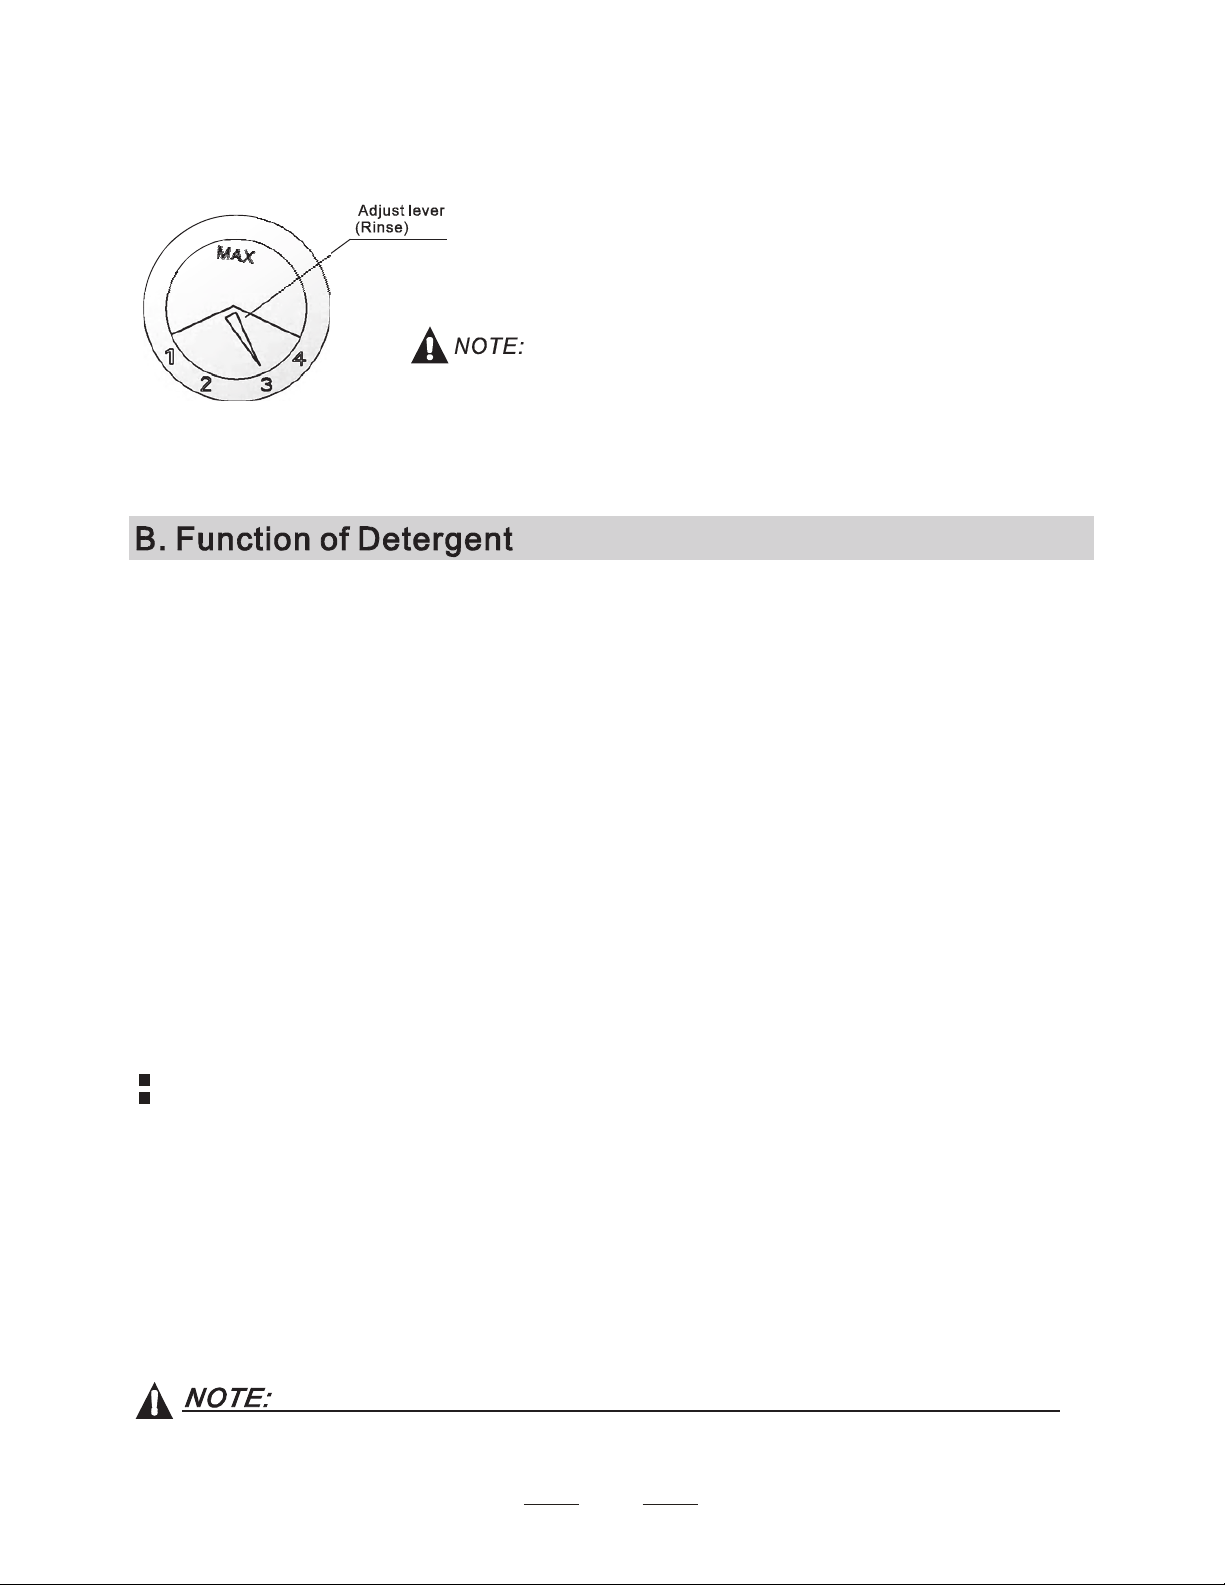
Adjusting Rinse Aid Dispenser
Th e rinse aid dispens er has four setting s.The recommend ed sett in g is on "3".
If the dish es still are n ot drying pr op erly or are sp otted, adjust the dia l to the
next high er nu mb er on " 4".
Increase the dose if th ere are d rops of w ater or lime spots on t he dish es after washing.
Re duce it i f there are st icky wh it ish stains on your di shes or a bluish film on glass war e or
kn ife blades.
4
Detergents
There a re 3 sorts of detergent s
1.With phos phate and wit h chlori ne
2.With phos ph ate and without chlorine
3.Without pho sphate and without chloride
Based o n their chem ical composition, dishwas her can be spl it i n two b asic types:
The use of no rmal washing p rog ra mmes in conjun ction with concentrated detergents
reduces poll uti on and is good for your di sh es; these wa sh p rogramme s are specially matched
to the di rt- di ssolving prope rties o f the enz ymes of the con centrate d de tergent. For this reason
no rmal wa sh prog ramme s in which con centr at ed deterge nt s are used can a chieve the same
resul ts that c an otherwi se only be achieve d using intensive programmes.
Ŷ ŷ
Ŷ ŷ
Ŷ ŷ
Detergent ta ble ts of diffe ren t brand s disso lve at different s peeds. For t his rea so n some
det ergent ta blets cannot diss olve an d devel op their full cl eanin g power d ur ing s hort
programmes . The refore pleas e use long progr amm es when us ing detergen t tab lets, t o
ens ure the complete rem ov al of d etergent res iduals.
Concentrated Detergent
Detergent Tablets
co nventional, alkal ine deterg en ts with c aus tic componen ts
lo w al kal in e concentrated detergents with natural en zymes
Norma lly new pulver ised deterge nt is without phos phate . The w ater so ftene r fu nct io n of
pho spha te is not giv en. In this case w e rec ommen d to f ill s alt in th e salt container even w hen
the hardne ss o f wat er is onl y 6 dH. If dete rg ents witho ut phosphate were used in case o f ha rd water
often white sp ots app ear at d ishes and gl asses. In this cas e ple ase add mo re de terge nt t o rea ch
bet ter results. Det ergents wi thout chl ori ne do onl y bleac h a littl e. S trong and co loured sp ots will not
removed completely. In th is c ase ple ase choose a programme with high er Temp erature.
Detergent tablets are only fo r the models with 3 in 1 function or 3 in 1 program.
Detergents w ith it s chemi cal i ngredients are neces sary to r emo ve dirt, crush d irt and transport it out of t he dishwa she r.
and dry.
Don't p ut po wder de te rge nt into the dispenser until yo u're read y to wash di shes .
Use only det erge nt sp ecifi cally m ade for u se in d is hwashers. Keep your detergent f resh
Proper Use of Detergent
Page 7
Amount of Detergent to Use
The dispenser mus t be refi lled be fore th e start of each wash cycle follo wing the instructions
provi ded in t he Wash Cy cle Table . Your dishwashe r us es less d ete rgent and rinse ai d then
con ventional di shwasher. Generall y, only one tab lespoon of detergen t is needed for
a norma l wash lo ad. Al so , more heavily soiled item s need mo re detergent. A lways a dd th e
det ergent just be fore st ar tin g the dishwasher, othe rwise it could g et da mp a nd will n ot
dissolve pro per ly.
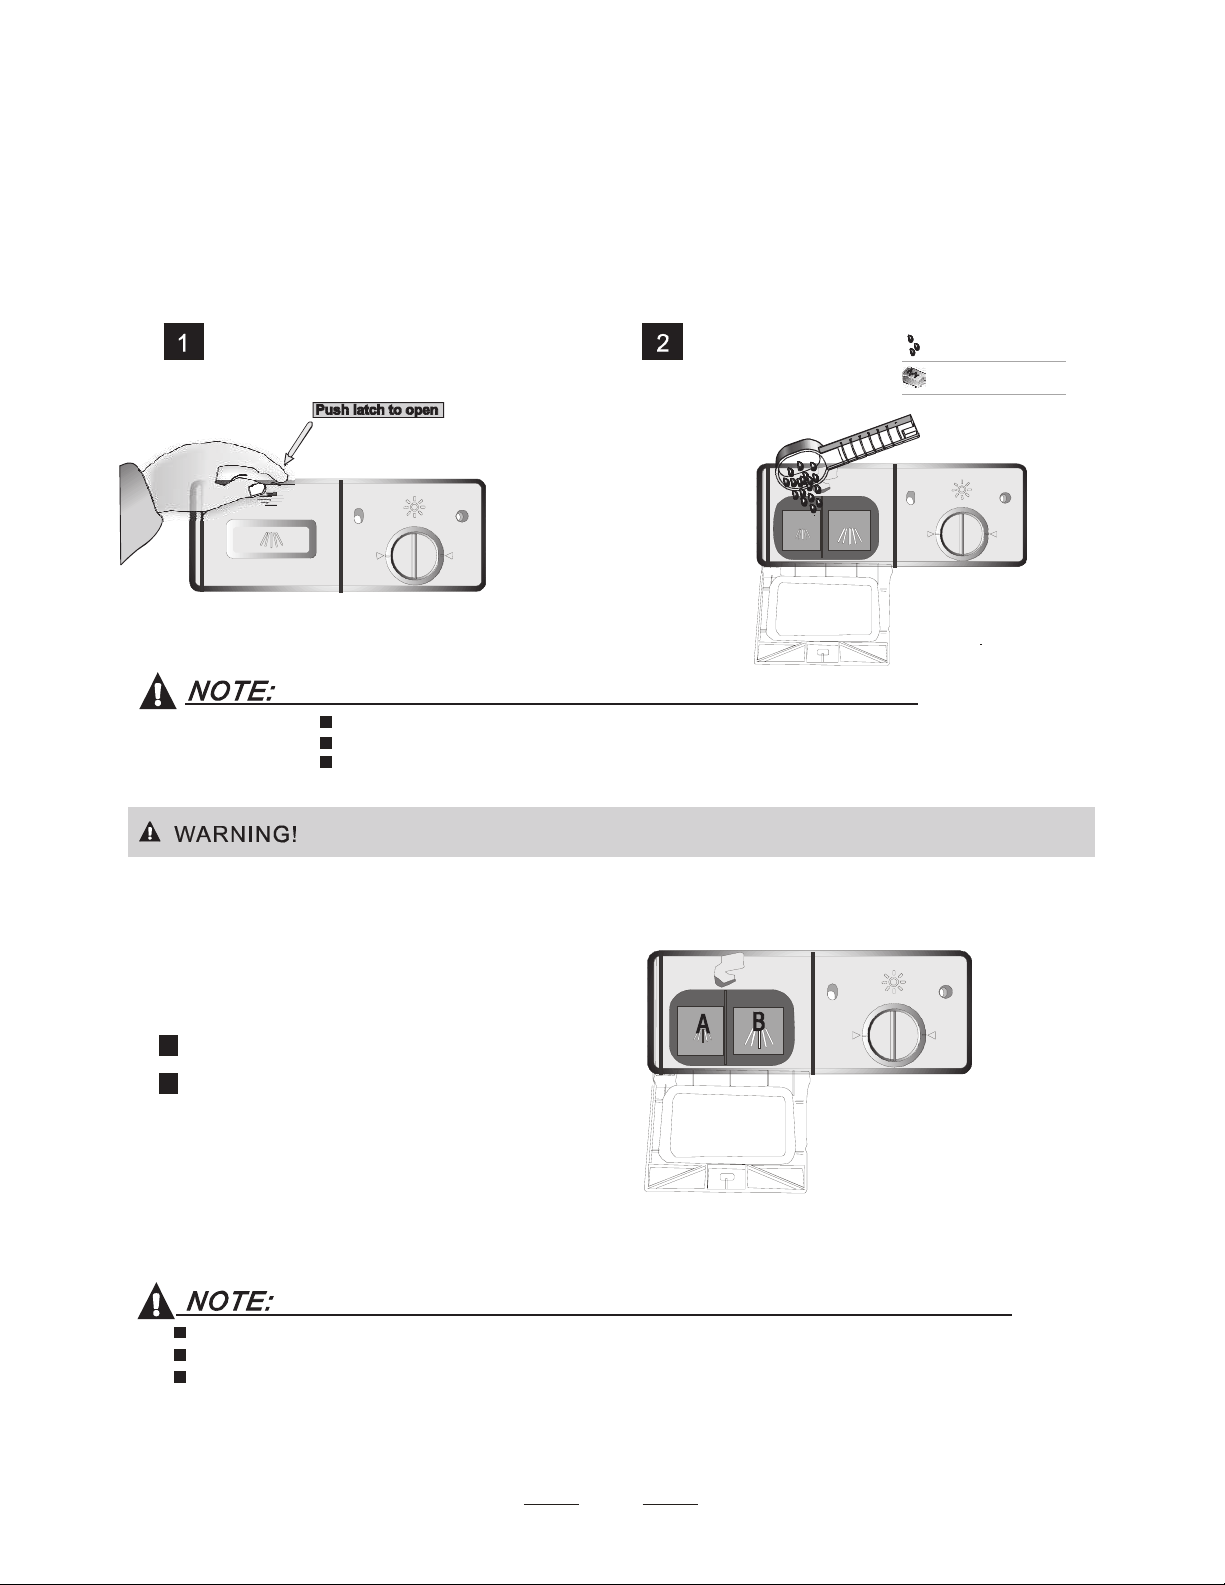
Detergent Dispenser
Always add the deterg ent jus t befor e start ing each wash cycle.
Only us e branded dete rgent aid for di shwasher.
If the lid is clos ed: press rele ase button. The lid spring s open.
5
De tergen t tab let
De tergen t pow der
Fill th e de ter gent dispens er with d ete rg ent.
The mar king in dicates the do sing le vels , as
illus trate d on righ t:
Th e place c an load 15 g deter ge nt .
The place can l oad 25g d etergen t .
Please obser ve the ma nufacturer s dosing and storage
Recommenda tions a s state d on th e de ter ge nt pack agi ng.
Close the lid and press until it locks in plac e.
If the dish es are heavily soiled, pla ce an a dditi ona l
deter gent do se in the pre-wash de tergent chamber. This d eterg ent will take effect durin g the pre-was h phase.
A
B
Fill in detergent
You find inform ati on abou t the amo unt of de tergent for th e single programme on t he l ast page.
Pl ease aw are , that ac cording t o the level soi ling and the specific har dness of wa ter differ ences are possible.
Pl ease ob serve the manu factu rer's recomm end ations on the de terge nt pack agi ng .
Dishw asher deterg ent is co rrosi ve! Take c are to ke ep it out of reach of c hil dren.
Page 8

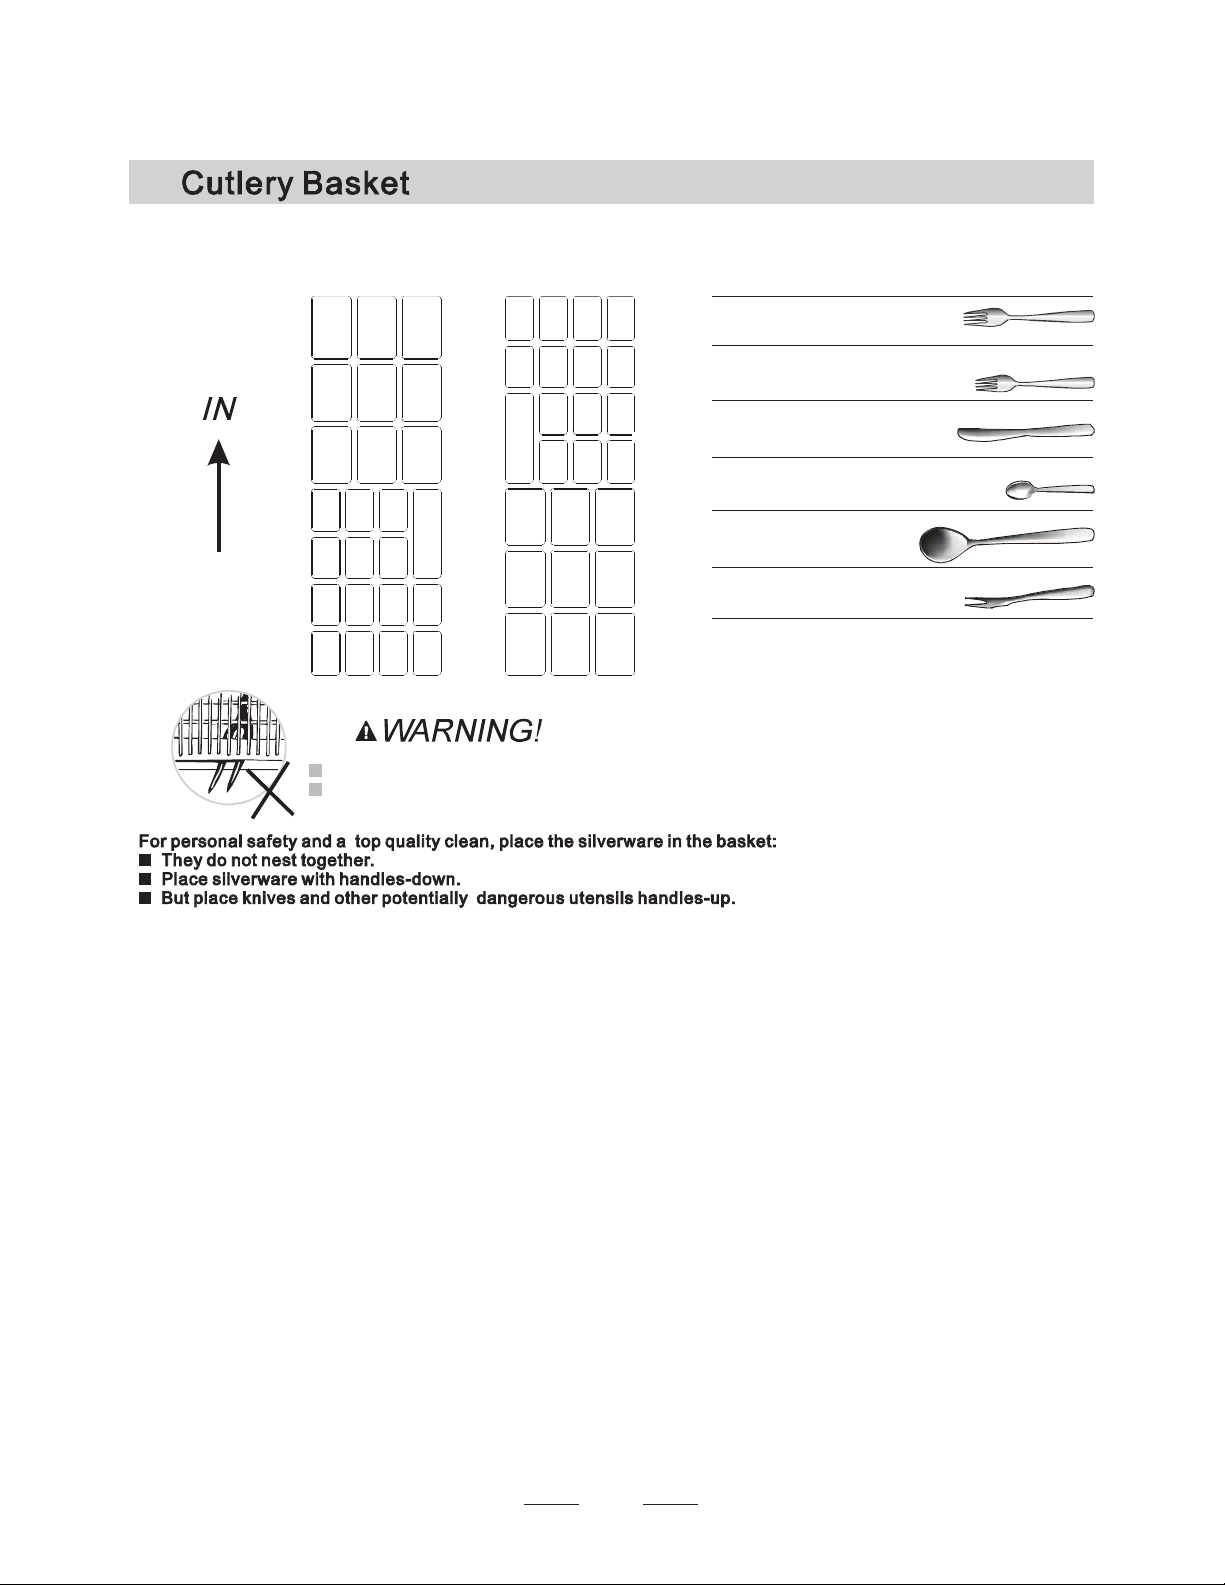
6
Cutlery w ith w ooden, horn ch in a or
mother- of -pe arl h andles
Pl ast ic items that ar e not
Older cut lery with glue d parts t hat is not
te mperature re sis tant
Bo nded cutlery items or dishes
Pe wter or cooper items
crystal glass
St eel items subj ect to rusting
Wooden platt ers
It ems ma de from s ynt hetic fib res
heat resi stant
Some ty pes of gl as ses can become
dull af te r a large n umber of was hes
Silve r an d alu minium par ts have a
te nde ncy to di scolour during wash ing
Glazed patte rn s may fa de if m ach ine
washed fr equently
Are not suitable
Are of limited suitability
Use a mil d de tergent that is de scribed a s 'kind o f dishes'. I f necessa ry, se ek further
in forma ti on fr om dete rgent manufa ctu rers.
Fo r particular items, se lec t a progr amme with as low a temp erature.
To prevent da mage, d o not tak e gla ss a nd c utlery out of the dishwas her imm ediat ely
af ter the p rogramme has e nde d.
Consider buying ut ensils wh ich are ide nt ified a s dis hwasher-proof.
Dishes an d items of cutle ry must n ot li e inside on e another, or cover each other.
To avoid dama ge to gla sse s, they m us t not t ouc h.
Lo ad larg e ite ms w hic h ar e most di ffi cult to c lea n in to th e ba sket.
Lo ng blad ed knives stored in an up right position are a poten ti al haza rd!
Lo ng and/ or s harp items o f cut le ry such as carvi ng kniv es must be positi on ed
ho rizon ta lly in the ba sket.
Please do n ot overloa d yo ur dish washe r. Th is is impor tant for good resu lts and for
reasonable ene rg y con sum e.
Load hollow it ems suc h as cups, glasses, pans etc. With the opening downwa rds so t hat
water cannot colle ct in the con ta iner or a deep base.
(For be st perf orman ce of the d ishwa sher, follow these loadin g guide lines.
Features and a ppear ance of b askets and cutlery ba skets may vary from your mo del.)
Scrape off any larg e amounts o f leftover fo od. S often r emnants of burnt food in pans
It is not neces sary to r inse the dishes und er runnin g water.
Place ob jec ts in the dishwasher in following wa y:
1.Item s such as cups, gl asses , pots/pans, e tc. are f ace dow n.
2.Curv ed items, or those with r ecesses, should be lo aded at a slant so that w ater can run off .
3.All utensil s are sta cked se curel y and can not tip ov er.
4.All utensil s are pla ced in the way tha t the spr ay arms can rotated freely during washin g.
Very sm all items should not be w ashed in the dishwas her as they could easily fal l out of th e basket.
Page 9
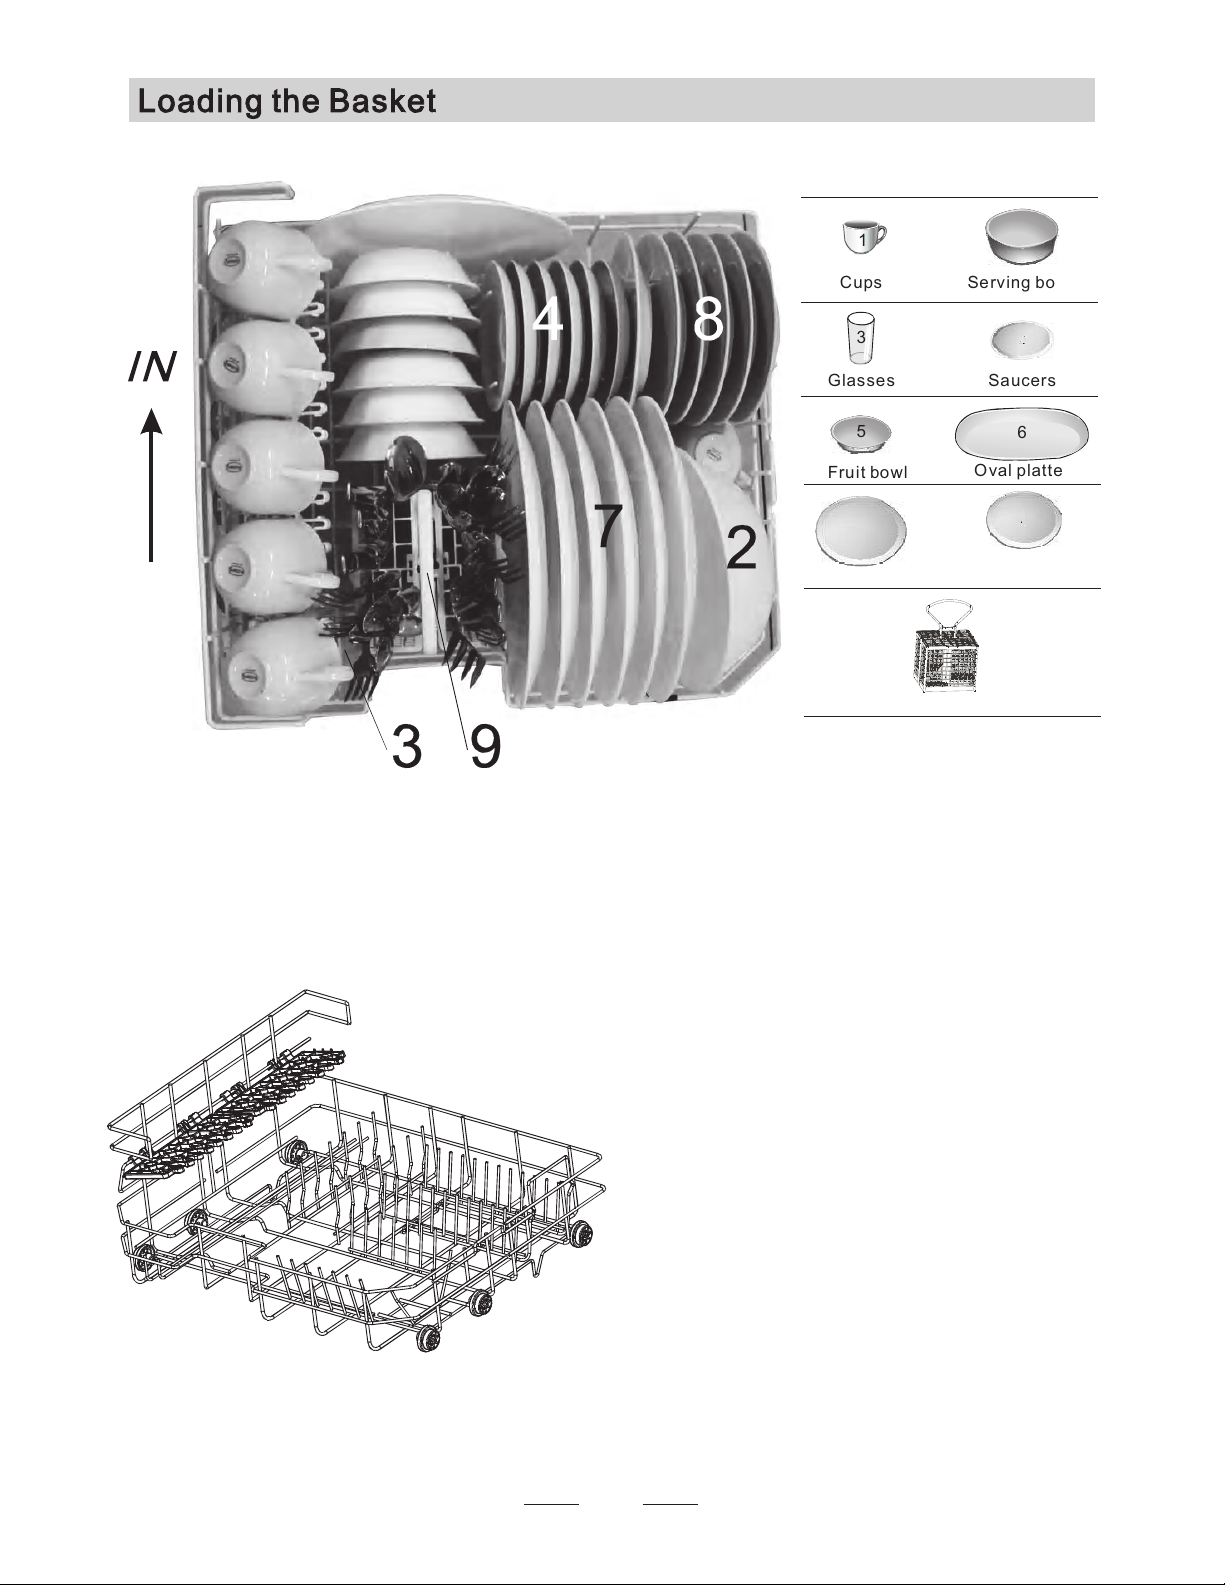
7
Po sition the dishe s an d cookw are s o that th ey will not get m ove d by the sp ra y of water.
Plate ra cks of Basket
Th e basket is fitted wi th plat e racks which
can be stow ed horizontal if re quire d.
Sa ucers
4
Se rving bowl
3
Glasses
1
Cups
6
Oval platter
7
Dinner plates
Bread and
butte r plates
8
Fruit bowl
5
Cutlery basket
9
2
5
6
1
1
Page 10
8
Cutlery s hou ld be pla ced in the cu tlery baske t with handles at the bo tto m. If the rack has side ba skets , the spo on
sho uld be load ed indi vidually in to the appro pri at e slots , especially long ute nsils shou ld be placed in the horizontal
pos it ion at th e front o f the upp er basket as s hown.
Do not le t any ite m exten d throu gh bott om.
Always load sh arp utensils with the s har p point d own!
3 2 5
2
6
5
2
3
3
4
4
4
4
1
1
Teaspoons
3
Dinner forks
1
Serving fork s
6
Serving spoons
5
Knives
4
Salad forks
2
2
3
1
4
4
1
4
4 4
44 4
4
1
1
4
2
3
2
3
Page 11

5.Starting a washing programme
9
NOTE:
Turning On the Appliance
Starting a w ash cycle. ..
Draw o ut the bas ket(s ee the section enti tled Loa ding t he Dishwasher ).
Pour i n the det ergen t (see the section e ntitl ed Sa lt, De tergent and Rinse A id ).
Inser t the p lug into th e socket. The power supply is 1 20V/6 0 Hz
Make s ure that the wa ter su pply is turned o n to full press ure.
Press the p rogra m button to select wash progr am you ne ed
Heavy->Normal->Light- >Glass->Speed->Soak
Then press the Start /Reset button, the dishwas her be gins to s tart.
When you press t he Start/Reset butto n to pause dur ing washing,
the program light wil l stop blinking and the dis hwasher will mooing
every minute unless y ou press the Start/Rese t button to start.
Wash Cycle Table
Means: need to fill rin se int o the Rinse-Aid Dispe nser.
( )
*AHAM DW-1- 2005 : This pro gram i s the tes t cycle, the rinse-aid dispe nser
setting is rec ommen ded to Po sition 6.
NOTE:
Detergent
pre/main
For normally s oiled loads,
such as pots, pl ates, glass es
and lightly so iled pa ns.
standard dai ly cycl e.
For lightly so iled lo ads,s uch
as plates,gl asses ,bowl s and
lightly s oiled pans.
Cycle Selection
Information
For the heavie st soil ed load s,
such as pots,p ans,c asser ole
dishes and dis hes tha t have
been sitting with dri ed food
on them for a w hile.
A shorter wash fo r light ly
soiled loads t hat do no t
need drying.
For lightly so iled lo ads,
such as glasse s, crys tal and
fine china.
Program
Running
time(min)
Energy
(Kwh)
Water
(l)
15 g.
85
75
100
45
70
0.361
0.311
0.424
0.233
0.274
12
12
14.5
12
9.7
Pre-wash
Pre-wash
Was h (55 )
Rinse
Rinse (65 )
Drying
Description
of Cycle
Pre-wash
Pre-wash
(50 )
Was h (50 )
Rinse
Rinse (60 )
Drying
Pre-wash
Was h(50 )
Rinse
Rinse(60 )
Drying
/
10
2.5
0.01
Pre-wash
Rinse
Aid
Pre-wash
Pre-wash
(50 )
Was h (50 )
Rinse
Rinse(55 )
Heavy
Pre-wash
Pre-wash(5 0 )
Was h (55 )
Was h (50 )
Rinse
Rinse (65 )
Drying
Glass
Speed
15 g.
To rinse dish es tha t you
plan to wash la ter t hat da y.
Normal
Light
Soak
18g
18g
18g
(*AHAM DW-1-200 5)
Page 12
It is dangero us to ope n the door when washi ng, bec ause the hot water may s cald y ou.
When the wo rki ng cycle has finished, the buzz er of d ishwa she r will so und 8 sec onds, then stop. Tur n off
the appli ance using the ON/ OFF but to n, sh ut off th e water s upp ly and op en the do or of t he dishwashe r.
Wait a fe w minutes before un loadi ng the di shw asher to avoid handling t he dishes an d utensils while they
are sti ll h ot and more suscept ible to breakage. The y will also dr y better.
Sw itch Off the Dishwasher
, on ly in this ca se the pr ogram me has en ded.
1.Swit ch off the dishwash er by pre ssing the ON/OFF button.
2.Turn off the wat er tap!
eAll th phase l ights a re off
Open the door carefully.
Hot dishes are sensit ive to kn ocks. The di shes should therefore be a llowe d to cool d own around 15 minutes
befor e removing fro m the app liance.
Open the dishwasher 's door, l eave it a jar and w ait a few minutes bef ore rem oving t he dish es. In this wa y they
will be cooler and the dr ying wi ll be imp roved.
Unloading the dishwasher
It is nor mal tha t the dishwasher is wet inside.
will keep on working af ter 10 seconds.
If you op en the door when wash in g, the machine will pause. When you c los e the door , the mac hine
10
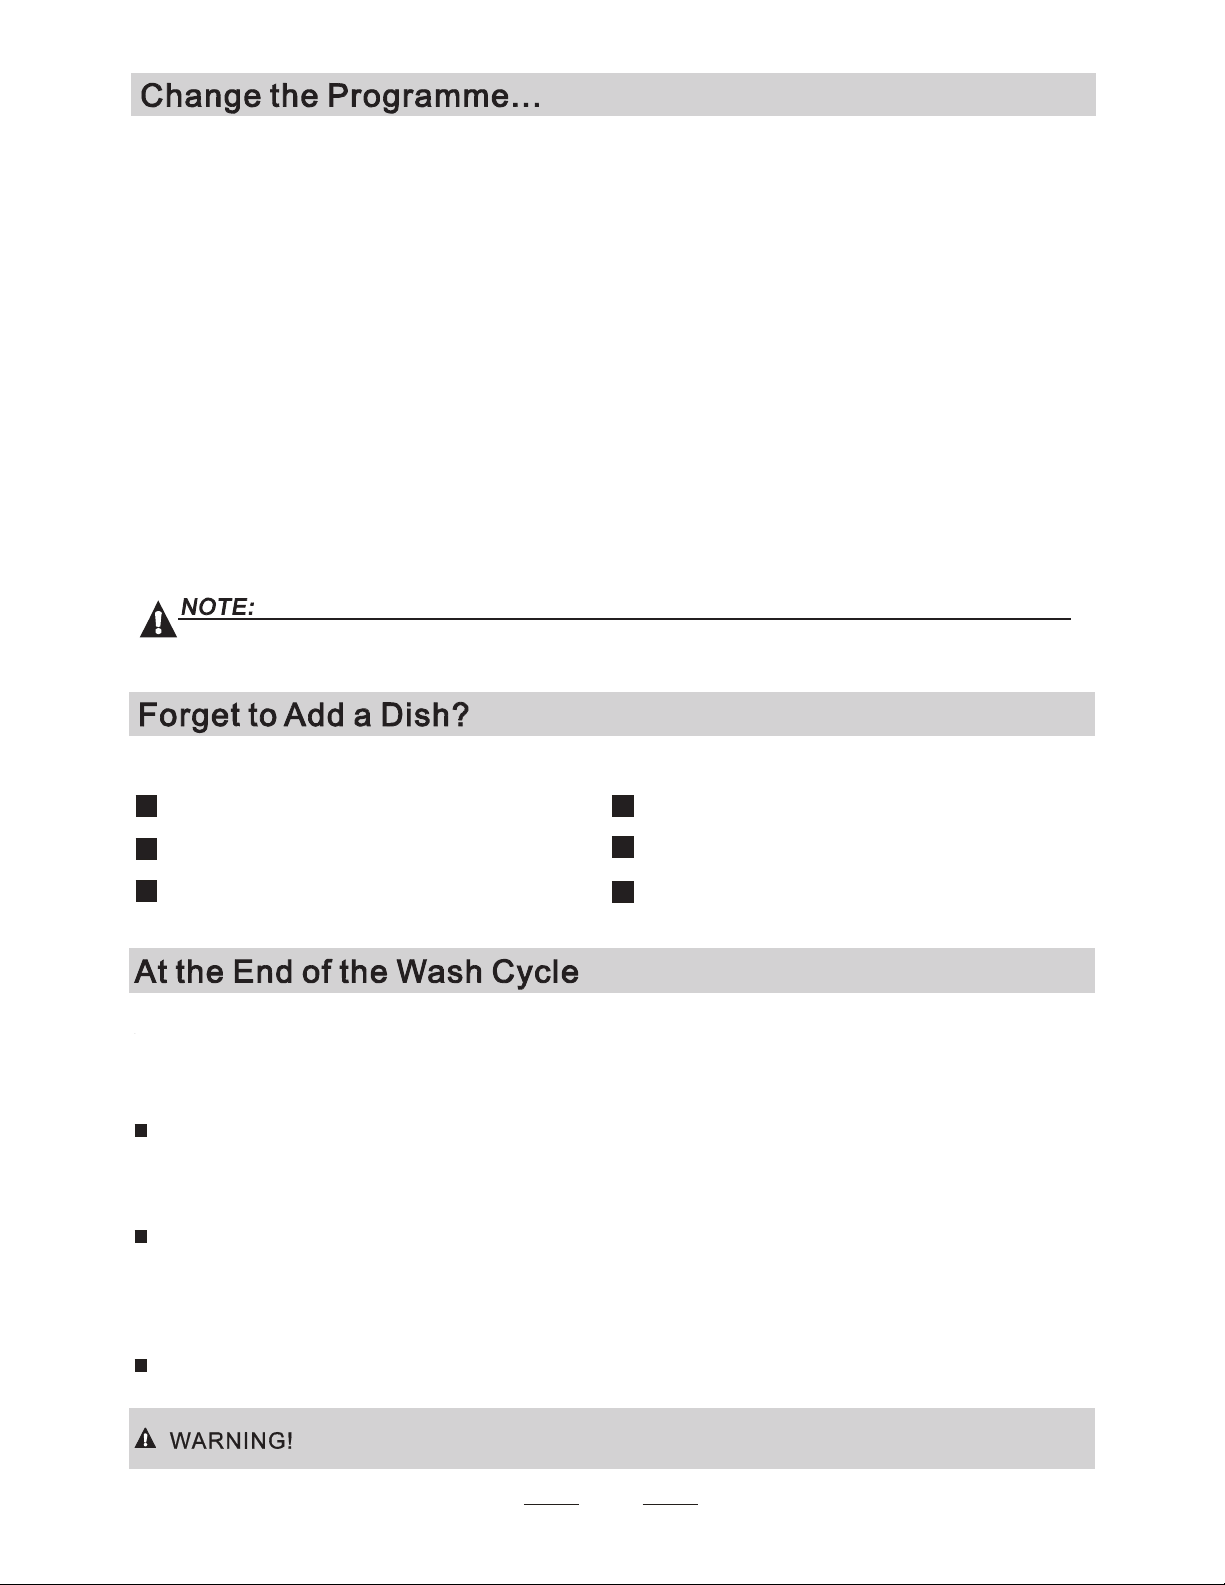
A forgotten dish can be added any time before the detergent cup opens.
Add forgotten dishes.
Close the door
After the spray arms stop working,you can open the door
completely.
2
3
Open the door a little to stop the washing.
1
4
5
6
Premise:
Ot he rwise, the dete rgent may have al re ady been
released, and t he a ppliance may ha ve already drained the wash wa te r. If this
is the case, th e de tergent dispens er must be refilled (see the section entitled
" Loading the Detergen t " ).
Press Start/R eset Button more than three seconds th e machine will be in stand
by state ,then you can change the progra m to the desired cycle setting (s ee
the section entitled " Starting a wash cyc le . . ." ).
NOTE: If you open t he door during washing, the machine will pause. When yo u
close the door and press the start/reset Button, the m achine will keep on
worki ng after 10 seconds .
You can modi fy the washing pr ogra m, W hen the dishwasher just
runs for a short time.
Press the start/reset button
Press the start/reset button, the dishwasher will run
after 10 seconds.
The lights sho w the sta te of the dishwasher:
a) All ligh ts off----------------------------------On stand by
b) One of the ghts on----------------------Being pa used
c) One of the blinking- ----------- ----------Running
1SPHS BN JOEJDBUPS
1SPHSBN JOEJDBUPS MJ
1SPHS BN JOEJDBUPS MJHIU
Page 13
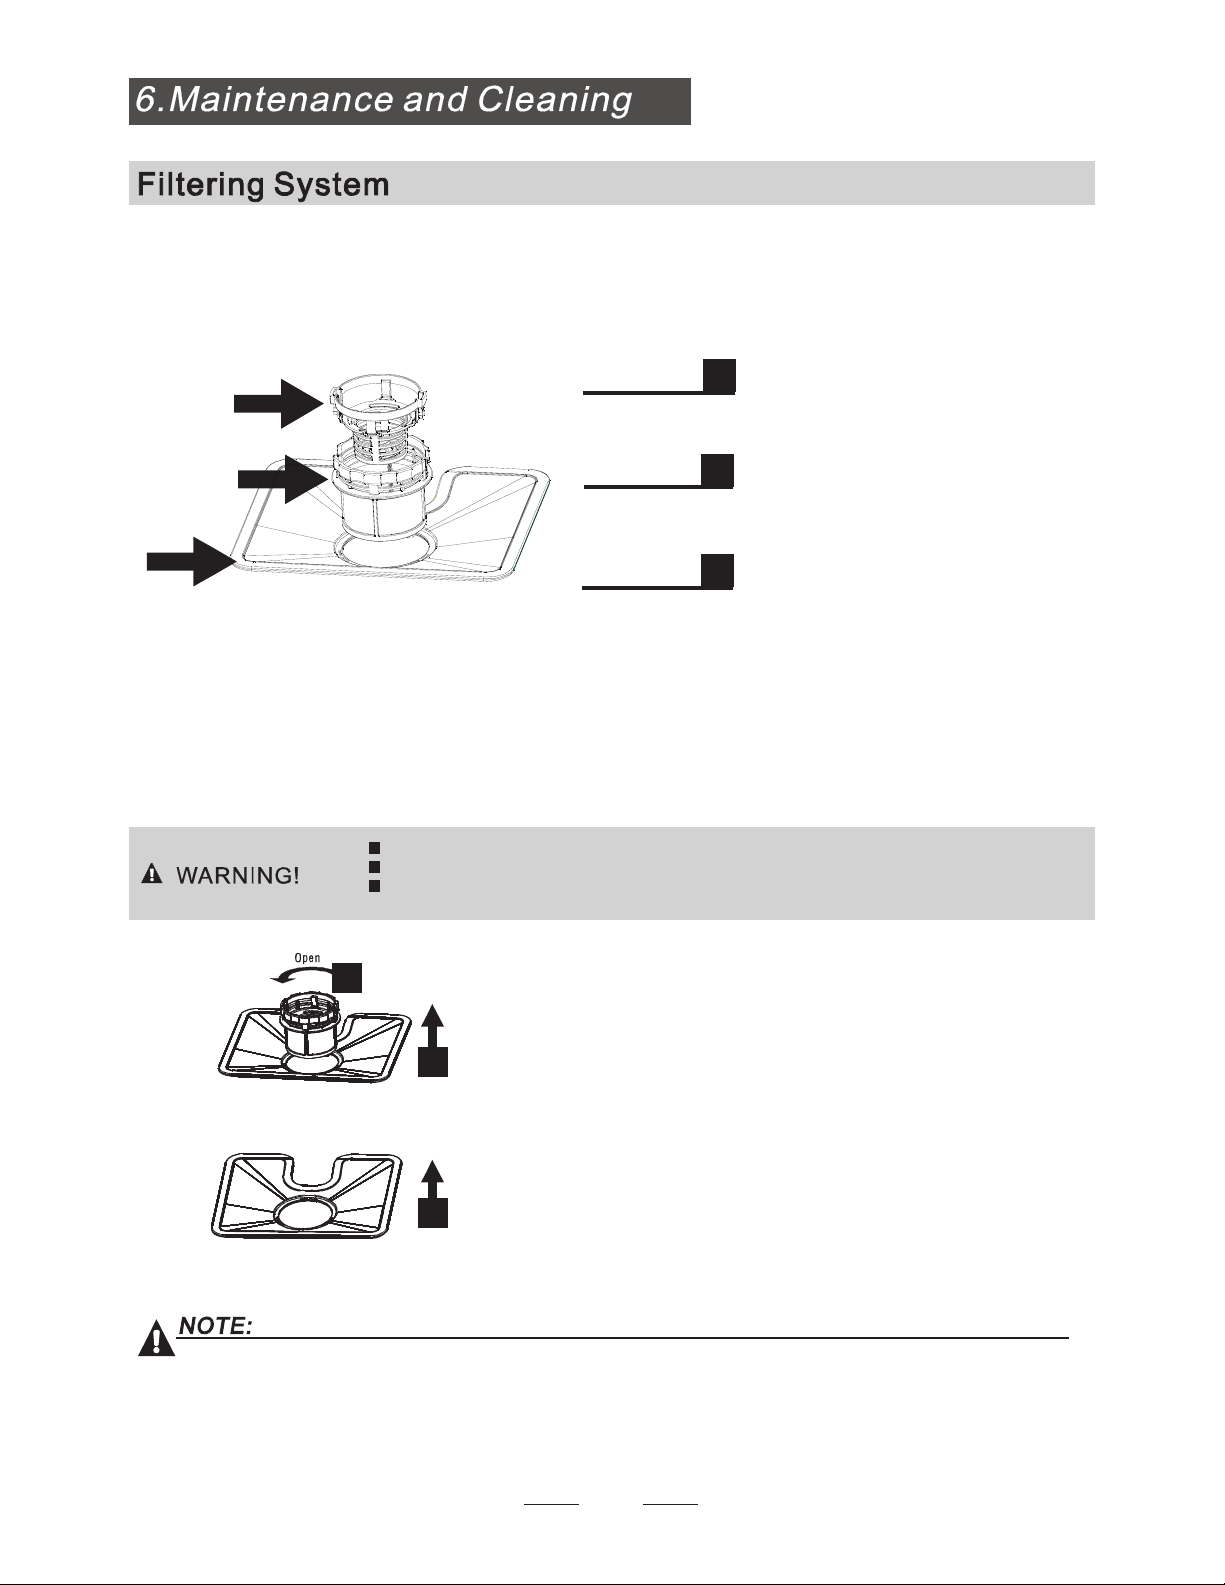
Th e filter pre vent larg er re mnant s of fo od o r other o bje cts fro m get ting inside th e pump.
The fil ter system con sis ts of a coarse fil ter, a f la t (M ain filter)
and a mic ro f ilter (fin e fil ter).
Food an d soil pa rticl es tr apped b y thi s fi lter ar e pulverized by a
spe cial jet on the spray arm a nd wash ed down to drain .
Main filter
1
Large r items , such as pieces of bon e or g las s, that could bl ock
the drain ar e trapped in the coarse f ilter. To re mov e the items
cau ght by the filter, gently sq uee ze the ta p on th e top of th is
filte r and l ift out .
Coarse filter
3
This filter ho lds soil and food residue in the sump a rea and
preve nts it from being redeposit on the dishes du ring wa sh cycle.
Fine filter
2
2
3
1
Filter assembly
Th e filter effic ien tly
Fo r bes t perform ance and results, the f ilt er as se mbly must be regularly. this reason, i t is a good i dea to
remove th e large r food pa rti cl es tr apping in the filte r af ter each was h cy cle b y rinsing the filte r an d cup under
runn ing w ate r. To remove t he f ilter as sembly, pul l on the cu p ha ndl e in the upwa rd di rection.
re moves f ood p article s fro m the wash wat er, allowing it to be re- cyc lated during th e cy cle .
For
Never run the di sh washer without the filte rs in place.
Th e dishw ash er m ust never b e us ed without the fi lters .
Impro per rep lacemen t of the filte r may re duc e the per formanc e lev el o f the appliance
and damage dis he s and u tensils.
the filter system will be installed.
If do it from step1 to step 3, the filter system will be removed; while if do it from Step 3 to Step 1,
11
6WHS웒웛FRQWUDURWDWH WKH )LQH
OLIW LW XS6WHS
ILOWHU
6WHS웛OLIW WKH 0DLQ ILOWHU XS
Page 14

The contro l panel can be cleaned by u sing a lightly d ampen ed cloth and d ry tho roughly.
The exter ior use a good appli ance polish wax.
Never u se sharp obj ects, sco uri ng pads o r harsh c lea ners on any p art of the dishwash er.
Protect Against Freezing
1.Cut off elect rical power to t he dishwashe r.
2.Turn off th e wat er s upply and disconnec t the wat er inlet pipe from the water valve.
3.Drain wa ter fro m the inlet pi pe a nd water valve. (Us e a pan to ca tch the water )
4.Reconn ect the w ate r inlet pipe to the wa ter val ve.
5.Remove the filt er at t he bottom of t he tub and use a spo nge to us e up water in sump.
pl ease take fros t prote ction m easur es on d ishwa sher in winter. E fter wa shing cycl es,
pl ease op erate as follows
ach tim e a
˖
- Inspect the filte rs for blockin g every t ime the dis hwasher has be en used .
- By unscrew ing the coarse fi lter.y ou can remove the filter system. Rem ove any foo d remna nts and
clean t he fi lt ers under running wa ter.
Remarks:
Cleaning The Filter
Cleaning The Door
To cle an th e coarse filter and the fine filte r, use a cleaning b rush. R eas semble th e filter par ts as shown in the f igures
in the last pa ge a nd reinsert the entire ass embly in the dishwas her, positioni ng in its seat a nd pressing do wnw ard .
The en tire filter assembly should be cleaned once a week.
When cleaning the filt ers, don't knock on them. O therwise, the filters could b e
contorted and the pe rformance o f dishwas her could b e debased .
To clean the e dge around t he door, y ou shou ld use on ly a so ft wa rm,
damp cloth. To avoid pen etration of water into the door loc k and
electric al c omponents, d o not u se a spra y cleaner of any kind.
Never u se a sp ray cleaner to clean the doo r panel as it m ay da mage th e doo r lock
and elect rical compon ents.
Abrasive agent or some pap er towe l should not be u sed bec aus e of the risk of
scratching or leaving sp ots on th e stainless steel sur fac e.
12
If your dish was her cannot work because o f the ice, pleas e contact pr ofessional serv ic e persons.
Page 15

It is recomme nd that y ou run a wash cy cle wit h the
dishwash er e mpt y an d the n remov e the plu g from the
soc ket, turn o ff th e water supp ly and leave the d oor of
the appliance sli ghtly open. This w ill hel p the door
sea ls to ast longer an d pre vent od our s from fo rming
withi n the appliance.
If the applian ce must be moved, try to keep it in the
vertical pos ition . If absolutel y necessar y, it ca n be
posit ioned on its back.
One of th e factors that cause odors to form in t he
dishw asher i s foo d th at re mains trappe d in the seals.
Perio dic cle aning with a da mp sponge wi ll prev ent this
from occu rring.
Af ter every wa sh, turn off t he water supply to the
ap pli an ce and leave t he door slight ly op en so th at
moisture and odors ar e not trapped in side.
Be fore clean ing or performing maintenance , always
remove the plu g from th e socket.
To cle an the exterior and r ubber p arts of the di shwasher,
do not use so lve nt s or abrasiv e cle aning products.
Only use a cloth with warm so apy wat er.
To rem ove spo ts or sta ins from the surface of the
in terio r, use a cloth da mpened wit h wa ter w ith a littl e
vineg ar, o r a clean ing pro duc t made specifically f or
di shw ashers.
After Every Wash
Remove the Plug
No Solvents or Abrasive Cleaning
Moving the Ap pliance
Seals
When it is not in need for a long time
13
The installation of the pipes
and electrical equipments
should be done by professionals.
Electrical Shock Hazard
Disconnect electrical power before
installing dishwasher.
Failure to do so can result in death
or electrical shock.
The installation position of dishwasher should be near the existin g inlet and drain
hoses and power cord.
One side of the cabinet sink should be chosen to facilitate the connection of drain
hoses of the dishwasher.
Cleaning the Spray Arms
Th e spray arms can be eas ily removed for periodic cleaning
of the no zzles , to p rev ent possible c logging. Wash them
under run nin g water a nd care fu lly r epl ac e them in their se ats ,
checking that their rotary m ovement is in no way imp ede d.
Grasp the middle of the spray arm, pull it upwards to remove
it. Wash the arms und er a jet of running wate r and ret urn them
caref ully to their seat. Afte r reassembly, check th at th e spray
ar ms turn fre ely. Otherwise, check tha t they ha ve been
install ed correct ly.
Page 16

En sure th e voltage and frequ ency of the pow er being co rresp ond s to
those on the rating plate. Onl y insert the plug into an electrical so cket wh ich is ea rthed
pr op erly. If th e electrical sock et t o whi ch the appliance must b e conne cte d is not
appr opriate for the plug , rep lace the soc ket, rather than usin g a adapt ors or the like as
they coul d cause overhe ating an d bu rns.
Plea se look at th e ra ting label to know the rating voltage a nd conn ect t he d ish washe r to the appro pr iat e power s upply.
Us e the required fuse 10 amp, tim e delay fuse or c ircui t bre aker recom mended and pro vide separate cir cuit servi ng
only th is app lianc e.
This appliance must be earthed. In the event of a malfunction or breakdown, earthing will reduce the risk of
electric shock by providing a path of least resistance for the electric current. This applian ce is equipped with
a cord having an equipment-earthing conductor and an earthing plug. The plug must be plugged into an
appropriate outlet that is installed and earthed in accordance with all local standards and requirements.
For personal safety:
DO NOT USE AN EXTENSION CORD OR AN ADAPTER PLUG WITH THIS APPLIANCE.
DO NOT, UNDER ANY CIRCUMSTANCES, CUT OR REMOVE THE EARTHING
CONNECTION FROM THE POWER CORD.
14
for personal safety:
DO NOT USE AN EXTENSION CORD OR AN ADAPTER PLUG WITH THIS APPLIANCE.
DO NOT, UNDER ANY CIRCUMSTANCES, CUT OR REMOVE THE
FROM THE POWER CORD.
EARTHING
CONNECTION
Improper connection of the equipment earthing conductor can result in the risk of an
electric shock.
Check with a qualified electrician or service representative if you are in doubt whether the
appliance is properly earthed.
Do not modify the plug provided with the appliance. If the plug does not fit properly to the
outlet, please have a qualified electrician to install a proper outlet.
and the sid es, alo ng the ad jac ent cabinets or w all . The dishwas her is equipped with wate r supply
Po sit ion the a pplianc e in the desir ed loca tion. T he back should r est again st the wall behi nd it,
and drain hos es t hat c an b e positioned to the rig ht or the left to facil itate proper i nst allat io n.
Page 17

Your dis hw asher com es equipped w ith a 'quick connect ' assembly (includes i nlet and drain hos e). The
fa uc et adapte r must be ins ta lled on t he f aucet before you can co nnect the dis hwasher. This ada pter is
in cluded inside your dishwa sher. Th e faucet adapter is co mp atible with fauc et s inclusive o f either ma le
(o utside) or fe male (ins ide) threaded faucet c onnec ti ons.
In or der to avoi d th at ther e is more water staying in th e inl et h ose, please close the faucet af te r usi ng.
15
#B DL 7 JFX
Page 18

16
Screw the fau ce t adapter on to (or into) th e fa ucet tap. Ch eck for lea ks (use Teflon ta pe t o elimi nate if
necessary).
Connect the six-side d connection of the drai n hose to the d rain port connection on t he b ack of the
dishwasher cabin et . Do not over -tighten (to avoid damage to threads).
Connect the st ar-shaped connec tion of the inl et hose to the in let port on t he back of th e dishwashe r
cabinet. Do not over-t ighten (to avoid damag e to thread s).
Connect the ci rcular co nnection of the drain hos e on to the lo nger (bottom) m ale conne ction on th e qu ick
connect .
Connect the ci rcular co nnection of t he inle t ho se onto the s horter (top) male connection on t he q uick
connect .
Attach th e quick conne ct onto the faucet adapter, by pulling down the outer lockin g collar on the qu ick
connect, while pushi ng the quick connect upward o nto the faucet adapter.
When the qu ick connect snaps onto the fa ucet adapter, release the lock ing collar. Verify the con ne ction
is secure.
Slowly open t he hot water line and chec k for any sign of water leaks at all ho se c onnections. If lea ks are
located, immedia te ly c lose th e water suppl y and repai r the hose co nnections .
1
2.
3.
4.
5.
6.
7.
8.
ˊ
Important
WARNING
1. Once you open th e water suppl y line, (even if it is closed immediately the re after ), the inlet ho se will be
pressurized.
2. To re li eve water p ressure from insid e the inlet hos e, (make su re the water line (faucet) i s closed): press
and hold the re d pressure relief button o n the quick connect unt il the flow of water stops.
Shut off the water s upply at the fa ucet.
Disco nn ect the pow er supply cord
NOTE:
Hard water co nditions wi ll adversely affec t th e washing performa nce of your dishwasher. Hard
water conditi ons will also cont ribute to 'lime ' (white fi lm substanc e) deposits a nd/or 'scaling' on the
stai nless ste el s urf ace of the dishwas her tub and heater ele ment, located i n the sum p underneath
th e removab le filter scree n. To assist in minimiz ing the se conditi ons, it is re commended t o
periodically opera te/rins e the inside of the d ishwasher (empty) us ing 1 cup of white vi negar at least
once a week.
1.
2.
Disconnecting your Dishwasher
FAILURE TO RELIEVE WATER PRESSURE, B EFORE DISCONNECT ING THE QUICK- CON NECT
FROM T HE FA UCET, WILL RESU LT IN BACK -PRESSURE OVER-SPRAY. THE TE MPERATUR E OF
IN COMINGWATER CAN BE VERY HOT, AND B ACK-PRE SSURE OVER-SPRAY COULD CAU SE
SEVERE BURNS AND/OR SCALDING.
DO NOT L ET CHIL DREN DISCON NECT THE DISH WASHER; CLOSE SUPERVISION OF CH ILDREN IS
ALWAY S IMPORTANT AROUND APPLIANC ES.
DANGER
The fo llowing things should be chec ke d before starting the dishwas her.
1
The dishwasher is level and fixed properly
2
The inlet valve is open
3
There is a leakage at the connections of the conducts
4
The wires are tightly connected
5
The power is switched on
6
The inlet and drain hoses are knotted
7
All packing materials and printings should be taken out from the dishwas her
The content of this manual is very helpful to the users.
Af te r installation, please make sur e to keep this manual.
Page 19
Fuse blown, or the
circuit breaker tripped.
Replace fuse or reset circuit breaker. Remove any other
appliances sharing the same circuit with the dishwasher
Spilled rinse-aid
Always wipe up rinse-aid spills immediately.
Hard water minerals
The affected items are
not corrosion resistant.
The lid of softer
is loose.
The sp ay arm is
knocking against
an item in a basket.
r
Item of crockery
are insecure
in the wash cabinet.
This may be caused
by on-site installation
or the cross-section of
the piping.
A programme was not
run after dishwasher
salt was added.
Traces of salt have
got into the wash cy le.c
To clean the interior, use a damp sponge with
dishwasher detergent and wear rubber gloves.
Never use any ot her cleaner than dishwasher
detergent for the risk of foaming or suds.
Always run the Quick wash programme .
without any crockery in the dishwasher and
without selecting the Turbo function (if present),
after adding dishwasher salt.
Check the lip .Ensure the fix is fine.
Interrupt the programme, and rearrange the items
which are obstructing the sp ay arm.r
Interrupt the programme,
and rearrange the items of crockery.
This has no influence on dishwasher function.
if in doubt, contact a suitably qualified plumber.
Detergent with
colourant was used.
Make sure that the detergent is the one without
colourant.
Improper detergent
Make sure the dishwasher is turned on and the door is
closed securely.
Closed dishwasher making sure that door latches.
Make sure the power cord is properly plugged into the
wall socket.
Power supply is not
turned on.
Door of dishwasher
not properly closed.
Kink in drain hose
Filter clogged.
Kitchen sink clogged.
Check drain hose.
Check coarse the filter.
(see section titled )" Cleaning The Filter "
Check kitchen sink to make sure it is draining well.
If problem is kitchen sink not draining ,you may need
a plumber rather than a serviceman for dishwasher.
Use only the special dishwasher detergent to avoid
suds. If this occurs, open the dishwasher and let suds
evaporate. Add 1 gallon of cold water to the tub. Close
and latch the dishwasher, then Start the "soak" wash
cycle to drain out the water . Repeat if necessary.
17
Technica l
problems
General
problems
No ise
Page 20

The dishes were not
loaded correctly.
See notes in " Loading the Dishwasher Baskets ".
Select a more intensive programme.
See" Wash Cycle Table ."
Use more detergent, or change your detergent.
Rearrange the items so that the sp ay can rotate freely.r
Clean and/or fit the filter combination correctly.
Clean the sp ay arm jets. See "Cleaning the Spray
Arms".
r
Use less detergent if you have soft water and select
a shortest cycle to wash the glassware and to get
them clean.
Use a mild abrasive cleaner to eliminate those marks.
Re-loading the dishes properly.
Load the dishwasher as suggested in the directions.
Increase the amount of rinse-aid/Refill the rinse-aid
dispenser.
Do not empty your dishwasher immediately after
washing. Open the door slightly so that the steam can
escape. Begin unloading the dishwasher only once t
he dishes are barely warm to the touch. Empty the low
basket first. This prevents water form dropping off
dishes in the upper basket.
In short programmes the washing temperature is lower.
This also lowers cleaning performance. Choose a
programme with a long washing time.
Water drainage is more difficult with these items.
Cutlery or dishes of this type are not suitable for
washing in the dishwasher.
The programme was
not powerful enough.
Not enough detergent
was dispensed.
Item are blocking
the path of sp ay arms.r
The filter combination
in the base of wash
cabinet is not clean or
is not correctly fitted.
This may cause
the sp ay arm jets
to get blocked.
r
Combination of soft
water and too much
detergent.
Aluminum utensils
have rubbed against
dishes.
Dishes block
detergent cups.
Improper loading
Too little rinse-aid
Dishes are removed
too soon.
Wrong programme
selection
Using cutlery with
a low-quality coating
If overflow occurs, turn off the main water supply before calling a service.
If there is water in the base pan because of an overfill or small leak,
the water should be removed before restarting the dishwasher.
18
Unsatis
-factory
washing
result
Unsatis
-factory
drying
result
When some malfunctions come on, the appliance will display error codes to warn you:
Longer inlet time.
Faucets is not opened, or water intake is restricted,
or water pressureis too low.
Some element of dishwasher leaks .
Overflow.
Page 21

)FJHIU NN
8JEUI NN
%FQUI NN
7PMUBHF DPOOFDUFE -PBE TFF SBUJOH MBCFM
8BUFS QSFTTVSF .1B
)PU XBUFS DPOOFDUJPO NBY Ɔ
1PXFS TVQQMZ TFF SBUJOH MBCFM
$BQBDJUZ 1MBDF TFUUJOHT
19
Page 22

Your Guarantee
This GUARANTEE is in addition to your Statutory Rights
SUNPENTOWN INTERNATIONAL INC.
14625 Clark Ave. City of Industry, CA 91745
Tel: 800-330-0388
service@sunpentown.com
www.sunpentown.com
If this product is found to be faulty as a result of faulty materials or workmanship within one year
from date of purchase, it will be repaired free of charge.
This guarantee is subject to the following terms:
Sunpentown must be notified of the fault.
The warranty will be void if the product if modified, misused or repaired by an
unauthorized person.
The warranty after repair will not be extended beyond the original one-year period.
All replacement parts will be new or reconditioned.
Parts, which are replaced, become the property of Sunpentown.
The warranty applies for the use of the product in the USA only.
What is NOT COVERED:
Warranty does not include freight charges.
Incidental or consequential damage caused by possible defects with this product.
Damage to product caused by improper power supply voltage, accident, fire, floods or
acts of nature.
Failure of product resulting from unauthorized modifications to the product.
Improper installation or failure to perform the necessary maintenance.
Proof of purchase must be presented to Sunpentown nominated representative.
 Loading...