

Page 1

Page 2
Dear Cus tom er ,
Pleasecarefullyreading it before usingthedishwasher
will help you to u se and main t ain the d ishw as h er properly.
Keepit torefer to at a later date.
Passitontoanysubsequ entowneroftheappliance.
This manual contain s section s ofSafety In stru c t ion s ,
OperatingInstructions,Installation Instructions and
Troubles hooting Tips , etc.
Toreview the section on Troubleshooting Tips
willhelp you t osolve somecommon problem s
byyourself .
Ifyou can not resolve the troub les b y yourse lf ,
please ask fo r the helpo f profe ssional technicians.
ControlPanel.... ...............................................3
Dishwasher F eatures.......................................3
A FilltheRinseAid Dispenser.........................4、
B Functionof Detergent .................................4、
Attention beforeor afterloading theDishwasher
Baskets...................... ....................................6
Loading the Basket ... ...... ...... ... ...... ... ... ...... ...... .7
CutleryBasket................................ ............... 8
WashCycle Table...........................................9
Turning on the Ap plian c e.... .. ... .... ........... . .. .... . 9
Changethe Programme.............. ................10....
At theEndofth e WashCycle........... ................10
FilteringSystem. ............... .............................11
Caringfor the Dishwasher..................... .........12.
Position ingthe Appliance................... ...... ....14..
AboutPowerConnection........................ .......14.
Water Connection............. ..................... .......14.
Connection ofDrainHoses..................... .......16.
Star t of dis hwa s her... . .... . ... . ... . ... . ... . ... . .. ..... . 16.. ..
The manufactu rer,following a p olicy ofcon stant
development a nd updati ng of theproduct, may
make modificatio ns witho ut givi ng prior notice.
Beforecallingforservice........................... .....17.
Errorcodes. ................................... ..............18.
Technical information.............................. .....1 9..
Page 3
When usin g your dishw as he r, follow the prec aut ions listed below:
This appliance must be grounded. In the event of a
malfunction or breakdown, grounding will reduce
the risk of electric shock by providing a path of
least resistance of electric current. This appliance
is equipped w ith a cord having an equipmentgrounding conductor and a grounding plug.
The plug must be plugged into an appropriate outlet
that is installe d and grounded in accordance with
all local codesand ordinances.
Do not abuse, sit on, or stand on the door or dish
rack of the dishwasher.
Do not touch the heating element during or
immediately after use.
(This instruction is only applicable to machines
with a visual heating element.)
Do not operate yourdishwasher unless all
enclosure panels are properly in place. Open
the door verycarefully if the dishwasheris
operating, there is a risk of water squirting out.
Do not place any heavy objects of stand on the
door when it is open. The appliance could tip
forward.
When lo ad ing i tems to b e wash ed:
1) L ocate sharpitemsso thatthey are not likely
todamage the doorseal;
2 Warning: Knives andotherutensils with
)
sh a rp points must be loaded in the ba sket
with theirpointsdown or p laced in a
horizonta lposition.
When using y our di shwasher, you shoul d
prevent plast ic items fromcoming int o contact
with heating element.(This instruction isonly
applicable to machines with a vi sual heat ing
element.)
Check that the detergent re ceptible isempt y
after compl etion of thewash cycle.
Do not wash plastic items unless they are marked
dishwasher safe or the equivalent. For plastic items
n
ot so marked ,check the manufacturer's
recommendations.
Use only det ergent and rinse additiv es
designed for anautomatic dishwasher.
Never use s oap, l aundr y de tergent, orhand
washing deterg ent inyour dishwasher.Keep
these produ cts outofthe re ach of child ren.
Improper connection of the equipment-grounding
conductor can result in arisk of electric shock.
Check with a qualified electrician or service
representative if you are in doubtwhether the
appliance is properly grounded. Do not modify the
plug provided with the appliance; If it is not fit for
the outlet. Have a proper outlet installed by a
qualified electrician.
Keep children away from detergent and rinse aid, keep
child away fromthe open door of the dishwasher,
ren
there could still be some detergent left inside.
This appliance is not intended foruse by persons
(including children with reduced physical, sensory or
mental capabilities, or lack of experience and
knowledge ,unless they have been given supervision
or instruction concerning use of the appliance by a
person responsible for their safety.
Children should be supervised to ensure that they do
not play with the appliance.
Dishwasher det ergents ares trongly alkaline, they
can be extre mely da ngerous i f swallo wed.Av oid
contact with skin andeyes and keepchildren away
from the dishwa sher when t he d oor is op en.
Thedoor shouldnot beleft in theopen position
sincethiscould present at rippinghazards.
If the suppl y cord i s dam aged, it mustbe replaced
by the m anufacturer oritsservice ag ent or a
similar ly qualified person in or de r t o av oid a
hazard.
Remove the door tothe washing compartment when
removing an old dishwasher from service or discarding
it.
Please dispos e of pack ing m aterials properly.
Use the dishwasher only for its intended function.
During installation,thepower supplymustnot
beexcessivelyor dangerouslybentorflattened.
Do not tamper with controls.
The appliance is tob e conne cted to t he water
mains usingnew hose setsand thatoldhose-sets
sho ul d not be reuse d .
Themaximum number of placesettings to be
washed is 6.
Themaximum permissibleinletwaterpressureis
1Mp a .
Theminimum permissibleinletw ater pressure is
0.04Mpa.
)
1
Page 4
To g etthe best performance from your dishwasher,read all operatingins tructions
beforeusing it for the firsttime.
2
1
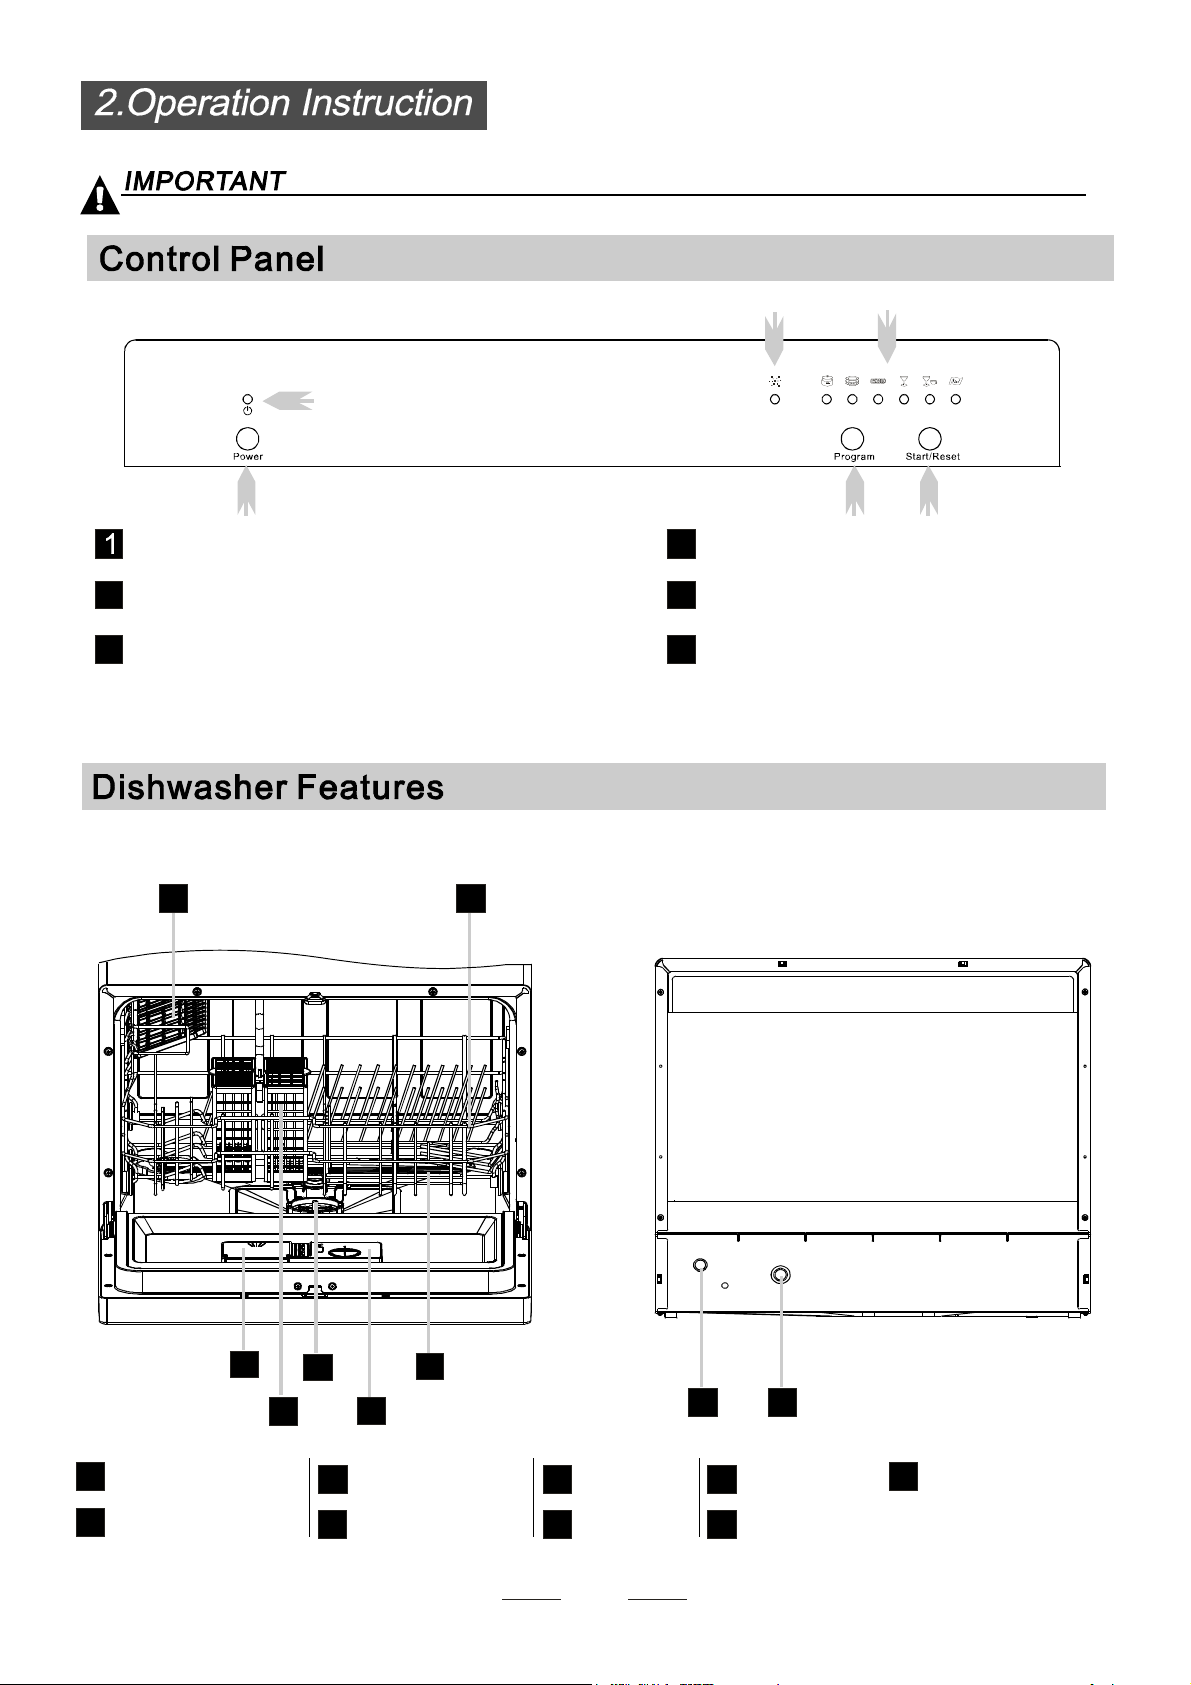
Power Button: To turn on/offthe power supply.
Power Lig ht : Tobe on when the ON/OF F Butto n
2
is Presseddown.
RinseAidWarning Light :Tobeonwhen the
3
rinseaid dispenserneedsto be refilled.
6 7
Front view
3
4
5 6
Program indicatorl igh t.
4
WashingProgramSelector: Press the button
5
to select wa sh cycles
Start/Rese t Button: Press this b utton to start
6
or pause the dishwasher,th e pr ocess pilot
lamp will be blinking when starting.
Back View
1
2
CutleryBasket
1
3
2
Filter assemb lyDetergentDispenser
3
4
Rinse A idDispenser
5
4
Spra yArms
5
CupShelf
6
2
8
9
Basket
7
Drain pipe connector
8
Inletpipe connector
9
Page 5
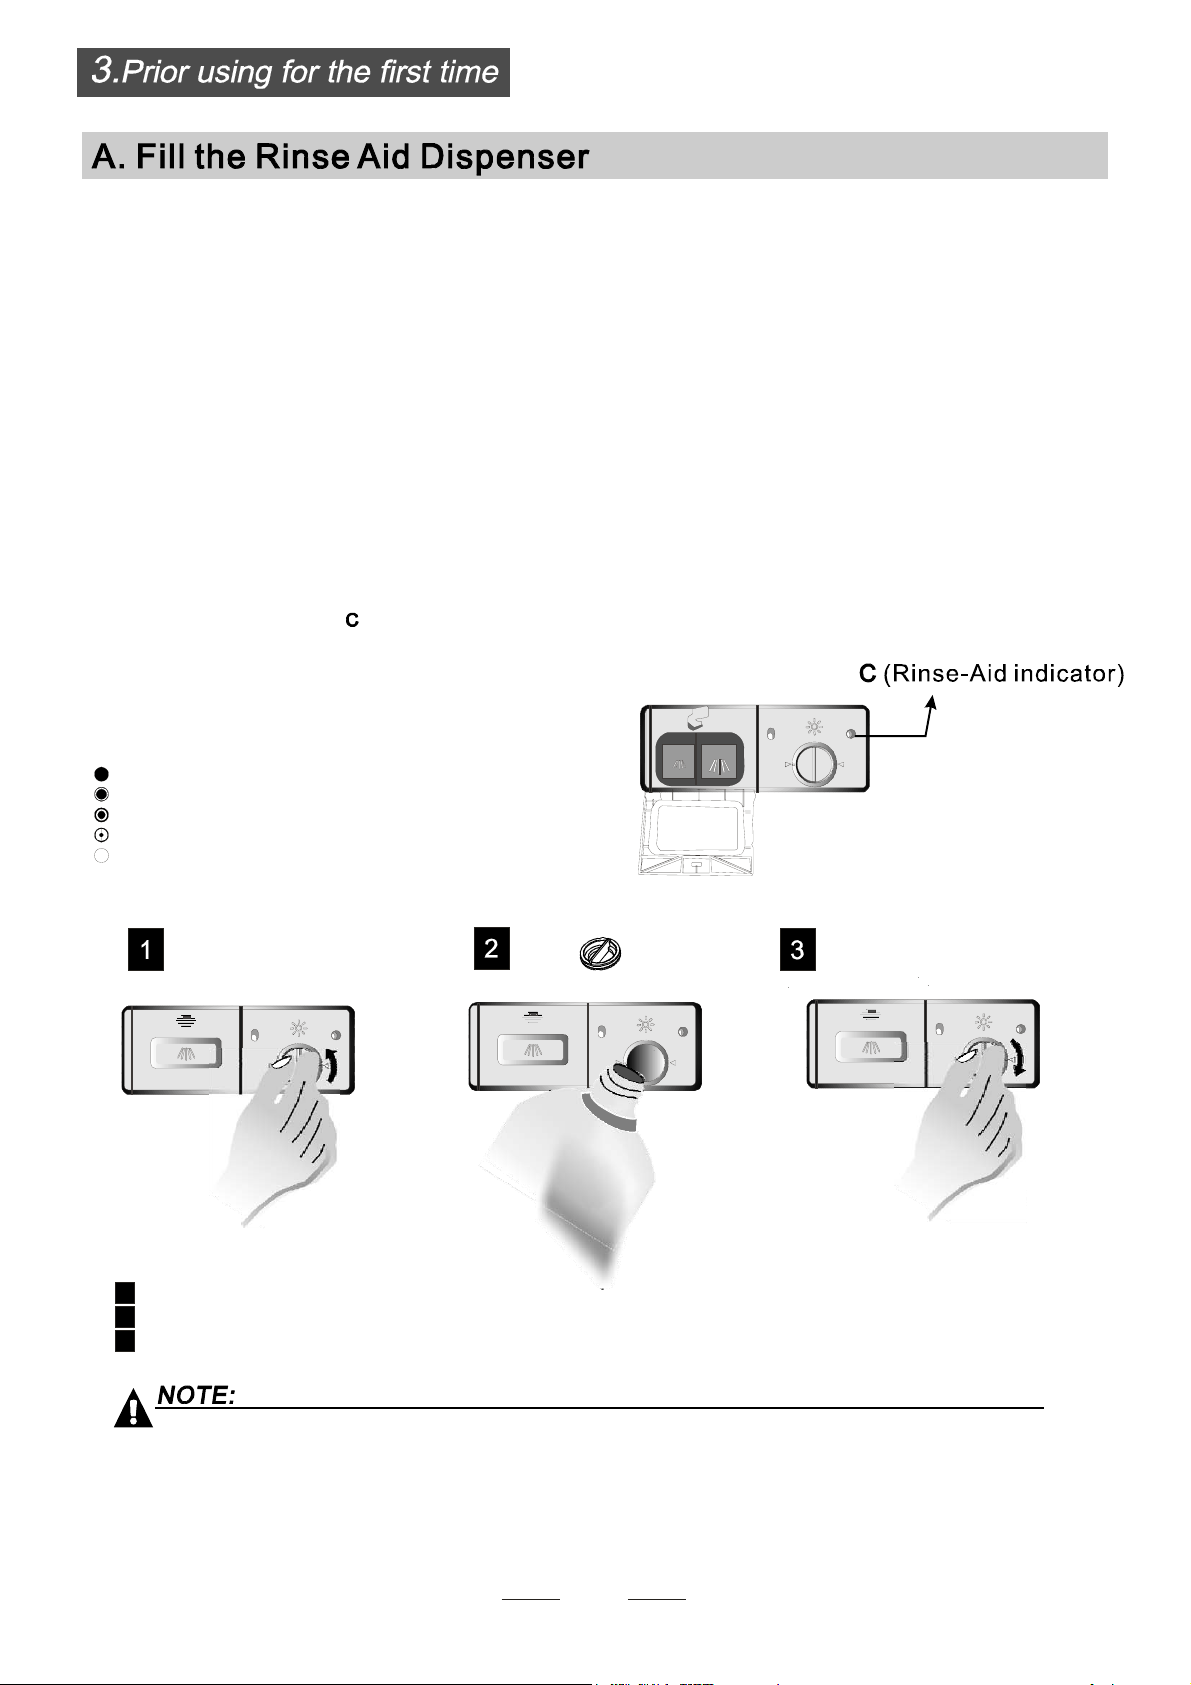
RinseAid Dispenser
The ri nse a id i s relea se d d uring t he final rins e to prevent wat er f rom forming dr oplets onyour dishes.That can leave
spots and strea ks. It al so improve s drying by allowing water to sheet offt he dishes. Your dishw asher is d esigned to
useliquid rins e aids. The rinseaiddispenser i s located insidethedoor next tothe detergent dispenser. To fillthe
dispenser, open thecap andpourtherinseaid into thedispenseruntil thelevelindicatorturns c ompletely black.
Thevolume of ther inse aid container is about 110 ml.
Function of R inseAid
Rinse aid isaut oma tically a dded during the last rinse, ensuringthorough rinsing, and spotand streak f ree drying.
Attention!
Only use branded rinse aid for dishwasher. Never filltherinseaiddispenserwithany othersubstances
(e.g. Dishwasher cleaning agent, liquid dete rgent). Th is woulddamage the appliance.
Whento Refillthe RinseAidDispenser
Ifthere is norinse-aid warnin g ligh t in thec ontrol p anel, you can judge the am ount of rinse-aid by the c olor
of the optical levelindicator located nexttothecap. When the rinse-aidcontainer is full,the whole
indicator will bed ark .As ther inse-aid diminishes, the size ofthe dark dot decreases. You should neve r let
therinseaidgetbelow1/4full.
Asthe rinse aidd imin ishes, the sizeo f theblack dot
ontherinse aidlevelindicator changes,as illustrated below.
Full
3/4full
1/2full
1/ 4 full- Should refillto eliminate spotting
Empty
""
Toopen the di spenser,turnthe cap tothe "open" (left) arr ow and liftit out.
1
Pourtherinse aidintothedispenser,beingcareful not tooverfill.
2
Replac e the cap by i nsert ing ita li gned with "open " arrow and tur nin g it to the c losed (right) a rrow.
3
Clean up an y ri nse aid s plit duringfi lling withan absorbent cloth t o av oid excessiv e foamin g
during the next wash.
Don't forget to replace the capbeforeyouclosedishwasherdoor.
3
Page 6
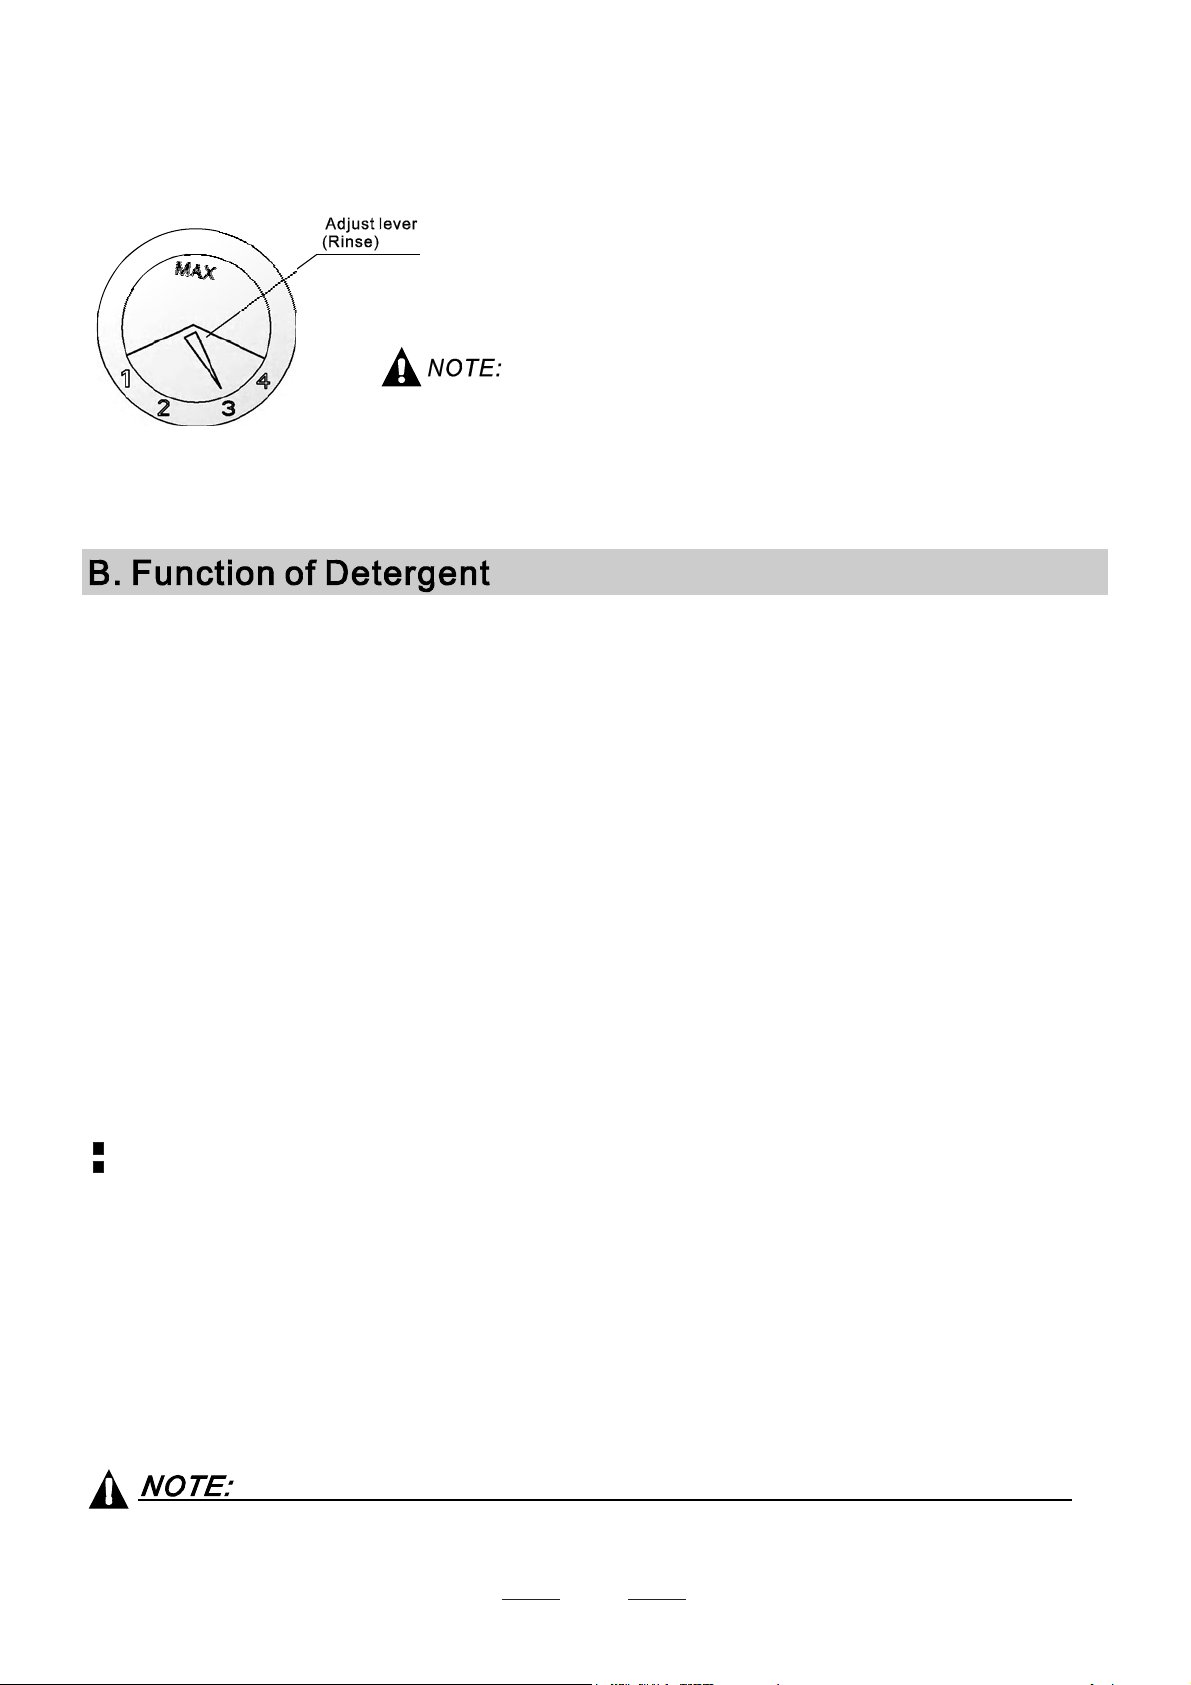
Adjusti ng RinseA id Disp enser
The rinse aiddispenser has foursettings.T he recom mended sett ing is on"3".
If the d ishes sti ll are not drying prop erly orar e spot ted, a djust thedial to t he
next high er nu mber on "4 ".
Increasethedoseif there aredropsofwater o rlimespotson thedishes afterwashing.
Reduce it ifthereare stickywhitishstainson your dishesor a bluishfilm on glasswareor
knifeblades.
Proper Use o f Detergent
Detergents with i ts chem ical i ngredients a re necessar y to r emove dirt, crushd ir t and tra nsport it outofthe dishwa sher.
Use only det ergent speci fically m ade for usein dishwasher s. Keep yourdet erge nt fresh
Don't put powder deterge ntintothe dispenser untilyou'rereadyto washdishes.
and dry.
Deterg ents
There a r e 3 s orts of d eter gents
1.With phosphateand withchlorine
2.Withphos phate andwithout chlorine
3.Withoutph osphate andwithout chlor ide
Normally new pu lverised detergent is without phos phate. T he water so ftene r functio n of
phosphate is not giv en. In thi s case we rec om mend to fill salt in th e salt co ntain er even when
the hardness of wateris only6 dH. If detergentswithoutphosphate wereusedin caseof hardwater
often white spot s appear atd ishes an d glasse s. In this casep lease add more detergent tore ach
better r esults. Detergents witho ut ch lorin e do only bleach a lit t le. Strongand coloured s p o ts will no t
removed comp let el y. In this case please choo se a prog ra mme with higher Temp er a ture .
°
Concentr ated D etergent
Based on their chemical composition,dishwashercanbe splitin two basict ypes:
conventional, alkaline detergents withcaustic components
lo w alk alin e c oncentrated detergents with natu ral e nzym es
The use of normal washing p rogrammes i n co njunction w ith co ncentrated d etergen ts
reduces poll ution and isgood for yourdishes; thes e wash p rogr ammes are specially matched
tothe di rt- diss olvin g properti es o f the e nz yme s of the conc ent rated detergent. For this reason
“”
normal washprogrammes in which concentrateddetergentsareusedcan achieve the same
resultsthat canotherwiseonly be achieved using intensive programmes.
“”
“”
Detergent Tablets
Dete rgent tabletsof different brands dissolve at differentspeeds. For thisreasonsome
detergent tablets ca nnot dissolve and develop the ir ful l cleaning powerduring short
prog rammes. Therefore pleaseuselong progr ammeswhenusingdetergent tablets, to
ens ure t he com plet e removal of dete r gent residuals.
Detergent tablets are onlyfor the models with 3 in1 functionor 3 in 1 p rogram.
4
Page 7
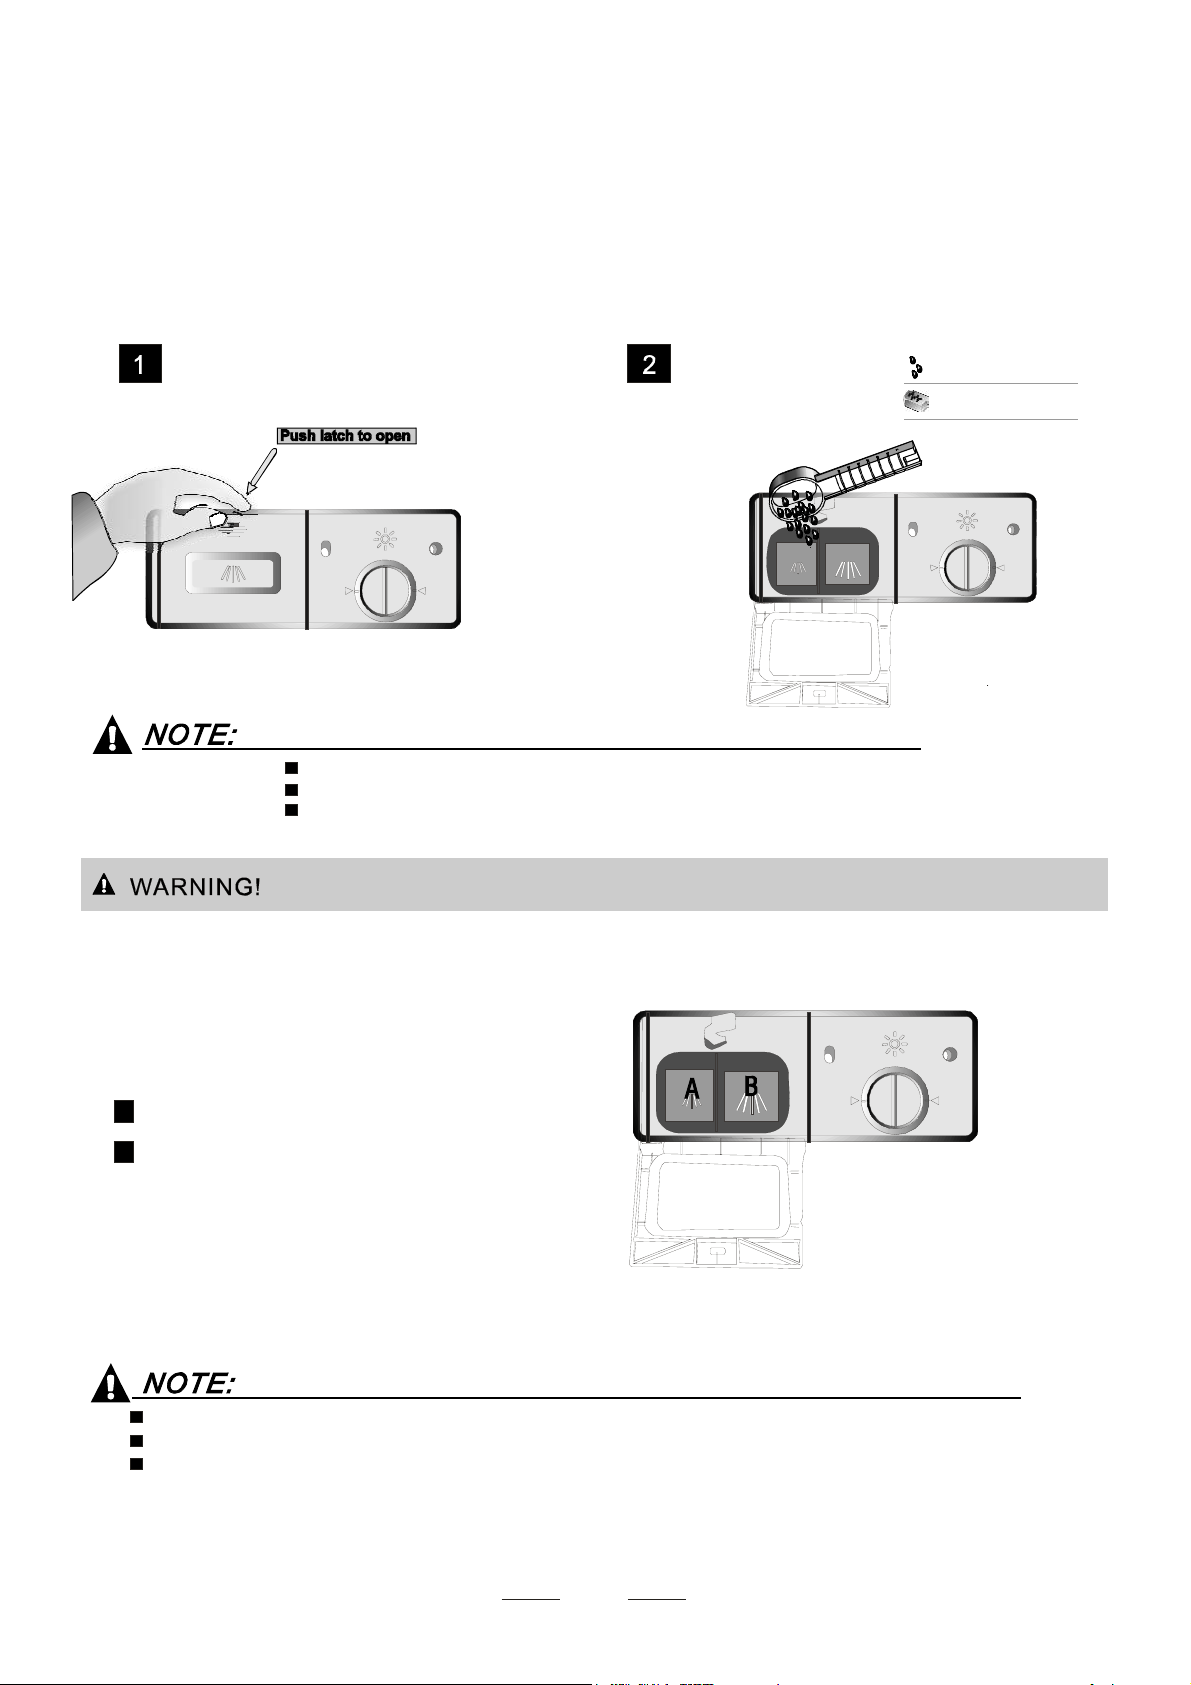
DetergentDispenser
The dispenser m ust be re filled be fore the startof each was h cycle f ollowing the instructions
provided in t he Wash Cycle Table . Yourdi shw asher uses less d ete rgent and rin se ai d then
convent ional dishwasher. Generally, only onetablespoon ofdetergent is neededfor
anormalwashload. Also, moreheavily soileditems needmoredetergent. Always add the
detergen t j ust before star ting the dish was her, othe rwis e it could ge t da mp andwill n ot
dissolv e properl y.
AmountofDetergentto Use
Detergent powder
Detergenttablet
If the lid iscl osed: pr ess rele ase button. T he lid springsopen.
Always add th e detergent justbefore starting ea ch wash cycl e.
Onlyusebrandeddetergentaidfor dishwasher.
Dishwasher de tergent i s corrosive! Ta ke car e to kee p it outof reach of c hildren.
Fillin detergent
Fillthe de tergent disp enser w ith deter gent.
The mar k i ng ind ica tes the do s i ng le vels , as
illustratedon right:
The place c an load 15gdetergent .
A
The place can lo ad 25g dete rgent .
B
Pleaseobserve th e manu facturers do sing and storage
Recommendationsas statedon thedetergent packaging.
Close the li d and press until it lock s in p lace.
If the d ishes are heavily soi led, place an addi tional
detergentdosein thepre-washdetergent chamber.Thisdetergent willtakeeffect duringthepre-wash phase.
Youfind i nformatio n about theamount of de tergent forth e single programme on the l ast p age.
Please aw are, tha t according t o the levelsoiling and the specific hardnes s of wa ter difference s are po ssible.
Please observethemanufacturer'srecommendations on thedetergent packaging.
5
Page 8

Con sider buying utensi ls which ar e identif ied as di shwa sh er-proof.
Use a mildde tergent t hat i s described as' kind ofdi shes'. If necessary, seek f urther
inform a t ion from detergent manufactu rers.
For partic ular items,s elect ap rogramme w ith a s low a temperature.
Toprevent da mage, d o no t take glassandcutlery out of the dishwasher immediately
after theprogrammehasended.
Are not s uitable
Cutlery w ith w ooden, horn chinaor
mother-of -pearl handl es
Pl as tic ite ms tha t are not
Ol der cu tler y wit h glu ed parts that is n ot
temperature resistant
Bonded cutle ry ite ms or di shes
Pewteror cooperitems
cr ys tal glass
St eel i tems subj e ct to rus ting
Wooden platte rs
Items ma de from s ynthetic fibres
(For best perf ormance of thedishwasher,follow these loadingguidelines.
Features and appea ran ce o f baskets and cutlery baskets may vary fr om yourm o del. )
Scrape off any largeamounts of leftover food. Sof ten remnants ofburnt food inpans
It is not necessary to rinse thed ishes u nder running water.
Place objects in the dish was her in follo wing way:
1.Itemssuch as cups, glasses, pots/pans, etc.are face down.
2.Curveditems, or t hose with recesses, should beloaded at a s lant s o that w ater c an run off .
3.All utensilsarestacked securelyand can nottipover.
4.Allutensils are pla ced in theway that the spray arms can r otated freelyduring washing .
heat resistant
Are o f limited suitab ility
Sometypes of glasses canbecome
dull after a large number of washes
Silverandaluminiumpar tshavea
tendenc y todiscolour during w ashi ng
Glaz e d p a tterns m ay fade ifmachine
washed frequent ly
Very small itemss hould not bew ashed i n the dishwasher as they c ould eas ily fall out of the basket.
Load hollow ite ms suc h as cup s, glasses, p ans etc. Withthe opening dow nwards sotha t
wat e r cannot collect in the contai n e r or a deepb a se .
Dishesand items of cutlery mustnot lieins ide oneanother, or cover each other.
Toavoid dama ge to glasses, they mus t not touch.
Loadlargeitemswhicharemostdifficulttocleanintothebasket.
Long blad ed kni ves sto red in a n uprigh t po sition are ap otential hazard!
Long and/ors harp itemso f cut lery such as carving kniv es must bep ositione d
horizontally in the basket.
Please don ot ove rload yo ur di shwasher. T his isimportant for g ood resu lts a nd fo r
reasonab le ene rgy con sume.
6
Page 9

Loading the BasketLoading the Basket
Position the dishes and cookware so that they will not get moved by the spray of water.
IN
1
5
33
6
99
44
77
88
1
22
1
Cups
3
Glasses
5
Fruit bowl
7
Dinner plates
Cutlery basket
2
Serving bowl
4
Saucers
6
Oval platter
8
Bread and
butter plates
9
Plate racks of Basket
The basket is fitted with plate racks which
can be stowed horizontal if required.
7
Page 10

Cutlery should be placed in the cutlery basket with handles atthe bot tom. If t he rack hasside baskets, thespoon
should be loaded individuallyinto the appropriate slots,especiallylongutensilsshould beplaced inthehorizontal
position at th e front o f theu pper basket asshown.
Dinnerfork s
325
4
1
44
444
3
2
2
2
2
4
1
1
3
3
3
4
2
3
4
1
1
4
6
4
4
1
Do not le t any iteme xtend through bottom.
Always loa d sharp u tensils w ith t he sharp point down!
4
4
5
1
Sal a d f o r ks
2
Kni v e s
3
Teaspoons
4
Servingsp oons
5
Ser v i n g f ork s
6
8
Page 11

()
Means:needtofillrinse intotheRinse-Aid Dispenser.
*AHAM DW-1-2005 : T his pr ogram isth e test cycle, the rinse-aid dispenser
setting is r ecommended toPosition 6.
Intensive
Normal
Eco
(EN 50242)
Glass
Rapid
For the heaviest soiled loads,
such as pots,pans,casserole
dishesand dishes that have
been sitting with dried food
on themfor a while.
For normally soiled loads,
suchaspots, plates,glasses
and lightly soiled pans.
standard daily cycle.
For lightly soiled loads, such
as plates, glasses, bowls and
lightlysoiledpans.
For lightly soiled loads,
such as glasses, crystaland
fine china.
Ashorter wash f or lightly
s oiled loads that do not
needdrying.
Pre-wash 5 0
Wash (70 )
Rin se
Rin se
Rin se (70 )
Dryin g
Pre-wash
Wash(60 )
Rinse
Rinse (7 0 )
Drying
Pre-wash
Wash(55 )
Rinse
Rinse
Drying
Wash(45 )
Rinse
Rinse
Drying
Wash(40 )
Rinse
Rinse
(
℃
℃
℃
℃
℃
(70 )
℃
℃
(60 )
℃
℃
℃)
3/15 g.
3/15 g.
3/15 g.
15 g.
15 g.
145
125 0.70 8.4
170 0.63
75 0.48 6.8
30 6.0
0.94
0.30
11.0
8.4
For normal ly soiled loads,
such as pots, plates, glasses
and lightly soiledpans.
standard dail y cycle.
Startingawashcycle...
Drawoutthebasket(seethe sectionentitle d Loading the Dishwasher ).
Pou r in the d e tergent (see the sect i on entitled Sa l t , Det erge nt and Ri nse Aid ).
Inser tthe plugintothesocket. Thepower s upply is 120V/60 Hz
Make sure that the wat er suppl y is turn edon to full pressur e .
Press the pr ogram button to select wash progr am you n eed
Pre-wash
Wash(60 )
Rinse
Rinse
Drying
“”
“”
℃
(70 )
℃
3in 1
Heavy->Normal ->Speed
Then press t he Start /Reset but ton, the d ishwasher begins to sta rt.
When you press the Start/Reset button to pa use duringwashing,
the pro gram ligh t will stop blinki ng and the di sh was h er will mooin g
everyminuteunlessyoupressthe Start/Resetbuttontostart.
140
0.70
8.4
9
Page 12

Premise:
runs for a short time.
You can modify the washingprogram, When the dishwasher just
Otherwise, thedetergent ma y hav eal ready been
released, and the appliance may have already drained the wash water. If this
isthe case, the detergent dispensermust be refilled (see t he sectionentitled
" Loading the Detergent ").
PressStart/Reset Buttonmore than three s econds the machinewill bein stand
bystate ,thenyou canchange the program tothe desired cycle s etting(se e
thesection entitled " Starting a wash cycle. .." ).
NOTE : If you o pen the doo r durin g w ashing, the mach ine wil l pause . When you
closeth e door and press the start/resetButton,the machine will k eepon
working after 10 seconds.
The lights sho w the state ofthe dishwasher:
a)All lights off----------------------------------On standby
Program indicator
b)One ofthe ghts on----------------------Being paused
c)One ofthe blinking----------------------Running
Program indicator li
Program indicator light
If you ope n the doo r when washing, the machin e will pause.When you c lose the door, the machin e
will keep on working after 10 seconds.
Aforgottendish can be added any time before the detergent cup opens.
Press the start/reset button
1
Open thedoor a little to stop the washing.
2
After the spray arms stop working,you can open the door
3
completely.
When the workingcycle has finished, the buzz er of dishwa sher will sound 8 seconds , then st op. Turn off
the appliance using the O N/OFF butto n, shut offth e wa ter supp ly and op en the d oor ofth e dishw asher.
Wait a few mi nutes be fore unloadi ng the d ishw asher to av oid handl ing t he dishes an d utensi ls wh ile they
are still hota nd more susceptible to br eakage. The y will al so dry be tter.
Add forgotten dishes.
4
Close the door
5
Press the start/reset button, the dishwasher will run
6
after 10seconds.
SwitchOff theDishwasher
eAll th phaselig hts are off
1.Switchoff the dishwa sher by pressing the ON/ OFF but ton.
2.Turn off thewatertap!
, only in this c ase the progra mm e ha s e nded .
Openthe doorcarefully.
Hot dishes ar e sensit ive to kn ocks. The di shes shou ld ther efore be a llowed t o cool d own arou nd 15 minutes
beforeremoving from the appliance.
Open the d ishwasher's door,leave itajar and w ait a f ew minut es befor e remov ing the dishes.In this wayt hey
will be cool er and t he dryi ng will b e impr oved.
Unloadingthe dishwasher
Itis normal thatthe dishwashe r is we t inside.
It is dangero u s t o open th e door w hen washi ng , be c a us e the hot water may scald you .
10
Page 13

The filter prevent larger re mnants offo od o r other o bjects f rom gett ing i nside the pum p.
The filter system con sists of acoarse filter,aflat (Main fi lter)
and a micro filte r ( fi n e filter ).
1
2
3
1
3
2
Main filter
Foodandsoilparticlestrappedby thisfilterar epulverizedby a
special jet on th e spray arm a n d was hed down to d r a i n.
Fine fil ter
This filte r holds s oil and f ood residue inthe sump a rea and
prevents it frombeing redeposit ont he dishes during wash cycle.
Coarsefilter
Larger items,such as pieces of boneor glass,thatcouldblock
the drain are trapped in the c oarse f ilter.To re move th e items
caughtb yt he filter,gentlysq ueezeth etapon the topo f this
filterand lift out.
Filterassembly
Thefilterefficiently
Fo r best per form a n ce an d results, t he fil ter assembly must be regularl y. this reason, it is a good id ea to
remove the la rger food particl estrapping i n the filter after e ach was h cycle b y rinsing the filterand cup un der
running w ater.Toremove the filte r assemb ly,pull onth e cu phandle in theu pward di rection.
removes food particles from the wa sh w ater,al lowin g it t o be re-cyc lated duringt he cy cle.
For
Nev er ru n the dis hwasher with o u t the filt ers in pl ace.
Th e dish washer must never be used without the filters .
Improper replacementof the f ilter mayred uce the performance level o f the appliance
anddamagedishes and utensils.
1
2
Step1:contrarotate the Fine ,
liftitup;Step2:
Step3:lift the Main filter up
filter
3
If do it from step1 to step 3, the filter system will be removed; while if do it from Step 3 to Step 1,
the filter system will be installed.
11
Page 14

Remarks:
- Inspect t he filter s for blo cking e very time the dishwasher has beenus ed.
- By unscrew ing the c oarse fi lter.you can rem ove the f ilter sys tem.Remove any food remnants a nd
clean thefilters under running water.
Theentire filter assembly shouldbe cleanedoncea week.
CleaningThe Filter
To cl ean the c o a rse f ilter and the fin e fil t e r, use acl eanin g bru sh. Reassemble t hefilter par ts as shown in the figures
inthe las t page a nd reinse rt the e ntire ass embly in the dishwasher, positioni ng in its seat and pressin g downward .
Whenc leaningthefilters,don'tknockonthem.Otherwise,thefilterscouldbe
contorted andtheperformanceof dishwashercouldbedebased.
The control p anel can be cleaned by u sing a l ightly dampenedcloth and dry thoroughly.
The exterior use agoo d appl iance pol ish wax.
Neveruse sh arp obje cts, scouring padsorharsh c leaners ona ny part o f the di shwasher.
CleaningThe Door
To clean theedge around thedoor,you shoulduseonly a softwarm,
damp cloth. To avoid penetration of w ater into t he doorlo ck an d
electrical comp onents, do notu se a spraycl eaner of any kind.
Never use a spr ay c leaner t o clean t he d oor panel asit maydamage the doorlock
and electricalc omponents.
Abrasive agent ors ome paper towels hould notbeused because oftherisk of
scra tching or le av i ng spots on the stainless steel su rfac e.
Protec tAgain st Freezi ng
please take frost protection meas ures o ndishwasher inw inter.E fter washing cycles,
please op erate as follows
1.Cut off electrica l power t o the di shwashe r.
2.Turnoff thew ater su pply an d disconnec t th e water i nlet pi pe from thewater valve.
3.Drain water from theinlet pipe a nd water valve. (Use a panto catch the water)
4.Reconnect the wate r inlet pipe to the wa ter valve.
5.Removethe filterat thebottomof thetuband use a spongetouseupwaterin sump.
:
ach tim e a
If your dis hwas he r cannot work bec a u s e of the ice, plea se contact professio nal servi ce persons.
12
Page 15

Cleani ng the SprayArms
Thesprayarmscan be easilyremovedforperiodic cleaning
of the nozzles,to prevent p ossible c logging. Wa sh th em
under running waterand ca refully replace them in their s eats,
checking thattheir rotarymovement is inno way impeded.
Grasp the middle of the spr ay a rm, pull itupwards to remove
it. Washt hearmsunder a jetof running water andreturnthem
car e fully to thei r seat. After re assembly, c heck t hat t he spray
arms turn freely. Otherwise, check thattheyhavebeen
in stall ed cor rectl y.
AfterEvery Wash
After ever y wash, turn offthe water supplyto the
appliance andl eave th e door s lightly op en sotha t
moisture a nd odor s are nottrapped inside.
Removethe Plug
Before cleani ng or p erformi ng mainten ance, always
remove the plug fromthe socket.
No SolventsorAbrasive Cleaning
Tocleantheexteriorand rubberpartsof the dishwasher,
donot usesolventsor abrasive cleaningproducts.
Only use a c lo th with w arm soapy water.
Torem ove spots or s t ains from the surface oft he
interi or, use a cloth da mpe ned withwater w ith a littl e
vinegar,o r a cleaning product mad e sp ecifically fo r
dishw ashers.
When itis notin needfor along time
It isrecommend that yourunawas h cyclewith the
dishwasher empt y and the n remove th e plu g from the
socket, turn o ff the wa ter supp ly and l eave thedoor of
the appl ianc e sli ghtly open. Th is w ill h elp t h e door
sealsto astlonger and preventodoursfromforming
withinthe appliance.
Moving t heAp plia nce
If the app liance m ust be mo ved, tr y to keepi t in t he
vertical position. Ifabsolutelynecessary, itcanbe
positioned on itsback.
Seals
Oneofthefactorsthatcau seodorsto forminthe
dishwasher is foo d th at remain s trappe din the seals.
Periodic cleaning with a damp sponge will prev ent t his
fro m occ urring.
ElectricalShock Hazard
Theinstallationof thepipes
and electrical equipments
shouldbe doneby professionals.
Disconnect electricalpower before
installingdishwasher.
Failureto do socan result indeath
or electri cal sh ock.
Theinstallationpositionof dishwashershouldbe nearthe existing inletand drain
hosesand powercord.
Oneside of thecabinet sinkshould be chosen tofacilitate theconnectionofdrain
hosesof thedishwasher.
13
Page 16

Positi on the appli ance in thed esired l ocat ion. The backshould rest aga inst the w all behindi t,
and the s ides, alongt he a djacent cabinets orw all. The dishwasher iseq uipped w ith watersu pply
anddrainhoses t hatcan bepositionedto the right or the lefttofacilitate proper installation.
For personal saf ety:
DO NOT USE AN EXTENSION CORD OR AN ADAPTER PLUG WITH THIS APPLIANCE.
DONOT, UNDER ANY CIRCUMSTANCES, CUT OR REMOVETHEEARTHING
CONNECTION FROM THE POWER CORD.
Please look at therating label to knowthe rat ing volta ge and c onnect t he dishwash er to t he appropriate power suppl y.
Use the r equired fuse1 0 amp , tim e delay f use orc ircuit bre aker rec ommended and provide separate circuit serving
only this appliance.
Ensure the v oltage a nd frequenc y of thep ower being cor respond sto
those on therating plate. Only in sert the p lug into an electrical socket whichi s earthed
properly.Ifthe el ectrical sock et to whi ch the a pplianc e must b e conne cted is not
appropriate for theplug, replace the socket, rather thanusinga adaptors or the likeas
theycould causeove rheatingand burns.
This appliance must be earthed. In the event of a malfunction or breakdown, earthing will reduce the risk of
electric shock by providing a path of least resistance for the electric current. This appliance is equipped with
a cord having an equipment-earthing conductor and an earthing plug. The plug must be plugged into an
appropriate outlet that isinstalled and earthed in accordance with all localstandards and requirements.
Improper connection of the equipment earthing conductor can result in the risk of an
electric shock.
Check with a qualified electrician or service representative if you are in doubt whether the
appliance is properly earthed.
Do not modify the plug provided with the appliance. If the plug does not fit properly to the
outlet, please have a qualified electrician to install a proper outlet.
for personal safety:
DO NOT USE AN EXTENSION CORD OR ANADAPTER PLUG WITH THIS APPLIANCE.
DO NOT, UNDER ANY CIRCUMSTANCES, CUT OR REMOVE THE
CONNECTION
FROM THE POWER CORD.
EARTHING
14
Page 17

Back View
Your dishwasher comesequipped with a'quickconnect'assembly (includesinleta nd drain hose). The
faucetadaptermust be installed on the faucet befor e you can connect thedishwasher.This adapteris
includedinsideyour dishw asher.The fauceta dapte r is compatible withfaucetsinclusiveof eithermale
(outside) orfemale(inside)threadedfaucetconnections.
Inorderto avoidth at there is more water staying in the inlet hose, please close the faucet after using.
15
Page 18

Screwthe faucet adapter onto (or into) th efaucettap. Check for leaks (use Teflontapeto eliminateif
1
.
necessary).
Connectthesix-sidedconnectionof thedr ainhose to the drainport connectiononthe back of the
2.
dishwasher cabinet.Do not over-tighten(toavoid damage to threads).
Connectthestar-shapedconnection of thei nlethose to the inlet portonthe back of the dishwasher
3.
cabinet.Donot over-tighten(to avoiddamage to threads).
Connectthecircularconnectionof thedrain hose ontothelonger(bottom) male connection on the quick
4.
connect.
Connectthecircularconnectionof theinle t hose onto the s horter(top)male connectiononthe quick
5.
connect.
Attachthequickconnectontothe faucet adapter,by pulling down the outer locking collar on thequick
6.
connect,whilepushingth e quick connect upward onto the faucet adapter.
Whenthe quick connect snaps onto the faucet adapter,releasethe locking collar.Verifythec onnection
7.
issecure.
Slowlyopenthe hot water line and checkf orany sign of water leaks a t all hose connections.If leaks are
8.
located,immediatelyclosethe water supply and repair the hoseconnections.
Important
1. Once you o p en the water suppl y line, (even if itis closed imme di ately thereaf ter ), the inle t h o se will be
pressurized.
2. To r el i ev e water pres sur e from inside th e inlet hose, (ma ke sure the water line (fauc et) is closed ): pres s
and hold the red pressurereliefbutton on thequick connect until the flo w of water stops.
WARN ING
FAILUR E TORELIE V E WATER P RES S URE, BEFO R E DI S CON NECT I NG THE QUI CK- CON N ECT
FROMTHE FAUCET, WILL RESULT IN BACK-PRESSUREOVER-SPRAY. THE TEMPERATUREOF
INCOMINGWATER CAN BE VERYHOT,AND BACK -PRESSURE OVER-SPRAYCOULD CAUSE
SEV ERE BURNS AND/OR SCALD ING .
DANGER
DONOT LET CHILDREN DISCONNECT THEDISHWASHER;CLOSE SUPERVISION OF CHILDRENIS
ALWAYS IMPORTANT AR OUN D A PPL I ANC ES.
NOTE:
Hardwaterconditionswill adversely affectthewashing performanceof yourdishwasher. H ard
water conditi ons wi ll also contribute to 'lime' (whitefilm substanc e) deposits and/or 'scaling' o n the
stainless steel surfaceof the dishwasher tub and heaterelement, located in the sumpunderneath
the remo vab l e filte r scre en . To assis t in mi n imizing thes e conditi o n s, it i s recom me nd ed to
periodically o perate/rinse theinside of the dishwasher (empty)using 1 cupof white vinegar at least
once a week.
Disconnecting your Dishwasher
1.
Shut off the wa te r suppl y at th e fa uce t.
2.
Disconnect thepowersupplycord
Thefollowingthings shouldbe checked beforestarting thedishwasher.
1
Thedishwasheris leveland fixedproperly
2
The inle t val ve is ope n
3
Thereis aleakage atthe connections ofthe conducts
The wiresare tightlyconnected
4
5
The poweris switched on
The inle t and drai n hoses are k notte d
6
7
Allpacking materials andprintingsshouldbe takenout fromthe dishwasher
After installation , please make sure to keep this manual.
The co nt en t of thi s ma nu al is ve ry he l pfu l to t he us ers .
16
Page 19

Fuse blown, or the
circuit breaker tripped.
Replace fuse or reset circuit breaker. Remove any other
appliances sharing the same circuit with the dishwasher
Technical
problem s
Power supplyis not
turned on.
Door of dishwasher
not properly closed.
Kink in drain hose
Filter clogged.
Kitchen sinkclogged.
Improper detergent
Spilled rinse-aid
Detergent with
colourant was used.
Make sure the dishwasher is turned on and the door is
closed securely.
Make sure the power cordis properly plugge d into the
wall socket.
Closeddishwasher making sure that door latches.
Check drain hose.
Check coarse thefilter.
(see section titled )"CleaningTheFilter"
Check kitchen sink to mak e sure it is draining we ll.
If problem is kitchen sink not draining ,you may need
a plumber rather than a serviceman for dishwasher.
Use only the special dishwasher detergent to avoid
suds. If this occurs, open the dishwasher and let suds
evaporate.Add 1 gallon of cold water to the tub. Close
and latch the dishwasher, then Start the "soak" wash
cycle to drain out the water . Repeat if necessary.
Always wipe up rinse-aid spills immediately.
Make sure that the detergent is the one without
colourant.
General
problem s
Noise
Hard water minerals
The affected items are
notcorrosion resistant.
A programme was not
run after dishwasher
salt wasadded.
Traces of salt have
gotinto the wash cy le.c
The lid of so fter
is loose.
Thesp ay arm is
r
knocking against
an itemin abasket.
Item of crockery
are insecure
in the wash cabinet.
This may be caused
by on-site installation
or the cross-section of
the piping.
T o clean the interior, use a damp sponge with
dishwasher detergent and wear rubber gloves.
Never use any other cleaner than dishwasher
detergent for the risk of foaming or suds.
Always run the Quick wash programme .
without any crockery in the dishwasher and
without selecting the Turbo function (if present),
after adding dishwasher salt.
Check thelip .Ensure thefixis fine.
Interrupt the programme, and rearrange the items
whichare obstructing the sp ay arm.r
Interrupt the programme,
and rearrange the items of crockery.
This has no influence on dishwasher function.
if in doubt, contact a suitably qualified plumber.
17
Page 20

The dishes were not
loaded correctly.
See notes in " Loading the Dishwasher Baskets ".
Unsa ti s
-factory
washin g
resu lt
Theprogramme was
notpowerful enough.
Not enough detergent
wasdispensed.
Item are bloc king
the path of sp ay arms.r
The filter combination
inthebaseofwash
cabinet is not clean or
is not correctly fitted.
This may cause
the sp ay arm jets
r
to ge t blocked.
Combination of soft
water and too much
detergent.
Aluminum utensils
have rubbed against
dishes.
Dishes block
detergentcups.
Improper loading
Too little rinse-aid
Select a more intensive programme.
See" Wash Cycle Table ."
Use more detergent, or change your detergent.
Rearrange the items so that the sp ay can rotate freely.r
Clean and/or fit the filter combination correctly.
Clean the sp ay arm jets. See "Cleaning the Spray
Arms".
Use less detergent if you have sof t water and select
a shortest cycle to wash the glassw a re and to get
them clean.
Use a mild abrasive cleaner to eliminate those marks.
Re-loadin g the dishesproperly.
Load the dishwasheras suggested in the directions.
Increase the amount of rinse-aid/Refill the rinse-aid
dispenser.
r
Unsa ti s
-factory
dryi ng
resu lt
Dishes are removed
too soon.
Wrong programme
selection
Using cutlery with
a low-quality coating
Do not empty your dishwasher immediately after
washing. Open the door slightly so that the steam can
escape. Begin unloading the dishwasher only oncet
he dishes are barely warm to the touch. Empty the low
basket first. This prevents water form dropping off
dishes in the upper basket .
In short programmes the washing temperature is lower.
This also lower scleaning performance.Choose a
programmewith a long washing time.
Water drainage is more difficult with these items.
Cutlery or dishes of this type are not suitable for
washing in the dishwasher.
When some malfunctions come on, the appli ance will display error codes to warn you:
Longer inlet time.
Overflow.
Faucets is not opened, or water intake is restricted,
or water pressureis too low.
Some element of dishwasher leaks .
If overflow occurs, turn off themain watersupply before calling a service.
If there is water in the base pan because of an overfill or small leak,
the water should be removed before restarting the dishwasher .
18
Page 21

Height : 438mm
Width : 550mm
Depth : 500mm
Voltage connected Load : see rating label
Water pressure: 0.04-1.0MPa
Hot water connection : max 60 ℃
Power supply: see rating label
Capacity: 6 Place settings
19
 Loading...