

Page 1
Operating Instructions
Congratulations on the purchase of your new
Sunpak tripod. Your tripod has been designed
to be rugged and dependable and will provide you
with years of reliable service.
Please spend a few moments reviewing these
instructions, so that you can take full advantage
of your tripod’s features and capabilities.
SUNPAK LIMITED LIFETIME WARRANTY
This Sunpak product has been carefully manufactured, accurately adjusted, inspected and thoroughly tested before shipment
to assure you of the highest quality.
Should this Sunpak product require service, we will repair or
replace, at our option, any part or the product itself, which our
examination shows to be defective in material or workmanship.
This warranty does not apply to wear and tear associated with
the normal use of the product. This warranty is non-transferable.
Repairs will be made to the product at no charge, under the
terms of the warranty as stated above, only when accompanied
by a dated and itemized bill of sale and nominal handling charge.
Be certain to follow all assembly and/or operating instructions
with this product. This warranty is not valid if the product has
been misused or damaged in any way that is beyond our control
or through normal wear and tear associated with use. This warranty applies only to the product and we are not responsible in
any way for losses, damages or any inconvenience caused by
equipment failure.
Some states do not allow the exclusion or limitation of consequential damages, so the above limitation or exclusion may not
apply to you. This warranty gives you specific legal rights and
you may have other rights which may vary from state to state.
Should service be required, the product should be carefully
packed (in the original packaging if possible ) and sent, prepaid
and insured, along with a check or money order for $9.95
(shipping and handling), to the address listed below. A note
briefly describing the nature of the defect should also be enclosed to expedite handling.
Proof of purchase and payment for shipping and handling
must be included for warranty repairs.
OWNER’S RECORD
Please complete this section and retain with your original bill of
sale for your records.
Purchase Date ________________________________________
Model _______________________________________________
Dealer’s Name ________________________________________
Address _____________________________________________
City ________________________________________________
State ___________________ Zip Code ____________________
ToCAD America Inc.
Sunpak Tripod Division
53 Green Pond Road
Rockaway, NJ 07866
sunpak.com
Precautions
Insure that all levers, collars and leg locks
are properly tightened, and that all three
legs are fully angled opened before use.
Do not mount any camera directly onto the
head mount screw located on the top of the
tripod’s center column. The screw may be
longer than the tripod socket in your
camera, and could possibly cause damage.
Do not carry or transport the tripod with the
camera equipment attached (as example
but not limited to: over your shoulder or
cradled in your arms).
Do not Oil or Grease any part of the tripod.
Do not use any solvents or thinners to clean
your tripod. Use mild detergent and wipe dry
with a soft, lint-free cloth only.
Do not store or expose your tripod to
excessive heat or cold or use close to any
flame or fire.
Do not exceed the load limit for this product.
Cat. no. 620-U63TM-PG
Ultra 63TM Tri-Monopod
with Pistol Grip Ball Head
Extending the Ultra 63TM Tripod Legs
Each leg of the Ultra 63TM has separate leg segments and each segment may be withdrawn as
needed. This permits setting your equipment at a
comfortable height and can be very useful when
positioning your tripod on uneven terrain.
To deploy any leg extension, flip the Leg Lock Lever
outwards and gently pull on the leg to extend. To
secure, press the Leg Lock until it locks in place.
Not properly securing a Leg Lock may cause the
tripod leg to retract unexpectedly and result in
damage to your camera and tripod.
Opening and Closing the Tripod
Your Sunpak Ultra 63TM is equipped with metal
Leg Braces with Locking Collar for maximum stability and strength.
When opening the tripod, make certain that the Leg
Brace Locking Collar is loosened. All three leg
braces should be extended by gently pressing down
on any one leg brace until it stops. To secure, retighten the collar. To close the tripod, reverse the
sequence.
Page 2
Height Adjustments (Tripod Mode)
Your Sunpak Ultra 63TM is equipped with a Lift-nLock Center Column for precise height adjustments.
To raise or lower the Center Column, loosen the
Elevation Locking Collar. Grasp the tripod head and
lift to the desired height. Do not raise the Center
Column above the “Stop Here” marking in order to
insure proper support. Retighten the Elevation
Locking Collar.
Note: Never release your camera until the Elevation
Locking Collar is securely retightened.
Specifications (Tripod Mode)
Folded Length 27.9 in.
Maximum Height 63 in.
Minimum Height 25.4 in.
Weight 4.2 lbs.
Load Capacity 11lbs.
Specifications (Monopod Mode)
Extended Height 66.5 in.
Minimum Height 19.5 in.
Load Capacity 6.6 lbs.
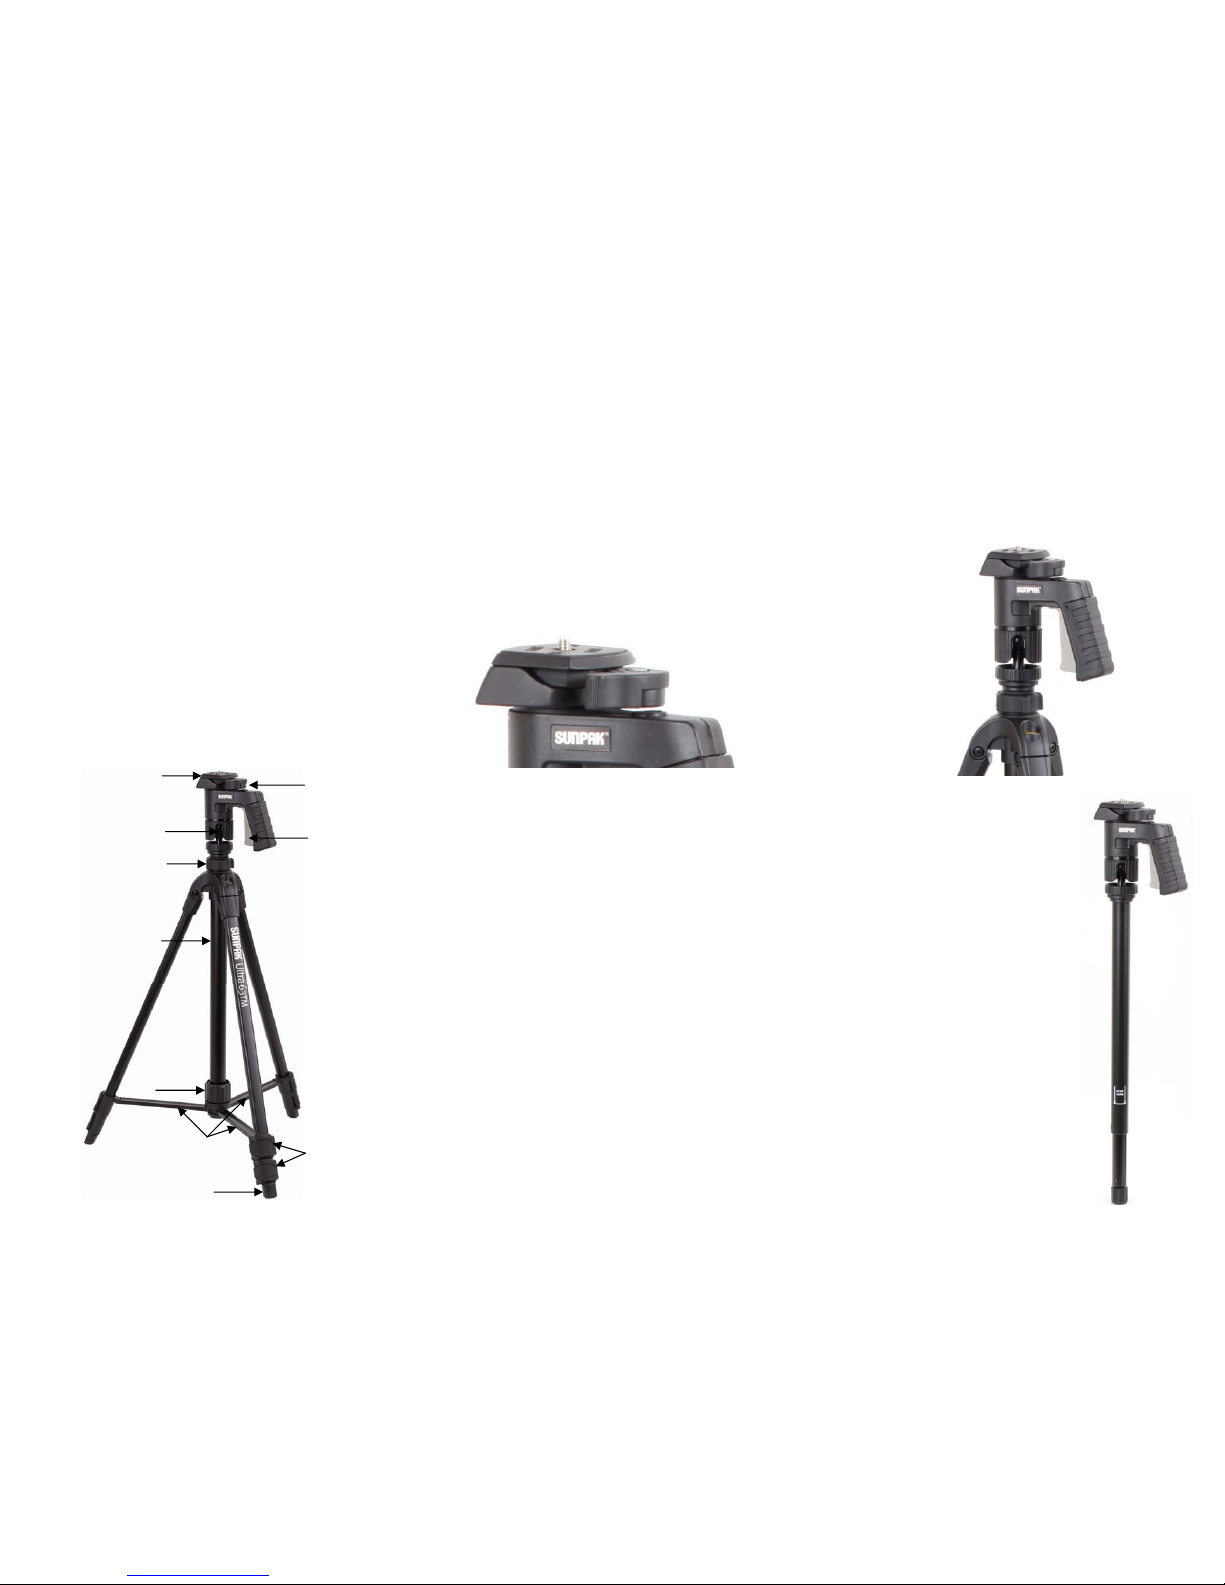
Tripod Components
1. Quick Release Plate
2. Quick Release Locking Lever
3. Vertical Cut-Out for 360° Photography
4. Pistol Grip Trigger Control Lock
5. Elevation Locking Collar
6. Lift and Lock Center Column
7. Leg Brace Locking Collar
8. Leg Brace
9. Flip Lock Leg Locks
10. Rubber Tipped Feet
Quick Release Plate
Move the Quick Release Locking Lever outward
until it stops and remove the Quick Release Plate
by lifting upward. The plate has a threaded ¼” x 20
camera mounting screw for camera attachment.
Position the plate so that the camera mounting
screw aligns with the tripod socket on your camera
or camcorder and attach, using the camera mounting screw. Move and hold open the Quick Release
Lock Lever and with the camera tilted slightly down,
slide the Quick Release Plate back into position.
After doing so, secure the platform using the Quick
Release Locking Lever by pressing firmly until it
stops.
Using the Pistol Grip Ball Head
For movement in any direction, simply loosen the
Pistol Grip Ball Head, by squeezing the Trigger Control Lock. When you have reached your desired position, simply release the trigger lock and the Pistol
Grip Ball Head will lock into place. The Pistol Grip
Ball Head also comes with a Vertical Cut-Out for
360° Photography. To use this feature, simply
squeeze the trigger and rotate the Pistol Grip Ball
Head until you feel the ball head begin to move
downward. You may now use the Pistol Grip Ball
Head at any angle. You can even shoot straight
down.
1
2
4
3
5
6
7
Height Adjustments
(Monopod Mode)
To extend the monopod, twist
the leg lock located at the
foot of the monopod counterclockwise and gently pull on
the leg segment to the desired length. The monopod
section of your Ultra 63TM
has 5 leg sections, and all of
the leg sections can be adjusted to your desired height.
To secure in position, twist
the leg lock clockwise. Not
properly securing the twist leg
lock may cause the monopod
to retract unexpectedly and
result in possible damage to
your camera and monopod.
To retract the leg sections in
order to use it in the tripod,
simply reverse the above procedure and reinsert the center column back in the tripod.
8
9
10
Using in Monopod Mode
To change the operation from tripod mode to monopod mode, loosen the Elevation Locking Collar and
pull up on the head until the Center Column is free of
the tripod body. Reverse this process to re-install the
unit back into the tripod body.
Note: The Pistol Grip Ball Head is removable, which
can allow the user to mount the camera directly to
the 1/4” x 20 screw at the top of the monopod.
 Loading...