

Page 1
Page 2
SUNPNK"
AuTilffiom3E[[
OWN
E R'S
MANUAL
BEDIENUNGSANLEITUNG
MODE
D'EMPLOI
MANUAL DE
INSTRUCCIONES
B
RUKSANV
ISN ING
Page 3
Introduction
Welcome
to the
world-wide
family
of
SUNPAK owners!
More
than
seven
million
SUNPAK elec-
tronic
f lash
systems have
been
chosen
by
photographers
throughout
the
world for
their rugged
construction,
innovative
design.
and
fast,
easy
operation.
To
insure
that
you
get
the
most
out of
your
electro-
nic f lash,
please
take
the
few
minutes
required
to
check through
this
owner's
manual
with
your
SUNPAK flash
in
front
of
you.
Einfiihrung
Willkommen
in
der
weltweiten Familie
von
SUNPAK-Besitzern
! Uber
sieben
M i | | ionen
SUNPAK-E
lektronenbl
itzgerdte
wurden
an
Photographen
in aller
Welt
verkauft,
die bei ihrer
Arbeit
die robuste
Konstruktion,
die
technischen
Neuerungen
sowie
die
zeitsparende
und
bequeme
Bedienungsweise
unserer
Erzeugnisse
zu
schdtzen
wissen. Damit
Sie
die
Mciglich-
keiten
lhres
Blitzgerdtes voll
ausnutzen
kcinnen,
nehmen
Sie sich bitte
ein
paar
Minuten
Zeit, um
sich
anhand
der
vorliegenden
Gebrauchsanleitung
ryrit
dem
SUNPAK-Blitzgerdt
vertraut
zu
machen.
Introducci6n
iBienvenidos
a la
gran
familia
mundial
de
los
propietarios
de
SUNPAK!
Mds de
siete
millones
de
sistemas de
flash
electr6nico
SUNPAK han
sido
elegidos
por
los fot6grafos
de todo
el mundo
debido
a
su
robusta
construcci6n,
su disefro
inno-
vador
y
su
funcionamiento
r6pido
y
sencillo.
Para
estar seguro
de
sacar
el m5xi-
mo
provecho
de
su
flash
electr6nico
t6mese
los
pocos
minutos
necesarios
para
repasar
este manual
teniendo
enf rente
su
flash
SUNPAK.
Pr6face
Bienvenue
au
sein
de la
grande
famille
mondiale
des
possesseurs
de
Sunpak!
Plus
de
sept millions de
photographes
du
monde
entier
ont
choisi
les flashes
6lectro-
niques
Sunpak
pour
leur
construction
robuste. leur
conception moderne
et leur
emploi ais6
et
rapide.
Veuillez
consacrer
les
quelques
instants
n6cessaires
d la
lecture
de ce manuel
d'instructions,
avec
votre flash
Sunpak
devant
vous,
afin d'en
tirer le
meilleur
parti.
Introduktion
V6lkommen
till den viirldsomspdnnande
familjen
av
Sunpak-iigare!
Mer
iin
sju
miljoner
SU
NPAK
elektronbl
ixtsystem
har valts
av fotografer
civer
hela vdrlden.
for
sin stadiga
konstruktion,
uppfirrnings-
rika
utformning,
och
snabba,
enkla
anv:indningsiitt.
Fdr
att vara
siiker
p5
att
f6
ut det mesta
av
Er
elektronblixt,
b6r
Ni
ta
det fStal
minuter
som fordras
for
att lesa igenom
denna
bruksarivisning
med
Er
SUNPAK-blixt
liggande
framfcir Er.
]ilF?"'
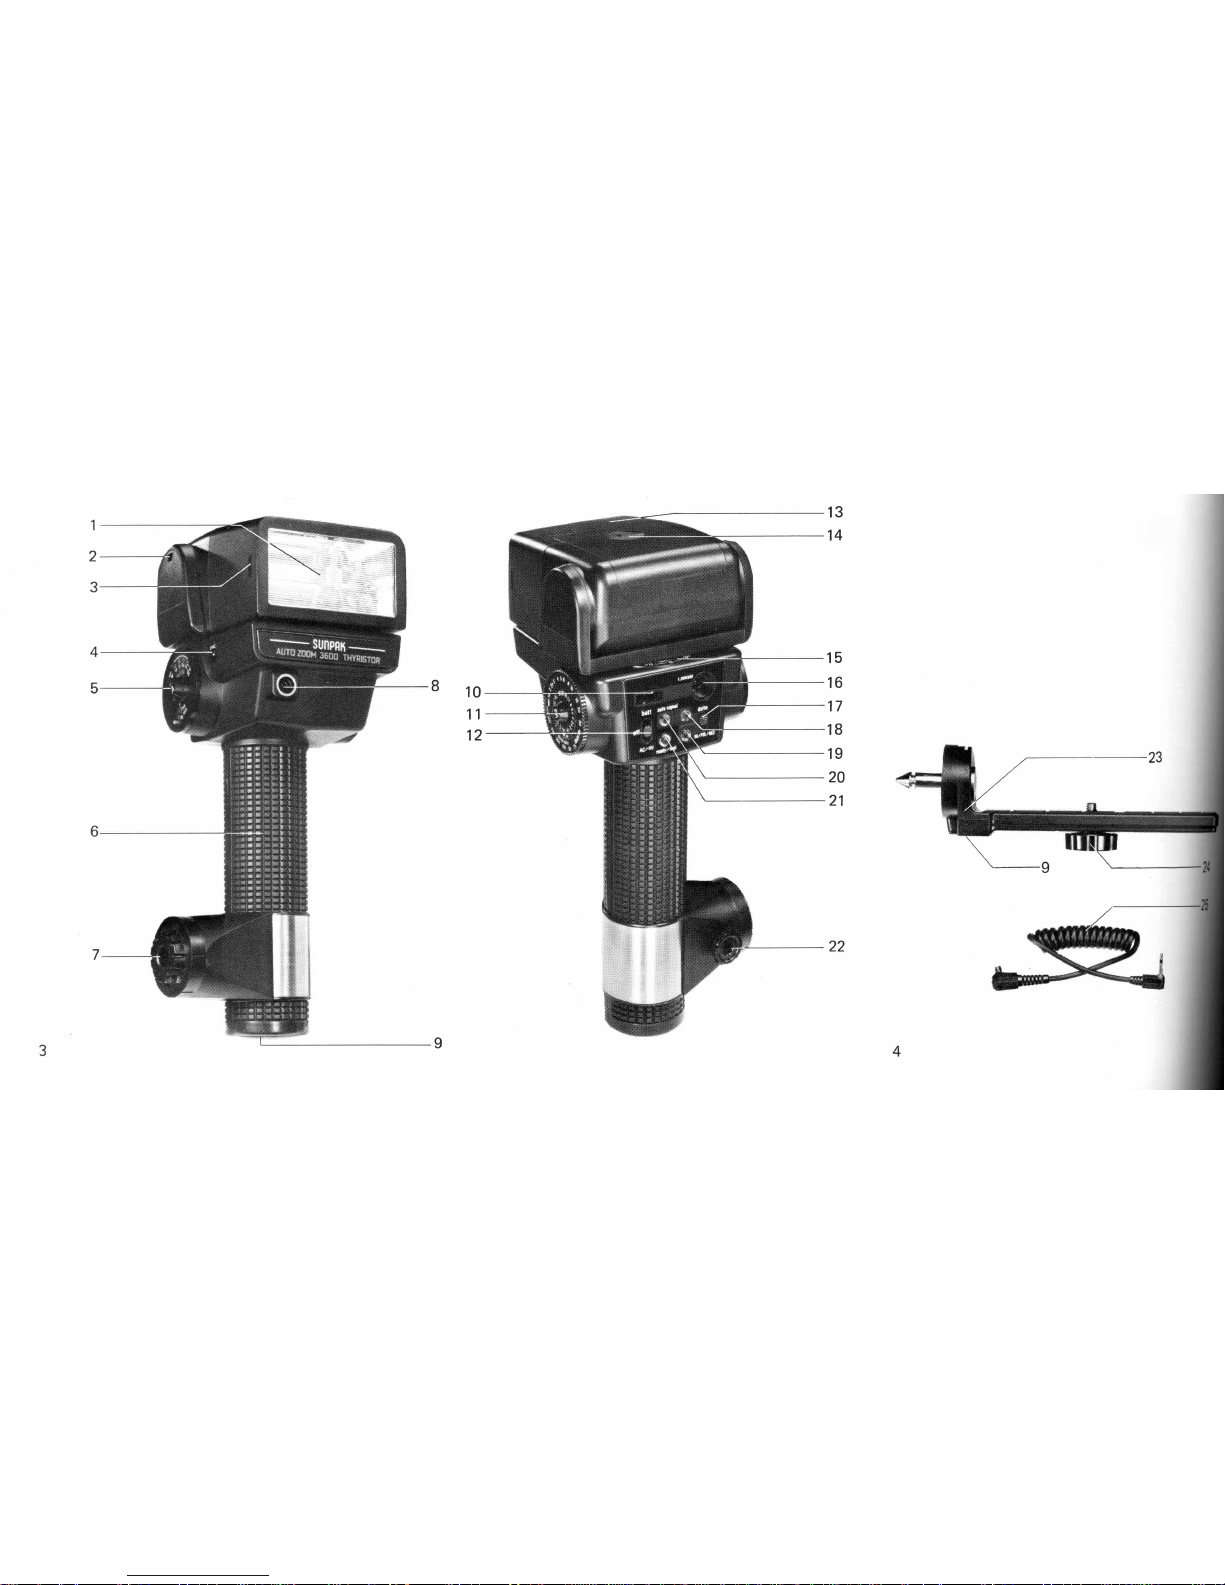
Description
of
Parts:
1. F lashtube
Housing
2.
Vertical
Bounce
Scale
3. Accessory
Mounting
Groove
4.Flash
Synchro Outlet
5.Auto Exposure
Control
Dial
6.Flash Grip
T.Flash
Bracket
Clamp
S.Silicon
Photo
Transistor
Cell
9.Tripod Mounting
Socket
10.AC/S10V
Outlet
l1.Power Ratio/MD
Calculator
Dial
12. Battery/AC.
H.V.
Selector
(On/Off
Switch)
13.Bounie
Head
14. Battery
Door
15.
Horizontal
Bounce
Scale
16.
Remote
Sensor Outlet
17. Mode
Selector
Switch
18.Auto
Mode
Indicator
19.MD Mode
Indicator
20.Auto
Signal
Lamp
21 .
Ready/Test
(Open
Flash)
Button
22. Ouick-Release
Button/Lock
R
ing
23. Camera Mounting
Bracket
24. Camera R etain
i ng
Screw
25.Flash
Synchro Cord
26,
Battery Holder
27.Filter Holder
Page 4
10
11
12
13
14
15
16
17
18
19
20
21
Page 5
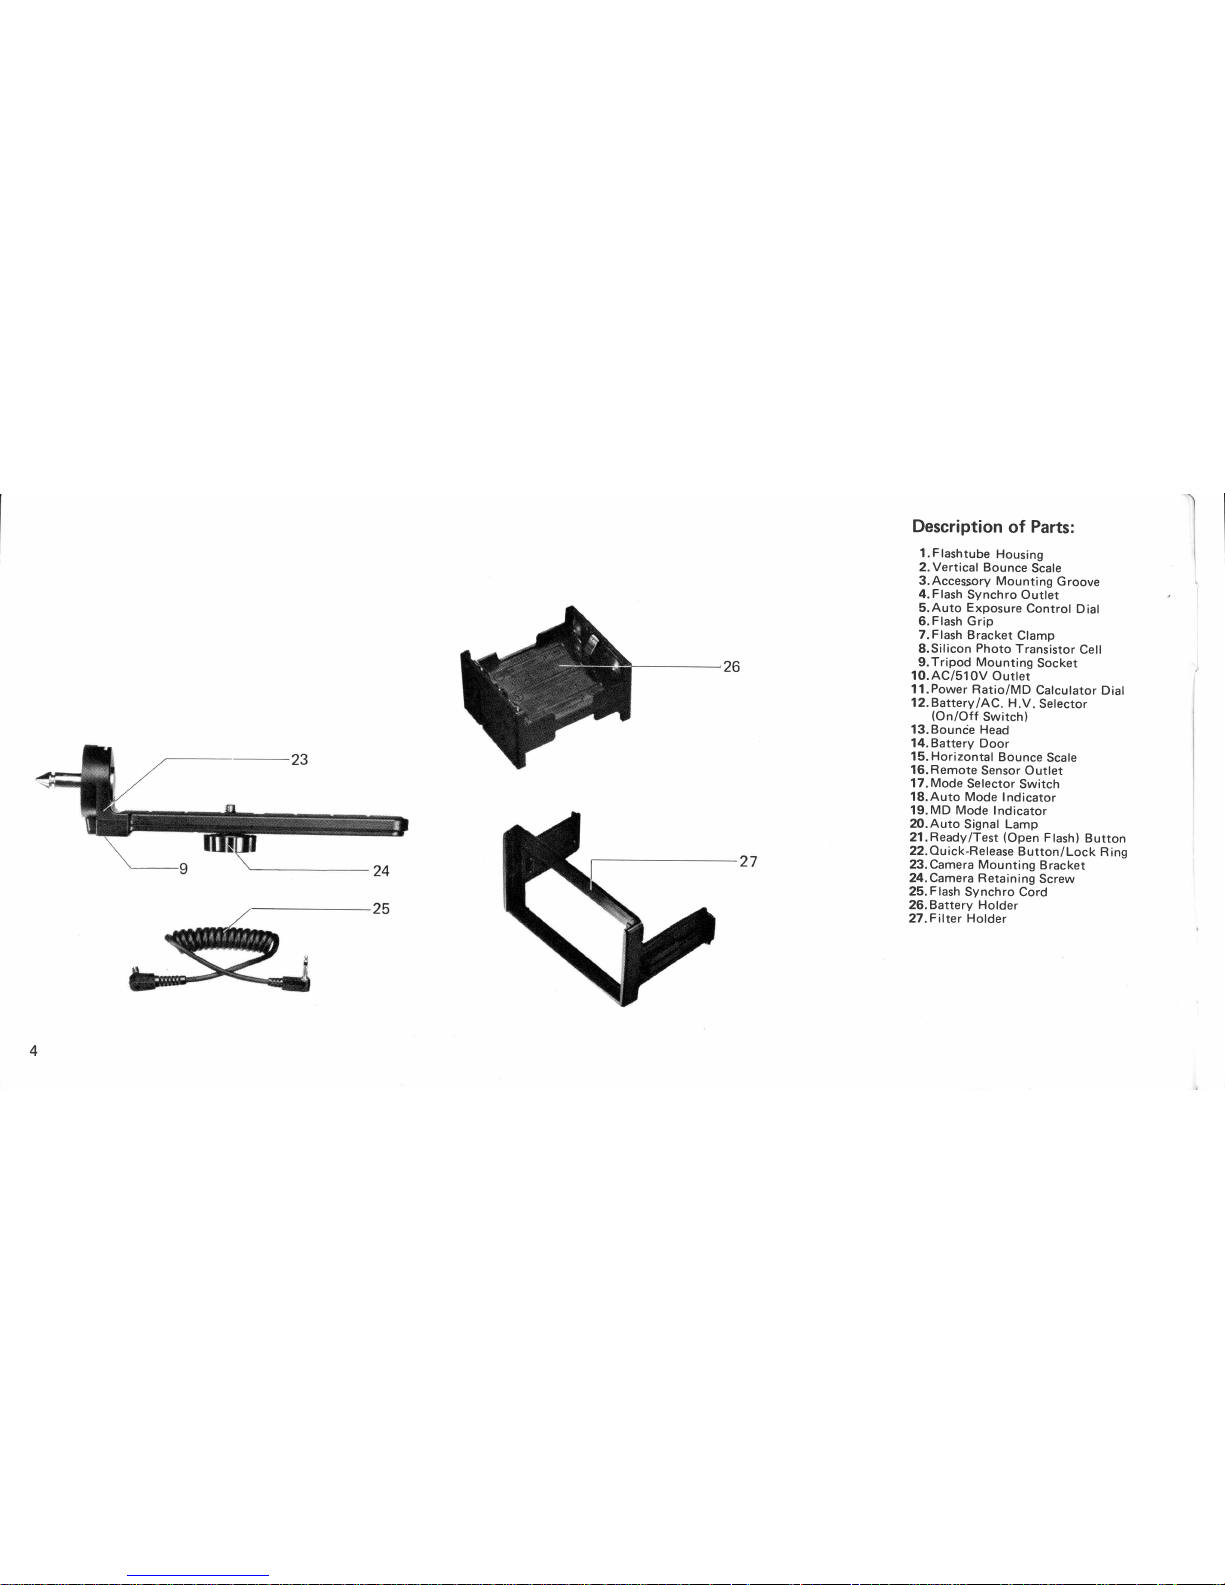
Description
of
Parts:
1
. F lash
tube
Housing
2.Vertical
Bounce
Scale
3. Accessory
Mounting
G
roove
4.Flash
Synchro Outlet
5.
Auto Exposure
Control
D
ial
6.
Flash
Grip
7.F
lash
Bracket
Clamp
8.
Silicon
Photo
Transistor
Cell
9.Tripod Mounting
Socket
10.
AC/51
0V O
utlet
11.
Power
Ratio/MD
Calculator
Dial
l2.Battery
lAC.
H.V.
Selector
(On
lOtt
Switch)
13. Bounie
Head
14. Battery
Door
15.
Horizontal
Bounce
Scale
16.
Remote
Sensor
Outlet
17.
Mode
Selector
Switch
18.
Auto Mode
Indicator
19.MD Mode
Indicator
20.Auto
Signal Lamp
21
.Ready/Test
(Open
F
lash)
Button
22.O.uick-Release
B utton/
Lock
R
i ng
23. Camera Mounting
Bracket
20.Camera Retain
ing
Screw
25.F lash
Synchro
Cord
26. Battery Holder
27
.F
ilter Holder
\
4
Page 6
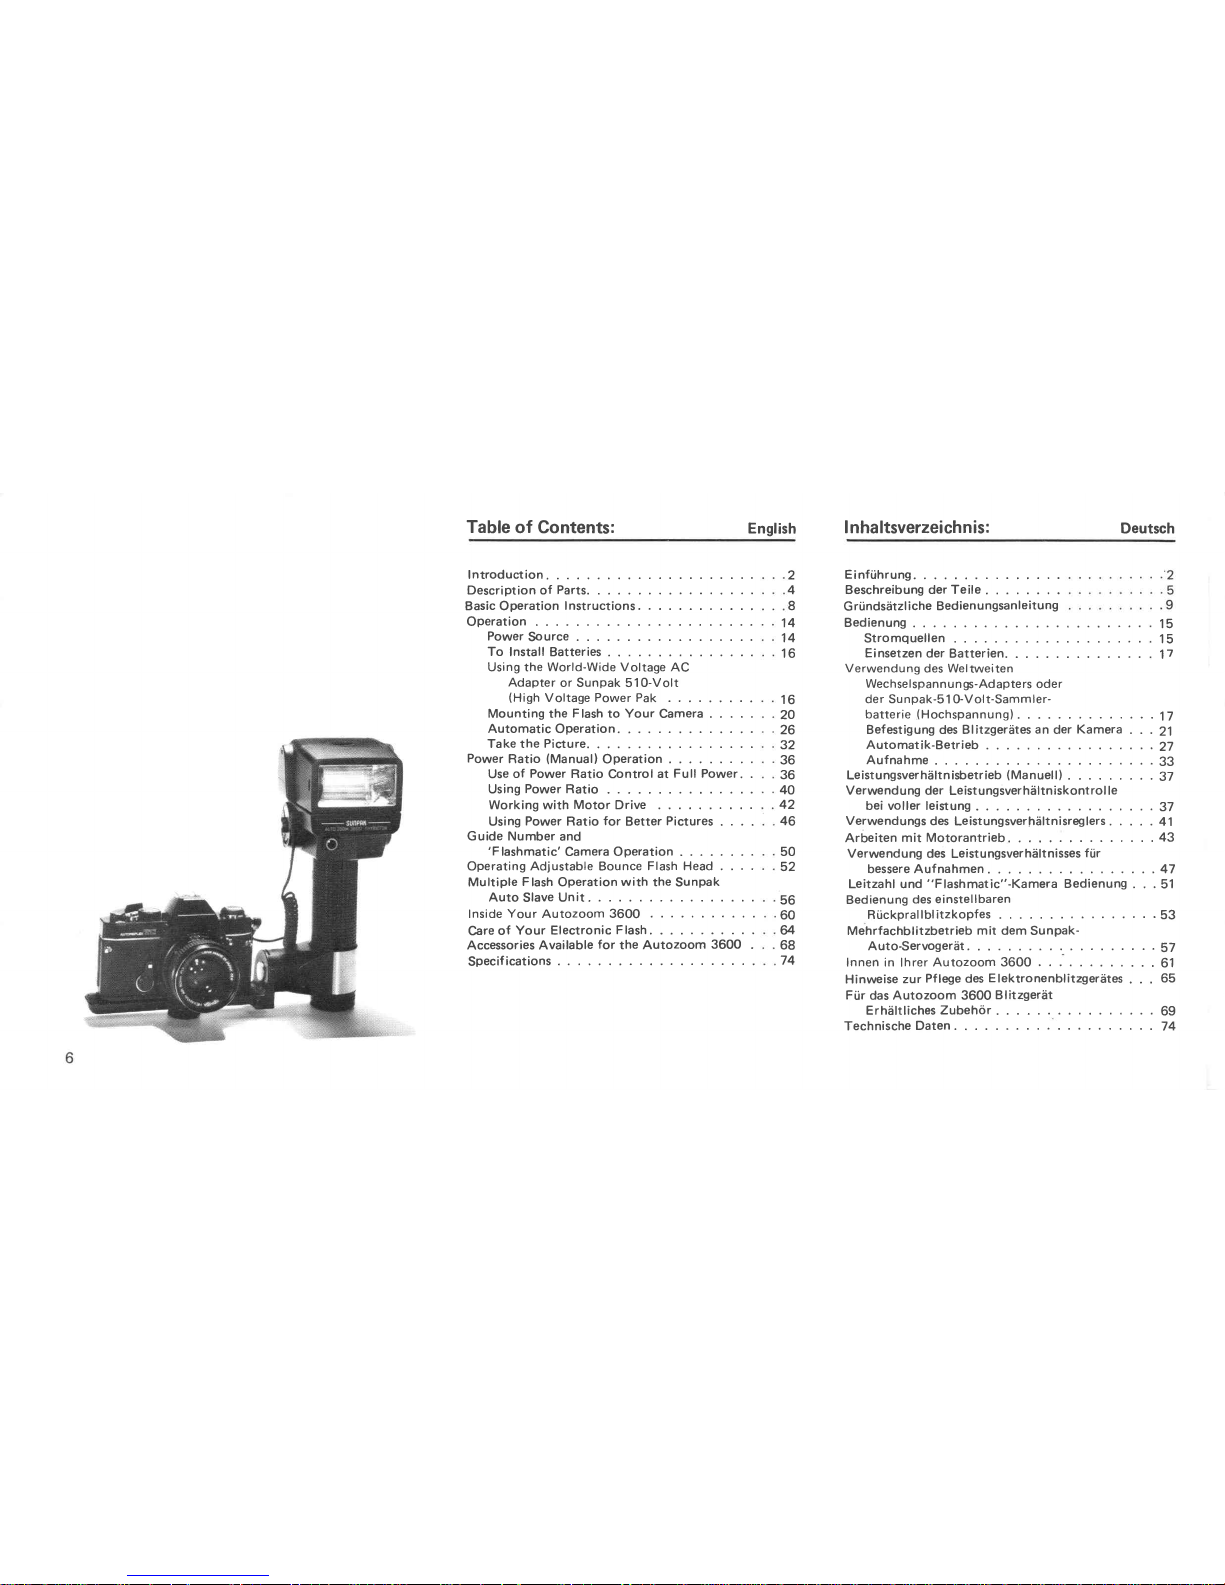
Table
of
Contents:
Introduction.
Description of
Parts
Basic Operation
Instructions.
Operation
Power
Source
To
lnstall Batteries
Using the
World-Wide Voltage
AC
Adapter
or Sunpak
51O-Volt
(High
Voltage
Power
Pak
Mounting
the
Flash
to
Your
Camera
.
Automatic
Operation.
Take the
Picture.
Power
Ratio
(Manuall
Operation
Use
of
Power
Ratio
Control
at
Full Power.
Using
Power Ratio
Working with
Motor
Drive
Using
Power
Ratio
for
Better
Pictures
Guide Number
and
'Flashmatic'
Camera Operation .
Operating Adjustable Bounce
Flash Head
Multiple
Flash
Operation
with
the
Sunpak
Auto
Slave
Unit.
Inside
Your
Autozoom 3600
Care
of
Your Electronic
Flash
Accessories
Available
for
the Autozoom
3600
Specifications
.
English
Inha ltsverzeichn is:
Deutsch
2
4
8
14
14
16
50
52
56
60
u
68
74
Einftihrung.
. .
Beschreibung
oe.i"il!
: :
: : : : . .
G
ri.inds6tzl iche Bedienungsanleitung
Bedienung
.
Stromquellen
Ei nsetzen
der Batterien.
Verwendung
des Wel
tweiten
Wechselspannu n
gs-Adapters
oder
der Su
npak-5
1 O-Vol
t-Sammler-
batterie ( Hochspannung)
Befestigung des Blitzgerdtes
an
der
Kamera
Automatik-Betrieb
Aufnahme
Leistungsverhiiltn isbetrieb
(
Ma n
uel
|
)
Verwend u ng
der Leist u ngsver
h6ltn iskont
rol
le
bei voller leistung
Verwendungs
des
Leistungsverhdltnisreglers
Arbeiten
mit Motorantrieb
Verwendung
des Leistungsverhiiltnisses
fiir
bessere Aufnahmen.
Leitzahl und
"Flashmatic"-Kamera
Bedienung
.
Bedienung
des
einstel
lbaren
R iickpral I bl
itzkopfes
Mehrfachblitzbetrieb
mit
dem Sunpak-
Auto-Servogerdt
Innen in
lhrer
Autozoom 3600
Hinweise
zur
Pflege des
E
lektronenblitzger6tes
Fi.ir
das Autozoom 3600
Blitzgerdt
ErhSltliches
Zubehor
.
Technische
Daten
15
15
17
16
20
26
32
36
36
40
42
46
.17
.21
.27
.33
.37
.37
.41
.43
.47
.51
.53
.57
.61
.65
.69
.74
Page 7
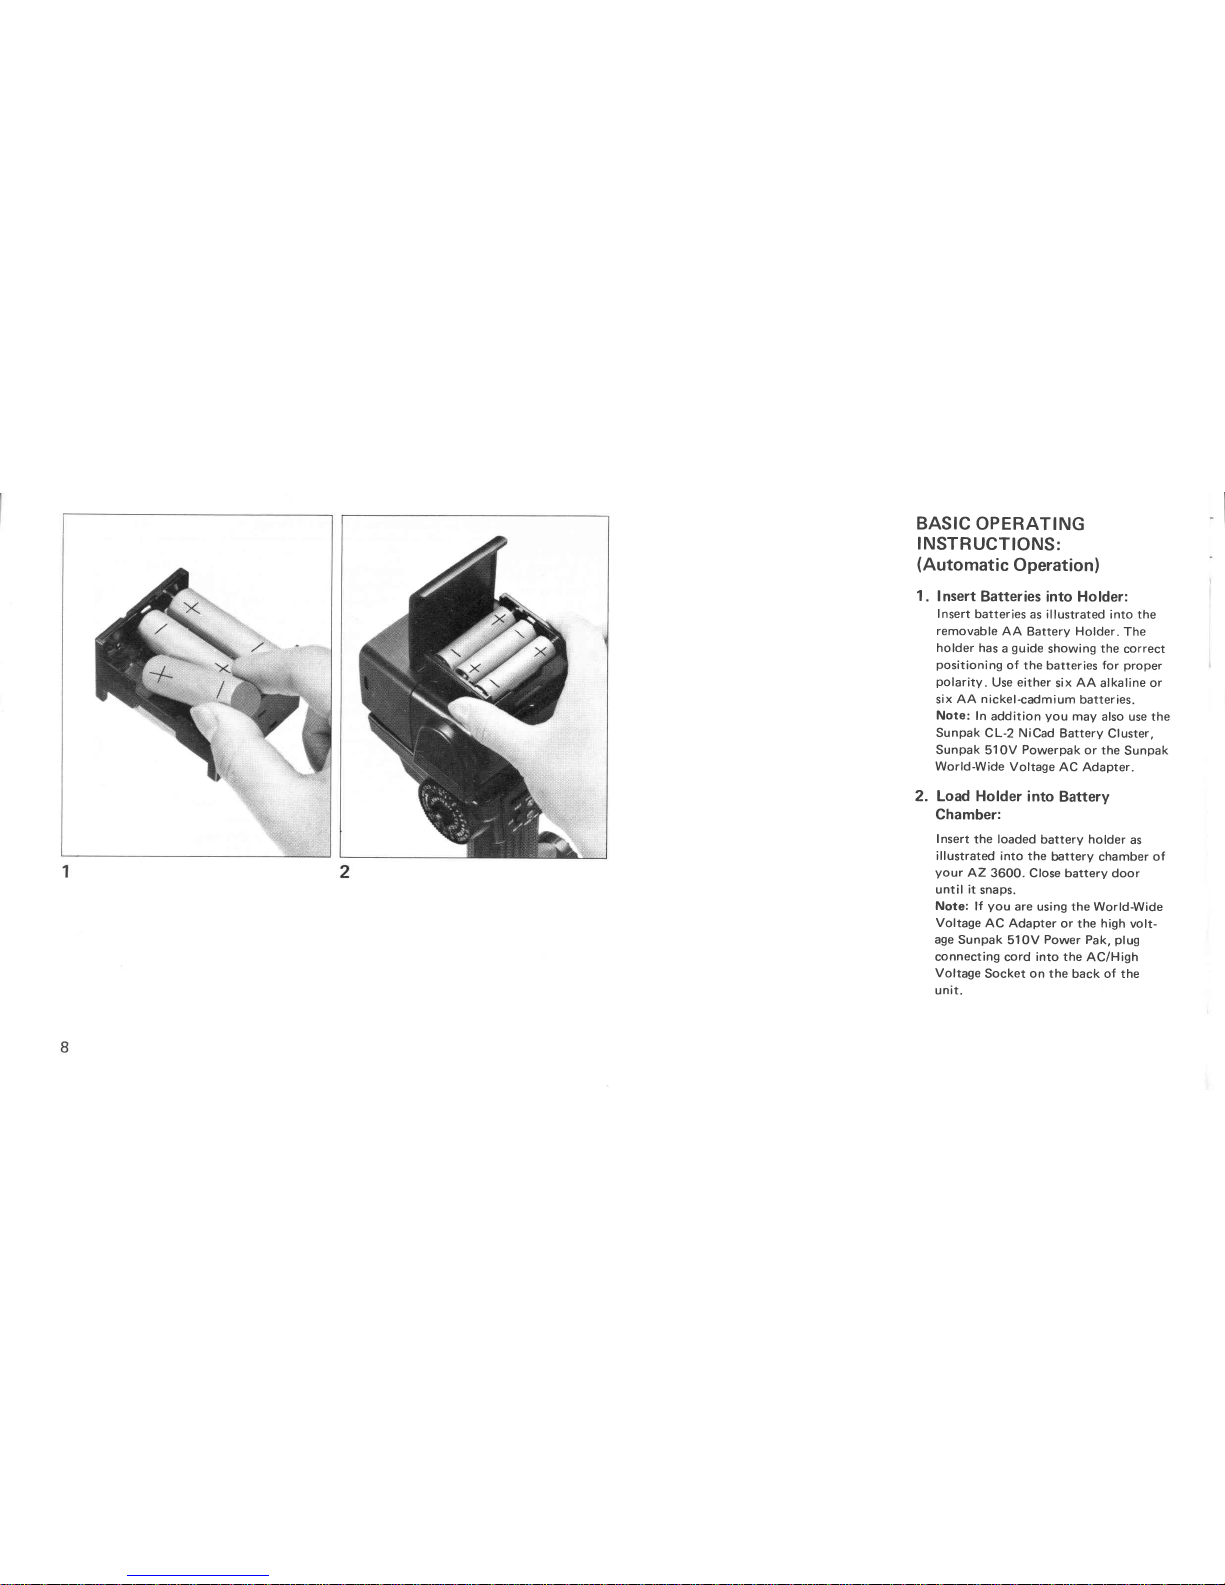
BASIC
OPERATING
INSTRUCTIONS:
(Automatic
Operation)
1.
Insert
Batteries
into Holder:
Insert
batteries
as illustrated
into the
removable
AA
Battery
Holder.
The
holder
has
a
guide
showing
the
correct
positioning
of
the
batteries
for
proper
polarity.
Use
either
six
AA
alkaline or
six
AA
nickel-cadmium
batteries.
Note:
In
addition
you
may
also
use
the
Sunpak CL-2 NiCad
Battery
Cluster,
Sunpak
510V
Powerpak
or the
Sunpak
World-Wide
Voltage
AC Adapter.
2. Load Holder
into
Battery
Chamber:
Insert
the loaded
battery holder
as
illustrated
into the
battery chamber
of
your
AZ
3600. Close battery
door
until
it
snaps.
Note:
lf
you
are using the World-Wide
Voltage
AC Adapter
or the
high
volt-
age
Sunpak
51OV
Power
Pak,
plug
connecting
cord
into the
AC/High
Voltage
Socket
on the
back of the
unit.
Page 8
3
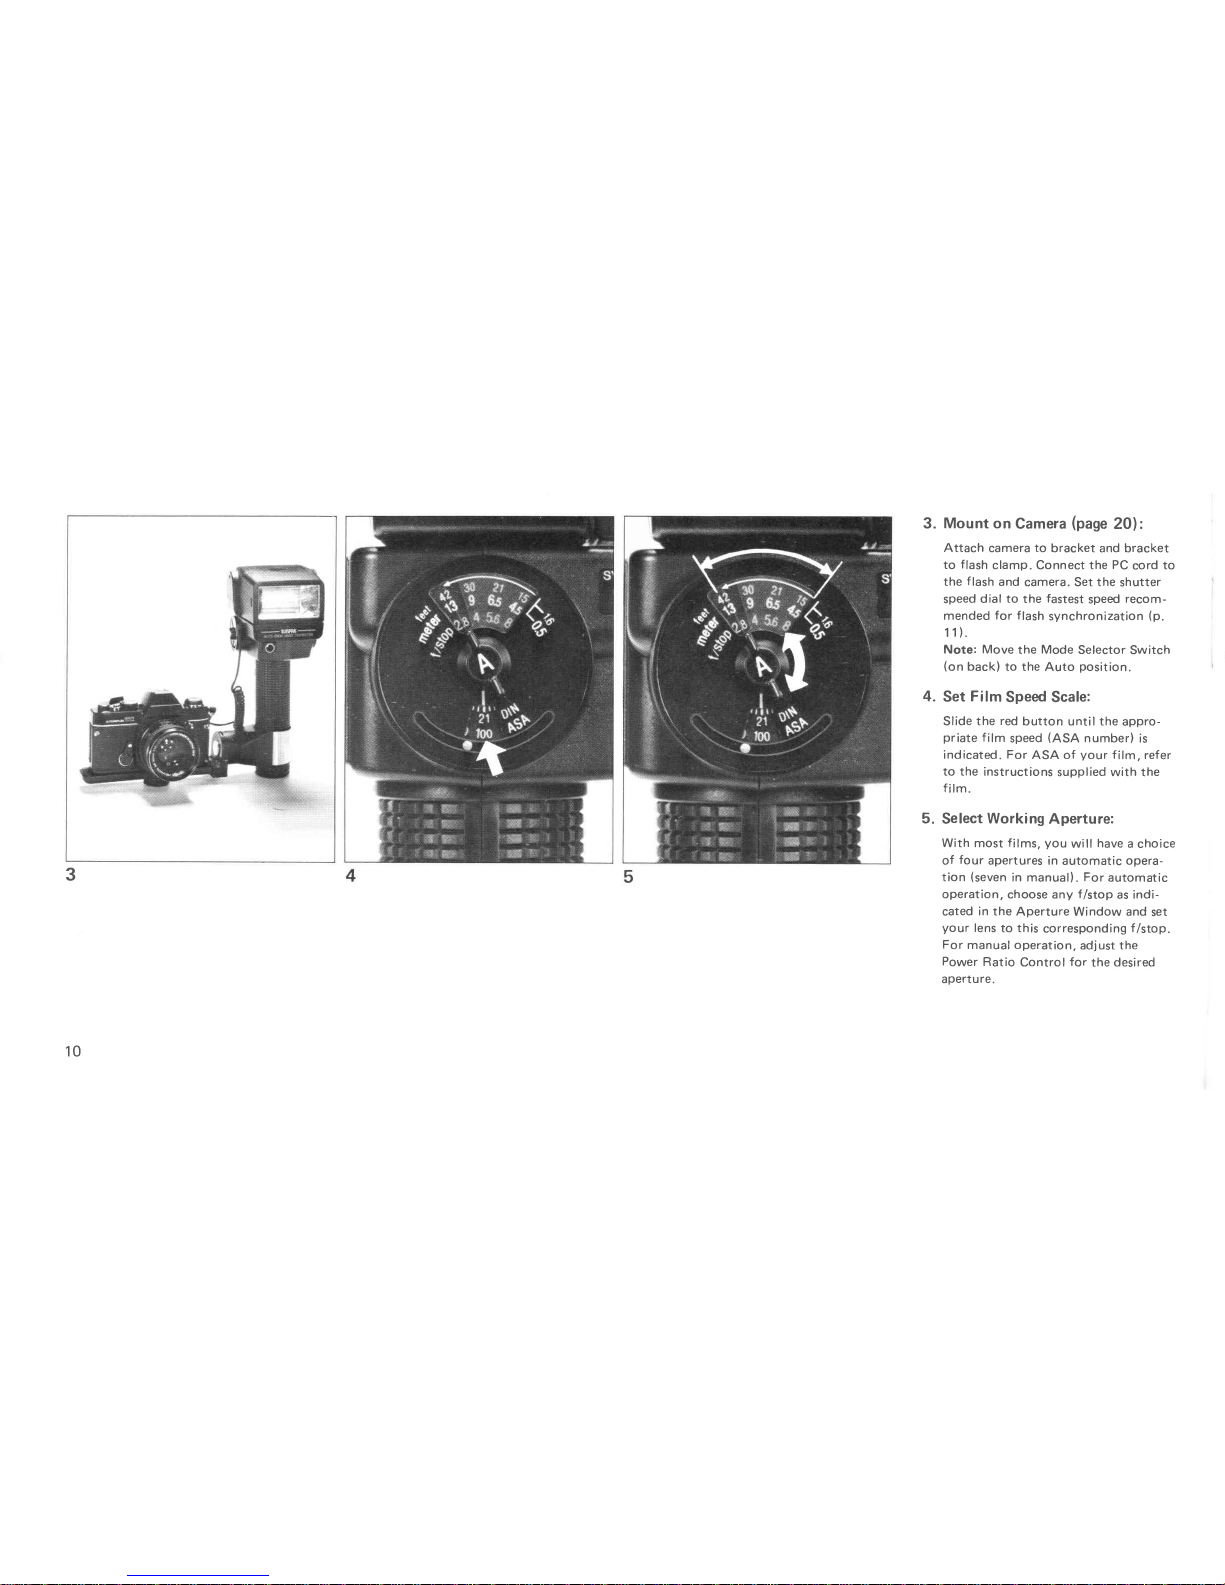
3.
Mount
on
Camera
(page
2Oll.
Attach
camera
to
bracket
and bracket
to
flash
clamp.
Connect
the
PC
cord
to
the
f
lash
and
camera. Set the
shutter
speed
dial
to
the
fastest
speed
recom-
mended
for flash
synchronization
(p.
11).
Note: Move
the
Mode
Selector Switch
(on
back)
to the Auto
position.
4.
Set
Film
Speed Scale:
Slide
the
red
button until the
appro-
priate
film
speed
(ASA
number)
is
indicated.
For
ASA of
your
f
ilm,
refer
to the instructions
supplied with the
f
ilm.
5.
Select
Working
Aperture:
With most
films,
you
will
have
a
choice
of
four
apertures in
automatic
opera-
tion
(seven
in manual).
For
automatic
operation,
choose any
f/stop
as indi-
cated
in the
Aperture
Window
and
set
your
lens
to this
corresponding
f/stop.
For
manual operation,
adjust the
Power
Ratio
Control
for
the
desired
aperture.
10
Page 9
7
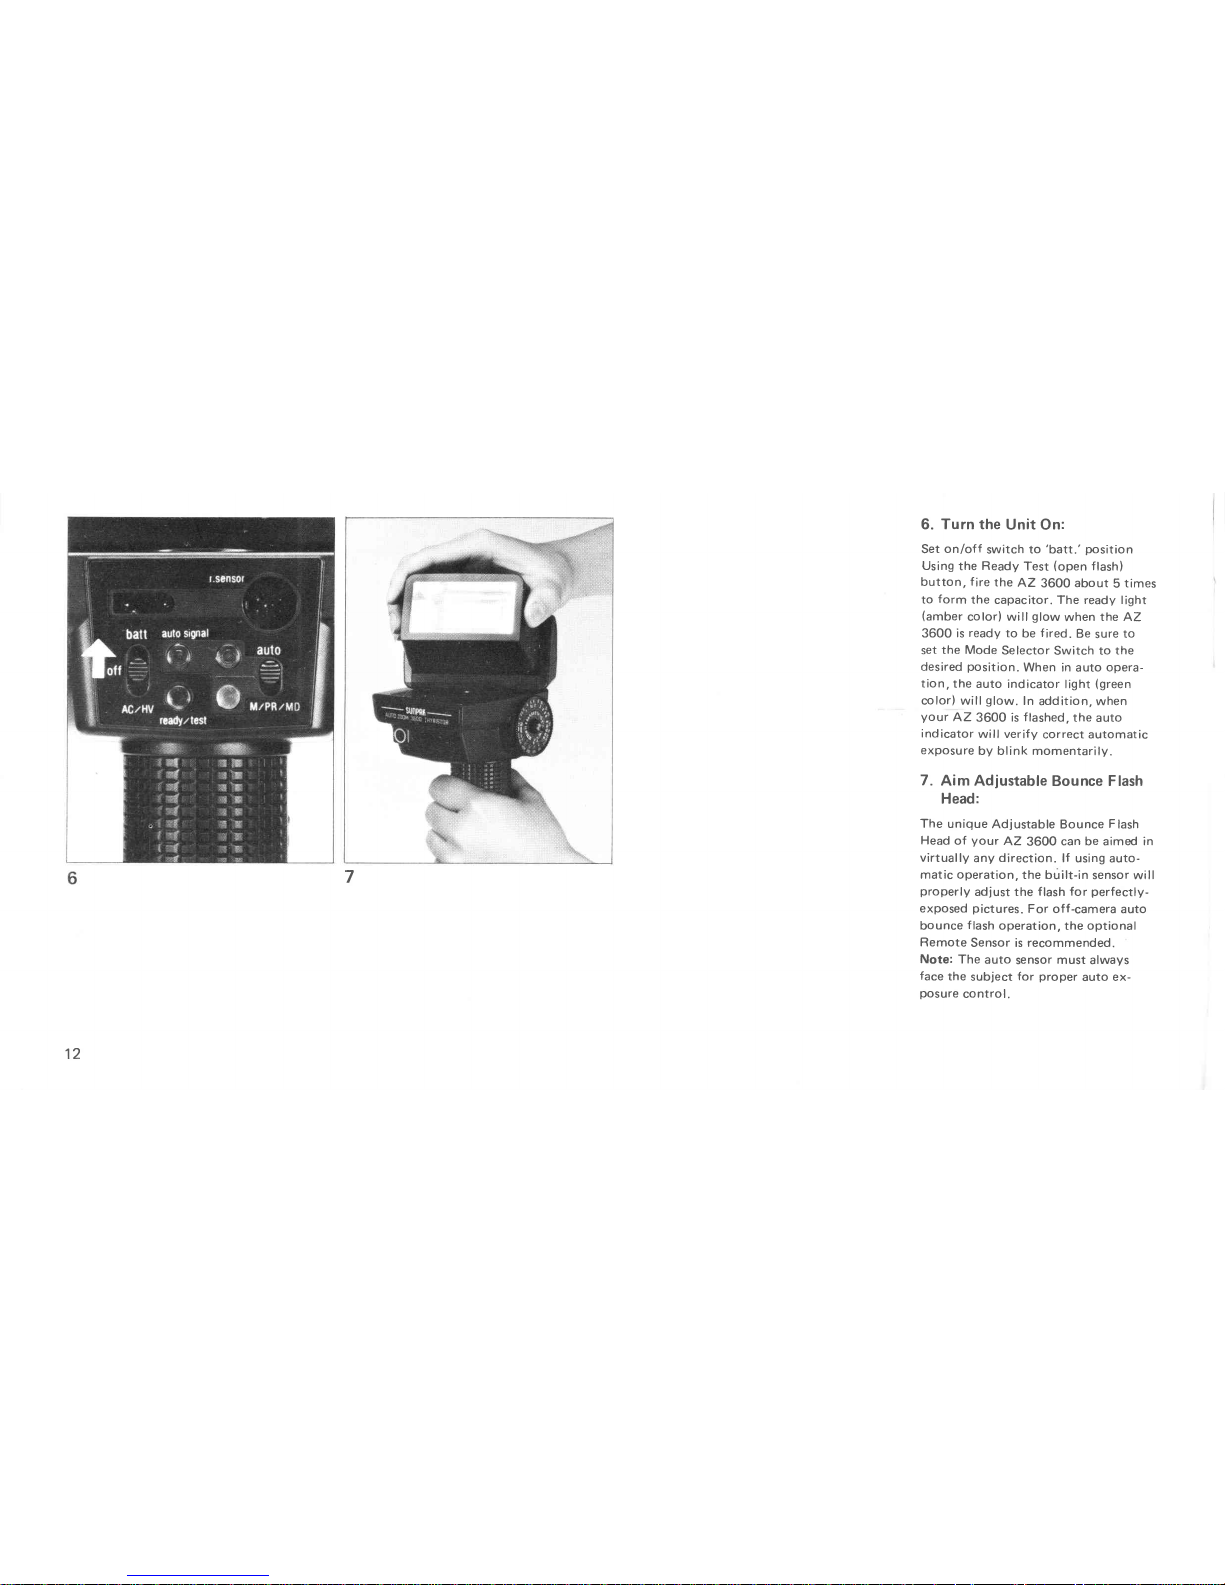
6.
Turn the
Unit On:
Set
on/off
switch
to
'batt.'
position
Using
the
Ready
Test
(open
flash)
button,
f
ire the
AZ
3600
about
5
times
to
form
the
capacitor. The ready light
(amber
color) willglow
when
the AZ
3600
is
ready
to
be
f
ired. Be
sure
to
set
the Mode
Selector
Switch to
the
desired
position.
When in
auto
opera-
tion,
the
auto indicator
light
(green
color) will
glow.
In
addition, when
your
AZ
3600
is f lashed,
the
auto
indicator
will verif
y
correct automatic
exposure
by blink momentarily.
7.
A,m Adjustable
Bounce Flash
Head:
The
unique
Adjustable
Bounce
Flash
Head
of
your
AZ
3600
can be aimed
in
virtually
any
direction.
lf
using auto-
matic operation,
the built-in
sensor will
properly
adjust the
f
lash
for
perfectly-
exposed
pictures.
For
off-camera auto
bounce
f
lash
operation,
the
optional
Remote
Sensor is
recommended.
Note:
The
auto
sensor
must
always
face
the
subject
for
proper
auto
ex-
posure
control.
12
Page 10

Alkaline
or
Nickel-Cadmium
Batteries?
The
major
advantage of alkaline
batteries
is
that they
provide
more
flashes
per
set.
While nickel-cadmium batteries
will
provide
fewer flashes
per
set, they will
recycle
your
AZ
3600
slightly
faster
and
can
be recharged hundreds
of times
for
more
economical operation
over
the
long run.
Alkali- oder
Nickel-Cadmium-
Batter
ien
?
Der Hauptvorteil
von
Alkali-Batterien
besteht
darin,
daB sie
eine
groBere
Anzahl
von
Blitzen liefern.
Obwohl Nickel-
Cadmium-Batterien
weniger
Blitze liefern,
bewirken
sie eine etwas
schnellere
Blitz-
folge
und
lassen
sich
von
Malen
wie-
deraufladen.
Dadurch
wird
auf
die
Dauer
ein
wirtschaftlicherer
Betrieb
des Sunpak
AZ
3600
Blitzgerdtes erzielt.
cPilas alcalinas
o de niquel-
cadmio?
La
principal
ventaja
de las
alcalinas
radica
en
que
dan mayor n0mero
de destellos
por
unidad
que
las de niquel-cadmio,
pero
6stas
recargan
algo m6s
r5pidamente
el
AZ
3600,
puditindose
recargar
cientos de veces
para
un funcionamiento
m5s econ6mico a largo
plazo.
Piles
alcalines
ou
nickel-
cadmium?
L'avantage
majeur
des
piles
alcalines est
qu'elles
permettent
plus
d'6clairs
par
jeu.
Toutefois,
si
les
piles
au
nickel-cadmium
donnent
moins d'6clairs,
elles
ont
l'avantage
de recharger
votre AZ
3600
l6gdrement
plus
vite
et, du
fait
qu'elles
peuvent
€tre
recharg6es
des
centaines de
fois,
elles
permettent
un
fonctionnement
plus
6conomique d long
terme.
1)
To Install
Batteries:
1. Open
the
battery
door
as illustrated
and
remove
battery
holder.
2.
lnstall batteries
as illustrated
in the
holder. Be
sure
to
observe
correct
polarity
or
you
may
cause
damage
to
your
AZ
3600.
3. Replace Battery
Holder
in
your
AZ
3600.
Extra
Battery
Holders
may be
purchased
for
times when
rapid
re-
placement
of batteries is
necessary.
Note:
The
Battery
Holder has
been
designed to f it
your
AZ
3600
so
as to
assure
proper
use. Do not
force
since
it
will
f
it in only the
proper position.
Using
the World-Wide Voltage AC
Adapter
or
Sunpak
51O-Volt
(High
Voltage) Power Pak
1)
For
AC
operation,
be
sure to check
that
the voltage
selector
on
your
World-Wide-
Voltage
AC Adapter is set to
the appro-
priate
voltage
Your
AC Adapter has been
factory
set
for
22OV
For
use
in
other
countries
where 100V.1zOV
and 240V
Den
storsta
fordelen
med
alkaliska
batterier dr att de
ger
fler
blixtar
per
set
batterier.
Nickel-Kadmium
batterier
ger
farre
blixtar
per
set batterier,
men
Steruppladdar Er
AZ 3600 nbgot
snabbare och
kan laddas
om
hundratals
g3nger
for
att
ge
mer
ekonomisk
anvdndning
pb
ldngre likt.
16
Page 11
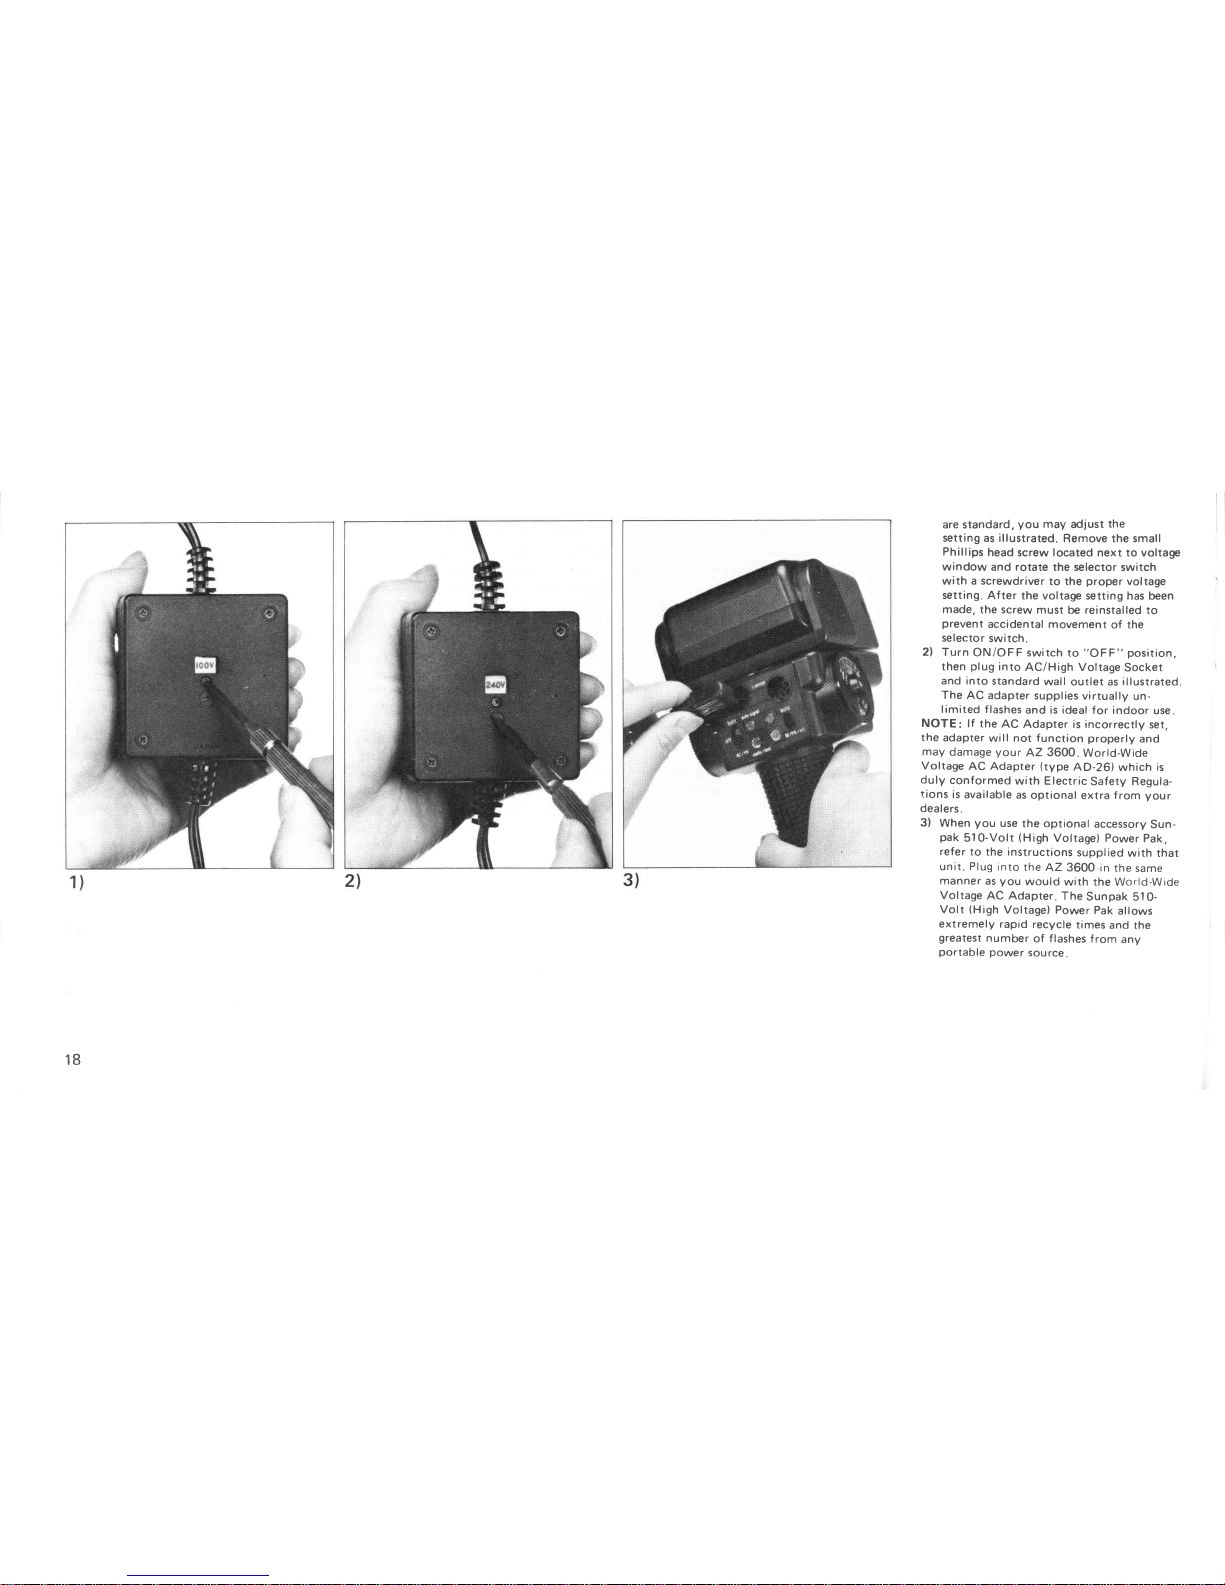
are standard,
you
may
adjust
the
setting
as illustrated.
Remove the
small
Phillips
head
screw located next to voltage
window and rotate
the selector
switch
with a screwdriver
to the
proper
voltage
setting After
the voltage
setting has been
made,
the screw
must be reinstalled
to
prevent
accidental
movement
of
the
selector
switch.
2l
Turn
ON/OFF switch
to
"OFF" position,
then
plug
into
AC/High Voltage
Socket
and into
standard
wall outlet
as
illustrated
The
AC adapter
supplies
virtually
un-
limited f
lashes
and is ideal for
indoor
use
NOTE:
lf the
AC
Adapter is
incorrectly
set,
the
adapter
will not function
properly
and
may
damage
your
AZ
3600.
Wortd-Wide
Vof tage
AC Adapter
(type
AD-261which is
duly
conformed
with Electric
Safety
Regula-
tions
is
available
as optional
extra f rom
your
dealers
3)
When
you
use
the optional
accessory
Sun-
pak
510-Volt
(High
Voltage) Power
Pak,
refer
to the
instructions
supplied
with
that
unit.
Plug
into
the
AZ
3600 in
the same
manner
as
you
would
with the World-Wide
Voltage
AC Adapter.
The
Sunpak
510-
Volt
(High
Voltage) Power
Pak
allows
extremely rapid
recycle
times
and
the
greatest
number
of
flashes
from
any
portable
power
source
18
Page 12
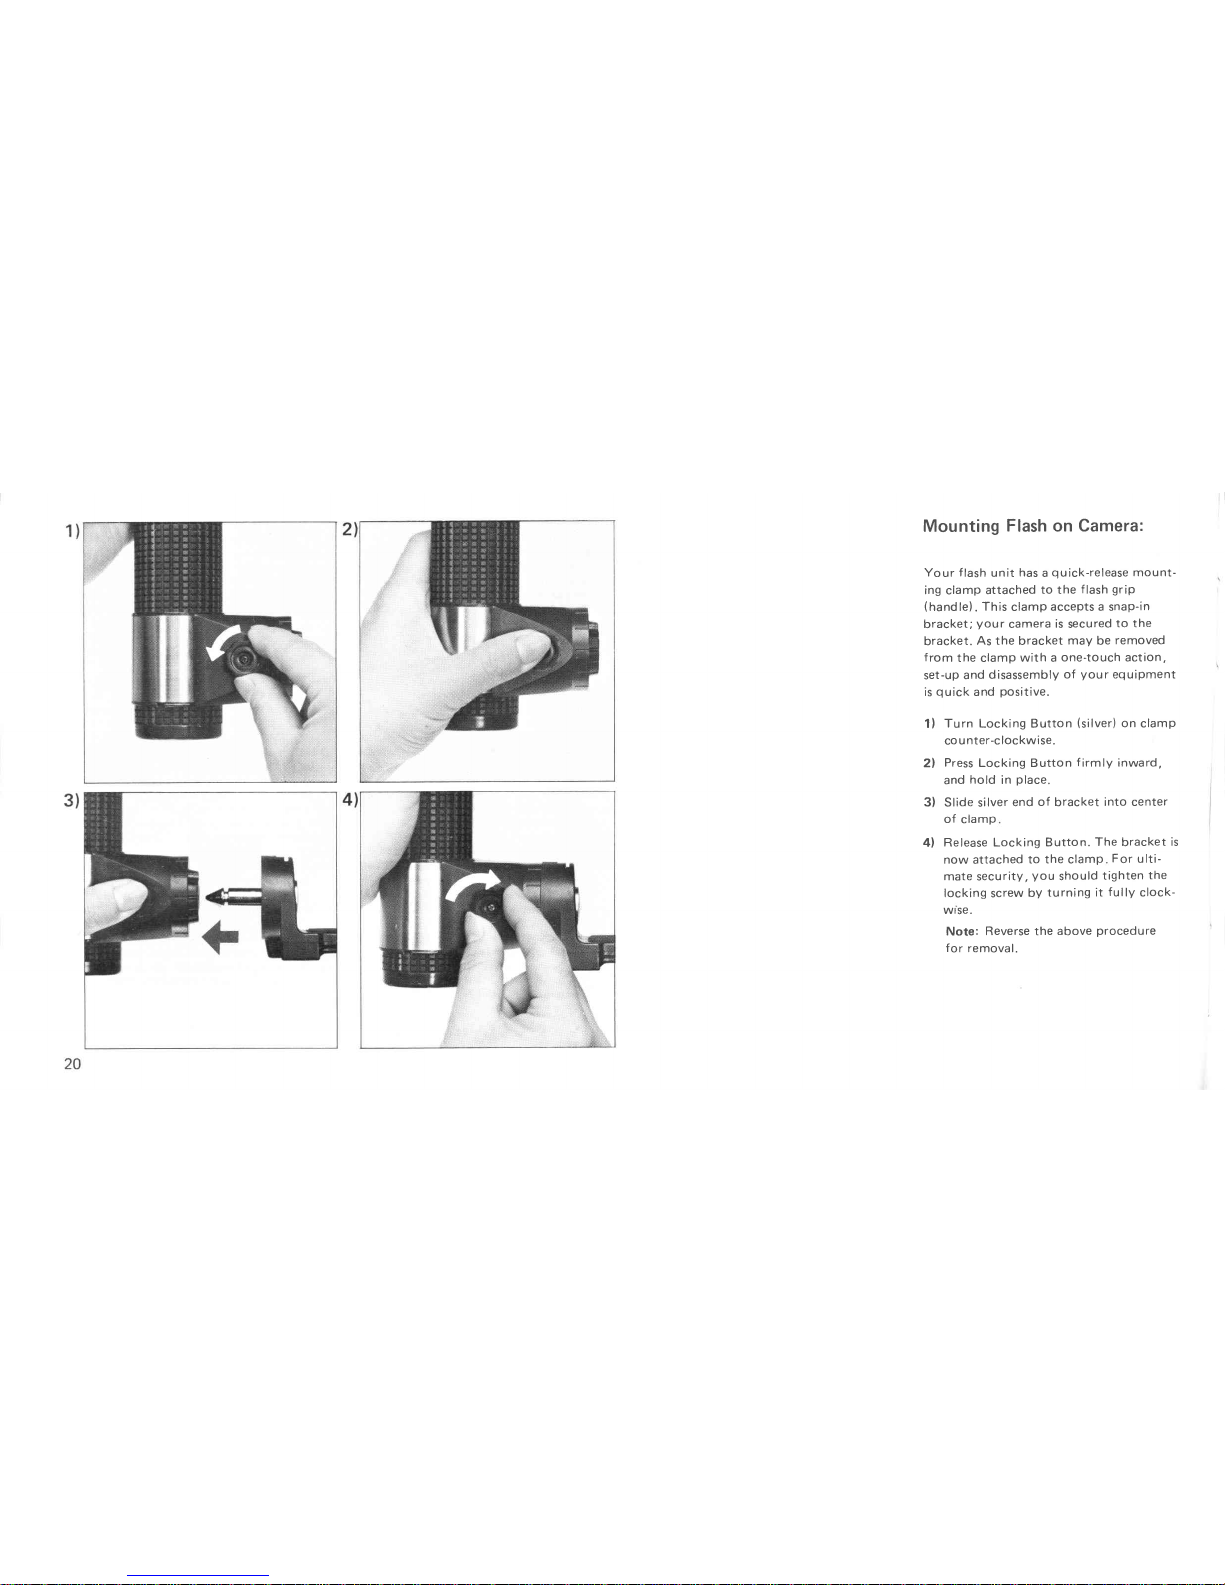
Mounting
Flash
on
Camera:
Your f
lash unit
has
a
quick-release
mount-
ing
clamp
attached
to
the
flash
grip
(handle).
This
clamp
accepts a snap-in
bracket;
your
camera
is
secured
to the
bracket.
As the
bracket
may
be
removed
f
rom
the clamp
with a
one-touch action,
set-up
and
disassembly
of
your
equipment
is
quick
and
positive.
1)
Turn
Locking Button
(silver)
on
clamp
co
u
nter-c lockwise.
2l
Press
Locking Button
f
irmly inward,
and
hold
in
place.
3)
Slide silver
end
of
bracket
into center
of
clamp
4l Release
Locking Button.
The
bracket
is
now attached
to the clamp
For
ulti-
mate security,
you
should
tighten
the
locking
screw
by
turning
it
fully
clock-
wrse.
Note:
Reverse the
above
procedure
for
removal.
Page 13

5l
Press
the Camera Retaining
Screw
through opening
at
end
slot
on
brack-
et,
and
turn
screw clockwise f irmly
until
threaded
portion
of
screw
passes
above
bracket
slot.
Center the
camera
retaining
screw
under
your
camera's
tripod
socket, and tighten
securely.
6l Connect
the Synchro cord to the f lash
synchro outlet
(on
the side of the
f
lash)
and camera's f lash
outlet
as shown.
.
lf the
camera
has
separate
flash
outlets
(terminals)
marked
"M"
and
"X",
attach
Sunpak
cord
to
the
"X"
outlet
(terminal)
.
.
lf
the
camera has
a
switch
(usually
around the
lens
barrel) marked
"M"
and
"X".,
set the
switch to
the
"X"
posrtron.
7l
Set
shutter speed
to
the
fastest
speed
usable
for
electronic f lash
with
your
camera,
provided
that
speed
does not
exceed
1/85Oth.
second. On
single-lens
ref lex
cameras with
focal-plane
shut-
ters, this
speed
is usually
1/60th
or
1l125th;
cameras with in-the-lens
shutters usual ly allow
synchronization
at
speds
up
to the maximum of
22
Page 14

1/850tfr
Do
not
set shutter
to a
speed
faster
than
1/850th
second,
as this
may
cause
under-exposure
when
the
flash
is
used at
maximum
power.
(lf
shutter
has
a
switch
marked
'M'and 'X',
place
at
'X'
position.)
Should
you
desire
to mount
the
f
lash
on
the
right
side
of
your
camera,
or
raise or
lower
the
flash handle
within
the
clamp,
this
may
be
done
by
loosen-
ing the
two
Phillips-head
screws
inside
the
encircling
ring of the
clamp.
Then
reposition
the
encircling
ring
as
de-
sired.
Be
sure
to
tighten
the
screws
again
fully
for
maximum stability
and
correct
lighting
angle.
24
Page 15

Note:
lf
the
ASA/DlN
number for
your
film
is not
printed
on the ASA/DlN
Film
Speed Scale,
use
an
intermediate
marking
as shown.
(See
Psgs
771.
H
inweis:
Falls
die
DIN-Empfindlichkeit
lhres
Films
nicht
auf der
Dl
N-Filmempfindlichkeits-
skala
eingedruckt
sein sollte, verwenden
Sie einen
der
unten angegebenen
Zwischenwerte:
(Siehe
Seite 77).
Note:
Si
le
nombre
ASA
/DlN
de
votre
film
n'est
pas
imprim6
sur
l'6chelle
de
sensibilit6
en
ASA/DlN
du film,
utiliser
une marque
interm6diaire,
comme il
est montr6.
(Voir
page
77!-.
Nota:
Si el
n0mero ASA/DlN de la
pelicula
no
aparece
impreso
en
la
escala
de sensibili-
dades
ASA/DlN
hay
que
utilizar los
siguientes
valores
intermedios:
(Vea
la
pigina77l.
Obs:
Om
det ASA/DlN-vdrde
som
gdller
ftir
Din
film
inte finns
tryckt
p3
rtt av de
mellanlSgen som
visas
hdr nedan.
(Se
sid
77).
Automatic Operation
The
sensitive Silicon
Photo
Transistor of
your
AZ
3600
Sensor
measures the light
ref
lected by
your
subject
and automatical-
ly
controls
the f lash
duration to
assure
@rrect
exposure within a wide
range
of
distances.
lt's
easy to use:
1)
Move Mode
Selector
on back
of
flash
to
'Auto',position.
2l Rotate
red
button
of Auto
Exposure
Dial until the desired
ASA
f
ilm
speed
is
shown.
(Example:
ASA 1
O0)
3l
Rotate Auto
f/stop
Selector
Knob
until
desired
lens
opening is
corre-
sponding
with
the
thin white
line.
Set
camera
lens to this opening
(f
/numberl.
(Example:
F/Set
2.8)
Note:
At this
F/stop
setting
your
Auto
working
distance
is
0.5m
to 12.8m
(1.6'
to 42'1.
*
You
will note that
you
may
select
any
lens opening
within a 4-stop
range. For
example,
with ASA10O f ilm openings
from f
/2.8
to
f/8
may
be used.
By
using a wider
lens
opening
you gain
the
ability of taking
pictures
at
the
greatest
Page 16

distance - up
to 12.8m |'42'l at
maxi-
mum aperture.
Choosing a smaller
lens
opening
reduces the maximum
distance
range, and
increases
depthof-f ield
or
the'zone' of
overall
sharpness.
You
may
even
set
this control
to an inter-
mediate
or
fractional
lens
opening
(such
as
f
14.5
or
f/6.31
to match
the
maximum
aperture
of a
particular
lens.
or
for
any
desired
reason.
*The
minimum
distance
for
correct
automatic
exposure is
O.5m
(1
.6'l
.
regardless
of the lens
opening in use.
*An
interesting benef
it of
your
flash's
energy-saving
(Thyristor)
circuitry
is
that by shooting
at the widest
possible
lens opening
{f/2.8
with ASA10O
film)
you
not only obtain the
greatest
dis-
tance
range
but also
the
greatest
number of
flashes,
and
fastest recycling
times, in
normal operation.
Reason: At a
given
distance,
less
energy
is
required to light
a subject
at
f
l2.8than
at
smaller
apertures
(f/5.6
-
il22t.
l
L
Maximum Distance
Range:
Q.5-12.8m11.6'-42'at
maximum
aperture
(f/2.8
with
ASA 1OO film).
Maximaler-Entfernungsbereich:0.5-12.8m
bei
Maximaler
Blendenoffnung
(1:2,8
mit
DIN 21-Film).
Grande
port6e
de distance: O,5-12,8m11,6'-42'avec
l'ouverture la
plus
gande
(f
12,8
avec
un film
100
ASA).
M6xima extensi6n de
distancia: O,5-12,8m1
1,6'-42' con
m5xima
aberutura
(112,8
con
pel
icula
ASA 100),
Maximal
avstgndsomrede:
0,5-12,8m
vid
maximal linscippning
ff12,8med
ASA100/
DIN
21
film).
Page 17

*Smalf
er lens openings
lf 18
-
f
l22l
pro-
vide
greater
'depthof-f
ield' within
their usable distance
range
(to
4.5m/
15'at minimum
aperture). Choose
them when
you're
taking
pictures
of
children
or
sporting
events,
where it's
hard to
stay in
focus
because the sub-
lects
are
usually
moving. By shooting
at smaf
ler lens openings
ff18
-
Il22l
you'll generally get
sharper
pictures
of
moving
subjects.
This is also handy in
dim
light or
with wide angle lenses,
when
precise
focusing
is
somewhat
harder
than
normal.
Minimum Distance Range:
0.5-4.5m/1.6'-15'
at
minimum
aperture
(f/
8 with
ASA
100
film).
Minimaler-Entfernungsbereich:
0,5-4,5m
bei Minimaler
Blendenoffnung
(1:8
mit
DIN 21-Film).
Petite
port6e
de distance:
O,5-4,5m11,6'_15'avec l'ouverture la
plus petite
(f/8
avec un
film
100 ASA).
Minima
extensi6n
de distancia:
OF-4,5m11,6'-15' con
mfnima
aberutura
(f/8
con
pelicula
ASA 100).
Minsta avst3ndsomrtde:
0,5-4,5m
vid minsta linscippning
(f/8
med ASA 1OO/DlN
21
film).
30
Page 18

Take
the
Picture
It's easy-just
follow
these
steps:
1l Move
the On/Off Switch on f lash to
appropriate
position
for
power
source
in use.
2l
You'll
notice
the
Auto
Mode
Indicator
on back of
flash
will
glow.
This
con-
f
irms that
your
flash
is
ready
for
automatic operation.
3l
Within
seconds the
Ready' Lamp
will
also
glow.
When the
capacitor is
fully
charged, the
Ready Lamp
will start
to
pulsate.
Now,
focus
and . . .
Take the
Picture! Your f
lash
will automatically
deliver
the
correct amount
of light
for
correct
exoosure
within the distance
range indicated.
{
32
Page 19

Take the
Picture
It's easy-just
follow
these
steps:
1l
Move the
On/Off Switch
on
flash
to
appropriate
position
for
power
source
In use.
2l
You'll
notice the Auto
Mode
Indicator
on
back of
flash
will
glow.
This
con-
firms
tha't
your
flash
is
ready
for
automatic
operation.
3)
Within
seconds the
Ready' Lamp
will
also
glow.
When
the
capacitor
is
fully
charged,
the
Ready Lamp will
start
to
pulsate.
Now,
focus
and . . .
Take the
Picture! Your flash
will automatically
deliver the
correct
amount
of
light
for
correct
exposure
within
the distance
range indicated.
32
Page 20

For
Succeeding
Exposures
. .
.
Just
wait until
the Ready
Lamp
starts
to
pulsate,
make
sure
you're
within
the
usable distance
range
for
the
lens opening
inuse...andshoot!
To Verify
Correct
Exposure
Aim the f lash towards the
subject
and
press
the
'Test'
(Ready/Test)
button.
The
f
lash will
fire
and,
immediately, the Auto
Signal
Lamp
will
glow
and then
fade
out;
when this occurs,
the
automatic
exposure
will
be'correct.
lf the Auto
Signal
Lamp
does
not
gJow,
choose
a wider
lens open-
ing, or
move
closer to
your
subject
and
repeat the verif
ication test. lt's
a simple,
highly
accurate
way
of
conf
irming that
your picture
will be
perfectly
exposed
before
you
take the
picture.
34
Page 21

POWER
RATIO
(MANUAL)
OPERATION
With
the
unique
Power
Ratio
Control
on
your
AZ
3600,
VoU
can adjust
the light
output
so
your
camera
can
be used over
a
seven
stop
range, from
full
to 1/64
power.
This
feature
gives you
greater
depthof-
f
ield
control, ability to
control
battery life
and
recycle
times,
precise
f
ill-in
flash
capability
and the ability to
control
flash
duration.
Use of
Power
Ratio
Control at
Full Power:
1.
Set
the
Mode
Selector
Switch
to
the
M/PR/MD
setting.
2. Set the f ilm
Speed Scale to the
desired
ASA
setting.
3.
Adjust
the
Power
Ratio
Control
to
Full
power.
36
Page 22

4.
You
may
determine the
proper
f/stop
by
matching
the aperture
and
distance
scales
on
your
calcufator
dial. The dis-
tance
scale
refers
to the f lash-to-subject
distance, not
the camera-to-subject
distance,
so be sure to
measure
flash-
to-subject when
you
are
using
the
AZ
3600
for
remote lighting.
(Example:
At
3.3m/10'
use
f
/1
1 with ASA
100
f
ilm.)
Note:
On
your
Power
Ratio
Control Dial,
Film
Speed
Adjustment Indexes
are
marked
in Blue
and
Red
beside
to White
dot.
Set ASA
speed
to
correct
mark when Tele
or Wide accessory is used.
o
Wide
Red
mark: Wide
angle
dif
fuser
"21mm".
o
Thin Red
mark: Wide
angle
diffuser
"28mm".
Wide Blue mark:
Tele-Ki1"f
-1"
fsl
135mm lenses.
Thin
Blue mark: Tele-Kit
"T-1 " tor
85mm
lenses.
t
I
j
I
t
38
Page 23

Using
Power Ratio
1. When
using the
Power
Ratio
at
Full
power,
set
the
Film
Speed Scale
to
the
desired ASA rating and be sure
the
Mode
Selector
Switch
at
the
M/PR/MD
sett
ing.
2.
Determine the
f
lash-to-the
subject
dis-
tance.
When the
AZ
3600
is
mounted
to
the
camera,
you
can
easily do
so
by
focusing
your
camera's
lens
and
read-
ing the
distance
indicated
by the
distance
scale
on the lens.
3.
Turn the
Power
Ratio
Controldial
until
you
have
the
desired
f/stop
oppo-
site
this
distance.
{t
Note: In
addition
to
Full,
112,114,
118,1
116,
1132,
1164
vou
may
also
set
intermediate
positions
as indicated
by
small
white
dots.
4. Be
sure
the distance
scale
shows
there
is the
proper
amount
of light
for
a cor-
rect exposure of
your
subject.
lf not,
increase
or decrease
the
power
as
needed.
Page 24

You
are
now
ready
to
take
Your
picture.
Remember
to
adjust
the
aperture
on
Your
lens
to
match
the
aperture
indicated
on the
calculator
dial.
Working
with
Motor
Drive:
The
MD setting
on
Your
SunPak's
AZ
3600
flash
has been
designed
for
use
with
the
new
Power/Auto
Wind
cameras
availa'
ble
today.
With
Sunpak
unique
Power
Ratio
Control,
you
now
have
the
ability
to
greatly
increase
your
picture-taking
range abilities.
1. Set
the
mode
selector
switch
to
the
M/PR/MD
setting'
2.
Set
the
Film Speed
Scale
to
the
desired
ASA setting.
42
Page 25

When
the unit
is'on'
and the Power
Ratio
Dial is
set
at
either
1132
or 1164
power,
you
are
in
the'MD' mode
(marked
in
yellow).
Note:
When
1132
or 1/64
power
is
set, the
yellow'MD'
mode
indicator
lamp
will
glow.
With
your
Power
Wind
or
Auto
Wind
camera,
the
Sunpak AZ
3600 will re-
cycle
as
fast
as
4
f
rames
per
second.
Note:
Alkaline
batteries
are
not
recom-
mended for
MD
operation.
Nickel
Cadmium batteries
or 51OV Power
Pak
will
provide
the
best
results,
44
Page 26

Depth
of
Field
Schdrfentiefe
Profondeur
de chanrp
Profundidad
de campo
Djupskdrpa
46
Examples:
Beispiele:
Exemples:
Ejemplos:
Exempel:
Precise Fill-ln Flash
Genausdosierter
Aufhel lbl itz
Eclair
d'appoint
pr6cis
Flash
preciso
para
luz
de relleno
Exakt
ifyllnadsblixt
Using
Power
Ratio for
Better
Pictures
Depth
of Field
Note
that the
above
picture
has
great
depth
of
f ield
(the
background
and the
subject are
in
focus)
and the
below
picture
has little
depth
of
f
ield
(the
subject is in
foucs
but the
background is not).
Because of the versatility
of
your
Power
Ratio
control,
you
have
a choice
of up to
six
different
apertures
for
maximum
control
of
depth of f ield.
You
can use this
control to
make
pictures
the way
you
want.
Examples:
When
photographing
still
life, more
depth-
of
-field
is
often required.
Use the higher
power
settings and
smaller
lens
openings
for
best
resu
lts.
For
portraits,
use
the lower
power
settings
and
larger lens
openings
to
get
less
depth of
f
ield.
Precise Fill-ln
Flash
The major
advantage
of
f
ill-in f lash is
that
it
renders
attractive outdoor
portraits
because
it eliminates
harsh
shadows. Simply set
your
camera's
aperture
according to the meter
reading
for
the
background. Next
set
your
Power
Ratio
to that
aperture
opposite
the
Page 27

actual
f
lash-to-sublect distance.
Be
sure
to
use
a
shutter
speed
that
will
synchronize
with
electronic f lash.
The above
picture
was taken
without
f
ill-in
flash. The
below
picture
was taken with
f ill-in
f
lash. Note how much
more
pleasing
the
below
one
rs.
Freezing
Action
Your
AZ
3600
can
f reeze
almost
any
action at f ull
power
with
a
f
lash
speed
of
just
1/850tfr
second
For
even
briefer
f
lash duration, which
will
allow
f
reezing of
the
fastest
action,
you
can use
the
Power
Ratio's
lower
settings
to obtain speeds
as
fast
as
l
l2O,OOOth
second.
See
chart below
Freezing
Action
"Einf
rieren" von
Bewegungen
Action
de
"geler"
Congelamiento de acci6n
Frysning
av
rorelse
Working With Motor
Drive
Arbeiten
mit Motorantrieb
Fonctionnement
avec
le moteur d'entrainement
Trabajando
con
accionamiento
por
motor
Brukande av
Motor Drive
Leistungsverhbltnis
Rapport
de
puissance
Razon
de
Potencia
Styrkef
orh8ltande
Power
Ratio
Ful
I 1t2 114
118
1116
1132
1t64
A:
Blttzdauer
Durde
de
l'6clair
Duracion
del
flas
Blixtl6ngd
Flash
Diration
1/850 1 /1 300 112800
1/5000
1/8000
1
/1
3000
1t20000
48
Page 28

Guide Numbers
of
Your
Autozoom 3600
Leitzahlen lhres Autozoom
3600
Nombre-guide de votre
Autozoom
3600
Guide
Number
-.
-
=
Ursiances
t/stop
Leitzahl
Ble"de
=
Enrrernungen
50
Ntmeros
guia
de su
Autozoom 3600
Guidenummerlista
till
Er Autozoom 3600
Guidenummer
=
Avst6ndet
f/stopp
Nombre-ouide
--=---
=
dtstances
clraph
ragme
N0mero
qu
ie
----:-:-=L]|stanc|as.
Abertu ra
Guide Number and
"
Flashmatic"
Camera Operation :
A
"Guide
Number" is
simply a number
expressing the
power
of a f lash unit in
relation
to the sensitivity
(film
speed) of the film in use. In
use, the
photographer
divides the
flash-to-subiect
distance into
the
Guide
Number.
and
the
result is the
f/stop
for
correct exposure.
Normally, refergnce
to
Guide
Numbers is
not necessary
as the
computer
mechanism
and
scale of
your
Sunpak
AZ
3600
make such
calculations
automatically.
However,
there are
instances in
which
precise
Guide Number
information is
needed:
Use with
"Flashmatic"
Cameras or
Lenses
Many
35
mm rangefinder-type
cameras
incorporate their own automatic f lashexposure controls. With cameras
(or
lenses)
of this type, THE
LENS APERTURE
IS
AUTOMATICALLY
SELECTED BY
THE CAMERA
AS
YOU FOCUS. For
correct
exposure
with such cameras
or
lenses,
the Guide Number
for
your
film/
f
lash combination must
be
set on the
Guide Number
Scale of the lens.
Film
Speed
ASA
25
50 64
80
100
125
400
800
1600
DIN
15
18
19
20 21
22 27
30
33
Manual Power
Ratio
Guide Numbers In Meter
Leitzahlen in Metern
Nombres
guides
en mitres
Full
18 25
29
32 36
40
72 100 144
1t2
12.5 18 20 22 25 28 50 72
100
114
9
12.5
14.5 16
18 20 36
50 72
1t8
6.3
9 10
1'l 12.5
14 25
36 50
Leitzahlen fiir
Manuelleistung
Rapport
de
puissance
manuel
Raz6n de energia
manual
Manuellt
styrkeftirhellande
rrumeros
guras
en
mel
Guidenummer i meter
1/16
4.5
6.3
7.2
8
I
10
18
25 36
1/32 3.2
4.5
5
5.6
6.3
7
12.5
18
25
1164 2.2 3.2
3.6
4 4.5
5 I
12.5
18
Guide Numbers In Feet
Leitzahlen
in FuR
Full
60
85 96 107 120 134 240
340
480
112
42
60
68
76
85
95 170
240
340
1/4
30
42
48
54 60
67 120 170 240
rrurrrulEl
uutuEt
Ett
PtEq5
N0meros
guias
en
pies
Guidenummer i fot
1/8
21
30 34
38
42 47
85 120
170
1116
15
21
24
27 30 34
60 85
120
1/32
11
15
17
19
2',\
24
42
60
85
't/64
7.5 11
12
13
15
17
30
42
60
Page 29

1
2
OPERATING
ADJUSTABLE
BOUNCE FLASH
HEAD
Your
AZ 3600
has
a
unique
f lash
head
assembly which
allows
you
to aim the
light in
virtually
any direction.
This
allows
you
to
use
the
AZ
3600 to
render
more
pleasing
and
more
creative
lighting
results.
For
added
convenience
and
repeatability,
the Adjustable Bounce
Flash
Head
has
reference marks
so
you
can
determine the
exact
angle of bounce
you
desire
1.
To rotate
the Adjustable
Bounce
Flash
Head,
grip
with thumb
and
forefinger
and
gently
turn to desired setting
DO NOT
FORCE
H EAD
2. To
adjust the
Flash
Base,
simply
twist
as
illustrated
with
thumb and
fore-
fi
nger.
.
For
a
complete description
for
better
bounce
pictures please
read
Sunpak's
"Guide
to Electronic
Flash
Photo-
graphy"
enclosed with
your
AZ 3600.
52
Page 30

Wide-Angle
Lenses:
For best results
when
using
moderate
wide-angle
lenses
with direct f lash,
such as
a
35
mm
focal
length lens
with a 35
mm
camera,
adjust thb bounce flash head so
that
the rectangular
reflector matches
the
rectangular
format of
the camera.
In
most
cases,
this
is
accomplished by
pivoting
the
reflector
330 degrees to the
left
or
right.
For
other wide-angle
lenses,
use the
optional
accessory wide angle diffusion
filters
(these
accessories are included in
the
Sunpak
Filter Kit
(FK-2)
or bounce
lighting may also be used for
maximum f
lash coverage.
54
Page 31

,6r.'
lf1b,
9-P
Q
Orr
r
%
%R
R
tr+
Multiple
Flash
Operation with
the
Sunpak
Auto
Slave
Unit
Using two
or
more
Sunpak
electronic flash
unit cdn
produce
stunningly
attractive
professional portraits.
Equally,
using
additional
flash
units
strategically
posi-
tioned can substantially
expand
your
photographic
capabilities. To do
this:
use
the compact,
solid-state
Sunpak
Auto
Slave Unit,
available
f rom
your
Sunpak
dealer, This
permits
wireless
synchroniza-
tion
of any number of
Sunpak
electronic
f lash units
at
distances
up to
100'
(3Om)
from
the
"Master"
unit.
When the
master unit
(with
shutter
cord
connected
to
the camera) is f ired.
all
other
slave-equipped units fire
simulta-
neously.
56
Page 32

A. Plug
the
Sunpak Slave
Unit
into
the
f lash
cord
of
your
auxiliary
(second)
flash
unit
B. Adjust
the sensor eye of the
Slave so
that
it
faces the master f lash unit
C.
Determine the
correct lens
opening
manually
(as
a starting
guide,
close
down lens
one
f/number from
indicated
aperture when using two
di
rectly-ai
med f lashes)
.
D. Connect the main
f
lash
to
your
camera
in the normal manner.
E.
Shoot
. . .
when
the light from
the
master
(camera-connected)
f
lash
reaches
the
Sunpak Slave's sensor the
Slave
automatically
fires
the
second
flash in
perfect
synchronization
with
the
first!
The
Sunpak Slave operates
at
distances of up to
30m
(100
feet)
from
the
master f lash,
and
is
unaffected
by
even the
brightest
color
lighting.
58
Page 33

Inside
Your
Autozoom 3600
THYRISTOR CIRCUITRY
Sunpak's
advanced thyristor circuitry
is the
latest in electronic f lash technology.
In less-
advanced automatic f lash units,
when the
automatic
sensor
shuts off
the
f
lash, the cir-
cuit
still
expends
the available
energy as
if a
"f
ull"
power
f lash
had
been
produced.
How-
ever, thyristor
circuitry saves
the unused
energy
for
the
next f
lash. This means more
f
lashes
per
battery and
recycling
times are
more rapid,
depending on distances and
lighting
conditions.
WIDE.ANG LE I LLUMINATION
The
use
of wide-angle
lenses is very
popular
in
photography
today.
Your
Autozoom 3600
can be used with 35mm
lenses
on 35mm
cameras
without any accessorids.
By using
the
diffusion
filters
available
in
the accessory
Autozoom 3600
Filter Kit,
lenses up
to
21
mm
focal
length
on 35mm
cameras
may
be
used. By using
bounce
light,
even
wider
focal
length
lenses
may
be
used.
AGED
GOLD.TONE
FLASH TUBE
Modern electronic
f
lash
units
operate at
speeds
of
1llOOOth
second or
less.
This
burst
of
light
is
far
shorter
than the optimum
ex-
posure
time today's
f
ilms
have.
Your
Auto-
zoom
3600
uses a unique
gold-tone
f
lash tube
60
Page 34

that has been aged and
pre-f
lashed until
critical
color balance
is achieved.
This means
your
Autozoom 3600 will
give you
warm,
pleasing,
correct color
rendition
with all daylight
f
ilms.
Monitor Circuit
Your
Sunpak
Autozoom
3600
contains
a built-in
monitor and
voltage
regulation
circuit
that will
maintain
your
unit
at
1O0%
power.
The amber
ready light will
glow
when the
unit
is at
85%
power:
an accept-
able
level
for
most
picture
taking.
The ready
light will
blink when the unit
is
at
100%
power
and
you
will hear an
audible
pulsating
signal
caused
by
the monitor
circuit
electro-
nically
switching
the
power
supply
on
and off
.
This
power
level
is
automatically
maintained
until the f lash is f ired;
assuring
consistant
and
repeatable
results
and at
the
same
time
reducing
battery drain by as
much
as 50%.
NOTE: The monitor
circuit does
not
f
unction
when using the World-Wide Voltage AC
adapter
or
Sunpak
Battery
Pak
accessories
62
Page 35

Care of
Your
Autozoom
3600
STORAGE
lf
you
don't
use
your
Autozoom
3600
for
several
weeks, or
if
you plan
to take
it
on a
trip,
the accessory
compartment case
is
recommended. This
case
will not
only hold
your
Autozoom
3600,
but
its many
acces-
sories.
Also
be
sure
to
remove
the battery
pack
before
storage
to
prevent possible
damage due
to battery
leakage.
TURNING OFF
UNIT
When
you
f inish using
your
Autozoom
3600,
the
ready light
will still
be
glowing
when
you
turn the unit off
Do
not discharge
your
Autozoom
3600
before
putting
it
away
The
next time
you
use
it,
the capacitor
in
your
flash
will
reform faster
and the
life
of
your
Autozoom
3600
will be extended
64
Page 36

MAI NTENANCE
lf
your
Autozoom
3600's
ref lector window
becomes
dirty, use one drop of
lens
cleaner
and
lens cleaning
tissue
to clean
it. A
small
amount of
lens
cleaner
and lens tissue
or
a
slightly
moist
cloth can be used to clean
the
rest
of the unit.
BE SURE
TO THOROUGHLY DRY THE
UNIT
IMMEDIATELY AFTER
CLEANING
SE
RVICE
In the unlikely
event that
your
Sunpak
electro-
nic f lash
requires
service,
return
it
to
your
dealer or
the address shown
on Sunpak
world
wide
network. Do
not,
under
any conditions,
attempt
to disassemble
and/or
adiust
it
your-
self
: electronic
f
lash operates
on high
voltage,
and should
not be taken
apart
However, keep
in
mind
that
f
lash f ailure
is
more
likely to
result f rom weak batteries
than
any
other
single
cause:
if the
f
lash doesn't
f
ire,
check
batteries
and contacts
carefully.
66
Page 37

Accessories
Available
for
the Autozoom
3600
1.
Sunpak
510-Volt
(High
Volt-
age)
Power
Pak:
Accepts
stand-
ard
510V
Battery
(Eveready
No. 497
or Sunpak Recharge-
able 510V Nicad
Battery,
and
or
equivalent).
Gives 340-2900
flashes
with
recycling
times
0.25
to 2
seconds
depending
on
Auto
Distance or Manual
Power
Ratio
selected,
Special
circuit
prevents
f lashtube
"af
terglow".
With
coiled cord,
shoulder
strap,
vinyl
case with belt
loops.
2.
3-(t0'l
Extension
Cord
for
Sunpak
Professional Power
Pak:
Tough,
moulded
3m
(10')cord
for
using flash
away
from
Bat-
tery
Pak.
3.
Sunpak
Battery
Charger
(OBC-S)
for
Nicad
Battery
Cluster:
External
Battery
charger
re-
charges
Nicad
Cluster fully
in
3
hours.
For
use
exclusively
with
Sunpak Nicad
Battery
Cluster.
For
1OO-12W
l22O-24Ov
AC
current.
4.
Sunpak Qrick-Charge Nicad
Battery
Cluster
(CL-21:
Gives
5G430 flashes
per
charge,
with
recycl
ing
times 0.3
-
4
seconds depending on distance
or
Manual
Power
Ratio selected.
Recharges
in
3
hours
with
Sunpak
Battery
Charger.
5.
Sunpak
Filter
Kit
(FK-21lSunpak
Filter
Holder: Filter
kit
consists
of red,
blue,
green
and
yellow
color
f
ilters
as
well
as a
neutral
density filter,
85B
color
correc-
tion
filter
for
use with
tungsten
film,
UV
filter
eliminating
and
two
wide-angle
diffusers.
Supplied
with
case.
Filter
Holder is
also
available
separately.
6.
Sunpak Zoom
Tele
Kit
(TL-31:
ldeal for
use
with telephoto
and
zoom
lenses
of the
most
po-
pular
focal
lengths,
the
Sunoak
Zoom
Tele
Kit
(TL-3)
actualty
increases
light
intensity
while
decreasing
the angle
of illumina-
tion. This
dual
Zoom
Tele
Kit
(TL-3)
may
be
used
for
focal
length
lenses
f
rom
85
to 135mm
with
35mm
format
cameras. The
dual
Zoom
Tele
Kit
and vertical/
horizontal
orientation
of the
ad-
justable
bounce
flash
head
de-
termine the
porper
lens
to use.
7.
Detachable Jack PC
Cord:
1
meter/3.3
feet,3
meters/10
feet
and 5 meters/16.5
feet.
8. Sunpak
Auto
Slave:
Can
be used
r^.,ith either the Autozoom 3600
or
any
electronic
flash using
a
PC
cord
for
slave
operation.
Needs
no batteries and
is
effective
to 3Om
(1OO')
with
360
degree
sensitivity.
Supplied
with
accessory shoe
for use on
a
tripod,
and
a
case.
9.
Sunpak 6x6
Ouick Release
Bracket:
Attaches
to
Flash
Clamp,
allows to
use
12
posi-
tion
for
bounce-flash.
Oversize
metal
platform
for
use
with
2t/q" x 2/q"
(6x6)
SLR
and
TLR
cameras.
With
adjustable
retaining
screw.
10.Sunpak
35mm
Ouick Release
Bracket
11.
Bracket
Extender
for
Remote
Sensor
68
Page 38

Sunpak Autozoom 3600
Specifications:
English
Technische Daten
des Sunpak
Autozooni'3600
Deutsch
s
#
f
T
Guide Numbers:With ASA
10O film
With ASA 50
film
BCPS:
With AA Nicad Batteries
(6):
Number of
flashes
per
set
Recycling
Time
With
AA Alkaline
Batteries
(61:
Number of
flashes
per
set
Rerycling
Time
With
Sunpak
510-Volt
(High
VoltagB)
Powerpak:
Number of
flashes
per
battery
Recycling
Time
With
Sunpak
World-Wide Voltage AC
Adaptor
(AD-26):
Recycling Time at 1OOV
120V
220V
240V
Automatic
Distance
Range
Flash Duration;
Sensor Acceptance
Angle:
Angle
of
illumination:
Color
Temperature:
Dimensions :
Weight
(less
batteriesl
:
36
(in
meterl,
12O
(in
feet)
25
(in
meter),
85(in
feet)
2550
Maximum
Power Minimum
Povver
430
0.3
sec.
800
0.3 sec.
2900
O.25
sec.
0.3 sec.
0.3 sec.
0.3 sec.
0.3
sec.
0.5m-12.8m
11
.6'-42'l
at
maximum aperture
0.5m-4.5m
{1.6'-15'} at
minimum aperturre
1
l850th
-1
|
20000th second
15"
Horizontal 50o x Vertical 45o
35mm
lens
on
35mm camera
{Vertical
Position)
SOmm
lens
on 35mm
camera
(Horizontal
Positionl
5500"
Ketvin
248
x 1O1 x 101mm/9.7" x 3.9" x 3,9"
72O
9125.4
oz.
Leitzahl:
BCPS:
Mit
(6)
NiCad-Batterien der Gr<iBe
AA:
Anzahl
der Blitze
pro
Satz
Blitzfolgezeit
Mit
(61
Alkalibatterien
der
Gr<iBe AA:
Anzahl der Blitze
pro
Satz
36
(Bei
21
-DlN-Filml
25
(Bei
15-DlN-Filml
2550
Maximrlsr Loinune Minimaler Loinung
50
4
sec.
100
8 sec.
340
2 sec.
1 3
sec.
12 sec.
1 1 sec.
50
4
Sek.
100
430
0,3
Sek.
800
0,3
Sek.
290f)
O,25
Sek.
0,3 Sek.
0,3 Sek.
0,3 Sek.
Blitzfolgezeit
8 Sek.
Mit dem
Sunpak-51 0-Volt-Stromversorgungsteil
(Hochspannung):
Anzahl der Blitze
pro
Batterie
Elitzfolgezeit
Mit
Sunpak Weltweit
Adapter
(AD-26):
Blitzf olgezeit
Blitzdauer:
yo
2
Sek
Wechselspan
n ungs-
Bei 1OOV
13
Sek.
12OV
12
Sek.
22OV
11
Sek.
2QV
11
Sek.
|
0.3 Sek.
Automatik-E ntf ernungsbeieich :
O,sm-
1 2,8m
bei maximaler B lendenoff n ung
0,5m-4,5m
bei
minimaler
Blendenriffnung
1/850-1/20000
Sekunde
Sensor-Erfassungswinkel: 15"
Ausleuchtungswinkel :
60o
Horizontalstellung
x 45o
Vertikalstellung
35mm0biektiv
mit
35mm-Kamera
(Vertikalstellung)
5Omm-Objektiv mit
35mm-Kamera
(
Horizontalstell
ungl
Farbtemperatur:
55ooo Kelvih
Abmessungen :
248x101x101mm
Gewicht :
72O
g
(ohne
Batterien)
AIle
Angaben unterliegen otwaigen
Anderungen
ohne Vorankiindigung.
74
Notico: Features and
specifications
are
subject
to c'hange
with out
prior
noti@,
Page 39

Markiert
Markiert
-
Marked
ASA
Speeds
:
ASA Filmempfindlichkeit
Vitesses
ASA marou6es
Velocidades
ASA indicadas
Markerad
ASA hastighetr
lntermediate
Nos.
Zwischenmark
ierungen
N-
interm6diaires
Nos.
intermedios
Mellanliggande
nummer
800
400
200
*
100
50
*
25
320
250
160125
80
64
40
32
Marked
DIN
Speeds
: DIN
Filmempfindlichkeit
Vitesses
DIN
marqu6es
Velocidades
DIN
indicadas
30 27
*
24
21
18
15
26 25
23 22
20
19
17
16
Markerad
DIN hastighetr
Intermediate
Nos.
Zwischenmark
ieru
ngen
N" interm6diaires
Nos.
intermedios
Mellanliggande
nummer
 Loading...