

Page 1
Page 2

SUNPAK
Ex24
EX24,
Instructions for
^urtrz4
^urtr24e
f;,4
(u''
use
,i/'
Page 3
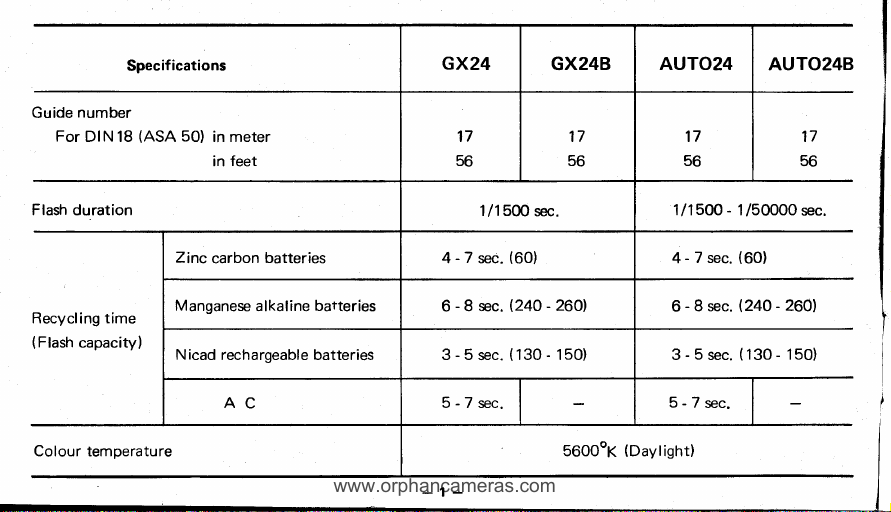
Guide
www.orphancameras.com
For
number
DIN 18
Specif
(ASA
ications
50)
in meter
feet
in
GX24
17
56
GX24B AUTO24
17
56
17
56
AUTO24B
17
56
Flash duration
Zinc
M
Recycling time
(Flash
capacity)
Colour
Colour
temperature
temperatur"
anganese alkaline
N icad
1
50O
sec.
/1
batteries
carbon
batteries
rechargeable batteries 3-5sec.(130-150) 3-5sec.
4-7sec.(60) 4-7sec.(60)
6-8sec.e4O-260) 6-8sec.
AC 5-7sec.
rl
I
560OoK
560OoK
1/1500 - 1/500OO
5-7sec.
(Daylight)
(Daylight)
sec.
(24O-2601
(130-
150)
l
I
|
I
I
I
Page 4
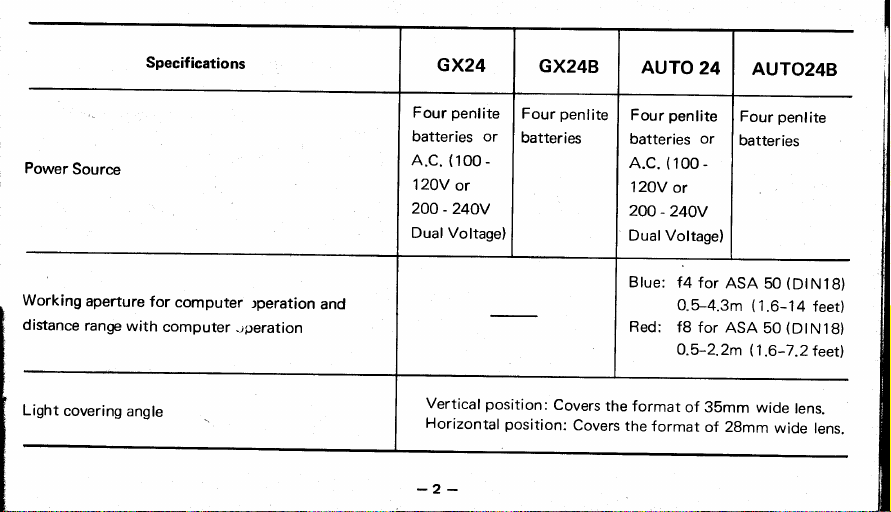
Power
Source
Specifications
GX24
penlite
Four
batteries or
(100 -
A.C.
12OV
or
-
200
240v
Dual Voltage)
GX248,
penlite
Four
batteries
AUTO
24
penlite
Four
batteries
A.C.
12OV
200
or
(100 -
or
-240v
DualVoltage)
AUTO24B
penlite
Four
batteries
Working
distance
Light
covering
aperture
range
with
angle
for
computer
computer
:peration
JiJeration
and
Vertical
position:
Horizontal
Covers
position:
the
Covers
Blue:
Red:
format
the
format
f4
for
,ASA
0.5-4.3m
f8
for
ASA
O.5-2.2m
of 35mm
of 2gmm
(DtN18)
50
(1.6-1
(DlN18)
50
('l
.6-7 .2
wide
wide lens.
4 feetl
teetl
lens.
Page 5
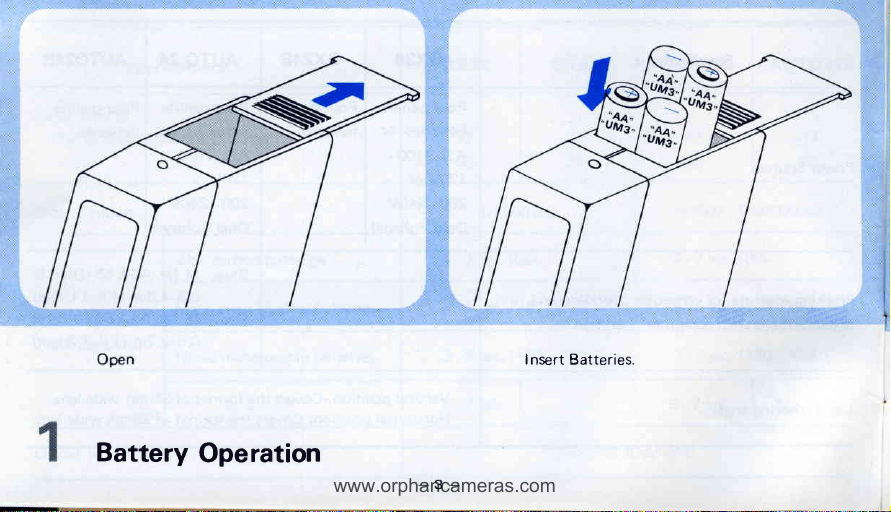
Insert Batteries.
www.orphancameras.com
.,"
11,::,r:
Battery
Operation
Page 6
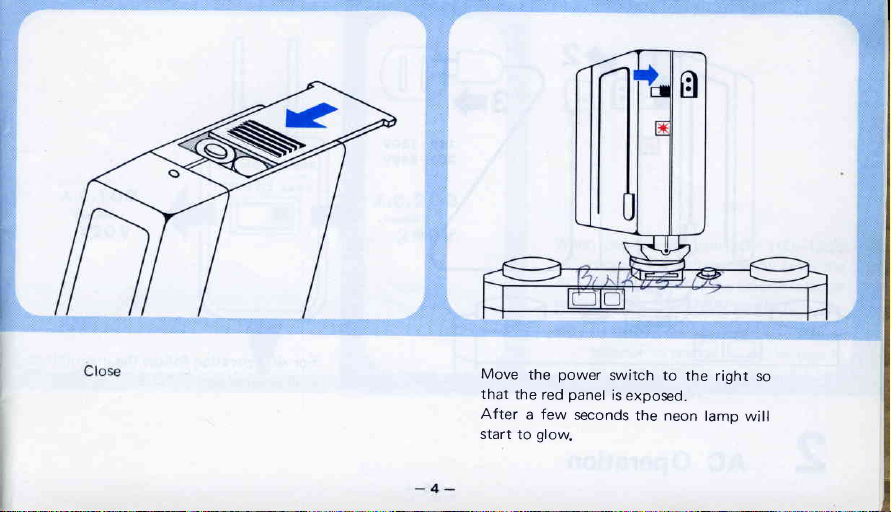
Move
that
After
start
the
a
to
the
few
gloW
power
red
switch to
panel
is
seconds
exposed.
the neon
the
right so
lamo
will
Page 7
3+
www.orphancameras.com
1
1 20v
00-
200-240v
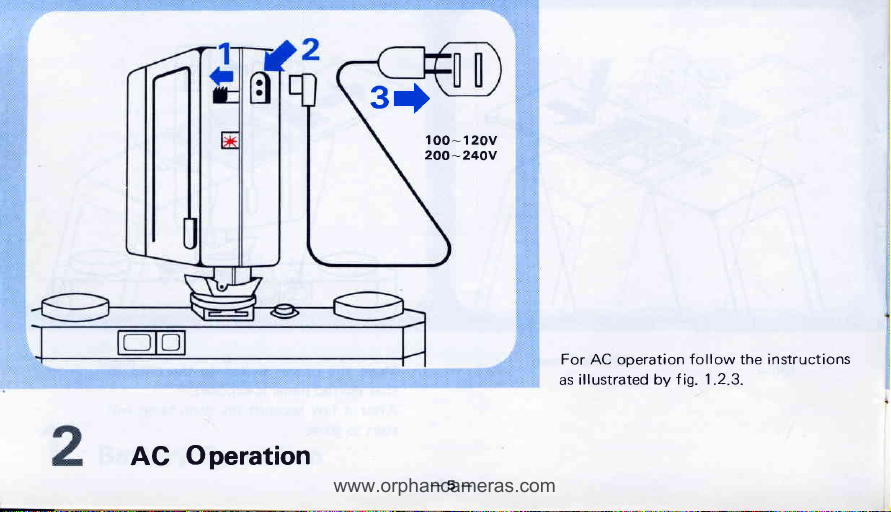
Operation
AC
For AC operation follow the instructions
illustrated by f ig.
as
1.2.3.
Page 8
A.C.l
sr^
|
20v
OO
,6@.li',
A.C.2
:^
24ov
0
0
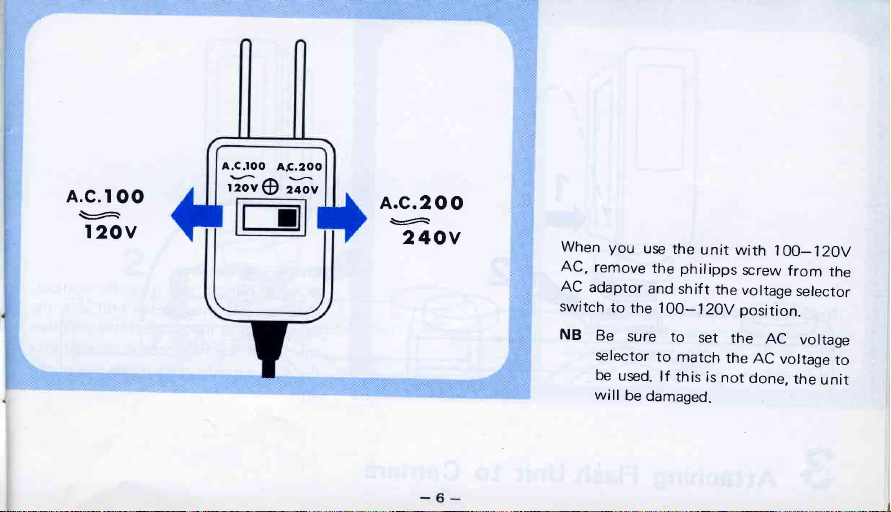
When you
AC,
AC
switch
NB
remove
adaptor
to
the 100-120V
Be
sure
selector
be
used.
will
be
use
the
unit
the philipps
and
shift
to
set
to
match
lf
this
is
damaged.
with
the
position.
the
the
not
1OO_120V
screw
voltage
AC
AC
voltage
done,
from
selector
voltage
the
unit
the
to
Page 9

into
www.orphancameras.com
Sliding
your
lf
slide
camera top
the tip of
the
unit.
camera
the hot shoe of
P.C.
synchro cord receptacle of the
hot-shoe
has a centre contact,
the unit into
as illustrated.
P.C.
the
cord
Make
sure that
is inserted
the
into
Attaching
3
Flash Unit to
Camera
Page 10
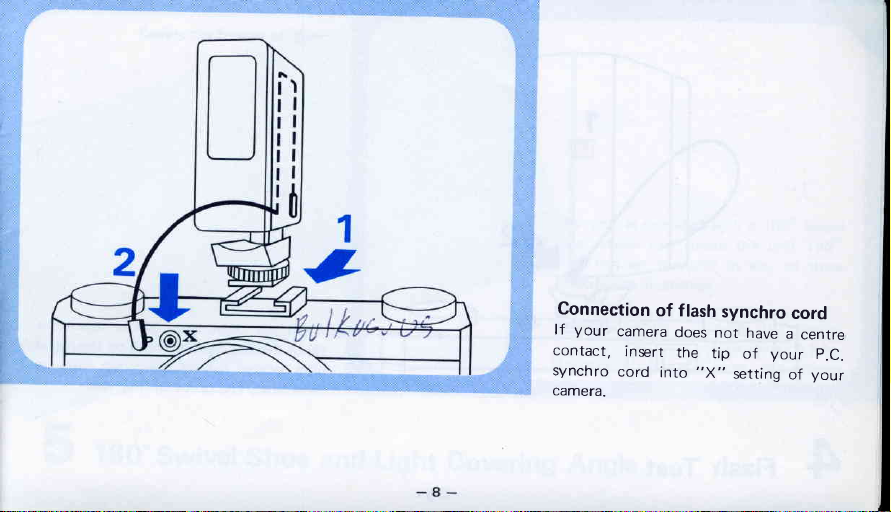
Connection
your
lf
contact,
synchro
camera.
camera
cord
of f
insert
does
the
into
lash
"X"
synchro
not
have
tip
of
setting
cord
a
your
of
centre
p.C.
your
Page 11
the neon
www.orphancameras.com
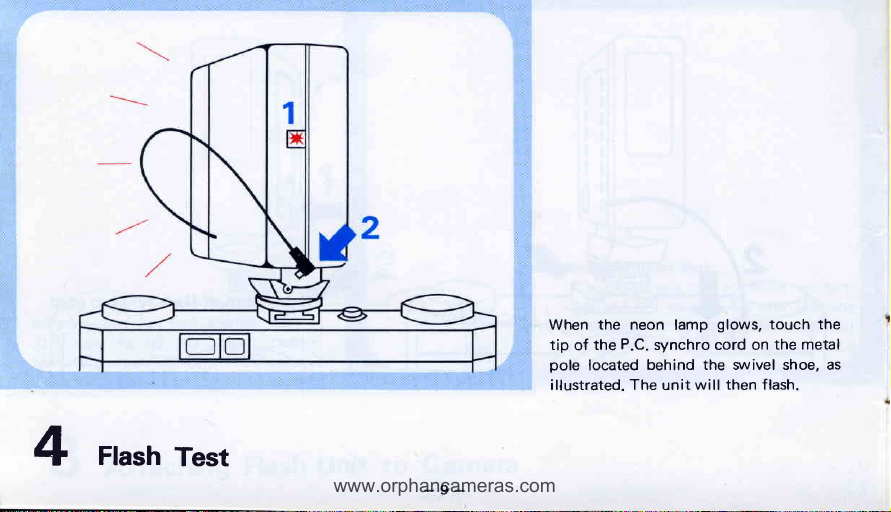
When
tip
the
of
pole
located
illustrated. The unit
lamp
P.C.
synchro cord on
behind the vuivel shoe, as
glows,
touch the
the metal
will then flash.
4
Fhsh
Test
Page 12

Covers
the
format
of
35mm
wide
tens
5
18o"
swivel
shoe
Coverc
28mm
and
the format
wide
lens
Light
The
shoe
You
positions
of
Vertical position:
Horizontal position:
covering
unit is
which
can
set the
as i I
Angle
provided
can
rotate the
unit in any
lustrated.
with
a lBOo
Covers
of
35mm
Covers
of 2Bmm
sarivel
unit 180o.
of three
th'e format
wide
lens
the
format
wide
lens
Page 13

t5
www.orphancameras.com
I
.t
How to
Guide Number
Use
F)
-'d
A
a
Dial
DETERMING
How
to
you
lf
1B) speed, match
to the ASA
index on the
adjustment for
speed). On the
indicated, and on
F
stop is indicated.
for the
and subject can
value
aperTU re.
(eXZ+
THE
use
Guide Number
are using a film
desired
should
the
(DlN
50
inner dial
ASA
outer disc, the
the opposite
distance between
now be read. The F
be set
GX24e)
CORRECT F
Dial
ASA
of
triangle on
50/DlN 18 film
The correct
for
18)
your
50
film
(Fig.
distance
side, the
the unit
STOP
(DlN
the disc
speed
shows
F
stop
stop
camera
is
ir
Page 14

20feet
1
Handle
after
the Figure
Example(GX2+
7
GX24e)
GXz4
.,1i':
,;i
:'
..
\
you
lf
1B)
speed, and
unit
and the
feet),
.
:
f2.B
then the
f
or
l-2_.,3-*4
are using
your
a film
the
subject is
correct F
camera
of
ASA 50
distance
6m
stop is f 2.8.
aperture.
(DlN
between
(approx.
the
20
Set
Page 15
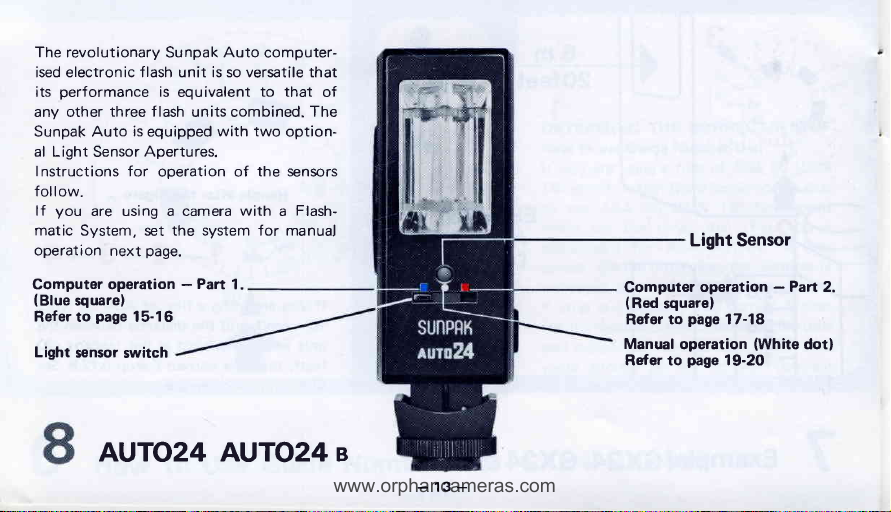
The revolutionary
www.orphancameras.com
ised electronic flash unit is so versatile that
performance
its
any other
Sunpak Auto
al Light
Sensor
Instructions for
follow.
you
lf
are using a camera
matic system, set the system for
operation
Computer operataon
(Blue
square)
Refer to
Light
page
sensor
is
three f lash
is
equipped
Apertures.
operation of
page.
next
15-16
switch
Auto
Sunpak
equivalent
units combined.
with two
with
-
Part
1.
AUTO24 AUTO24 e
computer-
to that
option-
the
sensors
Flash-
a
manuaj
The
of
Light Sensor
Computer
(Red
Refer
Manual
Refer to
-
-
13
operation - Part 2.
square)
page
to
17-18
operation
page
19-20
(White
dot)
Page 16

Distance to
subiect.
Light
of the
Light
signal to
intensity
flash
unit
(Transmitting
Sensor
the bypass tube)
intenrity
Light
computing
+
Control
+
Bypass tube
.r-()\\
-rJ 5 \'r\
tubs over
Bypars
licht out{ut
curve
contor
s€ction
controlling
LIGHT
The
unit stops the
intensity
and
photographed
exposure.
The light
reflected
and automatically
tensity.
control
a
the
control
a
stop firing
trolling
-
-
14
SENSOR
light
sensor
of light
the
light
sensor
from
The
light sensor
center f
light
sensor, the flash
section
and
the
surplus.
used in
the
flash tube
emitted
reflected
match
the
from
the
conditions
measures
subject
the
controls
serves,
or the intensity.
unit is
which
signals
a current
flash
subject
flash
the
unit
being
Sunpak Auto
firing when
from the
the
for correct
intensity
of light
after the flash f ires
the
flash
light
in-
accordingly,
In addition
provided
the
bypass tube
with
flash tube
con-
as
to
to
Page 17

www.orphancameras.com
i-n't
"1
o
Rg_l-.
t{^us
f*-
*!r
O.5-4.3m
19inch-14feet
,
Page 18
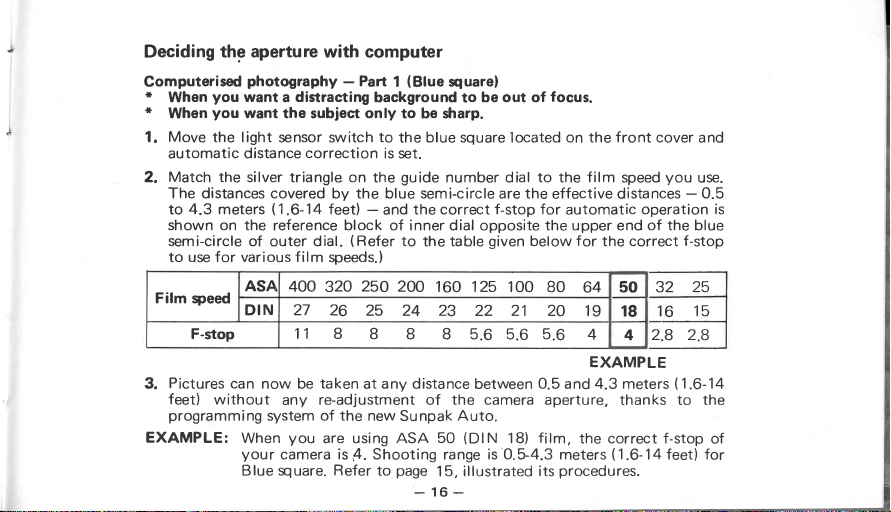
Deciding
Computerised
*
*
1.
2.
Film
3.
EXAMPLE:
thg aperture with
photography
you
When
When
Move
automatic distance
Match
The distances covered by the blue semi-circle
to
shown on the
semi-circle of
to
Pictures
feet)
programming
want a distracting
you
want
the subject
the light
the silver triangle on
4.3
meters
use for various f ilm
speed
F-stop
without
sensor switch
(1.6-14
reference block of inner dial opposite the upper end of
outer
ASA
400 320
DIN 27
11 B
can
now be
any
system of the new
you
When
your
camera is
Blue square.
computer
-
correction
feet)
dial.
speeds.)
26
taken
re-adjustment of the camera aperture,
are using ASA 50
Refer
(Blue
Part
1
background to
only
to be sharp.
to
blue squarelocated on thefront cover
the
is set.
guide
the
-
thecorrect f-stop
and
(Refer
to
the
250
200
160 125
25 24 23
8
8 8 5.65.65.6
any
at
distance between
Sunpak
Shooting
,4.
to
page
_
range
15,
16
square)
be out of
number dial
are
given
table
100 BO
22 21 20
Auto.
(DlN
1B)
is 0.5-4.3
illustrated its
_
focus.
to
film
the
the
effective distances
for
belowfor the correct
0.5
film,
meters
procedures.
speed
64 50
19
181516
4 4
EXAMPLE
4.3
meters
thanks to
(1.6-14
operation
32
2.8
automatic
and
the correct f-stop
and
you
use.
-
0.5
the
blue
f-stop
25
2.8
(1.6-14
the
feet) for
is
of
Page 19

Red square
www.orphancameras.com
O.5-2.2m
19inch-7feet
i:rle\
Page 20

f
I
Computerised
i
When
1. Move
correction
Match
2.
Thedistancescovered
2.2
shown on
semicircle
to
use
Film
Pictures
3.
feet) without
EXAMPLE:
Photography
you
want
the
light
is
the silv'er
meters
f
the reference
of outer
for
various f ilm speeds.)
ASA
speed
DIN
F-stop
now
can
when
your
Refer
-
Pafi2
sharply defined
sensor slvitch to
set.
triangle
on the
by
the red semi-circle
-
feet)
.6-7.2
any readjustment
camera is B.
to
dial.
400
320
27
26
22 16
be taken
you
are
page
block of inner
(Refer
250 200
25 24
16 16
at
using AsA
lT,illustrated
(Red
square)
pictures
of both
the red
guide
number
and the
correct
to
the table
dial
160 125 100
23 22 21 20
16
distance
any
of the camera
Shooting range
between 0.5
(DlN
50
procedures.
its
subject and
square
and automatic
to
dial
are the
f-stop for
opposite
given
the film
effective distance
automatic operation is
the
below for the
80
11 1't 11
and
aperture.
1B) film,
is
0.5-2.2 meters
background.
distance
you
speed
-
upper
end of the
correct f-stop
50
64
19
8
EXAMPLE
2.2metersn.6-7.2
the
32
16
18
8 5.6
correct f-stop
fi.G-7.2
use.
0.5 to
red
25
15
5.6
of
feetl
Page 21

'l
www.orphancameras.com
t
6m
20feet
1
Page 22

MANUAL
you
when
programming
distance
given
r
Move
programming
operation.
*
Match
exposure index
(DlN18)
(DlN1B)
+
Measure
aperture value is
from
*
set
example, if the
feet),
on
For
between
below:
the
the
your
your
the inner
manual
wish
the silver
exposure index
operation,
OPERATION
to
use the
function
computer
film,
the
measured
camera
camera
dial
and
the
subject
aperture
function
triangle
of the
match the
distance
between the subject
read off
distance.
aperture in
distance between
aperture should
opposite the
follow
Sunpak Auto 24
adjusting
and the flash
and
on
film
triangle
mark
the inner
the illustrations
your
switch to the
preparing
guide
the
For
used.
on the
on the inner
dial
accordance
the subject
be
meters
6
manually, dispensing
camera
aperture
please
unit,
white
the Sunpak
number
dial of the flash
example, if
outer
GN
GN
dial.
the
and
at the
opposlte side
with
the GN
and the flash
set at f2.B
(20
since this is the
feet)
distance setting.
follow
dot, thus
Auto 24
you
are
dial with
flash
unit. The
dial
unit is
according
with
for manual
with
unit
ASA
using
the ASA
of the
GN dial
l
reading.
6 meters
value shown
to the
correct
the instructions
eliminating
the
the
the
b0
50
For
(20
\
l-2+3
+4
Page 23

B
www.orphancameras.com
1/1
1/2
1/4
1t8
1/15
1/30
1/60
1/125
1/25O
1/5OO
Leaf-type
shutter
1/1
1/2
1/4
1/g
1/15
1/30
1/60
1/125
1/25O
1/5,00
Focal
B
speed
can
unit
or \ mark setting. Theref ore,
"X"
the shutter
or\mark.
dial
"X"
manual carefully or consult
is of leaf type, any shutter
shutter
only
of
your
lf
mark,
your
be synchronized
camera does not
follow the in-
camera at
the
the
plane
Shutter
The flash
with
set
"X"
have an
struction
manufacturer.
lf the
speed can be synchronized.
shutter
12
cx24
GX24e
AUTO24
-21
AUTO24
-
e
Page 24

NB
For long
from
unit since leakage
could
of the f lash
storage,
the
battery
occur with
unit.
container
remove
consequent
of the
the
of
battery fluid
batteries
the flash
corrosion
Page 25

www.orphancameras.com
to
How
Insert
1.
into
Su npak
Connect
2.
end of
lustrated.
il
Plug
3.
source
ou rs.
h
completed.
*
Do
ordinary
with
charger
use
'AA"
4
battery
F lash.
charger
synchro
charger
and
N ow
not
charge
batteries.
iCad
batteries.
N
unit
iCad
batteries
N
comPartment
of
AC
with
Use
to the
flash
Power
for
ng
the
onlY
cord
cord
into
charge
chargi
of
as
14
is
 Loading...