

Page 1

DF3600U
Universal Flash
SUNPAK
DF3600U
Page 2

Thank you for purchasing this Sunpak flash.
Before using the DF3600U, please take a moment to read this manual and
your camera’s instruction manual to familiarize yourself with the flash
operations.
Safety instruction
1, Never trigger the flash around flammable gas or liquid gas (such as
gasoline and solvents)! There is risk of explosion!
2, Neither shoot with the flash at drivers who are driving cars, buses or trains,
nor the rider of motor and bicycle. They may be temporarily blinded by the
bright light and cause traffic accident.
3, Never trigger the flash at close range of your eyes! Using the flash directly
at people or animal's eyes will damage the retinas and cause serious visual
disturbance, even blindness.
4, Only use the b at te ri es listed in this man ua l!
5, Never place the batteries in high-temperature environment, such as in
direct sunlight or in the fire.
6, Remove the drained battery from the flash. As the alkaline liquid exuding
from the battery will damage the flash.
7. Keep the flash away from the water (such as the rain).
8, Note: Protect the flash in extreme high temperature or humid
environment.
9, Do not place the flash in car dashboard glove compartments. When
triggered flash, do not place an opaque object in front of the reflection screen or
above, and no dirt is allowed on the reflective screen. Otherwise the high-
energy flash will burn reflective objects on the screen or damage screen.
10, Never open the flash by yourself. It has danger of high voltage. There are no
user replaceable parts inside.
11, Do not fire the flash at full power more than 10 times continuously. Wait 5
minutes every 10 continuous full power flashes.
12, When in full power output by quickly back continuous use flash, The
zoom setting should be less than 35 mm, due to the effect of high heat flash
diffuser will be hot.
13, Rapid temperature changes can lead to water vapor condensation. In this
situation, give the flash time to gradually adapt to the environment temperature.
14, Never use any defective batteries in this flash.
The DF3600U Features
1, High Guide Number of 118/feet @ ISO 100
2, Wirel es s SL AVE unit fu nc ti on : Co mpatibility w it h th e Ca no n and
Nikon Wire le ss f la sh system,rea li ze TTL off camer a, ma nu al and
frequency f la sh
3, Powered by 4 - AA batteries (Alkaline, Ni-CD, Ni-MH)
4, Dual mode, Universal hot shoe contacts
5, High-Speed Sync: Max hight speed Sync 1/8000s
6, TTL flash
7, Manual flash
8, Multi flash
9, S1,S2 Light flashing mode
10, Flash exposure FEB, exposure compensation, flash exposure lock
(FEL/FV)
11, The came ra m en u ac cess funtion (Onl y fo r th e ne west Canon
Version )
12, Rear- curtain Sync
13, Voice prompt
14, Custom fu nc ti on
15, Power sav e mo de
16, Overhea ti ng p ro tection
17, Manual, Au to z oo m
18, Automa ti c sa ve f unction
19, Large s iz e LCD display
20, Quick res po ns e: F ull output recycl e ti me o nl y 2.3 seconds
1 2
Page 3

Description of Parts
Fla sh head t ilt ang le scal e
bounce card
Built-in
Bui lt-in w ide-a ngle
dif fus er
Fla sh head
shoe contact
Hot
Ser ial num ber
Fla sh sens or
Syn chron ous soc kets
Par amete r Setti ngs but ton
/ MAS TER sel ect but ton
Bac kligh t / LED Mod e
swi tch but ton
MOD E selec t butto ns /
SLAVE s ele ct bu tton
Fla sh test b utton / Wak e
but ton / Cha rge lam p
Liq uid cry stal di splay
Pre ss two bu tton at t he same
tim e resto re fact ory set tings
Hig h-spe ed sync hrono us /
Rea r-cur tai n sync / Or dinar y
fla sh swit ch butt on
Foc al leng th/ Wire less
par amete r setti ngs but ton /
Cus tom fun ction s ettin gs
but ton
ON/ OFF swi tch but ton
Sel ect/S ettin gs
but ton gro up
Bat tery co ver
Ins talla tion fe et
Ins tall pi n
3 4
Page 4
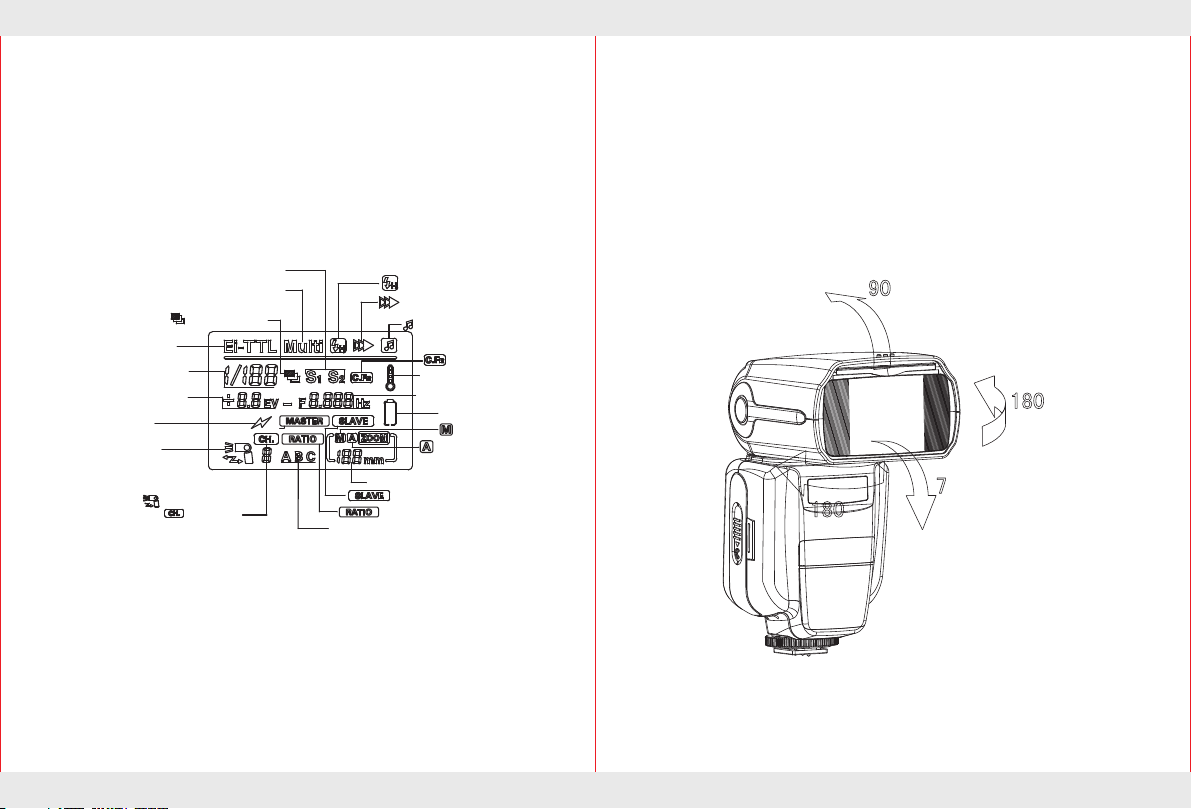
Auto- focus auxiliary AF assis t lamp
<S1 /S2> In ducti on mode l
<M/ Mulit > Manua l fla sh /
Mul tiple f reque ncy fla sh
<TT L>TTL mo de
<E- TTL> Ca non TTL mo de
<i- TTL> Ni kon mod e
Pow er fine -tuni ng
Str obosc opic fr equen cy sett ing
TTL ex posur e compe nsati on
Lig ht indu ction m odel
Fla sh mode
SLAVE f las h
< >Fl ash exp osure
Pow er regu latio n
<<
Cha nnels
>>
SLAVE a cco unt
LCD sc ree n
Hig h-spe ed sync hrono us
Sec ond cur tain sy nc
(Re ar-cu rta in sync )
Buz zer swi tch
Cus tom fun ction
Ove rheat ing pro tecti on
Ape rture v alue
Fre quenc y flash f reque ncy
Pow er disp lay
Man ual zoo m
Aut omati cally z oom
Zoo m focal l ength
SLAVE m ode
Fla sh ligh t Ratio
When shooting under a dark conditions, the Automatic AF Assist which
is
built into the flash light may temporarily project red light to assist focusing.
In some cases it may interfere with your subject. If this happens, you can
switch to Manual focus (M) or to the Custom function (Fn - 08) close focus
light.
For detail Zoom setting please refer to Page 19
Adjust the direction of flash
The flash head can be lifted up to 90 degrees, down to 7 degrees, and rotate up
to 180 degrees. Adjust the flash head toward the ceiling or wall can make the
shooting pictures more natural as well as pale shadows.
5 6
Page 5

Applicable batteries a nd power supply.
Insta ll the battery
The following batteries are applicable to the flash.
1, AA battery
A:4 (AA) Alk al in e ma nganese battery ( 1. 5V ). The batter y ca n me et d emand
of medium pow er w it ho ut maintenance, b ut i t ca n no t be recharge .
B:4 (AA) Nick el -c ad mium battery (1.2 V) . The battery rec yc le s qu ickly and
can be rechar ged, so it is economi c an d pr ac tical.
C:4 (AA) Nimh b at te ri es (1.2V). Th is b at tery's power obvi ou sl y ex ceed that
of nickel-c ad mi um b attery and it is less h ar mf ul t o the environment ( do n ot
contain cad mi um ).
D:4 (AA) Lith iu m ba tt ery (1.5V). Thi s ba ttery has large c ap acity. Low
self-disc ha rge rate and no nee d of m ai nt enance.
E:4 (AA) Hydr og en o xy gen cell (1.5V). Th is battery is also ca ll ed ( Ox yride),
Its capacit y is l arger and its s er vi ce l if e is about 1.5 times of a lk al in e battery's.
So it is very Sui ta bl e fo r use in electronic p ro du ct s of high power consu mp ti on .
Lithium bat te ry i ns ta llation
1, Open t he b atter y co ve r.
Accor di ng to the d ir ection of t he
arrow s ho wn in sli de b attery ha tc h
cover, o pe n th e batte ry c ompar tm ent.
2, Install battery
According to the battery polarity
located on the indise of the battery
cover, install the battery into battery
compartment
polarity contact is correct.
3, Clos e th e batte ry c ov er.
Close d it a ccord in g to the dire ct ion
of the ar ro w shown i n sl ide the
batte ry c over.
. Make sure the battery
7 8
Page 6

Insta ll flash to camera
1.
Prepare to install the fkash
Accor di ng to the d ir ection in di cated b y an
arrow w il l spin lo ck d ial to the le ft s ide.
2.
Install the
Accor di ng to the d ir ection in di cated b y an
arrow w il l flash i ns talled fo ot c omple te ly
inser te d into th e ca mera's ho t sh oe.
3.
Lock the
Accor di ng to the d ir ection in di cated b y an
arrow will spin lock dial to the right to lock
flash.
the
4.
Remove the flash
Accor di ng to the d ir ection in di cated b y an
arrow will spin lock dial to the left side, and
slowly remove the flash from the hot shoe
Make sure the flash and camera power are off.
Don't pull out forcibly!
flash
flash
Turn on the power
Press t he P ower bu tt on (ON/ ) for
two sec on ds to tur n on /off th e fl ash.
In order to sav e ba tt er y power and avoid bat te ry l ea kage,The defaul t se tt in g
In order to save battery power and avoid battery leakage,The default setting is as
are as follow in g:
follows:
After the DF3600U is turned on and there is no activity or no functions
working within 60 seconds,the CPU will go into Sleep Mode. In this case press
any button to wake up the flash. If the DF3600U is not used for a long period
time, it is recommended to use the main power switch to turn off the flash and
remove the power source (batteries). Before removing the batteries, turn off the
power of the DF3600U flash. After the DF3600U's capacitor is fully charged,
the DF3600U's flash ready indicator button ( ) lights up, indicating that the
flash is ready to trigger. This means that the DF3600U can be used for the next
shoot.
OFF
State of charge indicator
Befor e sh ootin g, c onfirm th e fl ash cha rging
and cam er a viewf in der light s in dicat or l ights
have be en l it.
External po we r su pp ly by extending the i nt er fa ce and complete PC sy nc .
9 10
Page 7

Commo n flash mode
Divided int o Aut om atic flash mode, TT L mod e, M m anual flash and
Strobosco pi c fl as h mode Multi.
Automatic T TL flash mode
Set the camer a' s sh oo ting mode to < P > (Progr am Au to E xposure) or Green
frame < □ > (Auto), f ul ly Au to matic flash wil l ma ke f la sh p hotography and
modes of the < P > an d < □ > as s im pl e as Ordinary TTL Mo de f la sh .
Selec t th e flash m od e
1.Pre ss M ODE fla sh m od e selec t bu tton in
commo n fl ash mod e.
2.Pre ss 【M ODE】 mod e bu tton unti l th e
LCD dis pl ay .
Set the f la sh expo su re comp en satio n va lue.
The exp os ure com pe nsation c an b e set in st an dby
mode..
1, The Left and Right buttons set can set the exposure
compensation value:
Right Button: The exposure compensation is
increased; Left Button: The exposure compensation
value is decreased.
2, The compensation range can be set of -3.0EV to
+3.0EV.Its compensated value Icon:
0EV→+0. 3E V→+0.7E V→+1 .0EV→+1.3 EV→+ 1.7EV→. . . .→+3.0 EV
0EV→-0. 3E V→-0.7E V→-1 .0EV→-1.3 EV→- 1.7EV→. . . .→-3.0 EV
FEB set ting value
By F EB you can st ay u nd er t he con di tion o f in va riabl e back gr ou nd e xp osure
Autom at icall y ch an ge the ma in body of th e fl ash expos ur e. Surr ounded by
three exposu re can be adjust ed acco rd ing to 1/ 3 to plus or minus a level 3,
accor di ng to the l ac k of correc t ex posur e, e xposure a nd o rder of o ve rexpo se d
expos ur e (Or de r b y custo m) . In after comp le tion of all t hr ee su rr ounded by
expos ur e, surrou nd ed by flash e xp os ure autom at icall y ca nc el ( N on auto ma ti
cally c an celed i n th e custom se t ).
For flas h sur ro unded the exp os ur e functi on , set th e cam era driver Mo de to "
singl e shot" and to ensur e that the flash is rea dy bef or e film in g. Conne ct the
Canon camer a, s et on t he f la sh e xposure value sur ro un ded exposur e; C on ne ction
Nikon , su rroun de d by not show in g on the fl as h exposur e in forma ti on, if you ne ed
to confir m the use of the ca mera suppor t surr ounde d the expo sure func ti on , if
suppo rt , pleas e re fer to the ca me ra set.
FEB set ti ng surr ounded by e xp osure v alue
( Effec ti ve for Ca non cam er as o nly )
Stand by m ode pre ss “ Paramet er S ettin gs b utton", s ur round ed b y the cur re nt
expos ur e value , en ter the set s ta te.1, S ur rounded b y ro tary di al c an adju st
expos ur e value Cl ockwise r ot ation , su rrounde d by t he expo su re valu e, i n tu rn,
incre as es; Cou nt erclock wi se, sur ro unded by th e ex posur e va lue dec re as es in
turn. 2, The ex po sure va lu e ra nge is 0 to 3 .0 . Surro un de d by the ex po sure va lu e
is: 0 1 1.3 1 .7 2 .0 0.3 0. 7 2. 3 2.7 3.0
0
3.02.72.32.01.71.31.00.70.3
11 12
Page 8

3, Complete s et up
After set up pr es s ag ai n the【 Parameter Set ti ng s bu tton 】to exit the set
status. If FE B va lu e is n ot 0 displays, as sho wn b y th e cu st om function can
be set FEB expo su re s eq uence.
On-line operation
Flash TTL mode
Through the hot shoe connection Canon camera;
Screen displays E-TTL to represent the current metering system;
Through the hot shoe connection Nikon camera;
Screen disp la y i- TT L to re pr esent the current m et er in g system;
Because the N ik on s ys tem does not suppor t fl as h on F EB Settings, whil e
online does n ot d is pl ay the FEB informat io n, t o re alize surrounde d th e
exposure fu nc ti on o n Nikon (BKT), plea se r ef er t o the camera Settin gs .
Flash exposure lo ck ( FE L/ FV )
Use flash exposure lock, you can lock the correct
flash exposure Settings for each parts of scene.
When flash TTL mode is displayed on the LCD
screen, please connect the flash with camera
correctly. Canon camera press the
" FEL" or "*" (AEL- Auto exposure lock) button,
Nikon Camera press "FV" button, Then the flash
give off preflash, camera will calculate the
appropriate flash output data, At this point you
have a time to re composition, After it finished you
can press the shutter to shooting.(This feature
requires to camer support to use.Please refer to
your camera manual set)
Other Automa tic flash shootin g mode
As long as the ca me ra 's s hooting mode to (AV) or A (Apertur e pr io ri ty ae),
the [TV] S (Shu tt er p ri ority ae) or [M] (Man ua l) , yo u can also use E-TTL
/ i-TTL flash Autom at ic al ly
Selec t th is mode t o ma nually se t th e shutt er s peed.Valu e is Autom at icall y
set to matc h t he camera shu tt er speed ci rc le for stan da rd expos ur e.If the
TV/S
apert ur e disp lay flashin g, means that the bac kgrou nd und er expos ed or
overe xp osed, a dj ust the shu tt er spee d un til the ape rt ure sto p fl ashin g.
Selec t th is mode t o ma nuall y se t the ape rt ure val ue .The ca me ra is
Autom at icall y set t o mat ch th e apert ur e s hu tter sp eed t o ach ie ve
stand ar d exposur e. If the da rk back gr ound, suc h as at night), will use
the slo w sy nc i n order t o ob ta in the ma in y ou r subje ct a nd t he
backg ro und of the stan da rd e xposu re .Usin g fl as h fo r MASTE R of you r
AV/A
subje ct stan da rd expo sure.Us e th e slow shutter backgrou nd expo su re
stand ar ds.Be ca use for low i ll umina ti on scene wi ll u se the sl ow s hutte r,
it i s reco mm ended to use a tr ip od .If th e sh ut ter sp ee d di sp lay fl as hing,
means that the backgr ou nd und erexpos ed or over ex po sed.A dj ust the
displ ay s tops fl as hing unti l ap ertur e sh utter spe ed .
To man ua lly set t he s hutte r sp eed and ape rt ure whe n ch oosing th is p atter n.
Using fl ash for M AS TER of yo ur subject st andar d e xp osure .U sing a
M
combi na tion of y ou t o se t the shu tt er s peed an d ap erture to o bt ain
backg ro und exp os ure.
If you use the < DE P > or < A - DEP > s hooting model, Th e result and use
< P > (AE) model is t he s am e.
Flash Sync Sp ee ds a nd Apertures Value.
Shutter Spe ed S et ti ng
Set Automa ti ca ll y(1/60 sec.~1/X se c. )
P
TV
AV
M
Set man ua lly(3 0 se c.~1/Xs ec .)
Set Auto ma tical ly (30 sec .~ 1/Xsec. )
Set man ua lly(b uL b,30 sec. ~1 /Xsec .)
Aperture S et ti ng
Automatic
Automatic
Manual
Manual
13 14
Page 9

1/X sec .i s the cam er a's maxim um f lash sy nc s peed.
Note: T he Cano n ca mera mode : P, TV, AV, M, A - DEP, gree n frame
Nikon m od e: P, S, A, M
Manua l flash mode M
When you need to manually exposure, You can set the flash brightness
according to your own needs. From 1/128 power to 1/1 full power to adjust
the incremental setting the flash output.
Select the fl as h MO DE
1.Press 【 MO DE】 b ut to n
2.until the L CD d is pl ay M.
more than 10 consecutive freq ue nc y gli nt li gh t sho ot. Between exposure
operation , please let th e fl as h have enough time to ca ll back. If yo u try to
execute mo re tha n 10 cons ec ut iv e freq ue ncy glint ligh t shoo t. In orde r to
prevent fla sh u ni t ov erheating, flas h ca n Aut omatically stop . If t hi s si tuation
happened, plea se let fl ash cooling f or at l ea st 15 minut es .P le ase use a n ew
battery or th e fu ll b at tery operating th is m od e.
Selec t th e flash m od e
Press 【M OD E】 butto n
until t he L CD disp la y .
Frequency setting
Press the Setting/Select Button and the Hz will
flicker. Adjust using the Left or Right buttons, then
press the Settings/Select button to set. You can adjust
the flash frequency from 1 Hz - 199 Hz.
Power setting
Use the Left and Right buttons to manually
set output power value.The Left Button
will decrease down to 1/128 and the Right
Button will increase to 1/1 (full power).
Right: 1/128 → 1 /64 →1 / 32 →11/ 16 → 1/8 → 1/4→ 1/2 → 1/1
Left : 1/ 1 → 1/2 →1 /4 → 1/8 → 1/ 16 → 1/32 → 1/64 → 1/128
Strob oscopic flash mod e(Multi)
To properly use M ulti m od e, s et the camera in th e M mode. When you us in g
The num be r of fl as hes set
Next, press the Settings/Select button and adjust the
number of flashes using the Left and Right buttons.
Depending on the Manual Power Ratio, you can
adjust the number of flashes from 1 to 40. Once you
have reached your desired number of flashes, press
the Settings/Select button to exit.
Exposure power setting
Press the Setting/Select button again to delect the
power. Use the Left and Right buttons to choose from
1/128 power up to 1/4 power.
the Mult i mode, the re will emi t a se ri es of qui ck flash, it can und er take
Multiple f la sh in a p ho to gr aph, a series of action s i n order to fr ee ze.
Commonly used wh en sho ot in g a m oving ob je ct , Pl ea se set the fl as h output
power as r equired, Times of fl ash a nd Fl as h f re qu en cy (E ve ry fl ashes t ime
show by Hz). Pl ea se u se t he new batteries or f ul ly c ha rged batt er y op er ating
this mode . To pr event fl as h un it overheatin g and dama ge , do not perf or m
The relational table of flash power and times of flash
Flash p ow er
Tim es of fla sh
1/128
1-40
1 64/
1 20-
1 32/
1 12-
1 16/
1 8-
1 8/
1 4-
1 4/
1 2-
15 1 6
Page 10

Note:
·Strobosco pi c mo de , Use the following f or mu la t o determine the shu tt er
speed, and th en u se t he s tep is smaller than t he s hu tt er speed of one or
more long shu tt er s pe ed.
·The shutte r sp ee d = Times of flash÷Fla sh f re qu en cy (Hz)
·The shutte r sp ee d, c an be used with B door
“ ”High speed Rear- Curtain sync Sett ings“ ”
High-speed synchron ou s:
Synchrono us o pe ra tion of flash and cam er a wi th h igh shutter speed , The
maximum shu tt er s pe ed of up to 1/8000s.W he n us in g a flash to shoot an
outdoor por tr ai t, a s well as other needs u nd er t he s trong light sourc e an d
large a pe rt ure this mode is ve ry e xc el le nt results.
Rear cu rt ai n sy nc :
Use the slow sh ut te r, yo u ca n cr eate a light trails a ft er y ou r subject, flash in
front of the sh ut te r cl oses a flash.
1, Flas h li ght to be on th e Ca non cam er a using
high sp eed/c ur tain sy nc co rr ectly, in TT L, M
mode acc or ding to the 【 Hig h s peed/ Re ar
curta in /Ordi na ry fl ashli gh t s wi tch butt on】
in ordina ry fla sh (forme r curt ain sy nc ) (n o) ,
di spl ay an d h ig h s pe ed sy nch ron iz ati on
betwe en curt ain syn c ( ) af ter ( ) - >
switch, o pe n th e correspon di ng f un ction.
2, Flas h on N ikon came ra c an not di re ctly set hi gh s peed sy nc hrono us m od e, the
camer a menu of the Auto matical ly "FP " is op en ed, connect th e came ra fla sh
scree n di splay , " "i mmediat el y.
If you ne ed t he Rear -curt ai n synchro no us mode ,O pen the Rea r-cur ta in sync
funct io n on the ca me ra settin gs ( Flash n o di splay).
Off-camera high speed synchro no us :
In Wir el ess SLAVE mode can r ec eive high s pe ed sync hr onous s ig na l from
MASTE R fl ash.
Note: In order to make correct use of high-speed/Rear-curtain sync, please
properly set camera flash mode and shutter speed.
High-speed synchron iz at io n of f th e ma ch in e ca n be a ch ie ve d in t wo
ways:
1, Wirel es s TTL trig ge r (The tr ig ger need su pp ort hig h sp eed syn ch ro nizat io n)
2, Set th e sp eedligh t to S LAVE c or S LAVE n mo de
a: To ac hieve t he H igh speed s yn c in SLAVE c, receiv in g Canon Wi re less
instr uc tions , fi rst, the ph ot ograp h in m anual mod e us ing bui lt -in fla sh a s th e
Wirele ss M AS TER fla sh , the max im um s ync spe ed i s only to 1 / 2 00 o r 1 / 250.
Need in t he s et-to p pl us a band Wire less cont ro l funct io n of the fl as h, i n the
main co nt rol fla sh o pen high- sp eed syn ch ronous, o nl ine MAS TE R light s ig na l
from li gh t, in ord er t o achieve f ro m the mac hi ne high s pe ed s ync to.
To ach ie ve the Hi gh s peed sy nc i n SLAVE n, re ceivi ng t he order of t he N ikon
b:
C can use b ui lt-in f la sh flash, c an a lso use f la sh with MAS TE R contr ol f uncti on ,
open th e ca mera Aut o FP fu nc tion, u si ng the buil t- in flas h fl ash, buil t- in flas h
only se nd d ata to fr om t he lamp, th ey d o not syn c in f lash, by fr om t he lamp t o
carry o ut h igh-s pe ed synchr on ous mac hi ne.
The camera menu access (Only the newest Canon Camera)
In supp or t of E-TT L Canon is re la tivel y new ca mera can be accessed through
the camera menu to operat e on the flash. In fl as h con trol menu of "E xtern al
flash fun ct ion se ttings" and "Ex te rnal flas h cust om functi on set tings" can set
the flash relat ed par amete rs , su ch as sw it ch E-TT L mo de, manua l flas h mo de
and M ul tiple fl as h mode (Multi ), Wireless fl as h settin g, su rr ounde d by
expos ur e, expo su re compen sa tion, t he f ocal leng th a nd the fu nc tion of a dv an ced
optio ns .
17 18
Page 11

【ZOOM】se ttings
Press ‘ZOOM button’ to display flicking. The flash will default to A
(Automatically zooms with the lens). To manually change to a different focal
length, press the Right Button to go to Manual, them continue pressing until
you reach the desired setting. Use the Left Button to decrease the focal length
and keep pressing until it goes back to A. Press "ZOOM button" to exit setup.
35
Autom atic
18
28
24
About Automatic Zoom A and M an ua l Zo om M S et ti ng s:
Flash head Automatically zoom: If the unit does
not default to "A" , continue to press the Left Button
until "A" is displayed and the flash will now
Automatically adjust the flash coverage with the
focal length of the lens up to 180mm when mounted
to cameras which support E -TTL and i-TTL
systems.
Manually set the lamp holder zoom position:
Press the Right Button when the "M" is displayed,
and then you can manually adjust the flash
coverage (18, 24, 28, 35, 50, 70, 85, 105, 135 or
180mm).
·
When using manual zoom, please make sure that flash coverage equals
the lens zoom setting, so that the picture will not appear the edge of the
shadow.
135
105857050
180
Wireless comm and flash mode
Wireless flash sys te m is c om posed by Multiple Wirele ss f la sh ;You can
create a wide variety of lighting effects like using ordinary TTL flash.
Wireless command flash mode has SLAVE mode.
SLAVE flash mode.
MMMMMMMMMA M
SLAVE flash mode can be divided into:
Wireless SLAVE flash mode (E-TTL SLAVE c Canon)
Command SLAVE flash mode (i-TTL SLAVE n Nikon)
SLAVE flash model
SLAVE fla sh model can be divid ed i nt o:
Wireless i ns tr uc ti on model (SLAVE c/SLAVE n )
Wir eless optical f la sh m od el
Long press 【Fl as h mo de l select button】 3 sec on ds , fl ash light will shif t
between fla sh m od el (TTL/M/Multi) a nd S LAVE flash mo de l (E -T TL
SLAVE c /i- TTL SLAVE n ).
Under nor ma l
flash model :
3 seconds shi ft i nt o wi reless flash mode l.
Under Wire less flash model: Sh or t pr ess 【Flash model sel ec t bu tt on】
flash light s hi ft b et ween E-TTL SLAVE c mod el , i-TTL SLAVE n mo de l ,
M S1 model and M S2 m od el .
UnderSLAVE model :Long pre ss 【F la sh m odel select butto n】,i t ca n
shift into fl as h mo de ( Salve C /SLAVE c /S 1/S2 as off c am er a SL AVE
unit to build d ifferent ligh t.
Long press 【Fl as h mo de l select button】
c
SLAVE
SLAVE n
19 20
Page 12

S1 S2
Note:
1, Sho rt pr ess 【Fla sh mo del select bu tt on】 on ly ch ange SLAVE flash mo de l
in Wir eless S LAVE fl as h mod el .I f the f lash is connected to th e camera, p ress
the shutter b ut to n, t he flash will not be co nn ec te d with the camera, an d it n ee ds
to manu al ly exit th e wireless sla ve mode to perform the online operation.
2, U nd er SLAVE mode, yo u can t hr ou gh the cu st om funct io n (Fn-08) o n the
AF assist light flash close, e xi t wi re le ss S LAVE mode, need t o use the focus
lamp, pleas e en te r cu st om s et tings page to re open the AF assist lamp .
3, System sta nd by 6 0 se conds after the fla sh w il l no t enter the dormant s ta te .
Wireless inst ruction model (SLAVE c /SLAVE n )
SLAVE c: me ans receive Wire le ss f lash sign from Cano n 7D /6 0D /6 0c
camera buli d- in f la sh and 580EX II、600EX、S T-E2 a nd t he Vice fact or y
MASTER wire le ss f la sh signal.
SLAVE n:m eans receive C inst ru ct io n sign from Nikon cam er a bu li d in
flash instr uc ti on a nd SB-900/800/7 00、S U- 80 0 an d the Vice f ac tory
MASTER comm an d si gn al signal
SLAVE c/n : support 4 channel s ,3 d ifferent grou p ,T TL ,M an ua l an d Multi
Wireless flash by th is m od el .Rotate flash lig ht h ea d in o rder to wireless
trigger to MA ST ER l ig ht.Before shoot in g ,w e ne ed set up the same chan ne l
about flash l ig ht a nd M ASTER light.
Short pre ss ( Zoom button): unt il c ha nn el or group twinkle a s fo r SL AVE
unit ,setti ng C om mu nication channe l of S LAVE unit (1. 2. 3. 4) a nd SLAVE
unit group (A .B .C )
When workin g in a S LAVE unit, th e fl as h li ght and mode are comp le te ly
controlle d by t he M AS TER control unit an d di sp la y the received
informati on ;
Note:
·Flash light a nd m od el i n Wireless instr uc ti on P ar ameter in Wire le ss
instructi on m od e ca n' t setting direc tl y.It's only ca n se tt in g by
MASTER ligh t.
·To correc tl y us e th e wi reles s co mm an d mo de, you must sett in g
communica ti on c ha nn el and grou p by c or rect.
21 22
Page 13

Wireless opti cal flash model(S1,S2)
Rotating th e fl as h la mp, the signal tran sm it te r should toward to th e
MASTER spee dl ig ht i n S1,S2 mode.
Setting opt ic al f la sh m odel:
1, Press 【Flash mo de l se le ct button】 until LCD d is pl ay S 1/S2 model in
Wireless flash mod el .T he se two models are sui ta bl e fo r the side effe ct o f
the machine , to c re at e a variety of lighti ng e ffects. The y are suitable for
manual flas h an d TTL flash environmen t.
2, In these two mod es , th e ou tput brightness i s ad ju st ed to the same as the
M mode.
S1 mode l:
Suita bl e for man ua l flash env ir onmen t, each
flash o f in ducti on M ASTER fla sh l ight an d
sync tr ig ger fal sh .The effe ct as sam e as
Wirele ss f la sh trig ge r.MAST ER f lash se tt in g
manua l mo del in co mm om situat io n,ple as e
don't u se TTL model o f pr e-fla sh a nd red rey
reduc ti on of sev er al flash.
S2 mode l:
Suita bl e for man ua l flash env ir onmen t
(pre- fl ash can ce lmodel ). Th is mode l ca n
ignon e TTL flash Pr e fl ashin g si gnal and ma in
flash s yn c.It su pp ort MASTE R fl ash lig ht i n
TTL model.
Note: If SLAVE light does't sy nc f la sh w it h MASTER flash li gh t in S 1
/S2 model.P le ae s se tt ing optcial mod el o f SL AVE light a nd p ow er
output by cor rect.
Please avoi d se ve ra l si tuation as belo w:
Avoi d MA ST ER light to use red e ye reduct io n fu nc it on
Avoi d MA ST ER light to use model l am p
Avoi d MA ST ER light to use instr uc ti on m od el(Nikon) or wi reless
model (Cano n)
Avoi d MA ST ER light to use ST-E2 and the v ic e fa ct or y master fl as h
as for fl as h co ntrol er.
Note:
If the camera w it ho ut a b ui lt-in flash (su ch a s Ca no n' s 5D, 5D II, 5D III)
is unable to us e th e c/ Sl av e n S1/S2 or Sl av e mo de s eparately. Bec au se t he
Slave c/Sla ve n o r S1/S2 mode is req uired t o us e th e Ma st er ligh t ex po su re
to use. If you ne ed t o us e th is f eature to y ou n ee d repurch asing the origina l
Canon flash o r ST-E 2 as a f lash contro ll er.
Multi lighting applications
1, Wi reles s op ti ca l in strcu ti on l ig ht
You can create tw o or t hr ee s lave units to compl et e th e mu lti - position
shooting re qu ir em ent. And by the main T TL au to f lash shooting fla sh
set the flash r at io , ma nual flash output s tr ob e ou tput,
(1)Flash li gh t co mp ose two salve unit gr ou p' s wi reless flash.
Setting SLAVE unit: SLAVE c and SLAVE n.
Setting cha nn el : 1, 2,3,4
Setting gro up : Two fl as h li gh ts setting group A ,B
Setting MAS TE R un it : Setting each grou p fl as h mo del and output powe r
Setting fla sh l ig ht r atio: Setting MAS TE R un it f lash light ratio A:B o r A:
B:C for shoot in g (f or e xample: Canon ins tr uc it on )
(2)Flash li gh t co mp ose three SLAVE unit group 's wire le ss f la sh
Setting SLAVE unit: SLAVE c and SLAVE n.
Setting cha nn el : 1, 2,3,4
Setting gro up : Three flash lig ht s se tt ing group A,B,C
Setting MAS TE R un it : Setting each grou p' s fl as h model and output po we r
Setting fla sh l ig ht r atio: MASTER unit f la sh l ig ht ratio setting <A : BC >
(For exampl e: C an on i nstruction ) ,pre ss d ow n te st button of MASTER
unit to test fl as h. If t he SLAVE un it d oe sn't flash ,pleas e ch ec k th e flash
light angle a nd t he r ig ht distance.
Note:
MASTER unit : If s et ti ng <RATIO A: B>, se tt in g SLAVE uni t of g ro up C
will not flas h.
If the group of t hr ee f la sh light set <A>,th ey w il l be c ontrolled by MAST ER
flash light .
23 24
Page 14

2, Wi reles s op ti ca l fl ash
Using built -i n fl as h light or outlay fla sh l ig ht a s MASTER MASTER fla sh
light.Ple as e pu t di fferent a ng el .
wireless ch an ne l wi ll be reflect back by w al l in i nd oor.So please ch oo se
more space to p ut f la sh l ight.
After impro ve d Wir eless trigger i nd uc to r ,t he trigger indu ct io n fa st er ,
S1 and S2 model a va il be f or outdoor.The d is ta nc e 15 meters by wirele ss
trigger ind uc to r.Put SLAVE li gh t ,please test S1 or S2 w he th er i s work
before shoo ti ng .
Note: Pleas e do n' t pu t any barrier betwe en M AS TE R flash light and
SLAVE fla sh light in optical f la sh .Wi re le ss trigger induct io n to t he
MASTER fals h li gh t an d don't allow the sun sh in e di rectly raying in
outdooor. If t hi s re quest is not good for y ou r sh oo ti ng ,you can up or
down or left or r ig ht t o ro ating the flash lig ht .
Setting postion and operation rang
Out door Ind oor Out door Ind oor
Voice prompts:
Diffe re nt s ound is diffe re nt w orking conditio ns .
Long press “c us to me r menu setting key” t o co us to mer setting. Th e bu zzer
switch will b e ON o r OF F.
1, A long rin g: c al l ba ck to complete
2, Two short ring: on or ca ll b ac k to c omplete normal fl as h.
3, Two long ring: flash c al l ba ck u nfinsihed.
4, Five short r in g: t he b attery power is not e no ug ht o r call back timeout .
5,Contiun e bu zz : f la sh ligve overheat in g an d co me into overheati ng
protectio n. Th e di splay will show ico n.
Back li gh t di sp lay:
1, ON/OFF: Pr ess the backlight b ut to n to c ha nge.
2, After sta ndby 15s ,the backl ig ht w il l be a uto off.
Custo mer menu setting
Updated: Year
Updated: Mo nt h
Updated: Da te
25 2 6
Page 15

According to your req ue st t o se t up c us to me r menu.
Custo me r menu se tt ing:Lon g pr ess
Press < Pa ramet er s etting bu tt on) to se le ct settin g op tion. Ro tary di al t o se tting
ON or OFF,the n pr ess 【Model f la sh sele ct b utton】to qu it .
No
Fn-01
Func tion
Auto s leep
【Custo me r menu bu tt on】” as left p ic ture ;
Sett ing
NO.
0
1
Desc ription
ON
OFF
Autom atic save functio n
After flash s et u p, 5 s ec onds without keys tr ok es , will automatica ll y sa ve
the current S et ti ng s, It is convenient f or n ex t ti me operation .
Setting clear
When you need t o cl ea r th e changes on the flas h, r es to re the factory defa ul t
settings, j us t at t he s ame time hold down th e "p ar am eter settings but to n" a nd
"High speed / Re ar c ur tain/Ordinary f la sh li ght switch button , th e fl as h to
restore the d ef au lt S ettings.
Preset at the same time
Fn-03
Fn-04
Fn-08
14
Fn-
-15
Fn
Note: Fn ON: 00 -1 3 op ti on b y outlay flash li gh t cu st om er menu o f ca me ra
menu to setti ng . No : 00、0 2、05、0 6、07、09、10、11、12、13 opti on h ad
been ON(Can on i ns id e me nu)
Auto c ancel
flas h exposure
Flas h exposure order
Auto f ocus assisant fl ash
Buzz s witch
Version
0
1
0
1
0
1
0
1
F
ON
OFF
0 → - → +
- → 0→ +
ON
OFF
ON
OFF
Date
Flash lock (Low power tip s)
When the batt er y po we r is low or other reaso ns c au se f lash chargi ng i s no t
completed wi th in the li mi t time, the fl as h will en te r a state of lo ck, Mean
while t he screen d is play as show n in fi gu re , short c ha nnel wi th a buzzer
sounded, remin d the user to replac e the batt er y to ensur e the norm al us e,
if change after full y cha rged batteries, flash ligh t c an 't re cy cl e b ac k in a
limited am ou nt of ti me (20 seconds) to recy cl e b ac k, please contact af te r
sell servic e.
27 28
Page 16

Bounc e Flash
Reflectio n fl as h is b y putting a flash hea d to wa rd t he wall or ceiling, f la sh
be metope reflect in front o f th e il lu mi nated by t he o bj ec t. This can reduce
the sh adow on the re ve rs e of the subjec t object, in or de r to obt ain mo re
natural pho to gr ap hic effec t.
Adj ust the flash head tilt, rotation Angle an d select the reflectio n
pla ne
Whi te Ceil ing
reflectio n pl an e .T he effe ct iv e di st ance is 1 m to 2 m, depen di ng o n th e
shooting en vi ro nm ent. Shoot color ph ot os , pl ease choose white o r
reflectiv e pl an e re flection flash. O th er wi se,When taken pho to s wi ll
appear unna tu ra l co lor.
Use the built-in reflex plate
Appli ca tion of r ef lex flash w he n
shoot in g, use th e bu ilt-in re fl ectio n
board , ca n make th e ma in body mor e
brigh t an d exist en ce of vital it y.
Meanw hi le it can a vo id to light t he
front o f th e foreg ro und objec ts .
When the flas h he ad t hr own back and
the ceiling a s th e ra di ation surface,
can usually b e th e mo st s imple to
obtain good r es ul ts . Holding camera
longitudi na l, h or izontal select fl as h
can obtain th e sa me e ffect.
Note that do no t fl as h di rect exposure
to the subjec t. B et we en flash head and
1, Th e fl as h he ad up
90 degrees.
2, Pull out wid e
diffu si on p late as
well as pop-u p
reflectio n ca rd a t
the same time .
3,Keep refl ec ti ng
cards with wi de
diffu si on p late, only
push wide dif fusion
plate
Use the b uilt-in wide-an gle diffuser
When the ca me ra to th e s ubject's dista nc e i s l es s t han 2m, you can use th e
wide angle di ffuser plate more n at ur al ly close-up. Can al so u se t he b uilt-in
wide-angl e di ffuser will fla sh c ov er age expanded into a w id e an gl e.
1.Pull out wide diffusion plate
Slowly pull c om pl et ely wide diff us io n
plate, then p ut i t in t he f lash head.
2.Push the ref le ct or p la te
At the same tim e to p us h re flection piece
into the flas h he ad .
29 30
Page 17

Speci fication
Circuit design: Insulated gate bipolar transistor (IGBT)
Guide Number: 118 (ISO100,180 mm)
Flash cover ag e: M an ual/Automatic z oo m1 8 ~ 18 0 mm
TTL flash mo de : Aut omatic mode, Manu al m od e M, S troboscopic mod e
Wir eless trigger : Li gh t pu ls e, Induction fl as h li gh t
Wir eless flash dis ta nc e: I nd oor 20 ~ 30 meters, Out do or 1 0 ~ 15 m
Support the s ub or di na te unit: 4 commun ic at io n ch annels (1, 2, 3, 4) a nd
Rotation Ang le : Up a nd Down - 7 ~ 90 degrees
Left-Righ t /R ig ht -L eft rot at io n Ang le: 0 ~ 180 degrees
Color tem pe rature :5 50 0K
Flash time: 1 /2 00 s- 1/20000s
Manual flas h co nt rol: 1/128- 1/ 1 st ep 0 .3 EV, a tota l of 2 2 gr ade fine-tune
External in te rf ac e: Hot Shoe, PC sync in te rf ac e, External inter fa ce D C
Recycle tim e : 2. 3 se co nds
Power sup pl y: 4 AA Batteries ,
Flashes :(A se t of f ul l working hours whe n th e ma xi mum and minimum
Additional features: Power saving mode, Overheating protection
Size : 7.87" H x 2.95" W x 2.24" D
Weight : 13.2 oz. (without batteries)
Flash head ro ta ti on t o achieve reflect io n fl as h
Multi, LED li gh ti ng , canon master,Nikon Mas te r mo de ls,
Slave light S LAVE c, SLAVE n, Light flash mod e S1 , S2 ,
Surrounde d by f la sh e xposure (FEB)
3 SLAVE uni t group (A, B, C)
gear
power suppl y
power battery) Flash number for 500-5000 times
Sunpak One Year Warranty:
This Sunpak product has been carefully manufactured, accurately adjusted,
inspected and thoroughly tested before shipment to assure you of the highest
quality. Should this Sunpak product require service, we will repair or
replace, at our option, any part, or the product itself, which our examination
shows to be defective in material or workmanship. This warranty does not
apply to wear and tear associated with the normal use of the product. This
warranty is non-transferable.
Repairs will be made to the product at no charge, under the terms of the
warranty as stated above, only when accompanied by a copy of your dated
and itemized sales receipt. Be certain to follow all assembly and/or operating
instruction with this product.
This warranty is not valid if the product has been misused or damaged in any
way that is beyond our control or through normal wear and tear associated
with its use. This warranty only applies to the product and we are not
responsible in any way for losses, damages or any inconvenience caused by
equipment failure.
Some states do not allow the exclusion or limitation of consequential
damages, so the above limitation or exclusion may not apply to you. This
warranty gives you specific legal rights and you may have other rights which
may vary from state to state.
Should service be required, the product should be carefully packed and sent
pre-paid and insured to the address listed below. A note describing the nature
of the defect should be enclosed to expedite handling. Proof of purchase
must be included for all warranty repairs.
Sunpak
ToCAD America Inc.
53 Green Pond Road
Rockaway, NJ 07866, USA
www.tocad.com
31 32
 Loading...