

Page 1

Page 2
SUNPNK
auto622
pro
Owner's Manual
Bedienungsanleitung
Mode
d'emploi
Manual
G
ebru
Manuale
de instrucciones
iksaanwijzing
d'istruzioni
system
Page 3

INTRODUCTION
www.orphancameras.com
622 System
The Sunpak
and sophisticated
r
More Power.
Guide
25180
r
More
Fully dedicated
cords and
use
cameras.
automatic
ooeration.
.
More Creativity.
Interchangeable
maximum creative
.
More
A full
ample,
Powerpak
er
o
More
The energy-saving
hundreds
al
times as
recharges completely
.
More
Dial
112power,1/4
credible
new
ouence
Because
that
camera
tures. Then,
shoot
your
rewarded
your
come.
Welcome
Auto
flash
of 50/160
Number
(m/f)
ISO 25
for
Gontrol.
of
Versatility.
range of
in weight.
operation-and
the unique
world of
you
a
new equipment
first
capability
interchangeable
TTL off-the{ilm
Flashes.
Picture-taking
read through
and
test
more: override
Plus
operation
power
battery
the
operation.
of extra
And
well.
Power
power...
power.
1/128th
fill-in
and
flash
many unique
its
of
f lash unit
as with
roll
of
by superior
film ... and
roll of
... to the Sunpak
flash
versatilitY.
cartridge
This
Thyristor
lashes in automatic
f
provides
the unique
flash,
more.
this
in f
any
film
to the best
is a remarkably
gives
unit. lt
(m/f)
for ISO
film on
Standard
via
dedicated
modules allows
metering with
manual
and
head system
available.
sources
is removable
the body
makes
circuitry
ultra{ast
Nicad
hour.
in
one
Possibilities.
Ratio control
the waydown
all
This opens
flash,
macro
features,
Owner's
you
ront
of
important
confirm
advantage.
pictures
many,
for
world of
that
to
flash
versatile
you...
100 Jilm,
Head.
remote
the
compatible
features
Manual with
before
for
power
ratio
provides
For ex'
on
light-
gives you
or manurecycling
"Cluster"
at
to shoot
in-
to an
whole
up a
rapid-se-
recommend
we
new equipment'
beginning
many
light!
taking
you
your
pic-
are uslng
You'll
with
years
be
LEITU
EIN
Das Sunpak Auto
wert
Das
.
Mehr Leistung.
Leitzahl 50
25
.
Mehr Kontrolle.
Volle Steuerbarkeit
kabeln
lichen
kompatiblen Kameras.
steuerbarkeit fUr Automatik und
stungsfaktorbetrieb.
o
Mehr Kreativitdt.
Auswechselbares Blitzkopfsystem im Interesse
kreativen Blitzens.
.
Mehr
Die verschiedensten Spannungsversorgungsmoglichkeiten.
Beispiel das
Dadurch wird das Gehduse
.
Mehr
Die energiesparende
lhnen Hunderte von Extra-Blitzen bei automatischem und
laden
NiCd-"Cluster" liidt
.
Mehr Bildauf nahmemdglichkeiten.
Mit der einzigartigen Leistungsfaktorregelung
konnen
hin
nehmen. Dies
Fotografierdimension:
Schnellfolgeblitz
Dieses Blitzsystem
male
nungsanleitung mit
Tisch aufmerksam durchzulesen, bevor Sie Blitzaufnahmen
to
ren wichtigen neuen
Filmrolle testbelichten,
Sie die Moglichkeiten lhres
ausnutzen. Sie werden belohnt. Schon lhre ersten
Blitzaufnahmen
Betrieb
Willkommen in der Sunpak-Blitzlichtwelt.
NG
vielseitige
System bietet
mit
Vielseitigkeit.
Blitze.
zu einer unglaublichen
auf . Deshalb empfehlen
ist
622-System
und fortschrittliche Blitzeinheit.
lhnen ...
(m)
fUr
ISO 100,
Standardkopf.
und auswechselbare
TTL-Messung
geht
Sie
lhnen fur viele
Film
mit
speziellen
von
Und
Bei Powerpak-Betrieb
Batteriemagazin abnehmbar.
Thyristorschaltung
manuellem
blitzschnell. Und der
mit
machen. Dann,
Betrieb.
in
einer Stunde
1/2 Leistung, 1/4 Leistung ... bis
lhnen
eroffnet
Aufhellblitz,
und vieles mehr.
weist viele
Kamera und Blitz auf dem
Gertit, sollten Sie
um sicherzustellen, daR
gelingen.
werden
Jahre sicher.
ist
eine bemerkens-
(m)
25
FernausloserModuln erm0gFilmeebene mit
der
mehr:
noch
manuellen
ist
leichter.
Auch das Nach-
einzigartige
vollig
11128 Leistung
vOllig
eine
Makro-Blitz,
einziEartige
wir lhnen,
wie bei
die
jedem
neuen
Blitzes voll
St6rungsfreier
fUr
ISO
Uber-
Lei-
zum
gibt
nach.
auf-
neue
Merk-
Bedie-
ande-
eine
INTRODUCTION
622 est
Auto
Sunpak
Le
polyvalent
ment
.
plus
Une
Nombre
100 lSO, et
de
ISO sur
25
.
plus grande
Une
cordgns
Ses
interchangeables
pellicule
hors
plus,
De
oermettent
qu'en
si
.
plus
Une
t6te de
La
imum de
.
plus
Une
Fonctionne
tations.
d
touche
Sunpak.
.
plus grand
Un
Le circuit
centaines
des
manuel, et
rapides. Et
ultra
clusif se
.
plus
De
vue.
r6glant
En
on
sance,
jusqu'au
ce
ouissance.
photographie
l'6clair
de
A cause
exclusives,
ce
tirement
lash devant
f
pour
d'essai
pareil
maximum de ses
au
recompense
vue
au
de
licule... et
Bienvenue
Sunpak!
perfectionn6.
et
puissance.
grande
guide
de 50/160
(m/f)
25180
t6te standard.
gamme
t6l6commande
de
permettent
les appareils
avec
caract6ristiques
s'et
fonctionnement
un
rapport de
grande
souplesse
grande
Par
piles
Ceci
thyristor a 6conomie
recharge
grandes
macro,
nous
flash dds
ce
Puissance.
cr6ativit6.
interchangeable
flash
pourra
de
polyvalence.
gamme
une
sur
exemple,
il
la commande
taux
Ceci
I'abondance
mode d'emploi
soi,
s'assurer
par
pendant
on
lors d'une
I'appareil
rend
nombre d'6clairs.
d'6clairs
des
autorise
"bloc
le
une
en
possibilit6s
prendre
incroyable
ouvre
l'6clair compl6mentaire,
dont
l'6clair en
recommandons
puis,
que
qualit6
la
le
de
le monde
dans
remarquable-
flash
un
vous donne...
ll
(m/f)
cr6ation.
alimentation
un
de ses
prendre
possibilit6s.
premier
longues ann6es
une
avec
avec une
pourra
des
succession
sup6rieure
pellicule
commande.
de
ses
et
mesure
une
compatibles.
d'asservissement
automatique
assure
compldte
retirer
sur
plus
l6ger.
d'energie
automatique
en
dur6e
de
heure.
de
monde
I'appareil
I'on utilise
recyclage
de
piles"
NiCad
prises
de
rapport de
112,
vues d
'll128dme
de
nouveau
caract6ristiques
lire trds atten'
de
photo
une
On
des
rouleau
de
pellicule
de
modules
TTL
aln-
max-
un
d'alimen'
la
car-
le bloc
permet
ou
exde
puis-
114 et
la
de
de
rapide.
le
et
pellicule
l'ap-
bien
en sera
prises
pel-
de
venir.
a
lumidre
,r;ij,f,ii'l,t&i&;t,
.,.r+x,ir'+*kc,
.,..#&ii!;*-:,.r-
Page 4
Table of Contents
Description
Sunpak
Condensed
Selecting
Selecting
Mounting Flash
PC Cord/Dedicated
Hook-Up
Automatic Operation
Automatic Operation
Manual Operation..................
Operating
For Better Bounce
MultipleFlashOperation......................
Accessories
622
Careof
Guide
Guide
Guide
Auto
Specif
of Parts
Auto 622 Pro System Chart
and Installing
and
Adjustable Bounce
Pro System
YourAuto622Prosy;i;;
Number Relerence Chart
Number Reference Chart
Number Chart
Distance Range .............
ications
Instructions
Operating
Flash Head
Installing Power
on
Camera
Cord
(Dedicated
Flash Prctures
for the
Available
..............
(Optional)
........
...........................
Source
..............................
Mode) ............. ............ 52
Flash Head ..................... 60
Auto
Sunpak
. ...
(l)
....
(ll).........
.......... 9
..... .. 10
.........12
....... 14
.................... 34
. 40
. .... ...
................. J{
.......... 62
........64
22
44
qA
lnhalt
Bezeichnung
Sunpak aulo
SchnellanleitunS
Auswahl und
Wahl
Ansetzen des
AnschluR
(Sonderzubeho0
Automatischer
Aulomatischer
Manueller Betrieb
Bedienen
indirektes Blitzen
Tips zu
Mehrfachblitzbetrieb
ZubehOr
Pflege des SU
Leitzahl-Bezugstabelle(l)
Leitzahl-Bezugstabelle
Leitzahltabelle
Automatikentfernungsbereich
Technische
der einzelnen
622
Ansetzen des Blitzkopies
und Installation der Spannungsquelle
Blitzes an die
mit PC-Kabel/Dediziertem
Betrieb ..........
Betrieb
des einstellbaren
indirektem Blitzen
{ur das Sunpak auto
N PAK auto 622
Daten
Teile ..............
pro-system-Diagramm
.....
Kamera
....................
(Dedizierte
..........
Blitzkopfes
...........
............
622
pro-system
......
(ll)
.
............
.....................
.................
Kabel
Betriebsart)
fUr
pro-system
.........
72
10
12
1j
22
34
40
44
52
54
60
62
o4
66
76
77
78
79
80
matidres
des
Table
9
Indice
partes
Descripcion de
Gr6f
Instrucoones de f uncionamienlo
Elecci6n
Seleccion
Monlaje del
Conexion
Funcionamiento
Funcionamiento
Funcionamiento
Funcionamiento del
Para
Funcionamiento
Accesorios disponibles
622
Cuidados del Sunpak
622
Grdf
Grdf
Gr6fica
Alcance del llash
Especif
las
ica del sistema Sunpak
instalaci6n de
e
instalacion de
e
f lash
del cable
mejores fotograf
obtener
Pro System
Pro System
ica
referencia de
de
referencia de
ica de
numeros
de
icaciones ....................
la
la f
la camara
en
PO/cable especial
automatico
autometico
manual
f lash de
multiple del
para
..........
Auto
..........
numeros
nrjmeros
guia
...............
..............
aulo
cabeza
uente de
(modo
rellejo ajustable
ias con
flash
el Sunpak
pro
622
system
resumidas
f lash
del
alimentaci6n
(opcional)
especial)
f lash de
Auto
guia (l)
guia (ll)
-.ellhu,,
........
10
12
14
..
22
34
40
.........
44
..............
52
54
60
reflejo .
62
64
66
IZ
....................
76
77
78
79
80
Inhoudsopgave
..'...
Y
10
12
14
zz
34
40
44
52
trA
.
60
oz
64
72
76
77
78
79
80
9
Beschrijving
Systeemkaa
Keuze
Keuze
Monteren
Aansluiting
kontrolekabel
Automatische
Automatische
Handbediening
Gebruik
Voor betere
Veelvoudig
Afzonderlijk
Sunpak
Zorg
Verwijzingstabel
Verwijzingstabel
Richtgetallen-tabel
Automatisch
Technische
van
onderde1en
de
het
rt van
van de
installatie
en
en
van de verstelbare
Auto 622
en onderhoud
van de
installatie
f litser
van de
van synchroonf
(los
verkrijgbaar)
bediening
bediening
met indirekt
foto's
............
flitsen
bestelbare
Pro SYSteem
van
voor
voor
...............
alstandsbereik
gegevens
.................
pak
AuIo 622
Sun
f litskop
voedingsbron
camera
op een
litskabel/speciale
....................
(speciale f
unktie)
reJlektieflitskop
flitsen ............
toebehoren
het Aulo 622
richtgetallen
richtgetallen
(l)
(ll)
Pro Systeem
...................
..............
het
voor
Pro
Systeem
..........
Sommario
Designazione delle
Componenti
lslruzioni condensate
Selezione e
Selezione e
d'a|imentazlone....................
Montaggio del
Collegamento del
(opzionale)
Funzionamento
Funzionamento
Funzionamento
della
Uso
regolabile
Funzionamento
Accessori
Manutenzione
Tabella
di
Tabella
di
Tabella dei
automatica
Gamma
Dati tecnici
parti
del Sistema Sunpak
installazione della
installazione della sorgente
lampeggiatore sulla
cavo PC/cavo dedicato
automatrco
automatico
manuale
lampeggiamento a
testa
di
lampi multipli ......................
a
disponibili del Sistema Sunpak
del Sistema SunpakAuto 622
riferimento
riferimento
guida
numeri
delle distanze
Auto 622Pro
di lunzionamento
testa del lampeggiatote
lotocamera .. . ........ 34
(modo
dedicato) ................. 52
guida
guida
.............
(1)
(2)
numeri
numeri
...........................9
..............10
......................... 1 2
...........
....................44
luce riflessa
........................60
Auto 622
. . ......
.. ..
..............,.,....
.14
..................22
.. . ..40
................ 62
Pro . 64
........... 72
Pto
.. ......... 76
. ... ..........77
.
........78
.........79
80
Page 5
12
www.orphancameras.com
13
14
15
16
17
18
19
20
21
22
23
10
Page 6
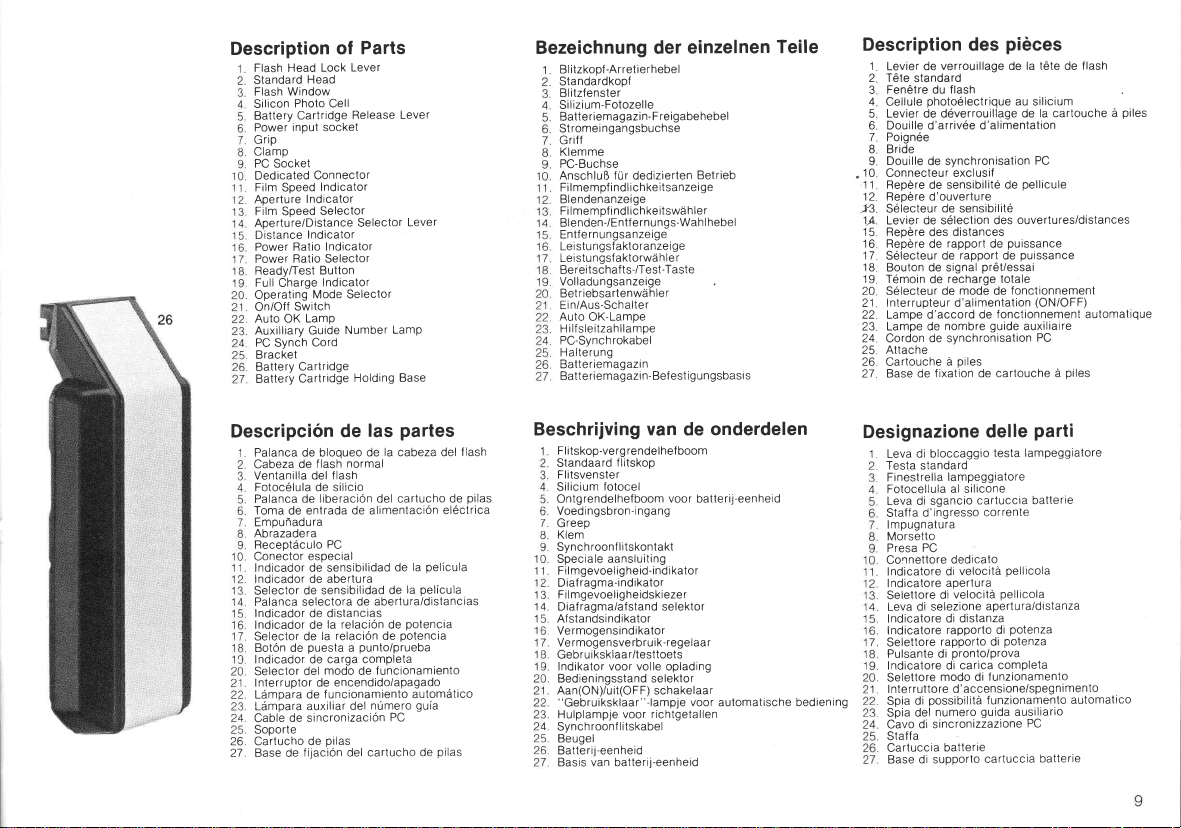
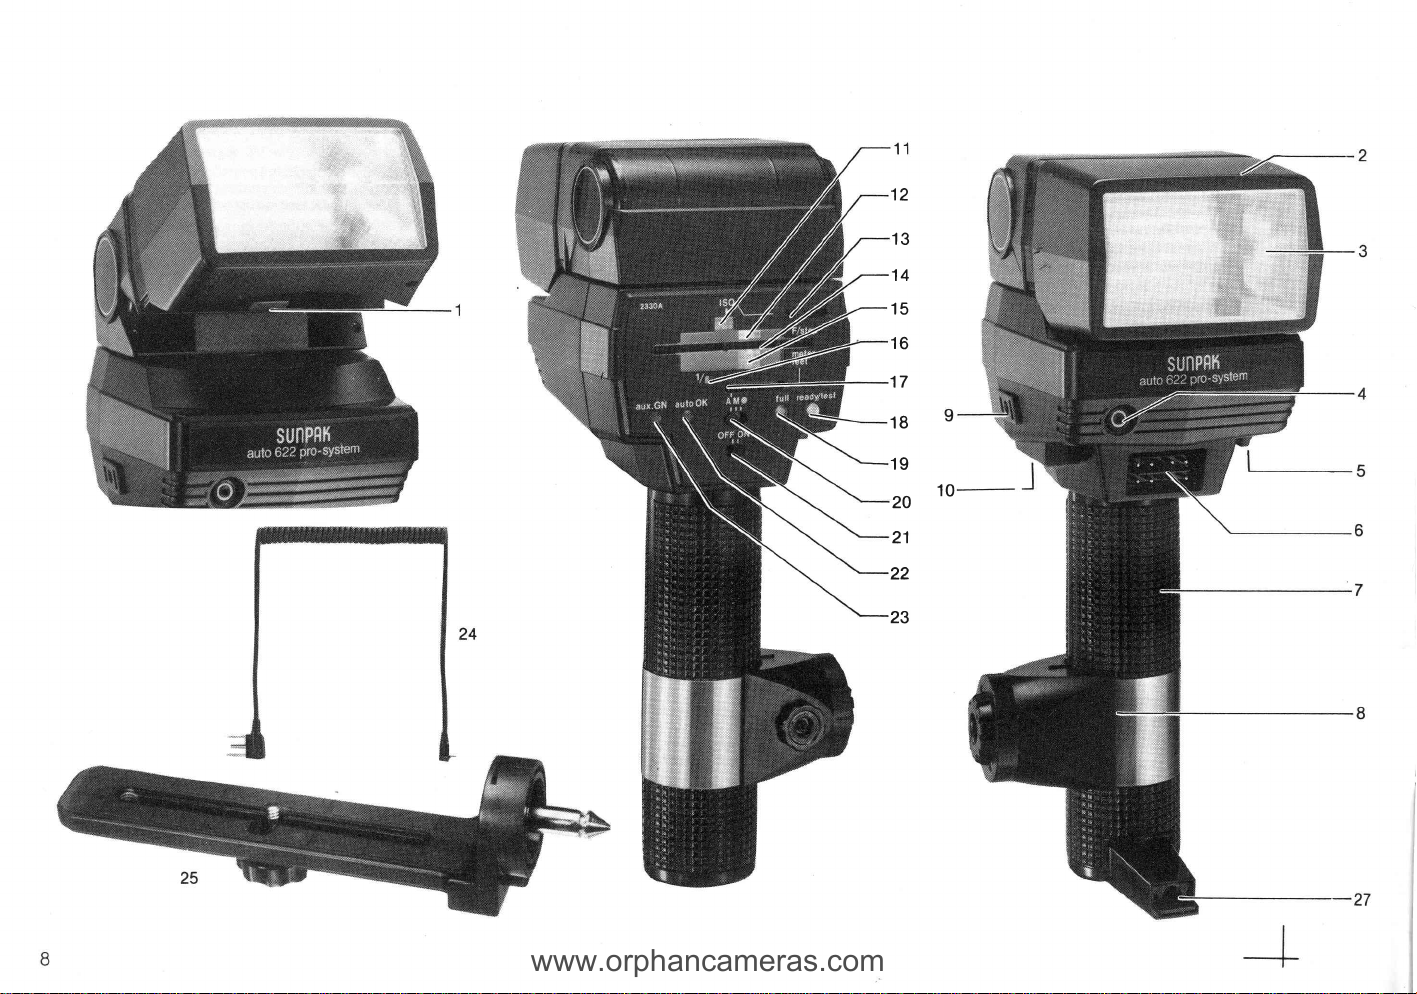
Description
Head
Photo Cell
Cartridge
inout socket
Connector
Indicator
Indicator
Ratio
Ratio Selector
Charge
Mode Selector
Switch
Lamp
Guide
Cord
Synch
Cartridge
Cartridge
Lock
lndicator
Selector
Indicator
Button
Indicator
Flash Head
Standard
Flash Window
Silicon
Battery
Power
Grip
Clamo
PC Socket
Dedicated
Film Speed
Aoerture
Film Soeed
Aperture/Distance
Distance
Power
Power
Ready/Test
Full
Operating
On/Off
Auto OK
Auxilliary
PC
Bracket
Battery
Battery
of
Lever
Release
Number
Holding
Parts
Selector
Lever
Lever
LamP
Base
Bezeichnung der
-Ar
itzkoof
Bl
Standardkopf
Blitzfenster
Silizium-Fotozelle
Batteriemagazi
Stromeingangsbuchse
Griff
Klemme
PC-Buchse
AnschluR
I mempf i ndl ichkeitsanzei
Fi
Blendenanzeige
I memof i ndl ichkeitswiihle
Fi
Blenden-/Entf
Entf ernungsanzeige
Lei stu
Leistu
r'e i t
Be
Volladungsanzeige
Betriebsartenwdhler
Ein/Aus.Schalter
Auto
ilf
H
PC-Synchrokabel
Halterung
Batteriemagazin
Batteriemagazi
ierhebel
ret
n- F reigabehebel
fur
dedizierten
ernungs-Wah
ngsf
aktoranzei
ngsf
aktorwdh
haf t
s-/Te st
sc
OK-Lamoe
sleitzahllampe
n-
ge
le r
-Ta
Bef est
einzelnen
Betrieb
ge
r
I hebel
ste
ig
s
ungsbasi
Teile
Description
1
2 Tete standard
3
4
5 Levier de d6verrouillage
6 Douille d'arrivcse d'alimentation
7 Poign6e
8 Bride
I
10
*
1
1 Repere
12 Repere d'ouverture
*3
14
15 Reodre des distances
16 Repere
17
18
19 T6moin
20 S6lecteur de
21
22 Lampe d'accord
23 Lampe de
24
25 Attache
26
27 Base de
verrouillage de la
Levier de
Fen6tre du
Cellule
ohoto6lectrique
Douille
de synchronisation
Connecteur exclusif
de
de
56lecteur
Levier de s6lection
de
S6lecteur de
Bouton de signal
de
Interrupteur d'alimentation
nombre
de synchronisation
Cordon
Cartouche d oiles
fixation de cartouche d
pidces
des
flash
sensibilite de
rapport
recharge totale
au
sensibilite
ouvertures/distances
des
puissance
de
rapport
de
pret/essai
mode
fonctionnement
de
fonctionnement automatique
de
guide
tete
de
silicium
la cartouche a
de
PC
pellicule
puissance
(ON/OFF)
auxiliaire
PC
oiles
flash
piles
Descripcion
Palanca de blooueo
Cabeza
Ventanilla
Fotoc6lula de silicio
Palanca
Toma de entrada
Emouf,adura
Abrazadera
Receot6culo
Conector
lndicador
lndicador
Selector
Palanca
Indicador de distancias
lndicador de
Selector de
Boton de
Indicador de
Selector del
nterruptor
I
Lamoara de
Ldmpara auxiliar
Cable
Soporte
26
Cartucho
Base
27
lash
f
de
del flash
liberacion del cartucho de
de
PC
esoecial
de sensibilidad
de abertura
de sensibilidad
selectora de
la relacion
la relacion de
puesta
carga completa
modo
encendido/apagado
de
funcionamiento automdtico
de sincronizacion
de
oilas
fijacion del cartucho
de
partes
las
de
la cabeza del
de
normal
de alimentacion
de
la
de
abertura/distancias
potencia
de
potencia
punto/prueba
a
funcionamiento
de
n0mero
del
PC
pelicula
la
pelicula
guia
de
lash
f
pilas
electrica
pilas
Beschrijving
Fl itskop-ve
Standaard
Flitsvenster
Silicium
Ontgrendelhefboom
Voedingsbron-ingang
Greeo
Klem
Synch
Speciale
I mgevoel igheid-ind ikator
Fi
ragma-indikator
Diaf
Fi I mgevoel
ragma/afstand
Diaf
Af standsindikator
Vermogensindikator
rmogensve
Ve
Gebru
Indikator voor volle oplading
Bedieningsstand
Aan(ON)/uit(OFF) schakelaar
"Gebruiksklaar"-lampje
Hulplampje voor
Synchroonf
Beugel
Batterij-eenheid
Basis
van
rg rendelhef
flitskop
fotocel
itskontakt
roonf I
aansluiting
ighe idskieze r
rbru ik-regelaar
iksklaar/testtoets
selektor
richtgetallen
litskabel
van batterij-eenheid
onderdelen
de
boom
voor batterij-eenheid
selektor
voor aulomatische bediening
Designazione
di bloccaggio
Leva
Testa
standard
Finestrella
Fotocellula
Leva di sgancio
d'
Staffa
lmpugnatura
Morsetto
PC
Presa
Connettore
Indicatore di
Indrcatore
Selettore
Leva di
Indicatore di
Indicatore
Selettore
Pulsante
Indicatore
Selettore
I nterruttore d'accensione/spegnimento
di
Spia
Spia del
di sincronizzazione
Cavo
Staffa
Cartuccia
Base di supporto
delle
testa
lampeggiatore
al silicone
cartuccia
ingresso corrente
dedicato
velocita
apertura
pellicola
velocita
di
apertura/distanza
selezione
distanza
rapporto di
rapporto di
pronto/prova
di
comPleta
di carica
funzionamento
modo di
possibilitd
funzionamento
guida
numero
batterie
cartuccia
lampeggiatore
batterie
pellicola
potenza
potenza
ausiliario
PC
parti
automatico
batterie
Page 7
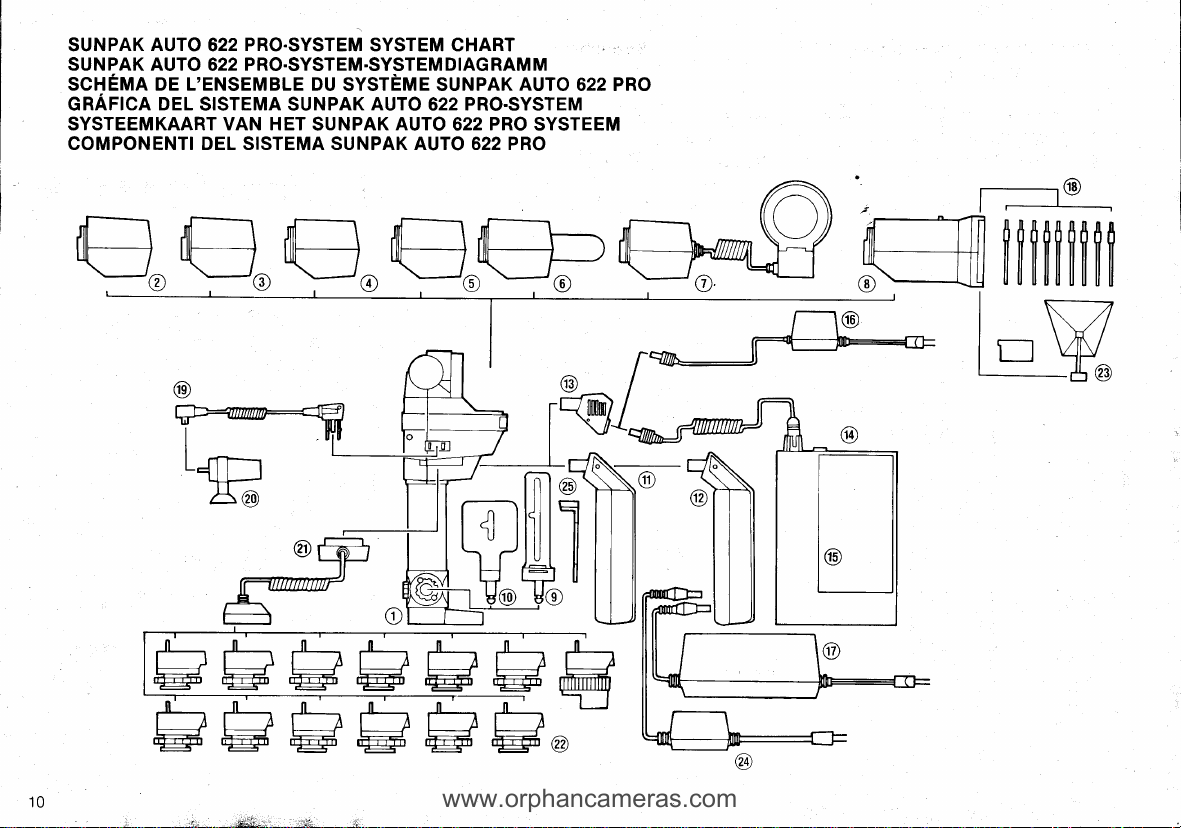
SUNPAK AUTO 622 PRO.SYSTEM SYSTEM CHART
www.orphancameras.com
SUNPAK AUTO
SCHEMA DE L,ENSEMBLE DU SYSTEME SUNPAK AUTO 622 PRO
GRAFICA
SYSTEEMKAART VAN HET SUNPAK AUTO 622 PRO SYSTEEM
COMPONENTI DEL SISTEMA SUNPAK
DEL
PRO.SYSTEM.SYSTEMDIAGRAi'M
622
SISTEMA SUNPAK
AUTO
622 PRO.SYSTEM
AUTO 622 PRO
.li----]
[F-J r- r]t+
\ / \ / \ /
\-J.,
bbhbC-b
-_-=-jE-14EE-i_'E_=@6
tstr+l/-]hhh
.ffi1
"ffi6
'iffil .+#n ,F==6
nl----l nd----r-
il4ilstl-_Myn
rrt
I
r.,rt
*ut
&1
8,6i,
l7\' r-J@
\\-.i//
-fr--TT
llf+,CflAAl
fll++l llllllllllllllllll
l_v
Ll
I
\4u
A@
10
tu
.. .#,
Page 8
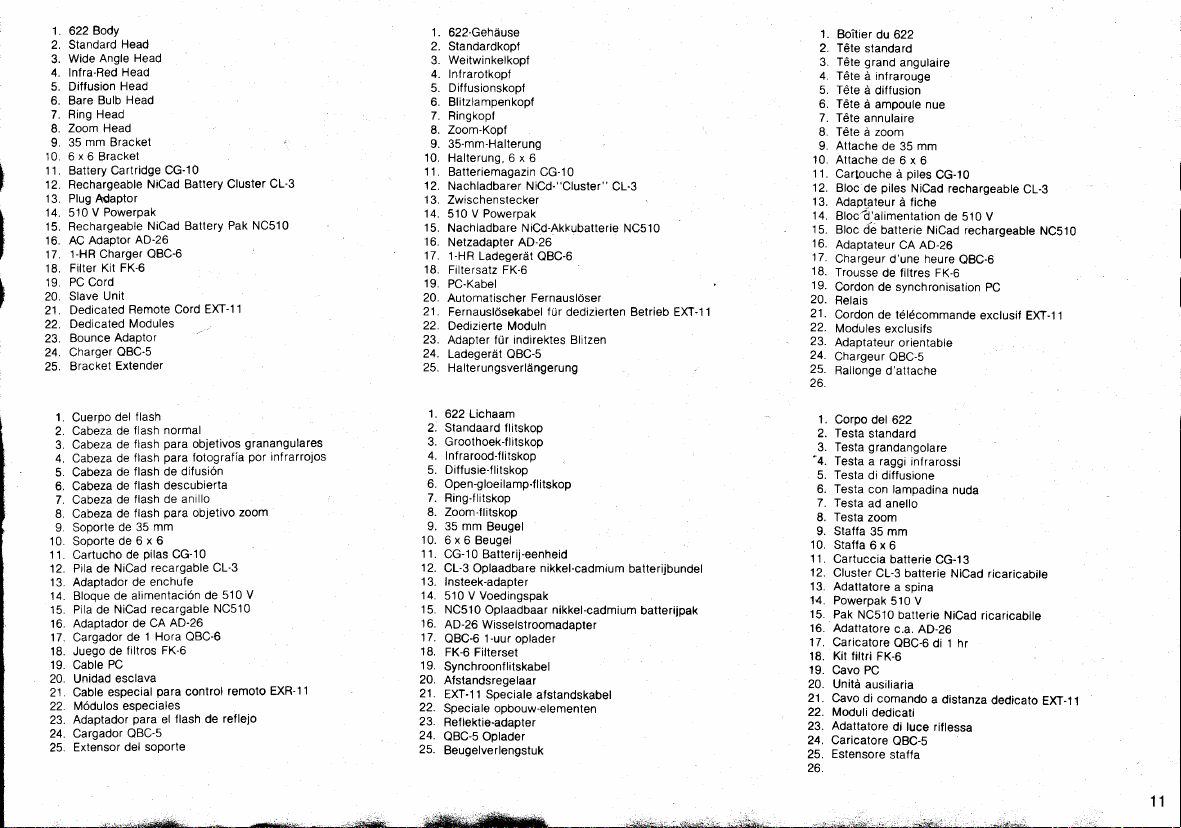
1.622Body
2.
3.
4. lnfra-Red
5.
6. Bare
7. Fing
8.
9.
10.6x6Bracket
11. Battery Cartridge
12. Rechargeable
13. Plug Adaptor
14. 510 V
15. Rechargeable
16. AC Adaptor
17.
18.
19.
20.
21.
22.
23. Bounce
24. Charger
25.
1.
2.
3.
4. Cabeza de
5. Cabeza
6. Cabeza
7. Cabeza
8. Cabeza
9. Soporte
10. Soporte
1 1 . Cartucho
12. Pila de
13. Adaptador
'14.
15. Pila de
16.
17. Cargador
18. Juego de
19.
20. Unidad
21. Cable
22.
23.
24. Cargador QBC-s
25.
Head
Standard
Wide
Diffusion
Zoom Head
35
mm
Angle
Bulb
Head
Bracket
Head
Head
Head
Head
NiOad Battery Cluster
Powerpak
Nioad Battery
1-HR Charger QBC-6
Filter Kit
PC Cord
Slave Unit
Dedicated
Dedicated
Bracket
Cuerpo
Cabeza
Cabeza
Bloque
Adaptador de CA
Cable
Modulos especiales
Adaptador
Extensor
AD-26
FK-6
Remote Cord
Modules
Adaptor
OBC-S
Extender
flash
del
flash normal
de
flash
de
flash
flash de
de
flash descubierta
de
flash de anillo
de
flash
de
mm
de 35
x 6
de 6
pilas
de
recargable CL'3
NiCad
de enchufe
de alimentaci6n
recargable
NiOad
1 Hora QBC-6
de
filtros
PC
esclava
gara
esoecial
para
del soporte
CG-10
para
para
difusi6n
para
CG-10
AD-26
FK-6
control
flash de
el
Pak NC510
EXT-11
objetivos
fotografia
zoom
objetivo
510 V
de
NC510
remoto EXR-l1
reflejo
CL-3
granangulares
por
rarrojos
inf
1.
622-Gehduse
2. Standardkoof
Weitwinkelkopf
3.
4. Infrarotkoof
5. DiffusionskooJ
6. Blitzlampenkoof
7.
Ringkopl
8. Zoom-Kopf
9. 35-mm-Halterung
10.
Halterung,6x6
11.
Batteriemagazin CG-10
12.
Nachladbarer NiCd-"Cluster"
13.
Zwischenstecker
14. 510 V Powerpak
15.
Nachladbare NiCd-Akkubatterie
16.
Netzadapter AD-26
17.
1-HR Ladegeriit
18.
Filtersatz FK-6
19.
PC-Kabel
20.
Automatischer Fernauslciser
21.
Fernauslcisekabel
22.
Dedizierle Moduln
23.
Adapter fUr indirektes Blitzen
24.
Ladegerdt
25.
Halterungsverlangerung
1.
622 Lichaam
2. Standaard flitskop
3. Groothoek-flitskop
4.
Infrarood{litskop
5. Diffusie{litskop
6. Open-gloeilamp{litskop
7. Ring-flitskop
8. Zoom-flitskop
9. 35 mm
'l0.6x6Beugel
1.
1
CG-10 Batterij-eenheid
12.
CL-s Oplaadbare nikkel-cadmium
13. Insteek-adapter
14.
510 V Voedingspak
15.
NC510
16.
AD-26 Wisselstroomadaoler
17.
QBC-6
18.
FK-6 Filterset
19.
Synchroonflitskabel
20.
Afstandsregelaar
21.
EXT-11 Speciale
22.
Speciale opbouw-elemenren
23.
Reflektie-adapter
24.
QBC-5 Oplader
25.
Beugelverlengstuk
QBC-6
fUr
dedizierten Betrieb EXT-11
QBC-S
Beugel
Oplaadbaar nikkel-cadmium
1-uur oplader
atstandskabel
CL-3
NC510
batterijbundel
batterijpak
1.
Boitier
du 622
2. TCle
standard
grand
3. T6te
4.
Tete d inf rarouge
5. Tete
6. Tete
7.
Tete
8. T6te a zoom
Attache
9.
10. Attache
11.
Cartouche
'12.
Bloc
13.
Adapt-ateur
14.
Bloc'd'alimentation
'15.
Bloc
'16.
Adaptateur
17.
Chargeur
18.
Trousse
19.
Cordon de synchronisation
20.
Relais
21.
Cordon de t6l6commande
22.
Modules
23.
Adaptateur
24.
Chargeur
25.
Rallonge
26.
1.
Corpo
2. Testa
3. Testa
'4.
Testa
5. Testa
Testa
6.
7. Testa
L Testa
9. Staffa
10.
StaffaGx6
11.
Cartuccia
'12.
Cluster
13. Adattatore
14. Powerpak
15.
Pak
16. Adattatore
17. Caricatore
Kit filtri
18.
19.
Cavo PC
20.
Unitd ausiliaria
21
. Cavo di
22. Moduli
Adattatore
23.
24. Caricatore
Estensore
25.
26.
angulaire
d
diffusion
d ampoule
annulaire
de
d-e batterie
NC510 batterie
nue
de 35 mm
de
6 x 6
piles
d
piles
NiOad rechargeable
d fiche
CA AD"26
heure
d'une
de filtres FK-6
exclusifs
orientable
QBC-5
d'attache
del 622
standard
grandangolare
a raggi infrarossi
di diffusione
con lampadina
ad
anello
zoom
35 mm
batterie
CL-3 batterie
a
spina
510 V
c.a.
AD-26
QBC-6 di t
FK-6
comando
dedicati
di luce riflessa
QBC-s
staffa
CG-10
de 510 V
Nicad rechargeable
CL-3
QBC-6
PC
exclusif
EXT-1 1
nuda
CG-13
NiOad ricaricabile
NiCad ricaricabile
hr
a distanza
dedicato
NC510
EXT-11
.*i*r;":
'A'
!*iry
FP.'
Page 9
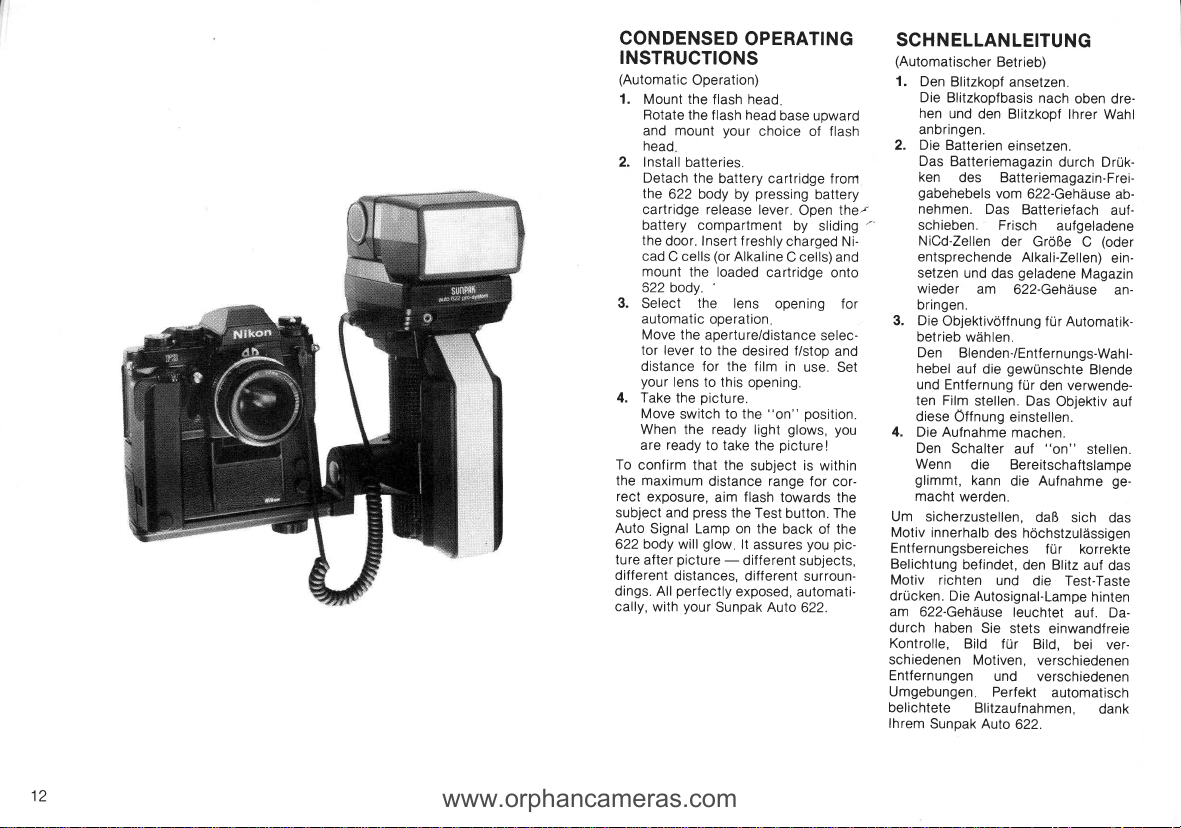
CONDENSED
www.orphancameras.com
OPERATING
INSTRUCTIONS
(Automatic
1.
2. Install
3.
4. Take
To
the maximum
rect
subject and
Auto
622 body
ture
different
dings. All
cally,
Operation)
Mount the
Rotate the
and mount
head
Detach the
the
cartridge release
battery
the
cad
mount
522
Select
automatic
Move the
tor
distance
your
Move
When the ready
are
confirm
exposure,
Signal Lamp on the
after
flash head
flash head
your
batteries.
battery cartridge
622 body by
compartment
door. Insert f reshly
(or
cells
C
body.
lever
ready
with
Alkaline
the loaded
'
the
lens
operation
aperture/distance
to the
desired f/stop
for the
lens
this
to
opening.
picture.
the
to the
switch
to take
that the
distance
flash towards
aim
press
the
glow
will
picture
distances,
perfectly
-
your
Sunpak Auto
lt assures
different
different
exposed,
choice
pressing
lever.
film in
light
the
subject
Test
base upward
of flash
battery
Open
by
sliding
charged Ni-
cells)
C
cartridge
opening
selec-
use.
"on"
position.
glows,
picture!
is
within
range
for
button. The
back
of
you pic-
subjects,
surroun-
automati-
622.
SCH
(Automatischer
1.
Den
Die
hen
anbringen.
2. Die
Das
f rom
Ihe;
and
onto
for
and
Set
you
cor-
the
the
ken
gabehebels
nehmen.
-'
schieben.
NiCd-Zellen
entsprechende
setzen
wieder
bringen.
3. Die
betrieb
Den
hebel
und
ten Film
diese
4.
Die Aufnahme
Den
Wenn
glimmt,
macht
Um sicherzustellen,
Motiv
Entfernungsbereiches
Belichtung
Motiv
drucken. Die
am
622-Gehiiuse
durch haben
Kontrolle,
schiedenen
Entfernungen
Umgebungen
belichtete
lhrem
N ELLAN
Blitzkopf
Blitzkopfbasis
und
Batterien
Batteriemagazin
Objektivdffnung
Entfernung
Schalter
innerhalb
richten
Sunpak Auto
LEITUNG
Betrieb)
ansetzen.
nach
den Blitzkopf
einsetzen.
des Batteriemagazin-Frei-
vom
Das
Frisch
der GroRe
und
das
am
622-Gehiiuse
wdhlen.
Blenden-/Entfernungs-Wahl-
gewunschte
auf
die
stellen. Das
Offnung einstellen.
machen.
auf
die Bereitschaftslampe
kann
die Auf
werden.
des
befindet,
und
Autosignal-Lampe
leuchtet
Sie
stets
Bild
fUr
Motiven,
und
Perfekt
Blitzaufnahmen,
oben
lhrer
durch
622-Gehduse
Batteriefach
aufgeladene
Alkali-Zellen)
geladene
fur
622.
C
Magazin
f ur Automatik-
Blende
den verwende-
Objektiv
"on"
stellen.
nahme
daR
sich
hdchstzuldssigen
f
Ur korrekte
den Blitz
auf
die Test-Taste
hinten
auf . Da-
einwandfreie
Bild,
bei ververschiedenen
verschiedenen
automatisch
dre-
Wahl
Druk-
ab-
auf-
(oder
ein-
an-
auf
ge-
das
das
dank
12
Page 10
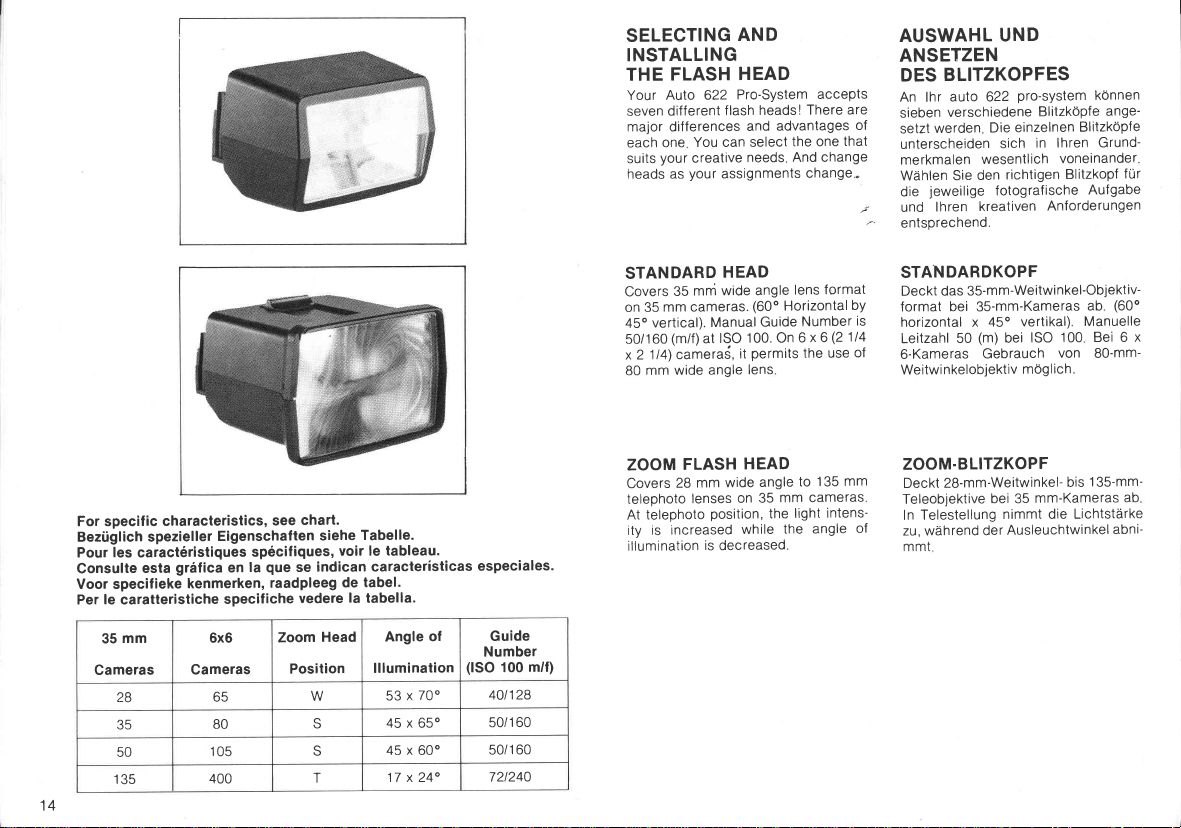
SELECTING
AND
INSTALLING
THE FLASH
Auto 622
Your
different
seven
major differences
one
each
your
suits
heads as
HEAD
Pro-System
flash
You can select
creative
your
assignments
heads!
advantages
and
needs
accePts
are
There
of
that
the one
And change
change
"
AUSWAHL
ANSETZEN
DES
An lhr
sieben
setzt
unterscheiden
merkmalen
Wdhlen
die
und
t.
entsprechend.
UND
BLITZKOPFES
auto 622
verschiedene
werden
Sie
jeweilige
lhren
Pro-sYstem
BlitzkOpfe
einzelnen
Die
in lhren
sich
wesentlich
richtigen
den
fotografische
kreativen
Anforderungen
kOnnen
ange-
Blitzk6pfe
Grund-
voneinander
Blitzkopf
Aufgabe
fur
For specific
Beziiglich spezieller
les
Pour
Consulte
Voor specifieke
le
Per
caratteristiche
mm
35
Cameras
28
35
50
135
14
characteristics,
caract6ristiques
esta
Eigenschaften
gr6fica
en
kenmerken,
specifiche
6x6
Cameras
65
80
105
400
chart.
see
sp6cifiques,
la
siehe
que
indican
se
raadpleeg
vedere
Head
Zoom
Position
W
S
S
T
Tabelle.
tableau.
voir le
caracteristicas
tabel.
de
la
tabella.
Angle
lllumination
53
45 x 65"
45 x 60"
17 x 24"
STANDARD
Covers
on 35
vertical).
45o
50/160
1/4) camerad,
x 2
mm
80
ZOOM
Covers
telephoto
telephoto
At
is increased
ity
illumination
especiales.
Number
(lSO
50/160
50/160
721240
Guide
100
128
401
m/f)
of
70"
x
HEAD
wide angle
mni
35
mm cameras.
(m/f)
wide
FLASH
28
Manual
ISO
at
angle
wide
mm
lenses
position,
is
decreased
(60"
100. On
permits
it
lens
HEAD
on
while
lens
Horizontal
Number
Guide
x 6
6
the use
to
angle
mm cameras
35
light
the
angle
the
format
(2
135
intens-
STANDARDKOPF
Deckt das 35-mm-Weitwi
by
format
is
horizontal
114
Leitzahl
of
6-Kameras
nkelobjektiv
Weitwi
ZOOM.BLITZKOPF
mm
of
28-mm-Weitwinkel-
Deckt
Teleobjektive
Telestellung
In
zu, wdhrend
mmt
bei
35-mm-Kameras
45" vertikal),
x
(m)
ISO
bei
50
Gebrauch
mOg
mm-Kameras
bei 35
nimmt die
Ausleuchtwinkel
der
nkel-Objektiv-
(60'
ab
Manuelle
Bei 6
100
von
8O-mm-
I ich.
bis 1 35-mm-
ab
Lichtstiirke
abni-
x
Page 11
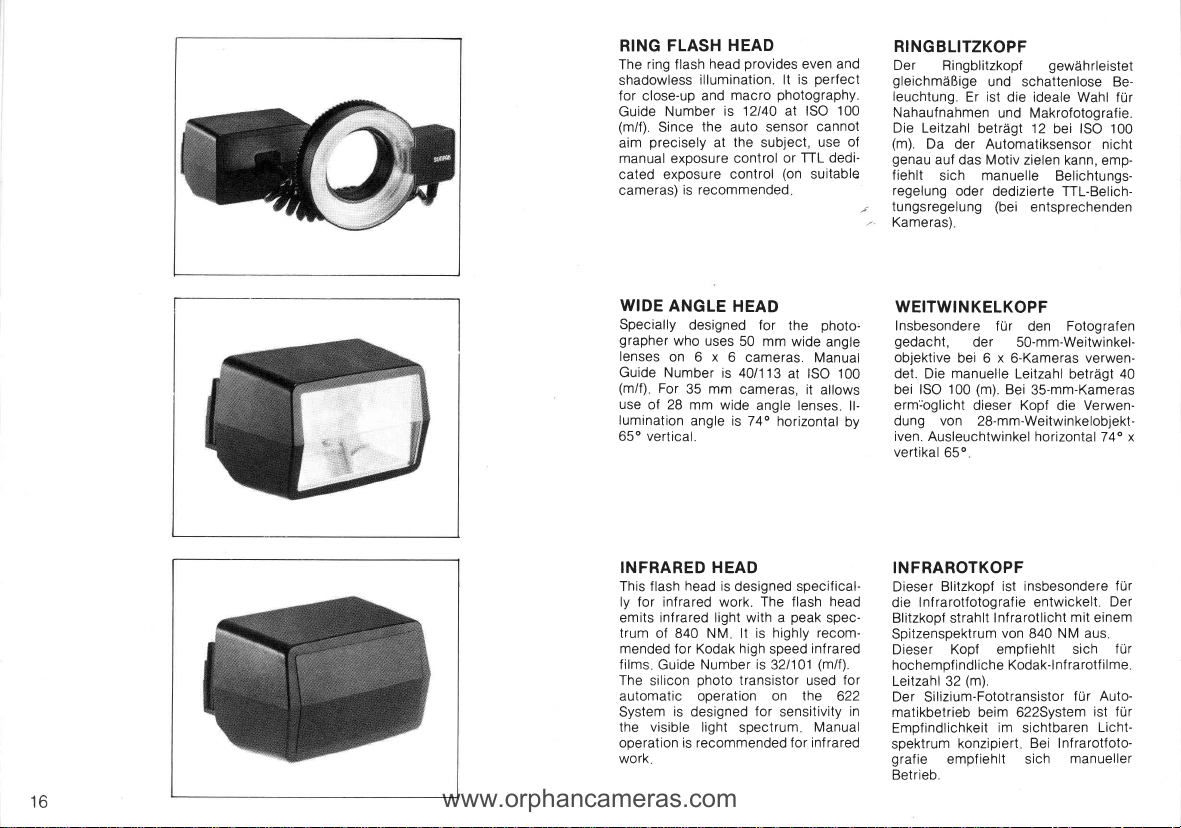
RING FLASH
www.orphancameras.com
ring
The
shadowless
for close-up
Guide
(m/f).
aim
manual
cated exposure
cameras)
WIDE
Specially
grapher
lenses
Guide
(m/f)
use
of 28
lumination
65"
vertical.
head
flash
illumination. lt
and
Number
the
Since
precisely
at
exposure
is recommended
ANGLE
designed for
who
uses
on 6 x
Number
For
35 mrn
mm wide
angle is
is 40/1
HEAD
provides
even and
perfect
is
photography.
macro
is 12140 at ISO
auto sensor
the
control or
control
subject,
TTL dedi'
(on
cannot
use
suitable
HEAD
photo.
the
50
mm wide
6 cameras.
cameras,
74o
13
at
angle
lenses
horizontal
Manual
ISO
it
allows
100
of
angle
100
ll-
by
RINGBLITZKOPF
Der
Ringblitzkopf
gleichmdRige
leuchtung.
Nahaufnahmen
Die Leitzahl
(m).
Da
genau
f
regelung
tungsregelung
/
Kameras)
WEITWINKELKOPF
gedacht,
objektive
det. Die
bei ISO
erm:oglicht
dung von
iven.
vertikal
der
auf das Motiv
iehlt
sich
oder
Insbesondere
bei 6 x 6-Kameras verwen-
manuelle
100
Ausleuchtwinkel horizontal
65o
und
ist
Er
betrdgt 12
Automatiksensor
manuelle
der
(m).
dieser Kopf
28-mm-Weitwinkelobjekt-
gewdhrleistet
schattenlose Be-
die ideale
und Makrofotografie.
dedizierte
(bei
f ur
Leitzahl
Bei
Wahl
fur
ISO
bei
100
zielen
entsprechenden
den Fotografen
50-mm-Weitwinkel-
35-mm-Kameras
nicht
kann, emp-
Belichtungs-
TTL-Belich-
40
betrtigt
Verwen-
die
74" x
16
INFRARED HEAD
This f lash
ly for infrared work. The flash
emits
trum of
mended for
ilms
f
The
automatic operation on
System
the visible light
ooeration
work
head is
designed
infrared light
840 NM lt
Guide
silicon
is
is recommended for inf
with
high
Kodak
Number
photo
transistor
designed
spectrum
specifical-
peak
a
highly recom-
is
infrared
speed
is
32l101
used
the
for
sensitivity
head
spec-
(m/f).
for
622
in
Manual
rared
INFRAROTKOPF
Blitzkopf
Dieser
die lnfrarotfotografie
strahlt
Blitzkopf
Spitzenspektrum
Kopf empf
Dieser
hochempf indliche Kodak-lnf
Leitzahl 32
Der
Silizium-Fototransistor
matikbetrieb beim 622System
Empfindlichkeit
spektrum
graf
Bet
ie
rieb.
konzipiert
empf
ist
Infrarotlicht
von
(m).
im
iehlt
insbesondere
entwickelt
mit
NM aus
840
iehlt
sich
rarotf ilme
fUr
sichtbaren
Bei Infrarotfoto-
manueller
sich
fur
Der
einem
f
ur
Auto-
ist f
u
Licht-
r
Page 12
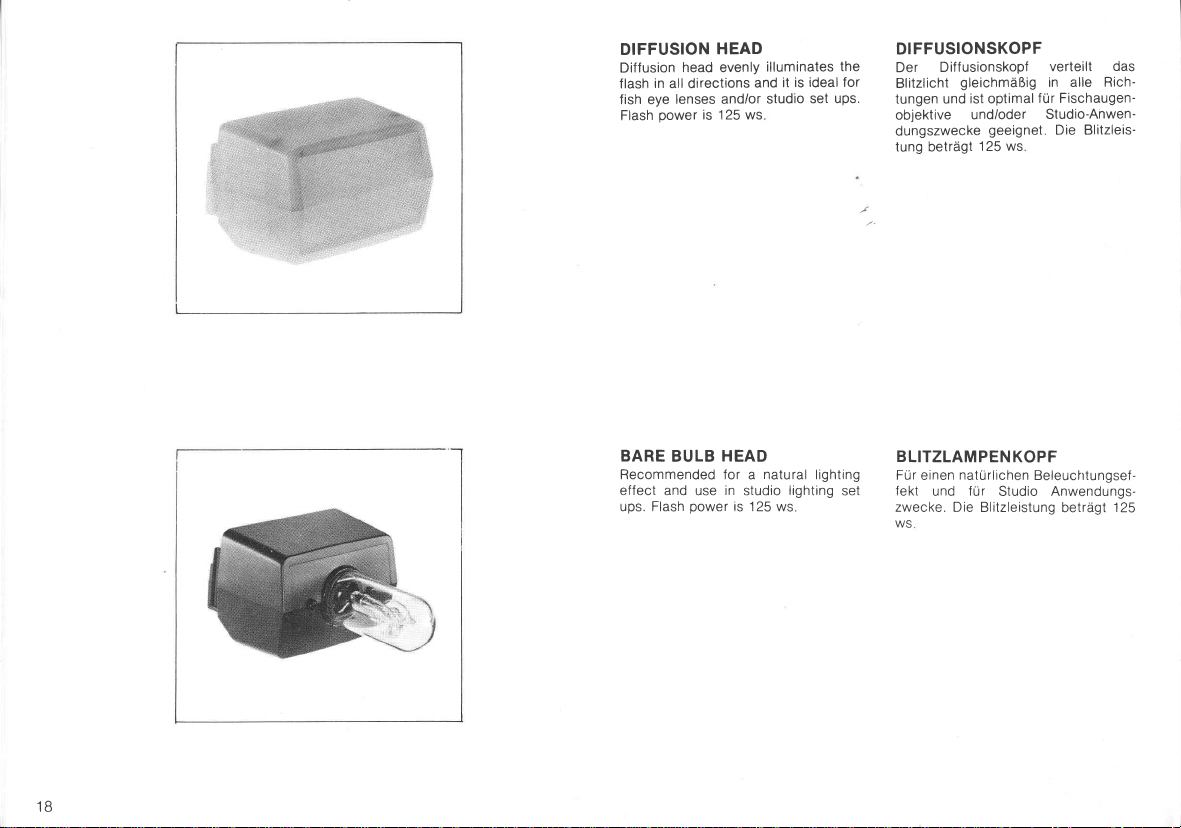
DIFFUSION
Diffusion
flash
fish eye
Flash
head evenly
in
all directions
lenses and/or
power
is 125 ws
HEAD
illuminates
it is
and
studio
the
ideal for
ups.
set
DIFFUSIONSKOPF
Diff usionskopf
Der
Blitzlicht
tungen
objektive
dungszwecke
tung betrdgt
gleichmdRig
ist optimal
und
und/oder
./
geeignet.
125 ws
Die
das
Rich-
Blitzleis-
verteilt
in alle
fur Fischaugen-
Studio-Anwen-
1B
BARE
Recommended for a natural lighting
effect and use
ups. Flash
BULB
power
HEAD
in
studio
'125
is
lighting
ws
set
BLITZLAMPENKOPF
Fur
fekt
zwecke.
WS
natUrlichen
einen
und f ur Studio Anwendungs-
Die Blitzleistung
Beleuchtungsef-
betrdgt
125
Page 13

When
www.orphancameras.com
selected,
flash head is
the
mount
622 System body
accordance
following
1. Rotate the f lash
ward.
2. Align
with the
3. Slide the
with
procedure:
the flash head
base
flash head until it clicks
it
onto
in
the
head
base up-
mounting rail
the
Den richtigen Blitzkopf
aussuchen und
maRen
an das 622
folgender-
System-
Gehduse ansetzen:
1. Die Blitzkopfbasis nach oben
hen
2. Die Blitzkopf-Befestigungsschiene
&
auf
Basis
die
3. Den Blitzkopf aufschieben, bis er
/
'/
ein
rastet
ausrichten.
dre-
20
To
detach the flash
System
upward
upward and slide
towards front
push
body,
position, push
head f rom
the flash
the
head
the lock lever
the f lash head
622
Zum Abnehmen
in
622-System-Gehiiuse
nach oben
nach
oben schieben
nach
vorne abziehen
des Blitzkopfes
drucken, den
und den Blitzkopf
vom
Blitzkopf
den
Arretierhebel
Page 14

SELECTING
AND
INSTALLING THE POWER
souRcE
WAHL
UND
INSTALLATION
DER
SPANNUNGSQUELLE
POWER
Your
may
sources. Each
specif
source
1.
2.
3.
4.
5.
6.
SOURCES:
Auto
Sunpak
used with
be
ic
advantages;
your photographic
for
Four
C-size
Four
C-size
Rechargeable
Cluster
CL-3
AC
Adaptor
The
Sunpak
Battery
The
Sunpak
NiCad
Battery
622
six different
power
source
select
alkaline
batteries.
NiCad
batteries.
iCad
N
AD26
Powerpak
510 V
Rechargeable
Pak
NC51O
Pro-System
powef
has
/
power
the
needs.
Battery
for
510 V
SPAN NU NGSQU
Das
Sunpak auto
auf sechserleiweise mit
sorgt werden.
nungsversorgungsquelle
nen
Vorteile.
nungsversorgungquellen
graf
ischen
chend
Vier
1.
Alkalibatterien
2.
Vier NiCd-Batterien
Nachladbarer
3.
CL-3
4.
Netzadapter AD26
5.
Sunpak
terie
6. Sunpak
NC51
O
ELLEN:
pro-system
622
Spannung ver-
Jede
einzelne
Wdhlen
Anforderungen
Powerpak
510 V NiCd-Akkubatterie
hat
Sie
lhren foto-
der
der GrORe C.
NiOd-"Cluster"
fur
kann
Span-
ihre
eige-
die
Span-
entspre-
GroRe C
510 V-Bat-
22
Page 15

Each
www.orphancameras.com
quikly
power
source
and easily.
installs
Here's
how:
Die
einzelnen
Spannungsversorgungsquellen
schnell und
anbringen.
mtihelos
Gehen Sie
folgendermaRen
lassen
vor:
sich
With 4 Nickel
Alkaline
1. Push the
C-Size
battery cartridge
lever toward
Pull out and
cartridge
the
Slide
door.
Insert four
the
side
compartment.
grip.
detach
battery compartment
batteries as shown
Cadmium or
Batteries:
release
the
battery
Mit 4 NiCdterien der GriiRe C:
1.
Den
.,
/-,
hebel
Das Batteriem agazin
2.
hen
Das Batteriefach
3.
4.
Vier Batterien
in-
im
Alkalibat-
oder
Batteriemagazin-Freigabe-
zum Griff
und abnehmen
Fach
hin
aufschieben
gemdB
einsetzen.
schieben
herauszie-
Markierung
24
Page 16

Close
5.
doo
First attach
connecting
Attach the
7.
while
release
the battery
r.
pushing
lever
the bottom
hook
connecting
the
battery
comPartment
part
the
of
socket
cartridge
Das Batteriefach
5.
Zuerst den
6.
AnschluBbuchse unter
Die
7.
ken
des
gabehebels
zuschieben.
Teil einhaken
unteren
Batteriemagazin-Frei-
anbringen
Druk-
,/
26
Page 17

With Sunpak
www.orphancameras.com
Battery
Cluster:
CL'3
NiGad
Mit Sunpak
NiCad-"Cluster"
CL-3:
Push
1.
lever
Pull
2.
cartridge.
Take
Cluster
tom
Attach
while
release
Battery
the
toward
and detach
out
recharged
the
CL-3
part
of
the
pushing
the
cartridge
grip.
attach
and
connecting
the
connecting
the battery
lever.
the
NiCad
release
batterY
BatterY
bot'
the
hook.,
socket
cartridge
1. Den
hebel
2. Das
hen
und abnehmen
Den unteren
3.
denen
haken
Die AnschluRbuchse
4.
-
ken des
gabehebels
Batteriem
zum Griff
Batteriem
agazin-Freigabe-
hin
schieben.
agazin
Teil des
NiOd-"Cluster''
Batteriemagazin-Frei-
anbringen
herauszie-
nachgelaCL-3
Druk-
unter
ein-
28
Page 18

With
Sunpak 510 V
Powerpak:
1. Insert
2. Insert
4.
510 V battery
NC510
as shown
equivalent) into
as shown
close
the battery
Connect
622 body
Connect
Powerpak
socket
battery into
on the
6 V battery*
on
the
power
the
the
Powerpak.
plug
the
plug
the
adaptor
door.
plug'adaptor
input
power
cord
plug
and
or charged
Powerpak
(4G13
or
adaptor
and
onto the
socket
to the
adaptor
Mit
Sunpak
510
Powerpak:
1 .
2. Die 6 V-Batterie.
"
;
/
V- oder
Die 51
0
Batterie wie am
in
Powerpak einsetzen
das
sprechende)
stecker
stecker einsetzen
teriefach
Den Zwischenstecker
romei
St
hduse
Das
Zwischensteckerbuchse anschlieBen.
wie
gezeigt
schlieRen
ngangsbuchse
stecken
Stromkabel
V
geladene
Powerpak
(4G13
oder ent-
Zwischen-
am
in
Zwischen-
den
und das
am 622-Ge-
Powerpak und
an
NCs1 0gezeigt
Bat-
in
die
30
Page 19

AC
www.orphancameras.com
With
1.
Before
determine
110-120
for
States,
this
with
not set
Phillips-head
the
of
back
to
tor
tighten
if the
tant:
incorrectly,
may be
Insert
2.
equivalent)
as shown
the
close
Connect
3.
socket.
the other
Plug
4.
the
into
Note:
V battery
The 6
dedicated
cameras
for
This
non-dedicated
Current:
attaching
AC
that
oPeration
V
or
Canada,
standard).
correct
for
Adaptor,
correct
the
the screw
voltage
your
daqaged.
V batterY
6
into
the
on
batterY
plug
AC
end
plug
adaPtor
is designed
signals
battery
operation
the
Power
AdaPtor
countries
other
AdaPtor
lf
voltage,
screw
the selec-
re-set
voltage,
securely.
selector
and
flash
(4G13
the
Plug
adaPtor
Plug
door.
electrical
the
to
AC
of
to
comPatible
for
necessary
not
is
cord,
is
set
(United
is
loosen
the'
on
and
lmpor-
is set
adaptor
or
adaPtor
and
adaPtor
transmit
Netzstrom:
Mit
Anbringen
Vor
1.
Uberprufen,
die
auf
eingestellt
richtig
nicht
Kreuzschlitzschraube
den
und
Spannung
/
//'
wieder
be
Wichtig:
wdhler
k6nnen
beschddigt
6-V-Batterie
2.
sprechende)
stecker
stecker
teriefach
Netzstecker
Den
3.
4.
Zur
anschlieRen.
dose
Das andere
adapters
stecken.
Beachtung:
6-V-Batterie
Die
dedizierter
komoatibler
Betrieb
zierten
erf orderlich
ob der
0rtliche
ist. Falls
eingestellt
Wdhler
einstellen.
einwandfrei
Wenn
richtig
nicht
Blitz
werden
(4G13
wie am
gezeigt
einsetzen
schlieRen.
in den
dient
Signale
Kameras.
ist diese
Netzkabels
des
NetzadaPter
NetzsPannung
Adapter
der
ist, die
l6sen
hinten
richtige
die
auf
Die Schrau-
anziehen.
SPannungs-
der
eingestellt
und
in den
und
an
Ende
Zwischenstecker
zur Ubertragung
bei
FU
Batterie
ist,
Adapter
ent-
oder
ZwischenZwischen-
Bat-
das
Steck-
eine
Netz-
des
Verwendung
nicht dedi-
r
nicht
32
Page 20

MOUNTING
CAMERA
ON
flash
Your
mounting
grip (handle).
snap-in
camera.
rom
f
the
up and disassembly
quick
is
THE
has
unit
clamp attached
This clamp accepts a
bracket
The
bracket
with one
clamp
and efficient
FLASH
quick-release
a
to the flash
to
secure
may
be
touch,
your
of
equipment
your
removed
so set-
ANSETZEN DES BLITZES
AN
DIE KAMERA
Der
Blitz ist mit
Befestigungsklemme
gestattet
Einschnapphalterung
"
der
Kamera
mil
einem
,
.'fernl
werden,
und Auseinanderbauen
muhelos
einer
Schnellfreigabe-
Diese
Griff
vonstatten
am
Klemme nimmt
von
so daB
zur
der Klemme
das
geht.
auf. Die Halterung
Griff aus-
Sicherung
Zusammen-
schnell
eine
kann
entund
34
1. Turn
2. Press
3. Slide
4.
the
clamp counterclockwise.
ward,
the center of clamp
Release
bracket
clamp. For
should
by
Lodking
the
Locking Button
and
the
silver
the Locking
is now
tighten the
turning
hold in
end
attached
further
it
fully clockwise
Button
f irmly in-
place
of bracket
Button The
security,
locking
on the
into
to the
you
screw
1. Den Sicherungsknopf
Klemme
drehen
2.
Den Sicherungsknopf
drUcken
ten
Das
3.
die
4. Den
Die
me
rungsschraube
fest
im
Gegenuhrzeigersinn
hineingedrUckt
und
Silberende
Mitte
Sicherungsknopf
Halterung ist
angebracht
anziehen.
der
der Klemme schieben.
nun
Nun die Siche-
im
Uhrzeigersinn
fest
Halterung
loslassen.
an die Klem-
an
hinein-
der
hal-
in
Page 21

5.
www.orphancameras.com
Note:
lf
right
two
circling
Phillips-head
cartridge
tion
sure
for
lighting
through
Screw
the
on
slot
clockwise
portion
of screw
slot.
bracket
retaining
triPod
era's
scurelY.
you
to
want
your
of
side
Phillips-head
ring of
screw
holding
the encircling
to tighten
maximum
angle
the
Press
Camera
oPening
Turn
bracket
until
irmlY
f
Passes
Center
under
screw
socket
the
mount
camera,
screws
clamp
the
inside
base.
ring as desired.
the screw
stabilitY
Retaining
end
the
at
the screw
threaded
the
above
the camera
cam-
Your
tighten
and
the
on
flash
the
loosen
the en-
inside
the one
and
the battery
reposi-
Then
firmly
again
correct
and
Kamerahalteschraube
Die
5.
Offnung
die
Halterung
im
fest
das Gewindeteil
uber der
Kamerahalteschraube
Stativgewinde
einsch
Beachtung:
Zur
Befestigung
Zur
rechten
Seite
Kreuzschlitzschrauben
sungsring
Kreuzschlitzschraube
magazin-Haltebasis
Be
Einfassungsring
Die Schrauben
richten
anziehen,
richtigen
leisten
Endnut
der
an
drUcken.
Uhrzeigersinn
Halterungsnut
rauben.
der
der
maximale
um
Ausleuchtwinkel
Die
drehen,
der Schraube
unter
ausrichten
Blitzes
des
Kamera die
im Einf as-
und die
Klemme
in
der
l6sen
wunschgemdR
wieder
Stabilitdt
zu
durch
an der
Schraube
bis
Die
steht
dem
fest
und
auf der
beiden
eine
Batterie-
Dann den
aus-
fest
und
gewdhr-
36
Page 22

To Mount
the Ring Head
Ansetzen des
Ringkopfes
1. Match
side dia;neter of
and fasten
2. Attach
hood
Attachment Disc in
motion
Note:
lf
the inside
mm
52
as Nikkor lenses), attach
Head
Adaptor
the
Remember:
1. Remove
when
Macro/Micro
ree
f
will appear
2. lf
Head with a
the
so
ture
Adaptor Ring
the
the
of the camera by
and
directly to the lens without using
adaptor
you
use
flare free
no flares
your
75
an 0
ree
lenses
is left
on,
photograph
your
Sunpak
standard
adaptor on
camera
a clockwise
your
pitch, (such
securely
Ring Head
diameter of
has
Ring
the f lare f
taking close-ups with
in
the
will appear
to the
out-
lens
lens
to the
rotating
the
lens is
Ring
the
adaptor
the flare
lf
its
shadow
Flash
Ring
lens, leave
the ring
pic-
your
in
1. Den Zwischenring
raobjektiv
anbringen
2. Den Ringkopf an
blende
"
./
2ur Beachtung:
Wenn lhr
chmesser
windesteigung von
beispielsweise Nikkor-Objektive), den
Ringkopf
das Objektiv anbringen
Wichtig:
1.
2.
der
Befestigungsscheibe im
der
zeigersinn
Objektiv einen
von 52 mm und
direkt ohne
Den Antiref
Nahaufnahmen
Objektiven
Antiref lexionsadapter
fernt
wird,
Foto
Bei Verwendung
Ringkopfes
jektiv
den Antiref lexionsadapter
am Ring
Reflexionen
auf das
ausrichten und sicher
der Gegenlicht-
Kamera
durch Drehen
anbringen,
lnnendur-
eine Ge-
hat
0,75
Zwischenring
lexionsadapter
mit Makro/Mikro-
entfernen Wenn
erscheinen
mit
lassen,
im
Schatten
des
einem
so daB
Bild
erscheinen
nicht
Normalob-
Kame-
Uhr-
(wie
an
bei
der
ent-
im
Sunpak
keine
3B
Page 23

CORD'DEDICATED
www.orphancameras.com
PC
coRD
(oPTloNAL)
HOOK.UP
PC.
ANSCHLUSS
MIT
KABEL'DEDIZIERTEM
KABEL
(SoNDERZUBEHoR)
Dedicated
Optional
dicated
nience
Depending
cated
set
ready
TTL
and/or
1.
2.
3.
4.
Dedicated
Module
and advantages.
features
'X'
the
indication
off-the-f
auto
the
Plug
to
dedicated
ing the
plug
the
Connect
your
camera
the
Slide
module
cated
tighten
The dedicated
the shutter
Cord
give
your
on
may be
shutter
inside
plane
ilm
aperture
dedicated
connector
levers
lock
dedicated
the
mounting
into
lock
the
sPeed
and
Cord
you
added
type, dedi-
camera
available
sPeed,
the viewfinder,
exposure
control.
remote
while
both
on
module
the
of
foot
the
Position
ring.
will
circuit
automaticallY
De-
conve-
that
Provide
control
in-
cord
hold-
of
sides
for
dedi-
and
adjust
Dediziertes
dedizierte
Das
'{
Modul
-'
mehr Bedienungskomfort
noch
weitere
nach
Je
Merkmale
lung der
schaftsanzeige
tungsregelung
und/oder
Das
1.
in den
stecken,
hebel auf
Steckers
Das
2.
Kamera
Den
3.
dedizierten
schieben
anziehen
Die
VerschluRzeit
Kabel
Kabel
(Sonderzubehor)
Vorteile.
KameratYP
mdglich,
"X"-VerschluRzeit,
Blendenautomatik
dedizierte
dedizierte
anschlieRen
dedizierte
sind
wie
im
Sucher,
der
von
Fernauslosekabel
dedizierten
die Sicherungs-
wdhrend
beiden
festgehalten
Modul
estigungsf
Bef
Moduls
den
und
Schaltung
automatisch
dedizierte
und
lhnen
bieten
und
dedizierte
Einstel-
B.
z
Bereit-
TTL-Belich-
Filmebene
AnschluR
des
Seiten
werden
lhre
f
Ur
des
uR
ein-
richtig
Sicherungsring
die
stellt
ein
40
Page 24

PC Cord
1. Connect
2. Set
the PC cord
outlet
sync
and
f lash)
as shown
camera
lf the camera
terminals
the
attach
inal.
term
(usually
switch
marked
barrel)
the switch
the shutter
that
speed
flash on
tronic
vided that speed
second). Check
1/500th
struction
ra.
single-lens
On
focal-plane shutters,
with
is usually
speed
meras with
ters usually allow
at speeds
Do
1/500
faster
speed
may cause
This
when the
power (lf
imum
marked
switch
"X"
place
at
to the f lash
(on
the side
f lash outlet
has
separate
"M''
marked
cord
Sunpak
lf the camera
around
"M"
and
"X"
position
the
to
synchronizes
brochure
between
up
not
flash
the fastest
to
your
cahera
not
does
your
for
reflex cameras
or 11125',
1/60
the
synchronization
maximum of
the
to
the
shutter
set
1/500th second.
than
under-exposure
is
used
the
shutter
"M"
position
)
of
on
flash
"X",
and
"X"
to the
has
lens
the
"X",
elec-
with
(proexceed
the in-
came-
this
lens shut-
to a
max-
at
has
"X",
and
the
the
a
set
ca-
a
PC-Kabel
Das
1.
PC-Kabel
chroanschluR
Blitzes)
und
Kamera
der
Ren Wenn
Blitzbuchsen mit
'M"
+
Kabel
schlieRen. Wenn
.i
Schalter
/7'
tubus mit
"X"
einstellen
2.
Den VerschluR
Belichtungszeit,
Elektronenblitz
synchronisiert
1/500
ten
zu in
lhre
Spiegelreflexkameras mit
verschluB
in
Kameras
ermoglichen
bei Belichtungszeiten
1/500
kUrzer
len,
verursacht
der
arbeitet
einen
"M"
"X"
"X"
und
an die
(in
der
besitzt,
Sekunden
wird)
einstellen Lesen
der Bedienungsanleitung
Kamera
ist
Regel
der
mit
Die
als 1/500
da dadurch
Blitz mit
(Wenn
Schalter
"X"
und
einstellen
an
den Blitzsyn-
(an
der Seite
den BlitzanschluR
gezeigt
wie
die Kamera
besitzt,
der Regel
Markierung
den
(vorausgesetzt,
nach
diese VerschluBzeit
ZentralverschlUssen
eine
Belichtungszeit nicht
Unterbelichtungen
werden
maximaler
mit
besitzt,
anschlieseparate
der Markierung
das Sunpak-
"X"-Klemrne
die Kamera
Schalter auf
auf die kUrzeste
die
an
nicht
1/60 oder
Synchronisation
einen
am
Objektiv"M"
und
"X"
mit
lhrer
Bei eindugigen
dem
Kamera
daR
uberschrit-
hier-
Sie
Schlitz-
11125
von
bis
Sekunde einstel-
konnen,
wenn
Leistung
der VerschluR
Markierung
der
diesen
)
des
an
an-
fUr
zu
auf
-
-
42
Page 25

AUTOMATIC
www.orphancameras.com
Standard
With
Move
1.
full
Move
"A"
Set
3.
Turn on-off switch
4.
You may
5.
from the
sliding
The
by
100 f ilm'.
Maximum
6.
dicated
This
when
bounce
conditions
rating
The
automatic
0
lens
(sH-1)
(wH-1)
Head
Zoom
Head
Wide
power
the
position.
mode
the
position
the film
select
seven
the aperture
f/stop range
green
lamp.
tl2rnG
operating distance
in both
indication
the flash
position,
result in
distances
minimum
meters/2 feet
7
opening
OPERATION
Head
ratio
selector
selector
in
use
speed
on
Auto
an
range with
stop
selector
in
is indicated
use
(For
example
)
meters and
not operate
does
is
head
since
different
for correct
distance
exposure
regardless of
in use
to
to 2.
switch
Aperture
lever
ISO
is infeet.
for
set
bouncing
ope-
is
the
AUTOMATISCHER
BETRIEB
Mit StandardkoPf
Zoomkopf
WeitwinkelkoPf
1.
Den
.r
./.
3.
4.
5.
6.
Leistungsfaktorwdhler
volle Leistung
Den Betriebsartenwahlschalter
"A"
auf
Die Film'empfindlichkeit des
wendeten Films
Den Ein/Aus-Schalter
konnen eine
Sie
aus dem
Verschieben des
hebels
Blendenstufenbereich
die
(Beispiel
maximale Betriebsentfernung
Die
wird
FuR
funktipniert
kopf
gestellt
andere Betriebsentfernungen
ten
Die minimale Entfernung
rekte
m,
0,7
BlendenOff
(sH-1)
(wH-1)
stellen.
stellen.
einstellen.
einschalten
Automatikblende
7-Stufen-Bereich durch
wdhlen.
grune
Film ISO 100:
sowohl
angezeigt
indirektes Blitzen ein-
auf
ist,
da
Automatikbelichtung
ungeachtet
nung
Der wirksame
Lampe
in
Metern
Diese
nicht,
wenn der
in
dieser
der wirksamen
Blendenwahl-
wird durch
auf
ver-
angezeigt
tl2-tl16.)
als auch
Anzeige
Blitz-
Betriebsart
gel-
kor-
fUr
betrdgt
44
Page 26

('VV"
position
"T"
position
position
"S"
"W"-Position
"S"-Position
"T"-Position
Position
Position
Position
Posicion
Posicion
.rVlf"
"S"
"T"
Posicion
stand
"\rlrr"
stand
"S"
stand
"T"
Posizione
Posizione
Posizion
e
"\,Ur"
"S"
"T"
"W"
"S"
"T"
Note:
When
the
ferent operating
automatically
blue
*
"
the zoom
using
housing
tube
flash
lights,
A
useful
f lash's energy-saving
circuitry:
widest
ISO
with
reach
also
but
flashes,
times in
at a
son:
gy
is required
than
at smaller
Smaller
provide
within
By shooting
(f/8-f/16
ings
you'll
tures
advantage
an
wide angle
focusing
normal
distances.
indicated
to zoom
relative
operating
When
possible
film),
100
greatest
the
greatest
the
the fastest
and
operation.
normal
given
distance,
to
apertures
lens openings
greater
their usable
smaller
at
with ISO
generally
moving subjects
of
in dim
lenses,
is
somewhat
position
head,
you
lens opening
distance
light
"depth-of-f
distance
get
results
This
in amber
position.
of
benefit
(Thyristor)
shoot
you
not only
number
recycling
The
less
subiect
(f/B-f/16)
(f/8-f/16)
lens oPen-
100
sharPer
light or with
when
Precise
harder
in dif'
at
range,
range
This
of
is
and
your
the
(t12
of
rea-
ener-
att12
ield"
film),
Pic-
is
than
Beachtung:
Zur
Verwendung
Bei
luRt die
beeinf
rohrengehduses
nung
ockergelb
Position
GroRer
"
schaltung
"
Wenn
tivoff
'r
/'-
nehmen, erreichen
auf
nur
reich, sondern
zahl an
Nachladezeit
Grund.
fernung
Ausleuchtung
als
(f/8
*
Kleinere
-fll6)
Schdrfentiefe
baren
nahme
Auf
tiv6ffnungen
100) erhalten
schdrfere
Motiven.
schwacher
nahme
Auf
tiven,
stellung
normal
ZoomkoPfes
des
Position
die
wird
Dies
blau
und
angezeigt.
Vorteil
(l-hyristor)
mit der
Sie
(tlz
nung
grOBten
den
Blitzen
einer
bei
ist weniger
groBeren
bei
-
f/16) erforderlich.
Objektiv6ff
gewiihrleisten
Entfernr*rngsbereichs
bei
(f/8
Bilder
Dies
Beleuchtung
mit Weitwinkelobjekdie
wenn
etwas
des
Betriebsentfer-
automatisch
je
nach Zoom'
EnergiesPar-
der
des
gr6Rten
Film ISO
mit
auch
bei
des
innerhalb
Sie
Entfernungsbe-
groBte
die
die schnellste
und
Normalbet
gegebenen
Energie
Motivs
Blendenzahlen
nungen
ihres
kleineren
-
mit Film
f/16
in
der
Sie
beweglichen
von
Vorteil
ist ein
genaue
Scharfein-
schwieriger
Blitz-
Blitzes:
Objek-
100)
nicht
An-
rieb
Ent-
zul
flz
bei
(f/8
groBere
nutz-
Durch
Objek-
ISO
Regel
bei
bei
oder
ist als
46
Page 27

Take The Picture!
www.orphancameras.com
the
1. Turn
2. The Ready/Test Lamp will
3. Then
For
Wait
on Make
distance
use and shoot!
To Verify
Aim
press
fire.
Signal
curs,
rect
choose a wider
closer
test
of confirming
accurately exposed before
the
CAUTION
When
your
"off
powe
unit on Within seconds
"f
the
Blue
glow.
power.
Your flash will automatically deliver
correct
tance range indicated.
picture
your
lt's
is ready to fire
Now,
the correct amount of
exoosure
continued
until
the
lmmediately afterwards,
lt's a
"
operation
the
Blue
you're
sure
range for the lens opening
Correct
towards the
flash
"Test"
the
Lamp will blink When
the
autonfatic exposure
the
lf
Auto Lamp does
your
to
simple,
that
you've
finished
move the
622,
position
r
Lamp will also
ull"
that the f lash
signal
at
focus
and shoot
within
"full"
Lamp comes
within
Exposure
The flash will
button
lens
opening, or
subject and
highly
accurate
picture
your
shooting
onloff switch
preserve
to
full
the
subject
repeat the
glow
(100%)
light for
the
dis-
usable
and
the Auto
this oc-
is
cor-
not
blink,
move
way
will be
you
take
with
battery
Auf nehmen
1. Das
2. Beginnt
3. Auch
"
./
in
Fur Dauerbetrieb
Warten,
Bereitschaftslampe
Uberzeugen
nerhalb
nungsbereiches
Objektivoff
drucken
Belichtungskontrolle
Den
"Test"-Taste
zundet
Autosignal-Lampe
stimmt
Wenn die Auto-Lampe nicht
to
eine
oder ndher
und den Test wiederholen
einfacher,
Kontrolle
Aufnahme
VORSICHT
Falls
tigen,
Ein/Aus-Schalter
ren
Gerdt einschalten.
kurzer Zeit
Lampe
glimmt.
zeichnet,
Leistung
Nun
scharf einstellen
Ausl6ser
Der
rekte
Belichtung innerhalb
zeigten
Blitz
groRere
Sie den
...
die Bereitschafts-/Test-
glimmen
zu
die
Dadurch
daB der Blitz
(100%)
das
Objektiv auf das Motiv
drUcken.
gibt
Blitz
Lichtmenge
Entfernungsbereiches
bis die blaue
Sie
des
nung
Sie auf den
auf das
drUcken Der
Unmittelbar danach blinkt die
die automatische
Objektiv6ffnung wiihlen
an
der
duBerst
der Belichtung,
tatsdchlich
622
schalten
Nach
"f
blaue
automatisch die kor-
sich,
fi.tr
Motiv richten
Sie
ab,
ull"-Lampe
gekenn-
wird
mit
arbeiten kann
und dann
...
nutzbaren
bef
Ausloser
In
Motiv
genauer
nicht
um Strom zu spa-
auf den
fur
einwandf
des
auf leuchtet.
daR Sie sich
verwendete
die
inden
und die
diesem Fall
Belichtung
herangehen
Dies ist
Weg zur
bevor
gemacht
mehr
ihn
mit
voller-
reie
ange-
ab.
"full"
Entfer-
und
\v
Blitz
blinkt,
wird.
benO-
dem
in-
ein
die
48
Page 28

Head
Red Head
GN
Guide
is not
the
as
may
mode
test
shots
mode
OPERATION
Head
Head
glowing,
lamp is
Number
dial
usable
power
622
be used
but we advise
for
this
for use with
particularly
is
for TTL
dedicated
AUTOMATIC
Ring
With
lnfra
Diffusion
Bare Bulb
lf the Aux
means the
the
of
622 unit
glow
as
soon
is
turned on.
The Diffusion Head and Bare Bulb
"
Head
automatic
shooting
photography.
flash
*
Ring Head and Infra Red Head are
not recommended
automatic
*
The Ring Head
recommended
mode
cameras.
on back
lt will
switch
in the
kind
of
AUTOMATISCHER
BETRIEB
Mit
Ringkopf
Inf rarotkopf
Dif f
usionskopf
Blitzlampenkopf
/
/'Wenn
it
bedeutet
hinten
Sie
geschaltet
*
*
*
Aux
die
dies, daR die
am
622
glimmt,
wird.
Der Diffusions- und
kopf kOnnen bei Automatikbetrieb
verwendet werden. Wir empfehlen
jedoch
fur
raf
fotog
ie Testauf
Ringkopf
nicht in
Automatikbetrieb verwen-
werden.
det
Der Ringkopf
dedizierte
piert.
GN-Lampe
nicht verwendbar
sobald der 622
Art von
diese
und lnfrarotkopf sollten
ist insbesofldere fUr
TTL-Kameras konzi-
glimmt,
Leitzahlscheibe
nahmen.
ist
ein-
Blitzlampen-
Blitzlicht-
50
Page 29

AUTOMATIC
www.orphancameras.com
(DEDTCATED
Some dedicated cameras
off-the-film
fhe
Pro-System is
622
them
the mode
1.
Set
tion. Display of aperture/distance
will turn
2.
the apertuie
Set
Note:
Depending
tions.
struction
dedicated
man ual
Ready
3.
viewf
you're
Note:
For
specific camera
refer
manual
module
OPERATION
MODE)
plane
exposure systems.
compatible
selector at
off
you
on camera
refer to
the camera's
manual and
module instruction
indicaion is
inder
ready to take the
to the
and
instruction
displayed
it
When
camera's
the
Sunpak dedicated
maunal
offer TTL
"o"
want to
instruc-
the
Sunpak
is
displayed
picture.
instructions,
instruction
with
posi-
use.
in
the
AUTOMATISCHER
BETRTEB
(DEDIZIERTE
BETRIEBSART)
Einige dedizierte
"
Belichtungsregelung
ne
t
tigen
1.2.Den Betriebsartenwdhler
in-
3.
Pro-System
Das 622
Kameras
Die
stellen
Entfernung
gewUnschte
Die
Beachtung:
Zur
Kamera-Bedienungsanlei-
In
der
tung
der
und
dedizierte Sunpak-Modul
fur das
nachlesen
Bereitschaftsanzeige
Die
im
scheint
Aufnahme
Zur Beachtung:
In
tung und
fur das
nachlesen
gemacht
Kamera-Bedienungsanlei-
der
der
dedizierte SunPak-Modul
Kameras
kompatibel.
Anzeige
erlischt.
Bedienungsanleitung
Sucher.
Bedienungsanleitung
von der
ist mit derar-
der
einstellen
Blende
Nun kann die
wdrden
Filmebe-
"'"
auf
Blende/
er-
TTL-
bieten
52
Page 30

MANUAL
With
Standard
Zoom
Wide
the
Using
Power
ferent
Lens
Your
capability
used in manual
wider
mode
because the
continues to
shorten recycling
number
extremely
1.
2.
3. Focus
4.
Openings
Sunpak
Auto
of variable
or
smaller lens
for
selective
energy-saving
function
of flashes
easy to
Move
the
back
of flash
disengages
Set the film
(example:
use
and note
the
distance indicator
ample:
2 2 meters/7
Now,
simply move
(in
the
center
the
desired lens
the
correct
(2
2 meters/7
2 2 meters/7
can
select
openings
tromt12
(at
power)
full
your
Set
lens
termediate
simply
set
However,
always move
Control
Dial to
(such
as Full,
the
Power
between marked
OPERATION
Head
Head
Head
Ratio
Control To
flash has
622
light
output,
mode
This
lets
openings
depth-of-field
thyristor
lt will
simultaneously
provide
time
and
Yet this
useful feature
use:
Mode'selector
the
speed
of
f lash-to-subject
feet)
feet f rom
any of
to
lens
your
112 , 114
Ratio
Switch on the
to
Manual
auto computer
dial at film
ISO
100)
the
distance
your
on
feet)
the
Power
the
Calculator
opening
appears
With ISO
your
eight
different lens
(1/128th
this opening
opening
Lens
Aperture
the
the marked
etc
,
Dial to
any
numbers
Select Dif-
the
unioue
even when
you
shoot
in
manual
control,
circuitry
greater
a
position
This
circuitry
speed
shown
lens
Ratio
Dial)
until
under
distance
100 f itm
subject,
power)
1oil22
lf
an
is indicated,
Ring
Power
Ratio
position
Do not
)
position
MANUELLER BETRIEB
Mit
Standardkopf
Zoomkopf
Weitwinkelkopf
Gebrauch
Wahl
lhr
at
"
tige Feihigkeit variabler
Gebrauch
.,
'.
erm}glicht
oder kleineren
manuellem
tiefenkontrolle, weil
is
Thyristorschaltung
Gleichzeitig
und eine
gewdhrleistet
duRerst einfach:
in
1. Den
by
(ex-
2. Die Filmempfindlichkeitsscheibe auf die
Dial
,
3.
at
you
4. Nun einfach die Leistungsfaktorscheibe
in-
set
in
des Leistungsfaktorreglers zur
verschiedener
Sunpak
am Blitz auf
einstellen Die Comouter-Automatikschaltung wird dadurch umgangen
Filmempf
Films
Das
einstellen und
anzeige am
nung
(in
der
len, bis die
unter
Motiv-Entfernung
Mit Film ISO
von 2,2 Meter vom
jede
ObjektivOf
Leistung) bis
wdhlen
Das Objektiv auf diese Offnung
einstellen Wenn eine Zwischenob-
jektivoff
den Objektivblendenring
Jedoch stets
auf eine
112, 1/4
lungen
Objektivoffnungen
Auto
622-Blitz
in manuellem Betrieb. Dies
lhnen
Aufnahme
die
Objektiv0ffnungen
zur
Betrieb
wird die Nachladezeit
grORere
Anzahl
Die
Bedienung
Betriebsartenwahlschalter
indlichkeit
(Beispiel:
einstellen
Objektiv auf das
die
Objektiv
(Beispiel.
ablesen
Mitte
Rechenscheibe)verstel-
der
gewUnschte
korrekten Blitz
der
100
beliebige der acht
f nungen von t12
tl22
nung
angezeigt wird, einfach
die Leistungsfaktorscheibe
markierte
nicht
usw)
einstellen
besitzt
einzigar-
die
Lichtabgabe auch bei
grOReren
mit
gezielten
Schdrfen-
die Energiespar-
weiterhin-f unktioniert
manuellen Betrieb
von der Entfernungs-
(2,2
bei einer Entfernung
Objektiv
verkUrzt,
an Blitzen
ist
auRerdem
hinten
des verwendeten
ISO 100)
Motiv
scharf
angezeigte Entfer-
Meter)
2,2
ObjektivOffung
erscheint
MeIer)
kOnnen
verschiedenen
(bei
Position,
auf Zwischenstel-
(11128
Volleistung)
einstellen
(z
B
Full,
bei
ist
Sie
54
Page 31

Background
www.orphancameras.com
Hinterground
Arridre-plan net
Fondo
Achterground scherp
Sfondo a
in
scharf
enfocado
fuoco
focus
Foreground
Vordergrund
plan
Premier
plano
Primer
Voorground
piano
Primo
in focus
schaft
net
enfocado
scherp
fuoco
a
Background
foreground
Hinterground
Vordergrund
Arridre-plan et
plan
Fondo
enfocados
Achterground en
voorground scherp
Sfondo e
fuoco
a
in focus
nets
primer plano
y
primo
and
und
scharf
premire
piano
Depth-Of-Field
In
lens opening
camera's
of
a small
the
subject
However,when
becomes
the
reduced
aperture
pleasing
backgrounds
For other
you
focus.
Control,
setting
extra
Examples:
When
depth-of-field
the
lens openings
traits, use
and
depth-of
to controlling
addition
lens
-f
your
ield of
aperture,
in front
area
will
wider
in focus
area
Thus,
your
subjecis,
want
will
With
you
to the
creative
photographing
power
higher
larger
-f
ield.
aPerture
or
controls
also
image.
such
of
be
the
such
will be
when
portraits
because
will be
the entire
the SunPak
adjust
can
aperture
control
is
often
settings
for best
lower
the
openings
lens
Control
exposure,
the
a
When
f/16 or
as
behind
and
in
lens
t12.8 or
as at
significantly
you
use a
will
distracting
eliminated
but
all
as still
such
area
Power
power
the
you
life,
still
required.
and smaller
results.
power
the
of
Your
depth-
has
lens
f/1 1,
Your
focus
aPerture
l12,
wider
more
be
life,
to be
Ratio
ratio
desire
more
Use
por-
For
settings
less
for
rf
ent
Schd
AuRer der
ert die Objektiv6ffnung
Kameraobjektivs
lhres
Schdrfentiefe
Objektivoffnung
f/l6
wie z B
for
"
/
''tl2
in
hinter dem Hauptmotiv
vor
und
abgebildet.
(kleinerer
nung
ab
sich
vOffnungen zu
dadurch
lenkende
wischt
Aufnahmesituationen,
lichst
werden sollen
Stilleben
faktorregelung
stungsfaktoreinstellung
wunschten
kreative
Beispiele:
Bei Stilleben
Schdrfentiefe
wenden Sie die
stellungen
off
Resultate.
arbeiten Sie
einstellungen
tivoffnungen, um
ve
f/2 nimmt die
oder
8
Bei Portrdtaufnahmen
beispielsweise,
klar
Details
werden
alle
Kontrolle anpassen.
nungen, und sie
rm inde rn
ief
Belichtungsregelung
des Bilds.
oder
Bei
wdhlen,
herauskommt, und
Details scharf
Mit der Sunpak-Leistungs-
Blende f Ur
ist
wUnschenswert.
und
Bei
mit kleineren
und
ung
eregel
steu-
Blende
oder
(groRer
Blendenzahl)
f/1 1 wird der
grORerer
Blendenzahl
Schdrfentiefe
gr0Rere
weil
im Hintergrund
Andererseits
bei denen
Beispiel
Ein
kOnnen Sie
hiiufig
hdheren Leistungsein-
kleinere
erzielen
Portrdtauf
groBeren
die Schdrfentiefe
die
auch
kleiner
Bei
Bereich
scharf
ObjektivOff-
wie z.B
iehlt
empf
es
Objekti-
Portrdt
das
ab-
ver-
gibt
es
mog-
abgebildet
hierfur :
Lei-
die
ge-
der
zusdtzliche
groBe
eine
Ver-
Blenden-
beste
nahmen
Leistungs-
Objek-
zu
56
Page 32

MANUAL
With
OPERATION
Head
Ring
Red
lnfra
Diffusion
Bulb
Bare
purpose
Special
totally
different characteristics
Number and
Guide
Number dial
Guide
flash
lamp
distance
displayed..
You will find
power
we strongly
test rolls
Apertures
displayed But
active
ratios f rom
on
heads
is not
unit
glow
will
indications
a
in this manual on
recommend
for
of film
and distances
power
you
and
power
f
ull
of the
any
special
risable.
guide
Head
Head
Head
f lash
flash
on
The
and all
will
of each
your
special
ratio
may
select
to
1 1128ld:'
purpose
heads have
power
The
the
back of
Aux, GN
aperture/-
not
be
flash
page
78, but
you
to
shoot
needs
not
are
settings are
power
power
flash
MANUELLER
Ringkopf
Mit
rarotkopf
Inf
Dif f usionskoPf
Blitzlampenkopf
/
--spezialzweck-BlitzkOpfe
in
Eigenschaften,
andere
Blitzleistung
und
zahlscheibe
nicht
Lampe
/Entf
nicht
Auf Seite
Sie
Tabelle.
Anhalt
lhnen
rungen
Blenden und
nicht angezeigt.
stellungen
Sie
schen
1
1128
Blitzkopf
hinten am
verwendbar
glimmt
ernungs-Anzeigen
k6nnen
und sdmtliche
in
78
dieser
Leitzahl/Leistungsfaktor-
eine
kOnnen
Sie
verwenden,
jedoch
fUr spezielle
Testaufnahmen
Entfernungen
sind
Leistungsfaktoren
voller Leistung
jedem
mit
verwenden
Die
jedoch
BETRIEB
ganz
haben
Leitzahl
was
Leit-
Die
angeht
Blitzgerdt
"Aux
Die
Anleitung
diese
wir emPf
zu
Leistungfaktorein-
wirksam, und
und
Spezialzweck--
ist
"
GN
Blenden-
erscheinen
finden
Tabelle als
ehlen
Anforde-
machen
werden
zwi-
Telleistung
58
Page 33

Operating
www.orphancameras.com
The
Bounce Flash
Adiustable
Head
Bedienen des
Blitzkopfes
fiir
Blitzen
einstellbaren
indirektes
Your
auto 622has a unique
assembly which enables
the light in virtually any direction and
render more
results
For
added convenience
ability, the Adjustable Bounce
Head
determine
you
desire.
1. To
Flash Head,
forefinger
desired setting.
DO NOT FORCE THE HEAD.
To
2.
twist as
foref
pleasing
has reference marks,
the
exact angle of bounce
rotate
the Adjustable Bounce
grip
and
the Flash
adjust
illustrated
inger
flash head
you
and creative
repeat-
and
you
so
with thumb and
gently
turn to the
Base, simply
with thumb and
to
Flash
aim
can
Auto
lhr
622
Blitzkopfsystem,
Lichts
des
erm6glicht
"
tive
Ergebnisse
lm Interesse
.t
komforts und
-,
wunschter
einstellbare
Bezugsmarkierungen
Blitzen
gewunschte
daR der
genau
bestimmt
1.
Zum
Blitzkopfes
diesen
ger
halten
wiinschte Stellung
GEWALT
2.
Einstellung der
Zur
mit
fach
gezeigt
wie
ein einzigartiges
besitzt
praktisch
in
und exzellente
gewdhrleistet.
zusiitzlichen
Wiederholbarkeit
Effekte
Blitzkopf
Drehen des einstellbaren
fUr
mit Daumen und Zeigefin-
und
ANWENDEN
Daumen und
drehen
Abstrahlung
die
das
jede
Richtung
sowie
Bedienungs-
weist der
indirektes
f
ur
RUckstrahlwinkel
kann
werden
indirektes Blitzen
vorsichtig
in
drehen.
Blitzbasis
Zeigef
krea-
auf,
die
KEINE
ein-
inger
ge-
so
ge-
60
Page 34

Wrong
X
Wrong
X
WaY
Way
[-^
tffii
sl
O Right Way
TIPS
BETTER
FOR
FLASH
Don't Stand
BOUNCE
PICTURES
Too Close
to Your
Subject.
Reason:
downward
that
reach
-l
n|t'
ulF
ro
li
n
il
AI
g
X
4-;:-
'
Wrong
\
'.,
'.
Way
:
\
\
/i
lcrt
./+aS.
I \"
/ \
'',-T'
'
t\{
\ qi)
's
'
[Ar
-
lTtl
tY I
L"l
Way
ht
Rig
O
ffi
[\l
cause unpleasant
(shadow)
subject's eyes
Rotate
2.
vent the
immediately
f rom receiving any
direct
In small
3.
light off
Provided
ing, this
even
bounce
Remember,
4.
off a wall
In
makes
face for bounce
often,
subject since
have to travel so
lf
5.
surface,
the wall
other
show
photograph.
your
possibly you
piece
taped in
housing
onto
at an angle
(or
no light
many homes, a white
you
than
the
very
your
subject's
areas under
and
the f lash
subject
behind
light from the
rooms, try bouncing
the wall onto
it is a white wall and
technique
lighting
where space
you
if the
ceiling
excellent
an
more light can
the light does
find a suitable
can't
you
can
or ceiling
white,
the color
Therefore,
own bounce surlace
can use an
of white cardboard
front of
that it reflects the
so
subiect.
light will be
The
reflected
so acute
little light)can
face. This will
looking dark
nose.
iciently to
suff
or the background
flash.
provides
than off
can bounce
reflective sur-
flash ... and,
far.
make one,
is
your
in the finished
the flashtube
the
pre-
the
subject
portion
the
the ceiling.
ceil-
more
-ceiling
is limited.
light
high.
is too
wall
quite
reach the
bounce
i.e., if
color
any
will
subject
create
ordinary
held or
light
of
not
'.
t
/"
.
ZU INDIREKTEM
BLITZEN
Gehen
Sie nicht zu nahe
Motiv
heran.
1.
Grund. Das Licht wird in
spitzen Winkel nach
iert,
sicht des Motivs
werden
Augen
2. Den Blitz
zu
noch
hinter
ringste
In
3.
der
lassen.
daR Wand
bietet
mdRigere Ausleuchtung
direkter Blitz von
4. Das Blitzlicht
einer Wand, wenn
hoch ist. In
weiRe Wiinde
te
Blitzen
dieser Technik
Motiv fallen,
strecke
5. Falls
xionsf ldche
selbst
oder Decke nicht weiR ist,
das
Reflexionsfldche.
nen weiRen Pappkarton
Blitzr6hrengehduse
das Blitzlicht von
das
kaum
daR
vermeiden,
dem
kleinen Riiumen
Wand
diese
Reflexionsfldche
Sie keine
fUr
Motiv im
Motiv
Licht auf
dunkle Schatten unter
und
Nase
der
ausreichend
dal'J
Hintergrund
Motiv auch
Direktlicht vom Blitz
an die Decke werfen
Unter der Voraussetzung,
Decke
und
Technik
der
reflektiert
Rdumen
vielen
eine ausgezeichne-
dar, und hiiufig kann
mehr Licht
da
nicht
die
so lang ist.
geeignete
f inden, konnen
eine
sorgen.
Bild
Sie
dieser Fliiche
geworfen
lhr
an
einem so
unten reflekt-
das Ge-
Dadurch
trifft.
das Licht von
die Decke zu
fur indirektes
die
halten,
wird.
den
verursacht.
drehen, um
weder
Motiv
unmittelbar
ge-
nur das
erhdlt.
weiR
sind,
gleich-
eine
als
Decke.
auch von
stellen
bei
auf das
Reflexions-
Refle-
Sie
Wenn Wand
erhalt
Farbe
der
konnen
vor
das
so daR
auf
zu
in-
ei-
62
.
Page 35

Multiple
www.orphancameras.com
For
fects,
pak
It's
junction
any other
Understanding Multiple
o
o
Although the
sitive
fected
or even daylight
go
And the
with a handy
tach
dard tripod.
Flash
genuinely professional
the
only thing
flash is
easy to
with
electronic flash
'main'
The
attached to
sensitive
each
of
units; when
the other flash
perfect
in
the
by
slave units
volved is the
'main'
flash to
don't have to
dangling
The
Sunphk Auto
perfect
flash
work. lt's
no
batteries, and is
sitive being
remote
flash
bcunce lighting
meters/100
32
plugs
into
remote
flash.
to
electronic
by bright
off accidentally
Sunpak
any shoe-mount
Operation
better than a
... two
Sunpaksl
your
use
another auto
f lash is
the camera A light-
slave unit
'remote'
the
main
the
units
synchronization
The
one
the camera,
contend with wires
across the floor
partner
for
very
even
at
feet
the PC
Sunpak
Slave
f lash light,
'ambient'
-
so
Auto
Slave
adapter that lets
flash to
lighting
(Or
more
in
Sunpak
or almost
Flash
the
one which
is
attached
(other)
flash is fired,
triggered
are
only cord
going
from the
so
Slave
your
multiple-
requires
small,
extremely
to trip
able
with indirect
distances up
more.
or
cord
of
is
very
it's
unaf-
room
your
f lash
won't
is
supplied
you
any
stan-
Sun-
con-
flash
you
is
sen-
the
sen-
light
at-
Mehrf
achblitz
ef-
Wenn Sie
leuchtungseffekte
to
in-
or
to
)
"
is
a
a
lt
gibt
dann
als
besser
lich zwei Sunpaks
kdnnen
Sie
zusammen
fast
oder
verwenden
blitz
Theorie des
".,
o
Hauptblitz
Der
Kamera angesetzte.
findlicher
jedem
verwendet.
zundet,
Blitzgerdte
perfekter
in
viert
bendtigen,
Kamera.
zur
rwarr
o
Der
automatische
nausliiser
unentbehrlich.
fordert
Rerordentlich
Tochterblitz
den
Blitzen
tem
zu 32
bis
in
wird
blitzes
der
Obwohl
elektronische
das
empfindlich
hellem Umgebungs-Raumlicht
Tageslicht
Das bedeutet,
versehentlich
AuBerdem
mit
loser
ausgestattet,
Steckschuhblitzes
gestattet
Stativ
professionelle
echt
nur
es
eine
Sunpak-Blitz
ein
!
lhren Sunpak
mit anderen
jedem
anderen
Mehrfachblitzes
Fernausl6ser
zusdtzlichen
Wenn der
werden auch die
von den
Synchronisation
Das
einzige
ist
das
Also
FuBboden.
auf dem
fUr Mehrfachblitzen
ist
Er
Batterien
keine
empfindlich.
aus
Metern und
PC-Kabel des
das
gesteckt.
Sunpak-Fernausldser
reagiert, wird er
in keiner
daR
gezUndet
ist
der
praktischen
einem
den
der
an
Be-
erzielen
(Oder
wollen,
Moglichkeit, die
ist, ndm-
rere.)
meh
mUhelos
Automatik-
Elektronen-
ist
an die
der
Ein lichtemp-
Fernausl6sern
Kabel, das
vom
kein Kabelwir-
mit
wird
Tochterblitz
Hauptblitz
anderen
akti-
Sie
HauPtblitz
Sunpak-Fer.
ist klein, er-
ist au-
und
l6st
Er
mehr
indirek-
von
Er
aus.
Tochter-
auf
duBerst
von
auch bei
Entfernungen
Blitzlicht
oder
Weise beeinfluRt,
lhr Blitz
Sunpak-Fernaus-
AnschluB
jedes
werden
Adapter
Standard-
nicht
kann.
jedes
64
Page 36

ACCESSORIES
Pro
System
AVAILABLE
FOR THE
Sunpak
Auto
622
1.
Detachable Interface
Quick
Full camera
sync, but
are compatible with all
622
No
Cat
651-040
651-046
651-049
651-043
651-044
651-047
651-041 KX.1D
651-048
146
651
143
651
651 246
651-042
2.
Battery
Extra
available for
651-160
3. Ni-cd
Provides
charge.
approximately
Sunpak
4.
Quick
Cluster
The
Sunpak
No.
5. Dedicated
cat No.
dedication with
much more
pro
system.
Shoe
Module
CA-1D
NE-1D
OT-1D
MX.1D Minolta
YC-1
D CONTAX
RX.1.D
PT.l D Pentax
NE.2D
MX.2D Minolta
NE.3D
STD-1D For
Cartridge
battery
the
Cluster
CL-3
90
to 500
CL-3
can be
t
cat No.
QBC-6.
Changer
CL-3
charger is for
CL-3 Ni-cd
651-165
Remote
651-166
Modules
full
electronic
one touch interchangeable interface
Sunpak
'D'
Sunpak
Interface
Canon A-1, AE-1 PROGRAM,
Nikon FE,
Otympus
Richo
XR-10005,
Konica FC-1,
Nikon FA, FE-2
Nikon F3
all Non-Dedicated
series Electronic Flash
with
EM, FM, New
OM-2N,
Ofr/"L
XD
ME,
X-370,
XG
series,
137 MD/MA
XR-2S,
FP-1, FS-1,
ME
super,
FG
X-500, X-600,
series,
Quartz,
cameras
(CG-10)
cartidge
Auto
hours using
QBC-6
use with
Cluster
Cord EXT-1
622
cat.
flashes
charged in
651-163.
for
Ni-cd
are
No
per
the
the
cat.
1
interfacing.
AE-1, AL-1,
FM2,
FG-20
tt,
OM-20,
OM-30, OM-2
X-7,
X-70,
139
Quartz,
XR-6, XR-S,
FT-1,
Super
XR-7
FT-1 MOT
Program,
X-700
6. Filter Kit FK-6
Use with
kit consists
and
Yellow
neutral
a
correction filter for
ten
film,
fusers
No
651-167
7.
Conversion
cat No
8. AC Adapter
This AC Adapter
operate
220V, and 24OV
you
to
f lashes
cat
No. 651-741
not
Set
Systems and Auto
AV-1, NewF-1
S/p,
LEICA R4 MOT
RTSII
Quartz
Program
Plus,
Sunpak Zoom Head Filter
of read,
f ilters
color
density filter,
two
and
Plug
651-168
wide-angle
Supplied with
AD-26
your
lash
f
AC The benef
are unlimited
maximum
and
"X"
the
only
modules
T-50,T-70
OM-3
LX
Blue,
Green
as well as
color
85B
use with tungs-
case
cat.
permits you
on 100V,
120V,
number
economy
dif-
to
its
or
66
Page 37

Ni-cd Battery
www.orphancameras.com
9. Charger QBC-5
NC51 0
The charger
Sunpak
will
proximately
651-809
10. Powerpak
Allows
to
be used
times and situations
$
#
*
t
t
ed
must.Has built
tion and detachable
cessory 3
available. cat. No. 651-723
11. 510V Ni-cd Battery
This battery
recycle times of any available
power
recharged
and
400 flashes
651-727
12.6x6Bracket
This
for use with 6x6 SLR
meras.With adjustable
screw.cat.
13. Bounce
Can be used
Designed
soft,
subject.
14. Slave Unit
15. Interchangeable
Standard
Zoom
Wide
Ring
lnf rared Flash
651-064
Diffusion Head
Bare Bulb Head
16. Bracket
fully recharge battery
number of f
provides
is
indirect lighting effects
Head
Flash Head cat.
FOR
is for
NC510
10
for
510V
professional
most rapid recycle
for
in voltage
mi10'coiled cord
provides
source.The
for hundreds of cycles
approximately
per
oversize
an
No.
651-752
Lighting Kit
with Zoom
give
to
cat. No. 651-795
cat. No. 651-715
Head cat. No. 651-060
Head cat. No.651-061
cat.
cat. No. 651-062
Extender cat.
with the
use
Ni-cd Battery. lt
hours.
charge. cat. No.
Flash Head
No. 651-065
Head cat.
cat. No. 651-066
in
cat.
Battery
batteries
51 0V
where extendlashes is a
regula-
cord. An ac-
is
NCs10
the fastest
NC510 can be
platform
metal
TLR
and
retaining
Head.
pleasant,
very
to the
No.
651-063
No.651-715
80
ap-
No.
also
to
ca-
No.
DAS Sunpak
ZUBEHOR
1.
Schnellwechsel-lnterface-Moduln
Volle Kamerakomoatibilitdt m it voll
elektronischen Schnittstellen.
Nicht
sondern
Schnellwechsel-lnterface-Moduln
d
Elektronenblitzsystemen
Auto
2. Batteriemagazin
Extra-Batteriemagazine
fUr
NiCd-"Cluster"
3.
Bietet 90 bis
dung.
mit
den.
4. Schnelladegerdit QBC-6
NiCd-"Cluster" CL-3
Das Ladegerat
NiCd-"Cluster" CL-3
Dediziertes Fernauslosekabel
5.
EXT-1
6. Filtersatz
Gebrauch
Der
Blau-, Grun-und
einem Graufilter,
turfilter
Weitwinkel-Diffusoren.
hduse.
7. Konversionsstecker
Netzadapter
8.
Dieser Netzadapter ermdglicht
den
12OV,220 V und
nung. Vorteile: Unbegrenzte
zahl und
ke it.
FUR
"X"-Synchronisation,
nur
viel viel mehr.
mit allen Sunpak
Pro-System kornpatibel.
622
Auto
CL-3
Sunpak QBC-6
1
Filtersatz
Betrieb
(CG-10)
622.
CL-3
100 Blitze
kann in
etwa 1 Stunde
geladen
ist fur
gebaut.
FK-6
mit
Sunpak
besteht
Gelbfiltern sowie
fUr Kunstlichtf ilm und zwei
85B Farbkorrek-
AD-26
Blitzes mit
des
240 V
hdchste Wirtschaftlich-
r$8tg*&rreha.***
Sunpak
"D"-Serien-
und dem
lieferbar
pro
wer-
den Sunpak
Zoomkopf
aus Rot-,
Mit Ge-
100 V,
Netzspan-
Blitz-
AUTO
9. Ladegeriit QBC-s
NC510 Ladegerdt
mit Sunpak
Liidt die
vollst6ndig
10. Powerpak
si
La-
fUr
Ermoglicht die
professionelln
schnellste
Situationen,
ein absolutes
bauter Spannungsregulierung
abnehmbarem
Spiralkabel
behor
510 V NiCd-Batterie
11.
Diese
sten
zur
nungsversorgungsquellen.
Batterie
von
und
Blitze
12. 6 x 6-Halterung
Eine UbergroRen-Metallplatte
Gebrauch
Kameras. Mit einstellbarer
sch
13. Satz
Kann mit dem Zoomkopf
wendet
beste,
fekte
Automatischer
14.
,':_x$ri
Pro'system
622
f
NiCd-Batterie
ur
fUr Gebrauch
NC510 NiCd-Batterie.
in
Batterie
auf.
fttr
Nachladezeiten
wo eine
iSt ebenfalls
lieferbar.
Batterie bietet die schnell-
Nachladezeiten unter allen
Verfugung stehenden
NC510 kann
Zyklen nachgeladen
gewdhrleistet
pro
Ladung.
mit 6 x 6 SLR- und
raube.
fur indirektes
werden. Gewahrleistet
weiche
indirektem
bei
10 Stunden
ca.
V-Batterie
510
Verwendung
V Batterien
510
hohe Blitzzahl
ist. Mit einge-
MuR
Kabel. Ein 3-m'
Fernausloser
als Zu-
NC-5'10
fUr Hunderte
werden
etwa 80 bis
Blitzen
Beleuchtungsef
Blitzen.
von
fiir
und
und
Span-
Die
400
fur
TLR-
Halte-
ver-
Auswechselbarer
1 5.
Standardkopf
Zoomkopf
Weitwinkelkopf
Ringblitzkopf
rarotblitzkoof
lnf
Duff usionskoof
Blitzlampenkopf
1
Halterungsverldngerung
6.
-
Blitzkoof
.l
)
67
Page 38

Care
Your
engineered
"maintenance".
formance
these
1.
When
be
pose
in
of time.
unit in
seat
Also,
before
to battery
?.
Check for
(the
light
more
of alkaline
(or
ed, they
It's
appearance;
of batteries
chemical
and
tery
flash
has happened,
after
tery
Finally,
batteries
with
battery
energy
electrical
Your
of
Sunpak
electronic
to
year-in
pointers:
basic
Storage:
not
in
stored in
direct
Inspect
if
use,
a cool
the unit
to extreme
sunlight for
For
example,
glove
the
of a car.
be
sure to remove
storage
leakage.
Batteries
reasonable
length
of time it
to
come
on between
than 20
or 30
batteries
nickel
cadmium
must
also
leave
contacts
be recharged).
wise
to check
sometimes
discharge
material
a whitish-powder
passes
which
unit's
electrical
cleaning
the Sunpak's
with
good
it's
a
in
once
a handkerchief.
surface,
pass
to
through
system.
Auto
622 Pro
flash
require
Still, to insure
your
compartment,
to
replace
a while
the
almost
year-out
and
auto
622
place.
dry
heat
extended
do not
the
prevent
damage
Frilquently:
recycling
takes the ready
flashes):
seconds, a fresh
should be
batteries
your
even
leak
or
through
the
on the
your
onto
contacts.
the
internal
an
eraser.)
idea
to remove
and wipe
The
cleaner
easier it
your
flashgun's
has
been
no
per-
best
follow
should
Do
not
ex-
leave
or
periods
leave
the
trunk
or
batteries
due
time
if it's
set
obtained
are
us-
batteries'
the best
some
jacket
...
bat-
Sunpak
(lf
this
batteries
bat-
the
them
the
is for
the
System
it
Remove
3.
lf for
use
several weeks
teries and
plastic
a
4.
lf
becomes
1'
cleaner
small amount
.t
lissue
,.
used
SURE
UNIT
ING.
5.
In
Sunpak
vice, return
Sunpak Distributor
shown
work.
tempt to
yourself
Electronic
voltage
However,
failure
weak
single
batteries and
CAUTION:
The
camera is
Blade
from
from
Batteries:
reason
some
your
flash
store
bag
Maintenance:
your
auto
dirty,
on a
or a slightly moist
to clean the rest
TO
THOROUGHLY
IMMEDIATELY
Service:
the unlikely
electronic flash
it
to
on the Sunpak World
Do not,
disassemble
flash
and
should not
keep in
is
more likely
batteries
cause. lf it
contacts
electronic
sent
Keep
the metal
dirt and
scratches
you
not
do
unit for
or more, remove
them
is
one
622's reflector
use
lens
of
your
under any
than
signal
through
grime,
a
separately. Inside
good
way.
one drop
cleaning
lens
cleaner and lens
cloth
of the unit.
DRY
AFTER
event
that
requires
dealer
or the sole
at
the address
condition, at-
and/or
operates
be
taken apart.
mind
that f lash
result
to
from
any
doesn't fire,
carefully.
transfer from
the
positions
protect
and
intend
period
the
bat-
window
lens
of
tissue. A
can
be
BE
THE
CLEAN-
your
ser-
wide
Net
adjust it
on high
from
other
check
the
Interface
free
them
to
of
72
Page 39

Guide number
www.orphancameras.com
reference chart
Tableau de r6l6rence du
Verwijzingstabel
voor richtgetallen
(l)/Leitzahl.Bezugstabelle (l)
(l)/Grifica
nombre
guide
(l)/Tabella
de referencia
de n'umeros
di riferimento numeri
guida
(l)
guida
(l)
"S"
Standard head/Zoom head
Standardkopf/Zoomkopf
T6te
standard/Tete
P.R.
Full 80t25 1 1 3/35 128t40 143t44 1
lz
1t4 40/1
ltB
1/16
1t32
1t64
1t128
Zoom head "W'
Zoom-Blilzkopf W"/lveitwinkolkopf Zoom-flitskop
TCte a zoom
ISO
speed
Full 57t20 80t28 91t32
1t2
1t4 28t10 40t14
1t8 20t7 28t10
t/ to
1t32 10/3.5 14t5 16/5.6
1164 7t2.4 10/3.5
1t128 5t1.7
76
d zoom sur la oosition
rso
57t18 80t25 91t28 101132 1 1
28tB.B 40t13 45t14
20i6 2 2BIB.B 32t10
14t4.4 20t6.2
10/3.1
7t2.2 1
posilionruVide
posilion
la
sur
40114
t415 20t7 23t8
position
"S"-position
"S"
25 50
3 57t18 64t20
14t4.4
0/3.
64 80
23t7 25t8 28t9
16/5 1B/5.6
1 1 1/3.5 13t4
head Cabeza de fl6sh
"W"/TCte
25 50 64 80
grand
57t20 64t22
45/16
32111
1'l t4
712 4
BI2.B 9/3
Cabeza
Standaard
Testa
51/16 57t18
1 40t12
36/1
angulaie
Tesla
1 01 /35
72t25 80t28
51t17 57t20
36t12
25t8 28t10 36t12
18/6
13t4 1415 18/6.3 20t7 25t8.9
flash
de
normal/Cabeza
flitskop/Zoom-flitskop"S"
standard/Testa zoom
100 160
60/50 202t63 226t70 286t89
143t44 1
3/36
101132 1 13/35
80t25
51/16 57t18 72t22
36/1 140t13 51/1 6
20t6 25t8
14t4.5 1B/5.6 20t6
para
objetivo zoom,
'W"
sland/Fingjlilskop
zoom sulla
100 160 200 320
1 13/40 1 43/50 1
40t14
20t7 25t8.9
10/3.5
posizione
101/35 1 1
72t25 BOI281 01/35
51t17
13t4.4 14t5 18/6.3 2017 25t8.9
flash
de
stand
posizione
sulla
200 320 400
60/50 202t63 226t70 286/89
80t25
2BIB.B 36/1 140/1
2 25t8 2BIB.B
W"/Tesla
60/56
3/40
57120
40t14
28t10 36/12.6
para
objetivo zoom,
"S"
320/1 00
143t44 1 60/50
101t32 1
posici6n
13/35 143t44 1
80t25
57118
"W"/Cabeza
grandangolare
400 640 800
43/50 1
226t80 286/1 01
60/56
113t40
80t28
57t20
40t14 51t17.8 57t20 63122 BOI28
28t10
202t71
1
72t25
51t17
position "S"
640 800 1 000 1
405t126 4521141
320/1 00 358/1 10 4521141
202t63 226t70 253t79
101t32
72t22
3 51/1 6 57t18 63/1 9
36/1 140t13 44t13.5
llash
do
320t113
202t71 226t80 253t89 320t113
1 43/50 1
101/35 1 13/40 126t44 1
72t25
36/12.6
506/1 58 640t200
60/501 79/55 226t70
1 13/35 126t39 1
80t25 89t27
para
objetivos
1
000
358/1 26
1 79/63 226t80 320t
60/56
80128 89/31
40t14 44t15.8 57t20 BOt28
28t10
32111
(feet/meter)
600 3200
905/280
640t200
320/1 00 452t141
320/1 00
60/50 226t70
1 13/35
57 t18 79t25
1 60/50
57t18 79t25
granangulares
(lesvmeler)
1 600 3200
453/1
60 640t226
453/1
226t80
60/56
113t401 60/56
1 13/40
40t14 57t20
60
1 13
I
{
i
I
, .;.-.i!,. d4 i
Page 40

number reference
Guide
Tableau de r6fience du
Verwijzingstabel
voor richtgetallen
(ll)/Leitzahl-Bezugstabelle (ll)
chart
nombre
guide (ll)/Gr6fica
(ll/Tabella
de referencia de numeros
di riferimento numeri
guida
guia
(ll)
(ll)
"T"
head
Zoom
Zoomkopf
Tete
d zoom sur
ISO
speed
Full
vz
1t4
1/8 40t12 57t18 64t20 72t22 80t25
1116 28t9
UJZ
1t64
1t128 10/3.1
position
"T"-position
position
la
25 50 64 80
| | J/JO 1
80t25
57t18
20t6 28t9 32t10.1 36/11.3
14t4 4
Ring head
Ringblitzkopf
flash annulaire
TOte
de
ISO
speed 25 50
Full
1t2
1t4
1/B
1/16
1t32
1t64
1t128
19.2t6 27.1t8.4 30.7/9.6
10.7/3.3 15.1t4.7 17.1t5.3 19.1/5.9
6.2t2 9.0/2.8
4.4t1.4
2.8t0.9 4.Ot1.2 4.6t1.4
Cabeza
Zoom'flitskop
Testa
"T"
1 1
t4q.q 16/5 18/5.6 20t6
6.3/1.9
zoom
181t57 202t64 226t72 286t91 320t101 405t128
60/50
128t40 143145 1
3/36
80t25 91t28 101t32 1 1 3/36 143t451 60/50 202t64
40t12
45t14 51/1 6 57t18
20t6 23t7.2 25tB 28t9 36/1
Cabeza de
Ring-f litskop
Testa
ad anello
10.2t3.2
7.1t2.2
para
flash
de
sulla
flash
t)4
objetivo zoom,
"T"
stand
posizione
anillo
de
80
34.2t10.7 38.4112
11.4t3.5 12.8t4
Bt25 8.9t2.8 11.3/3.5 12.6t3.9 16/5.0 17.9/5.6 22.6t7.0 25.3t7.9 28.3t8.8
5.1/1 .65.7t1.8
"T"
posicion
"T"
100 160 200
202t64 226t72 286t91
60/50
101t32 I tJ/JO 143t45 1 60/50 202t64 226t72 253tBO 320t101
72t22
40t12.7 f,t/to
25t8
100 160
48.5/15.1
21.4t6.7 27.1t8.4 30.3/9.4
'|
6.1/5.0
7.2t2.2
4.0t1.2 4.5t1.4
3.211
80t25
57t18
1.3 40t12.7
40t9 36/1 1.3 40t12.7 51/1 6 57t18 63/20.1 80t25
200 320
54.3/16.9 68 6t21
18.0/5.6 22.8t7.1 25.6t8
8.1t2.5
320
101t32
72t22.7 BOt25 101t32
51/1 6 57118
38.3/1
400 640 800 1 000
452t144
320t101
226t72 286t91
1 1
.4 76.8t24
1.9 42.8t13.4 54 0/16.9 60.4/18.9 67.5t21 .1 85.7t26.8 121 .2t37.9
572t182 640t203
405t128
143t45 1
3/36
72t22.7 BOt25 B9t2B
400
640 800 10001 600
96.9/30 3 108/33 9
32.3t10.1 36.1/1
452t144
320t101 358/1
715t227 905/288 128Ot407
506/1 60 640t203 905/288
1 79/56 226t72
60/50
1 1
126t40.2 r
3/36
121 .2t37.9
1.3 40.3t12.6
1
600 3200
1
3 452t144 640t203
60/50.9
4 1 1
3/36
153,6/48216.9t67.8
.2t16 72.3t22.6
51
35.8r11.250.5/15.8
10.2t3.2 11.5/3.6 14.5t4.5 16.2t5.O
5.6/1 6.4t2 8.0t2.5 9.0/2.8
18.2t5.6 23.0t7.2 41
10.1/3.1 12.8t4
(f
eeUmeter)
452t144
01
320/1
226172
160/50.9
1 1
3/36
(feet/meter)
3200
.2t12.9
17.9t5.6
77
Page 41

Guide number chart
www.orphancameras.com
Tableau du nombre
Richtgetallen-tabel
(lSO
100
leet/lSO
(100
guide
(lSO
ISO/mitreslGr6fica
100 meter)/Tabella
100 meters)/Leitzahltabelle
n0meros
de
dei
numeri
guida
guia
(lSO
(lSO
100 metri)
100 Meter)
(lSO
100
en
pies y
metros)
Ratio Full
Power
Head
STD
Head
Zoom
Head 800
Ring
lR
Head 35
Wide Head
numberrFlash
Guide
LeitzahltBlitzdauer
Nombre
guide/Dur6e
Guide Number
Flash Duration 1/500 1t750 1 I 1700
(lSO
100 f/m) 1 60/50 120t36
mm 1
35
w
mm
28
STD
mm
35
T
135 mm
mm
mm
50
(6x6)
duration
60/50
128t40 93t28
1
60/50
240t72
40t12 22t6.7 13t4 9t2.8 5.9/1.8
101132
128t40 93t28 64t20 46t14 32t10 2317
Nrimero
Richtgetal/Flitsduur
d'6clair Numero
Full
1t2
1 20/36 80t25 60/18
64t20 46114 32t10
120t36
1
60/50
72t22
80t25
120t36 80t25 60/1 8
51/16
guia/duraci6n del
guida/Durata lampo
UZ 114
80t25 60/1 8 40t12
1t4 1t8
60/1 8 40t12 30/9
36/1 1
destello
1/8 1/1
1/3500 1 /5000
t/ to 1t32 1164 1t128
40t12
30/9
23t7 16/5
20t6
/r
15t4.5
1 1.5/3.5
20t6 15t4.5
40t12 30/9
3.3/1
25tB
16/5 1 1.5/3.5
6 1t32 1t64 1t128
20t6
30/9 20t6 15/4.5
1/1 0000 1
/1
4000 1 /20000
78
.rtm:
.
Page 42

Auto
ditance
Plage
des distances_automatiqu_es
Automatisch
(lSO
range
afstandsbereik
100/lSO
(lSO
lOOmeters[Automatik-Entfernungsbereich
(100
|SO/mitres[Alcance
100
meter)/Gamma
automatica
de
distancia
delle
automatico
distanze
(lSO
i00
(lSO
Meter)
(lSO
100
metri)
100
en
pies
y
metros)
auto F-stop
rz
F28
F4
F5.6
F8
F11
T to
B.C.P.S
(Beam
Candle Power
Leuchtstdrken.Ref
Tableau
Gr6fica
B.C.P.S
Tabella
de r6f6rence
de referencia
(Lichtbundelsterkte
di riferimento
Power
Ratio
STD Head
Zoom Head
Wide Head
Ring
Head
Flash
Energy
2',-66't0.7
2'
2'
2' - 21't0.7
2'- 16'10.7
2' - 11'10.7
2'
Second) Reference
erenztabelle
(seconde
BCPS
B.G.P.s.
sekonde) verwiizingstabel
B.C.P.S.
(W)
28 mm
-
-
-8'10.7
Wide
-20
-
43'10.7
13
33'1O.7 - 10 m
-
6.5 m
-5
m
-
3.3 m
-2.5
m
(BCpS)
puissance
(segundos
(Potenza
in
W
T
50 mm
m
m
chart
de
chandelle
intensidad
de
del
Candele/Seconde)
Full
4550
2300
4530
9030
2300
260
125 ws
1t2
2300
1 130
2300
4530
1 130
80
63 ws
2'-80't0.7
2'
2'
2'-30',lo.7-9
2'-20'10.7-6m
z', - 15't0.7
2'-10'1O.7-3m
du faisceau)
haz
en bujias)
114
1 130
555
'1
130
2300
555
30
31 ws
35
-25
-
60'1O.7 - 18 m
-
-
40',t0.7
-
mm
12
m
4.5 m
16 ws
(S)
m
m
ltB
280
555
1 130
280
15
1/16
280
140
280
555
140
6
8ws
5'-120'/1.5-36
5'-80'/1.5-25
5'l-60'i1
-
40'11
5'
s',-30'/1.5-9
5'-20'11.5-6 m
5'- 15',/1.5-
1t32
140
70
140
280
70
1.8
4ws
135 mm
.5- 18
.5- 12
m
4.5 m
1t64
70
35
70
140
35
2ws
(T)
m
m
m
m
1t128
35
18
35
70
1B
lws
'
..&i:lia;=r,
Page 43

Sunpak
www.orphancameras.com
Specif
Gulde Number
(with
BCPS:
Angle of lllumination:
Automaiic Aperture Settlng:
Automatic
(with
Variable
Sensor
Bounce
Inlerchangeable
Sources:
Auto 622 Pro
ications
STD Head):
Head
STD
Wide Head
Head
Zoom
Ring Head
Head
lnfrared
Dilfusion Head
Bare Bulb Head
Distance
Head):
STD
Power Ratio Range:
Acceptance Angle:
Power
Range
Flash:
System
(lSO
100/320
50/160
4,550
60o Horizontal by
Permits
camera.
74o Horizontal by 65" Vertical.
Permits use of 50
28 mm
W-Position
Permits
camera.
S-Position 60o
Permils use of 35
camera.
T-position 24o Horizontal by
Permits use of
camera.
80o
Permits use of 35
camera.
60"
Permits use of 35
camera.
Horizontally,
Horizontally, Approximately 360"
il2,
0.7
(lSO
0.7
(lSO
0.7
(lSO
128:1,8-stop range
150
Adjustable Bounce
rotation
4 x C alkaline Batteries
4 x C Ni-Cad cluster
AC: Multi-voltage
Sunpak
Sunpak
400 m/f),
(lSO
100 m/f),
25180
power)
(at
full
45o
Vertical.
mm lenses on 35
use of 35
mm lenses on 6 x 6 camera,
lenses
use
Horizontal by 80' Vertical.
Horizontal
ilz.8,1t4,l|t5.6,
-25
m/2'-80'
100 m/J,
-9
ml2'-30'
100 m/t,
-
ml2'-10'
3
m/f
100
and
Powerpak lor 510 V Battery
NC510 Rechargeable Battery
mm
on 35
70o Horizontal
mm lenses
of 28
Horizontal by
mm lenses on
135 mm lenses on 35
mm lenses
45o Vertical.
by
mm
Approximately
il8, fl11, f/16
maximum
at
medium
at
minimum
at
,
Flash Head
90
elevation
degree
(not
CL-3
AC Adapter
(lSO
25 m/f)
mm
cameras.
Vertical.
by 53o
on 35
45"
Vertical.
17o Vertical.
on 35
Lenses on 35
360o
(tSO
aperture)
aperture)
aperture)
at 330 degree
included)
(optional)
(AD-26) (optional)
(optional)
(optional)
35
100)
mm
mm
mm
mm
mm
Duration:
Flash
ol Flashes &
Number
Recycling
With C Alkaline
With C Ni-Cad
With
With
510
With Sunpak
Color
Dimensions(HxWxD):
Weighl:
Time
Number
Recycling
Number of Flashes:
Recycling Time:
Sunpak
AC Adapter
Recycling
Sunpak
V Battory
Number
Recycling
Rechargeable
Number of
Recycling
Temperature:
Batteries
ol Flashes:
Time:
cluster CL.3
Multi-Voltage
(AD-26)
(at
Time
Powerpak for
of Flashes:
Time:
NC510
Flashes:
Time:
'120
V):
Batlery
1/500-1/30000th second
distance.
1/200001h second depending
1/500manual Power
''
Maximum Power
"
/'
Most suitable
'10.7"x4.8"x3.8"/
272 mm x
(with
Body 32
Battery
(less
STD
Zoom
Wide Head 3.8
Ring
Inirared Head 3.8
Diffusion
Bare Bulb
Ni-cd cluster CL-3
Ratio
setting
Bo
13
sec.
90
3 sec.
19
sec.
200
1
sec.
80
3 sec.
for
daylight
123 mm x 97
Head)
STD
g
(less
ozl910
Cartridge 3.5 ozl100
batteries)
Head 3.8 ozl1
Head
Flash Head
10
ozl190
6.3
ozl110
4.4
ozl20O
ozl1 10
ozl1 10
Head 3.8
Head 5.6 ozl160
14.8 ozl420
batteries)
g
g
g
depending
in
use.
Minimum Power
7oo
0.25 sec.
500
0.25 sec.
0.25 sec
2500
0.25 sec.
400
0.25 sec.
films
color
mm
g
g
g
g
g
g
on Auto
on
BO
.
j
ir
.
J
 Loading...