

Page 1
Page 2
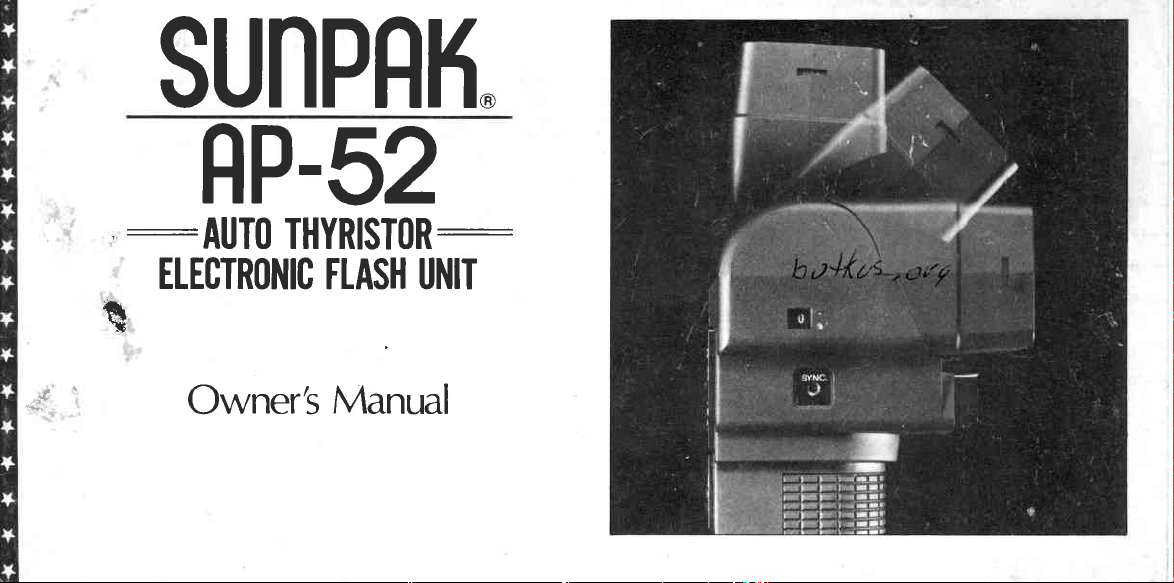
SUNPRH"
RP.52
:
I
AUTII THYRISTOR:
ELECTRONIC
FLASH UNIT
a
.F
Owner's
Manual
Page 3
IMPORTANT SAFECUARDS
www.orphancameras.com
When using
precautions
safety
ing the
Read
1.
2. Close supervision
is used by or
unattended
not
Do
3.
dropped
by a
protect
To
4.
immerse this
5. To avoid
this
wnen
lncorrect
hazard when
your photographic
should
following:
understand all
and
near children.
while
operate
qualif
appliance,
some
appliance
or damaged-until
ied
serviceman.
against
appliance
electric shock
but
service
reassembly can
the appliance
is necessary
in use.
always
instructions.
Do not
if the
it
electrical
in water
hazard, do
take it to a
repair
or
is used subsequently.
equipment, basic
followed,
be
when any appliance
leave
appliance
has been examined
hazards, do
shock
or other
not disassemble
qualif
ied
work is
electric shock
cause
includ-
appliance
has
been
liquids.
serviceman
required.
not
not operate appliance
Do
6.
let
not
7. Do
or touch
lf an extension
B.
taken
tripped
Always
9.
when
-
from outlet.
SA/E
cord
hot surfaces.
to arrange
over
unplug
not in use.
THESE
with a damaged
table or counter
hang over edge
is necessary,
cord
the cord
pulled.
or
appliances
Never
plug
Grasp
and
of
care should
that it
so
from electrical
yank
pull
will
cord to
to disconnect.
INSTRUCTIONS
cord.
not
outlet
pull
be
be
plug
Page 4
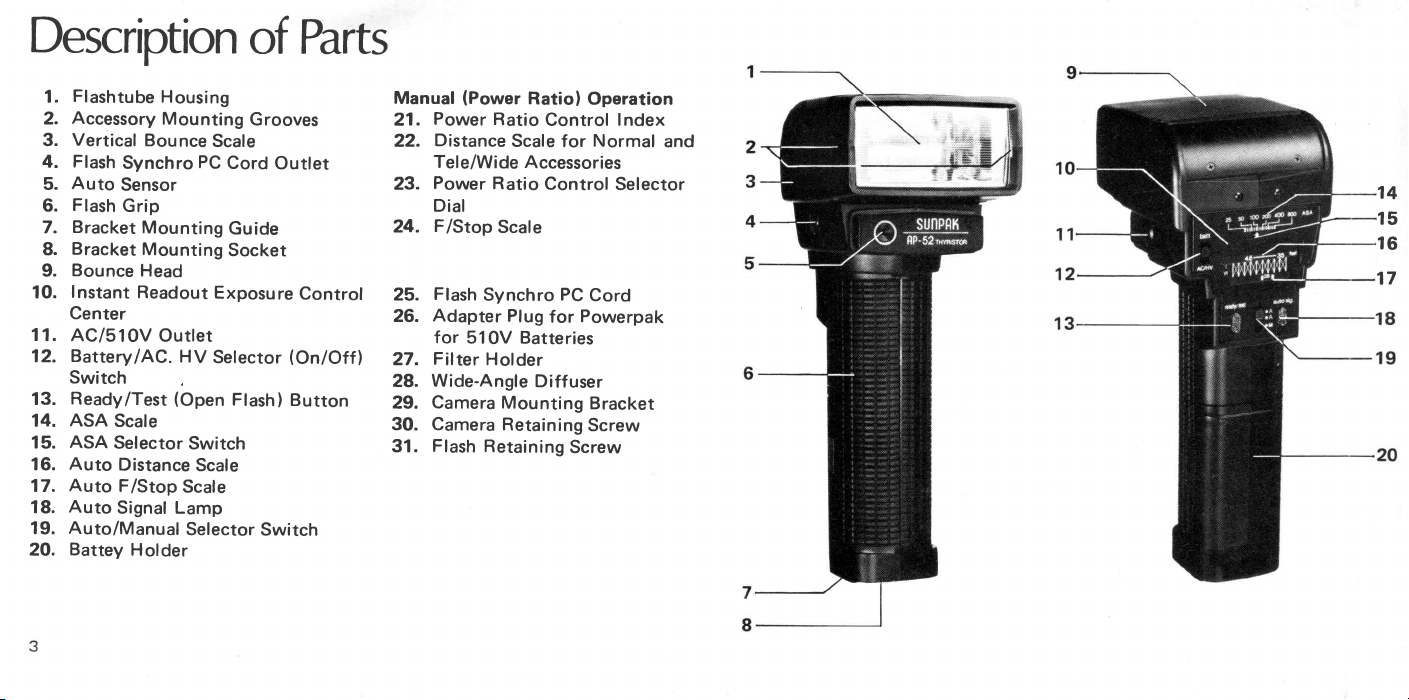
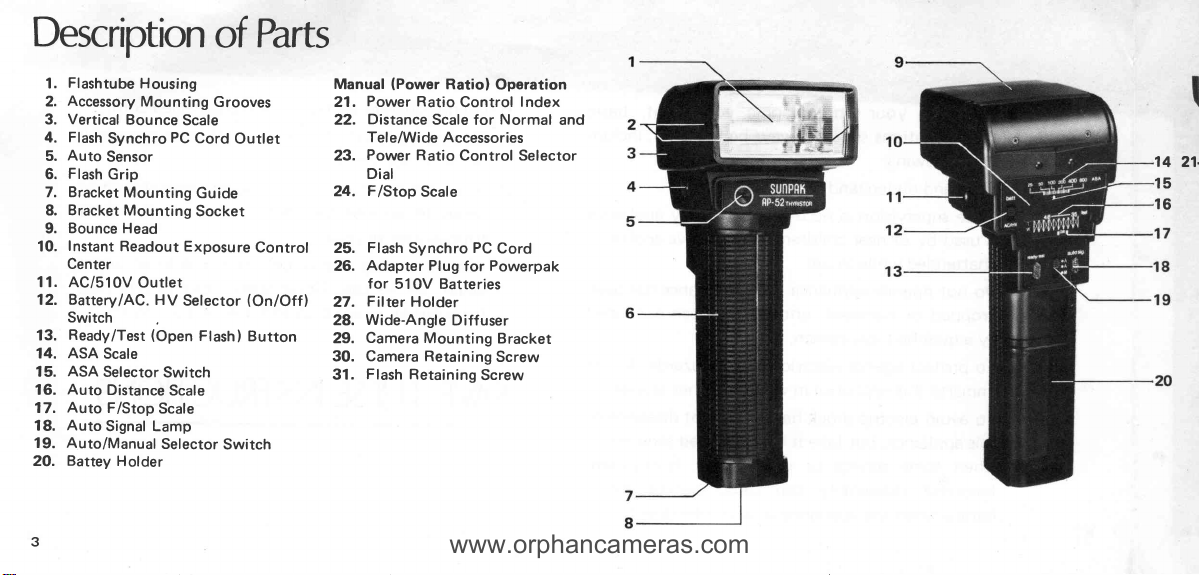
Description
of
Parts
Flashtube
1.
Accessory
2.
Vertical
3.
Flash
4.
Auto
5.
F
lash
6.
Bracket
7.
Bracket
8.
Bounce
9.
I
nstant Readout
10.
Center
1 1 .
AC/s1
Battery
12.
Switch
Ready/Test
13.
ASA
14.
ASA
15.
Auto
16.
Auto
17.
Auto
18.
Auto/Manual
19.
Battey
20.
Housing
Mounting
Bounce
Synchro
Sensor
Grip
0V
lAC.
Scale
Selector
Distance
F/Stop
Signal Lamp
H
PC
Mounting
Mounting
Head
Outlet
HV
(Open
Switch
Scale
Scale
Selector
older
Grooves
Scale
Cord
Outlet
Guide
Socket
Exposu
Selector
re Control
Flash)
Switch
(On/Off
Button
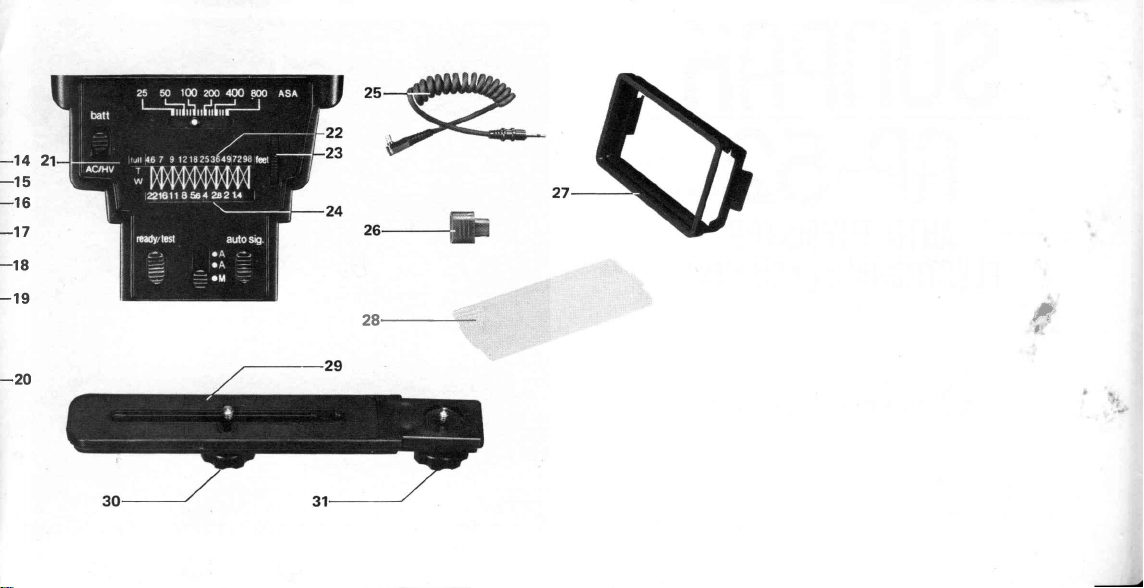
Manual
21.
22.
23.
24.
25.
26.
)
27.
28.
29.
30. Camera
31.
(Power
Power
Distance
Tele/Wide
Power
Dial
F/Stop
Flash
Adapter
for
Filter
Wide-Angle
Camera
Ff
ash
Ratio)
Ratio
Scale
Accessories
Ratio
Scale
Synchro PC
Plug
510V Batteries
Holder
Mounting
Retaining
Retaining
Operation
Control
for
Control
Cord
Powerpak
for
Diffuser
Bracket
Screw
Screw
Index
Normal
Selector
and
14
15
16
17
Page 5
Description
www.orphancameras.com
of
Parts
Flashtube
1.
Accessory
2.
Vertical
3.
Flash
4.
Auto
5.
F
lash
6.
7. Bracket
Bracket
8.
Bounce Head
9.
Instant
10.
Center
AC/s10V
11.
Battery/AC.
12.
Switch
Ready/Test
13.
ASA
14.
ASA
15.
Auto
16.
Auto
17.
Auto
18.
Auto/Manual
19.
Battey
20.
Housing
Mounting
Bounce
Mounting
Mounting
Readout
Outlet
HV
(Open
Switch
Scale
Scale
Selector
H
olde r
PC
Synchro
Sensor
Grip
Scale
Selector
Distance
F/Stop
Signal Lamp
Grooves
Scale
Cord
Outlet
Guide
Socket
Exposure
Selector
Flash
)
Switch
Control
(On
lOttl
Button
3
(Power
Manual
Power
21.
Distance
22.
Tele/Wide Accessories
Power
23.
Dial
F/Stop
24.
Flash
25.
Adapter Plug
26.
for
Filter
27.
Wide-Angle
28.
Camera
29.
30. Camera Retaining
Flash
31.
Ratiol
Ratio
Control
Scale
for
Ratio
Control Selector
Scale
Synchro
510V Batteries
Holder
Retaining
PC
for
Diffuser
Mounting
Screw
Operation
Index
Normal
Cord
Powerpak
Bracket
Screw
and
14
15
16
21.
Page 6
-14
-15
-16
-17
-18
-19
2
Zg
.l,:
#
,
-20
*
Page 7
Introduction
www.orphancameras.com
Welcome to the world-wide family
SUNPAK
More than
electronic flash
chosen
the world
innovative
tion.
out
the
through
SUNPAK f lash in front
owners!
million
seven
systems have
photographers
by
for
their rugged
design,
insure
To
your
of
few
minutes required
and
that
electronic
this owner's manual
fast,
you
f
lash,
of
SUNPAK
throughout
get
to check
construction,
easy
you.
of
been
opera-
the most
please
take
your
with
Condensed
Automatic
1.
$t the
0perating
0peration
ASA.
2. Set the Auto/Manual
green
the
Move the Battery/AC HV
3.
Switch to
Wait for
4.
yellow
or
the
Ready/Test
the
Instructions for
Selector
"A"
"batt"
position.
glow.
5.
Set the aperture on
corresponding
computer f/stop
the
ready
to take
For
more creative use
please
AP-52,
read
your
aperture which appears in
window.
pictures.
your
with
page
t I
Switch to
position.
Selector
amber light
camera
to the
You
your
Sunpak
to 25.
to
are
Table
of Conten$
Descriptionof Parts
OPERATION
PovverSources
To
Install Batteries
Using Multi-Voltage
or Sunpak Pouverpak for
(High
Mounting
OPERATION OF THE
CONTROL
AutomaticOperation
Takingthe
Power Ratio
Using
Selectingthe Flash
For
CopyPhotography
Hints for Taking Photographs
OtherFlashHints
Multiple
Sunpak
Accessories Available
InsideYourAP-52
Guide Number
Camera Operation.
Care of
Specifications...
Voltage)
the
CENTER
Picture
Power
Pictures
Better
Bounce
aCopySet-Up
Flash
Operation
Auto
and'Flashmatic'
Your Electronic
AC Adapter
Battery
Flash
to the Camera . .
POWER/EXPOSURE
(Manual)
Ratio
for
Position
Flash
Unit .
Slave
for
Flash
........3
Sl GVolt
Operation
Better
Pictures.
Using
the
with
the AP-52.
....5
......6
.....7
. .
....9
......10
. . .
. . 11
.......13
. . .. .. .15
. . . .16
..;.19
.......2O
....21
. .. . . .22
. . . . .23
....24
......25
.
.
. .26
.
....27
8
Page 8
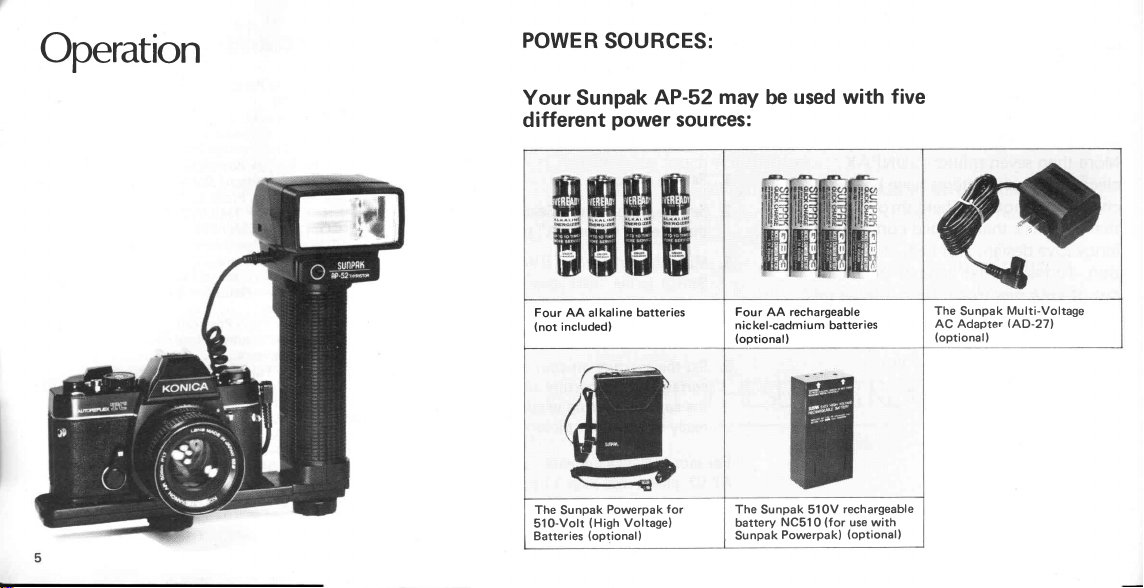
Operation
POWER
SOURCES:
Your
Sunpak
different
Four AA
alkaline
(not
includedl
The
Sunpak
(Hign
51O-Volt
(optional)
Batteries
AP-52
power
batteries
Powerpak
Voltage)
sou
for
may
be
rces:
Four
AA rechargeable
kel-cadm ium batteries
nic
(optional)
The
Sunpak 510V
battery
Sunpak
used with
rechargeable
(for
NC510
Powerpak)
use with
(optional)
five
The
Sunpak
AC Adapter
(optional)
Multi-Voltage
IAD-27I-
Page 9
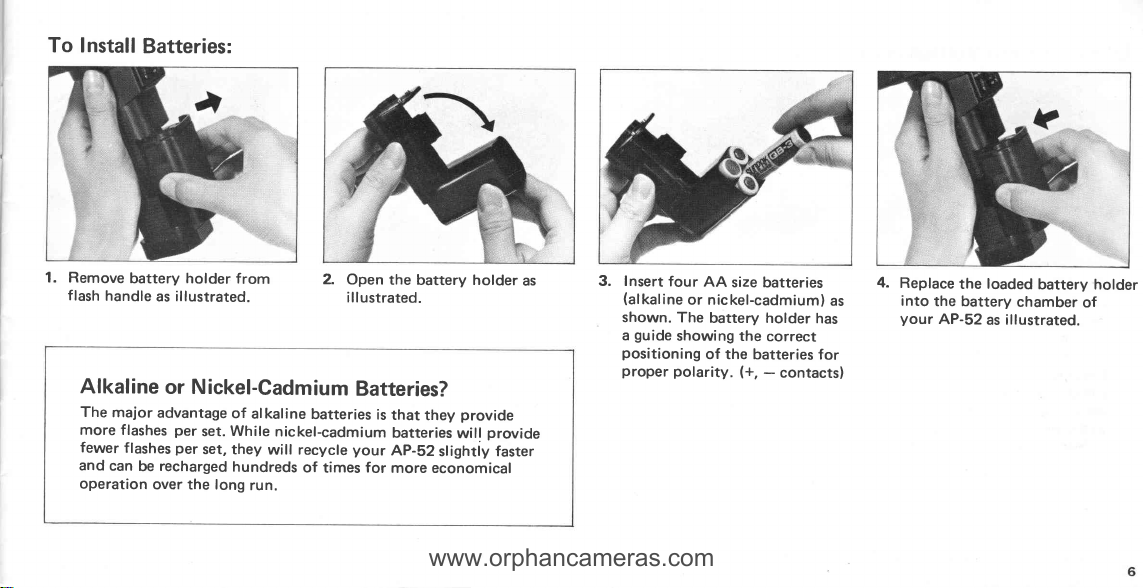
To Install
www.orphancameras.com
Batteries:
1. Remove
flash
battery holder
handle
as
Alkaline
The
major
flashes
can
be
advantage
recharged
over the long
more f lashes
fewer
and
operation
from
illustrated.
or Nickel-Cadmium
of
set.
set,
While
alkaline
they
will
hundreds
run.
per
per
2.
Open
illustrated.
Batteries?
batteries
nickel-cadmium
recycle
of
times
is
your
for
the
battery holder
that
batteries
Ap-52
more economical
provide
they
prwide
will
slightly faster
as
3. Insert
(alkaline
shown.
guide
a
positioning
proper
four
AA
size batteries
or nickel-cadmium)
The
battery holder
showing
polarity.
of the
the
correct
batteries
-
(+,
contacts)
has
for
as
4.
Replace
into
your
loaded
the
the battery
AP-52
as illustrated.
battery holder
chamber
of
Page 10

the Multi-Voltage
Using
Adapter
AG
or
the
Sunpak
Powerpak
for 510-Volt
Batteries
For AC operation,
1.
check
your
on
Adapter
voltage.
ate
has
been
U.S.
the
countries
other
and
22OV
you
may adiust
that
Multi-Voltage
is set
factory set
standard.
the
to
Your
24OV
voltage
sure
be
selector
AC
the apPropri-
Adapter
AC
for
12f^V,
For
use
100V,
where
standard,
are
setting
the
to
in
as
rWhen
using
Battery/AC
illustrated.
Phillips
voltage
to
the selector
driver
setting.
has
be
tal
switch.
Remove the
head
window
the
to
After
made,
been
reinstalled
movement
switch
Multi-Voltage
HV Selestor
located
screw
and
with
proper
voltage
voltage
the
screw
the
prevent
to
selector
the
of
AC Adapter
to
Switch
small
next
rotate
screw
a
setting
must
acciden-
or Sunpak
AC/HV
Plug into the
Z
socket
standard
trated.
supply
flashes
use.
Note:
Adapter
adapter
ly
Powerpak
posataon.
on
unll
The
virtually
and
lf
the
is incorrectly
will
may damage
and
for SlGVolt
AC/High
flash
the
and
outlet
Adapter will
AC
unlimited
for indoor
is ideal
Multi-Voltage
function
not
Voltage
into
illus-
as
set,
your
Batteri6,
a
AC
the
Proper-
AP-52.
3.
always
you
When
accessory
51O-Volt
the supplied
end
it into the
manner as
Multi-Voltage
The
Volt Battery
rapid
greatest
use the
Sunpak
Batte
Powerpak cord
of
AP-52
you
Sunpak
recycle
number
set
optional
Porruerpak
tirst attach
ry ,
plug
adapter
in
the same
tu)uld
Adapter.
AC
Powerpak
extremelY
allows
and
times
flashes.
of
and
with
for
the
to
for
the
Plug
the
51G
Page 11

MOUNTING
www.orphancameras.com
1.
Attach
'Bracket
the
bottom
trated, and
f
irmly.
THE
the bracket
Mounting
of the
tighten the
FLASH
the
to
Socket' at
grip
as
screw
illus-
TO
THE
CAMERA:
Z
Center the camera retaining
screw under
tripod
securely.
your
socket,
and
camera's
tighten
3.
Connect
flash
synchro
(insert
it
snaps
camera's f lash
*
lf
the
terminals
attach
term inal.
*
lf
the
(usually
marked
switch
PC
the
cord to the
(PC)
the
into
camera
marked
Sunpak cord to
camera has
around
'M'
to the
terminal
connecting
position),
terminal
has
separate
'M'
a switch
lens
the
'X',
and
'X'
set
position.
pin
until
and
the
as shown.
flash
'X',
and
'X'
the
barrell
the
4.
Set the shutter
fastest
shutter
mended for f
tion. On
cameras
ters,
or 1l125th
marked
ring;
shutters usually
zation
second. Do
to
second,
exposure
at
with
this
'X'
cameras
at speeds
a speed
as
maximum
speed
speed
lash
synchroniza-
single-lens
speed
faster
this may
when
reflex
focal-plane
is usually
and sometimes
on
the shutter
in-thelens
with
allow
up
to 1
not
set the shutter
than
cause
flash
the
pov\rer.
dial
to the
recom-
shut1/6Oth
speed
synchroni-
/800th
1/800th
under-
is
used
I
Page 12

Automatic
photo
sensitive
The
of
tor
light reflected
the
subject
flash
the
exposure within
distances.
Manual Selector
green
the
f lash
easy
It's
Note:
Marked
Speeds:
lntermediate
Nos:
I
silicon
you
r AP-52 sensor
automatically
and
duration
moving
By
yellow
or
for
is
automatic
set
use:
to
ASA
lf
the
speed scale,
ASA
25
from
to assure
wide
a
the
Switch
'A'
number
use
an
40
32
measures
your
controls
range
Auto/
to
mark,
operation.
for
intermediate
50
Operation
transis-
correct
of
either
Your
Film
the
Set
appropriate
the
refer to
with
not indicated on
160
rating of
ASA
the
film.
the
as shown.
2ffi
your
64 80
1.
film
is
markings
100 200
125
OPERATION
to the
Scale
Speed
ASA setting.
instructions supplied
the
400 800
320
your
ASA
500 640
f
ilm,
For
film
THE
OF
For
Z
the
in
automatic
Auto/Manual
the
Switch
that
so
appear
your
set
(for
ASA 100
opening
Your f lash and
for
correct
tances
feet.
POWER/EXPOSURE
3.
maximum
oPeration,
green
to the
green
the
(ASA
100
camera
film, the
t
is
12.8l..
exposure
between
distance
Selector
line and
Film). Then
lens
lens are
4.6
move
'A'
Position,
oPening
lens
now set
at all
feet
and
range
f
12.8
dis-
35
CONTROL
For
maximum
(greatest
and
move the
Switch
tion, so
f/5.6
Then set
opening
lens opening
Your f lash
adjusted
af
and
sharpness
in
of, the
back
Auto/Manual Selector
yellow'A'
to the
yellow
the
appear.
your
(for
ASA 1OO
is f/5.6).
and
for
correct
17.5
betwee
feet.
l distances
CENTER
depth-of-f
camera
lens
ield
in front of,
subject)
posiline
and
lens
f
ilm,
now
are
exposure at
n 2.3
the
feet
Page 13

TAKING
www.orphancameras.com
It's
easy
1.
Move
(on
'batt'position.
You
2.
in a few
Test
will start
that
THE PICTURE:
-
just
follow
the Battery/AC
the
back of the
hear a faint
will
seconds,
Button
to
your
flash
flash)
the
on the back
glow.
This
is
ready to
these
HV
hum
Ready/
of
confirms
Switch
to the
and,
flash
fire.
steps:
3. Ta ke
the
Your
f lash
deliver
light
for
the
distance
For
succeeding
Just
wait
light
comes on. Make
are
within the
distance range
opening
pictu
!
re
will automatically
the correct amount
correct exposure
range indicated.
exposures .
until
in
ready/test
the
usable
for
the
use
and . . . shoot!
sure
auto
lens
of
within
. .
you
To Verify
To verify
posure,
toward
'Ready/Test'
the flash
exposing
exposure
the
glow
exposure.
glow,
(or,
correct
just
your
to
any
is
'Auto
green
immediately
lf the
move
you
if
are shooting
Correct
automatic
your
aim
subject and
button. This
fire
without
f ilm.
lf
for
correct
Signal'
after the
lamp
closer to
Auto
f
lash
actually
the
your
lamp
does
your
in
Exposure:
ex-
directly
press
the
will
cause
automatic
subject,
will
'test'
not
subject
yellow
auto mode,
adjust the aperture
This
verification
operation,
correctly
green
switch to
lamp
that
your
picture
exposed.
provides
in
green
and
accordingly.).
positive
automatic
will
be
Page 14

Power
With
Sunpak's
you
Control
output over
fulf
1116
to
you greater
gives
ability
control,
life
recycle
and
flash
in
capability,
capability
flash duration.
Ratio
unique
adjust the
can
five
a
power.).
depth-of-field
to
times,
and the
(Manual)
Power Ratio
light
(from
range,
stop
feature
This
battery
control
precise
macro/close-up
ability
fill-
to control
Using
1.
Set
Switch
ratio
2.
Set
desired
ASA 100).
Operation
Power Ratio Control
the
Auto/Manual
the
'M'
to
operation.
f ilm
the
ASA setting
speed
for
Selector
manual
scale
(example
power
to the
at
3.
Adjust the
to
Ratio
Full
full
Selector
Power:
power
power
ratio
by turning
Dial.
control
Power
The scales
f
now show
/stop
exposures.
(
not camera-to-su bject)
bject
su
distance.
(example
your
Set
ing
(example:
the correct
is
lens to the
shown
f/8).
for
Find
12'l
for
with
lens
distance
correct
the
f
lash-to-
the
lens
distance.
this
ASA
100
opening at
and
open-
film,
12'
Page 15

USING POWER
www.orphancameras.com
As
when
using
power,
Full
at
Scale to the
rating
and be
Manual
Selector
"M".
on
2.
Determine
f
subject
so by
on the
rom
the AP-52
the camera,
focusing
lens
and reading
indicated
by the
lens.
RATIO
Power
the
set
the
appropriate
sure
the
Switch
the
distance
your
f
you
can
your
the distance
distance
lash. When
is mounted
Ratio
Film
ASA
Auto/
is
your
of
to
easily
do
camera's
scale
Speed
3. Turn
Dial
f/stop
the
until
opposite this
ALWAYS
RATIO
CONTROL DIAL
MARKED
A
POSITION.
POWER
RATIO
MARKED
UNIT WILL NOT
,4S
DESI
RED.
(Example:
you
f
if m,
5.6,4 and 2.8).
Power
you
have
TURN
(CLICK
DO
RATIOS
9
feet,
may
choose f
Ratio
Control
the
desired
distance.
POWER
THE
STOP)
NOT
SET THE
BETWEEN
OR
RATE
OPE
with
ASA lOO
11
THE
1
,
TO
4.
Be
the
sure
there
light for
your
decrease
You
5.
picture.
aperture on
the
calculator
is
the
the correct
sublect. lf
the
now
are
Remember
aperture
scale.
distance
proper
amount
not, increase
power
as
ready
to take
to
your
lens
indicated
scale shows
of
exposure
or
needed.
your
adjust
the
match
to
on the
of
6. When
using a tele adapter
angle diff
coding
d istance.
to the tele adapter, and
correspond
d if f users .
user, refer
read
to
Bl
ue
to the wide
the
I ines
or
to the color
f/stop
or
correspond
red lines
angle
wide
8,
Page 16

USING
POWER
RATIO
FOR BETTER
PICTURES
Depth-of-Field
Note that
depth-of-field
the
bottom
field
background
Because
Power
choice of up to
apertures
depth-of-field.
create
the top
are
subject
picture
(tne
subject
is not).
the versatility of
of
Ratio control,
for
pictures you
the
maximum
picture
(tne
background and
focus)
in
little
has
focus
is
in
you
f
different
ive
Use
this control to
want.
greater
has
the
and
depth-of-
but
have
a
control of
the
Examples:
photographing
When
depth-of-field
higher
the
lens openings
portraits,
For
settings
less depth-of-field.
and
is
power
for
use
larger
still
required. Use
often
settings
results.
best
lower
the
lens
more
life,
and smaller
power
openings
for
Page 17

Precise
www.orphancameras.com
The major
is
it
that
portraits
shadows. Simply set
aperture
for
reading
your
Power
opposite
distance. Be
that
speed
electronic
The top
flash.
fall-in
was taken
much more
how
lower
one is.
Flash
Fill-ln
advantage
renders
attractive
because
according
the
picture
it eliminates harsh
background. Next
the
Ratio to that
actual
to use
sure
will
synchronize
flash.
was taken without
The bottom
fill-in flash.
with
pleasing
fill-in flash
of
outdoor
your
camera's
to the meter
aperture
flash-to-subject
a shutter
with
picture
Note
the
set
Freezing
Your AP-52
any
f
lash
For
which
fastest
Ponrer Ratio's louer
obtain speeds
second. See
Working
Action
can
f
at
action
speed
even briefer
just
of
will allow
you
action,
as
chart
With
freeze
ull
flash
freezing
fast
Motor Drive
Cameras
1/16tn
By using
setting,
with
will
fresh
to three
making the
with motor-driven
ca meras.
*
*
the
far
each f
recycle
batteries,
pictures
For
motor
Povverpak
No.
651-723)
(You
can
second.)
Note:When
tinuously,
minutes or
energy is
less
lash and the
almost instantly.
you
per
AP-52
drive
operation,
for
51O-Volt
will
up to
shoot
taking up to
rest
the
more.
almost
power
with a
1/800th
duration,
of
can
use the
settings
as
1/1O,OOOth
below.
Power
expended
AP-52
can shoot up
second, thus
ideal for
and
auto-wind
the
batteries
provide
the best
pictures per
four
frames
40
flash
unit
second.
the
to
Ratio
With
use
Sunpak
(C;t.
results.
for
1O
WM
Nffi
Power
Ratio
Fu
ll-
-
112
-
con-
114
-
118
1116-1/1O0Ofth
Flash
Duration
1
/80Oth
1/1500th
1/3000th sec.
1/7000th sec.
sec.
sec.
sec.
Page 18

Selecting
Flash
Position
Your
Sunpak
you
allows
you
use the
to
creative
Bounce
angle of
WIDE
The
a
angle
is
together
Cat.
Bounce lighting
to aim
lighting results.
Flash Head is
bounce
ANGLE LENSES:
reflector
35mm
lenses, use
supplied
No.
AP-52 to
Sunpak
marked
you
desire.
is
designed to
wide
angle
wide'angle
your
with
with 21mm wide
-738.
65 1
may
has a unique
AP-52
light
the
f lash
in
many directions. This enables
render
For added
lens
convenience,
you
so
llluminate
on a 35mm camera. lf
diffusers.
AP-52
and
angle
used
be
also
assembly
head
pleasing
more
can
determine the exact
the
28mm wide
also available
diff user
by Sunpak
to increase
which
more
and
the adjustable
picture
format
you
use
angle
in
option
Filter
flash
coverage.
of
wider
diffuser
Kit,
-
*
You
r AP-52
on the bracket.
flash
retaining
flash
the
required,
securely. This
creative
manual
h;ftx"fr
rotates
Just
screw and
body
any degree
at
fasten
then
offers
lighting
options
operation.
15o
every
loosen
rotate
the screw
more
in
the
lf using
automatic
will
sensor
perfectly
Note: The
face
the
subject
posure
control.
properly
exposed
auto
operation,
adjust
pictures.
sensor
proper
for
must
the
built-in
the f lash
always
ex-
auto
for
Page 19

For
www.orphancameras.com
Don't
Stand Too
Better
Bounce
Close
to
Your
I
X
Wrong
I
Way
A)'..
OF
RV
IY
lt
F4
\tl
)r
u
O
n isht
Way
,,
Reason:
light)
The light
so acute
can reach
unpleasant
the
an angle
cause
under
your
subject's
will
be ref lected
that no
subject's
looking
eyes
light
dark
and
(or
face.
(shadow)
nose.
Subject.
downward
very
little
This
will
areas
Flash
at
Pictures
X
O n isht
Rotate
subject
the
subject f
light
Wrong
s!
trE
N]
H
I
the f
or
f
rom
Way
--'
/.--tby'
wb
rNl
IY
Yfl
\t
II
il
Way
/O
\il
lash
the
backgrou
rom
the f lash.
\-
./
/s,
-ffi
(l
Iu
,)-
/ds,.
r
l#f{
-t\
\
lA
\.
)\
\/\
r/
(-'-,--J
\.
\
\l /
\
\\l
\
Lt)
iciently
suff
nd
receiving
\
\
\
\
prevent
to
immediately
portion
any
the
beh
of
ind
direct
X
Wtong
Way
\
/1,,
I
I
I
I
I
tl
tl
tl
RfA
IY E1"
you
that
is
too high.
an excellent
lash
... and,
subject
far.
{',J
since
t
qI[J
Remember
if
the
ceiling
wall makes
f
bounce
reach
the
travel
as
can
bounce light
In many
ref lective
quite
often,
light
the
O n
isht
homes,
surface
more
does
Way
off
the
a white
for
light
not have to
wall
can
16
Page 20

X
Wrong
Way
X
Wrong
way
Mr,'
fl#
&H
you
can't
lf
is any
color other
photograOh.
ordinary
that
17
piece
it reflects
;::
'
,"
,'u*
..s
find
a suitable bounce
than white,
Therefore,
of white
the light onto
your
your
create
cardboard
the
Onignt
you
surface,
subject
own
held or taped in
subject.
can
will
bounce
way
make one...lf the wall
that color
show
surface
front
in the
possibly you
...
flashtube
the
of
or ceiling
f inished
can
use
housing
an
so
ORignt
close-up
In
achieved by
lective
ref
of "bounce"
objects.
surfaces
IY
R
w"y
photography,
using
light often
one
in
or more
bounce
,ff'.:
I
't*T__-l
l'shrp I
l\l
]r----r
/i \\..
/
i---r'
many excellent
pieces
flash.
fascinating details of small
reveals
\'
\
\
effects
lighting
of white
The soft, diffused
cardboard
can be
as
effect
Page 21

r]
www.orphancameras.com
ilt
For
extensive
graphy,
many
lighting,
created by bouncing the
a white or
dealer
lightstands if this
silvered umbrella.
for recommendations
portrait
in
use
photographers prefer
approach
and child
Check
on umbrellas and
interests
photo-
"umbrella"
f
lash
off
with
you.
your
Page 22

Copy
Photography
Because of
By adjusting
with the
For
which can have
In addition,
19
its unique
relatively
copying,
the
you
its
you
flash-to-subject
short
use a copy
can
pan
head mounted to the bottom of the center column.
can use one, two or
Power
power, you
Ratio Control,
your
can use
distances.
modified enlarger baseboard and
stand,
four AP-52
your
AP-52 to control
is ideal for
AP-52
s.
*
Hobbies:
seashells,
items.
*
Vital Documents:
tificates, cancelled checks, licenses,
*
Gharts:
record of
for
transparencies of the
for
*
Valuable
silverware
photographed
purposes.
photography.
copy
light
output, which is critical
girder
You
butterflies,
You
any
school or
presentations.
slide
Possessions:
and
reproduce
can
Diplomas,
keep
can
charts
business. In
works
and used
tripod
or a
plant
or
of art can be
stamps, coins,
life
and other
birth
photographic
a
graphs you
addition,
charts
can be
ltems
such
for insurance
ctr-
etc.
prepare
color
made
jewelry,
as
pre-
1.
An ideal
having two AP-52
to
Auto Slave, aimed at a
subject on
the
amount
you
aperture
four
Control
2.
you
your
power
the
chart on
power
set-up
your
camera,
the
illustration
of light is hitting the
either close down
should
by one stop
units) or adjust the
half
by
(-
1
stoP).
you
own another
lf
can use the
to set the unit
AP-52
level as
guide
number
page
level to
for
shadow-free
s,
one
another
45o
axis as
same
twice the normal
shows,
(two
Power Ratio
the
electronic
Power
Ratio
the
other
from
25 with the appropriate
your
other unit.
copies
connected
to the
Sunpak
angle
the
camera. As
subiect, so
the lens
when
stops
Power Ratio
flash
Control
at a similar
unit.
Simply
the
specification
to
setting
is
the
using
unit,
on
match
Page 23

Hints
www.orphancameras.com
,/^,
V\H+}
\ /)
4lt
t/1
Power
#
v i-l
\t I tl
ll l,v=
r-A /
for Taking
(ffiflts
6Yrr{
\\-/z\. \
'<r,
-\\
\r,
/
\,/
o
%
gE
l*a
--
\ff
Photographs
1. When
2.
3. For
4.
photographing
try
a coin,
This is
surface such as an oil
best
you get
For
subjects, use
levels.
what is
the
that will diffuse its light.
and commercially
are
accessory color
without a f
For
try the
paper
surrounds, but won't darectly hit the
setting
excellent
also
possible
showing shadow and texture
subject
a
ideal. For
lighting a highly-reflective
results,
results
the
you
experimentation
Again,
the best
you
lighting effect, fire
softer
special
ilter.
tent lighting method.
or oak tag
three-dimensional
a
flash
the
for
subjects
painting,
experiment
you
like.
AP-52s
r
lighting
are
filter
and
with each
ratio
copying.
ltems
available
effects,
higher
at a
bending it
units at
photographic
Using a
subject, such as
a 60"
axis
with
irregular
an
gloss
high
and
with different
threedimensional
on
at different
is the
between
the
such as artist's
use
power
subject
By
simply
so
way to discover
best
the AP-52s
AP-52
diffusion material
AP-52
one
level than
with controlled
taking
the light
subject
from
subjects.
angles until
power
through
tracing
with
heavy
from
illustrated.
as
Copy
the lens.
flat
For
for
material
a
paper
an
AP-52
an
light,
white
the
unit
Set-Up
Page 24

Other
Flash Hints
Multiple
When
is
capability. Be
and
subject.
background scene, a
camera
Special
One of
is the
image
a simple
exposure
the
the
on
use the tube to cover
For
telescope effect.
a
AP-52
most cases,
willdominate
best
superimposition on a
Exposures
shooting
ideal
center
"Shoot"
over
area
image
the
smaller
results
multiple exposures,
because of
sure
your
placing
When
support
Effects
the most
technique of
another.
cardboard tube. Take
using available
the image
of
on. Then, take
f
ilm,
same
centering
higher
is
than the available
image
the
the
using this technique,
its multidirectional
to use a dark background
flash
is recommended.
popular
using
Because
available
on each
the
same
tripod
or other
special
superimposing
The
only
light
you
wish to
a
second
your
all but
use two tubes
areas,
the light
through the tube
shot
light image.
dark
area.
your
individual
people
in
rigid
effects
today
requirement
first
the
and center
superimpose
exposure
AP-52.
Simply
the centered
from
light in
For
your
make
AP-52
one
one
is
area.
for
your
F lash
Open
When
AP-52
shutter
Simply
your
unit
the
shutter
shooting
to
act
speeds
push
as a
the
for
one,
is open.
at
for
night,
f ill-in
Test
Macro/Close-Up
lower
the
power
can
f
lash is
even
the
exciting
can be
levels
properly
very
further,
filter
available
expose close-ups
close. To
bounce the
By using
AP-52,
photography
lower
you
your
sity
diffusion
kit.
you
can
f
lash while setting
background
(open
flash) Button
more
two or
power
levels on
world
mastered.
available
Macro/Close-Up
of
f
rom the
lower
in
the accessory
your
use
exposure.
flashes while
your
Because of
AP-52,
even
light
the
light
use
or
your
on
Auto
the
when
inten-
the
f
ilter
Page 25

Multiple
www.orphancameras.com
Using two
units can
professional
additional f lash
positioned
your
use
Slave Unit, available
dealer
wireless
Sunpak
up to 100' f rom
When the master
connected
other
simu
or more
produce
can
photographic
the compact,
(Cat.
synchronization
electronic f
to the camera)
slave-equipped
ltaneously.
Flash
electronic
Sunpak
stunningly
portraits.
No.
Equally,
units
strategically
substantially expand
capabilities.
solid-state
your
from
651-715).
the
unit
This
of any number
lash
units
"Master"
(with
is f ired,
f
ire
units
shutter cord
attractive
using
To do this
Sunpak Auto
Sunpak
at
unit.
Operation
f
lash
permits
of
distances
all
Plug
A.
cord
B.
Adjust the
faces
C. Determine
ing
from
two
D.
Connect
noimal
E.
Shoot . . . when the
(camera-connected)
Slave's
the
with the f irst!
distances
flash,
color lighting.
with the
the
Sunpak
your
of
the master
guide.
indicated
directly-aimed f lashes)
manner.
sensor,
second
and
Slave
auxiliary
sensor eye of
f lash
the
correct lens
close
down
aperture
the main f lash
light f
f
lash
the
Slave
perfect
f lash
in
The
of
is
Sunpak
up to 1O0
unaffected
Sunpak
into
Unit
(second)
the
unit.
opening
lens
one
when
.
your
to
rom
reaches
automatically f ires
synchronization
Slave
feet
f
even
by
the
f
lash
Slave
f/number
using
camera in
the master
the
operates
rom
the master
the
f lash
unit.
that
so
(as
a
Sunpak
brightest
Auto
it
-
start
the
at
Slave
Unit
m
W
ft
=r'
Page 26

Accessories Available for
the
Sunpak
AP-52
For maximum creativity and
operation, many optional
of
accessories are available
AP-52.
cameras,
AP-52
photograph
Sunpak
lows
Af
unit with a
trigger an
plugging
PC
socket
Cat.
23
to
your
No
like
Just
you
can customize
your
suit
req u
ic
Auto
Slave:
AP-52,
PC
cord, to
auxiliary
PC
its
on
the Slave.
-715
.651
cord
for
today's system
exact
irements.
or
any
be
flash
by
into a built-in
ease
your
your
f lash
used
Sunpak Multi Voltage AG
The
Sunpak
Adapter
unlimited
Moreover,
selector on
maximum convenience
picture
taking.
No.651-74f.
Cat.
to
(AD-27
allows
)
flashes.
the world-wide
the adapter
Voltage
Dual
Adapter:
AC
you
voltage
gives
your
for
you
OBC-3
Sunpak
Charger:
Sunpak
charges one
time. lt will
in
Sunpak
Charger
Cat.
Sunpak
Cat.
Sunpak
with
Cat.
This charger
OB-3
approximately
OBC-3
o.
N
65
OB-3
No.
651
OBC-3
OB-3
No.
651-733
Nicad
3-Hour
for
is
Nicad
Batteries. lt
four
to
batteries
fully recharge
hours.
3
N icad
3-hour
-731
1
Nicad Batteries
N icad
-732
N icad
Batteries
Charger
use with
at a
batteries
(4
pcs.)
(4
pcs.)
ry@
:
and
well
color
tungsten
Filter
it
red,
of
yellow
neutral density
as a
correction
film,
diffusers.
Holder
No.
color
filter
and
Supplied
is
supplied
651-738
npak F ilter K
Su
Filter kit consists
green
blue,
filters
as
filter,
858
for use with
two
wide-angle
case.
with
with the AP-52 and available
separately.
Filter Kit Cat.
Page 27

Inside
www.orphancameras.com
bur Sunpak
AP-52
Tele Adapter:
mm
telephoto and
35mm
Decreases
increasing light intensity.
651-791
To
camera.
illumination
used
be
zoom
for
lens
angle
Cat.
135
with
while
No.
Aged
Gold-Tone
Modern
electronic
operate
at speeds of
second or
far
exposure time
Your
tone
and
balance is
your
pleasing,
with
less.
than
shorter
uses
AP-52
flash
tube that has
pre-flashed
achieved. This means
AP-52 will
correct
daylight
all
Thyristor
Sunpak's advanced
technology. In
matic
sensor
available energy
However,
flash.
more rapid,
thyristor
This means
Flash
Tube
flash
units
1/6o0tn
This burst
the optimum
today's
unique
a
until critical color
give you
color
films.
light is
of
films
have.
gold-
been
aged
warm,
rendition
Circuitry
thyristor circuitry is
less
advanced automatic
shuts off the
as
depending
"full"
if a
circuitry
flashes
more
on distances
f
Wide-Angle
The
use
popular
Your
to
35mm
accessories.
By
using the
in the
able
Filter
length
used. By
wider focal
used.
the latest in electronic
f
lash, the circuit
power
saves the
per
lash
flash
unused
battery and recycling
and lighting
lllumination
of wide-angle
photography
in
AP-52 can
lenses
diffusion
accessory
Kit, lenses
on 35mm cameras may
using bounce light, even
length lenses
units,
expends
still
had
been
energy
conditions.
lenses is very
used
be
without
filters
AP-52
up to
28mm
when
the auto-
the
produced.
for
the next
times
today.
with
any
may
f
are
up
avail-
focal
be
be
lash
Page 28

Cuide
"Guide
A
number expressing
f
lash
a
sitivity
film
in
grapher
ject
distance into the
Number, and the result is the
f/stop for
reference
mally,
is not necessary as the
bers
puter
mechanism
your
Sunpak
calcu lations a utomatica I ly.
such
However, there are instances in
precise
which
formation
To determine
range in manual operation
the
divide
aperture
Distance
25
Number
Number" is
in relation
unit
(ASA
film
In use,
use.
divides the
correct exposure. Nor-
AP-52 make
Guide Number in-
is needed:
maximum
Guide
(f
/stop).
=
,9'N'
f/stop
simply a
power
the
to the
speed) of the
photo-
the
f lash-to-sub-
Guide
to Guide
and
scale
Number bv the
Num-
effective
com-
of
(in
of
sen-
feet)
and
"Flashmatic"
Numbers of
Guide
Manual
Power
Ratio
Full
112 35 50 56 62 70 78 1
114
118 17 25
1116 12 17 20 22 25
2s
so | ,o
25 35 € 45
Guide Numbers of the
Accessory
21l24mm 25
28mm
Normal
Tele 70
the AP-52:
luo luo I
I
ASA 25
Camera
ASA
so
lroolns lo*lt*lrooo
Guide
so
ao
I
I
28
31
with TeleAlUide
AP-52
Guide
35
50
Film
Operation
Speed
Numbers
roo
lt:: I
50
35 39
Numbers
ASA 100 ASA 400
50
70
100
140
zoo
zto
56
100 140 2@
70 100
28
50
Accessories.
,* | soo
|
200 2g
70 100
100
140
200
280
140
brhvs,ciyi/o-l
"Flashmatic"
with
Use
Cameras
Many
cameras
Auto
automatic
trols.
this type,
Manual
symbol
APERTURE IS AUTOMATI.
CALLY SELECTED BY
CAMERA
correct
eras or lenses,
for
must be
ber Scale
or
Lenses
rangefinder-type
35mm
(such
incorporate
53)
flash exposure con-
With cameras
the f lash
(selector
"M")
AS
exposure
your
film/flash
on the Guide
set
the lens.
of
tnd't
as the Konica
their own
(or
lenses) of
is
to
set
to white
switch
THE LENS
AND
YOU FOCUS.
the
THE
with
such
Number
Guide
combination
Num-
For
cam-
Page 29

Care of
www.orphancameras.com
Your
Sunpak
engineered
maintenance.
performance year-in
follow
these
1.
Inspect
"
lnspect"
(the
time
light
to come on between
more
than
alkaline
batteries
nickel
cadmium batteries
recharged).
be
It's also wise
appearance: sometimes
batteries discharge
material
a whitish-powder
onto
contacts.
batteries
battery
it's
in
through
your
after
contacts with a
good
a
a while
\bur
electronic f lash
require
to
basic
Batteries
means
length
10
to check
Sunpak
this
lf
idea
and
almost
insure
to
Still
year-out
and
instructions:
Freguently:
f
reasonable recycling
or
it
of time
15
or
seconds,
should be
are used, they
your
even
leak
or
jacket
the
on the
battery, which
flash
unit's
has happened, replace the
to
the
pen-knife.
remove
them
with
cleaning
wipe
takes the
f
lashes): if it's
obtained
batteries
some
. .
Sunpak's
the batteries once
Electronic
has
been
no
best
ready
f
resh
a
the
.
electrical
a
of
set
(or
if
must
f
or
of
best
chemical
leave
and
passes
internal
Finally,
handkerchief
Flash
-the
is
f
2. Remove
lf
your
or
separately.
good
3.
Make
your
cleaner
for
the energy
lashgun's
It;:
$
for
some
f
lash
more,
remove
way.
sure
camera.
the
battery
to
electrical
,
Batteries:
you
reason
for
unit
a
the
Storage
f
lash
the
surface, the
pass
through to the
system.
not intend
do
period
of
plastic
a
several
batteries and
inside
is
securely attached
easier it
to
use
weeks
store them
bag is
one
to
4. Maintenance:
your
lf
AP-52's
comes
lens
cleaning
lens
of
moist
unit.
BE
dirty, use one
cleaner
cloth can
tissue
SURE
reflector
drop of
clean it.
to
lens
and
used
be
TO
THOROUGHLY
UNIT IMMEDIATELY
5.
Service:
In the unlikely event
electronic
your
the address
Do
disassemble
tronic
should
mind
from
contacts
f lash
or
dealer
shown back
not, under
and/or adjust
flash
operates
not
be taken
flash
that
weat< Uatteri
caref
that
requires
the sole U.S. distributor
conditions,
any
on
apart.
failure
ul ly.
window be-
lens
cleaner
A
small
tissue or a slightly
to clean the
rest
DRY
AFTER
CLEANING.
your
Sunpak
return
service,
Warranty
of the
attempt
yourself
it
high voltage
However,
is more likely
:
elec-
and
keep in
to resul
on
amour
of tl
Tl
it
to
at
Car
to
Page 30

Specifications:
Numbers:
Guide
B.C.P.S.
Angle
Interchangeable
Flash Speed:
Automatic Aperture
Automatic
Sensor Acceptance
Bounce
27
of
DIRECT
IN
Power
Flash:
lllumination:,
Sources:
D istance
FLASH:
Setting
Ranges:
Angle:
20O
50
170O
60o
permits
cameras, 80mm
8omm
4AA
4AA
AC:
Sunpak
Battery
Sunpak
1
on
1
/8OO-1 /1
on Manual,Power Ratio setting
t12.8, t15.6
:
4.6'-35'
2.3'-17.5'
15"
Adjustable Bounce
0",
every 15" Horizontal
(ASA
(ASA
(at
Horizontal by 45o
NiCad
Alkaline Battery
(Optional)
AD
l8@-1 l22o0oth
Auto distance.
45o,
film),
4OO
film)
25
Fulll
use of
35mm
lenses on 6x7 cameras.
lenses
Battery
Multi-Voltage
-27
at 1 00/1
|
Powerpak
(optional)
Rechargeable Battery
NC510
OOOOth second
(ASA
(at
maximum aperture)
(at
minimum
and
6oo
9o"
(ASA
1OO
Vertical;
lenses
on 6x6
(optional)
(not
20
for
510V
second depending
100 f ilm)
Flash
Vertical
(manual
1O0
on
35mm
cameras,
included)
AC Adapter
l24OV
l2n
(High
depending
in use.
aperture)
Head
at
(automatic
exposure)
filml,
Selector.
Voltage)
(optional)
exposure)
Number of
With AA
With AA Alkaline
With
With
With
Variable
Synchron
Color Temperature:
Dimensions
Weight:
Flashes
Recycling
Number of
Recycling Time:
Number
Recycling Time:
Sunpak
AC Adapter
Recycling
Sunpak
510V Battery:
Number
Recycling Time
Sunpak
Rechargeable
Number of
Recycling Time:
Times:
NiCad Batteries:
flashes:
flashes:
of
Multi-Voltage
IAD-27!-:.
Time
Powerpak for
flashes:
of
NC510
Battery:
flashes:
Power Ratio Range:
ization
Contact:
(HxWxDl:
&
Batteries:
(at
120V1:
r
All specifications subject
Maximum
Power Minimum
50
sec,
6
100
1O sec.
1 4 sec.
90
1
Full,
PC
5500"
7.9" x3.1" x3.4"
17.3
.2 sec.
1
114, 1/8 and 1/16
12,
Cord
Kelvin
(without
oz.
500
O.3
900
O.3
5000
O.25
360
0.25
batteries)
to change without
Power
sec.
sec.
sec.
sec.
notice.
.,
';
 Loading...