


Follow the instructions shown below surely to use the ash safely.
Read and understand the contents of this manual before using the ash.
After reading, keep and use this manual close at hand, such as near the
ash.
* For maintenance, inspection or repair, bring the ash to the
store where it was purchased or our service center.
* Never try to open or modify the ash. Such action may
result in re, shock hazard or injury due to high voltage.
* Never use accessories not specied by us. Using them may
result in re, shock hazard or injury.
* If the ash is dropped or damaged, or something fell into the ash, bring
the ash to the store where it was purchased or our service center.
* Never use the ash at a distance too near to people (particularly
babies). Using the ash very near to people's eyes may result in visual
impairme nt. When s hooting a baby pa rticularly, be sure to keep a
distance of 3 feet ( one meter) or farther.
* When loading batteries, be careful about their polarity. When replacing
batteries, change them all at the same time, loading the same model
of batteries from the same manufacturer. Incorrect usage may result in
Th i s i s t he wa r ni n g fo r t h e u ni n su l at e d
“Dangerous H i g h Vol t a g e ” in the a s h . I f
disassembly or modication is done neglecting
this indi cati on, deat h or serious injury may
result.
Caution: Handling the ash neglecting this indication may
result in human injury or damage to the ash.
Warning
Caution
leakage, heating, rupture, short battery lifetime and loose contact.
* Never use the ash near glasses or near containers holding cosmetics
or chemicals. If the spilled liquid gets into the ash, it may result in re,
shock hazard or injury.
* Never use the ash in a place with hig h humidity, such as in the
bathroom or near a humidier. It may result in re, shock hazard or injury.
* When cleaning or caring for the ash, be sure to remove the batteries.
* Never use the ash in a place where ammable gas or explosive gas
may exist in the air.
* Keep batteries away from babies so that they will not be swallowed by
mistake.
Warning
* Never place the ash in a dusty place subject to direct
sunlight or a place with high humidity. The increased inside
temperature may result in re.
* Never place the ash in a dusty place. Using a dusty ash
may result in re or a shock hazard.
* Never use the ash in an unstable place. It may lose its balance and fall
or drop, resulting in injury.
Other cautions
* Never wipe the ash with benzene, thinner or alcohol. It may change
the color or shape of the ash. When it is dirty, wipe it with a dry soft cloth
without chemicals.
Caution
8

9
Contents
Safety precautions ...................................................................... 8
This is the appearance of the PF30X ash ....................................... 9
Name of each part .. ...................... ...................... .................. 10
Load the batteries rst .............................................................. 11
Mounting on the camera ......................................................................... 11
Test button .................................................................................... 11
To adjust the brightness of the image when it is too bright or too dark
.................................................................................................... 12
What if the AUTO CHECK lamp doesn’t turn on? ............................. 12
The AF assist light ............................................................................ 12
Bounce Flash ....................................................................................... 12
Specications and performance of PF30X ........................................ 13
This is the appearance of the PF30X
* By mounting this ash on the camera and turning it ON, the ash emits
an accurate and optimum light using the automatic high-precision Light
Adjustment function for E-TTL II, i-TTL.
* The amount of light can be increased and decreased easily with the EV
ADJUSTMENT button when the amount of light is not enough due to the
position of the object or because of bounce shooting, or when the amount
of light is too much.
* Bounce shooting is possible freely up to 90 degrees upward.
* Auto-focus assist light function helps focusing in the darkness or for a
low light level.
Before using
* Once this ash is mounted on the camera, be sure to hold the body of
the camera. If the ash is held to carry the camera, the camera may drop
from the shoe.
* As for operating the functions together with the camera, check them with
our service center or the Sunpak homepage (http://www.sunpak.jp).
Congratulations on your purchasing PF30X.
This is the dedicated ash for Canon and Nikon digital single lens reex
cameras. Never use this for other cameras. Read this user’s manual
carefully to take the best advantage of the ash.
English

10
Name of each part
Battery cover
AF assist light
Lock ring
Flashtube Housing
EV ADJUSTMENT
lamps
AUTO CHECK lamp
Power switch
Ready lamp/Test
button
EV
ADJUSTMENT
buttons
Bounce angle
Shoe connection pin

11
English
Load the batteries rst.
1. Conrm t hat the Power switch is OF F
before loading the batteries.
2. Press down on the Battery cover and slide
it downwards to open it.
3. Load 2 new size AA ba tteries into the
battery box in accordance with the + in dicatio n s. Th e produ ct is d e signed to
prevent erroneous loading. If a mistake is
made in battery polarity, failure may result.
Be careful when loading the batteries.
4. Close the Battery cover and slide it
upward to close it securely. Turn ON the
Power switch. Charging starts with the beep
sound. Upon completion of charging, the
Ready lamp blinks to show the state when
sh ootin g is ready. (When full y charged,
the lamp changes from blinking to steady
lighting.)
5. To tur n off the powe r, turn the Powe r
switch OFF. The Ready lamp goes out.
* Before mounting on the camera, be careful
so that the shoe terminals do not short-circuit
with the power ON. If the terminals make
contact, light may be emitted suddenly or
failure may result.
* Using Nickel Metal-Hydride batteries is
recommended to shorten the charging time
and increase the number of times the strobe
may be lit.
Mounting on the camera
When the PF30X is mounted on or dismounted from the camera, be sure
to turn OFF the Power switch. If the PF30X is mounted or dismounted
with the power ON, malfunction or failure of the camera may result.
1. Insert the strobe into the camera hot shoe rmly and turn the Lock ring
counterclockwise and secure the ash.
2. After mounting the ash on the shoe, turn ON both the power of the
camera and that of the ash. The shutter speed is automatically set.
Now the ash shooting is ready. Start shooting after conrming that the
AUTO CHECK lamp is ON. If the AUTO CHECK lamp does not go ON,
the distance to the object is too far. Move to the near point where the
AUTO CHECK lamp goes ON for shooting.
Test button
The TEST/CHARGE button and the Ready lamp
are physically the same. For test lighting, press this
button after the Ready lamp is lit. Use test lighting
to conrm lighting.
When full light mode is used just after the Ready lamp starts to blink,
the photos may become dark due to insufciency of the amount of
light. Therefore, to get the photos with the optimum amount of light, it is
recommended to wait until blinking changes to steady lighting.
* If the Ready lamp blinks for more than 30 seconds (that is, if it blinks
for more than 30 seconds after emitting the light in full light mode without
mounting on the camera), the voltage of the used batteries is low.
Replace the batteries.
Information on the Ready lamp

12
AF assist light
AUTO CHECK lamp
When the object is within the AUTO effective range, the AUTO CHECK lamp
lights for 2 seconds at the same time as when emitting light. If the AUTO CHECK
lamp does not light, shoot the object after moving nearer to the object or opening
the diaphragm (adjusting to smaller diaphragm value). Another effective way is to
change the ISO sensitivity to the higher sensitivity side.
* Note that the effective range is shorter just after lighting of the Ready lamp.
automatic light adjustment not available), this EV ADJUSTMENT does not
function.
Be sure to use the EV ADJUSTMENT buttons after conrming that the AUTO
CHECK lamp goes ON.
To cancel the EV ADJUSTMENT function, press the button(s) for the opposite
side of the setting until the indicator lamp goes out.
To adjust the brightness of the image
PF30X is equipped with EV ADJUSTMENT
bu t tons, allowi n g del i cate l i ght v o lume
ad justm ent. Use t he E V A DJUS T MENT
buttons in the following cases for effective
s h oo ti ng b y f re el y a dj us ti ng to t he
satisfactory brightness.
* When the amount of l i g h t i s n o t e n o u g h for shooting with d a y l i g h t
synchronization (in order to mitigate the shadow of the object by sunlight, the
ash light is used as the assist light) or backlight
* When shooting with various levels of brightness
* When the light volume is not enough using bounce shooting
Conrm the image shot by the normal AUTO shooting (the AUTO CHECK lamp
goes ON) with the monitor. To adjust the brightness for the desired image, press
one of the EV ADJUSTMENT buttons and shoot again. When the monitored
image is darker than the desired ima ge, p ress the + EV b utton of t he EV
ADJUSTMENT buttons once to turn ON the +0.5 green LED lamp. In this state,
the lighting becomes brighter by +0.5 EV. After shooting, conrm the image
again. When the brightness is not yet strong enough, press the + EV button once
to turn ON the +1 green LED lamp and shoot again. The light volume can be
increased up to +1.5 EV.
Naturally, it is also possible to adjust the brightness when it is too bright. In this
case, press the - EV button one by one to adjust to the desired image.
When shot with the state that the AUTO CHECK lamp does not go ON (TTL
The AF assist light
When shooting in a dark place or a place with low
illumination, the AF assist light goes ON by lightly
pressing the shutter button of the camera to help
the settings su ch as a utomati c focus. When the
AF assist light is turned ON, the automatic focus
function is started, and the focusing signal is turned
ON, the shutter button functions simply by the user’s
pressing it.
For a multi-focus camera, set the focus point at the
center.
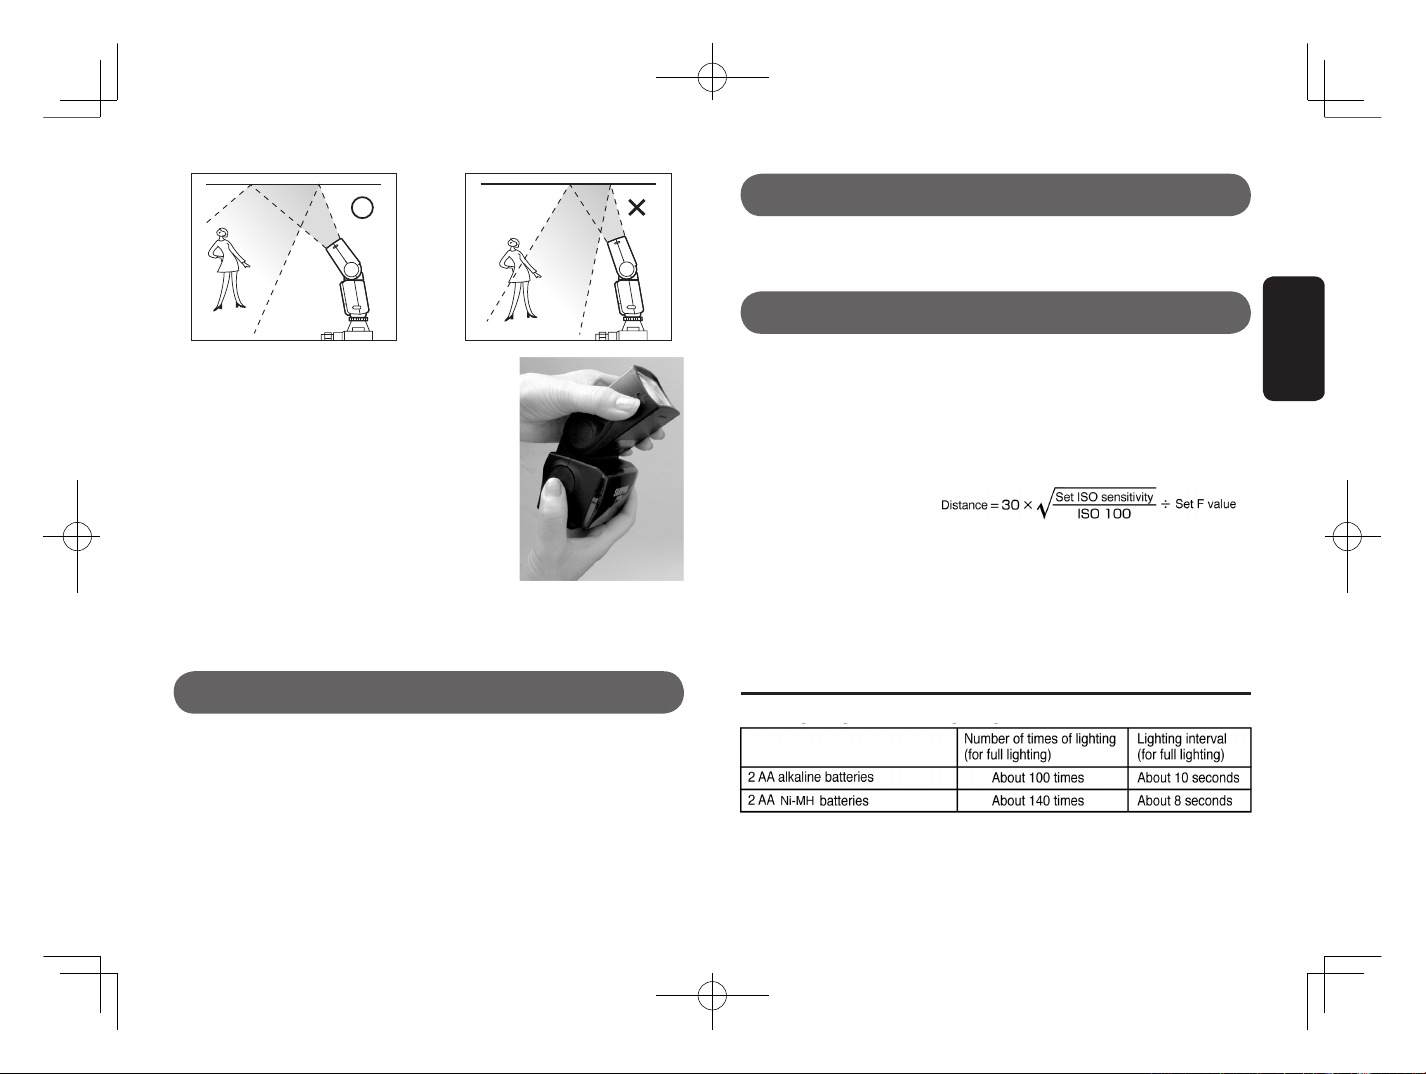
Bounce Flash
The PF30X allows bounce shooting by turning the Light emission part upward.
When shot with the Light emission part of the ash aimed directly at the object, a
strong shadow may appear in the back of the object, depending on the shooting
conditions, resulting in unnatural photos. However, it is possible to shoot beautiful
photos with soft and natural shadows by directing the Light emission part to
the ceiling. For bounce shooting, the amount of light may become insufcient,
depending on the distance to the ceiling (wall) of reection. In such a case,
adjust the light volume with the EV ADJUSTMENT buttons towards the positive
direction.
Adjust the AF frame to the object in the nder, and press the shutter lightly. After
conrming the lighting of the “lightning ash” mark in the nder, the shutter speed
and the diaphragm value, shoot the object.
* Bending the ash with too strong a force or bending it more than the angle
display, may break it. Handle it carefully.
13
Note for continuous shooting
Specications and performance of the PF30X
* Bounce shooting can be done just in the same
manner as normal shooting, except that the Light
emitting part is directed to the ceiling. Note that the
amount of light decreases by about 25%, depending
on the color and material of the reection surface.
Due to this reason, it is recommended to set the
di a phrag m valu e to t h e val u e as n ear t o open
(smaller value) as possible. For the bounce reection
surface, select at a surface with a high reection rate
as near to white as possible. For color shooting, if
the reection surface is colorful, the object is colored
by the color reection. Colorful surfaces should be
avoided.
To prevent degradation by heat due to continuous lighting, after shooting 15
times continuously, let the PF30X cool down for 10 minutes or longer before the
next shooting.
Automatic power saving function
When the PF30X is not operated for more than 15 minutes with the power ON,
the automatic power saving function automatically starts in order to save the
power consumption of the batteries. In the automatic power saving mode, all the
EV ADJUSTMENT lamps are OFF (if this function is used) and the Ready lamp
blinks quickly.
When the shutter of the camera is pressed lightly or when a button of the PF30X
is pressed, the au tomatic power savin g mode is released, and the PF30X
changes to the standby mode for lighting instantly.
Guide number 30/100 (ISO 100 - m/ft)
Effective lens focus distance Covers 28 mm lens or more with a 35 mm
camera
Covers 20 mm lens or more with an APS size
digital single lens reex camera
Lighting time 1/800 sec. (for full lighting)
Color temperature 5600 degrees
TTL effective distance
AF assist light effective range 1 m to 5 m (3.3ft to 16.5ft)
Bounce mechanism 0, 45, 60, 75, or 90 degrees upward
Power supply 2 size AA batteries (alkaline, nickel metal hydride, oxyride)
Temperature range 0 - 40ºC (32ºF - 104ºF)
Dimensions (approx) 102 (H) _ 69 (W) _ 92 (D) mm
Weight (approx) 200 g (excluding batteries)
* The external appearance and performance may partly be changed for improvement without advance notice.
Initial lighting times and lighting interval
* Th e number of ti mes of light ing is the num ber of times which new bat teries , within 3 mon ths af ter
manufacture, can be lighted continuously at a 30 second interval and for which the Ready lamp lights within
30 seconds after lighting at normal temperature.
* The lighting interval is the shortest t ime from lighting to turning-ON of the Ready lamp u nder the same
conditions as for the lighting times.
English
 Loading...