

Page 1

Sun Server X4-2L
Getting Started Guide
This guide describes the minimum steps you must perform for initial installation and power-on of the server.
For detailed installation information, refer to the Sun Server X4-2L Installation Guide . You can access the product
documentation using Oracle System Assistant and at the Oracle documentation website.
Before You Begin
■ If you are deploying multiple servers, use Oracle Enterprise Manager Ops Center. Refer to the Oracle
Enterprise Manager Ops Center product documentation at:
http://docs.oracle.com/cd/E27363_01/index.htm
■ If you are deploying a single server, use Oracle System Assistant, which is embedded in the Sun Server X4-2L.
For information about Oracle System Assistant, refer to the Oracle x86 Administration Guide for X4 Series
Servers at:
http://www.oracle.com/goto/x86AdminDiag/docs
Installing the Server
The following steps describe basic installation tasks for the server:
“1. Review Product Documentation” on page 1
“2. Install Optional Components” on page 2
“3. Mount the Server Into a Rack” on page 2
“4. Connect the Cables and Power Cords” on page 3
“5. Set Up Software and Firmware Using Oracle System Assistant” on page 4
“6. Set Up an Operating System and Drivers” on page 5
▼ 1. Review Product Documentation
1. Before installing the server, refer to the online Sun Server X4-2L Documentation Library. The most up-todate documents, including translations of some of the documents, are available at:
http://www.oracle.com/goto/X4-2L/docs
1
Page 2

Refer To: Information
Sun Server X4-2L Safety and Compliance Guide Safety precautions and procedures specific to the Sun Server X4-2L.
Important Safety Information for Oracle’s Hardware
Systems
Sun Server X4-2L Product Notes Supported software and hardware, and known server issues.
Sun Server X4-2L Installation Guide How to install hardware, cable and power on the server, connect to the
Sun Server X4-2L operating system installation
guides
Sun Server X4-2L Service Manual How to install optional components, remove and replace hardware
Oracle x86 Administration Guide for X4 Series
Servers
Oracle Integrated Lights Out Manager (ILOM)
Documentation Collection
Safety precautions and procedures to follow when installing Oracle
hardware.
service processor (SP), launch Oracle System Assistant, and configure
network settings.
How to install supported operating systems, including Oracle Solaris,
Oracle VM, Oracle Linux and other Linux systems, Windows, or
VMware ESXi.
components, and troubleshoot server problems.
Software methods to set up the server using Oracle System Assistant,
Oracle ILOM, and Oracle Hardware Management Pack. Refer to:
http://www.oracle.com/goto/x86AdminDiag/docs
Oracle recommends using Oracle System Assistant to set up the server.
You can also use Oracle ILOM and Oracle Hardware Management
Pack for some setup tasks.
Oracle ILOM features and how to perform server configuration,
monitoring, and administration tasks using Oracle ILOM. Refer to:
http://www.oracle.com/goto/ILOM/docs
Oracle is interested in improving its documentation and welcomes your comments and suggestions. You can
submit comments at: http://www.oracle.com/goto/docfeedback
▼ 2. Install Optional Components
Optional components for your server might be packaged and shipped separately. If applicable, install optional
components (such as DIMMs or storage drives) before mounting the server in a rack.
1. For installation procedures for optional components, refer to the Sun Server X4-2L Service Manual.
2. For a complete list of optional components, refer to the Sun Server X4-2L product page at:
http://www.oracle.com/goto/X4-2L
▼ 3. Mount the Server Into a Rack
For rackmounting instructions:
♦ Refer to the documents included with the rail kit, the service label on the server, and the Sun Server X4-2L
Installation Guide.
2
Page 3

▼ 4. Connect the Cables and Power Cords
Use Oracle System Assistant to simplify the setup and configuration of the server. For instructions, see “5. Set
Up Software and Firmware Using Oracle System Assistant” on page 4. Alternatively, you can use Oracle ILOM
for some server setup and configuration tasks. For instructions, refer to the Oracle ILOM Documentation
Collection.
Caution – Do not apply power to the server until instructed to do so. The server includes a service
processor (SP) that is used to configure and boot the host system. To properly configure the host
system and view SP messages, do not apply power to the server until you make the SP and host
networking connections, as described in this section.
To locate the server cable connections, see “Cabling Diagram” on page 4.
1. (Recommended method) To cable the server for local connection to Oracle System Assistant:
a. Connect a VGA monitor to the VGA port on the server.
b. Connect a USB keyboard and mouse to the USB connectors on the server.
2. (Alternative method) To cable the server for connection to Oracle ILOM:
a. For a local serial connection – Connect a serial cable between the server’s serial management port
(SER MGT) and a terminal device.
This connection provides initial communication with the SP. Set the server to communicate using 9600
baud, 8 bit, no parity, 1 stop bit. For DTE-to-DTE communication, use the supplied RJ-45 crossover
adapter with a standard RJ-45 cable to set up a null modem connection (transmit and receive signals
crossed over).
b. For a remote Ethernet connection – Connect an Ethernet cable between the server ’s network
management port (NET MGT) and the network to which future connections to the SP and host will
be made.
If using Oracle ILOM, configure the system for the first time through the SER MGT port. After initial
configuration, you can set up communication between the SP and host through the remote Ethernet
interface.
3. For network access, connect an Ethernet cable between the server ’s NET ports (NET3-0) and the network
to which the server will communicate.
4. Connect the power cords to the power supplies and to separate power sources.
The server is equipped with two power supplies. Connect them to separate power sources to provide power
redundancy. The server can operate with one power source; however, having only one power source reduces
the redundancy.
When the power cords are connected, the power supply LEDs light and the SP OK LED will blink rapidly as
the SP boots. The SP OK LED will light solid green once the SP has booted. After the SP has booted, the
Power/OK LED on the front panel will blink slowly, indicating that the host is in standby power mode. In
standby power mode, the server is not yet initialized or powered on.
3
Page 4
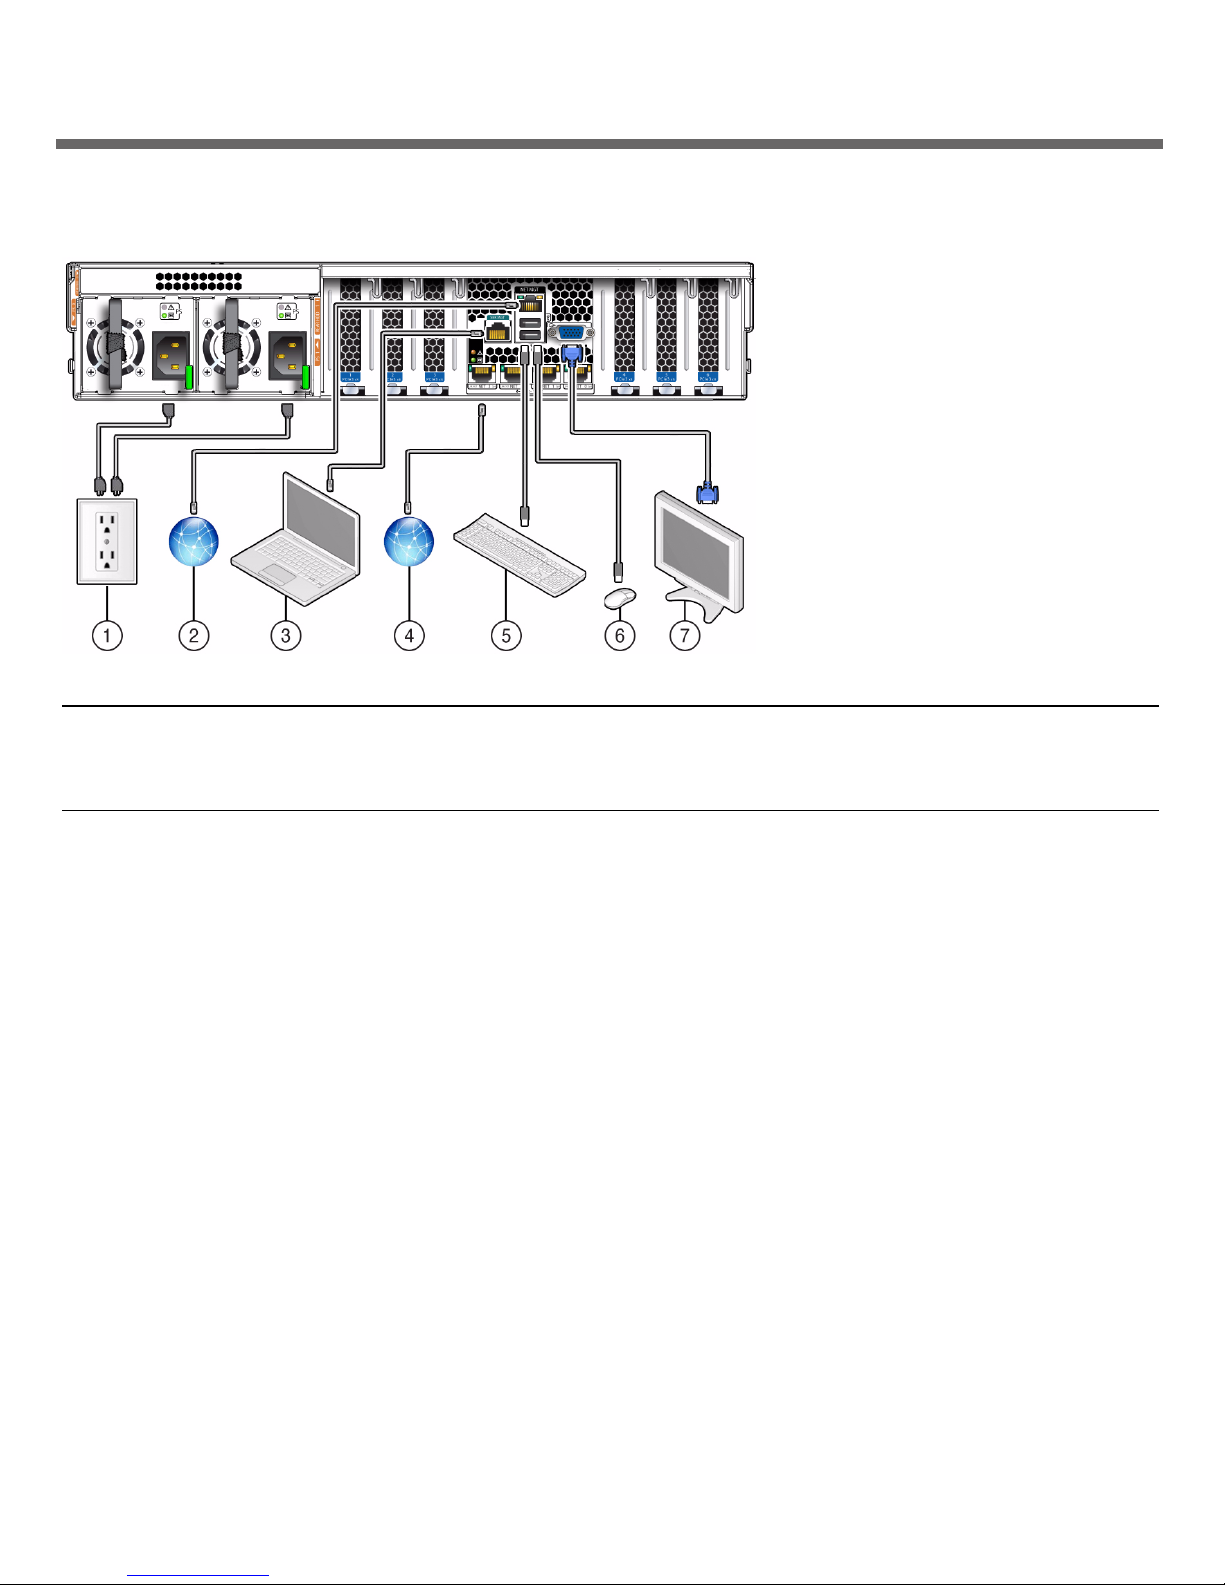
Cabling Diagram
FIGURE 1 Cabling for the Sun Server X4-2L
Figure Legend
1 Power supply 0 input power
Power supply 1 input power
2 Network management port (NET MGT) 5 USB port (USB 0)
3 Serial management port (SER MGT) 6 USB port (USB 1)
4 Ethernet ports (NET 3, NET 2, NET 1,
NET 0)
7 Video port (VGA)
▼ 5. Set Up Software and Firmware Using Oracle System Assistant
Oracle System Assistant enables you to update to the latest available firmware and software, easily configure
key server settings, and install an Oracle VM, Linux, or Windows operating system. This is the easiest method
for setting up the server. Oracle System Assistant is embedded in most Sun Server X4-2L systems.
1. Verify that the server is correctly installed in the rack.
2. Verify that a local console connection has been made to the server for Oracle System Assistant;
see “4. Connect the Cables and Power Cords” on page 3.
■ VGA monitor is connected to the VGA port on the server.
■ Keyboard and mouse are connected to the USB connectors on the server.
3. Verify that the server is in standby power mode; see “4. Connect the Cables and Power Cords” on page 3.
4. Launch Oracle System Assistant.
a. Press the front panel Power button to power on the server to full power mode.
The server boots, and power-on self-test (POST) and boot messages appear on the monitor.
Be attentive: You need to interrupt the boot process.
b. When prompted in the initial BIOS screen, press the F9 key.
The Oracle System Assistant application boots and the System Overview screen appears, showing system
information, and task buttons in the left pane.
4
Page 5
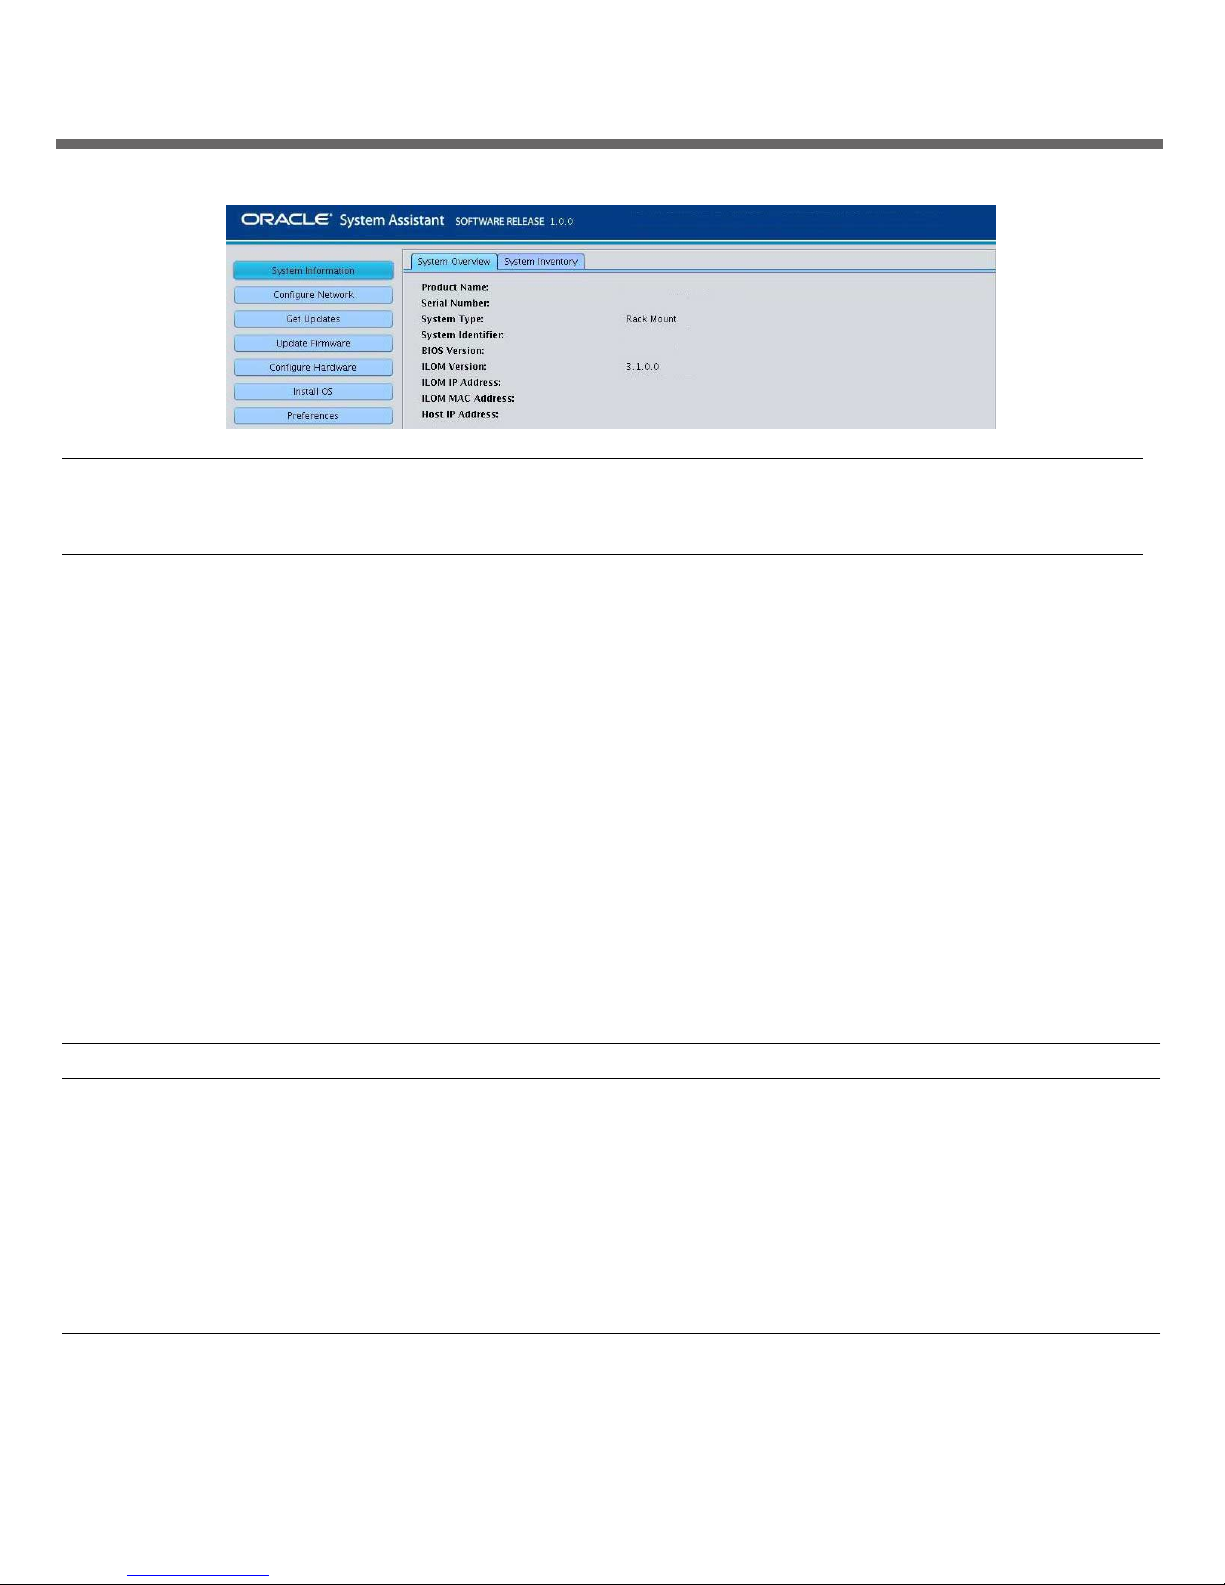
Note – You can also access Oracle System Assistant using the Oracle ILOM Remote Console. This access method
requires setting up a connection to Oracle ILOM and accessing the host console using an Oracle ILOM web
connection. Refer to the Oracle x86 Administration Guide for X4 Series Servers for instructions.
5. To set up the server’s network connection, click Configure Network.
6. To download the latest server firmware and software, click Get Updates.
7. To update the Oracle ILOM, BIOS, disk expander, or host bus adapter (HBA) firmware on the server, click
Update Firmware.
8. To configure Oracle ILOM, click Configure Hardware > Service Processor Configuration.
9. To configure RAID, click Configure Hardware > RAID Configuration.
10. To install an Oracle VM, Linux, or Windows operating system, and also download and install system
drivers and firmware, click Install OS.
For information on other supported OS installation options, see “6. Set Up an Operating System and
Drivers” on page 5.
▼ 6. Set Up an Operating System and Drivers
♦ Use the options in the following table to set up a supported operating system (OS) and required drivers.
OS Setup Option Refer To:
Configure preinstalled Oracle Solaris,
Oracle VM, or Oracle Linux
Install OS: Oracle VM, Linux, or Windows Use Oracle System Assistant (recommended) or refer to the installation guide
Install Oracle Solaris OS Sun Server X4-2L Installation Guide for Oracle Solaris Operating System
Install VMware ESXi software Sun Server X4-2L Installation Guide for VMware ESXi
Install supported OS drivers Use Oracle System Assistant (recommended) or refer to the installation guide
Sun Server X4-2L Installation Guide
for the OS
for the OS
If you do not have access to Oracle System Assistant to install drivers, you can download the latest Sun Server
X4-2L software release from the My Oracle Support website at: http://support.oracle.com
5
Page 6
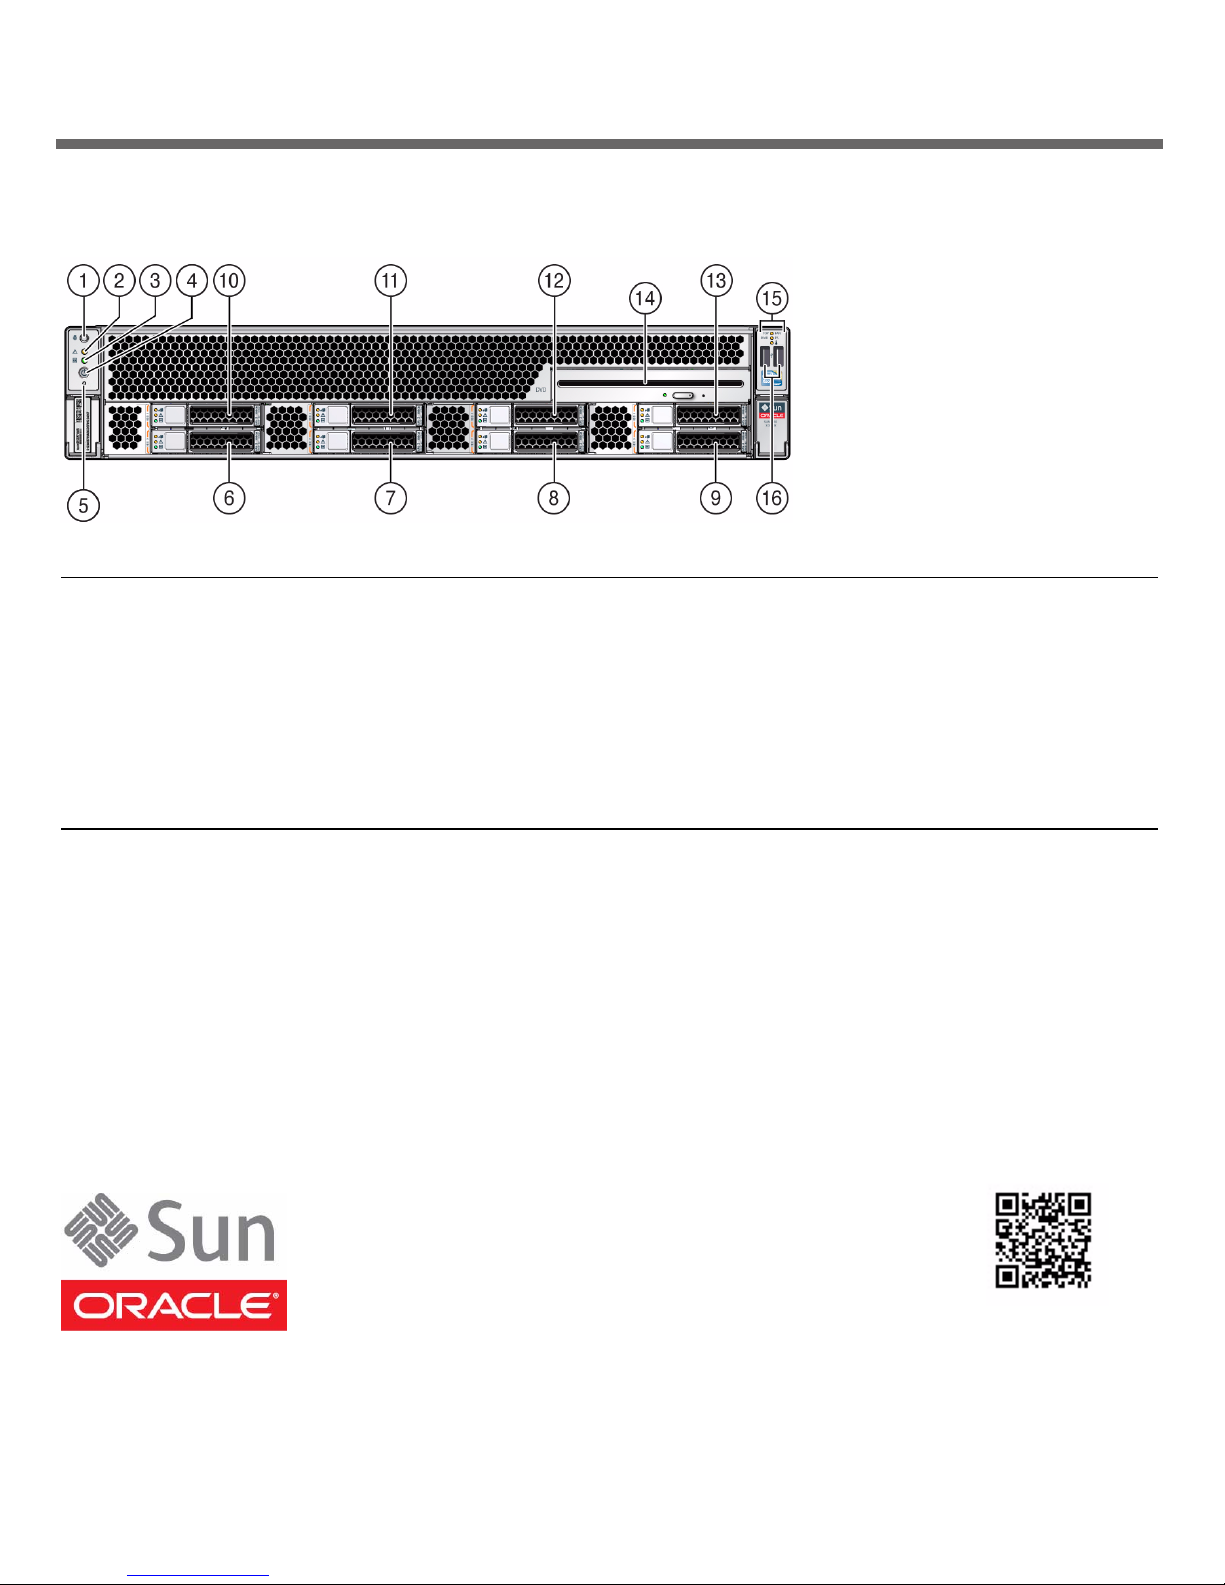
Server Front Panel Components
FIGURE 2 Sun Server X4-2L Front Panel Components
Figure Legend
1 Locator LED/Locator button: white 7 Storage disk drive 1 (optional) 13 Storage disk drive 7 (optional)
2 Service Required LED: amber 8 Storage disk drive 2 (optional) 14 SATA DVD drive
3 Power/OK LED: green 9 Storage disk drive 3 (optional) 15 Service Required LEDs (3):
Top: Fan Module (amber)
Rear: Power Supply (amber)
Overtemp Icon: System Over
Temperature Warning (amber)
4 Power button 10 Storage disk drive 4 (optional) 16 USB 2.0 connectors (2)
5 SP OK LED: green 11 Storage disk drive 5 (optional)
6 Storage disk drive 0 (optional) 12 Storage disk drive 6 (optional)
Access to Oracle Support
Oracle customers can access electronic support through My Oracle Support at http://support.oracle.com.
For detailed information, visit http://www.oracle.com/pls/topic/lookup?ctx=acc&id=info or if you
are hearing impaired, visit http://www.oracle.com/pls/topic/lookup?ctx=acc&id=trs.
The server serial number, which you will need when requesting service or technical support, is on the front
panel of the system and on the Customer Information Sheet that is shipped with the system. You can also view
the serial number using Oracle ILOM or Oracle System Assistant.
Copyright © 2013, Oracle and/or its affiliates. All rights reserved.
Copyright © 2013, Oracle et/ou ses affiliés. Tous droits réservés.
Part No.: E36973-02
Mfg No.: 7060265
September 2013
6
 Loading...