

Page 1
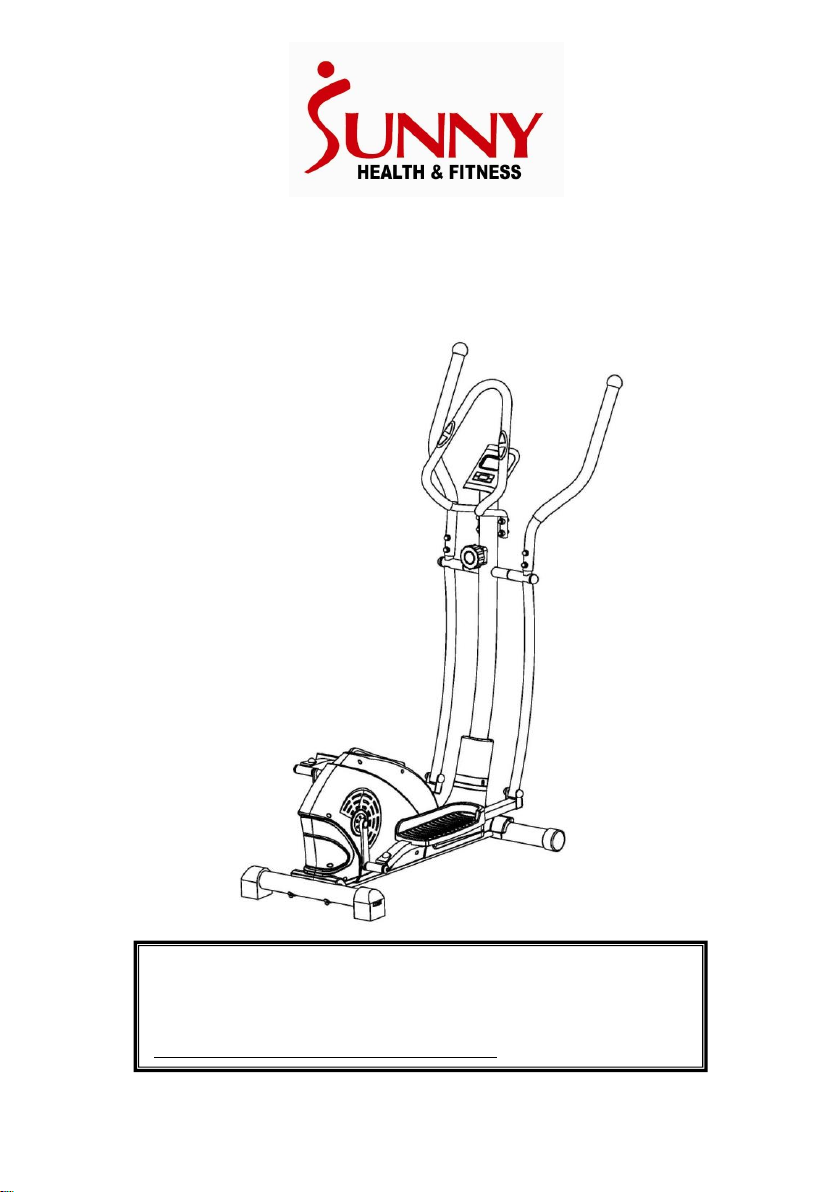
The specifications of this product may vary from
this photo and are subject to change without
notice. For Customer Service, please contact:
support@sunnyhealthfitness.com.
Ellllii
E
pttiiccaall
p
SSFF--EE11111144
Biikk
B
e
e
Page 2

2
Important Safety Information
We thank you for choosing our product. To ensure your safety and health,
please use this equipment correctly. Please read the information below
carefully before using this equipment. It is important to read this entire manual
before assembling and using the equipment. Safe and effective use can only be
achieved if the equipment is assembled, maintained and used properly.
1. Before starting any exercise program you should consult your doctor to
determine if you have any medical or physical conditions that could put your
health and safety at risk, or prevent you from using the equipment properly.
2. Your doctor’s advice is essential if you are taking medication that affects your
heart rate, blood pressure or cholesterol level.
3. Be aware of your body’s signals. Incorrect or excessive exercise can
damage your health. Stop exercising if you experience any of the following
symptoms: pain, tightness in your chest, irregular heartbeat, extreme shortness
of breath, lightheadedness, dizziness or feelings of nausea. If you do
experience any of these conditions, you should consult your doctor before
continuing with your exercise program.
4. Keep children and pets away from the equipment. The equipment is
designed for adult use only.
5. Use the equipment on a solid, flat, level surface with a protective cover for
your floor or carpet to ensure safety, the equipment should have at least 0.5
meters of free space all around it.
6. Before using the equipment, please make sure all the nuts and bolts are
securely tightened.
7. Always use the equipment as indicated. If you find any defective components
while assembling or checking the equipment, or if you hear any unusual noises
coming from the equipment during use, stop immediately. Do not use the
equipment until the problem has been rectified.
8. Wear suitable clothing while using the equipment. Avoid wearing loose
clothing that may get caught in the equipment or that may restrict or prevent
movement.
9. This equipment is designed for indoor and home use only. The maximum
weight of user: 220LBS.
10. Care must be taken when lifting or moving the equipment so as not to injure
your back.
11. The equipment is not suitable for therapeutic use.
12. Please keep this manual and the assembling tools well for future reference.
Page 3
3
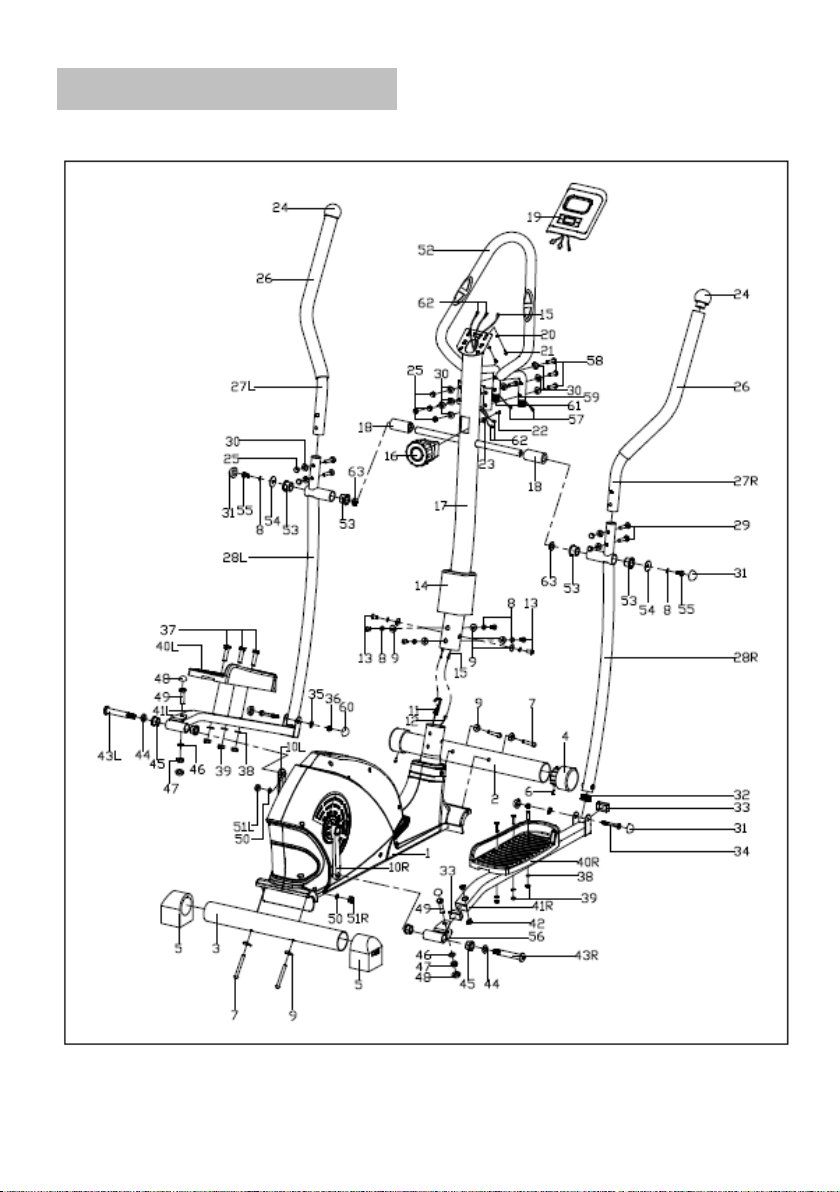
EXPLODED DIAGRAM
Page 4

4
NO.
DESCRIPTION
QTY
NO.
DESCRIPTION
QTY
1
Main frame
1 33
Square end cap
4
2
Front bottom tube
1 34
Screw M8×55
2
3
Rear bottom tube
1 35
Washer d8x1.2
2
4
End cap
2 36
Nylon nut M8
2
5
End cap
2 37
Screw M6×35
6
6
Screw ST4.2X18
2 38
Washer
φ6×φ12×1.2
6
7
Bolt M8XL75
4 39
Nylon nut M6
6
8
Spring washer D8
8
40L/R
Pedal
1pr.
9
Curved washer
Φ20×d8.5×R30
10
41L/R
Pedal support tube
1pr.
10L/R
Crank
1pr 42
Bushing
Φ14×10×Φ10.1
4
11
Tension wire
1
43L/R
Hinge Bolt
1pr.
12
Sensor wire
1 44
Wave washer
Φ17XΦ23X0.3
2
13
Screw M8x20
6 45
Axle sleeve (2)
Φ28×20
4
14
Cover for
handlebar post
1 46
Washer
φ10.5Xφ20X2
2
15
Connecting sensor
wire
1 47
Nylon nut M10
2
16
Tension Controller
1 48
Cap S17
4
17
Handlebar post
1 49
Screw M10X50
2
18
Bushing
2 50
Spring washer
D13
2
19
Computer
1
51L/R
Nylon nut B0.5×20
1pr.
20
Flat washer D5
2 52
Foam grip
1
21
Screw M5X10
2 53
Axle sleeve(1)
Φ26.8×28
4
22
Screw M5X55
1 54
Washer
Φ8.2×Φ32×2
2
23
Curved washer D5
1 55
Screw M8x15
2
24
End cap
2 56
Connecting joint
2
PARTS LIST
Page 5

5
25
Nut M8
8 57
Pulse wire
2
26
Handlebar grips
2 58
Screw M8x38
4
27L/R
Handlebar
1pr.
59
Hand Grip
1
28L/R
Swing bar
1pr.
60
Cap S13
2
29
Screw M8×45X8
4 61
Round end cap
2
30
Curved washer
Φ20×d8.5×R12.5
12 62
Connecting pulse
wire
2
31
Cap S14
4 63
Wave washer
Φ20×Φ28×0.5
2
32
Round end cap
2
ASSEMBLY INSTRUCTIONS
STEP 1:
Fix the front bottom tube (2) and the rear bottom tube (3) to the mainframe (1)
with bolts (7), curved washers (9). (Tips: Two people installing this step together
will be easier to align to the holes position.)
Page 6

6
Step 2:
Insert handlebar post (17) through the cover of the handlebar post (14), then
connect the sensor wire (12) to the connecting sensor wire (15) securely.
Connect tension wire (11) and the tension control wire (16) according to
diagram below. Lastly, attach the handlebar post (17) onto the mainframe (1)
with screws (13), spring washers (8) and curved washers (9) then slide down
the cover of the handlebar post (14).
Page 7

7
Step 3:
1. Tighten the swing tubes (28R/L) to handlebar post (17) with wave washers
(63), screws (55), spring washer (8) and flat washers (54).
*Note: do not screw it too tightly.
★CAUTION: For next step: Part 43 is labeled L for LEFT and R for RIGHT.
Please make sure to turn 43L Counter clockwise and 43R clockwise.
The Right and Left Hinge Bolt (No. 43R/L) must
fully penetrate the nylon ring of the nylon nuts
(51R/L). This will ensure the stability and durability
of your Elliptical Trainer.
In order to install hinge bolt properly, keep it
perfectly straight as the bolt goes through the
pedal arms and the crank. If the hinge bolt is
connected to the crank at an angle, damage to
both the hinge and the crank may occur.
2. Tighten the pedal support tubes (41R/L) to the cranks (10R/L) with wave
washers (44) and bolt (43R). Attach spring washers (50) and nylon nuts (51R/L)
to the end of the bolts (43) Note: do not screw it too tightly.
Page 8

8
3. Connect the swing tubes (28R/L) to the pedal support tubes (41R/L) with
screw (34), flat washer (35), nylon nut (36). Now tighten screw (55) screw (34)
and nylon nut (51R/L). Last; install cap (31), cap (48), and cap (60).
4. Tighten pedals (40R/L) to the pedal support tubes (41R/L) with screw (37),
flat washers (38) and nylon nuts (39).
Page 9

9
Step 4:
Firstly, connect the pulse wire (57) with the connecting pulse wire (62) (coming
out from the hole on the handlebar post (17)). Then screw the hand grip (59) to
the handlebar post (17) with the screw (58), the arc washer (30) and the nut
(25).
Page 10

10
Step 5:
1. Tighten the L/R handlebars (27L/R) to the L/R swing tube (28L/R) with
screws (29), curved washers (30) and nut (25).
2. Connect the connecting pulse wire (62) (coming out from the top of the
handlebar post (17)) and connecting sensor wire (15) with the computer (19)
relevant wires, Then tighten the computer(19)to the computer bracket of
handlebar post (17) with screws (21) and flat washers (20).
Page 11

11
WARM UP AND COOL DOWN ROUTINE
A good exercise program consists of a warm-up, aerobic exercise, and a cool
down.Do the entire program at least two to three times a week, resting for a day
between workouts. After several months you can increase your workouts to four
or five times per week.
AEROBIC EXERCISE is any sustained activity that sends oxygen to your
muscles via your heart and lungs. Aerobic exercise improves the fitness of
your lungs and heart. Aerobic fitness is promoted by any activity that uses
your large muscles eg: legs, arms and buttocks. Your heart beats quickly and
you breathe deeply. An aerobic exercise should be part of your entire exercise
routine.
The WARM-UP is an important part of any workout. You should begin with it
before every session to prepare your body for a more strenuous workout. It
helps to heat up and stretch your muscles, increases your circulation and pulse
rate, and delivers more oxygen to your muscles.
COOL DOWN at the end of your workout, repeat these exercises to reduce
soreness in tired muscles.
Inner Thigh Stretch
Sit with the soles of your feet together with your
knees pointing outward. Pull your feet as close
into your groin as possible. Gently push your
knees towards the floor. Hold for 15 counts.
Page 12

12
Shoulder Lift
Lift your right shoulder up toward your ear for one
count. Then lift your left shoulder up for one count
as you lower your right shoulder.
Hamstring Stretch
Sit with your right leg extended. Rest the
sole of your left foot against your right inner
thigh. Stretch toward your toe as far as
possible. Hold for 15 counts. Relax and
then repeat with left leg extended.
Head Roll
Rotate your head to the right for one count, feeling
the stretch up the left side of your neck. Next, rotate
your head back for one count, stretching your chin to
the ceiling and letting your mouth open. Rotate your
head to the left for one count, and finally, drop your
head to your chest for one count.
WARM UP EXERCISES
Page 13

13
Calf-Achilles Stretch
Lean against a wall with your left leg in front
of the right and your arms forward. Keep your
right leg straight and the left foot on the floor;
then bend the left leg and lean forward by
moving your hips toward the wall. Hold, then
repeat on the other side for 15 counts.
Toe Touch
Slowly bend forward from your waist,
letting your back and shoulders relax
as you stretch toward your toes. Reach
down as far as you can and hold for 15
counts.
Side Stretch
Open your arms to the side and continue
lifting them until they are over your head.
Reach your right arm as far upward toward
the ceiling as you can for one count. Feel
the stretch up your right side. Repeat this
action with your left arm.
 Loading...