

Page 1

Magnetic Upright Bike
Model No. SF-B915
For Customer Service, please contact: support@sunnyhealthfitness.com
Page 2

2
Please read instructions carefully before assembling or using the item.
1、 Assemble the machine exactly as described in the instruction manual.
2、 Check all the screws, nuts and other connections before using the machine for the first
time and ensure that all pieces are tightened and in safe condition for usage.
3、 Set up the machine in a dry level place and keep it away from moisture and water.
4、 Place a suitable base (e.g. rubber mat, wooden board) beneath the machine in the area
of assembly to avoid dirt, etc.
5、 Before beginning training, remove all objects within a radius of 2 meters from the
machine.
6、 Do not use aggressive cleaning articles to clean the machine. Only use the supplied
tools or suitable tools of your own to assemble the machine or repair any parts of
machine. Remove any sweat from the machine immediately after your workout.
7、 Your health can be affected by incorrect or excessive training. Consult a doctor before
beginning a training program. They can define the maximum setting (Pulse, Watts,
Duration of training, etc) to which you should train yourself. This machine is not
suitable for therapeutic purpose.
8、 Only do training on the machine when it is in correct working condition. Use only
original spare parts for any necessary repairs.
9、 This machine can be used for only one person’s training at a time.
10、 Wear training clothes and shoes which are suitable for fitness training with the
machine. Your training shoes should be appropriate for the trainer.
11、 If you experience dizziness, sickness or other abnormal symptoms, please STOP
training and consult a doctor immediately.
12、 People such as children and handicapped persons should only use the machine in the
presence of another person who can give aid and advice.
13、 The power of the machine increases with increasing the speed, and the reverse. The
machine is equipped with an adjustable knob which can adjust the resistance. Reduce
the resistance by turning the adjusting knob for the resistance setting towards stage 1.
Increase the resistance by turning the adjusting knob for the resistance setting towards
stage 8.
The maximum user’s weight is 220lb.
Page 3
3
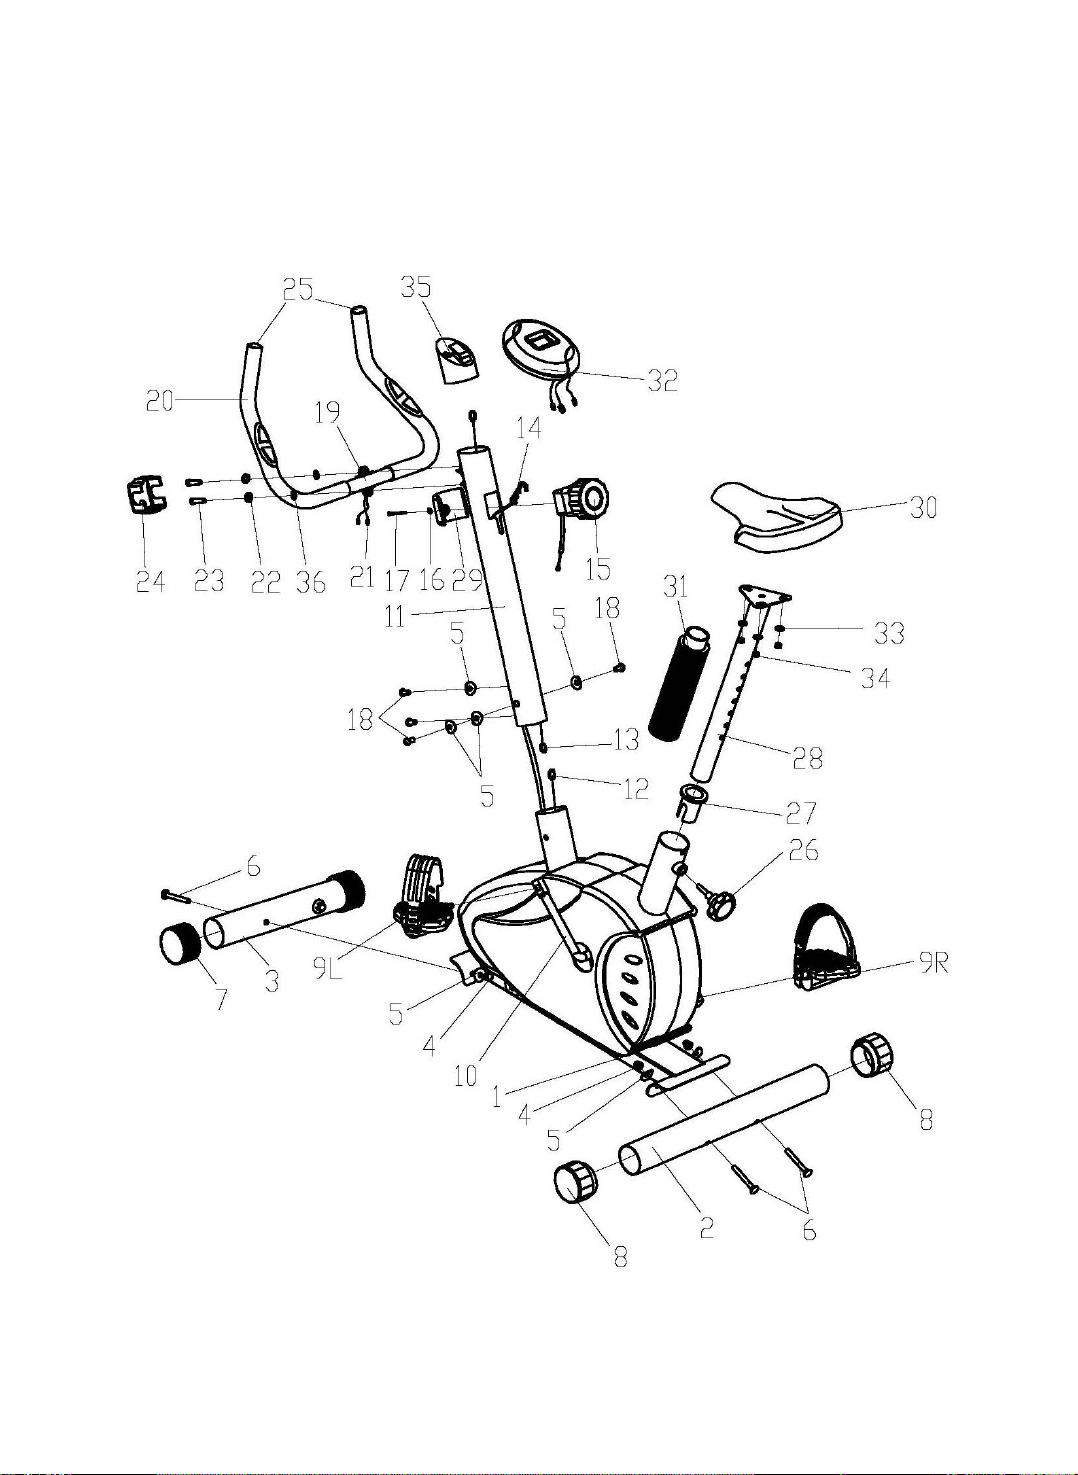
EXPLODED DIAGRAM
Page 4

4
Parts No.
Description
Qty
1
Main frame
1
2
Rear stabilizer
1
3
Front stabilizer
1
4
Nylon locknut
4
5
Arc washer
8
6
Carriage bolt
4
7
Front end cap
2
8
Rear end cap
2
9L/R
Pedal (L/R)
1.pr
10
Crank
1
11
Handlebar post
1
12
Sensor wire
1
13
Extension wire
1
14
Tension wire
1
15
Tension controller
1
16
Flat washer
1
17
Screw
1
18
Screw
4
19
Handlebar
1
20
Foam grip
2
21
Pulse wire
2
22
Washer
2
23
Screw
2
24
Handle chuck cover
1
25
End cap
2
26
Knob
1
27
Bushing
1
28
Seat post
1
29
End cap
1
30
Seat
1
31
Plastic tube
1
32
Computer
1
33
Flat washer
3
34
Nylon nut
3
35
Computer seat
1
36
Flat washer
2
Parts List
Page 5

5
Assembly Instructions
Step 1
Connect the front stabilizer (3) and rear stabilizer (2) to the main frame (1) with the nylon
locknuts (4), arc washers (5) and carriage bolts (6).
Step 2
Pull the tension wire (14) through the handlebar post (11) and take it out from the front
tension hole of the post; then connect the extension wire (13) with sensor wire (12), insert the
handlebar post (11) onto main frame (1) and lock it tightly with arc washers (5) and screws
(18). Connect the tension controller (15) with tension wire (14), then lock the tension
controller (15) on the handlebar post (11) tightly with flat washers (16) and screws (17).
Important note: Protect the cable inside from damage when completing this step.
Page 6

6
Step 3
Attach the seat (30) to the seat post (28) with the nylon nuts (34) and flat washers (33). Then
cover the seat post (28) with the plastic tube (31). At last, lock the seat post (28) on the main
frame (1) with knob (26).
Step 4
Attach the pedals (9L/R) to the crank (10). Each pedal is marked with L&R (for left & right)
respectively, viewed from the rider’s seated position.
★Important Note: The left pedal has reversed threading; you must turn
COUNTER-CLOCKWISE to tighten. Failure to adhere to this procedure may result in
permanent damage to your bike.
Page 7

7
Step 5
Pull the pulse wire (21) through the handlebar post (11) and pull it out through the top hole of
the post. Then fix the handlebar (19) on the handlebar post (11) with screws (23), arc washers
(22), and flat washers (36). Lastly, attach the handle chuck cover (24).
Step 6
Pull the extension wire (13) and pulse wire (21) through the computer seat (35); then cover
the computer seat (35) on the handlebar post (11). Fix the computer (32) on the computer seat
(35) once the computer wires are all connected well.
Installation completed.
After finishing installation, please inspect all the screws and nuts carefully to make sure they
are securely tightened. Ensure that all the Nuts, Nut Caps and Pedals are in safe condition.
Inspect the equipment periodically. If you should find any defective parts, replace them
immediately. Don’t exercise until they have been repaired.
Page 8

8
USING YOUR ELLIPTICAL BIKE
Using your elliptical bike will provide you with several benefits. It will improve your physical fitness,
tone your muscles and in conjunction with a calorie controlled diet, help you lose weight.
WARM-UP PHASE
The purpose of warming up is to prepare your body for exercise and to minimize injuries. Warm up
for two to five minutes before strength-training or aerobic exercising. Perform activities that raise
your heart rate and warm the working muscles. Activities may include brisk walking, jogging,
jumping jacks, jump rope, and running in place.
STRETCHING
Stretching while your muscles are warm after a proper warm-up and again after your strength or
aerobic training session is very important. Muscles stretch more easily at these times because of
their elevated temperature, which greatly reduces the risk of injury. Stretches should be held for 15
to 30 seconds. DO NOT BOUNCE.
Remember always to check with your physician before starting any exercise
program.
EXERCISE PHASE
This is the stage where you put the effort in.
After regular use, the muscles in your legs
will become more flexible. Work at your own
pace and be sure to maintain a steady
tempo throughout. The rate of work should
be sufficient to raise your heartbeat into the
target zone shown on the graph below.
COOL-DOWN PHASE
The purpose of cooling down is to return the body to its normal or near normal, resting state at the
end of each exercise session. A proper cool-down slowly lowers your heart rate and allows blood
to return to the heart.
 Loading...