

Page 1

For Customer Service, please contact: support@sunnyhealthfitness.com
For Customer Service, please contact: support@sunnyhealthfitness.com
For Customer Service, please contact: support@sunnyhealthfitness.comFor Customer Service, please contact: support@sunnyhealthfitness.com
Page 2

Important Safety Information
Important Safety InformationImportant Safety Information
Important Safety Information
We
thank
you
for
choosing
our
product.
To
guarantee
your
safety
and
health,
please
use
this
equipment correctly. Please read the information below carefully before using this equipment.
1.Itis
important
to
read
this
entire
manual
before
assembling
and
using
the
equipment.
Safe
and
effective use can only be achieved if the equipment is assembled, maintained and used properly.
2. Before starting any exercise program you should consult your doctor to determine if you have
3.Beaware
of
your
body
ssignals.
Incorrect
or
excessive
exercise
can
damage
your
health.
Stop
your exercise program.
4. Keep children and pets away from the equipment. The equipment is designed for adult use only.
5.
Use
the
equipment
onasolid,
flat
level
surface
with
a
protective
cover
for
your
floor
or
carpet.
To
ensure safety, the equipment should have at least 1.7 feet of free space all around it.
6.
Before
using
the
equipment,
check
that
the
nuts
and
bolts
are
securely
tightened.
Always
use
7.
There
are
many
functions
of
the
computer;
the
data
will
show
when
using
the
equipment
and
will
8.
Wear
suitable
clothing
while
using
the
equipment.
Avoid
wearing
loose
clothing
that
may
get
9. This equipment is designed for indoor and home use only, not intended for commercial use.
10. Care must be taken when lifting or moving the equipment so as not to injure your back.
11. The equipment is not suitable for therapeutic use.
12. Maximum weight of user: 220LB.
13. Please save this manual and the assembling tools as well.
any medical or physical conditions that could put your health and safety at risk, or prevent you from
using the equipment properly. Your doctor s advice is essential if you are taking medication that
affects your heart rate, blood pressure or cholesterol level.
exercising if you experience any of the following symptoms: pain, tightness in your chest, irregular
heartbeat, and extreme shortness of breath, lightheadedness, dizziness or feelings of nausea. If
you do experience any of these conditions you should consult your doctor before continuing with
the equipment as indicated. If you find any defective components while assembling or checking the
equipment, or if you hear any unusual noises coming from the equipment during use, stop
immediately. Do not use the equipment until the problem has been rectified.
display information about your exercise routine.
caught in the equipment or that may restrict or prevent movement.
1
Page 3
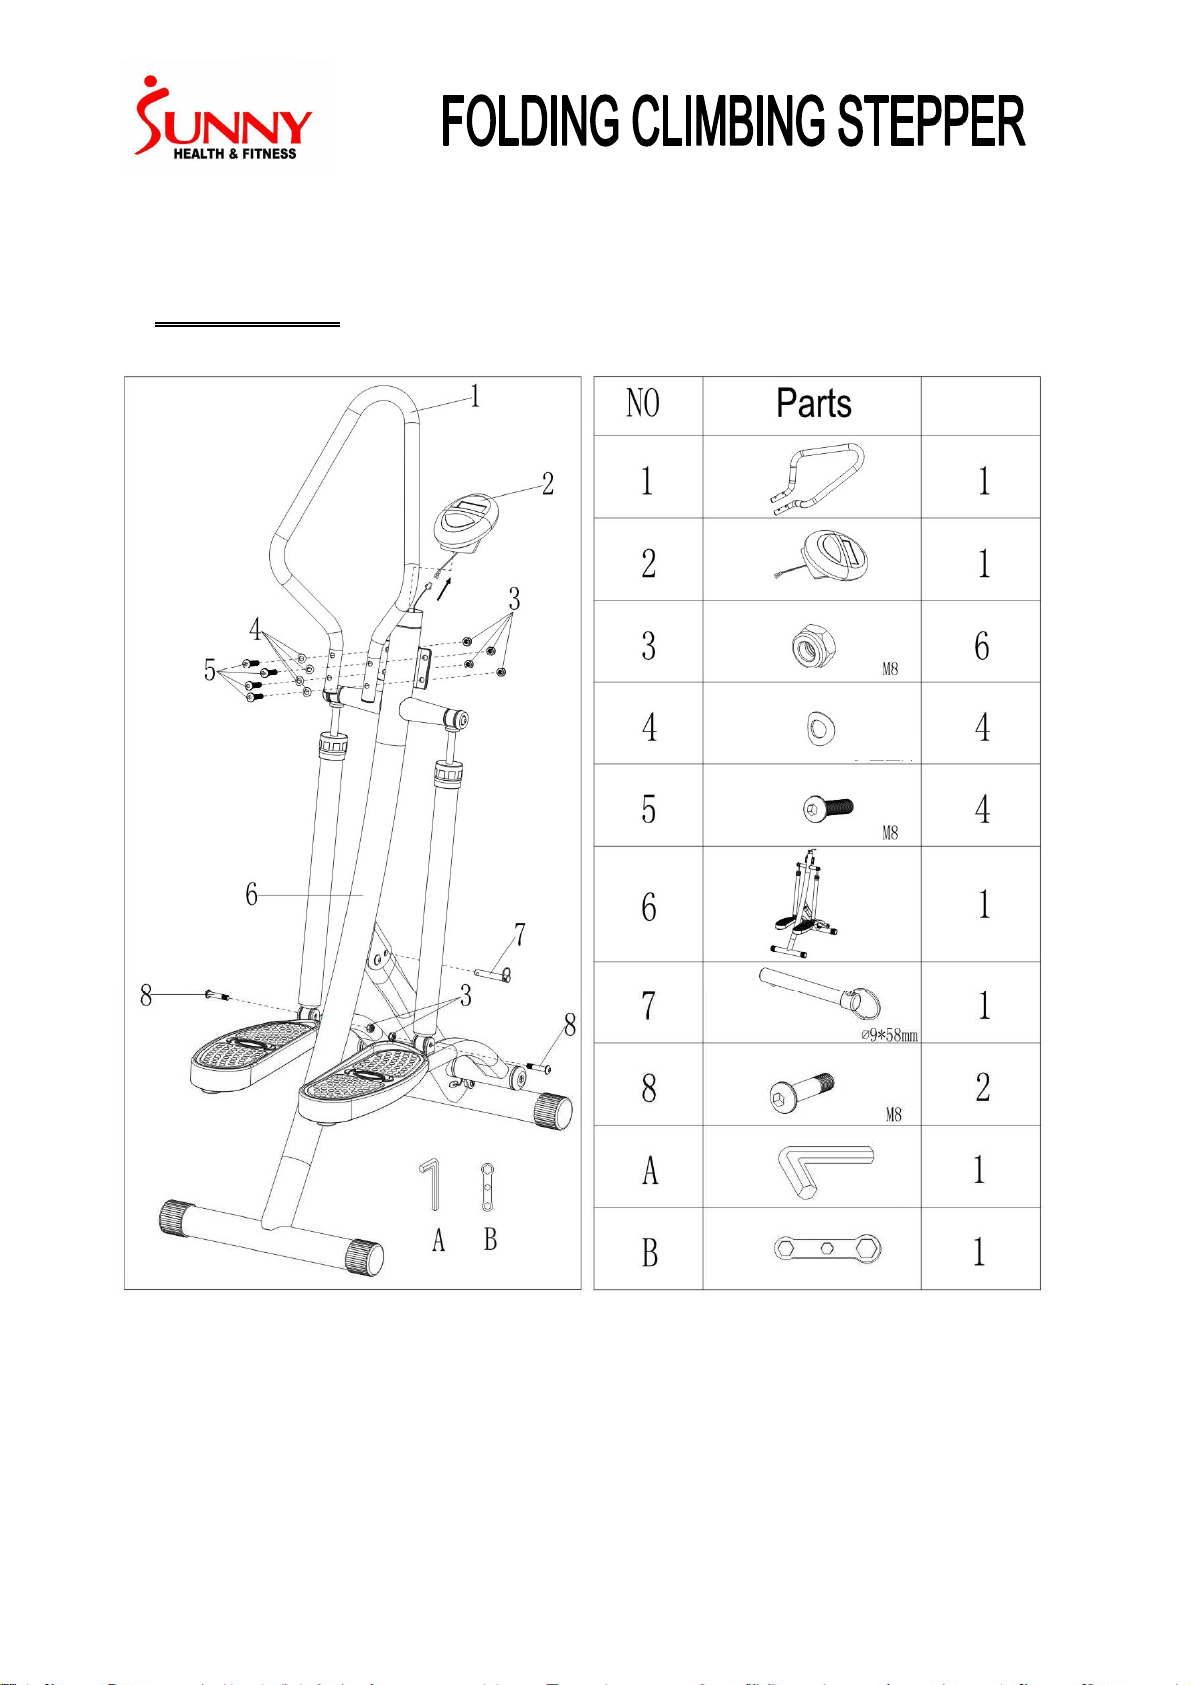
PARTS LIST
PARTS LIST
PARTS LISTPARTS LIST
Q'TY
Q'TY
Q'TYQ'TY
2
Page 4

Packing List
Part No. Description Description Quantity
6666
Main Frame 1
1 Handle bar
8,3 Screws and nuts (set)on the pedal tube 2
7 Pin(pcs) 1
2 Meter
1
1
3,4, 5 Screws and nut(set) on base frame 4
A,B tool set 1
3
Page 5

ASSEMBLY INSTRUCTIONS
ASSEMBLY INSTRUCTIONS
ASSEMBLY INSTRUCTIONSASSEMBLY INSTRUCTIONS
Main frame and all parts
Move up the pedal, and use the tool set to scure the
cylinders by using the screws #8 and nuts #3.
Pull out the support tube.
Secure the support tube
by the pin #7.
Attach the handlebar to the
main frame and make sure
the holes match correctly.
Use the tool set to assemble
the handle bar by screws #5,
spacer #4 and nuts #3.
Pull out the wire from the tube
and connect with the meter
wire.
The assembly is done.
4
Install the meter on the top.
(Please make sure the wire
is in the tube.“
Page 6

METER FUNCTIONS
TIME(TMR“
COUNT(CNT“
CALORIES(CAL“
KEY FUNCTION:
KEY FUNCTION:KEY FUNCTION:
KEY FUNCTION:
OPERATION PROCEDURES:
OPERATION PROCEDURES: OPERATION PROCEDURES:
OPERATION PROCEDURES:
If the digits do not show clearly on the monitor, please replace the
FUNCTIONS:
FUNCTIONS:FUNCTIONS:
FUNCTIONS:
Automatically accumulates workout time when starting exercise.
Automatically accumulates steps when starting exercise.
Automatically accumulates calories consumed when starting exercise.
Automatically accumulates amount of steps since first workout.
METER FUNCTIONS
METER FUNCTIONSMETER FUNCTIONS
MODE/SELECT:
AUTO ON/OFF :
The monitor will be automatically shut off if there is no signal coming in for 4 to 5 minutes.
The monitor will turn on automatically once you start to exercise.
TOTAL COUNT(TOTAL“
SCAN
To select the funtion you want.Hold the key for 4 seconds to have count,
time and cal values reset.
The TOTAL COUNT cant be reset by MODE key, only by replacing
batteries.
Automatically scans through each function: TIME, COUNT(CNT“, TOTAL
COUNT, CALORIES.
BATTERY
batteries. This monitor uses two AA batteries. You should replace both
batteries at the same time.
5
Page 7

WARNING: Consult a physician before using this equipment.
FOLDING THE STEPPER:
FOLDING THE STEPPER:FOLDING THE STEPPER:
FOLDING THE STEPPER:
UNFOLDING THE STEPPER:
UNFOLDING THE STEPPER:UNFOLDING THE STEPPER:
UNFOLDING THE STEPPER:
Secure the support tube by the pin #7.
WARNING: Consult a physician before using this equipment.
WARNING: Consult a physician before using this equipment.WARNING: Consult a physician before using this equipment.
Remove the pin #7. Step on the rear tube, and push forward for storage.
Hold the main frame, and pull out the support tube.
EXERCISE INSTRUCTIONS:
EXERCISE INSTRUCTIONS:
EXERCISE INSTRUCTIONS:EXERCISE INSTRUCTIONS:
1. Stand behind your CLIMBING STEPPER with both hands on the handlebar assembly,
your right foot on the right pedal, and carefully move your left foot and place it on the
left foot pedal. Make sure you are balanced, using smooth and controlled movements.
2. Keep both hands on the handle bar to keep your balance.
3. If you want to adjust the level of tension, please turn the adjustment knob of the cylinder
carefully as below. Level 1 is the lowest level, and level 12 is the highest level.
4. The suggested time limit of exercise is 10 - 15 minutes, at least 3 times a week.
6
 Loading...