

Page 1

T
Edited with the trial version of
Foxit Advanced PDF Editor
To remove this notice, visit:
www.foxitsoftware.com/shopping
WIST
HANDLE BAR
S
TEPPER WITH
NO. 059
For Customer Service, please contact: support@sunnyhealthfitness.com
Page 2

Important Safety Information
Edited with the trial version of
Foxit Advanced PDF Editor
To remove this notice, visit:
www.foxitsoftware.com/shopping
1
We thank you for choosing our product. To guarantee your safety and health, please use this
equipment correctly. Please read the information below carefully before using this equipment.
1. It is important to read this entire manual before assembling and using the equipment. Safe
and effective use can only be achieved if the equipment is assembled, maintained and
used properly.
2. Before starting any exercise program you should consult your doctor to determine if you
have any medical or physical conditions that could put your health and safety at risk, or
prevent you from using the equipment properly. Your doctor’s advice is essential if you are
taking medication that affects your heart rate, blood pressure or cholesterol level.
3. Be aware of your body’s signals. Incorrect or excessive exercise can damage your health.
Stop exercising if you experience any of the following symptoms: pain, tightness in your
chest, irregular heartbeat, and extreme shortness of breath, lightheadedness, dizziness or
feelings of nausea. If you do experience any of these conditions you should consult your
doctor before continuing with your exercise program.
4. Keep children and pets away from the equipment. The equipment is designed for adult use
only.
5. Use the equipment on a solid, flat level surface with a protective cover for your floor or
carpet. To ensure safety, the equipment should have at least 1.7 feet of free space all
around it.
6. Before using the equipment, check that the nuts and bolts are securely tightened. Always
use the equipment as indicated. If you find any defective components while assembling or
checking the equipment, or if you hear any unusual noises coming from the equipment
during use, stop immediately. Do not use the equipment until the problem has been
rectified.
7. There are many functions of the computer; the data will show when using the equipment
and will display information about your exercise routine.
8. Wear suitable clothing while using the equipment. Avoid wearing loose clothing that may
get caught in the equipment or that may restrict or prevent movement.
9. This equipment is designed for indoor and home use only, not intended for commercial use.
10. Maximum weight of user: 250LB.
11. Care must be taken when lifting or moving the equipment so as not to injure your back.
12. The equipment is not suitable for therapeutic use.
13. Please save this manual and the assembling tools as well.
Page 3
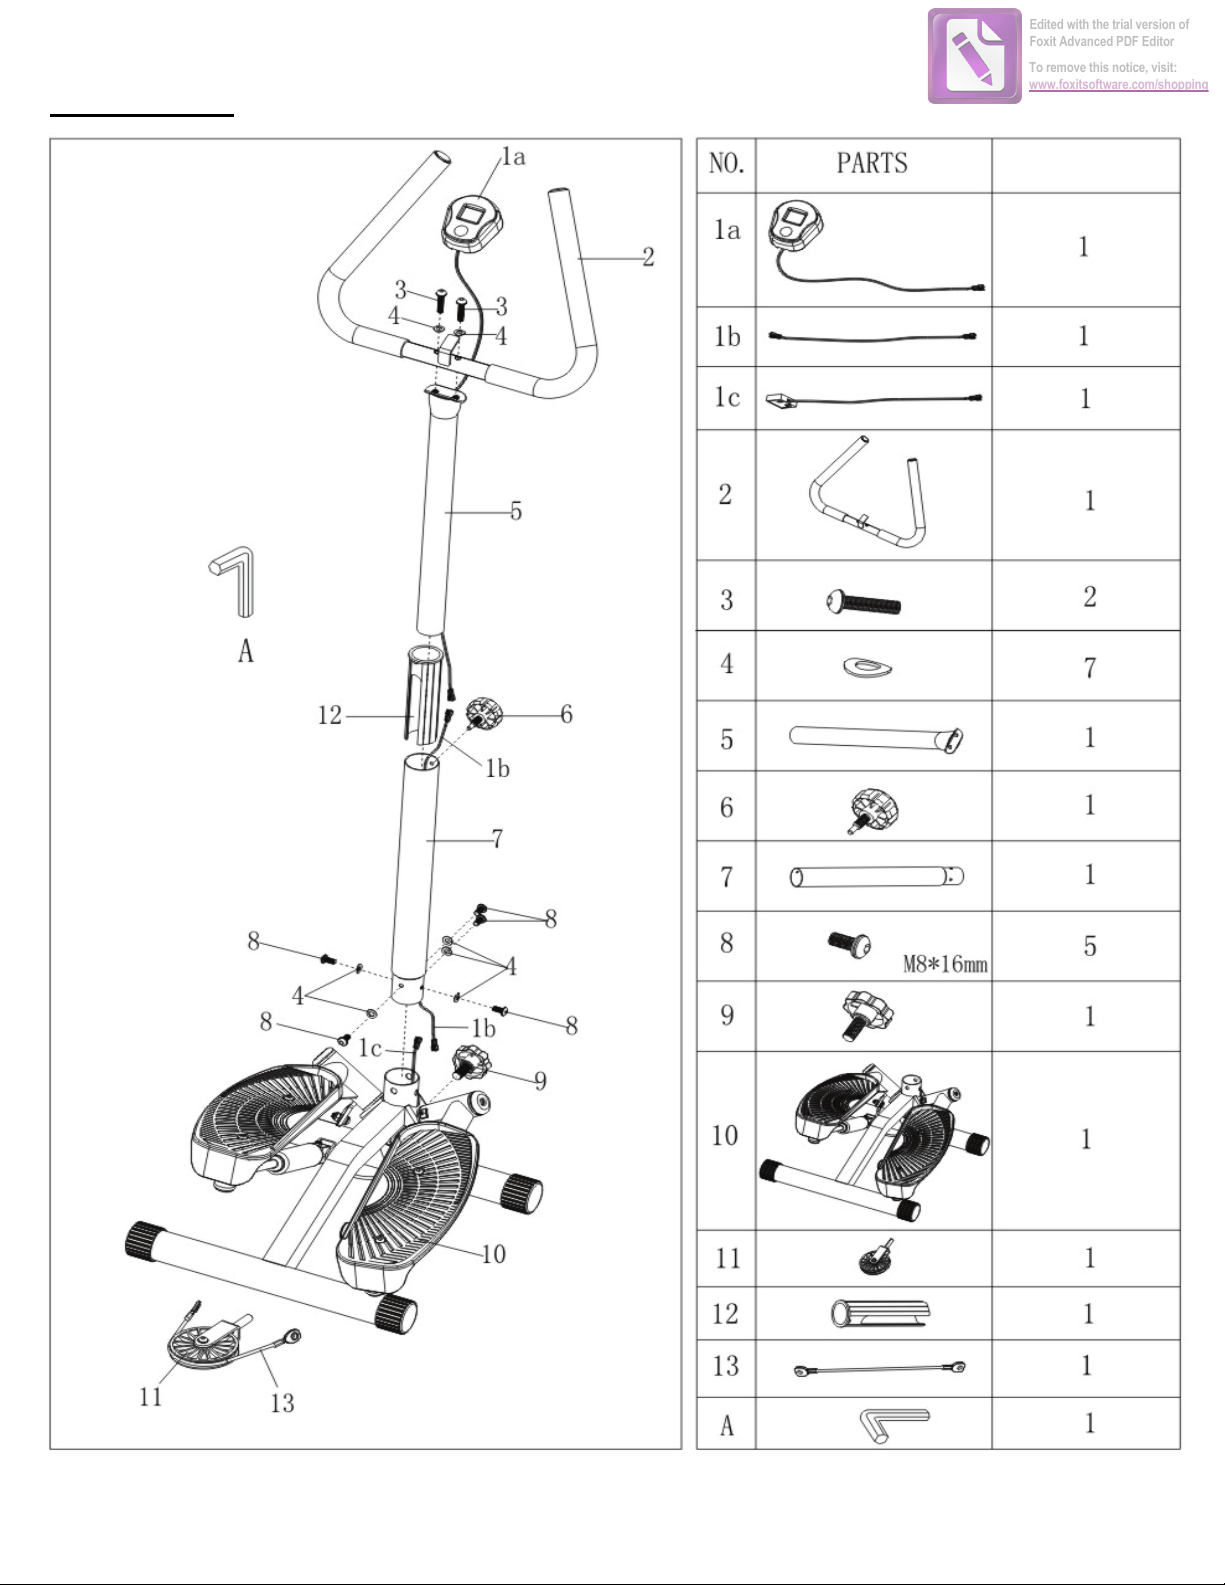
Parts List
Edited with the trial version of
Foxit Advanced PDF Editor
To remove this notice, visit:
www.foxitsoftware.com/shopping
2
Q’TY
K
K
Page 4

Assembly Instructions
Edited with the trial version of
Foxit Advanced PDF Editor
To remove this notice, visit:
www.foxitsoftware.com/shopping
3
1. Take out the Base Frame (10) from the box
and lift both pedals all the way up.
2. Lift pedals up and push the pulley a little
.
forward to its place. Then hook the cable to the
groove of pulley (11) and press the pedals
down.
3. Tighten the Adjustment Knob (9) onto the
Base Frame (10). Use this Knob to adjust the
stepping height (tension).
4. Disconnect the Connecting Wire (1b) from the
Meter Wire (1a). For your convenience connect
the Connecting Wire (1b) with the twist tie that
came from the computer package. This way, you
can easily insert the Connecting Wire (1b)
through the Bottom Stand Post (7).
5. Pull out the Wire (1c) from the Base Frame
(10), and connect it with the Connecting Wire
(1b). Use the Allen Wrench (A), Washers (4)
and Bolts (8) to assemble the Bottom Stand
Post (7) onto the Base Frame (10).
6. Pull out the Connecting Wire (1b) from the
Bottom Stand Post (7).
7. Take the wire from the Meter (1a) and put it
through the small hole in the Top Stand Post (5).
You can also use the twist tie again, as men-
tioned in step 4; to insert the Meter wire (1a)
easily through the Top Stand Post (5).
Page 5

8. Connect the Meter Wire (1a) with the
Edited with the trial version of
Foxit Advanced PDF Editor
To remove this notice, visit:
www.foxitsoftware.com/shopping
4
Connecting Wire (1b) coming through the Bottom
Stand Post (7).
9. Assemble the Top Stand Post (5) into the
Bottom Stand Post (7) and fix it by using the
Screw (6).
10. Assemble the Handle Bar (2) to the Top Stand
Post (5) using 2 Washers (4) and 2 Bolts (3).
11. Install the Meter (1a) on top of the Handle
Bar (2).
12. The assembly is done.
e
Page 6

Operating Instructions
Edited with the trial version of
Foxit Advanced PDF Editor
To remove this notice, visit:
www.foxitsoftware.com/shopping
5
1. Please follow and read the instructions before assembling and using the equipment. Any other kinds of
improper use are strictly prohibited.
2. To operate your stepper, make sure the cable is connected to the groove of the pulley which is located
under the baseframe.
3. Place and operate your stepper on a flat level and dry surface.
4. This product is designed for adult use only.
5. Keep children and pets away from the exercise area.
6. Wear suitable clothing and footwear when using the product.
7. The time limit of exercise is 10-15 minutes each time.
8. To start an exercise, always make sure your feet step right on the pedals and that all nuts and bolts are
securely tightened.
9. Use Knob (9) to adjust the stepping height & tension.
+ Tension gets stronger when tightening the knob and moving range gets higher.
- Tension gets weaker when loosening the knob and moving range gets lower.
Maintenance and Care Instructions
1. If the stepper screeches during exercise, please loosen the screw of U-Shaped iron and cable. Then,
lubricate U-Shaped iron and cable (13) to improve the sliding condition (as seen in picture below).
After lubricating with oil, please secure the U-Shaped iron and Cable (13).
2. Only use dry cloth to gently wipe the stepper clean after usage. Then store your stepper in a dry place.
3. It’s normal for sound to come from the cylinder when it gets hot during exercise.
4. The cylinder will become hot while exercising. Please do not touch the cylinder to avoid burning your
hand.
Please lubricate U-Shaped iron and cable (see below)
Page 7

Meter Functions
Edited with the trial version of
Foxit Advanced PDF Editor
To remove this notice, visit:
www.foxitsoftware.com/shopping
6
Function Button : Press red button to select functions of time, count, total count, calories. Hold the
button for 4 seconds to have a total reset (except TOTAL COUNT).
SCAN : Press “mode” key to select “scan”. This function will automatically scans through all
the functions displayed on the bottom line of the monitor.
TIME : Automatically accumulates workout time when starting exercise.
COUNT : Automatically accumulates workout counts when starting exercise.
TOTAL COUNT : Automatically accumulates different sessions workout counts when starting
exercise.TOTAL COUNT will be reset by replace the batteries.
CALS : Automatically accumulates calories amount consumed when starting exercise.
NOTE
1. If there is a improper display on the monitor, please replace the batteries to improve results.
2. Please use 2 AA batteries as a power supply.
3. The monitor will be automatically shut off if there is no signal coming in for 4 to 5 minutes.
4. The monitor will be auto-powered when you start to exercise, or you can push button to signal in.
5. When there is no signal coming in for a period of 4 seconds, all functions will automatically stop calculating
and a “stop” sign will appear on the upper left corner of the monitor.
6. The meter will automatically start calculating by simply starting to exercise, and will automatically stop
calculating when exercise stops for 4 seconds.
 Loading...