

Page 1
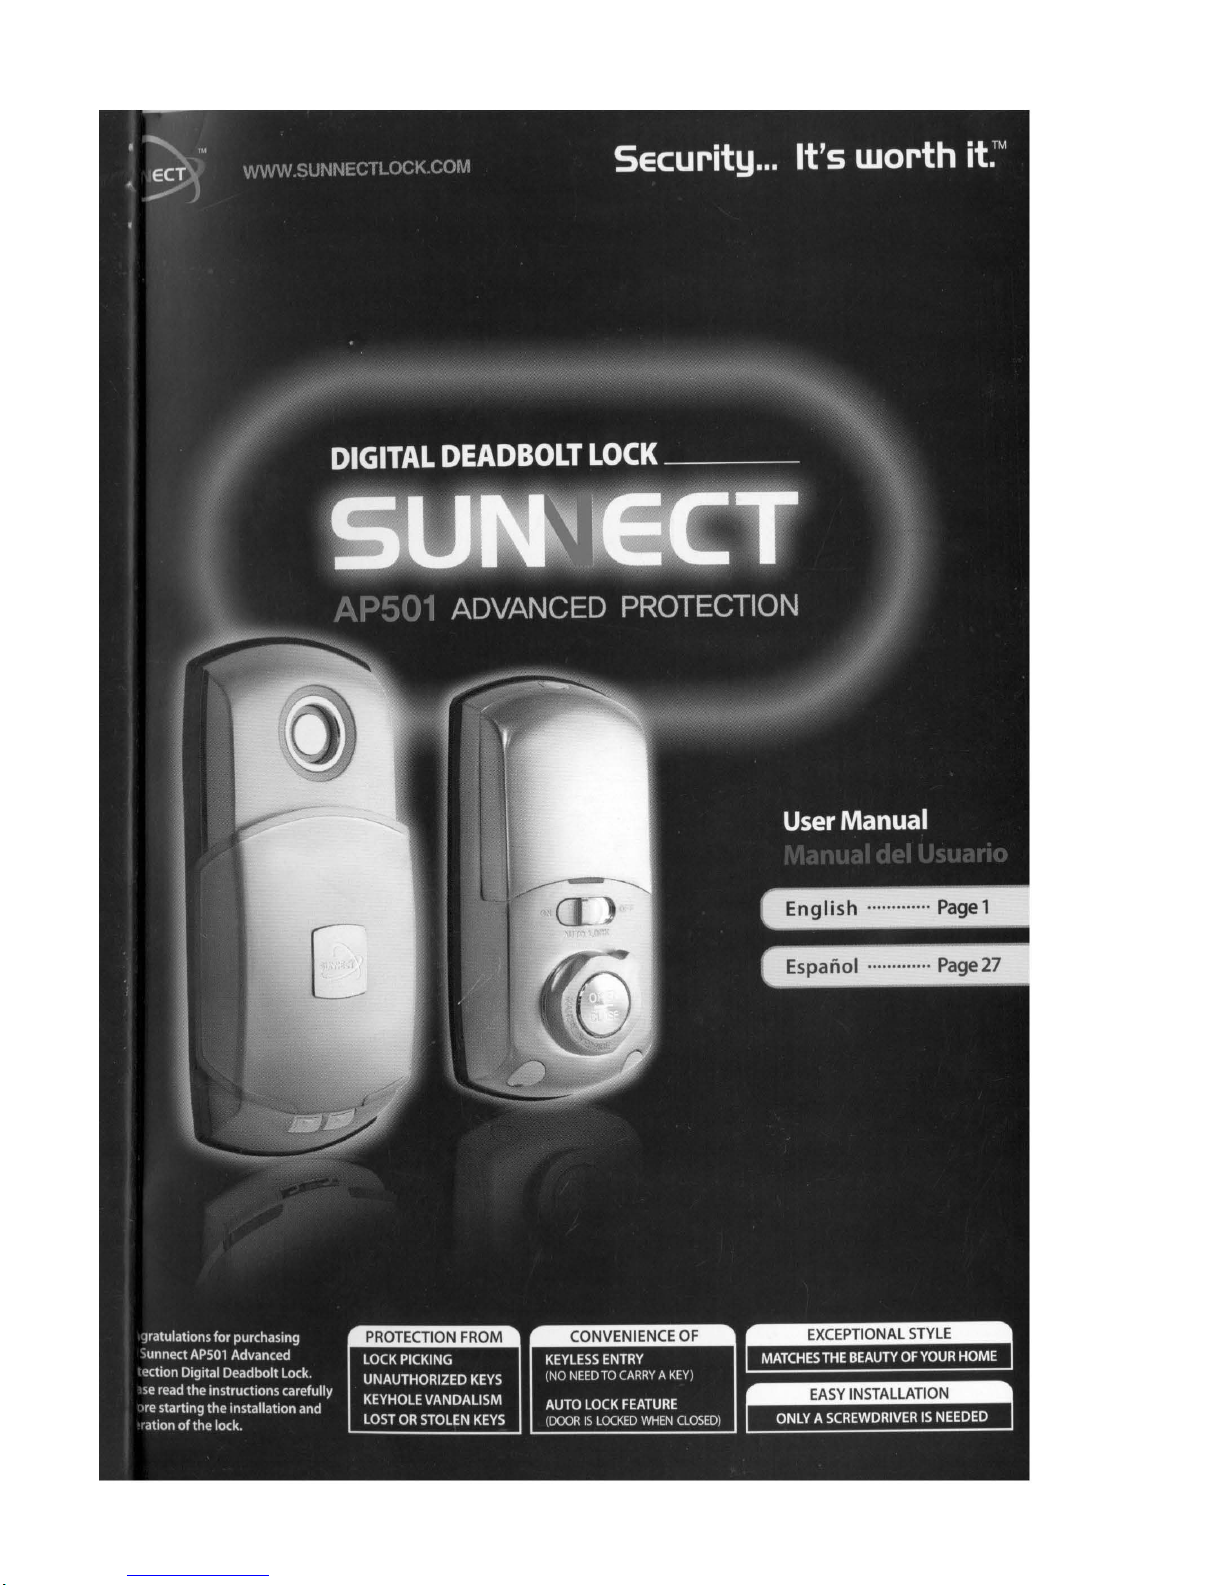
LOCK
PICKING
UNAUTHORIZED
KEYS
KEYHOLE
VANDALISM
LOST
OR
STOLEN
KEYS
Page 2
• Product Features
• Important Safeguards . ·
•
Changing Batteries
• Using the Temporary Power Terminal
In
Case
of
A Complete Battery Drain
• Enclosed Product Parts
•
Component Names
• Tag
Key
Registration
• Passcode Registration
• Locking
Auto
Lock
Mode
Manual Mode
2
3
4
5
6
7
8
9
10
• Unlocking
···············
······
···
····
···
·················
···
····
12
Using
the
Tag
Key Usi
ng
the
Passcode
Unlocking
from
the
Inside
• Switching the Left/Right Handing
• Setting
the
Auto Lock Mode ·
• Volume Control
• Intruder Alarm
• Door-Closing
Error Alarm
•
Reset Function
• Master Function
• Troubleshooting Guide
• Product Specifications
• Contacting Sunnect
• Warranty, Registration, Additional Information
14
15
16
17
18
18
.......
19
....... 24
24
25
25
1
Page 3
2
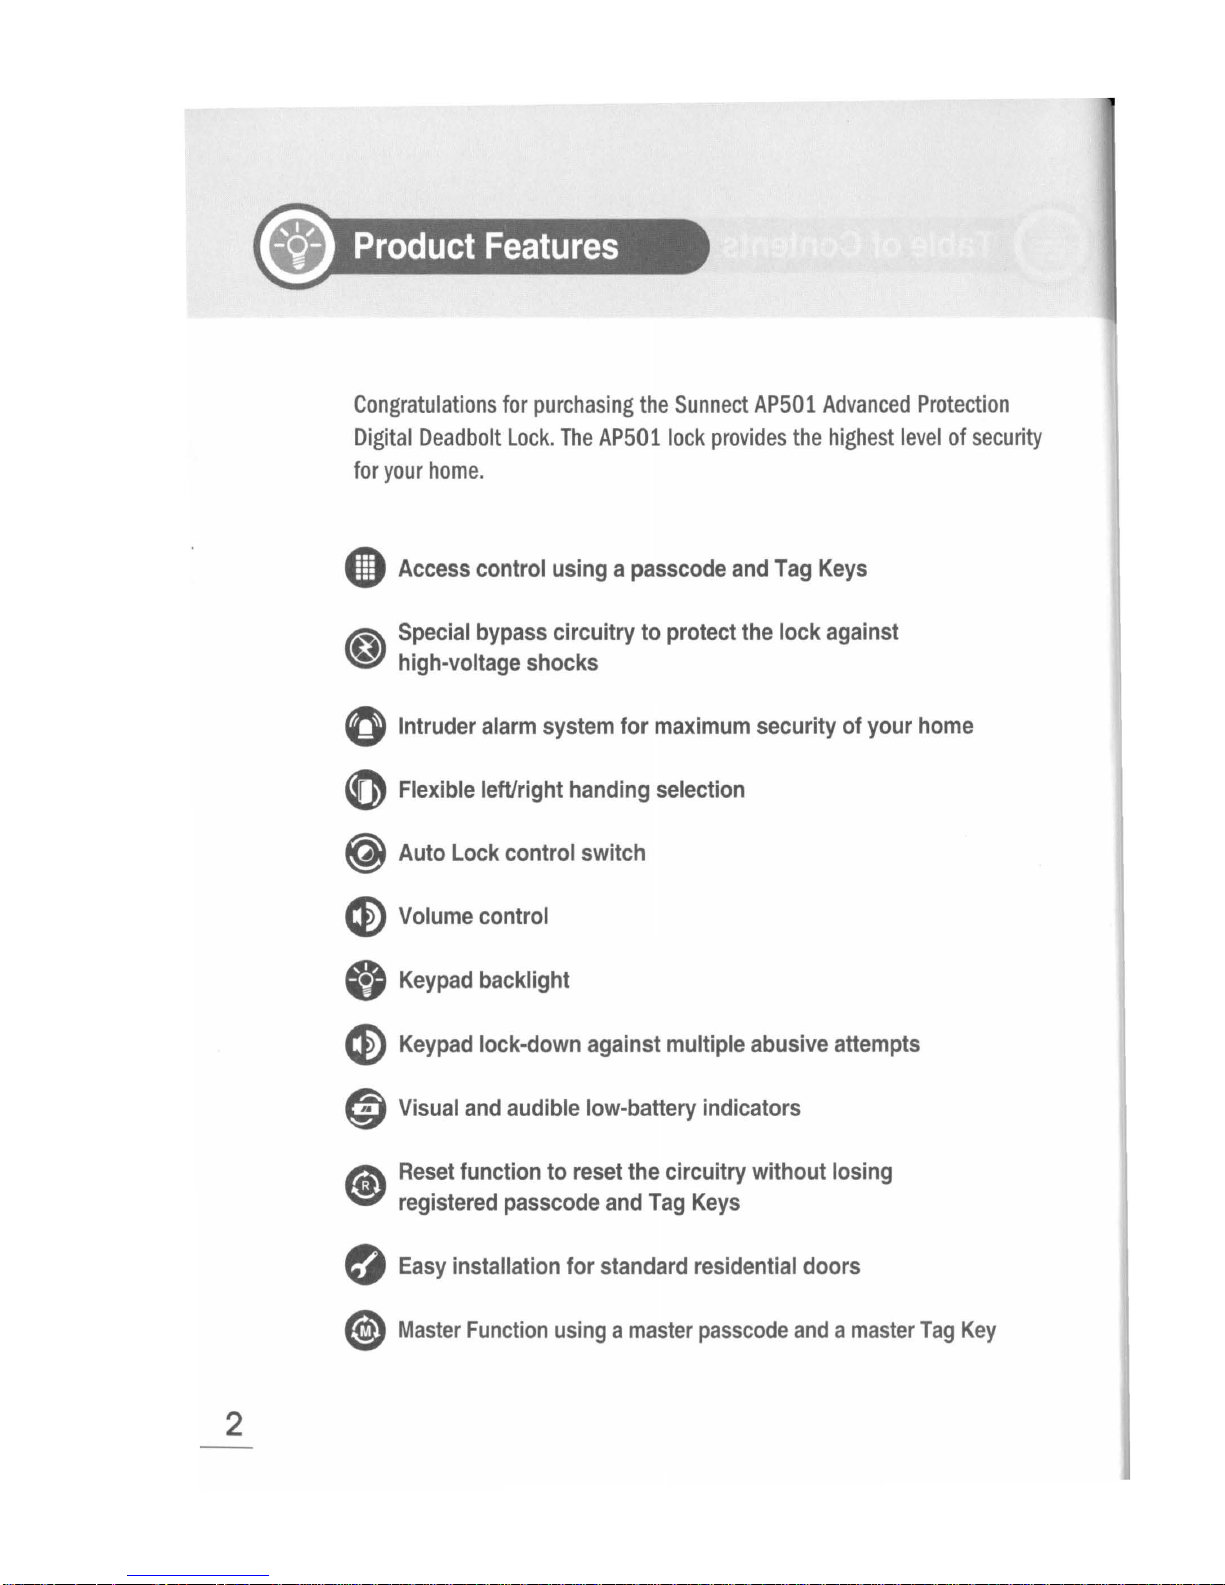
Congratulations
for
purchasing
the
Sunnect
AP501
Advanced
Protection
Digital
Deadbolt
Lock.
The
AP5011ock
provides
the
highest
level
of
security
for
your
home.
8 Access control using a passcode
and
Tag
Keys
IR\
Special
bypass circuitry to protect
the
lock against
~
high-voltage shocks
()
Intruder
alarm
system for
maximum
security of your
home
(})
Flexible leftlright handing selection
(@)
Auto Lock control switch
®
Volume
control
(0
Keypad
backlight
®
Keypad
lock-down against multiple abusive attempts
® Visual
and
audible low-battery indicators
~
Reset
function to
reset
the circuitry without losing
~
registered passcode
and
Tag
Keys
G
Easy
installation for standard residential doors
®
Master
Function
using a master
passcode
and a master
Tag
Key
Page 4
~
Important
Safeguards
{'(;/\
Do
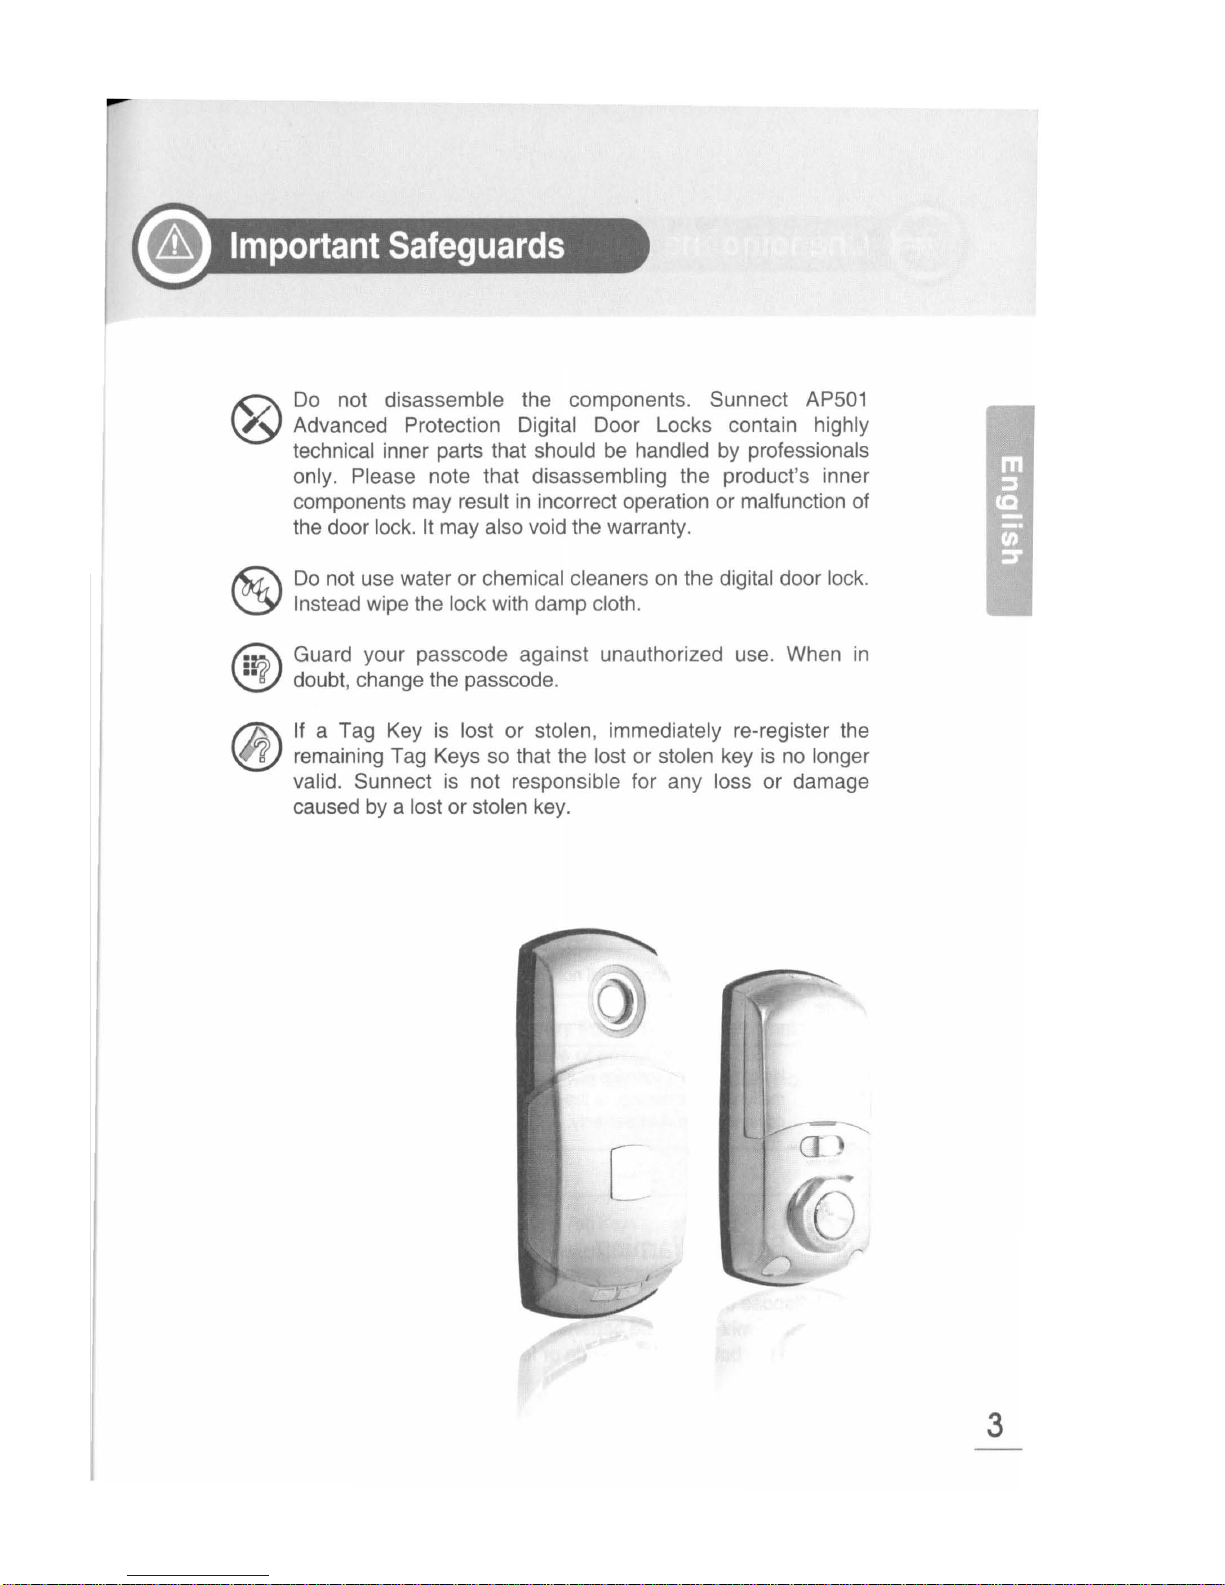
not disassemble the components. Sunnect AP501
\!:::>'
Advanced Protection Digital Door Locks contain highly
technical
inner parts that should
be
handled
by
professionals
only . Please note that disassembling the product's inner
components may
result in incorrect operation or malfunction of
the door
lock.
It
may also void the warranty.
&:\
Do
not
use
water or chemical cleaners
on
the digital door lock.
~
Instead wipe the lock with damp cloth.
~
Guard your passcode against unauthorized use. When
in
~
doubt, change the passcode.
I7:Ji:\
If
a Tag Key
is
lost or stolen, immediately re-register the
V{!) remaining Tag Keys so that the lost or stolen key
is
no
longer
valid.
Sunnect
is
not responsible for any loss or damage
caused
by
a lost or stolen key.
[
3
Page 5
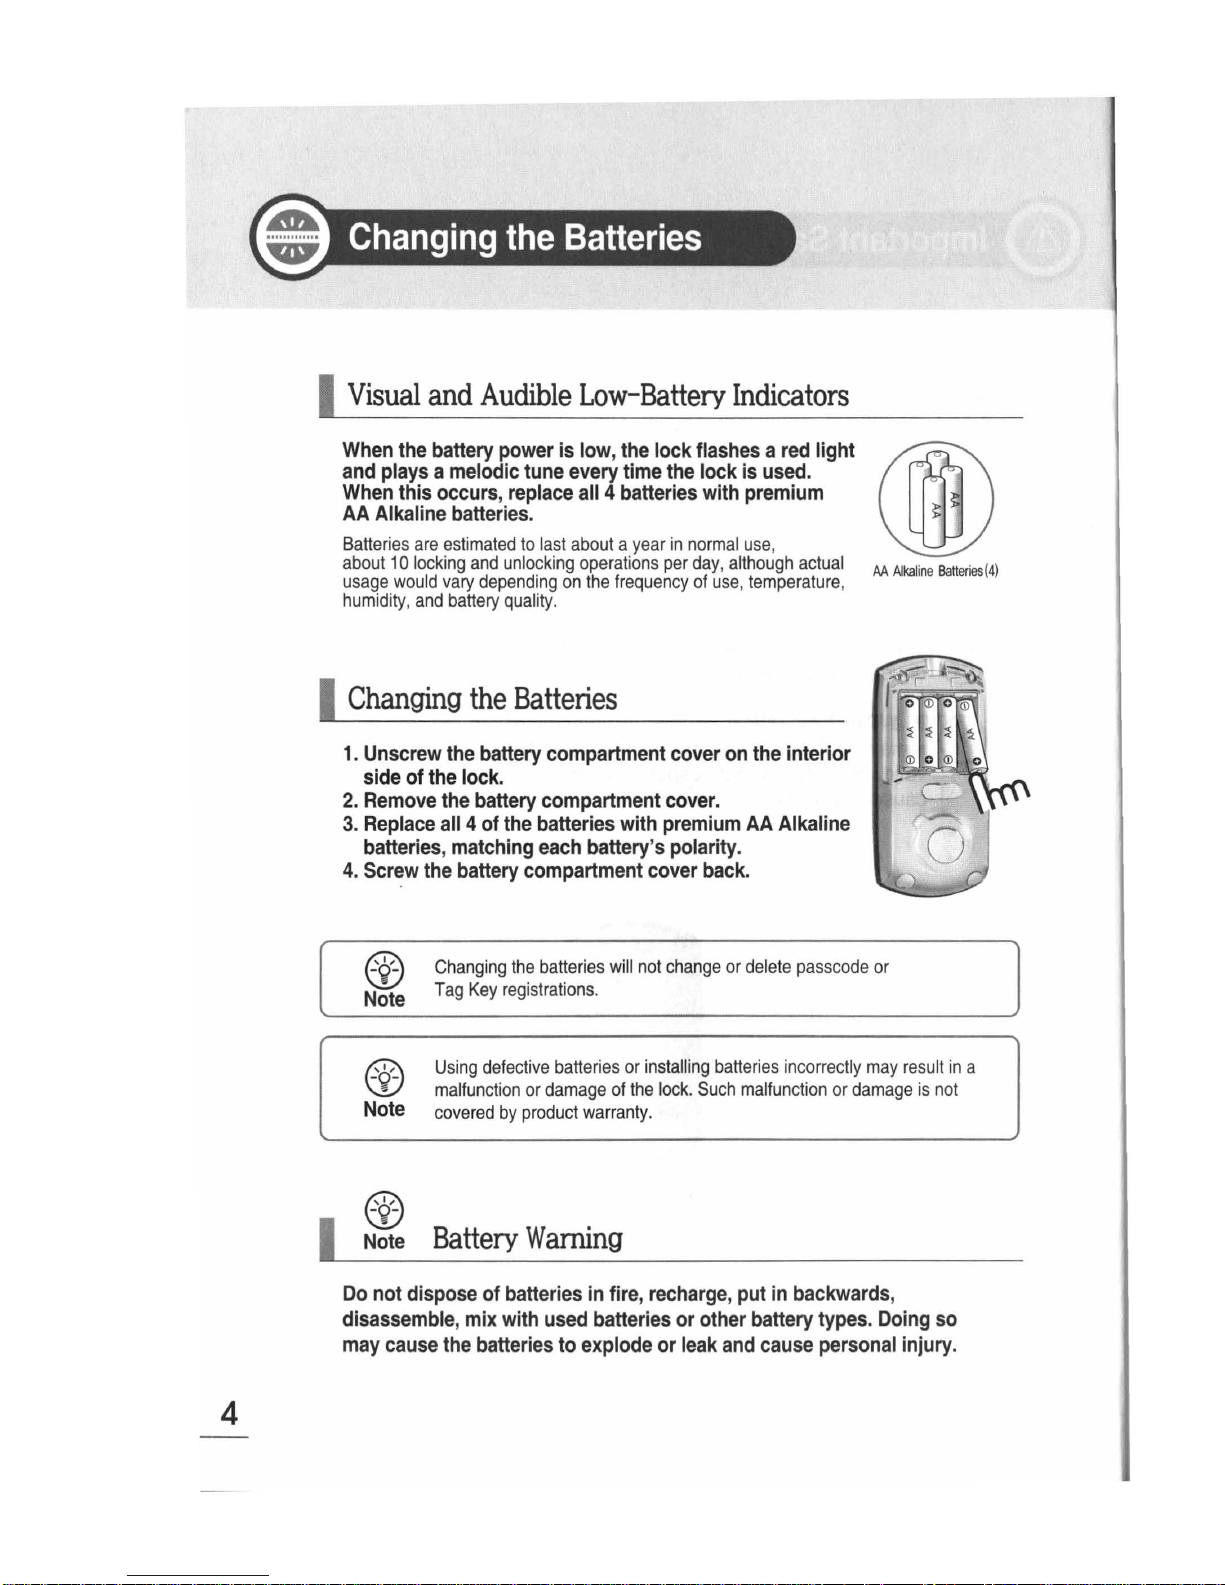
4
I
Visual
and
Audible
Low-Battery
Indicators
When
the
battery
power
is
low,
the
lock
flashes a red
light
and
plays a melodic
tune
every
time
the
lock
is
used.
When
this
occurs,
replace
all 4 batteries
with
premium
AA
Alkaline
batteries.
Batteries
are
estimated
to
last
about a year
in
normal
use
,
about
1 0
locking
and
unlocking
operations
per
day, although
actual
usage
would
vary
depending
on
the
frequency
of
use, temperature
,
humidity,
and
battery
quality.
I
Changing
the
Batteries
1.
Unscrew
the
battery
compartment
cover
on
the
interior
side
of
the
lock.
2.
Remove
the
battery
compartment
cover.
3.
Replace
all 4 of
the
batteries
with
premium
AA
Alkaline
batteries,
matching
each
battery's
polarity.
4.
Screw
the
battery
compartment
cover
back.
AA Alka
line
Batteri
es(
4)
60.
w
Note
Changing
the
batteries
will
not
change
or
delete
passcode
or
Tag
Key
registrations
.
60.
w
Note
60.
w
I
N~te
Using
defective
batteries
or
installing
batteries
incorrectly
may
result
in
a
malfunction
or
damage
of
the
lock. Such
malfunction
or
damage
is
not
covered
by
product
warranty
.
Battery
Warning
Do
not
dispose
of
batteries
in
fire,
recharge,
put
in
backwards,
disassemble,
mix
with
used
batteries
or
other
battery
types.
Doing
so
may
cause
the
batteries
to
explode
or
leak
and
cause
personal
injury.
Page 6
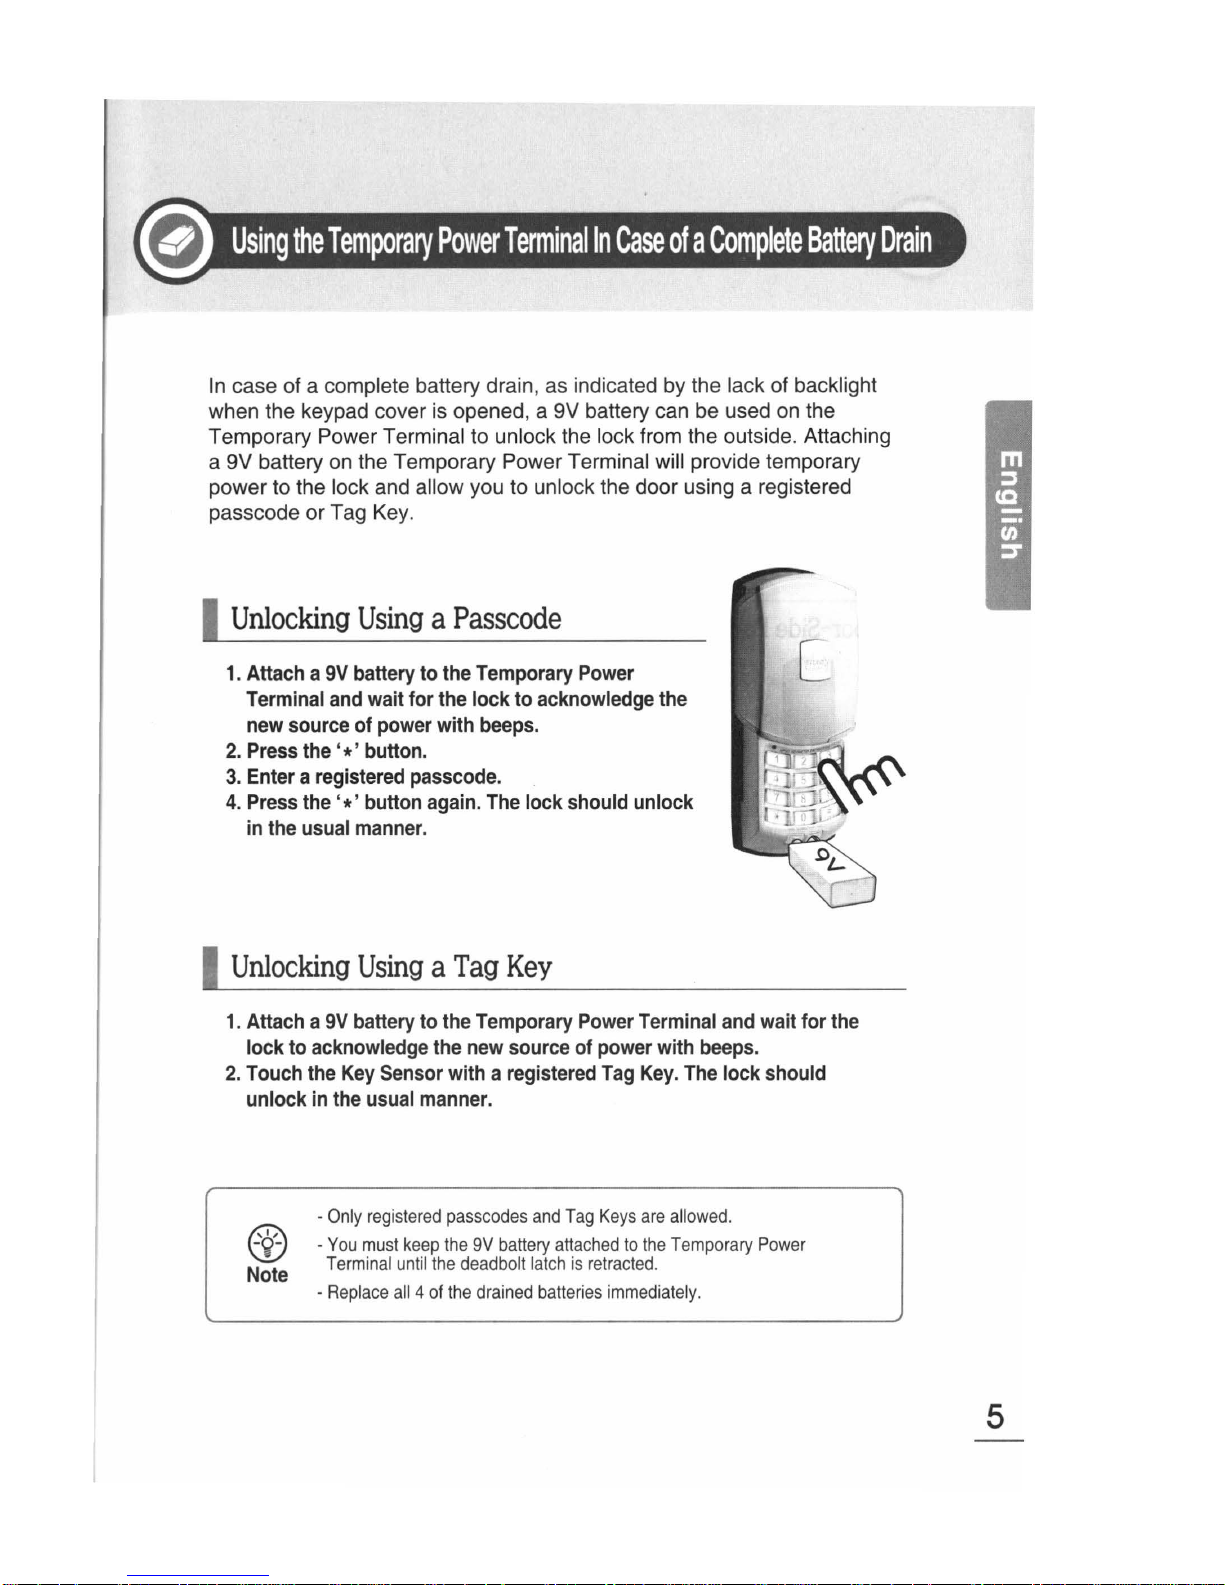
In
case of a complete battery drain, as indicated by the lack of backlight
when the keypad cover is opened, a 9V battery can be used
on
the
Temporary Power
Terminal to unlock the lock from the outside. Attaching
a 9V battery
on
the Temporary Power Terminal will provide temporary
power to the
lock and allow you to unlock the door using a registered
passcode or Tag Key.
I
Unlocking
Using a Passcode
1.
Attach a 9V
battery
to
the
Temporary
Power
Terminal
and
wait
for
the
lock
to
acknowledge
the
new
source
of
power
with
beeps.
2.
Press
the
'*'
button.
3.
Enter a registered
passcode.
4.
Press
the'*'
button
again.
The
lock
should
unlock
in
the
usual
manner.
I
Unlocking
Using a Tag
Key
1.
Attach a 9V
battery
to
the
Temporary
Power
Terminal
and
wait
for
the
lock
to
acknowledge
the
new
source
of
power
with
beeps.
2.
Touch
the
Key
Sensor
with a registered
Tag
Key.
The
lock
should
unlock
in
the
usual
manner.
a:c..
w
Note
-Only
registered
passcodes
and
Tag
Keys
are
allowed
.
-You
must
keep
the
9V
battery
attached
to
the
Temporary
Power
Terminal
until
the
deadbolt
latch
is
retracted
.
-
Replace
all 4 of
the
drained
batteries
immediately
.
5
Page 7
6
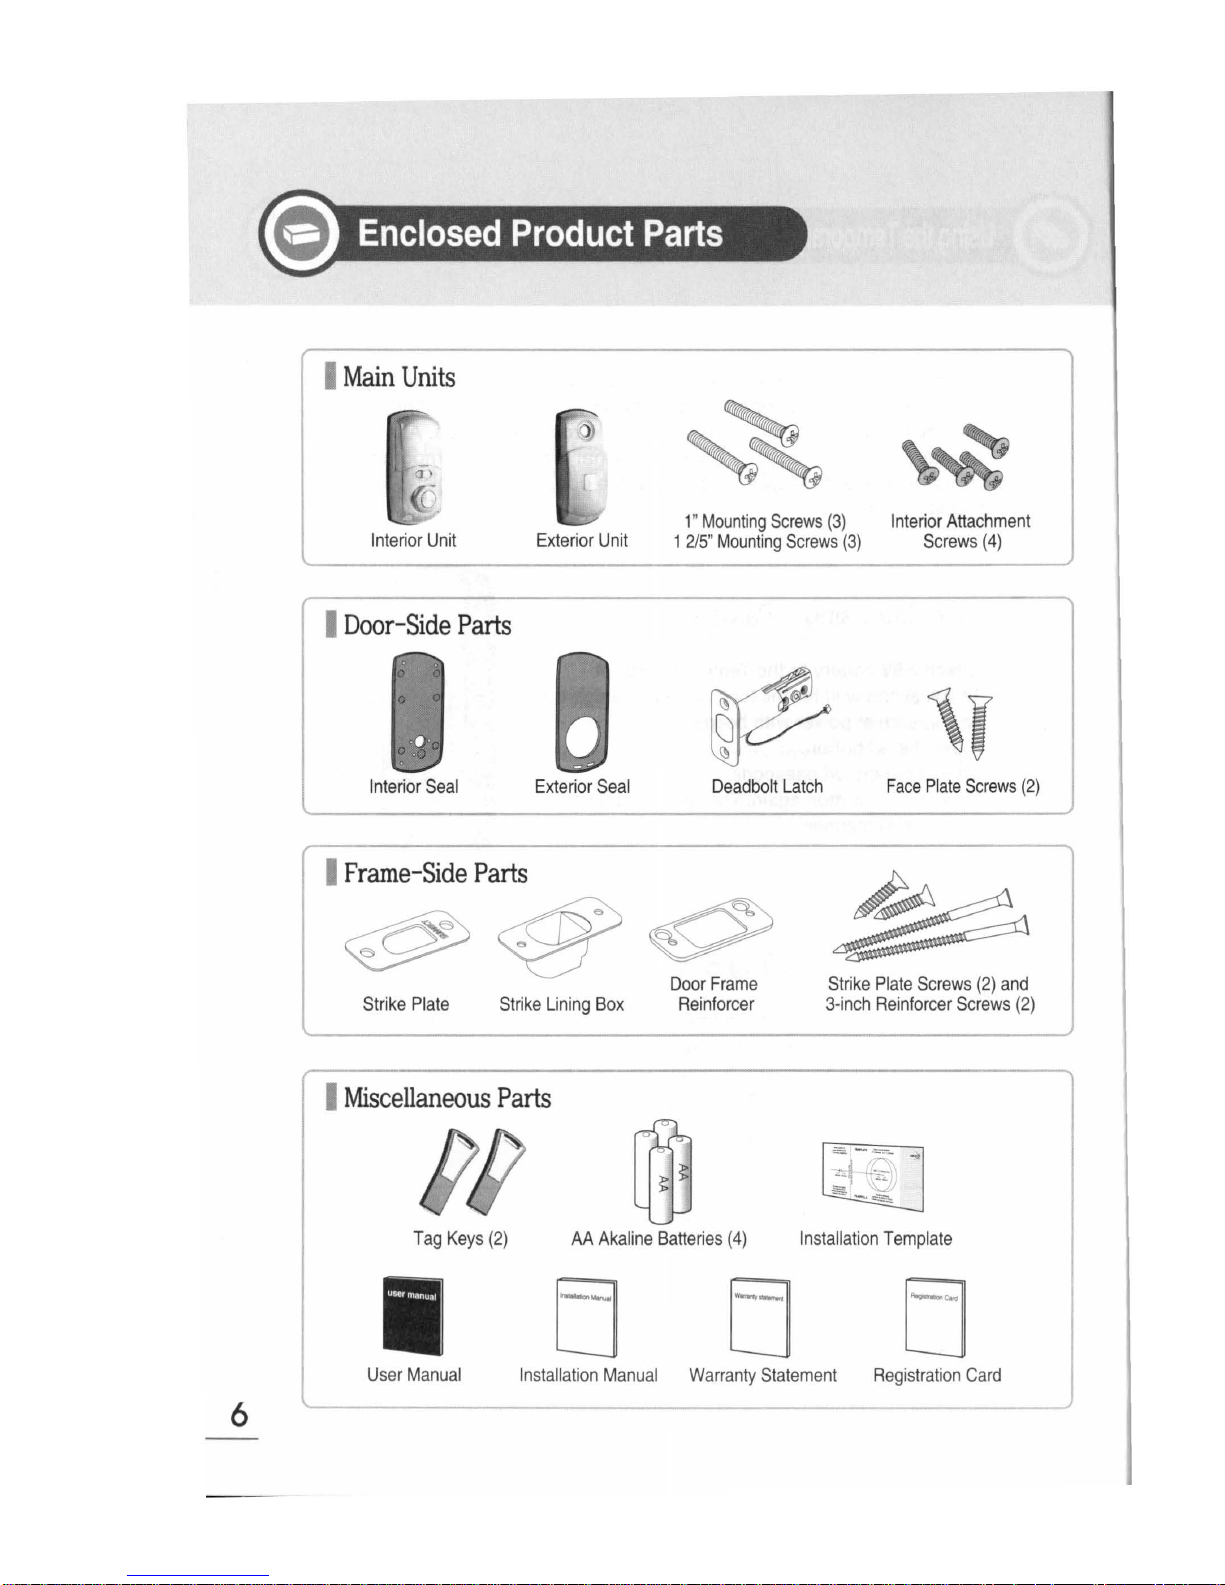
I
Main
Units
Interior
Unit
Exterior
Unit
I
Door-Side
Parts
Interior
Seal
Exterior
Seal
I
Frame-Side
Parts
1"
Mounting
Screws (3)
1 2/5"
Mounting
Screws
(3)
Deadbolt
Latch
Interior
Attachment
Screws (4)
,,
Face
Plate
Screws
(2)
~~~
Door
Frame
Strike
Plate
Screws
(2)
and
3-inch
Reinforcer
Screws
(2)
Strike
Plate
Strike
Lining
Box
Reinforcer
I
Miscellaneous
Parts
Tag
Keys
(2)
AA
Akaline
Batteries
(4)
Installation
Template
EJ EJ
Us
er
Manual
Installation
Manual
Warranty
Statement
Registration
Card
Page 8
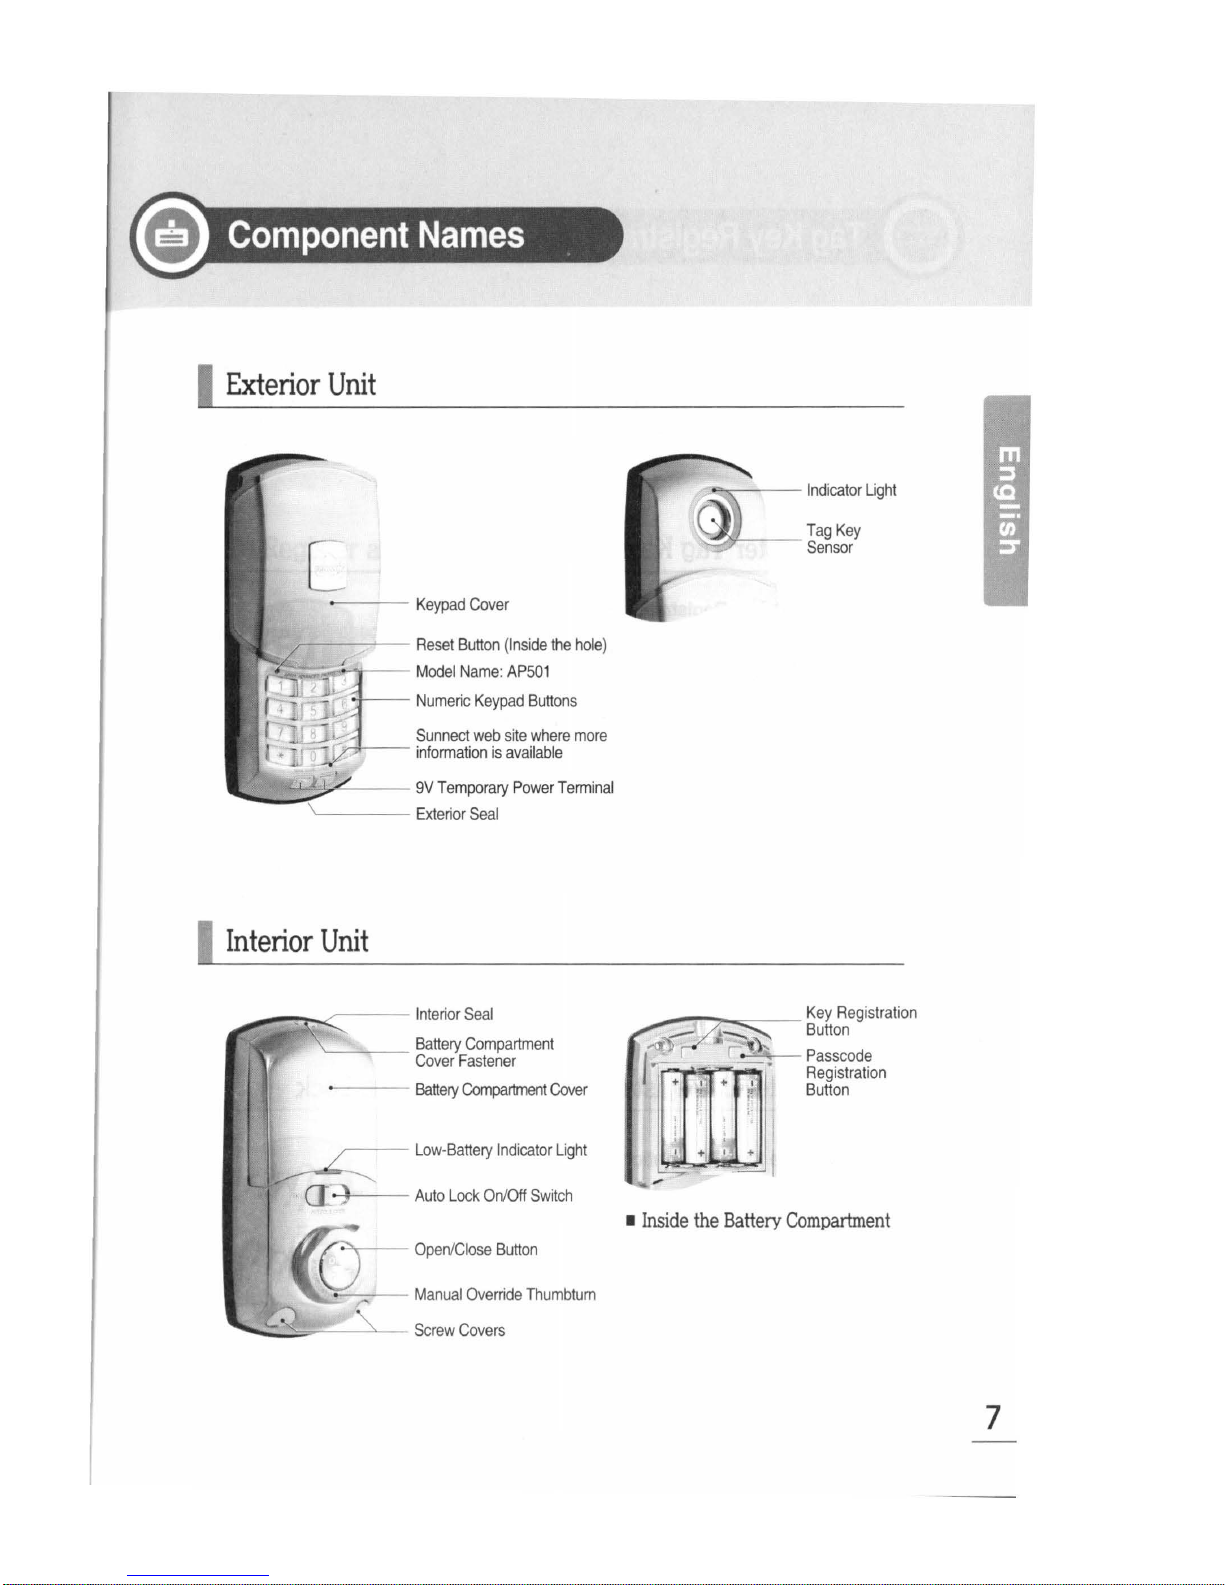
e
Component
Names
I
Exterior
Unit
[
-
---
Keypad
Cover
r---~
-
Reset
Button
(Inside
the
hole)
-"--~--
Model
Name:
AP501
Numeric
Keypad
Buttons
~~~,;_~::;7'
£._
___
9V
Temporary
Power
Terminal
'-------
Exterior
Seal
n
Interior
Unit
--~~""-<
c
___
Interior
Seal
'------
Battery
Compartment
Cover
Fastener
-
---
Battery
Compartment
Cover
Low-Battery
Indicator
Light
Open/Close
Button
---~...:::---
--
~~ho~egistration
Passcode
Registration
Button
1
Inside
the
Battery
Compartment
7
Page 9
8
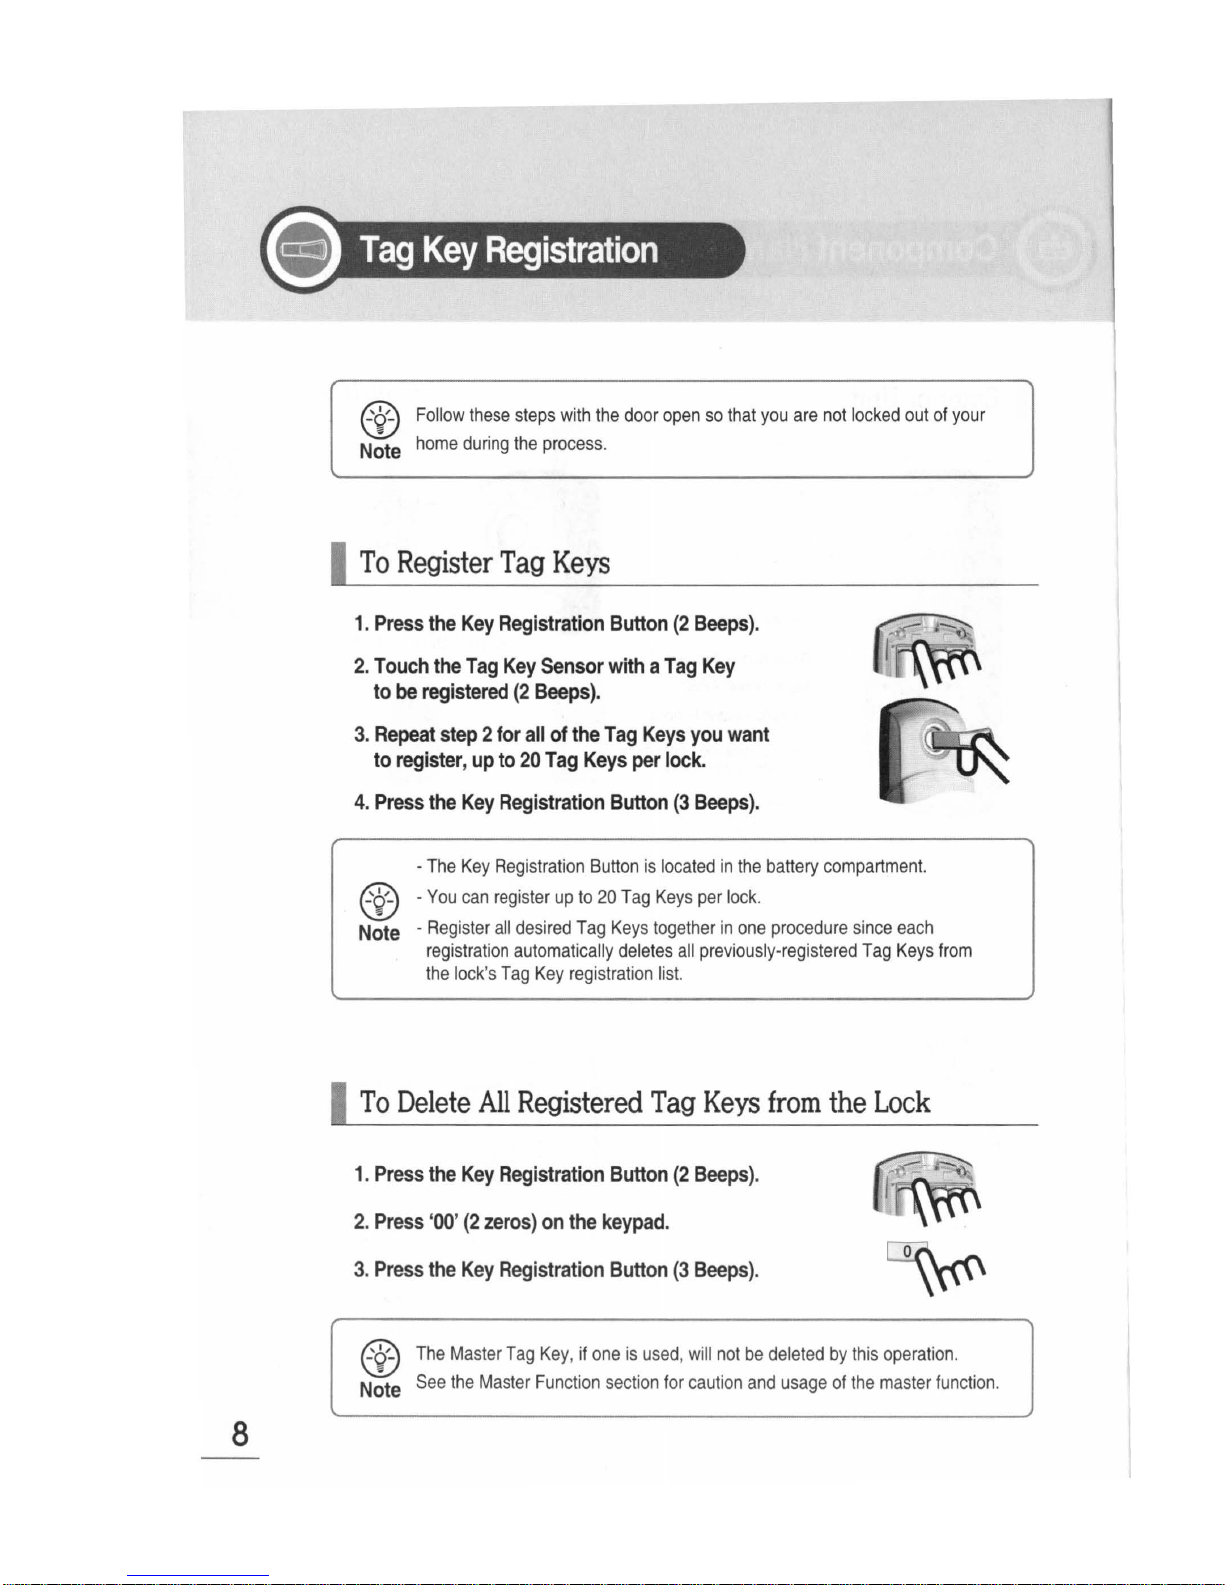
@
Follow
these
steps
with
the
door
open
so
that
you
are
not
locked
out
of
your
Note
home
during
the
process.
I
To
Register
Tag
Keys
1.
Press
the
Key
Registration
Button
(2
Beeps).
2.
Touch
the
Tag
Key
Sensor
with a Tag
Key
to
be
registered
(2
Beeps).
3.
Repeat
step 2 for
all
of
the
Tag
Keys
you
want
to
register, up
to
20
Tag
Keys
per
lock.
4.
Press
the
Key
Registration
Button
(3
Beeps).
-
The
Key
Registration
Button
is
located
in
the
battery
compartment.
@ -You
can
register
up
to
20
Tag
Keys
per
lock.
Note
-
Register
all
desired
Tag
Keys
together
in
one
procedure
since
each
registration
automatically
deletes
all
previously-registered
Tag
Keys
from
the
lock
's
Tag
Key
registration
list.
I
To
Delete
All
Registered
Tag
Keys
from
the
Lock
1.
Press
the
Key
Registration
Button
(2
Beeps).
2.
Press
'00'
(2
zeros)
on
the
keypad.
3.
Press
the
Key
Registration
Button
(3
Beeps)
.
~
l~l\~
@
The
Master
Tag
Key, if
one
is
used, will
not
be
deleted
by
this
operation.
Note
See
the
Master
Function
section
for
caution
and
usage
of
the
master
function
.
Page 10

@
Follow
these
steps
with
the
door
open
so
that
you
are
not
locked
out
of
your
Note
home
during
the
process.
I
To
Register a User
Passcode
1.
Press
the
Passcode
Registration
Button
(2
Beeps).
2.
Enter
the
desired
passcode
on
the
keypad
(3-20
Digits)
.
3.
Press
the
Passcode
Registration
Button
(3
Beeps).
@ -The
factory-set
default
passcode
is
"1234"
.
Note
-
The
Passcode
Registration
Button
is
located
in
the
Battery
Compartment
.
9
Page 11

10
M
Auto
Lock
Mode
When
the
Auto
lock
mode
is
turned
on
(recommended),
the
AP501
digital
door
lock
will
automatically
extend
the
dead
bolt
latch
within 2 seconds
after
the
door
is
closed.
If
the
Auto
lock
mode
is
turned
off,
the
lock
will
not
respond
to a door
closure.
ad
w
Note
ad
w
Note
If
you
do
not
open
the
door
within 6 seconds
after
entering a passcode
or
touching a Tag
Key, the
lock
will
automatically
reengage
the
deadbolt
latch.
The
Auto
Lock
mode
switch
is
located
in
the
center
of
the
interior
body
and
we
highly
recommend
you
keep
the
Auto
Lock
mode
turned
on
for
better
security, turning
it
off
only
on
those
days
when
you
want
to
leave
the
door
unlocked
to
accommodate
frequent
traffic
through
the
door.
Page 12

B
Manual
Locking
Mode
&::>-.
w
Note
T
he foll
owi
ng
proce
dur
es
are applicabl
e on
ly
when the Auto
Lock
mode
is
turn
ed off.
(See the Auto L
ock Mode
section for information
on
the
Au
to Lock
mode.)
1
From
Outside
-Slide the
Keypad
Cover
up
and
down.
-
Or
, if
the
Keypad
Cover
is
already up,
press
'0'
on
the
keypad.
1
From
Inside
-
Press
the
OPEN/CLOSE
Button
(Recommended).
-Or, turn
the
Manual
Override
thumbturn
so
that
the
arrow
points towards
the
strike
plate. (Not
recommended
for
normal
use.)
The
AP501
digital door lock
is
designed
to
work
optimally with
the
OPEN/CLOSE
button.
We
highly
recommend
using
the
OPEN/CLOSE
button
under
normal
circumstances
and
use
the
Manual
Override
thumbturn only
if
the
battery
power
is
completely
drained
or if
you
encounter
a
mechanical
malfunction with
the
OPEN/CLOSE
button.
11
Page 13

12
I
From
Outside
Using a Tag
Key
Touch
the tip of a
Tag
Key
to
the
Tag
Key
Sensor for
about
half a second.
I
From
Outside
Using a Passcode
•
When
the
Keypad
Cover
is
Closed
-Slide the
Keypad
Cover
up.
-
Enter
the passcode.
-
Slide the
Keypad
Cover
down.
•
When
the
Keypad
Cover
is
Already
Up
-
Press
'*'
to
activate the
Keypad
and
turn
on
the
Keypad
backlight.
-
Enter
the passcode.
-
Press
'*' or slide the
Keypad
Cover
down.
tSJC,
T
he AP501
digital
door
lock
will
lock
down the
Keypad
for 1 minute
if
an
W
incorrect
passcode
is
entered 3 times
in a row.
Wait
for 1 minute
and
enter
the
Note
correct
passcode
.
Page 14

I
Using
Extraneous
Digits
To
Enhance
Security
You
may
encounter a situation
where
you
have
to
enter
your
passcode
while
someone
may
be
close
enough
to
see
your
passcode
entry.
In
this
case,
you
can
enter
extraneous
digits
before
your
actual
passcode,
and
the
AP501
digital
door
lock
will
correctly
recognize
the
passcode
as
long
as
the
correct
passcode
is
entered
in
the
end.
For
example,
assuming
your
passcode
is
"12345"
you
can
enter
"57347983121512345
"
and
the
lock
will
recognize
the
passcode
of "12345" appended
to
the
extraneous
digits
"
573479831215" and
retract
the
deadbolt
latch. An
unauthorized
observer
would
not
know
how
many
digits
are
in
your
actual
passcode,
which
can
be
up
to
20
digits
long
,
and
would
have
to
try
to
memorize
all
the
digits
you
entered, 17
in
the
example
above.
@
If
you
suspect
that
an
unauthorized
observer
has
learned
your
passcode,
Note
immediately
change
your
passcode
to
prevent
unauthorized
entry.
I
From
Inside
Using
the
OPEN/CLOSE
Button
Press
the
OPEN/CLOSE
Button.
This
is
the
recommended
way
to
unlock
the
lock
from
inside.
I
From
Inside
Using
the
Manual
Override
Thumbtum
Turn
the
Manual
Override
Thumbturn
so
that
the
arrow
points
away
from
the
strike
plate.
(Not
recommended
for
normal
use.)
@
-
-
Note
The
AP501
digital
door
lock
is
designed
to
work
optimally
with
the
OPEN/CLOSE
button. We
highly
recommend
using
the
OPEN/CLOSE
button
under
normal
circumstances
and
use
the
Manual
Override
thumbturn
only
if
the
battery
power
is
completely
drained
or
if
you
encounter a mechanical
malfunction
with
the
OPEN/CLOSE
button
.
13
Page 15

14
It
is
important
to
set
the
handing
of
the
door
lock
correctly.
If
set
incorrectly,
the
door
lock
would
extend
the
deadbolt
latch
when
it
should
retract, and
vice
versa, such
that
the
door
lock
would
unlock
when
it
should
lock
and
lock
when
it
should
unlock
.
Refer
to
the
diagram
below
to
determine
the
handing
of
your
door.
The
simple
rule
is
that
if
the
door
hinge
is
on
your
left
as
you
enter
the
house
from
the
outside, then
the
door
is
left-handed.
It
is
right-handed
if
the
door
hinge
is
on
your
right
as
you
enter.
You
set
the
handing
of
the
lock
after
the
lock
is
installed
on
the
door.
You
can
change
the
handing
if
you
move
the
lock
to a different
door
with
different
handing.
0
Setting
the
Lock
to
Left
Handing
1.
Press
the
OPEN/CLOSE
Button
for 5 seconds
(2
Beeps).
2.
Press
'7'
on
the
Keypad.
3.
Press
'*'
on
the
Keypad
(3
Beeps).
n
Setting
the
Lock
to
Right
Handing
1.
Press
the
OPEN/CLOSE
Button
for 5 seconds
(2
Beeps).
2.
Press
'8'
on
the
Keypad.
3.
Press
'*'
on
the
Keypad
(3
Beeps).
Right-Hand
ed Door
Left-Handed
Door
II
the
hinge
is
on
the
right-
hand
side
,
the
door
is
right-handed.
Outside
@
The
default
factory
Note
setting
is Left
handing.
Page 16

~
Setting the Auto Lock
Mode
The Auto Lock feature is very convenient in that it ensures that your door
is locked every time you close it. You do not need
to
worry about whether
you
left your door locked or unlocked.
The
AP501
will lock the door
for
you. In order
for
this Auto Lock feature to work , the Auto Lock mode
must
be on.
The Auto Lock mode is turned on when the switch is set
to
ON
and it is
turned off when the switch is set
to
OFF.
Test the setting by closing the
door and checking the door
lock's response. If the Auto Lock mode is
turned on, the door
lock should lock within 2 seconds after the door is
closed.
15
Page 17

16
1.
Press
the
OPEN/CLOSE
Button
for 5 seconds
(2
Beeps).
2.
Press
one
(and
only
one)
of
the
following
digits
on
the
Keypad
according
to
your
desired
volume
level:
'1'
to
turn
off
sound
completely.
'2'
to
set
the
volume
to
Low.
'3'
to
set
the
volume
to
Medium.
'4'
to
set
the
volume
to
High.
3.
Press
'*'
on
the
Keypad
(3
Beeps).
rs;:c..
w
Note
@
-
.
Note
Even
if
the
volume
is
set
to
Off
('1'
in
step 2 of
the
procedure
above
),
intruder
alarm, low-battery
indicator, and
error
alarm
will
sound
normally.
(
The
intruder
alarm
can
be
turned
off
separately. See
the
Intrud
er
Alarm
section
for
the
procedure
.)
The
default
factory
setting
is
Medium
.
Page 18

~
Intruder
Alarm
A
forced
entry, opening
the
door whi
le
the
door
lock
is
locked
, wi
ll
set
off
the
intruder
alarm. Once
the
intruder
alarm
is
set
off, you
can
stop
the
alarm
by
entering a valid
passcode
or
touching a registered
Tag
Key
to
the
Tag
Key
sensor
.
You
can
activate
or
deactivate
this
intruder
alarm
function
using
the foll
owing
procedure.
a
Activating
the
Intruder
Alarm
1.
Press
the
OPEN/CLOSE
Button
for 5 seconds
(2
Beeps).
2.
Press '9'
on
the
Keypad.
3.
Press'*'
(3
Beeps).
~
Deactivating
the
Intruder
Alann
1.
Press
the
OPEN/CLOSE
Button
for 5 seconds
(2
Beeps)
.
2.
Press
'0'
on
the
Keypad
.
3.
Press
'*'
(3
Beeps).
17
Page 19

18
In case the door lock could not fully extend the dead bolt
latch
during its locking process, either because the door
was
closed with the dead bolt latch already extended
or
because the door was not fully closed, the
door
lock will
retract the dead bolt latch and reattempt
to
extend it. If it
still fails
to
fully extend the deadbolt latch,
it
will indicate
a
door-closing error with visual (red light) and audible
alarm.
To reset the door-closing error alarm, press the
OPEN/CLOSE button. Investigate the cause
of
the alarm
and make corrections.
The
AP501
digital
door
lock
's
internal
circuitry
can
be
reset
with
the
Reset
button
.
By
resetting
the
circuitry, you
are
effectively
restarting
the
software
that
controls
the
lock. Using
the
Reset
button
will
not
cause
any
change
or
deletion
to
the
passcode
or
Tag
Key
registrations
stored
in
the
door
lock
.
R
To
Reset
Press the Reset button once using a pin. The Reset
button is
located inside the small hole in the
upper-left corner of the Keypad.
Page 20

~
Master
Function
n
Introduction
The master function allows you to keep a passcode and a Tag Key as the
master passcode and master Tag Key that cannot be deleted or changed
without the master passcode. This
is
extremely useful
in
those situations
where a manager must manage multiple
AP501 door locks. For instance,
an
apartment management company may use the master passcode to ensure
entry into each apartment while allowing the tenants to register their own
"User" passcodes and Tag Keys.
In
this case, the tenants' passcodes and Tag
Keys would
be
called User passcodes and User Tag Keys while the
management's would
be
called master passcode and master Tag Key.
Your
AP501 Advanced Protection digital door lock
is
manufactured with the
parts and software required for the master function but the master function
is
initially deactivated.
In
ordinary residential use, we do not recommend using
the master function for the inherent risk of losing the master passcode and
master Tag Key.
In
fact, if you use the master function and forget the master
passcode, there
is
no
way to uncover the missing master passcode. (On the
other hand, if you lose a master Tag Key, you can register a new master Tag
Key using the master passcode .)
To activate
th
e master function on your
AP501
door lock, you can refer
to
Activating the Master Function section below. Please keep
in
mind that
in
ordinary residential use, you get all of the benefits of AP501 without ever
needing the master function. The master function is mainly for those situations
with multiple
AP501 installations to manage.
19
Page 21

20
Detennining
Whether
the
Master
Function
is
Activated
On
Your
APSOl
There
is a simple
way
to
find
out
whether
your
AP501
door
lock
has
its
master
function
activated
or
not.
First, open
the
Keypad
Cover
and
wait
until
the
keypad
backlight is
turned
off
(4
to
5
seconds), and
press "#777#".
If
you
hear a melodic
tune,
then
the
master
function
is
activated
on
your
AP501
door
lock
.
If
you
do
not
hear
any
tune, then
open
the
Keypad
Cover
(make
sure
to
wait
until
the
backlight
is
turned
off)
and
press "#555#
".
If
you
hear a melodic
tune, then
the
master
function
is
deactivated
on
your
AP501
door
lock
.
If
you
do
not
hear
any
tune
with
either
seq
uences, then
try
again
making
sure
you
enter
the
sequences
correctly.
One
of
the
two
sequences
must
produce a tune
.
I
Activating
the
Master
Function
A cAUTION
Please
read
the
entire
Master
Function
section
and
thoroughly
understand
the
ramifications
of
using
the
master
function
on
your
door
lock
before
you
decide
to
activate
the
master
function
on
your
AP501
door
lock.
If
you
activate
the
master
function
and
forget
the
master
passcode, there
is
no
way
to
uncover
the
master
passcode
or
deactivate
the
master
function. If
this
happens
to
you, please
refer
to
the
If
the
Master
Passcode
Is
Lost
section.
®
-
-
Note
Before
you
can
activate
the
master
function, you
must
first
set
or
change
the
master
passcode.
If
you
have
never changed
the
master
passcode, the
factory
default
setting
is '
1111
'.
Please
refer
to
the
Registering a Master
Passcode
section
for
the
procedure.
Once
you
activate
the
master
function, it
cannot
be
deactivated
without
the
master
passcode.
Keep
the
master
passcode
in a secure
place
.
1.
Press
the
OPEN/CLOSE
Button
for 5 seconds
(2
Beeps).
2.
Press
'5'
on
the
keypad.
3.
Press
'*'
on
the
keypad.
4.
Enter
the
current
master
passcode.
5.
Press
'*'
on
the
keypad.
[-;:c,
If
the
master
passcode
you
enter
in
step 4 above
matches
the current
master
~
passcode
stored
in
your
lock, the
master
function
is
activated
.
Page 22

I
Dea
ctivating
the
Master
Function
B
1.
Pre
ss
the
OPEN/CLOSE
Button
for 5 seconds
(2
Beeps).
ss '6'
on
the
keypad.
2.
Pre
3.
Pre
4.
Ent
5.
Pre
'I,
-~
Not
'I,
-~
Not
Reg
~9'
ss
'*'
on
the
keypad.
er
the
current
master
passcode.
ss
'*'
on
the
keypad.
e
e
If
the
master
passcode
you
enter
in
step 4 above
matches
the
current
master
passcode
stored
in
your
lock, the
master
function
is
deactivated.
Once
the
master
function
is
deactivated, the
master
passcode
is
reverted
to
the
factory
setting
of '1111' and
any
master
Tag
Key
registration
is
deleted.
If
you
decide
to
activate
the
master
function
in
the
future, you
must
first
change
this
default
master
passcode
of '1111' to
another
passcode.
istering a Master
Tag
Key
-
Previously-registered
master
Tag
Key
will
automatically
be
deleted
as
you
register a new
master
Tag
Key.
Not
e
-Only
one
master
Tag
Key
can
be
registered
per
lock.
1.
Pre
ss
the
Key
Registration
Button
(2
Beeps).
2.
Pre
ss
the
'#'
sign
on
the
keypad
(2
Beeps).
Pressing
the
'#'
alerts
the
r
lock
you
are
registering a master
Tag
Key.
doo
3.
Ent
er
the
current
master
passcode
(3-20
Digits)
in
order
to
authenticate
r
right
to
register a master
Tag
Key.
you
4.
Pre
ss
the
'*'
sign
on
the
keypad
(3
Beeps)
to
indicate
the
end
of
the
ster
passcode.
rna
5.
Tou
ch
the
new
master
Tag
Key
on
the
Tag
Key
Sensor
(2
Beeps).
y 1
master
Tag
Key
can
be
registered
per
lock.
On
I
6.
Pre
ss
the
Key
Registration
Button
(4
Beeps)
21
Page 23

22
~
Registering a Master
Passcode
@
Perfo
rm
the
following
procedure wi
th t
he door open
so
that
you
are
not
-
Note
locked out of your home
duri
ng
the p
rocess
.
@
M
ake sur
e to
test th
at a valid master passco
de
is
regist
ered before
cl
osi
ng
the door. You
can
test
it
by pressi
ng the
OPEN/CLOSE
button
to
-
Note
exten
d the deadbolt
latch and
ent
eri
ng the master passco
de
to retract
the deadbo
lt
lat
ch.
1.
Press
the
Passcode
Registration Button
(2
Beeps).
2.
Press
the
'#' sign
on
the
keypad
(2
Beeps).
Pressing the '#' alerts
the
door lock
you
are
registering a
master
passcode.
3.
Enter the current master passcode
(3-20
Digits)
in
order to authenticate
your right
to
register a master passcode.
4.
Press
the
'*' sign
on
the
keypad
(3
Beeps)
to indicate the
end
of
the
master
passcode.
5. Enter
the
new
desired master passcode (3-20 Digits).
6.
Press
the '*' sign
on
the
keypad
(3
Beeps)
to indicate the
end
of
the
master
passcode.
7. Enter
the
new
desired master passcode
again
for
confirmation
(3-20 Digits).
8.
Press
the
Passcode
Registration Button
(4
Beeps).
~
Unlocking
Using a Master
Passcode
or a Master
Tag
Key
Unlocking
the
AP501
door lock using a master passcode or a master
Tag
Key
is
identical
to
unlocking using a user passcode or a user
Tag
Key.
Please
refer to
the
Unlocking section for
the
corresponding procedures.
Q
Effect
of
the
Master
Function
on
User
Passcode
and
User
Tag
Keys
Activating
the
master function
and
reg
istering a master passcode or
master
Tag
Key
do not
have
any
effect
on
the user passcode
and
user
Tag
Keys.
The
user passcode
and
user
Tag
Keys
are
registered
and
used
in
the
same
manner
as
if the master function
is
not activated.
Page 24

" If
the
Master
Passcode
is
Lost
If
you
have
activated
the
master
function
on
your
AP501
digital door
lock
but
you
have
forgotten
the
master
passcode, the
re
is
no
way
to
uncover
the
lost
passcode
or
deactivate
the
master
function.
This
is
done
by
design
to
ensure
the
security
of
your
AP501
door
lock.
The
only
way
to
reset
the
master
function
of
an
AP501
door lock withou
t
the
correct
master
passcode
is
to
detach
it
from
the
door
and
ship
it
to
Sunnect
for
the
resetting
service.
This
service
is
not
covered
by
product
warranty
and
there
will
be a fee
charged
for
this
service.
Before
you
ship
your
door
lock, please
contact
Sunnect
to arr
ange
for
the
service
and
for
a
service
case
number.
&c.
w
Note
Even
if
you
have
forgotten the
master
passcode, the AP501
door
lock
functions
correctly
using
the
user
passcode
and
user
Tag
Keys. As
long
as
you
are
certain
that
no
one
else
has
the
forgotten
master
passcode
or
the
master
Tag
Key, you have
the
option
of
continuing
to
use
the AP501
door
lock
with
the
user
passcode
and
user
Tag
Keys.
Registering
and
using a user
passcode
and
user
Tag
Keys
do
not
require
the
master
passcode.
[
23
Page 25

24
Symptoms
•
The
door
lock
stops
working
all
of a sudden.
•
It
makes
beeping
noises
during
normal
operation.
•
The
door
lock
plays
a
melodic
tune
during
any
operation
or
there
is
a
delay
before
locking
or
unlocking.
Possible
Causes
-
Low
battery
power
or
a
complete
battery
drain.
-Temporary
circuit
overload
.
-
Low
battery
--------------
------------------
•
The
door
lock
does
not
lock
automatically
when
the
door
is
closed.
-
The
Auto
Lock
switch
is
setto'Off'.
-
Improper
installation
of
the
Deadbolt
and
the
Auto
Lock
Sensor
Magnet
in
the
Strike
Lining
Box
.
e One-inch Throwbolt for maximum security
ePasscode:
3 to
20
digits
eMaximum number of Tag Keys supported: 20
eOperating temperature range: -5° to 130° F
ePower: 6V
(4
AA batteries included)
• Estimated Battery Life: Approx . 1 year
Possible
Solutions
-
In
case
of
low
battery
power
,
replace
all 4 batteries.
-
Press
the
Reset
button
.
-
If
outside
the
house
,
use a 9V
battery
with
the
Temporary
power
terminal.
-
Replace
all 4 batteries
-
Make
sure
the
Auto
Lock
switch
is
set
to 'ON
'.
-
Make
sure
the
Door
Lock
is
installed
properly
.
eEmergency Power: 9V battery (not included) applied to the Exterior unit
eDoor thickness range: 1 %"- 2"
eBackset range: 2 %" - 2 %"
• Interior unit dimensions
(H
x W x
D):
6
'14'
x 4" x 1
'12''
e Exterior unit dimensions
(H
x W x D): 5 %" x 3" x 1
'Ia"
Page 26

\.By
Phone:
As part of our effort to best serve our customers, we try
to respond
promptly to all forms of contact from our
customers, distributors, and
potential customers .
We
look forward to hearing from you.
1-877 -
DOORLOK
( 1-877-366-7565)
jgJ
By
Mail:
PO
Box
1501
Lorton,
Virginia
22199-1501
Q
By
Email:
Installation
and
Technical
Support: support@sunnectlock.com
Warranty
Service
and
General
Inquiries:
service@sunnectlock.com
Sales
and
Distributor
Support:
sales@sunnectlock.com
In
all
written
communication
(mail,
email), please
include
your
name, address, and
phone
number
as
well
as
your
lock
's
serial
number
if
you
have
one
.
Optionally, please
include
your
email
address, your
lock
purchase
date
and
location
.
@mil
f!i!M
M@!tlll[.].flii·M@
i.lif!IMI·li·
·!II
~·ll•
Please refer to the separate Warranty Statement card and the Product
Registration card for
detail information on the warranty policy and the
product registration process.
You may also obtain more information
about the product,
download all manuals, or request warranty service by
visiting www.Sunnectlock.com.
·
25
Page 27

Please
refer
to
the
User
Manual
for
proper
installation
and
operation
of
the
lock
and
proper
handling
of
batteries
.
Images
on
the
box
are
for
illustrative
purposes
only
and
the
actual
product's
finish
may
vary
from
the
images.
Product
specifications
and
other
information
on
this
packaging
are
subject
to
change
without
prior
notice.
Sunnect
makes no
commitments
regarding
the
accuracy
of
translation
into
languages
other
than
English
.
~~
~
UkAS
ISO 9001/14001
~;;:"
Por
favor
acuda
al
Manual
del
Usuario
para
Ia
instalaci6n y operaci6n
apropiadas
de
Ia
cerradura y para
el
manejo
apropiado
de
las
baterfas
.
Las
figuras
en
Ia
caja
son
unicamente
con
fines
ilustrativos y el
terminado
real
del
producto
puede
diferir
un
poco
del
original.
Las
especificaciones
de
producto y demas
informacion
contenidas
en
este
paquete
estan
sujetas a cambios
sin
previa
aviso.
Sunnect
no
garantiza
Ia
exactitud
de
Ia
traducci6n a otros
idiomas a excepcion
de
Ia
traducci6n
al
ingles.
SUN'JEC
Sunnect,
Inc.
P.
0.
Box
1501,
Lorton, VIrginia
22199·1501
1·877-DOORLOK
(366·7565)
www.Sunnectlock.com
Designed
in
Fairfax, Virginia. Manufactured
in
Korea
. U.S.
Pat
ent
Pending
.
"
Sunnect
", "Security. It's
worth
it.",
and "AP501" are
tra
demarks
of
Sunnect, Inc
.
Copyright
© 2008
Sunnect, Inc.
All
rights
reserved.
 Loading...