

Page 1
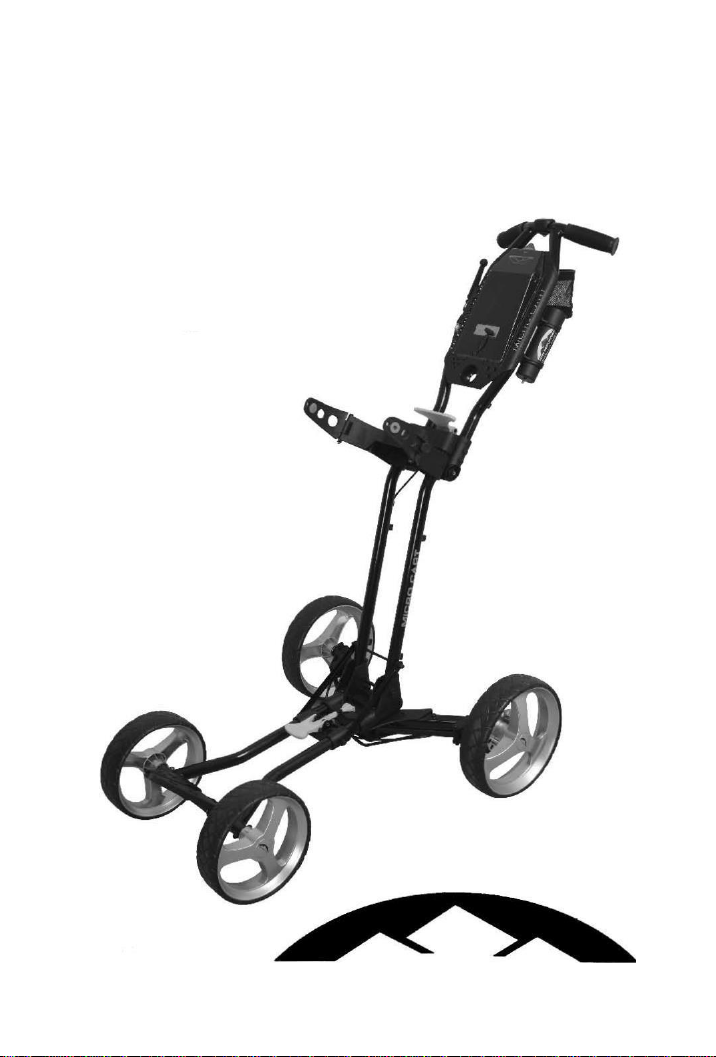
MC3™
User's Guide
To take full advantage
of the ergonomic features
of your new Sun
Mountain MC3, please
read the following
information.
SUN MOUNTAIN
®
Page 2
•
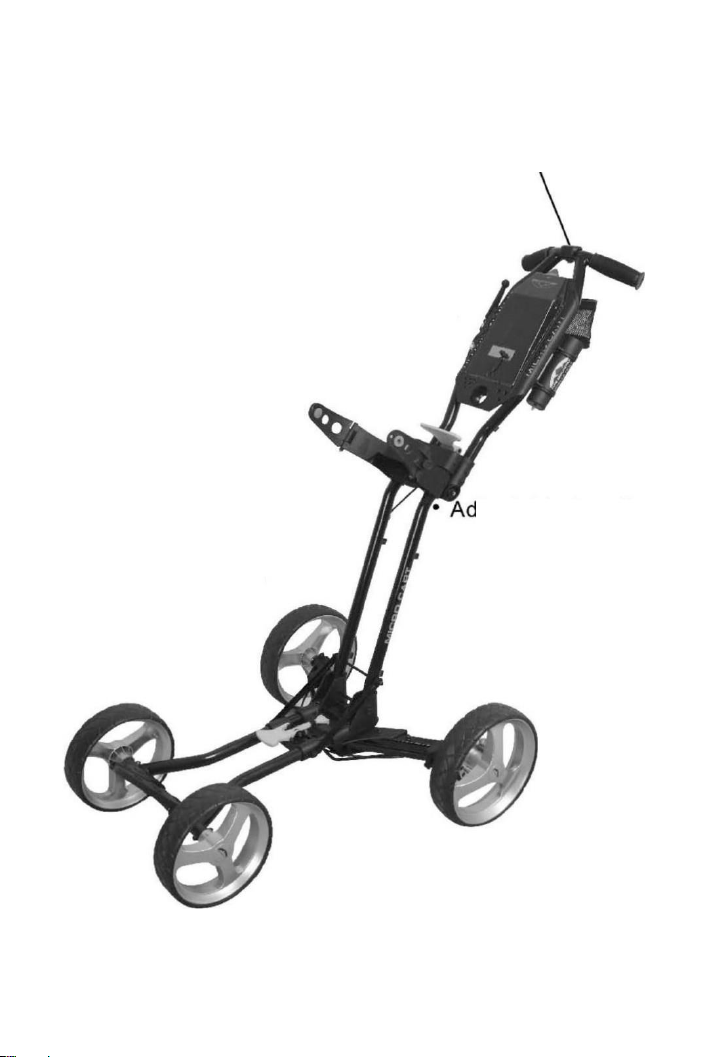
Console tray includes
a padded valuables
tray and magnetic
score card holder .
•
Lightweight
aluminum frame.
•
Umbrella holder mount.
justable handle.
Page 3
2
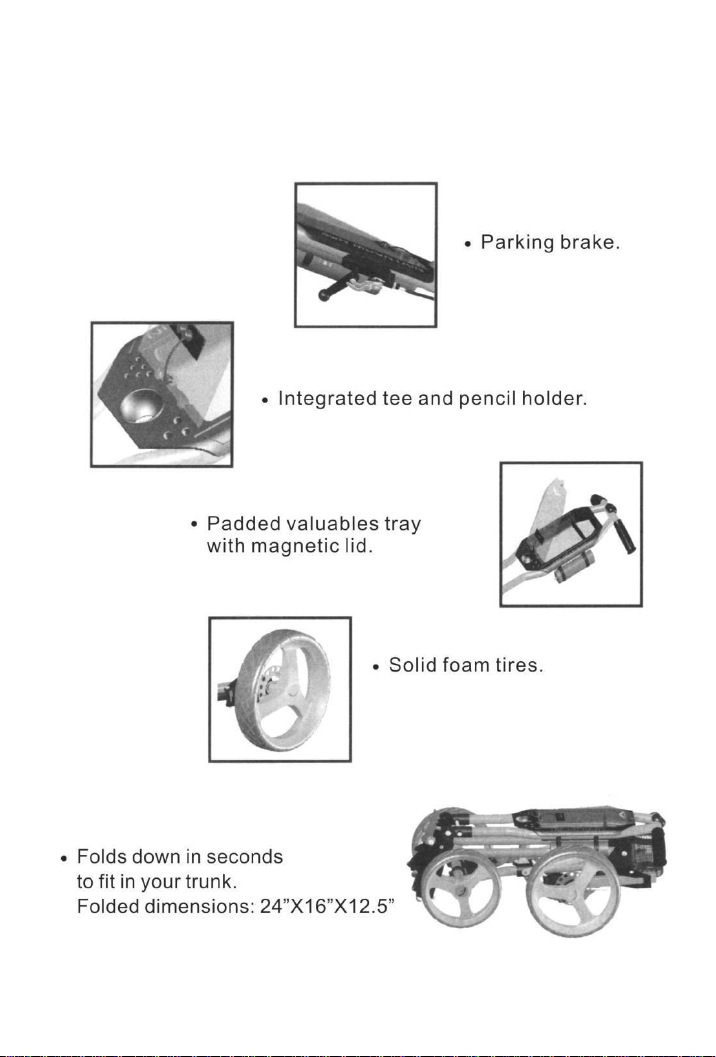
Your Micro Cart has several innovative features designed for
convenience, easy access and use.
Page 4
3
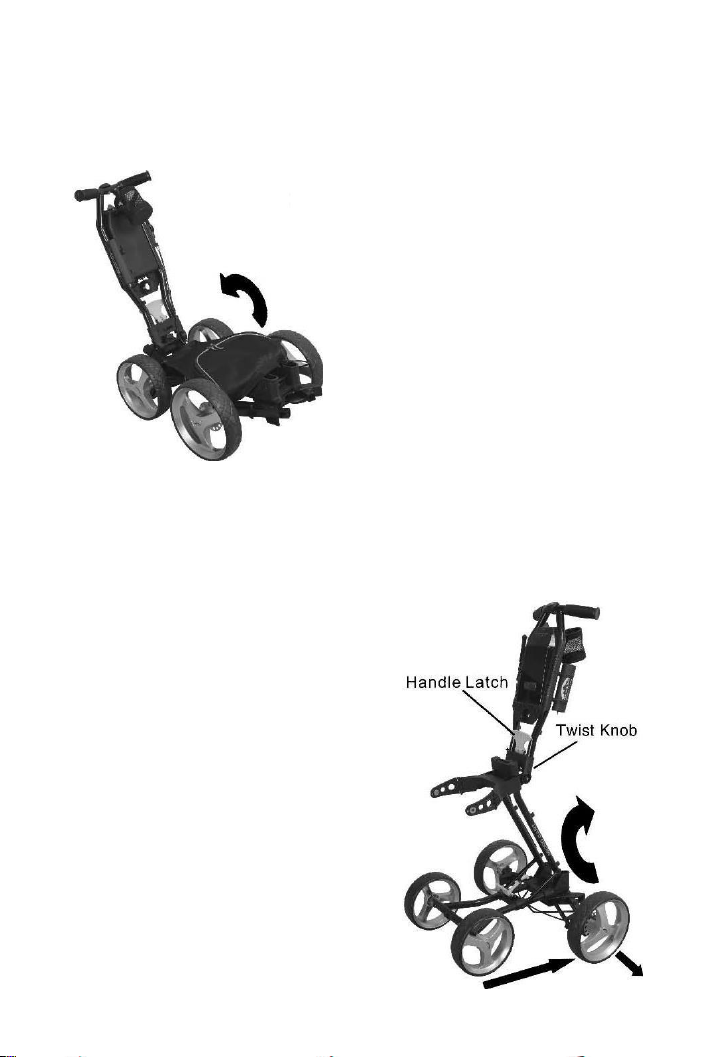
INSTRUCTIONS FOR UNFOLDING YOUR MC3
STEP ONE: UNFOLDING THE UPRIGHT TUBES
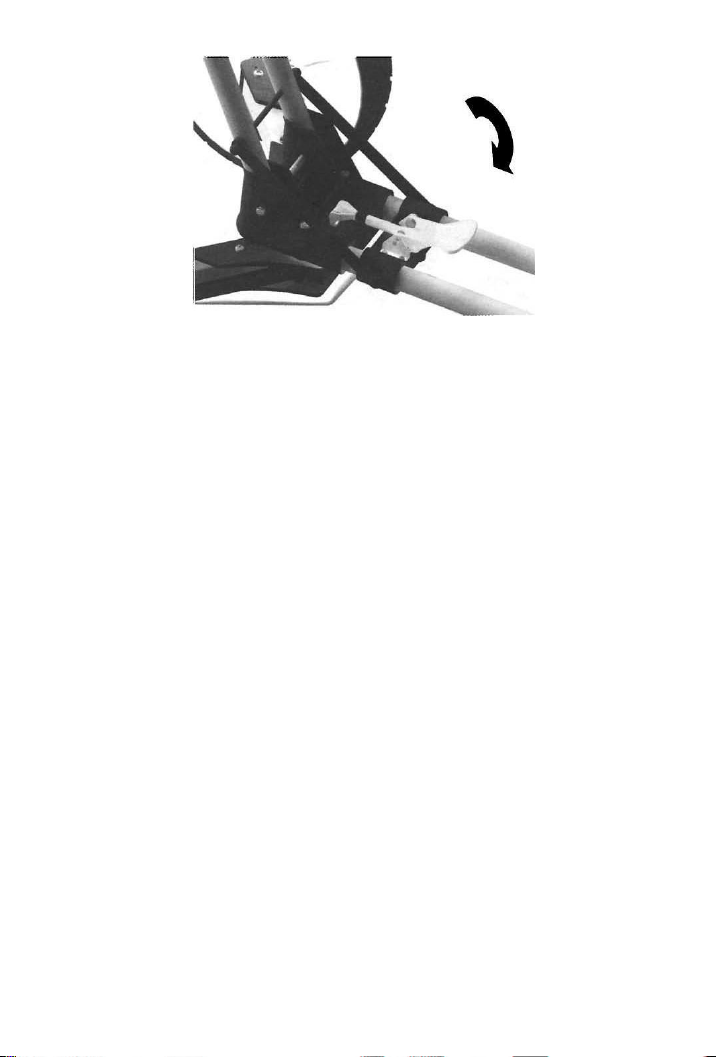
Release the folding latch underneath
the accessory tray by lifting up on the
rim of the cup holder. While holding
the front wheel in place with your
hand or foot, pull the handle back
until the upright tubes are fully
extended . Secure the cart by
engaging the yellow latch hook
and lever as shown in the
illustration on page 4. If your
lever is too tight, loosen the
nut at the base of the latch hook,
turn the latch hook until the lever is comfortable to maneuver,
and retighten the nut.
STEP TWO: SECURING THE HANDLE
Lift the handle, until the
handle height is comfortable.
Move the yellow handle latch
forward toward the upper bag
rest to secure the handle.
Over time, the handle tension
may decrease causing the handle
to ratchet. To increase the tension,
simply turn the twist knob clockwise
in small increments until the handle
is secure. It is easiest to make
this adjustment when the cart is
folded.
Page 5
4
STEP THREE: ADJUSTING THE HANDLE HEIGHT
To reset the handle height, release the handle by pulling the
handle latch toward the accessory tra y. Lift or lower the
handle to the new height and secure the handle latch.
STEP FOUR: LOADING YOUR GOLF BAG
Unfold the triangular lower bag support and place the bottom of
your golf bag on it. Then lean the top part of your bag into the
upper bag support. The bag bracket secures your bag without
straps. The width of the upper bag support can be adjusted by
turning the thumb screws on both sides. If your bag pockets
are touching the front wheels, you may expand the front axle.
See page 13 for instructions.
STEP FIVE: STEERING
To steer you cart, push down on the handle so the front
wheels lift slightly off the ground. Then pivot right or left to
change direction, lower the front wheels and go.
Page 6
5
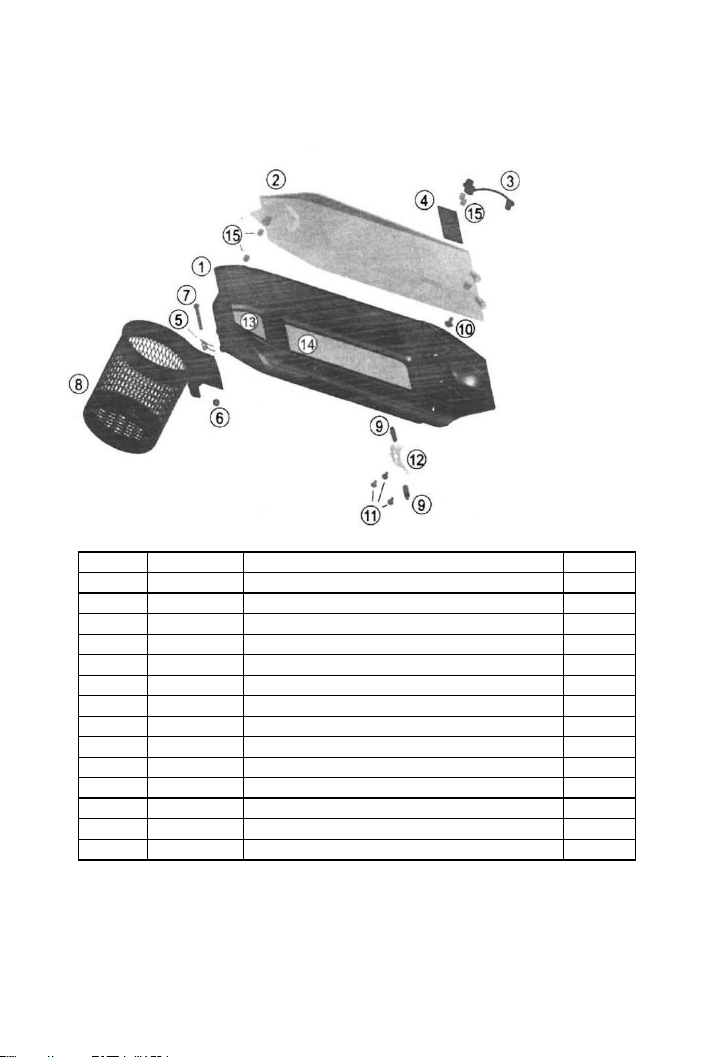
ACCESSORIES TRAY ASSEMBLY
Item #
Part #
Description
Qty
1-2
MC1-901
Tray Assembly
1
3
MC1-501
Magnet Strap with Magnets
1
4
MC1-502
Magnet Plate
1
5
MC1-201
Torsion Spring
1
6
SV1-225
M4-0.7 Nylock Nut
1
7
MC1-278
M4-0.7x44mm Phillips Pan Head Screw
1 8 MC1-910
Beverage Holder Kit
1 9 MC1-304
Hinge Post
2
10
MC1-203
3.6x6mm Phillips Pan Head Screw w/washer
1
11
MC1-204
M3x5mm Mill Cauda with Pan Head Screw
3
12
MC1-205
Spring Plate
1
13
MC1-701
Upper Tray Pad
1
14
MC1-702
Lower Tray Pad
1
15
MC1-706
6.35X6.35 Magnet
4
Page 7
6
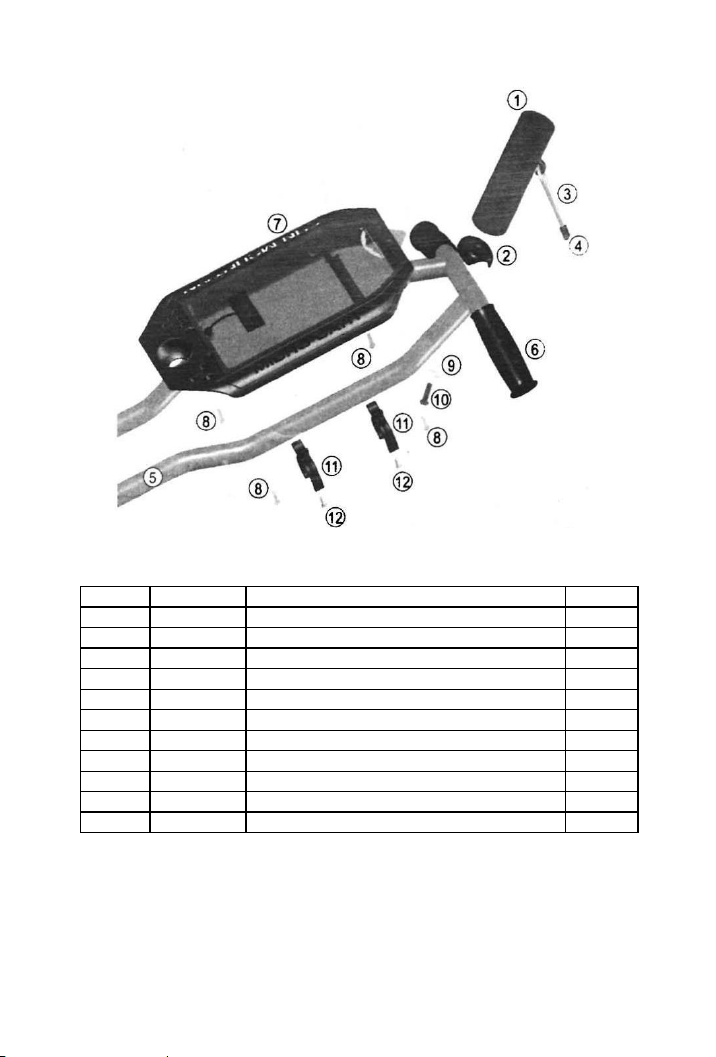
HANDLE PARTS
Item #
Part #
Description
Qty
1
MC1-905
Umbrella Holder Receiver
1
2
SV1-903A
Umbrella Mount Kit
1
3-4
MC1-703
Umbrella Holder Bungee w/Clasp
1
5
MC3-914A_
Handle Tube Assembly (color specific)
1
6
MC3-705
MC3 Black Handle Grip
2
7
MC1-901
Accessories Tray Assembly
1
8
MC1-206
4x20mm Phillips Pan Head Screw
4
9
SV1-209
6.4mm Washer
1
10
SV1-210
¼”X20mm Phillips Pan Head Screw
1
11
SV1-903B
Umbrella Clip Kit
1
12
005-122
M4x12mm Phillips Pan Head Screw
2
Page 8
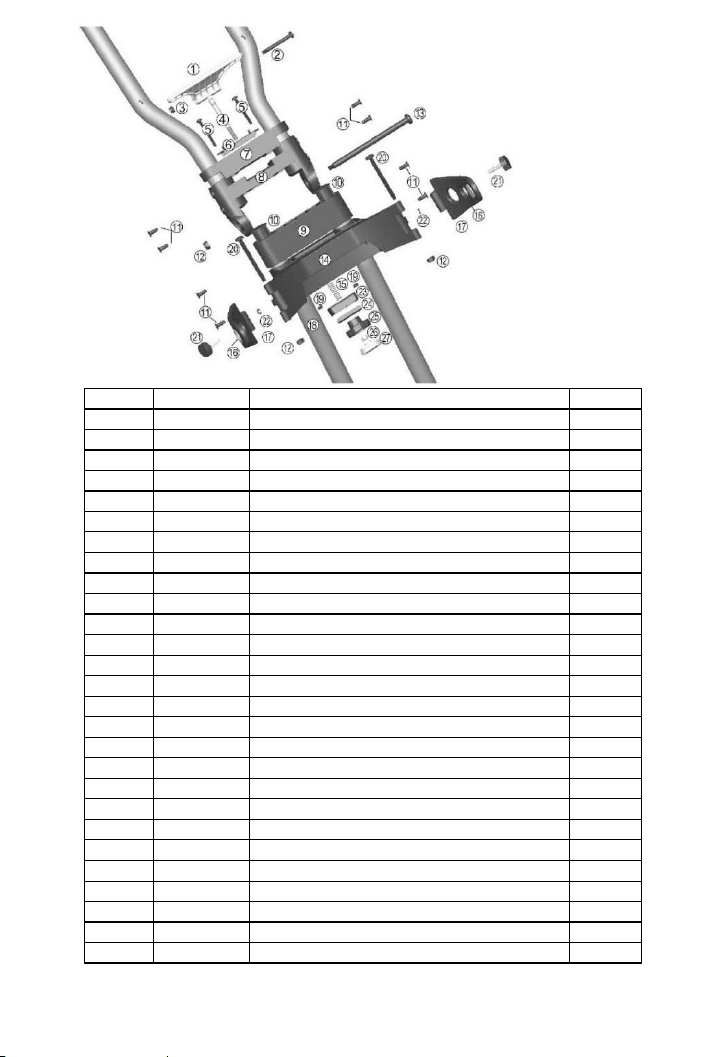
7
Item #
Part #
Description
Qty
1
MC3-910A_
Handle Latch Assembly (color specific)
1
2
MC3-282
M5x43.5 Phillips Pan Head Screw
1
3
SV1-221
M5 Nylock Nut
1
4
MC3-283
Link
1 5 005-110
M4x40mm Phillips Pan Head Screw
2 6 MC3-285
Upper Mount Plate
1
7
MC3-349A
Pivot Cap
1
8
MC3-350A
Handle Pivot
1
9
MC3-351A
Brace
1
10
MC1-309
Tube End Plug
2
11
MC1-213
M5x12mm Phillips Pan Head Screw
8
12
SV1-202
M6 Nylock Nut
3
13
MC1-210
M6x125.5mm Bolt
1
14
MC1-312
Upper Bag Support
1
15
MC3-286
Spring
1
16
MCS-341_
Bag Wrap Cushion (color specific)
2
17
SV1-912_
Bag Wrap (color specific)
2
18
NA
Main Frame
19
SV1-221
Nylock Nut M5-0.7
2
20
MC1-218
M6-1.0x65mm Phillips Pan Head Screw
2
21
MC1-315
Thumb Screw
2
22
SV1-223
3mm E-clip
2
23
MC3-352
Grip Mount
1
24
MC3-287
Lower Mount Plate
1
25
MC3-353
Twist Knob
1
26
SV1-202
M6 Nut
1
27
MC3-354
Twist Knob Cap
1
Page 9
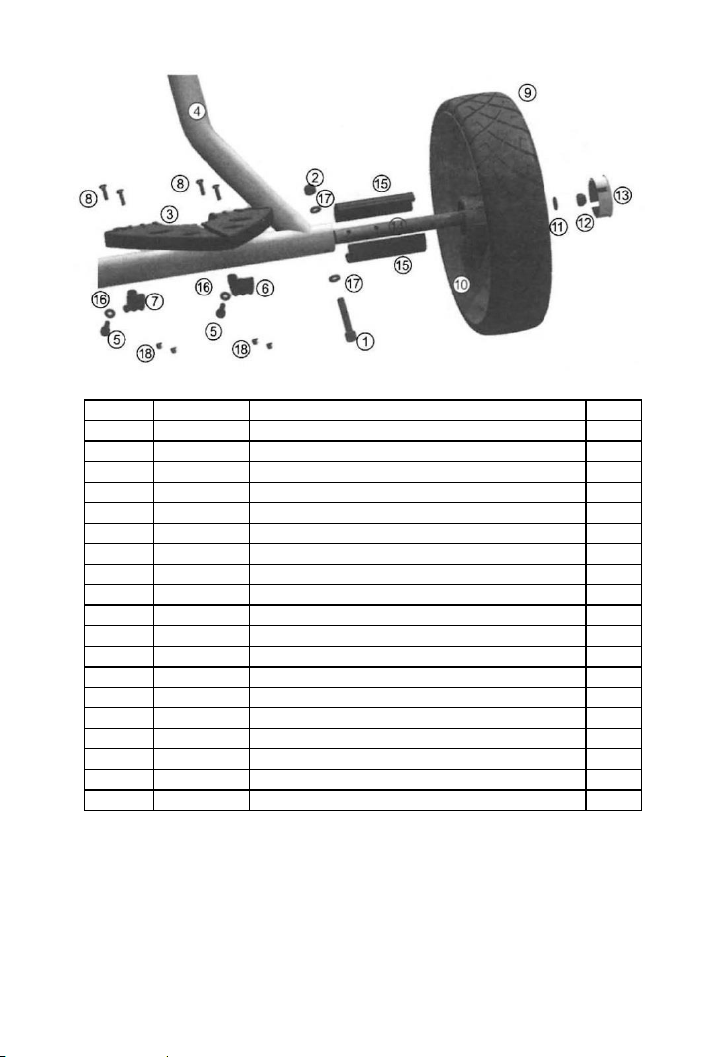
8
Item #
Part #
Description
Qty
1
MC2-281
M6 X35mm Hexagon Screw
2 2 SV1-202
M6 Nylock Nut
2
3
MC3-912
Lower Bag Support Kit (new style/seat slot)
1
4
NA
Main Frame
5
MC1-221
M4x14mm Screw
2
6-7
MC3-912
Spade Supports (new bag support kit required)
1 8 MC1-220
M3-0.5x12mm Phillips Pan Head Screw
4
9
MC3-701
Front Wheel (color specific)
2
10
NA
Front Rim
11
MC1-215
6-12mm Flat Washer
2
12
SV1-202
M6 Nut
2
13
V1S-327R-_
Front Rim Center Cap (color specific)
2
14
MC1-225
Front Axle
2
15
MC2-340
Front Axle Bushing
4
16
MC1-342
4x8 Lock Washer Internal Teeth
2
17
MC1-215
6-12mm Flat Washer
4
18
MC1-222
M3-0.5 Nylock Nut
4
1,2,&17 ship together as a set
Page 10
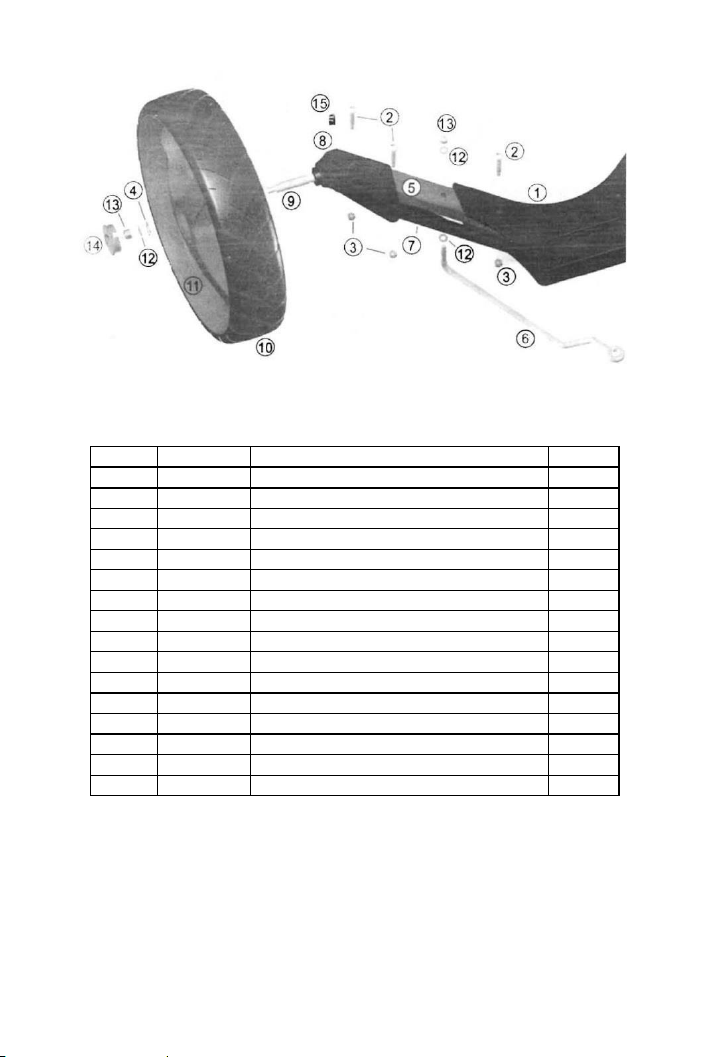
9
Item #
Part #
Description
Qty
1
MC3-322
Main Fitting
1
2
MC1-226
M5x39mm Phillips Pan Head Screw
3
3
SV1-221
M5-0.8 Nylock Nut
3
4
MC1-233
9mm E-Clip
2
5
MC1-107BK
Outrigger Tube (black only)
2
6
MC1-243
Upper Delta Link
1
7
MC3-277W
Right Parallel Link (white only)
1
8
MC3-337
Right Wheel Fitting
1
9
MC1-230
Rear Axle
2
10
MC3-702_
Right Rear Wheel-No Brake (color specific)
1
MC3-259
Disc Brake (ordered with MC3-702_)
1
11
NA
Rear Rim
12
MC1-215
6-12mm Flat Washer
3
13
SV1-202
M6 Nut
2
14
V1S-327R-_
Wheel center cap (color specific)
2
15
MC2-346
Pouch Clip
2
Page 11
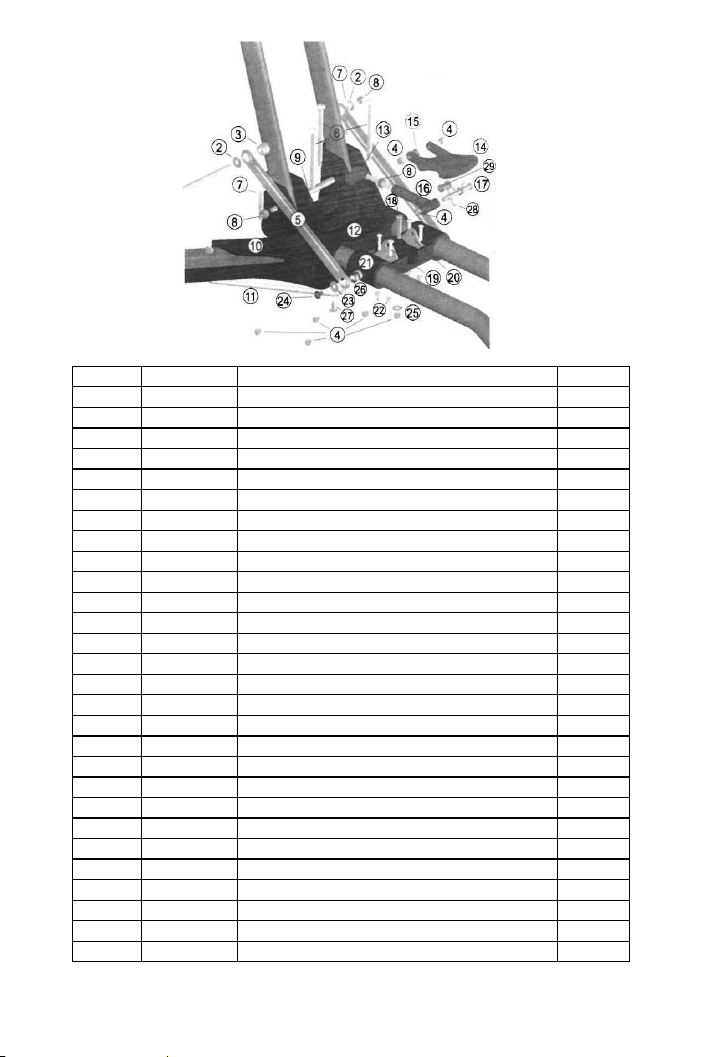
10
Item #
Part #
Description
Qty
1
MC3-234
M6x160mm Bolt
2
2
MC1-235
6-14mm Flat Washer
2
3
MC1-236
Upright Tube Pivot Post
2
4
SV1-221
M5-0.8 Nylock Nut
9
5
MC1-238
Upright Link
2
6
MC1-239
M5X74.4mm Phillips Pan Head Screw
3
7
MC1-240
M5X39mm Phillips Pan Head Screw
2
8
SV1-202
M6 Nut
5
9
MC1-242
M5-8x142.4mm Lower Milled Draw Bolt
1
10
MC3-322
Main Fitting
1
11
MC1-243
Upper Delta Link
1
12
MCS-329
Upper Main Frame Fitting (black only)
1
13-14
MCS-909_
Lower Latch Assembly (color specific)
1
15
MC1-244
M5x12.8 Hexagon Head Bolt
1
16
MCS-909_
Lower Latch Assembly (color specific)
1
17
MC1-245
M5x44.8mm Phillips Pan Head Screw
1
18
MC1-246
M5.28mm Phillips Pan Head Screw
1
19
MC1-247
M4x18mm Phillips Pan Head Screw
4
20
MCS-909_
Lower Latch Assembly (color specific)
1
21
MC3-333
Slider
2
22
SV1-225
M4-0.7 Nylock Nut
4
23
MC1-250
4-14mm Flat Washer
2
24
MC1-251
M4x6mm Phillips Pan Head Screw
2
25
MC1-215
6-12mm Flat Washer
1
26
MC1-253
Upright Link Rotating Ring
2
27
RC3-102
5x15 Rivet
1
28
MCS-909_
Lower Latch Assembly (color specific)
1
29
MC1-254
M5x17.5 Hexagon Head Bolt
1
Page 12
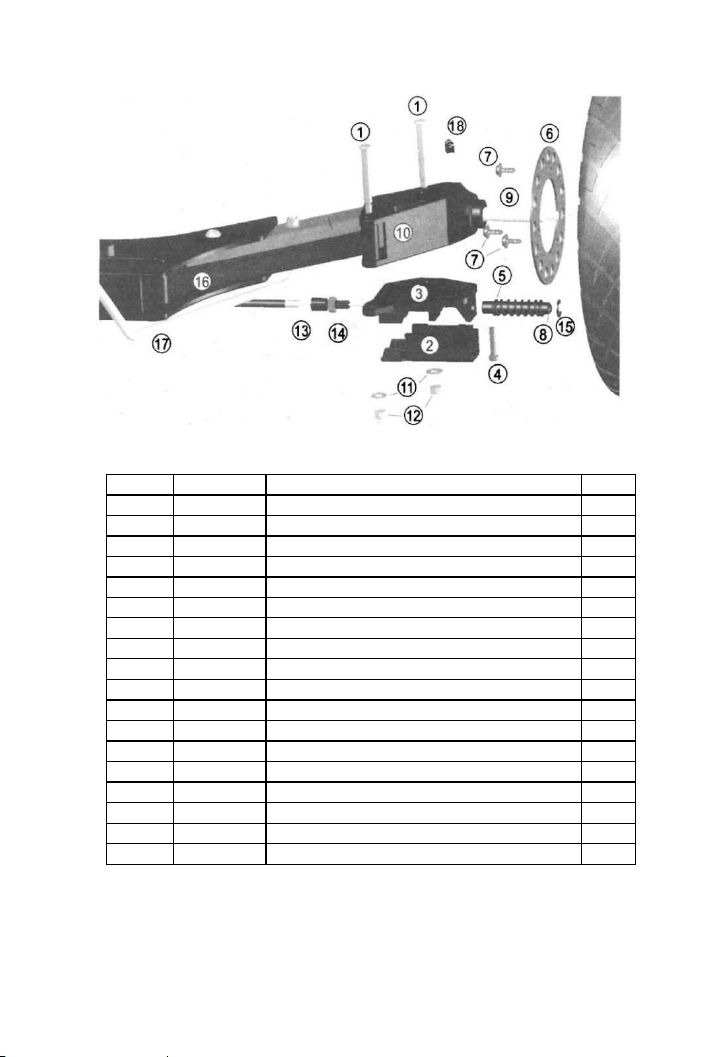
11
Item #
Part #
Description
Qty
1
MC1-245
M5-44.8mm Phillips Pan Head Screw
2 2 SV1-302
Brake Housing
1
3
SV1-303
Brake Mounting Base
1
4
SV1-203
M4x20 HEX Screw
1 5 SV1-204
Brake Spring
1
6
MC3-259
Disc Brake
1
7
MC1-260
3x10mm Phillips Pan Head Screw w/washer
3
8
SV1-205
Brake Pin
1
9
MC1-230
Rear Axle
1
10
MC3-324
Left Wheel Fitting
1
11
MC1-215
6-12mm Flat Washer
2
12
SV1-227
M5-0.8 Nylock Nut
2
13
MC1-903A
Lower Brake Cable Adjustment Stud
1
14
SV1-202
M6 Nut
1
15
SV1-206
6x0.8mm E-clip
1
16
MC3-323
Left Parallel Link (white only)
1
17
MC1-229
Lower Delta Link
1
18
MC2-346
Pouch Clip
2
Page 13
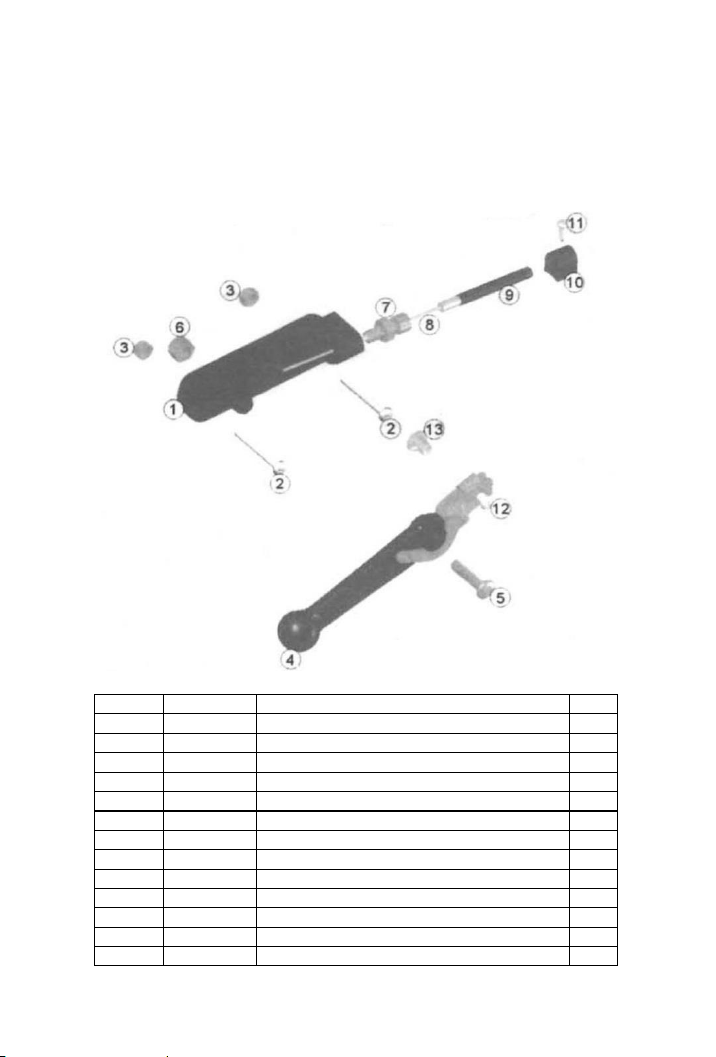
12
Adjusting the Brake:
Item #
Part #
Description
Qty 1 MC1-338
Brake Lever Mount
1
2
MC1-268
M4-0.7x35mm Phillips Pan Head Screw
2 3 SV1-225
M4-0.7 Nylock Nut
2 4 MC1-902
Brake Level with Linkage
1 5 MC1-270
M6-1.0x22mm Phillips Pan Head Screw
1
6
SV1-202
M6-1.0 Nylock Nut
1
7
MC1-903
Brake Cable Adjustment Stud and Nut
1
8
005-419
Brake Cable Kit and Hardware
1 9 Refer to 8
Brake Cable Sheathing
1
10
SV1-306
Brake Cable Sheathing Clip
6
11
MC1-273
3x10mm Phillips Pan Head ST Screw
6
12
MC1-274
M4x5mm Phillips Pan Head Screw
1
13
MC1-275
Brake Cable Stud
1
The brake cable lengthens over time and as a result, the
brake pin hits the disc brake. To tighten the brake cable, turn
the brake cab le adjustment stud clockwise (item 7) until the
brake pin has enough clearance.
Page 14
13
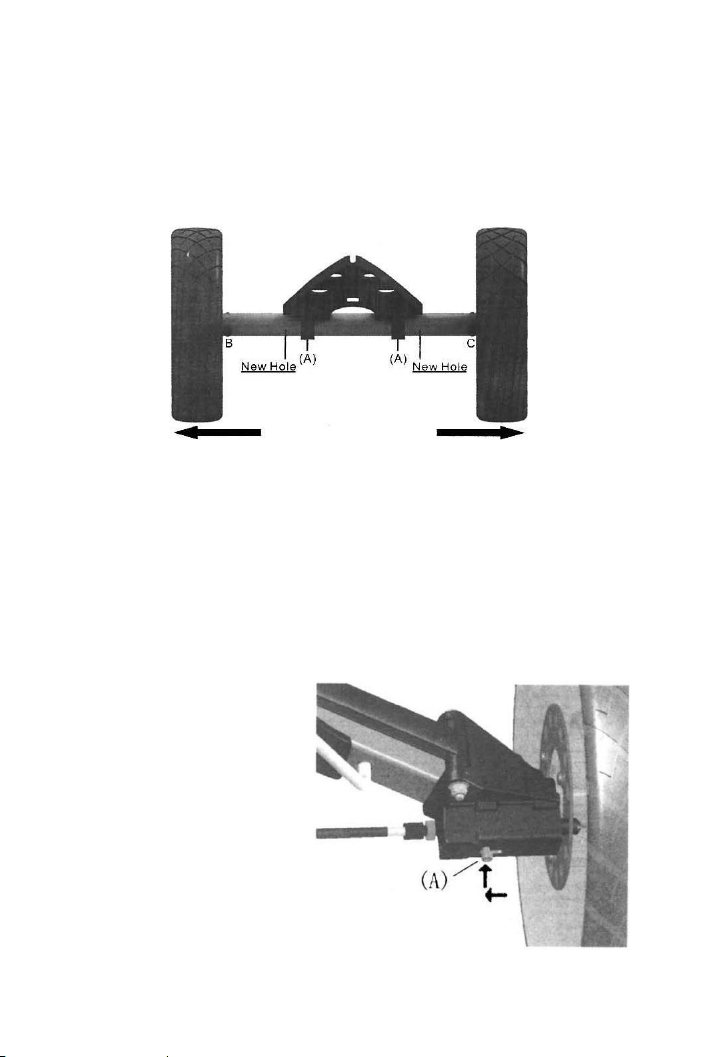
Extendable Front Axles
If your bag pockets are touching the front wheels, the front
axle can be extended to accommodate the larger bag. To
extend the front axles, unscrew the four hex screws (A,B,C)
using the allen wrench we provided, and pull the wheels
outward. There are four holes on each axle; choose the width
that works best for your bag and refasten the hex screws.
Adjusting the Alignment:
All Micro-Carts go through alignment testing before they are
shipped. However, if your cart is not rolling straight you can
adjust the alignment with the internal hex bolt (B & C). If your
cart goes right turn the left bolt (B) clockwise and the right bolt
(C) counter-clockwise. Conversely, if your cart goes left, turn
the left bolt (B) counter-clockwise and the right bolt (C)
clockwise.
Brake Lock Out
If the brake cable fails,
you will need to
disengage the brake
pin. To do so, flip the
cart upside down and
pull screw (A) back and
into the locked position
as shown.
Page 15

14
Maintenance:
Fertilizers and other chemicals used on golf courses can be corrosive
over time. To keep the powder-coated finish of your MC3 in good
condition, wash your cart regularly with a damp wash cloth and mild
detergent.
Limited Warranty:
Sun Mountain warrants the MC3 to be free of defects in materials and
workmanship. The cart frame (two parallel tubes from the handle to the
wheel) is warranted for 3 years from date of purchase. Other parts such
as the tires, brakes, handle wrap, etc. are warranted for 1 year from date
of purchase. This warranty does not cover normal wear and tear,
damage, failure or loss resulting from misuse, accident, neglect or failure
to follow instructions or warnings in this user’s guide.
IMPORTANT!
Pulling the MC3 behind a power cart or using it as part of a rental
fleet voids the warranty. Sun Mountain is the sole judge of any claim
or warranty. Proof of purchase is required.
Warranty Registration:
Please register your item by visiting our Customer Care section at
www.sunmountain.com
Claim Procedure
:
If you have a claim covered by the warranty, please call our customer
service staff to identify and resolve the problem.
If it is deemed necessary to return your cart, a return authorization
number will be provided by the customer service agent. This number
MUST be included on the product or package being returned.
For claim information, please call 1-800-227-9224.
Page 16

For customer service or replacement parts
call 1-800-227-9224.
Visit our web site at
www.sunmountain.com
SUN MOUNTAIN
301 N. 1st Street W.
Missoula, MT 59802
 Loading...