

Page 1

T2 LITE
POS User Manual Book
This Manual Book shall be read carefully before use and remained in safe hands.
Page 2

Three options for sub screen of intelligent POS machine
Quick Installation Guide
“Take main screen as sample”
1. Rotate the display to a horizontal state 2. Open the line hide cover
15.6〃main screen only
(T3521)
15.6〃main screen+10.1
consumer screen
(T3522)
〃
15.6〃main screen+15.6
consumer screen
(T3523)
〃
3.
Connect the power interface of the adapter
to the power port at the bottom of the
mainframe. And insert the other side of the
adapter to electric supply sockets
4. Press the power button for
two seconds to turn on.
Page 3

Product Introduction
“Take main screen as sample”
Card slot cover
15.6”
Power
In the state of power off, a short press turns on the
computer.
In the state of normal use, press on the power button
for two or three seconds to choose power off or restart.
In the state of system halted, press on the power
button for 11 seconds for power off.
Pilot Light
Blue light on when the power is on.
Light off when the power is off.
Display
USB interface
Power, Pilot Light
Metal Base
USB Interface
For external keyboard, mouse and USB drive.
Display
For the touch screen used by the operator.
Metal Base
For supporting the display when put on the
desktop.
Able to be replaced with the VESA suspension
bracket.
TXD
RXD
GND
5V
USB
USB
Serial
interface
interface
LAN
interface
Headset
jack
interface
Slot reader interface
For external MSR/RFID POS
Card slot is an optional part which may not
becontained according to configuration.
TF card slot
For external TF card.
Slot reader interface
Interface cover
TF card slot
Debug key
Micro USB debug port
Line hide cover
Cashbox
interface
Power
port
Micro USB debug port, debug key
For facilitydebugging.
Cashbox Interface
For external cashbox with 120ms electric pulse
output. No continuous power supply.
This facility only supports 24V/1A cashbox. There
may exist hidden troubles that will burn the circuit
of the cashbox in case of 12V cashbox.
Page 4
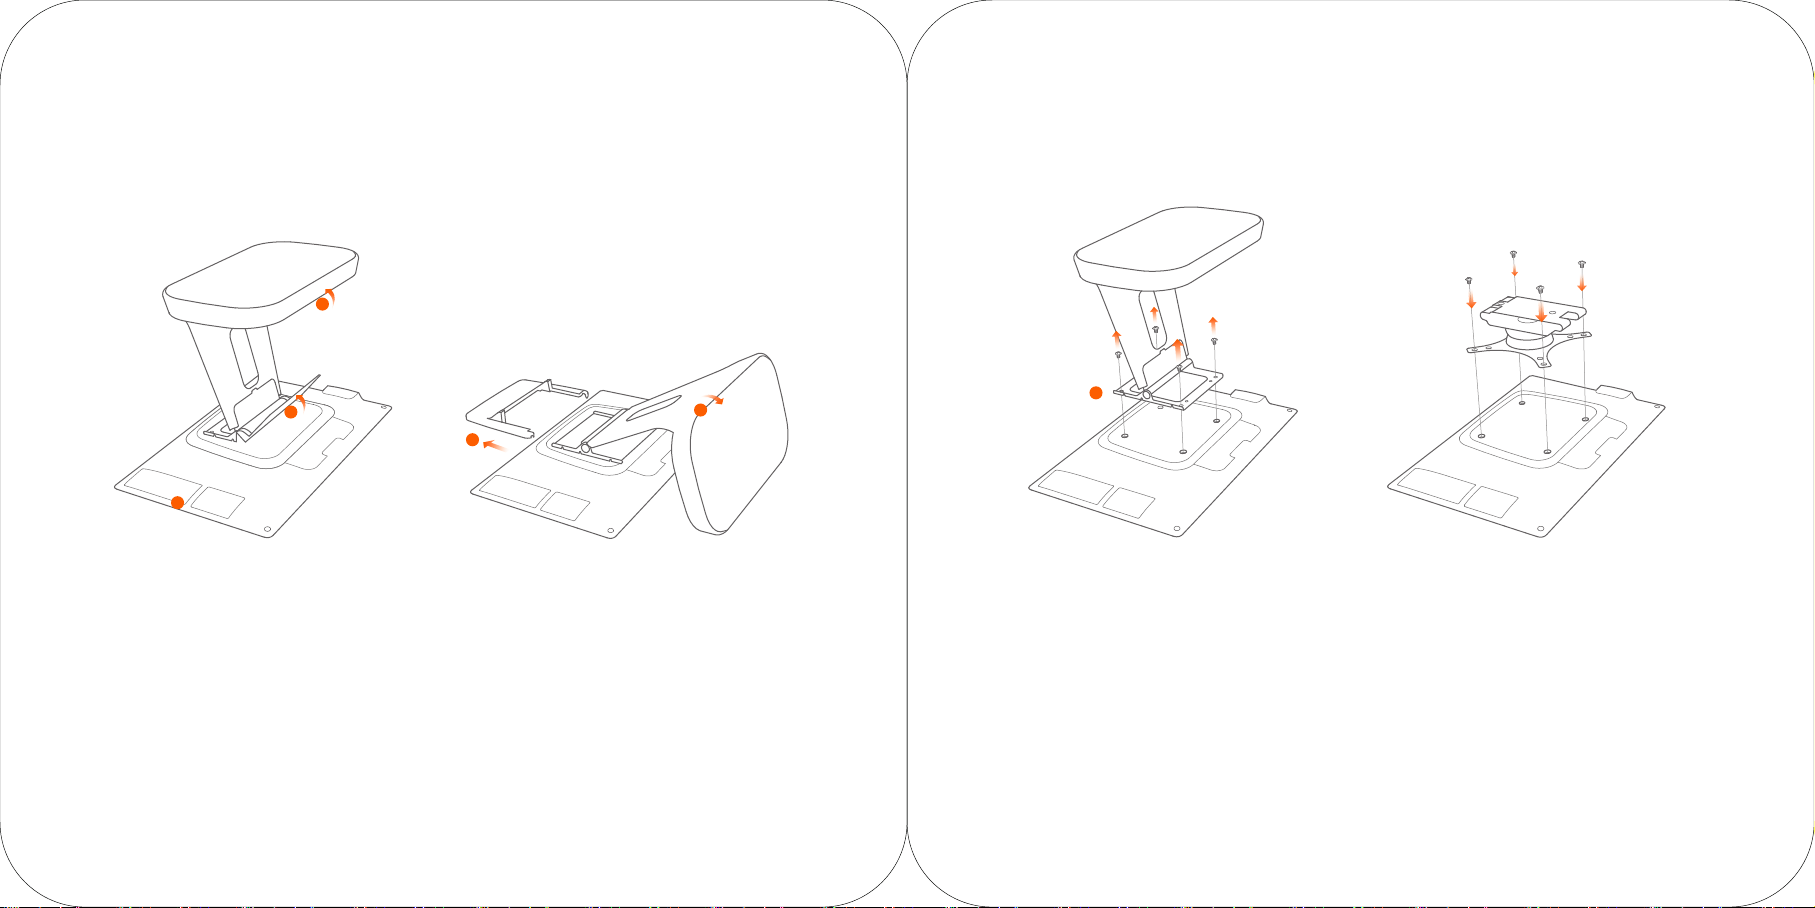
Installation Steps for the VESA Bracket
“Limited main screen only”
2
3
1
Remove the base
1. Put the display flat on the desktop
with its face down.
2. Rotate the metal base to a vertical state.
3. Remove the lower cover of the bracket.
4
5
Remove the base
4. Rotate the metal base to a horizonal state.
5. Remove the upper cover of the bracket.
6
Remove the base
6. Unscrew the four M4 screws with a
screwdriver and complete the removal
of base.
Install VESA accessories
1. Put the VESA bracket aligning to four screw holes
according to required direction.
2. Use the four M4 screws removed from the base
to fix the VESA bracket.
3. Install the bracket on the wall or desk
in accordance with VESA bracket manual book
and complete the installation of VESA suspension
bracket.
Note: This machine only supports the installation for VESA
MIS-D (100×100mm) suspension bracket. The VESA
bracket is an optional accessory which needs to be
purchased by the user.
Page 5

Minimal Settings
Basic Parameters for POS Machine
Operating system
Android 7.1
Only a few steps to turn on the intelligent business equipment.
1
Press the power button and the screen lights on. Enter the first start-up screen
and operate according to the prompt. Two modes of Internet access are available.
Wi-Fi setting.
2
· Press [Setting] and start WLAN. Enter the searching interface of WLAN, waiting for WLAN
network available;
· Click on the WLAN to be connected. A password is required for access if an encrypted
network is chosen.
3
Setting of LAN
How to download/use the application
This POS machine is suitable for cashier environment of business customers of different industries
including Chinese and Western foodservice industry, exclusive department store, convenience store,
the banking service industry, consulting station, interactive multimedia and advertisement broadcast
system, etc. Relevant apps can be scanned, downloaded and installed in the application store with
access to the internet.
Please read the built-in Help APP for more help.
Processor
Display resolution
Storage
Touch screen
Wi-Fi
Bluetooth
Loudspeaker
External interface
External storage card
VESA(limited main screen only)
Item dimension
AC adapter
Qualcomm snapdragon Qcta-core processor
15.6’’ resolution HD 1920 x 1080
16GB ROM + 2GB RAM
Multi-touch capacitive display
Support 802.11b/g/n 2.4GHz
Support Bluetooth 3.0/4.0 and iBeacon
Single 1.2W voice reaches 90db
5 x USB Type A interfaces, 1x RJ11 serial interface,
1 x RJ12 24V cashbox interface, 1x RJ45 LAN interface,
1 x headset jack, 1x power port, 1x Micro-USB debug interface
MicroSD (TF), 64G maximum
In accordance with VESA MIS-D 100×100mm Standard
H 35cm × W 38cm × T 17cm
Model:CYZS36-240150
Input:AC 100~240V,50/60Hz,1.5A Output:DC 24V,1.5A
Specification of 15.6” customer display
Display resolution 15.6’’ resolution HD 1920 x 1080
Touch screen Multi-touch capacitive display
Specification of 10.1” customer display
Display resolution 10.1’’ resolution HD 1024 x 600
Configurations and parameters listed in this page are indicative and actual products on the market shall prevail.
Page 6
Precautions
Warning
· Please insert the AC plug into the AC outlet according
to the identifying input on the power adapter;
· It is prohibited to use the device in any places with
potential explosive gases;
· Nonprofessionals shall not open the power adapter
anyhow so as to avoid dangers;
· The device is a Grade A product. In living environment,
the product may cause radio interference. Therefore,
users may be required to take practical measures
against the interference.
· About the battery replacement:
1. It may cause explosion with wrong type battery
2. Old battery which is replaced should be handled
by repair man, do not put it in fire!
· Adapter shall be installed near the equipment and
shall be easily accessible.
· The operating temperature of the device between
0℃ to 45℃.
· The device complies with RF specifications when
the device used at 20cm form your body.
· This product can be used across EU member states.
Important Safety Instructions
· Avoid installing or using during thunder
and lightning,other wise lightning stroke
may occur;
· Cut off the power immediately if there
is abnormal smell, overheating or smog!
Statement
The company is not responsible for the
following behaviors:
· Damages caused by using and maintaiing
the device without following the User Guide;
· Damages or problems caused by selection
of objects or Consumables (products
which are not the initial ones provided or
recognized by the company).
In this case, the company will not undertake
any responsibility.
· No one is entitled to modify or change
the product unless permitted by the
company.
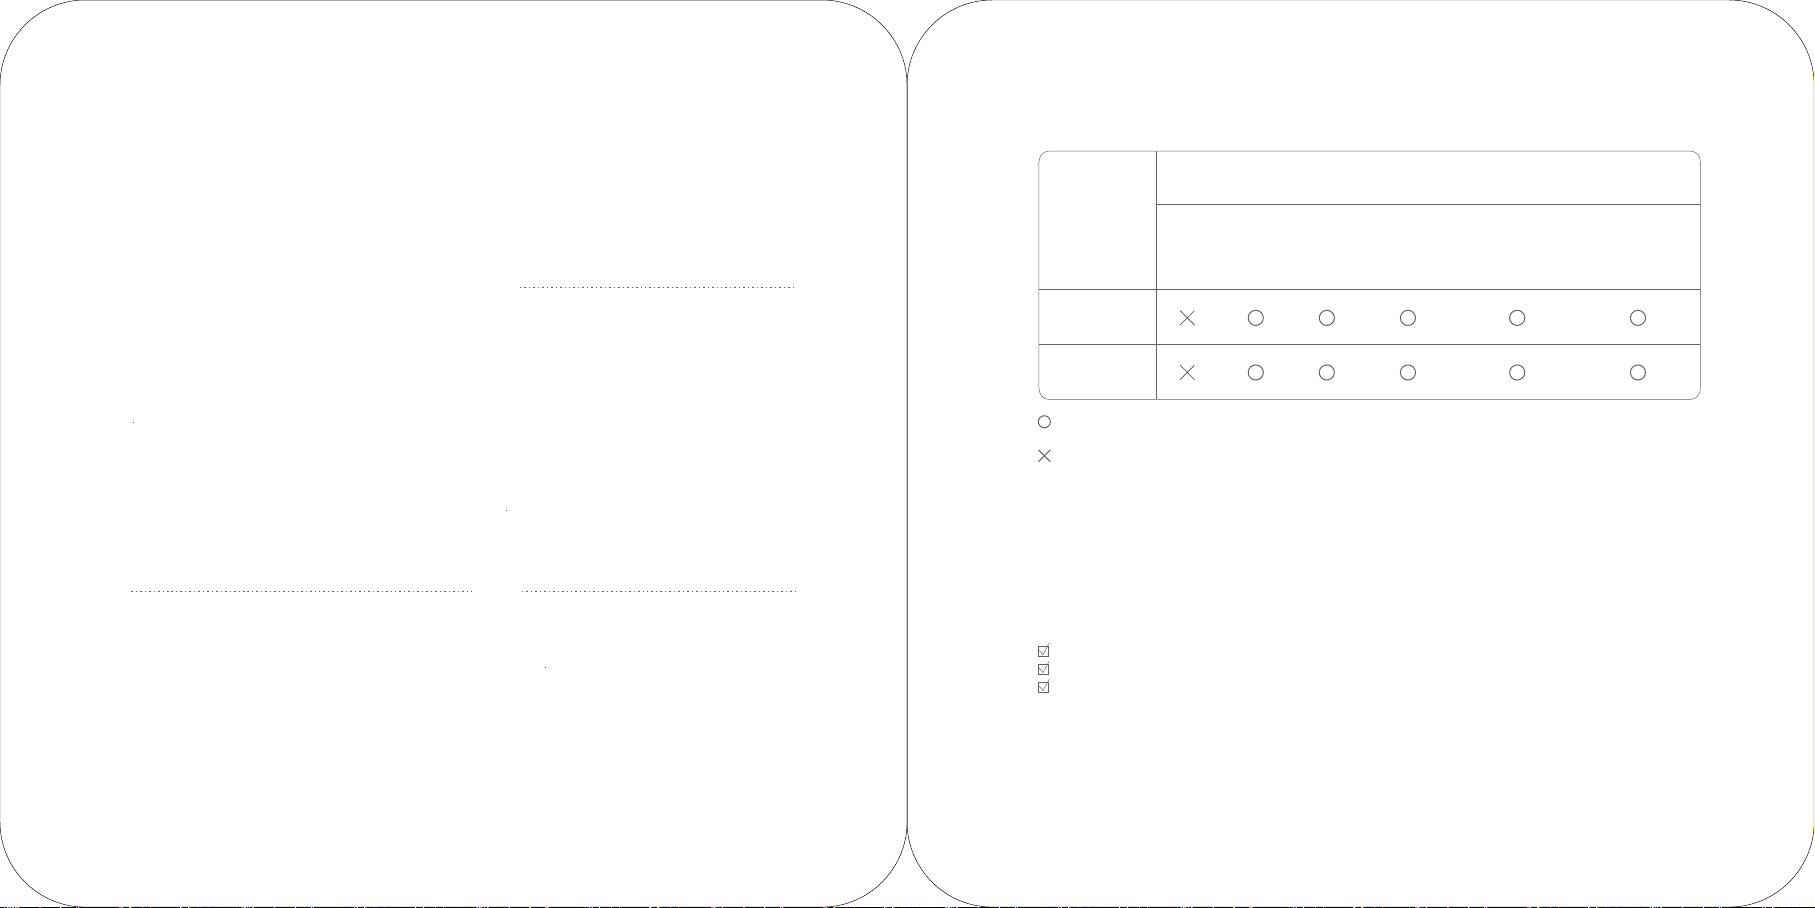
Name and Content of Toxic or Harmful
Substances in this Product
Toxic or Harmful Substances or Elements
Part Name
(Pb)
Components of
circuit board
Print head
component
: Means that the content of the toxic or harmful substance in all homogeneous materials of this part is below
the limit stipulated in SJ/T11363-2006.
: Means that the content of the toxic or harmful substance in at least one of the homogeneous materials of this
part is beyond the limit stipulated in SJ/T11363-2006; but as for the component marked with “×” on the table,
the content is beyond the l imit since there is no alternative mature technology in the industry yet.
The products reaching or exceeding the environmental service life shall be recycled per “Regulations
on the Control and Management of Electronic Information Products” and shall not be littered.
Lead
Mercury
(Hg)
Cadmium
(Cd)
Hexavalent
chromium
(Cr(VII)
Polybrominated
biphenyls
(PBB)
Polybrominated
diphenyl ethers
(PBDE)
Recommendation
· Do not use the device near water or in humid
environment.Keep liquid from falling onto the
terminal;
· Do not use the device in extremely cold and hot
environment, e.g. around fire or lighted cigarettes;
· Do not smash, throw or bend the device;
· Use the device in clean and dustfree environment
as much as possible and keep small items from
falling into the terminal;
· Do not use it near medical devices unless permitted.
Disclaimer
Discrepancies between the product and
the file concerning details may raise due to
product updates. Please be subject to the
material object. The company reserves the
right to interpret the file and the right to
revise this manual without prior notices.
Please make sure the temperature for
adapter will be from -10 ℃ to 40 ℃.
Please make sure the temperature for
device will be from -10 ℃ to 40 ℃.
Package content
1× main machine
1× user manual
1× power adapter
Manufacture
Room 505, KIC Plaza, No.388 Song Hu Road, Yang Pu District, Shanghai, China
Page 7
EU Regulatory Conformance
Hereby, Shanghai Sunmi Technology Co., Ltd. declares that the radio equipment type is in compliance with Directive
2014/53/EU.
The full text of the EU declaration of conformity is available at the following internet address: www.sunmi.com
Notice: Observe the national local regulations in the location where the device is to beused. This device may be
restricted for use in some or all member states of the European Union (EU).
Adapter shall be installed near the equipment and shall be easily accessible.
The operating temperature of the device between 0℃ to 45℃.
The device complies with RF specifications when the device used at 20cm form your body
This product can be used across EU member states.
FCC Regulations:
This device complies with part 15 of the FCC Rules. Operation is subject to the following two conditions:
(1) This device may not cause harmful interference, and (2) this device must accept any interference received,
including
interference that may cause undesired operation.
This device has been tested and found to comply with the limits for a Class B digital device, pursuant to Part 15 of
the FCC Rules. These limits are designed to provide reasonable protection against harmful interference in a residen-
tial installation. This equipment generates, uses and can radiated radio frequency energy and, if not installed and
used in accordance with the instructions, may cause harmful interference to radio communications. However, there
is no guarantee that interference will not occur in a particular installation If this equipment does cause harmful
interference to radio or television reception, which can be determined by turning the equipment off and on, the user
is encouraged to try to correct theinterference by one or more of the following measures:
· Reorient or relocate the receiving antenna.
· Increase the separation between the equipment and receiver.
· Connect the equipment into an outlet on a circuit different from that to which the receiver is connected.
· Consult the dealer or an experienced radio/TV technician for help.
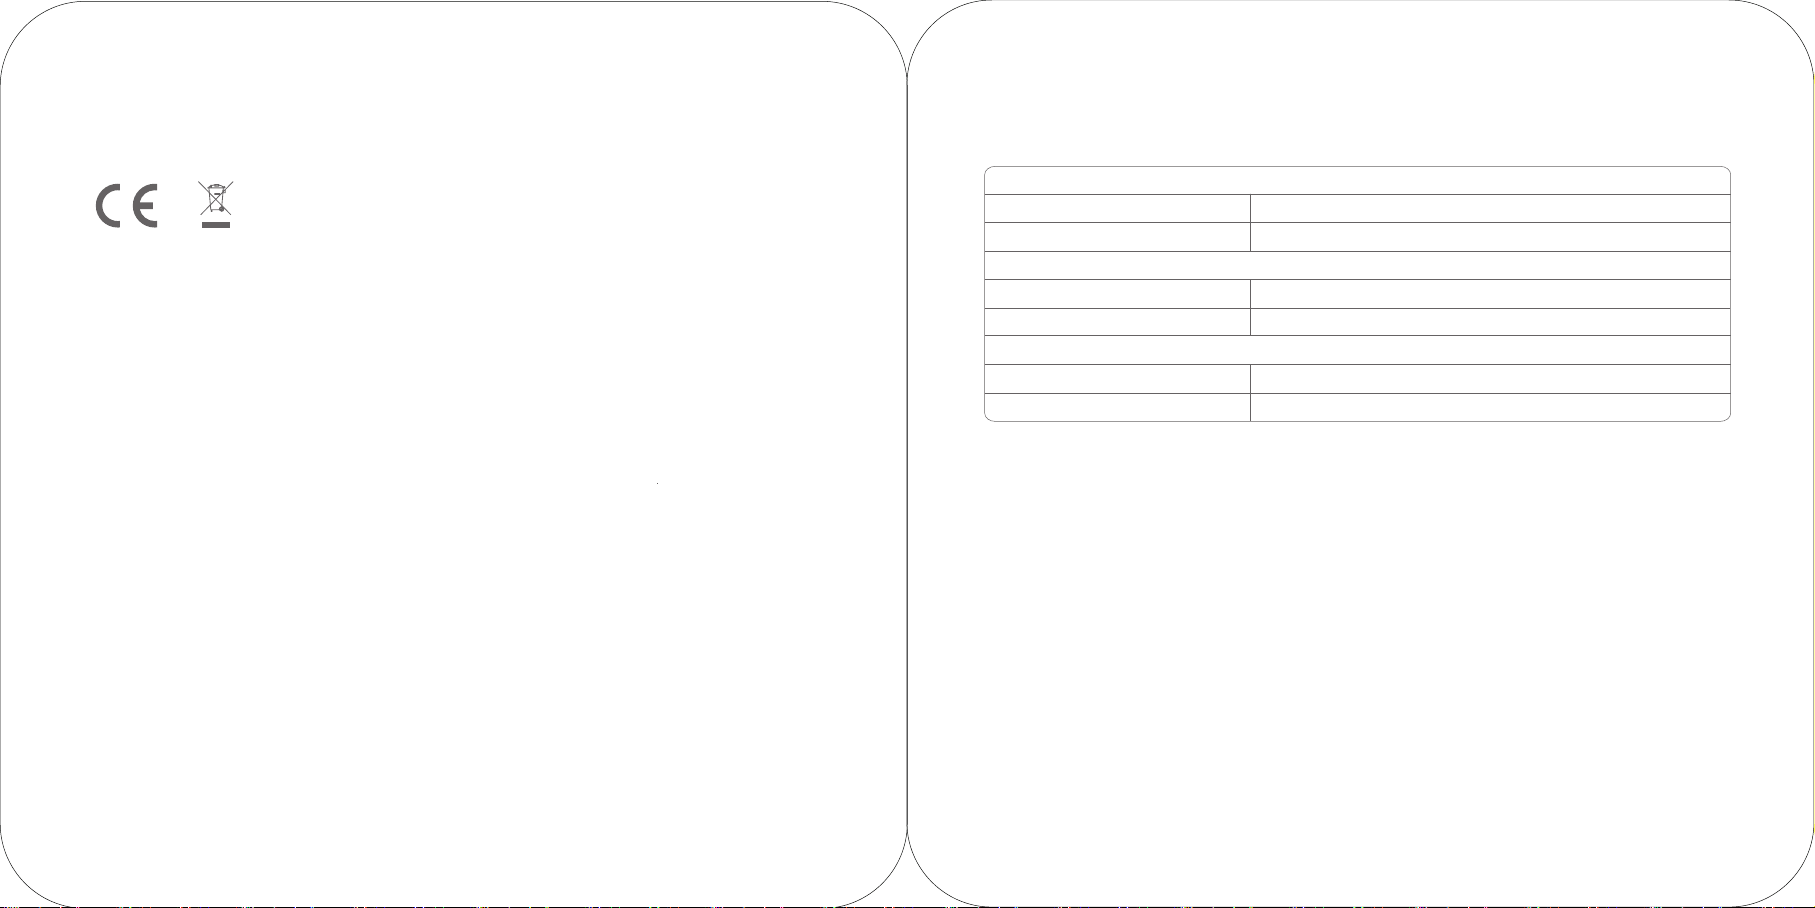
Technical features and characteristic
the product includes the following features and characteristics:
BT
Operation Frequency
Transmitted
BLE
Operation Frequency
Transmitted
WIFI
Operation Frequency
Transmitted
2402MHz-2480MHz
2dBm
2402MHz-2480MHz
2dBm
2412MHz-2462MHz
18dBm
Caution: Changes or modifications not expressly approved by the party responsible for compliance could
void the user's authority to operate the equipment.
 Loading...