

Page 1

K1
Kiosk User Manual Book
Before using this product, please read carefully this instruction manual and keep it properly.
Page 2

Quick Install Guide Minimalist Setting
Enable the smart commercial device, which only needs several steps
After turning on the complete machine power supply, the screen will be lit and you will enter the
1
first boot interface, and just simply operate according to the instructions. There are above two
types of Internet surfing modes available for the local machine to choose.
2
Wi-Fi setting
· Click “Setting” button, then enable WLAN, enter WLAN search interface. Wait for its search
and list the available WLAN hot spots;
· Click WLAN to be connected and it is required to enter access password for connection if an
encrypted network is selected.
3
LAN setting
· After plugging in properly the network cable, click “Setting” button, click “Wired Network”, to
choose Enable;
· It is required to enter access password for connection if an encrypted network is connected.
· As for IP address, there are two options: to automatically obtain IP & to manually enter IP
address.
1
Open the panel with key
2
3
4
1
2
Plug the network cable into the network interface
3
Plug the power line into the power supply module
4
Turn on the complete machine power switch
notice:If involved voltage conversion , please contact
professional staff or Sunmi
How to download/use App
This Self-Checkout Kiosk is applicable for the cashier environment of commercial customers in
various industries, such as Chinese & Western catering industry, high-end department stores,
supermarkets, convenience stores, information sites, interactive multi-media, etc. The relevant App
can enable the App market under the Internet mode, browse & download App to simply complete
the installation.
Please read the internal machine help App for more usage help
Page 3

Brief Introduction of Self-Checkout Kiosk
Face camera
Integrated touch display screen Protection cover on
Paper exit of the printer
Bar code scanning port
System on-off key
Face camera
Camera used to shoot human face.
Integrated touch display screen
Touchable screen applied for customer usage.
Paper exit of the printer
Used to print receipts in the state of power-on.
Bar code scanning port
Used to scan the bar codes of the goods or mobile phones.
System on-off key
In standby state, short press to boot, short press again to be
in standby mode;
In service status, long press for 2 to 3 seconds, and you can
choose to shut down or restart;
In the state of power-on, long press for 11 seconds, and power
off to shut down the machine.
the mainboard
Protection cover on the mainboard
Inside the machine. And the mainboard external interfaces
will be exposed after opening it, for example: USB port,
TF card port, etc.
Key for panel key hole
Open the panel, and it is convenient to carry out the paper
change operation & internal maintenance.
Wired network interface
Key for panel power supply
interface
Key for panel power switch
Key for panel key hole
Wired network interface
Inside the machine. A wired network socket.
Key for panel power supply interface
On the power supply module. A complete machine
power supply socket.
Key for panel power switch
On the power supply module. This switch controls the
on-off of the complete machine power supply.
Page 4

Paper Loading Steps of the Printer of
Three Types of Installation Methods Available for
Self-Checkout Kiosk
2
4
K1 Self-Checkout Kiosk
1
3
2 3
1
Open the host panel
Open the host panel with key.
2
Open the printer bin gate
Toggle downward the printer driving lever
and open the printer bin gate.
3
Install the printing paper
Place inward 80 mm thermal sensitive paper and pull out
a section outside the printer port.
4
Close the bin gate and the panel
Press both sides of the printer bin gate and close this gate.
The printer will automatically cut paper in power on state.
In power off state, it is necessary to manually tear off
excessive paper;
Close the host panel.
1
Vertical type installation
2
1
Wall mounting type installation
3
Desktop type installation
Page 5

Installation Steps of wall mounting type complete machine
136
1096
196
1
Install the wall-mounted rack
Drill holes according to the height described in the
reference drawing.
Firmly fix the wall-mounted rack onto the wall surface.
2
Install the rear mounted pieces of the host
Assemble the rear mounted pieces of the
host onto the back side of the host.
3
Mount the host well
Mount the host onto the wall-mounted rack.
4
Plug in of the cables
Pass the power line & network cable through the
cabinet opening, and plug in the plug at the host end.
Page 6

Installation Steps of Vertical Type Complete Machine
Upright post
Base plate
1 2 3
Install the upright post
Install the upright post onto the
base plate.
Install the left side table bracket
Assemble the table support member
onto the upright post.
Install the left side table
Assemble the left side stainless steel
table onto the table bracket.
Cross beam Left side stainless steel tableTable bracket
4
Assemble the right side table & cross beam
Assemble two cross beams onto the right side table.
Right table
5
Assemble the right side table
Assemble the right side table onto the table bracket.
Page 7

fixed
Installation Steps of Desktop Type Complete Machine
6
Install the fixed mounting elements
7
Mount the host onto the upright post
Pass the power line & network cable through the
cabinet opening, and plug in the plug at the host end.
The camera height after installation is suggested to
be 1620 mm above the ground.
1
Assemble the desktop bracket
Assemble the desktop bracket
into an assembly.
2
Install the bracket
Hold the host screen downward, install the
desktop bracket onto the host backboard.
3
Plug in the cable
Pass the power line & network cable
through the cabinet opening, and plug
in the plug at the host end.
Page 8

Basic Parameters of Self-Checkout Kiosk Package Packing List of Self-Checkout Kiosk Host
Operating system
Processor
Storage
Display screen
Touch screen
WIFI
Bluetooth
Face camera
Printer
Bar code scanning
Horn
Power supply input
Operational environment
Storage environment
Android 7.1
Rockchip RK3288
Memory:2GB; store:16GB + TF card extension
21.5’ TFT-LCD display screen, resolution: 1920*1080
Ten point touch control capacitive screen
Single frequency 2.4G, support 802.11b/g/n
Support Bluetooth 4.0 BLE and iBeacon
Light camera with 3D structure
Printing head with 80mm width, paper roll with 80mm diameter, with automatic cutter
Vertical type platform scanner for 2D image
Dual track, 3W each
100-220V~3.5A 50/60Hz
200-240V~2.0A 50/60Hz
0℃~40℃,25%~90%
-20℃~55℃,93% (40℃, non-condensing)
host × 1
set of wall mounted type racks × 1(required in wall mounting)
accessories box × 1
piece of receipt paper Ф 80 mm ⅹ 60 mm × 1
host power line × 1(national standard)
host network cable × 1
antenna × 1
hooks × 2
host keys × 2
mounting screws × 9(Cross recessed pan head combination screw M5*14)
power supply adapter × 1
User Guide × 1(including packing content, product certificate of compliance)
Common Troubleshooting
Packing & Shipping Parameters of Complete
Machine’s External Dimension
External dimension
Complete machine weight
Packing dimension/weight
(including package)
The vertical type base is divided into 3 pieces in packing for ease of transportation.
Host: 36cm width ⅹ11cm depth ⅹ82cm height;
vertical type complete machine: 36cm width ⅹ11cm depth ⅹ82cm height
Host only: 17.6 kg; vertical type complete machine: 64.8 kg
Host package: 47cm width ⅹ91cm length ⅹ21cm thickness, weight: 18.5 kg
Vertical type package 1/3: 55cm width ⅹ57cm length ⅹ23.5 cm thickness, weight: 10 kg
Vertical type package 2/3: 30cm width ⅹ138cm length ⅹ30 cm thickness, weight: 18 kg
Vertical type package 3/3: 61.5cm width ⅹ64.5cm length ⅹ4 cm thickness, weight: 24 kg
Symptom Solution
How to do when crashed
The printer doesn’t work
The printing content is blank
Vague printing content
Long press the power key for 11 seconds, enter power off shut down, short
press to restart.
Confirm that the paper storage cover is correctly closed;
Confirm whether there is paper sticking fault.
Please check whether the paper roll has been reversed.
Please check whether wrong thermal sensitive printing paper roll has been used.
Please check whether the thermal head piece has been contaminated. If it has
been contaminated, please use cotton swab dipped with absolute alcohol to
carry out wiping.
Please change the thermal paper with quality guaranteed, to avoid unclear
printing caused by low paper quality.
Page 9
Name & Content Identification Table of This
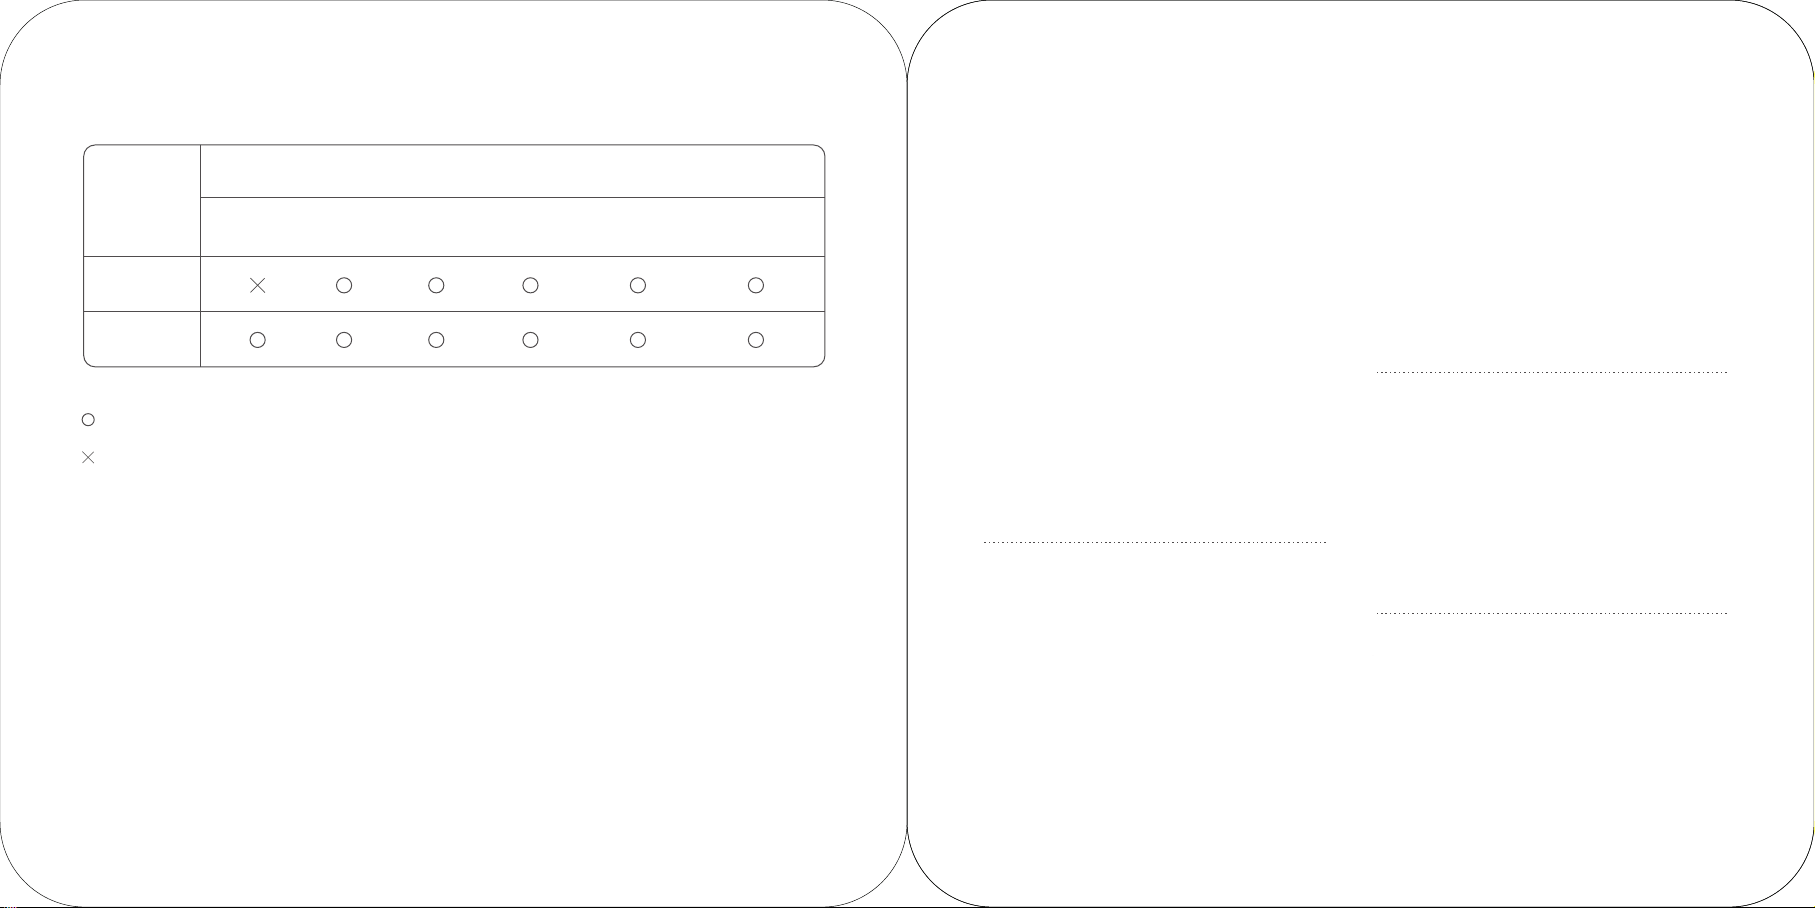
Product’s Toxic & Harmful Substance
Toxic and harmful substances and elements
Name of parts
(Pb) (Hg) (Cd) (Cr(VII) (PBB) (PBDE)
Circuit board
Shell
Points for Attention
Safety warning
• Please plug the AC plug into the AC socket
corresponding to the identification input on the
power adapter of the accessory;
• It is strictly forbidden to use it at a site with the
existence of any potential explosive gas;
• Non-professionals are not allowed to open the
internal module at will, to avoid danger.
• This is a A grade product. In the living environment,
this product may cause radio
interference. In this case, the user maybe required to
apply feasible measures against the
interference.
Suggestions
• Do not use it near the water or in the humid
environment, to prevent the liquid from dropping into
the terminal;
• Do not use it in extreme cold or hot environment. For
example: near the ignition source or lighted cigarette;
• Do not drop, throw or bend it;
• Try best to use it in clean and dust-free environment, to prevent small items from dropping into the
terminal;
• Do not use it nearby the medical devices when not
allowed.
:It indicates that the content of toxic and harmful substances in all homogeneous materials of this part is
below the limit specified in SJ/T11363-2006.
:It indicates that the content of toxic and harmful substances is higher than the limit specified in
SJ/T11363-2006 in at least one homogeneous material of this part; however, the the reason why the toxic
substance of that part exceeds the limit is that there is no applicable material to replace it currently.
For products that have reached or passed the service years for environmental protection, they should be recycled
according to Measures for Control and Management of Electronic Information Products and should not be thrown
away at will.
Manufacture
Room 505 No.388 Song Hu Road Shanghai, China
Points for attention about the power
supply
• Please unplug the plug from the power supply AC
socket to completely disconnect the power supply
connection of the device;
• The power supply socket should be installed near
the device, and be easy to contact.
Important Safety Instructions
• Avoid it to be installed or used during the thunder &
lightning period, otherwise there will be risk of being
electrically shocked by it;
• When you have discovered unusual odor, overheat
or smog, please cut off the power supply at once!
• The paper knife is relatively sharp, please don’t
touch it!
Statement
Our company will not be responsible for the results of
the following actions
• Damage caused by usage & maintenance not under
the conditions of this guidance note;
• Our company will not be responsible for any damage
or problem caused by any option or consumable (not
the initial product or recognized product provided by
our company). You have no right to make product
modifications or changes without the consent of our
company;
Disclaimer
Due to the product update, certain details of this
document may be inconsistent with the product.
Please refer to the material item. Our company owns
the interpretative right of this document. We reserve
the right to modify this user guide without giving
advance notice.
Page 10

FCC Regulations:
This device complies with part 15 of the FCC Rules. Operation is subject to the following two conditions:
(1) This device may not cause harmful interference, and (2) this device must accept any interference received, including
interference that may cause undesired operation.
This device has been tested and found to comply with the limits for a Class B digital device, pursuant to Part 15 of the FCC
Rules. These limits are designed to provide reasonable protection against harmful interference in a residential installation.
This equipment generates, uses and can radiated radio frequency energy and, if not installed and used in accordance with
the instructions, may cause harmful interference to radio communications. However, there is no guarantee that interference
will not occur in a particular installation If this equipment does cause harmful interference to radio or television reception,
which can be determined by turning the equipment off and on, the user is encouraged to try to correct theinterference by
one or more of the following measures:
· Reorient or relocate the receiving antenna.
· Increase the separation between the equipment and receiver.
· Connect the equipment into an outlet on a circuit different from that to which the receiver is connected.
· Consult the dealer or an experienced radio/TV technician for help.
Caution: Changes or modifications not expressly approved by the party responsible for compliance could
void the user's authority to operate the equipment.This equipment must be installed and operated in accordance with provid-
ed instructions and the antenna(s) used for this transmitter must be installed to provide a separation distance of at least 20
cm from all persons and must not be co-located or operating in conjunction with any other antenna or transmitter. End-users
and installers must be provide with antenna installation instructions and transmitter operating conditions for satisfying RF
exposure compliance.
BT/BLE
Wi-Fi 802.11b
Wi-Fi 802.11g
Wi-Fi 802.11n
Operation Frequency
2402MHz-2480MHz
2412MHz-2462MHz
2412MHz-2462MHz
2412MHz-2462MHz
Transmitted
1.5 ± 1.5dBm
18.5 ± 1.5 dBm
18.5 ± 1.5 dBm
17.5 ± 1.5 dBm
 Loading...