

Sun Microsystems Ultra 60, Ultra 2 Creator Series, Ultra 2 Series, Ultra 1 Series Upgrade Manual

Sun™Ultra™2 Series to Sun
Ultra™60 System Upgrade
Guide
™
A Sun Microsystems, Inc. Business
901 San Antonio Road
Palo Alto, CA 94303 USA
650 960-1300 fax 650 969-9131
Part No.: 805-1767-10
Revision A, December 1997

Copyright 1997 Sun Microsystems,Inc.,901SanAntonioRoad•PaloAlto,CA94303USA.Allrightsreserved.
This productordocumentisprotectedbycopyrightanddistributedunderlicensesrestrictingitsuse,copying,distribution,anddecompilation.
No part of this productordocumentmaybereproducedinanyformbyanymeanswithoutpriorwrittenauthorizationofSunand its licensors,
if any.Third-party software, including font technology,is copyrighted and licensed from Sun suppliers.
Parts of the product may be derived from Berkeley BSD systems, licensed from the University of California. UNIX is a registeredtrademark in
the U.S. and other countries, exclusively licensed through X/Open Company, Ltd.
Sun, Sun Microsystems, the Sun logo, AnswerBook, SunDocs, Ultra, and Solaris are trademarks, registered trademarks, or service marks of Sun
Microsystems,Inc. in the U.S. and other countries. All SPARCtrademarks are used under license and are trademarks or registeredtrademarks
of SPARC International, Inc. in the U.S. and other countries. Products bearing SPARCtrademarks are based upon an architecture developed by
Sun Microsystems, Inc.
The OPEN LOOK and Sun™ Graphical User Interface was developed by Sun Microsystems, Inc. for its users and licensees. Sun acknowledges
the pioneering efforts of Xerox in researching and developing the concept of visual or graphical user interfaces for the computer industry.Sun
holds a non-exclusive license from Xerox to the Xerox Graphical User Interface, which license also covers Sun’s licensees who implement OPEN
LOOK GUIs and otherwise comply with Sun’s written license agreements.
RESTRICTEDRIGHTS: Use, duplication, or disclosureby the U.S. Government is subject to restrictions of FAR52.227-14(g)(2)(6/87) and
FAR52.227-19(6/87), or DFAR252.227-7015(b)(6/95) and DFAR227.7202-3(a).
DOCUMENTATION IS PROVIDED“AS IS” ANDALL EXPRESS OR IMPLIEDCONDITIONS, REPRESENTATIONSAND WARRANTIES,
INCLUDING ANY IMPLIED WARRANTY OF MERCHANTABILITY, FITNESS FOR A PARTICULAR PURPOSE OR NONINFRINGEMENT, ARE DISCLAIMED, EXCEPT TO THE EXTENT THAT SUCH DISCLAIMERS ARE HELD TO BE LEGALLY INVALID.
Copyright 1997 Sun Microsystems, Inc., 901 San Antonio Road • Palo Alto, CA 94303 Etats-Unis. Tousdroits réservés.
Ce produit ou document est protégé par un copyright et distribué avec des licences qui en restreignentl’utilisation, la copie, la distribution, et la
décompilation. Aucune partie de ce produit ou document ne peut être reproduite sous aucune forme, par quelque moyen que ce soit, sans
l’autorisation préalable et écrite de Sun et de ses bailleurs de licence, s’il y en a. Le logiciel détenu par des tiers, et qui comprend la technologie
relativeaux polices de caractères, est protégé par un copyright et licencié par des fournisseurs de Sun.
Des parties de ce produit pourront être dérivées des systèmes Berkeley BSD licenciés par l’Université de Californie. UNIX est une marque
déposée aux Etats-Unis et dans d’autres pays et licenciée exclusivement par X/Open Company, Ltd.
Sun, Sun Microsystems, le logo Sun, AnswerBook, SunDocs,Ultra, et Solaris sont des marques de fabrique ou des marques déposées, ou
marquesde service, de Sun Microsystems, Inc. aux Etats-Unis et dans d’autres pays. Toutesles marquesSPARCsont utilisées sous licence et
sontdes marques de fabrique ou des marques déposées de SPARCInternational, Inc. aux Etats-Unis et dansd’autres pays. Les produitsportant
les marquesSPARCsont basés sur une architecture développée par Sun Microsystems, Inc.
L’interfaced’utilisation graphique OPEN LOOK et Sun™ a été développée par Sun Microsystems, Inc. pour ses utilisateurs et licenciés. Sun
reconnaîtles efforts de pionniers de Xerox pour la rechercheet le développement du concept des interfaces d’utilisation visuelle ou graphique
pour l’industrie de l’informatique. Sun détient une licence non exclusive de Xerox sur l’interface d’utilisation graphique Xerox, cette licence
couvrant également les licenciés de Sun qui mettent en place l’interface d’utilisation graphique OPEN LOOK et qui en outre se conforment aux
licences écrites de Sun.
CETTE PUBLICATION EST FOURNIE "EN L’ETAT" ET AUCUNE GARANTIE, EXPRESSE OU IMPLICITE, N’EST ACCORDEE, Y
COMPRIS DES GARANTIES CONCERNANT LA VALEUR MARCHANDE, L’APTITUDE DE LA PUBLICATION A REPONDRE A UNE
UTILISATION PARTICULIERE, OU LE FAIT QU’ELLE NE SOIT PAS CONTREFAISANTE DE PRODUIT DE TIERS. CE DENI DE
GARANTIE NE S’APPLIQUERAIT PAS, DANS LA MESURE OU IL SERAIT TENU JURIDIQUEMENT NUL ET NON AVENU.

Regulatory Compliance Statements
Your Sun product is marked to indicate its compliance class:
• Federal Communications Commission (FCC) — USA
• Department of Communications (DOC) — Canada
• Voluntary Control Council for Interference (VCCI) — Japan
Please read the appropriate section that corresponds to the marking on your Sun product before attempting to install the product.
FCC Class ANotice
This device complies with Part 15 of the FCC Rules. Operation is subject to the following two conditions:
1. This device may not cause harmful interference.
2. This device must accept any interference received, including interference that may cause undesired operation.
Note: This equipmenthas been tested and found to comply with the limits for a Class A digital device, pursuant to Part 15 of the FCC
Rules. These limits are designed to provide reasonable protection against harmful interference when the equipment is operated in a
commercial environment. This equipment generates, uses and can radiate radio frequency energy and, if not installed and used in
accordance with the instruction manual, may cause harmful interference to radio communications. Operation of this equipment in a
residential area is likely to cause harmful interference in which case the user will be required to correct the interference at his own
expense.
Shielded Cables: Connections between the workstation and peripherals must be made using shielded cables in order to maintain
compliance with FCC radio frequency emission limits. Networking connections can be made using unshielded twisted-pair (UTP)
cables.
Modifications: Any modifications made to this device that are not approved by Sun Microsystems, Inc. may void the authority
granted to the user by the FCC to operate this equipment.
FCC Class BNotice
This device complies with Part 15 of the FCC Rules. Operation is subject to the following two conditions:
1. This device may not cause harmful interference.
2. This device must accept any interference received, including interference that may cause undesired operation.
Note: This equipment has been tested and found to comply with the limits for a Class B digital device, pursuant to Part 15 of the FCC
Rules. These limits are designed to provide reasonable protection against harmful interference in a residential installation. This
equipment generates, uses and can radiate radio frequency energy and, if not installed and used in accordance with the instructions,
may cause harmful interference to radio communications. However, there is no guarantee that interference will not occur in a
particular installation. If this equipment does cause harmful interference to radio or television reception, which can be determined by
turning the equipment off and on, the user is encouraged to try to correct the interference by one or more of the following measures:
• Reorient or relocate the receiving antenna.
• Increase the separation between the equipment and receiver.
• Connect the equipment into an outlet on a circuit different from that to which the receiver is connected.
• Consult the dealer or an experienced radio/television technician for help.
Shielded Cables: Connections between the workstation and peripherals must be made using shielded cables in order to maintain
compliance with FCC radio frequency emission limits. Networking connections can be made using unshielded twisted pair (UTP)
cables.
Modifications: Any modifications made to this device that are not approved by Sun Microsystems, Inc. may void the authority
granted to the user by the FCC to operate this equipment.
iii

DOC Class ANotice -AvisDOC, ClasseA
This Class A digital apparatus meets all requirements of the Canadian Interference-Causing Equipment Regulations.
Cet appareil numérique de la classe A respecte toutes les exigences du Règlement sur le matériel brouilleur du Canada.
DOC Class BNotice -AvisDOC, ClasseB
This Class B digital apparatus meets all requirements of the Canadian Interference-Causing Equipment Regulations.
Cet appareil numérique de la classe B respecte toutes les exigences du Règlement sur le matériel brouilleur du Canada.
iv Sun Ultra 2 Series to Sun Ultra 60 System Upgrade Guide • December 1997

Contents
Preface vii
1. Overview 1
Tools Required 1
Upgrade Kit 1
Safety Requirements 2
Symbols 3
System Precautions 4
Lithium Battery 4
2. Performing the Upgrade 5
Overview 5
Powering Off the System 6
Removing the Cover 8
Attaching the Antistatic Wrist Strap 10
Removing DIMMs 11
Removing a CD-ROM Drive 14
Replacing the Bracket into the Chassis 16
Replacing the Cover 17
Returning the Old System 17
Contents v

vi Sun Ultra 2 Series to Sun Ultra 60 System Upgrade Guide • December 1997

Preface
This document describes how to upgrade a Sun™ Ultra™ 2 or Ultra™ 2 Creator
Series system to a Sun™ Ultra™ 60 system.
Who Should Use This Book
You should read this book if you want to upgrade a Ultra 2 Series system to a Ultra
60 system.
How This Book Is Organized
Chapter 1 “Overview,” outlines the process to be followed in upgrading a Sun
Ultra 1 or Ultra 1 Creator Series system to a Sun Ultra 60 System.
Chapter 2 “Performing the Upgrade,” describes how to remove components from
an Ultra 1 Series system to be transferred to an Ultra 60 System.
Preface vii

Related Books
The following documents contain topics that relate to the information
in Sun Ultra 2 Series to Sun Ultra 60 System Upgrade Guide.
■ Sun Ultra 60 Hardware Setup Instructions, 805-1705
■ Sun Ultra 60 Installation Guide, 805-1706, 805-1707, 805-1708
Ordering Sun Documents
The SunDocsSMprogram provides more than 250 manuals from Sun Microsystems,
Inc. If you live in the United States, Canada, Europe, or Japan, you can purchase
documentation sets or individual manuals using this program.
For a list of documents and how to order them, see the catalog section of the
SunExpress™ Internet site at http://www.sun.com/sunexpress.
Accessing Sun Documentation Online
The docs.sun.com Web site enables you to access Sun technical documentation
online. You can browse the docs.sun.com archive or search for a specific book title
or subject. The URL is http://docs.sun.com/.
viii Sun Ultra 2 Series to Sun Ultra 60 System Upgrade Guide • December 1997

What Typographic Changes Mean
The following table describes the typographic changes used in this book.
TABLEP-1 Typographic Conventions
Typeface or
Symbol Meaning Example
AaBbCc123 The names of commands, files,
and directories; on-screen
computer output
AaBbCc123 What you type, contrasted with
on-screen computer output
AaBbCc123 Command-line placeholder:
replace with a real name or
value
AaBbCc123 Book titles, new words or terms,
or words to be emphasized
Edit your .login file.
Use ls -a to list all files.
machine_name% You have mail.
machine_name% su
Password:
To delete a file, type rm filename.
Read Chapter 6 in User’s Guide. These
are called class options.
You must be root to do this.
Shell Prompts in Command Examples
The following table shows the default system prompt and superuser prompt for the
C shell, Bourne shell, and Korn shell.
TABLEP-2 Shell Prompts
Shell Prompt
C shell prompt machine_name%
C shell superuser prompt machine_name#
Bourne shell and Korn shell
prompt
Bourne shell and Korn shell
superuser prompt
$
#
Preface ix

x Sun Ultra 2 Series to Sun Ultra 60 System Upgrade Guide • December 1997

CHAPTER
1
Overview
Tools Required
You will need the following tools and equipment:
■ Antistatic mat (included in upgrade kit)
■ Wrist strap (included in upgrade kit)
■ Phillips screwdriver
■ Container for screws
Upgrade Kit
The upgrade kit contains some hardware parts needed to complete the upgrade
process, as well as upgrade instructions.
■ Electrostatic discharge kit, part number 560-1302, so you can safely handle parts
that are sensitive to damage by static electricity.
■ Sun Ultra 2 Series to Sun Ultra 60 System Upgrade Guide, (part number 805-1767).
1

Safety Requirements
For your protection, observe the following safety requirements:
■ Follow all cautions and instructions marked on the equipment.
■ Ensure that the voltage and frequency rating of the power outlet to be used
matches the electrical rating labels on the system.
■ Use properly grounded power outlets.
To protect both yourself and the equipment, observe the safety precautions listed in
TABLE 1-1.
TABLE1-1 Safety Precautions
Item Problem Precaution
AC power cord Electrical shock
Disconnect the AC cord from the AC wall socket before working
on the power supply.
Grounding
Power On/Standby
switch
Antistatic wrist strap Electrostatic
ESD mat ESD An approved antistatic mat, when used with an antistatic wrist
Printed circuit board ESD Handle a printed circuit board by the edges only. Store printed-
Electric shock Remove the DC power from the system by disconnecting the AC
Discharge (ESD)
Leave the AC power cord plugged into the AC wall outlet when
replacing drives, DIMMs, chips, or the system board. Leave the
AC power cord plugged into the wall outlet to provide a
grounding path for the antistatic wrist strap, which you must
wear while servicing the system.
power cord from the system before disconnecting a working unit
or connecting a replacement unit.
Note: The power supply ”remembers” the state it was in when
power was interrupted. If it is not set to Standby before being
disconnected, the power supply will turn on automatically when
it is connected again. This occurs even if the Power On/Standby
switch or keyboard power key is not pressed.
Wear a grounded antistatic wrist strap when handling printed
circuit boards, drives, or other components such as DIMMs.
strap, provides protection from static damage and cushions and
protects small parts that are attached to printed circuit boards.
Place all components removed from the system onto the ESD mat.
circuit boards in antistatic bags.
2 Sun Ultra 2 Series to Sun Ultra 60 System Upgrade Guide • December 1997

TABLE1-1 Safety Precautions (Continued)
Item Problem Precaution
Cover System damage
and overheating
SBus slot filler panels System damage
and overheating
Heat sinks on
processor modules
and system boards
Heat, burns Do not touch the metal heat sinks on processor modules or the
Replace the cover after servicing the system.
Install filler panels in all unused SBus slots. Openings on the back
panel reduce the cooling capability of the system and allow EMI
emissions that exceed FCC compliance limits.
system board. The heat sinks can be hot enough to cause injury.
Symbols
The following symbols mean:
Caution – This equipment contains lethal voltages. Accidental contact can result in
serious injury or death.
Caution – Physical danger due to a non-electrical hazard or danger of irreversible
damage to data or to the operating system.
Caution – Improper handling by unqualified personnel can cause serious damage
to this equipment. Unqualified personnel who tamper with this equipment may be
held liable for any resulting damage to the equipment.
Caution – Hot surface. Avoid contact. Surfaces are hot and may cause injury if
touched.
Chapter 1 Overview 3

System Precautions
Observe all safety precautions and ensure compliance with skill level requirements,
certification, and all applicable local and national laws.
Caution – Before you begin, carefully read each of the procedures in this manual. If
you have not performed similar operations on comparable equipment, do not
attempt to perform these procedures.
Lithium Battery
Caution – On Ultra 2 Series system boards, a lithium battery is molded into the
real-time clock, SGS No. MK48T18, MK48T08x-xxx, MT48TxxB-xxx, or MK48T18-
xxxPCZ. Batteries are not customer replaceable parts. They may explode if
mistreated. Do not dispose of the battery in fire. Do not disassemble it or attempt to
recharge it.
4 Sun Ultra 2 Series to Sun Ultra 60 System Upgrade Guide • December 1997

CHAPTER
2
Performing the Upgrade
Overview
1. Read the documentation in the RMA (Return Material Authorization) information
package provided with the upgrade.
2. Follow the procedures described in this chapter: a. Power off the system and all attached peripheral devices. b. Disconnect all devices attached to the Ultra 2 Series system, including monitor,
keyboard, mouse, and associated cables.
c. Remove all DIMMs (memory modules) and any CD-ROM drive installed in the
Ultra 2 Series system, and install them in the Ultra 60 system.
For information about installing components into a Ultra 60 workstation, refer to the
Ultra 60 Installation Guide.
Note – SBus cards are not supported by the Ultra 60 system.
d. Connect the monitor, keyboard, and mouse to the Ultra 60 system as shown in
the Ultra 60 Installation Guide.
3. Follow the instructions in the RMA information package about packing and
returning the Ultra 2 Series enclosure and those components not moved to the
Ultra 60.
If you have any additional questions, contact your Sun sales representative.
5

Powering Off the System
Caution – When the Power switch is set to standby and the AC power cord remains
connected to a power outlet, hazardous AC voltage is still present in the power
supply primary.
The power supply ‘remembers’ the state it was in when power was interrupted.
Press the Power switch to Standby before you disconnect a working unit or connect
a replacement unit. If the power supply is not placed in standby before it is
disconnected, it turns on automatically when it is connected again, even if you do
not touch the system power switch or keyboard buttons.
1. If the Ultra 2 Series system that you are upgrading is being used as a server, notify
users that the system is going down.
2. Back up system files and data.
3. If the system that you are upgrading is being used as a server, shutdown the
operating system by becoming superuser and issuing the shutdown command.
kiwi% su
Password:
# shutdown -gl -y
Caution – Failure to shut down the operating system can result in loss of data.
4. Turn off the power to the monitor.
5. Turn off all attached external devices.
6 Sun Ultra 2 Series to Sun Ultra 60 System Upgrade Guide • December 1997

6. Place the power on/standby switch to standby ( ) (FIGURE 2-1).
7. Verify the following: a. Front panel LED is off. b. System fans are disabled.
Power on/standby switch
FIGURE 2-1 Rear View of an Ultra 2 System
8. Detach all cords and cables connected to the system unit except for the AC power cord.
The AC power cord provides the grounding path for safely discharging static
electricity.
Chapter 2 Performing the Upgrade 7

Removing the Cover
To remove the cover:
1. Use a Phillips screwdriver to remove the lock block (if installed) on the cover
(
FIGURE 2-2).
Lock block
FIGURE 2-2 Location of Lock Block
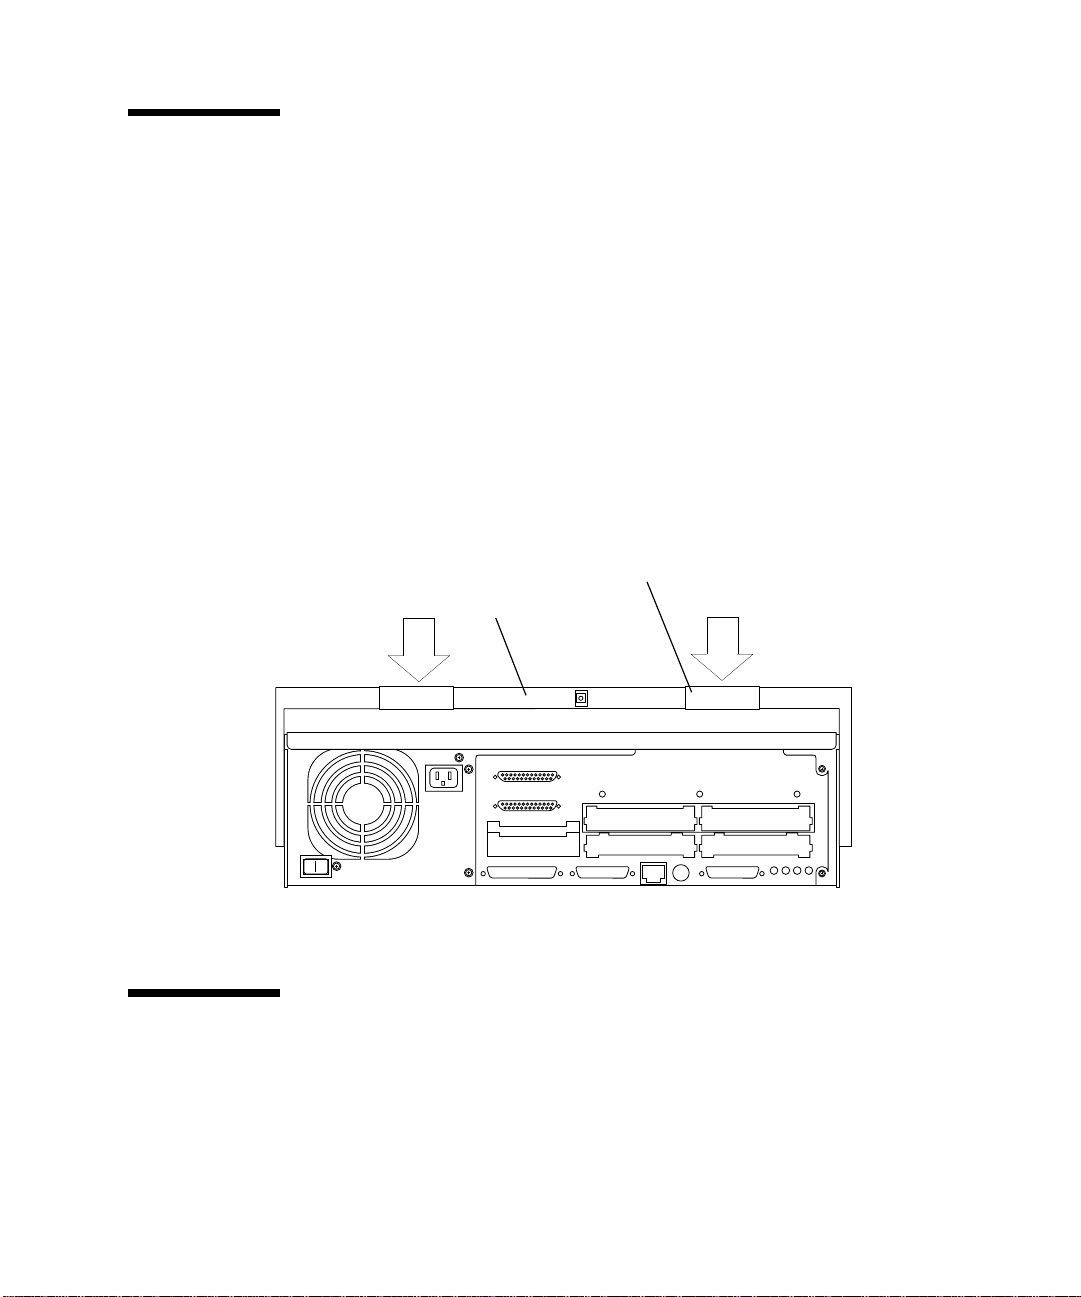
2. Pull the two top cover tabs to free the cover from the back panel ( FIGURE 2-3).
3. Grasp the sides of the cover and proceed as follows: a. Lift the cover from the back panel ( b. When the cover clears the back panel, move the cover away from the front
panel to free it from the chassis and set aside.
8 Sun Ultra 2 Series to Sun Ultra 60 System Upgrade Guide • December 1997
Screw
FIGURE 2-3).

Cover
FIGURE 2-3 Removing the Cover
Top cover tab (2)
Chapter 2 Performing the Upgrade 9

Attaching the Antistatic Wrist Strap
1. Unwrap the first two folds of the wrist strap and wrap the adhesive side firmly
against your wrist (
2. Peel the liner from the copper foil at the opposite end of the wrist strap and attach
the copper end of the wrist strap to the power supply top.
FIGURE 2-4).
Wrist strap
Copper end
FIGURE 2-4 Attaching the Antistatic Wrist Strap
When used properly, a wrist strap keeps static electricity from building up on your
hands.
10 Sun Ultra 2 Series to Sun Ultra 60 System Upgrade Guide • December 1997

Removing DIMMs
Caution – A DIMM is made of delicate electronic components that are extremely
sensitive to static electricity. Handle a DIMM only by the edges. Do not touch the
components on the DIMM or any metal parts. Wear an antistatic wrist strap before
unpacking and while handling a DIMM. Ordinary amounts of static from your
clothes or work environment can damage a DIMM.
Do not disconnect the power cord from the system unit back panel. The power
cord should also be connected to a grounded power outlet. This connection
provides the necessary ground path to safely remove and install DIMMs and other
components.
Be sure that the system unit power switch is set to Standby. Check the green light at
the front of the chassis to be sure it is off.
All Ultra 2 Series systems have at least four identical DIMMs, each set having the
same speed and capacity, installed in paired sockets of a DIMM bank.
Each DIMM has chips mounted on both sides. The part of the DIMM that connects
in the memory slot has gold “fingers,” a scalloped edge with a conductive surface.
FIGURE 2-5 and FIGURE 2-6 show front and back views of a DIMM. When installed, the
key notch should be near the DIMM ejector levers.
Key notch
Key notch
FIGURE 2-5 DIMM—Front View
FIGURE 2-6 DIMM—Back View
Chapter 2 Performing the Upgrade 11

1. Place the antistatic mat next to the system.
2. Locate the DIMMs.
DIMMs are located under the shroud at the left front of the system (
FIGURE 2-7).
3. Lift the right side of the shroud and swing it toward the left side of the system case.
The DIMMs are now accessible for removal.
Shroud
FIGURE 2-7 Shroud covering DIMMs.
12 Sun Ultra 2 Series to Sun Ultra 60 System Upgrade Guide • December 1997

4. Use your fingers or the eraser end of a pencil to move the ejection lever away from
the DIMM that you want to remove.
Ejection levers are greatly enlarged to show detail in
FIGURE 2-8 DIMM Ejection Levers
FIGURE 2-8.
5. Grasp the upper corners of the DIMM and lift to remove it from the slot.
Set the removed DIMMs on an antistatic surface.
6. Install the DIMMs in the Ultra 60 System.
See the Sun Ultra 60 Installation Guide for instructions.
Note – DIMMs in a Ultra 60 must be installed in groups of four. Each pair of
DIMMs installed in a given bank of four must be of the same speed and capacity.
Chapter 2 Performing the Upgrade 13

Removing a CD-ROM Drive
1. Remove the screws securing the drive bracket to the chassis (FIGURE 2-9).
CD-ROM drive
Diskette drive (not visible)
FIGURE 2-9 Drive bracket and drives
2. Remove the DC harness from the clip located on the drive bracket.
3. Disconnect the DC harness from the peripheral power cable at P1.
4. Push the drive bracket toward the disk drive bay and gently flip it over. Place the
drive bracket on top of the disk drive bay.
5. Disconnect the SCSI cable from the CD-ROM drive.
6. Disconnect the peripheral power cable: a. From the CD-ROM drive (P3). b. From the diskette drive (P2) if any.
7. Disconnect the diskette cable from the diskette drive (if any).
8. Place the bracket on the antistatic mat.
Drive bracket
14 Sun Ultra 2 Series to Sun Ultra 60 System Upgrade Guide • December 1997

9. Use a Phillips screwdriver to remove the four screws securing the CD-ROM drive
to the drive bracket (
FIGURE 2-10 Positioning the CD-ROM Drive
FIGURE 2-10).
Screw (4)
Bracket
CD-ROM / tape drive
Note – Save the four screws that you just removed. You will need them to install the
drive in the Ultra 60 System.
10. Remove the CD-ROM drive, and place it aside on an antistatic surface.
11. Install the CD-ROM drive in the Ultra 60 System.
Refer to the Ultra 60 Installation Guide for installation instructions.
Chapter 2 Performing the Upgrade 15

Replacing the Bracket into the Chassis
1. Position the drive bracket on top of the disk drive bay.
2. Connect the diskette cable to the diskette drive, if present:
3. Position the bracket into the chassis.
4. Slide the bracket toward the chassis side opening.
Note – Chassis base hooks must lock into the drive bracket bottom holes.
5. Connect the DC harness to the peripheral power cable at P1.
6. Replace the DC harness to the clip located on the drive bracket.
7. Replace the screws securing the drive bracket to the chassis.
16 Sun Ultra 2 Series to Sun Ultra 60 System Upgrade Guide • December 1997
Replacing the Cover
1. Hold the cover at a 30-degree angle to the system unit.
2. Position the cover lip to the chassis lip.
3. Lower the cover onto the system unit so that the rear of the cover is supported by
the chassis back panel (
4. Press down on both sides of the cover near the front edges until it firmly seats
with the chassis back panel.
5. Press the tabs near the back panel.
6. Position the lock block. Tighten the screw securing the lock block to the cover and back panel.
FIGURE 2-11).
Top cover tab (2)
Cover
FIGURE 2-11 Replacing the Cover
Returning the Old System
Follow the instructions in the RMA documentation to repackage and return the Ultra
2 Series system to Sun.
Chapter 2 Performing the Upgrade 17

18 Sun Ultra 2 Series to Sun Ultra 60 System Upgrade Guide • December 1997
 Loading...