

Page 1

Sun Microsystems, Inc.
www.sun.com
Submit comments about this document at: http://www.sun.com/hwdocs/feedback
Sun Ultra™ 20 Workstation
Setup Guide
Part No. 819-2150-12
March 2006, Revision A
Page 2

Copyright 2006 Sun Microsystems, Inc., 4150 Network Circle, Santa Clara, California 95054, U.S.A. All rights reserved.
Sun Microsystems, Inc. has intellectual property rights relating to technology that is described in this document. In particular, and without
limitation, these intellectual property rights may include one or more of the U.S. patents listed at http://www.sun.com/patents and one or
more additional patents or pending patent applications in the U.S. and in other countries.
This document and the product to which it pertains are distributed under licenses restricting their use, copying, distribution, and
decompilation. No part of the product or of this document may be reproduced in any form by any means without prior written authorization of
Sun and its licensors, if any.
Third-party software, including font technology, is copyrighted and licensed from Sun suppliers.
Parts of the product may be derived from Berkeley BSD systems, licensed from the University of California. UNIX is a registered trademark in
the U.S. and in other countries, exclusively licensed through X/Open Company, Ltd.
Sun, Sun Microsystems, the Sun logo, AnswerBook2, docs.sun.com, Sun Ultra, Java, and Solaris are trademarks or registered trademarks of Sun
Microsystems, Inc. in the U.S. and in other countries.
The OPEN LOOK and Sun™ Graphical User Interface was developed by Sun Microsystems, Inc. for its users and licensees. Sun acknowledges
the pioneering efforts of Xerox in researching and developing the concept of visual or graphical user interfaces for the computer industry. Sun
holds a non-exclusive license from Xerox to the Xerox Graphical User Interface, which license also covers Sun’s licensees who implement OPEN
LOOK GUIs and otherwise comply with Sun’s written license agreements.
U.S. Government Rights—Commercial use. Government users are subject to the Sun Microsystems, Inc. standard license agreement and
applicable provisions of the FAR and its supplements.
DOCUMENTATION IS PROVIDED "AS IS" AND ALL EXPRESS OR IMPLIED CONDITIONS, REPRESENTATIONS AND WARRANTIES,
INCLUDING ANY IMPLIED WARRANTY OF MERCHANTABILITY, FITNESS FOR A PARTICULAR PURPOSE OR NON-INFRINGEMENT,
ARE DISCLAIMED, EXCEPT TO THE EXTENT THAT SUCH DISCLAIMERS ARE HELD TO BE LEGALLY INVALID.
Copyright 2006 Sun Microsystems, Inc., 4150 Network Circle, Santa Clara, Californie 95054, Etats-Unis. Tous droits réservés.
Sun Microsystems, Inc. a les droits de propriété intellectuels relatants à la technologie qui est décrit dans ce document. En particulier, et sans la
limitation, ces droits de propriété intellectuels peuvent inclure un ou plus des brevets américains énumérés à http://www.sun.com/patents et
un ou les brevets plus supplémentaires ou les applications de brevet en attente dans les Etats-Unis et dans les autres pays.
Ce produit ou document est protégé par un copyright et distribué avec des licences qui en restreignent l’utilisation, la copie, la distribution, et la
décompilation. Aucune partie de ce produit ou document ne peut être reproduite sous aucune forme, par quelque moyen que ce soit, sans
l’autorisation préalable et écrite de Sun et de ses bailleurs de licence, s’il y ena.
Le logiciel détenu par des tiers, et qui comprend la technologie relative aux polices de caractères, est protégé par un copyright et licencié par des
fournisseurs de Sun.
Des parties de ce produit pourront être dérivées des systèmes Berkeley BSD licenciés par l’Université de Californie. UNIX est une marque
déposée aux Etats-Unis et dans d’autres pays et licenciée exclusivement par X/Open Company, Ltd.
Sun, Sun Microsystems, le logo Sun, AnswerBook2, docs.sun.com, Sun Ultra, Java, et Solaris sont des marques de fabrique ou des marques
déposées de Sun Microsystems, Inc. aux Etats-Unis et dans d’autres pays.
L’interface d’utilisation graphique OPEN LOOK et Sun™ a été développée par Sun Microsystems, Inc. pour ses utilisateurs et licenciés. Sun
reconnaît les efforts de pionniers de Xerox pour la recherche et le développement du concept des interfaces d’utilisation visuelle ou graphique
pour l’industrie de l’informatique. Sun détient une license non exclusive de Xerox sur l’interface d’utilisation graphique Xerox, cette licence
couvrant également les licenciées de Sun qui mettent en place l’interface d ’utilisation graphique OPEN LOOK et qui en outre se conforment
aux licences écrites de Sun.
LA DOCUMENTATION EST FOURNIE "EN L’ÉTAT" ET TOUTES AUTRES CONDITIONS, DECLARATIONS ET GARANTIES EXPRESSES
OU TACITES SONT FORMELLEMENT EXCLUES, DANS LA MESURE AUTORISEE PAR LA LOI APPLICABLE, Y COMPRIS NOTAMMENT
TOUTE GARANTIE IMPLICITE RELATIVE A LA QUALITE MARCHANDE, A L’APTITUDE A UNE UTILISATION PARTICULIERE OU A
L’ABSENCE DE CONTREFAÇON.
Page 3

iii
Contents
1. System Setup 1
Safety and Compliance Information 1
Planning the Installation Process 2
Package Contents Inventory 3
Front and Back Panels 4
Cabling the Workstation 6
Powering On the Workstation 9
Setting Up or Installing the Operating System 10
Setting Up the Preinstalled Software 10
Installing an Additional Operating System and Drivers 12
Overview Instructions for Additional Operating Systems and Drivers 12
2. Troubleshooting Setup, Documentation, and Downloading Developer
Software Applications 15
Troubleshooting the Sun Ultra 20 Workstation Setup 16
Technical Assistance 18
Sun Ultra 20 Workstation Documentation 20
Finding the Documentation 20
Localization 20
Downloading Deverloper Software Applications 21
Page 4

iv Sun Ultra 20 Workstation Setup Guide • March 2006
Page 5

1
CHAPTER
1
System Setup
This chapter includes information about the following topics:
■ “Safety and Compliance Information” on page 1
■ “Planning the Installation Process” on page 2
■ “Package Contents Inventory” on page 3
■ “Front and Back Panels” on page 4
■ “Cabling the Workstation” on page 6
■ “Powering On the Workstation” on page 9
■ “Setting Up or Installing the Operating System” on page 10
Safety and Compliance Information
Refer to the following documents for safety information regarding the
Sun Ultra™ 20 Workstation:
■ Important Safety Information for Sun Hardware Systems, 816-7190 (included with the
workstation ship kit).
■ Sun Ultra 20 Workstation Safety and Compliance Guide, 819-2149 (available at the
Sun Ultra 20 documentation site. See
“Sun Ultra 20 Workstation Documentation”
on page 20).
Page 6
2 Sun Ultra 20 Workstation Setup Guide • March 2006
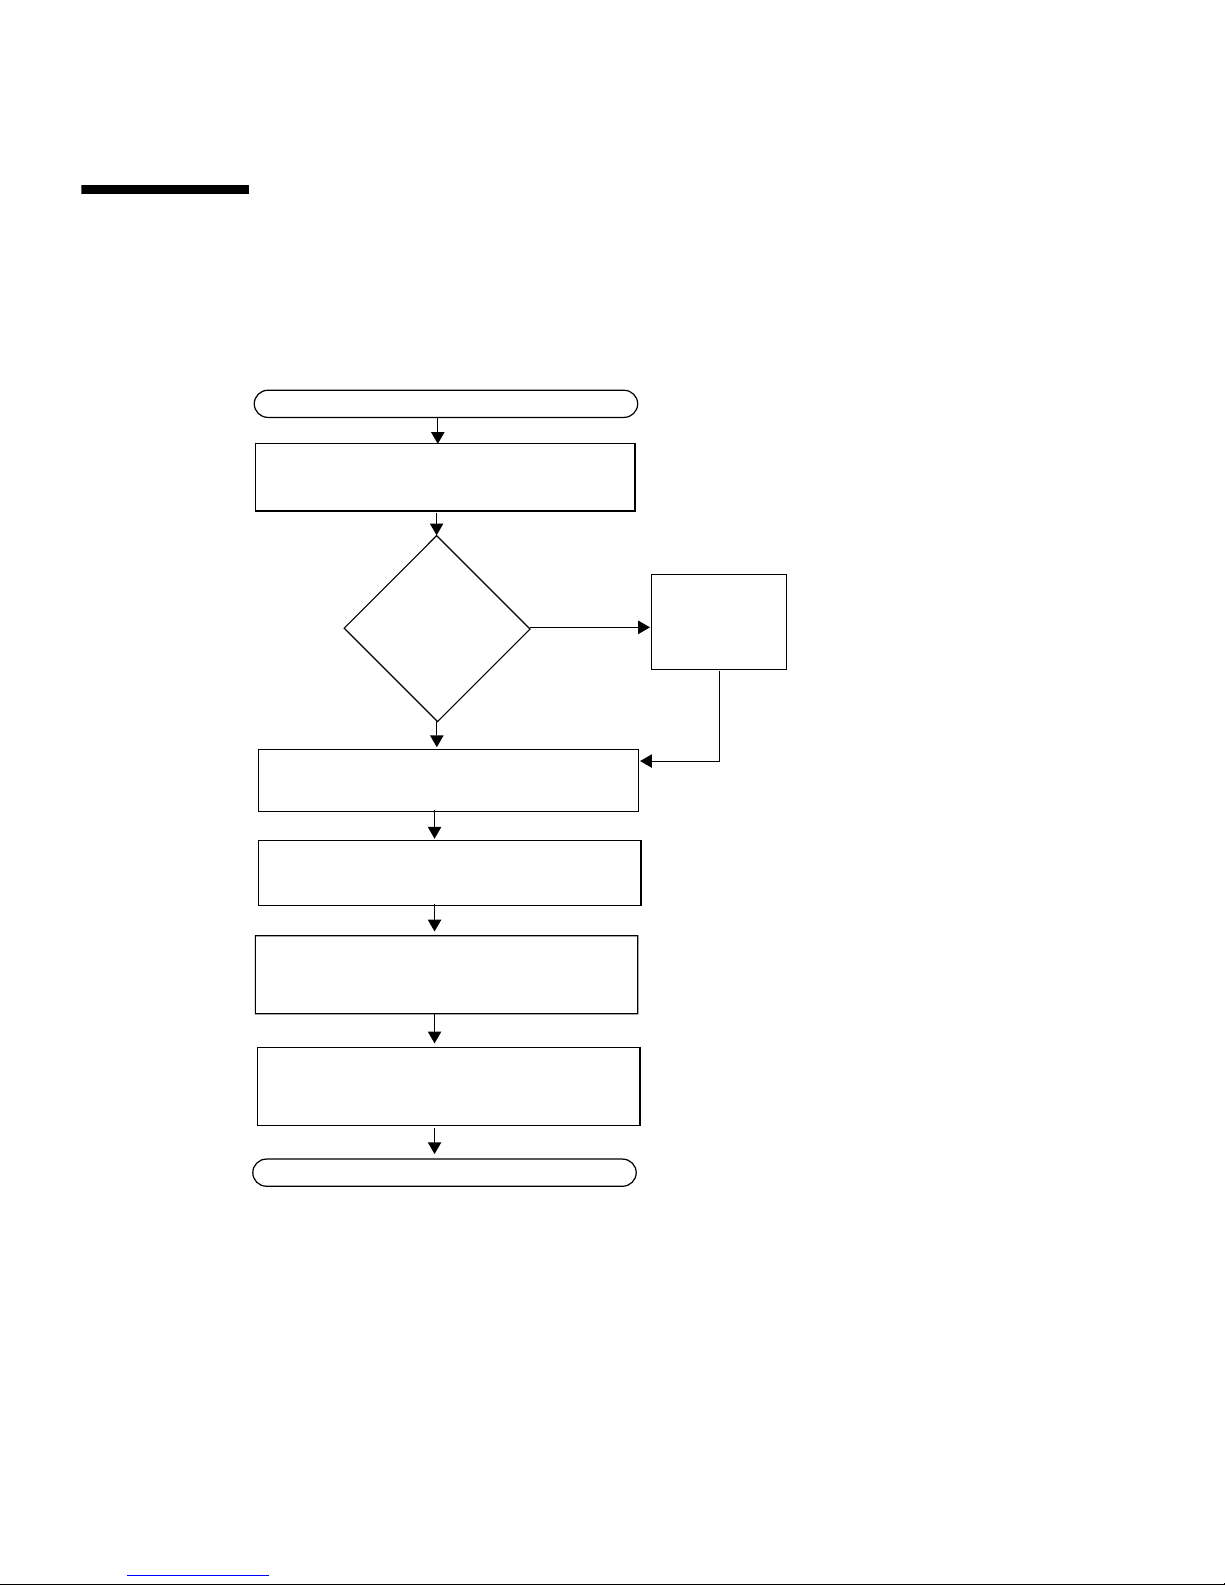
Planning the Installation Process
Use the following flowchart as a process tool to assist you with installation of the
Sun Ultra 20 Workstation.
FIGURE 1-1 Process for Setting Up the Sun Ultra 20 Workstation
Unpack the workstation and familiarize
yourself with the workstation features.
Connect the workstation and external device
cables.
Power on the workstation.
Install the supplemental drivers from the Sun
Ultra 20 Workstation Supplemental CD.
READY TO WORK!
START
Install the operating system or configure the
preinstalled operating system.
Install optional
components?
Install
optional
components
.
Yes
No
See “Package Contents Inventory” on page 3 and
“Front and Back Panels” on page 4.
To install DIMMs, graphic
accelerators, PCI cards, hard
drives, tape drives, or
CD or DVD drives, see the Sun
Ultra 20 Workstation User
Guide or the component
documentation.
See “Cabling the Workstation” on page 6.
See “Powering On the Workstation” on page 9.
See “Setting Up or Installing the Operating
System” on page 10.
See “Installing an Additional Operating System
and Drivers” on page 12.
Page 7
Chapter 1 System Setup 3
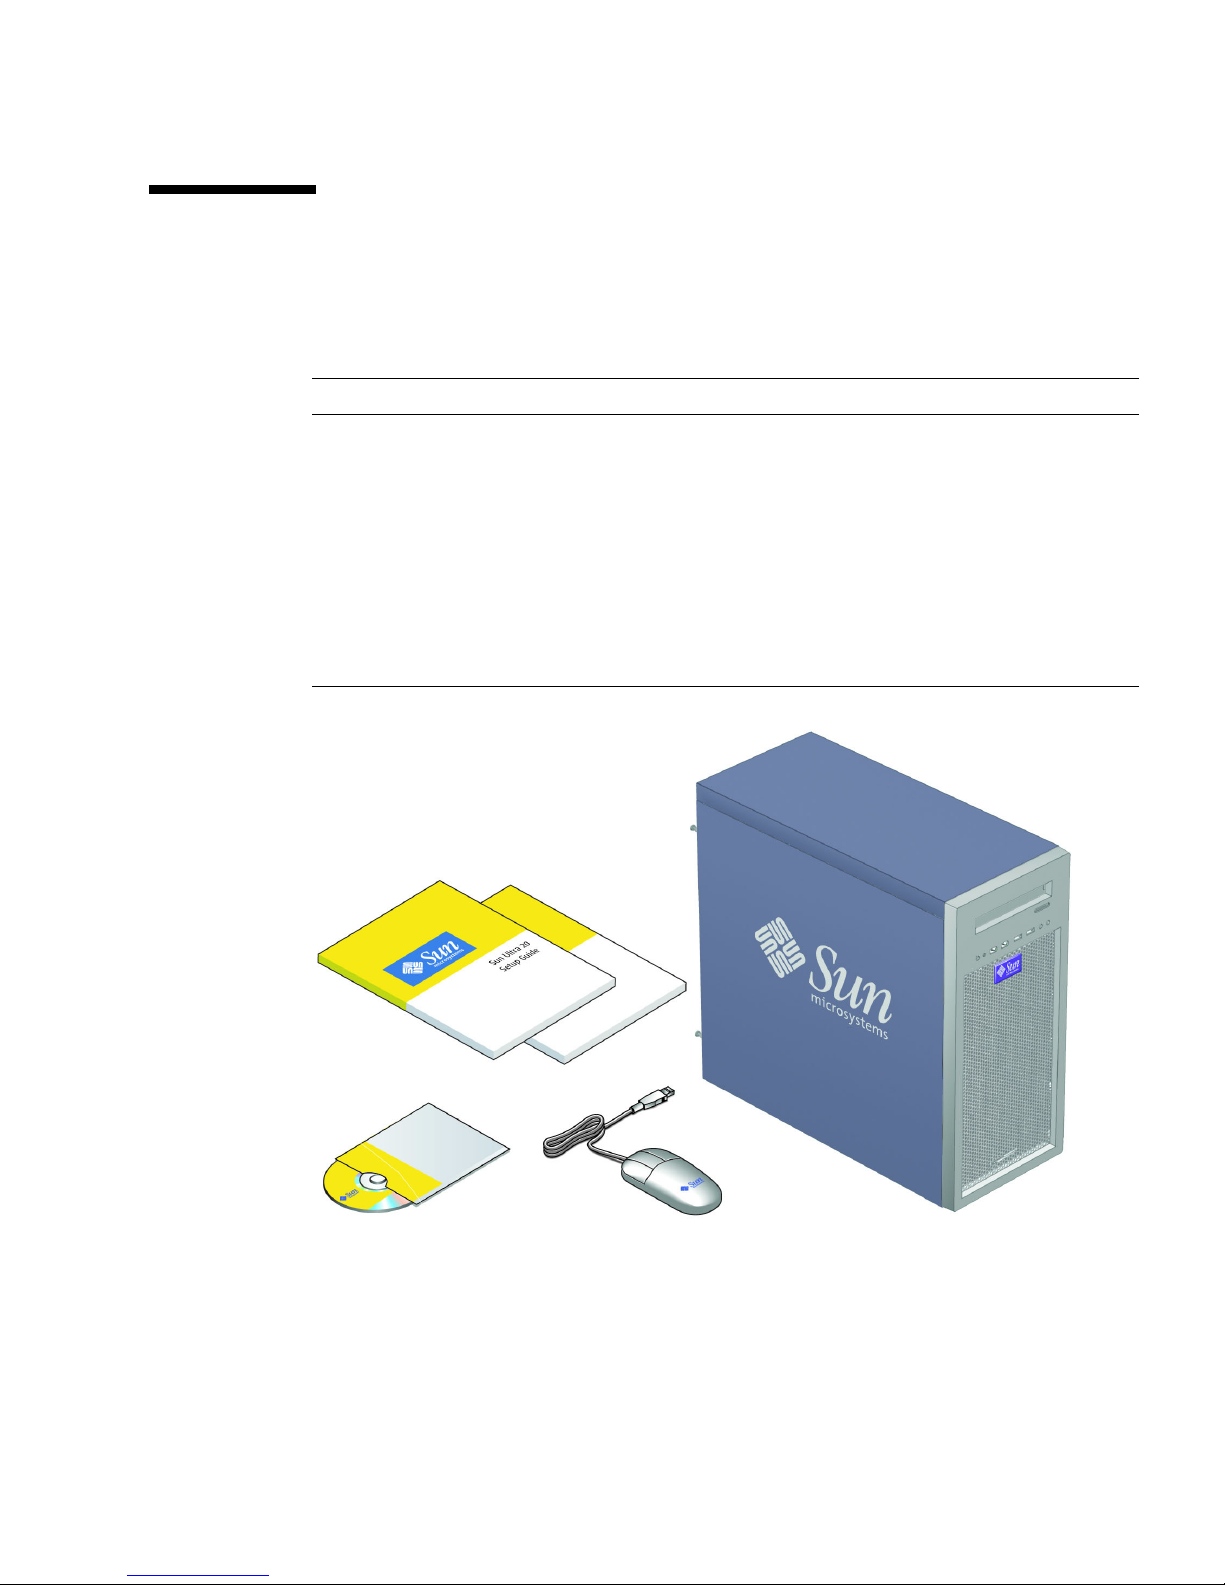
Package Contents Inventory
Carefully unpack all workstation components from the packing cartons. The
following items should be packaged with the Sun Ultra 20 Workstation:
FIGURE 1-2 Sun Ultra 20 Workstation Ship Kit Contents
Description
Hardware • DMS 59 cable (if the workstation has a NVS280 or NVS285 video
card installed)
• Keyboard, mouse and power cord (in separate county kits)
Media • Sun Ultra 20 Workstation Supplemental CD (includes drivers and
diagnostics software)
Documentation • Sun Ultra 20 Workstation Setup Guide
• Sun Ultra 20 Workstation Release Notes
• Where to Find Sun Ultra 20 Workstation Documentation
• Additional safety and license documentation
Page 8
4 Sun Ultra 20 Workstation Setup Guide • March 2006
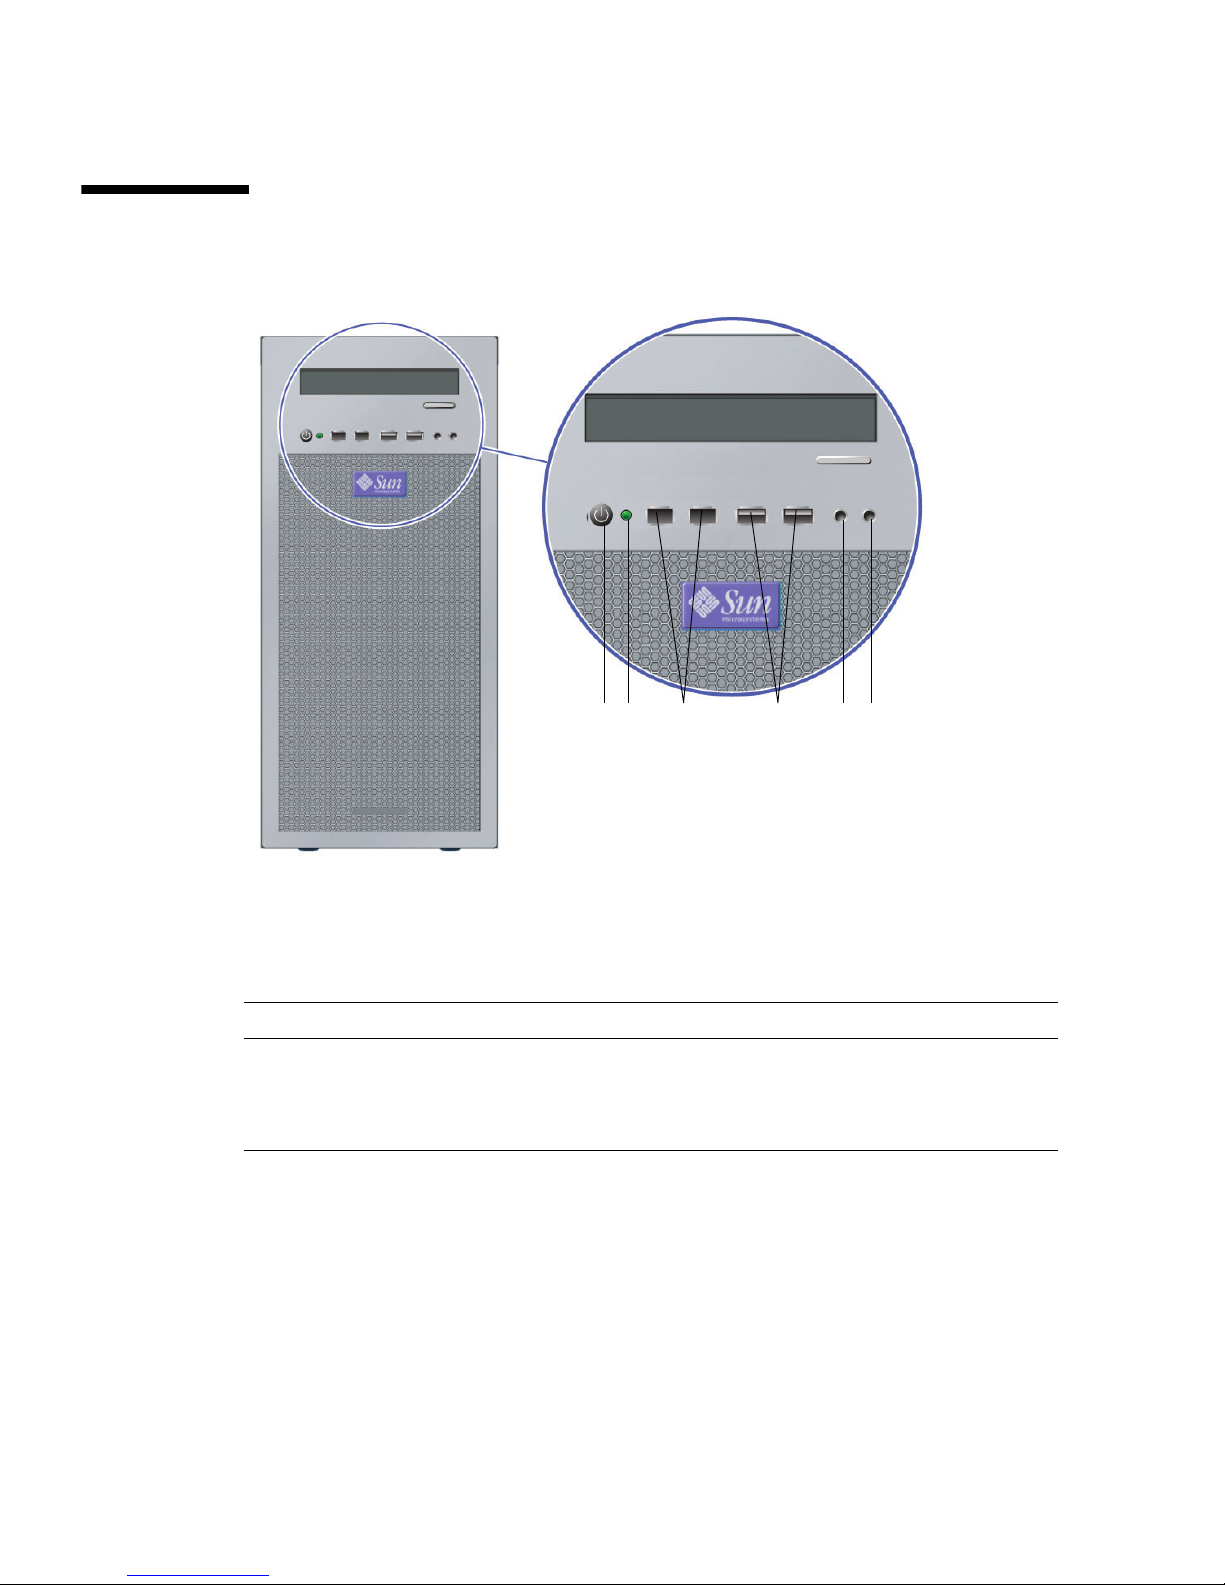
Front and Back Panels
.
FIGURE 1-3 Front Panel
TABLE 1-1 Front Panel
Label Button/LED/Port Label Button/LED/port
1 Power button 4 2 USB ports
2 Power LED 5 Microphone-in jack
3 2 1394 (firewire) ports 6 Headphone-out jack
23 4561
Page 9

Chapter 1 System Setup 5
FIGURE 1-4 Rear Panel
TABLE 1-2 Rear Panel
Label Connector/Slot Label Connector/Slot
1 Power connector 7 Ethernet connector
2 Power switch 8 4 USB connectors
3 Onboard HDI15 video connector 9 PCI Express x16 graphics slot
4 Microphone jack 10 4 PCI slots
5 Line-in jack 11 2 PCI Express x1 slots
6 Line-out jack
1
8
4
3
5
7
9
10
11
6
2
Page 10

6 Sun Ultra 20 Workstation Setup Guide • March 2006
Cabling the Workstation
FIGURE 1-5 Cable Connections
Connect the workstation and external devices in this order (See FIGURE 1-5):
1. Connect the workstation power cord to a grounded electrical outlet.
2. Connect the keyboard and mouse to the USB connectors on the rear of the panel.
3. Connect an Ethernet cable to the Ethernet connector on the Sun Ultra 20
Workstation and connect the other end to an Ethernet RJ45 jack.
Page 11

Chapter 1 System Setup 7
4. Connect the monitor cable as follows:
■ If a x16 PCI Express graphics card is not installed in the top PCI slot, connect the
monitor to the onboard video connector. See the top pane of
FIGURE 1-6.
■ If a x16 PCI Express graphics card is installed in the top PCI slot, connect the
monitor to the graphics card connector. See the bottom pane of
FIGURE 1-6.
You might need a DVI connector to attach the monitor to the graphics card. A
DMS59 cable is included for systems that have an NVS280
or NVS285 card
installed.
Note – The onboard video connector is disabled by default if a graphics card is
installed. If you want to enable the onboard ATI connector, follow the instructions in
the Sun Ultra 20 Workstation User Guide, Appendix B.
5. Connect any additional external devices to the workstation’s other connectors.
Page 12

8 Sun Ultra 20 Workstation Setup Guide • March 2006
FIGURE 1-6 Connecting the Monitor
Page 13

Chapter 1 System Setup 9
Powering On the Workstation
Tip – If you are installing optional internal components such as additional DIMMs,
PCI cards, optical drives, or hard drives, install those components before you power
on the workstation. If you are not installing optional components, you are ready to
power on the workstation.
1. Turn on power to the monitor and to all external devices.
2. Turn the power switch on the rear of the workstation to the On ( | ) position.
See FIGURE 1-4 for the location of the power switch.
3. Press and release the workstation Power button on the front panel (FIGURE 1-7).
FIGURE 1-7 Powering on the Workstation
4. After several seconds, verify that the platform power LED next to the Power
button lights.
The platform power LED lights after the workstation begins the internal booting
process. See
FIGURE 1-3 for location of the platform power LED.
Page 14

10 Sun Ultra 20 Workstation Setup Guide • March 2006
5. If you are powering on the workstation for the first time, you will need to install
the operating system or configure the preinstalled operating system after the
system is finished booting.
See “Setting Up or Installing the Operating System” on page 10.
Setting Up or Installing the Operating
System
Your workstation will have the Solaris™ 10 Operating System preinstalled and the
following software also preinstalled: Sun Studio, Sun Java Studio Enterprise and Sun
Java Studio Creator, and NetBeans IDE.
■ See “Setting Up the Preinstalled Software” on page 10 if you plan to use the
installed operating system.
■ See “Installing an Additional Operating System and Drivers” on page 12 if you
plan to install an additional operating system.
Setting Up the Preinstalled Software
Further information on preinstalled software can be found in the Sun Ultra 20
Workstation Getting Started Guide, 819-2148.
The preinstalled software applications are also available for download. See
“Downloading Deverloper Software Applications” on page 21.
To configure the preinstalled operating system: Use TABLE 1-3 to collect the
information that you need, then follow the system prompts to configure the
operating system.
Page 15

Chapter 1 System Setup 11
TABLE 1-3 Information for Preinstalled Solaris 10 Setup
Setup Window Explanation and Notes Your Information
Select Language
and Locale
Native language and locale to use for the workstation.
Host Name A name to give the workstation.
Network
Connectivity
(IP Address)
Network or stand-alone workstation protocols. A system
administrator might be required to complete this section.
Note: Depending on how you answer and what
information is provided by your network, you might also
be prompted for the workstation’s IP address.
IPv6 Enable IPv6 on the workstation.
Security Settings Security settings and protocols.
Name Service Name service to use: NIS+, NIS, DNS, LDAP, or None.
Note: This window is not displayed if the workstation is
not connected to a network.
Domain Name NIS or NIS+ domain for this workstation.
Note: This window is not displayed if the workstation is
not using the NIS or NIS+ service.
Name Server/
Subnet/
Subnet Mask
Name server (specify the server or have the workstation
find one on a local subnet).
Note: This window is not displayed if the workstation is
not connected to a network.
Note: Depending on how you answer and what
information is provided by your network, you might also
be prompted for:
• The subnet for the workstation
• The subnet mask for the workstation
Time Zone Local time zone (select by geographic region, GMT offset,
or a time zone file).
Date and Time Current date and time (accept the default or enter the
current date and time).
Root Password Root (superuser) password for the workstation.
Proxy Server
Configuration
Workstation connection: direct to the Internet or through a
proxy server.
Page 16

12 Sun Ultra 20 Workstation Setup Guide • March 2006
Installing an Additional Operating System and
Drivers
The Solaris 10 Operating System is preinstalled on your workstation. If you plan to
install an additional operating system, install it at this time. You might need to
remove the Solaris 10 Operating System in order to do this.
The following sources of information can help you with installing additional
operating systems on the Sun Ultra 20 Workstation:
■ Overview instructions for installing the drivers can be found in the following
section:
“Overview Instructions for Additional Operating Systems and Drivers”
on page 12.
■ Detailed information on removing the existing operating system, installing
additional drivers, and installing another operating system is in the Sun Ultra 20
Workstation Getting Started Guide, available at:
http://www.sun.com/products-n-solutions/hardware/docs
/Workstation_Products/Workstations/ultra_20/index.html
■ Drivers for supported operating systems are available on the Sun Ultra 20
Workstation Supplemental CD included with your system and can also be
downloaded from the download link at:
http://www.sun.com/desktop/workstation/ultra20/downloads.html
■ The most recent list of operating systems supported for Sun Ultra 20 Workstation
can be found on the product web site at:
http://sun.com/ultra20
Overview Instructions for Additional Operating Systems and
Drivers
If you want detailed instructions on installing drivers, see the Sun Ultra 20
Workstation Getting Started Guide. If you want to install using overview instructions
only, refer to the following procedures.
Page 17

Chapter 1 System Setup 13
Installing the Operating System
Follow these directions for installing a supported operating system (OS) on the Sun
Ultra 20 Workstation.
1. Power on the Sun Ultra 20 Workstation.
2. Do one of the following:
■ If you are installing a Windows XP or the Solaris 10 Operating System, and the
BIOS Installed O/S option has not been changed from the default, proceed to
Step 3.
■ If you are installing a Linux OS, make the following change to the BIOS settings:
a. Select the Advanced tab and change the Installed O/S option to Linux.
b. Press the F10 key to save your changes and exit the BIOS Setup Utility.
3. Install the operating system, following the instructions that come with the
software.
Note – If you need to install RAID drivers for Windows XP, you will need to create
a new Windows CD before installing the Windows XP OS. See the Sun Ultra 20
Workstation Getting Started Guide for further information.
4. After installing the operating system, install the appropriate drivers from the Sun
Ultra 20 Workstation Supplemental CD, using one of the following procedures.
Installing the Drivers for a Linux OS
To install the drivers from the Supplemental CD for supported Red Hat and SUSE
operating systems:
a. If you have installed Red Hat Enterprise Linux, run the up2date utility.
b. If the CD does not automount, manually mount the CD.
c. Change to the following directory:
/mountpoint/drivers/linux/operating_system
Where mountpoint is the directory the CD is mounted to, and operating_system is
the operating system installed (red_hat or suse).
d. Run ./install.sh
Page 18

14 Sun Ultra 20 Workstation Setup Guide • March 2006
Installing the Drivers for a Windows XP OS
To install the drivers from the Supplemental CD for Windows XP 32-bit or 64-bit:
a. Change to the following directory: D:\drivers\windows\OS\chipset
Where OS is XP32 or XP64.
b. Double-click on the executable file.
c. Follow the instructions in the installation software.
d. Repeat the above instructions for the video drivers in the following directory:
D:\drivers\windows\OS\video
Where OS is XP32 or XP64.
Installing the Drivers for the Solaris 10 OS
If you are using the preinstalled version of Solaris, the drivers are already installed.
To install the drivers from the Supplemental CD if you have reinstalled the Solaris 10
Operating System:
a. Change to the following directory: /cdrom/cdrom0/drivers/sx86
b. Run ./install.sh
Page 19

15
CHAPTER
2
Troubleshooting Setup,
Documentation, and Downloading
Developer Software Applications
This chapter contains information to help you troubleshoot minor workstation
problems.
This chapter includes information on the following topics:
■ “Troubleshooting the Sun Ultra 20 Workstation Setup” on page 16
■ “Technical Assistance” on page 18
■ “Sun Ultra 20 Workstation Documentation” on page 20
■ “Downloading Deverloper Software Applications” on page 21
Page 20

16 Sun Ultra 20 Workstation Setup Guide • March 2006
Troubleshooting the Sun Ultra 20
Workstation Setup
If you experience problems while setting up your workstation, refer to the
troubleshooting information in
TABLE 2-1. For additional troubleshooting
information, see the Sun Ultra 20 Workstation User Guide, 819-2146.
TABLE 2-1 Troubleshooting Procedures
Problem Possible Solution
Workstation powers
on, but the monitor
does not.
• Is the Power button for the monitor turned on?
• Is the monitor power cord connected to a wall outlet?
• Does the wall outlet have power? Test by plugging in another
device.
• Is the monitor connected to the onboard video connector or PCI
Express video connector?
CD or DVD does not
eject from the media
tray when you press
the Eject button.
• Move the mouse or press any key on the keyboard. The drive
might be in low-power mode.
• Use the utility software installed on your workstation to eject the
CD.
No video displays
on the monitor
screen.
• Is the monitor cable attached to the onboard video connector or
PCI Express video connector?
• Does the monitor work when connected to another system?
• If you have another monitor, does it work when connected to the
original system?
• Verify that the BIOS settings are correct.
Page 21

Chapter 2 Troubleshooting Setup, Documentation, and Downloading Developer Software Applications 17
Workstation does
not power on when
the front panel
Power button is
pressed.
Keep notes on the following situations in case you need to call
service:
• Is the power switch on the back of the workstation turned on (see
FIGURE 1-4)?
• Is the Power button LED illuminated on the front of the system?
(Ensure that the power cord is connected to the system and to a
grounded power receptacle.)
• Does the wall outlet have power? Test by plugging in another
device.
• Do you hear a beep when the system is powered on? (Ensure that
the keyboard is plugged in.)
• Test with another keyboard that you know is functional. Do you
hear a beep when you connect the keyboard and power on the
system?
• Does the monitor sync within 5 minutes after power on? (The
green LED on the monitor stops flashing and remains
illuminated.)
Keyboard or mouse
does not respond to
actions
• Verify that the mouse and keyboard cables are connected to the
on-board USB 2.0 connectors on the workstation.
• Verify that the workstation is powered on and the front Power
LED is illuminated.
Workstation appears
to be in low-power
mode, but the Power
button LED does not
blink.
The power-indicator LED blinks only when all workstation
components are in low-power mode. A tape drive might be
connected to your workstation. Because tape drives do not enter
low-power mode, the power-indicator LED does not blink.
Hung or frozen
workstation: No
response from
mouse, keyboard or
any application.
Try to access your workstation from another system on the network.
1. From a terminal window, type: ping hostname
2. If there is no response, remotely log in from another system using
telnet or rlogin, and ping the system again.
3. Attempt to kill processes until the system responds.
If the above procedure does not work:
1. Press the Power button to power off the system.
2. Wait 20 to 30 seconds and power on the system.
TABLE 2-1 Troubleshooting Procedures
Problem Possible Solution
Page 22

18 Sun Ultra 20 Workstation Setup Guide • March 2006
Technical Assistance
If the troubleshooting procedures in this chapter fail to solve your problem, use
TABLE 2-2 to collect information that you might need to communicate to the support
personnel. TABLE 2-3 lists the Sun web sites and telephone numbers for additional
technical support.
TABLE 2-2 System Information Required for Support
System Configuration Information Needed Your Information
Sun service contract number
System model
Operating system, including service pack number or
update number
System serial number
Peripherals attached to the system
Hardware configuration information, including the
following:
• Graphics cards installed
• PCI or PCI Express cards installed
• Amount of memory
• Processor speed
• Optical disk type
Email address and phone number for you and a
secondary contact
Street address where the system is located
Superuser password
Summary of the problem and the work being done
when the problem occurred
Output of diagnostics test, if applicable
Other useful information
IP address
Workstation name (System host name)
Network or internet domain name
Proxy server configuration
Page 23

Chapter 2 Troubleshooting Setup, Documentation, and Downloading Developer Software Applications 19
TABLE 2-3 Sun Web Sites and Telephone Numbers
Workstation Documents and Support
Resources
URL or Telephone Number
PDF and HTML files for all the current
Sun Ultra 20 Workstation documents.
http://www.sun.com/documentation/
Solaris and other software documents.
This web site has full search
capabilities.
http://docs.sun.com/documentation/
Discussion and troubleshooting forums. http://supportforum.sun.com/
Support, diagnostic tools, and alerts for
all Sun products.
http://www.sun.com/bigadmin/
Software patches, lists of system
specifications, troubleshooting and
maintenance information, and other
tools.
http://www.sunsolve.sun.com/handbook_pub/
Service support phone numbers. 1-800-872-4786 (1-800-USA-4Sun) Select Option 1
International telephone numbers for
SunService Support.
http://www.sun.com/service/contacting/solution.html
Warranty and contract support contacts.
Links to other service tools.
http://www.sun.com/service/warrantiescontracts/
Warranties for every Sun product. http://www.sun.com/service/warranty
Page 24

20 Sun Ultra 20 Workstation Setup Guide • March 2006
Sun Ultra 20 Workstation
Documentation
Finding the Documentation
The documentation in the following table for the Sun Ultra 20 Workstation can be
found at:
http://www.sun.com/products-n-solutions/hardware/docs/
Workstation_Products/Workstations/ultra_20/
Localization
This document, and others, are available in the following languages: French,
Spanish, German, Italian, Swedish, Japanese, Traditional Chinese, Simplified
Chinese, Korean or Russian. Please refer to the Sun Ultra 20 Workstation Getting
Started Guide, the Sun Ultra 20 Workstation User Guide, and the Sun Ultra 20
Workstation Release Notes at:
http://www.sun.com/products-n-solutions/hardware/docs/
Workstation_Products/Workstations/ultra_20/
Please note that English versions of these documents are updated more frequently
and may contain more current information about the Sun Ultra 20 Workstation.
Application Title Part Number
System overview,
troubleshooting,
diagnostics and service
information
Sun Ultra 20 Workstation User Guide 819-2146
Installation information Sun Ultra 20 Workstation Getting Started
Guide
819-2148
Safety Information Sun Ultra 20 Workstation Safety and
Compliance Guide
819-2149
Late-breaking information Sun Ultra 20 Workstation Release Notes 819-2147
Page 25

Chapter 2 Troubleshooting Setup, Documentation, and Downloading Developer Software Applications 21
Downloading Deverloper Software
Applications
Developer software applications are preinstalled on the Sun Ultra 20 workstation. To
download the software packages, go to the web sites below. The sites contain the
software packages, updates, documentation, and more.
Software Package Download Site
Sun Studio http://developers.sun.com/sunstudio
Java Studio Enterprise http://developers.sun.com/jsenterprise
Java Studio Creator http://developers.sun.com/jscreator
NetBeans http://www.netbeans.org
Page 26

22 Sun Ultra 20 Workstation Setup Guide • March 2006
 Loading...