

Page 1
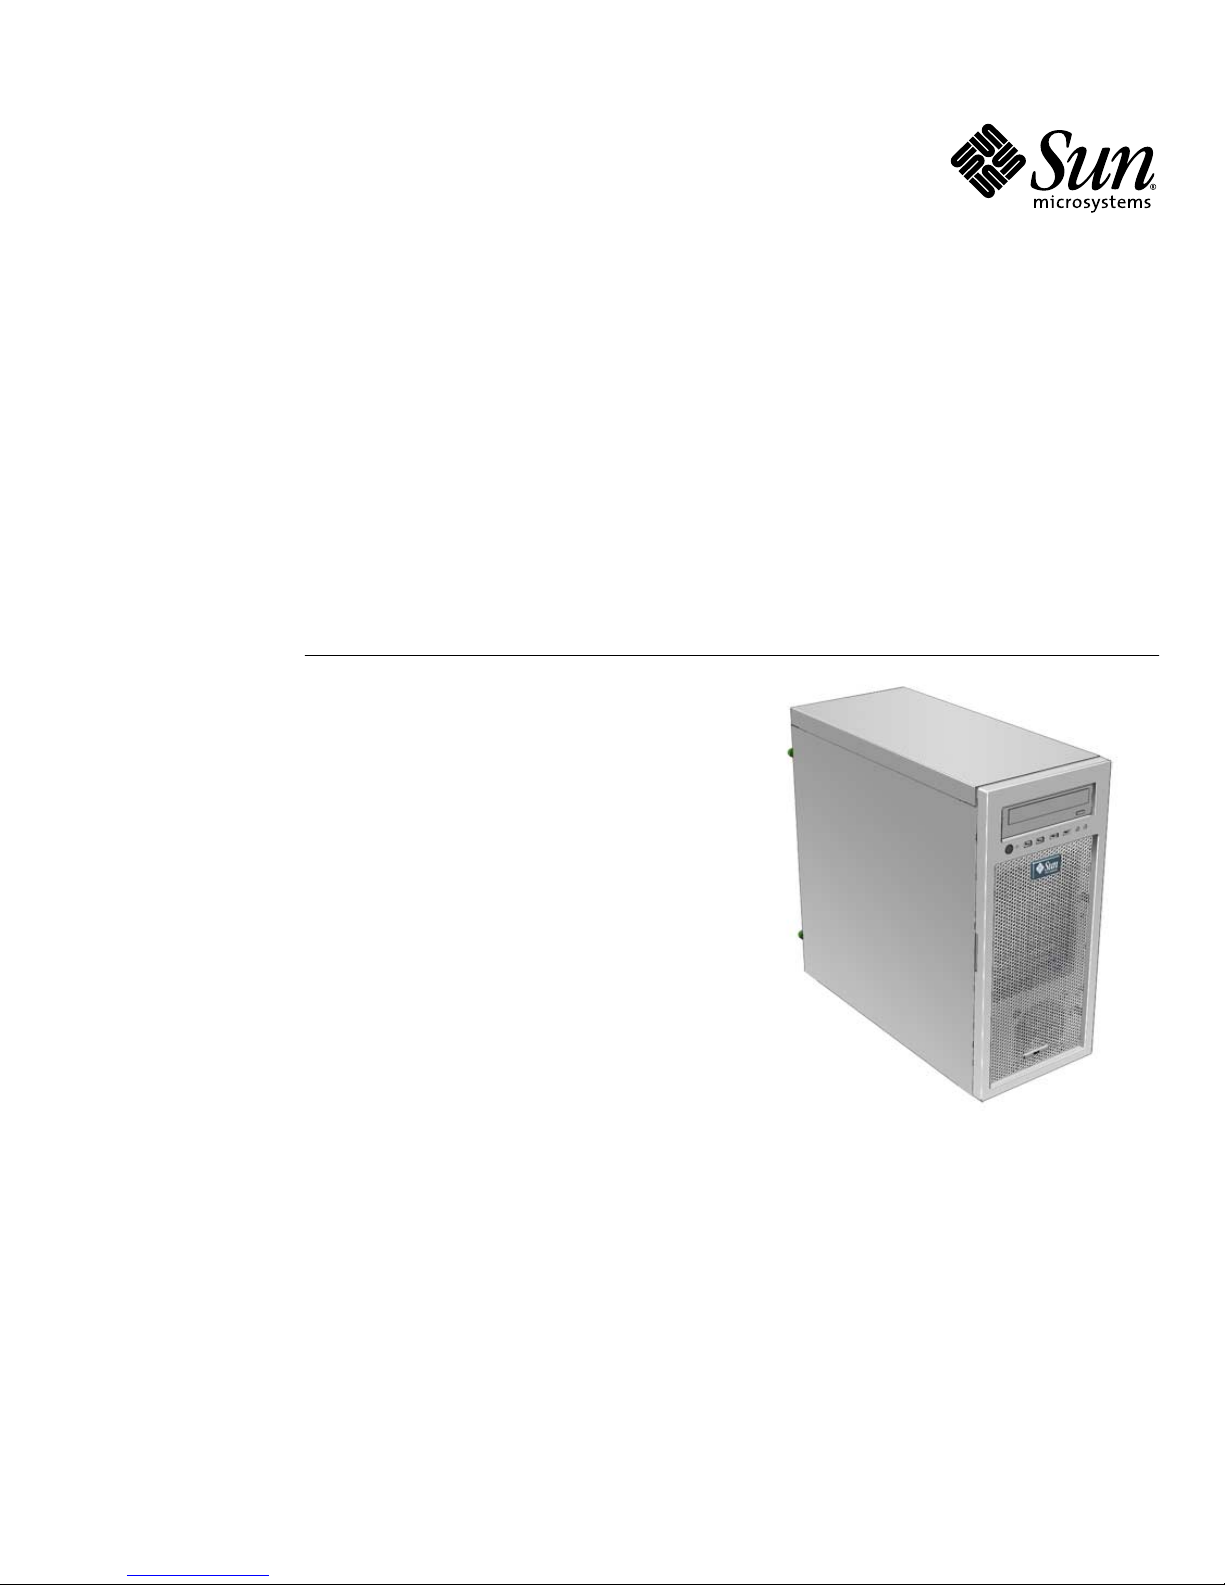
Sun Ultra™ 24 Workstation
Installation Guide
Sun Microsystems, Inc.
www.sun.com
Part No. 820-2475-10
October 2007, Revision A
Submit comments about this document at: http://www.sun.com/hwdocs/feedback
Page 2

Copyright ©2007 SunMicrosystems, Inc., 4150 Network Circle, Santa Clara, California 95054, U.S.A. All rights reserved.
This distributionmay includematerials developedby third parties.
Sun, SunMicrosystems, the Sun logo, Java, Netra, Solaris, Sun Ray, SunUltra ,the JavaCoffee Cup logo, the Solaris logo, Sun Ultra 24, Ultra 24,
Sun andSun Microsystems Inc. are trademarks or registeredtrademarks ofSun Microsystems, Inc. in the U.S. and other countries.
Intel ®Intel isa trademarkor registered trademarkof IntelCorporation orits subsidiaries in the United States and other countries. Intel Inside®
Intel Insideis atrademark orregistered trademark of Intel Corporation or its subsidiaries in the United States and other countries.
This product is covered and controlled by U.S. Export Control lawsand maybe subjectto theexport orimport lawsin othercountries. Nuclear,
missile, chemicalbiological weaponsor nuclearmaritime enduses orend users,whether direct or indirect, are strictly prohibited.Export or
reexport to countries subject to U.S. embargo or to entities identified on U.S. export exclusion lists, including, but not limited to, the denied
persons andspecially designatednationals listsis strictlyprohibited.
Use ofany spare or replacement CPUs is limited to repair or one-for-onereplacement of CPUs in products exported in compliance with U.S.
export laws.Use ofCPUs asproduct upgrades unless authorized by the U.S. Government is strictly prohibited.
Copyright ©2007 SunMicrosystems, Inc., 4150 Network Circle, Santa Clara, California 95054, Etats-Unis. Tous droits réservés.
Cette distributionpeut inclure des élémentsdéveloppés pardes tierces parties.
Sun, SunMicrosystems, le logo Sun, Java, Netra, Solaris, Sun Ray, SunUltra ,le logoJava Coffee Cup, le logo Solaris, Sun Ultra 24, Ultra 24, Sun
et SunMicrosystems Inc. sont des marques de fabrique ou des marques déposées de Sun Microsystems, Inc.aux Etats-Uniset dansd’autres
pays.
Intel estune marque de fabriqueou unemarque déposée de Intel Corporation ou de sa filiale aux Etats-Unis et dans d’autres pays.
Ce produit est soumisà lalégislation américainesur lecontrôle desexportations etpeut être soumis à la règlementation en vigueur dans
d’autres pays dans le domaine des exportations et importations. Les utilisations finales, ou utilisateurs finaux, pour des armes nucléaires, des
missiles, desarmes biologiqueset chimiquesou dunucléaire maritime, directement ou indirectement, sont strictement interdites. Les
exportations oureexportations vers les pays sous embargo américain, ou vers des entités figurant sur les listes d’exclusion d’exportation
américaines, ycompris, maisde maniere non exhaustive,la listede personnesqui fontobjet d’unordre de ne pas participer, d’une façon directe
ou indirecte, aux exportationsdes produits ou des services qui sont régis par la législation américaine sur le contrôle des exportations et la liste
de ressortissants spécifiquement désignés,sont rigoureusement interdites. L’utilisation de pièces détachées ou d’unités centrales de
remplacement est limitée aux réparations ou à l’échange standard d’unités centrales pour les produits exportés, conformément à la législation
américaine enmatière d’exportation. Sauf autorisation par les autorités des Etats-Unis, l’utilisation d’unités centrales pour procéder à des mises
à jourde produits est rigoureusement interdite.
Page 3

Contents
Preface v
1. Introduction to the Sun Ultra 24 Workstation Hardware 1–1
1.1 Planning the Installation Process 1–2
1.2 Inventorying Package Contents 1–3
1.3 Front Panel 1–3
1.4 Back Panel 1–5
1.5 Interior Components 1–6
1.6 Connecting External Devices to the Workstation 1–7
1.7 Powering the Workstation On and Off 1–9
1.8 Adding and Removing Devices To and From the Boot Menu 1–10
2. Configuring the Preinstalled Solaris OS and Using Preinstalled Developer
Software 2–1
2.1 Configuring the Solaris 10 OS 2–1
2.1.1 Licensing Information 2–2
2.1.2 Disk Configuration 2–2
2.1.3 Installation Flowchart 2–2
2.1.4 Configuring the Preinstalled Solaris 10 OS 2–3
2.2 Exploring Preinstalled Developer Software 2–5
2.2.1 Sun Studio Software 2–6
iii
Page 4

2.2.2 Sun Java Studio Creator 2–6
2.2.3 Sun Java Studio Enterprise 2–7
2.2.4 NetBeans IDE 2–7
2.2.5 Sun Java Enterprise System 2–7
2.3 Restoring or Reinstalling the Operating System 2–8
A. Configuring the System for Dual Monitors A–1
A.1 To Configure Solaris for Multiple Displays A–1
A.2 To Configure Windows for Multiple Displays A–2
A.3 To Configure Linux for Multiple Displays A–3
B. Troubleshooting Setup and Obtaining Technical Assistance B–1
B.1 Troubleshooting the Sun Ultra 24 Workstation Setup B–2
B.2 Technical Assistance B–3
C. Tools and Drivers DVD, Supported Operating Systems, and System
Specifications C–1
C.1 Tools and Drivers DVD Software C–1
C.2 Supported Operating System Software C–2
C.3 Sun Ultra 24 Workstation Features and Specifications C–3
C.3.1 System Components and Features C–3
C.3.2 Memory Configurations C–4
C.3.3 PCI-E and PCI Expansion Slots C–5
C.3.4 Physical Specifications C–5
C.3.5 Power Specifications C–6
C.3.6 Environmental Specifications C–6
iv Sun Ultra 24 Workstation Installation Guide • October 2007
Page 5

Preface
The Sun Ultra 24 Workstation Installation Guide provides the information that you
need to set up and configure the workstation hardware and software.
How This Book Is Organized
This guide is organized into the following chapters:
Chapter 1 contains instructions on unpacking, cabling, and powering the
workstation.
Chapter 2 explains how to set up the preinstalled Solaris™ 10 OS and additional
development software.
Appendix A describes how to configure the Solaris, Linux, and Windows operating
systems for dual monitors.
Appendix B discusses troubleshooting system issues and obtaining support.
Appendix C provides information about the Sun Ultra 24 workstation Tools and
Drivers DVD, supported operating systems, and system specifications.
v
Page 6

Shell Prompts
Shell Prompt
C shell machine-name%
C shell superuser machine-name#
Bourne shell and Korn shell $
Bourne shell and Korn shell superuser #
Typographic Conventions
Typeface
AaBbCc123 The names of commands, files,
AaBbCc123
AaBbCc123 Book titles, new words or terms,
* The settings on your browser might differ from these settings.
*
Meaning Examples
and directories; onscreen
computer output
What you type, when contrasted
with onscreen computer output
words to be emphasized.
Replace command-line variables
with real names or values.
Edit your.login file.
Use ls -a to list all files.
% You have mail.
% su
Password:
Read Chapter 6 in the User’s Guide.
These are called class options.
You must be superuser to do this.
To delete a file, type rm filename.
vi Sun Ultra 24 Workstation Installation Guide • October 2007
Page 7

Related Documentation
The document set for the Sun Ultra 24 workstation is described in the Where To Find
Sun Ultra 24 Workstation Documentation sheet that is packed with your system.
Additionally, you can find the Sun Ultra 24 workstation documentation at
http://docs.sun.com/app/docs/prod/ultra24.
Translated versions of some of these documents are available at
http://docs.sun.com. Select a language from the drop-down list and navigate to
the Sun Ultra 24 document collection using the workstation category link. Available
translations for the Sun Ultra 24 workstation include Simplified Chinese, Traditional
Chinese, French, Japanese, and Korean.
English documentation is revised more frequently and might be more up-to-date
than the translated documentation.
Documentation, Warranty, Support,
and Training URLs
Sun Function URL Description
Hardware
Documentation
Software
Documentation
Warranty http://www.sun.com/service/support/
Support http://www.sun.com/support/ Obtain technical support, including
Training http://www.sun.com/training/ Learn about Sun courses and educational
http://www.sun.com/documentation Read Sun hardware documents.
http://docs.sun.com Read Solaris OS and other software
documents.
View specific details regarding your
warranty/index.html
warranty.
patches.
offerings.
Preface vii
Page 8

Ordering Components
You can order additional components and replacement parts for the Sun Ultra 24
workstation. Contact your local Sun sales representative for more information. For
the most up-to-date component information, see the Sun Ultra 24 workstation
components list at http://sunsolve.sun.com/handbook_pub/.
Third-Party Web Sites
Sun is not responsible for the availability of third-party web sites mentioned in this
document. Sun does not endorse and is not responsible or liable for any content,
advertising, products, or other materials that are available on or through such sites
or resources. Sun will not be responsible or liable for any actual or alleged damage
or loss caused by or in connection with the use of or reliance on any such content,
goods, or services that are available on or through such sites or resources.
Safety Information
Read the following documents for safety information:
■ Important Safety Information for Sun Hardware Systems
■ Sun Ultra 24 Workstation Safety and Compliance Guide
Sun Welcomes Your Comments
Sun is interested in improving its documentation and welcomes your comments and
suggestions, which you can submit at http://www.sun.com/hwdocs/feedback.
Please include the title and part number of your document with your feedback:
Sun Ultra 24 Workstation Installation Guide, 820-2475-10.
viii Sun Ultra 24 Workstation Installation Guide • October 2007
Page 9

CHAPTER
1
Introduction to the Sun Ultra 24
Workstation Hardware
This chapter provides an overview of the Sun Ultra 24 workstation hardware.
This chapter includes the following sections:
■ Section 1.1, “Planning the Installation Process” on page 1-2
■ Section 1.2, “Inventorying Package Contents” on page 1-3
■ Section 1.3, “Front Panel” on page 1-3
■ Section 1.4, “Back Panel” on page 1-5
■ Section 1.5, “Interior Components” on page 1-6
■ Section 1.6, “Connecting External Devices to the Workstation” on page 1-7
■ Section 1.7, “Powering the Workstation On and Off” on page 1-9
■ Section 1.8, “Adding and Removing Devices To and From the Boot Menu” on
page 1-10
1-1
Page 10
1.1 Planning the Installation Process
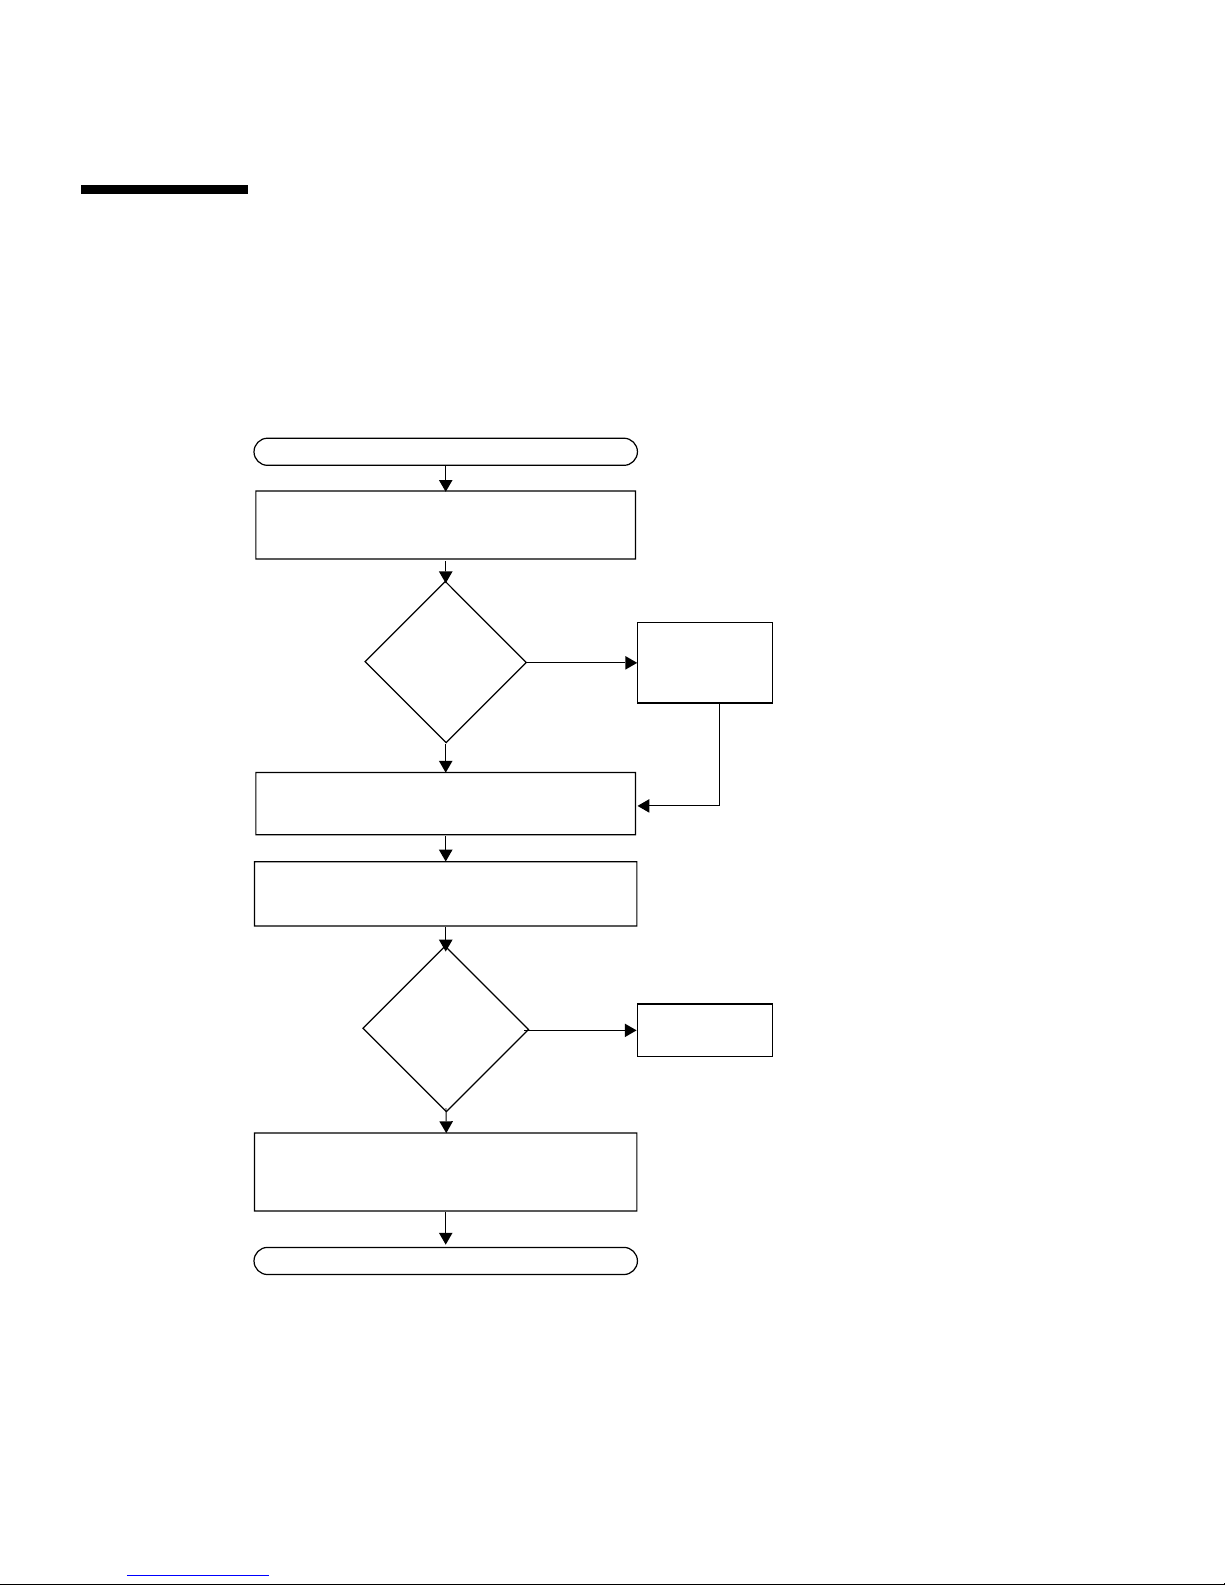
Use the following flowchart as a process tool to assist you with installation of the
Sun Ultra 24 workstation.
FIGURE 1-1 Process for Setting Up the Sun Ultra 24 Workstation
START
More information is available
Unpack the workstation and
familiarize yourself with the
workstation features.
Install
optional
components?
Ye s
Install
optional
components.
in “Front Panel” on page 3
and “Back Panel” on page 5.
For information about how
to install DIMMs, graphic
accelerator cards, PCI
cards, hard drives, or CD or
DVD drives, refer to the
Ultra 24 Workstation Service
Manual
.
Sun
No
Connect the workstation and
external device cables.
Power on the workstation.
Configure
preinstalled
OS
software?
Ye s
Configure the preinstalled Solaris 10
Operating System.
READY TO WORK!
No
Install your
OS.
For instructions, go to
“Connecting External Devices
to the Workstation” on page 7.
For instructions, go to
“Powering the Workstation
On and Off” on page 9.
For information about how to
install an optional, supported
OS, refer to the Sun Ultra 24
Workstation Operating System
Guide.
For instructions about how
to perform this task, go to
“Configuring the Solaris 10
OS” on page 1.
See Appendix C and the
Sun Ultra 24 Workstation
Operating System Guide.
1-2 Sun Ultra 24 Workstation Installation Guide • October 2007
Page 11

1.2 Inventorying Package Contents
Carefully unpack all workstation components from the packing cartons. The
following items are contained in the package.
TABLE 1-1 Items Included in the Sun Ultra 24 Workstation Box
Hardware • Sun Ultra 24 workstation
• DMS-59 cable
(if the workstation is configured with an NVS290 graphics card)
Documentation • Sun Ultra 24 Workstation Installation Guide
(this document)
• Where to Find Sun Ultra 24 Workstation Documentation
(lists available online documents for this product)
• Sun safety, warranty, and license documents
CD-ROM • Sun Ultra 24 Workstation Tools and Drivers DVD
(includes drivers and diagnostics software)
If you ordered an optional country kit, the kit ships in a separate package and
includes a power cable, keyboard, and mouse.
Note – Use only a Type 7 keyboard and mouse with the Sun Ultra 24 workstation.
1.3 Front Panel
TABLE 1-2 lists the front panel components of the Sun Ultra 24 workstation. See
FIGURE 1-2 for the location of these components.
TABLE 1-2 Front Panel Components
Label Button/LED/Port Label Button/LED/port
1 Power button 4 Two USB 2.0 ports
2 Power LED 5 Microphone-in jack
3 Two 1394 ports 6 Headphone-out jack
Chapter 1 Introduction to the Sun Ultra 24 Workstation Hardware 1-3
Page 12
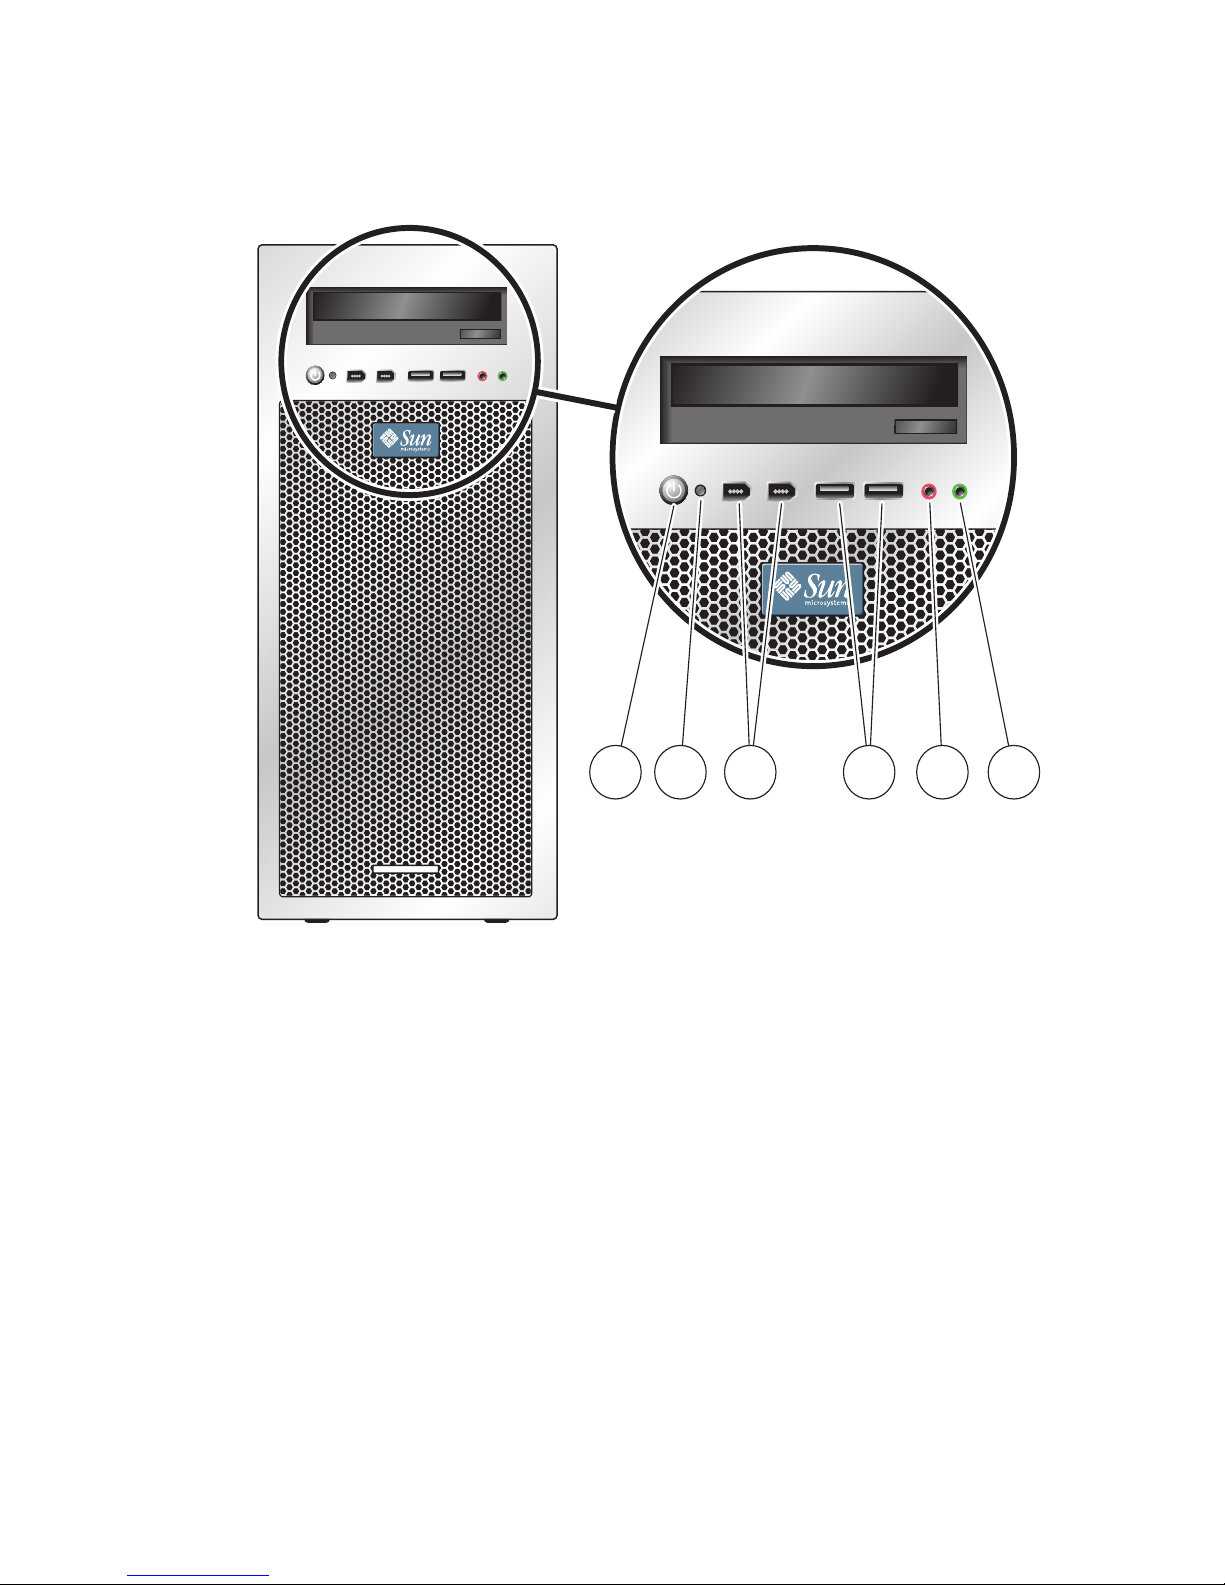
FIGURE 1-2 Front Panel Components
12 3 4 5 6
1-4 Sun Ultra 24 Workstation Installation Guide • October 2007
Page 13
1.4 Back Panel
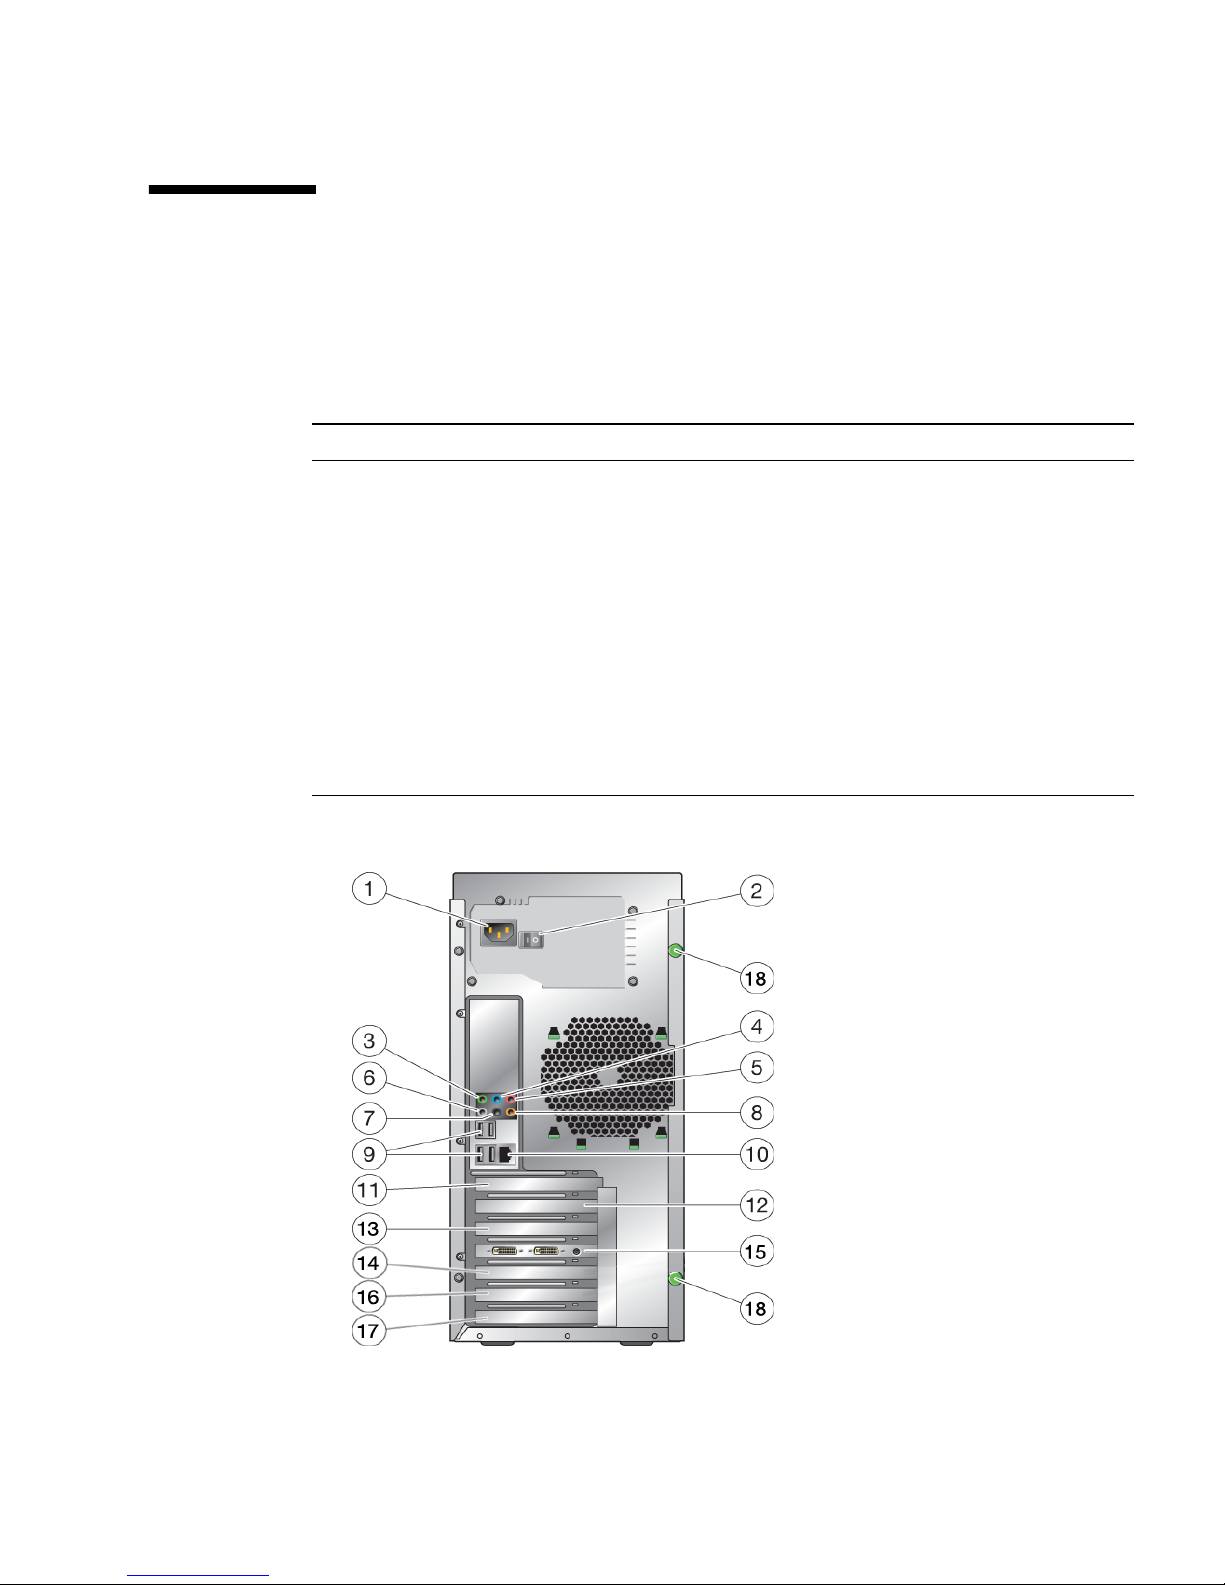
TABLE 1-3 lists the Sun Ultra 24 workstation back panel components. These
components are called out in
TABLE 1-3 Back Panel Components
Label Connector/Slot Label Connector/Slot
1 Power connector 10 One Ethernet connector
2 Power switch 11 Cover plate, no slot
3 Front audio connector (green) 12 PCI Express x16 slot
4 Line-in jack (blue) 13 PCI Express x1 slot
5 Microphone jack (pink) 14 PCI 33 MHz 32-bit slot
6 Side audio connector (gray) 15 PCI Express x16 slot
7 Back audio connector (black) 16 PCI 33 MHz 32-bit slot
8 Center audio connector (orange) 17 PCI E x8 mechanical slot (x4 electrical)
9 Four USB 2.0 connectors 18 Thumbscrews (for side cover)
FIGURE 1-3.
FIGURE 1-3 Back Panel Components
Chapter 1 Introduction to the Sun Ultra 24 Workstation Hardware 1-5
Page 14
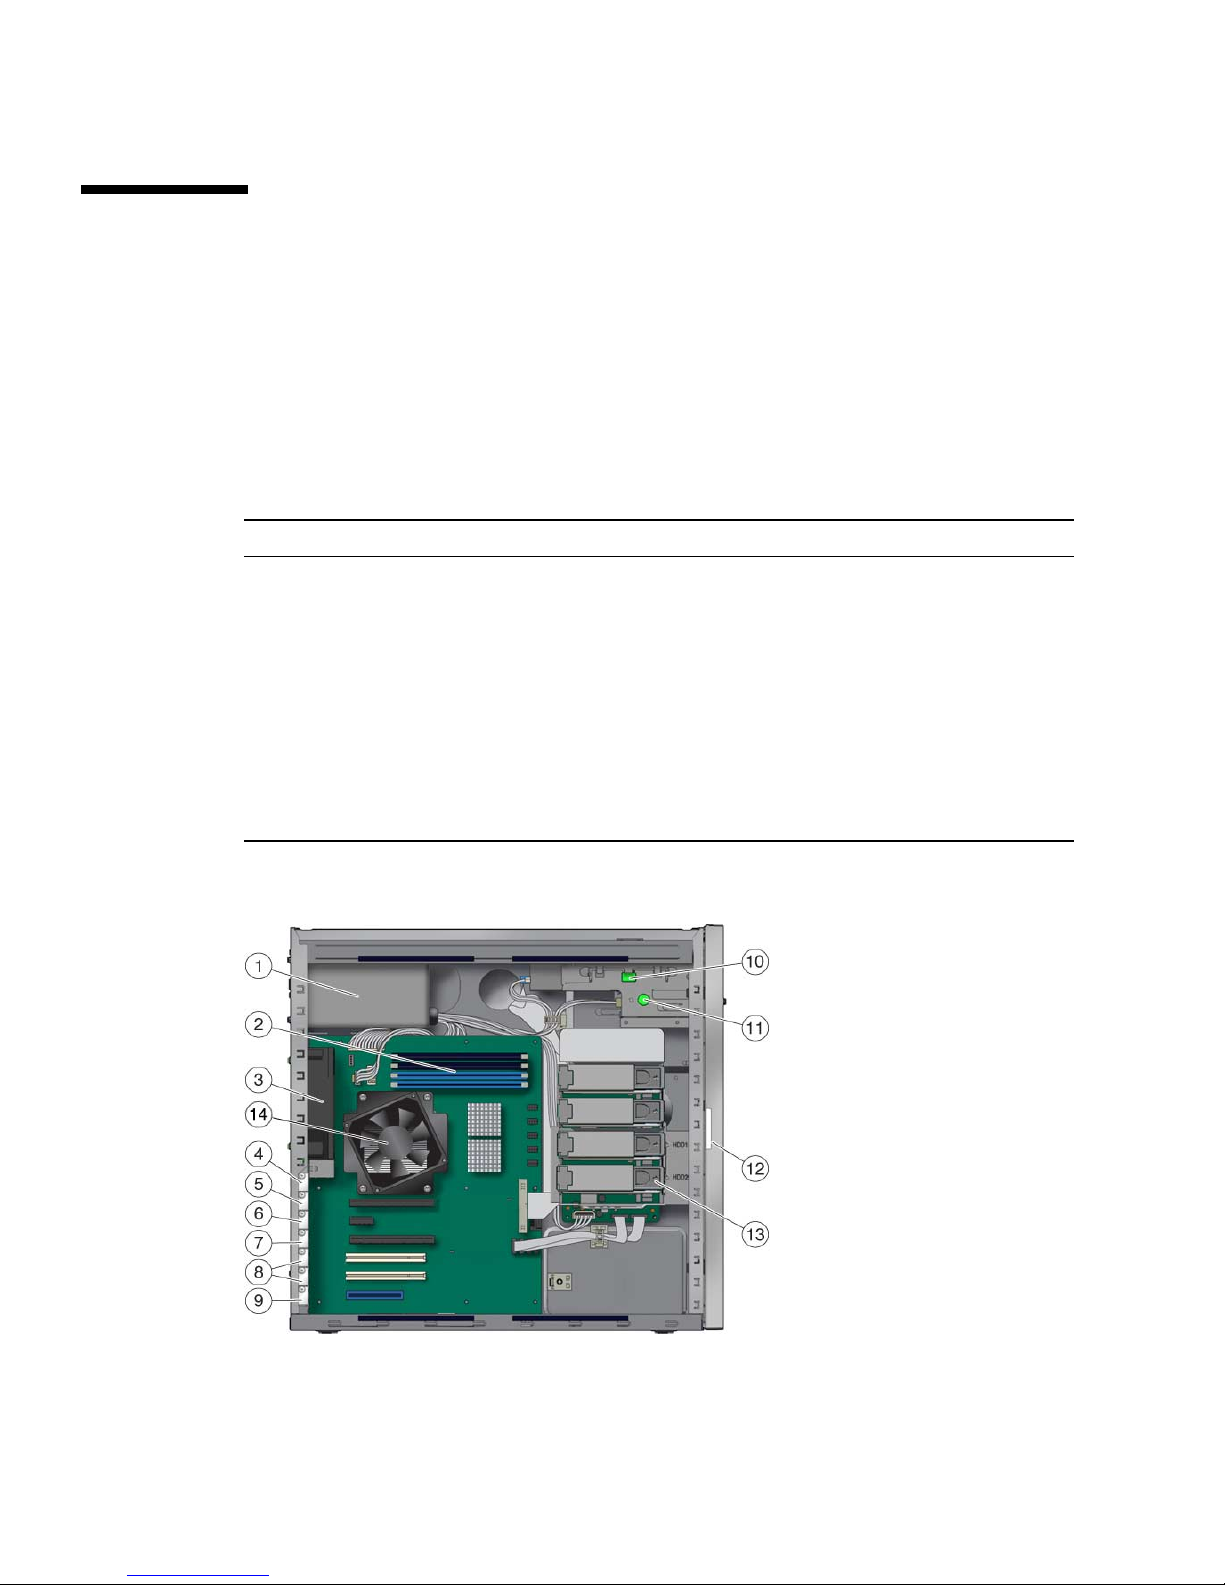
1.5 Interior Components
TABLE 1-4 lists the interior components of the Sun Ultra 24 workstation. See
FIGURE 1-4 for the location of these components.
For further information about PCI slots, see Section C.3.3, “PCI-E and PCI Expansion
Slots” on page C-5. For component installation, removal, and replacement
procedures, see the Sun Ultra 24 Workstation Service Manual.
TABLE 1-4 Internal System Components
Label Component Label Component
1 Power supply 8 PCI slots 0,1
2 Memory (DIMMs) 9 PCI-E slot 3 (x8 mechanical, x4
3 System fan 10 DVD release lever
4 Empty slot 11 I/O board release thumbscrew
5 PCI-E slot 0 (x16) 12 System serial number
6 PCI-E slot 1 (x1) 13 Hard drive bays (1 to 4)
7 PCI-E slot 2 (x16) 14 Heatsink
electrical)
FIGURE 1-4 Internal System Components Internal System Components
1-6 Sun Ultra 24 Workstation Installation Guide • October 2007
Page 15
1.6 Connecting External Devices to the
Workstation
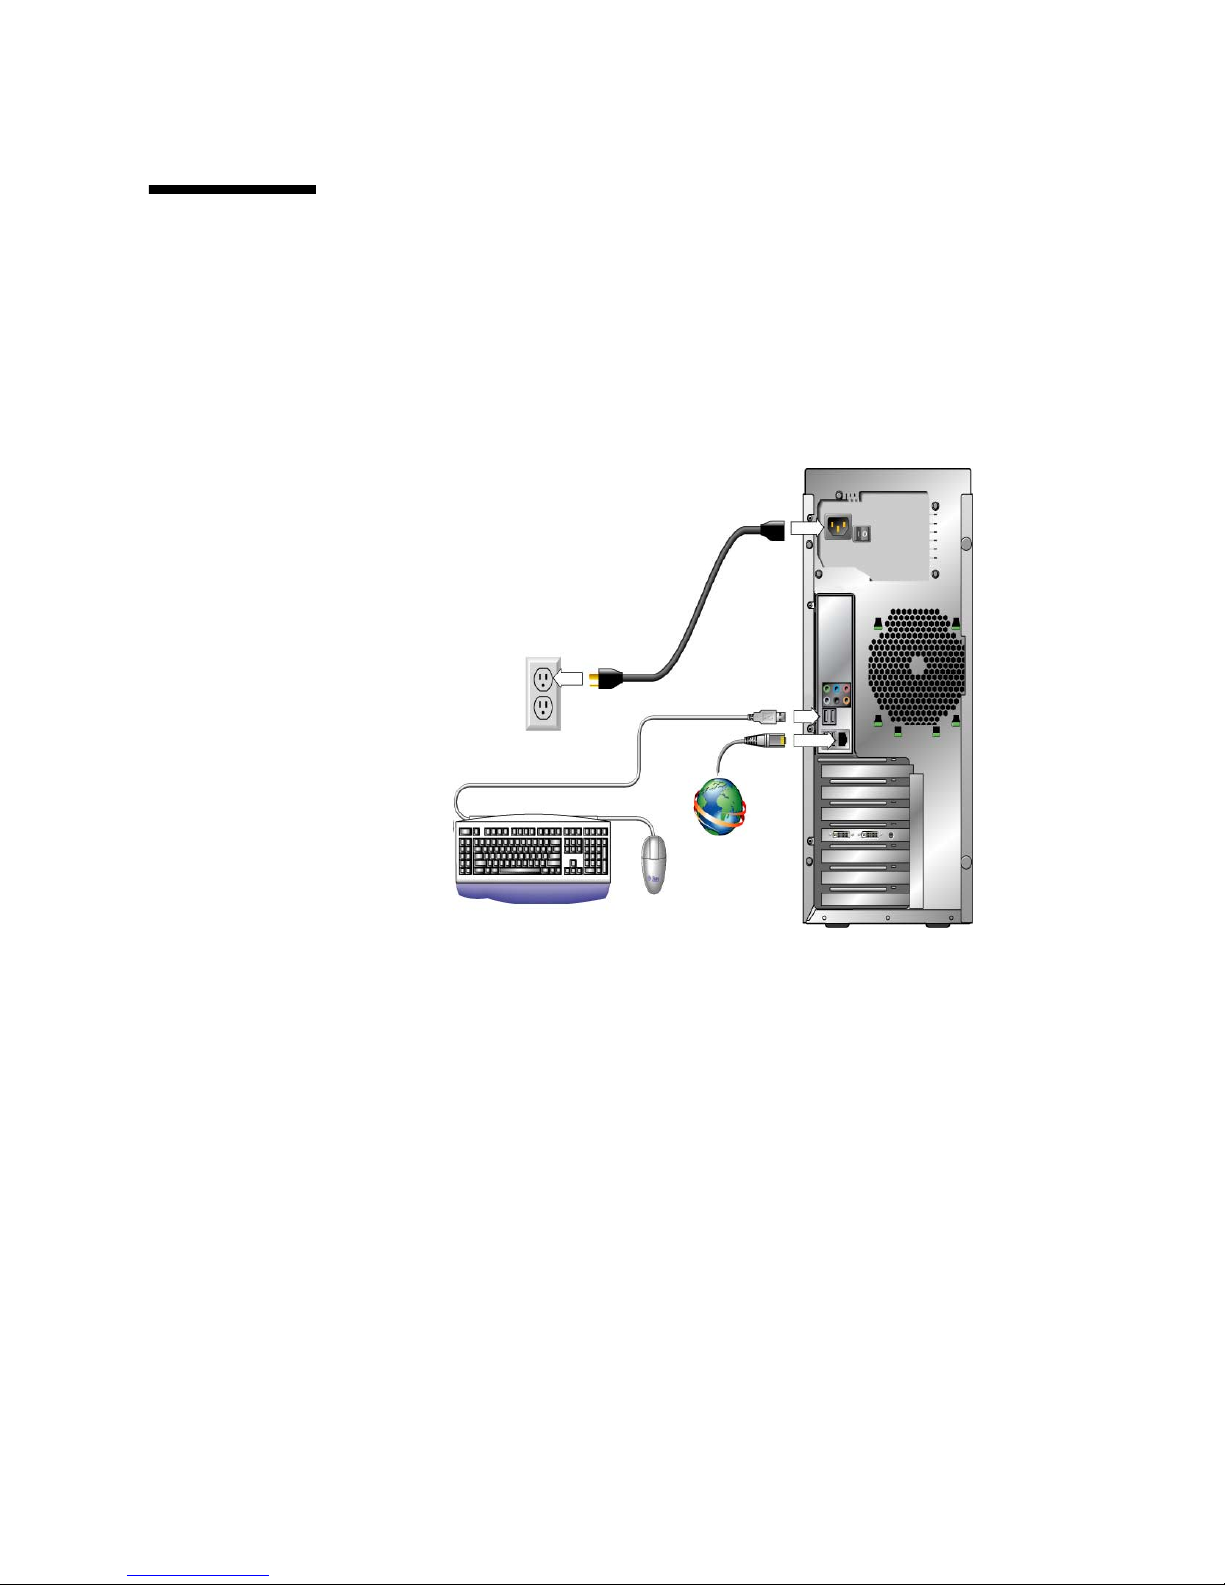
FIGURE 1-5 illustrates the external device cable connections to the workstation.
FIGURE 1-5 External Cable Connections
To Connect External Devices to the Workstation
1. Connect the workstation power cord to a grounded electrical outlet.
2. Connect the keyboard to a USB connector on the back or front panel.
3. Connect the mouse to the USB connector on the underside of the keyboard or
to a USB connector on the front or back panel.
4. Connect the Ethernet cable to the Sun Ultra 24 workstation, and connect the
other end of the cable to an Ethernet RJ-45 jack.
Chapter 1 Introduction to the Sun Ultra 24 Workstation Hardware 1-7
Page 16
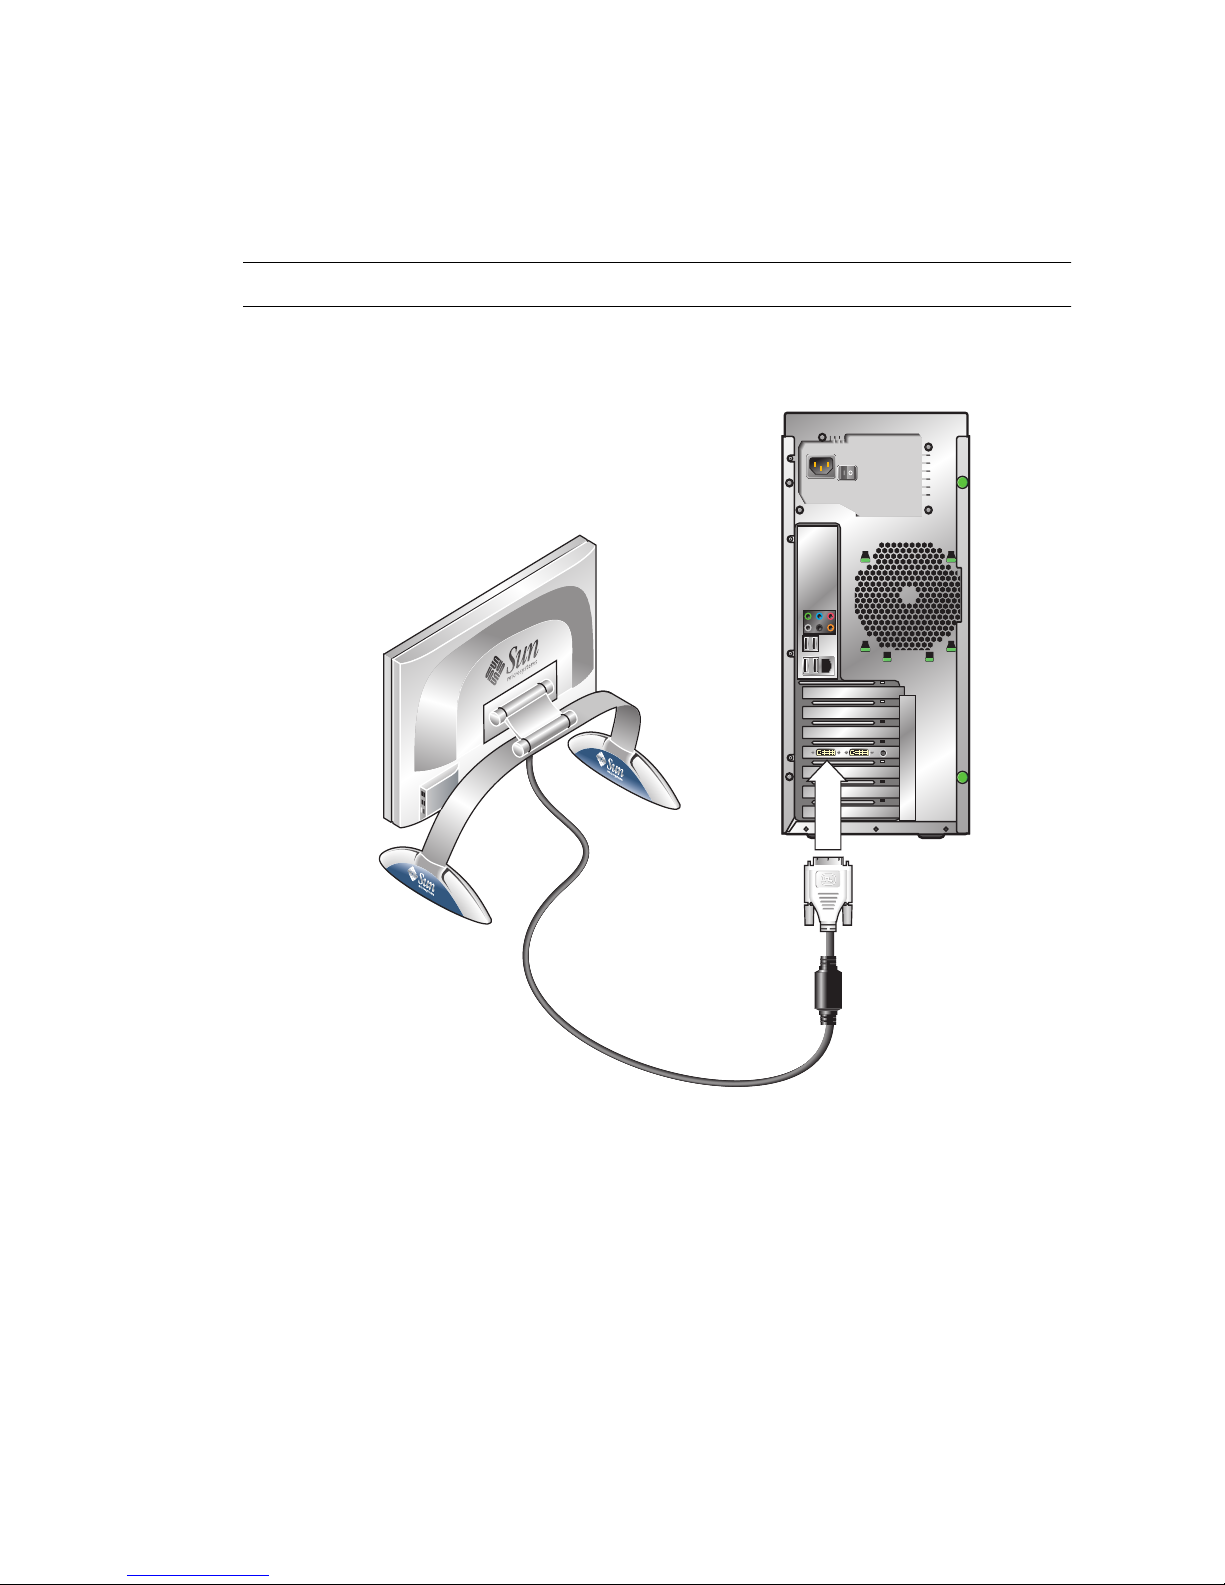
5. If a PCI Express graphics card is installed in the top PCI-E slot, connect the
monitor to the graphics card connector. See the bottom of
FIGURE 1-6.
Note – Your graphics card might require a DVI cable to connect to your monitor.
FIGURE 1-6 Connecting the Monitor to the System
6. Connect any additional external devices to the workstation’s other connectors.
1-8 Sun Ultra 24 Workstation Installation Guide • October 2007
Page 17

1.7 Powering the Workstation On and Off
This section contains instructions for properly powering the workstation on and off.
Always use the following power procedures for your workstation.
To Power On the Workstation
1. Turn on the power to the monitor and to all external devices.
2. Turn the power switch on the back of the workstation to the On ( | ) position.
3. Press and release the power switch on the front panel.
4. After several seconds, verify that the Power LED next to the power switch is
lit.
The Power LED lights after the workstation begins the internal booting process.
5. If you need to change the system parameters in the BIOS, press the F8 key
during the POST process to access the BIOS Setup Utility.
Caution – Be careful when making changes to the system BIOS, as some changes
can cause your system to malfunction.
To Power Off the Workstation
1. Save your data and close any open applications.
2. Read both of the following power-off options, and then follow one of the
options to turn off the workstation.
■ Power off the workstation by using the operating system shutdown command
or menu option. In most cases, this initiates an orderly shutdown of the
operating system and shuts off the workstation power.
Caution – To avoid data loss, use the first option whenever possible.
Chapter 1 Introduction to the Sun Ultra 24 Workstation Hardware 1-9
Page 18

■ If the first option does not shut off the workstation power, press and hold the
Power button for approximately four seconds. This option shuts down the
power to the workstation but does not initiate an orderly shutdown of the
operating system. This option might result in data loss.
If the proceeding options do not power off the workstation, turn the power
switch on the back panel to the Off ( 0 ) position.
After powering off the workstation, wait at least four seconds before powering
on the workstation again.
1.8 Adding and Removing Devices To and
From the Boot Menu
The boot menu lists the devices from which the system can boot. If you want to boot
from a newly installed or attached device, you must add it to the boot menu.
To Add and Remove Devices To and From the
Boot Menu
1. Press the F2 key during system boot.
The BIOS Setup screen appears.
2. In the Boot Settings menu, add the device to, or remove them from, the boot
device list.
3. Press the F10 key to save your settings and exit.
1-10 Sun Ultra 24 Workstation Installation Guide • October 2007
Page 19

Chapter 1 Introduction to the Sun Ultra 24 Workstation Hardware 1-11
Page 20

CHAPTER
2
Configuring the Preinstalled Solaris
OS and Using Preinstalled
Developer Software
The Solaris™ 10 Operating System (OS) is preinstalled on the Sun Ultra 24
workstation, along with developer software. This chapter contains instructions for
configuring the preinstalled Solaris 10 OS, and information about the developer
software.
For information about how to install Linux, Windows, or a different version of the
Solaris OS, see the Sun Ultra 24 workstation Operating System Installation Guide,
available on the Sun documentation web site. Also, refer to Appendix C for a list of
supported operating systems.
This chapter contains the following sections:
■ Section 2.1, “Configuring the Solaris 10 OS” on page 2-1
■ Section 2.2, “Exploring Preinstalled Developer Software” on page 2-5
■ Section 2.3, “Restoring or Reinstalling the Operating System” on page 2-8
2.1 Configuring the Solaris 10 OS
This section covers the following topics:
■ Section 2.1.1, “Licensing Information” on page 2-2
■ Section 2.1.2, “Disk Configuration” on page 2-2
■ Section 2.1.3, “Installation Flowchart” on page 2-2
■ Section 2.1.4, “Configuring the Preinstalled Solaris 10 OS” on page 2-3
2-1
Page 21

2.1.1 Licensing Information
The Solaris 10 OS installed on your system requires no licensing fee. The Sun Ultra
24 workstation requires Solaris 10 8/07 or a subsequent compatible version of the
Solaris OS. For more information, go to:
http://wwws.sun.com/software/solaris/licensing/index.html
2.1.2 Disk Configuration
The exact disk configuration that is preinstalled is as follows:
■ Hard drive root partition—14.0 Gb
■ Hard drive swap partition—2.0 Gb
■ Hard drive var partition—6.0 Gb
■ Hard drive export partition—remainder of the disk
2.1.3 Installation Flowchart
Use the flowchart in FIGURE 2-1 to assist with setting up your OS.
2-2 Sun Ultra 24 Workstation Installation Guide • October 2007
Page 22
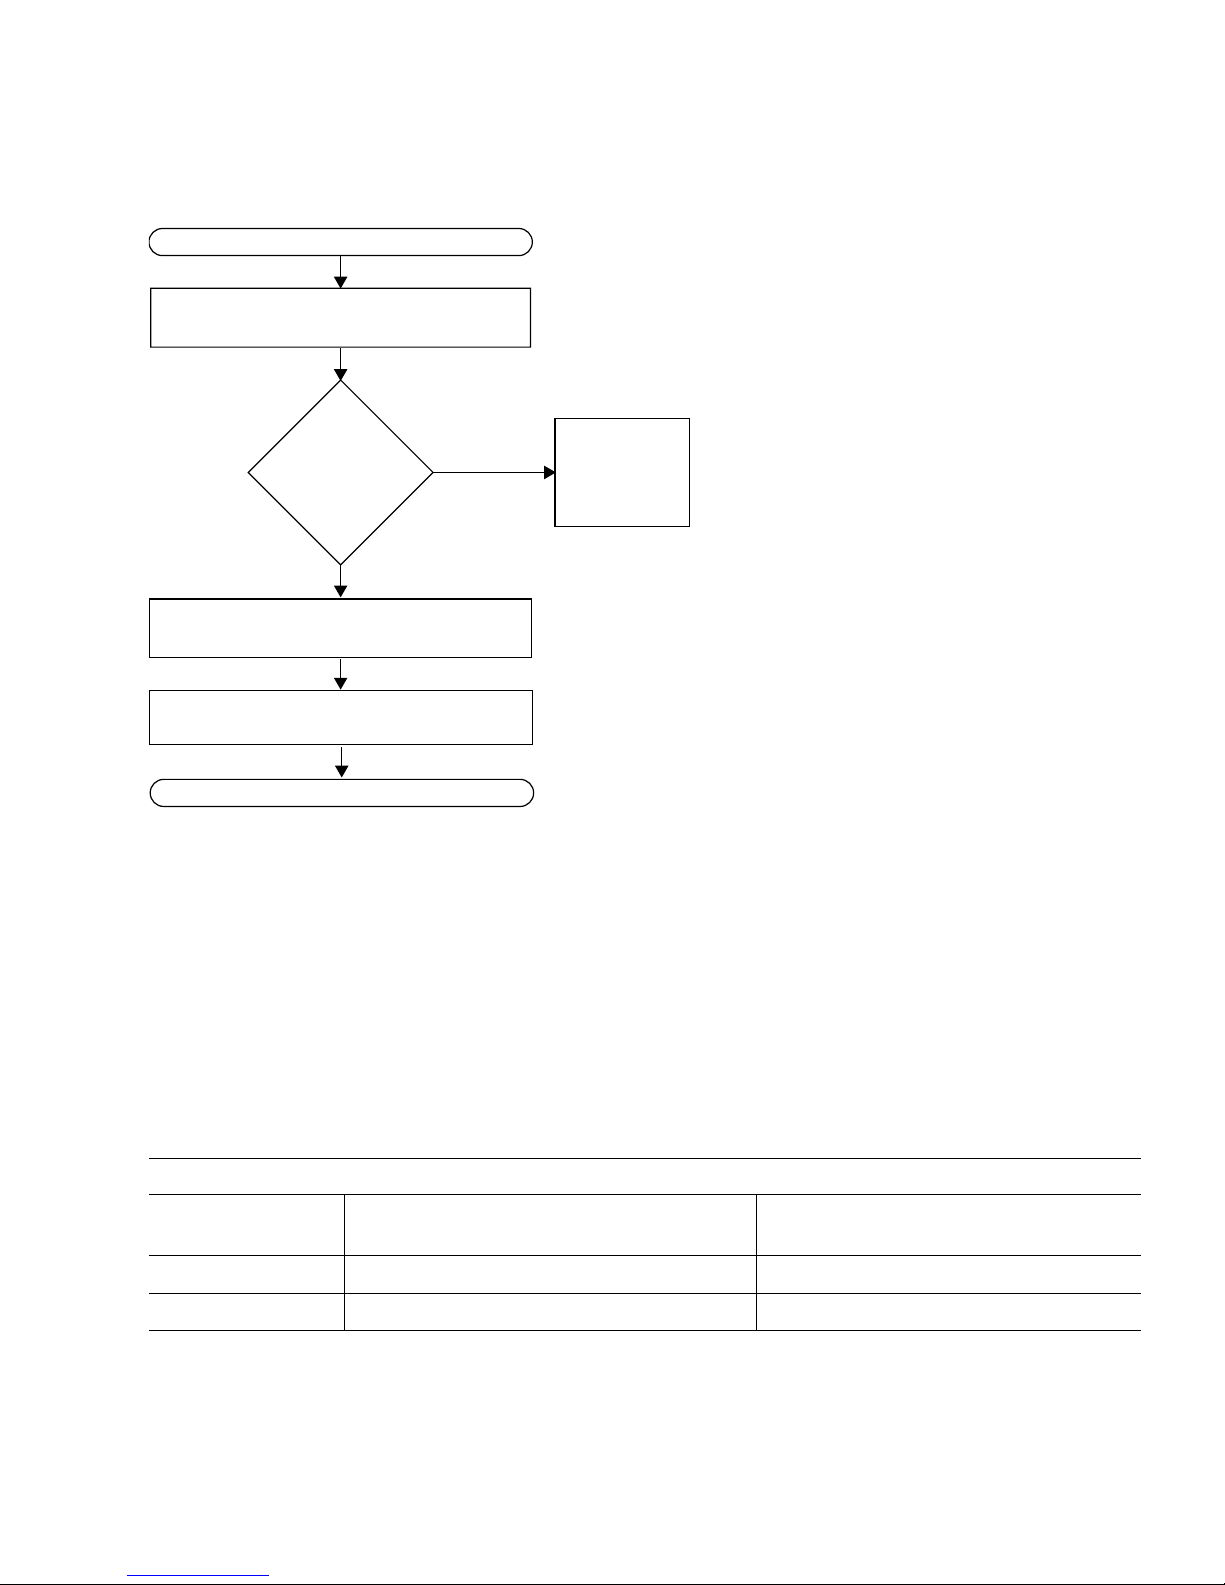
FIGURE 2-1 Installation Flow Diagram
START
Power on the system.
Section 1.7, “Powering the
Workstation On and Off” on
page 1-9
Use a
preinstalled
version of
software?
No
Install a
different OS
from other
media.
For instructions, refer to Appendix C,
the
Sun Ultra 24 workstation Operating
System Installation Guide
, and the
documentation for your OS.
Ye s
Configure the Solaris 10 OS.
Section 2.1.4, “Configuring the
Preinstalled Solaris 10 OS” on page 2-3
Explore developer software.
Section 2.2, “Exploring Preinstalled
Developer Software” on page 2-5
READY TO WORK!
2.1.4 Configuring the Preinstalled Solaris 10 OS
Use a copy of TABLE 2-1 to write down the information that you might need to collect
before setting up the Solaris 10 OS.
To help you fill out the information in the table, your system administrator (SA)
should provide you with information specific to your site before you begin. Check
with your SA about whether some of the information is available on your network.
TABLE 2-1 Information for Preinstalled Solaris 10 OS Configuration
Setup Window Explanation and Notes Your Information
Select Language
and Locale
Host Name A name to give the workstation.
Terminal Type Type of terminal to use on the workstation.
Native language and locale to use for the
workstation.
Chapter 2 Configuring the Preinstalled Solaris OS and Using Preinstalled Developer Software 2-3
Page 23

TABLE 2-1 Information for Preinstalled Solaris 10 OS Configuration (Continued)
Setup Window Explanation and Notes Your Information
Network
Connectivity
Network or stand-alone workstation
protocols. A system administrator might be
required to complete this section.
(IP Address)
Note: Depending on how you answer and
what information is provided by your
network, you might also be prompted for
the workstation’s IP address.
IPv6 Option to enable IPv6 on the workstation.
Security Settings Security settings and protocols.
Name Service Name service to use: NIS+, NIS, DNS,
LDAP, or None.
Note: This window appears only if the
workstation is connected to a network.
Domain Name NIS or NIS+ domain for this workstation.
Note: This window appears only if you
specify NIS or NIS+ as the naming Service.
Name Server/
Subnet/
Name server (specify the server or have the
workstation find one on a local subnet).
Subnet Mask
Note: This window displays only if the
workstation is connected to a network.
Note: Depending on how you answer and
what information is provided by your
network, you might also be prompted for:
• The subnet for the workstation
• The subnet mask for the workstation
Time Zone Local time zone (select by geographic
region, GMT offset, or a time zone file).
Date and Time Current date and time (accept the default, or
enter the current date and time).
Root Password Root (superuser) password for the
workstation.
Proxy Server
Configuration
2-4 Sun Ultra 24 Workstation Installation Guide • October 2007
Workstation connection: direct to the
Internet or through a proxy server.
Page 24

To Configure the Preinstalled Solaris 10 OS
1. Power on the workstation. See Section 1.7, “Powering the Workstation On and
Off” on page 1-9.
A configuration script starts. It prompts you to input the workstation hostname,
the time zone, time and date information, and the root password.
2. Answer the prompts by following the onscreen instructions.
3. When you finish the configuration, the system reboots.
The workstation displays the login window.
4. Type your user name and password to log in and begin using the workstation.
5. Review the Solaris 10 Operating System Release Notes for any late-breaking
information about your preinstalled software.
The Solaris 10 Operating System Release Notes documentation is located at
http://docs.sun.com.
2.2 Exploring Preinstalled Developer
Software
The following minimum versions of Sun’s developer software are preinstalled or
preloaded onto your Sun Ultra 24 workstation. An overview of each developer
software package is presented in the following sections.
■ Sun Studio 11 (see Section 2.2.1, “Sun Studio Software” on page 2-6)
■ Sun Java™ Studio Creator 2 (see Section 2.2.2, “Sun Java Studio Creator” on
page 2-6)
■ Sun Java Studio Enterprise 8 (see Section 2.2.3, “Sun Java Studio Enterprise” on
page 2-7)
■ NetBeans™ IDE 5.0 (see Section 2.2.4, “NetBeans IDE” on page 2-7)
■ Sun Java Enterprise System (see Section 2.2.5, “Sun Java Enterprise System” on
page 2-7)
Your system might have later versions of this software preinstalled.
Chapter 2 Configuring the Preinstalled Solaris OS and Using Preinstalled Developer Software 2-5
Page 25

2.2.1 Sun Studio Software
Sun Studio software provides a comprehensive, productive environment for
developing reliable, scalable, high-performance applications using C, C++, and
FORTRAN for the Solaris OS. The software package includes compilers,
performance analysis tools, and a powerful debugger, as well as an integrated
development environment (IDE).
The Sun Studio IDE provides modules for creating, editing, building, debugging,
and analyzing the performance of C, C++, or FORTRAN applications. It includes a
set of basic Java language support modules that can be enabled if needed for JNI
(Java™ Native Interface) development.
The Sun Studio software consists of two major components:
■ The Sun Studio component, which includes the IDE, compilers, tools, and core
platform
■ The Java 2 Platform, Standard Edition (J2SE) technology on which the core
platform runs
For more information about the Sun Studio software, or to download the software,
go to http://developers.sun.com/sunstudio.
2.2.2 Sun Java Studio Creator
The Sun Java Studio Creator development environment (formerly “Project Rave”) is
the next-generation tool for Java application development. This product combines
the power of 100 percent Java standards with simplified visual development
techniques to give developers the most effective, most productive way to build
applications in Java.
The Java Studio Creator environment was designed and tested to meet the needs of
skilled developers whose primary concern is rapid turnaround of business-critical
applications. Java Studio Creator enables you to leverage the power of the Java
platform to solve business problems, without forcing you to give up the highly
productive, visual style to which you are accustomed.
For additional information about Sun Java Studio Creator, or to download the
software, go to http://developers.sun.com/jscreator.
2-6 Sun Ultra 24 Workstation Installation Guide • October 2007
Page 26

2.2.3 Sun Java Studio Enterprise
Sun Java Studio Enterprise is a complete, cost-effective, unified platform of tools,
support, and services designed to fully integrate with the capabilities of the Sun Java
Enterprise System. Java Studio Enterprise enables you to develop applications in an
environment carefully designed to:
■ Improve productivity
■ Simplify the creation of sophisticated network applications that are ready to be
deployed on the Java Enterprise System
For additional information about Sun Java Studio Enterprise, or to download the
software, go to http://developers.sun.com/jsenterprise.
2.2.4 NetBeans IDE
The NetBeans IDE 5.0 includes Java 2 Platform, Enterprise Edition (J2EE)
development capabilities. This new release not only enables developers to develop
applications in the web tier, but also includes Enterprise JavaBeans (EJBs) and web
service development capabilities.
The NetBeans IDE is a single platform with out-of-the-box development capabilities
and support for enterprise (J2EE 1.4) applications and web services, mobile or
wireless Java 2 Platform, Micro Edition (J2ME) applications and services, and
desktop Java 2 Platform, Standard Edition (J2SE) applications. The robust opensource Java IDE has everything that Java software developers need to develop crossplatform desktop, web, and mobile applications straight out of the box.
For more information about the NetBeans IDE, or to download the software, go to
http://www.netbeans.org.
2.2.5 Sun Java Enterprise System
The Sun Java Enterprise System 5 (ES 5) is a comprehensive set of software and
lifecycle services designed to help make the most of your software investment.
Depending on your membership level, the service offering includes online and
telephone technical support, software releases and updates, training, and
professional services. Whether you are a new customer integrating Java ES into your
existing infrastructure or a current customer with a solution in production, Sun has
services to meet your needs, enabling you to focus on your business priorities.
For more information about Sun Enterprise System 5, or to download the software,
go to /www.sun.com/service/javaes/.
Chapter 2 Configuring the Preinstalled Solaris OS and Using Preinstalled Developer Software 2-7
Page 27

2.3 Restoring or Reinstalling the Operating
System
The hard drive for your system contains preinstalled software, including the Solaris
10 OS, developer software, and other applications. The preinstalled OS is
preconfigured with drivers required to support the workstation’s hardware.
The Solaris 10 8/07 OS (or a later, compatible version) is available for download, as
are the developer applications, drivers, and other applications. However, if you
reinstall the OS, you will need to follow the instructions in the Sun Ultra 24
Workstation Operating System Installation Guide to configure the OS and install the
drivers.
To restore the Solaris OS, make and keep a full backup of the OS. The Solaris 10
System Administration Collection includes instructions for backing up your OS and is
available at http:/docs.sun.com/.
Instead of downloading software, you can purchase the Solaris 10 media at
http://store.sun.com/.
2-8 Sun Ultra 24 Workstation Installation Guide • October 2007
Page 28

APPENDIX
A
Configuring the System for Dual
Monitors
This chapter describes how to configure the following operating systems for dual
monitors:
■ Section A.1, “To Configure Solaris for Multiple Displays” on page A-1
■ Section A.2, “To Configure Windows for Multiple Displays” on page A-2
■ Section A.3, “To Configure Linux for Multiple Displays” on page A-3
A.1 To Configure Solaris for Multiple
Displays
1. Install a second graphics card (optional).
2. Attach one monitor to the video connector of each graphic card, and boot the
system.
The system outputs to PCI-E slot 2 (default). You can modify this in the BIOS
Graphic Adapter screen, located under the Advanced menu and the Initiate
submenu.
3. When the system boots, insert the Tools and Drivers DVD, and change the
directory to the following location:
/mount_point/T&D_version_name/drivers/sx86
T&D_version_name The version name of the Tools and Drivers DVD.
4. Run the install.sh script.
5. Reboot system after the install.sh script has finished successfully.
A-1
Page 29

6. Log in.
7. Select Set up multi-display mode under X Server Display Configuration.
8. Click Apply to update X server with the new configuration.
9. Click Save to X Configuration File to save display configuration to the
/etc/X11/xorg.conf file.
A.2 To Configure Windows for Multiple
Displays
1. Install a second graphics card (optional).
2. Attach one monitor to the video connector of each graphic card, and boot the
system.
The system outputs to PCI-E slot 2 (default). You can modify this in the BIOS
Graphic Adapter screen, located under the Advanced menu and the Initiate
submenu.
3. When the system boots, insert the Tools and Drivers DVD, and change
directory to the following location:
/cdrom/T&D_disk_version/drivers/windows/video
T&D_version_name The version name of the Tools and Drivers DVD.
4. Change to the appropriate OS (32- or 64-bit), and load the video drivers.
5. Reboot the system.
6. Open the Nvidia Control Panel from the system tray, and click Run multiple
display wizard under Display to enable and customize your multi-display
setup.
7. Adjust the parameters as appropriate.
A second reboot might be necessary for the system to see both screens.
A-2 Sun Ultra 24 Workstation Installation Guide • October 2007
Page 30

A.3 To Configure Linux for Multiple
Displays
1. Install a second graphics card (optional).
2. Attach one monitor to the video connector of each graphic card, and boot the
system.
The system outputs to PCI-E slot 2 (default). You can modify this in the BIOS
Graphic Adapter screen, located under the Advanced menu and the Initiate
submenu.
3. When the system boots, insert the Tools and Drivers DVD, and change
directory to the following location:
/cdrom/T&D_disk_name/drivers/linux/OS
T&D_disk_name The name of the Tools and Drivers disk
OS Either redhat or suse.
4. Run the install.sh script.
5. Reboot system after the install.sh script has finished successfully.
6. Log in to run the Nvidia settings in a terminal window.
7. Set up multi-display mode under X Server Display Configuration.
8. Click Apply to update the X Server with the new configuration.
9. Click Save to X Configuration File to save the display configuration to the
/etc/X11/xorg.conf file.
Appendix A Configuring the System for Dual Monitors A-3
Page 31

A-4 Sun Ultra 24 Workstation Installation Guide • October 2007
Page 32

APPENDIX
B
Troubleshooting Setup and
Obtaining Technical Assistance
This appendix contains information to help you troubleshoot minor system
problems, and includes information about the following topics:
■ Section B.1, “Troubleshooting the Sun Ultra 24 Workstation Setup” on page B-2
■ Section B.2, “Technical Assistance” on page B-3
B-1
Page 33

B.1 Troubleshooting the Sun Ultra 24
Workstation Setup
If you experience problems while setting up your system, refer to the
troubleshooting information in
information, see the Sun Ultra 24 Workstation Service Manual, 820-2480.
TABLE B-1 Troubleshooting Procedures
Problem Possible Solution
TABLE B-1. For additional troubleshooting
System powers on,
but the monitor does
not.
CD or DVD does not
eject from the media
tray when you press
the Eject button.
No video appears on
the monitor screen.
System does not
power on when the
front panel Power
button is pressed.
• Is the Power button for the monitor turned on?
• Is the monitor power cord connected to a wall outlet?
• Does the wall outlet have power? Test by plugging in another device.
• Is the monitor connected to the onboard video connector or PCI Express video
connector?
• Move the mouse or press any key on the keyboard. The drive might be in low-power
mode.
• Use the utility software installed on your
• Is the monitor cable attached to the onboard video connector or PCI Express video
connector?
• Does the monitor work when connected to another system?
• If you have a monitor that you know works correctly, does it work when connected
to this system?
• Verify that the BIOS settings are correct.
• Review the Sun Ultra 24 Workstation Product Notes for any issues that might affect
your specific software and hardware configuration.
Keep notes on the following situations in case you need to call service:
• Is the power switch on the back of the
• Is the Power LED illuminated on the front of the system? (Ensure that the power
cord is connected to the system and to a grounded power receptacle.)
• Does the wall outlet have power? Test by plugging in another device.
• Do you hear a beep when the system is powered on? (Ensure that the keyboard is
plugged in.)
• Test with another keyboard that you know is functional. Do you hear a beep when
you connect the keyboard and power on the system?
• Does the monitor synchronize within 5 minutes after power-on? (The green LED on
the monitor stops flashing and remains illuminated.)
system to eject the CD.
system turned on (see FIGURE 1-3)?
B-2 Sun Ultra 24 Workstation Installation Guide • October 2007
Page 34

TABLE B-1 Troubleshooting Procedures (Continued)
Problem Possible Solution
Keyboard or mouse
does not respond to
actions.
System appears to
be in low-power
mode, but the Power
button LED does not
blink.
Hung or frozen
system: No response
from mouse,
keyboard, or any
application.
• Verify that the keyboard cable is connected to an on-board USB 2.0 connector on the
system, and that the mouse is connected to a USB connector on the keyboard or on
the system.
• Verify that the
The Power LED blinks only when all system components are in low-power mode. A
tape drive might be connected to your system. Because tape drives do not enter lowpower mode, the Power LED does not blink.
Are the keyboard and mouse Type 7? (Verify the model on the underside of the
keyboard).
Try to access your system from another system on the network.
1. From a terminal window, enter ping hostname.
2. If there is no response, remotely log in from another system using telnet or
rlogin, and enter the ping hostname command again.
3. Attempt to terminate processes until the system responds.
If this procedure does not work:
1. Press the Power button to power off the system.
2. Wait 20 to 30 seconds, and power on the system.
system is powered on and the front Power LED is illuminated.
B.2 Technical Assistance
If the troubleshooting procedures in this appendix fail to solve your problem, use
TABLE B-2 to collect information that you might need to communicate to the support
personnel.
TABLE B-3 lists Sun web sites and telephone numbers for additional technical
support. You can also refer to the web sites listed in “Documentation, Warranty,
Support, and Training URLs” on page vii.
TABLE B-2 System Information Required for Support
System Configuration Information Needed Your Information
Sun service contract number
System model
Operating system, including service pack number or
update number
System serial number
Appendix B Troubleshooting Setup and Obtaining Technical Assistance B-3
Page 35

TABLE B-2 System Information Required for Support (Continued)
System Configuration Information Needed Your Information
Peripherals attached to the system
Hardware configuration information, including the
following:
• Graphics card installed
• PCI or PCI Express cards installed
• Amount of memory
• Processor speed
• Optical disk type
Email address and phone number for you and a
secondary contact
Street address where the system is located
Superuser password
Summary of the problem and the work being done
when the problem occurred
Output of diagnostics test, if applicable
Other useful information
IP address
Workstation name (system host name)
Network or Internet domain name
Proxy server configuration
TABLE B-3 Sun Web Sites and Telephone Numbers
Workstation Documents and Support
Resources URL or Telephone Number
Discussion and troubleshooting forums http://supportforum.sun.com/
Support, diagnostic tools, and alerts for
http://www.sun.com/bigadmin/
all Sun products
Software patches, lists of system
http://www.sunsolve.sun.com/handbook_pub/
specifications, troubleshooting and
maintenance information, and other
tools
Service support phone numbers 1-800-872-4786 (1-800-USA-4Sun). Select Option 1
B-4 Sun Ultra 24 Workstation Installation Guide • October 2007
Page 36

TABLE B-3 Sun Web Sites and Telephone Numbers (Continued)
Workstation Documents and Support
Resources URL or Telephone Number
International telephone numbers for
http://www.sun.com/service/contacting/solution.html
SunService Support
Warranty and contract support contacts;
http://www.sun.com/service/warrantiescontracts/
links to other service tools
Warranties for Sun products http://www.sun.com/service/warranty
Appendix B Troubleshooting Setup and Obtaining Technical Assistance B-5
Page 37

B-6 Sun Ultra 24 Workstation Installation Guide • October 2007
Page 38

APPENDIX
C
Tools and Drivers DVD, Supported
Operating Systems, and System
Specifications
This appendix contains the following sections:
■ Section C.1, “Tools and Drivers DVD Software” on page C-1
■ Section C.2, “Supported Operating System Software” on page C-2
■ Section C.3, “Sun Ultra 24 Workstation Features and Specifications” on page C-3
For maximum reliability and performance, install your system into an appropriate
environment, and ensure correct configuration as discussed in this document.
C.1 Tools and Drivers DVD Software
The Sun Ultra 24 Workstation Tools and Drivers DVD, included with the
workstation, contains the following software:
■ Supplemental drivers to support preinstalled, or supported and user-installed,
operating systems. See the Sun Ultra 24 Workstation Operating System Guide for
information on installing these drivers.
■ Eurosoft Pc-Check diagnostics software, which provides various diagnostics
testing options for the Sun Ultra 24 workstation. See the Sun Ultra 24 Workstation
Service Manual for more information.
■ Erase Primary Boot Hard Disk utility to erase the preinstalled operating system.
■ XpReburn utility to add drivers to an existing Windows installation CD.
■ 2003Reburn utility to add drivers to an existing Windows 2003 installation CD.
■ Open DOS.
C-1
Page 39

C.2 Supported Operating System Software
The Solaris 10 8/07 OS is preinstalled on the Sun Ultra 24 Workstation. Previous
versions of the Solaris OS are not supported.
The following operating systems (or later versions) are also supported for this
workstation:
■ Solaris 10 8/07
■ Red Hat Enterprise Linux 4 WS Update 5, 32-bit and 64-bit
■ Red Hat Enterprise Linux 5 Client Update 0, 32-bit and 64-bit
■ SUSE Linux Enterprise Desktop 10 (SP 1) 64-bit only
■ SUSE Linux Enterprise Server 9 (SP3) 64-bit only
■ Windows XP SP2, 32-bit and 64-bit (WHQL certified)
■ Windows 2003 Enterprise Server R2 SP2 32-bit and 64-bit (WHQL certified)
■ Windows Vista Ultimate 32-bit and 64-bit (WHQL certified)
For an updated list of supported operating systems, go to
http://www.sun.com/ultra24.
You can order Red Hat Enterprise Linux WS or SUSE Linux Enterprise Desktop for
the Sun Ultra 24 workstation from Sun at
http://wwws.sun.com/software/linux/index.html.
Follow the installation instructions provided with the operating systems. The Sun
Ultra 24 Workstation Operating System Guide contains instructions and information
relating to driver installation for supported operating systems.
C-2 Sun Ultra 24 Workstation Installation Guide • October 2007
Page 40

C.3 Sun Ultra 24 Workstation Features and
Specifications
C.3.1 System Components and Features
TABLE C-1 shows the system’s key components.
TABLE C-1 Sun Ultra 24 Workstation Components
Component Description
CPU • One Intel Core 2 Duo/Quad processor
• Processor frequencies: 2.0 GHz and faster
• Level 2 Cache from 4 MB to 8 MB per processor
Memory • Four DIMM slots
• 512 MB, 1 GB, 2 GB unbuffered
DIMM
modules supported (see Section C.3.2, “Memory
Configurations” on page C-4
Media storage DVD-ROM or DVD-Dual
DDR2-667, unbuffered, ECC
)
Hard disk drives Up to
Power supply 530W PSU
Network I/O Onboard 10/100/1000BASE-T Gigabit Ethernet controller providing
Video NVIDIA Quadro graphics card on PCI-E x16 slot 2
PCI-E I/O and PCI
I/O
(see Section C.3.3,
“PCI-E and PCI
Expansion Slots” on
page C-5)
Other I/O • Six USB 2.0 connectors (two on the front and four on the back of
four SATA-II disk drives
one RJ45 connector on the rear panel
• Two PCI Express x16 slots
• Two PCI 33MHz 32-bit under PCI-E I/O and PCI I/O
• One PCI Express x8 mechanical slot (x4 electrical)
• One PCI Express x1 slot
the workstation)
• Two IEEE 1394 connectors on the front panel
• Six audio connectors on the back panel (lined up in two rows of
three)
• Microphone-in jack on the front and back panels
• Headphone-out jack on the front panel
Appendix C Tools and Drivers DVD, Supported Operating Systems, and System Specifications C-3
Page 41

C.3.2 Memory Configurations
TABLE C-2 lists the possible memory configurations for the Sun Ultra 24 workstation.
The system requires DDR2-667/800, unbuffered, ECC DIMMs installed in pairs
(except the base 512 MB configuration). You can purchase DIMM kits at
http://store.sun.com.
DIMM slots are numbered from DIMM 0 (closest to the CPU) to DIMM 3 (farthest
from the CPU). You should populate DIMMs in the following order: DIMM slot 1
(black), DIMM slot 3 (black), DIMM slot 0 (blue), and DIMM slot 2 (blue).
TABLE C-2 Sun Ultra 24 workstation Memory Configurations
Supported DIMM
Total Memory
512 MB 1 x 512 MB
1 GB 2 x 512 MB
2 GB 2 x 1 GB 4 x 512 MB
3 GB 2 x 1 GB and
4GB 2x2GB 4x1GB
5 GB 2 x 2 GB and
6 GB 2 x 2 GB and
8GB 4x2GB
Configuration 1
2 x 512 MB
2 x 512 MB
2x1GB
Supported DIMM
Configuration 2
C-4 Sun Ultra 24 Workstation Installation Guide • October 2007
Page 42

C.3.3 PCI-E and PCI Expansion Slots
TABLE C-3 lists the characteristics of the available PCI-E and PCI expansion slots.
TABLE C-3 Internal Expansion Slots
Slot Connector Type Length Height Description Position
0 Cover plate, no slot n/a n/a Open slot. Top
0 PCI-E x16 slot x16 Full For NVS 290, FX 570, or FX 1700, or FX4600
graphics accelerator (secondary).
1 PCI-E x1 slot x1 Full Not for graphics accelerators. Intended for
PCI-E expansion cards such as NIC.
2 PCI-E x16 slot
(default graphics output)
0 PCI 33MHz 32-bit Full Full Accommodates 64-bit PCI cards, but cards
1 PCI 33MHz 32-bit Full Full Accommodates 64-bit PCI cards, but cards
3 PCI-E x8 mechanical slot
(x4 electrical)
x16 Full For NVS 290, FX 570, FX 1700, FX4600, or
FX5600 graphics accelerator (primary).
operate at 32-bit mode.
operate at 32-bit mode.
x8 Full Not for graphics cards. Intended for PCI-E
expansion cards such as NIC.
C.3.4 Physical Specifications
TABLE C-4 lists the physical specifications for the Sun Ultra 24 workstation.
TABLE C-4 Sun Ultra 24 Workstation Physical Specifications
Top
Second
Third
Top
Bottom
Bottom
Specification British Metric
Width 7.9 in. 200 mm
Depth 18.5 in. 470 mm
Height 17.1 in. 435 mm
Weight (max with
packaging)
Appendix C Tools and Drivers DVD, Supported Operating Systems, and System Specifications C-5
43.7 lb 19.8 kg
Page 43

C.3.5 Power Specifications
The maximum continuous power for the Sun Ultra 24 workstation is 530W.
TABLE C-5, TABLE C-6, and TABLE C-7 list additional power specifications for the
system.
TABLE C-5 Input Voltage Range
Input Voltage Minimum Nominal Maximum Units
Range 1 90 115 132 Vrms
Range 2 180 230 264 Vrms
TABLE C-6 Input Frequency Range
Input Frequency Minimum Nominal Maximum Units
Range 1 57 60 63 Hz
Range 2 47 50 53 Hz
TABLE C-7 Input Current
Maximum Input
Input Voltage
Current
Range 8A 200 A
Maximum Inrush
Current
peak
C.3.6 Environmental Specifications
TABLE C-8 lists the environmental specifications for the Sun Ultra 24 workstation.
TABLE C-8 Sun Ultra 24 Workstation Environmental Specifications
Specification State British Metric
Humidity Operating 7%–93% RH noncondensing,
100.4˚ F max wet bulb
Nonoperating 93% RH, noncondensing,
109.4˚ F max wet bulb
Vibration Operating 0.25G in all axes, 5–500 Hz sine
Nonoperating 1.2G in all axes, 5–500 Hz sine
Shock Operating 4.5G, 11 msec. half-sine
7%–93% RH noncondensing,
38˚ C max wet bulb
93% RH, noncondensing,
43˚ C max wet bulb
C-6 Sun Ultra 24 Workstation Installation Guide • October 2007
Page 44

TABLE C-8 Sun Ultra 24 Workstation Environmental Specifications (Continued)
Specification State British Metric
Temperature Operating 41˚ F to 95˚ F 5˚ C to 35˚ C
Nonoperating –40˚ F to 149˚ F –40˚ C to 65˚ C
Maximum
–1.8˚ F for every 985 ft in altitude –1˚ C for every 300 m in altitude
operating
temperature
rating
Altitude Operating max 9,843 ft max 3,000 m
Nonoperating max 39,370 ft max 12,000 m
Appendix C Tools and Drivers DVD, Supported Operating Systems, and System Specifications C-7
Page 45

C-8 Sun Ultra 24 Workstation Installation Guide • October 2007
 Loading...