

Page 1

Sun Fire™V445 Server
Administration Guide
Sun Microsystems, Inc.
www.sun.com
Part No. 819-3741-10
August 2006, Revision A
Submit comments about this document at: http://www.sun.com/hwdocs/feedback
Page 2

Copyright 2006Sun Microsystems,Inc., 4150 Network Circle, SantaClara, California95054, U.S.A. All rights reserved.
Sun Microsystems, Inc.has intellectual property rights relating to technologythat isdescribed in this document. Inparticular, and without
limitation, theseintellectual propertyrights may include one ormore ofthe U.S. patents listed athttp://www.sun.com/patentsand one or
more additional patents orpending patent applications in theU.S. and in other countries.
This documentand the product to which it pertainsare distributedunder licenses restricting their use,copying, distribution,and
decompilation. Nopart of the product or of thisdocument may be reproduced in any formby anymeans without priorwritten authorizationof
Sun andits licensors, if any.
Third-party software, including fonttechnology, iscopyrighted andlicensed from Sun suppliers.
Parts ofthe productmay be derived from BerkeleyBSD systems,licensed from the University ofCalifornia. UNIXis a registered trademark in
the U.S.and in other countries, exclusivelylicensed throughX/Open Company,Ltd.
Sun, Sun Microsystems, theSun logo,
trademarks orregistered trademarksof SunMicrosystems, Inc. in the U.S.and in other countries.
All SPARCtrademarks areused under license and are trademarksor registeredtrademarks ofSPARCInternational, Inc. in the U.S.and in other
countries. Products bearingSPARCtrademarks arebased upon an architecture developed by SunMicrosystems, Inc.
The OPENLOOK and Sun™ Graphical UserInterface was developed by SunMicrosystems, Inc.for its users and licensees. Sun acknowledges
the pioneeringefforts ofXerox inresearching anddeveloping the concept of visualor graphical user interfaces forthe computer industry.Sun
holds anon-exclusive license from Xeroxto the Xerox GraphicalUser Interface,which license also covers Sun’slicensees who implement OPEN
LOOK GUIsand otherwise comply with Sun’swritten license agreements.
U.S. GovernmentRights – Commercial use. Government users aresubject tothe Sun Microsystems, Inc. standard licenseagreement and
applicable provisions ofthe FAR and its supplements.
DOCUMENTATION IS PROVIDED "AS IS" AND ALL EXPRESS OR IMPLIED CONDITIONS, REPRESENTATIONS AND WARRANTIES,
INCLUDING ANYIMPLIED WARRANTY OFMERCHANTABILITY,FITNESS FOR A PARTICULAR PURPOSE OR NON-INFRINGEMENT,
ARE DISCLAIMED, EXCEPT TO THE EXTENT THAT SUCH DISCLAIMERS ARE HELD TO BE LEGALLY INVALID.
Copyright 2006Sun Microsystems,Inc., 4150 Network Circle, SantaClara, California95054, Etats-Unis. Tous droits réservés.
Sun Microsystems, Inc.a les droits de propriété intellectuels relatants àla technologiequi est décrit dans cedocument. En particulier, etsans la
limitation, cesdroits depropriété intellectuelspeuvent inclure un ou plusdes brevetsaméricains énumérés à http://www.sun.com/patents et
un oules brevetsplus supplémentairesou les applicationsde breveten attente dans les Etats-Uniset dansles autres pays.
Ce produit oudocument est protégé par un copyright etdistribué avec des licences quien restreignentl’utilisation, lacopie, la distribution,et la
décompilation. Aucunepartie de ce produit ou document nepeut êtrereproduite sousaucune forme, par quelque moyenque ce soit, sans
l’autorisation préalableet écrite de Sun etde ses bailleurs de licence,s’il yena.
Le logicieldétenu par des tiers, etqui comprendla technologie relative aux polices de caractères,est protégépar un copyright et licenciépar des
fournisseurs deSun.
Des partiesde ce produit pourrontêtre dérivées des systèmes BerkeleyBSD licenciés par l’Université deCalifornie. UNIXest une marque
déposée auxEtats-Unis et dans d’autres pays et licenciéeexclusivement par X/Open Company, Ltd.
Sun, SunMicrosystems, lelogo Sun,
marques de fabrique oudes marquesdéposées de SunMicrosystems, Inc.aux Etats-Unis et dans d’autres pays.
Toutes lesmarques SPARCsont utiliséessous licence et sont desmarques defabrique ou desmarques déposéesde SPARCInternational, Inc.
aux Etats-Uniset dans d’autres pays. Les produits protant lesmarques SPARCsont baséssur une architecture développée par Sun
Microsystems, Inc.
L’interfaced’utilisation graphiqueOPEN LOOK et Sun™ aété développée par Sun Microsystems,Inc. pourses utilisateurs etlicenciés. Sun
reconnaît les efforts depionniers deXerox pour la recherche et le développementdu conceptdes interfaces d’utilisationvisuelle ougraphique
pour l’industriede l’informatique. Sun détient unelicense non exclusive de Xerox surl’interface d’utilisationgraphique Xerox, cette licence
couvrant égalementles licenciées de Sun quimettent enplace l’interface d’utilisation graphiqueOPEN LOOK etqui enoutre se conforment
aux licencesécrites de Sun.
LA DOCUMENTATION EST FOURNIE "EN L’ÉTAT" ET TOUTES AUTRES CONDITIONS, DECLARATIONS ET GARANTIES EXPRESSES
OU TACITESSONT FORMELLEMENT EXCLUES, DANS LAMESURE AUTORISEEPARLA LOIAPPLICABLE, Y COMPRIS NOTAMMENT
TOUTE GARANTIE IMPLICITE RELATIVE A LA QUALITE MARCHANDE, A L’APTITUDE A UNE UTILISATION PARTICULIERE OU A
L’ABSENCE DE CONTREFAÇON.
Sun Fire, Solaris,VIS, Sun StorEdge, Solstice DiskSuite,Java, SunVTS and the Solarislogo are
Sun Fire, Solaris,VIS, Sun StorEdge, Solstice DiskSuite,Java, SunVTS etle logoSolaris sont des
Page 3

Contents
Preface xxi
1. System Overview 1
Sun Fire V445 Server Overview 1
Processors and Memory 3
External Ports 3
Gigabit Ethernet Ports 3
10BASE-T Network Management Port 4
Serial Management and DB-9 Ports 4
USB Ports 4
RAID 0,1 Internal Hard Drives 5
PCI Subsystem 5
Power Supplies 5
System Fan Trays 6
ALOM System Controller Card 6
Hardware Disk Mirroring 6
Predictive Self-Healing 6
New Features 7
Locating Front Panel Features 8
Front Panel Indicators 9
iii
Page 4

Power Button 11
USB Ports 11
SAS Disk Drives 13
Removable Media Drive 13
Locating Back Panel Features 15
Back Panel Indicators 16
Power Supplies 16
PCI Slots 16
System Controller Ports 18
Network Management Port 18
Serial Management Port 19
System I/O Ports 19
USB Ports 19
Gigabit Ethernet Ports 19
DB-9 Serial Port 20
Reliability, Availability, and Serviceability (RAS) Features 21
Sun Cluster Software 21
Sun Management Center Software 22
2. Configuring the System Console 23
About Communicating With the System 24
Using the System Console 25
Default System Console Connection Through the Serial Management and
Network Management Ports 27
ALOM 29
Alternative System Console Configuration 29
Accessing the System Console Through a Graphics Monitor 30
About the sc> Prompt 31
Access Through Multiple Controller Sessions 32
iv Sun Fire V445 Server Administration Guide • August 2006
Page 5

Ways of Reaching the sc> Prompt 32
About the ok Prompt 33
Entering the ok Prompt 33
Graceful Shutdown 34
ALOM System Controller break or console Command 34
L1-A (Stop-A) Keys or Break Key 35
Externally Initiated Reset (XIR) 35
Manual System Reset 35
About Switching Between the ALOM System Controller and the System
Console 36
Entering the ok Prompt 38
▼ To Enter the ok Prompt 38
Using the Serial Management Port 39
▼ To Use the Serial Management Port 40
Activating the Network Management Port 40
▼ To Activate the Network Management Port 41
Accessing the System Console With a Terminal Server 42
▼ To Access the System Console With a Terminal Server Through the Serial
Management Port 42
▼ To Access the System Console With a Terminal Server Through the TTYB
Port 44
What Next 45
Accessing the System Console With a Tip Connection 45
▼ To Access the System Console With a Tip Connection Throught the Serial
Management Port 46
▼ To Access the System Console With a Tip Connection Through the TTYB
Port 47
Modifying the /etc/remote File 49
▼ To Modify the /etc/remote File 49
Accessing the System Console With an Alphanumeric Terminal 51
Contents v
Page 6

▼ To Access the System Console With an Alphanumeric Terminal Through
the Serial Management Port 51
▼ To Access the System Console With an Alphanumeric Terminal Through
the TTYB Port 52
Verifying Serial Port Settings on TTYB 53
▼ To Verify Serial Port Settings on TTYB 53
Accessing the System Console With a Local Graphics Monitor 54
▼ To Access the System Console With a Local Graphics Monitor 54
Reference for System Console OpenBoot Configuration Variable Settings 56
3. Powering On and Powering Off the System 57
Before You Begin 57
Powering On the Server Remotely 58
▼ To Power On the Server Remotely 58
Powering On the Server Locally 59
▼ To Power On the Server Locally 59
Powering Off the System Remotely 60
▼ To Power Off the System Remotely From the ok Prompt 61
▼ To Power Off the System Remotely From the ALOM System Controller
Prompt 61
Powering Off the Server Locally 62
▼ To Power Off the Server Locally 62
Initiating a Reconfiguration Boot 62
▼ To Initiate a Reconfiguration Boot 63
Selecting a Boot Device 65
▼ To Select a Boot Device 65
4. Configuring Hardware 67
About the CPU/Memory Modules 67
DIMMs 68
vi Sun Fire V445 Server Administration Guide • August 2006
Page 7

Memory Interleaving 70
Independent Memory Subsystems 70
DIMM Configuration Rules 71
About the ALOM System Controller Card 71
Configuration Rules 74
About the PCI Cards and Buses 75
Configuration Rules 77
About the SAS Controller 78
About the SAS Backplane 79
Configuration Rules 79
About Hot-Pluggable and Hot-Swappable Components 79
Hard Disk Drives 80
Power Supplies 80
System Fan Trays 81
USB Components 81
About the Internal Disk Drives 81
Configuration Rules 83
About the Power Supplies 83
Performing a Power Supply Hot-Swap Operation 85
Power Supply Configuration Rules 86
About the System Fan Trays 86
System Fan Configuration Rules 88
About the USB Ports 89
Configuration Rules 89
About the Serial Ports 90
5. Managing RAS Features and System Firmware 91
About Reliability, Availability, and Serviceability Features 92
Hot-Pluggable and Hot-Swappable Components 92
Contents vii
Page 8

n+2 Power Supply Redundancy 93
ALOM System Controller 93
Environmental Monitoring and Control 94
Automatic System Restoration 95
Sun StorEdge Traffic Manager 96
Hardware Watchdog Mechanism and XIR 96
Support for RAID Storage Configurations 96
Error Correction and Parity Checking 97
About the ALOM System Controller Command Prompt 97
Logging In to the ALOM System Controller 98
▼ To Log In to the ALOM System Controller 99
About the scadm Utility 100
Viewing Environmental Information 101
▼ To View Environmental Information 101
Controlling the Locator Indicator 102
▼ To Control the Locator Indicator 102
About Performing OpenBoot Emergency Procedures 103
Stop-A Function 104
Stop-N Function 104
▼ To Emulate the Stop-N Function 104
Stop-F Function 105
Stop-D Function 105
About Automatic System Restoration 105
Unconfiguring a Device Manually 106
▼ To Unconfigure a Device Manually 106
Reconfiguring a Device Manually 108
▼ To Reconfigure a Device Manually 108
Enabling the Hardware Watchdog Mechanism and Its Options 108
viii Sun Fire V445 Server Administration Guide • August 2006
Page 9

▼ To Enable the Hardware Watchdog Mechanism and Its Options 109
About Multipathing Software 109
6. Managing Disk Volumes 111
About Disk Volumes 111
About Volume Management Software 112
VERITAS Dynamic Multipathing 112
Sun StorEdge Traffic Manager 113
About RAID Technology 114
Disk Concatenation 114
RAID 0 – Disk Striping 115
RAID 1 – Disk Mirroring 115
RAID 5 – Disk Striping With Parity 116
Hot-Spares 116
About Hardware Disk Mirroring 116
About Physical Disk Slot Numbers, Physical Device Names, and Logical Device
Names 117
Creating a Hardware Disk Mirror 118
▼ To Create a Hardware Disk Mirror 118
Deleting a Hardware Disk Mirror 120
▼ To Delete a Hardware Disk Mirror 120
Performing a Mirrored Disk Hot-Plug Operation 121
▼ To Perform a Mirrored Disk Hot-Plug Operation 122
Performing a Nonmirrored Disk Hot-Plug Operation 123
▼ To view the status of the SCSI devices 124
▼ To Perform a Nonmirrored Disk Hot-Plug Operation 125
7. Managing Network Interfaces 129
About the Network Interfaces 129
About Redundant Network Interfaces 130
Contents ix
Page 10

Attaching a Twisted-Pair Ethernet Cable 131
▼ To Attach a Twisted-Pair Ethernet Cable 131
Configuring the Primary Network Interface 132
▼ To Configure the Primary Network Interface 132
Configuring Additional Network Interfaces 133
▼ To Configure Additional Network Interfaces 134
8. Diagnostics 137
Diagnostic Tools Overview 138
About Sun™ Advanced Lights-Out Manager 1.0 (ALOM) 140
ALOM Management Ports 141
Setting the admin Password for ALOM 141
Basic ALOM Functions 142
▼ To Switch to the ALOM Prompt 142
▼ To Switch to the Server Console Prompt 142
About Status Indicators 143
About POST Diagnostics 143
OpenBoot PROM Enhancements for Diagnostic Operation 144
What’s New in Diagnostic Operation 144
About the New and Redefined Configuration Variables 144
About the Default Configuration 145
About Service Mode 148
About Initiating Service Mode 149
About Overriding Service Mode Settings 150
About Normal Mode 150
About Initiating Normal Mode 151
About the post Command 151
▼ To Initiate Service Mode 153
▼ To Initiate Normal Mode 153
x Sun Fire V445 Server Administration Guide • August 2006
Page 11

Reference for Estimating System Boot Time (to the ok Prompt) 154
Boot Time Estimates for Typical Configurations 155
Estimating Boot Time for Your System 155
Reference for Sample Outputs 156
Reference for Determining Diagnostic Mode 158
Quick Reference for Diagnostic Operation 162
OpenBoot Diagnostics 163
▼ To Start OpenBoot Diagnostics 164
Controlling OpenBoot Diagnostics Tests 165
test and test-all Commands 166
OpenBoot Diagnostics Error Messages 167
About OpenBoot Commands 168
probe-scsi-all 168
probe-ide 169
▼ To Run OpenBoot Commands 172
About Predictive Self-Healing 172
Predictive Self-Healing Tools 173
Using the Predictive Self-Healing Commands 174
Using the fmdump Command 174
Using the fmadm faulty Command 176
Using the fmstat Command 176
About Traditional Solaris OS Diagnostic Tools 177
Error and System Message Log Files 177
Solaris System Information Commands 178
Using the prtconf Command 179
Using the prtdiag Command 179
Using the prtfru Command 184
Using the psrinfo Command 188
Contents xi
Page 12

Using the showrev Command 188
▼ To Run Solaris System Information Commands 189
Viewing Recent Diagnostic Test Results 190
▼ To View Recent Test Results 190
Setting OpenBoot Configuration Variables 190
▼ To View and Set OpenBoot Configuration Variables 191
Additional Diagnostic Tests for Specific Devices 192
Using the probe-scsi Command to Confirm That Hard Disk Drives Are
Active 192
Using the probe-ide Command To Confirm That the DVD Drive is
Connected 193
Using the watch-net and watch-net-all Commands to Check the
Network Connections 193
About Automatic Server Restart 194
About Automatic System Restoration 195
Auto-Boot Options 196
▼ To Set the Auto-Boot Switches 196
Error Handling Summary 197
Reset Scenarios 198
Automatic System Restoration User Commands 199
Enabling Automatic System Restoration 199
Disabling Automatic System Restoration 199
▼ To Disable Automatic System Restoration 199
Displaying Automatic System Restoration Information 200
About SunVTS 201
SunVTS Software and Security 201
Using SunVTS 202
▼ To Find Out Whether SunVTS Is Installed 203
Installing SunVTS 203
Viewing SunVTS Documentation 203
xii Sun Fire V445 Server Administration Guide • August 2006
Page 13

About Sun Management Center 204
How Sun Management Center Works 205
Using Sun Management Center 206
Other Sun Management Center Features 206
Informal Tracking 206
Hardware Diagnostic Suite 206
Interoperability With Third-Party Monitoring Tools 207
Obtaining the Latest Information 207
Hardware Diagnostic Suite 207
When to Run Hardware Diagnostic Suite 207
Requirements for Using Hardware Diagnostic Suite 208
9. Troubleshooting 209
Troubleshooting 209
About Updated Troubleshooting Information 210
Product Notes 210
Web Sites 210
SunSolve Online 210
Big Admin 211
About Firmware and Software Patch Management 211
About Sun Install Check Tool 212
About Sun Explorer Data Collector 212
About Sun Remote Services Net Connect 213
About Configuring the System for Troubleshooting 213
Hardware Watchdog Mechanism 213
Automatic System Restoration Settings 214
Remote Troubleshooting Capabilities 215
System Console Logging 215
Predictive Self-Healing 216
Contents xiii
Page 14

Core Dump Process 216
Enabling the Core Dump Process 217
▼ To Enable the Core Dump Process 217
Testing the Core Dump Setup 219
▼ To Test the Core Dump Setup 219
A. Connector Pinouts 221
Reference for the Serial Management Port Connector 221
Serial Management Connector Diagram 222
Serial Management Connector Signals 222
Reference for the Network Management Port Connector 222
Network Management Connector Diagram 223
Network Management Connector Signals 223
Reference for the Serial Port Connector 224
Serial Port Connector Diagram 224
Serial Port Connector Signals 224
Reference for the USB Connectors 225
USB Connector Diagram 225
USB Connector Signals 225
Reference for the Gigabit Ethernet Connectors 226
Gigabit Ethernet Connector Diagram 226
Gigabit Ethernet Connector Signals 226
226
B. System Specifications 227
Reference for Physical Specifications 228
Reference for Electrical Specifications 228
Reference for Environmental Specifications 229
Reference for Agency Compliance Specifications 230
xiv Sun Fire V445 Server Administration Guide • August 2006
Page 15

Reference for Clearance and Service Access Specifications 231
C. OpenBoot Configuration Variables 233
Index 237
Contents xv
Page 16

xvi Sun Fire V445 Server Administration Guide • August 2006
Page 17

Figures
FIGURE 1-1 Front Panel Features 8
FIGURE 1-2 Front Panel System Status Indicators 9
FIGURE 1-3 Power Button Location 11
FIGURE 1-4 USB Ports Location 12
FIGURE 1-5 Hard Disk Drives Location 13
FIGURE 1-6 Removable Media Drive Location 14
FIGURE 1-7 Back Panel Features 15
FIGURE 1-8 Back Panel System Status Indicators 16
FIGURE 1-9 PCI Slot Locations 17
FIGURE 1-10 Network and Serial Management Port Locations 18
FIGURE 1-11 System I/O Port Locations 19
FIGURE 1-12 Gigabit Ethernet Port Locations 20
FIGURE 2-1 Directing the System Console to Different Ports and Different Devices 26
FIGURE 2-2 Serial Management Port (Default Console Connection) 28
FIGURE 2-3 Separate System Console and System Controller Channels 37
FIGURE 2-4 Patch Panel Connection Between a Terminal Server and a Sun Fire V445 Server 43
FIGURE 2-5 Tip Connection Between a Sun Fire V445 Server and Another Sun System 46
FIGURE 4-1 Memory Module Groups 0 and 1 69
FIGURE 4-2 ALOM System Controller Card 72
FIGURE 4-3 ALOM System Controller Card Ports 74
xvii
Page 18

FIGURE 4-4 PCI Slots 77
FIGURE 4-5 Hard Disk Drives and Indicators 82
FIGURE 4-6 Power Supplies and Indicators 84
FIGURE 4-7 System Fan Trays and Fan Indicators 87
FIGURE 8-1 Diagnostic Mode Flowchart 161
FIGURE A-1 Serial Management Connector Diagram 222
FIGURE A-2 Network Management Connector Diagram 223
FIGURE A-3 Serial Port Connector Diagram 224
FIGURE A-4 USB Connector Diagram 225
FIGURE A-5 Gigabit Ethernet Connector Diagram 226
xviii Sun Fire V445 Server Administration Guide • August 2006
Page 19

Tables
TABLE 1-1 Sun Fire V445 Server Features at a Glance 2
TABLE 1-2 System Status Indicators 10
TABLE 1-3 System Diagnostic Indicators 10
TABLE 1-4 Network Management Port Indicator 18
TABLE 1-5 Ethernet Indicators 20
TABLE 2-1 Ways of Communicating With the System 24
TABLE 2-2 Ways of Accessing the ok Prompt 39
TABLE 2-3 Pin Crossovers for Connecting to a Typical Terminal Server 43
TABLE 2-4 OpenBoot Configuration Variables That Affect the System Console 56
TABLE 4-1 Memory Module Groups 0 and 1 69
TABLE 4-2 PCI Bus Characteristics, Associated Bridge Chips, Motherboard Devices,
and PCI Slots 76
TABLE 4-3 PCI Slot Device Names and Paths 77
TABLE 4-4 Hard Disk Drive Status Indicators 82
TABLE 4-5 Power Supply Status Indicators 84
TABLE 4-6 Fan Tray Status Indicators 87
TABLE 5-1 Device Identifiers and Devices 106
TABLE 6-1 Disk Slot Numbers, Logical Device Names, and Physical Device Names 117
TABLE 8-1 Summary of Diagnostic Tools 138
TABLE 8-2 What ALOM Monitors 140
xix
Page 20

TABLE 8-3 OpenBoot Configuration Variables That Control Diagnostic Testing and Automatic System
Restoration 146
TABLE 8-4 Service Mode Overrides 149
TABLE 8-5 Scenarios for Overriding Service Mode Settings 150
TABLE 8-6 Summary of Diagnostic Operation 162
TABLE 8-7 Sample obdiag Menu 164
TABLE 8-8 Keywords for the test-args OpenBoot Configuration Variable 166
TABLE 8-9 System Generated Predictive Self-Healing Message 173
TABLE 8-10 showrev -p Command Output 189
TABLE 8-11 Using Solaris Information Display Commands 189
TABLE 8-12 SunVTS Tests 202
TABLE 8-13 What Sun Management Center Monitors 204
TABLE 8-14 Sun Management Center Features 204
TABLE 9-1 OpenBoot Configuration Variable Settings to Enable Automatic System Restoration 214
TABLE A-1 Serial Management connector signals 222
TABLE A-2 Network Management connector signals 223
TABLE A-3 Serial port connector signals 224
TABLE A-4 USB connector signals 225
TABLE A-5 Gigabit Ethernet connector signals 226
TABLE B-1 Dimensions and Weight 228
TABLE B-2 Electrical Specifications (Continued) 228
TABLE B-3 Environmental Specifications 229
TABLE B-4 Agency Compliance Specifications 230
TABLE B-5 Clearance and Service Access Specifications 231
TABLE C-1 OpenBoot Configuration Variables Stored on a ROM Chip 233
xx Sun Fire V445 Server Administration Guide • August 2006
Page 21

Preface
The Sun Fire V445 Server Administration Guide is intended for experienced system
administrators. It includes general descriptive information about the Sun Fire
V445 server and detailed instructions for configuring and administering the server.
To use the information in this manual, you must have working knowledge of
computer network concepts and terms, and advanced familiarity with the Solaris™
operating system (OS).
How This Book Is Organized
The Sun Fire V445 Server Administration Guide is divided into the following chapters:
■ Chapter 1 presents an illustrated overview of the system and a description of the
system’s reliability, availability, and serviceability (RAS) features, as well as new
features introduced with this server.
TM
■ Chapter 2 describes the system console and how to access it.
■ Chapter 3 describes how to power on and power off the system, and how to
initiate a reconfiguration boot.
■ Chapter 4 describes and illustrates system hardware components. It also includes
configuration information for CPU/memory modules and dual inline memory
modules (DIMMs).
■ Chapter 5 describes the tools used to configure system firmware, including Sun
Advanced Lights Out Manager (ALOM) system controller environmental
monitoring, automatic system recovery (ASR), hardware watchdog mechanism,
and multipathing software. In addition, it describes how to unconfigure and
reconfigure a device manually.
■ Chapter 6 describes how to manage internal disk volumes and devices.
■ Chapter 7 provides instructions for configuring network interfaces.
TM
xxi
Page 22

■ Chapter 8 describes how to perform system diagnostics.
■ Chapter 9 describes how to troubleshoot the system.
This manual also includes the following appendices:
■ Appendix A details connector pinouts.
■ Appendix B provides tables of various system specifications.
■ Appendix C provides a list of all OpenBoot™ configuration variables, and a short
description of each.
Using UNIX Commands
This document might not contain information about basic UNIX®commands and
procedures such as shutting down the system, booting the system, and configuring
devices.
See one or more of the following for this information:
■ Solaris Handbook for Sun Peripherals
■ AnswerBook2™ online documentation for the Solaris OS
■ Other software documentation that you received with your system
xxii Sun Fire V445 Server Administration Guide • August 2006
Page 23

Typographic Conventions
TABLE P-1
Typeface
AaBbCc123 The names of commands, files,
*
AaBbCc123
AaBbCc123 Book titles, new words or terms,
AaBbCc123 Command-line variable; replace
* The settings on your browser might differ from these settings.
Meaning Examples
and directories; on-screen
computer output
What you type, when
contrasted with on-screen
computer output
words to be emphasized
with a real name or value
System Prompts
Edit your.login file.
Use ls -a to list all files.
% You have mail.
% su
Password:
Read Chapter 6 in the User’s Guide.
These are called class options.
You must be superuser to do this.
To delete a file, type rm filename.
TABLE P-2
Type of Prompt Prompt
C shell machine-name%
C shell superuser machine-name#
Bourne shell and Korn shell $
Bourne shell and Korn shell superuser #
ALOM system controller sc>
OpenBoot firmware ok
OpenBoot Diagnostics obdiag>
Preface xxiii
Page 24

Related Documentation
TABLE P-3
Application Title Part Number
Late-breaking product
information
Installation overview Sun Fire V445 Server Getting Started
System installation,
including rack installation
and cabling
Service Sun Fire V445 Server Service Manual 819-3742
Site planning overview Site Planning Guide for Sun Servers
Site planning data Sun Fire V445 Server Site Planning Guide 819-3745
Sun Advanced Lights Out
Manager (ALOM) system
controller
Sun Fire V445 Server Product Notes 819-3744
819-4664
Guide
Sun Fire V445 Server Installation Guide 819-3743
Sun Advanced Lights Out Manager
(ALOM) 1.6 Online Help
817-1960
Documentation, Support, and Training
Sun Function URL
Documentation http://www.sun.com/documentation/
Support http://www.sun.com/support/
Training http://www.sun.com/training/
Sun Welcomes Your Comments
Sun is interested in improving its documentation and welcomes your comments and
suggestions. You can submit your comments by going to:
xxiv Sun Fire V445 Server Administration Guide • August 2006
Page 25

http://www.sun.com/hwdocs/feedback
Please include the title and part number of your document with your feedback:
Sun Fire V445 Server Administration Guide, part number 819-3741
Preface xxv
Page 26

xxvi Sun Fire V445 Server Administration Guide • August 2006
Page 27

CHAPTER
1
System Overview
This chapter introduces you to the Sun Fire V445 server and describes its features.
The following sections are included:
■ “Sun Fire V445 Server Overview” on page 1
■ “New Features” on page 7
■ “Locating Front Panel Features” on page 8
■ “Locating Back Panel Features” on page 15
■ “Reliability, Availability, and Serviceability (RAS) Features” on page 21
■ “Sun Cluster Software” on page 21
■ “Sun Management Center Software” on page 22
Note – This document does not provide instructions for installing or removing
hardware components. For instructions on preparing the system for servicing and
procedures to install and remove the server components described in this document,
refer to the Sun Fire V445 Server Service Manual.
Sun Fire V445 Server Overview
The Sun Fire V445 server is a high-performance, shared memory, symmetric
multiprocessing server that supports up to four UltraSPARC® IIIi processors and
uses the Fire ASIC PCI-Express NorthBridge along with PCI-X and PCIe expansion
slots. The UltraSPARC IIIi processor has a 1 Mbyte L2 cache and implements the
SPARC® V9 Instruction Set Architecture (ISA) and the Visual Instruction Set
extensions (Sun VIS™ software) that accelerate multimedia, networking, encryption,
and Java™ software processing. The Fire ASIC provides higher I/O performance
and interfaces with the I/O subsystem, which contains 4 10/100/1000Mb Ethernet
ports, 8 SAS disk drives, 1 DVD-RW drive, 4 USB ports, a POSIX compliant DB-9
serial port, and service processor communication ports. The PCI expansion
subsystem is configurable with a variety of plug in third party adapters.
1
Page 28

System reliability, availability, and serviceability (RAS) are enhanced by features that
include hot-pluggable disk drives and redundant, hot-swappable power supplies
and fan trays. A full list of RAS features are described in Chapter 5.
The system, which is mountable in a 4-post rack, measures 7 inches high (4 rack
units - U), 17.6 inches wide, and 24 inches deep (22.225 cm x 44.7 cm x 60.96 cm).
The system weighs approximately 75 lb (34.02 kg). Robust remote access is provided
with Advanced Lights Out Manager (ALOM) software, which also controls
powering on/off and diagnostics. The system also meets ROHS requirements.
TABLE 1-1 provides a brief description of the Sun Fire V445 server features. More
details on these features are provided in the following subsections.
TABLE 1-1 Sun Fire V445 Server Features at a Glance
Feature Description
Processor 4 UltraSPARC IIIi CPUs
Memory 16 slots that can be populated with one of the following types of
DDR1 DIMMS:
• 512 MB (8 GB maximum)
• 1 GB (16 GB maximum)
• 2 GB (32 GB maximum)
External ports • 4 Gigabit Ethernet ports – Support several modes of operations
at 10, 100, and 1000 megabits per second (Mbps)
• 1 10BASE-T network management port – Reserved for the
ALOM system controller and the system console
• 2 Serial ports – One POSIX compliant DB-9 connector, and one
RJ-45 serial management connector on the ALOM system
controller card
• 4 USB ports – USB 2.0 compliant and support 480Mbps, 12Mbps,
and 1.5Mbps speeds
Internal hard drives 8 2.5 inch (5.1 cm) high, hot-pluggable Serial Attached SCSI (SAS)
disk drives
Other internal
peripherals
PCI interfaces Eight PCI slots: four 8 lane PCI-Express slots (two of which also
Power 4 550-watt hot-swappable power supplies, each with its own
Cooling 6 hot-swappable high-power fan trays (one fan per tray) organized
1 DVD/ROM/RW device
support 16 lane form factor cards) and four PCI-X slots
cooling fan
into three redundant pairs – 1 redundant pair for disk drives – 2
redundant pairs for the CPU/memory modules, memory DIMMs,
I/O subsystem, and front-to-rear cooling of the system
2 Sun Fire V445 Server Administration Guide • August 2006
Page 29

TABLE 1-1 Sun Fire V445 Server Features at a Glance (Continued)
Feature Description
Remote management A serial port for the ALOM management controller card and a
10BASE-T network management port for remote access to system
functions and the system controller
Disk Mirroring Hardware RAID 0,1 support for internal disk drives
RAS features Robust reliability, availability, and serviceability (RAS) features are
supported. See
Firmware Sun system firmware comprising:
• OpenBoot PROM for system settings and power-on self test
(POST) support
• ALOM for remote management administration
Operating system The Solaris OS is preinstalled on disk 0
Chapter 5 for details
Processors and Memory
Processing power is provided by up to four CPU/memory modules. Each module
incorporates one UltraSPARC IIIi processor, and slots for four double data rate
(DDR) dual inline memory modules (DIMMs).
System main memory is provided by up to 16 DDR synchronous dynamic random
access memory DIMMs. The system supports 512-Mbyte, 1-Gbyte, and 2-Gbyte
DIMMs. Total system memory is shared by all CPUs in the system and ranges from
a minimum of 1 Gbyte (one CPU/memory module with two 512-Mbyte DIMMs) to
a maximum of 32 Gbytes (four modules fully populated with 2-Gbyte DIMMs). For
more information about system memory, see “DIMMs” on page 68.
External Ports
The Sun Fire V445 server provides four Gigabit Ethernet ports, one 10BASE-T
network management port, two Serial ports, and four USB ports.
Gigabit Ethernet Ports
The four on-board Gigabit Ethernet ports located on the back panel support several
modes of operations at 10, 100, and 1000 megabits per second (Mbps). Additional
Ethernet interfaces or connections to other network types can be provided by
installing the appropriate PCI interface cards. Multiple network interfaces can be
combined with Solaris Internet Protocol (IP) network multipathing software to
Chapter 1 System Overview 3
Page 30

provide hardware redundancy and failover capability, as well as load balancing on
outbound traffic. Should one of the interfaces fail, the software can automatically
switch all network traffic to an alternate interface to maintain network availability.
For more information about network connections, see “Configuring the Primary
Network Interface” on page 132 and “Configuring Additional Network Interfaces”
on page 133.
10BASE-T Network Management Port
The network management port (labeled NET MGT) is located on the chassis back
panel. This port is reserved for use with the ALOM system controller and the system
console.
This port provides direct network access to the ALOM system controller card and its
firmware. This port also provides access to the system console, power-on self-test
(POST) output messages, and ALOM system controller messages. Use this port to
perform remote administration, including externally initiated resets (XIR).
Serial Management and DB-9 Ports
The DB-9 port is POSIX compliant with a general-purpose DB-9 connector (labeled
TTYB) on the system back panel. The serial management port is an RJ-45 connector
(labeled SERIAL MGT) on the chassis back panel, and is reserved for use with the
ALOM system controller and the system console.
The serial management port enables you to set up a system console device, without
configuring an existing port. All power-on self-test (POST) and ALOM system
controller messages are directed to the serial management port by default. For more
information, see “About the Serial Ports” on page 90.
USB Ports
The front and back panels both provide two Universal Serial Bus (USB) ports for
connecting peripheral devices such as modems, printers, scanners, digital cameras,
or a Sun Type-6 USB keyboard and mouse. The USB ports are USB 2.0 compliant,
and support 480Mbps, 12Mbps, and 1.5Mbps speeds. For additional details, see
“About the USB Ports” on page 89.
4 Sun Fire V445 Server Administration Guide • August 2006
Page 31

RAID 0,1 Internal Hard Drives
Internal disk storage is provided by up to eight 2.5 inch (5.1 cm) high, hot-pluggable,
SAS disk drives. The basic system includes a SAS disk backplane that accommodates
eight disks capable of data transfer rates of up to 320 megabytes per second. See
“About the Internal Disk Drives” on page 81 and “Locating Back Panel Features” on
page 15.
External multidisk storage subsystems and redundant array of independent disks
(RAID) storage arrays can be supported by installing peripheral component
interconnect (PCI) host adapter cards along with the appropriate system software.
Software drivers supporting SCSI and other types of devices are included in the
Solaris OS. In addition, the system supports internal hardware mirroring (RAID 0,1)
using the on-board SAS controller. See “About RAID Technology” on page 114.
PCI Subsystem
System I/O is handled by two expanded Peripheral Component Interconnect (PCI) Express buses and two PCI-X buses. The system has eight PCI slots: four 8 lane PCIExpress slots (two of which also support 16 lane form factor cards) and four PCI-X
slots. The PCI-X slots operate at up to 133MHz, are 64-bit capable, and support
legacy PCI devices. All PCI-X slots comply with PCI Local Bus Specification Rev 2.2
and PCI-X Local Bus Specification Rev 1.0. All PCIe Slots comply with PCI-Express
Base Specification r1.0a and PCI Standard SHPC Specification, r1.1. For additional
details, see “About the PCI Cards and Buses” on page 75.
Power Supplies
The basic system includes four 550-watt power supplies, each with its own cooling
fan. The power supplies are plugged into a separate power distribution board (PDB).
This board is connected to the motherboard through 12 volt high current bus bars.
Two power supplies provide sufficient current (1100 DC watts) for maximum
configuration. The other power supplies provide 2+2 redundancy, enabling the
system to continue operating if up to two power supplies fail.
The power supplies are hot-swappable – you can remove and replace a faulty power
supply without shutting down the system. With four separate AC inlets you can
wire the server with a fully redundant AC circuit. A failed power supply does not
need to remain installed to sustain proper cooling. For more information about the
power supplies, see “About the Power Supplies” on page 83.
Chapter 1 System Overview 5
Page 32

System Fan Trays
The system is equipped with six fan trays organized into three redundant pairs. One
redundant pair is for cooling the disk drives. The other two redundant pairs are for
cooling the CPU/memory modules, memory DIMMs, I/O subsystem, and provide
front-to-rear cooling of the system. Not all fans must be present to provide adequate
cooling – only one fan per redundant pair must be present.
Note – All system cooling is provided by the fan trays – power supply fans do not
provide system cooling.
See “About the System Fan Trays” on page 86 for details.
ALOM System Controller Card
The Sun ALOM system controller card enables system management and
administration for the Sun Fire V445 server over a serial line or an Ethernet network.
ALOM system controller provides remote system administration for geographically
distributed or physically inaccessible systems. These features include powering
on/off the system and enabling diagnostics. The firmware installed on the ALOM
system controller card enables you to monitor the system, without having to install
any supporting software.
The ALOM system controller card runs independently of the host system, and
operates off of standby power from the systems power supplies. This allows the
ALOM system controller to serve as a lights out management tool that continues to
function even when the server operating system goes offline or when the server is
powered off.
Hardware Disk Mirroring
The SAS controller supports hardware disk mirroring (RAID 0,1) capabilities for all
internal disk drives, resulting in improved disk drive performance, data integrity,
data availability, and fault recovery.
Predictive Self-Healing
Sun Fire V445 servers with Solaris 10 or later feature the latest fault management
technologies. With Solaris 10, Sun introduces a new architecture for building and
deploying systems and services capable of predictive self-healing. Self-healing
6 Sun Fire V445 Server Administration Guide • August 2006
Page 33

technology enables Sun systems to accurately predict component failures and
mitigate many serious problems before they actually occur. This technology is
incorporated into both the hardware and software of the Sun Fire V445 server.
At the heart of the Predictive Self-Healing capabilities is the Solaris Fault Manager, a
service that receives data relating to hardware and software errors, and
automatically and silently diagnoses the underlying problem. Once a problem is
diagnosed, a set of agents automatically responds by logging the event, and if
necessary, takes the faulty component offline. By automatically diagnosing
problems, business-critical applications and essential system services can continue
uninterrupted in the event of software failures, or major hardware component
failures.
New Features
The Sun Fire V445 server provides faster computing in a denser, more powerefficient package. The following key new features are included:
■ UltraSPARC IIIi CPU
The UltraSPARC IIIi CPU provides a faster JBus system interface bus that
considerably enhances system performance.
■ Higher I/O Performance With Fire ASIC, PCI-Express, and PCI-X
The Sun Fire V445 server provides higher I/O performance with PCI-Express
cards integrated with the latest Fire chip (NorthBridge). This integration allows
higher bandwidth and lower latency datapaths between the I/O subsystem and
the CPUs. The server supports two full height or low profile/full depth 16 lane
(wired 8 lane) PCI-Express cards and two full height or low profile/half depth 8
lane PCI-Express cards. The system also supports four PCI-X slots that operate at
up to 133MHz, are 64-bit capable, and support legacy PCI cards.
The Fire ASIC is a high performance JBus to PCI-Express host bridge. On the host
bus side, Fire supports a coherent, split transaction, 128-bit JBus interface. On the
I/O side, Fire supports two 8 lane serial PCI-Express interconnects.
■ SAS Disk Subsystem
Compact 2.5-inch disk drives provide faster, denser, more flexible, and more
robust storage. Hardware RAID 0/1 is supported across all eight disks.
■ ALOM Control of System Settings
The Sun Fire V445 server provides robust remote access to system functions and
the system controller. The physical system contol keyswitch has been removed
and the switch settings (power on/off, diagnostic mode) are now emulated with
ALOM and software commands.
Chapter 1 System Overview 7
Page 34
Other new features include the following:
■ Four hot-swap power supplies enable fully redundant AC/DC capabilities (N+N)
■ Fan trays are redundant and hot-swappable (N+1)
■ Increased data Integrity and availability for all SAS disk drives using HW Raid
(0+1) controller
■ Persistent storage of firmware initialization and probing
■ Persistent storage of error state on error reset events
■ Persistent storage of diagnostic output
■ Persistent storage of configuration change events
■ Automated diagnosis of CPU, memory, and I/O fault events during runtime
(Solaris 10 and subsequent compatible Solaris OSs)
■ Dynamic FRUID support of environmental events
■ Software readable chassis serial number for asset management
Locating Front Panel Features
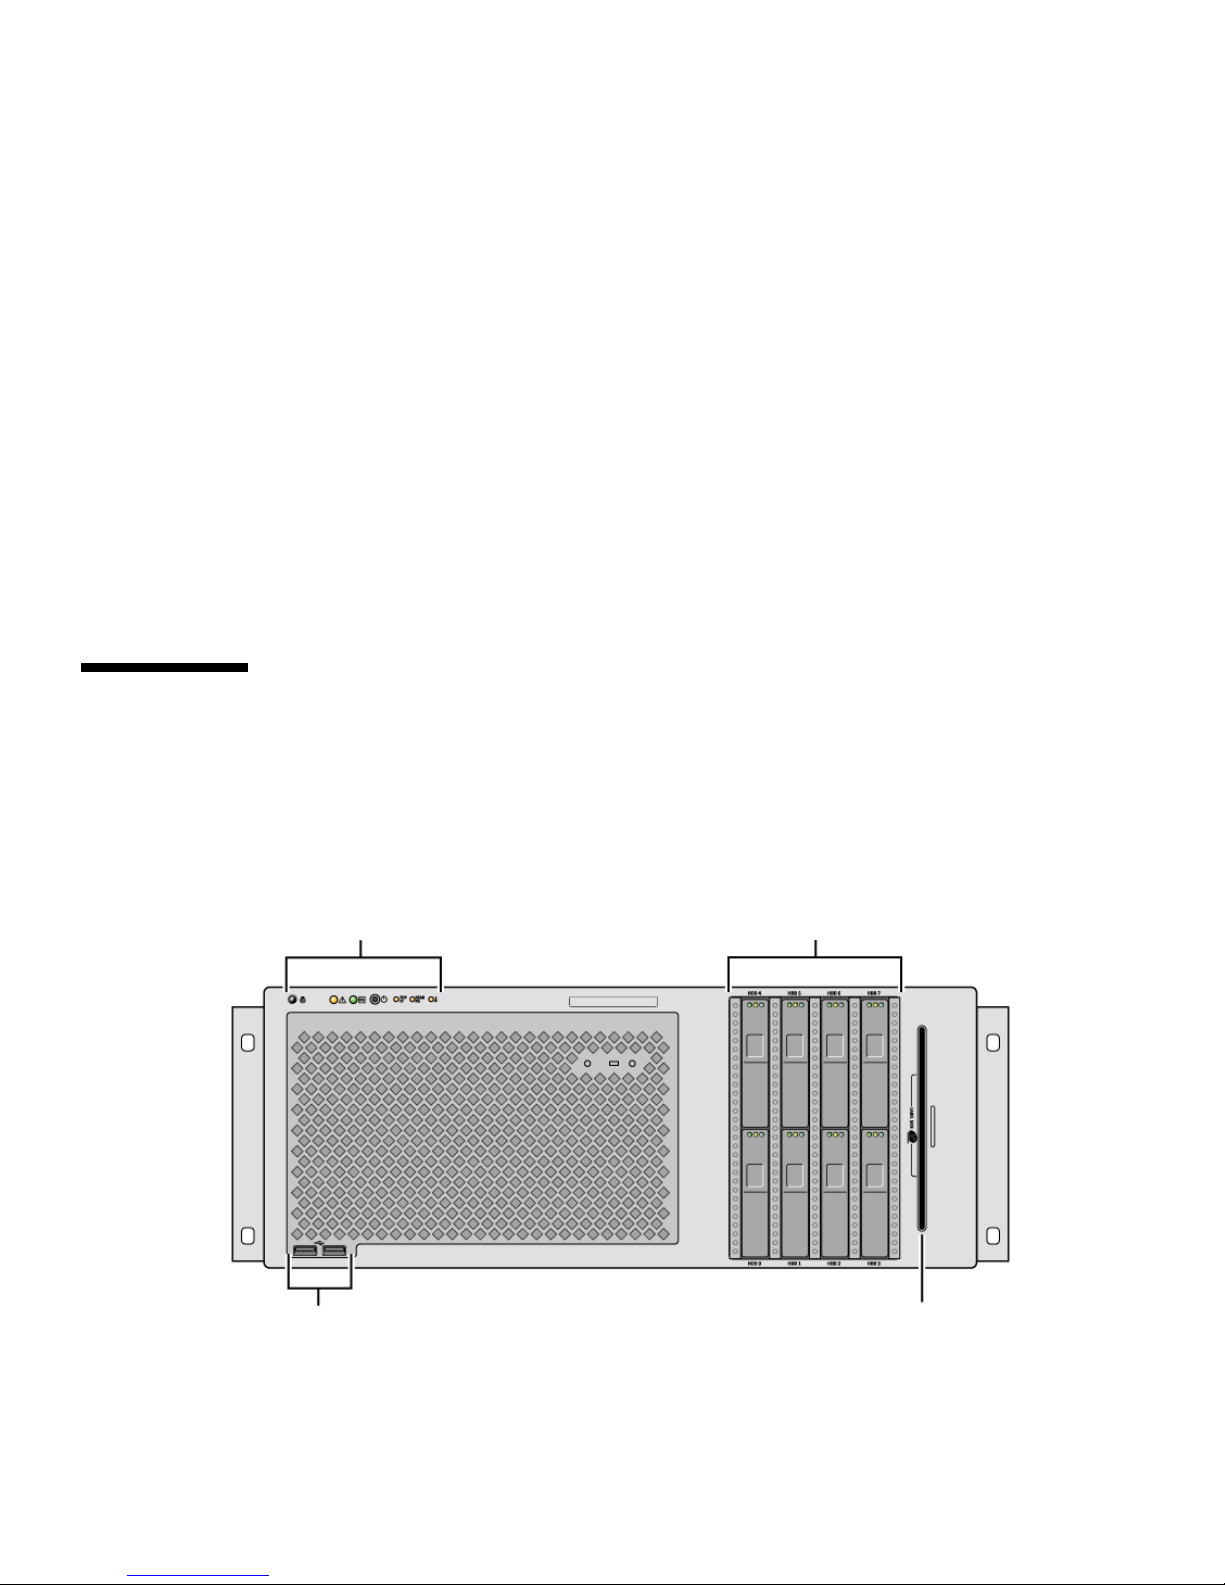
The illustration below shows the system features that you can access from the front
panel.
Status Indicators/control panel
SAS disk drives (8)
Removable media driveUSB ports
FIGURE 1-1 Front Panel Features
8 Sun Fire V445 Server Administration Guide • August 2006
Page 35
For information about front panel controls and indicators, see “Front Panel
Indicators” on page 9.
The system is configured with up to eight disk drives, which are accessible from the
front of the system.
Front Panel Indicators
Several front panel indicators provide general system status, alert you to system
problems, and help you to determine the location of system faults.
During system startup, the indicators are toggled on and off to verify that each one
is working correctly. Indicators located on the front panel work in conjunction with
specific fault indicators. For example, a fault in the power supply subsystem
illuminates the power supply Service Required indicator on the affected power
supply, as well as the system Service Required indicator. Since all front panel status
indicators are powered by the system’s standby power source, fault indicators
remain lit for any fault condition that results in a system shutdown.
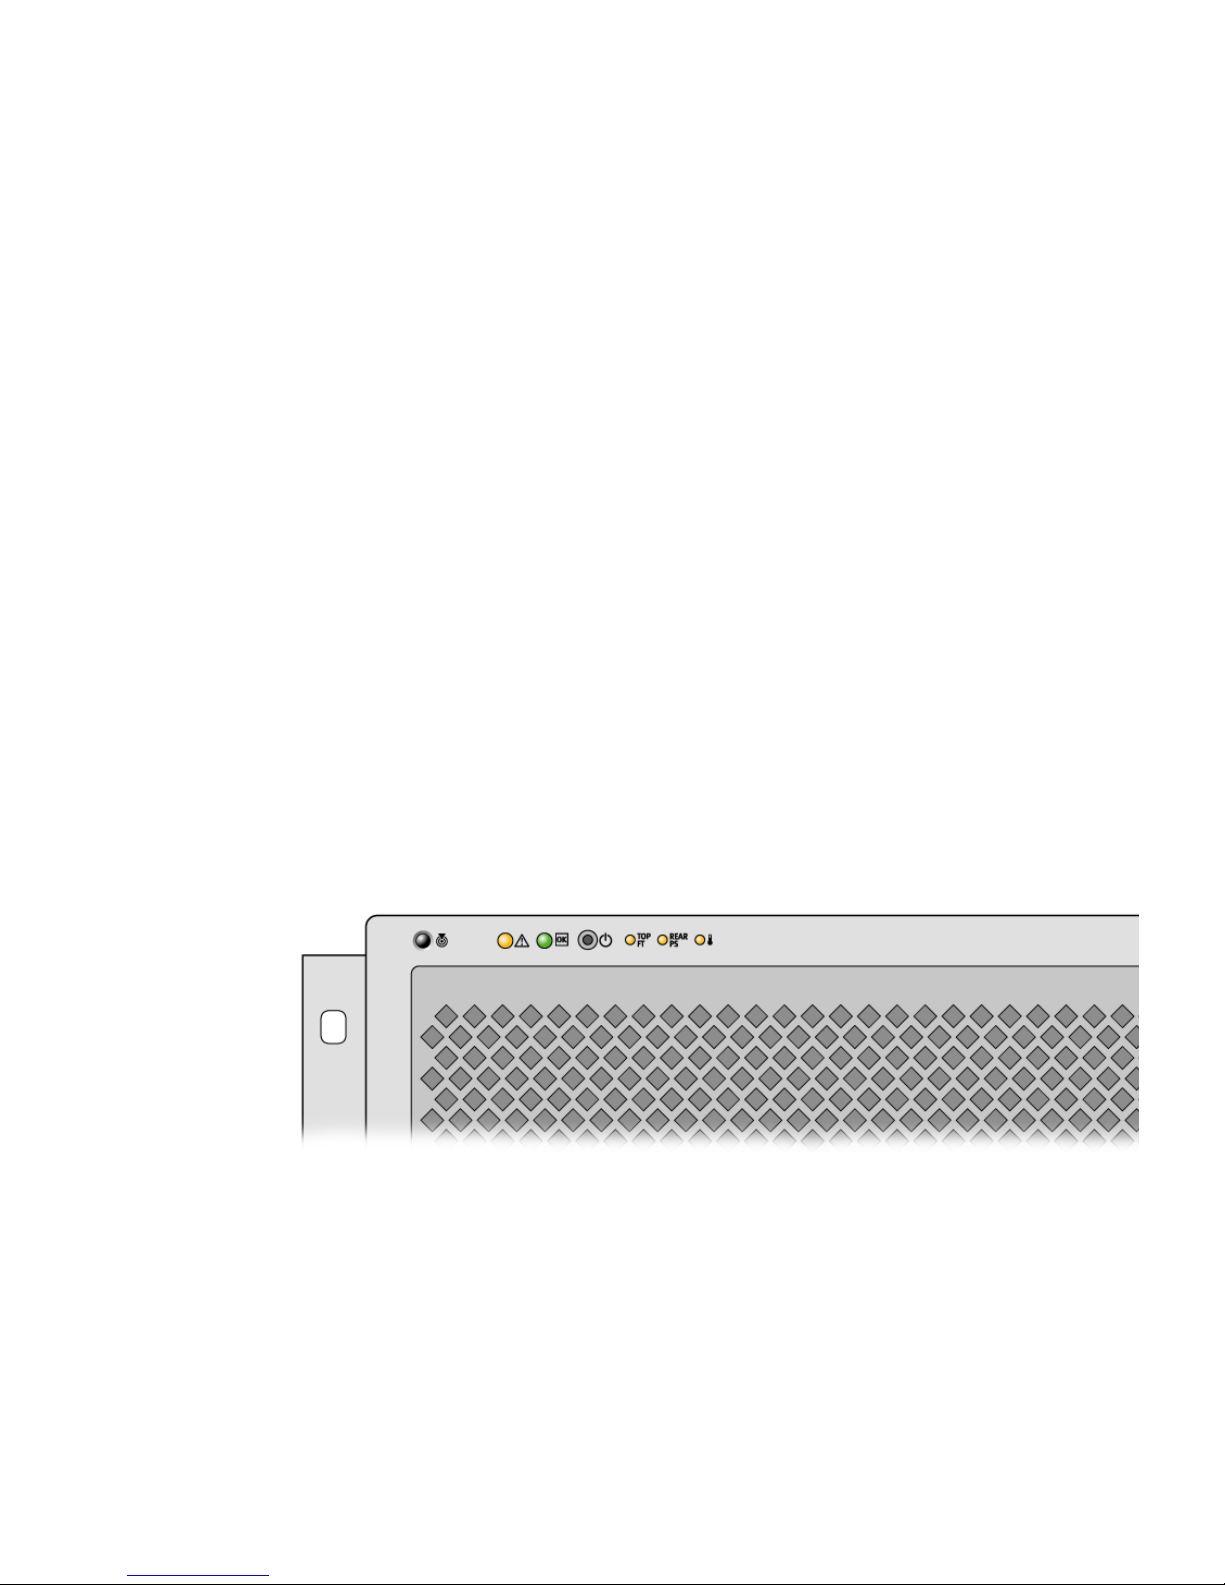
At the top left of the system as you look at its front are six system status indicators.
Power/OK indicator and the Service Required indicator provide a snapshot of the
overall system status. The Locator indicator helps you to quickly locate a specific
system even though it may be one of numerous systems in a room. The Locator
indicator/button is at the far left in the cluster, and is lit remotely by the system
administrator, or toggled on and off locally by pressing the button.
FIGURE 1-2 Front Panel System Status Indicators
Each system status indicator has a corresponding indicator on the back panel.
Chapter 1 System Overview 9
Page 36

Listed from left to right, the system status indicators operate as described in the
following table.
TABLE 1-2 System Status Indicators
Icon Name Description
Locator This white indicator is lit by a Solaris command, Sun
Management Center command, or ALOM commands to help
you locate the system. There is also a Locator indicator
button that allows you to reset the Locator indicator. For
information on controlling the Locator indicator, see
“Controlling the Locator Indicator” on page 102.
Service
Required
This amber indicator lights steadily when a system fault is
detected. For example, the system Service Required
indicator lights when a fault occurs in a power supply or
disk drive.
In addition to the system Service Required indicator, other
fault indicators might also be lit, depending on the nature of
the fault. If the system Service Required indicator is lit,
check the status of other fault indicators on the front panel
and other FRUs to determine the nature of the fault. See
Chapter 8 and Chapter 9.
System Activity This green indicator lights continuously when the system
power is on and the Solaris OS is running. This indicator
flashes in the intermediate stages even though the power is
on.
Additional fault indicators indicate the type of service required. These indicators are
described in
TABLE 1-3 System Diagnostic Indicators
Icon Name Location
TABLE 1-3.
Fan Tray Fault This indicator indicates a fault in a fan tray. Additional
indicators on the top panel indicate which fan tray requires
service.
Power Supply
Fault
CPU
Overtemperature
10 Sun Fire V445 Server Administration Guide • August 2006
The indicator indicates a fault in a power supply. Look at
the individual power supply status indicators (on the back
panel) to determine which power supply requires service.
This indicator indicates that a CPU has detected an
overtemperature condition. Look for any fan failures, as
well as a local overtemperature condition around the
server.
Page 37
For hard disk drive indicator descriptions, see TABLE 4-4. For fan tray indicator
descriptions located on the top panel of the server, see
TABLE 4-6.
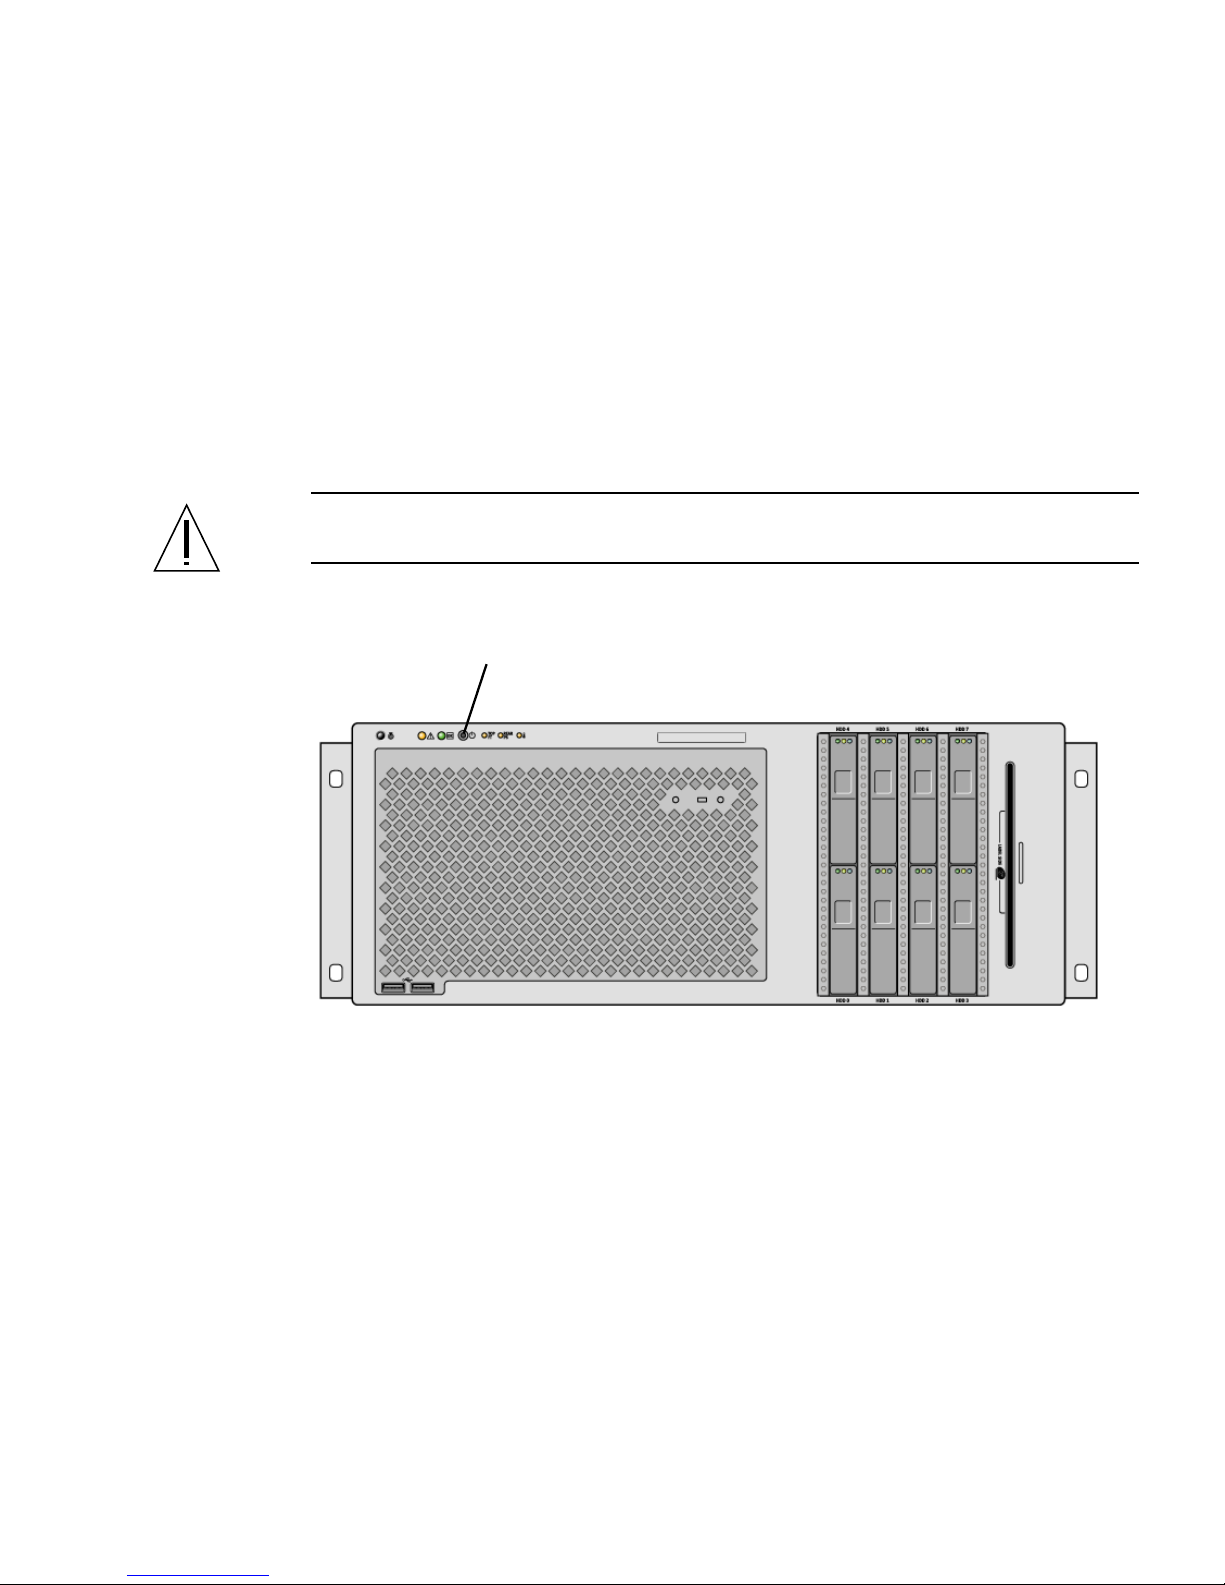
Power Button
The system Power button is recessed to prevent accidentally turning the system on
or off. If the operating system is running, pressing and releasing the Power button
initiates a graceful software system shutdown. Pressing and holding in the Power
button for four seconds causes an immediate hardware shutdown.
Caution – Whenever possible, use the graceful shutdown method. Forcing an
immediate hardware shutdown can cause disk drive corruption and loss of data.
Power button
FIGURE 1-3 Power Button Location
USB Ports
The Sun Fire V445 server has four Universal Serial Bus (USB) ports: two on the front
panel, and two on the back panel. All four USB ports comply with the USB 2.0
specification.
Chapter 1 System Overview 11
Page 38
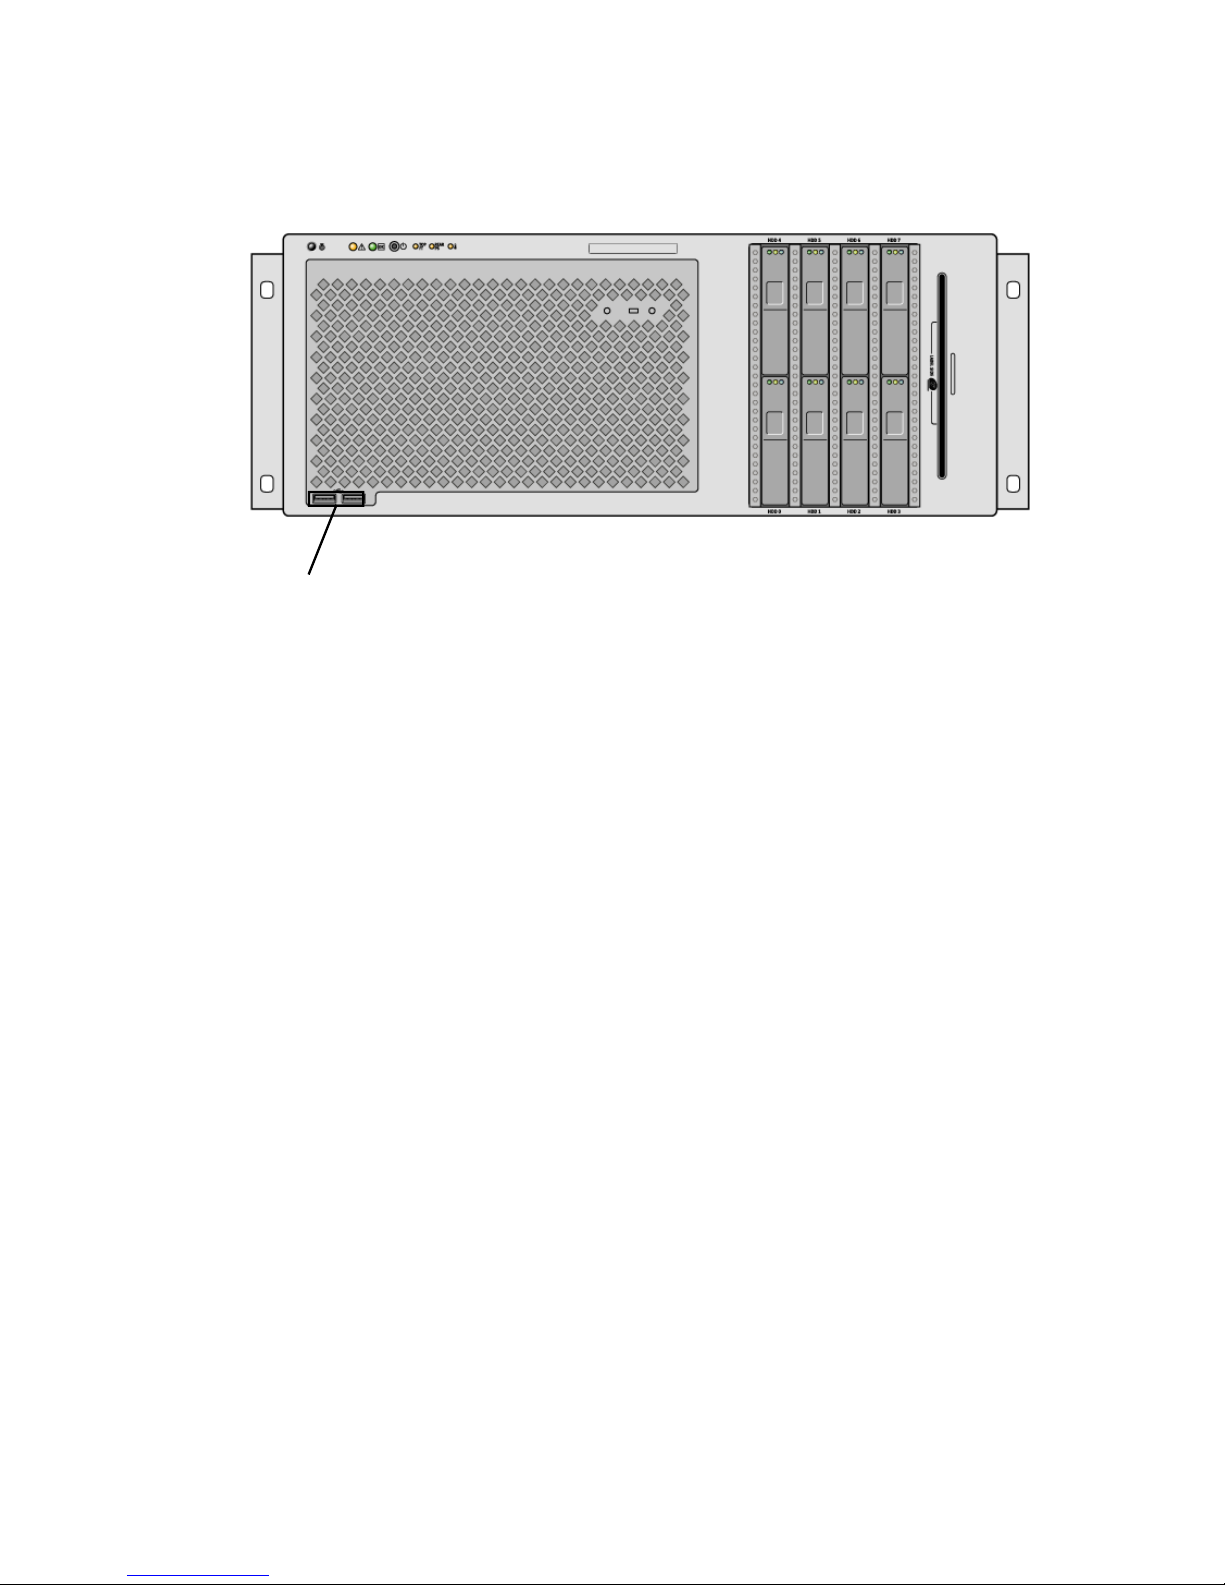
USB ports
FIGURE 1-4 USB Ports Location
For more information about the USB ports, see “About the USB Ports” on page 89.
12 Sun Fire V445 Server Administration Guide • August 2006
Page 39
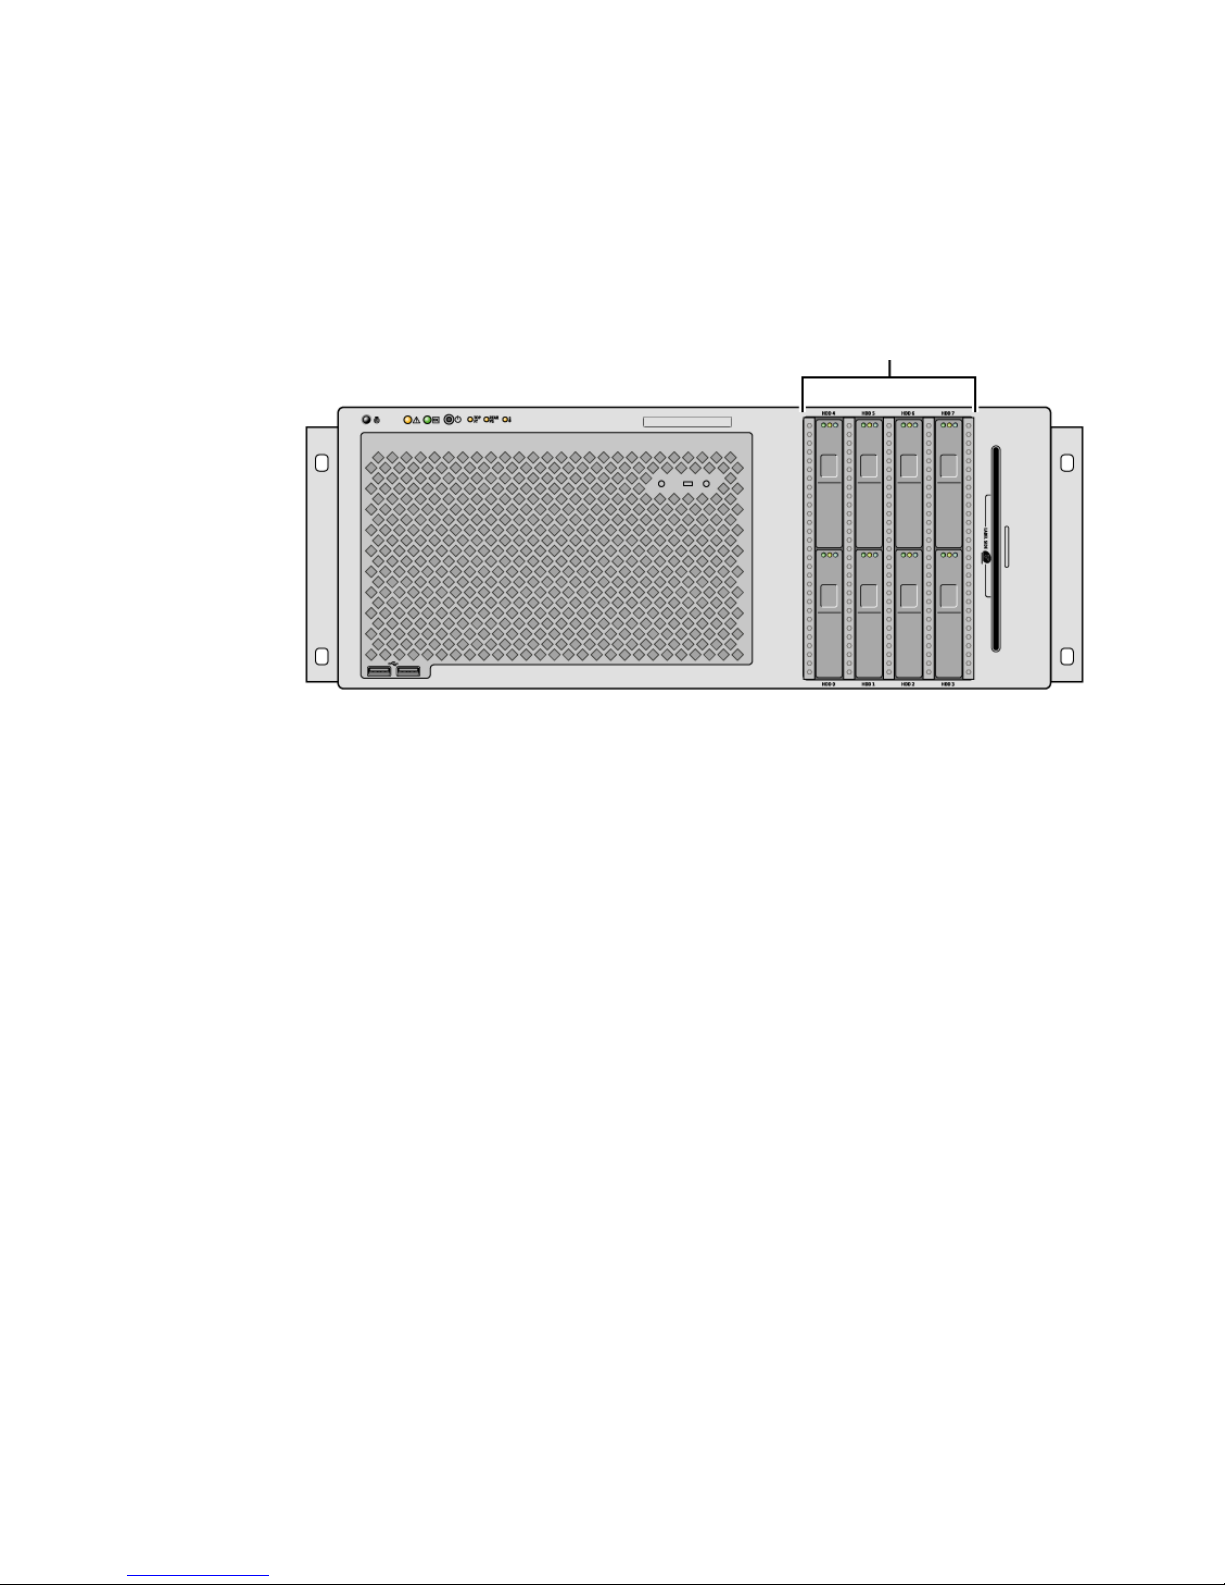
SAS Disk Drives
The system has up to eight hot-pluggable internal SAS disk drives.
SAS disk drives (8)
FIGURE 1-5 Hard Disk Drives Location
For more information about how to configure internal disk drives, see the “About
the Internal Disk Drives” on page 81.
Removable Media Drive
The Sun Fire V445 server has a DVD-ROM drive in a removable media bay. This
drive also has DVD-RW and CD-RW capabilities.
Chapter 1 System Overview 13
Page 40
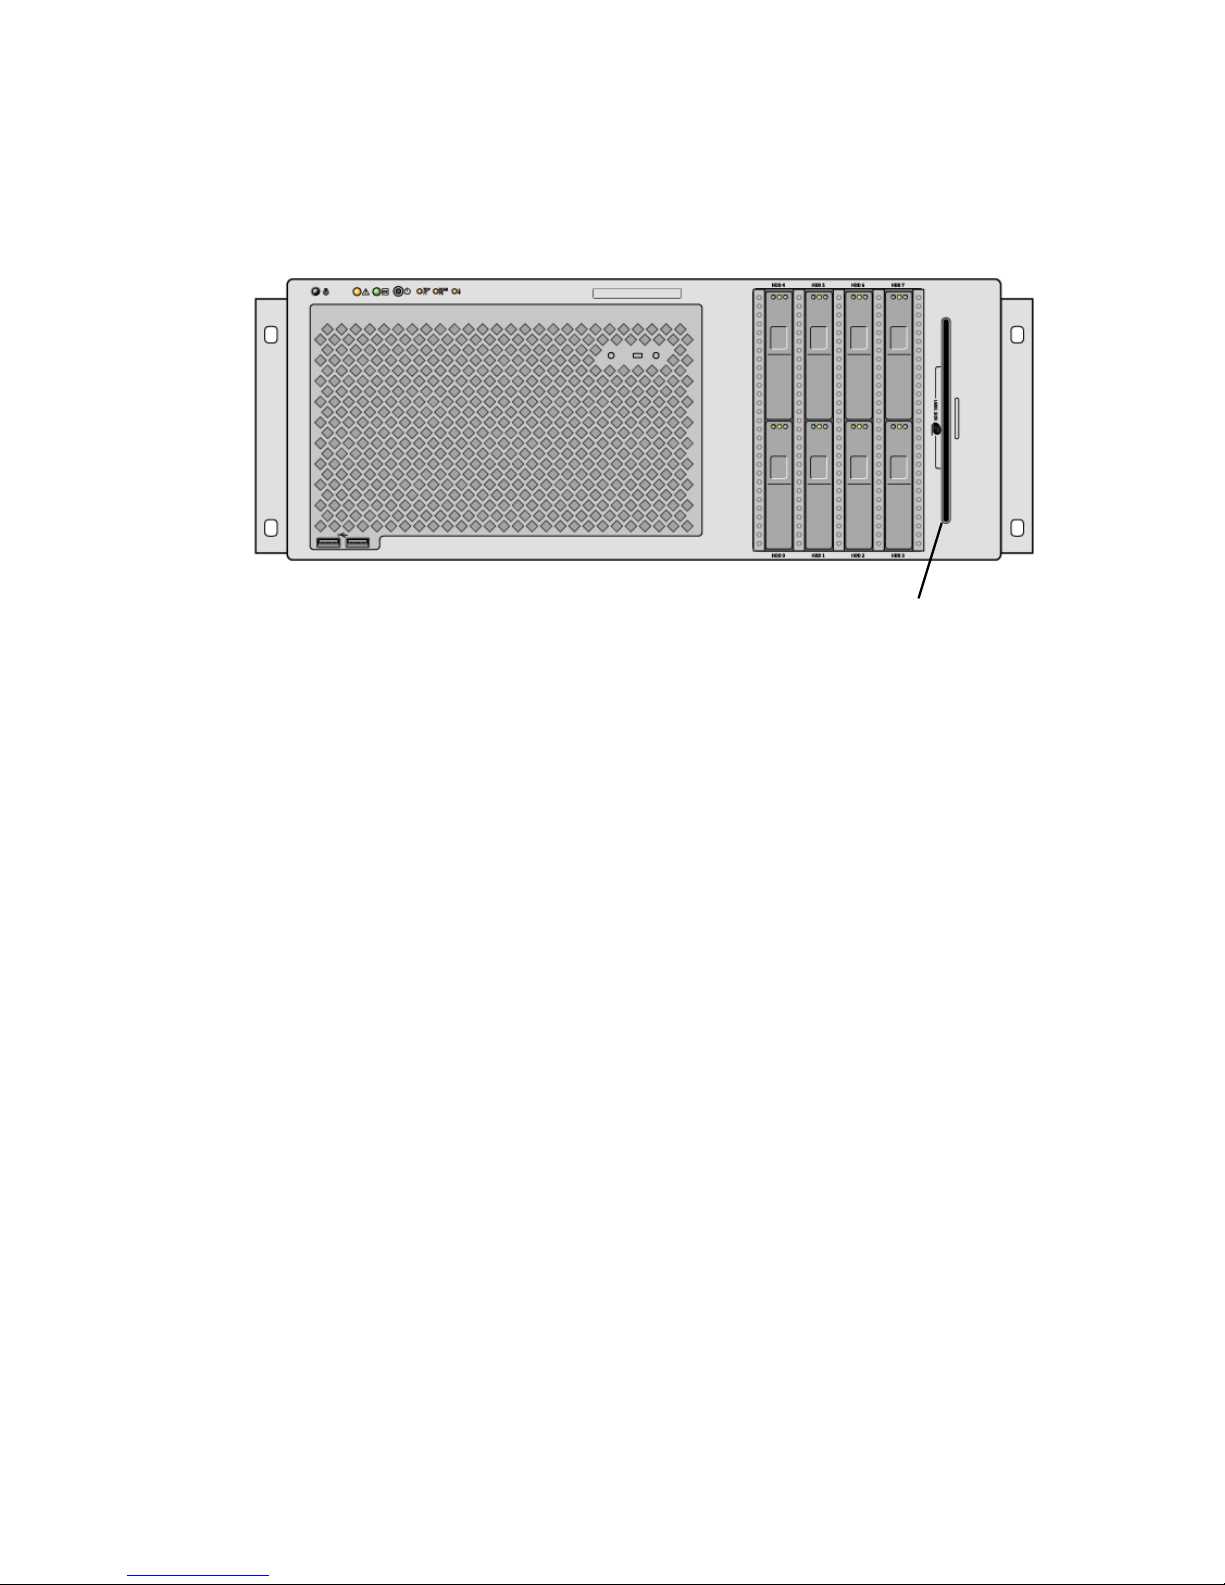
Removable media drive
FIGURE 1-6 Removable Media Drive Location
For more information about servicing the DVD-ROM drive, see the following
sections:
■ “Removing the DVD-ROM Drive” on page 197
■ “Installing the DVD-ROM Drive” on page 199
14 Sun Fire V445 Server Administration Guide • August 2006
Page 41
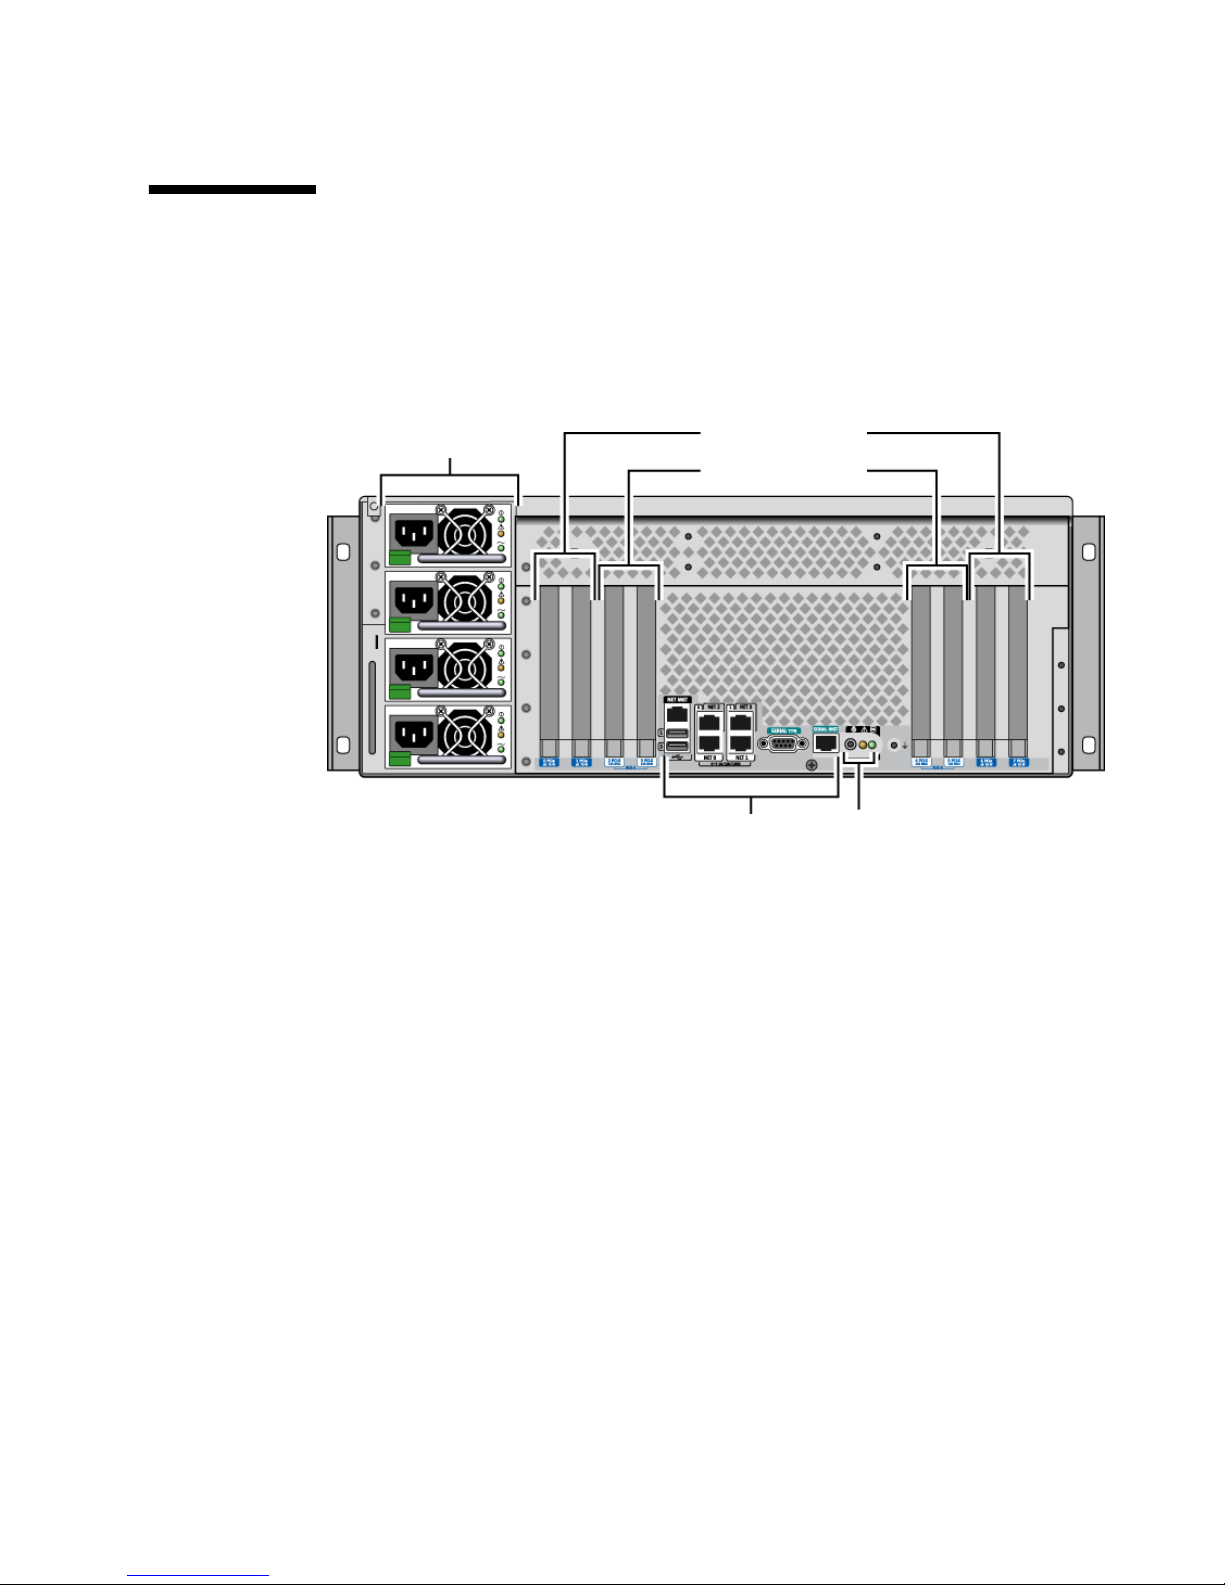
Locating Back Panel Features
The illustration below shows the system features that are accessible from the back
panel.
Power
supplies
FIGURE 1-7 Back Panel Features
PCIe card slots
PCI-X card slots
External
ports
System status
indicators
Chapter 1 System Overview 15
Page 42
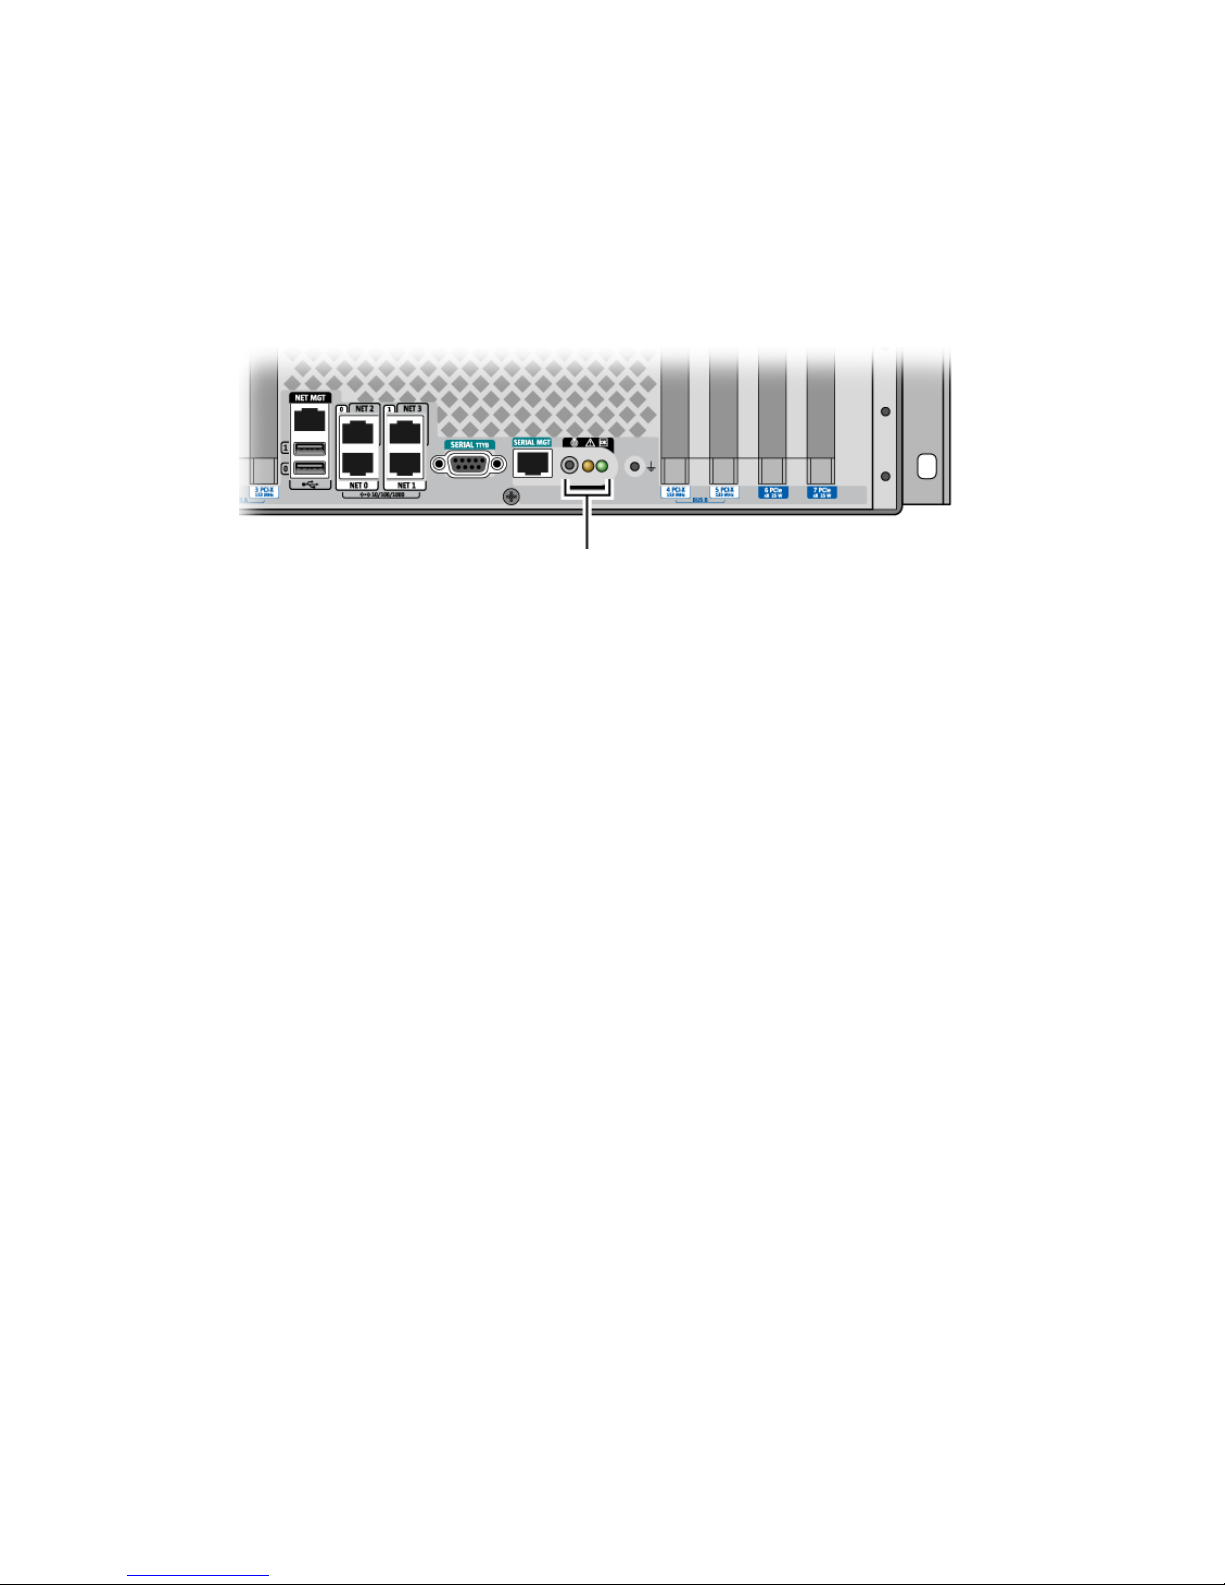
Back Panel Indicators
The back panel system status indicators consist of the Locator indicator, Service
Required indicator, and the System Activity indicator. These indicators are located in
the bottom center of the back panel, and operate as described in
Back panel system status indicators
FIGURE 1-8 Back Panel System Status Indicators
For power supply indicator descriptions, see TABLE 4-5. For fan tray indicator
descriptions located on the top panel of the server, see
TABLE 4-6.
TABLE 1-2.
Power Supplies
There are four AC/DC redundant (N+N) and hot-swappable power supplies,
whereby two power supplies are sufficient to power a fully configured system.
For more information about power supplies, see the following sections:
■ “About Hot-Pluggable Components” on page 168
■ “Removing a Power Supply” on page 181
■ “Installing a Power Supply” on page 183
■ “Reference for Power Supply Status LEDs” on page 204
For more information about power supplies, see “About the Power Supplies” on
page 83.
PCI Slots
The Sun Fire V445 server has four PCIe slots and four PCI-X slots. (One of the PCI-X
slots is occupied by the LSI Logic 1068X SAS controller.) These are labeled on the
back panel.
16 Sun Fire V445 Server Administration Guide • August 2006
Page 43
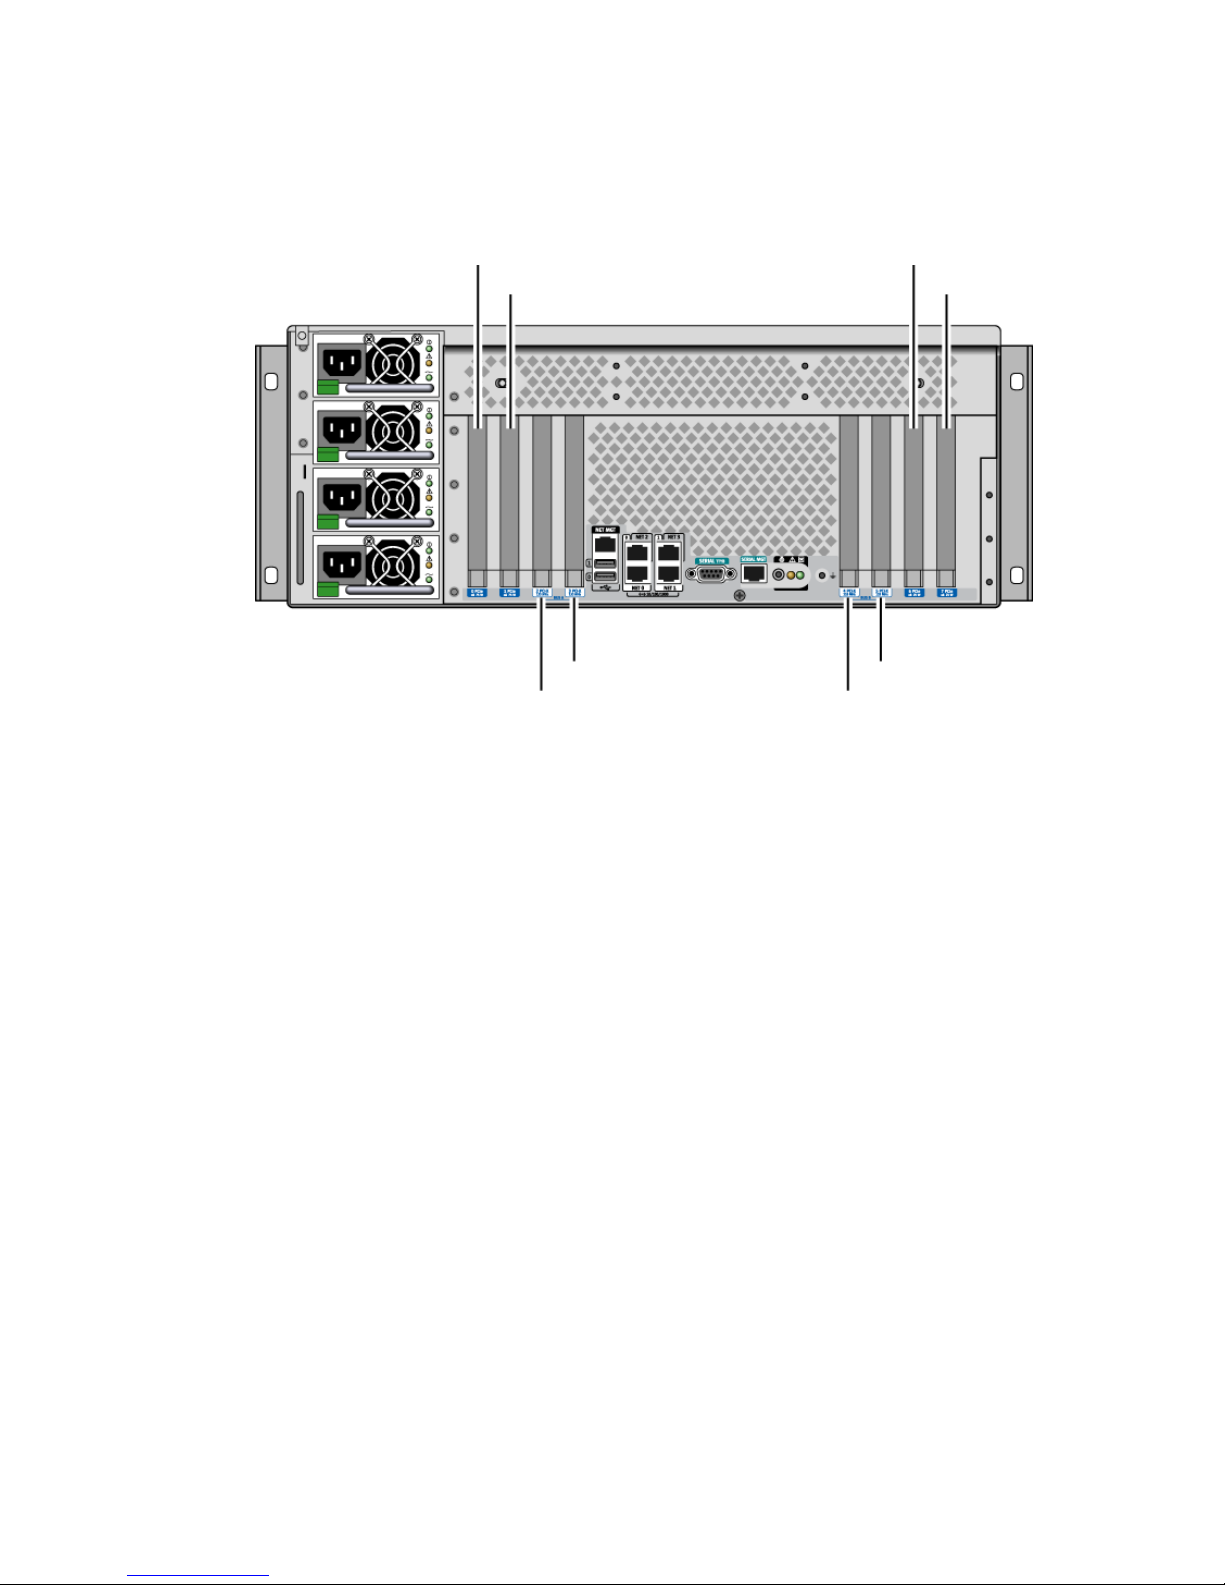
PCI1
PCI6PCI0
PCI7
PCI3
PCI2
FIGURE 1-9 PCI Slot Locations
PCI5
PCI4
For more information about how to install a PCI card, see “Installing a PCI Card” on
page 195.
For more information about PCI cards, see “About the PCI Cards and Buses” on
page 75.
Chapter 1 System Overview 17
Page 44
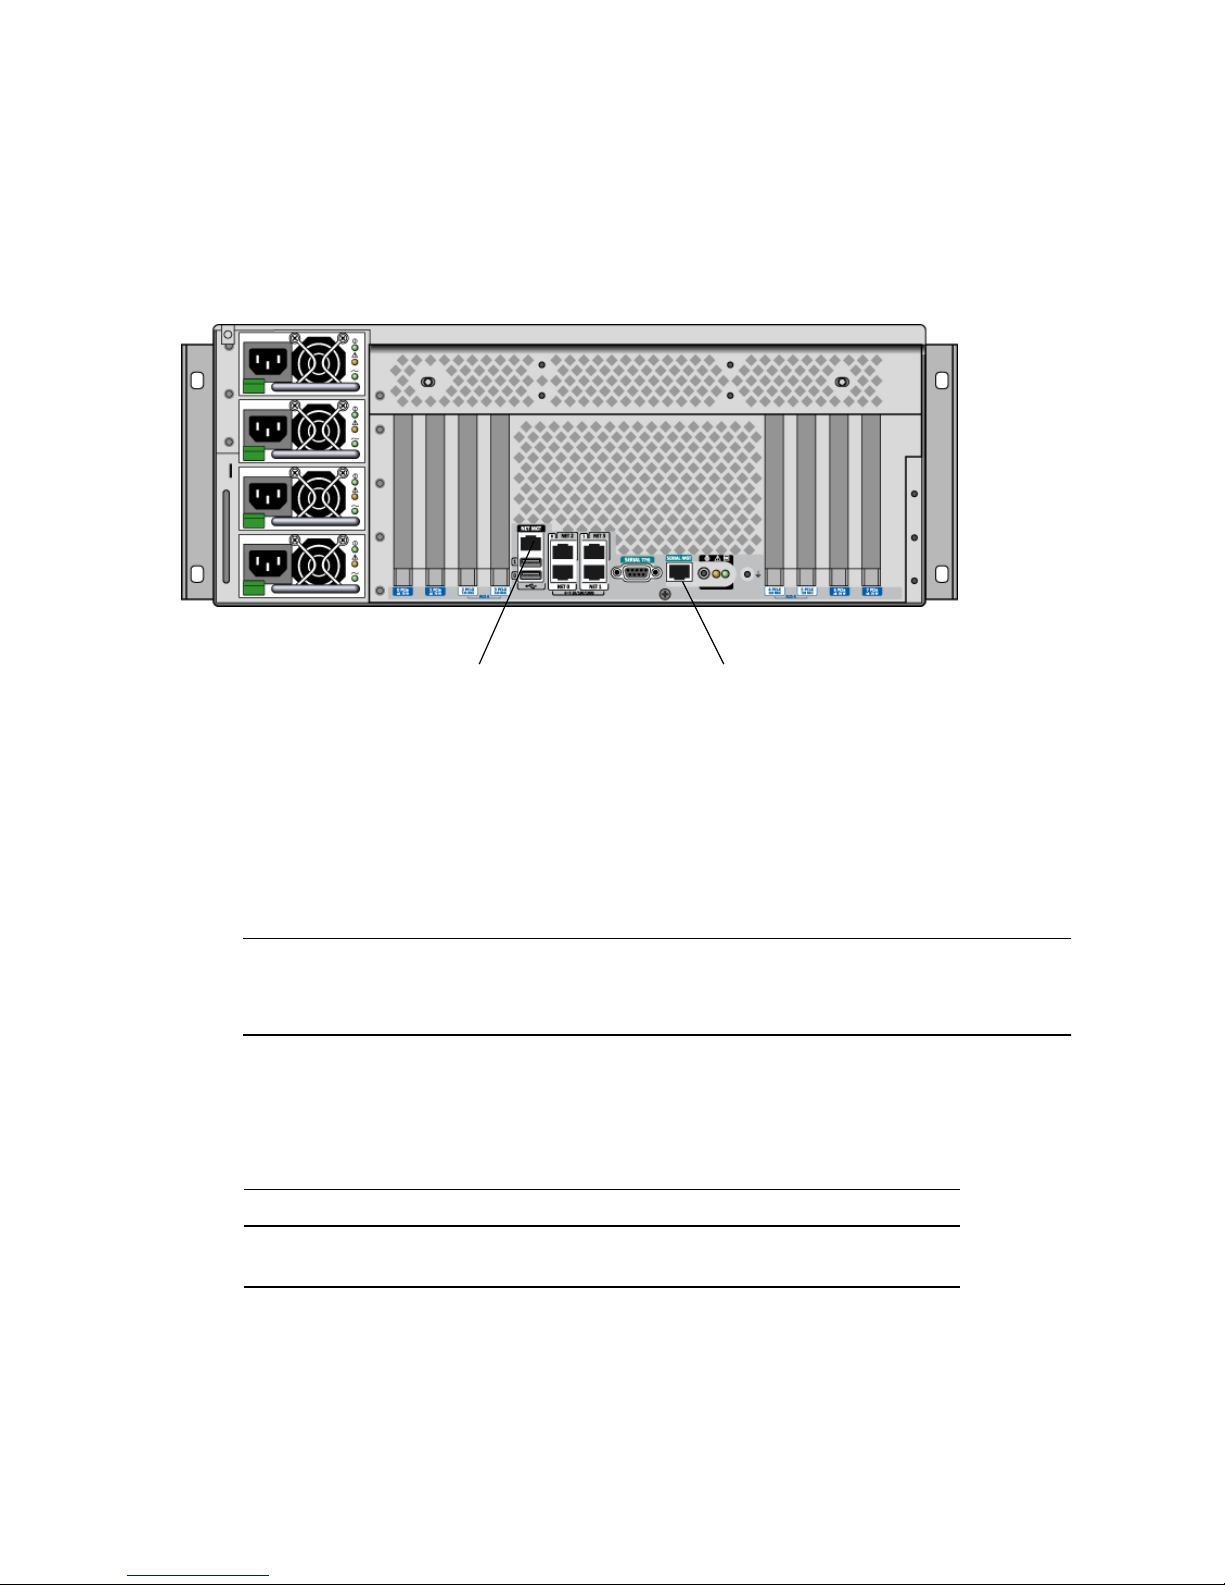
System Controller Ports
There are two system controller ports. Both use an RJ-45 connector.
Network management port Serial management port
(NET MGT) (SER MGT)
FIGURE 1-10 Network and Serial Management Port Locations
Network Management Port
This port provides direct network access to the ALOM system controller, when
configured, and can access the ALOM prompt and system console output.
Note – The system controller is accessed through the serial management port by
default. You must reconfigure the system controller to use the network management
port. See “Activating the Network Management Port” on page 40.
The network management port has a Link indicator that operates as described in
TABLE 1-4.
TABLE 1-4 Network Management Port Indicator
Name Description
Link This green indicator is lit when an Ethernet connection is
present.
18 Sun Fire V445 Server Administration Guide • August 2006
Page 45
Serial Management Port
The serial management port provides the default connection to the system controller
and can access the ALOM prompt and system console output. You can connect to the
serial management port using a VT100 terminal, a tip connection, or a terminal
server.
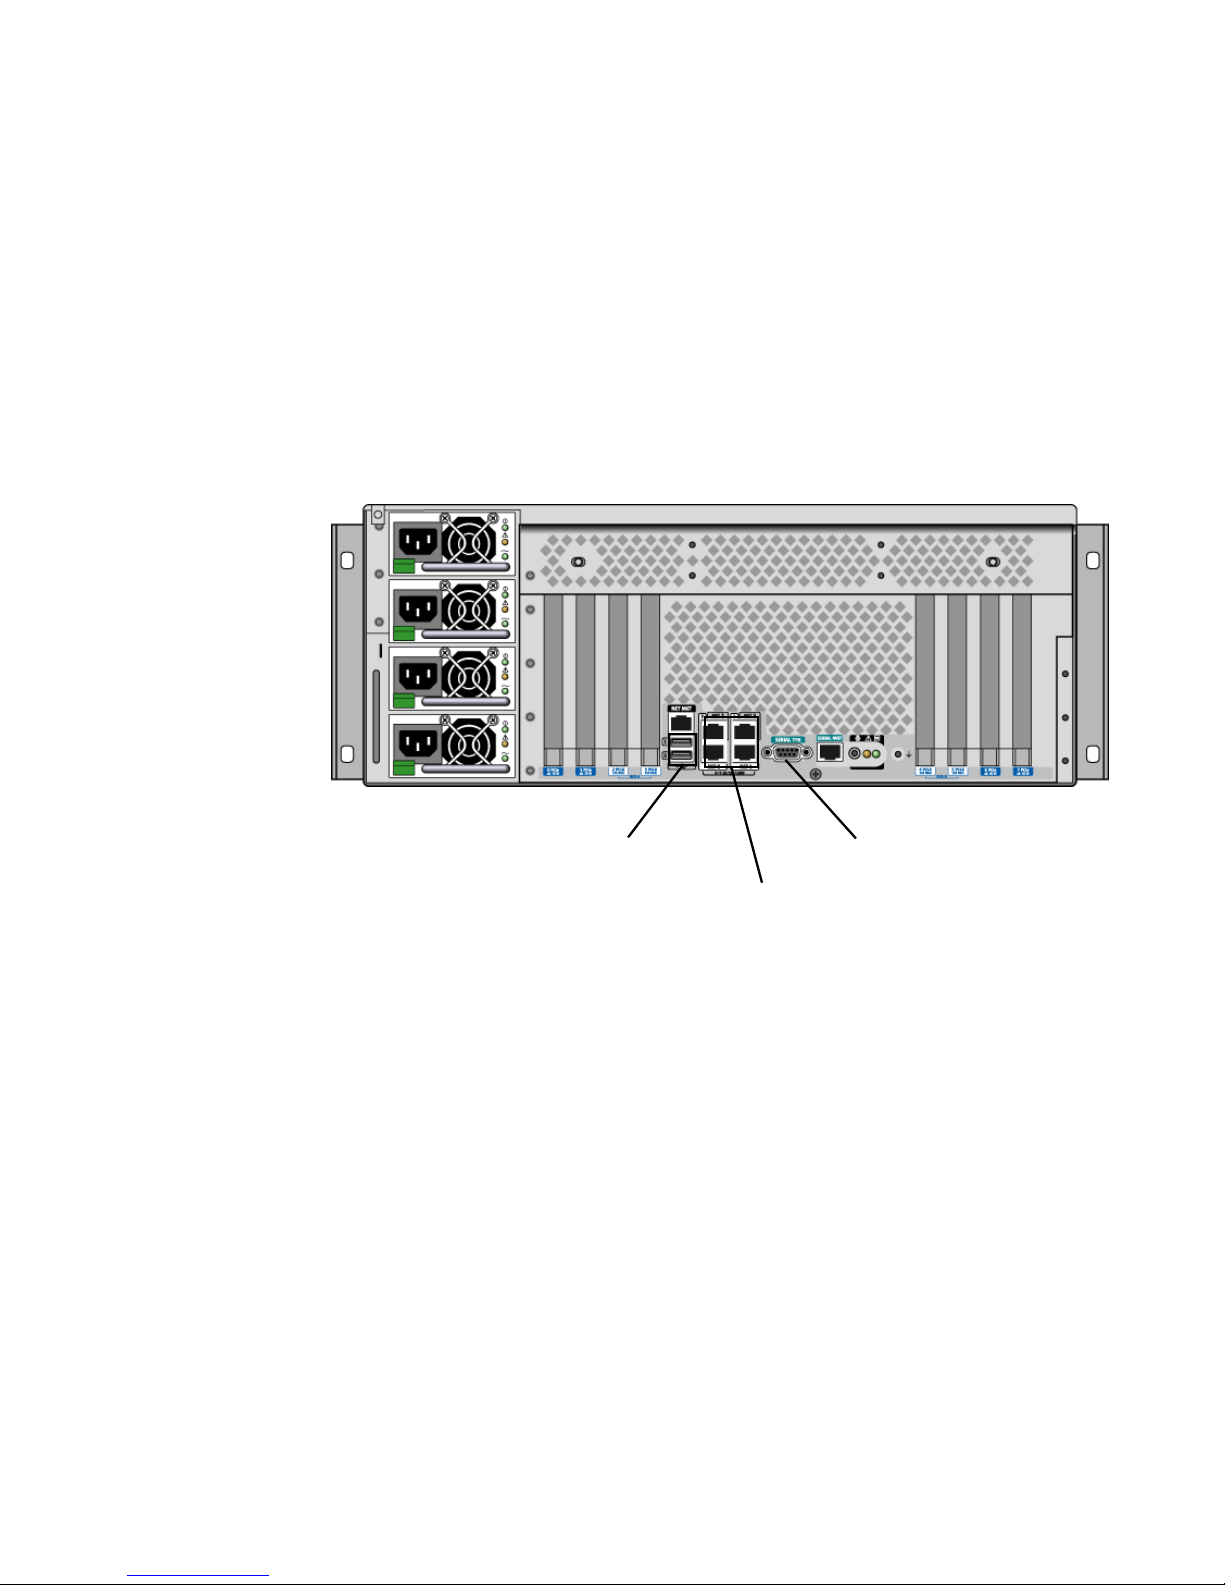
System I/O Ports
USB ports:
(USB0
USB1)
FIGURE 1-11 System I/O Port Locations
Gigabit Ethernet ports
DB9 serial port (TTYB)
USB Ports
There are two USB ports on the back panel. These comply with the USB 2.0
specification.
For more information about the USB ports, see “About the USB Ports” on page 89.
Gigabit Ethernet Ports
The Sun Fire V445 server has four Gigabit Ethernet ports.
Chapter 1 System Overview 19
Page 46
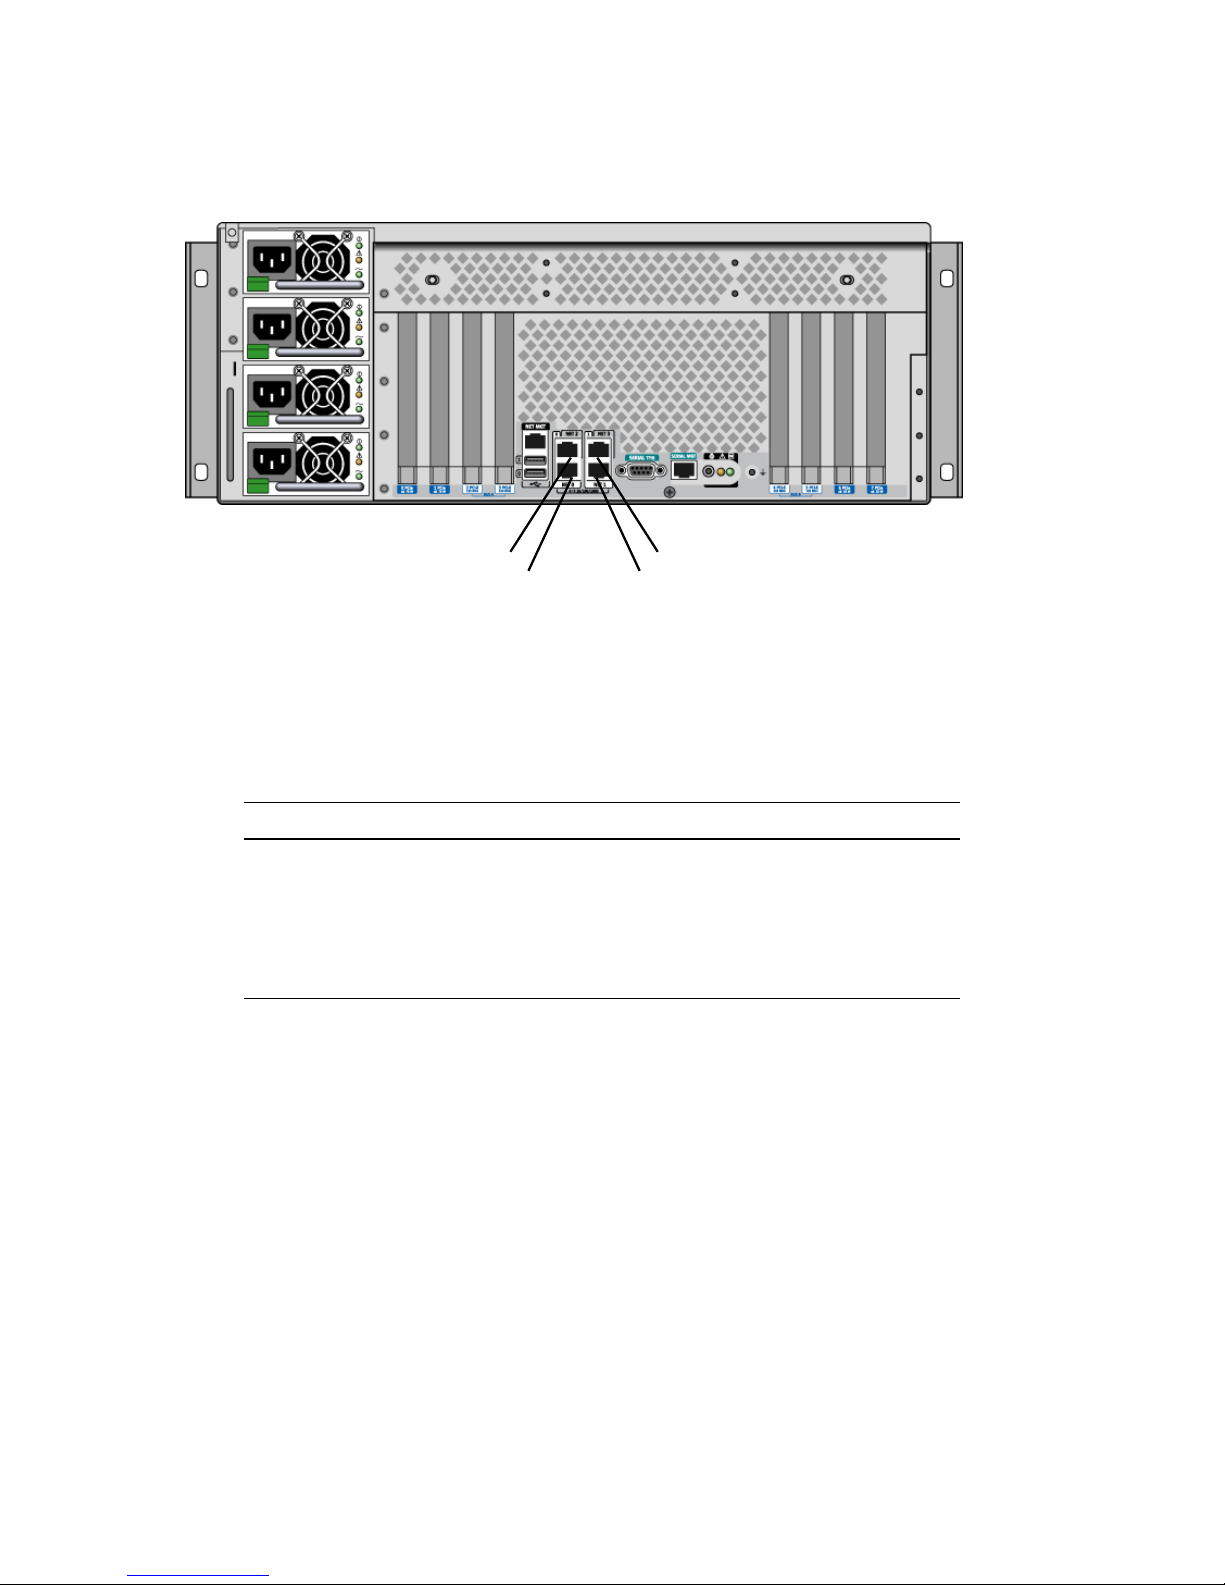
NET2 NET3
NET0 NET1
FIGURE 1-12 Gigabit Ethernet Port Locations
Each Gigabit Ethernet port has a corresponding status indicator, described in
TABLE 1-5.
TABLE 1-5 Ethernet Indicators
Color Description
(None) No connection present.
Green This indicates a Gigabit Ethernet connection. The indicator
blinks to indicate network activity.
Amber This indicates a 10/100 Megabit Ethernet connection. The
indicator blinks to indicate network activity.
DB-9 Serial Port
There is a POSIX compliant DB-9 serial port labeled TTYB. In addition, you may
configure the RJ-45 serial management port as a conventional serial port. See “About
the Serial Ports” on page 90.
20 Sun Fire V445 Server Administration Guide • August 2006
Page 47

Reliability, Availability, and
Serviceability (RAS) Features
The Sun Fire V445 server provides the following RAS features:
■ Hot-pluggable disk drives
■ Redundant, hot-swappable power supplies, fan trays, and USB components
■ Sun ALOM system controller with SSH connections for all remote monitoring and
control
■ Environmental monitoring
■ Automatic system restoration (ASR) capabilities for PCI cards and memory
DIMMs
■ Hardware watchdog mechanism and externally initiated reset (XIR) capability
■ Internal hardware disk mirroring (RAID 0/1)
■ Support for disk and network multipathing with automatic failover
■ Error correction and parity checking for improved data integrity
■ Easy access to all internal replaceable components
■ Full in-rack serviceability for all components
■ Persistent storage for all configuration change events
■ Persistent storage for all system console output
See Chapter 5 for information on how to configure these features.
Sun Cluster Software
Sun Cluster software enables you to connect up to eight Sun servers in a cluster
configuration. A cluster is a group of nodes that are interconnected to work as a
single, highly available and scalable system. A node is a single instance of Solaris
software. The software can be running on a standalone server or on a domain within
a standalone server. With Sun Cluster software, you can add or remove nodes while
online, and mix and match servers to meet your specific needs.
Sun Cluster software delivers high availability through automatic fault detection
and recovery, and scalability, ensuring that mission-critical applications and services
are always available when needed.
Chapter 1 System Overview 21
Page 48

With Sun Cluster software installed, other nodes in the cluster will automatically
take over and assume the workload when a node goes down. The software delivers
predictability and fast recovery capabilities through features such as local
application restart, individual application failover, and local network adapter
failover. Sun Cluster software significantly reduces downtime and increases
productivity by helping to ensure continuous service to all users.
The software lets you run both standard and parallel applications on the same
cluster. It supports the dynamic addition or removal of nodes, and enables Sun
servers and storage products to be clustered together in a variety of configurations.
Existing resources are used more efficiently, resulting in additional cost savings.
Sun Cluster software allows nodes to be separated by up to 10 kilometers. This way,
in the event of a disaster in one location, all mission-critical data and services remain
available from the other unaffected locations.
For more information, see the documentation supplied with the Sun Cluster
software.
Sun Management Center Software
Sun Management Center software is an open, extensible system monitoring and
management tool. The software is written in Java and uses Simple Network
Management Protocol (SNMP) to provide enterprise-wide monitoring of Sun servers
and workstations, including their subsystems, components, and peripheral devices.
For more information, see “About Sun Management Center” on page 204.
22 Sun Fire V445 Server Administration Guide • August 2006
Page 49

CHAPTER
2
Configuring the System Console
This chapter explains what the system console is, describes the different ways of
configuring it on a Sun Fire V445 server, and helps you understand its relation to the
system controller.
Tasks covered in this chapter include:
■ “Entering the ok Prompt” on page 38
■ “Using the Serial Management Port” on page 39
■ “Activating the Network Management Port” on page 40
■ “Accessing the System Console With a Terminal Server” on page 42
■ “Accessing the System Console With a Tip Connection” on page 45
■ “Modifying the /etc/remote File” on page 49
■ “Accessing the System Console With an Alphanumeric Terminal” on page 51
■ “To Verify Serial Port Settings on TTYB” on page 53
■ “Accessing the System Console With a Local Graphics Monitor” on page 54
Other information in this chapter includes:
■ “About Communicating With the System” on page 24
■ “About the sc> Prompt” on page 31
■ “About the ok Prompt” on page 33
■ “About Switching Between the ALOM System Controller and the System
Console” on page 36
■ “Reference for System Console OpenBoot Configuration Variable Settings” on
page 56
23
Page 50

About Communicating With the System
To install your system software or to diagnose problems, you need some way to
interact at a low level with the system. The system console is Sun’s facility for doing
this. You use the system console to view messages and issue commands. There can
be only one system console per computer.
The serial management port (SERIAL MGT) is the default port for accessing the
system console upon initial system installation. After installation, you can configure
the system console to accept input from and send output to different devices. See
TABLE 2-1 for a summary.
TABLE 2-1 Ways of Communicating With the System
Devices Available for Accessing the System Console
A terminal server attached to the serial management port
(SERIAL MGT) or TTYB. See the following:
• “Using the Serial Management Port” on page 39
• “To Access the System Console With a Terminal Server
Through the Serial Management Port” on page 42
• “To Verify Serial Port Settings on TTYB” on page 53
• “Reference for System Console OpenBoot Configuration
Variable Settings” on page 56
An alphanumeric terminal or similar device attached to the serial
management port (SERIAL MGT) or TTYB. See the following:
• “Using the Serial Management Port” on page 39
• “Accessing the System Console With an Alphanumeric
Terminal” on page 51
• “To Verify Serial Port Settings on TTYB” on page 53
• “Reference for System Console OpenBoot Configuration
Variable Settings” on page 56
During
Installation
✓✓
✓✓
*
After
Installation
24 Sun Fire V445 Server Administration Guide • August 2006
Page 51

TABLE 2-1
Ways of Communicating With the System (Continued)
During
Devices Available for Accessing the System Console
A tip line attached to the serial management port (SERIAL
MGT) or TTYB. See the following:
• “Using the Serial Management Port” on page 39
• “Accessing the System Console With a Tip Connection” on
page 45
• “Modifying the /etc/remote File” on page 49
• “To Verify Serial Port Settings on TTYB” on page 53
• “Reference for System Console OpenBoot Configuration
Variable Settings” on page 56
An Ethernet line connected to the network management port
(NET MGT). See the following:
• “Activating the Network Management Port” on page 40
A local graphics monitor (frame buffer card, graphics monitor,
mouse, and so forth). See the following:
• “To Access the System Console With a Local Graphics
Monitor” on page 54
• “Reference for System Console OpenBoot Configuration
Variable Settings” on page 56
* After initial system installation, you can redirect the system console to take its input from and send its output to
the serial port TTYB.
Installation
✓✓
*
After
Installation
✓
✓
Using the System Console
The system console device can be either a standard alphanumeric terminal, terminal
server, Tip connection from another Sun system, or a local graphics monitor. The
default connection is through the serial management port (labeled SERIAL MGT) on
the chassis back panel. You can also connect an alphanumeric terminal to the serial
(DB-9) connector (as TTYB) on the system back panel. A local graphics monitor
requires installation of a PCI graphics card, monitor, USB keyboard, and mouse. You
can also access the system console through a network connection with the network
management port.
The system console displays status and error messages generated by firmware-based
tests during system startup. After those tests have been run, you can enter special
commands that affect the firmware and alter system behavior. For more information
about tests that run during the boot process, see Chapter 8 and Chapter 9.
Once the OS is booted, the system console displays UNIX system messages and
accepts UNIX commands.
Chapter 2 Configuring the System Console 25
Page 52
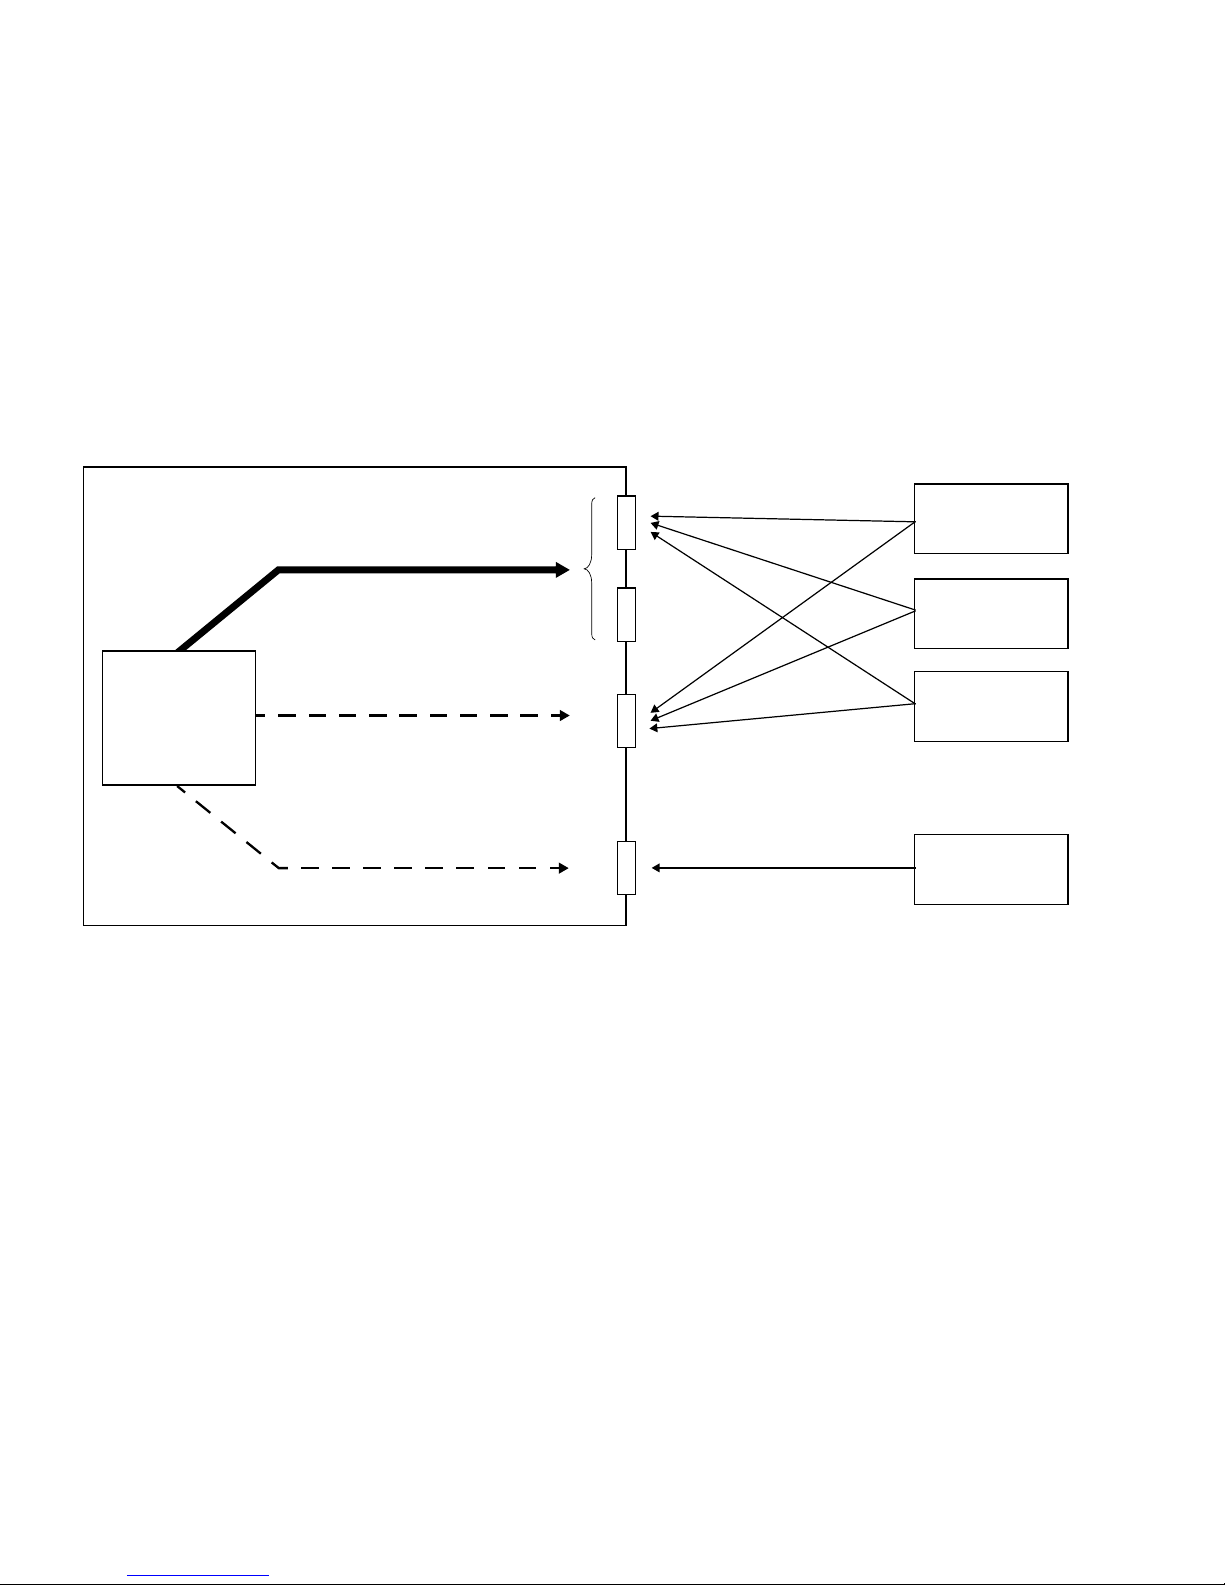
To use the system console, you need some means of getting data in to and out of the
system, which means attaching some kind of hardware to the system. Initially, you
might have to configure that hardware, and load and configure appropriate software
as well.
You also must ensure that the system console is directed to the appropriate port on
the Sun Fire V445 server’s back panel – generally, the one to which your hardware
console device is attached. (See
FIGURE 2-1.) You do this by setting the input-
device and output-device OpenBoot configuration variables.
Sun Fire V440 Server
Ports Console Devices
SERIAL MGT
OpenBoot Config. Variable Settings
input-device=ttya
output-device=ttya
NET MGT
System
Console
input-device=ttyb
output-device=ttyb
ttyb
input-device=keyboard
output-device=screen
FIGURE 2-1 Directing the System Console to Different Ports and Different Devices
Graphics Card
The following subsections provide background information and references to
instructions appropriate for the particular device you choose to access the system
console. For instructions on attaching and configuring a device to access the system
console, see the following sections:
tip
Line
Alphanumeric
Terminal
Terminal
Server
Graphics
Monitor
■ “Using the Serial Management Port” on page 39
■ “Activating the Network Management Port” on page 40
■ “Accessing the System Console With a Terminal Server” on page 42
■ “Accessing the System Console With a Tip Connection” on page 45
26 Sun Fire V445 Server Administration Guide • August 2006
Page 53

Default System Console Connection Through the Serial
Management and Network Management Ports
On Sun Fire V445 servers, the system console comes preconfigured to allow input
and output only by means of hardware devices connected to the serial or network
management ports. However, because the network management port is not available
until network parameters are assigned, your first connection must be to the serial
management port. The network can be configured once the system is connected to
power and ALOM completes its self test.
Chapter 2 Configuring the System Console 27
Page 54
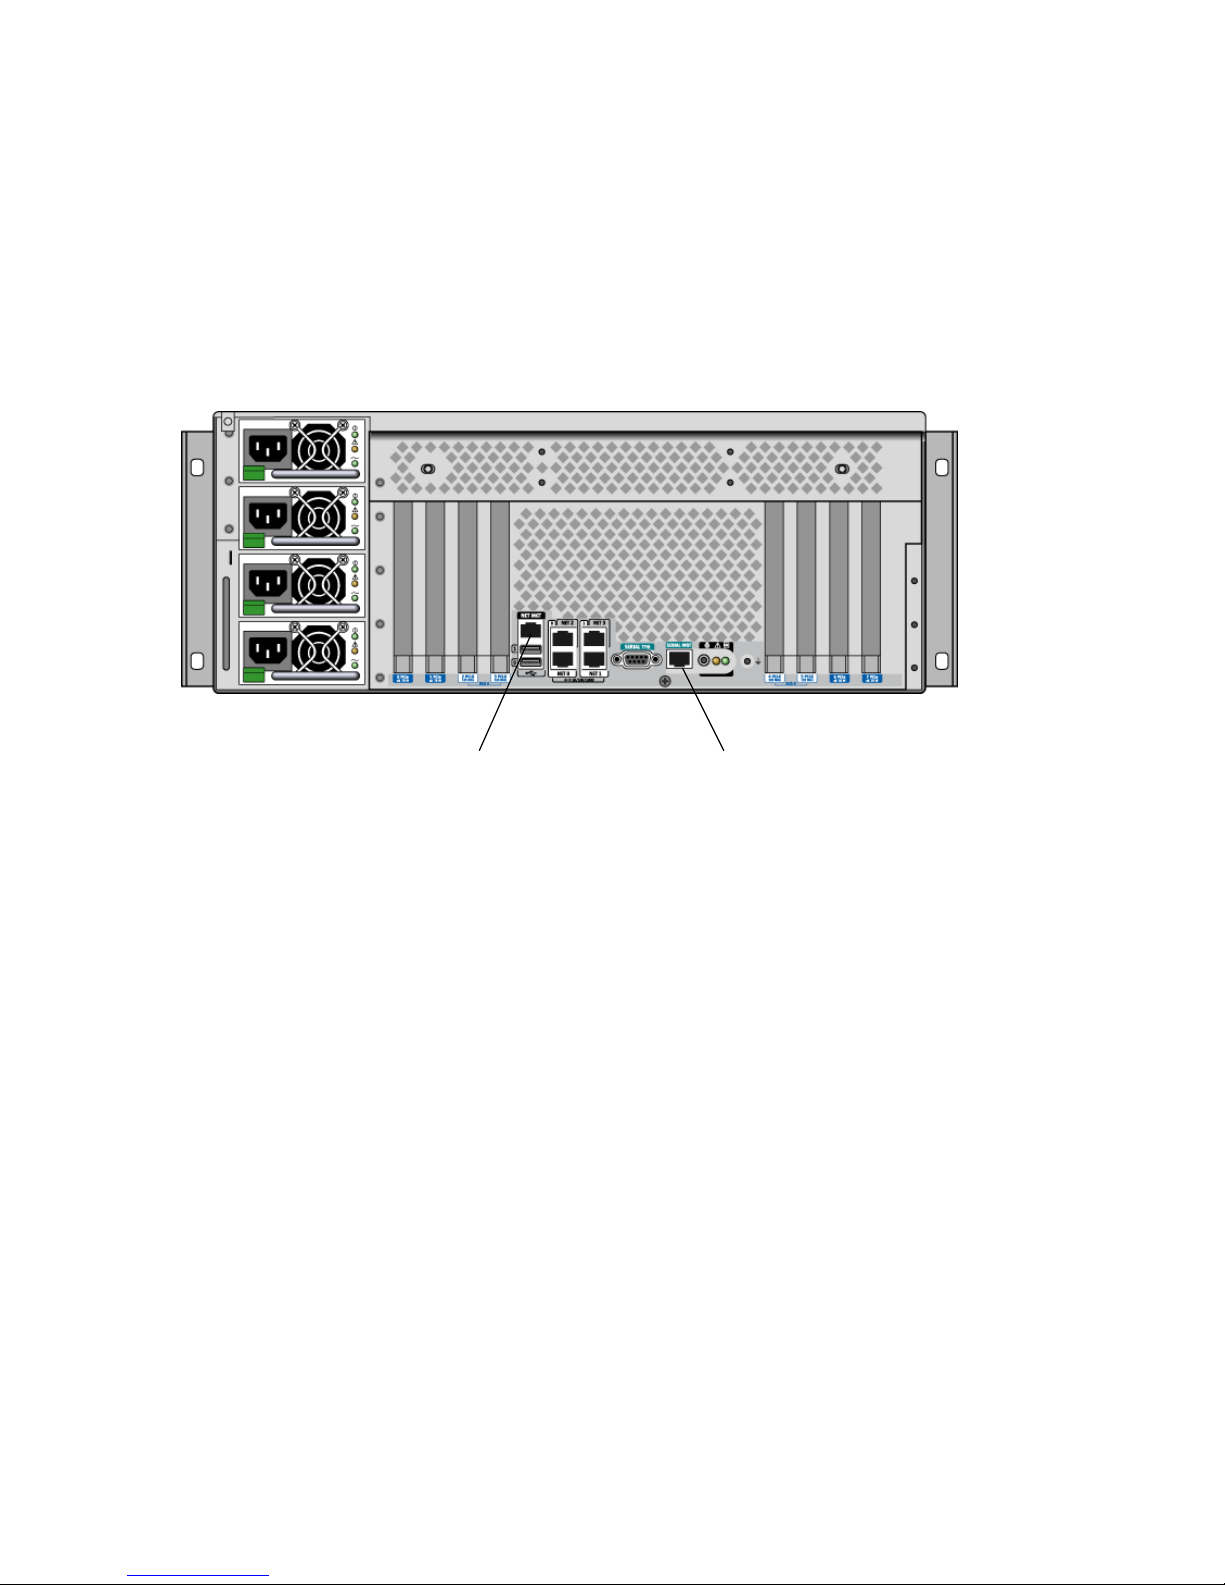
Typically, you connect one of the following hardware devices to the serial
management port:
■ Terminal server
■ Alphanumeric terminal or similar device
■ A Tip line connected to another Sun computer
This provides for secure access at the installation site.
Network management port Serial management port
(NET MGT) (SER MGT)
FIGURE 2-2 Serial Management Port (Default Console Connection)
Using a Tip line might be preferable to connecting an alphanumeric terminal, since
the tip command allows you to use windowing and OS features on the machine
being used to connect to the Sun Fire V445 server.
Although the Solaris OS sees the serial management port as TTYA, the serial
management port is not a general-purpose serial port. If you want to use a generalpurpose serial port with your server – to connect a serial printer, for instance – use
the regular 9-pin serial port on the back panel of the Sun Fire V445. The Solaris OS
sees this port as TTYB.
For instructions on accessing the system console through a terminal server, see
“Accessing the System Console With a Terminal Server” on page 42.
For instructions on accessing the system console through an alphanumeric terminal,
see “Accessing the System Console With an Alphanumeric Terminal” on page 51.
For instructions on accessing the system console with a Tip line, see “To Access the
System Console With a Tip Connection Throught the Serial Management Port” on
page 46.
28 Sun Fire V445 Server Administration Guide • August 2006
Page 55

Access Through the Network Management Port
Once you have configured the network management port, you can connect an
Ethernet-capable device to the system console through your network. This
connection provides for remote monitoring and control. In addition, up to four
simultaneous connections to the system controller sc> prompt are available through
the network management port. For more information, see “Activating the Network
Management Port” on page 40.
For more information about the system console and the ALOM system controller,
see:
■ “About the sc> Prompt” on page 31
■ “About the ok Prompt” on page 33
ALOM
ALOM software is preinstalled on the server’s system controller (SC) and is enabled
at the first power on. ALOM provides remote powering on and off, diagnostics
capabilities, environmental control, and monitoring operations for the server. The
primary functions of ALOM include the following:
■ Operation of system indicators
■ Fan speed monitoring and adjustment
■ Temperature monitoring and alerts
■ Power supply health monitoring and control
■ USB overcurrent monitoring and alerts
■ Hot-plug configuration change monitoring and alerts
■ Dynamic FRU ID data transactions
For more information about ALOM software, see “About the ALOM System
Controller Card” on page 71.
Alternative System Console Configuration
In the default configuration, system controller alerts and system console output
appear interspersed in the same window. After initial system installation, you can
redirect the system console to take its input from and send its output to the serial
port TTYB, or to a graphics card’s port.
A serial port and the PCI slots are located on the rear panel. Two USB ports are
located on the front panel.
The chief advantage of redirecting the system console to another port is that it
allows you to divide system controller alerts and system console output into two
separate windows.
Chapter 2 Configuring the System Console 29
Page 56

However, there are some serious disadvantages to alternative console configuration:
■ POST output can only be directed to the serial management and network
management ports. It cannot be directed to TTYB or to a graphics card’s port.
■ If you have directed the system console to TTYB, you cannot use this port for any
other serial device.
■ In a default configuration, the serial management and network management ports
enable you to open up to four additional windows by which you can view, but
not affect, system console activity. You cannot open these windows if the system
console is redirected to TTYB or to a graphics card’s port.
■ In a default configuration, the serial management and network management ports
enable you to switch between viewing system console and system controller
output on the same device by typing a simple escape sequence or command. The
escape sequence and commands do not work if the system console is redirected to
TTYB or to a graphics card’s port.
■ The system controller keeps a log of console messages, but some messages are not
logged if the system console is redirected to TTYB or to a graphic card’s port. The
omitted information could be important if you need to contact Sun customer
service with a problem.
For all the preceding reasons, the best practice is to leave the system console in its
default configuration.
You change the system console configuration by setting OpenBoot configuration
variables. See “Reference for System Console OpenBoot Configuration Variable
Settings” on page 56.
You can also set OpenBoot configuration variables using the ALOM system
controller. For details, see the Sun Advanced Lights Out Manager (ALOM) Online Help.
Accessing the System Console Through a Graphics Monitor
The Sun Fire V445 server is shipped without a mouse, keyboard, monitor, or frame
buffer for the display of bitmapped graphics. To install a graphics monitor on the
server, you must install a frame buffer card into a PCI slot, and attach a monitor,
mouse, and keyboard to the appropriate back panel ports.
After starting the system, you might need to install the correct software driver for
the PCI card you have installed. For detailed hardware instructions, see “To Access
the System Console With a Local Graphics Monitor” on page 54.
Note – Power-on self-test (POST) diagnostics cannot display status and error
messages to a local graphics monitor.
30 Sun Fire V445 Server Administration Guide • August 2006
Page 57

About the sc> Prompt
The ALOM system controller runs independently of the Sun Fire V445 server and
regardless of system power state. When you connect a Sun Fire V445 server to AC
power, the ALOM system controller immediately starts up, and begins monitoring
the system.
Note – To view ALOM system controller boot messages, you must connect an
alphanumeric terminal to the serial management port before connecting the AC
power cords to the Sun Fire V445 server.
You can log in to the ALOM system controller at any time, regardless of system
power state, as long as AC power is connected to the system and you have a way of
interacting with the system. You can also access the ALOM system controller prompt
(sc>) from the ok prompt or from the Solaris prompt, provided the system console
is configured to be accessible through the serial management and network
management ports. For more information, see the following:
■ “Entering the ok Prompt” on page 38
■ “About Switching Between the ALOM System Controller and the System
Console” on page 36
The sc> prompt indicates that you are interacting with the ALOM system controller
directly. It is the first prompt you see when you log in to the system through the
serial management port or network management port, regardless of system power
state.
Note – When you access the ALOM system controller for the first time, it forces you
to create a user name and password for subsequent access. After this initial
configuration, you will be prompted to enter a user name and password every time
you access the ALOM system controller.
Chapter 2 Configuring the System Console 31
Page 58

Access Through Multiple Controller Sessions
Up to five ALOM system controller sessions can be active concurrently, one session
through the serial management port and up to four sessions through the network
management port.
Users of each of these sessions can issue commands at the sc> prompt, but only one
user session can have write-access the the system console at anytime. The other
sessions accessing the system console will have read-only capability.
For more information, see:
■ “Using the Serial Management Port” on page 39
■ “Activating the Network Management Port” on page 40.)
Any additional ALOM system controller sessions afford passive views of system
console activity, until the active user of the system console logs out. However, the
console -f command, if you enable it, allows users to seize access to the system
console from one another. For more information, see the Sun Advanced Lights Out
Manager (ALOM) Online Help.
Ways of Reaching the sc> Prompt
There are several ways to get to the sc> prompt. These are:
■ If the system console is directed to the serial management and network
management ports, you can type the ALOM system controller escape sequence
(#.).
Note – #. (pound period) is the default setting for the escape sequence to enter
ALOM. It is a configurable variable.
■ You can log in directly to the ALOM system controller from a device connected to
the serial management port. See “Using the Serial Management Port” on page 39.
■ You can log in directly to the ALOM system controller using a connection through
the network management port. See “Activating the Network Management Port”
on page 40.
32 Sun Fire V445 Server Administration Guide • August 2006
Page 59

About the ok Prompt
A Sun Fire V445 server with the Solaris OS installed is capable of operating at
different run levels. A synopsis of run levels follows. For a full description, see the
Solaris system administration documentation.
Most of the time, you operate a Sun Fire V445 server at run level 2 or run level 3,
which are multiuser states with access to full system and network resources.
Occasionally, you might operate the system at run level 1, which is a single-user
administrative state. However, the lowest operational state is run level 0. At this
state, it is safe to turn off power to the system.
When a Sun Fire V445 server is at run level 0, the ok prompt appears. This prompt
indicates that the OpenBoot firmware is in control of the system.
There are a number of scenarios in which OpenBoot firmware control can happen.
■ By default, the system powers up to OpenBoot firmware control before the OS is
installed.
■ The system boots to the ok prompt when the auto-boot? OpenBoot
configuration variable is set to false.
■ The system transitions to run level 0 in an orderly way when the OS is halted.
■ The system reverts to OpenBoot firmware control when the OS crashes.
■ When a serious hardware problem develops while the system is running, the OS
transitions smoothly to run level 0.
■ You deliberately place the server under firmware control in order to execute
firmware-based commands or to run diagnostic tests.
It is the last of these scenarios which most often concerns you as an administrator,
since there will be times when you need to reach the ok prompt. The several ways to
do this are outlined in “Entering the ok Prompt” on page 33. For detailed
instructions, see “Entering the ok Prompt” on page 38.
Entering the ok Prompt
There are several ways to enter the ok prompt, depending on the state of the system
and the means by which you are accessing the system console. In order of
desirability, these are:
■ Graceful shutdown
■ ALOM system controller break or console command
■ L1-A (Stop-A) keys or Break key
■ Externally initiated reset (XIR)
Chapter 2 Configuring the System Console 33
Page 60

■ Manual system reset
A discussion of each method follows. For instructions, see “Entering the ok Prompt”
on page 38.
Graceful Shutdown
The preferred method of reaching the ok prompt is to shut down the OS by issuing
an appropriate command (for example, the shutdown, init,oruadmin command)
as described in Solaris system administration documentation. You can also use the
system Power button to initiate a graceful system shutdown.
Gracefully shutting down the system prevents data loss, enables you to warn users
beforehand, and causes minimal disruption. You can usually perform a graceful
shutdown, provided the Solaris OS is running and the hardware has not experienced
serious failure.
You can also perform a graceful system shutdown from the ALOM system controller
command prompt.
For more information, see:
■ “Powering Off the Server Locally” on page 62
■ “Powering Off the System Remotely” on page 60
ALOM System Controller break or console Command
Typing break from the sc> prompt forces a running Sun Fire V445 server to move
to OpenBoot firmware control. If the OS is already halted, you can use the console
command instead of break to reach the ok prompt.
If you issue a break at the SC you will remain in an SC prompt. To use the OpenBoot
prompt, enter the console command. For example:
hostname> #. [characters are not echoed to the screen]
sc> break -y [break on its own will generate a confirmation prompt]
sc> console
ok
After forcing the system into OpenBoot firmware control, be aware that issuing
certain OpenBoot commands (like probe-scsi, probe-scsi-all,orprobe-ide)
might hang the system.
34 Sun Fire V445 Server Administration Guide • August 2006
Page 61

L1-A (Stop-A) Keys or Break Key
When it is impossible or impractical to shut down the system gracefully, you can get
to the ok prompt by typing the L1-A (Stop-A) key sequence from a Sun keyboard, or,
if you have an alphanumeric terminal attached to the Sun Fire V445 server, by
pressing the Break key.
After forcing the system into OpenBoot firmware control, be aware that issuing
certain OpenBoot commands (like probe-scsi, probe-scsi-all,orprobe-ide)
might hang the system.
Note – These methods of reaching the ok prompt will only work if the system
console has been redirected to the appropriate port. For details, see “Reference for
System Console OpenBoot Configuration Variable Settings” on page 56
Externally Initiated Reset (XIR)
Use the ALOM system controller reset -x command to execute an externally
initiated reset (XIR). Forcing an XIR might be effective in breaking the deadlock that
is hanging up the system. However, an XIR also precludes the orderly shutdown of
applications, and so it is not the preferred method of reaching the ok prompt, unless
you are troubleshooting these types of system hangs. Generating an XIR has the
advantage of allowing you to issue the sync command to produce a dump file of the
current system state for diagnostic purposes.
For more information, see:
■ Chapter 8 and Chapter 9
■ Sun Advanced Lights Out Manager (ALOM) Online Help
Caution – Because an XIR precludes an orderly shutdown of applications, it should
only be attempted if previously described methods do not work.
Manual System Reset
Use the ALOM system controller reset command, or poweron and poweroff
commands, to reset the server. Reaching the ok prompt by performing a manual
system reset or by power-cycling the system should be the method of last resort.
Doing this results in the loss of all system coherence and state information. A
manual system reset could corrupt the server’s file systems, although the fsck
command usually restores them.
Chapter 2 Configuring the System Console 35
Page 62

Caution – Forcing a manual system reset results in loss of system state data, and
should be attempted only as a last resort. After a manual system reset, all state
information is lost, which inhibits troubleshooting the cause of the problem until the
problem reoccurs.
Caution – When you access the ok prompt from a functioning Sun Fire V445 server,
you are suspending the Solaris OS and placing the system under firmware control.
Any processes that were running under the OS are also suspended, and the state of
such processes might not be recoverable.
The commands you run from the ok prompt have the potential to affect the state of
the system. This means that it is not always possible to resume execution of the OS
from the point at which it was suspended. The diagnostic tests you run from the ok
prompt will affect the state of the system. This means that it is not possible to
resume execution of the OS from the point at which it was suspended.
Although the go command will resume execution in most circumstances, in general,
each time you force the system down to the ok prompt, you should expect to have to
reboot the system to get back to the OS.
As a rule, before suspending the OS, you should back up files, warn users of the
impending shutdown, and halt the system in an orderly manner. However, it is not
always possible to take such precautions, especially if the system is malfunctioning.
For more information about the OpenBoot firmware, see the OpenBoot 4.x Command
Reference Manual. An online version of the manual is included with the OpenBoot
Collection AnswerBook that ships with Solaris software.
About Switching Between the ALOM
System Controller and the System
Console
The Sun Fire V445 server features two management ports, labeled SERIAL MGT and
NET MGT, located on the server’s back panel. If the system console is directed to use
the serial management and network management ports (its default configuration),
these ports provide access to both the system console and the ALOM system
controller, each on separate channels (see
FIGURE 2-3).
36 Sun Fire V445 Server Administration Guide • August 2006
Page 63
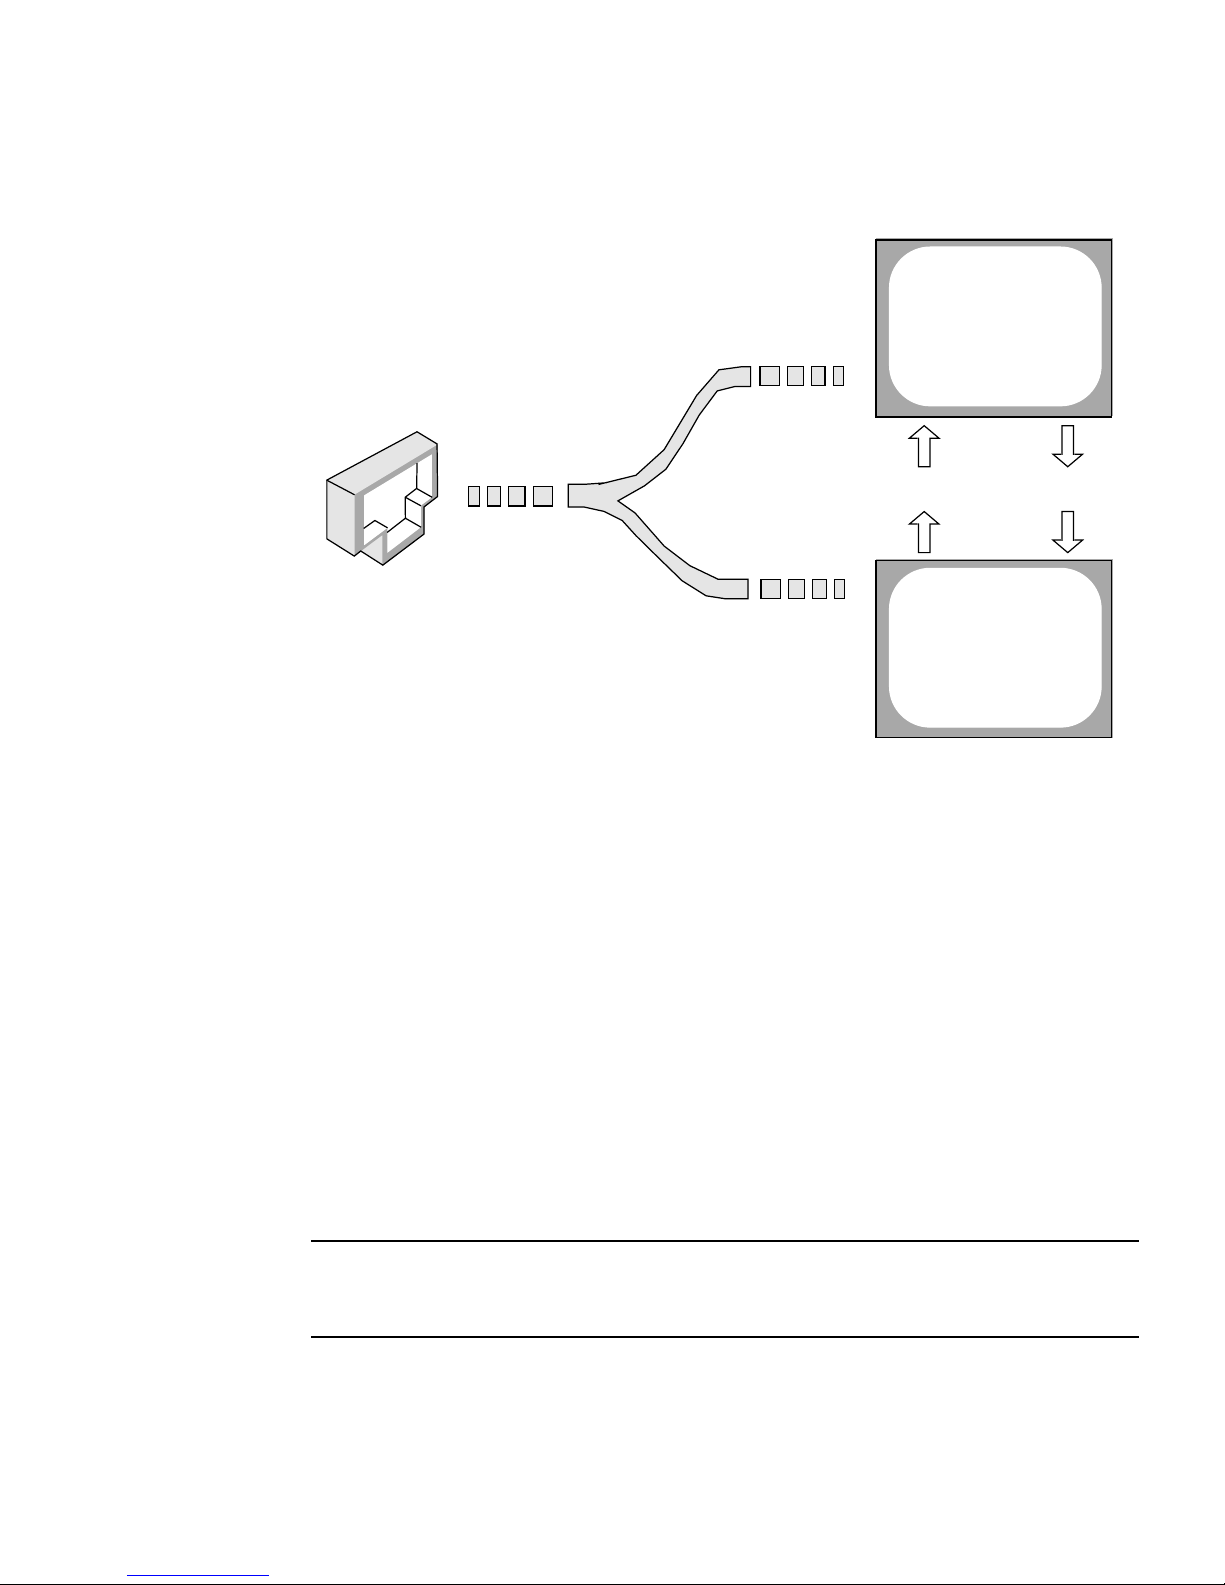
System Console
ok
NET MGT
#
or SERIAL MGT
Por t
console #.
sc>
ALOM System Controller
FIGURE 2-3 Separate System Console and System Controller Channels
If the system console is configured to be accessible from the serial management and
network management ports, when you connect through one of these ports you can
access either the ALOM command-line interface or the system console. You can
switch between the ALOM system controller and the system console at any time, but
you cannot access both at the same time from a single terminal or shell tool.
The prompt displayed on the terminal or shell tool tells you which channel you are
accessing:
■ The # or % prompt indicates that you are at the system console and that the
Solaris OS is running.
■ The ok prompt indicates that you are at the system console and that the server is
running under OpenBoot firmware control.
■ The sc> prompt indicates that you are at the ALOM system controller.
Note – If no text or prompt appears, it might be the case that no console messages
were recently generated by the system. If this happens, pressing the terminal’s Enter
or Return key should produce a prompt.
Chapter 2 Configuring the System Console 37
Page 64

To reach the system console from the ALOM system controller, type the console
command at the sc> prompt. To reach the ALOM system controller from the system
console, type the system controller escape sequence, which by default is #. (pound
period).
For more information, see the following:
■ “About Communicating With the System” on page 24
■ “About the sc> Prompt” on page 31
■ “About the ok Prompt” on page 33
■ “Using the Serial Management Port” on page 39
■ Sun Advanced Lights Out Manager (ALOM) Online Help
Entering the ok Prompt
This procedure provides several ways of reaching the ok prompt. The methods are
not equally desirable. For details about when to use each method, see “About the ok
Prompt” on page 33.
Caution – Dropping the Sun Fire V445 server to the ok prompt suspends all
application and OS software. After you issue firmware commands and run
firmware-based tests from the ok prompt, the system might not be able to resume
where it left off.
▼ To Enter the ok Prompt
1. If at all possible, back up system data before starting this procedure.
For information about the appropriate backup and shutdown procedures, refer to
Solaris system administration documentation.
2. Exit or stop all applications and warn users of the impending loss of service.
3. Decide which method you need to use to reach the ok prompt.
See “About the ok Prompt” on page 33 for details.
38 Sun Fire V445 Server Administration Guide • August 2006
Page 65

4. Refer to TABLE 2-2 for instructions.
TABLE 2-2 Ways of Accessing the ok Prompt
Access Method What to Do
Graceful shutdown of
the Solaris OS
• From a shell or command tool window, issue an appropriate
command (for example, the shutdown or init command) as
described in Solaris system administration documentation.
L1-A (Stop-A) keys or
Break key
• From a Sun keyboard connected directly to the Sun Fire V445
server, press the Stop and A keys simultaneously.
*
–or–
• From an alphanumeric terminal configured to access the system
console, press the Break key.
ALOM system
controller console or
break command
Externally initiated
• From the sc> prompt, type the break command. The console
command also works, provided the OS software is not running
and the server is already under OpenBoot firmware control.
• From the sc> prompt, type the reset -x command.
reset (XIR)
Manual system reset • From the sc> prompt, type the reset command.
* Requires the OpenBoot configuration variable input-device=keyboard. For more information, see “Ac-
cessing the System Console With a Local Graphics Monitor” on page 54 and “Reference for System Console
OpenBoot Configuration Variable Settings” on page 56.
Using the Serial Management Port
This procedure assumes that the system console is directed to use the serial
management and network management ports (the default configuration).
When you are accessing the system console using a device connected to the serial
management port, your first point of access is the ALOM system controller and its
sc> prompt. After connecting to the ALOM system controller, you can switch to the
system console itself.
For more information about the ALOM system controller card, see:
■ “About the ALOM System Controller Card” on page 71
■ Sun Advanced Lights Out Manager (ALOM) Online Help
Ensure that the serial port on your connecting device is set to the following
parameters:
■ 9600 baud
■ 8 bits
■ No parity
Chapter 2 Configuring the System Console 39
Page 66

■ 1 stop bit
■ No handshaking
▼ To Use the Serial Management Port
1. Establish an ALOM system controller session.
See Sun Advanced Lights Out Manager (ALOM) Online Help for instructions.
2. To connect to the system console, at the ALOM system controller command
prompt, type:
sc> console
The console command switches you to the system console.
3. To switch back to the sc> prompt, type the #. escape sequence.
ok #. [characters are not echoed to the screen]
For instructions on how to use the ALOM system controller, see:
■ Sun Advanced Lights Out Manager (ALOM) Online Help
Activating the Network Management
Port
You must assign an Internet Protocol (IP) address to the network management port
before you can use it. If you are configuring the network management port for the
first time, you must first connect to the ALOM system controller using the serial
management port and assign an IP address to the network management port. You
can either assign an IP address manually, or you can configure the port to obtain an
IP address using the Dynamic Host Configuration Protocol (DHCP) from another
server.
Data centers frequently devote a separate subnet to system management. If your
data center has such a configuration, connect the network management port to this
subnet.
40 Sun Fire V445 Server Administration Guide • August 2006
Page 67

Note – The network management port is a 10BASE-T port. The IP address assigned
to the network management port is a unique IP address, separate from the main Sun
Fire V445 server IP address, and is dedicated for use only with the ALOM system
controller. For more information, see “About the ALOM System Controller Card” on
page 71.
▼ To Activate the Network Management Port
1. Connect an Ethernet cable to the network management port.
2. Log in to the ALOM system controller through the serial management port.
For more information about connecting to the serial management port, see “Using
the Serial Management Port” on page 39.
3. Assign IP addresses by typing one of the following commands:
■ If your network uses static IP addresses, type:
sc> setsc if_network true
sc> setsc netsc_ipaddr ip-address
sc> setsc netsc_ipnetmask ip-address
sc> setsc netsc_ipgateway ip-address
Note – The if_network command requires resetting the SC before the changes
take effect. Reset the SC with the resetsc command after changing network
parameters.
■ If your network uses Dynamic Host Configuration Protocol (DHCP), type:
sc> setsc netsc_dhcp
4. Select the communications protocol, either Telnet, SSH, or none, type:.
sc> setsc if_connection none|ssh|telnet
Note – none is the default.
Chapter 2 Configuring the System Console 41
Page 68

5. To verify the network settings, type:
sc> shownetwork
6. Log out of the ALOM system controller session.
To connect through the network management port, use the telnet command to the
IP address you specified in Step 3 of the preceding procedure.
Accessing the System Console With a
Terminal Server
The following procedure assumes that you are accessing the system console by
connecting a terminal server to the serial management port (SERIAL MGT) of the
Sun Fire V445 server.
▼ To Access the System Console With a Terminal
Server Through the Serial Management Port
1. Complete the physical connection from the serial management port to your
terminal server.
The serial management port on the Sun Fire V445 server is a data terminal
equipment (DTE) port. The pinouts for the serial management port correspond with
the pinouts for the RJ-45 ports on the Serial Interface Breakout Cable supplied by
Cisco for use with the Cisco AS2511-RJ terminal server. If you use a terminal server
made by another manufacturer, check that the serial port pinouts of the Sun Fire
V445 server match those of the terminal server you plan to use.
If the pinouts for the server serial ports correspond with the pinouts for the RJ-45
ports on the terminal server, you have two connection options:
■ Connect a serial interface breakout cable directly to the Sun Fire V445 server. See
“Using the Serial Management Port” on page 39.
■ Connect a serial interface breakout cable to a patch panel and use the straight-
through patch cable (supplied by Sun) to connect the patch panel to the server.
42 Sun Fire V445 Server Administration Guide • August 2006
Page 69
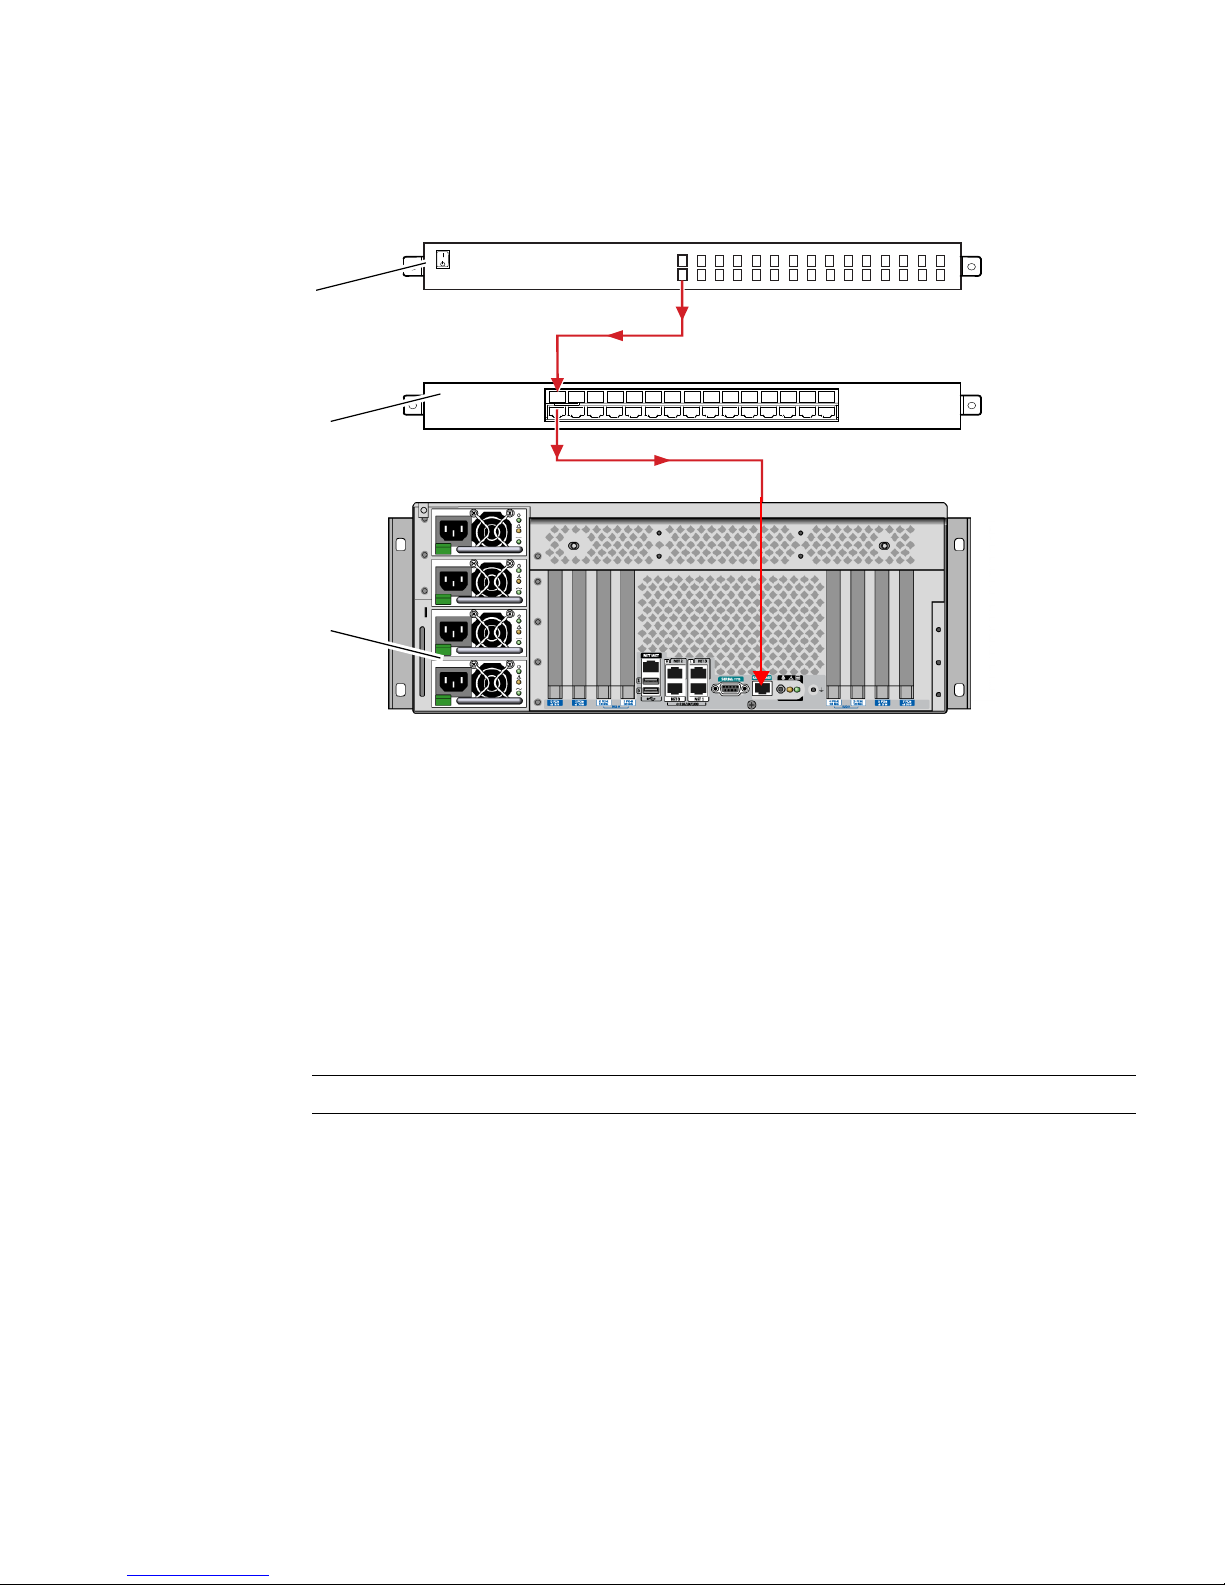
Terminal
server
6
3
5
8
2
1
4
9
7
10
Straight-through cable
12
15
14
11
13
Patch panel
Sun Fire V445
server
FIGURE 2-4 Patch Panel Connection Between a Terminal Server and a Sun Fire V445
If the pinouts for the serial management port do not correspond with the pinouts for
the RJ-45 ports on the terminal server, you need to make a crossover cable that takes
each pin on the Sun Fire V445 server serial management port to the corresponding
pin in the terminal server’s serial port.
Server
12
345678
91011
12 131415
Patch cable to serial management port
TABLE 2-3 shows the crossovers that the cable must perform.
TABLE 2-3 Pin Crossovers for Connecting to a Typical Terminal Server
Sun Fire V445 Serial Port (RJ-45 Connector) Pin Terminal Server Serial Port Pin
Pin 1 (RTS) Pin 1 (CTS)
Pin 2 (DTR) Pin 2 (DSR)
Pin 3 (TXD) Pin 3 (RXD)
Pin 4 (Signal Ground) Pin 4 (Signal Ground)
Pin 5 (Signal Ground) Pin 5 (Signal Ground)
Chapter 2 Configuring the System Console 43
Page 70

TABLE 2-3 Pin Crossovers for Connecting to a Typical Terminal Server (Continued)
Sun Fire V445 Serial Port (RJ-45 Connector) Pin Terminal Server Serial Port Pin
Pin 6 (RXD) Pin 6 (TXD)
Pin 7 (DSR /DCD) Pin 7 (DTR)
Pin 8 (CTS) Pin 8 (RTS)
2. Open a terminal session on the connecting device, and type:
% telnet IP-address-of-terminal-server port-number
For example, for a Sun Fire V445 server connected to port 10000 on a terminal server
whose IP address is 192.20.30.10, you would type:
% telnet 192.20.30.10 10000
▼ To Access the System Console With a Terminal
Server Through the TTYB Port
1. Redirect the system console by changing OpenBoot configuration variables.
At the ok prompt, type the following commands:
ok setenv input-device ttyb
ok setenv output-device ttyb
Note – Redirecting the system console does not redirect POST output. You can only
view POST messages from the serial and network management port devices.
Note – There are many other OpenBoot configuration variables. Although these
variables do not affect which hardware device is used to access the system console,
some of them affect which diagnostic tests the system runs and which messages the
system displays at its console. See Chapter 8 and Chapter 9.
44 Sun Fire V445 Server Administration Guide • August 2006
Page 71

2. To cause the changes to take effect, power off the system. Type:
ok power-off
The system permanently stores the parameter changes and powers off.
Note – You can also power off the system using the front panel Power button.
3. Connect the null modem serial cable to the TTYB port on the Sun Fire V445
server.
If required, use the DB-9 or DB-25 cable adapter supplied with the server.
4. Power on the system.
See Chapter 3 for power-on procedures.
What Next
Continue with your installation or diagnostic test session as appropriate. When you
are finished, end your session by typing the terminal server’s escape sequence and
exit the window.
For more information about connecting to and using the ALOM system controller,
see:
■ Sun Advanced Lights Out Manager (ALOM) Online Help
If you have redirected the system console to TTYB and want to change the system
console settings back to use the serial management and network management ports,
see the following:
■ “Reference for System Console OpenBoot Configuration Variable Settings” on
page 56
Accessing the System Console With a Tip
Connection
This procedure assumes that you are accessing the Sun Fire V445 server system
console by connecting the serial port of another Sun system to the serial
management port (SERIAL MGT) of the Sun Fire V445 server (
FIGURE 2-5).
Chapter 2 Configuring the System Console 45
Page 72
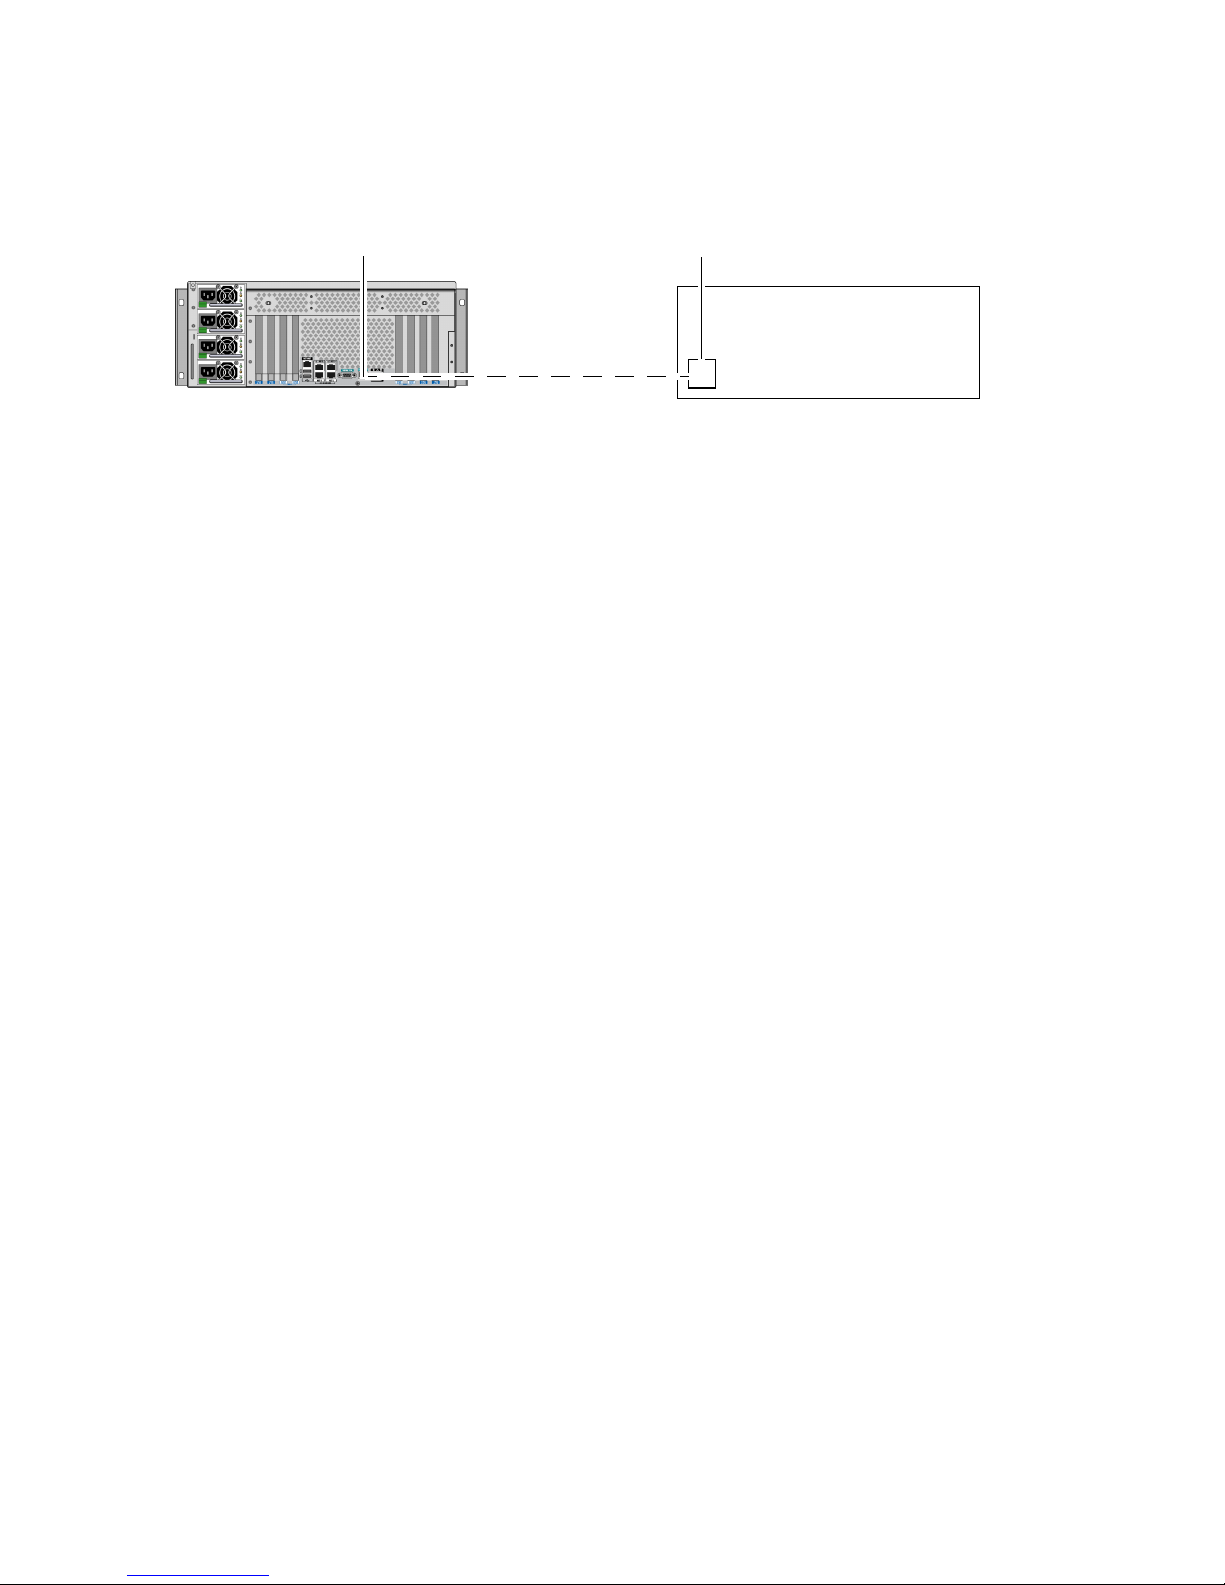
Serial portSerial management port
Tip connection
FIGURE 2-5 Tip Connection Between a Sun Fire V445 Server and Another Sun System
Another Sun system
▼ To Access the System Console With a Tip
Connection Throught the Serial Management
Port
1. Connect the RJ-45 serial cable and, if required, the DB-9 or DB-25 adapter
provided.
The cable and adapter connect between another Sun system’s serial port (typically
TTYB) and the serial management port on the back panel of the Sun Fire V445
server. Pinouts, part numbers, and other details about the serial cable and adapter
are provided in the Sun Fire V445 Server Parts Installation and Removal Guide.
2. Ensure that the /etc/remote file on the Sun system contains an entry for
hardwire.
Most releases of Solaris OS software shipped since 1992 contain an /etc/remote
file with the appropriate hardwire entry. However, if the Sun system is running an
older version of Solaris OS software, or if the /etc/remote file has been modified,
you might need to edit it. See “Modifying the /etc/remote File” on page 49 for
details.
46 Sun Fire V445 Server Administration Guide • August 2006
Page 73

3. In a shell tool window on the Sun system, type:
% tip hardwire
The Sun system responds by displaying:
connected
The shell tool is now a Tip window directed to the Sun Fire V445 server through the
Sun system’s serial port. This connection is established and maintained even when
the Sun Fire V445 server is completely powered off or just starting up.
Note – Use a shell tool or a CDE or JDS terminal (such as dtterm), not a command
tool. Some tip commands might not work properly in a command tool window.
▼ To Access the System Console With a Tip
Connection Through the TTYB Port
1. Redirect the system console by changing the OpenBoot configuration variables.
At the ok prompt on the Sun Fire V445 server, type the following commands:
ok setenv input-device ttyb
ok setenv output-device ttyb
Note – You can only access the sc> prompt and view POST messages from either
the serial management port or the network management port.
Note – There are many other OpenBoot configuration variables. Although these
variables do not affect which hardware device is used to access the system console,
some of them affect which diagnostic tests the system runs and which messages the
system displays at its console. See Chapter 8 and Chapter 9.
Chapter 2 Configuring the System Console 47
Page 74

2. To cause the changes to take effect, power off the system. Type:
ok power-off
The system permanently stores the parameter changes and powers off.
Note – You can also power off the system using the front panel Power button.
3. Connect the null modem serial cable to the TTYB port on the Sun Fire V445
server.
If required, use the DB-9 or DB-25 cable adapter supplied with the server.
4. Power on the system.
See Chapter 3 for power-on procedures.
Continue with your installation or diagnostic test session as appropriate. When you
are finished using the tip window, end your Tip session by typing ~. (the tilde
symbol followed by a period) and exit the window. For more information about tip
commands, see the tip man page.
For more information about connecting to and using the ALOM system controller,
see:
■ Sun Advanced Lights Out Manager (ALOM) Online Help
If you have redirected the system console to TTYB and want to change the system
console settings back to use the serial management and network management ports,
see the following:
■ “Reference for System Console OpenBoot Configuration Variable Settings” on
page 56
48 Sun Fire V445 Server Administration Guide • August 2006
Page 75

Modifying the /etc/remote File
This procedure might be necessary if you are accessing the Sun Fire V445 server
using a Tip connection from a Sun system running an older version of the Solaris OS
software. You might also need to perform this procedure if the /etc/remote file on
the Sun system has been altered and no longer contains an appropriate hardwire
entry.
This procedure assumes that you are logged in as superuser to the system console of
a Sun system that you intend to use to establish a tip connection to the Sun Fire
V440 server.
▼ To Modify the /etc/remote File
1. Determine the release level of Solaris OS software installed on the Sun system.
Type:
# uname -r
The system responds with a release number.
2. Do one of the following, depending on the number displayed.
■ If the number displayed by the uname -r command is 5.0 or higher:
The Solaris software shipped with an appropriate entry for hardwire in the
/etc/remote file. If you have reason to suspect that this file was altered and the
hardwire entry modified or deleted, check the entry against the following
example, and edit it as needed.
hardwire:\
:dv=/dev/term/b:br#9600:el=^C^S^Q^U^D:ie=%$:oe=^D:
Note – If you intend to use the Sun system’s serial port A rather than serial port B,
edit this entry by replacing /dev/term/b with /dev/term/a.
Chapter 2 Configuring the System Console 49
Page 76

■ If the number displayed by the uname -r command is less than 5.0:
Check the /etc/remote file and add the following entry, if it does not already
exist.
hardwire:\
:dv=/dev/ttyb:br#9600:el=^C^S^Q^U^D:ie=%$:oe=^D:
Note – If you intend to use the Sun system’s serial port A rather than serial port B,
edit this entry by replacing /dev/ttyb with /dev/ttya.
The /etc/remote file is now properly configured. Continue establishing a Tip
connection to the Sun Fire V445 server system console. See:
■ “Accessing the System Console With a Tip Connection” on page 45
If you have redirected the system console to TTYB and want to change the system
console settings back to use the serial management and network management ports,
see the following:
■ “Reference for System Console OpenBoot Configuration Variable Settings” on
page 56
50 Sun Fire V445 Server Administration Guide • August 2006
Page 77

Accessing the System Console With an
Alphanumeric Terminal
This procedure assumes that you are accessing the Sun Fire V445 server system
console by connecting the serial port of an alphanumeric terminal to the serial
management port (SERIAL MGT) of the Sun Fire V445 server.
▼ To Access the System Console With an
Alphanumeric Terminal Through the Serial
Management Port
1. Attach one end of the serial cable to the alphanumeric terminal’s serial port.
Use a null modem serial cable or an RJ-45 serial cable and null modem adapter. Plug
in this cable to the terminal’s serial port connector.
2. Attach the opposite end of the serial cable to the serial management port on the
Sun Fire V445 server.
3. Connect the alphanumeric terminal’s power cord to an AC outlet.
4. Set the alphanumeric terminal to receive:
■ 9600 baud
■ 8 bits
■ No parity
■ 1 stop bit
■ No handshake protocol
See the documentation accompanying your terminal for information about how to
configure it.
Chapter 2 Configuring the System Console 51
Page 78

▼ To Access the System Console With an
Alphanumeric Terminal Through the TTYB Port
1. Redirect the system console by changing the OpenBoot configuration variables.
At the ok prompt, type the following commands:
ok setenv input-device ttyb
ok setenv output-device ttyb
Note – You can only access the sc> prompt and view POST messages from either
the serial management port or the network management port.
Note – There are many other OpenBoot configuration variables. Although these
variables do not affect which hardware device is used to access the system console,
some of them affect which diagnostic tests the system runs and which messages the
system displays at its console. See Chapter 8 and Chapter 9.
2. To cause the changes to take effect, power off the system. Type:
ok power-off
The system permanently stores the parameter changes and powers off.
Note – You can also power off the system using the front panel Power button.
3. Connect the null modem serial cable to the TTYB port on the Sun Fire V445
server.
If required, use the DB-9 or DB-25 cable adapter supplied with the server.
4. Power on the system.
See Chapter 3 for power-on procedures.
You can issue system commands and view system messages using the alphanumeric
terminal. Continue with your installation or diagnostic procedure, as needed. When
you are finished, type the alphanumeric terminal’s escape sequence.
For more information about connecting to and using the ALOM system controller,
see:
■ Sun Advanced Lights Out Manager (ALOM) Online Help
52 Sun Fire V445 Server Administration Guide • August 2006
Page 79
If you have redirected the system console to TTYB and want to change the system
console settings back to use the serial management and network management ports,
see the following:
■ “Reference for System Console OpenBoot Configuration Variable Settings” on
page 56
Verifying Serial Port Settings on TTYB
This procedure enables you to verify the baud rate and other serial port settings
used by the Sun Fire V445 server to communicate with a device attached to its TTYB
port.
Note – The serial management port always operates at 9600 baud, 8 bits, with no
parity and 1 stop bit.
You must be logged in to the Sun Fire V445 server, and the server must be running
Solaris OS software.
▼ To Verify Serial Port Settings on TTYB
1. Open a shell tool window.
2. Type:
# eeprom | grep ttyb-mode
3. Look for the following output:
ttyb-mode = 9600,8,n,1,-
This line indicates that the Sun Fire V445 server’s serial port TTYB is configured for:
■ 9600 baud
■ 8 bits
■ No parity
■ 1 stop bit
■ No handshake protocol
Chapter 2 Configuring the System Console 53
Page 80

For more information about serial port settings, see the eeprom man page. For more
information about the TTYB-mode OpenBoot configuration variable, see
Appendix C.
Accessing the System Console With a
Local Graphics Monitor
After initial system installation, you can install a local graphics monitor and
configure it to access the system console. You cannot use a local graphics monitor to
perform initial system installation, nor can you use a local graphics monitor to view
power-on self-test (POST) messages.
To install a local graphics monitor, you must have:
■ A supported PCI-based graphics frame buffer card and software driver.
An 8/24-Bit Color Graphics PCI adapter frame buffer card (Sun part number
X3768A or X3769A is currently supported)
■ A monitor with appropriate resolution to support the frame buffer
■ A Sun-compatible USB keyboard (Sun USB Type–6 keyboard)
■ A Sun-compatible USB mouse (Sun USB mouse) and mouse pad
▼ To Access the System Console With a Local
Graphics Monitor
1. Install the graphics card into an appropriate PCI slot.
Installation must be performed by a qualified service provider. For further
information, see the Sun Fire V445 Server Installation Guide or contact your qualified
service provider.
2. Attach the monitor’s video cable to the graphics card’s video port.
Tighten the thumbscrews to secure the connection.
3. Connect the monitor’s power cord to an AC outlet.
4. Connect the USB keyboard cable to any USB port on the Sun Fire V445 server
front panel.
5. Connect the USB mouse cable to any USB port on the Sun Fire V445 server front
panel.
54 Sun Fire V445 Server Administration Guide • August 2006
Page 81

6. Obtain the ok prompt.
For more information, see “Entering the ok Prompt” on page 38.
7. Set OpenBoot configuration variables appropriately.
From the existing system console, type:
ok setenv input-device keyboard
ok setenv output-device screen
Note – There are many other OpenBoot configuration variables. Although these
variables do not affect which hardware device is used to access the system console,
some of them affect which diagnostic tests the system runs and which messages the
system displays at its console. See Chapter 8 and Chapter 9.
8. To cause the changes to take effect, type:
ok reset-all
The system stores the parameter changes, and boots automatically when the
OpenBoot configuration variable auto-boot? is set to true (its default value).
Note – To store parameter changes, you can also power cycle the system using the
Power button.
You can issue system commands and view system messages using your local
graphics monitor. Continue with your installation or diagnostic procedure, as
needed.
If you want to redirect the system console back to the serial management and
network management ports, see:
■ “Reference for System Console OpenBoot Configuration Variable Settings” on
page 56
Chapter 2 Configuring the System Console 55
Page 82

Reference for System Console OpenBoot
Configuration Variable Settings
The Sun Fire V445 system console is directed to the serial management and network
management ports (SERIAL MGT and NET MGT) by default. However, you can
redirect the system console to the serial DB-9 port (TTYB), or to a local graphics
monitor, keyboard, and mouse. You can also redirect the system console back to the
serial management and network management ports.
Certain OpenBoot configuration variables control from where system console input
is taken and to where its output is directed. The table below shows how to set these
variables in order to use the serial management and network management ports,
TTYB, or a local graphics monitor as the system console connection.
TABLE 2-4 OpenBoot Configuration Variables That Affect the System Console
System Console Output
Serial and
OpenBoot Configuration
Variable Name
output-device ttya ttyb screen
Network
Management Ports Serial Port (TTYB)
Local Graphics
*
Monitor
*
input-device ttya ttyb keyboard
* POST output will still be directed to the serial management port, as POST has no mechanism to direct its output
to a graphics monitor.
The serial management port and network management port are present in the
OpenBoot configuration variables as ttya. However, the serial management port
does not function as a standard serial connection. If you want to connect a
conventional serial device (such as a printer) to the system, you need to connect it to
TTYB, not the serial management port. See “About the Serial Ports” on page 90 for
more information.
The sc> prompt and POST messages are only available through the serial
management port and network management port. In addition, the ALOM system
controller console command is ineffective when the system console is redirected to
TTYB or a local graphics monitor.
In addition to the OpenBoot configuration variables described in
TABLE 2-4, there are
other variables that affect and determine system behavior. These variables are
created during system configuration and stored on a ROM chip.
56 Sun Fire V445 Server Administration Guide • August 2006
Page 83

CHAPTER
3
Powering On and Powering Off the
System
This chapter describes how to power on and power off the system, and how to
initiate a reconfiguration boot.
This chapter explains the following tasks:
■ “Powering On the Server Remotely” on page 58
■ “Powering On the Server Locally” on page 59
■ “Powering Off the System Remotely” on page 60
■ “Powering Off the Server Locally” on page 62
■ “Initiating a Reconfiguration Boot” on page 62
■ “Selecting a Boot Device” on page 65
Before You Begin
Note – Before powering on the system, you must attach a system console device to
gain access to the system. See Chapter 2. ALOM automatically boots up when the
system is plugged in.
The following is a brief summary of powering on the system properly:
1. Attach a system console device to the serial management port and turn the
console device on.
Serial management access is only possible during first-time startup.
2. Plug in the system power cords.
ALOM boots and starts issuing console messages. At this time, you can assign a
username and password.
57
Page 84

3. Power on the system. Once powered on, type console to get to the OK prompt
to watch the system boot sequence.
Powering On the Server Remotely
To issue software commands, you need to set up an alphanumeric terminal
connection, a local graphics monitor connection, ALOM system controller
connection, or a Tip connection to the Sun Fire V445 server. See Chapter 2 for more
information about connecting the Sun Fire V445 server to a terminal or similar
device.
Do not use this power-on procedure if you have just added any new internal option
or external storage device, or if you have removed a storage device without
replacing it. To power on the system under those circumstances, you must initiate a
reconfiguration boot. For those instructions, see:
■ “Initiating a Reconfiguration Boot” on page 62
Caution – Before you power on the system, ensure that the system doors and all
panels are properly installed.
Caution – Never move the system when the system power is on. Movement can
cause catastrophic disk drive failure. Always power off the system before moving it.
For more information, see:
■ “About Communicating With the System” on page 24
■ “About the sc> Prompt” on page 31
▼ To Power On the Server Remotely
1. Log in to the ALOM system controller.
2. Type the following command:
sc> poweron
58 Sun Fire V445 Server Administration Guide • August 2006
Page 85

Powering On the Server Locally
Do not use this power-on procedure if you have just added any new internal option
or external storage device, or if you have removed a storage device without
replacing it. To power on the system under those circumstances, you must initiate a
reconfiguration boot. For those instructions, see:
■ “Initiating a Reconfiguration Boot” on page 62
Caution – Never move the system when the system power is on. Movement can
cause catastrophic disk drive failure. Always power off the system before moving it.
Caution – Before you power on the system, ensure that the system doors and all
panels are properly installed.
▼ To Power On the Server Locally
1. Turn on power to any external peripherals and storage devices.
Read the documentation supplied with the device for specific instructions.
2. Establish a connection to the system console.
If you are powering on the system for the first time, connect a device to the serial
management port using one of the methods described in Chapter 2. Otherwise, use
one of the methods for connecting to the system console, also described in Chapter 2.
3. Connect the AC power cords.
Note – As soon as the AC power cords are connected to the system, the ALOM
system controller boots and displays its power-on self-test (POST) messages. Though
the system power is still off, the ALOM system controller is up and running, and
monitoring the system. Regardless of system power state, as long as the power cords
are connected and providing standby power, the ALOM system controller is on and
monitoring the system.
Chapter 3 Powering On and Powering Off the System 59
Page 86
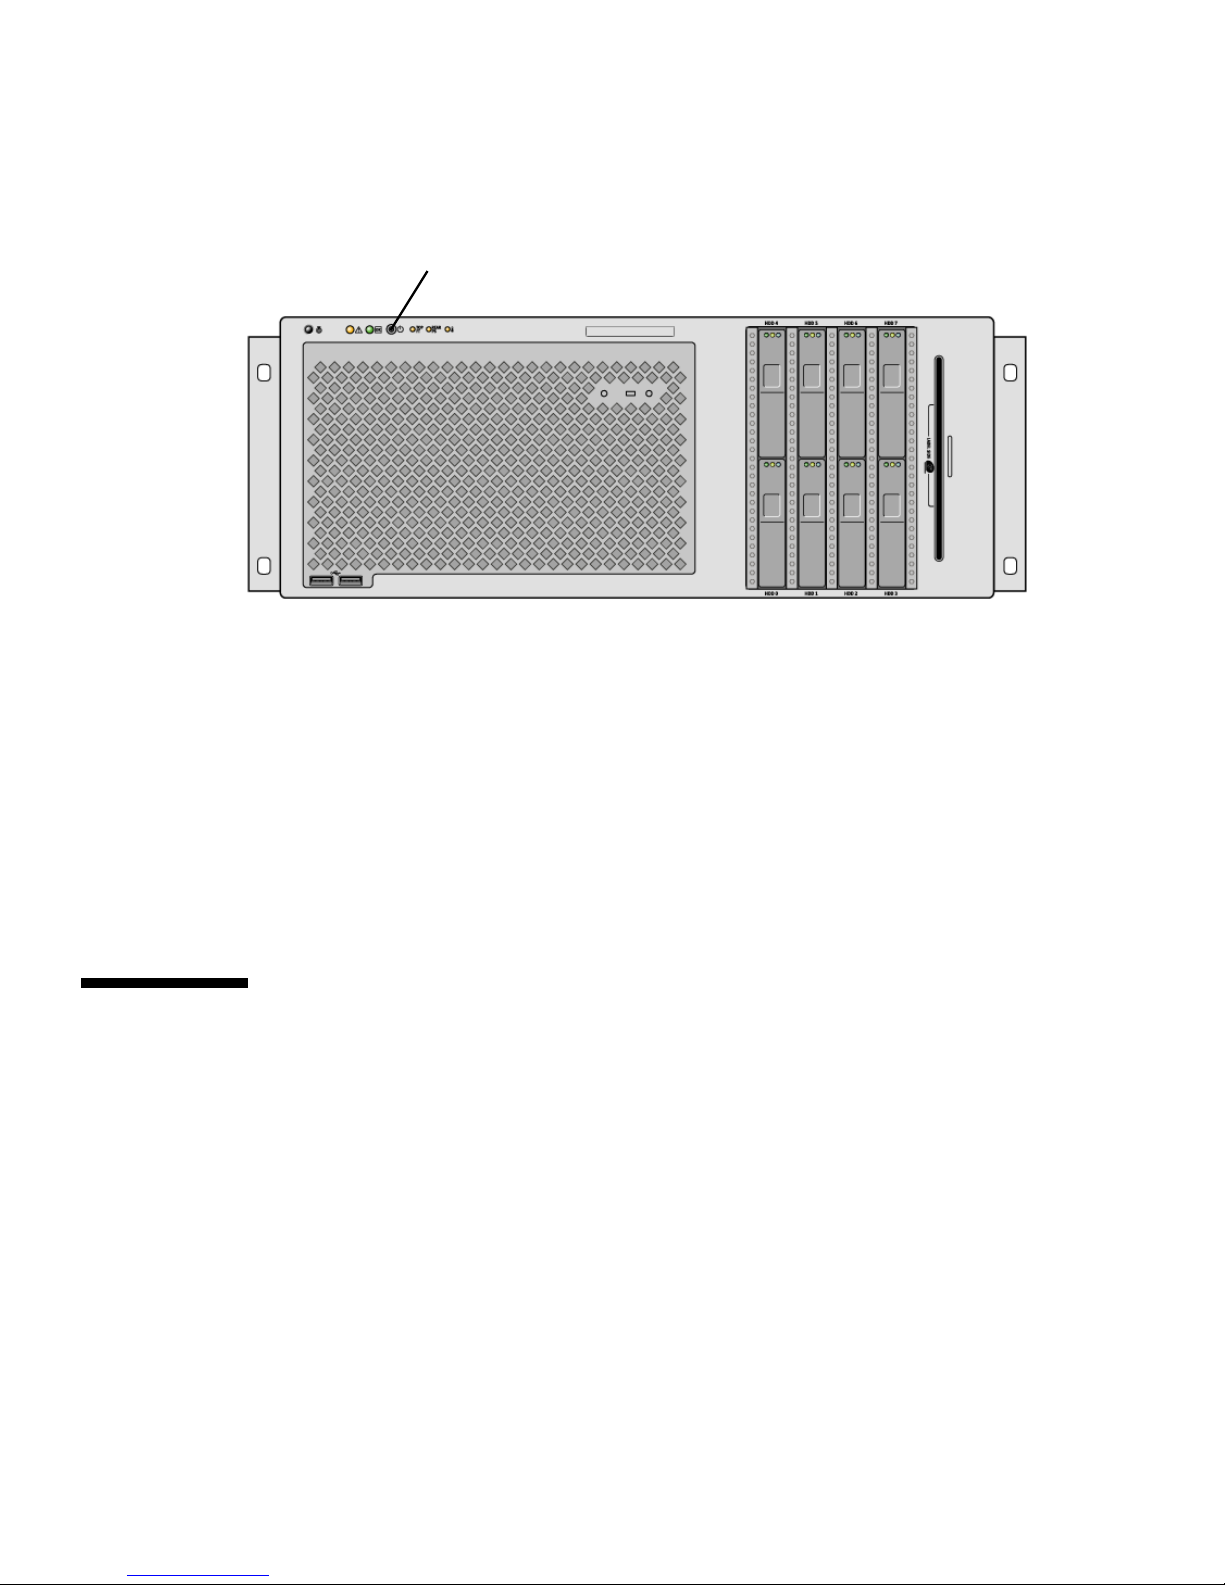
4. Press and release the Power button with a ball-point pen to power on the system.
Power button
The power supply Power OK indicators light when power is applied to the system.
Verbose POST output is immediately displayed to the system console if diagnostics
are enabled at power-on, and the system console is directed to the serial and
network management ports.
Text messages appear from 30 seconds to 20 minutes on the system monitor (if one is
attached) or the system prompt appears on an attached terminal. This time depends
on the system configuration (number of CPUs, memory modules, PCI cards, and
console configuration), and the level of power-on self-test (POST) and OpenBoot
Diagnostics tests being performed. The System Activity indicator lights when the
server is running under control of the Solaris OS.
Powering Off the System Remotely
To issue software commands, you need to set up an alphanumeric terminal
connection, a local graphics monitor connection, ALOM system controller
connection, or a Tip connection to the Sun Fire V445 server. See Chapter 2 for more
information about connecting the Sun Fire V445 server to a terminal or similar
device.
You can power off the system remotely either from the ok prompt or from the
ALOM system controller sc> prompt.
60 Sun Fire V445 Server Administration Guide • August 2006
Page 87
Caution – Applications running on the Solaris OS can be adversely affected by a
poorly executed system shutdown. ensure that you stop and exit applications, and
shut down the OS before powering off the server.
For more information, see:
■ “About Communicating With the System” on page 24
■ “About the ok Prompt” on page 33
■ “Entering the ok Prompt” on page 38
■ “About the sc> Prompt” on page 31
▼ To Power Off the System Remotely From the ok
Prompt
1. Notify users that the server will be powered off.
2. Back up the system files and data, if necessary.
3. Obtain the ok prompt.
See “Entering the ok Prompt” on page 38.
4. Issue the following command:
ok power-off
▼ To Power Off the System Remotely From the
ALOM System Controller Prompt
1. Notify users that the system will be powered off.
2. Back up the system files and data, if necessary.
3. Log in to the ALOM system controller.
See “Using the Serial Management Port” on page 39.
4. Issue the following command:
sc> poweroff
Chapter 3 Powering On and Powering Off the System 61
Page 88

Powering Off the Server Locally
Caution – Applications running on the Solaris OS can be adversely affected by a
poorly executed system shutdown. Ensure that you stop and exit applications, and
shut down the OS before powering off the server.
▼ To Power Off the Server Locally
1. Notify users that the server will be powered down.
2. Back up the system files and data, if necessary.
3. Press and release the Power button with a ball-point pin.
The system begins a graceful software system shutdown.
Note – Pressing and releasing the Power button initiates a graceful software system
shutdown. Pressing and holding in the Power button for four seconds causes an
immediate hardware shutdown. Whenever possible, you should use the graceful
shutdown method. Forcing an immediate hardware shutdown can cause disk drive
corruption and loss of data. Use that method only as a last resort.
4. Wait for the system to power off.
The power supply Power OK indicators extinguish when the system is powered off.
Caution – Ensure no other users have access to power on the system or system
components while working on internal components.
Initiating a Reconfiguration Boot
After installing any new internal option or external storage device, you must
perform a reconfiguration boot so that the OS is able to recognize newly installed
devices. In addition, if you remove any device and do not install a replacement
device prior to rebooting the system, you must perform a reconfiguration boot for
62 Sun Fire V445 Server Administration Guide • August 2006
Page 89

the OS to recognize the configuration change. This requirement also applies to any
component that is connected to the system I
2
C bus to ensure proper environmental
monitoring.
This requirement does not apply to any component that is:
■ Installed or removed as part of a hot-plug operation
■ Installed or removed before the OS is installed
■ Installed as an identical replacement for a component that is already recognized
by the OS
To issue software commands, you need to set up an alphanumeric terminal
connection, a local graphics monitor connection, ALOM system controller
connection, or a Tip connection to the Sun Fire V445 server. See Chapter 2 for more
information about connecting the Sun Fire V445 server to a terminal or similar
device.
This procedure assumes that you are accessing the system console using the serial
management or network management port.
For more information, see:
■ “About Communicating With the System” on page 24
■ “About the sc> Prompt” on page 31
■ “About the ok Prompt” on page 33
■ “About Switching Between the ALOM System Controller and the System
Console” on page 36
■ “Entering the ok Prompt” on page 38
▼ To Initiate a Reconfiguration Boot
1. Turn on power to any external peripherals and storage devices.
Read the documentation supplied with the device for specific instructions.
2. Turn on power to the alphanumeric terminal or local graphics monitor, or log in to
the ALOM system controller.
3. Use ALOM to initiate Diagnostics mode to run power-on self-test (POST) and
OpenBoot Diagnostics tests to verify that the system functions correctly with the
new part(s) you just installed.
4. Press the Power button with a ball-point pen to power on the system.
5. If you are logged in to the sc> prompt, switch to the ok prompt. Type:
sc> console
Chapter 3 Powering On and Powering Off the System 63
Page 90

6. When the system banner is displayed on the system console, immediately stop the
boot process to access the system ok prompt.
The system banner contains the Ethernet address and host ID. To stop the boot
process, use one of the following methods:
■ Hold down the Stop (or L1) key and press A on your keyboard.
■ Press the Break key on the terminal keyboard.
■ Type the break command from the sc> prompt.
7. At the ok prompt, type the following commands:
ok setenv auto-boot? false
ok reset-all
You must set the auto-boot? variable to false and issue the reset-all
command to ensure that the system correctly initiates upon reboot. If you do not
issue these commands, the system might fail to initialize, because the boot process
was stopped in Step 6.
8. At the ok prompt, type the following command:
ok setenv auto-boot? true
You must set auto-boot? variable back to true so that the system boots
automatically after a system reset.
9. At the ok prompt, type the following command:
ok boot -r
The boot -r command rebuilds the device tree for the system, incorporating any
newly installed options so that the OS will recognize them.
Note – A system banner appears in 30 seconds to 20 minutes. This time depends on
the system configuration (number of CPUs, memory modules, PCI cards) and the
level of POST and OpenBoot Diagnostics tests being performed. For more
information about OpenBoot configuration variables, see Appendix C.
The system front panel LED indicators provide power-on status information. For
information about the system indicators, see:
■ “Front Panel Indicators” on page 9
■ “Back Panel Indicators” on page 16
64 Sun Fire V445 Server Administration Guide • August 2006
Page 91

If the system encounters a problem during startup (running in the normal mode), try
restarting the system in Diagnostics mode to determine the source of the problem.
Use ALOM or the OpenBoot Prompt (ok prompt) to switch to Diagnostics mode
and power cycle the system. See “Powering Off the Server Locally” on page 62.
For information about system diagnostics and troubleshooting, see Chapter 8.
Selecting a Boot Device
You specify the boot device by setting an OpenBoot configuration variable called
boot-device. The default setting of this variable is disk net. With this setting,
the firmware first attempts to boot from the system hard disk drive, and if that fails,
from the on-board net0 Gigabit Ethernet interface.
Before you can select a boot device, you must complete system installation according
to the instructions in the Sun Fire V445 Server Installation Guide.
This procedure assumes that you are familiar with the OpenBoot firmware and that
you know how to enter the OpenBoot environment. For more information, see:
■ “About the ok Prompt” on page 33
Note – The serial management port on the ALOM system controller card is
preconfigured as the default system console port. For more information, see
Chapter 2.
If you want to boot from a network, you must connect the network interface to the
network. See, “Attaching a Twisted-Pair Ethernet Cable” on page 131.
▼ To Select a Boot Device
● At the ok prompt, type:
ok setenv boot-device device-specifier
where the device-specifier is one of the following:
■ cdrom – Specifies the DVD-ROM drive
■ disk – Specifies the system boot disk (internal disk 0 by default)
■ disk0 – Specifies internal disk 0
■ disk1 – Specifies internal disk 1
Chapter 3 Powering On and Powering Off the System 65
Page 92

■ disk2 – Specifies internal disk 2
■ disk3 – Specifies internal disk 3
■ disk4 – Specifies internal disk 4
■ disk5 – Specifies internal disk 5
■ disk6 – Specifies internal disk 6
■ disk7 – Specifies internal disk 6
■ net, net0, net1– Specifies the network interfaces
■ full path name – Specifies the device or network interface by its full path name
Note – The Solaris OS modifies the boot-device variable to its full path name, not
the alias name. If you choose a nondefault boot-device variable, the Solaris OS
specifies the full device path of the boot device.
Note – You can also specify the name of the program to be booted as well as the
way the boot program operates. For more information, see the OpenBoot 4.x
Command Reference Manual in the OpenBoot Collection AnswerBook for your specific
Solaris OS release.
If you want to specify a network interface other than an on-board Ethernet interface
as the default boot device, you can determine the full path name of each interface by
typing:
ok show-devs
The show-devs command lists the system devices and displays the full path name
of each PCI device.
For more information about using the OpenBoot firmware, refer to the OpenBoot 4.x
Command Reference Manual in the OpenBoot Collection AnswerBook for your specific
Solaris release.
66 Sun Fire V445 Server Administration Guide • August 2006
Page 93

CHAPTER
4
Configuring Hardware
This chapter provides hardware configuration information for the Sun Fire V445
server.
Note – This chapter does not provide instructions for installing or removing
hardware components. For instructions on preparing the system for servicing and
procedures to install and remove the server components described in this chapter,
refer to the Sun Fire V445 Server Service Manual.
Topics in this chapter include:
■ “About the CPU/Memory Modules” on page 67
■ “About the ALOM System Controller Card” on page 71
■ “About the PCI Cards and Buses” on page 75
■ “About the SAS Controller” on page 78
■ “About the SAS Backplane” on page 79
■ “About Hot-Pluggable and Hot-Swappable Components” on page 79
■ “About the Internal Disk Drives” on page 81
■ “About the Power Supplies” on page 83
■ “About the System Fan Trays” on page 86
■ “About the USB Ports” on page 89
■ “About the Serial Ports” on page 90
About the CPU/Memory Modules
The system motherboard provides slots for up to four CPU/memory modules. Each
CPU/memory module incorporates one UltraSPARC IIIi processor, and slots for up
to four dual inline memory modules (DIMMs). The CPUs in the system are
numbered from 0 to 3, depending on the slot where each CPU resides.
67
Page 94

Note – CPU/memory modules on a Sun Fire V445 server are not hot-pluggable or
hot-swappable.
The UltraSPARC IIIi processor is a high-performance, highly integrated superscalar
processor implementing the SPARC V9 64-bit architecture. The UltraSPARC IIIi
processor can support both 2D and 3D graphics, as well as image processing, video
compression and decompression, and video effects through the sophisticated Visual
Instruction Set extension (Sun VIS software). The VIS software provides high levels
of multimedia performance, including two streams of MPEG-2 decompression at full
broadcast quality with no additional hardware support.
The Sun Fire V445 server employs a shared-memory multiprocessor architecture
with all processors sharing the same physical address space. The system processors,
main memory, and I/O subsystem communicate via a high-speed system
interconnect bus. In a system configured with multiple CPU/memory modules, all
main memory is accessible from any processor over the system bus. The main
memory is logically shared by all processors and I/O devices in the system.
However, memory is controlled and allocated by the CPU on its host module, that is,
the DIMMs on CPU/memory module 0 are managed by CPU 0.
DIMMs
The Sun Fire V445 server uses 2.5-volt, high-capacity double data rate dual inline
memory modules (DDR DIMMs) with error-correcting code (ECC). The system
supports DIMMs with 512-Mbyte, 1-Gbyte, and 2-Gbyte capacities. Each
CPU/memory module contains slots for four DIMMs. Total system memory ranges
from a minimum of 1 Gbyte (one CPU/memory module with two 512-Mbyte
DIMMs) to a maximum of 32 Gbytes (four modules fully populated with 2-Gbyte
DIMMs).
Within each CPU/memory module, the four DIMM slots are organized into groups
of two. The system reads from, or writes to, both DIMMs in a group simultaneously.
DIMMs, therefore, must be added in pairs. The figure below shows the DIMM slots
and DIMM groups on a Sun Fire V445 server CPU/memory module. Adjacent slots
belong to the same DIMM group. The two groups are designated 0 and 1 as shown
in
FIGURE 4-1.
68 Sun Fire V445 Server Administration Guide • August 2006
Page 95
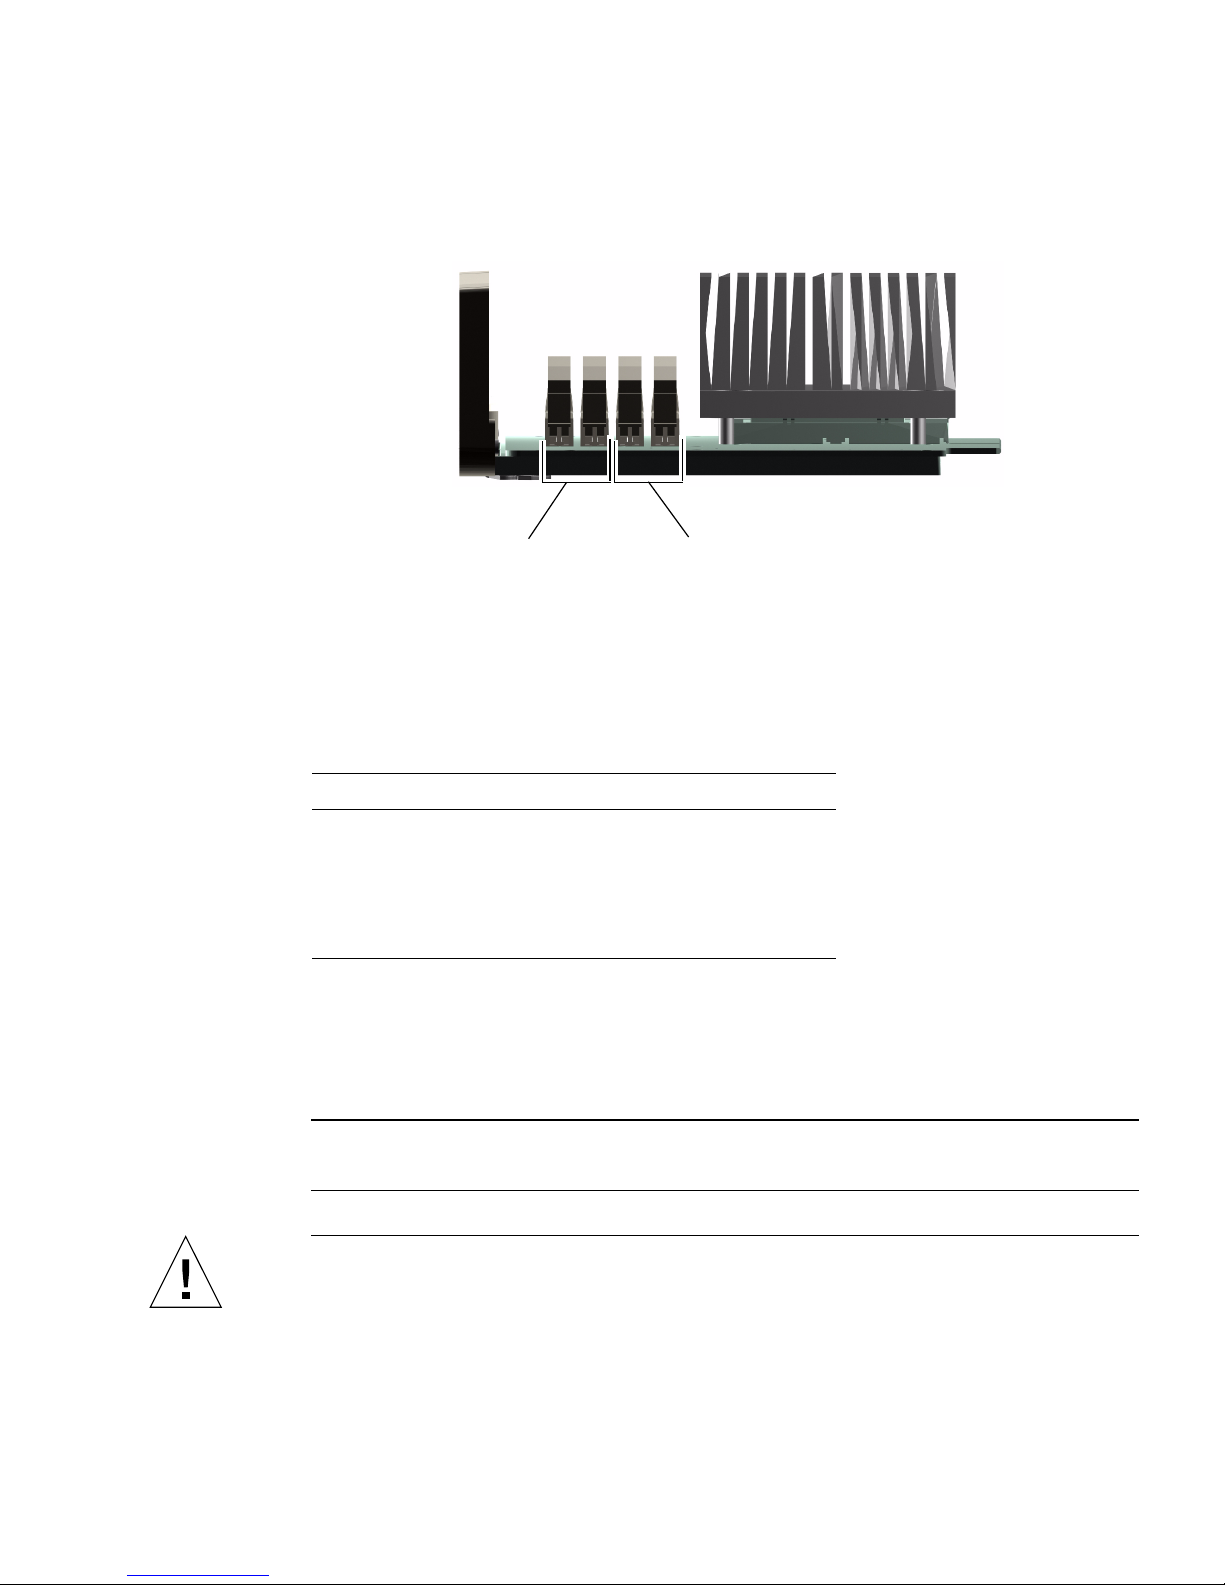
1010
DIMM group 1
FIGURE 4-1 Memory Module Groups 0 and 1
TABLE 4-1 lists the DIMMs on the CPU/memory module, and to which group each
DIMM group 0
DIMM belongs.
TABLE 4-1 Memory Module Groups 0 and 1
Label Group Physical Group
B1/D1 B1 1 (must be installed as a pair)
B1/D0
B0/D1 B0 0 (must be installed as a pair)
B0/D0
The DIMMs must be added in pairs within the same DIMM group, and each pair
used must have two identical DIMMs installed – that is, both DIMMs in each group
must be from the same manufacturer and must have the same capacity (for example,
two 512-Mbyte DIMMs or two 1-Gbyte DIMMs).
Note – Each CPU/memory module must be populated with a minimum of two
DIMMs, installed in either group 0 or group 1.
Caution – DIMMs are made of electronic components that are extremely sensitive
to static electricity. Static from your clothes or work environment can destroy the
modules. Do not remove a DIMM from its antistatic packaging until you are ready to
install it on the CPU/memory module. Handle the modules only by their edges. Do
Chapter 4 Configuring Hardware 69
Page 96

not touch the components or any metal parts. Always wear an antistatic grounding
strap when you handle the modules. For more information, refer to the Sun Fire
V445 Server Installation Guide and the Sun Fire V445 Server Service Manual.
For guidelines and complete instructions on how to install and identify DIMMs in a
CPU/memory module, refer to the Sun Fire V445 Server Service Manual and the Sun
Fire V445 Server Installation Guide.
Memory Interleaving
You can maximize the system’s memory bandwidth by taking advantage of its
memory interleaving capabilities. The Sun Fire V445 server supports two-way
interleaving. In most cases, higher interleaving results in improved system
performance. However, actual performance results can vary depending on the
system application. Two-way interleaving occurs automatically in any DIMM bank
where the DIMM capacities in DIMM group 0 match the capacities used in a DIMM
group 1. For optimum performance, install identical DIMMs in all four slots in a
CPU/memory module.
Independent Memory Subsystems
Each Sun Fire V445 server CPU/memory module contains an independent memory
subsystem. Memory controller logic incorporated into the UltraSPARC IIIi CPU
allows each CPU to control its own memory subsystem.
The Sun Fire V445 server uses a shared memory architecture. During normal system
operations, the total system memory is shared by all CPUs in the system.
70 Sun Fire V445 Server Administration Guide • August 2006
Page 97

DIMM Configuration Rules
■ You must physically remove a CPU/memory module from the system before you
can install or remove DIMMs.
■ You must add DIMMs in pairs.
■ Each group used must have two identical DIMMs installed – that is, both DIMMs
must be from the same manufacturer and must have the same density and
capacity (for example, two 512-Mbyte DIMMs or two 1-Gbyte DIMMs).
■ For maximum memory performance and to take full advantage of the Sun Fire
V445 server’s memory interleaving features, use identical DIMMs in all four slots
of a CPU/memory module.
For information about installing or removing DIMMs, see the Sun Fire V445 Server
Parts Installation and Removal Guide.
About the ALOM System Controller
Card
The Sun Advanced Lights Out Manager (ALOM) system controller card enables
access, monitoring, and control of the Sun Fire V445 server from a remote location. It
is a fully independent processor card with its own resident firmware, selfdiagnostics, and OS.
In addition, the ALOM system controller card functions as the default console
connection to the system, through its serial management port. For more information
about using the ALOM system controller as the default console connection, see:
■ “About Communicating With the System” on page 24
■ “Using the Serial Management Port” on page 39
When you first power on the system, the ALOM system controller card provides a
default connection to the system console through its serial management port. After
initial setup, you can assign an IP address to the network management port and
connect the network management port to a network. You can run diagnostic tests,
view diagnostic and error messages, reboot your server, and display environmental
status information using the ALOM system controller software. Even if the
operating system is down or the system is powered off, the ALOM system controller
can send an email alert about hardware failures, or other important events that can
occur on the server.
The ALOM system controller provides the following features:
■ Secure Shell (SSH) or Telnet connectivity – Network connectivity can also be
disabled
Chapter 4 Configuring Hardware 71
Page 98
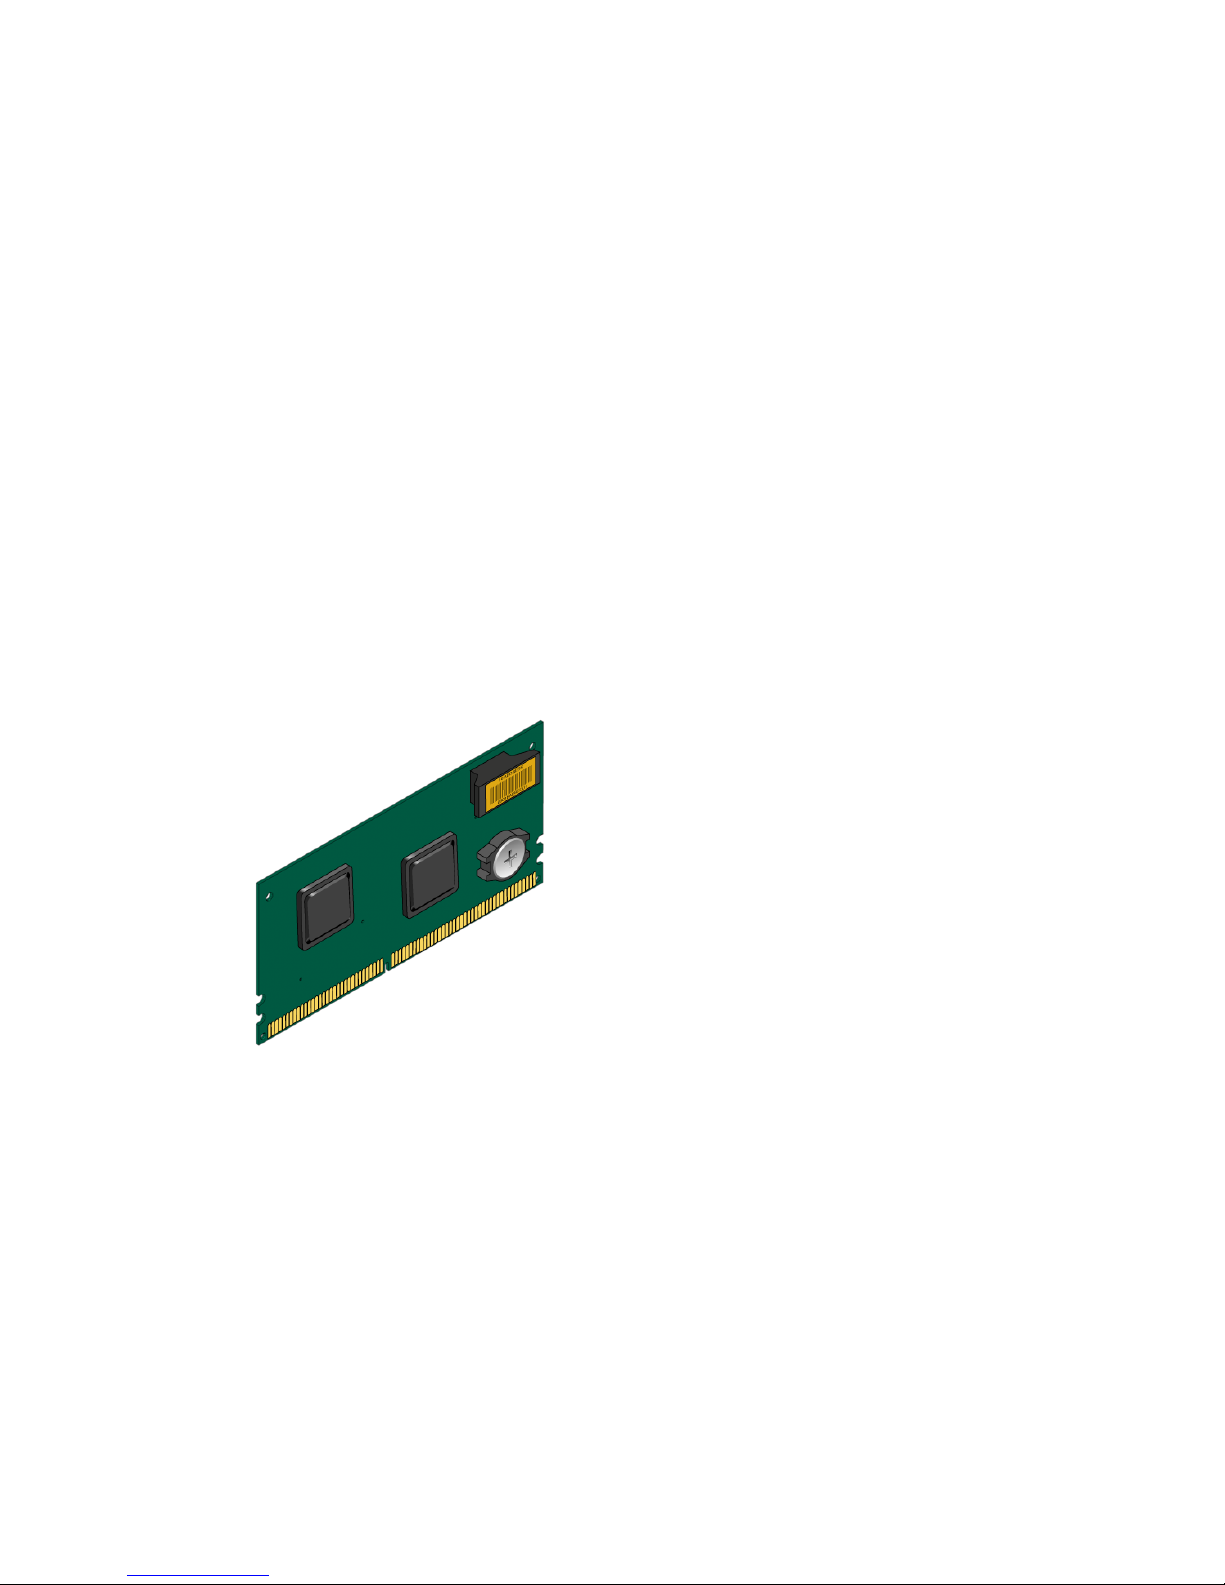
■ Remote powering on/off the system and diagnostics
■ Default system console connection through its serial management port to an
alphanumeric terminal, terminal server, or modem
■ Network management port for remote monitoring and control over a network,
after initial setup
■ Remote system monitoring and error reporting, including diagnostic output
■ Remote reboot, power-on, power-off, and reset functions
■ Ability to monitor system environmental conditions remotely
■ Ability to run diagnostic tests using a remote connection
■ Ability to remotely capture and store boot and run logs, which you can review or
replay later
■ Remote event notification for overtemperature conditions, power supply faults,
system shutdown, or system resets
■ Remote access to detailed event logs
FIGURE 4-2 ALOM System Controller Card
The ALOM system controller card features serial and 10BASE-T Ethernet interfaces
that provide multiple ALOM system controller software users with simultaneous
access to the Sun Fire V445 server. ALOM system controller software users are
provided secure password-protected access to the system’s Solaris and OpenBoot
console functions. ALOM system controller users also have full control over poweron self-test (POST) and OpenBoot Diagnostics tests.
72 Sun Fire V445 Server Administration Guide • August 2006
Page 99

Caution – Although access to the ALOM system controller through the network
management port is secure, access through the serial management port is not secure.
Therefore, avoid connecting a serial modem to the serial management port.
Note – The ALOM system controller serial management port (labeled SERIAL
MGT) and network management port (labeled NET MGT) are present in the Solaris
OS device tree as /dev/ttya, and in the OpenBoot configuration variables as ttya.
However, the serial management port does not function as a standard serial
connection. If you want to attach a standard serial device to the system (such as a
printer), you need to use the DB-9 connector on the system back panel, which
corresponds to /dev/ttyb in the Solaris device tree, and as ttyb in the OpenBoot
configuration variables. See “About the Serial Ports” on page 90 for more
information.
The ALOM system controller card runs independently of the host server, and
operates off of standby power from the server power supplies. The card features
on-board devices that interface with the server environmental monitoring subsystem
and can automatically alert administrators to system problems. Together, these
features enable the ALOM system controller card and ALOM system controller
software to serve as a lights out management tool that continues to function even
when the server OS goes offline or when the server is powered off.
The ALOM system controller card plugs in to a dedicated slot on the motherboard
and provides the following ports (as shown in
FIGURE 4-3) through an opening in the
system’s back panel:
■ Serial communication port via an RJ-45 connector (serial management port,
labeled SERIAL MGT)
■ 10-Mbps Ethernet port via an RJ-45 twisted-pair Ethernet (TPE) connector
(network management port, labeled NET MGT) with green Link/Activity
indicator
Chapter 4 Configuring Hardware 73
Page 100
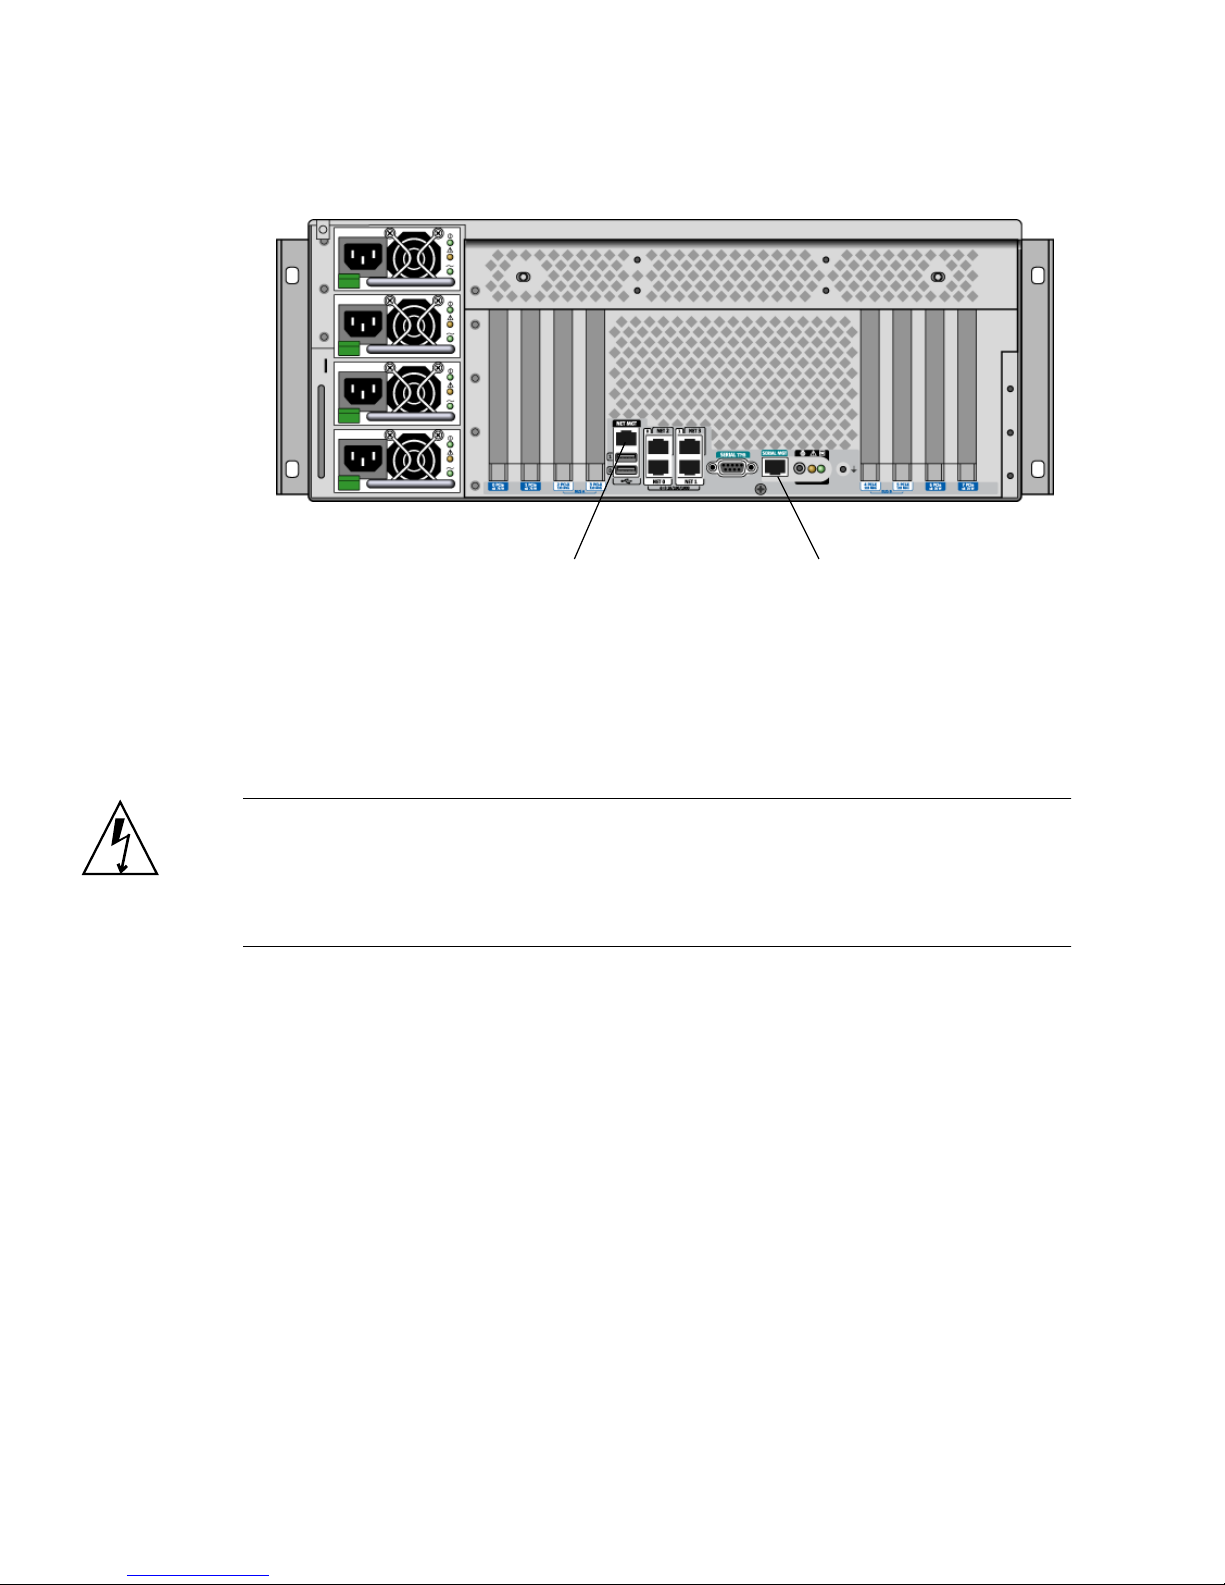
Network management port Serial management port
(NET MGT) (SER MGT)
FIGURE 4-3 ALOM System Controller Card Ports
Configuration Rules
Caution – The system supplies power to the ALOM system controller card even
when the system is powered off. To avoid personal injury or damage to the ALOM
system controller card, you must disconnect the AC power cords from the system
before servicing the ALOM system controller card. The ALOM system controller
card is not hot-swappable or hot-pluggable.
■ The ALOM system controller card is installed in a dedicated slot on the system
motherboard. Never move the ALOM system controller card to another system
slot, because it is not a PCI-compatible card. In addition, do not attempt to install
a PCI card into the ALOM system controller slot.
■ Avoid connecting a serial modem to the serial management port because it is not
secure.
■ The ALOM system controller card is not a hot-pluggable component. Before
installing or removing the ALOM system controller card, you must power off the
system and disconnect all system power cords.
■ The serial management port on the ALOM system controller cannot be used as a
conventional serial port. If your configuration requires a standard serial
connection, use the DB-9 port labeled “TTYB” instead.
■ The 100BASE-T network management port on the ALOM system controller is
reserved for use with the ALOM system controller and the system console. The
network management port does not support connections to Gigabit networks. If
74 Sun Fire V445 Server Administration Guide • August 2006
 Loading...