

Page 1

Sun
™
Datacenter Switch 3456
Service Manual
Sun Microsystems, Inc.
www.sun.com
Part No. 820-4733-10
August 2008, Revision A
Submit comments about this document at: http://www.sun.com/hwdocs/feedback
Page 2

Copyright 2008Sun Microsystems, Inc., 4150 NetworkCircle, SantaClara, California 95054, U.S.A. Allrights reserved.
Sun Microsystems,Inc. has intellectual property rights relating to technology embodiedin the product that is described inthis document. In
particular,and without limitation, these intellectualproperty rightsmay include one or more ofthe U.S. patents listed at
http://www.sun.com/patents and oneor more additional patents orpending patent applications in the U.S. andin other
countries.Unpublished -rights reserved under the CopyrightLaws of the United States..
This distributionmay include materials developed bythird parties.Parts of the product may bederived fromBerkeley BSD systems, licensed
from theUniversity of California. UNIX isa registered trademarkin the U.S. and inother countries, exclusively licensed through X/Open
Company, Ltd.
Sun, SunMicrosystems, the Sun logo, SunService,and The Network is the Computer aretrademarks or registered trademarksof Sun
Microsystems, Inc.in the U.S. and othercountries.The OPEN LOOK and Sun(TM) Graphical UserInterface was developed by Sun
Microsystems, Inc.for its users and licensees.
Sun acknowledgesthe pioneering efforts of Xerox inresearching anddeveloping the concept of visualor graphical user interfaces for the
computer industry.Sun holds a non-exclusive licensefrom Xerox to the Xerox Graphical User Interface,which license also covers Sun’s
licensees whoimplement OPEN LOOK GUIs andotherwise comply with Sun’s writtenlicense agreements.
Use ofany spare or replacement CPUs is limitedto repairor one-for-one replacement of CPUs in products exportedin compliance with U.S.
export laws.Use of CPUs as productupgrades unless authorized by the U.S. Governmentis strictly prohibited.
DOCUMENTATION IS PROVIDED "AS IS" AND ALL EXPRESS OR IMPLIED CONDITIONS, REPRESENTATIONS AND WARRANTIES,
INCLUDING ANY IMPLIED WARRANTY OF MERCHANTABILITY, FITNESS FOR A PARTICULARPURPOSE OR NON-INFRINGEMENT,
ARE DISCLAIMED, EXCEPT TO THE EXTENT THAT SUCH DISCLAIMERS ARE HELD TO BE LEGALLY INVALID.
Copyright ©2008 Sun Microsystems, Inc., 4150Network Circle,Santa Clara, California 95054, Etats-Unis.Tousdroits réservés.
Sun Microsystems,Inc. détient les droits de propriété intellectuels relatifs àla technologie incorporée dans le produit quiest décrit dans ce
document. Enparticulier, et ce sanslimitation, ces droits de propriété intellectuelle peuvent inclure unou plus des brevets américains listés à
l’adresse http://www.sun.com/patent set un ou les brevets supplémentairesou les applications de brevet enattente aux Etats - Uniset
dans lesautres pays.Non publie - droits réservésselon la législation des Etats-Unissur le droit d’auteur.
Cette distributionpeut comprendredes composants développés par destierces parties.Desparties de ce produit pourront être dérivées des
systèmes BerkeleyBSD licenciés par l’Université deCalifornie. UNIX est une marque déposée aux Etats-Unis et dans d’autrespays et licenciée
exclusivement parX/Open Company, Ltd.
Sun, Sun Microsystems, le logo Sun, SunService, et The Network is the Computer sont desmarques de fabrique ou des marques déposéesde
Sun Microsystems,Inc. aux Etats-Unis et dansd’autres pays.L’interface d’utilisation graphique OPEN LOOK etSun(TM) a été développée par
Sun Microsystems,Inc. pour ses utilisateurs etlicenciés.
Sun reconnaîtles effortsde pionniers de Xerox pour la recherche etle développement du concept desinterfaces d’utilisation visuelle ou
graphique pourl’industrie de l’informatique. Sun détientune license non exclusive deXerox surl’interface d’utilisation graphique Xerox, cette
licence couvrantégalement les licenciés de Sunqui mettent en place l’interfaced’utilisation graphique OPEN LOOK etqui, en outre, se
conforment auxlicences écrites de Sun.
L’utilisationde pieces detachees ou d’unitescentrales de remplacement est limitee aux reparations oua l’echange standard d’unites centrales
pour lesproduits exportes, conformement a lalegislation americaine en matiere d’exportation. Sauf autorisationpar les autorites des EtatsUnis, l’utilisationd’unites centrales pour proceder ades mises a jour de produits estrigoureusement interdite.
LA DOCUMENTATION ESTFOURNIE "EN L’ETAT" ET TOUTES AUTRES CONDITIONS, DECLARATIONS ETGARANTIES EXPRESSES
OU TACITES SONT FORMELLEMENT EXCLUES,DANS LA MESURE AUTORISEE PAR LA LOI APPLICABLE, Y COMPRISNOTAMMENT
TOUTE GARANTIEIMPLICITE RELATIVE A LA QUALITEMARCHANDE, A L’APTITUDE AUNE UTILISATION PARTICULIEREOU A
L’ABSENCEDE CONTREFACON.
Please
Recycle
Page 3

Contents
Preface vii
1. Sun Datacenter Switch 3456 Overview 1–1
1.1 Switch Chassis 1–1
1.2 Power Supplies 1–2
1.3 Fan Units 1–3
1.4 Chassis Management Controllers 1–4
1.5 Fabric Cards 1–5
1.6 Line Cards 1–6
2. Chassis Service Procedures 2–1
2.1 Filler Panels 2–1
▼ Removing the Filler Panel 1
▼ Installing the Filler Panel 3
2.2 Midplane Connector Pins 2–6
2.2.1 Tools 2–6
▼ Inspecting the Pins on the Rear Side of the Midplane 7
▼ Inspecting the Pins on the Front Side of the Midplane 10
▼ Removing Pins 13
▼ Removing a Pin With Needle-Nose Pliers 14
iii
Page 4

▼ Inserting Pins 15
2.3 Cable Management Hardware 2–16
▼ Removing Cable Plates 16
▼ Installing Cable Plates 16
▼ Removing Cable Trees 17
▼ Installing Cable Trees 18
▼ Removing Cable Trays 20
▼ Installing Cable Trays 20
2.4 InfiniBand Cables 2–21
2.4.1 Cable Cautions 2–21
▼ Removing Cables From the Sun Datacenter Switch 3456 22
▼ Attaching Cables to the Sun Datacenter Switch 3456 23
3. Power Supply Service Procedures 3–1
3.1 Troubleshooting Power Supplies 3–2
3.2 Powering Off Power Supplies 3–2
3.3 Removing Power Supplies 3–3
▼ Removing a Power Supply 3
3.4 Installing Power Supplies 3–5
▼ Installing a Power Supply 5
3.5 Powering On Power Supplies 3–7
4. Fan Service Procedures 4–1
4.1 Troubleshooting Fans 4–1
4.2 Removing Fans 4–1
▼ Removing a Fan 1
4.3 Installing Fans 4–2
▼ Installing a Fan 3
5. Chassis Management Controller Service Procedures 5–1
iv Sun Datacenter Switch 3456 Service Manual • August 2008
Page 5

5.1 Troubleshooting CMCs 5–2
5.2 Powering Off CMCs 5–2
5.3 Removing CMCs 5–3
▼ Removing a CMC 3
5.4 Installing CMCs 5–4
▼ Installing a CMC 4
5.5 Powering On CMCs 5–6
6. Fabric Card Service Procedures 6–1
6.1 Fabric Card Considerations 6–1
6.2 Troubleshooting Fabric Cards 6–2
6.3 Inspecting Fabric Cards 6–3
▼ Inspecting the Fabric Card iTRAC Connectors 3
▼ Inspecting the Fans 5
▼ Inspecting the Retainers 5
6.4 Powering Off Fabric Cards 6–6
6.5 Removing Fabric Cards 6–7
▼ Removing a Fabric Card 7
6.6 Installing Fabric Cards 6–8
▼ Installing a Fabric Card 8
6.7 Powering On Fabric Cards 6–10
7. Line Card Service Procedures 7–1
7.1 Line Card Considerations 7–1
7.2 Troubleshooting Line Cards 7–2
7.3 Inspecting Line Cards 7–3
▼ Inspecting the Line Card iTRAC Connectors 3
▼ Inspecting the Line Card iPASS Connectors 5
▼ Inspecting the Retainers 5
Contents v
Page 6

7.4 Powering Off Line Cards 7–6
7.5 Removing Line Cards 7–7
▼ Removing a Line Card 7
7.6 Installing Line Cards 7–12
▼ Installing a Line Card 12
7.7 Powering On Line Cards 7–15
Index Index–1
vi Sun Datacenter Switch 3456 Service Manual • August 2008
Page 7

Preface
This service manual provides service procedures for the Sun Datacenter Switch 3456.
This document is written for service personnel and users who have advanced
knowledge and experience managing an InfiniBand network.
Using UNIX Commands
This document might not contain information about basic UNIX®commands and
procedures such as shutting down the system, booting the system, and configuring
devices. Refer to the following for this information:
■ Software documentation that you received with your system
■ Solaris™ Operating System documentation, which is at:
http://docs.sun.com
vii
Page 8

Shell Prompts
Shell Prompt
C shell machine-name%
C shell superuser machine-name#
Bourne shell and Korn shell $
Bourne shell and Korn shell superuser #
Typographic Conventions
*
Typeface
AaBbCc123 The names of commands, files,
AaBbCc123 What you type, when contrasted
AaBbCc123 Book titles, new words or terms,
* The settings on your browser might differ from these settings.
Meaning Examples
Edit your.login file.
and directories; on-screen
computer output
with on-screen computer output
words to be emphasized.
Replace command-line variables
with real names or values.
Use ls -a to list all files.
% You have mail.
% su
Password:
Read Chapter 6 in the User’s Guide.
These are called class options.
Yo u must be superuser to do this.
To delete a file, type rm filename.
Related Documentation
The documents listed as online are available at:
viii Sun Datacenter Switch 3456 Service Manual • August 2008
Page 9

http://docs.sun.com/app/docs/prod/switch.3456
Application Title Part Number Format Location
Product Notes Sun Datacenter Switch 3456 Product Notes 820-4727-10 PDF Online
Unpacking Sun Datacenter Switch 3456 Unpacking Guide 820-4736-10 PDF
Printed
Site Planning Sun Datacenter Switch 3456 Site Planning Guide 820-4728-10 PDF Online
Installation Sun Datacenter Switch 3456 Installation Guide 820-4730-10 PDF
Printed
Administration Sun Datacenter Switch 3456 Administration Guide 820-4731-10 PDF Online
Service Sun Datacenter Switch 3456 Service Manual 820-4733-10 PDF Online
Reference Sun Datacenter Switch 3456 Reference Manual 820-4734-10 PDF Online
Regulatory Sun Datacenter Switch 3456 Safety and Compliance
Guide
820-4735-10 PDF Online
Shipping crate
Online
Shipping kit
Online
Documentation, Support, and Training
Sun Function URL
Documentation http://www.sun.com/documentation/
Support http://www.sun.com/support/
Training http://www.sun.com/training/
Sun Welcomes Your Comments
Sun is interested in improving its documentation and welcomes your comments and
suggestions. You can submit your comments by going to:
http://www.sun.com/hwdocs/feedback
Please include the title and part number of your document with your feedback:
Preface ix
Page 10

Sun Datacenter Switch 3456 Service Manual , part number 820-4733-10.
x Sun Datacenter Switch 3456 Service Manual • August 2008
Page 11

CHAPTER
1
Sun Datacenter Switch 3456 Overview
This chapter provides a visual overview of the Sun Datacenter Switch 3456. Topics
include:
■ Section 1.1 “Switch Chassis” on page 1-1
■ Section 1.2 “Power Supplies” on page 1-2
■ Section 1.3 “Fan Units” on page 1-3
■ Section 1.4 “Chassis Management Controllers” on page 1-4
■ Section 1.5 “Fabric Cards” on page 1-5
■ Section 1.6 “Line Cards” on page 1-6
1.1 Switch Chassis
FIGURE 1-1 describes the various parts of the switch chassis.
1-1
Page 12
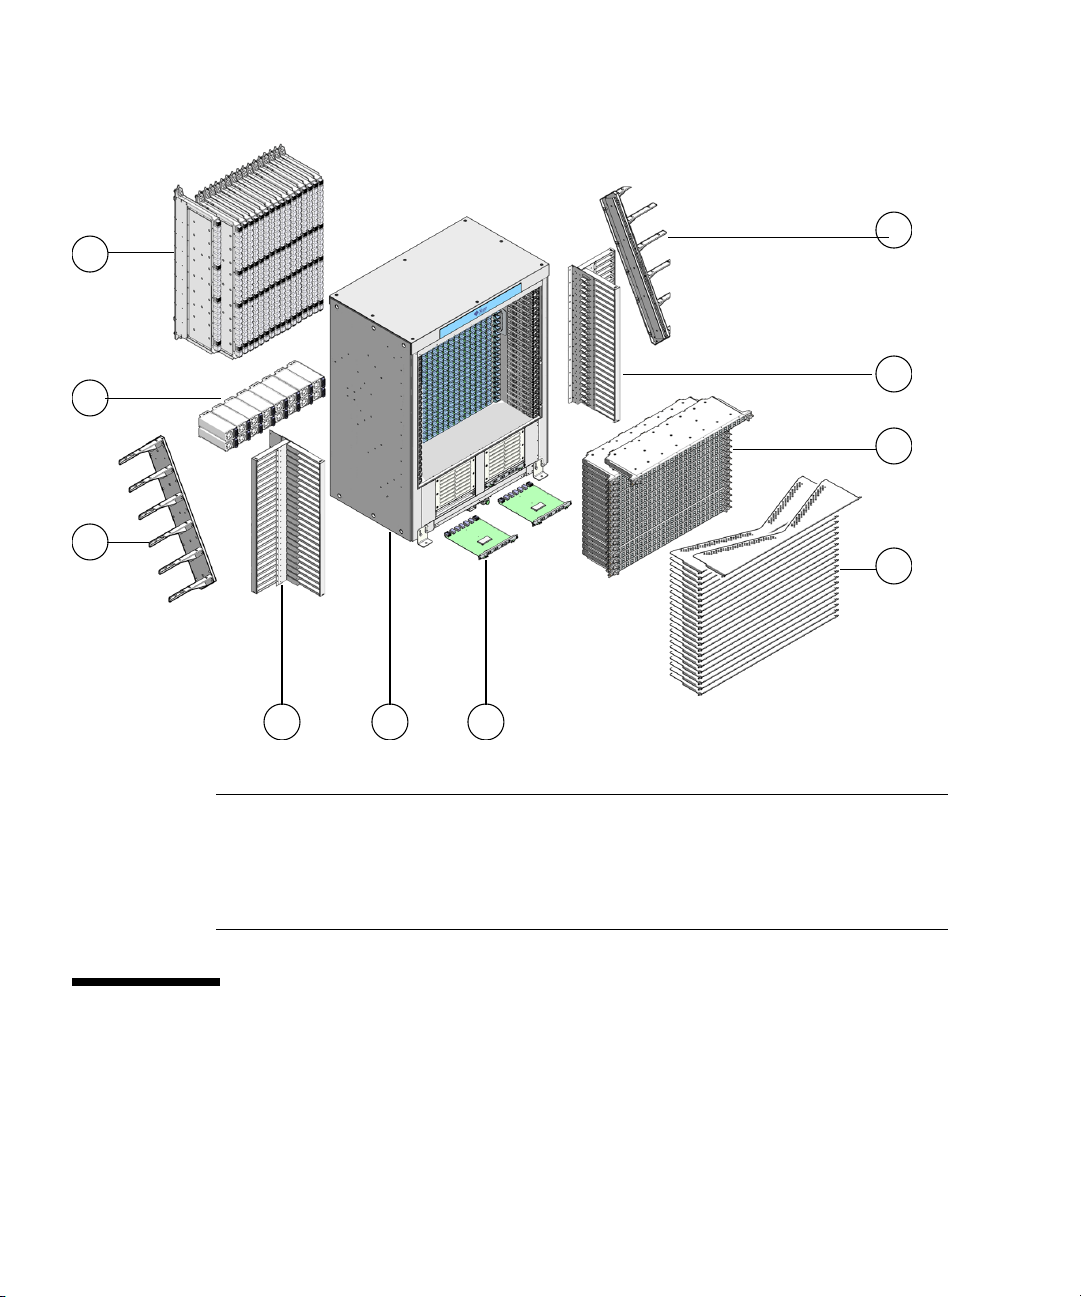
FIGURE 1-1 Parts of the Switch Chassis
1
2
3
4
5
6
7
8 9 10
Figure Legend
1 Fabric cards (18) 6 Line cards (24)
2 Power supplies (16) 7 Cable trays (24)
3 Cable plates (left) 8 Cable tree (left)
4 Cable plates (right) 9 Chassis
5 Cable tree (right) 10 CMCs (2)
1.2 Power Supplies
FIGURE 1-2 describes the various parts of the power supplies.
1-2 Sun Datacenter Switch 3456 Service Manual • August 2008
Page 13
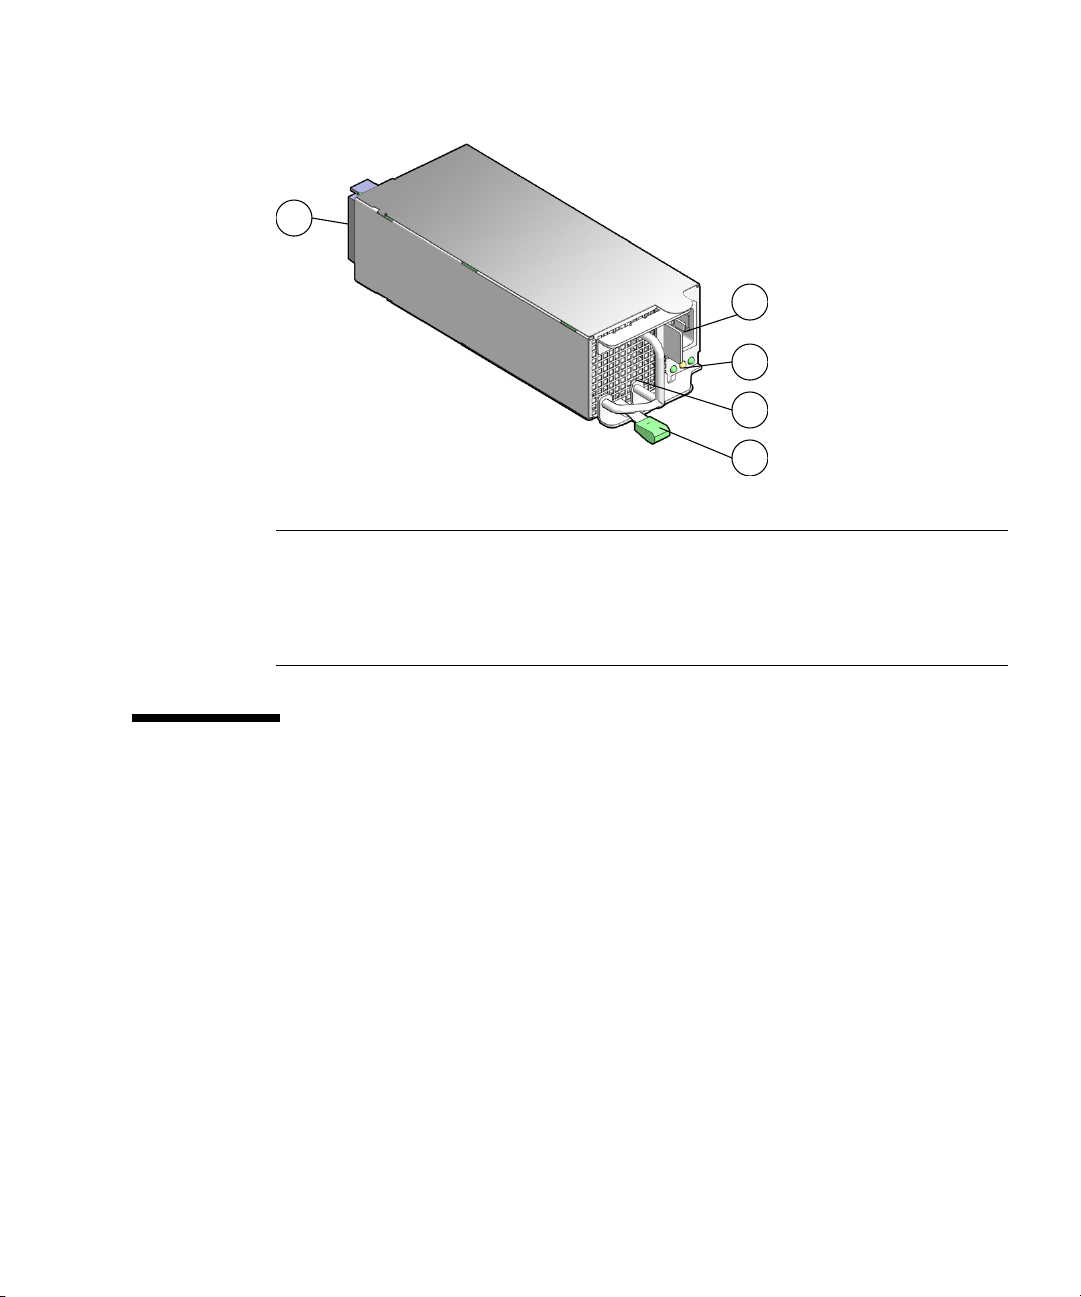
FIGURE 1-2 Parts of the Power Supplies
1
Figure Legend
1 Power Distribution Board connector
2 Power cord connector
3 Status LEDs
4 Fan
5 Release lever
2
3
4
5
1.3 Fan Units
FIGURE 1-3 describes the various parts of the fan units.
Chapter 1 Sun Datacenter Switch 3456 Overview 1-3
Page 14
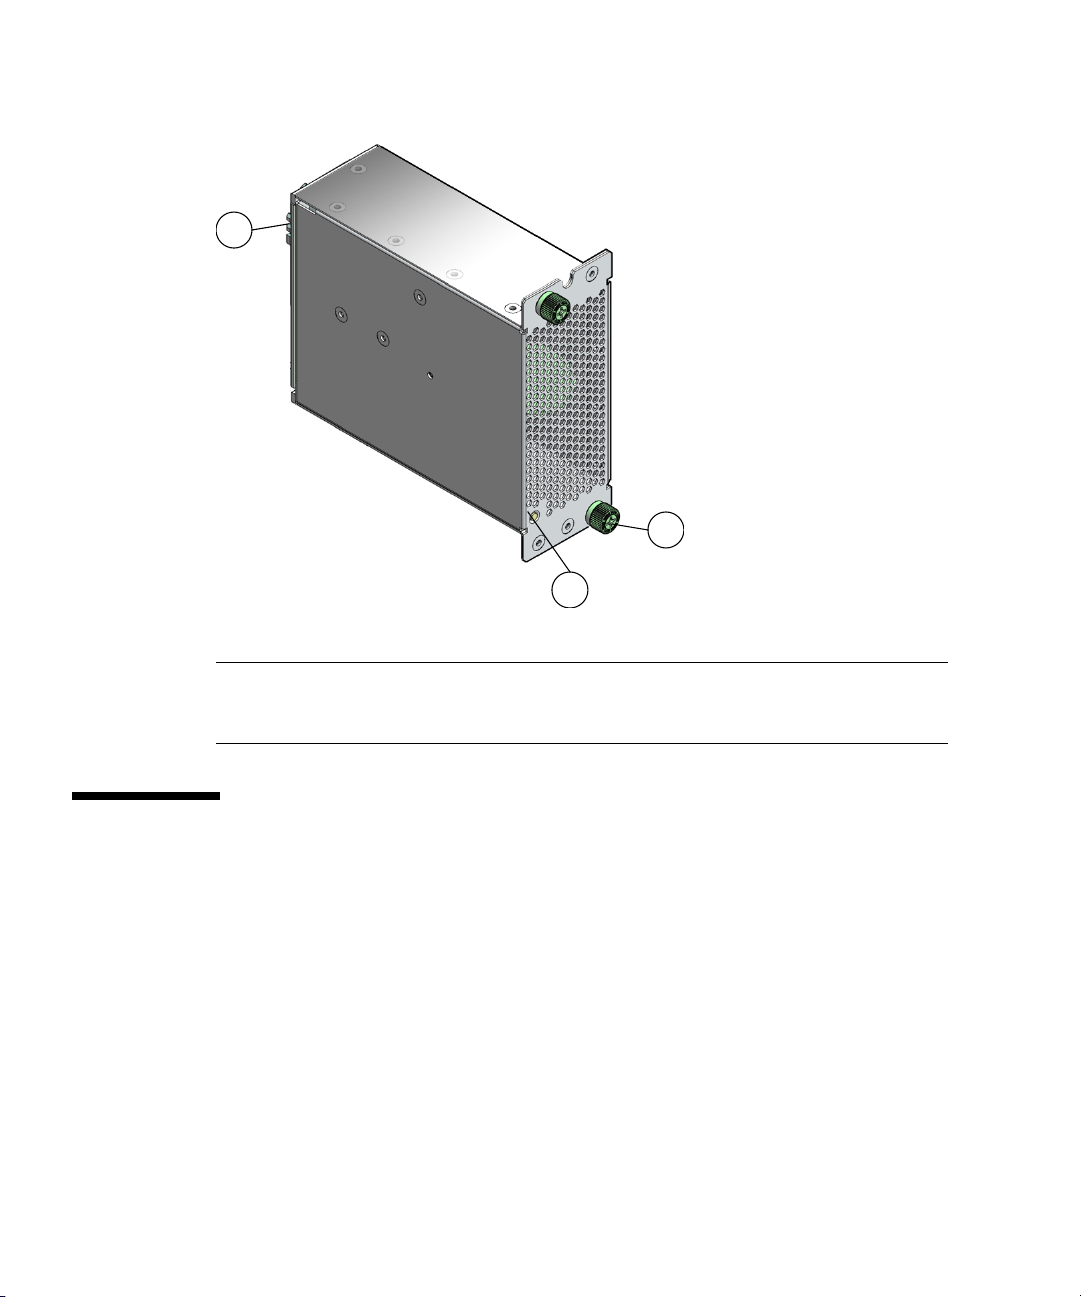
FIGURE 1-3 Parts of the Fan Units
1
Figure Legend
1 Fabric card connector
2 Thumbscrews
3 Status LED
2
3
1.4 Chassis Management Controllers
FIGURE 1-4 describes the various parts of the chassis management controllers (CMCs).
1-4 Sun Datacenter Switch 3456 Service Manual • August 2008
Page 15
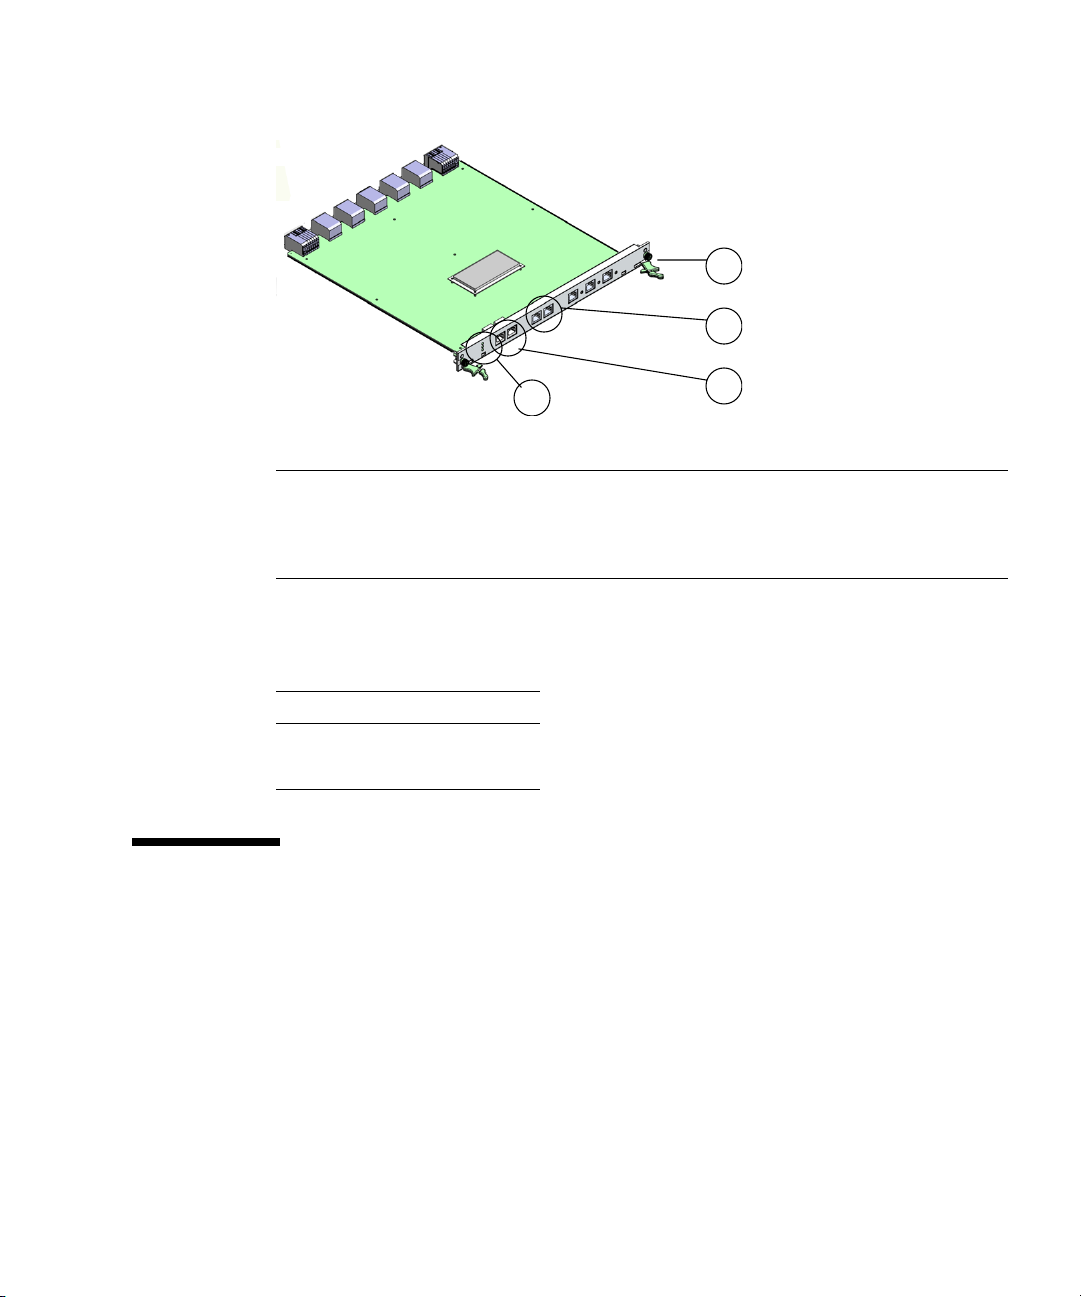
FIGURE 1-4 Parts of the CMCs
1
2
Figure Legend
1 Release levers
2 Network management por ts
3 Serial management ports
4 Status LEDs
TABLE 1-1 lists the IPMB addresses for the CMCs.
TABLE 1-1 IPMB Addresses for the CMCs
Component IPMB Address
CMC0 10
CMC1 12
1.5 Fabric Cards
FIGURE 1-5 describes the various parts of the fabric cards.
4
3
Chapter 1 Sun Datacenter Switch 3456 Overview 1-5
Page 16
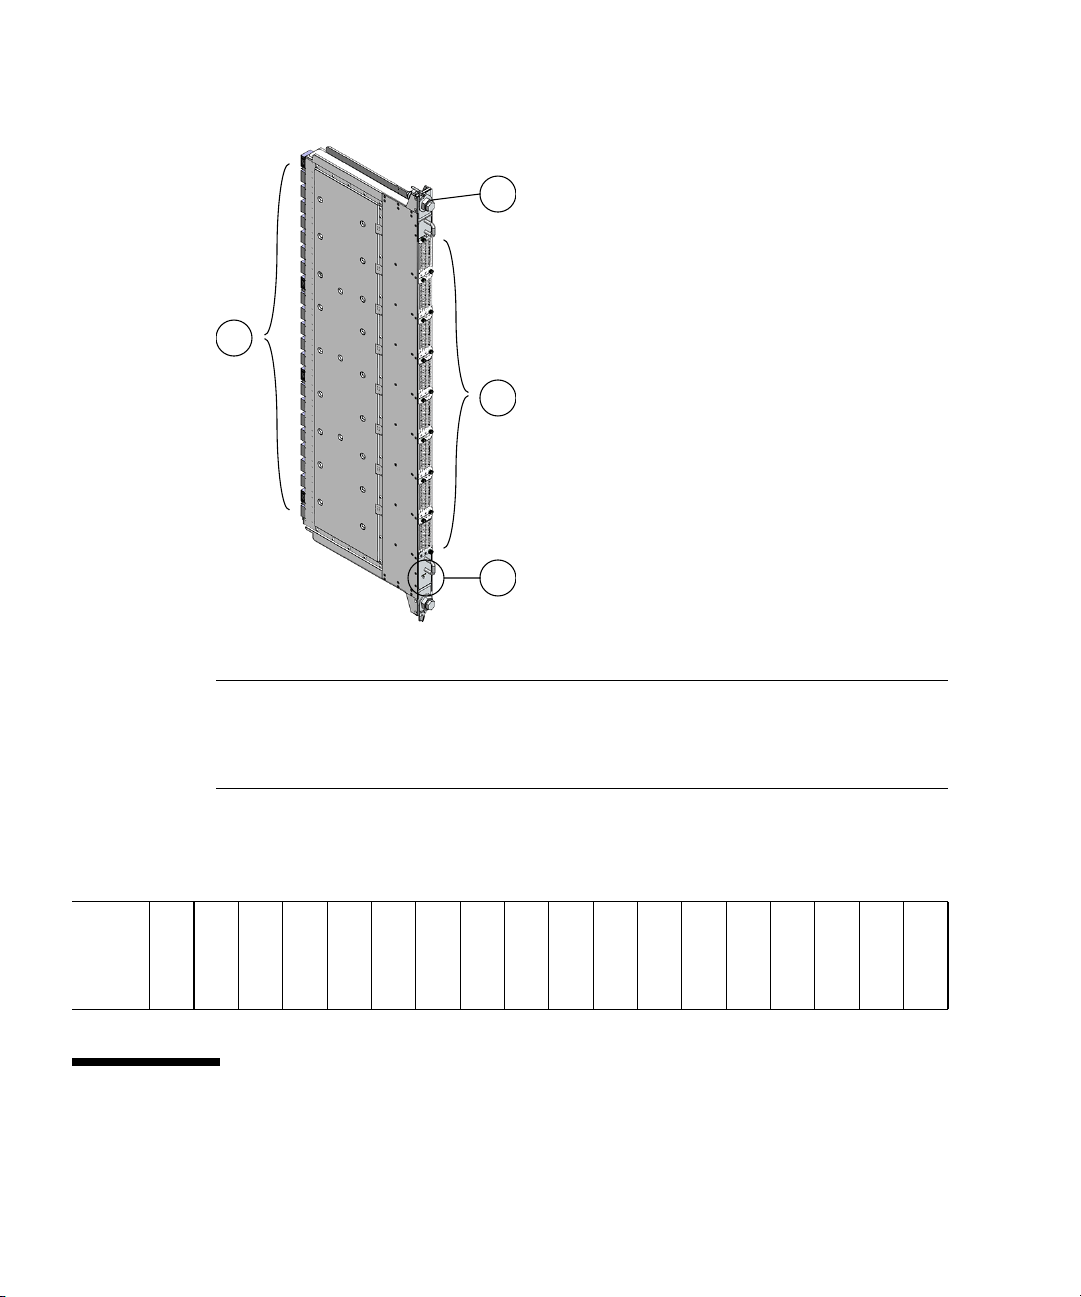
FIGURE 1-5 Parts of the Fabric Cards
2
1
3
4
Figure Legend
1 iTRAC connectors
2 Retainers
3 Fans
4 Status LEDs
TABLE 1-2 lists the IPMB addresses for the fabric cards.
TABLE 1-2 IPMB Addresses for Fabric Cards
Fabric
card
IPMB
address
FC0 FC1 FC2 FC3 FC4 FC5 FC6 FC7 FC8 FC9 FC10 FC11 FC12 FC13 FC14 FC15 FC16 FC17
b2 b4 b6 b8 ba bc be c0 c2 c4 c6 c8 ca cc ce d0 d2 d4
1.6 Line Cards
FIGURE 1-6 describes the various parts of the line cards.
1-6 Sun Datacenter Switch 3456 Service Manual • August 2008
Page 17
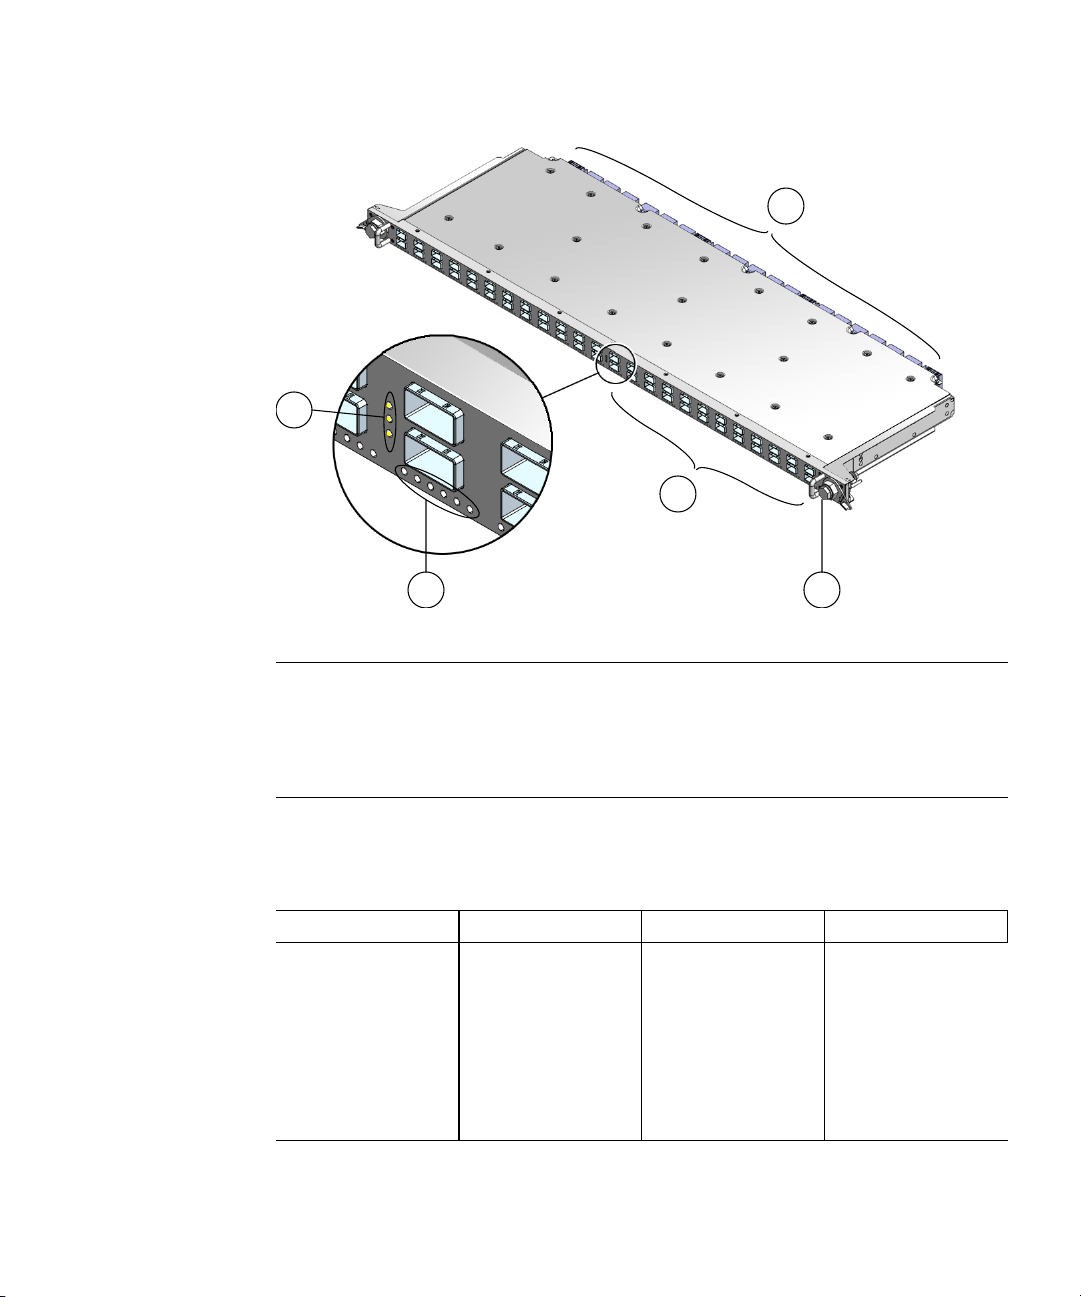
FIGURE 1-6 Parts of the Line Cards
1
3
4
2
Figure Legend
1 Status LEDs
2 Link LEDs
3 iTRAC connectors
4 iPASS connectors
5 Retainers
TABLE 1-3 lists the IPMB addresses for the line cards.
TABLE 1-3 IPMB Addresses for Line Cards
Line card Address Line card Address Line card Address Line card Address
5
LC5 8c LC11 98 LC17 a4 LC23 b0
LC4 8a LC10 96 LC16 a2 LC22 ae
LC3 88 LC9 94 LC15 a0 LC21 ac
LC2 86 LC8 92 LC14 9e LC20 aa
LC1 84 LC7 90 LC13 9c LC19 a8
LC0 82 LC6 8e LC12 9a LC18 a6
Chapter 1 Sun Datacenter Switch 3456 Overview 1-7
Page 18

1-8 Sun Datacenter Switch 3456 Service Manual • August 2008
Page 19

CHAPTER
2
Chassis Service Procedures
This chapter describes procedures performed on the Sun Datacenter Switch 3456
chassis. Topic include:
■ Section 2.1 “Filler Panels” on page 2-1
■ Section 2.2 “Midplane Connector Pins” on page 2-6
■ Section 2.3 “Cable Management Hardware” on page 2-16
2.1 Filler Panels
▼ Removing the Filler Panel
1. Grasp the locking levers at each end of the filler panel.
FIGURE 2-1.
See
2-1
Page 20
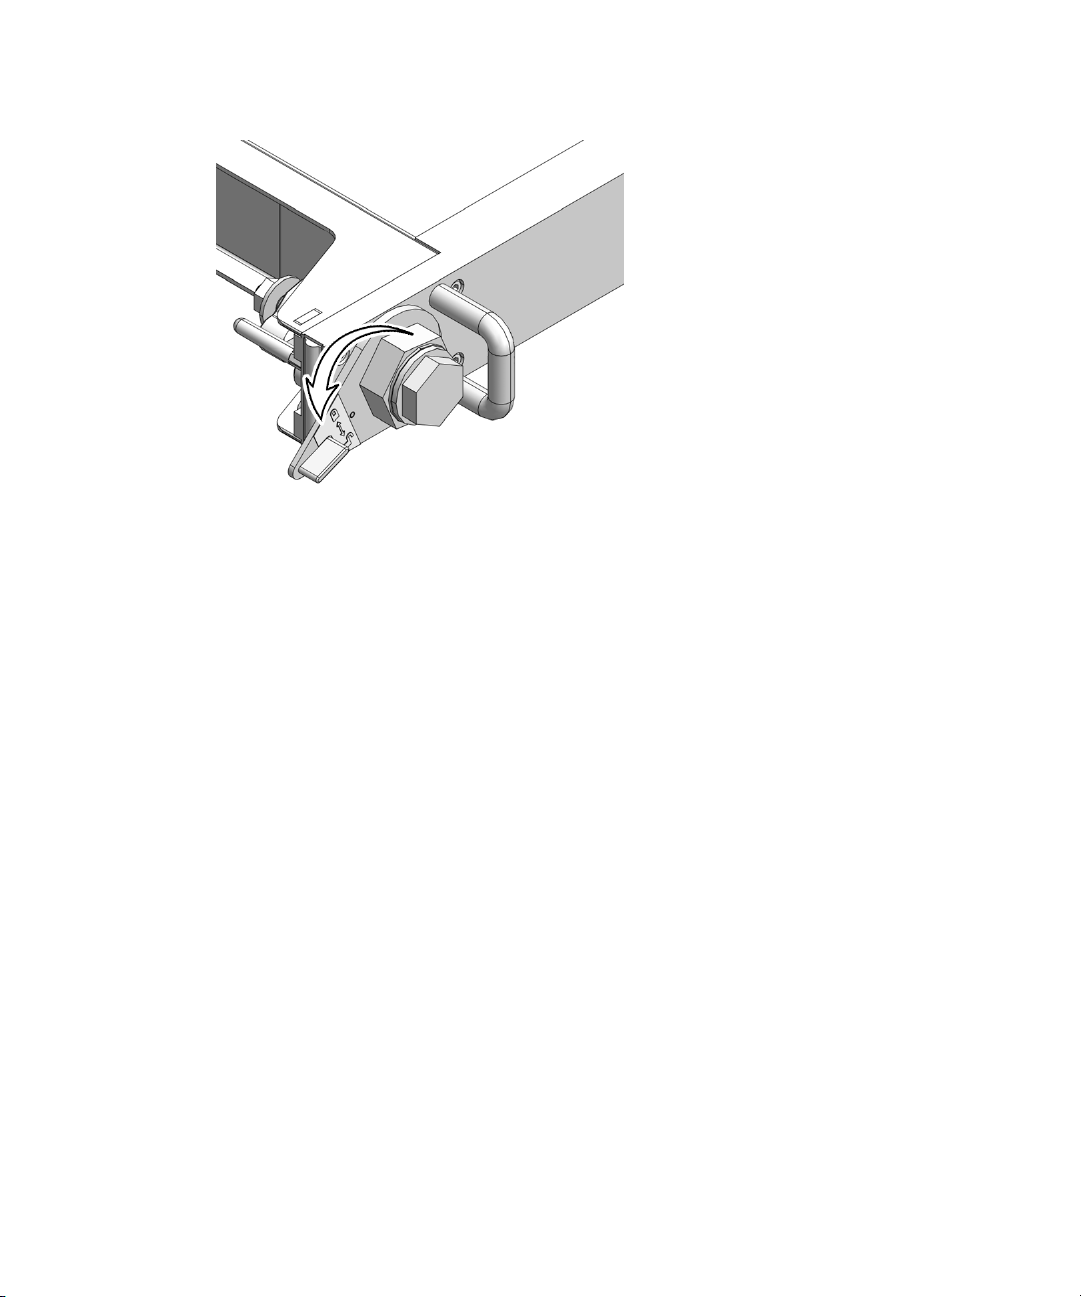
FIGURE 2-1 Turning Filler Panel Lock Levers
2. Turn the levers counter-clockwise to the unlock position.
FIGURE 2-1.
See
3. Lift the filler panel away from the chassis by the handles.
See
FIGURE 2-2.
2-2 Sun Datacenter Switch 3456 Service Manual • August 2008
Page 21
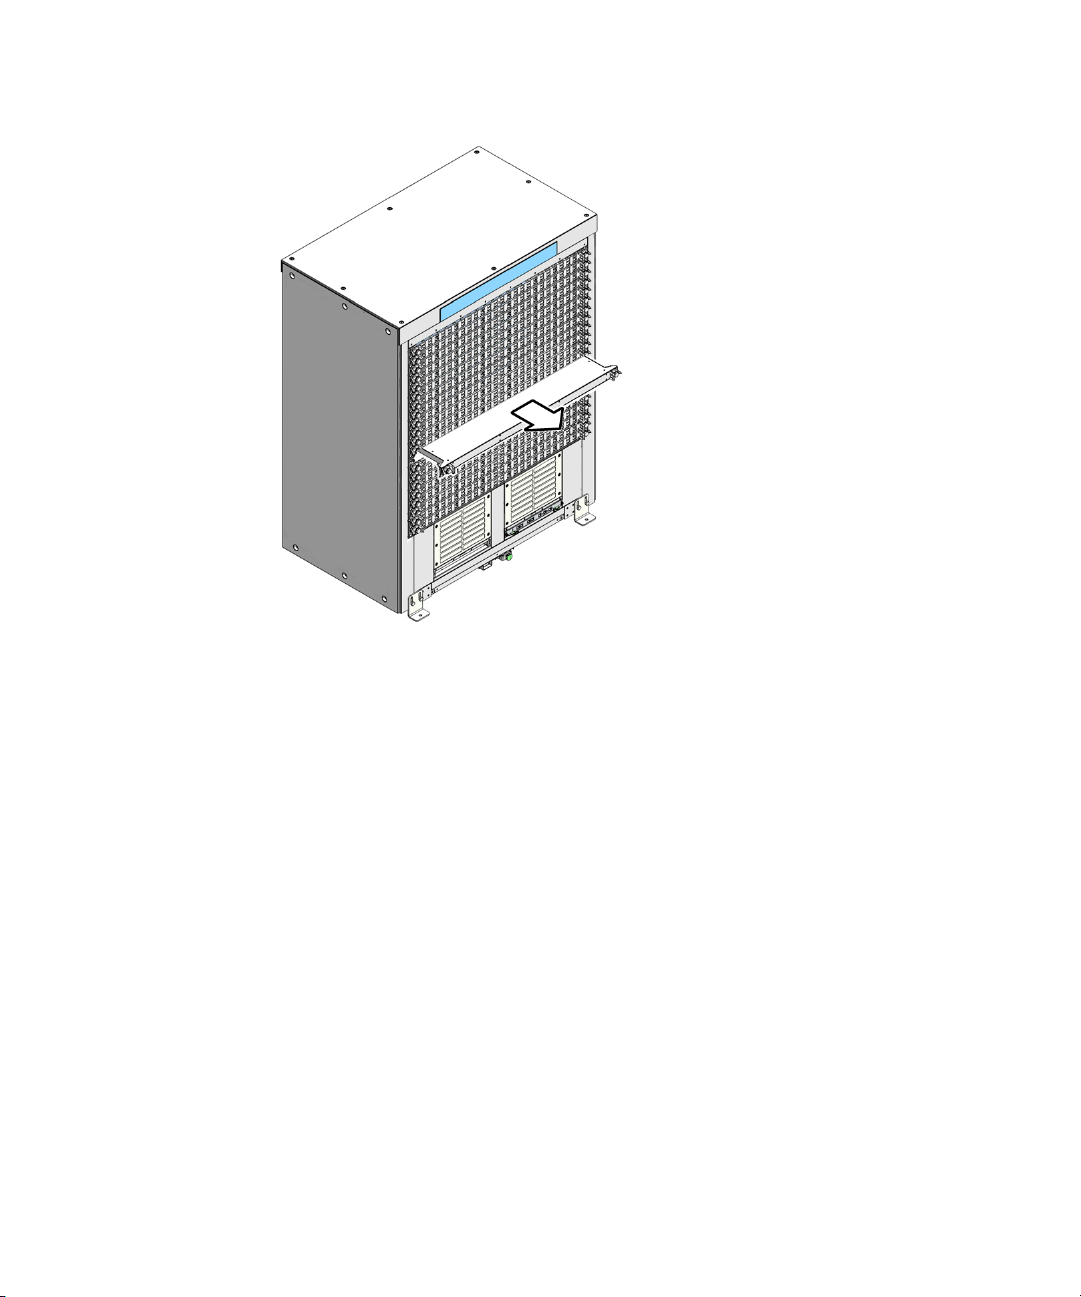
FIGURE 2-2 Removing the Filler Panel
4. Repeat from Step 1 for all remaining filler panels.
▼ Installing the Filler Panel
After you remove fabric cards and line cards, you must install filler panels into the
vacant slots to maintain proper airflow and thermal management.
1. Grasp the handles at each end of the filler panel and lift the panel to the vacant
slot.
2. Turn the levers counter-clockwise to the unlock position.
See
FIGURE 2-3.
Chapter 2 Chassis Service Procedures 2-3
Page 22
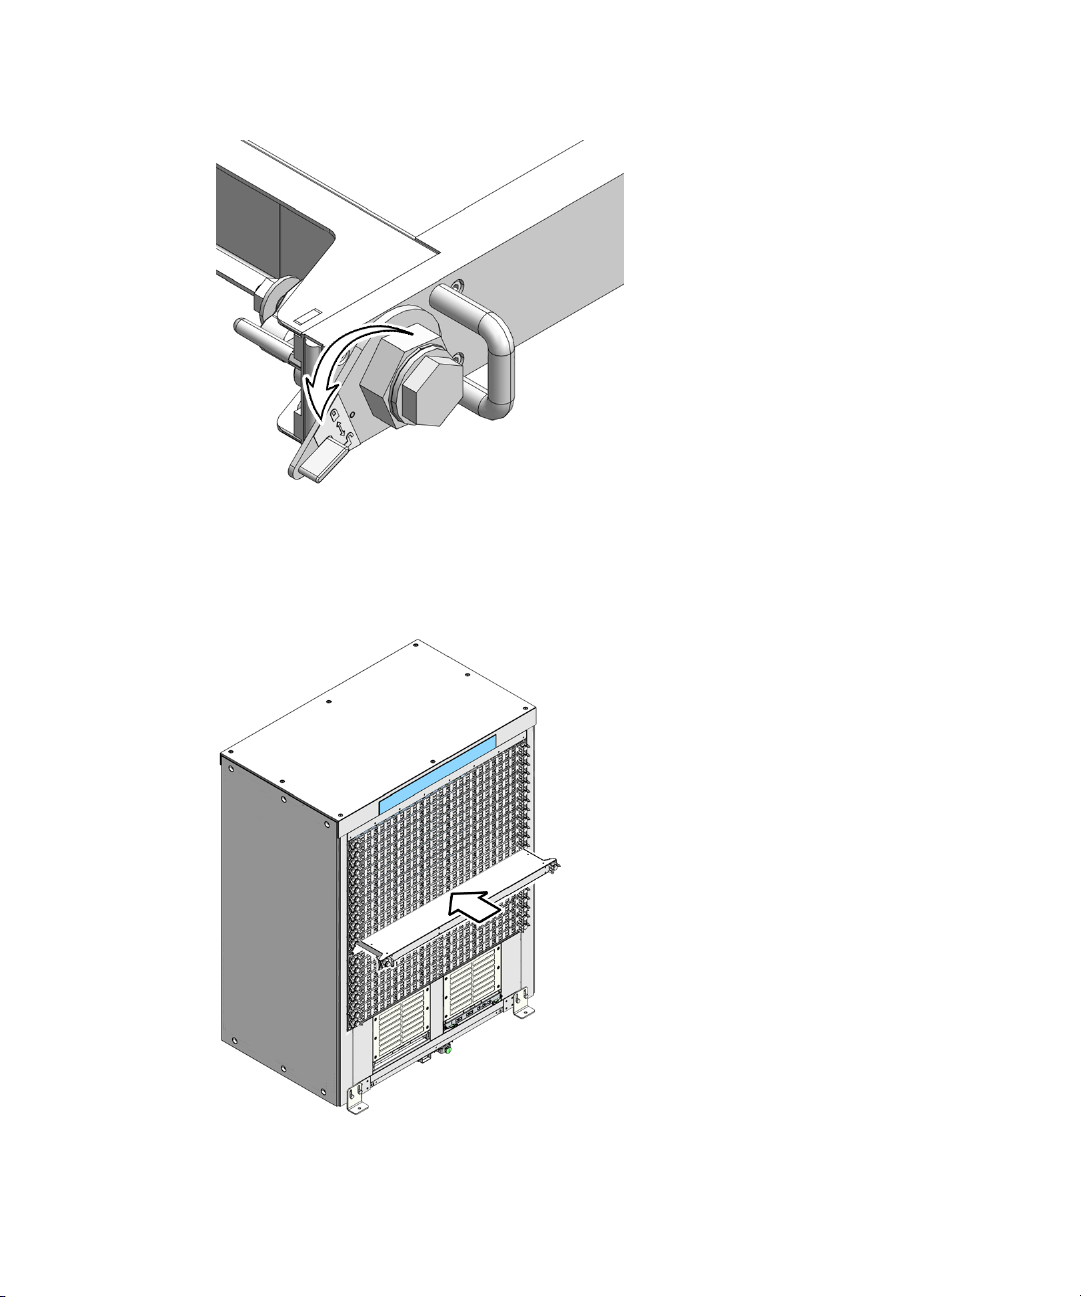
FIGURE 2-3 Turning Filler Panel Lock Levers Counter-Clockwise
3. Slide the filler panel into the chassis until it stops.
FIGURE 2-4.
See
FIGURE 2-4 Installing the Filler Panel
2-4 Sun Datacenter Switch 3456 Service Manual • August 2008
Page 23
4. Turn the levers clockwise to the lock position.
FIGURE 2-5.
See
FIGURE 2-5 Turning Filler Panel Lock Levers Clockwise
5. Repeat from Step 1 for any remaining vacant slots.
2.2 Midplane Connector Pins
Caution – All midplane connector pin operations require the Sun Datacenter Switch
3456 to be fully powered off.
2.2.1 Tools
For inspecting pins, you need the following tools:
■ Pin gauge block
■ Bright flashlight
■ Magnifying glass or loupe
■ Notepad and pen
Chapter 2 Chassis Service Procedures 2-5
Page 24

To repair or replace a pin, you need the following tools:
■ Molex pin replacement tool
■ Replacement pins (extracted from a spare iTRAC connector)
■ Head-mounted magnifier
■ Flashlight
Note – Another person to assist you can make the task much easier.
▼ Inspecting the Pins on the Rear Side of the
Midplane
Note – This procedure assumes that a fabric card has been removed from the
chassis.
The primary tool used to check the midplane pins is the pin gauge block. This tool
effortlessly slides over the straight pins of an iTRAC connector that is in good
condition. If there is any resistance, a pin is bent and requires further examination.
1. Using the pin gauge block, gently insert it into the iTRAC connector at the
upper end of the open slot.
2. If you feel any resistance to insertion, note the connector number on the
notepad.
See
FIGURE 2-6.
2-6 Sun Datacenter Switch 3456 Service Manual • August 2008
Page 25
FIGURE 2-6 Fabric Card Connector Nomenclature
The connector number is located above each connector and is unique. For
example, the upper-left connector number is FC-R23-F0. The lower-right
connector number is FC-R0-F17. The connector number is decoded as follows:
■ FC – Fabric card
■ Ra – Row a, where a is 0 through 23
■ Fb – Frame b, where b is 0 through 17
The origin of this coordinate system is the lower-left corner, FC-R0-F0. In
FIGURE 2-6, the connector identified is FC-R13-F15.
3. Continue down to the next connector and repeat from Step 1.
4. After you have checked the bottom connector, visually inspect any connectors
you noted previously.
Chapter 2 Chassis Service Procedures 2-7
Page 26
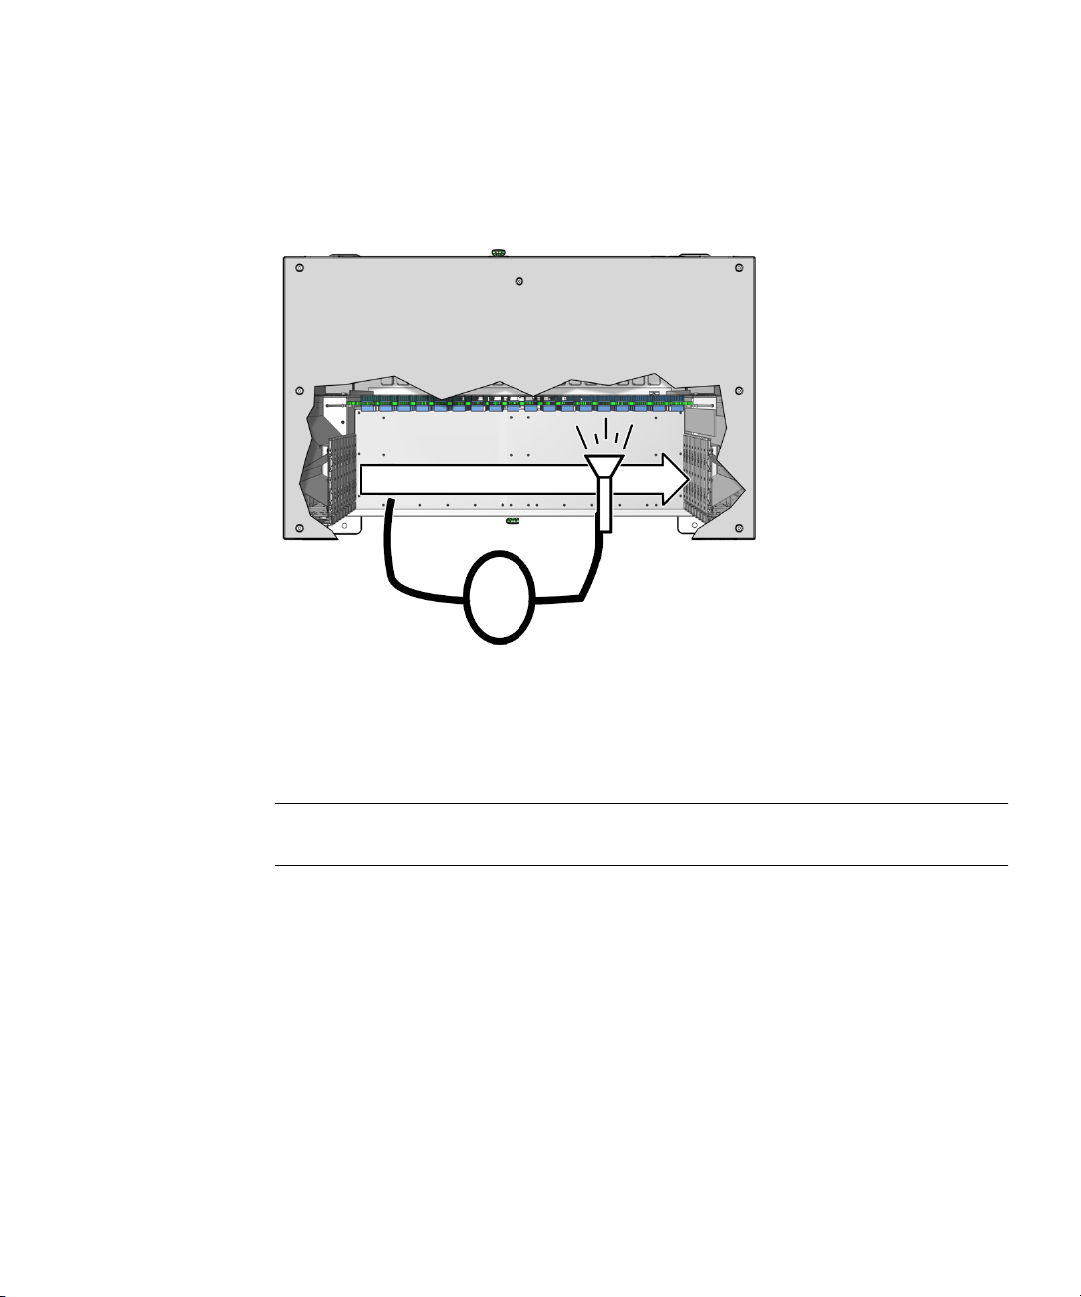
5. Using the magnifying glass and the flashlight positioned above you, look at the
individual pins of the connector.
Look at the pins straight on. See
FIGURE 2-7 Inspecting the Pins (Fabric Card)
FIGURE 2-7.
6. Look for any light reflection inconsistencies.
A bent pin reflects light differently, either brighter or darker than the surrounding
pins.
Note – Do not look at the individual pins, rather look at all of the connector’s pins
as a whole. A bent pin will be apparent.
7. Identify the pin that needs repair or replacement and note this.
8. Look for any contaminants that might be present.
These contaminants might appear as light dots near the pins.
9. Move your head to the next suspect connector and inspect its pins, repeating
Step 5 through Step 8.
10. Continue in this manner for all suspect connectors.
11. If a pin needs repair or replacement, see “Removing Pins” on page 2-13.
2-8 Sun Datacenter Switch 3456 Service Manual • August 2008
Page 27

▼ Inspecting the Pins on the Front Side of the
Midplane
Note – This procedure assumes that a line card has been removed from the chassis.
The primary tool used to check the midplane pins is the pin gauge block. This tool
effortlessly slides over the straight pins of an iTRAC connector that is in good
condition. If there is any resistance, a pin is bent and requires further examination.
1. Using the pin gauge block, gently insert it into the iTRAC connector at the left
end of the open slot.
2. If you feel any resistance to insertion, note the connector number on the
notepad.
See
FIGURE 2-8.
Chapter 2 Chassis Service Procedures 2-9
Page 28

FIGURE 2-8 Line Card Connector Nomenclature
The connector number is located above each connector and is unique. For
example, the lower-left connector number is LC-C17-L0. The upper-right
connector number is LC-C0-L23. The connector number is decoded as follows:
■ LC – Line card
■ Cc – Column c, where c is 0 through 17
■ Ld – Level d, where d is 0 through 23
The origin of this coordinate system is the lower right corner, LC-C0-L0. In
FIGURE 2-8, the connector identified is LC-C14-L10.
3. Continue right to the next connector and repeat from Step 1.
4. After you have checked the far right connector, visually inspect any connectors
you noted previously.
2-10 Sun Datacenter Switch 3456 Service Manual • August 2008
Page 29
5. Using the magnifying glass and the flashlight positioned to the side of you,
look at the individual pins of the connector.
Look at the pins as straight on. See
FIGURE 2-9 Inspecting the Pins (Line Card)
FIGURE 2-9.
6. Look for any light reflection inconsistencies.
A bent pin reflects light differently, either brighter or darker than the surrounding
pins.
Note – Do not look at the individual pins, rather look at all of the connector’s pins
as a whole. A bent pin will be apparent.
7. Identify the pin that needs repair or replacement and note this.
8. Look for any contaminants that might be present.
These contaminants might appear as light dots near the pins.
9. Move your head to the next suspect connector and inspect its pins, repeating
Step 5 through Step 8.
10. Continue in this manner for all suspect connectors.
11. If a pin needs repair or replacement, see “Removing Pins” on page 2-13.
Chapter 2 Chassis Service Procedures 2-11
Page 30

▼ Removing Pins
Before you can attempt to straighten a bent pin, you must remove the pins
surrounding the bent pin. See
1. Locate the bent pin.
See
FIGURE 2-10.
FIGURE 2-10 Locating the Bent Pin and Surrounding Pins
FIGURE 2-10.
2. Use the Molex tool to remove the pin (if any) above the bent pin.
a. Slide the Molex tool completely over the pin.
b. Activate the lock to grasp the pin.
c. Press the trigger to pull the pin out.
d. Push the ejector back in to release the pin and reset the tool.
3. Set the pin aside.
4. Use the Molex tool repeating Step 2 to remove the pin (if any) below the bent
pin.
5. Set the pin aside.
2-12 Sun Datacenter Switch 3456 Service Manual • August 2008
Page 31

6. Repeat Step 2 to remove the pins to the left and right sides of the bent pin (if
any).
7. Set these pins aside.
The bent pin is now exposed.
8. Flip the Molex tool over and use the tube in attempt to straighten the pin.
If the pin cannot be straightened satisfactorily, or might break if straightened,
replace it.
9. Remove the pin following Step 2.
10. If the pin is too bent for the Molex tool, see “Removing a Pin With Needle-Nose
Pliers” on page 2-14.
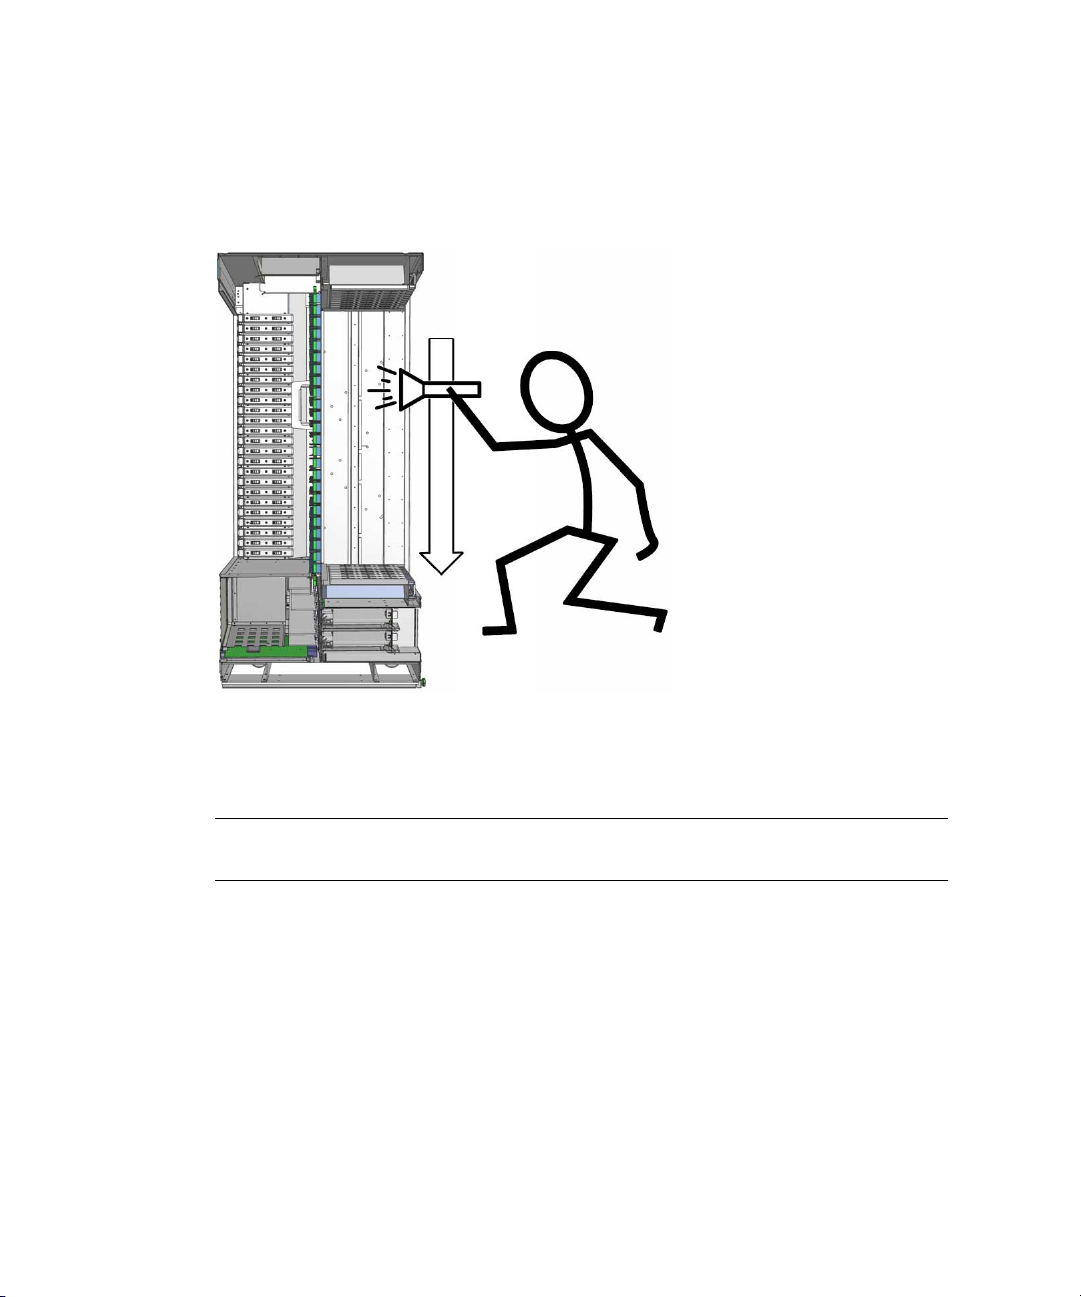
▼ Removing a Pin With Needle-Nose Pliers
Perform this procedure only when the Molex tool is incapable of removing the pin.
You need micro-tipped needle-nose pliers.
1. With one hand, grasp the pin with the very tip of the needle-nose pliers.
2. Squeeze the pliers sufficiently to grip the pin for extraction.
3. With the other hand, steady the pliers in a position for perpendicular
extraction.
See
FIGURE 2-11.
Chapter 2 Chassis Service Procedures 2-13
Page 32

FIGURE 2-11 Using Pliers to Pull a Pin
4. In one motion, use both hands to pull the pin out of the connector.
5. Dispose of the pin.
▼ Inserting Pins
When inserting pins, work from the top down. Repeat Step 1 through Step 5 for each
pin that needs to be inserted.
1. Ready the Molex tool for a pin insertion.
a. Press the trigger on the Molex tool to release the ejector.
b. Slide a pin into the opening.
A portion of the pin protrudes.
c. Activate the lock to grasp the pin.
2. Position the Molex tool over the hole in the connector where you want to insert
the pin.
3. Holding the Molex tool perpendicular to the plane of the connector, insert the
pin into the connector.
2-14 Sun Datacenter Switch 3456 Service Manual • August 2008
Page 33

4. Slowly press the ejector in until it stops.
The pin is inserted.
5. Carefully deactivate the lock and withdraw the Molex tool from the connector.
2.3 Cable Management Hardware
▼ Removing Cable Plates
1. Remove the cables from the cable plates.
See “Removing Cables From the Sun Datacenter Switch 3456” on page 2-22.
2. Starting on the right side of the Sun Datacenter Switch 3456 chassis, remove the
cable plates.
a. Using an Allen wrench, remove the four M5 x 1.5 screws that secure the
upper cable plate.
b. Remove the cable plate from the chassis.
c. Repeat from Step a for the next lower cable plate and continue until all six
cable plates are removed.
3. Repeat Step 2 for the left side of the switch.
▼ Installing Cable Plates
1. Starting on the right side of the Sun Datacenter Switch 3456 chassis, install the
cable plates.
a. Using an Allen wrench, attach the lowest plate with four M5x1.5 screws.
The support rib for the plate is on the underside. See
Chapter 2 Chassis Service Procedures 2-15
FIGURE 2-12.
Page 34

FIGURE 2-12 Cable Plate Locations
Note – The support rib for the plate is on the underside and visible from the front
of the switch chassis. From the back of the switch, the plates appear smooth.
b. Tighten the screws securely.
c. Repeat from Step a for the next higher cable plate and continue until all six
cable plates are installed.
2. Repeat Step 1 for the left side of the switch.
▼ Removing Cable Trees
Note – Two people are required to remove the cable trees. One person must hold
the weight of the tree for an extended time.
1. Remove all cables from the line cards.
See “Removing Cables From the Sun Datacenter Switch 3456” on page 2-22.
2-16 Sun Datacenter Switch 3456 Service Manual • August 2008
Page 35

2. Start on the front right corner of the Sun Datacenter Switch 3456 chassis.
a. Remove all screws from the front of the cable tree.
b. Remove all but the upper two screws from the right side of the cable tree.
c. While a helper lifts the weight of the cable tree, remove the two remaining
screws from the right of the cable tree.
d. Lift the cable tree away from the chassis.
3. Repeat Step 2 for the cable tree on the front left corner of the switch chassis.
▼ Installing Cable Trees
Note – Two people are required to install the cable trees. One person must hold the
weight of the tree for an extended time.
1. Identify the cable trees.
The cable trees are symmetrical and their orientation for installation can be
difficult to determine. When properly installed, the fluted branches of the tree
point forward, with the fluting on the underside of the branches. The top surface
of all branches is smooth. See
FIGURE 2-13.
Chapter 2 Chassis Service Procedures 2-17
Page 36

FIGURE 2-13 Cable Tree Placement
2. Set the cable trees upright at their respective corners of the switch chassis.
3. Starting on the front right corner of the chassis, lift the cable tree into position.
Have a helper assist in aligning the cable tree mounting screw holes with those in
the chassis.
4. While holding the cable tree in position, have a helper install the mounting
screws.
a. Using a Allen wrench, install the first M5x1.5 screw into the top hole on the
right side of the chassis.
Finger tighten the screw only.
b. Install the second screw into the next lower hole.
Finger tighten the screw only.
c. Repeat from Step a until all 11 screws are installed on the right side.
5. Repeat Step 4 for the 11 screws on the front of the right cable tree.
6. Press the cable tree into the switch chassis and firmly tighten all 22 screws from
top to bottom.
7. Repeat from Step 3 for the other cable tree at the front left corner of the chassis.
2-18 Sun Datacenter Switch 3456 Service Manual • August 2008
Page 37

▼ Removing Cable Trays
1. Remove the cables from the line card where the cable tray is to be removed.
See “Removing Cables From the Sun Datacenter Switch 3456” on page 2-22.
2. Lift on the front of the cable tray and begin to pull out.
Note – Once the tray is free of the guides at the back end, it no longer has support
and will fall. Anticipate this behavior.
3. Support the back end of the cable tray, and continue to pull the tray out and
away from the cable trees.
▼ Installing Cable Trays
1. Lift the cable tray into a horizontal orientation, with the rolled edge towards
you and the lip on the underside.
2. Locate where you want to install the cable tray.
3. Move the cable tray between and just above the branches of the cable tree for
the slot where you want to install the tray.
Slide the far end of the tray into the guides.
4. Continue to press the tray into the guides until it stops, then lower the front of
the tray onto the flanges.
See
FIGURE 2-14.
Chapter 2 Chassis Service Procedures 2-19
Page 38

FIGURE 2-14 Installing Cable Trays
Note – Install cable trays only as they are needed. If all cable trays are installed
before the switch is cabled, their presence make cabling extremely difficult.
2.4 InfiniBand Cables
2.4.1 Cable Cautions
Caution – Do not allow any IB cable to bend through a less than 5 inch (127 mm)
radius. Tight bends can break the cable internally.
Caution – Do not use zip ties to bundle or support IB cables. The sharp edges of the
ties can break the cables internally.
2-20 Sun Datacenter Switch 3456 Service Manual • August 2008
Page 39

Caution – Do not allow any IB cable to experience extreme tension. Do not pull on
an IB cable or allow it to drag. Unroll an IB cable for its length. Pulling on an IB
cable can break the cables internally.
Caution – Do not twist an IB cable more than 1 revolution for its entire length.
Twisting an IB cable can break the cable internally.
Caution – Do not route IB cables where they might be stepped upon or experience
rolling loads. Such a crushing effect can break the cable internally.
▼ Removing Cables From the Sun Datacenter
Switch 3456
This procedure describes how to remove the cables from one line card, so that line
card can be replaced. If you are removing cables for several line cards or all line
cards, work from the upper line card down. This way, you have more working space
as your task progresses.
If you are removing a cable from the switch to replace that cable, consider the
following:
■ If you are removing a cable from connectors 0A through 11B, start the procedure
at Step 8.
■ If you are removing a cable from connectors 12A through 23B, start the procedure
at Step 1.
1. Locate the connector at 12B.
This is the upper cable.
2. Grasp the cable connector to support its weight and apply the removal force.
3. Pull on the loop of the retractor strap while simultaneously pulling on the
cable connector.
The cable connector comes free.
4. Carefully move the cable out of the front branch of the cable tree.
5. Consider your next step:
■ If you are disconnecting cables for a cable replacement:
Chapter 2 Chassis Service Procedures 2-21
Page 40

a. Unthread the cable out of the side branch of the cable tree, and off of the
cable plate.
b. Gently lower the cable to the floor.
■ If you are disconnecting cables for a line card replacement:
c. Gently lower the cable so that is it hanging from the side branch.
Caution – Do not allow the cable to drop or strike the floor. Jerking, bending,
pulling on, or dropping the cable can damage the cable. See Section 2.4.1 “Cable
Cautions” on page 2-21.
6. Repeat from Step 1 for the cable at 12A.
This is the lower cable.
7. Repeat from Step 1 moving to the right for cables 13B, 13A, 14B, and so on to
23A or the cable that needs replacement.
8. Repeat from Step 1 moving to the left for cables 11B, 11A, 10B, and so on to 0A
or the cable that needs replacement.
9. If you are removing cables to replace a line card, remove the cable tray.
See “Removing Cable Trays” on page 2-20.
▼ Attaching Cables to the Sun Datacenter Switch
3456
Note – This procedure assumes that you are cabling a single line card after a
replacement procedure. If all line cards are being cabled, or you are installing a
replacement cable, refer to the Sun Datacenter Switch 3456 Installation Guide.
1. Install a cable tray into the slot for the line card.
Refer to “Installing Cable Trays” on page 2-20.
2. Locate the cable for the connector 23A.
3. Curve the cable to the left through the front branch of the cable tree.
FIGURE 2-15.
See
2-22 Sun Datacenter Switch 3456 Service Manual • August 2008
Page 41

FIGURE 2-15 Threading the Cable Through the Cable Tree
Caution – Do not force a bend radius of less than 5 inches (127 mm). Any bend
tighter than this damages the inner fibers of the cable, rendering it useless.
4. Plug the first cable into the connector at 23A.
FIGURE 2-16.
See
Chapter 2 Chassis Service Procedures 2-23
Page 42

FIGURE 2-16 Plugging in an IB Cable
a. Visually inspect the cable connector to see whether the shell is not bent and
is parallel to the inner boards.
If the shell is bent or damaged, get a different cable.
b. Ensure that the retraction strap is forward.
c. Orient the cable connector to horizontal.
Ensure that the upper shell just touches the underside of the top of the
connector on the line card.
See
FIGURE 2-17.
FIGURE 2-17 Checking the IB Cable Connector
d. Slowly move the connector in.
As you slide the connector in, the top of the shell should scrape against the
underside of the top of the connector on the line card.
■ If the cable stops or binds after about 5 mm travel, back out and repeat from
Step c.
2-24 Sun Datacenter Switch 3456 Service Manual • August 2008
Page 43

■ If the connector stops or binds with about 2 mm still to go, back out and
repeat from Step c.
e. Continue to push the connector in until the hooks catch onto the top of the
connector on the line card.
5. Repeat from Step 2 for the second cable connecting to connector 23B.
6. Repeat from Step 2 moving to the left for cables connecting to connector 22A,
22B, 21A, and so on to 12B.
7. Repeat from Step 2 moving to the right for cables connecting to connector 0A,
0B, 1A, and so on to 11B.
Chapter 2 Chassis Service Procedures 2-25
Page 44

2-26 Sun Datacenter Switch 3456 Service Manual • August 2008
Page 45

CHAPTER
3
Power Supply Service Procedures
This chapter describes procedures for servicing the switch power supplies. Topics
include:
■ Section 3.1 “Troubleshooting Power Supplies” on page 3-2
■ Section 3.2 “Powering Off Power Supplies” on page 3-2
■ Section 3.3 “Removing Power Supplies” on page 3-3
■ Section 3.4 “Installing Power Supplies” on page 3-5
■ Section 3.5 “Powering On Power Supplies” on page 3-7
Commands described in this chapter are executed at the management console. See
the Sun Datacenter Switch 3456 Administration Guide for more information about these
commands.
3-1
Page 46

3.1 Troubleshooting Power Supplies
The status LEDs on the power supplies can help you determine the problem with the
power supplies. See
TABLE 3-1 Power Supply Status LEDs
Glyph Name Color State and Meaning
Active Green On – Power supply enabled, 12 VDC is supplied.
Attention Amber On – Fault detected, 12 VDC shut down
Connected Green On – Correct AC input voltage is present.
Additionally, the showpresent and psustatus commands can provide some
information.
TABLE 3-1.
Off – Power supply disabled, 12 VDC is not supplied.
Flashing – No function.
Off – No faults detected
Flashing – No function
Off – No input voltage
Flashing – Incorrect AC input voltage.
3.2 Powering Off Power Supplies
Power supplies can be brought from full power to standby state, using the
disablepsu command. For example, to bring power supply 0 (PSU0) to a standby
state:
# disablepsu 0
Using psu i2c addr 0x5d
PSU 0, 12 V is off
#
The power supplies are only fully powered off when they are disconnected from the
facility power. This is possible by:
■ Disconnecting the power cord for the power supply
■ De-energizing the respective circuit breaker for the power supply
3-2 Sun Datacenter Switch 3456 Service Manual • August 2008
Page 47

3.3 Removing Power Supplies
▼ Removing a Power Supply
1. Determine which power supply is to be removed.
2. Use the disablepsu command to bring the power supply to a standby state.
3. At the power supply, remove the power cord.
See
FIGURE 3-2.
FIGURE 3-1 Removing the Power Cord
The power supply is completely powered off.
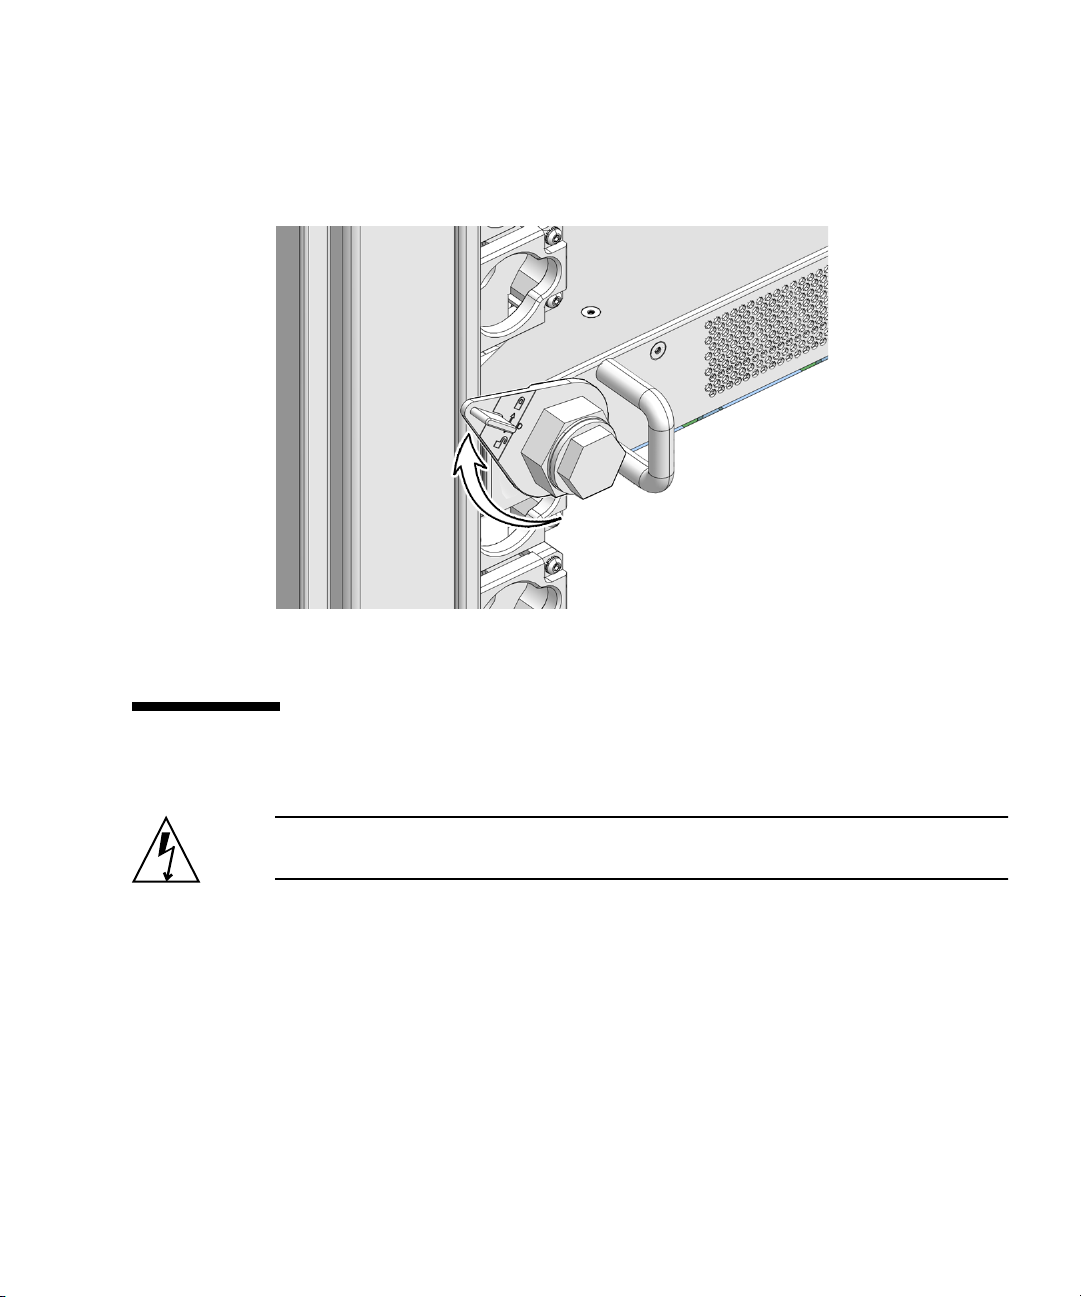
4. Swing the release lever of the power supply out and to the right.
See
FIGURE 3-2.
Chapter 3 Power Supply Service Procedures 3-3
Page 48

FIGURE 3-2 Releasing the Power Supply
5. Pull the handle of the power supply to remove it from the chassis.
FIGURE 3-3.
See
FIGURE 3-3 Removing the Power Supply
6. Set the power supply aside.
3-4 Sun Datacenter Switch 3456 Service Manual • August 2008
Page 49

3.4 Installing Power Supplies
▼ Installing a Power Supply
1. Unwrap the replacement power supply from its antistatic packaging.
2. Swing open the release lever.
3. Orient the power supply with the handle on the left and the receptacle on the
right.
4. Slide the power supply into the open slot, pushing the power supply in until
the release lever moves.
See
FIGURE 3-4.
FIGURE 3-4 Installing the Power Supply
5. Swing the release lever to the left to secure the power supply into the chassis.
FIGURE 3-5.
See
Chapter 3 Power Supply Service Procedures 3-5
Page 50

FIGURE 3-5 Securing the Power Supply
6. Reconnect the power cord.
FIGURE 3-2.
See
3-6 Sun Datacenter Switch 3456 Service Manual • August 2008
Page 51

FIGURE 3-6 Attaching the Power Cord
The Connected LED lights to indicate the power supply is connected to facility
power.
7. Use the enablepsu command to bring the power supply to a fully powered
state.
8. Verify the power supply’s operation with the showpresent and psustatus
commands.
3.5 Powering On Power Supplies
When facility power is applied to a power supply, it enters a standby state. You can
apply facility power by:
■ Plugging the power cord from the power supply into a ‘live’ receptacle
■ Energizing the respective circuit breaker for the power supply
Chapter 3 Power Supply Service Procedures 3-7
Page 52

Use the enablepsu command to bring the power supply from a standby state to full
power. For example, to bring power supply 0 (PSU0) to full power:
# enablepsu 0
Using psu i2c addr 0x5d
Turning on 12V ...
PSU 0, 12 V on
#
3-8 Sun Datacenter Switch 3456 Service Manual • August 2008
Page 53

CHAPTER
4
Fan Service Procedures
This chapter describes procedures for servicing the fans on the fabric cards. Topics
include:
■ Section 4.1 “Troubleshooting Fans” on page 4-1
■ Section 4.2 “Removing Fans” on page 4-1
■ Section 4.3 “Installing Fans” on page 4-2
Commands described in this chapter are executed at the management console. See
the Sun Datacenter Switch 3456 Administration Guide for more information about these
commands.
4.1 Troubleshooting Fans
Each fan has a status LED that flashes when a fan has failed. Additionally, the
checkfans and getfans commands can provide some information.
4.2 Removing Fans
▼ Removing a Fan
Note – Fans are hot swappable and do not require powering off for removal.
4-1
Page 54

1. Determine which fan is to be removed.
If a fan has failed, its LED flashes.
2. Loosen the two captive thumbscrews on either side of the fan.
FIGURE 4-1.
See
FIGURE 4-1 Removing the Fan
3. Pull the fan straight out.
FIGURE 4-1.
See
4. Set the fan aside.
4.3 Installing Fans
Note – Fans are hot-swappable and can be inserted into live fabric cards.
4-2 Sun Datacenter Switch 3456 Service Manual • August 2008
Page 55

▼ Installing a Fan
1. Unwrap the replacement fan from its antistatic packaging.
2. Orient the fan over the opening in the fabric card with the LED at the bottom.
3. Slide the fan into the fabric card until the fan stops.
See
FIGURE 4-2.
FIGURE 4-2 Installing the Fan
The fan might immediately power on.
4. Tighten the captive thumbscrews to secure the fan in the fabric card.
See
FIGURE 4-2.
5. Use the checkfans and getfans commands to verify the fan’s operation.
Chapter 4 Fan Service Procedures 4-3
Page 56

4-4 Sun Datacenter Switch 3456 Service Manual • August 2008
Page 57

CHAPTER
5
Chassis Management Controller Service Procedures
This chapter describes procedures for servicing the CMCs. Topics include:
■ Section 5.1 “Troubleshooting CMCs” on page 5-2
■ Section 5.2 “Powering Off CMCs” on page 5-2
■ Section 5.3 “Removing CMCs” on page 5-3
■ Section 5.4 “Installing CMCs” on page 5-4
■ Section 5.5 “Powering On CMCs” on page 5-6
Commands described in this chapter are executed at the management console. See
the Sun Datacenter Switch 3456 Administration Guide for more information about these
commands.
5-1
Page 58

5.1 Troubleshooting CMCs
The chassis management controllers (CMCs) have several status LEDs that can
provide some troubleshooting assistance. See
TABLE 5-1 CMC Status LEDs
Glyph Name Color State and Meaning
Attention Amber On – A fault has been detected.
Off – Normal operation.
Flashing – A critical error has happened.
Ready-to-Remove Blue On – CMC is ready to be removed.
Off – Do not remove the CMC.
Flashing – No function.
OK Green On – CMC is operating normally.
Off – No power is being supplied to the CMC.
Flashing – No function.
N/A NET MGT Link
(right)
N/A NET MGT Activity
(left)
Green On – Link is operating as a 100 Mbps connection.
Off – Link is operating as a 10/100 Mbps connection.
Flashing – No function.
Amber On – Link is established.
Off – No link established.
Flashing – Activity on the port.
TABLE 5-1.
Additionally, the following commands can help troubleshooting CMCs:
■ i2ctest
■ clia shmstatus
■ clia sensordata
■ clia getfruledstate
5.2 Powering Off CMCs
So long as standby power is present, the CMCs are on. A CMC can’t be powered off,
but it can be deactivated with the clia deactivate command. Deactivating
means to stop administration from that CMC.
5-2 Sun Datacenter Switch 3456 Service Manual • August 2008
Page 59

For example, to deactivate CMC0 (10h):
# clia deactivate 10 0
Pigeon Point Shelf Manager Command Line Interpreter
Command issued via IPMB, status = 0 (0x0)
Command executed successfully
#
Instead of deactivating a CMC, you can use the clia switchover command. The
clia switchover command transfers control of the Sun Datacenter Switch 3456
from one CMC to the other. For example:
# clia switchover
#
Note – You can use the clia switchover command on either the active or the
inactive CMC with the same results. The inactive CMC becomes active, the active
CMC becomes inactive.
5.3 Removing CMCs
▼ Removing a CMC
1. If the active CMC is to be removed, use the clia switchover command to
transfer administration duties to the other CMC.
Otherwise, continue to Step 2.
2. Remove any cables connected to the CMC front panel.
3. Squeeze the latches on the release levers and wait for the blue
Ready-to-Remove LED to light.
4. Swing the release levers outward.
See
FIGURE 5-1.
Chapter 5 Chassis Management Controller Service Procedures 5-3
Page 60

FIGURE 5-1 Removing the CMC
5. Slowly pull the CMC from the chassis.
FIGURE 5-1.
See
6. Set the CMC aside.
5.4 Installing CMCs
▼ Installing a CMC
1. Remove the replacement CMC from its antistatic packaging.
2. Squeeze the latches on the release levers and swing the levers outward.
3. Set the back of the CMC onto the rails inside the chassis.
5-4 Sun Datacenter Switch 3456 Service Manual • August 2008
Page 61

4. Carefully slide the CMC into the chassis until the release levers move.
FIGURE 5-2.
See
FIGURE 5-2 Installing and Securing the CMC
5. Swing the release levers inward to secure the CMC into the chassis.
FIGURE 5-2.
See
6. Reconnect the cables you removed previously to the front panel.
7. Configure the new CMC.
See the Sun Datacenter Switch 3456 Installation Guide or Sun Datacenter Switch 3456
Administration Guide.
8. If you used the clia switchover command when you removed the CMC, use
command again to transfer back control to the new CMC.
Chapter 5 Chassis Management Controller Service Procedures 5-5
Page 62

5.5 Powering On CMCs
When a CMC is plugged into a powered chassis, the CMC is powered on by the
presence of standby voltage. Although the CMC is on, it might be inactive. A CMC
can be made active, using the clia switchover command. For example:
# clia switchover
This Shelf Manager is now active, but is shutting down to
trigger a switchover.
#
5-6 Sun Datacenter Switch 3456 Service Manual • August 2008
Page 63

CHAPTER
6
Fabric Card Service Procedures
This chapter describes procedures for servicing the fabric cards. Topics include:
■ Section 6.1 “Fabric Card Considerations” on page 6-1
■ Section 6.2 “Troubleshooting Fabric Cards” on page 6-2
■ Section 6.3 “Inspecting Fabric Cards” on page 6-3
■ Section 6.4 “Powering Off Fabric Cards” on page 6-6
■ Section 6.5 “Removing Fabric Cards” on page 6-7
■ Section 6.6 “Installing Fabric Cards” on page 6-8
■ Section 6.7 “Powering On Fabric Cards” on page 6-10
Commands described in this chapter are executed at the management console. See
the Sun Datacenter Switch 3456 Administration Guide for more information about these
commands.
6.1 Fabric Card Considerations
Caution – The thermal management of the switch chassis is compromised when a
fabric card slot is vacant. You must install a filler panel or replacement fabric card
immediately after removing one.
Fabric cards use high-density iTRAC connectors that interface with the midplane
pins. If these connectors are damaged, the pins of the midplane connector are also
damaged upon fabric card insertion.
You must inspect the fabric card connectors, fans, and retainers before installing the
fabric card into the switch chassis.
6-1
Page 64

6.2 Troubleshooting Fabric Cards
The status LEDs on the fabric cards can help you determine the problem with the
fabric cards. See
TABLE 6-1 Fabric Card Status LEDs
Glyph Name Color State and Meaning
Locator White On – No function.
Ready-to-Remove Blue On – Fabric card has been disabled and is ready to be removed.
Attention Amber On – Fault detected.
Ok Green On – Normal operation at full power.
Additionally, the following commands can provide basic status information:
■ showpresent
■ checkpwrfault
■ checkvoltages
■ checkswitches
■ showtemps
TABLE 6-1.
Off – Normal operation.
Flashing – The fabric card is identifying itself.
Off – Do not remove
Flashing – No function.
Off – No fault detected.
Flashing – Critical error.
Off – Standby voltage, or no power at all applied.
Flashing – No Function.
More complex and verbose commands are available for troubleshooting. See the Sun
Datacenter Switch 3456 Administration Guide and Sun Datacenter Switch 3456 Reference
Manual for further information.
6-2 Sun Datacenter Switch 3456 Service Manual • August 2008
Page 65

6.3 Inspecting Fabric Cards
Caution – Inspect the replacement fabric card before removing the defective fabric
card from the chassis. This way, you can make a quick exchange and not
compromise the thermal management of the switch.
▼ Inspecting the Fabric Card iTRAC Connectors
The iTRAC connectors on fabric cards are the receptacles for the midplane connector
pins. These connectors are checked just as meticulously as the midplane connector
pins. However, you must verify that no connectors are damaged and no holes are
blocked.
You need the following tools:
■ Bright flashlight
■ Magnifying glass or loupe
■ Dental type metal pick
1. Unwrap the fabric card from its antistatic packaging.
2. Place the fabric card on a work surface with the iTRAC connectors facing you.
3. Using the flashlight positioned to the side and above you, look at the holes of
the left-end connector.
Look at the holes straight on. See
FIGURE 6-1.
Chapter 6 Fabric Card Service Procedures 6-3
Page 66

FIGURE 6-1 Inspecting Fabric Card Connectors
Note – Do not look at the individual holes, rather look at all of the connector ’s holes
as a group. A damaged or contaminated hole will be apparent.
4. Look for any closed over or contaminated holes.
A closed-over or contaminated hole appears brighter than the surrounding holes.
If you see any closed-over or contaminated holes, use the magnifying glass and
pick to remove the contamination or open the closed-over hole.
Verify that the contamination has been removed from the connector and the
connector surface is clean. Use a spare midplane connector pin to verify the
resistance to insertion.
■ If there is great resistance, but the pin does enter the hole properly, investigate
why.
■ If the pin does not enter the hole at all, reject the fabric card. Contact your
SunService
SM
representative.
5. Look for any enlarged or cracked holes.
An enlarged or cracked hole appears darker than the surrounding holes.
If you see any enlarged or cracked holes, use a spare midplane connector pin to
verify the resistance to insertion.
■ If the insertion gives a little resistance and the pin does not wobble in the hole,
the connector is still acceptable.
■ If there is no resistance to insertion and the pin can wobble in the hole, reject
the fabric card. Contact your SunService representative.
6-4 Sun Datacenter Switch 3456 Service Manual • August 2008
Page 67

6. Move your head slightly right to the next connector, and inspect its pins,
repeating Step 4 and Step 5.
7. Continue in this manner for each connector until you reach the right side of the
fabric card.
▼ Inspecting the Fans
The fans of the fabric card are FRU components. The fans secure in position with
two thumbscrews.
1. Ensure that each fan is seated properly in the fabric card.
2. Ensure that both thumbscrews are tight on each fan.
▼ Inspecting the Retainers
The two retainers on the fabric card serve three purposes:
■ Align the fabric card for proper insertion into the chassis.
■ Allow final insertion of the fabric card into the chassis and simplify the physical
connection of the fabric card connectors to the midplane connectors.
■ Allow extraction of the fabric card from the chassis and simplify the physical
disconnection of the fabric card connectors from the midplane connectors.
The retainer’s design is shown in
● Ensure that the pieces of the retainer look finished, move smoothly, do not
FIGURE 6-2.
bind, or do not feel loose or sloppy in any way.
See
FIGURE 6-2.
Chapter 6 Fabric Card Service Procedures 6-5
Page 68

FIGURE 6-2 Retainer Design
6.4 Powering Off Fabric Cards
Powering off a fabric card is a two-stage process. First you must take the fabric card
to a standby state, then you can power off the fabric card completely.
The deactivate command powers down the fabric card to a standby state. For
example, to deactivate fabric card 14:
# deactivate fc 14
Deactivating FC 14
Pigeon Point Shelf Manager Command Line Interpreter
Command issued via IPMB, status = 0 (0x0)
Command executed successfully
#
Caution – When a fabric card is deactivated, its fans are also powered off. The
cooling provided by the fabric card is no longer available to the rest of the chassis.
When you power off a fabric card for repairs or replacement, work quickly so that
the chassis thermal management is not compromised.
6-6 Sun Datacenter Switch 3456 Service Manual • August 2008
Page 69

The disableboard command completely powers down (disable) a fabric card so
that it can be removed from the chassis. For example, to disable fabric card 14:
# disableboard fc 14
#
6.5 Removing Fabric Cards
This procedure describes how to remove one fabric card as part of a replacement
operation.
▼ Removing a Fabric Card
Caution – Before beginning this procedure, have a fabric card filler panel or
replacement fabric card prepared and standing by for immediate installation. A
quick exchange is necessary to maintain chassis thermal management.
Caution – If you are going to immediately replace a defective fabric card with a
new one, inspect and prepare the new fabric card, performing Step 1 through Step 6
in “Installing a Fabric Card” on page 6-8 before starting this procedure.
Removing the fabric card is a two-person task, as both people must work in a
synchronized manner. To prevent damage to the fabric card or the pins of the
midplane connector, the two installers perform identical tasks simultaneously.
1. Extend the antitilt bar from the bottom of the switch chassis.
2. Power off the fabric card, using the deactivate and disableboard
commands.
3. Using a 17 mm socket and ratchet, turn each retainer drive screw
counter-clockwise until no resistance is felt.
4. Slowly rotate each retainer drive screw counter-clockwise, until resistance is
felt, then stop.
5. Simultaneously rotate the retainer drive screws clockwise, stopping at each half
turn, to maintain synchronization.
6. Continue synchronized rotation until greater resistance is felt, then stop.
Chapter 6 Fabric Card Service Procedures 6-7
Page 70

7. Rotate both retainer levers to the unlock position.
8. Grasp the handles at both ends of the fabric card and slowly pull it from the
chassis.
Stop when the fabric card is halfway out.
9. Improve your grip to support the weight of the fabric card.
10. Continue to pull the fabric card out.
11. Lift the fabric card out and away from the chassis.
12. Set the fabric card onto a flat horizontal work surface.
13. Immediately install replacement fabric card or filler panel into the vacant slot.
Continue to “Installing a Fabric Card” on page 6-8, Step 8, or perform the
following:
a. Grasp the handles at each end of the filler panel and lift the panel to the
vacant slot.
b. Turn the levers counter-clockwise to the unlock position.
c. Slide the filler panel into the chassis until it stops.
d. Turn the levers clockwise to the lock position.
14. Retract and secure the antitilt bar.
6.6 Installing Fabric Cards
This procedure describes how to install one fabric card as part of a replacement
operation. If you are installing more than one fabric card, repeat the procedure for
each fabric card. Alternatively, refer to the Sun Datacenter Switch 3456 Installation
Guide.
▼ Installing a Fabric Card
Installing the fabric card is a two-person task, as both people must work in a
synchronized manner. To prevent damage to the fabric card or the pins of the
midplane connector, the two installers perform identical tasks simultaneously.
1. Extend the antitilt bar from the bottom of the switch chassis.
6-8 Sun Datacenter Switch 3456 Service Manual • August 2008
Page 71

2. Unwrap the fabric card from its antistatic packaging.
3. Inspect the connectors, fans, and retainers.
See:
■ “Inspecting the Fabric Card iTRAC Connectors” on page 6-3
■ “Inspecting the Fans” on page 6-5
■ “Inspecting the Retainers” on page 6-5
4. Place a fabric card on a work surface, with the retainers facing the two
installers.
5. Using a 17 mm socket and ratchet, turn each retainer drive screw fully
counter-clockwise until resistance is felt.
6. Rotate both the retainer drive screws clockwise, 1/4 turn.
Caution – If you are preparing a new fabric card as a replacement operation, stop
here and refer to: “Removing a Fabric Card” on page 6-7
7. Remove the filler panel where the fabric card is to install.
a. Grasp the locking levers at each end of the filler panel.
b. Turn the levers counter-clockwise to the unlocked position.
c. Lift the filler panel away from the chassis by the handles.
d. Set the filler panel aside.
8. Lift the fabric card from the work surface and orient it vertically, with the
status LEDs at the bottom.
9. Insert the fabric card into the chassis at the vacant slot.
Ensure that the fabric card is vertical.
Note – Once the fabric card is about halfway into the slot, it is no longer necessary
to bear the weight of the fabric card.
10. Continue to slide the fabric card in, maintaining a vertical orientation.
When you feel resistance, stop.
11. Rotate both retainer levers to the unlocked position.
12. Slide the fabric card for another 1.75 in (4 cm) until it stops.
13. Rotate both retainer levers to the locked position.
Chapter 6 Fabric Card Service Procedures 6-9
Page 72

14. Slowly rotate each retainer drive screw clockwise, until resistance is felt, then
stop.
15. Simultaneously rotate the retainer drive screws clockwise, stopping at each half
turn, to maintain synchronization.
During this time, the retainer levers might have moved from the locked position.
Move the levers back to the locked position and continue.
16. Continue synchronized rotation until greater resistance is felt, then stop.
17. Verify that the fabric card is properly seated in the slot.
18. Give each retainer drive screw a final turn to torque.
19. Retract and secure the antitilt bar.
20. Power on and activate the fabric card using the enableboard and activate
commands.
21. Verify the operation of the new fabric card.
6.7 Powering On Fabric Cards
After installing a fabric card, use the enableboard command to bring standby
power to the fabric card. For example, to enable fabric card 14:
# enableboard fc 14
fc 14 is now enabled
#
Once enabled, bring the fabric card up to full power with the activate command.
The activate command also enables routing of links to use the new fabric card.
For example, to activate fabric card 14:
# activate fc 14
Activating FC 14
Pigeon Point Shelf Manager Command Line Interpreter
Command issued via IPMB, status = 0 (0x0)
Command executed successfully
#
Use the following commands to verify the status of the new fabric card:
■ showpresent
■ checkpwrfault
6-10 Sun Datacenter Switch 3456 Service Manual • August 2008
Page 73

■ checkvoltages
■ checkswitches
■ showtemps
More complex and verbose commands are available for verification. See the Sun
Datacenter Switch 3456 Administration Guide and Sun Datacenter Switch 3456 Reference
Manual for further information.
Chapter 6 Fabric Card Service Procedures 6-11
Page 74

6-12 Sun Datacenter Switch 3456 Service Manual • August 2008
Page 75

CHAPTER
7
Line Card Service Procedures
This chapter describes procedures for servicing the line cards. Topics include:
■ Section 7.1 “Line Card Considerations” on page 7-1
■ Section 7.2 “Troubleshooting Line Cards” on page 7-2
■ Section 7.3 “Inspecting Line Cards” on page 7-3
■ Section 7.4 “Powering Off Line Cards” on page 7-6
■ Section 7.5 “Removing Line Cards” on page 7-7
■ Section 7.6 “Installing Line Cards” on page 7-12
■ Section 7.7 “Powering On Line Cards” on page 7-15
Commands described in this chapter are executed at the management console. See
the Sun Datacenter Switch 3456 Administration Guide for more information about these
commands.
7.1 Line Card Considerations
Caution – The thermal management of the switch chassis is compromised when a
line card slot is vacant. You must install a filler panel or replacement line card
immediately after removing one.
Line cards use high-density iTRAC connectors that interface with the midplane pins.
If these connectors are damaged, the pins of the midplane connector are also
damaged upon line card insertion.
Equally important, the line cards have iPASS connectors for attaching IB cables. If
one of these connectors is damaged, then 24 nodes of the line card cannot be used.
7-1
Page 76

You must inspect the front and back line card connectors, and retainers before
installing the line card into the switch chassis.
7.2 Troubleshooting Line Cards
The status LEDs on the line cards can help you determine the problems with the line
cards. See
TABLE 7-1 Line Card Status LEDs
Glyph Name Color State and Meaning
Locator White On – No function.
Ready-to-Remove Blue On – Line card has been disabled and is ready to be removed.
Attention Amber On – Fault detected.
Ok Green On – Normal operation at full power.
N/A Link Green On – Link established.
TABLE 7-1.
Off – Normal operation.
Flashing – The line card is identifying itself.
Off – Do not remove
Flashing – No function.
Off – No fault detected.
Flashing – Critical error.
Off – Standby voltage, or no power at all applied.
Flashing – No Function.
Off – No link or link down.
Flashing – Symbol error.
Additionally, the following commands can provide basic status information:
■ showpresent
■ checkpwrfault
■ checkvoltages
■ checkswitches
■ showtemps
More complex and verbose commands are available for troubleshooting. See the Sun
Datacenter Switch 3456 Administration Guide and Sun Datacenter Switch 3456 Reference
Manual for further information.
7-2 Sun Datacenter Switch 3456 Service Manual • August 2008
Page 77

7.3 Inspecting Line Cards
Caution – Inspect the replacement line card before removing the defective line card
from the chassis. This way, you can make a quick exchange and not compromise the
thermal management of the switch.
▼ Inspecting the Line Card iTRAC Connectors
The large iTRAC connectors on line cards are the receptacles for the midplane
connector pins. These connectors are checked just as meticulously as the midplane
connector pins. However, you must verify that no connectors are damaged and no
holes are blocked.
You need the following tools:
■ Bright flashlight
■ Magnifying glass or loupe
■ Dental type metal pick
1. Unwrap the line card from its antistatic packaging.
2. Place the line card on a work surface with the iTRAC connectors facing you.
3. Using the flashlight positioned to the side and above you, look at the holes of
the left-end connector.
Look at the holes straight on. See
FIGURE 7-1.
Chapter 7 Line Card Service Procedures 7-3
Page 78

FIGURE 7-1 Inspecting Line Card Connectors
Note – Do not look at the individual holes, rather look at all of the connector ’s holes
as a group. A damaged or contaminated hole will be apparent.
4. Look for any closed over or contaminated holes.
A closed-over or contaminated hole appears brighter than the surrounding holes.
If you see any closed-over or contaminated holes, use the magnifying glass and
pick to remove the contamination or open the closed-over hole.
Verify that the contamination has been removed from the connector and the
connector surface is clean. Use a spare midplane connector pin to verify the
resistance to insertion.
■ If there is great resistance, but the pin does enter the hole properly, investigate
why.
■ If the pin does not enter the hole at all, reject the line card. Contact your
SunService
SM
representative.
5. Look for any enlarged or cracked holes.
An enlarged or cracked hole appears darker than the surrounding holes.
If you see any enlarged or cracked holes, use a spare midplane connector pin to
verify the resistance to insertion.
■ If the insertion gives a little resistance and the pin does not wobble in the hole,
the connector is still acceptable.
■ If there is no resistance to insertion and the pin can wobble in the hole, reject
the fabric card. Contact your SunService representative.
7-4 Sun Datacenter Switch 3456 Service Manual • August 2008
Page 79

6. Move your head slightly right to the next connector, and inspect its pins,
repeating Step 4 and Step 5.
7. Continue in this manner for each connector until you reach the right side of the
line card.
▼ Inspecting the Line Card iPASS Connectors
The small iPASS connectors on the line card are for the InfiniBand cables. The design
of these connectors is much simpler and more robust, so inspection is much easier.
● Check the small connectors for any debris, or cracked or bent fittings.
Most debris can be blown out. If you find a cracked or bent connector, contact
your Sun Service representative.
▼ Inspecting the Retainers
The two retainers on the line card serve three purposes:
■ Align the line card for proper insertion into the chassis.
■ Allow final insertion of the line card into the chassis and simplify the physical
connection of the line card connectors to the midplane connectors.
■ Allow extraction of the line card from the chassis and simplify the physical
disconnection of the line card connectors from the midplane connectors.
The retainer’s design is shown in
● Ensure that the pieces of the retainer look finished, move smoothly, do not
FIGURE 7-2.
bind, or do not feel loose or sloppy in any way.
See
FIGURE 7-2.
Chapter 7 Line Card Service Procedures 7-5
Page 80

FIGURE 7-2 Retainer Design
7.4 Powering Off Line Cards
Powering off a line card is a two-stage process. First you must take the line card to a
standby state, then you can power off the line card completely.
The deactivate command powers down the line card to a standby state. For
example, to deactivate line card 20:
# deactivate lc 20
Deactivating LC 20
Pigeon Point Shelf Manager Command Line Interpreter
Command issued via IPMB, status = 0 (0x0)
Command executed successfully
#
The disableboard command completely powers down (disable) a line card so that
it can be removed from the chassis. For example, to disable line card 20:
# disableboard lc 20
#
7-6 Sun Datacenter Switch 3456 Service Manual • August 2008
Page 81

7.5 Removing Line Cards
This procedure describes how to remove one line card as part of a replacement
operation.
▼ Removing a Line Card
Caution – Before beginning this procedure, have a line card filler panel or
replacement line card prepared and standing by for immediate installation. A quick
exchange is necessary to maintain chassis thermal management.
Caution – If you are going to immediately replace a defective line card with a new
one, inspect and prepare the new line card, performing Step 1 through Step 6 in
“Installing a Line Card” on page 7-12 before starting this procedure.
Removing the line card is a two-person task, as both people must work in a
synchronized manner. To prevent damage to the line card or the pins of the
midplane connector, the two installers perform identical tasks simultaneously.
1. Extend the antitilt bar from the bottom of the switch chassis.
2. Power off the line card, using the deactivate and disableboard commands.
3. Remove the IB cables from the iPASS connectors on the front of the line card.
See “Removing Cables From the Sun Datacenter Switch 3456” on page 2-22.
4. Using a 17 mm socket and ratchet, turn each retainer drive screw
counter-clockwise until no resistance is felt.
5. Slowly rotate each retainer drive screw counter-clockwise, until resistance is
felt, then stop.
6. Simultaneously rotate the retainer drive screws clockwise, stopping at each half
turn, to maintain synchronization.
7. Continue synchronized rotation until greater resistance is felt, then stop.
8. Rotate both retainer levers to the unlock position.
See
FIGURE 7-3.
Chapter 7 Line Card Service Procedures 7-7
Page 82

FIGURE 7-3 Unlocking Retainer Levers
9. Grasp the handles at both ends of the line card and slowly pull it from the
chassis.
Stop when the line card is halfway out. See
FIGURE 7-4 Pulling Line Card Out
FIGURE 7-4.
7-8 Sun Datacenter Switch 3456 Service Manual • August 2008
Page 83

10. Improve your grip to support the weight of the line card.
11. Continue to pull the line card out.
12. Lift the line card out and away from the chassis.
13. Set the line card onto a flat horizontal work surface.
14. Immediately install replacement line card or filler panel into the vacant slot.
Continue to “Installing a Line Card” on page 7-12, Step 8, or perform the
following:
a. Grasp the handles at each end of the filler panel and lift the panel to the
vacant slot.
b. Turn the levers counter-clockwise to the unlock position.
See
FIGURE 7-5.
FIGURE 7-5 Turning Filler Panel Lock Levers Counter-Clockwise
c. Slide the filler panel into the chassis until it stops.
FIGURE 7-6.
See
Chapter 7 Line Card Service Procedures 7-9
Page 84

FIGURE 7-6 Installing the Filler Panel
d. Turn the levers clockwise to the lock position.
FIGURE 7-7.
See
FIGURE 7-7 Turning Filler Panel Lock Levers Clockwise
15. Retract and secure the antitilt bar.
7-10 Sun Datacenter Switch 3456 Service Manual • August 2008
Page 85

7.6 Installing Line Cards
This procedure describes how to install one line card as part of a replacement
operation. If you are installing more than one line card, repeat the procedure for
each line card. Alternatively, refer to the Sun Datacenter Switch 3456 Installation Guide .
▼ Installing a Line Card
Installing the line card is a two-person task, as both people must work in a
synchronized manner. To prevent damage to the line card or the pins of the
midplane connector, the two installers perform identical tasks simultaneously.
1. Extend the antitilt bar from the bottom of the switch chassis.
2. Unwrap the line card from its antistatic packaging.
3. Inspect the connectors and retainers.
See:
■ “Inspecting the Line Card iTRAC Connectors” on page 7-3
■ “Inspecting the Line Card iPASS Connectors” on page 7-5
■ “Inspecting the Retainers” on page 7-5
4. Place a line card on a work surface, with the retainers facing the two installers.
5. Using a 17 mm socket and ratchet, turn each retainer drive screw fully
counter-clockwise until resistance is felt.
6. Rotate both the retainer drive screws clockwise, 1/4 turn.
Caution – If you are preparing a new line card as a replacement operation, stop
here and refer to: “Removing a Line Card” on page 7-7
7. Remove the filler panel for where the line card is to install.
a. Grasp the locking levers at each end of the filler panel.
FIGURE 7-8.
See
Chapter 7 Line Card Service Procedures 7-11
Page 86

FIGURE 7-8 Turning Filler Panel Lock Levers
b. Turn the levers counter-clockwise to the unlocked position.
FIGURE 7-8.
See
c. Lift the filler panel away from the chassis by the handles.
See
FIGURE 7-9.
7-12 Sun Datacenter Switch 3456 Service Manual • August 2008
Page 87

FIGURE 7-9 Removing the Filler Panel
d. Set the filler panel aside.
8. Lift the line card from the work surface and orient it horizontally, with the link
LEDs across the bottom.
9. Insert the line card into the chassis at the vacant slot.
Ensure that the line card is square to the chassis and not skewed.
Note – Once the line card is about halfway into the slot, it is no longer necessary to
bear the weight of the line card.
10. Continue to slide the line card in, maintaining a squared orientation.
When you feel resistance, stop.
11. Rotate both retainer levers to the unlocked position.
12. Slide the line card for another 1.75 in (4 cm) until it stops.
13. Rotate both retainer levers to the locked position.
14. Slowly rotate each retainer drive screw clockwise, until resistance is felt, then
stop.
Chapter 7 Line Card Service Procedures 7-13
Page 88

15. Simultaneously rotate the retainer drive screws clockwise, stopping at each half
turn, to maintain synchronization.
During this time, the retainer levers might have moved from the locked position.
Move the levers back to the locked position and continue.
16. Continue synchronized rotation until greater resistance is felt, then stop.
17. Verify that the line card is properly seated in the slot.
18. Give each retainer drive screw a final turn to torque.
19. Retract and secure the antitilt bar.
20. Power on and activate the line card using the enableboard and activate
commands.
21. Attach the IB cables to the line card.
See “Attaching Cables to the Sun Datacenter Switch 3456” on page 2-23.
22. Verify the operation of the new line card.
7.7 Powering On Line Cards
After installing a line card, use the enableboard command to bring standby power
to the line card. For example, to enable line card 20:
# enableboard lc 20
lc 20 is now enabled
#
Once enabled, bring the line card up to full power with the activate command.
The activate command also enables routing of links to use the new line card. For
example, to activate line card 20:
# activate lc 20
Activating LC 20
Pigeon Point Shelf Manager Command Line Interpreter
Command issued via IPMB, status = 0 (0x0)
Command executed successfully
#
Use the following commands to verify the status of the new line card:
■ showpresent
■ checkpwrfault
7-14 Sun Datacenter Switch 3456 Service Manual • August 2008
Page 89

■ checkvoltages
■ checkswitches
■ showtemps
More complex and verbose commands are available for verification. See the Sun
Datacenter Switch 3456 Administration Guide and Sun Datacenter Switch 3456 Reference
Manual for further information.
Chapter 7 Line Card Service Procedures 7-15
Page 90

7-16 Sun Datacenter Switch 3456 Service Manual • August 2008
Page 91

Index
A
activate command, 6-10, 7-15
attaching cables, 2-23
C
cable
plates
installing, 2-16
removing, 2-16
trays
installing, 2-20
removing, 2-20
trees
installing, 2-18
removing, 2-17
cables
attaching, 2-23
cautions, 2-21
removing, 2-22
cautions, 2-21
chassis
parts
front, 1-1
CMCs
connectors, 1-4
installing, 5-4
IPMB addresses, 1-5
LEDs
location, 1-4
status, 5-2
parts, 1-4
powering
off, 5-2
on, 5-6
removing, 5-3
troubleshooting, 5-2
commands
clia
deactivate, 5-2
switchover, 5-3, 5-6
switch-specific
activate, 6-10, 7-15
deactivate, 6-6, 7-6
disableboard, 6-7, 7-6
disablepsu, 3-2
enableboard, 6-10, 7-15
enablepsu, 3-8
connectors
CMCs, 1-4
fabric cards, 1-5
fans, 1-3
line cards, 1-6
power supplies, 1-2
D
deactivate CLIA command, 5-2
deactivate command, 6-6, 7-6
disableboard command, 6-7, 7-6
disablepsu command, 3-2
E
enableboard command, 6-10, 7-15
enablepsu command, 3-8
Index-1
Page 92

F
fabric cards
connectors, 1-5
inspecting, 6-3
fans, 6-5
iTRAC connectors, 6-3
retainers, 6-5
inspection tools, 6-3
installing, 6-8
IPMB addresses, 1-6
LEDs
location, 1-5
status, 6-2
midplane connector nomenclature, 2-8
parts, 1-5
powering
off, 6-6
on, 6-10
removing, 6-7
troubleshooting, 6-2
fans
connectors, 1-3
installing, 4-3
LEDs
location, 1-3
status, 4-1
parts, 1-3
removing, 4-1
troubleshooting, 4-1
filler panels
installing, 2-3
removing, 2-1
I
inserting pins, 2-15
inspecting
fabric cards, 6-3
fans, 6-5
iTRAC connectors, 6-3
retainers, 6-5
line cards, 7-3
iPASS connectors, 7-5
iTRAC connectors, 7-3
retainers, 7-5
pins
front, 2-10
rear, 2-7
inspection tools
fabric cards, 6-3
line cards, 7-3
midplane, 2-6
installing
cable
plates, 2-16
trays, 2-20
trees, 2-18
CMCs, 5-4
fabric cards, 6-8
fans, 4-3
filler panels, 2-3
line cards, 7-12
power supplies, 3-5
IPMB addresses
CMCs, 1-5
fabric cards, 1-6
line cards, 1-7
L
LEDs
CMCs
location, 1-4
status, 5-2
fabric cards
location, 1-5
status, 6-2
fans
location, 1-3
status, 4-1
line cards
location, 1-6
status, 7-2
power supplies
location, 1-2
status, 3-2
line cards
connectors, 1-6
inspecting, 7-3
iPASS connectors, 7-5
iTRAC connectors, 7-3
retainers, 7-5
inspection tools, 7-3
installing, 7-12
IPMB addresses, 1-7
LEDs
location, 1-6
status, 7-2
Index-2 Sun Datacenter Switch 3456 Service Manual • August 2008
Page 93

midplane connector nomenclature, 2-11
parts, 1-6
powering
off, 7-6
on, 7-15
removing, 7-7
troubleshooting, 7-2
M
midplane
connector nomenclature
fabric cards, 2-8
line cards, 2-11
P
parts
chassis
front, 1-1
CMCs, 1-4
fabric cards, 1-5
fans, 1-3
line cards, 1-6
power supplies, 1-2
pins
gauge block, 2-7
inserting, 2-15
inspecting
front, 2-10
rear, 2-7
removing, 2-13
with needlenose pliers, 2-14
power supplies
connectors, 1-2
installing, 3-5
LEDs
location, 1-2
status, 3-2
parts, 1-2
powering
off, 3-2
on, 3-7
removing, 3-3
troubleshooting, 3-2
powering
off
CMCs, 5-2
fabric cards, 6-6
line cards, 7-6
power supplies, 3-2
on
CMCs, 5-6
fabric cards, 6-10
line cards, 7-15
power supplies, 3-7
R
removing
cable
plates, 2-16
trays, 2-20
trees, 2-17
cables, 2-22
CMCs, 5-3
fabric cards, 6-7
fans, 4-1
filler panels, 2-1
line cards, 7-7
pins, 2-13
with needlenose pliers, 2-14
power supplies, 3-3
S
switchover CLIA command, 5-3, 5-6
T
troubleshooting
CMCs, 5-2
fabric cards, 6-2
fans, 4-1
line cards, 7-2
power supplies, 3-2
Index-3
Page 94

Index-4 Sun Datacenter Switch 3456 Service Manual • August 2008
 Loading...