

Page 1

Sun Storage 7000
Unified Storage System
Installation Guide
Part No: 821–1386–10 Rev.A
February 2010
Page 2

Copyright ©2010 Sun Microsystems, Inc. All rights reserved. 4150 Network Circle, Santa Clara, CA 95054 U.S.A.
Sun Microsystems, Inc. has intellectual property rights relating to technology embodied in the product that is described in this document. In particular, and without
limitation, these intellectual property rights may include one or more U.S. patents or pending patent applications in the U.S. and in other countries.
U.S. Government Rights – Commercial software. Government users are subject to the Sun Microsystems, Inc. standard license agreement and applicable provisions
of the FAR and its supplements.
This distribution may include materials developed by third parties.
Parts of the product may be derived from Berkeley BSD systems, licensed from the University of California. UNIX is a registered trademark in the U.S. and other
countries, exclusively licensed through X/Open Company, Ltd.
Sun, Sun Microsystems, the Sun logo, the Solaris logo, the Java Coee Cup logo, docs.sun.com, ZFS, Java, and Solaris are trademarks or registered trademarks of Sun
Microsystems, Inc. or its subsidiaries in the U.S. and other countries. All SPARC trademarks are used under license and are trademarks or registered trademarks of
SPARCInternational, Inc. in the U.S. and other countries. Products bearing SPARC trademarks are based upon an architecture developed by Sun Microsystems, Inc.
The OPEN LOOK and Sun
of Xerox in researching and developing the concept of visual or graphical user interfaces for the computer industry. Sun holds a non-exclusive license from Xerox to
the Xerox Graphical User Interface, which license also covers Sun's licensees who implement OPEN LOOK GUIs and otherwise comply with Sun's written license
agreements.
Products covered by and information contained in this publication are controlled by U.S. Export Control laws and may be subject to the export or import laws in
other countries. Nuclear, missile, chemical or biological weapons or nuclear maritime end uses or end users, whether direct or indirect, are strictly prohibited. Export
or reexport to countries subject to U.S. embargo or to entities identied on U.S. export exclusion lists, including, but not limited to, the denied persons and specially
designated nationals lists is strictly prohibited.
DOCUMENTATION IS PROVIDED “AS IS” AND ALL EXPRESS OR IMPLIED CONDITIONS, REPRESENTATIONS AND WARRANTIES, INCLUDING ANY
IMPLIED WARRANTY OF MERCHANTABILITY, FITNESS FOR A PARTICULAR PURPOSE OR NON-INFRINGEMENT, ARE DISCLAIMED, EXCEPT TO
THE EXTENT THAT SUCH DISCLAIMERS ARE HELD TO BE LEGALLY INVALID.
TM
Graphical User Interface was developed by Sun Microsystems, Inc. for its users and licensees. Sun acknowledges the pioneering eorts
Copyright ©2010 Sun Microsystems, Inc. Tous droits réservés. 4150 Network Circle, Santa Clara, CA 95054 U.S.A.
Sun Microsystems, Inc. détient les droits de propriété intellectuelle relatifs à la technologie incorporée dans le produit qui est décrit dans ce document. En particulier,
et ce sans limitation, ces droits de propriété intellectuelle peuvent inclure un ou plusieurs brevets américains ou des applications de brevet en attente aux Etats-Unis
et dans d'autres pays.
Cette distribution peut comprendre des composants développés par des tierces personnes.
Certaines composants de ce produit peuvent être dérivées du logiciel Berkeley BSD, licenciés par l'Université de Californie. UNIX est une marque déposée aux
Etats-Unis et dans d'autres pays; elle est licenciée exclusivement par X/Open Company, Ltd.
Sun, Sun Microsystems, le logo Sun, le logo Solaris, le logo Java Coee Cup, docs.sun.com, ZFS, Java et Solaris sont des marques de fabrique ou des marques déposées
de Sun Microsystems, Inc., ou ses liales, aux Etats-Unis et dans d'autres pays. Toutes les marques SPARC sont utilisées sous licence et sont des marques de fabrique
ou des marques déposées de SPARC International, Inc. aux Etats-Unis et dans d'autres pays. Les produits portant les marques SPARC sont basés sur une architecture
développée par Sun Microsystems, Inc.
L'interface d'utilisation graphique OPEN LOOK et Sun a été développée par Sun Microsystems, Inc. pour ses utilisateurs et licenciés. Sun reconnaît les eorts de
pionniers de Xerox pour la recherche et le développement du concept des interfaces d'utilisation visuelle ou graphique pour l'industrie de l'informatique. Sun détient
une licence non exclusive de Xerox sur l'interface d'utilisation graphique Xerox, cette licence couvrant également les licenciés de Sun qui mettent en place l'interface
d'utilisation graphique OPEN LOOK et qui, en outre, se conforment aux licences écrites de Sun.
Les produits qui font l'objet de cette publication et les informations qu'il contient sont régis par la legislation américaine en matière de contrôle des exportations et
peuvent être soumis au droit d'autres pays dans le domaine des exportations et importations. Les utilisations nales, ou utilisateurs naux, pour des armes nucléaires,
des missiles, des armes chimiques ou biologiques ou pour le nucléaire maritime, directement ou indirectement, sont strictement interdites. Les exportations ou
réexportations vers des pays sous embargo des Etats-Unis, ou vers des entités gurant sur les listes d'exclusion d'exportation américaines, y compris, mais de manière
non exclusive, la liste de personnes qui font objet d'un ordre de ne pas participer, d'une façon directe ou indirecte, aux exportations des produits ou des services qui
sont régis par la legislation américaine en matière de contrôle des exportations et la liste de ressortissants spéciquement designés, sont rigoureusement interdites.
LA DOCUMENTATIONEST FOURNIE "EN L'ETAT" ET TOUTES AUTRES CONDITIONS, DECLARATIONSET GARANTIES EXPRESSES OU TACITES
SONT FORMELLEMENT EXCLUES, DANS LA MESURE AUTORISEE PAR LA LOI APPLICABLE, Y COMPRIS NOTAMMENT TOUTE GARANTIE
IMPLICITE RELATIVE A LA QUALITE MARCHANDE, A L'APTITUDE A UNE UTILISATIONPARTICULIERE OU A L'ABSENCE DE CONTREFACON.
100412@23626
Page 3

Contents
Preface .....................................................................................................................................................5
1 Introduction ...........................................................................................................................................9
Overview ..................................................................................................................................................9
Introduction ....................................................................................................................................9
2 Installation ............................................................................................................................................13
Installation ........................................................................................................................................... 13
Introduction ................................................................................................................................. 13
Controller ............................................................................................................................................. 13
Controller Installation Overview ............................................................................................... 13
Prerequisites ................................................................................................................................. 14
Tasks .............................................................................................................................................. 15
Shelf ....................................................................................................................................................... 28
Disk Shelf Installation .................................................................................................................. 28
Prerequisites ................................................................................................................................. 29
Tasks .............................................................................................................................................. 30
Cabling .................................................................................................................................................. 37
Cabling Diagrams ........................................................................................................................ 37
7210 Cabling ........................................................................................................................................ 38
Connecting Expansion Storage to the Sun Storage 7210 ........................................................ 38
7310 Cabling ........................................................................................................................................ 40
Connecting Expansion Storage to the Sun Storage 7310 ........................................................ 40
7310 Cluster Cabling ........................................................................................................................... 43
Connecting Expansion Storage to the Sun Storage 7310 Cluster ........................................... 43
7410 Cabling pt.1 ................................................................................................................................. 46
Connecting Expansion Storage to the Sun Storage 7410 ........................................................ 46
3
Page 4

Contents
7410 Cabling pt.2 ................................................................................................................................. 49
Connecting Expansion Storage to the Sun Storage 7410 (cont.) ............................................ 49
7410 Cluster Cabling pt.1 ................................................................................................................... 53
Connecting expansion storage to the Sun Storage 7410 Cluster ............................................ 53
7410 Cluster Cabling pt.2 ................................................................................................................... 58
Connecting Expansion Storage to the Sun Storage 7410 Cluster (cont.) .............................. 58
Power .................................................................................................................................................... 63
Powering On and Conguring the Appliance .......................................................................... 63
Tasks .............................................................................................................................................. 64
Next Steps ...................................................................................................................................... 65
Initial ..................................................................................................................................................... 66
Initial Conguration .................................................................................................................... 66
Prerequisites ................................................................................................................................. 66
Summary ....................................................................................................................................... 66
BUI ................................................................................................................................................. 67
CLI ................................................................................................................................................. 67
Glossary .................................................................................................................................................73
Index ......................................................................................................................................................75
Sun Storage 7000 Unied Storage System Installation Guide • February 20104
Page 5

Preface
The Sun Storage 7000 Unied Storage System Installation Guide contains installation, cabling
and initial conguration documentation for the Sun Storage 7000 Unied Storage System series
of NAS appliances.
This documentation is also available while using the appliance Browser User Interface,
accessible via the Help button. The appliance documentation may be updated using the System
Upgrade procedure documented in the System Service Manual.
Who Should Use This Book
These notes are for users and system administrators who install and use the Sun Storage 7000
server appliances.
Related Documentation
Refer to the following documentation for installation instructions, hardware overviews, service
procedures and software update notes.
■
Administration Guide and Service Manual (http://wikis.sun.com/display/fishworks/
documentation/)
■
Release Notes (http://wikis.sun.com/display/fishworks/software+updates)
Third-PartyWeb Site References
Third-party URLs are referenced in this document and provide additional, related information.
5
Page 6

Preface
Note – Sun is not responsible for the availability of third-party Web sites mentioned in this
document. Sun does not endorse and is not responsible or liable for any content, advertising,
products, or other materials that are available on or through such sites or resources. Sun will not
be responsible or liable for any actual or alleged damage or loss caused by or in connection with
the use of or reliance on any such content, goods, or services that are available on or through
such sites or resources.
Documentation, Support, and Training
The Sun web site provides information about the following additional resources:
■
Documentation (http://www.sun.com/documentation/)
■
Support (http://www.sun.com/support/)
■
Training (http://www.sun.com/training/)
Typographic Conventions
The following table describes the typographic conventions that are used in this book.
TABLE P–1 Typographic Conventions
Typeface Meaning Example
AaBbCc123 The names of commands, les, and directories,
and onscreen computer output
AaBbCc123 What you type, contrasted with onscreen
computer output
aabbcc123 Placeholder: replace with a real name or value To view an individual property, use
AaBbCc123 Book titles, new terms, and terms to be
emphasized
Sun Storage 7000 Unied Storage System Installation Guide • February 20106
Use the help command to show
available actions.
Last login: Mon Oct 13 15:43:05
2008 from kiowa
caji console login: root
Password:
get propertyname.
Read Chapter 6 in the User's Guide.
A cache is a copy that is stored
locally.
Do not save the le.
Note: Some emphasized items
appear bold online.
Page 7

CLI Prompts in Command Examples
The following table shows the default Command Line Interface prompts for the appliance.
TABLE P–2 CLI Prompts
Type Prompt
Appliance CLI machine_name:>
Preface
7
Page 8

8
Page 9
Overview
CHAPTER 1
1
Introduction
Introduction
The Sun Storage 7000 Unied Storage family of products provide ecient le and block data
services to clients over a network, and a rich set of data services that can be applied to the data
stored on the system.
Platforms
■
Sun Storage 7110
■
Sun Storage 7210
■
Sun Storage 7310
■
Sun Storage 7410
■
Sun Disk Shelf J4400/J4410/J4500
Protocols
The Unied Storage products include support for a variety of industry-standard client
protocols, including:
■
CIFS
■
NFS
■
HTTP and HTTPS
9
Page 10

Overview
■
WebDAV
■
iSCSI
■
FC
■
FTP
■
SFTP
Key Features
Your Sun Storage system also includes new technologies to deliver the best storage
price/performance and unprecedented observability of your workloads in production,
including:
■
Analytics, a system for dynamically observing the behavior of your system in real-time and
viewing data graphically
■
The ZFS Hybrid Storage Pool, composed of optional Flash-memory devices for acceleration
of reads and writes, low-power, high-capacity disks, and DRAM memory, all managed
transparently as a single data hierarchy
Data Services
To manage the data that you export using these protocols, you can congure your Sun Storage
system using the built-in collection of advanced data services, including:
■
RAID-Z (RAID-5 and RAID-6), mirrored, and striped disk congurations
■
Unlimited read-only and read-write snapshots, with snapshot schedules
■
Data deduplication
■
Built-in data compression
■
Remote replication of data for disaster recovery
■
Active-active clustering for high availability (7310 and 7410)
■
Thin provisioning of iSCSI LUNs
■
Virus scanning and quarantine
■
NDMP backup and restore
Availability
To maximize the availability of your data in production, the Sun Storage products include a
complete end-to-end architecture for data integrity, including redundancies at every level of the
stack. Key features include:
■
Predictive Self-Healing and diagnosis of all system hardware failures: CPUs, DRAM, I/O
cards, disks, fans, power supplies
■
ZFS end-to-end data checksums of all data and metadata, protecting data throughout the
stack
■
RAID-6 (DP) and optional RAID-6 across disk shelves
■
Active-active clustering for high availability (7310 and 7410)
Sun Storage 7000 Unied Storage System Installation Guide • February 201010
Page 11
■
Link aggregations and IP multipathing for network failure protection
■
I/O Multipathing between the controller and disk shelves
■
Integrated software restart of all system software services
■
Phone-Home of telemetry for all software and hardware Issues
■
Lights-out Management of each system for remote power control and console access
Browser User Interface (BUI)
Overview
The browser user interface
The BUI is the graphical tool for administration of the appliance. The BUI provides an intuitive
environment for administration tasks, visualizing concepts, and analyzing performance data.
The management software is designed to be fully featured and functional on the following
supported web browsers: Firefox 2.x and 3.x, Internet Explorer 7 and 8, Safari 3.1 or later, and
WebKit 525.13 or later.
Direct your browser to the system using either the IP address or host name you assigned to the
NET0 port as follows: https://ipaddress:215 or https://hostname:215. The login screen appears.
Chapter 1 • Introduction 11
Page 12

Overview
Command Line Interface (CLI)
The CLI is designed to mirror the capabilities of the BUI, while also providing a powerful
scripting environment for performing repetitive tasks. The following sections describe details of
the CLI. When navigating through the CLI, there are two principles to be aware of:
■
Tab completion is used extensively - if you are not sure what to type in any given context,
pressing the Tab key will provide you with possible options. Throughout the
documentation, pressing Tab is presented as the word "tab" in bold italics.
■
Help is always available - the help command provides context-specic help. Help on a
particular topic is available by specifying the topic as an argument to help, for example help
commands. Available topics are displayed by tab-completing the help command, or by
typing help topics.
You can combine these two principles, as follows:
dory:> help tab
builtins commands general help properties script
Sun Storage 7000 Unied Storage System Installation Guide • February 201012
Page 13
Installation
CHAPTER 2
2
Installation
Introduction
Controller
This section addresses how to physically install the system chassis into a rack, connect
controllers in a cluster, and expand storage. The following topics are described.
■
Controller Installation
■
Disk Shelf Installation
■
Cabling
■
Power on and Conguration
Controller Installation Overview
This section describes how to install any Sun Storage Unied Storage 7000 controller model
into a rack using the rail assembly in the bolt-on rackmount kit. Note that if your rack mount kit
shipped with installation instructions, use those instructions instead.
Observe the following cautions:
13
Page 14

Controller
■
Always load equipment into a rack from the bottom up so that it will not become top-heavy
and tip over. Deploy the anti-tip bar to the prevent the rack from tipping during equipment
installation.
■
Ensure that the temperature in the rack does not exceed the controller's maximum ambient
rated temperatures. Consider the total airow requirements of all equipment installed in the
rack to ensure that the equipment is operated within its specied temperature range.
■
For best results, only qualied Sun service personnel should perform cluster installation and
conguration. Contact Sun Service for assistance.
Prerequisites
Refer to the poster that shipped with the product or the following hardware service sections
located on
fishworks)
■
■
■
■
http://wikis.sun.com/display/shworks (http://wikis.sun.com/display/
for an overview of your system controller.
7110 Overview - view component diagrams and specications
7210 Overview - view component diagrams and specications
7310 Overview - view component diagrams, specications, and cluster options
7410 Overview - view component diagrams, specications, and cluster options
If you intend to install disk shelves into the same rack, refer to the
Disk Shelf Installation section
(applies to J4400 and J4500) for how to install them into the bottom of your rack.
Check that your rack is compatible with the slide rail and cable management assembly options
as follows:
■
The structure is a four-post rack with mounting at both front and back. Two-post racks are
not compatible.
■
The horizontal opening and unit vertical pitch conforms to ANSI/EIA 310-D-1992 or IEC
60927 standards.
■
The distance between the front and back mounting planes is between 24 inches and 36
inches (610 mm to 915 mm).
■
The distance to the front cabinet door, providing clearance depth in front of the front
mounting plane, is at least 1 inch (25.4 mm).
■
The distance to the back cabinet door, providing clearance depth behind the front mounting
plane, is at least 31.5 inches (800 mm) with the cable management assembly, or 27.5 inches
(700 mm) without the cable management assembly.
■
The distance between structural supports and cable troughs, providing clearance width
between the front and back mounting planes, is at least 18 inches (456 mm).
Sun Storage 7000 Unied Storage System Installation Guide • February 201014
Page 15
Tasks
The following are installation tasks with enumerated steps.
ControllerTasks
▼
Installing Mounting Brackets on the Chassis
If the mounting brackets are shipped inside the slide rails, you must remove them before
beginning this procedure, as follows.
■
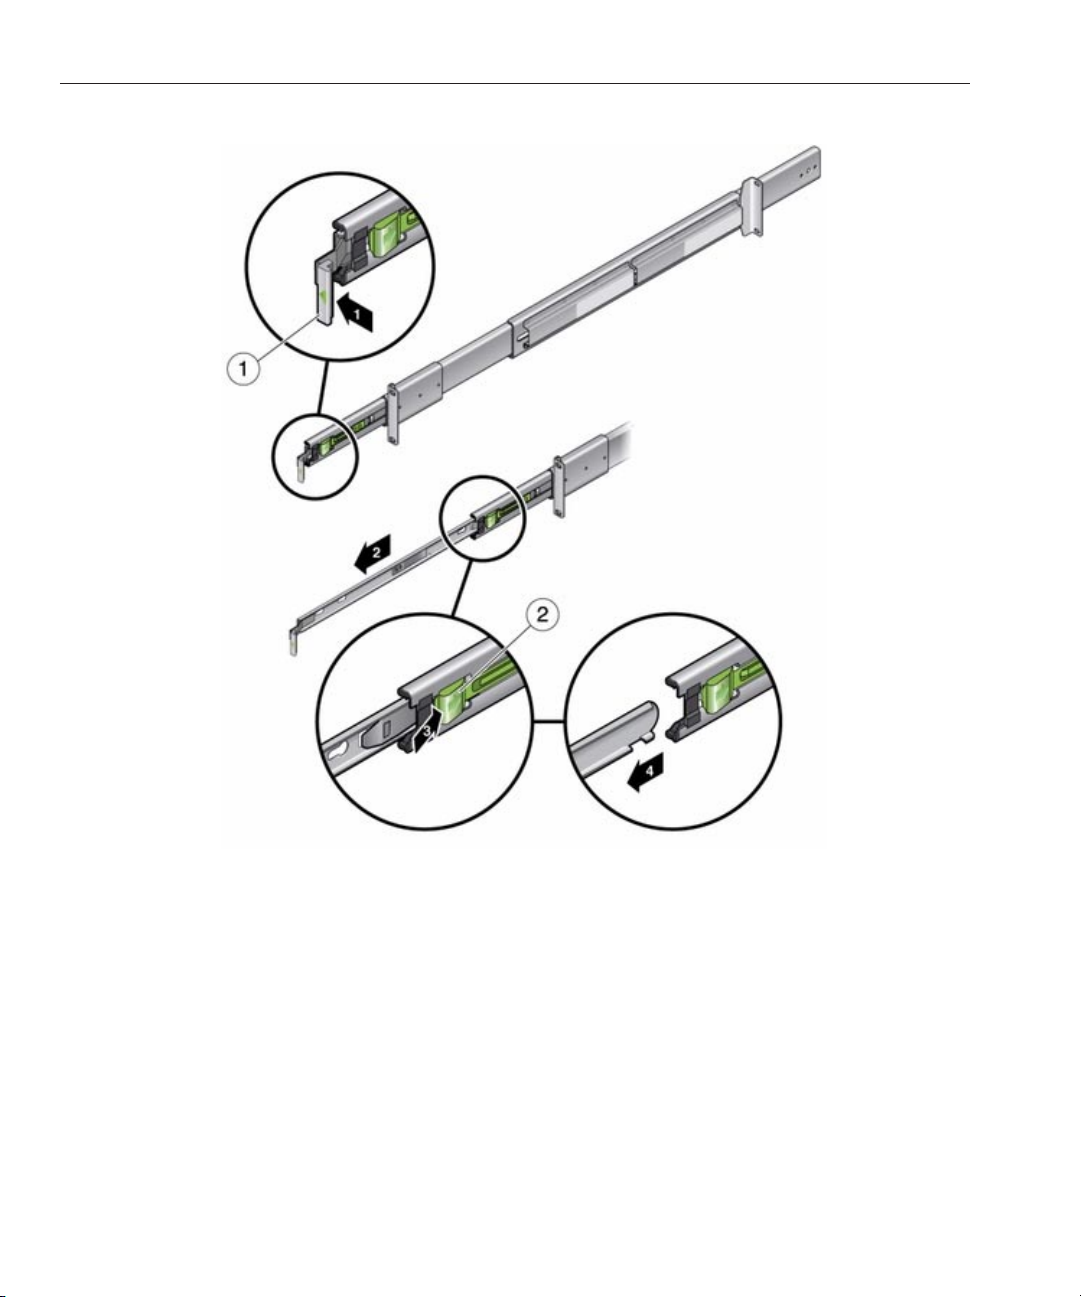
Unpack the slide rails and locate the slide rail lock at the front of the assembly.
■
Squeeze and hold the tabs at top and bottom of the lock while you pull the mounting bracket
out to the stop.
■
Push the mounting bracket release button toward the front of the mounting bracket while
withdrawing the bracket from the assembly.
The following graphic illustrates the 7110, 7310, and 7410 rail kit.
Controller
Chapter 2 • Installation 15
Page 16
Controller
The following graphic illustrates the 7210 rail kit.
Position a mounting bracket against the chassis so that the slide rail lock is at the front of the
1
chassis, and the keyed openings on the mounting bracket are aligned with the locating pins on
the side of the chassis.
Sun Storage 7000 Unied Storage System Installation Guide • February 201016
Page 17
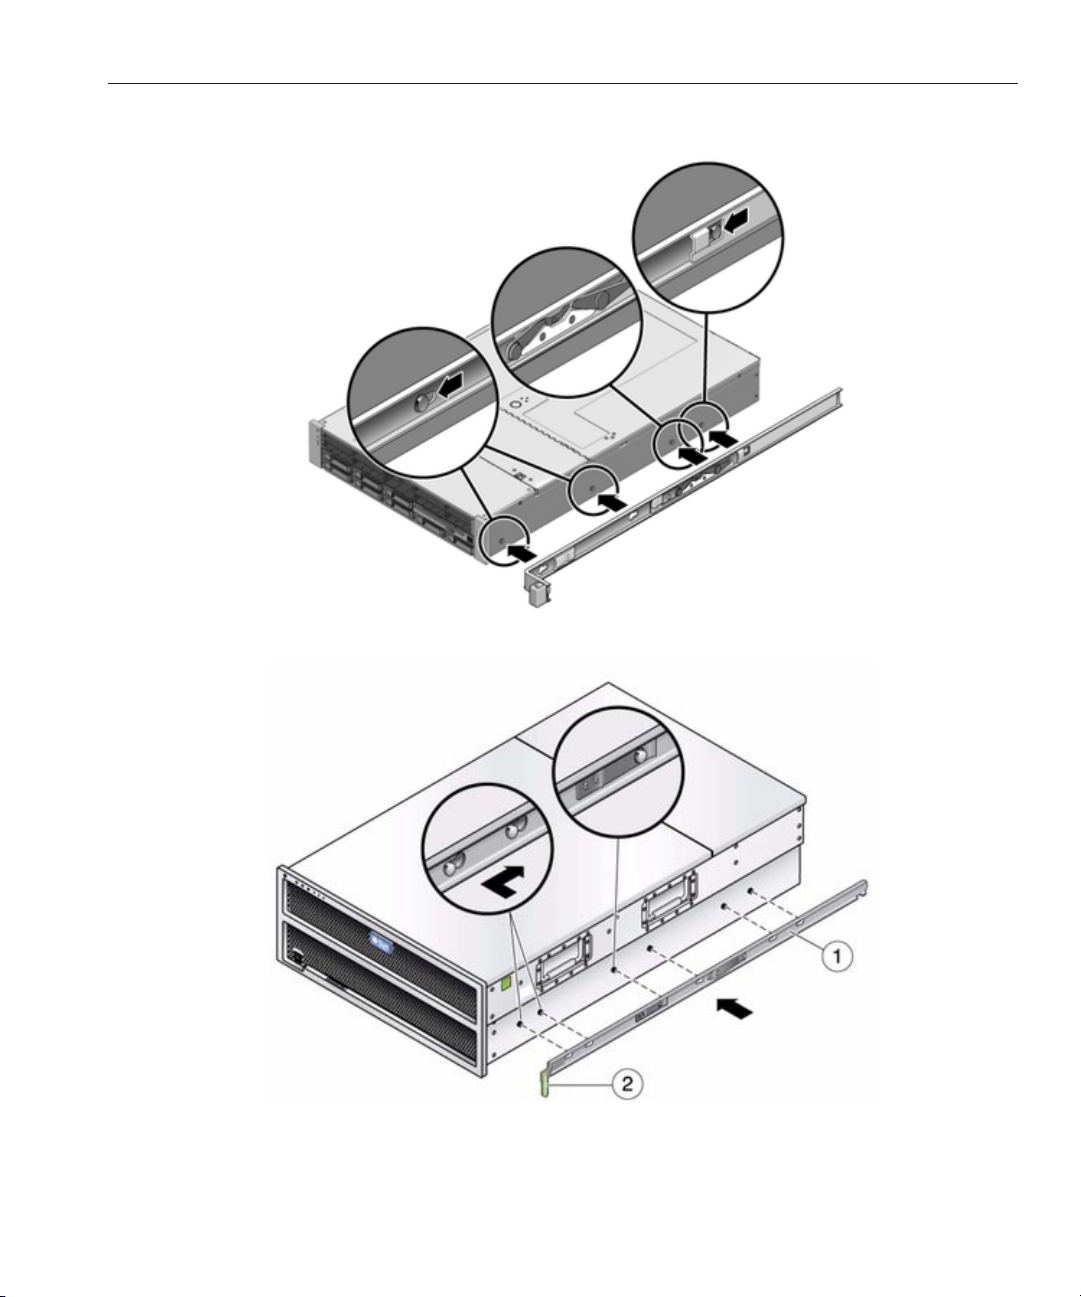
The following graphic illustrates the 7110, 7310, and 7410 mounting brackets.
2
graphic illustrates the 7210 mounting brackets.
Controller
The following
Chapter 2 • Installation 17
Page 18
Controller
With the heads of the four chassis locating pins protruding though the four keyed openings in
3
the mounting bracket, pull the mounting-bracket toward the front of the chassis until the
mounting-bracket clip locks into place with an audible click.
Verify that all mounting pins are securely fastened to the chassis.
4
Repeat to install the remaining mounting bracket on the other side of the chassis.
5
▼
Installing the Chassis into the Rack Slide Rails
This procedure requires a minimum of two people because of the weight of the chassis.
Attempting this procedure alone could result in equipment damage or personal injury. Always
load equipment into rack from the bottom up.
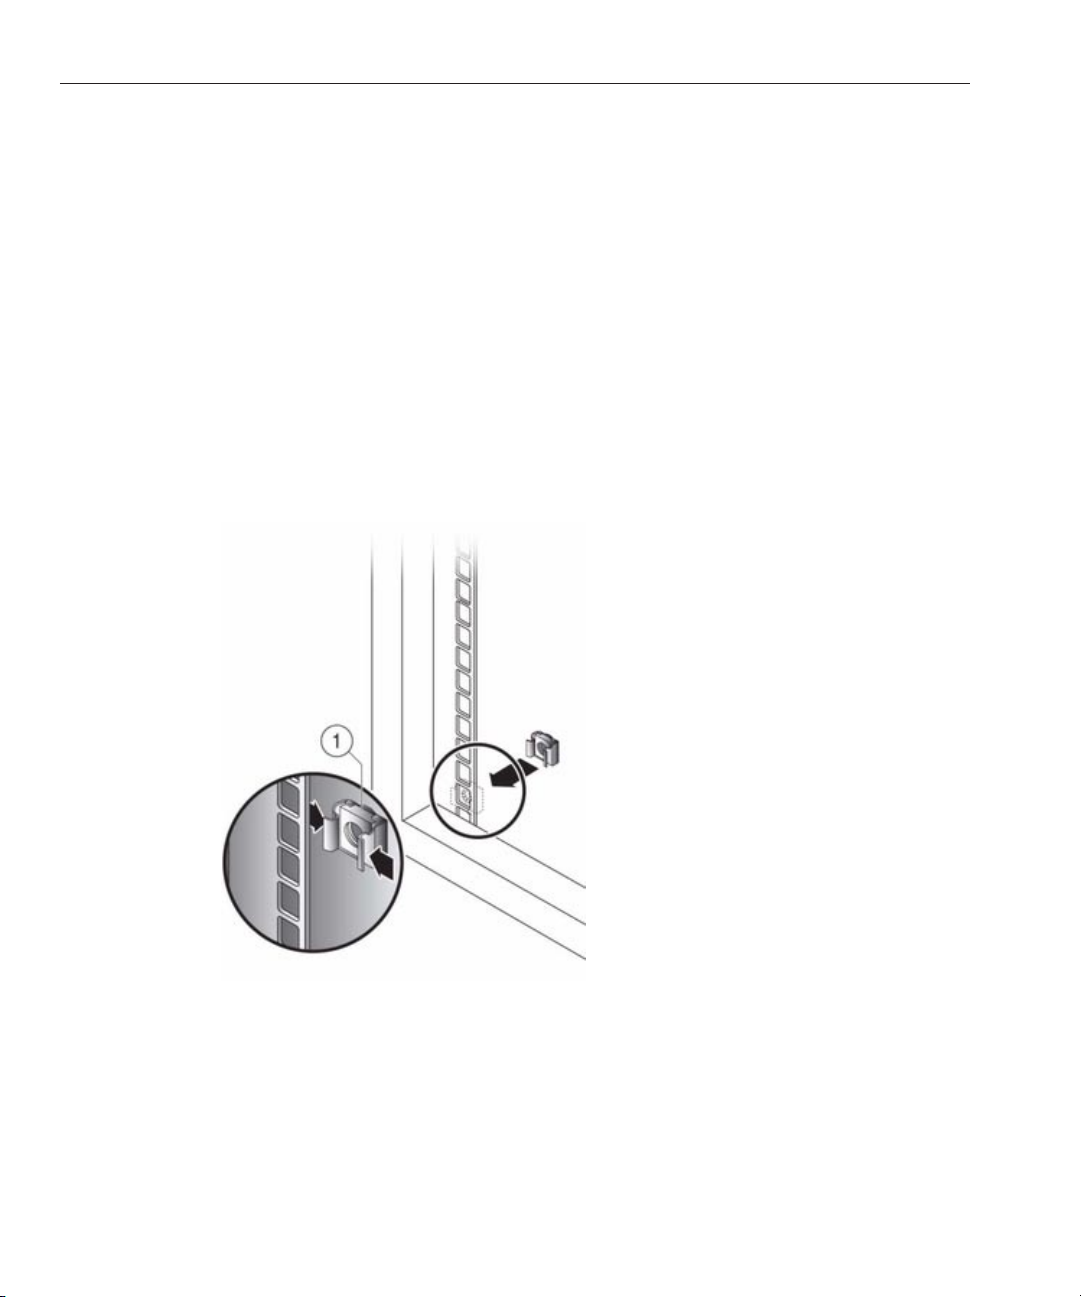
If you are using a universal 19-inch cabinet, snap an M6 square cage nut into the top and bottom
1
holes of the location where you will be installing the rail plate as shown in the following graphic.
Position a slide rail assembly in your rack so that the brackets at each end of the slide rail
2
assembly are on the outside of the front and back rack posts.The following graphic illustrates
Sun Storage 7000 Unied Storage System Installation Guide • February 201018
Page 19
the 7110, 7310, and 7410 rail assembly brackets.
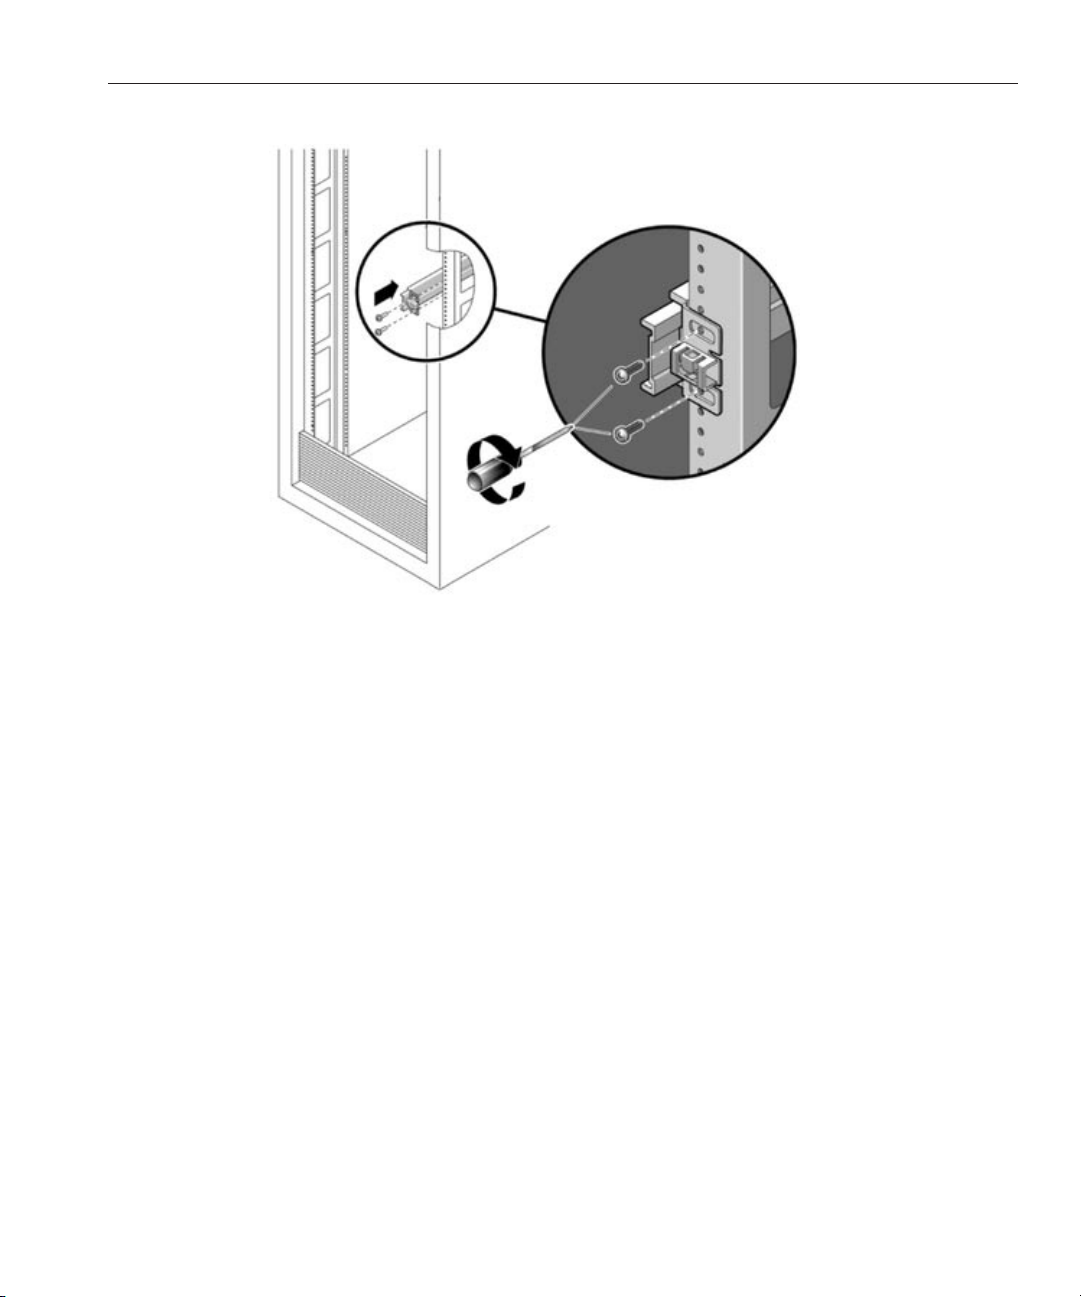
Attach each slide rail assembly to the rack posts, but do not tighten the screws completely.3
Controller
Chapter 2 • Installation 19
Page 20
Controller
From the front of the rack, set the proper width of the rails with the rail-width spacer.
4
Tighten the screws on the brackets.
5
Remove the spacer and conrm that the rails are attached tightly to the rack.
6
Sun Storage 7000 Unied Storage System Installation Guide • February 201020
Page 21
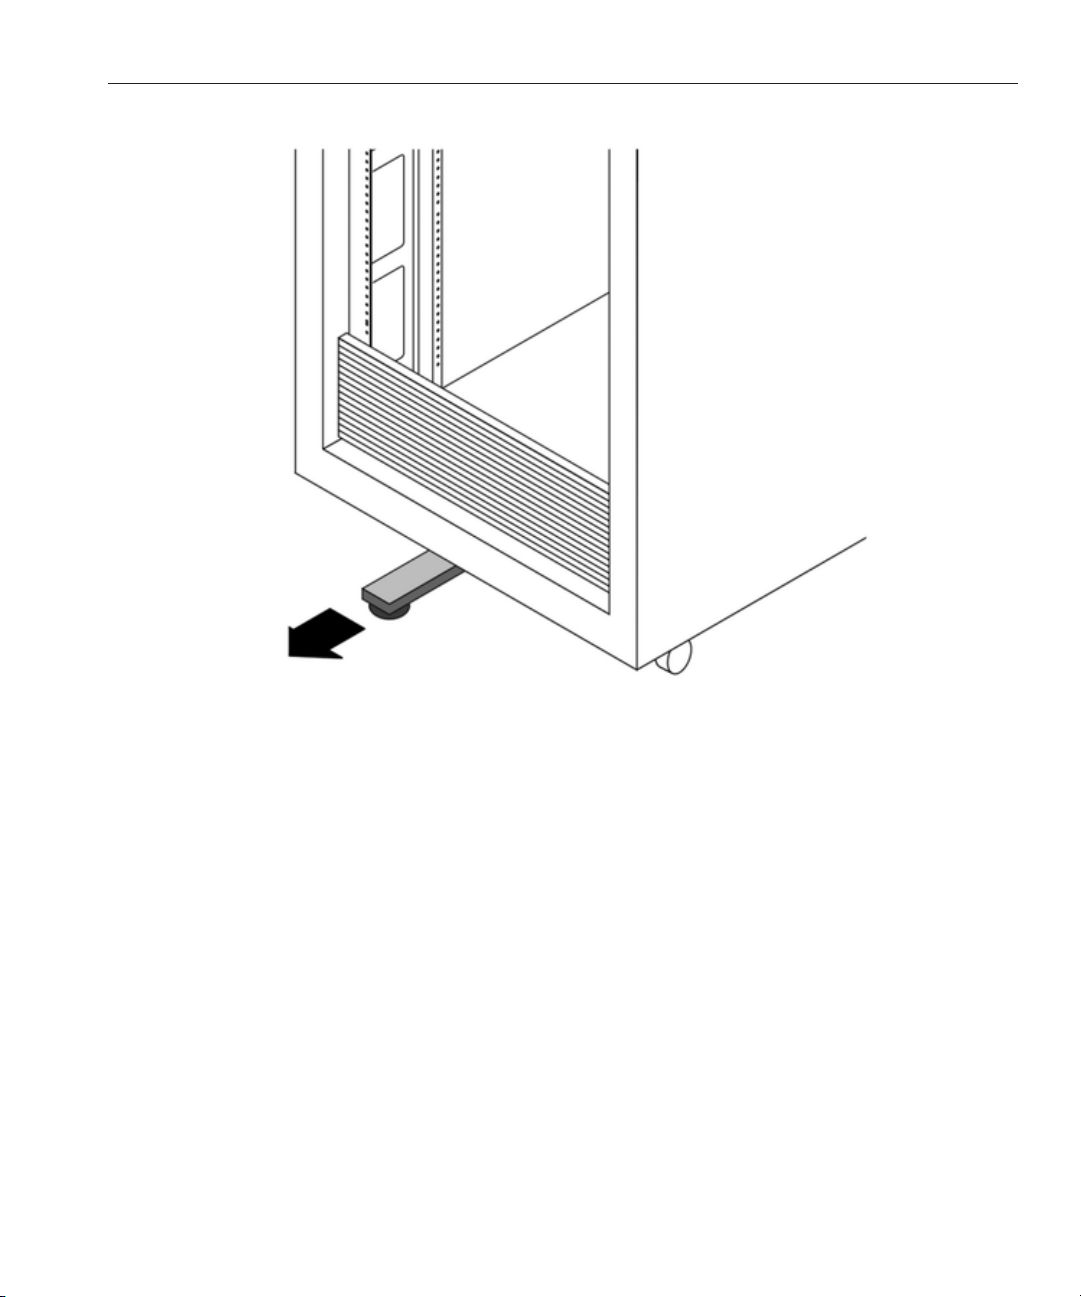
If your rack includes an anti-tip foot, extend it from the bottom of the rack.
7
Controller
If you are installing a 7110, 7310, or 7410, push the slide rails into the slide rail assemblies in the
8
rack as far as possible. If you are installing a 7210, pull the middle rail ball bearing retainers to
the front of both slide rails, securing them with the green latch.
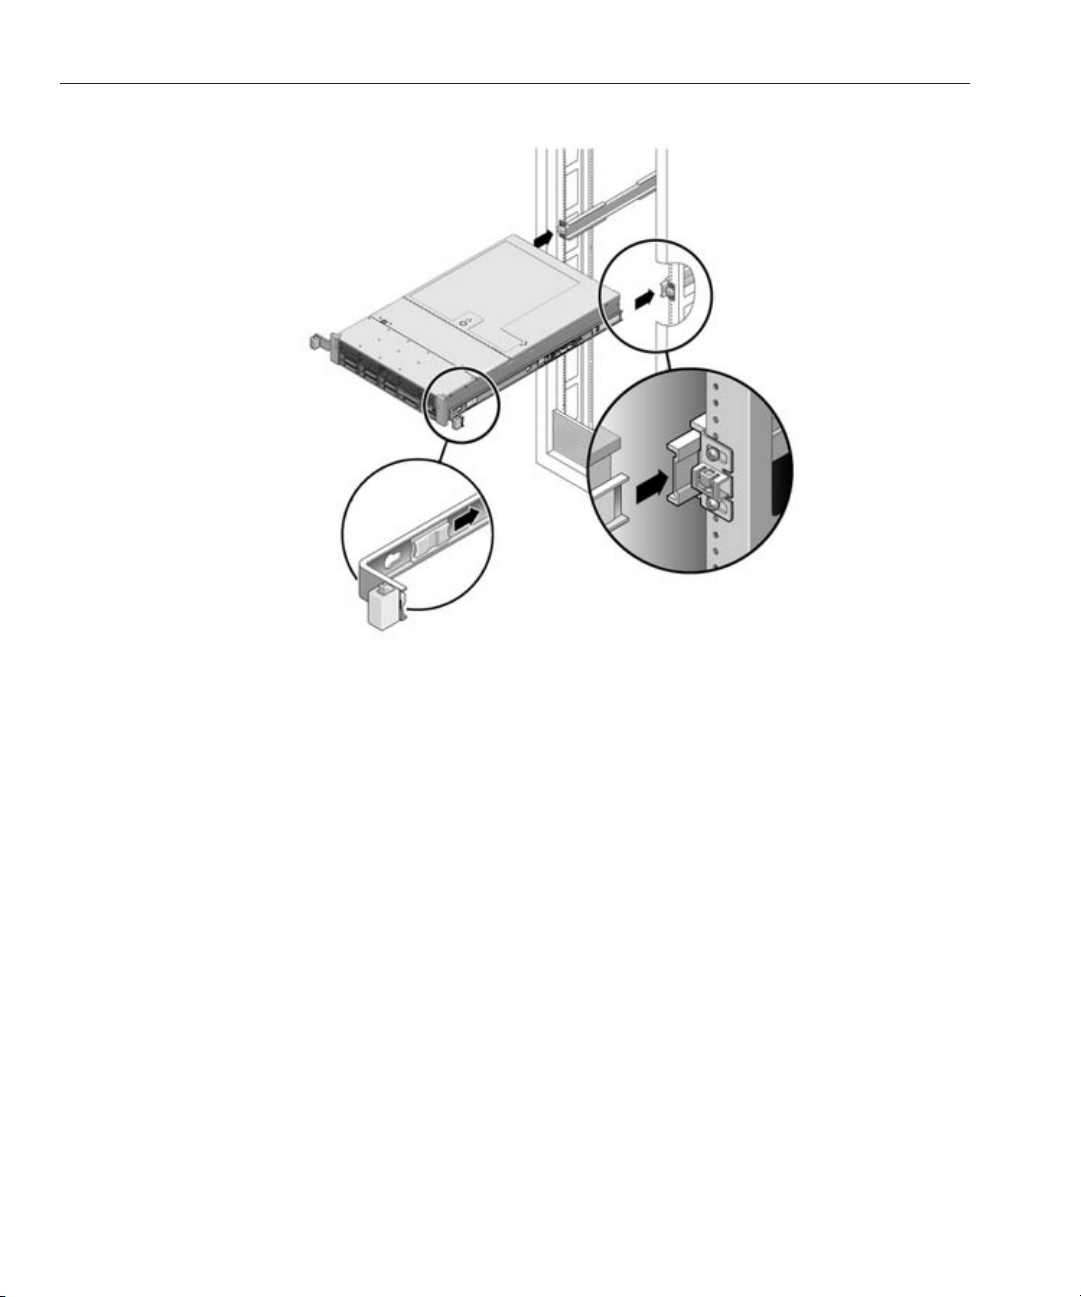
Raise the chassis so that the back ends of the mounting brackets are aligned with the slide rail
9
assemblies that are mounted in the equipment rack.
Insert the chassis with mounting brackets into the slide rails, then push the chassis into the rack
10
slowly,until the mounting brackets meet the slide rail stops (approximately 12 inches, or 30
cm).
Chapter 2 • Installation 21
Page 22
Controller
The following graphic illustrates 7110, 7310, and 7410 chassis insertion.11
Sun Storage 7000 Unied Storage System Installation Guide • February 201022
Page 23
The following graphic illustrates 7210 chassis insertion.
12
Controller
Simultaneously push and hold the slide rail release buttons on each mounting bracket while
13
you push the chassis into the rack. When the slide rail locks on the front of the
mounting-brackets engage with the slide rail assemblies, you will hear an audible click.
▼
Installing the Cable Management Assembly (CMA)
This procedure is completed from the back of the equipment rack.
Chapter 2 • Installation 23
Page 24

Controller
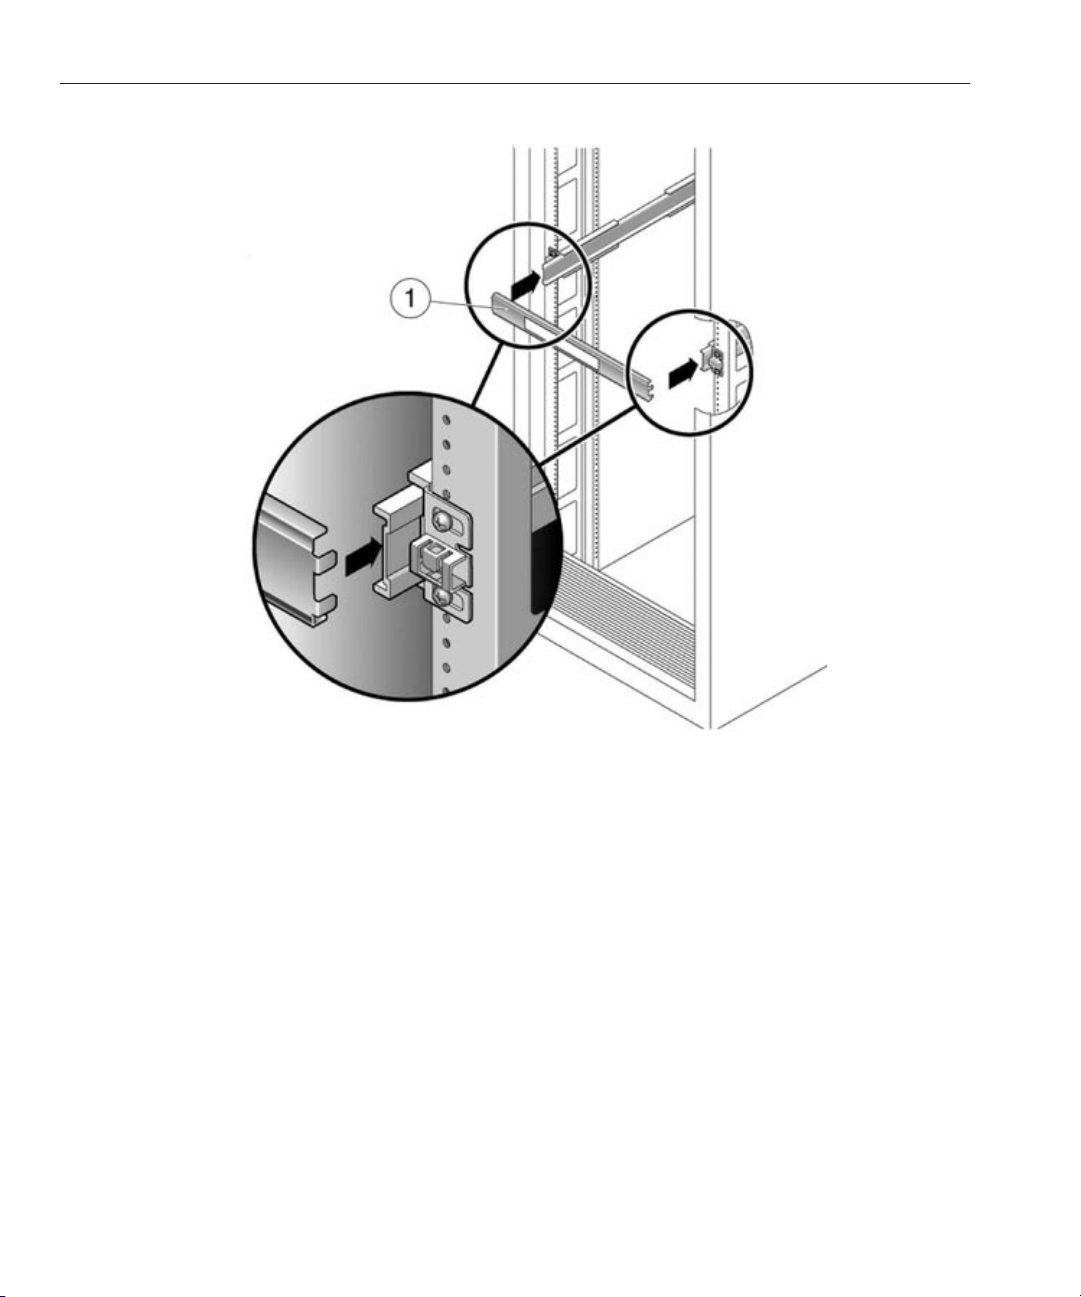
Attach the CMA rail extension to the left slide rail until the extension locks into place.1
Sun Storage 7000 Unied Storage System Installation Guide • February 201024
Page 25

Insert the CMA mounting bracket connector into the right slide rail until the connector locks
2
Controller
into place.
Chapter 2 • Installation 25
Page 26

Controller
Insert the right CMA slide rail connector into the right slide rail assembly until the connector
3
locks into place.
Sun Storage 7000 Unied Storage System Installation Guide • February 201026
Page 27

Insert the left CMA slide rail connector into the rail extension on the left slide rail assembly until
4
the connector locks into place.
Controller
Chapter 2 • Installation 27
Page 28

Shelf
After you install and route the cables through the assembly, attach the hook and loop straps to
5
secure the cables. Then attach the right and left outer latches to support the assembly.
Shelf
Disk Shelf Installation
This section describes how to install the J4400, J4500 or Sun Disk Shelf-24x3.5" SAS-2 into a
rack using the rail assembly in the bolt-on rack mount kit. Note that if your rack mount kit
shipped with installation instructions, use those instructions instead.
Observe the following cautions:
■
Always load equipment into a rack from the bottom up so that it will not become top-heavy
and tip over. Deploy the anti-tip bar to the prevent the rack from tipping during equipment
installation.
Sun Storage 7000 Unied Storage System Installation Guide • February 201028
Page 29

Shelf
■
Ensure that the temperature in the rack does not exceed the controller's maximum ambient
rated temperatures. Consider the total airow requirements of all equipment installed in the
rack to ensure that the equipment is operated within its specied temperature range.
Prerequisites
Refer to the poster that shipped with the product or the System Service Manual located on
http://wikis.sun.com/display/shworks (http://wikis.sun.com/display/fishworks) for an
overview of your disk shelf.
■
Disk Shelf Overview - view component diagrams and specications
Use one of the following racks for the J4400 or Sun Disk Shelf.
■
Sun Rack 900/1000 cabinet
■
Sun Fire cabinet
■
Sun StorEdge Expansion cabinet
■
Sun Rack II 1042/1242 cabinet (Sun Disk Shelf-24x3.5" SAS-2 only)
■
Any 19-inch wide, 4-post, EIA-compatible rack or cabinet with a front-to-back depth
between vertical cabinet rails of 61 cm to 91 cm (24 in. to 36 in.). The cabinet can have
threaded or unthreaded cabinet rails.
Use a rack that meets the following standards for the J4500.
■
Four-post structure (mounting at both front and rear). Note that two-post racks and
two-post racks converted to four-post racks are not compatible.
■
Rack horizontal opening and unit vertical pitch conforming to ANSI/EIA 310-D- 1992 or
IEC 60927 standards.
■
Distance between front and rear mounting planes between 23 and 34 inches (580 mm and
870 mm).
■
Minimum clearance depth (to front cabinet door) in front of front rack mounting plane:
1.85 inches (47 mm).
■
Minimum clearance depth (to rear cabinet door) behind front rack mounting plane: 33.5
inches (851 mm) without cable management arm (a cable management arm is not included
or supported with this product). The Sun Storage J4500 shelf ts best in 1000 mm racks. Sun
recommends using the Sun Rack 1000-42 and Sun Rack 1000-38.
■
Minimum clearance width between the structural supports and cable troughs: 19inches (483
mm).
■
Minimum clearance width (not between structural supports and cable troughs) between
front and rear mounting planes: 18 inches (456 mm).
Position the rack next to the rack where the controller is installed, if separate. Stabilize the
cabinet and lock the casters.
Chapter 2 • Installation 29
Page 30

Shelf
Tasks
Shelf Tasks
▼
Installing the Disk Shelf into the Rack Slide Rails
You will need a No. 2 Phillips head screwdriver that is a minimum of 4-inches in length.
A mechanical lift is highly recommended for the J4500 and Sun Disk Shelf because either shelf
can weigh between 91 to 170 pounds (42-77kg). At least three people are required, two to install
the shelf and one spotter to engage the rails. If a mechanical lift is not available, remove the
power supplies, SIM boards and hard disk drives to reduce the weight, see Disk Shelf
Maintenance Procedures for instructions included in the System Service Manual on
http://wikis.sun.com/display/shworks. (http://wikis.sun.com/display/fishworks.)
Starting at the bottom of the cabinet, locate the appropriate rack unit (RU) height.The J4400,
1
J4500 and Sun Disk Shelf require four standard mounting units (4RU) of vertical space in the
cabinet.
If you are installing a J4500, you will need to rst attach the J4500 mounting brackets.
2
Sun Storage 7000 Unied Storage System Installation Guide • February 201030
Page 31

If you are using a universal 19-inch or Sun Rack II cabinet, snap an M6 square cage nut into the
3
4U location where you will be installing the system. For J4400/Sun Disk Shelf, install in top and
bottom holes. For J4500, install in bottom hole and fourth hole up from the bottom.
Shelf
For J4400/Sun Disk Shelf,install appropriate rail plates in four locations on the rack (2 front and
4
2 back) by aligning the two pins on the rail plate with holes on the cabinet rails.
Chapter 2 • Installation 31
Page 32

Shelf
For J4400/Sun Disk Shelf,insert M6 screws in the top and bottom holes of each rail plate and
5
tighten (8 total places).
For J4500, attach the slide-rail assembly, making sure you have six holes of free space above the
6
bracket.
For J4400/Sun Disk Shelf,install each rail by rst aligning the front pins of the rack adapter
7
plates with corresponding holes in the front of the rail, then adjust the rail to t the rack and
insert the pins from the rear rack adapter plates into the corresponding holes of the rail.
Sun Storage 7000 Unied Storage System Installation Guide • February 201032
Page 33

For J4400/Sun Disk Shelf,install 4 8-32 screws into the 4 remaining holes front and rear of each
8
rack rail (16 total).
Shelf
For J4500, install 4 screws at front and back to mount each rail assembly.
9
For J4400/Sun Disk Shelf, using a mechanical lift or two people, one at each side of the shelf,
10
carefully lift and rest the shelf on the bottom ledge of the left and right rails. The following
Chapter 2 • Installation 33
Page 34

Shelf
graphic illustrates the Sun Disk Shelf chassis insertion.
Sun Storage 7000 Unied Storage System Installation Guide • February 201034
Page 35

The following graphic illustrates J4500 chassis insertion.
11
Shelf
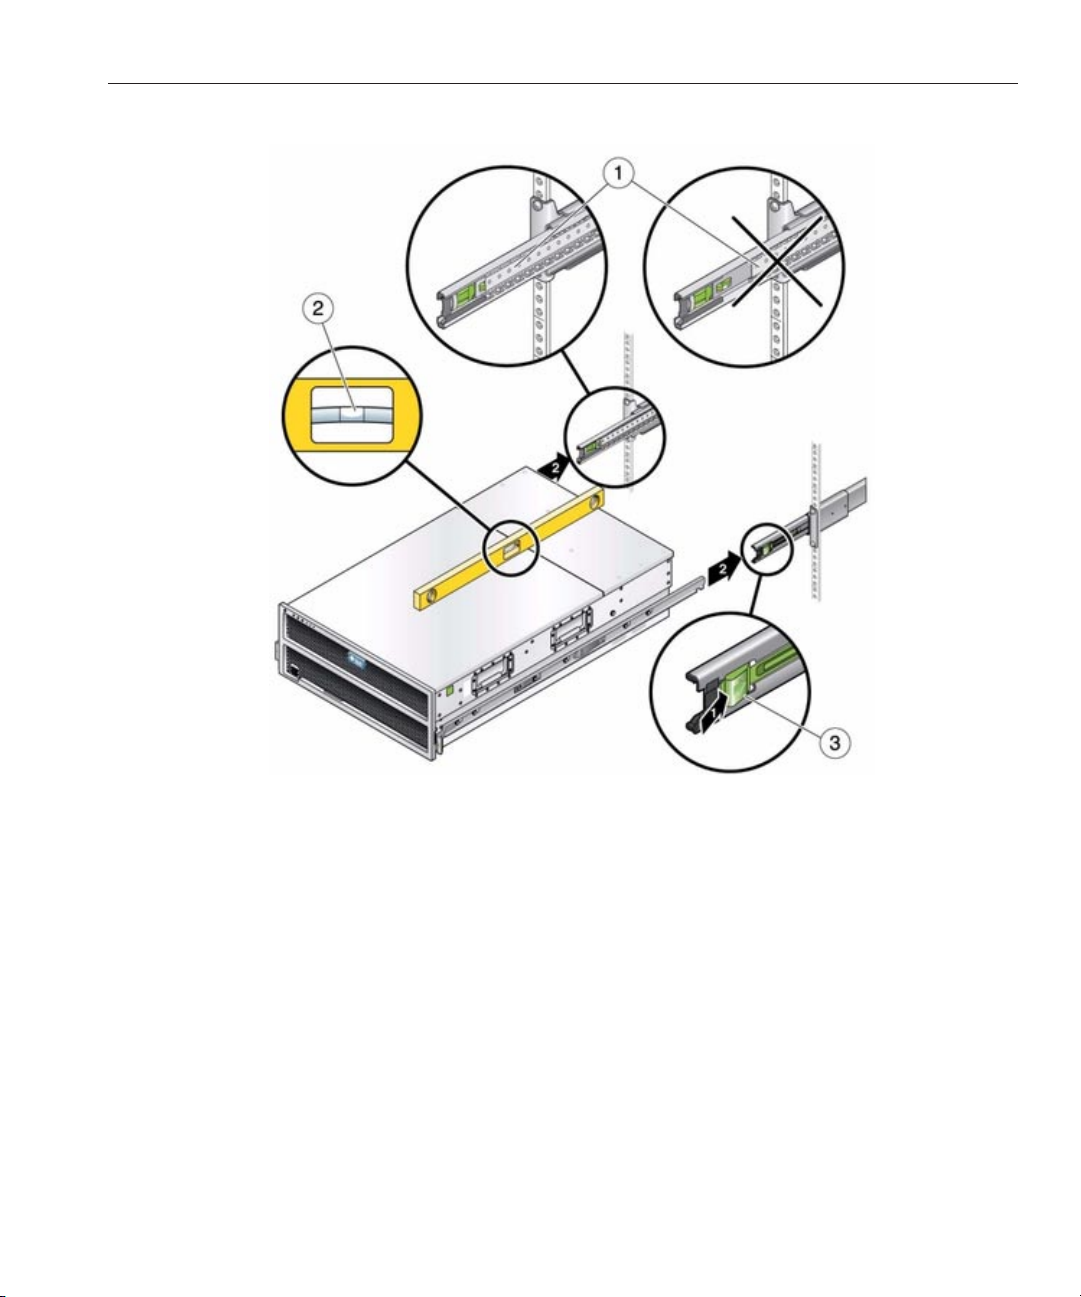
Carefully slide the shelf into the cabinet until the front anges of the shelf touch the vertical
12
face of the rack.
Chapter 2 • Installation 35
Page 36

Shelf
For the J4400/Sun Disk Shelf, tighten the captive screws on each side of the front of the shelf to
13
secure the shelf to the rack. The following graphic illustrates the J4400 screws.
Sun Storage 7000 Unied Storage System Installation Guide • February 201036
Page 37

For the J4400/Sun Disk Shelf, at the back, slide a system locking clip onto each lower corner of
14
the chassis.
Cabling
Cabling
See Also
■
Controller Installation
■
7210 Cabling Diagrams
■
7310 Cabling Diagrams
■
7410 Cabling Diagrams
Cabling Diagrams
The diagrams in the sections that follow illustrate how to properly connect storage controllers,
either in standalone or clustered congurations, to one or more disk shelves for storage
expansion. Use the images as a key to understanding how the abstracted diagrams correspond
to actual hardware:
Chapter 2 • Installation 37
Page 38

7210 Cabling
■
■
■
■
■
■
■
7210 Cabling
Connecting Expansion Storage to the Sun Storage 7210
The Sun Unied Storage 7210 can support up to two J4500 disk shelves. The gures below show
the complete set of supported congurations, as well as steps to migrate from one state to
another.
Sun Unied Storage 7210
NOTE: Cabling diagrams are not representative of proper slot location for HBAs.
Connecting Expansion Storage to the 7210
Connecting Expansion Storage to the 7310
Connecting Expansion Storage to the 7310 Cluster
Connecting Expansion Storage to the 7410 (2 HBAs)
Connecting Expansion Storage to the 7410 (3 HBAs)
Connecting Expansion Storage to the 7410 Cluster (2 HBAs)
Connecting Expansion Storage to the 7410 Cluster (3 HBAs)
Cabling Diagrams
Sun Storage 7000 Unied Storage System Installation Guide • February 201038
Page 39

fig.1 Sun Unied Storage 7210 system with one J4500 disk shelf
7210 Cabling
Chapter 2 • Installation 39
Page 40

7310 Cabling
fig.2 Sun Unied Storage 7210 system with two J4500 disk shelves
7310 Cabling
Connecting Expansion Storage to the Sun Storage 7310
The Sun Unied Storage 7310 can support up to four J4400/Sun Disk shelves. The gures below
show the complete set of supported congurations, as well as steps to migrate from one state to
another.
NOTE: Cabling diagrams are not representative of proper slot location for HBAs.
Cabling Diagrams
Sun Storage 7000 Unied Storage System Installation Guide • February 201040
Page 41

fig.1 Sun Unied Storage 7310 with one J4400/Sun Disk shelf
7310 Cabling
Chapter 2 • Installation 41
Page 42

7310 Cabling
fig.2 Sun Unied Storage 7310 with two J4400/Sun Disk shelves
fig.3 Sun Unied Storage 7310 with three J4400/Sun Disk shelves
fig.4 Sun Unied Storage 7310 with four J4400/Sun Disk shelves
Sun Storage 7000 Unied Storage System Installation Guide • February 201042
Page 43

7310 Cluster Cabling
Connecting Expansion Storage to the Sun Storage 7310 Cluster
The Sun Unied Storage 7310 cluster can support up to four J4400/Sun Disk shelves. The
gures below show the complete set of supported redundant cluster congurations, as well as
steps to migrate from one state to another.
NOTE: Cabling diagrams are not representative of proper slot location for HBAs.
7310 Cluster Cabling
Cabling Diagrams
fig.1 Sun Unied Storage 7310 cluster with one J4400/Sun Disk shelf
Chapter 2 • Installation 43
Page 44

7310 Cluster Cabling
fig.2 Sun Unied Storage 7310 cluster with two J4400/Sun Disk shelves
Sun Storage 7000 Unied Storage System Installation Guide • February 201044
Page 45

fig.3 Sun Unied Storage 7310 cluster with three J4400/Sun Disk shelves
7310 Cluster Cabling
fig.4 Sun Unied Storage 7310 cluster with four J4400/Sun Disk shelves
Chapter 2 • Installation 45
Page 46

7410 Cabling pt.1
7410 Cabling pt.1
Connecting Expansion Storage to the Sun Storage 7410
The Sun Unied Storage 7410 is available with either two or three HBA cards installed, each of
which can support up to four J4400/Sun Disk shelves. The gures below show a representative
sample of stable, balanced congurations with two HBAs, as well as steps to migrate from one
state to another.
NOTE: Diagrams below are not representative of proper slot location for HBAs.
Cabling Diagrams
fig.1 Sun Unied Storage 7410 with two HBAs and one J4400/Sun Disk shelf
Sun Storage 7000 Unied Storage System Installation Guide • February 201046
Page 47

fig.2 Sun Unied Storage 7410 two HBAs and with two J4400/Sun Disk shelves
7410 Cabling pt.1
Chapter 2 • Installation 47
Page 48

7410 Cabling pt.1
fig.3 Sun Unied Storage 7410 with two HBAs and three J4400/Sun Disk shelves
fig.4 Sun Unied Storage 7410 with two HBAs and four J4400/Sun Disk shelves
fig.5 Sun Unied Storage 7410 with two HBAs and six J4400/Sun Disk shelves
Sun Storage 7000 Unied Storage System Installation Guide • February 201048
Page 49

fig.6 Sun Unied Storage 7410 with two HBAs and eight J4400/Sun Disk shelves
7410 Cabling pt.2
7410 Cabling pt.2
Connecting Expansion Storage to the Sun Storage 7410 (cont.)
The Sun Unied Storage 7410 is available with either two or three HBA cards installed, each of
which can support up to four J4400/Sun Disk shelves. The gures below show a representative
sample of stable, balanced congurations with three HBAs, as well as steps to migrate from one
state to another.
NOTE: Diagrams below are not representative of proper slot location for HBAs.
Chapter 2 • Installation 49
Page 50

7410 Cabling pt.2
Cabling Diagrams
fig.1 Sun Unied Storage 7410 with three HBAs and one J4400/Sun Disk shelf
fig.2 Sun Unied Storage 7410 with three HBAs and two J4400/Sun Disk shelves
fig.3 Sun Unied Storage 7410 with three HBAs and three J4400/Sun Disk shelves
Sun Storage 7000 Unied Storage System Installation Guide • February 201050
Page 51

7410 Cabling pt.2
Chapter 2 • Installation 51
Page 52

7410 Cabling pt.2
fig.4 Sun Unied Storage 7410 with three HBAs and four J4400/Sun Disk shelves
fig.5 Sun Unied Storage 7410 with three HBAs and six J4400/Sun Disk shelves
fig.6 Sun Unied Storage 7410 with three HBAs and nine J4400/Sun Disk shelves
Sun Storage 7000 Unied Storage System Installation Guide • February 201052
Page 53

fig.7 Sun Unied Storage 7410 with three HBAs and twelve J4400/Sun Disk shelves
7410 Cluster Cabling pt.1
7410 Cluster Cabling pt.1
Connecting expansion storage to the Sun Storage 7410 Cluster
The Sun Unied Storage 7410 cluster is available with either two or three HBA cards installed,
each of which can support up to four J4400/Sun Disk shelves. The gures below show a
representative sample of stable, balanced and redundant cluster congurations with two HBAs,
as well as steps to migrate from one state to another.
NOTE: Diagrams below are not representative of proper slot location for HBAs.
Chapter 2 • Installation 53
Page 54

7410 Cluster Cabling pt.1
Cabling Diagrams
fig.1 Sun Unied Storage 7410 cluster with two HBAs and one J4400/Sun Disk shelf
fig.2 Sun Unied Storage 7410 cluster with two HBAs and two J4400/Sun Disk shelves
Sun Storage 7000 Unied Storage System Installation Guide • February 201054
Page 55

7410 Cluster Cabling pt.1
Chapter 2 • Installation 55
Page 56

7410 Cluster Cabling pt.1
fig.3 Sun Unied Storage 7410 cluster with two HBAs and three J4400/Sun Disk shelves
fig.4 Sun Unied Storage 7410 cluster with two HBAs and four J4400/Sun Disk shelves
Sun Storage 7000 Unied Storage System Installation Guide • February 201056
Page 57

7410 Cluster Cabling pt.1
fig.5 Sun Unied Storage 7410 cluster with two HBAs and six J4400/Sun Disk shelves
fig.6 Sun Unied Storage 7410 cluster with two HBAs and eight J4400/Sun Disk shelves
Chapter 2 • Installation 57
Page 58

7410 Cluster Cabling pt.2
7410 Cluster Cabling pt.2
Connecting Expansion Storage to the Sun Storage 7410 Cluster (cont.)
The Sun Unied Storage 7410 cluster is available with either two or three HBA cards installed,
each of which can support up to four J4400/Sun Disk shelves. The gures below show a
representative sample of stable, balanced and redundant cluster congurations with three
HBAs, as well as steps to migrate from one state to another.
NOTE: Diagrams below are not representative of proper slot location for HBAs.
Cabling Diagrams
Sun Storage 7000 Unied Storage System Installation Guide • February 201058
Page 59

7410 Cluster Cabling pt.2
fig.1 Sun Unied Storage 7410 cluster with three HBAs and one J4400/Sun Disk shelf
fig.2 Sun Unied Storage 7410 cluster with three HBAs and two J4400/Sun Disk shelves
fig.3 Sun Unied Storage 7410 cluster with three HBAs and three J4400/Sun Disk shelves
Chapter 2 • Installation 59
Page 60

7410 Cluster Cabling pt.2
Sun Storage 7000 Unied Storage System Installation Guide • February 201060
Page 61

7410 Cluster Cabling pt.2
fig.4 Sun Unied Storage 7410 cluster with three HBAs and four J4400/Sun Disk shelves
fig.5 Sun Unied Storage 7410 cluster with three HBAs and six J4400/Sun Disk shelves
Chapter 2 • Installation 61
Page 62

7410 Cluster Cabling pt.2
fig.6 Sun Unied Storage 7410 cluster with three HBAs and nine J4400/Sun Disk shelves
fig.7 Sun Unied Storage 7410 cluster with three HBAs and twelve J4400/Sun Disk shelves
Sun Storage 7000 Unied Storage System Installation Guide • February 201062
Page 63

Power
Power
Powering On and Conguring the Appliance
This section provides instructions for conguring the primary network interface using the
preinstalled Unied Storage System command line interface (CLI). After you congure the
primary interface, congure the remaining system parameters using the browser user interface
(BUI) from any client on the same network.
Prerequisites
Refer to the Disk Shelf Installation and Controller Installation pages for detailed instructions to
install your system in the rack. Complete the system cabling according to the
section.
Gather the following information in preparation for conguring an Ethernet interface on the
storage controller.
■
IP address
■
IP netmask
■
Host name
■
Domain Name Server (DNS) domain name
■
DNS server IP address
■
Default router IP address
■
Password
Cabling Diagrams
If you will access the appliance through an administrative client, congure the administrative
client with the following settings:
■
8N1: eight data bits, no parity, one stop bit
■
9600 baud
■
Disable hardware ow control (CTS/RTS)
■
Disable software ow control (XON/XOFF)
Refer to the poster that shipped with the product or the following sections in the System Service
Manual located on
fishworks)
■
7110 Overview
■
7210 Overview
■
7310 Overview
■
7410 Overview
Chapter 2 • Installation 63
http://wikis.sun.com/display/shworks (http://wikis.sun.com/display/
for an overview of your system controller.
Page 64

Power
Tasks
PowerTasks
▼
PoweringOn the Appliance
You can access the system by connecting an administrative client to the serial management port
on the controller. Alternatively, if there is a Dynamic Host Conguration Protocol (DHCP)
server on the network, you can access the system by connecting the network management port
to your network.
Note that if you are installing a cluster, congure only one controller initially. The software
propagates the conguration to the peer controller during cluster initialization. After the cluster
is initialized, you can administer the system from either storage controller. However, do not
attempt initial conguration on both controllers independently. Refer to the Cluster
documentation in the System Administration Guide located on
shworks (http://wikis.sun.com/display/fishworks)
If you are using an administrative client to access the appliance, connect a serial cable from the
1
SER MGT port on the back panel of the controller to the serial port on the administrative client.
Use the DB9 to RJ45 adapter if necessary.
http://wikis.sun.com/display/
for more information.
2
If you are using the network to access the appliance, connect an Ethernet cable from the NET
MGT port on the back panel of the controller to your network.
3
Connect an Ethernet cable from your network to the NET0 port on the back panel of the
controller.
4
Poweron any disk shelves attached to the storage system by plugging the two power cords into
the universal power connectors, connecting the cords to the external power source and turning
on the disk shelf power switches. Wait several minutes until the power indicators are lit a steady
green.
Connect power cables to power supply 0 and power supply 1 on the storage controller(s) and
5
wait until the Power/OK LED on the front panel next to the Power button lights and remains lit
(approximatelytwo minutes).
6
Open a terminal window or terminal emulator and issue either the telnet or ssh command, as
follows:
7
For serial port concentrator, use root as the user name and replace serial-concentrator
portnumber with the appropriate value: telnet serial-concentrator portnumber
Sun Storage 7000 Unied Storage System Installation Guide • February 201064
Page 65

For network connection, use root as the user name and determine the IP address by accessing
8
your DHCP server for the address assigned to the SP MAC address: ssh root@192.168.128.256
Typethe password changeme when prompted.
9
At the command prompt, type start /SP/console.
10
Typey to conrm that you want to start the console.
11
Press any key to begin conguring the appliance.The shell interface conguration screen
12
appears. NET-0at the top of the screen should be underlined.
Verify the information on the screen, or enter values that do not appear.
13
Apply the values by pressing ESC-1 or the F1 key or by pressing Enter after conrming the
14
password.The nal shell conguration screen appears, conrming that your appliance is ready
for further conguration using the BUI.
▼
Completing Conguration
Congure the remaining system parameters through a browser running on any client on the
same network as the initial interface. The management software is designed to be fully featured
and functional on the following supported web browsers: Firefox 2.x and 3.x, Internet Explorer
7, Internet Explorer 8, Safari 3.1 or later, and WebKit 525.13 or later.
Power
Direct your browser to the system using either the IP address or host name you assigned to the
1
NET0 port as follows: https://ipaddress:215 or https://hostname:215. The login screen appears.
Typeroot into the Username eld and the administrative password that you entered into the
2
appliance shell kit interface and press the Enter key.TheWelcome screen appears.
To begin conguring the system, click Start on the Welcome screen. You are guided through the
3
Initial Conguration of the remaining network interfaces, DNS, time settings, directory service
and storage.
Next Steps
■
Initial Conguration
Chapter 2 • Installation 65
Page 66

Initial
Initial
Initial Conguration
The initial conguration consists of six conguration steps.
1. Network
2. DNS
3. Time
4. Name Services (NIS, LDAP, Active Directory)
5. Storage
6. Registration & Support
Prerequisites
The initial conguration of the system is conducted after powering it on for the rst time and
establishing a connection, as documented in the
http://wikis.sun.com/display/shworks/Documentation. (http://wikis.sun.com/display/
fishworks/Documentation.)
Installation section, also available as a PDF on
Note that the option to perform initial conguration of a cluster is only available in the BUI. If
electing this option, read the clustering documentation before beginning initial conguration
for detailed additional steps that are required for successful cluster setup. Alternatively,
cluster-capable appliances may be initially congured for standalone operation using the
following procedure and re-congured for cluster operation at a later time.
Summary
This procedure will congure networking connectivity, several client network services, and the
layout of the storage pool for standalone operation. When completed, the appliance is ready for
use - but may not have any shares congured for remote clients to access. See the Shares section
for how to create shares. Refer to the Conguration section for other available settings and to
revisit those from the initial conguration. See
(http://wikis.sun.com/display/fishworks)
the System Administration Guide.
This procedure may be repeated at a later time by clicking the "INITIAL SETUP" button on the
System screen or by entering the maintenance system setup context in the CLI.
Sun Storage 7000 Unied Storage System Installation Guide • February 201066
http://wikis.sun.com/display/shworks
for the Shares and Conguration sections of
Page 67

Initial
BUI
The BUI initial conguration wizard provides a screen for each of the initial conguration
steps. Click "COMMIT" to save the conguration and go to the next screen. Arrows beneath the
COMMIT button can be used to revisit previous steps, and change the conguration if desired.
CLI
Alternatively, use the CLI to step through the initial conguration sections. Each step begins by
printing its help, which can be reprinted by typing help. Use the done command to complete
each step.
Performing Initial Conguration with the CLI
Login using the password you provided during Installation:
caji console login: root
Password:
Last login: Sun Oct 19 02:55:31 on console
To setup your system, you will be taken through a series of steps; as the setup
process advances to each step, the help message for that step will be
displayed.
Press any key to begin initial configuration ...
Congure networking. In this example, the existing settings are checked (which were from
DHCP), and accepted by typing done. To customize them at this point, enter each context
(datalinks, devices and interfaces) and type help to see available actions for that context. See the
Network page for additional documentation or refer to the System Administration Guide at
http://wikis.sun.com/display/shworks. (http://wikis.sun.com/display/fishworks.)
aksh: starting configuration with "net" ...
Configure Networking. Configure the appliance network interfaces. The first
network interface has been configured for you, using the settings you provided
at the serial console.
Subcommands that are valid in this context:
datalinks => Manage datalinks
devices => Manage devices
interfaces => Manage interfaces
Chapter 2 • Installation 67
Page 68

Initial
help [topic] => Get context-sensitive help. If [topic] is specified,
it must be one of "builtins", "commands", "general",
"help" or "script".
show => Show information pertinent to the current context
abort => Abort this task (potentially resulting in a
misconfigured system)
done => Finish operating on "net"
caji:maintenance system setup net> devices show
Devices:
DEVICE UP MAC SPEED
nge0 true 0:14:4f:8d:59:aa 1000 Mbit/s
nge1 false 0:14:4f:8d:59:ab 0 Mbit/s
nge2 false 0:14:4f:8d:59:ac 0 Mbit/s
nge3 false 0:14:4f:8d:59:ad 0 Mbit/s
caji:maintenance system setup net> datalinks show
Datalinks:
DATALINK CLASS LINKS LABEL
nge0 device nge0 Untitled Datalink
caji:maintenance system setup net> interfaces show
Interfaces:
INTERFACE STATE CLASS LINKS ADDRS LABEL
nge0 up ip nge0 192.168.2.80/22 Untitled Interface
caji:maintenance system setup net> done
Congure DNS. See the DNS page for additional documentation or refer to the System
Administration Guide at
http://wikis.sun.com/display/shworks. (http://wikis.sun.com/
display/fishworks.)
Configure DNS. Configure the Domain Name Service.
Subcommands that are valid in this context:
help [topic] => Get context-sensitive help. If [topic] is specified,
it must be one of "builtins", "commands", "general",
"help", "script" or "properties".
show => Show information pertinent to the current context
Sun Storage 7000 Unied Storage System Installation Guide • February 201068
Page 69

commit => Commit current state, including any changes
abort => Abort this task (potentially resulting in a
misconfigured system)
done => Finish operating on "dns"
get [prop] => Get value for property [prop]. ("help properties"
for valid properties.) If [prop] is not specified,
returns values for all properties.
set [prop] => Set property [prop] to [value]. ("help properties"
for valid properties.) For properties taking list
values, [value] should be a comma-separated list of
values.
caji:maintenance system setup dns> show
Properties:
<status> = online
domain = sun.com
servers = 192.168.1.4
caji:maintenance system setup dns> set domain=sf.fishworks.com
domain = sf.fishworks.com (uncommitted)
caji:maintenance system setup dns> set servers=192.168.1.5
servers = 192.168.1.5 (uncommitted)
caji:maintenance system setup dns> commit
caji:maintenance system setup dns> done
aksh: done with "dns", advancing configuration to "ntp" ...
Initial
Congure NTP - how the appliance synchronizes its time. See the NTP page for additional
documentation or refer to the System Administration Guide at
http://wikis.sun.com/display/
shworks. (http://wikis.sun.com/display/fishworks.)
Configure Time. Configure the Network Time Protocol.
Subcommands that are valid in this context:
help [topic] => Get context-sensitive help. If [topic] is specified,
it must be one of "builtins", "commands", "general",
"help", "script" or "properties".
show => Show information pertinent to the current context
commit => Commit current state, including any changes
abort => Abort this task (potentially resulting in a
Chapter 2 • Installation 69
Page 70

Initial
misconfigured system)
done => Finish operating on "ntp"
enable => Enable the ntp service
disable => Disable the ntp service
get [prop] => Get value for property [prop]. ("help properties"
for valid properties.) If [prop] is not specified,
returns values for all properties.
set [prop] => Set property [prop] to [value]. ("help properties"
for valid properties.) For properties taking list
values, [value] should be a comma-separated list of
values.
caji:maintenance system setup ntp> set servers=0.pool.ntp.org
servers = 0.pool.ntp.org (uncommitted)
caji:maintenance system setup ntp> commit
caji:maintenance system setup ntp> done
aksh: done with "ntp", advancing configuration to "directory" ...
Congure NIS, LDAP and Active Directory. For additional documentation, see: NIS, LDAP and
Active Directory or refer to the System Administration Guide at
http://wikis.sun.com/display/
shworks. (http://wikis.sun.com/display/fishworks.)
Configure Name Services. Configure directory services for users and groups. You
can configure and enable each directory service independently, and you can
configure more than one directory service.
Subcommands that are valid in this context:
nis => Configure NIS
ldap => Configure LDAP
ad => Configure Active Directory
help [topic] => Get context-sensitive help. If [topic] is specified,
it must be one of "builtins", "commands", "general",
"help" or "script".
show => Show information pertinent to the current context
abort => Abort this task (potentially resulting in a
misconfigured system)
Sun Storage 7000 Unied Storage System Installation Guide • February 201070
Page 71

done => Finish operating on "directory"
caji:maintenance system setup directory> nis
caji:maintenance system setup directory nis> show
Properties:
<status> = online
domain = sun.com
broadcast = true
ypservers =
caji:maintenance system setup directory nis> set domain=fishworks
domain = fishworks (uncommitted)
caji:maintenance system setup directory nis> commit
caji:maintenance system setup directory nis> done
caji:maintenance system setup directory> done
aksh: done with "directory", advancing configuration to "support" ...
Congure the storage pool. See the Storage section for additional documentation.
Configure Storage.
Subcommands that are valid in this context:
help [topic] => Get context-sensitive help. If [topic] is specified,
it must be one of "builtins", "commands", "general",
"help", "script" or "properties".
Initial
show => Show information pertinent to the current context
commit => Commit current state, including any changes
done => Finish operating on "storage"
config <pool> => Configure the storage pool
unconfig => Unconfigure the storage pool
add => Add additional storage to the storage pool
import => Search for existing or destroyed pools to import
scrub <start|stop> => Start or stop a scrub
get [prop] => Get value for property [prop]. ("help properties"
for valid properties.) If [prop] is not specified,
returns values for all properties.
set pool=[pool] => Change current pool
Chapter 2 • Installation 71
Page 72

Initial
caji:maintenance system setup storage> show
Properties:
pool = pool-0
status = online
profile = mirror
log_profile = -
cache_profile = -
caji:maintenance system setup storage> done
aksh: done with "storage", advancing configuration to "support" ...
Congure Remote Support. Refer to (Phone Home) for additional documentation.
Remote Support. Register your appliance and configure remote monitoring.
Subcommands that are valid in this context:
tags => Configure service tags
scrk => Configure phone home
help [topic] => Get context-sensitive help. If [topic] is specified,
it must be one of "builtins", "commands", "general",
"help" or "script".
show => Show information pertinent to the current context
abort => Abort this task (potentially resulting in a
misconfigured system)
done => Finish operating on "support"
caji:maintenance system setup support> done
aksh: initial configuration complete!
Sun Storage 7000 Unied Storage System Installation Guide • February 201072
Page 73

Glossary
Active Directory Microsoft Active Directory server
Alerts Congurable log, email or SNMP trap events
Analytics appliance feature for graphing real-time and historic performance statistics
ARC Adaptive Replacement Cache
BUI Browser User Interface
CLI Command Line Interface
Cluster Multiple heads connected to shared storage
Dashboard appliance summary display of system health and activity
Dataset the in-memory and on-disk data for a statistic from Analytics
DNS Domain Name Service
DTrace a comprehensive dynamic tracing framework for troubleshooting kernel and application problems on
production systems in real-time
FTP File Transfer Protocol
HTTP HyperText Transfer Protocol
Hybrid Storage
Pool
Icons icons visible in the BUI
iSCSI Internet Small Computer System Interface
Kiosk a restricted BUI mode where a user may only view one specic screen
L2ARC Level 2 Adaptive Replacement Cache
LDAP LightweightDirectory Access Protocol
Logzilla write IOPS accelerator
Masthead topsection of BUI screen
combines disk, ash, and DRAM into a single coherent and seamless data store.
73
Page 74

Modal Dialog
Modal Dialog a new screen element for a specic function
NFS Network File System
NIS Network Information Service
Project a collection of shares
Readzilla read-optimized ash SSD for the L2ARC
Remote
replicating shares to another appliance
Replication
Schema congurable properties for shares
Scripting automating CLI tasks
Service applianceservice software
Share ZFS lesystem shared using data protocols
Snapshot an image of a share
SSH Secure Shell
Statistic a metric visible from Analytics
Title Bar local navigation and function section of BUI screen
WebDAV Web based Distributed Authoring and Versioning
ZFS on-disk data storage subsystem
Sun Storage 7000 Unied Storage System Installation Guide • February 201074
Page 75

Index
C
Controller
Installing Mounting Brackets on the Chassis, 15-18
Installing the Cable Management Assembly
(CMA), 23-28
Installing the Chassis into the Rack Slide
Rails, 18-23
P
Power
Completing Conguration, 65
Powering On the Appliance, 64-65
S
Shelf, Installing the Disk Shelf into the Rack Slide
Rails, 30-37
75
Page 76

76
 Loading...