


Sun Microsystems, Inc.
www.sun.com
Submit comments about this document at: http://www.sun.com/hwdocs/feedback
Sun StorageTek
™
5220 NAS Appliance
Getting Started Guide
Part No. 819-7167-10
October 2006, Revision A

Copyright 2006Sun Microsystems, Inc.,4150 NetworkCircle, Santa Clara, California 95054, U.S.A. All rights reserved.
Sun Microsystems, Inc.has intellectualproperty rights relatingto technologythat isdescribed inthis document.In particular,and without
limitation, theseintellectual property rightsmay includeone ormore of the U.S. patents listed at http://www.sun.com/patentsand oneor
more additional patents or pending patent applications in the U.S. and in other countries.
This documentand theproduct to which it pertains are distributedunder licensesrestricting theiruse, copying,distribution, and
decompilation. Nopart ofthe product orof thisdocument maybe reproduced in any form by any means without prior written authorization of
Sun andits licensors,if any.
Third-party software, including font technology, is copyrighted and licensed fromSun suppliers.
Parts ofthe product maybe derivedfrom Berkeley BSD systems, licensed from theUniversity ofCalifornia. UNIXis aregistered trademark in
the U.S.and inother countries,exclusively licensedthrough X/Open Company, Ltd.
Sun, SunMicrosystems, the Sun logo, Java, AnswerBook2, docs.sun.com, Sun StorageTek, FlexLine, SunFire, and Solaris are trademarksor
registered trademarks of Sun Microsystems,Inc. inthe U.S.and inother countries.
All SPARC trademarks are usedunder licenseand are trademarksor registered trademarks of SPARCInternational, Inc.in theU.S. andin other
countries. Products bearingSPARC trademarksare based upon an architecturedeveloped bySun Microsystems, Inc.Netscape Navigatorand
Mozilla are trademarkor registered trademarks of Netscape Communications Corporation in the United States and other countries.
The OPENLOOK andSun™ GraphicalUser Interfacewas developedby SunMicrosystems, Inc. for its users and licensees.Sun acknowledges
the pioneeringefforts of Xeroxin researching anddeveloping theconcept ofvisual orgraphical userinterfaces forthe computerindustry. Sun
holds anon-exclusive licensefrom Xerox tothe XeroxGraphical UserInterface, whichlicense alsocovers Sun’slicensees whoimplement OPEN
LOOK GUIsand otherwisecomply withSun’s writtenlicense agreements.
U.S. GovernmentRights—Commercial use. Government users aresubject tothe SunMicrosystems, Inc.standard license agreementand
applicable provisions ofthe FAR and its supplements.
DOCUMENTATION IS PROVIDED "AS IS" AND ALL EXPRESS OR IMPLIED CONDITIONS, REPRESENTATIONS AND WARRANTIES,
INCLUDING ANYIMPLIED WARRANTY OF MERCHANTABILITY,FITNESS FORA PARTICULAR PURPOSE OR NON-INFRINGEMENT,
ARE DISCLAIMED, EXCEPT TO THE EXTENT THAT SUCH DISCLAIMERS ARE HELD TO BE LEGALLY INVALID.
Copyright 2006Sun Microsystems, Inc.,4150 NetworkCircle, Santa Clara, Californie 95054, États-Unis. Tous droits réservés.
Sun Microsystems, Inc.possède lesdroits de propriétéintellectuels relatifsà latechnologie décritedans cedocument. Enparticulier, etsans
limitation, cesdroits de propriétéintellectuels peuventinclure unou plusieursdes brevets américainslistés surle site
http://www.sun.com/patents, unou lesplusieurs brevets supplémentaires ainsique lesdemandes debrevet en attenteaux lesÉtats-Unis et
dans d’autres pays.
Ce documentet leproduit auquel il se rapporte sont protégéspar uncopyright etdistribués souslicences, celles-cien restreignent l’utilisation,
la copie,la distribution,et ladécompilation. Aucunepartie dece produit oudocument nepeut être reproduite sous aucune forme, par quelque
moyen quece soit,sans l’autorisationpréalable etécrite deSun etde sesbailleurs de licence, s’il y en a.
Tout logicieltiers, satechnologie relative auxpolices decaractères, comprise, est protégé parun copyrightet licenciépar desfournisseurs de
Sun.
Des partiesde ceproduit peuvent dériver des systèmes Berkeley BSD licenciés par l’Université de Californie. UNIX est unemarque déposée
aux États-Uniset dansd’autres pays, licenciée exclusivement par X/Open Company, Ltd.
Sun, SunMicrosystems, le logo Sun, Java, AnswerBook2, docs.sun.com, Sun StorageTek, et Solarissont desmarques de fabrique ou des
marques déposées de Sun Microsystems,Inc. auxÉtats-Unis etdans d’autrespays.
Toutes lesmarques SPARCsont utiliséessous licenceet sontdes marques defabrique oudes marques déposéesde SPARC International,Inc.
aux États-Uniset dansd’autres pays. Les produits portantles marquesSPARC sontbasés sur une architecture développéepar Sun
Microsystems, Inc. Netscape Navigator et Mozilla est une marquesde NetscapeCommunications Corporationaux Etats-Uniset dansd’autres
pays.
L’interfaceutilisateur graphiqueOPEN LOOKet Sun™ a été développée par Sun Microsystems, Inc.pour sesutilisateurs etlicenciés. Sun
reconnaît les efforts de pionniersde Xeroxdans larechercheet ledéveloppement duconcept desinterfaces utilisateurvisuelles ougraphiques
pour l’industrieinformatique. Sundétient unelicense nonexclusive deXerox sur l’interface utilisateur graphique Xerox, cettelicence couvrant
également leslicenciés deSun implémentantles interfacesutilisateur graphiquesOPEN LOOKet seconforment enoutre aux licences écrites de
Sun.
LA DOCUMENTATION EST FOURNIE "EN L’ÉTAT" ET TOUTES AUTRES CONDITIONS, DÉCLARATIONS ET GARANTIES EXPRESSES
OU TACITES SONT FORMELLEMENT EXCLUES DANS LA LIMITE DE LA LOI APPLICABLE, Y COMPRIS NOTAMMENT TOUTE
GARANTIE IMPLICITE RELATIVE À LA QUALITÉ MARCHANDE, À L’APTITUDE À UNE UTILISATION PARTICULIÈRE OU À
L’ABSENCE DE CONTREFAÇON.

iii
Contents
Preface ix
1. System Overview 1
System Features 1
Hardware Overview 3
Sun StorageTek 5220 NAS Appliance 3
Appliance Options 4
Back-End Storage 4
Software Overview 6
Web Administrator 7
Administrator Console 7
Licensed Options 7
2. Installing the Appliance and
Back-End Storage 9
Cabinets, Racks, and Rail Kits 10
Requirements for Racks and Cabinets 10
Requirements for Rail Kit 10
Slide Rail Kit for the Appliance 11
Universal Rail Kit for Back-End Storage 11
Preparing for the Installation 11

iv Sun StorageTek 5220 NAS Appliance Getting Started Guide • October 2006
Preparing the Cabinet 12
Proper Grounding Technique 13
Avoiding Damage to Internal Components 13
Grounding the Rack During Installation 13
Checking the Slide Rail Kit 14
Checking the Universal Rail Kit 14
Checking the Appliance 15
Checking the Controller and Expansion Units 15
Planning the Installation 16
Attaching the Universal Rail Kit 19
▼ To Attach the Universal Rail Kit to a Cabinet 19
Installing a Unit in a Cabinet 24
▼ To Install a Controller or Expansion Unit 24
Installing the Appliance in a Cabinet 28
▼ To Install the Slide Rails 28
▼ To Install the Cable Management Kit 35
▼ To Verify the Operation of the Slide Rails and the CMA 39
Connecting the Power Cables 42
▼ To Connect the Power Cables 42
Next Steps 42
3. Connecting the Sun StorageTek 5220 NAS Appliance 43
Connecting the Appliance to Back-End Storage 43
Connecting the Appliance to the Controller Unit 44
▼ To Connect a Controller Unit 45
Connecting a Controller Unit to Expansion Units 46
▼ To Cable a Controller Unit to One Expansion Unit 47
▼ To Cable a Controller Unit to Two Expansion Units 48
Connecting to the Network 49

Contents v
▼ To Connect to Copper Fast Ethernet or Gigabit Ethernet Networks 49
▼ To Connect to Optical Gigabit Ethernet Networks 50
Powering On the System 51
▼ To Power On the Appliance and Controller Unit Initially 52
▼ To Power On the Appliance, Controller Unit, and Expansion Units
Initially 54
▼ To Power On the System After a Shutdown 55
Configuring the Appliance 56
Assigning the IP Address 56
▼ To Prevent an Address Assignment 56
▼ To Assign the IP Address Manually 56
▼ To Display the IP Address 57
Accessing the Web Administrator 58
▼ To Connect to the Web Administrator 58
Next Steps 59
A. Hardware Specifications 61
B. Third-Party License Agreements 65
Glossary 81
Index 85

vi Sun StorageTek 5220 NAS Appliance Getting Started Guide • October 2006

vii
Figures
FIGURE 1-1 Sun StorageTek 5220 NAS Appliance, Front 3
FIGURE 1-2 Sun StorageTek 5220 NAS Appliance With Single HBA Card, Back 4
FIGURE 1-3 RAID Controller Unit, Front 5
FIGURE 1-4 RAID Controller Unit, Back 5
FIGURE 1-5 Expansion Unit, Front 6
FIGURE 1-6 Expansion Unit, Back 6
FIGURE 2-1 Appliance, Controller Unit, and Expansion Units in a Rack 17
FIGURE 2-2 Rack With Two Complete Storage Systems 18
FIGURE 2-3 Positioning the Front of the Left Rail Behind the Left Front Cabinet Rail 19
FIGURE 2-4 Securing the Left Rail to the Front of the Cabinet 20
FIGURE 2-5 Adjusting the Length of the Left Rail at the Back of the Cabinet 21
FIGURE 2-6 Securing the Left Rail to the Back of the Cabinet 22
FIGURE 2-7 Tightening the Rail Adjustment Screws 23
FIGURE 2-8 Positioning the Unit in the Cabinet 24
FIGURE 2-9 Sliding the Unit Into the Cabinet 25
FIGURE 2-10 Securing the Unit to the Front of a Cabinet 26
FIGURE 2-11 Securing the Unit to the Back of the Cabinet Rail 27
FIGURE 2-12 Unlocking the Slide Rail Assembly 28
FIGURE 2-13 Sliding the Mounting Bracket Release Button 29
FIGURE 2-14 Unlocking the Slide Rail Middle Section 30

viii Sun StorageTek 5320 NAS Appliance and Gateway System Getting Started Guide • July 2006
FIGURE 2-15 Attaching a Mounting Bracket to the Chassis 31
FIGURE 2-16 Mounting a Slide Rail 32
FIGURE 2-17 Adjusting the Distance Between the Slide Rails 33
FIGURE 2-18 Mounting the Chassis on the Slide Rails 34
FIGURE 2-19 Inserting the CMA Rail Extension Into the Back of the Left Slide Rail 35
FIGURE 2-20 Mounting the Inner CMA Connector 36
FIGURE 2-21 Attaching the Outer CMA Connector 37
FIGURE 2-22 Mounting the Left Side of the Slide Rail 38
FIGURE 2-23 Unlocking the Slide Rail Assembly 39
FIGURE 2-24 Unlocking the Slide Rail Lever Stops 40
FIGURE 2-25 Locating the Slide Rail Release Button 41
FIGURE 3-1 Ports for HBA Cards and Controller Unit 44
FIGURE 3-2 Connecting the Appliance to the Controller Unit 45
FIGURE 3-3 Ports on the Controller Unit and Expansion Unit 46
FIGURE 3-4 Connecting the Controller Unit and One Expansion Unit 47
FIGURE 3-5 Connecting a Controller Unit to Two Expansion Units 48
FIGURE 3-6 Connecting to a Fast Ethernet or Gigabit Ethernet Network 49
FIGURE 3-7 Connecting to an Optical Gigabit Network 50
FIGURE 3-8 Detail of Power Button and Front Panel 53

ix
Preface
The Sun StorageTek 5220 NAS Appliance Getting Started Guide is a combined
installation, configuration, and getting started guide for the Sun StorageTek™ 5220
NAS Appliance. This guide describes how to install the appliance and its back-end
storage, how to connect the appliance and storage, and how to configure the system.
Product Documentation
In addition to this guide, the product includes the following documents. The
documents listed as online are available at
http://www.sun.com/hwdocs/Network_Storage_Solutions/nas
TABLE P-1 Product Documentation
Subject Title Part Number Format Location
Regulatory and
safety information
for the appliance
Sun StorageTek 5220 NAS Appliance Regulatory and Safety
Compliance Manual
819-7366-10 PDF Online
Regulatory and
safety information
for the back-end
storage
Sun StorageTek 5220 NAS Array Regulatory and Safety
Compliance Manual
819-7367-10 PDF Online
Installation poster Sun StorageTek 5220 NAS Appliance Setup 819-7166-10 Print
PDF
Ship kit
Online
Recent information
not included in the
other documents
Sun StorageTek NAS OS Software Release Notes, Release 4.20 819-6652-nn PDF,
HTML
Online

x Sun StorageTek 5220 NAS Appliance Getting Started Guide • October 2006
Related Documentation
The product relies on information found in the following documents. The
documents listed as online are available at
http://www.sun.com/hwdocs/Network_Storage_Solutions/nas
Documentation, Support, and Training
Third-Party Web Sites
Sun is not responsible for the availability of third-party web sites mentioned in this
document. Sun does not endorse and is not responsible or liable for any content,
advertising, products, or other materials that are available on or through such sites
or resources. Sun will not be responsible or liable for any actual or alleged damage
or loss caused by or in connection with the use of or reliance on any such content,
goods, or services that are available on or through such sites or resources.
TABLE P-2 Related Documentation
Subject Title Part Number Format Location
Printed version of online
Help
Sun StorageTek NAS OS Administration Guide 819-4284-10 PDF Online
Installation and
configuration procedures
Sun Rack Installation Guide 816-6386-10 Print Ship kit
Sun Function URL
Documentation http://www.sun.com/documentation/
Support http://www.sun.com/support/
Training http://www.sun.com/training/

Preface xi
Sun Welcomes Your Comments
Sun is interested in improving its documentation and welcomes your comments and
suggestions. You can submit your comments by going to:
http://www.sun.com/hwdocs/feedback
Please include the title and part number of your document with your feedback:
Sun StorageTek 5220 NAS Appliance Getting Started Guide , part number 819-7167-10.

xii Sun StorageTek 5220 NAS Appliance Getting Started Guide • October 2006

1
CHAPTER
1
System Overview
This chapter describes the components and terminology of the Sun StorageTek 5220
NAS Appliance. It includes the following sections:
■ “System Features” on page 1
■ “Hardware Overview” on page 3
■ “Software Overview” on page 6
System Features
The Sun StorageTek 5220 NAS Appliance is the Sun Microsystems modular, scalable,
network-attached storage (NAS) solution. Its configuration uses a single appliance,
with controller unit and optional expansion units available for back-end storage.
TABLE 1-1 lists the features of the product and their descriptions.

2 Sun StorageTek 5220 NAS Appliance Getting Started Guide • October 2006
TABLE 1-1 Features of the Sun StorageTek 5220 NAS Appliance
Feature Description
File Access Protocols
• Microsoft networks (CIFS /SM B)
• UNIX
®
(NFS V2 and V3)
• File Transfer Protocol (FTP)
Block Access Protocol
iSCSI
Network Security and
Protocol Integration
• Network Logon (Netlogon) client
• Microsoft Windows Domain support
• Multiple Master Domain (MMD) support
• CIFS Security Descriptors (SD) on files and directories
• Discretionary Access Control Lists (DACL) on files and directories
• NIS
• NIS+
• Unicode
• Microsoft Windows Active Directory Service (ADS) support
• Microsoft Windows Dynamic DNS support
• Microsoft Windows-compatible Kerberos (v5) security
• Microsoft Windows-compatible Lightweight Directory Access Protocol (LDAP)
• LDAP authentication for NFS
• Network Time Protocol (NTP)
• Rdate command
• syslogd Remote Logging
• Simple Network Management Protocol (SNMP)
Supported Clients
A client is any computer on the network that requests file services from the Sun
StorageTek 5220 NAS Appliance. In general, Sun StorageTek 5220 NAS Appliance
supports any client implementation that follows the NFS version 2 or 3 protocol or the
CIFS specifications.
Network Connection
• Autosensing 10/100/1000BASE-TX RJ-45 network connectors
• Optional dual-port optical Gigabit Ethernet network interface cards (NIC)
• Optional dual-port copper 10/100/1000 Ethernet NIC cards
IP Address Automatic
Assignment
Supports Dynamic Host Configuration Protocol (DHCP) and Address Resolution
Protocol (ARP) for automatic assignment of IP address
RAID Controllers
Controller unit contains one controller configured for Serial ATA (SATA) disk drives

Chapter 1 System Overview 3
Hardware Overview
The following sections describe the system components of the Sun StorageTek 5220
NAS Appliance with back-end storage.
Sun StorageTek 5220 NAS Appliance
The Sun StorageTek 5220 NAS Appliance is the basic unit. FIGURE 1-1 shows the front
of the appliance. You need the software serial number for any calls for service and
for adding licenses and you need the hardware serial number if you decide to
expand the system.
FIGURE 1-1 Sun StorageTek 5220 NAS Appliance, Front
Data Management
• Sun StorageTek File Checkpoint facility enables users to recover accidentally
damaged or deleted data with a simple file copy operation
• Directory tree quotas
• User and group quotas
Setup and
Configuration
• Web-based user interface for system configuration and administration
• A command-line and console menu interface. See the Sun StorageTek NAS OS
Administration Guide
Client Data Backup
• Network Data Management Protocol (NDMP), V2 and V3
• Enterprise Backup Software, version 7.2 minimum
• Veritas NetBackup 5.x minimum
• Compatible with BakBone NetVault 7 minimum, supported by BakBone
TABLE 1-1 Features of the Sun StorageTek 5220 NAS Appliance (Continued)
Feature Description
Software serial number
Hardware serial number (underside)

4 Sun StorageTek 5220 NAS Appliance Getting Started Guide • October 2006
FIGURE 1-2
shows the back of the appliance. The appliance contains a dual-port fibre
channel (F C) host bus adapter (HBA) card in PCI slot 1. The other slot, PCI slot 0,
can be empty or contain one of the optional cards, listed in “Appliance Options” on
page 4.
FIGURE 1-2 Sun StorageTek 5220 NAS Appliance With Single HBA Card, Back
Appliance Options
One of the ports on the HBA card in PCI slot 1, HBA Port 2, can be used for
connecting to tape backup. Its other port, HBA Port 1, is dedicated to connecting to
the controller unit, as shown in
FIGURE 3-1.
PCI slot 0 can contain the following options:
■ A dual-port copper 10/100/1000 Gigabit Ethernet card
■ A dual-port optical Gigabit Ethernet card
■ A FC HBA card for tape backup
■ A SCSI HBA card for tape backup
An uninterrupted power supply device (UPS), using the USB-to-Serial Port
Adapter/Convert Cable included in the ship kit. If a power outage occurs, the UPS
maintains the operation of the system. If the battery in the UPS loses power, the UPS
performs a graceful shutdown of the system. Connecting the UPS adapter cable to a
supported local UPS device enables the appliance to monitor the state of the UPS.
Back-End Storage
The RAID controller unit provides direct-attached back-end storage for the Sun
StorageTek 5220 NAS Appliance. At a minimum, the system has an appliance and
one controller unit containing SATA disk drives.
PCI
0
PCI
1
Network ports
Sun Service only
UPS adapter

Chapter 1 System Overview 5
FIGURE 1-3
shows the front of the controllers unit.
FIGURE 1-3 RAID Controller Unit, Front
FIGURE 1-4 shows the back of the controller unit.
FIGURE 1-4 RAID Controller Unit, Back
Power supply switch
Power supply switch

6 Sun StorageTek 5220 NAS Appliance Getting Started Guide • October 2006
In addition to the appliance and controller unit, you can set up additional back-end
storage by connecting one or two expansion units to the controller unit. Each
expansion unit must contain only SATA disk drives.
FIGURE 1-5 shows the front of
the expansion unit.
FIGURE 1-5 Expansion Unit, Front
FIGURE 1-6 shows the back of the expansion unit.
FIGURE 1-6 Expansion Unit, Back
Software Overview
The appliance and its back-end storage are configured and managed through the
following software components, described in the following sections:
■ “Web Administrator” on page 7
■ “Administrator Console” on page 7
■ “Licensed Software Options” on page 8
To controller unit

Chapter 1 System Overview 7
Web Administrator
The Sun StorageTek 5220 NAS Appliance ships with the Web Administrator software
installed. Other than a standard web browser, you do not need to install any
software to manage your system.
The Web Administrator graphical user interface (GUI) lets you configure system
parameters through a series of menus and screen panels. These settings are
discussed in the Sun StorageTek NAS OS Administration Guide
To access the Web Administrator, your system must be running Microsoft Windows
98/NT/2000/XP/2003, Sun Solaris™ Operating System (Solaris OS) 5.7 (minimum
version), or Red Hat Linux software.
Microsoft Windows users require one of these browsers:
■ Internet Explorer 5.5 (minimum version) on systems using Microsoft Windows
98/NT/2000/XP/2003
■ Netscape™ software 4.77 (minimum version) on systems using Microsoft
Windows 98/NT/2000/XP/2003 and Solaris OS. Netscape 6.0 and 6.01 are not
supported.
Solaris OS and Red Hat Linux users require one of the following browsers:
■ Netscape™ software 4.77 (minimum version) on systems using Microsoft
Windows 98/NT/2000/XP/2003 and Solaris OS. Netscape 6.0 and 6.01 are not
supported.
■ Mozilla™ browser.
■ Java™ platform-enabled browser with Java Plug-in 1.4 (minimum version).
Note – To download the latest Java Plug-in, go to http://java.com
Administrator Console
An alternative to the Web Administrator is the administrator console. You can use a
number of protocols such as Telnet, SSH, or RLogin to connect to the administrator
console as long as the application you use has an ANSI-compatible terminal
emulator. The administrator console is described in Appendix A in the Sun
StorageTek NAS OS Administration Guide.

8 Sun StorageTek 5220 NAS Appliance Getting Started Guide • October 2006
Licensed Software Options
You can purchase additional software for the system:
■ Sun StorageTek File Replicator duplicates data from one volume onto a mirrored
volume on a different Sun StorageTek 5220 NAS Appliance or Sun StorageTek
5320 NAS Appliance.
■ Sun StorageTek Compliance Archiving Software enable volumes to follow
advisory or mandatory enforcement of compliance archiving guidelines for data
retention and protection.
The options and how to activate them are described in Chapter 9 in the Sun
StorageTek NAS OS Administration Guide.

9
CHAPTER
2
Installing the Appliance and
Back-End Storage
This chapter describes the process of installing the Sun StorageTek 5220 NAS
Appliance, a controller unit, and expansion units. It contains the following sections:
■ “Cabinets, Racks, and Rail Kits” on page 10
■ “Preparing for the Installation” on page 11
■ “Planning the Installation” on page 16
■ “Attaching the Universal Rail Kit” on page 19
■ “Installing a Unit in a Cabinet” on page 24
■ “Installing the Appliance in a Cabinet” on page 28
■ “Connecting the Power Cables” on page 42
■ “Next Steps” on page 42
The installation procedures in this chapter require the following items:
■ No. 2 Phillips screwdriver
■ No. 3 Phillips screwdriver
■ Antistatic protection
Caution – Electrostatic discharge can damage sensitive components. Touching the
array or its components without using a proper ground might damage the
equipment. To avoid damage, use proper antistatic protection before handling any
components.

10 Sun StorageTek 5220 NAS Appliance Getting Started Guide • October 2006
Cabinets, Racks, and Rail Kits
The Sun StorageTek 5220 NAS Appliance can be installed in the Sun™ Rack 900, the
Sun™ Rack 1000, or third-party racks that comply with the requirements. Although
the system is installed in a single cabinet or rack, the appliance and the back-end
storage units require different rails to support them.
Note – A cabinet is a rack with a door and the two terms are used interchangeably.
Requirements for Racks and Cabinets
Requirements to support installation of the storage system:
■ The rack’s horizontal opening and unit vertical pitch must conform to ANSI/EIA
310-D-1992 or IEC 60927.
■ Rack must have four-post structure to allow mounting at both front and back.
■ Distance between front and back mounting planes must be between 61 cm and
92 cm (24 to 36 inches).
■ Clearance depth at front (distance between front cabinet door and front mounting
plane) must be at least 2.6 cm (1 inch).
■ Clearance depth at back (distance between front mounting plane to the back
cabinet door) must be at least 80 cm (31.5 inches).
■ Clearance width (distance between the left and right structural supports, cable
troughs, and so on within the front and back mounting planes) must be at least
46 cm (18 inches).
Rack density varies widely based on systems installed, power distribution
installation (in-cabinet, external), power source (single-phase, three-phase), and
whether redundant power is required. Some rack vendors do not support a fullyloaded rack because of the amount of power required. For power specifications, refer
to Appendix A.
Requirements for Rail Kit
Note – Not all third-party racks are compatible with these slide rail kits.

Chapter 2 Installing the Appliance and Back-End Storage 11
Slide Rail Kit for the Appliance
The Sun StorageTek 5220 NAS Appliance is supported with the slide rail kit (3707669-02) and cable management arm (370-7668-02). The slide rail kit contains fourpoint mounted slide rails and is designed to enable the Sun StorageTek 5220 NAS
Appliance to be installed in the Sun Rack™ 900, the Sun Rack 1000, and other
ANSI/EIA 310-D-1992 or IEC 60927 compliant racks. No other kits are available to
allow two-point, front-mount, or mid-mount installation.
The slide kit includes hardware that enables mounting to any of the following types
of rails:
■ 6-mm threaded holes
■ No. 10-32 threaded holes
■ No. 10 clearance holes
■ Square unthreaded holes compliant with EIA and IEC standards
Universal Rail Kit for Back-End Storage
Use the universal rail kit to mount the controller and expansion units in any
standard Sun cabinet, such as the Sun Rack 900/1000 cabinet.
Preparing for the Installation
Use the following procedures to prepare for installation:
■ “Preparing the Cabinet” on page 12
■ “Proper Grounding Technique” on page 13
■ “Checking the Slide Rail Kit” on page 14
■ “Checking the Universal Rail Kit” on page 14
■ “Checking the Controller and Expansion Units” on page 15
■ “Checking the Appliance” on page 15
■ “Preparing the Cabinet” on page 12

12 Sun StorageTek 5220 NAS Appliance Getting Started Guide • October 2006
Preparing the Cabinet
Note – The rack must have an AC power disconnect. This power source disconnect
must be easily accessible, and it must be labeled as controlling power to the entire
rack, not only to the appliance
Be sure the location of the cabinet or rack complies with the following requirements
and that it has been installed as described in its installation instructions:
■ Check that the rack or cabinet has unrestricted air flow for the cooling fans.
■ Check that the maximum ambient operating temperature in the rack does not
exceed 95˚F (35˚C).
■ Make sure that the rack will not tip over, even when the controller and expansion
units are fully extended from the rack.
■ Make sure the rack has two power sources connected to two separate power
circuits.
■ Make sure the power outlets are close enough to the units for the power cords to
reach the cabinet properly.
■ Make sure the power cables are grounded.
Before you begin mounting the rail kits, do the following:
1. Stabilize the cabinet as described in the cabinet documentation.
2. If the cabinet has casters, make sure the casters are locked to prevent the cabinet
from rolling.
3. Remove or open the front panel.
4. Remove or open the vented back panel.
Note – Sun Microsystems makes no warranties or guarantees as to fit, form, or
function of the Sun StorageTek 5220 NAS Appliance system installed in third-party
racks or cabinets. It is the customer’s responsibility to ensure that the rack or cabinet
can house the Sun StorageTek 5220 NAS Appliance system in all conditions that
might exist. All racks and cabinets must comply with local building and construction
codes.

Chapter 2 Installing the Appliance and Back-End Storage 13
Proper Grounding Technique
You must maintain reliable grounding of this equipment. Review specifications in
Appendix A to determine the appropriate AC branch circuit size for the quantity of
units in your configuration and your operating voltage. Always follow your local
electrical codes for loading circuits.
Caution – The controller unit and expansion units contain several components
sensitive to static-electrical discharge. Surges of static electricity (caused by shuffling
your feet across a floor and touching a metallic surface, for example) can cause
damage to electrical components. It is important that proper grounding techniques
be observed.
■ Transport products in static-safe containers.
■ Cover workstations with approved static-dissipating material.
■ Wear a wrist strap, and always be grounded when touching static-sensitive
equipment or parts.
■ Use only grounded tools and equipment.
■ Avoid touching pins, leads, or circuitry.
Avoiding Damage to Internal Components
■ For the controller unit and expansion units, make sure that the power switch is
turned off and that both power cables are plugged in.
■ Wear a wrist strap, and always be grounded when touching static-sensitive
equipment or parts. If a wrist strap is not available, touch any unpainted metal
surface on the back panel of any unit to dissipate static electricity. Repeat this
procedure several times during installation.
■ Avoid touching exposed circuitry, and handle components by their edges only.
Caution – Do not power on any units until after you have connected the Sun
StorageTek 5220 NAS Appliance to the network.
Grounding the Rack During Installation
The safe ground conductor provides proper grounding only for the Sun StorageTek
5220 NAS Appliance. You must provide additional proper grounding for the rack
and other devices installed in it.
■ Include a third-wire safety ground conductor with the rack installation to avoid
the potential for an electrical shock hazard.

14 Sun StorageTek 5220 NAS Appliance Getting Started Guide • October 2006
■ Use a minimum 14 A WG connected to the earth ground stud on the back of the
appliance.
■ Connect the safety ground conductor to the chassis stud with a two-hole crimp
terminal with a maximum width of 0.25 inch.
■ Install the nuts on the chassis with a 10 in/lb torque.
Review specifications in Appendix A to determine isolation and continuous power
requirements.
Checking the Slide Rail Kit
When you unpack the shipping box, verify that you have all of the parts:
■ Two slide rail assemblies, one for installing on the right side of the rack and one
for the left. Each slide rail assembly has two parts:
■ Slide rail that attaches to the rack posts
■ Mounting brackets that attach to the appliance chassis
■ Package of screws and nuts in assorted sizes to fit various types of racks and
cabinets
■ Cable management arm with six preinstalled cable clips
■ Manufacturer’s instruction sheet for the cable management arm
Checking the Universal Rail Kit
When you unpack the shipping box, verify that you have all the parts:
■ Two cabinet rail adapter plates (used for unthreaded cabinet rails only)
■ Mounting hardware as listed below:
Type Quantity Use
10-32 panhead screw 8 Assemble main and extender sections of left and
right rails (Typically, left and right rails are
shipped pre-assembled)
10-32 panhead screw 4 Mount left and right rails to front of cabinet rails
Metric M6 panhead screw 4 Mount left and right rails to back of cabinet rails
Metric M6 panhead screw 4 Secure front of tray to left and right cabinet rails
6-32 flathead screw 2 Secure back of tray to left and right side rails

Chapter 2 Installing the Appliance and Back-End Storage 15
Checking the Appliance
When you unpack the shipping box, verify that you have all of the parts:
■ Sun StorageTek 5220 NAS Appliance
■ Ship kit for the appliance, containing documentation and cables
Make sure you have the two power cords for your location, shipped separately.
Checking the Controller and Expansion Units
Caution – Two people are needed to lift and move the controller unit and
expansion units. Use care to avoid injury. A unit can weigh up to 95 pounds (43 kg).
Do not lift by the front of the unit; this can cause damage to the drives.
When you unpack the shipping box, verify that you have all of the parts.
For the controller unit:
■ Sun StorageTek 5220 RAID Controller Unit
■ Setup poster
For the expansion unit:
■ Sun StorageTek 5220 Expansion Unit
■ One 2-meter optical Fibre Channel (FC) LC-to-LC cable to connect the expansion
unit to the controller unit or to a second expansion unit
■ Two SF P FC transceiver modules
■ Accessing Documentation guide
The power cords are shipped separately.

16 Sun StorageTek 5220 NAS Appliance Getting Started Guide • October 2006
Planning the Installation
At a minimum, the system has an appliance and the controller unit. Your system can
have one or two expansion units, installed now or at a later date. Plan the placement
of the rails carefully because they are spaced differently, depending on whether you
are installing a unit or an appliance.
In general, the installation is accomplished in the following order:
1. Install the universal slide rail kit for the controller unit, starting at the bottom of
the rack.
2. Install the universal slide rail kit for each expansion unit, starting above the
controller unit.
3. Mount the controller unit at the bottom of the cabinet.
4. Mount each expansion unit, from the bottom up.
5. Install the slide rails for the appliance.
6. Install the cable management kit.
7. Mount the appliance.
8. Install the power cords.
Caution – The controller and expansion units must be installed in the cabinet
starting from the bottom up to distribute the weight correctly in the cabinet. The
appliance is installed last. Uneven loading of the rack can cause dangerous
instability.
Note – Some procedures require two people to complete.

Chapter 2 Installing the Appliance and Back-End Storage 17
FIGURE 2-1
shows the cabinet with a controller unit, an expansion unit, an additional
expansion unit, and an appliance.
FIGURE 2-1 Appliance, Controller Unit, and Expansion Units in a Rack
Sun StorageTek 5220 NAS Appliance
Sun StorageTek 5220 RAID Controller Unit
Sun StorageTek 5220 Expansion Unit
Available space
Sun StorageTek 5220 Expansion Unit (optional)

18 Sun StorageTek 5220 NAS Appliance Getting Started Guide • October 2006
FIGURE 2-2
shows a cabinet with two complete but separate storage systems.
FIGURE 2-2 Rack With Two Complete Storage Systems
Sun StorageTek 5220 NAS Appliance
Sun StorageTek 5220 RAID Controller Unit
Sun StorageTek 5220 Expansion Unit
Available for more storage systems
Sun StorageTek 5220 Expansion Unit
Second storage system
Chapter 2 Installing the Appliance and Back-End Storage 19
Attaching the Universal Rail Kit
This procedure describes the steps to attach the universal rail kit to all standard Sun
cabinets.
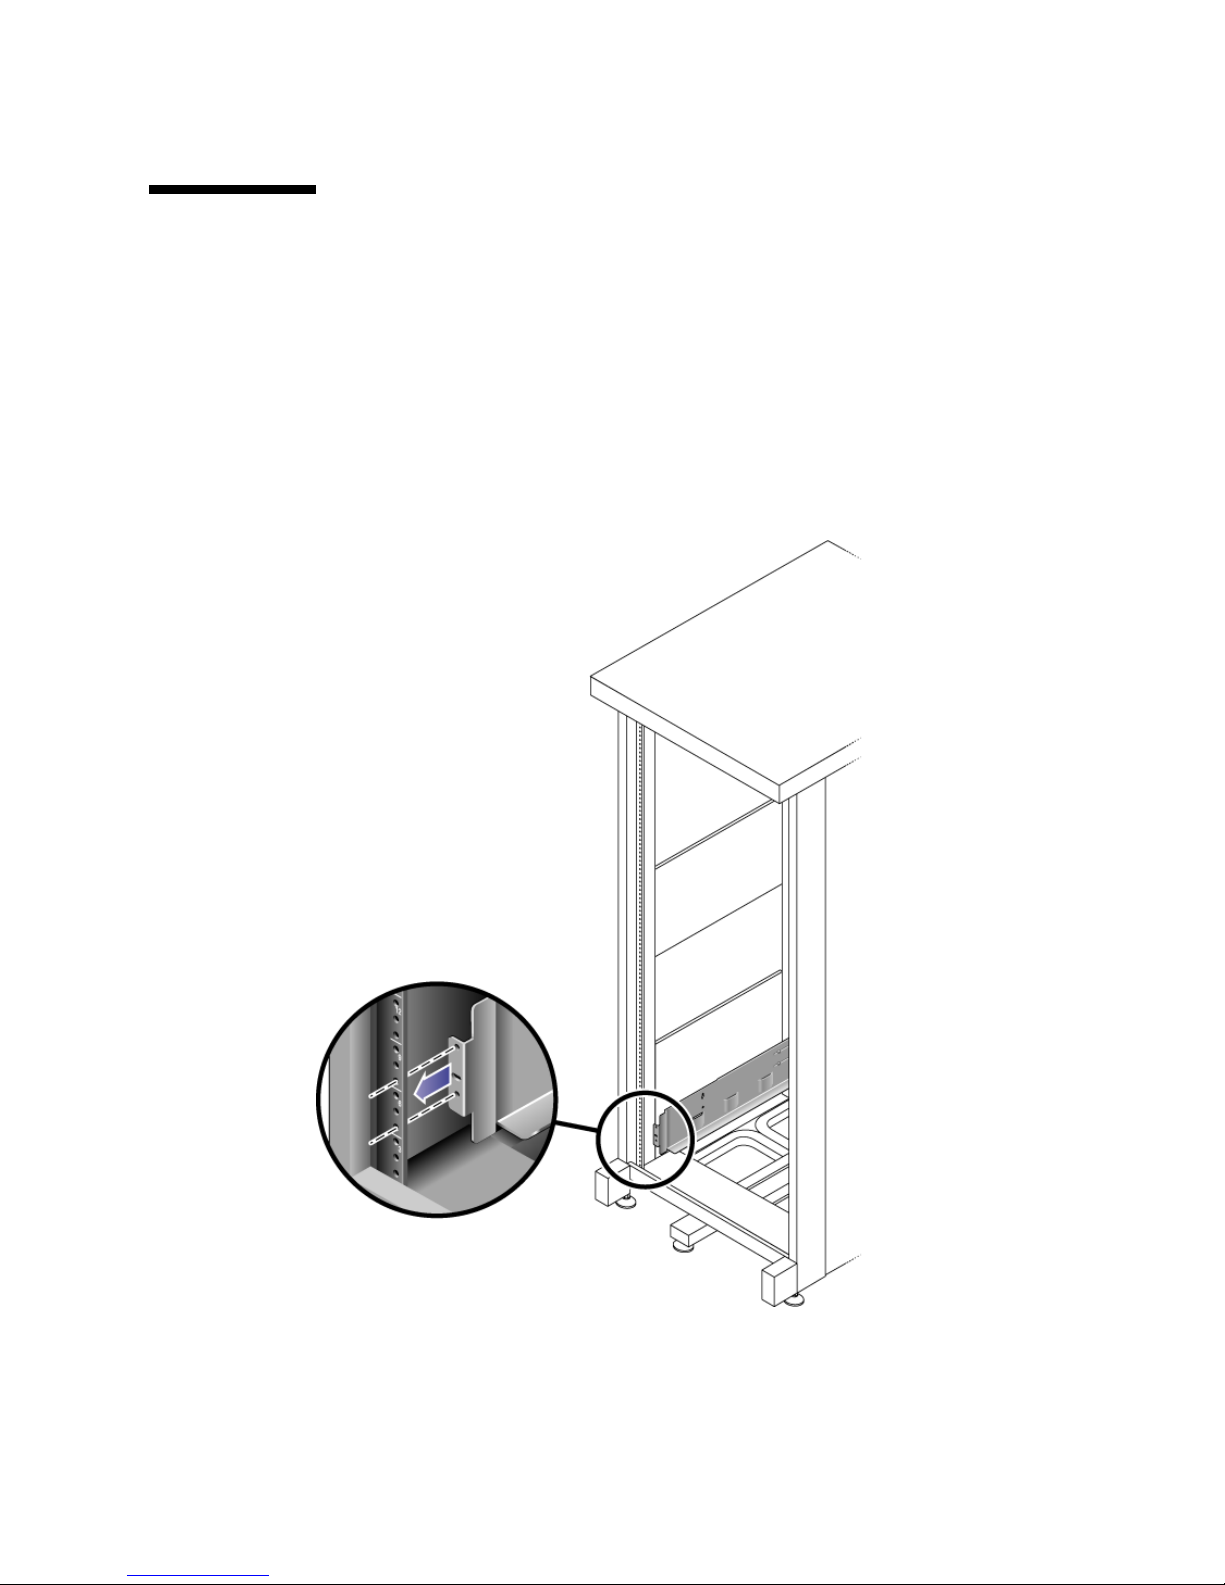
▼ To Attach the Universal Rail Kit to a Cabinet
1. Position the front of the left rail behind the left front cabinet rail (FIGURE 2-3).
FIGURE 2-3 Positioning the Front of the Left Rail Behind the Left Front Cabinet Rail

20 Sun StorageTek 5220 NAS Appliance Getting Started Guide • October 2006
2. Use the No. 2 Phillips screwdriver to insert and tighten two 8-32 screws to secure
the left rail to the front of the cabinet (
FIGURE 2-4).
Each controller and expansion unit requires three standard mounting units (3U) of
vertical space in the cabinet. Each standard mounting unit (U) has three mounting
holes in the left and right cabinet rails. Insert the screws into the lowest holes in the
top two mounting units of the 3U slot in which the tray is to be mounted.
These screws pass through the cabinet rail holes and screw into threaded holes in the
left rail.
FIGURE 2-4 Securing the Left Rail to the Front of the Cabinet
3. Repeat Step 1 and Step 2 for the right rail.

Chapter 2 Installing the Appliance and Back-End Storage 21
4. At the back of the cabinet, adjust the length of the left rail as needed to fit the
cabinet, and position the rail flange over the face of the cabinet rail (
FIGURE 2-5).
FIGURE 2-5 Adjusting the Length of the Left Rail at the Back of the Cabinet
5. Align the rail flange so that the mounting holes correspond to those at the front of
the cabinet.

22 Sun StorageTek 5220 NAS Appliance Getting Started Guide • October 2006
6. Use the No. 3 Phillips screwdriver to insert and tighten four metric M6 screws
(two per side) at the back of the rail (
FIGURE 2-6).
FIGURE 2-6 Securing the Left Rail to the Back of the Cabinet
7. Repeat Step 4, Step 5, and Step 6 for the right rail.

Chapter 2 Installing the Appliance and Back-End Storage 23
8. Using the No. 2 Phillips screwdriver, tighten the eight adjustment screws (four on
each side) toward the back of each rail (
FIGURE 2-7).
FIGURE 2-7 Tightening the Rail Adjustment Screws

24 Sun StorageTek 5220 NAS Appliance Getting Started Guide • October 2006
Installing a Unit in a Cabinet
Install the controller unit in the first empty 3U slot at the bottom of the cabinet.
Install expansion units above the controller unit, from the bottom upward.
▼ To Install a Controller or Expansion Unit
1. Using two people, one at each side of the unit, carefully lift and rest the unit on
the bottom ledge of the left and right rails (
FIGURE 2-8).
Caution – Use care to avoid injury. A unit can weigh up to 95 pounds (45 kg).
FIGURE 2-8 Positioning the Unit in the Cabinet

Chapter 2 Installing the Appliance and Back-End Storage 25
2. Slide the unit carefully into the cabinet until the front flanges of the unit touch
the vertical face of the cabinet (
FIGURE 2-9).
FIGURE 2-9 Sliding the Unit Into the Cabinet

26 Sun StorageTek 5220 NAS Appliance Getting Started Guide • October 2006
3. Use the No. 3 Phillips screwdriver to install and tighten four M6 screws (two per
side) to secure the tray to the front of the cabinet (
FIGURE 2-10).
FIGURE 2-10 Securing the Unit to the Front of a Cabinet

Chapter 2 Installing the Appliance and Back-End Storage 27
4. Install and tighten two 6-32 screws (one per side) at the back of the unit, to secure
the back of the unit to the cabinet (
FIGURE 2-11).
Note – The two upper holes on the back of the unit are not used.
FIGURE 2-11 Securing the Unit to the Back of the Cabinet Rail

28 Sun StorageTek 5220 NAS Appliance Getting Started Guide • October 2006
Installing the Appliance in a Cabinet
Installing a appliance takes three step:
1. “To Install the Slide Rails” on page 28
2. “To Install the Cable Management Kit” on page 35
3. “To Verify the Operation of the Slide Rails and the CMA” on page 39
▼ To Install the Slide Rails
1. Pull both mounting brackets completely out of their respective slide rails:
a. Press and hold simultaneously the upper and lower lock buttons of the slide
rail lock (
FIGURE 2-12).
FIGURE 2-12 Unlocking the Slide Rail Assembly
b. Pull the mounting bracket out until it locks in the extended position.
Chapter 2 Installing the Appliance and Back-End Storage 29
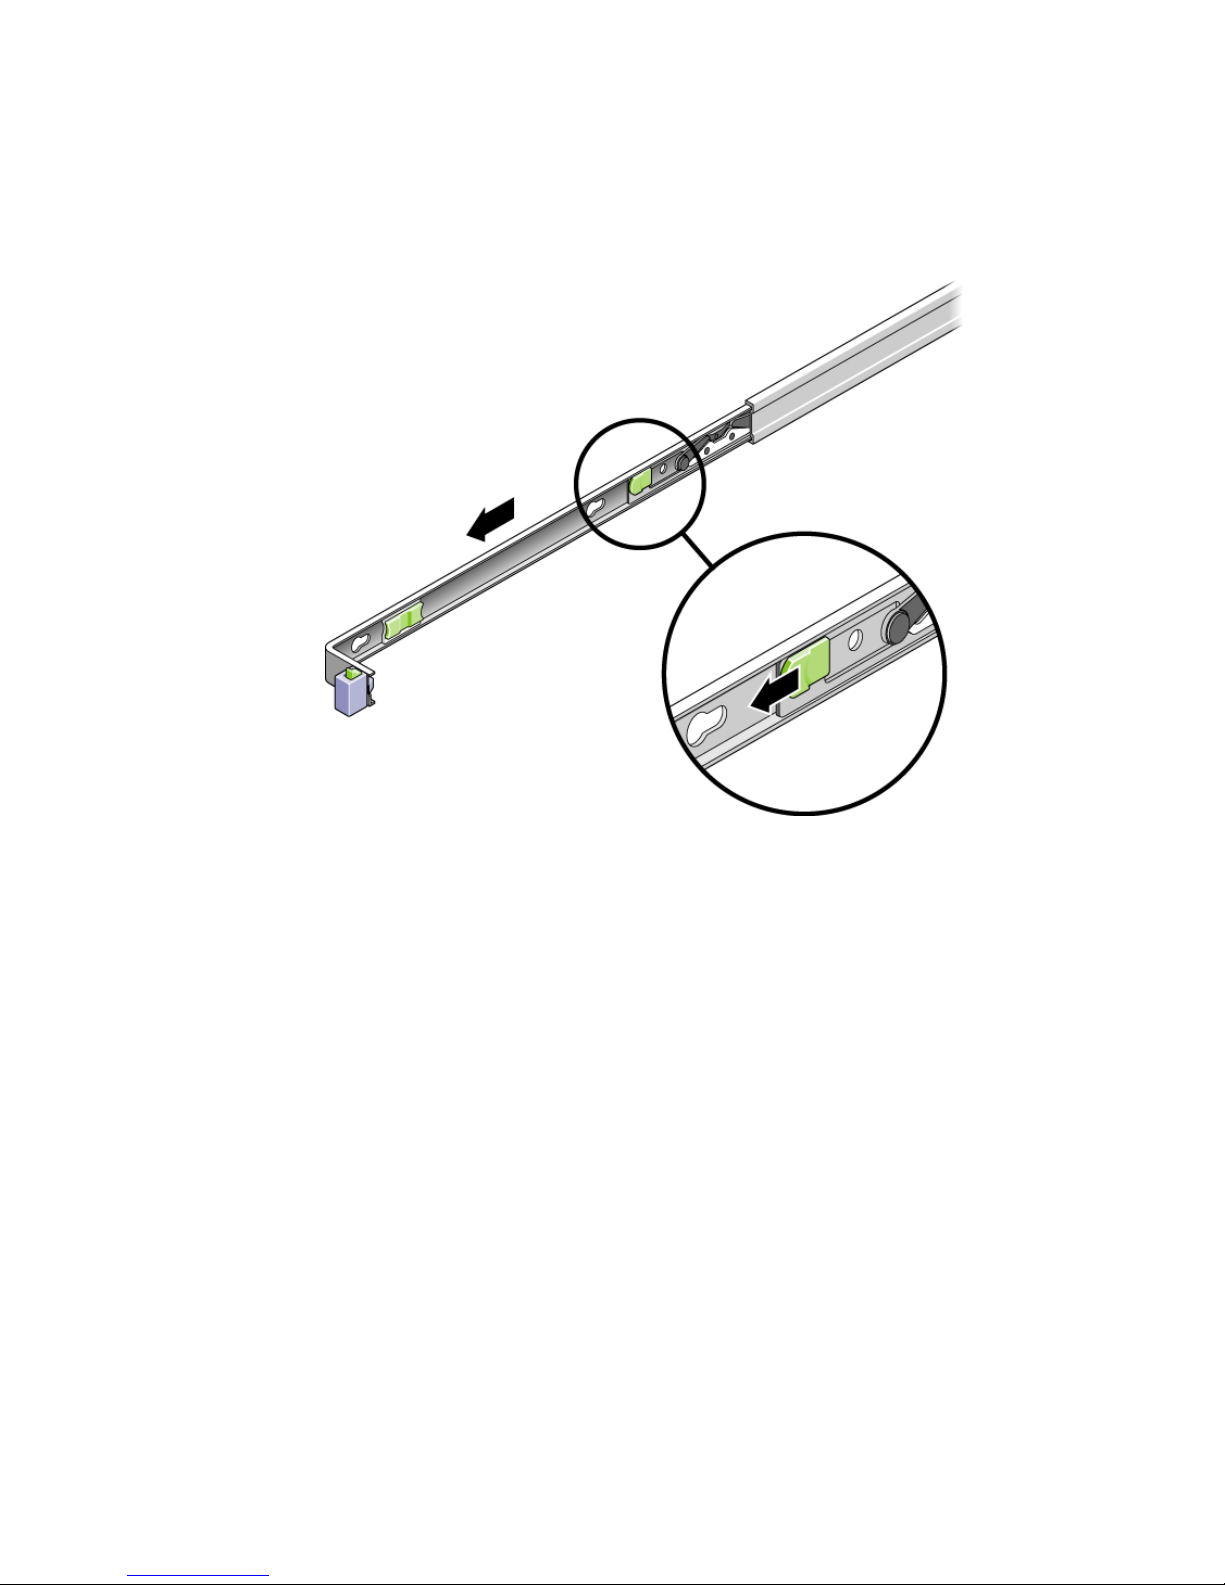
c. Slide the mounting bracket release button in the direction shown in FIGURE 2-13,
and then slide the mounting bracket out of the slide rail.
FIGURE 2-13 Sliding the Mounting Bracket Release Button
30 Sun StorageTek 5220 NAS Appliance Getting Started Guide • October 2006
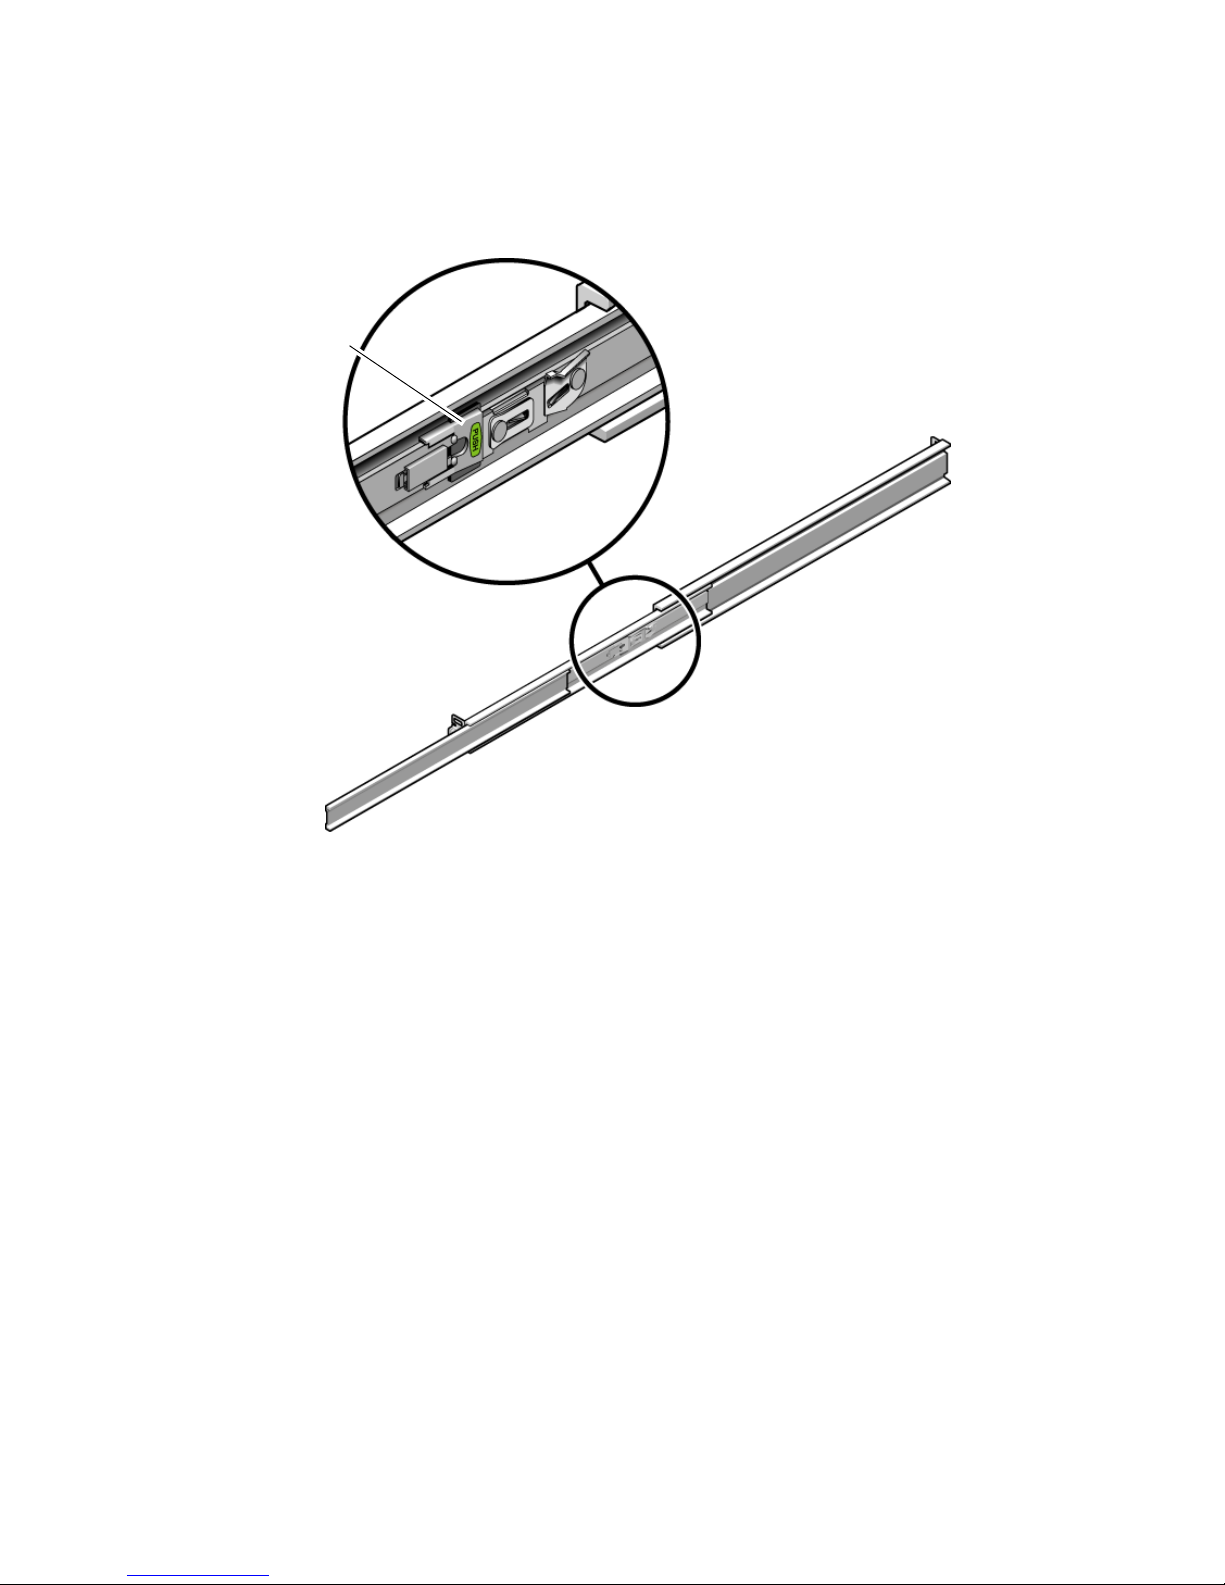
d. Press the metal lever labeled Push on the middle section (FIGURE 2-14) of the
sliding rail, and then push the middle section back into the rack.
FIGURE 2-14 Unlocking the Slide Rail Middle Section
Metal lever

Chapter 2 Installing the Appliance and Back-End Storage 31
2. Attach a mounting bracket to the right side of the appliance chassis.
a. Position the mounting bracket against the appliance chassis (
FIGURE 2-15) so that
the bracket’s slide rail lock is at the front and its three keyed openings align
with the three locating pins on the side of the chassis.
FIGURE 2-15 Attaching a Mounting Bracket to the Chassis
b. With the three pins protruding though the openings in the mounting bracket,
pull the bracket toward the front of the chassis until it locks into place with an
audible click.
c. Verify that the three pins are trapped in their openings and that the back pin
has engaged the mounting bracket lock, as shown in
FIGURE 2-15.
3. Attach the second mounting bracket to the left side of the appliance chassis.
4. On the rack posts, determine which hole numbers to use for the slide rails. The
appliance requires one rack unit (1U).
5. Determine which screws to use to mount the slide rails.
■ If the rack posts have threaded holes, determine whether the threads are metric or
standard and use the appropriate screws from the mounting kit.

32 Sun StorageTek 5220 NAS Appliance Getting Started Guide • October 2006
■ If the rack posts do not have threaded holes, secure the screws with a caged nuts.
6. Attach a slide rail to the right front rack post.
a. Attach the front of a slide rail to the right front rack post (
FIGURE 2-16) using
two screws. Do not tighten the screws yet.
FIGURE 2-16 Mounting a Slide Rail
b. Adjust the length of the slide rail by sliding the back mounting flange to reach
the outside edge of the back rack post.
c. Use two screws to attach the back of the slide rail to the back rack post loosely.
7. In the same way, attach the second slide rail to the left rack posts. Do not tighten
the screws.

Chapter 2 Installing the Appliance and Back-End Storage 33
8. Use the slide rail spacing tool to adjust the distance between the slide rails:
a. At the front of the rack, insert the left side of the tool into slots at the end of
the left rail (
FIGURE 2-17).
FIGURE 2-17 Adjusting the Distance Between the Slide Rails
b. Insert the right side of the tool into the front end of the right rail, while sliding
the end of the rail to the right or left as needed to allow the ends of the tool to
enter the ends of both rails. The distance between the rails is now equal to the
width of the appliance with its mounting brackets.
c. Tighten the screws to lock the ends of the rails in place.
d. At the back of the rack, repeat Step a through Step c for the back ends of the
rails.

34 Sun StorageTek 5220 NAS Appliance Getting Started Guide • October 2006
9. Deploy the anti-tilt bar, if the chassis or rack is so equipped.
Caution – The weight of the appliance on extended slide rails can be enough to
overturn a cabinet.
10. With a partner, lift the appliance and insert the ends of its mounting brackets into
the sliding rails (
FIGURE 2-18).
Caution – The appliance weighs approximately 52 pounds (24 kg). Two people are
required to lift and mount the system into a cabinet.
FIGURE 2-18 Mounting the Chassis on the Slide Rails
11. Simultaneously release the rail locks on each side of the sliding rails, and guide
the chassis into the rack.
Caution – Verify that the appliance is securely mounted in the rack, and that the
slide rails are locked to the mounting brackets.

Chapter 2 Installing the Appliance and Back-End Storage 35
▼ To Install the Cable Management Kit
The.cable management assembly (CMA) clips into the ends of the left and right
sliding rail. No screws are necessary for mounting the CMA.
Caution – Support the CMA during this installation. Do not allow the assembly to
hang by its own weight until it is secured by all three attachment points.
1. At the back of the rack, plug the CMA rail extension into the end of the left
sliding rail assembly (
FIGURE 2-19).
The tab at the front of the rail extension clicks into place.
FIGURE 2-19 Inserting the CMA Rail Extension Into the Back of the Left Slide Rail

36 Sun StorageTek 5220 NAS Appliance Getting Started Guide • October 2006
The right sides of the two CMA arms have hinged extensions. On the
manufacturer’s instruction sheet, the smaller extension is called the CMA Connector
for Inner Member. It attaches to the right mounting bracket. The larger extension is
called the CMA Connector for Outer Member, and attaches to the right sliding rail.
2. Insert the smaller extension into the clip located at the end of the mounting
bracket (
FIGURE 2-20).
FIGURE 2-20 Mounting the Inner CMA Connector

Chapter 2 Installing the Appliance and Back-End Storage 37
3. Insert the larger extension into the end of the right sliding rail (FIGURE 2-21).
FIGURE 2-21 Attaching the Outer CMA Connector

38 Sun StorageTek 5220 NAS Appliance Getting Started Guide • October 2006
4. Insert the hinged plastic connector at the left side of the CMA fully into the CMA
rail extension (
FIGURE 2-22).
The plastic tab on the CMA rail extension locks the hinged plastic connector in
place.
FIGURE 2-22 Mounting the Left Side of the Slide Rail

Chapter 2 Installing the Appliance and Back-End Storage 39
▼ To Verify the Operation of the Slide Rails and the CMA
Tip – Two people are needed for this procedure: one to move the appliance and one
to observe the cables and CMA.
1. Deploy the cabinet’s anti-tilt bar, if it has one.
2. Unlock the slide lock buttons (
FIGURE 2-23) at the right and left sides of the
appliance chassis, and slowly pull the appliance out of the rack until the slide
rails reach their stops.
FIGURE 2-23 Unlocking the Slide Rail Assembly
3. Inspect the attached cables for any binding or kinks.
4. Verify that the CMA extends fully and does not bind in the slide rails.

40 Sun StorageTek 5220 NAS Appliance Getting Started Guide • October 2006
5. When the appliance is fully extended, release the slide rail lever stops
(
FIGURE 2-24).
Push both levers simultaneously and slide the appliance back into the rack.
FIGURE 2-24 Unlocking the Slide Rail Lever Stops
Metal lever

Chapter 2 Installing the Appliance and Back-End Storage 41
6. Simultaneously unlock both slide rail release buttons (FIGURE 2-25), and push the
appliance completely into the rack.
FIGURE 2-25 Locating the Slide Rail Release Button
The appliance stops after approximately 15 inches (40 cm) of travel.
7. Verify that the cables and the CMA retracted without binding.
8. Adjust the cable hangers and CMA as required

42 Sun StorageTek 5220 NAS Appliance Getting Started Guide • October 2006
Connecting the Power Cables
This section describes how to connect the power cables.
Note – Do not power on the units until you complete the installation procedures for
your system. The power-on sequence is described in detail in “Powering On the
System” on page 51.
▼ To Connect the Power Cables
1. Verify that both power switches are off for each controller unit and expansion unit
in the cabinet. The toggle switch must be set to 0.
2. Connect each power supply in each unit to a separate power source in the cabinet.
Caution – The cabinet must have two power sources connected to two separate
power circuits.
3. Connect each power supply in the Sun StorageTek 5220 NAS Appliance to a
separate power source in the cabinet.
As soon as you connect the appliance’s power cords to the cabinet, the AC LE D on
the front lights, indicating standby power mode.
4. Connect the primary power cables from the cabinet to the external power source.
Next Steps
When you have installed the appliance and its units and have connected their power
cables, you are ready to connect the appliance to the controller unit and connect the
controller unit to any expansion units, as described in Chapter 3.

43
CHAPTER
3
Connecting the Sun StorageTek 5220
NAS Appliance
This chapter provides instructions for connecting the Sun StorageTek 5220 NAS
Appliance, the Sun StorageTek 5220 RAID Controller unit, and the optional Sun
StorageTek 5220 expansion units. It also provides initial configuration instructions
for the system. This chapter contains the following sections:
■ “Connecting the Appliance to Back-End Storage” on page 43
■ “Connecting to the Network” on page 49
■ “Powering On the System” on page 51
■ “Configuring the Appliance” on page 56
Connecting the Appliance to Back-End
Storage
This section describes how to cable the Sun StorageTek 5220 NAS Appliance to backend storage, for several different configurations. This section includes the following
tasks:
■ “Connecting the Appliance to the Controller Unit” on page 44
■ “Connecting a Controller Unit to Expansion Units” on page 46

44 Sun StorageTek 5220 NAS Appliance Getting Started Guide • October 2006
Connecting the Appliance to the Controller Unit
The connection from the appliance to the controller unit is made from Port 1 of the
HBA card in PC slot 1 of the appliance to the controller unit’s Ch1 port. The other
HBA port can be used for tape backup. The Ch 2 port is not used.
FIGURE 3-1 shows the port locations on the HBA card and on the controller unit.
FIGURE 3-1 Ports for HBA Cards and Controller Unit
Ch2 Ch1
HBA Port 1

Chapter 3 Connecting the Sun StorageTek 5220 NAS Appliance 45
▼ To Connect a Controller Unit
Use the LC-to-LC fiber optic cables from the appliance’s ship kit to connect the
appliance to the controller unit, as shown in
FIGURE 3-2.
● Connect the HBA port 1 on the appliance to the controller unit’s Ch 1 port.
FIGURE 3-2 Connecting the Appliance to the Controller Unit

46 Sun StorageTek 5220 NAS Appliance Getting Started Guide • October 2006
Connecting a Controller Unit to Expansion Units
The connection between the controller unit and an expansion unit is made from the
controller unit’s ports (P1 and P2) to the expansion unit’s 1B port.
FIGURE 3-3 shows
the locations for the ports.
FIGURE 3-3 Ports on the Controller Unit and Expansion Unit
You can cable one expansion unit or two expansion units to a controller unit:
■ For one expansion unit, see “To Cable a Controller Unit to One Expansion Unit”
on page 47.
■ For two expansion units, see “To Cable a Controller Unit to Two Expansion Units”
on page 48.
Expansion Unit
Controller Unit
1B 1A
P2 P1

Chapter 3 Connecting the Sun StorageTek 5220 NAS Appliance 47
▼ To Cable a Controller Unit to One Expansion Unit
Use the 2-meter LC-to-LC fibre optic cable to connect a controller unit to an
expansion unit, as shown in
FIGURE 3-4.
● Connect one cable between the P1 port of the controller unit and the 1B port of
the expansion unit.
The other ports in the units remain empty.
FIGURE 3-4 Connecting the Controller Unit and One Expansion Unit
Expansion Unit
Controller Unit

48 Sun StorageTek 5220 NAS Appliance Getting Started Guide • October 2006
▼ To Cable a Controller Unit to Two Expansion Units
Use two 2-meter LC-to-LC fibre optic cables to connect a controller unit and two
expansion units, as shown in
FIGURE 3-5.
1. Connect one cable between the P1 port of the controller unit and the 1B port of an
expansion unit.
2. Connect one cable between the P2 port of the controller unit and 1B port of the
second expansion unit.
The other ports in the units remain empty.
FIGURE 3-5 Connecting a Controller Unit to Two Expansion Units

Chapter 3 Connecting the Sun StorageTek 5220 NAS Appliance 49
Connecting to the Network
Use the following procedures to connect the Sun StorageTek 5220 NAS Appliance to
your network, either Fast Ethernet or optical Gigabit Ethernet, depending on your
site’s configuration. The cables are provided in the ship kit. Each configuration is
described in the following sections.
▼ To Connect to Copper Fast Ethernet or Gigabit
Ethernet Networks
FIGURE 3-6 shows the locations of the network ports for connecting the appliance to
a 100BASE-T Fast Ethernet network or to a 1000BASE-T Gigabit Ethernet network.
1. Connect an RJ-45 CAT5E shielded Ethernet cable from your local area network to
port NET0 on the back of the appliance.
2. For additional network connections, use the ports in this order: NET1, NET2, and
NET3. If PCI slot 0 contains a copper 10/100/1000 Gigabit Ethernet card, you can
make additional network connections, using the cables shipped with the card.
FIGURE 3-6 Connecting to a Fast Ethernet or Gigabit Ethernet Network
NET0
NET3
NET1
NET2

50 Sun StorageTek 5220 NAS Appliance Getting Started Guide • October 2006
▼ To Connect to Optical Gigabit Ethernet
Networks
To connect the appliance to an optical Gigabit Ethernet network, the appliance must
have the optional optical Gigabit Ethernet card installed in PCI0.
FIGURE 3-7 shows the locations of the ports and the optical Gigabit Ethernet
connectors.
1. Connect a fiber optic cable from the network to the A connector on the card.
2. Connect a second fiber optic cable from the network to the B connector on the
card.
FIGURE 3-7 Connecting to an Optical Gigabit Network
Network ports have different identifiers in hardware and software. When you
configure the system (see “Configuring the Appliance” on page 56), the ports are
identified as described in the following table:
TABLE 3-1 Identifiers for Network Ports
Hardware
Identifier
Software
Identifier
Appliance NET0 emc1
NET1 emc2
NET2 emc3
NET3 emc4
optical Gigabit Ethernet card A emf5
B emf6
A
B
NET
0

Chapter 3 Connecting the Sun StorageTek 5220 NAS Appliance 51
Powering On the System
This section describes how to power on the appliance, controller units, and
expansion units for the first time and how to power on the devices after the first
time.
Caution – Use the correct initial power-on sequence for your configuration. Failure
to follow the correct procedure will result in an inoperative system.
■ If you have an appliance and a controller unit only, see “To Power On the
Appliance and Controller Unit Initially” on page 52.
■ If you have an appliance, a controller unit, and one or more expansion units, see
“To Power On the Appliance, Controller Unit, and Expansion Units Initially” on
page 54.
■ If you are powering on a system again after initially powering it on, see “To
Power On the System After a Shutdown” on page 55.
Note – If you are using a UPS, connect all units to the UPS.
Note – To achieve fault tolerance, units with two power supplies must receive
power from two different AC circuits.

52 Sun StorageTek 5220 NAS Appliance Getting Started Guide • October 2006
▼ To Power On the Appliance and Controller Unit
Initially
Note – If you also have one or more expansion units, you must use the procedure
described in “To Power On the Appliance, Controller Unit, and Expansion Units
Initially” on page 54.
1. Verify that all cables between the Sun StorageTek 5220 NAS Appliance and the
controller unit are secured according to the instructions in “Connecting the
Appliance to the Controller Unit” on page 44.
2. Power on the controller unit by toggling the two power supply switches to the On
position.
3. Wait for all LEDs on the controller unit’s front panel to turn solid green,
indicating good operation. This takes about four minutes.
4. Verify that the Sun StorageTek 5220 NAS Appliance is connected to the network
by checking that the green LED on the appliance’s network connection is lit.

Chapter 3 Connecting the Sun StorageTek 5220 NAS Appliance 53
5. Using a pen tip or similar implement, press the recessed Power button on the
appliance’s front panel, as shown in
FIGURE 3-8.
FIGURE 3-8 Detail of Power Button and Front Panel
Power LED
Power button

54 Sun StorageTek 5220 NAS Appliance Getting Started Guide • October 2006
▼ To Power On the Appliance, Controller Unit,
and Expansion Units Initially
Note – If you have one or more expansion units, you must use this initial power-on
sequence. If you do not have any expansion units, you must use the procedure
described in “To Power On the Appliance and Controller Unit Initially” on page 52.
1. Verify that all cables between the Sun StorageTek 5220 NAS Appliance, controller
unit, and expansion units are secured according to the instructions in “Connecting
the Appliance to the Controller Unit” on page 44 and “Connecting a Controller Unit
to Expansion Units” on page 46.
2. Power on the controller unit by toggling the two power supply switches to the On
position.
3. Wait for all LEDs on the controller unit’s front panel to turn solid green,
indicating good operation. This takes about three minutes.
4. Power on the first expansion unit by toggling the two power supply switches to
the On position.
5. Wait for all LEDs on the expansion unit’s front panel to turn solid green,
indicating good operation.
6. If you have a second expansion unit, set both of its power supply switches to the
On position. Wait for all LEDs on the front panel to turn solid green.
7. After you have powered on the expansion units, wait 5 minutes for all units to be
identified and mounted and then proceed.
8. Verify that the appliance is connected to the network by checking that the green
LED on the appliance’s network connection is lit.
9. Power on the appliance by pressing the recessed Power button located on the
front panel. Using a pen tip or similar implement, press the recessed Power
button on the appliance’s front panel, as shown in
FIGURE 3-8.

Chapter 3 Connecting the Sun StorageTek 5220 NAS Appliance 55
▼ To Power On the System After a Shutdown
Use this procedure to power the system on again after it has been running and then
powered off. If the system has never been powered on before, use the procedure
described in “To Power On the Appliance and Controller Unit Initially” on page 52
or “To Power On the Appliance, Controller Unit, and Expansion Units Initially” on
page 54.
Note – When you power off the controller units and expansion units, wait five
seconds before you power them back on. If you power the units off and on too
quickly, unexpected results can occur.
1. Verify that all cables between the Sun StorageTek 5220 NAS Appliance, controller
units, and expansion units are secured according to the instructions in
“Connecting the Appliance to the Controller Unit” on page 44 and “Connecting a
Controller Unit to Expansion Units” on page 46.
2. Power on each expansion unit by setting the two power supply switches to the On
position. Wait at least 30 seconds after powering on the second expansion unit, if
your system has one.
3. Power on the controller unit by setting the two power supply switches to the On
position.
4. Check that all LEDs on the controller unit’s front panels have turn solid green,
indicating good operation.
5. Check that all LEDs on the expansion unit’s front panels have turn solid green,
indicating good operation.
6. Verify that the appliance is connected to the network by checking that the green
LED on the appliance’s network connection is lit.
7. Power on the appliance by pressing the recessed Power button located on the
front panel. Using a pen tip or similar implement, press the recessed Power
button on the appliance’s front panel, as shown in
FIGURE 3-8.

56 Sun StorageTek 5220 NAS Appliance Getting Started Guide • October 2006
Configuring the Appliance
The Sun StorageTek 5220 NAS Appliance ships with the operating system installed.
To configure the appliance for the first time, complete the following tasks:
■ Provide an IP address
■ Use the Web Administrator’s Configuration Wizard.
Assigning the IP Address
You can assign an IP address in either of the following ways:
■ Using a Dynamic Host Configuration Protocol (DHCP) server to assign the IP
address automatically. Your network must have either a DHCP server or a DHCP
relay agent, which has access to a DHCP server on another network. The DHCP
server or agent assigns an IP address to the Sun StorageTek 5220 NAS Appliance
whenever it is powered on while connected to the network. If a DHCP server is
not available, you must assign the IP address manually.
■ Using the controls and liquid crystal display (LCD) panel on the Sun StorageTek
5220 NAS Appliance to enter the IP address manually.
▼ To Prevent an Address Assignment
If a DHCP server is available on your network but you prefer to assign the IP
address manually, you must prevent the appliance from acquiring an IP address
automatically by using the following procedure:
1. During the power-on sequence, wait for the following message to display in the
LDC panel: “DHCP Discovery NIC X”
2. Press any key on the LCD panel.
3. When the panel displays the message, “Abort DHCP?” press the ENTER button
on the panel to confirm.
4. Follow the instructions in To Assign the IP Address Manually.
▼ To Assign the IP Address Manually
If a DHCP server is not available or if you prefer to assign a permanent IP address to
the appliance, configure the IP address using the LCD panel.

Chapter 3 Connecting the Sun StorageTek 5220 NAS Appliance 57
1. Turn on the Sun StorageTek 5220 NAS Appliance and wait for the power-on
sequence to complete.
Note – If you have a DHCP server, skip the discovery step. When the LCD panel
displays “DHCP Discovery NIC X” status message, press any key on the LCD panel
to display the “Abort DHCP?” message. Press the ENTER button.
The LCD panel displays the following:
A: Set IP Number
B: Retry DHCP
2. Press the ENTER button to select A.
3. Enter the values for the IP address.
To enter data, use the up and down arrow buttons to change the value of the digits
and press the ENTER button to confirm the value you want. The cursor moves to the
next digit. After you set the last digit, press the ENTER button again to proceed to
the next setting.
You can enter values for the following settings or you can accept the default:
■ IP address
■ Subnet mask
■ Broadcast address
4. At the prompt about having a gateway, press Enter to accept the default of Yes.
The gateway indicates the network gateway.
After the gateway address is set, press the ENTER button to return to the Network
Config menu.
▼ To Display the IP Address
● At the main menu of the LCD panel, press the ENTER button. At the prompt for
Network Config settings, press the up arrow to A. Press the up or down arrow
keys to select the network port and press the ENTER button to see the IP address.

58 Sun StorageTek 5220 NAS Appliance Getting Started Guide • October 2006
Accessing the Web Administrator
Note – To use the Web Administrator, the appliance must be connected to your
network, you must know its current IP address, and you must be logged into a client
on the same network as the appliance.
When you connect to the Web Administrator for the first time, the Configuration
Wizard launches automatically.
▼ To Connect to the Web Administrator
1. From a client system on the same network as the appliance, open a web browser
and type the IP address of the Sun StorageTek 5220 NAS Appliance in the address
or location field, for example:
http://123.111.78.99
Press Enter.
Note – If the client system uses a proxy server and does not locate the appliance,
change the browser’s option to bypass the proxy server for local addresses. See your
browser’s online help or documentation for more information.
Your browser displays the Web Administrator’s login screen. For your convenience,
bookmark this location or add it to your Favorites list so that you do not have to
enter the IP address in future sessions.
2. At the login screen, click Apply.
You can set the password at a later time, using the procedure in the Sun StorageTek
NAS OS Administration Guide.
The Systems Operations, Set Time and Date panel is displayed.
3. Select the date, the time, and the time zone, and then click Apply.
This is the only time when the Web Administrator prompts for the date and time. If
these values must be changed, use the Administrator Console.
4. Click Yes to confirm the date and time you set.
The Web Administrator displays the license agreement. Read the license agreement
before you accept it. If you decline, Web Administrator displays the login screen.
5. Accept the license agreement.
The Web Administrator’s Configuration Wizard starts. The wizard guides you
through the process of configuring the Sun StorageTek 5220 NAS Appliance.

Chapter 3 Connecting the Sun StorageTek 5220 NAS Appliance 59
6. At each panel of the wizard, enter the information it requests. For descriptions of
the panels, see the Sun StorageTek NAS OS Administration Guide.
If your system uses DHCP to assign DNS, WINS, or IP and gateway addresses, the
fields for these values for port-emc1 (NET0) are configured automatically and you
do not need to enter information. Verify the information or add information for
other network ports and continue with the wizard.
Note – At the panel that requests the information for your DNS server, be sure to
click the Add button on the panel before you continue with the wizard.
7. On the Confirmation screen, review the configuration you have set up. To change
information, use the back arrow to return to a panel.
8. Click Finish on the Confirmation screen.
The system configures the settings and displays the Save Configuration screen.
9. Click Close on the Save Configuration screen.
The wizard checks that all mandatory information is complete and then reboots the
appliance.
Next Steps
At this point, the storage system is running on your network but before it can store
data, you need to set up your file system and to configure your users’ access. Setting
up a file system includes defining any logical unit numbers (LUNs), partitions, file
volumes, or segments. When your file system is complete, set up user access rights
and any other system management features such as setting up a local log file. For
information on all these tasks and their concepts, see the Sun StorageTek NAS OS
Administration Guide.
Note – The boot sequence log file is located in the bootlog, under /cvol/log. The
file that the Web Administrator displays is a running log that can overflow. To save
the entire log, set up a local log according to the instructions in the Sun StorageTek
NAS OS Administration Guide.

60 Sun StorageTek 5220 NAS Appliance Getting Started Guide • October 2006

61
APPENDIX
A
Hardware Specifications
This appendix describes the characteristics and requirements of the Sun StorageTek
5220 NAS Appliance, the Sun StorageTek 5220 RAID Controller unit, and the Sun
StorageTek 5220 Expansion unit.
TABLE A-1 Environmental Specifications
Specifications Operating Non-Operating/Storage
Temperature
Appliance
+10˚C to +35˚C (+50˚F to +95˚F) -40˚C to +65˚C (-40˚F to +149˚F)
Controller/Expansion Units
+10˚C to +35˚C (+50˚F to +95˚F) -10˚C to +45˚C (+14˚F to +113˚F)
Humidity
Appliance
10% to 90%, non-condensing 10% to 93%, non-condensing
Controller/Expansion Units
20% to 80%, non-condensing 10% to 90%, non-condensing

62 Sun StorageTek 5220 NAS Appliance Getting Started Guide • October 2006
TABLE A-2 Physical Characteristics
Specification Value
Dimensions
(HxWxD)
Appliance
4.38 cm x 44.5 cm x 64.0 cm (1.72 in. x 17.52 in x 25.2 in.)
Controller/Expansion Units
13.0 cm x 48.3 cm x 57.2 cm (5.1 in. x 19 in. x 22.5 in.)
Height in
Rack
Appliance
1U
Controller/Expansion Units
3U
Weight
Appliance
18.6 kg (41.1 lb)
Controller Unit
37.2 kg (82 lb)
Expansion Unit
36.7 kg (81 lb)

Appendix A Hardware Specifications 63
TABLE A-3 Power Requirements
Specification Value
Voltage
90-264VAC
Frequency
47-63 Hz
AC current input (maximum)
Appliance
3.6A (115V~) or 1.8A (230V~)
Controller Unit
4.2A (115V~) or 2.1A (230V~)
Expansion Unit
4.1A (115V~) or 2.0A (230V~)
Power consumption
Appliance
418VA (from AC source), maximum
251W (from power supply), maximum
Power availability: 550W maximum (from power supply)
Controller Unit
340VA, 204W (8x500 GB SATA drives)
485VA, 291W (16x500 GB SATA drives)
Power availability: 600W maximum (from power supply)
Expansion Unit
325VA, 195W (8x500 GB SATA drives)
470VA, 282W (16x500 GB SATA drives)
Power availability: 600W maximum (from power supply)
Hard drive (500 GB)
13.6W
Power availability: 600W maximum (from power supply)
Power cord
SJT or SVT 18 SWG min, 3 conductor with 250V and 10A plug
and socket
Heat dissipation (typical)
Appliance
857 BTU/hr
Controller Unit
994 BTU/hr (16 x 500 GB SATA drives)
Expansion Unit
963 BTU/hr (16 x 500 GB SATA drives)
Hard drive (500 GB)
48 BTU/hr

64 Sun StorageTek 5220 NAS Appliance Getting Started Guide • October 2006

65
APPENDIX
B
Third-Party License Agreements
1 The software provided as part of the Sun StorageTek 5220 NAS Appliance system
may contain code provided by the following organizations or individuals under the
described licenses.
2 The University of California Berkley Software Distribution License
Copyright (c) 1991 The Regents of the University of California.
All rights reserved.
Redistribution and use in source and binary forms, with or without modification, are
permitted provided that the following conditions are met: 1.Redistributions of
source code must retain the above copyright notice, this list of conditions and the
following disclaimer. 2.Redistributions in binary form must reproduce the above
copyright notice, this list of conditions and the following disclaimer in the
documentation and/or other materials provided with the distribution. 3.All
advertising materials mentioning features or use of this software must display the
following acknowledgement: This product includes software developed by the
University of California, Berkeley and its contributors. 4.Neither the name of the
University nor the names of its contributors may be used to endorse or promote
products derived from this software without specific prior written permission. THIS
SOFTWARE IS PROVIDED BY THE REGENTS AND CONTRIBUTORS “AS IS”
AND ANY EXPRESS OR IMPLIED WARRANTIES, INCLUDING, BUT NOT
LIMITED TO, THE IMPLIED WARRANTIES OF MERCHANTABILITY AND
FITNESS FOR A PARTICULAR PURPOSE ARE DISCLAIMED. IN NO EVENT
SHALL THE REGENTS OR CONTRIBUTORS BE LIABLE FOR ANY DIRECT,
INDIRECT, INCIDENTAL, SPECIAL, EXEMPLARY, OR CONSEQUENTIAL
DAMAGES (INCLUDING, BUT NOT LIMITED TO, PROCUREMENT OF
SUBSTITUTE GOODS OR SERVICES; LOSS OF USE, DATA, OR PROFITS; OR
BUSINESS INTERRUPTION) HOWEVER CAUSED AND ON ANY THEORY OF
LIABILITY, WHETHER IN CONTRACT, STRICT LIABILITY, OR TORT
(INCLUDING NEGLIGENCE OR OTHERWISE) ARISING IN ANY WAY OUT OF
THE USE OF THIS SOFTWARE, EVEN IF ADVISED OF THE POSSIBILITY OF
SUCH DAMAGE.

66 Sun StorageTek 5220 NAS Appliance Getting Started Guide • October 2006
3 NetBSD License
Copyright (c) 1998 The NetBSD Foundation, Inc.
All rights reserved.
This code is derived from software contributed to The NetBSD Foundation by
Lennart Augustsson (lennart@augustsson.net) at Carlstedt Research & Technology.
Redistribution and use in source and binary forms, with or without modification, are
permitted provided that the following conditions are met: 1.Redistributions of
source code must retain the above copyright notice, this list of conditions and the
following disclaimer. 2.Redistributions in binary form must reproduce the above
copyright notice, this list of conditions and the following disclaimer in the
documentation and/or other materials provided with the distribution. 3.All
advertising materials mentioning features or use of this software must display the
following acknowledgement: This product includes software developed by the
NetBSD Foundation, Inc. and its contributors. 4.Neither the name of The NetBSD
Foundation nor the names of its contributors may be used to endorse or promote
products derived from this software without specific prior written permission. THIS
SOFTWARE IS PROVIDED BY THE NETBSD FOUNDATION, INC. AND
CONTRIBUTORS “AS IS” AND ANY EXPRESS OR IMPLIED WARRANTIES,
INCLUDING, BUT NOT LIMITED TO, THE IMPLIED WARRANTIES OF
MERCHANTABILITY AND FITNESS FOR A PARTICULAR PURPOSE ARE
DISCLAIMED. IN NO EVENT SHALL THE FOUNDATION OR CONTRIBUTORS
BE LIABLE FOR ANY DIRECT, INDIRECT, INCIDENTAL, SPECIAL, EXEMPLARY,
OR CONSEQUENTIAL DAMAGES (INCLUDING, BUT NOT LIMITED TO,
PROCUREMENT OF SUBSTITUTE GOODS OR SERVICES; LOSS OF USE, DATA,
OR PROFITS; OR BUSINESS INTERRUPTION) HOWEVER CAUSED AND ON
ANY THEORY OF LIABILITY, WHETHER IN CONTRACT, STRICT LIABILITY, OR
TORT (INCLUDING NEGLIGENCE OR OTHERWISE) ARISING IN ANY WAY OUT
OF THE USE OF THIS SOFTWARE, EVEN IF ADVISED OF THE POSSIBILITY OF
SUCH DAMAGE.
4 The Massachusetts Institute of Technology License
Copyright 1990 by the Massachusetts Institute of Technology.
All Rights Reserved.
Export of this software from the United States of America may require a specific
license from the United States Government. It is the responsibility of any person or
organization contemplating export to obtain such a license before exporting.
WITHIN THAT CONSTRAINT, permission to use, copy, modify, and distribute this
software and its documentation for any purpose and without fee is hereby granted,
provided that the above copyright notice appear in all copies and that both that
copyright notice and this permission notice appear in supporting documentation,
and that the name of M.I.T. not be used in advertising or publicity pertaining to
distribution of the software without specific, written prior permission. Furthermore
if you modify this software you must label your software as modified software and
not distribute it in such a fashion that it might be confused with the original M.I.T.
software. M.I.T. makes no representations about the suitability of this software for
any purpose. It is provided “as is” without express or implied warranty.

Appendix B Third-Party License Agreements 67
5 The OpenVision Technologies Inc License
Copyright 1993 by OpenVision Technologies, Inc.
Permission to use, copy, modify, distribute, and sell this software and its
documentation for any purpose is hereby granted without fee, provided that the
above copyright notice appears in all copies and that both that copyright notice and
this permission notice appear in supporting documentation, and that the name of
OpenVision not be used in advertising or publicity pertaining to distribution of the
software without specific, written prior permission. OpenVision makes no
representations about the suitability of this software for any purpose. It is provided
“as is” without express or implied warranty.
OPENVISION DISCLAIMS ALL WARRANTIES WITH REGARD TO THIS
SOFTWARE, INCLUDING ALL IMPLIED WARRANTIES OF MERCHANTABILITY
AND FITNESS, IN NO EVENT SHALL OPENVISION BE LIABLE FOR ANY
SPECIAL, INDIRECT OR CONSEQUENTIAL DAMAGES OR ANY DAMAGES
WHATSOEVER RESULTING FROM LOSS OF USE, DATA OR PROFITS, WHETHER
IN AN ACTION OF CONTRACT, NEGLIGENCE OR OTHER TORTIOUS ACTION,
ARISING OUT OF OR IN CONNECTION WITH THE USE OR PERFORMANCE OF
THIS SOFTWARE.
6 The University of Michigan License
Copyright (c) 1990 Regents of the University of Michigan.
All rights reserved.
Redistribution and use in source and binary forms are permitted provided that this
notice is preserved and that due credit is given to the University of Michigan at Ann
Arbor. The name of the University may not be used to endorse or promote products
derived from this software without specific prior written permission. This software
is provided “as is” without express or implied warranty.
7 The Internet Software Consortium License
Copyright (c) 1997 The Internet Software Consortium.
All rights reserved.
Redistribution and use in source and binary forms, with or without modification, are
permitted provided that the following conditions are met: 1.Redistributions of
source code must retain the above copyright notice, this list of conditions and the
following disclaimer. 2.Redistributions in binary form must reproduce the above
copyright notice, this list of conditions and the following disclaimer in the
documentation and/or other materials provided with the distribution. 3.Neither the
name of The Internet Software Consortium nor the names of its contributors may be
used to endorse or promote products derived from this software without specific
prior written permission. THIS SOFTWARE IS PROVIDED BY THE INTERNET
SOFTWARE CONSORTIUM AND CONTRIBUTORS “AS IS” AND ANY EXPRESS
OR IMPLIED WARRANTIES, INCLUDING, BUT NOT LIMITED TO, THE IMPLIED
WARRANTIES OF MERCHANTABILITY AND FITNESS FOR A PARTICULAR
PURPOSE ARE DISCLAIMED. IN NO EVENT SHALL THE INTERNET SOFTWARE

68 Sun StorageTek 5220 NAS Appliance Getting Started Guide • October 2006
CONSORTIUM OR CONTRIBUTORS BE LIABLE FOR ANY DIRECT, INDIRECT,
INCIDENTAL, SPECIAL, EXEMPLARY, OR CONSEQUENTIAL DAMAGES
(INCLUDING, BUT NOT LIMITED TO, PROCUREMENT OF SUBSTITUTE GOODS
OR SERVICES; LOSS OF USE, DATA, OR PROFITS; OR BUSINESS
INTERRUPTION) HOWEVER CAUSED AND ON ANY THEORY OF LIABILITY,
WHETHER IN CONTRACT, STRICT LIABILITY, OR TORT (INCLUDING
NEGLIGENCE OR OTHERWISE) ARISING IN ANY WAY OUT OF THE USE OF
THIS SOFTWARE, EVEN IF ADVISED OF THE POSSIBILITY OF SUCH DAMAGE.
8 Carnegie Mellon University License
The Carnegie Mellon University license appears in an SNMP header file.
Copyright 1988, 1989 by Carnegie Mellon University
All Rights Reserved
Permission to use, copy, modify, and distribute this software and its documentation
for any purpose and without fee is hereby granted, provided that the above
copyright notice appear in all copies and that both that copyright notice and this
permission notice appear in supporting documentation, and that the name of CMU
not be used in advertising or publicity pertaining to distribution of the software
without specific, written prior permission. CMU DISCLAIMS ALL WARRANTIES
WITH REGARD TO THIS SOFTWARE, INCLUDING ALL IMPLIED WARRANTIES
OF MERCHANTABILITY AND FITNESS, IN NO EVENT SHALL CMU BE LIABLE
FOR ANY SPECIAL, INDIRECT OR CONSEQUENTIAL DAMAGES OR ANY
DAMAGES WHATSOEVER RESULTING FROM LOSS OF USE, DATA OR PROFITS,
WHETHER IN AN ACTION OF CONTRACT, NEGLIGENCE OR OTHER
TORTIOUS ACTION, ARISING OUT OF OR IN CONNECTION WITH THE USE OR
PERFORMANCE OF THIS SOFTWARE.
9 Troll FTP License
Copyright 1995-2000 Trolltech AS. Copyright 2001 Arnt Gulbrandsen.
Use, modification and distribution is allowed without limitation, warranty, or
liability of any kind.
10 RSA Data Security, Inc. Message Digest License
Copyright (C) 1991-2, RSA Data Security, Inc. Created 1991.
All rights reserved.
License to copy and use this software is granted provided that it is identified as the
“RSA Data Security, Inc. MD4 Message-Digest Algorithm” in all material mentioning
or referencing this software or this function. License is also granted to make and use
derivative works provided that such works are identified as “derived from the RSA
Data Security, Inc. MD4 Message-Digest Algorithm” in all material mentioning or
referencing the derived work. RSA Data Security, Inc. makes no representations
concerning either the merchantability of this software or the suitability of this
software for any particular purpose. It is provided “as is” without express or
implied warranty of any kind. These notices must be retained in any copies of any
part of this documentation and/or software.

Appendix B Third-Party License Agreements 69
11 MD5 License “THE BEER-WARE LICENSE” (Revision 42):
<phk@login.dknet.dk> wrote this file. As long as you retain this notice you can do
whatever you want with this stuff. If we meet some day, and you think this stuff is
worth it, you can buy me a beer in return. Poul-Henning Kamp
12 NIS License
Copyright (c) 1996, 1997 Bill Paul <wpaul@ctr.columbia.edu>.
All rights reserved.
Redistribution and use in source and binary forms, with or without modification, are
permitted provided that the following conditions are met: 1.Redistributions of
source code must retain the above copyright notice, this list of conditions and the
following disclaimer. 2.Redistributions in binary form must reproduce the above
copyright notice, this list of conditions and the following disclaimer in the
documentation and/or other materials provided with the distribution. 3.All
advertising materials mentioning features or use of this software must display the
following acknowledgement: This product includes software developed by Bill Paul.
4.Neither the name of the author nor the names of any co-contributors may be used
to endorse or promote products derived from this software without specific prior
written permission. THIS SOFTWARE IS PROVIDED BY Bill Paul AND
CONTRIBUTORS “AS IS” AND ANY EXPRESS OR IMPLIED WARRANTIES,
INCLUDING, BUT NOT LIMITED TO, THE IMPLIED WARRANTIES OF
MERCHANTABILITY AND FITNESS FOR A PARTICULAR PURPOSE ARE
DISCLAIMED. IN NO EVENT SHALL Bill Paul OR CONTRIBUTORS BE LIABLE
FOR ANY DIRECT, INDIRECT, INCIDENTAL, SPECIAL, EXEMPLARY, OR
CONSEQUENTIAL DAMAGES (INCLUDING, BUT NOT LIMITED TO,
PROCUREMENT OF SUBSTITUTE GOODS OR SERVICES; LOSS OF USE, DATA,
OR PROFITS; OR BUSINESS INTERRUPTION) HOWEVER CAUSED AND ON
ANY THEORY OF LIABILITY, WHETHER IN CONTRACT, STRICT LIABILITY, OR
TORT (INCLUDING NEGLIGENCE OR OTHERWISE) ARISING IN ANY WAY OUT
OF THE USE OF THIS SOFTWARE, EVEN IF ADVISED OF THE POSSIBILITY OF
SUCH DAMAGE.
13 The Network Time Protocol Version 4 Distribution Copyright Notice
The following copyright notice applies to all files collectively called the Network
Time Protocol Version 4 Distribution. Unless specifically declared otherwise in an
individual file, this notice applies as if the text was explicitly included in the file.

70 Sun StorageTek 5220 NAS Appliance Getting Started Guide • October 2006
14 OpenLDAP Public License
Version 2.7, 7 September 2001
Redistribution and use of this software and associated documentation (“Software”),
with or without modification, are permitted provided that the following conditions
are met: 4.Redistributions of source code must retain copyright statements and
notices, 5.Redistributions in binary form must reproduce applicable copyright
statements and notices, this list of conditions, and the following disclaimer in the
documentation and/or other materials provided with the distribution, and
6.Redistributions must contain a verbatim copy of this document. The OpenLDAP
Foundation may revise this license from time to time. Each revision is distinguished
by a version number. You may use this Software under terms of this license revision
or under the terms of any subsequent revision of the license. THIS SOFTWARE IS
PROVIDED BY THE OPENLDAP FOUNDATION AND ITS CONTRIBUTORS “AS
IS” AND ANY EXPRESSED OR IMPLIED WARRANTIES, INCLUDING, BUT NOT
LIMITED TO, THE IMPLIED WARRANTIES OF MERCHANTABILITY AND
FITNESS FOR A PARTICULAR PURPOSE ARE DISCLAIMED. IN NO EVENT
SHALL THE OPENLDAP FOUNDATION, ITS CONTRIBUTORS, OR THE
AUTHOR(S) OR OWNER(S) OF THE SOFTWARE BE LIABLE FOR ANY DIRECT,
INDIRECT, INCIDENTAL, SPECIAL, EXEMPLARY, OR CONSEQUENTIAL
DAMAGES (INCLUDING, BUT NOT LIMITED TO, PROCUREMENT OF
SUBSTITUTE GOODS OR SERVICES; LOSS OF USE, DATA, OR PROFITS; OR
BUSINESS INTERRUPTION) HOWEVER CAUSED AND ON ANY THEORY OF
LIABILITY, WHETHER IN CONTRACT, STRICT LIABILITY, OR TORT
(INCLUDING NEGLIGENCE OR OTHERWISE) ARISING IN ANY WAY OUT OF
THE USE OF THIS SOFTWARE, EVEN IF ADVISED OF THE POSSIBILITY OF
**************************************************************************
*
* Copyright (c) David L. Mills 1992-2001
*
* Permission to use, copy, modify, and distribute this software and
* its documentation for any purpose and without fee is hereby
* granted, provided that the above copyright notice appears in all
* copies and that both the copyright notice and this permission
* notice appear in supporting documentation, and that the name
* University of Delaware not be used in advertising or publicity
* pertaining to distribution of the software without specific,
* written prior permission. The University of Delaware makes no
* representations about the suitability this software for any
* purpose. It is provided “as is” without express or implied
* warranty.
*
***************************************************************

Appendix B Third-Party License Agreements 71
SUCH DAMAGE. The names of the authors and copyright holders must not be used
in advertising or otherwise to promote the sale, use or other dealing in this Software
without specific, written prior permission. Title to copyright in this Software shall at
all times remain with copyright holders. OpenLDAP is a registered trademark of the
OpenLDAP Foundation. Copyright 1999-2001 The OpenLDAP Foundation,
Redwood City, California, USA. All Rights Reserved. Permission to copy and
distribute verbatim copies of this document is granted.
15 OpenSSH License
The licenses which components of this software fall under are as follows. First, we
will summarize and say that all components are under a BSD license, or a license
more free than that. OpenSSH contains no GPL code. 1)Copyright (c) 1995 Tatu
Ylonen <ylo@cs.hut.fi>, Espoo, Finland All rights reserved As far as I am concerned,
the code I have written for this software can be used freely for any purpose. Any
derived versions of this software must be clearly marked as such, and if the derived
work is incompatible with the protocol description in the RFC file, it must be called
by a name other than “ssh” or “Secure Shell”. However, I am not implying to give
any licenses to any patents or copyrights held by third parties, and the software
includes parts that are not under my direct control. As far as I know, all included
source code is used in accordance with the relevant license agreements and can be
used freely for any purpose (the GNU license being the most restrictive); see below
for details. [However, none of that term is relevant at this point in time. All of these
restrictively licensed software components which he talks about have been removed
from OpenSSH, i.e.
■ RSA is no longer included, found in the OpenSSL library
■ IDEA is no longer included, its use is deprecated
■ DES is now external, in the OpenSSL library
■ GMP is no longer used, and instead we call BN code from OpenSSL
■ Zlib is now external, in a library
■ The make-ssh-known-hosts script is no longer included
■ TSS has been removed
■ MD5 is now external, in the OpenSSL library
■ RC4 support has been replaced with ARC4 support from OpenSSL
■ Blowfish is now external, in the OpenSSL library
[The license continues] Note that any information and cryptographic algorithms
used in this software are publicly available on the Internet and at any major
bookstore, scientific library, and patent office worldwide. More information can be
found e.g. at “http://www.cs.hut.fi/crypto”. The legal status of this program is
some combination of all these permissions and restrictions. Use only at your own
responsibility. You will be responsible for any legal consequences yourself; I am not
making any claims whether possessing or using this is legal or not in your country,
and I am not taking any responsibility on your behalf.

72 Sun StorageTek 5220 NAS Appliance Getting Started Guide • October 2006
NO WARRANTY
BECAUSE THE PROGRAM IS LICENSED FREE OF CHARGE, THERE IS NO
WARRANTY FOR THE PROGRAM, TO THE EXTENT PERMITTED BY
APPLICABLE LAW. EXCEPT WHEN OTHERWISE STATED IN WRITING THE
COPYRIGHT HOLDERS AND/OR OTHER PARTIES PROVIDE THE PROGRAM
“AS IS” WITHOUT WARRANTY OF ANY KIND, EITHER EXPRESSED OR
IMPLIED, INCLUDING, BUT NOT LIMITED TO, THE IMPLIED WARRANTIES OF
MERCHANTABILITY AND FITNESS FOR A PARTICULAR PURPOSE. THE
ENTIRE RISK AS TO THE QUALITY AND PERFORMANCE OF THE PROGRAM IS
WITH YOU. SHOULD THE PROGRAM PROVE DEFECTIVE, YOU ASSUME THE
COST OF ALL NECESSARY SERVICING, REPAIR OR CORRECTION.
IN NO EVENT UNLESS REQUIRED BY APPLICABLE LAW OR AGREED TO IN
WRITING WILL ANY COPYRIGHT HOLDER, OR ANY OTHER PARTY WHO MAY
MODIFY AND/OR REDISTRIBUTE THE PROGRAM AS PERMITTED ABOVE, BE
LIABLE TO YOU FOR DAMAGES, INCLUDING ANY GENERAL, SPECIAL,
INCIDENTAL OR CONSEQUENTIAL DAMAGES ARISING OUT OF THE USE OR
INABILITY TO USE THE PROGRAM (INCLUDING BUT NOT LIMITED TO LOSS
OF DATA OR DATA BEING RENDERED INACCURATE OR LOSSES SUSTAINED
BY YOU OR THIRD PARTIES OR A FAILURE OF THE PROGRAM TO OPERATE
WITH ANY OTHER PROGRAMS), EVEN IF SUCH HOLDER OR OTHER PARTY
HAS BEEN ADVISED OF THE POSSIBILITY OF SUCH DAMAGES.
2)The 32-bit CRC implementation in crc32.c is due to Gary S. Brown. Comments in
the file indicate it may be used for any purpose without restrictions: COPYRIGHT
(C) 1986 Gary S. Brown. You may use this program, or code or tables extracted from
it, as desired without restriction. 3)The 32-bit CRC compensation attack detector in
deattack.c was contributed by CORE SDI S.A. under a BSD-style license. See
http://www.core-sdi.com/english/ssh/ for details. Cryptographic attack detector
for ssh - source code Copyright (c) 1998 CORE SDI S.A., Buenos Aires, Argentina.
All rights reserved. Redistribution and use in source and binary forms, with or
without modification, are permitted provided that this copyright notice is retained.
THIS SOFTWARE IS PROVIDED “AS IS” AND ANY EXPRESS OR IMPLIED
WARRANTIES ARE DISCLAIMED. IN NO EVENT SHALL CORE SDI S.A. BE
LIABLE FOR ANY DIRECT, INDIRECT, INCIDENTAL, SPECIAL, EXEMPLARY OR
CONSEQUENTIAL DAMAGES RESULTING FROM THE USE OR MISUSE OF THIS
SOFTWARE. Ariel Futoransky futo@core-sdi.com <http://www.core-sdi.com> 4)
Remaining components of the software are provided under a standard 2-term BSD
license with the following names as copyright holders: Markus Friedl Theo de Raadt
Niels Provos Dug Song Aaron Campbell Doug Rabson Redistribution and use in
source and binary forms, with or without modification, are permitted provided that
the following conditions are met: 1.Redistributions of source code must retain the
above copyright notice, this list of conditions and the following disclaimer.
2.Redistributions in binary form must reproduce the above copyright notice, this list
of conditions and the following disclaimer in the documentation and/or other
materials provided with the distribution. THIS SOFTWARE IS PROVIDED BY THE
AUTHOR “AS IS” AND ANY EXPRESS OR IMPLIED WARRANTIES, INCLUDING,

Appendix B Third-Party License Agreements 73
BUT NOT LIMITED TO, THE IMPLIED WARRANTIES OF MERCHANTABILITY
AND FITNESS FOR A PARTICULAR PURPOSE ARE DISCLAIMED. IN NO EVENT
SHALL THE AUTHOR BE LIABLE FOR ANY DIRECT, INDIRECT, INCIDENTAL,
SPECIAL, EXEMPLARY, OR CONSEQUENTIAL DAMAGES (INCLUDING, BUT
NOT LIMITED TO, PROCUREMENT OF SUBSTITUTE GOODS OR SERVICES;
LOSS OF USE, DATA, OR PROFITS; OR BUSINESS INTERRUPTION) HOWEVER
CAUSED AND ON ANY THEORY OF LIABILITY, WHETHER IN CONTRACT,
STRICT LIABILITY, OR TORT (INCLUDING NEGLIGENCE OR OTHERWISE)
ARISING IN ANY WAY OUT OF THE USE OF THIS SOFTWARE, EVEN IF
ADVISED OF THE POSSIBILITY OF SUCH DAMAGE.
16 OpenSSL License LICENSE ISSUES
The OpenSSL toolkit stays under a dual license, i.e. both the conditions of the
OpenSSL License and the original SSLeay license apply to the toolkit. See below for
the actual license texts. Actually both licenses are BSD-style Open Source licenses. In
case of any license issues related to OpenSSL please contact opensslcore@openssl.org. Copyright (c) 1998-2002 The OpenSSL Project. All rights reserved.
Redistribution and use in source and binary forms, with or without modification, are
permitted provided that the following conditions are met: 1.Redistributions of
source code must retain the above copyright notice, this list of conditions and the
following disclaimer. 2.Redistributions in binary form must reproduce the above
copyright notice, this list of conditions and the following disclaimer in the
documentation and/or other materials provided with the distribution. 3.All
advertising materials mentioning features or use of this software must display the
following acknowledgment: “This product includes software developed by the
OpenSSL Project for use in the OpenSSL Toolkit. (http://www.openssl.org/)” 4.The
names “OpenSSL Toolkit” and “OpenSSL Project” must not be used to endorse or
promote products derived from this software without prior written permission. For
written permission, please contact openssl-core@openssl.org. 5.Products derived
from this software may not be called “OpenSSL” nor may “OpenSSL” appear in
their names without prior written permission of the OpenSSL Project.
6.Redistributions of any form whatsoever must retain the following
acknowledgment: “This product includes software developed by the OpenSSL
Project for use in the OpenSSL Toolkit (http://www.openssl.org/)” THIS
SOFTWARE IS PROVIDED BY THE OpenSSL PROJECT “AS IS” AND ANY
EXPRESSED OR IMPLIED WARRANTIES, INCLUDING, BUT NOT LIMITED TO,
THE IMPLIED WARRANTIES OF MERCHANTABILITY AND FITNESS FOR A
PARTICULAR PURPOSE ARE DISCLAIMED. IN NO EVENT SHALL THE OpenSSL
PROJECT OR ITS CONTRIBUTORS BE LIABLE FOR ANY DIRECT, INDIRECT,
INCIDENTAL, SPECIAL, EXEMPLARY, OR CONSEQUENTIAL DAMAGES
(INCLUDING, BUT NOT LIMITED TO, PROCUREMENT OF SUBSTITUTE GOODS
OR SERVICES; LOSS OF USE, DATA, OR PROFITS; OR BUSINESS
INTERRUPTION) HOWEVER CAUSED AND ON ANY THEORY OF LIABILITY,
WHETHER IN CONTRACT, STRICT LIABILITY, OR TORT (INCLUDING
NEGLIGENCE OR OTHERWISE) ARISING IN ANY WAY OUT OF THE USE OF
THIS SOFTWARE, EVEN IF ADVISED OF THE POSSIBILITY OF SUCH DAMAGE.

74 Sun StorageTek 5220 NAS Appliance Getting Started Guide • October 2006
This product includes cryptographic software written by Eric Young
(eay@cryptsoft.com). This product includes software written by Tim Hudson
(tjh@cryptsoft.com).
Original SSLeay License
Copyright (C) 1995-1998 Eric Young (eay@cryptsoft.com)
All rights reserved.
This package is an SSL implementation written by Eric Young (eay@cryptsoft.com).
The implementation was written so as to conform with Netscapes SSL. This library
is free for commercial and non-commercial use as long as the following conditions
are aheared to. The following conditions apply to all code found in this distribution,
be it the RC4, RSA, lhash, DES, etc., code; not just the SSL code. The SSL
documentation included with this distribution is covered by the same copyright
terms except that the holder is Tim Hudson (tjh@cryptsoft.com). Copyright remains
Eric Young’s, and as such any Copyright notices in the code are not to be removed.
If this package is used in a product, Eric Young should be given attribution as the
author of the parts of the library used. This can be in the form of a textual message
at program startup or in documentation (online or textual) provided with the
package. Redistribution and use in source and binary forms, with or without
modification, are permitted provided that the following conditions are met:
1.Redistributions of source code must retain the copyright notice, this list of
conditions and the following disclaimer. 2.Redistributions in binary form must
reproduce the above copyright notice, this list of conditions and the following
disclaimer in the documentation and/or other materials provided with the
distribution. 3.All advertising materials mentioning features or use of this software
must display the following acknowledgement: “This product includes cryptographic
software written by Eric Young (eay@cryptsoft.com)” The word ’cryptographic’ can
be left out if the routines from the library being used are not cryptographic related :). 4.If you include any Microsoft Windows specific code (or a derivative thereof)
from the apps directory (application code) you must include an acknowledgement:
“This product includes software written by Tim Hudson (tjh@cryptsoft.com)” THIS
SOFTWARE IS PROVIDED BY ERIC YOUNG “AS IS” AND ANY EXPRESS OR
IMPLIED WARRANTIES, INCLUDING, BUT NOT LIMITED TO, THE IMPLIED
WARRANTIES OF MERCHANTABILITY AND FITNESS FOR A PARTICULAR
PURPOSE ARE DISCLAIMED. IN NO EVENT SHALL THE AUTHOR OR
CONTRIBUTORS BE LIABLE FOR ANY DIRECT, INDIRECT, INCIDENTAL,
SPECIAL, EXEMPLARY, OR CONSEQUENTIAL DAMAGES (INCLUDING, BUT
NOT LIMITED TO, PROCUREMENT OF SUBSTITUTE GOODS OR SERVICES;
LOSS OF USE, DATA, OR PROFITS; OR BUSINESS INTERRUPTION) HOWEVER
CAUSED AND ON ANY THEORY OF LIABILITY, WHETHER IN CONTRACT,
STRICT LIABILITY, OR TORT (INCLUDING NEGLIGENCE OR OTHERWISE)
ARISING IN ANY WAY OUT OF THE USE OF THIS SOFTWARE, EVEN IF
ADVISED OF THE POSSIBILITY OF SUCH DAMAGE. The license and distribution
terms for any publically available version or derivative of this code cannot be
changed. i.e. this code cannot simply be copied and put under another distribution
license [including the GNU Public License.]

Appendix B Third-Party License Agreements 75
17 TZFILE Header File Declaration
This file is in the public domain, so clarified as of June 5, 1996 by Arthur David
Olson (arthur_david_olson@nih.gov).
18 ZLIB Copyright Notice
(C) 1995-2002 Jean-loup Gailly and Mark Adler
This software is provided ’as-is’, without any express or implied warranty. In no
event will the authors be held liable for any damages arising from the use of this
software. Permission is granted to anyone to use this software for any purpose,
including commercial applications, and to alter it and redistribute it freely, subject to
the following restrictions: 1.The origin of this software must not be misrepresented;
you must not claim that you wrote the original software. If you use this software in
a product, an acknowledgment in the product documentation would be appreciated
but is not required. 2.Altered source versions must be plainly marked as such, and
must not be misrepresented as being the original software. 3.This notice may not be
removed or altered from any source distribution.
Jean-loup Gailly Mark Adler
jloup@gzip.org madler@alumni.caltech.edu
19 Sun RPC License
Sun RPC is a product of Sun Microsystems, Inc. and is provided for unrestricted use
provided that this legend is included on all tape media and as a part of the software
program in whole or part. Users may copy or modify Sun RPC without charge, but
are not authorized to license or distribute it to anyone else except as part of a
product or program developed by the user. SUN RPC IS PROVIDED AS IS WITH
NO WARRANTIES OF ANY KIND INCLUDING THE WARRANTIES OF DESIGN,
MERCHANTIBILITY AND FITNESS FOR A PARTICULAR PURPOSE, OR ARISING
FROM A COURSE OF DEALING, USAGE OR TRADE PRACTICE. Sun RPC is
provided with no support and without any obligation on the part of Sun
Microsystems, Inc. to assist in its use, correction, modification or enhancement. SUN
MICROSYSTEMS, INC. SHALL HAVE NO LIABILITY WITH RESPECT TO THE
INFRINGEMENT OF COPYRIGHTS, TRADE SECRETS OR ANY PATENTS BY SUN
RPC OR ANY PART THEREOF. In no event will Sun Microsystems, Inc. be liable for
any lost revenue or profits or other special, indirect and consequential damages,
even if Sun has been advised of the possibility of such damages. Sun Microsystems,
Inc. 2550 Garcia Avenue Mountain View, California 94043 Copyright (c) 1988 by Sun
Microsystems, Inc.
20 Adaptec AIC SCSI Driver License
Copyright (c) 1994-2002 Justin T. Gibbs.
Copyright (c) 2000-2002 Adaptec Inc.
All rights reserved.
Redistribution and use in source and binary forms, with or without modification, are
permitted provided that the following conditions are met: 1.Redistributions of
source code must retain the above copyright notice, this list of conditions, and the
following disclaimer, without modification. 2.Redistributions in binary form must
reproduce at minimum a disclaimer substantially similar to the “NO WARRANTY”

76 Sun StorageTek 5220 NAS Appliance Getting Started Guide • October 2006
disclaimer below (“Disclaimer”) and any redistribution must be conditioned upon
including a substantially similar Disclaimer requirement for further binary
redistribution. 3.Neither the names of the above-listed copyright holders nor the
names of any contributors may be used to endorse or promote products derived
from this software without specific prior written permission. Alternatively, this
software may be distributed under the terms of the GNU General Public License
(“GPL”) version 2 as published by the Free Software Foundation. NO WARRANTY
THIS SOFTWARE IS PROVIDED BY THE COPYRIGHT HOLDERS AND
CONTRIBUTORS “AS IS” AND ANY EXPRESS OR IMPLIED WARRANTIES,
INCLUDING, BUT NOT LIMITED TO, THE IMPLIED WARRANTIES OF
MERCHANTIBILITY AND FITNESS FOR A PARTICULAR PURPOSE ARE
DISCLAIMED. IN NO EVENT SHALL THE COPYRIGHT HOLDERS OR
CONTRIBUTORS BE LIABLE FOR SPECIAL, EXEMPLARY, OR CONSEQUENTIAL
DAMAGES (INCLUDING, BUT NOT LIMITED TO, PROCUREMENT OF
SUBSTITUTE GOODS OR SERVICES; LOSS OF USE, DATA, OR PROFITS; OR
BUSINESS INTERRUPTION) HOWEVER CAUSED AND ON ANY THEORY OF
LIABILITY, WHETHER IN CONTRACT, STRICT LIABILITY, OR TORT
(INCLUDING NEGLIGENCE OR OTHERWISE) ARISING IN ANY WAY OUT OF
THE USE OF THIS SOFTWARE, EVEN IF ADVISED OF THE POSSIBILITY OF
SUCH DAMAGES.
21 QLogic 2300 License
Copyright (c) 1997, 1998, 1999, 2000, 2001 by Matthew Jacob
Feral Software
All rights reserved.
Redistribution and use in source and binary forms, with or without modification, are
permitted provided that the following conditions are met: 1.Redistributions of
source code must retain the above copyright notice immediately at the beginning of
the file, without modification, this list of conditions, and the following disclaimer.
2.The name of the author may not be used to endorse or promote products derived
from this software without specific prior written permission. THIS SOFTWARE IS
PROVIDED BY THE AUTHOR AND CONTRIBUTORS “AS IS” AND ANY
EXPRESS OR IMPLIED WARRANTIES, INCLUDING, BUT NOT LIMITED TO, THE
IMPLIED WARRANTIES OF MERCHANTABILITY AND FITNESS FOR A
PARTICULAR PURPOSE ARE DISCLAIMED. IN NO EVENT SHALL THE
AUTHOR OR CONTRIBUTORS BE LIABLE FOR ANY DIRECT, INDIRECT,
INCIDENTAL, SPECIAL, EXEMPLARY, OR CONSEQUENTIAL DAMAGES
(INCLUDING, BUT NOT LIMITED TO, PROCUREMENT OF SUBSTITUTE GOODS
OR SERVICES; LOSS OF USE, DATA, OR PROFITS; OR BUSINESS
INTERRUPTION) HOWEVER CAUSED AND ON ANY THEORY OF LIABILITY,
WHETHER IN CONTRACT, STRICT LIABILITY, OR TORT (INCLUDING
NEGLIGENCE OR OTHERWISE) ARISING IN ANY WAY OUT OF THE USE OF
THIS SOFTWARE, EVEN IF ADVISED OF THE POSSIBILITY OF SUCH DAMAGE.
Inspiration and ideas about this driver are from Erik Moe’s Linux driver (qlogicisp.c)
and Dave Miller’s SBus version of same (qlogicisp.c). Some ideas dredged from the
Solaris driver.

Appendix B Third-Party License Agreements 77
22 QLogic SCSI License
Copyright (c) 1997, 1998 by Matthew Jacob
NASA/Ames Research Center All rights reserved.
Redistribution and use in source and binary forms, with or without modification, are
permitted provided that the following conditions are met: 1.Redistributions of
source code must retain the above copyright notice immediately at the beginning of
the file, without modification, this list of conditions, and the following disclaimer.
2.Redistributions in binary form must reproduce the above copyright notice, this list
of conditions and the following disclaimer in the documentation and/or other
materials provided with the distribution. 3.The name of the author may not be used
to endorse or promote products derived from this software without specific prior
written permission.
THIS SOFTWARE IS PROVIDED BY THE AUTHOR AND CONTRIBUTORS “AS IS”
AND ANY EXPRESS OR IMPLIED WARRANTIES, INCLUDING, BUT NOT
LIMITED TO, THE IMPLIED WARRANTIES OF MERCHANTABILITY AND
FITNESS FOR A PARTICULAR PURPOSE ARE DISCLAIMED. IN NO EVENT
SHALL THE AUTHOR OR CONTRIBUTORS BE LIABLE FOR ANY DIRECT,
INDIRECT, INCIDENTAL, SPECIAL, EXEMPLARY, OR CONSEQUENTIAL
DAMAGES (INCLUDING, BUT NOT LIMITED TO, PROCUREMENT OF
SUBSTITUTE GOODS OR SERVICES; LOSS OF USE, DATA, OR PROFITS; OR
BUSINESS INTERRUPTION) HOWEVER CAUSED AND ON ANY THEORY OF
LIABILITY, WHETHER IN CONTRACT, STRICT LIABILITY, OR TORT
(INCLUDING NEGLIGENCE OR OTHERWISE) ARISING IN ANY WAY OUT OF
THE USE OF THIS SOFTWARE, EVEN IF ADVISED OF THE POSSIBILITY OF
SUCH DAMAGE.
Inspiration and ideas about this driver are from Erik Moe’s Linux driver (qlogicisp.c)
and Dave Miller’s SBus version of same (qlogicisp.c). Some ideas dredged from the
Solaris driver.
23 QLogic ISP 2300 Initiator/Target Firmware Copyright Notice

78 Sun StorageTek 5220 NAS Appliance Getting Started Guide • October 2006
24 Intel Corporation EM Gigabit NIC Driver License
Copyright (c) 1999-2001 Intel Corporation
All rights reserved.
Redistribution and use in source and binary forms of the Software, with or without
modification, are permitted provided that the following conditions are met:
1.Redistributions of source code of the Software may retain the above copyright
notice, this list of conditions and the following disclaimer. 2.Redistributions in
binary form of the Software may reproduce the above copyright notice, this list of
conditions and the following disclaimer in the documentation and/or other
materials provided with the distribution. 3.Neither the name of the Intel Corporation
nor the names of its contributors shall be used to endorse or promote products
derived from this Software without specific prior written permission. THIS
SOFTWARE IS PROVIDED BY THE COPYRIGHT HOLDERS AND
CONTRIBUTORS “AS IS” AND ANY EXPRESS OR IMPLIED WARRANTIES,
INCLUDING, BUT NOT LIMITED TO, THE IMPLIED WARRANTIES OF
MERCHANTABILITY AND FITNESS FOR A PARTICULAR PURPOSE ARE
DISCLAIMED. IN NO EVENT SHALL THE INTEL OR ITS CONTRIBUTORS BE
LIABLE FOR ANY DIRECT, INDIRECT, INCIDENTAL, SPECIAL, EXEMPLARY, OR
CONSEQUENTIAL DAMAGES (INCLUDING, BUT NOT LIMITED TO,
PROCUREMENT OF SUBSTITUTE GOODS OR SERVICES; LOSS OF USE, DATA,
OR PROFITS; OR BUSINESS INTERRUPTION) HOWEVER CAUSED AND ON
ANY THEORY OF LIABILITY, WHETHER IN CONTRACT, STRICT LIABILITY, OR
TORT (INCLUDING NEGLIGENCE OR OTHERWISE) ARISING IN ANY WAY OUT
OF THE USE OF THIS SOFTWARE, EVEN IF ADVISED OF THE POSSIBILITY OF
SUCH DAMAGE.
ISP2300 Initiator/Target Firmware
with Fabric (Public Loop), Point-point, and
expanded LUN addressing for FCTAPE
NOTICE
COPYRIGHT 2001 QLOGIC CORPORATION
ALL RIGHTS RESERVED
This computer program is CONFIDENTIAL and contains TRADE SECRETS of
QLOGIC CORPORATION. The receipt or possession of this program does
not convey any rights to reproduce or disclose its contents, or to
manufacture, use, or sell anything that it may describe, in whole or
in part, without the specific written consent of QLOGIC CORPORATION.
Any reproduction of this program without the express written consent
of QLOGIC CORPORATION is a violation of the copyright laws and may
subject you to civil liability and criminal prosecution.
Firmware Version 3.01.20 (15:30 Dec 19, 2002)

Appendix B Third-Party License Agreements 79
25 NIC Bonding Pseudo Device Driver
The bonding pseudo device driver contains various copyright statements:
1.Copyright 1999, Thomas Davis, tadavis@lbl.gov. Licensed under the GPL. Based on
dummy.c, and eql.c devices. 2.Portions are (c) Copyright 1995 Simon “Guru AlephNull” Janes NCM: Network and Communications Management, Inc. BUT, I’m the
one who modified it for ethernet, so: (c) Copyright 1999, Thomas Davis,
tadavis@lbl.gov This software may be used and distributed according to the terms of
the GNU Public License, incorporated herein by reference. 3.Author: Donald Becker
becker@cesdis.gsfc.nasa.gov Copyright 1994-1996 Donald Becker This program is
free software; you can redistribute it and/or modify it under the terms of the GNU
General Public License as published by the Free Software Foundation. The author
may be reached as becker@CESDIS.gsfc.nasa.gov, or C/O Center of Excellence in
Space Data and Information Sciences Code 930.5, Goddard Space Flight Center,
Greenbelt MD 20771.
Documentation and source code may be found at
http://sourceforge.net/projects/bonding/
26 Open source http client library
COPYRIGHT AND PERMISSION NOTICE
Copyright (c) 1996 - 2005, Daniel Stenberg, <daniel@haxx.se>.
All rights reserved.
Permission to use, copy, modify, and distribute this software for any purpose with or
without fee is hereby granted, provided that the above copyright notice and this
permission notice appear in all copies.
THE SOFTWARE IS PROVIDED “AS IS”, WITHOUT WARRANTY OF ANY KIND,
EXPRESS OR IMPLIED, INCLUDING BUT NOT LIMITED TO THE WARRANTIES
OF MERCHANTABILITY, FITNESS FOR A PARTICULAR PURPOSE AND
NONINFRINGEMENT OF THIRD PARTY RIGHTS. IN NO EVENT SHALL THE
AUTHORS OR COPYRIGHT HOLDERS BE LIABLE FOR ANY CLAIM, DAMAGES
OR OTHER LIABILITY, WHETHER IN AN ACTION OF CONTRACT, TORT OR
OTHERWISE, ARISING FROM, OUT OF OR IN CONNECTION WITH THE
SOFTWARE OR THE USE OR OTHER DEALINGS IN THE SOFTWARE.
Except as contained in this notice, the name of a copyright holder shall not be used
in advertising or otherwise to promote the sale, use or other dealings in this
Software without prior written authorization of the copyright holder.
27 Open source XML parsing library
Copyright (c) 1998, 1999, 2000 Thai Open Source Software Center Ltd

80 Sun StorageTek 5220 NAS Appliance Getting Started Guide • October 2006
Permission is hereby granted, free of charge, to any person obtaining a copy of this
software and associated documentation files (the “Software”), to deal in the Software
without restriction, including without limitation the rights to use, copy, modify,
merge, publish, distribute, sublicense, and/or sell copies of the Software, and to
permit persons to whom the Software is furnished to do so, subject to the following
conditions:
The above copyright notice and this permission notice shall be included in all copies
or substantial portions of the Software.
THE SOFTWARE IS PROVIDED “AS IS”, WITHOUT WARRANTY OF ANY KIND,
EXPRESS OR IMPLIED, INCLUDING BUT NOT LIMITED TO THE WARRANTIES
OF MERCHANTABILITY, FITNESS FOR A PARTICULAR PURPOSE AND
NONINFRINGEMENT.
IN NO EVENT SHALL THE AUTHORS OR COPYRIGHT HOLDERS BE LIABLE
FOR ANY CLAIM, DAMAGES OR OTHER LIABILITY, WHETHER IN AN ACTION
OF CONTRACT, TORT OR OTHERWISE, ARISING FROM, OUT OF OR IN
CONNECTION WITH THE SOFTWARE OR THE USE OR OTHER DEALINGS IN
THE SOFTWARE.

81
Glossary
array (n.) Multiple disk drives that function as a single storage element and is
managed by the NAS appliance. The array consists of one controller unit and,
optionally, up to two expansion units.
AWG (American wire gauge) (n.) A unit for measuring the thickness of wire.
back-end storage The trays of disk drives. A tray with a RAID controller is called a controller
unit; a tray without a controller is called an expansion unit. See also controller
unit and expansion unit.
configuration (1) (n.) The manner in which the software and hardware of an information
processing system are organized and interconnected. (2) (n.) The physical and
logical arrangement of programs and devices that make up a data processing
system. (3) (n.) The devices and programs that make up a system, subsystem,
or network.
controller unit A RAID controller and up to 16 disk drives. See also expansion unit.
CIFS Common Internet File System
driver (n.) A software program that enables a computer to communicate with a
peripheral device.
DNS Domain Name Service
expansion unit A tray with up to 16 disk drives but no RAID controller. This type of unit
expands the capacity of an array and must be attached to a controller unit to
function. See also controller unit.
Fast Ethernet (n.) A high-speed version of Ethernet transmitting data at 100 Mbps. Fast
Ethernet networks use the same media access control method that 10BASE-T
Ethernet networks use but achieve 10 times the data transmission speed.
FC See Fibre Channel
Fibre Channel (FC) A set of standards for a serial I/O bus capable of transferring data between
two ports at up to 100 MBytes/second. Fibre Channel supports point to point,
arbitrated loop, and switched topologies.

82 Sun StorageTek 5220 NAS Appliance Getting Started Guide • October 2006
GB (gigabyte) (n.) A unit of information equal to 1024 megabytes.
Gigabit Ethernet (n.) An Ethernet technology that enables data transfer rates of up to 1 Gbps
using optical fiber cable or unshielded twisted-pair cable.
hot-swap (v.) To replace a failed component without interruption of system service.
HBA See host bus adapter.
host bus
adapter(HBA) An I/O adapter than connects a host I/O bus to a computer’s memory system.
(SNIA)
KB (kilobyte) (n.) A unit of information equal to 1024 bytes.
LAN (local area network) (n.) A data communications network that is limited
geographically limited (about 1 km radius).
LCD (liquid crystal display) (n.) A low-power display technology that uses rod-
shaped crystal molecules that change their orientation when an electrical
current flows through them.
LED (light-emitting diode) (n.) A semiconductor device that converts electrical
energy into light.
LUN logical unit number
MB (megabyte) (n.) A unit of information equivalent to 1,048,576 bytes or 1024
kilobytes. Most uses of “megabyte,” however, refer to exactly 1 million bytes.
MHz (megahertz) (n.) A measure of frequency equivalent to 1 million cycles per
second.
MTBF (Mean Time Between Failures) (n.) The estimated time a device operates before
a failure occurs.
NAS (network-attached storage) (n.) A storage appliance that connects directly to
the network. NAS does not usually perform network directory services or
function as an application server; instead, it augments storage capacities.
Quick and easy to set up, NAS appliances also typically provide cross-platform
file sharing.
NFS Network File System
NIC (network interface card) (n.) An adapter that lets you connect a network cable
to a microcomputer. The card includes encoding and decoding circuitry and a
receptacle for a network cable connection.
NIS Network Information Service
patch A software or firmware update for a storage device or device component.

Glossary 83
RAID (Redundant Array of Independent Disks) (n.) A group of hard disks under the
control of management software that work together to improve performance
and decrease the odds of losing data to mechanical or electronic failure by
using techniques such as data striping.
RAID-5 (n.) The most common RAID implementation. RAID-5 uses striping methods to
store data.
SAN (storage area network) (n.) A network that includes various storage devices
shared by multiple servers.
SCSI (Small Computer Systems Interface) (n.) A standard interface for personal
computers that enables you to connect up to 15 peripheral devices, such as CDROM drives.
SCSI bus (n.) A pathway between SCSI hardware devices.
SCSI host adapter (n.) A printed circuit board (also called an interface card) that enables the
computer to use a peripheral device for which it does not already have the
necessary connections or circuit boards.
SCSI ID (n.) Priority number (address) of a SCSCI device in a SCSI device chain. Only
one device at a time can transmit through a SCSI connection (port), and
priority is given to the device with the highest priority address. SCSI IDs range
from 0 to 15, and each SCSI device must be given a unique and unused SCSI
ID.
SFP (Small form-factor pluggable) (n). A specification for optical transceivers.
Devices are designed for use with small form factor (SFF) connectors, and offer
high speed and physical compactness.
SMB (server message block) (n.) A Microsoft-compatible network protocol for
exchanging files. SMB is typically used by Microsoft Windows for Workgroups,
OS/2 Warp Connect, and DEC Pathworks.
striping (n.) A method for data storage in which
a defined amount of data is written
to the first drive in an array. The next amount of data is written to the
second drive in the set, and so on. The primary advantage of striping the
data is the ability for all drives to process read and write operations
simultaneously.

84 Sun StorageTek 5220 NAS Appliance Getting Started Guide • October 2006

85
Index
A
administrator console, 7, 58
appliances
cabling, 43, 44
configuration, 56 to 59
dimensions, 62
height in rack, 62
installation, 28 to 41
network connections, 49 to 50
order of installation, 16 to 18
overview, 3 to 4
power button, 53
powering on, 51 to 55
rails, 11, 14
slide rails, 28 to 34
weight, 62
ARP, 2
B
back-end storage
cabling to appliance, 43
overview, 4
block access protocols, 2
boot sequence log, 59
browsers, 7
C
cabinets, See racks
cable
USB-to-serial port, 4
cable management assembly, 11, 14, 35 to 38, 41
cables, 15
appliance, 44, 49 to 50
back-end storage, 43
Ethernet, 49
fiber optic, 45
network, 49 to 50
optical fiber, 44
power, 42
cabling
appliance to controller units, 44
controller units, 46 to 48
expansion units, 46 to 48
CLI, 7
clients, 2
backup, 3
CMA See cable management assembly
command line interface, 7
configuration
administrator console, 7
appliances, 56 to 59
minimum, 4, 16
Web Administrator, 58 to 59
console software, 7
controller unit, 52
controller units, 4, 11
cabling to appliances, 44
cabling to expansion units, 46 to 48
dimensions, 62
disk drives, 2
height in rack, 62
installation, 15, 24, 24 to 27
LEDs, 52
order of installation, 16 to 18

86 Sun StorageTek 5220 NAS Appliance Getting Started Guide • October 2006
overview, 5
ports, 44, 46
power supply switch, 52
powering on, 51 to 55
rails, 14, 19 to 23
weight, 62
D
DHCP, 56
disk drives, 2
Dynamic Host Configuration Protocol, 56
E
electrical grounding, 9, 13 to 14
expansion units
cabling to controller units, 46 to 48
dimensions, 62
disk drives, 2
height in rack, 62
installation, 15, 24, 24 to 27
order of installation, 16 to 18
overview, 6
ports, 46
power supply switch, 54
powering on, 51 to 55
rails, 11, 14, 19 to 23
weight, 62
F
Fast Ethernet, 49
features
block access protocols, 2
client backup, 3
configuration software, 2, 3
disk drives, 2
file access protocols, 2
IP address assignment, 2
network security, 2
supported clients, 2
file access protocols, 2
G
Gigabit Ethernet, 49
copper, 4
fiber, 4
optical, 50
grounding, 9, 13 to 14
H
hardware
options, 4
overview, 3 to 6
serial number, 3
HBA cards, 4
ports, 44
I
identification of ports, 50
installation
appliances, 28 to 41
cable management assembly, 35 to 38
controller units, 15
expansion units, 15
order, 16 to 18
power cables, 42
preparation, 11 to 12
racks, 12
slide rails, 28 to 34
universal rails, 19 to 23
verification of slide rails, 39 to 41
IP address, 2, 56 to 57
DHCP, 2
K
kits
cable management, 35
rails, 10 to 11
L
LEDs, 52
licensed options, 7
local log, 59
log file, 59
N
network, 49 to 50
cards, 2
identifiers, 50
protocol, 2
security, 2
O
optical fiber cable, 44
optical Gigabit Ethernet, 50

Index 87
options
hardware, 4
software, 7
overview
appliances, 3 to 4
back-end storage, 4
controller units, 4, 5
expansion units, 6
hardware, 3 to 6
software, 6 to 8
P
PCI slot 0, 4, 44
PCI slot 1, 4, 44
ports
controller units, 44, 46
expansion units, 46
HBA card, 44
identifiers, 50
power, 51 to 55
initial, 52
UPS, 4
power button, 53
power cables, 42
power supply switch, 5, 52, 54
R
racks
installing appliances, 28 to 41
installing back-end storage, 24, 24 to 27
installing slide rails, 28 to 34
installing universal rails, 19 to 23
preparation, 12
rails, 11
requirements, 10
RAID Controller Unit, See controller unit
rails, 11
appliances, 14
back-end storage, 14
installing slide rails, 28 to 34
installing universal rails, 19 to 23
kits, 10 to 11
slide, 11
universal, 11, 14
requirements
grounding, 13 to 14
racks, 10
site, 10
slide rails, 11
software, 7
S
SATA, 2
serial number, 3
site requirements, 10
slide rails, 11, 14
installation, 28 to 34
verification, 39 to 41
software
archiving, 8
browsers, 7
configuration, 56 to 59
options, 7
overview, 6 to 8
replication, 8
requirements, 7
serial number, 3
Web Administrator, 58 to 59
storage, See back-end storage
Sun StorageTek 5220 Controller Unit, See controller
units
Sun StorageTek 5220 NAS Appliance, See appliances
Sun StorageTek 5320 Expansion Unit, See expansion
units
Sun StorageTek Compliance Archiving Software, 8
Sun StorageTek File Replicator, 8
U
uninterrupted power supply, 51
uninterrupted power supply(UPS), 4
universal rails, 14
installation, 19 to 23
kit, 11
USB-to-Serial cable, 4
V
verification
cable management assembly, 41
slide rails, 39 to 41
W
Web Administrator, 7, 58 to 59

88 Sun StorageTek 5220 NAS Appliance Getting Started Guide • October 2006
 Loading...