

Page 1
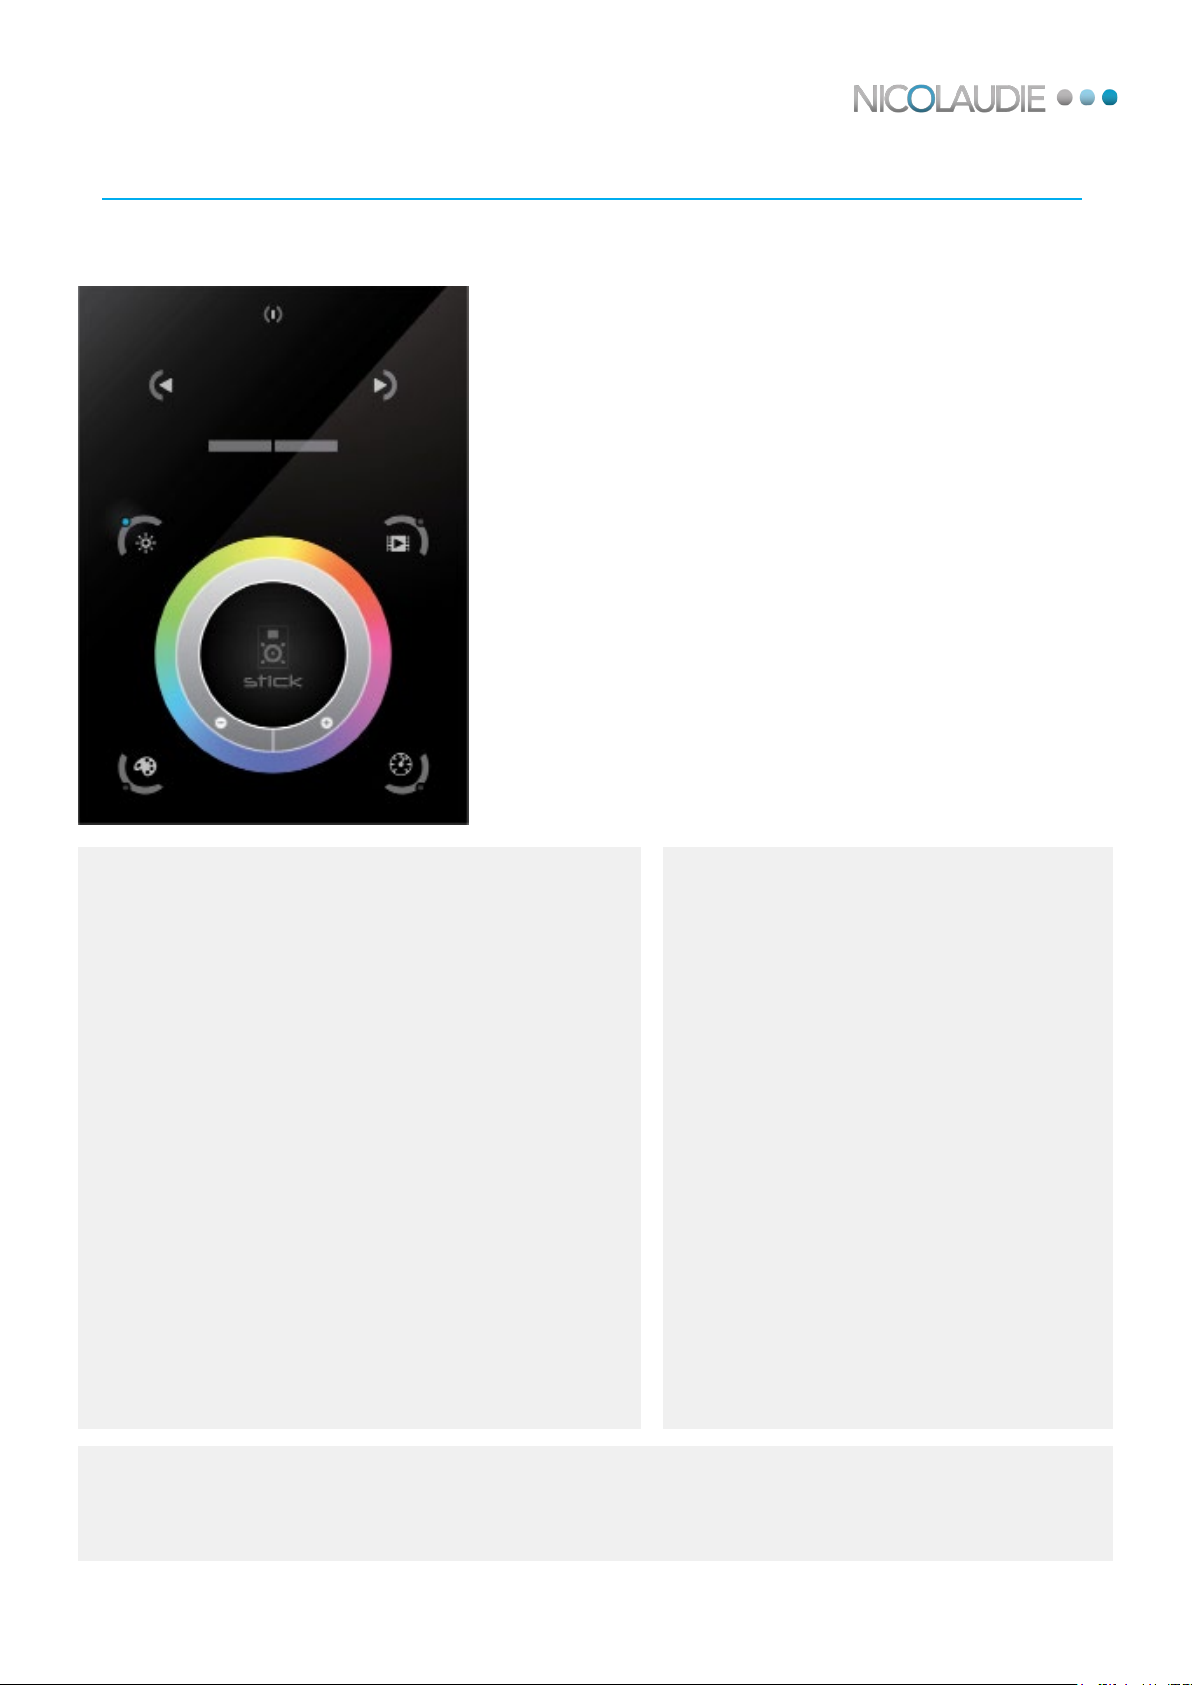
STICK-DE3
Sunlite Touch Sensitive Intelligent Control Keypad
Overview
The feature rich lighting controller has been
designed to provide a control solution for the
most demanding of projects, whilst maintaining
an easy to use panel of touch sensitive
buttons. The controller integrates a graphical
color screen allowing scene photos to be
displayed. Easily view the selected zone, scene
name and design without the need to navigate
through complex menus. Change the speed,
color and dimmer using the circular palette.
The lighting levels, color and eects can be
programmed from a PC, Mac, Android, iPad or
iPhone using the included software.
http://www.nicolaudie.com/stick-de3.htm
Key Features
• Sleek glass design which sits 11mm from the wall
• Graphical color display to show selected environment
• Color/dimmer/speed palette
• Color temperature mixing
• Touch sensitive buttons. No mechanical parts
• Touch sensitive wheel allows for accurate color selection
• Multi-zone microSD memory
• Multi-room control with 500 scenes, 10 zones
• 1024 DMX channels. Control 340 RGB xtures
• USB & Ethernet connectivity for programming and control
• RS232, Dry Contact Ports and an Infra Red input port
• Clock and calendar with Sunrise/Sunset triggering
• Network communication. Control lighting remotely
• Catalog of designs including black and white glass
• OEM customization of the color palette and logo
• Windows/Mac software to set dynamic colors/eects
• iPhone/iPad/Android remote and programming apps
Technical Data
Input Power
Output Protocol
Programmability
Available Colors
Connections
Memory
Temperature
Mounting
Dimentions
Weight
Standards
6V DC 0.6A
DMX512 (x2)
PC, Mac, Tablet,
Smartphone
Black / White
USB, Ethernet,
RS232, Clock, 8 dry
contact ports, 5v Output Relay
microSD card
-10 °C - 45 °C
Single or double gang
wall socket
146x106x11mm
247g
EC, EMC, ROHS, ETL
Optional Accessories
RJ2BLOCK
POWER4M
© Nicolaudie-Sunlite 1989-2015. All rights reserved. We reserve the right without notice to amend the technical information and specications.
RJ45 to connector block converter for power+DMX
6v ACDC power supply
Page 2
Sunlite Touch-sensitive Intelligent Control Keypad
Ref. STICK-DE3
Page 2
Technical datasheet Revision date 21 Jul. 2015
EASY INSTALLATION
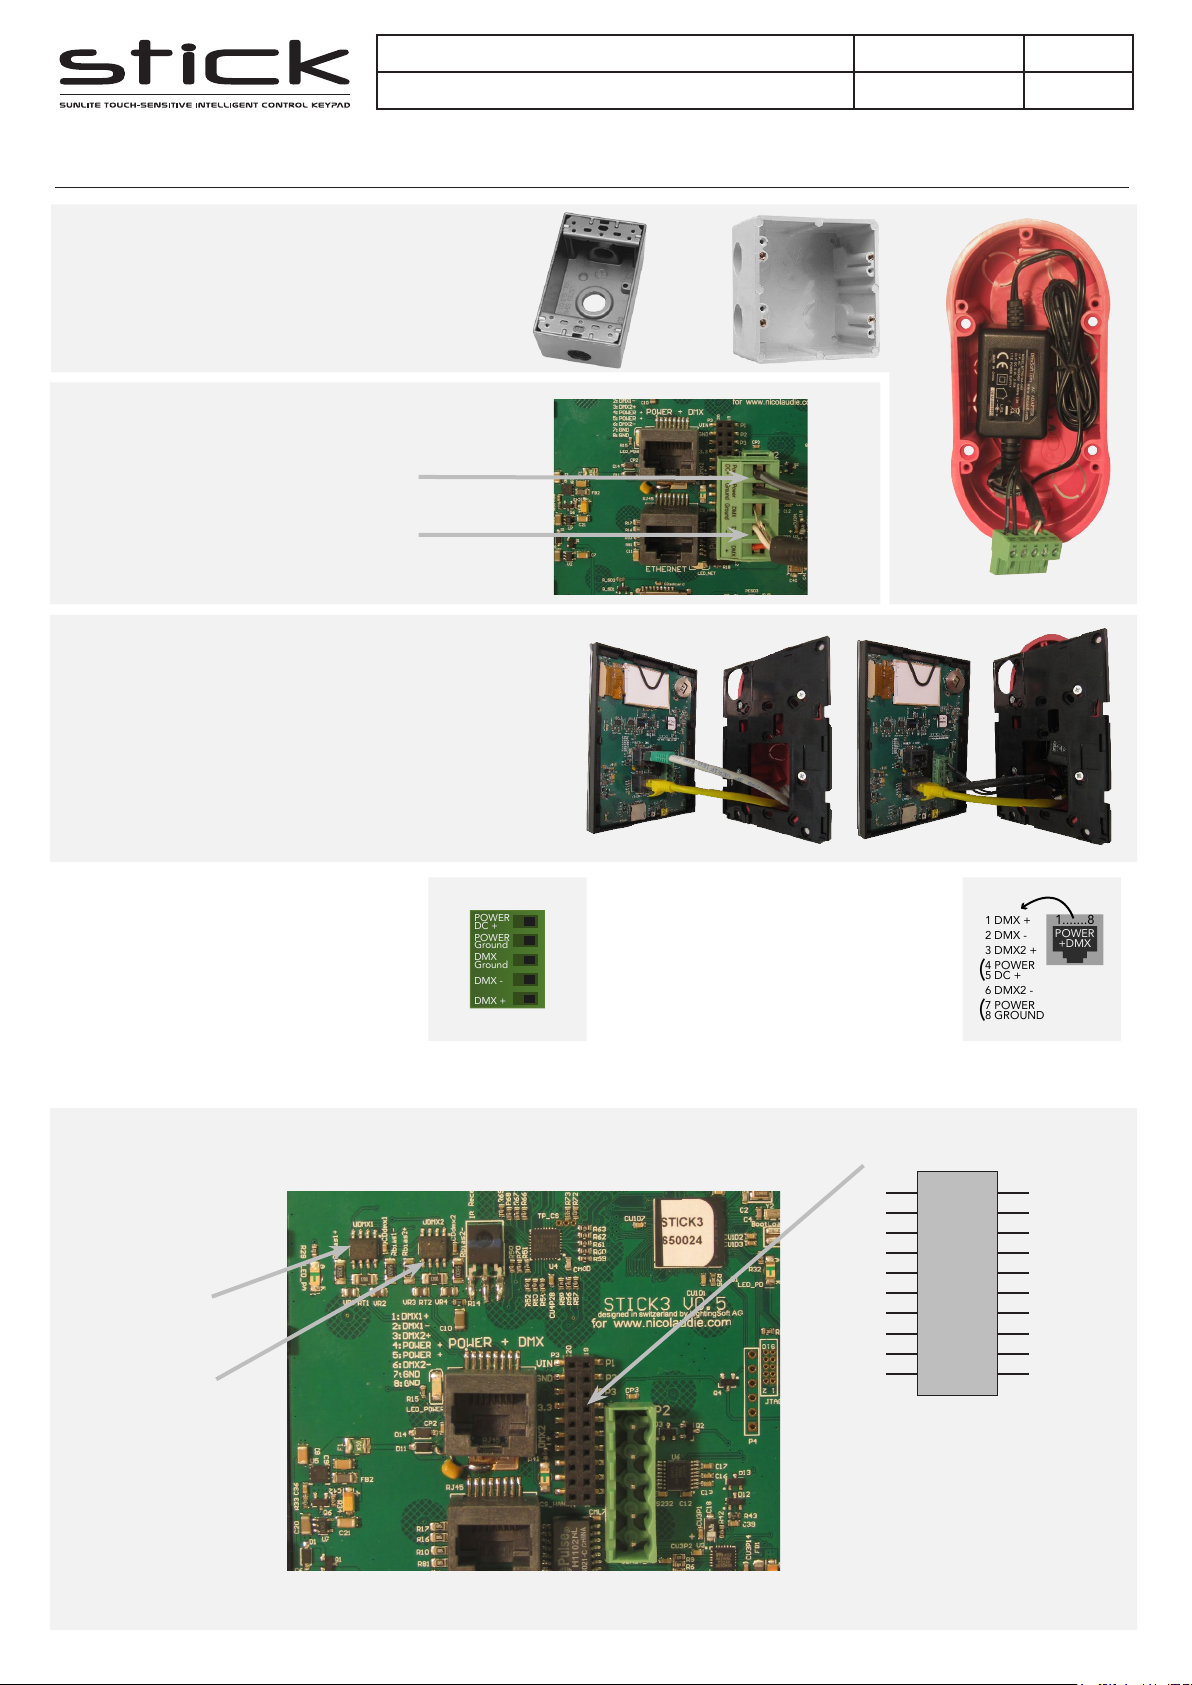
1. Mount an electrical box inside the wall
The controller can be installed in any standard electrical
backbox. If you use a double size box, you can insert
the power supply inside.
2. Connect the wires
POWER: Connect a 5.5V or 6V DC 0.6A ACDC supply.
Be sure to not invert the + and the ground.
DMX: Connect the DMX cable to the lighting
receivers (Leds, Dimmers, Fixtures..)
(for XLR: 1=ground 2=dmx- 3=dmx+)
3. Mount the interface on the wall
www.nicolaudie.com
V 1.05
First, mount the back side of the interface on the wall with 2 or
more screws
Secondly, plug the connectors :
- DMX and power (connector block or RJ45)
- Ethernet cable
The front panel is mounted by pressing it against the back
plate and then sliding down. 2 screws should then be attached
underneith to hold the controller in place.
POWER+DMX
WITH THE
CONNECTOR BLOCK
POWER
DC +
POWER
Ground
DMX
Ground
DMX -
DMX +
POWER+DMX
WITH THE
RJ45 CABLE
1 DMX +
2 DMX -
3 DMX2 +
4 POWER
(
5 DC +
6 DMX2 -
7 POWER
(
8 GROUND
1.......8
POWER
+DMX
**CHECK PIN CONFIGURATIONS. APPLYING POWER TO THE DMX INPUT WILL DAMAGE THE CONTROLLER**
**MAKE SURE THE CONTROLLER IS MOUNTED WITHOUT TOO MUCH FORCE BEHIND AS THIS CAN PUSH APART THE GLASS**
2x10 pins EXTENSION socket
DMX CHIP replacement
DMX universe #1
DMX universe #2
GND_DMX
EXTENSION socket
VIN
GND
IR_RX
3.3V
Relay
DMX2+
DMX2-
DMX1+
DMX1-
20
18
16
14
12
10
8
6
4
2
19
17
15
13
11
9
7
5
3
1
PORT1
PORT2
PORT3
PORT4
PORT5
PORT6
PORT7
PORT8
RS232 RX
RS232 TX
Ref: SP485ECN-L
MAX485 CSA
© Nicolaudie-Sunlite 1989-2015. All rights reserved. We reserve the right without notice to amend the technical information and specications.
Compatible header connectors:
WURTH ELEKTRONIK ref: 61301021121
MOLEX ref: 10-89-7202
TE Connectivity ref: 1-87227-0
FCI ref: 77313-101-20LF
HARWIN ref: M20-9981046
SAMTEC ref: TSW-110-xx-T-D
FARNELL ref: 1841232
RS ref: 763-6754 673-7534 251-8165
MOUSER ref: 538-10-89-7202
DIGIKEY ref: WM26820-ND
Page 3
Sunlite Touch-sensitive Intelligent Control Keypad
Ref. STICK-DE3
Page 3
Technical datasheet Revision date 21 Jul. 2015
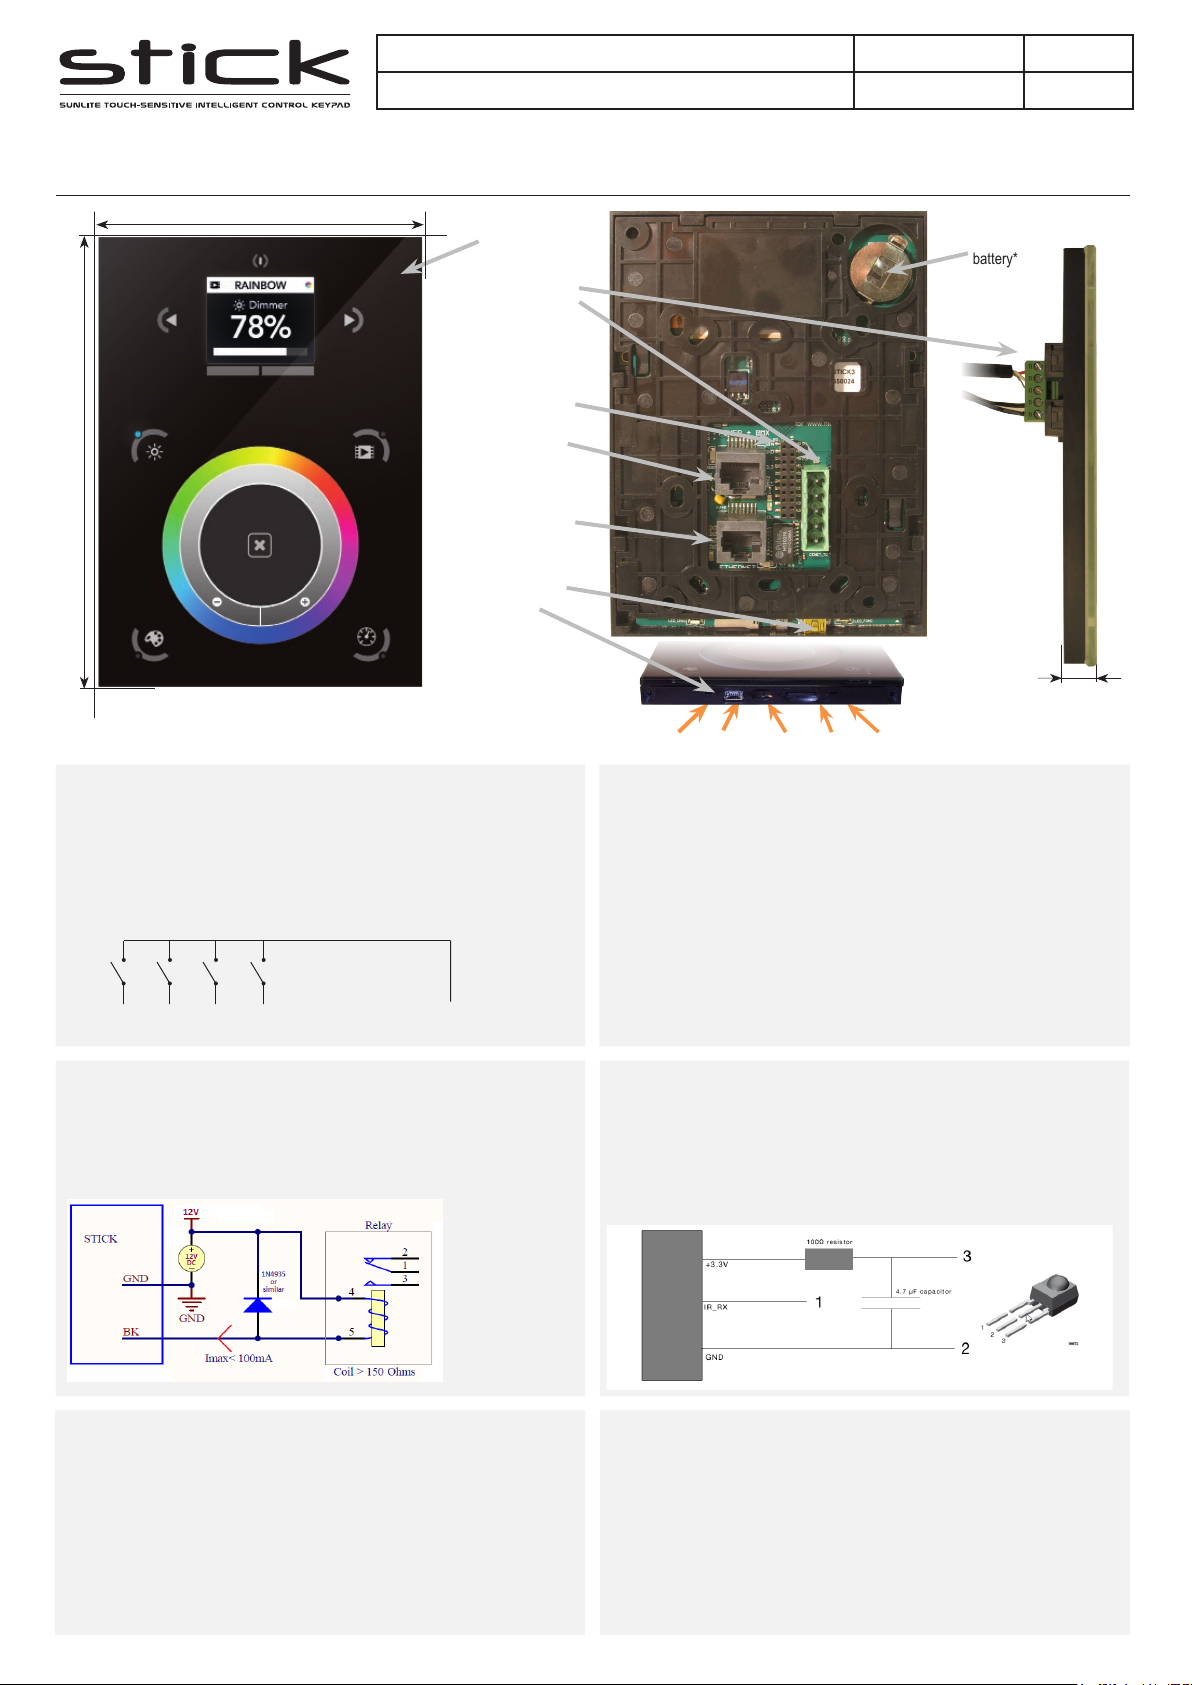
Connections & Triggering
146
mm
Prev
Scene
Dimmer
Prev Area
106 mm
Standby
Next
Scene
Next Area
Scene
Undo
Touch-sensitive
user interface
Screw-terminal
rear connector
(5 pins)
Extension socket
rear connectors
(2x10 pins)
Power+DMX
socket
(RJ45)
Ethernet socket
(RJ45)
Front access
connections
www.nicolaudie.com
Rechargeable
battery*
V 1.05
Color
Speed
Dry Contact Port Triggering
It is possible to start scenes using the input ports (contact closure).
To activate a port, a brief contact of atleast 1/25 second must be
established between the ports (1...8) and the ground (GND). Note:
the scene will not be switched o when the switch is released.
P1 P2 P3 P4 ... GND
BLACKOUT Relay (energy saving)
A relay can be connected between the RELAY and GND sockets
of the 20 pin extension socket. This can be used to turn o other
equipment such as lighting drivers. The signal is connected when
the controller is in standby.
11 mm
data
led
mini
usb
reset
button
microSDdmx
led
RS232 Triggering
Make a cable using the 3 pins : TX, RX and G (GND)
Set the RS232 parameters to : 9600bds 8 bits, no Parity, 2 Stop bits
- To play a scene, send 3 bytes : 1 x y 255
- To stop a scene, send 3 bytes : 2 x y 255
- To pause a scene, send 3 bytes : 3 x y 255
- To release a pause, send 3 bytes : 4 x y 255
- To reset a scene, send 3 bytes : 5 x y 255
When (y)=0, (x) can be set between 0 and 255
-to stop scene 145, send the command: 2 145 0 255
When (y)=1, (x) can be set between 0 and 243 to trigger scenes 256-499
-to play scene 300, send the command: 1 255 45 255
Infra Red
The controller works with the ocial IR remote control, however there
is no receiver. A 36khz infra red receiver can be connected, such as
the TSOP34836 by Vishay Semiconductors. Farnell ref: 4913127. This
can be attached to the 20 pin connector. It’s a good idea to add a
resistor and capacitor to surpress power supply disturbance.
Example of relay :
FINDER Ref.
22.23.9.012.4000
Network Control
The controller can be connected to a local network, allowing it to be
controlled from a smartphone or tablet over WiFi.
• Connect the controller to a router or switch with an RJ45 cable
• The controller is set by default to get an IP address from the
router via DHCP. If the network is not working with DHCP, a
manual IP address and subnet mask can be set using the
Hardware Manager
• If the network has a lewall enabled, allow ports 2430 and 2431
© Nicolaudie-Sunlite 1989-2015. All rights reserved. We reserve the right without notice to amend the technical information and specications.
TCP Triggering
The controller can be connected to an existing automation system
over a network and triggered via TCP package on port 2431 or UDP
packets on 2430. Refer to the remote protocol document for more
information.
Page 4
Sunlite Touch-sensitive Intelligent Control Keypad
Ref. STICK-DE3
Page 4
Technical datasheet Revision date 21 Jul. 2015
Setting up the Controller
iPhone/iPad/Android Control
The controller can be used with one of 3 dierent apps. Each
available at Google Play and the App store.
DMX Lightpad 3
Designed to work seamlessly with the controller, DMX
Lightpad 3 provides an easy way to control your lights over
a local WiFi network. Use the wheel to change the dimmer,
color or speed, and the arrows to select scenes and eects
just like the wall panel. Swipe down to reveal quick access
scene selection buttons.
Easy Remote
Create an entirely customized remote controller for your tablet
or smartphone. Easy Remote is a powerful and intuitive app
allowing you to easily add buttons, faders, color wheels and
more. Connect to a WiFi network and the app will nd all
compatible devices.
Arcolis
The Arcolis application is a comprehensive tool allowing you
to directly control and re-program the controller from your
smartphone or tablet. This is a simple application which can
be used by just about everyone in any situation. Mobile, easy
to use and powerful, Arcolis is the ideal controller for dimming
or switching traditional, LED and RGB color mixing DMX
lighting xtures. Program static and dynamic lighting scenes
and eects.
www.nicolaudie.com
V 1.05
Programming the Controller
The controller be programmed from a PC, Mac, Tablet or
Smartphone using the software available on our website.
Refer to the corresponding software manual for more
information. The rmware can be updated using the
Hardware Manager which is included with the programming
software.
ESA Pro Software (Windows) - Timeline + Multi-Zone
http://www.nicolaudie.com/en/esapro.htm
ESA2 Software (Windows/Mac) - Single Zone
http://www.nicolaudie.com/esa2.htm
Hardware Manager (Windows/Mac) - Firmware, clock..
http://www.dmxsoft.com/global/ftp/hardwaremanager.zip
http://www.dmxsoft.com/global/ftp/HardwareManager.dmg
Color Temperature Mixing
In addition to mixing RGB using the color pallet, it’s also
possible to mix up to 3 custom colors. This is useful for mixing color temperature. To set this up, choose the correct pro-
le for your lighting xture when programming the controller.
Proles for common channel congurations can be found in
the ‘Generic’ folder:
RGBW for Red, Green, Blue, White
RGBA for Red, Green, Blue, Amber
RGBY for Red, Green, Blue, Yellow
WWCW for Warm White, Cold White
Once your show has been written to the controller, tap the
color mode button and use the circular palette to change the
color. If your lighting xture has more than 3 color channels,
http://www.nicolaudie.com/smartphone-tablet-apps.htm
tap the color mode button a second time to mix the additional colors.
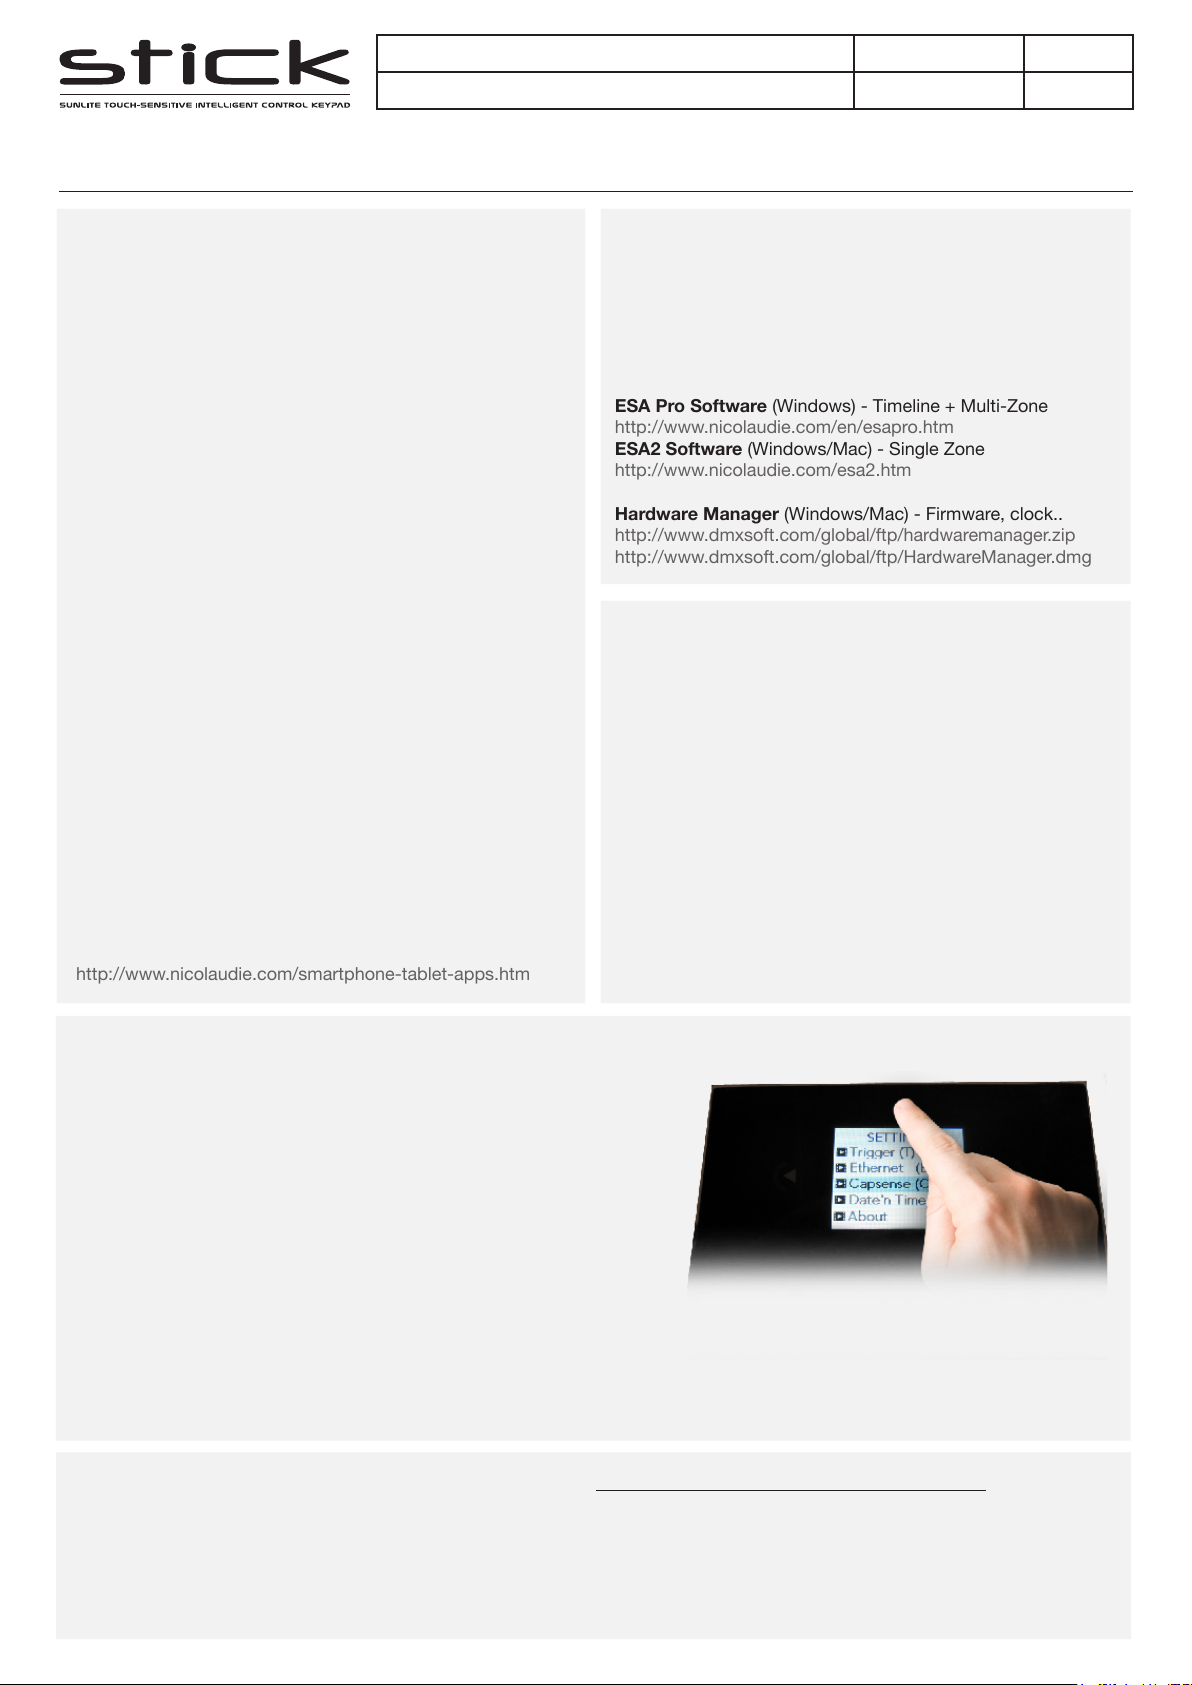
Settings Menu
To access the settings menu, hold the standby button for 3 seconds.
• Use the arrow buttons or palette to scrol through the menus
• Use the area buttons to navigate forwards and backwards
• The ‘undo’ button can also be used to navigate forwards
Mode (M): Manages the on/off button and the 4 modes (dimmer, speed, color, scene)
Arrows (A): Allows you to adjust which modes can be controlled by the arrows
Pallet (P): Allows you to adjust which modes can be controlled by the palette wheel
Scene (S): Scene management
First Start (F): Default settings when the unit is rst powered up
Trigger (T): Manages the controllers external triggering properties
Ethernet (E): Enables the Ethernet socket on the controller
Date/Time (D): Manages the date and time stored inside the controller
Graphics (G): Screen management
DMX Output (X): Manage the timings of the DMX output messages and the page priorities (advanced function!)
Sensitive (S): Manage the touch sensitivity settings
Language (L): change the language of the text which appears on the screen
About: check the rmware release date and version number and assign a name for the controller
Service
Servicable parts include:
• Memory card - used to store the scenes
• Battery - used to store the clock/calendar
• DMX Chips - used to drive the DMX (see p2.)
© Nicolaudie-Sunlite 1989-2015. All rights reserved. We reserve the right without notice to amend the technical information and specications.
*To replace the Li-Ion rechargeable battery on the DE3 :
1. You need a rechargeable 3.6v LIR 2032 replacement battery
2. Remove the back panel by pulling down and sliding it out.
3. Using a paper clip push the battery from the bottom so it slides out of
its cage.
4. Slide the replacement battery in from the top, making sure the positive
side is facing up.
5. Replace the back panel by pushing it up into place.
Page 5

Sunlite Touch-sensitive Intelligent Control Keypad
Ref. STICK-DE3
Page 5
Technical datasheet Revision date 21 Jul. 2015
www.nicolaudie.com
V 1.05
Internal Menu
MODE (M) : Manages the on/o button and the 4 modes (dimmer, speed, color, scene)
M OFF enable : enables/disables the use of the on/o button so that the controller is permanently on
M Dimm. enable : when enabled, scenes can be made brighter or darker
M Color. enable : when enabled, the color of a scene can be changed
M Speed. enable : when enabled, dynamic scenes can be made faster and slower
M Scene. enable : when enabled, the scene can be changed
M Auto mode : when enabled, the controller will revert to the default mode after it has been left for a specied period of time
M Auto time : the amount of time the controller will wait before reverting to the default mode
M Default : the default mode which the controller will revert to after a certain amount of time
M Dimmer 100% : when enabled, the dimmer mode will adjust between 0% and 100% without saturating to white between 100% and 200%
M Lock Control : Once this is enabled, you can hold the dimmer button for 5 seconds to enable/disable lock mode. It’s automatically activated
after 120 seconds. When lock is activated, you’ll see a red border around the screen
Arrows (A) : Allows you to adjust which modes can be controlled by the arrows
A Dimmer enable : allows for the Dimmer mode to be controlled by the arrows
A Color enable : allows for the Color mode to be controlled by the arrows
A Speed enable : allows for the Speed mode to be controlled by the arrows
A Scene enable : allows for the Scene mode to be controlled by the arrows
A Default : the mode to jump to when the arrows are pressed, if the arrows are not enabled on the selected mode
Pallet (P) : Allows you to adjust which modes can be controlled by the palette wheel
P Dimmer enable : allows for the Dimmer mode to be controlled by the palette wheel
P Color enable : allows for the Color mode to be controlled by the palette wheel
P Speed enable : allows for the Speed mode to be controlled by the palette wheel
P Scene enable : allows for the Scene mode to be controlled by the palette wheel
P Default : the mode to jump to when the palette is pressed, if the palette is not enabled on the selected mode
Scene (S) : Scene management
S0(o)enable:displays an empty o scene before scene 0 in each area
S Pause enable : allows a scene to be paused if the scene mode button is held for 1 second
S Stop enable : allows a scene to be stopped if the scene mode button is held for 4 seconds
SFadecong: manages the fading between scenes
From Show : the fade time set inside the show le will be used
Force : the automatic fade time set in the menu will override all fadetimes in the show le
Force Max : the controller will look at the show le fade time and the menu fade time and use the greatest
Force Min : the controller will look at the show le fade time and the menu fade time and use the smallest
Never : the controller will never fade between scenes
S Fade time : the time of the automatic fade between scenes
S Setting management : determines how dimmer/speed/color overrides are saved
SaveAlways : the dimmer/speed/color overrides all scenes until the reset button has been pressed
NeverSave : the dimmer/speed/color is never saved
AutoReset : the dimmer/speed/color is saved on the current scene
S Trigger : sets the scene triggering mode. Time Delay and Scene Butt allow for scenes to be scrolled through without playing
Auto : the scene will be triggered as soon as it’s selected
Time Delay : a short delay is added before a scene is triggered
Scene Butt. : the selected scene will not play until the scene button is pressed
First Start (F) : Default settings when the unit is rst powered up
F Scene Nr. : specify a default scene number
F Scene Scene Recover : activates the previously playing scene
F Display Time : when enabled, the time will be displayed on the screen at startup
F Scene Nr. : enables the triggering of a scene at startup. If disabled, no scene will be triggered
Trigger (T) : Manages the controllers external triggering properties
T Time enable : enables the clock triggering
T Ports enable : enables the 8 dry contact ports
T RS232 enable : enables scene triggering by RS232
T IR enable : enables the infra red port (disabled by default to prevent interference)
T UDP enable : allows the controller to send and receive UDP messages required for network control
T Blackout port : enables the blackout relay output which is triggered when the stanby putton is touched
Ethernet (E) : Manages the controllers network settings
Ethernet : Enables the Ethernet socket on the controller
Dynamic IP Addr : enables dynamic IP addressing (DHCP) which allows the controller to obtain an IP address from a router
Sync Blackout: when this open is enabled, all other controllers on the network will go into standby when the standby button is pressed
Enable NTP : enables Network Time Protocol. The controller will synchornise the clock with the internet if a connection is evailable
NTP Server : the IP address of the server to synchronize the clock. The default is 005.135.141.108
Device’s IP Add : the controllers static IP address it will use if it does not receive an IP address via DHCP
Mask: the subnet mask of the controller if not set to DHCP. Generally this is 255.255.255.0
Default Gateway : the IP address of the router if not set to DHCP
MAC Address : a unique ID used to identify the controller on the network
© Nicolaudie-Sunlite 1989-2015. All rights reserved. We reserve the right without notice to amend the technical information and specications.
Page 6

Sunlite Touch-sensitive Intelligent Control Keypad
Ref. STICK-DE3
Page 6
Technical datasheet Revision date 21 Jul. 2015
Date/Time (D) : Manages the date and time stored inside the controller
Date : the controllers date
Time : the controllers clock time
G Bright normal : the % brightness when the controller is not sleeping G Bright sleep: the % brightness when the controller is sleeping
G Bright LED : the % brightness of the mode and reset LEDs
Graphics (G) : Screen management
G Image enable : allows for images to be shown for each scene if they have been assigned in the programming software
G Image full : when enabled, the image will be displayed in full screen and the scene and area will not be visible
G Image time : the time it takes before the image is displayed in full screen
G Sleep enable : when enabled, the screen brightness will dim after a certain amount of time
G Sleep time : the amount of time to wait before sleeping
G Bright normal : the brightness of the screen’s backlight
G Bright sleep : the brightness of the screen’s backlight whilst the controller is sleeping
G Bright LED : the brightness of the scene, undo and standby LED’s
DMX Output (X) : Manage the timings of the DMX output messages and the page priorities (advanced function!)
X MBB : Mark Before Break- the time to wait between sending each 512 channel DMX message (or ‘packet’)
X Break : Break- the time to wait just before sending a new packet, resetting the DMX line
X MAB : Mark After Break- the message which tells your receiver to begin reading data
X MBS : Mark Between Slots- the delay time between sending each DMX channels data within the DMX packet
Univ-1/Univ-2 : each timing can be set dierently depending on the universe number
X Alphab Mode : if the same scene is triggered in the global area and a second area, the area with the highest letter will take priority
X LTP Mode : If the same scene is triggered in the global area and a second area, the latest scene triggered takes priority
Sensitive (S) : Manage the touch sensitivity settings
S USB Init : reset the touch sensitivity when the USB is connected and disconnected
S Auto Time : the time to wait before automatically resetting the touch sensitivity
S High Sense : when enabled, the sensitivity will be increased
S See Values : see each touch sensitive button number and palette value
www.nicolaudie.com
V 1.05
Language (L) : change the language of the text which appears on the screen
About : check the rmware release date and version number and assign a name for the controller
Reset : Reset all settings to the factory default
© Nicolaudie-Sunlite 1989-2015. All rights reserved. We reserve the right without notice to amend the technical information and specications.
Page 7

Sunlite Touch-sensitive Intelligent Control Keypad
Ref. STICK-DE3
Page 7
Technical datasheet Revision date 21 Jul. 2015
www.nicolaudie.com
V 1.05
Troubleshooting
The4ModeLEDsonthecontrollerareickering AllLEDsonthecontrollerareickering
The controller is in bootloader mode. This is a special ‘startup mode’
which is run before the main rmware loads.
-Check that there is nothing metallic touching the back of the controller
-Try re-writing the rmware with the latest hardware manager
-Try formatting or replacing the SD card
AllLEDsonthecontrollerareickering
except the standby LED
There is no SD card detected.
-Check the SD card is properly connected
-Try formatting the SD card in the computer
-Try re-writing the show le
-Try replacing the SD memory card
The controller is not detected by the
computer
-Be sure that the latest software version is installed
-Connect by USB and open the Hardware Manager (found in the software
directory). If it’s detected here, try to update the rmware
There has been no showle detected on the SD memory card.
-Try formatting the SD card in the computer
-Try re-writing the show le
-Try replacing the SD memory card
The lights are not responding
-Check the DMX +, - and GND are connected correctly
-Check that the driver or lighting xture is in DMX mode
-Be sure that the DMX address has been set correctly
-Check there are no more than 32 devices in the chain
-Check that the DMX LED is ickering to the right of the SD card
-Connect with the computer and open Hardware Manager (found in the
software directory). Open the DMX Input/Output tab and move the faders.
If your xtures respond here, it is possibly a problem with the show le
© Nicolaudie-Sunlite 1989-2015. All rights reserved. We reserve the right without notice to amend the technical information and specications.
 Loading...