

Page 1
Recumbent Hitch Rack Instruction Manual
Not to be used on any trailer,
H7
Fig. 2
Fig. 3
Fig. 4
WXQ
fifth wheel or vehicle being
towed by another vehicle
Weight Limit 125lbs/57 kg
The wheels can not exceed
beyond vehicle’s outside side
view mirrors.
PARTS LIST: 2 bike “setup”
Item Description Qty
A vertical post 1
B base assembly 1
C short hook 1
D long hook 1
E left wheel holder 2
F right wheel holder 2
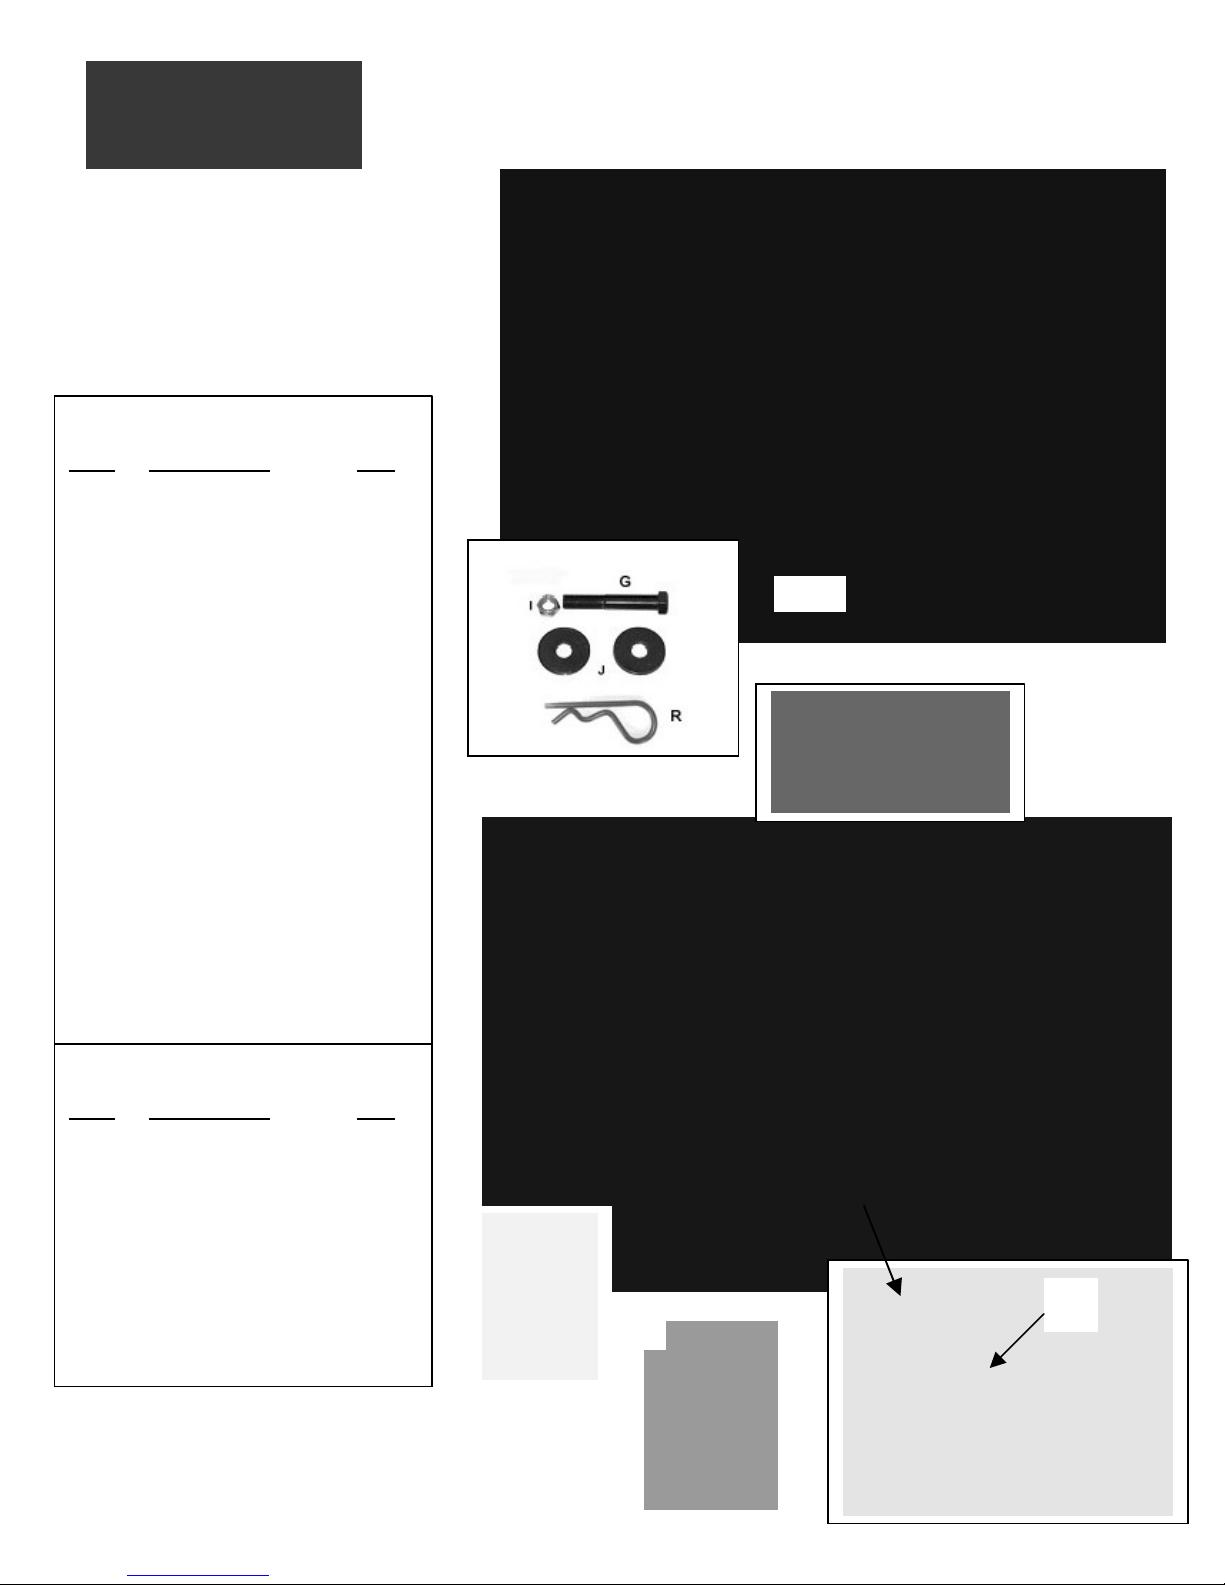
G pivot bolt 1
H fold-up bracket 1
I pivot nut 1
J pivot washers 2
L plates 2
M wheel support tube 2
N “L” pins 3
H7 Lever 1
P receiver tube* 1
Q hitch pin 1
R clip 2
Model 45816 – 2” receiver Model 45815 – 1 ¼” receiver
Fig. 1
* 2” square (p/n 45816) or
1 ¼” square (p/n 45815)
Extra parts for trike adapter
Item Description Qty
S flat hook 1
T short trike bar 2
U long trike bar 1
V small wheel adapter 2
W Red safety flag 1
X Extra tie-down strap 1
Not shown: 5mm hex wrench, end
bolts and nuts (2 each)
U
Page 2
Assembly Instructions:
Tools Required: Two 8” adjustable
through hole in the hitch and the
slot in the rack. Put clip R on hitch
on the front of the insert tube so the
with
washers (
, please take care not
with
washer
through holes, then place
the pin. The main beam will now be
with wrenches
&
and
to check alignment. Main beam
2: Install frame hooks:
2
wrenches or equivalent, Phillips
screwdriver.
For ease of assembly, we suggest
that you use your vehicle’s hitch.
1: Assemble Receiver Tube
to Base Assembly
1. Install your receiver tube P
into the hitch. Insert hitch pin
Q
pin Q. Then tighten the lever H7
insert tube will not move during
assembly.
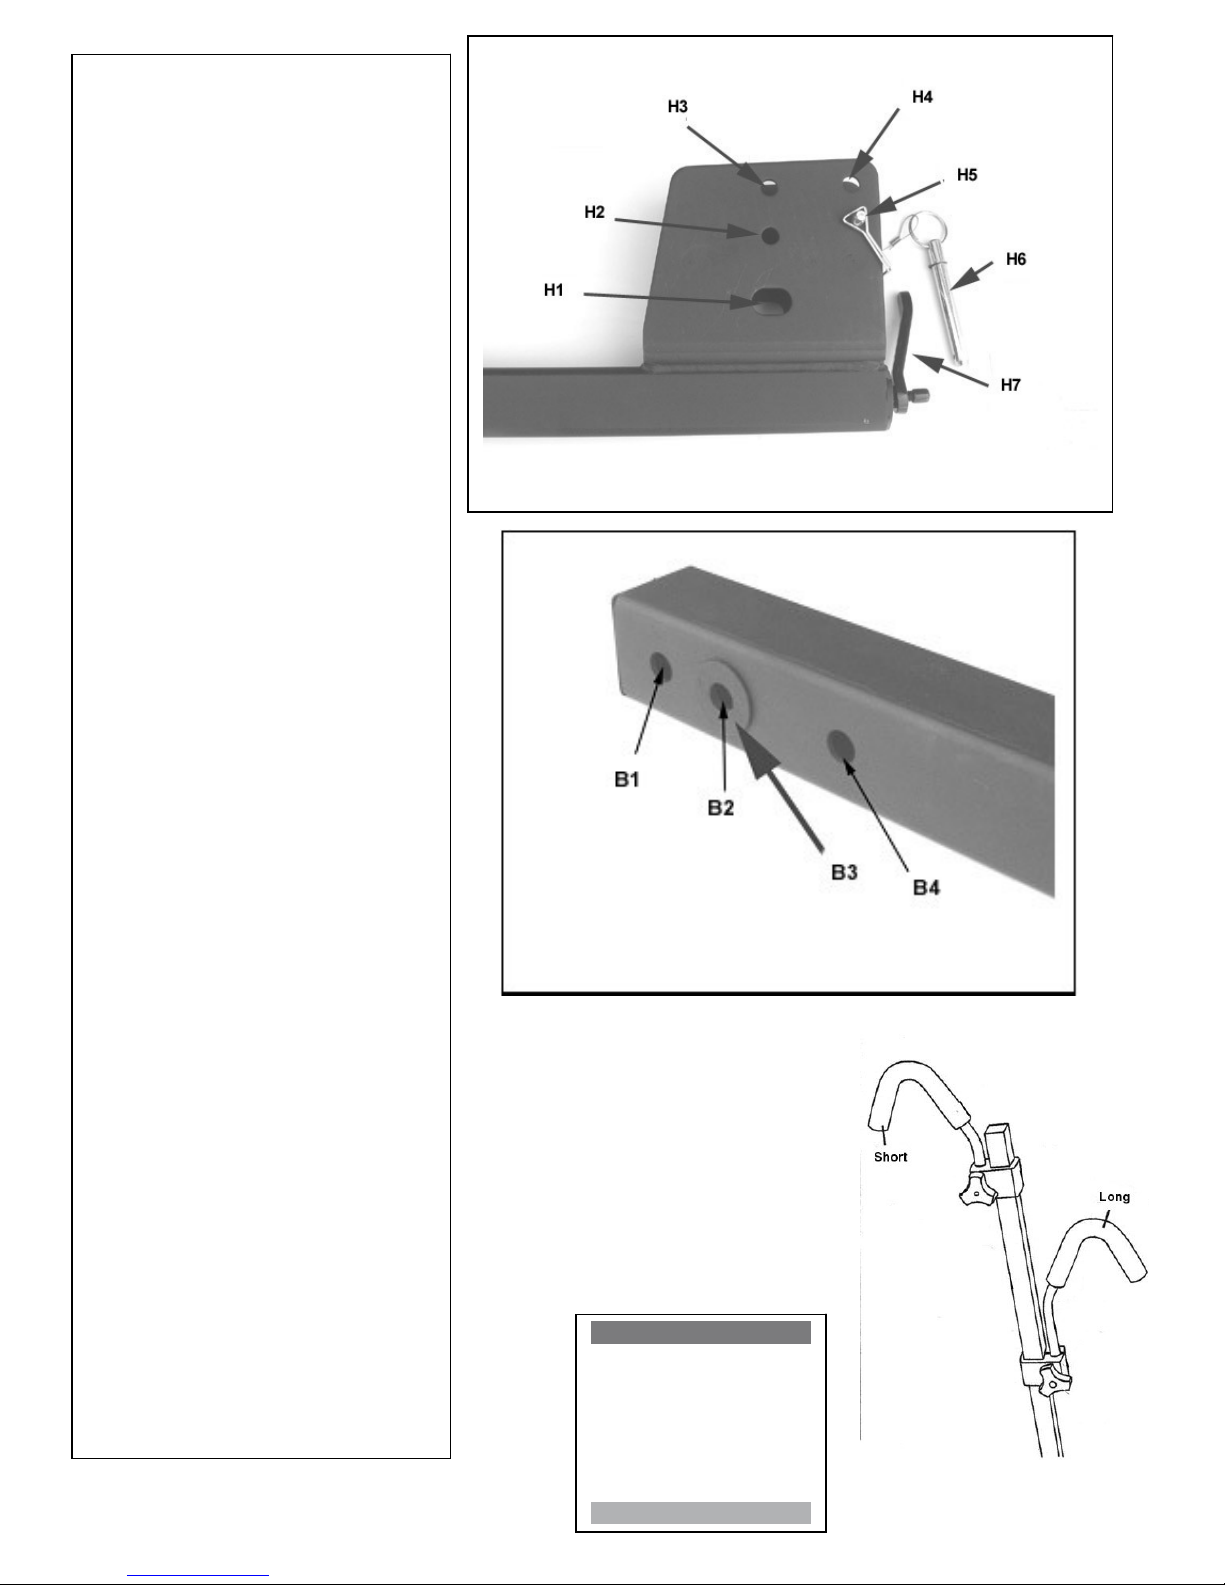
2. See Fig. 5 and 6: Gently insert
Base Assy B into the bracket of
Receiver tube H, aligning holes H3
B2. The main beam can rest
on pin H5. There are two plastic
B3) attached to
main beam B
to accidentally knock them off
during assembly. Insert bolt G
J
the other washer J on end of the
bolt and hand tighten nut I.
3. Insert pin H6 through holes H4
and B4.Then install clip R through
in a fixed Horizontal position.
Tighten bolt G and nut I securely
.
Fig. 5
Fig. 6
4. After tightening, remove clip R
Pin H6 and rotate Main Beam B
into a folded (vertical) position.
Insert pin H6 through holes H2
B1
should be able to rotate easily, but
not be too loose.
5. Remove pin H6 and rotate main
beam back to it’s horizontal
position to continue assembly.
Loosen knob and slide long
frame hook D down vertical post
facing vehicle. Then slide short
frame hook C onto post, facing
away from vehicle.
Fig. 7
Page 3
3: Install Wheel Holders:
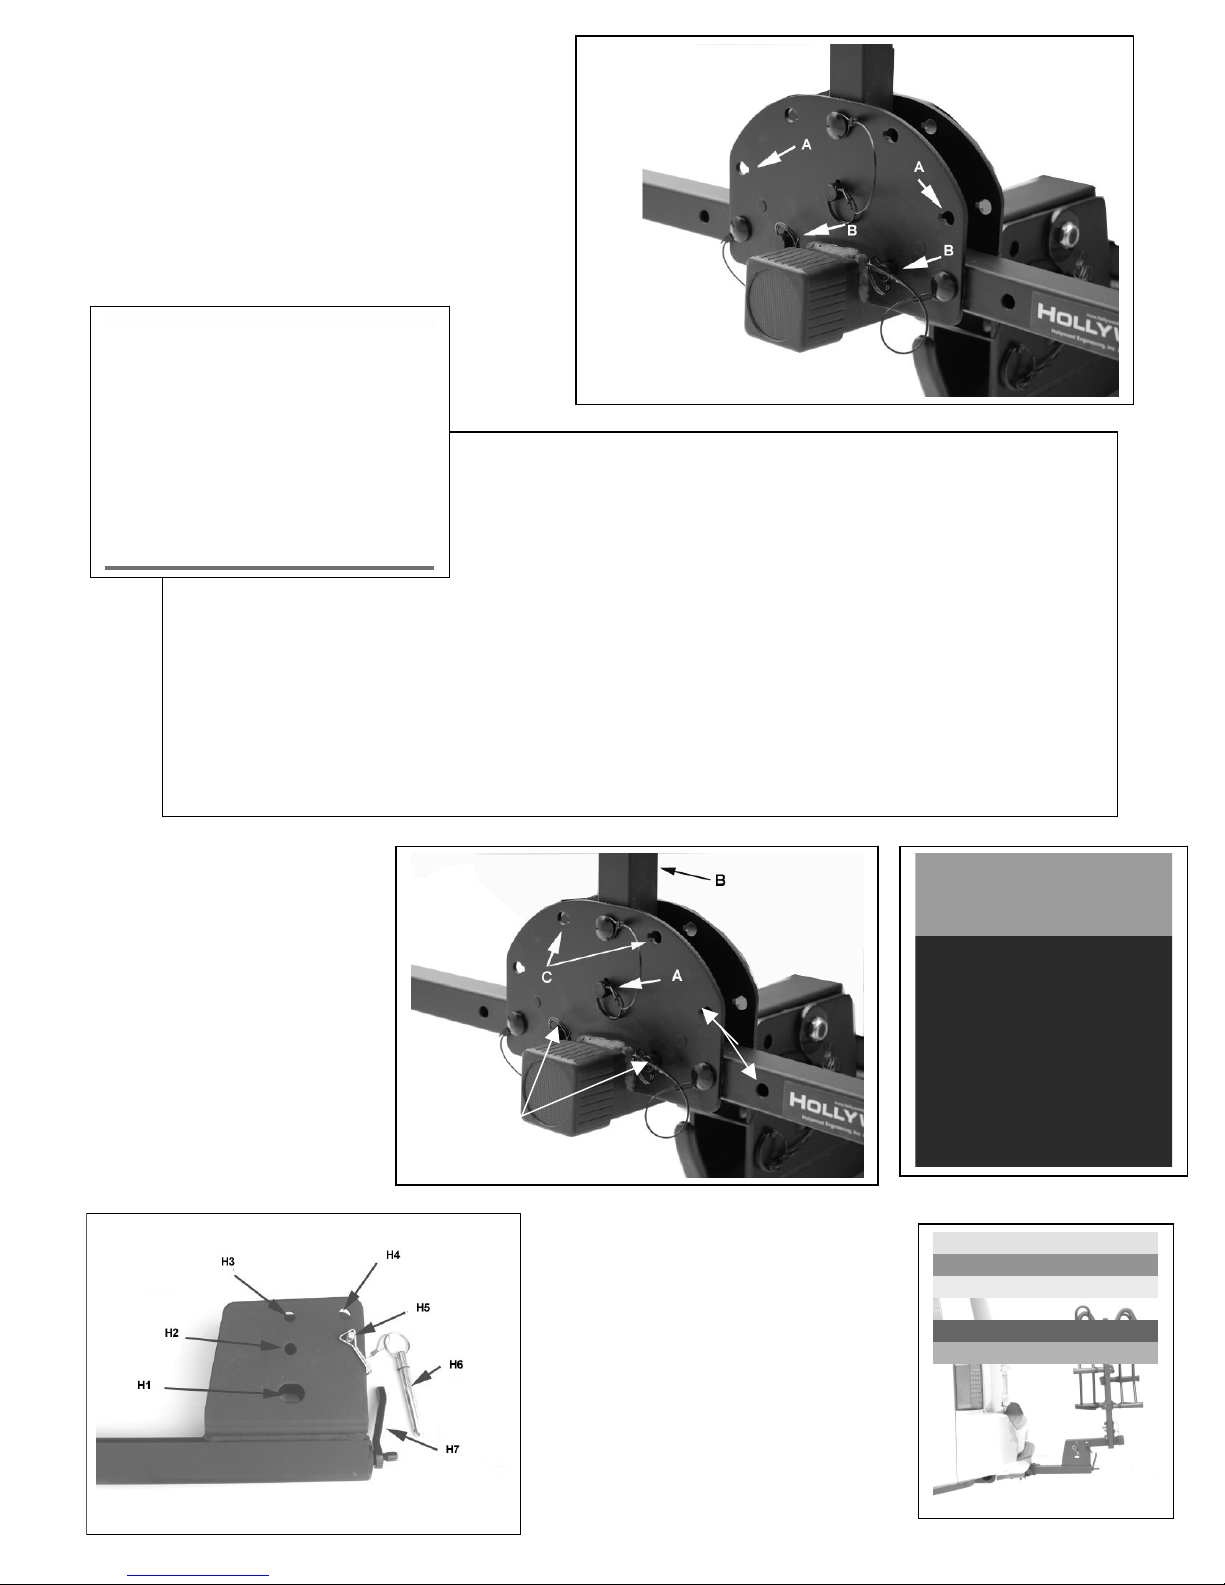
See Fig. 8: Rotate and remove L pins
4: Fold up feature:
, then remove
3
5: Fold Together Feature
D
E
Fig. 10a
From holes A. Rotate wheel tubes to a
horizontal position, then replace L pins
into holes B.
Slide wheel Holders E and F onto wheel
tubes as indicated below. See fig. 9
Fig. 8
Fig. 9
To fold up the main beam,
You must first fold down the
vertical post. Refer to Fig. 10:
Rotate and remove pin A, then
rotate the post (B) and replace
the pin in either holes C.
Now refer to Fig. 10a: remove
clip R from pin H6
pin H6. Rotate main beam
upward and re-install pin and
clip.
Fig. 10
(shown on right)
The rack’s wheel support tubes
can be rotated to the side as an
alternative way of folding up the
rack. Referring, remove pin from
hole D and rotate the wheel tube
so it is pointing upwards, align
holes E and re-insert the pin.
Repeat for other side.
Page 4
6: Tilt
–
Down Feature:
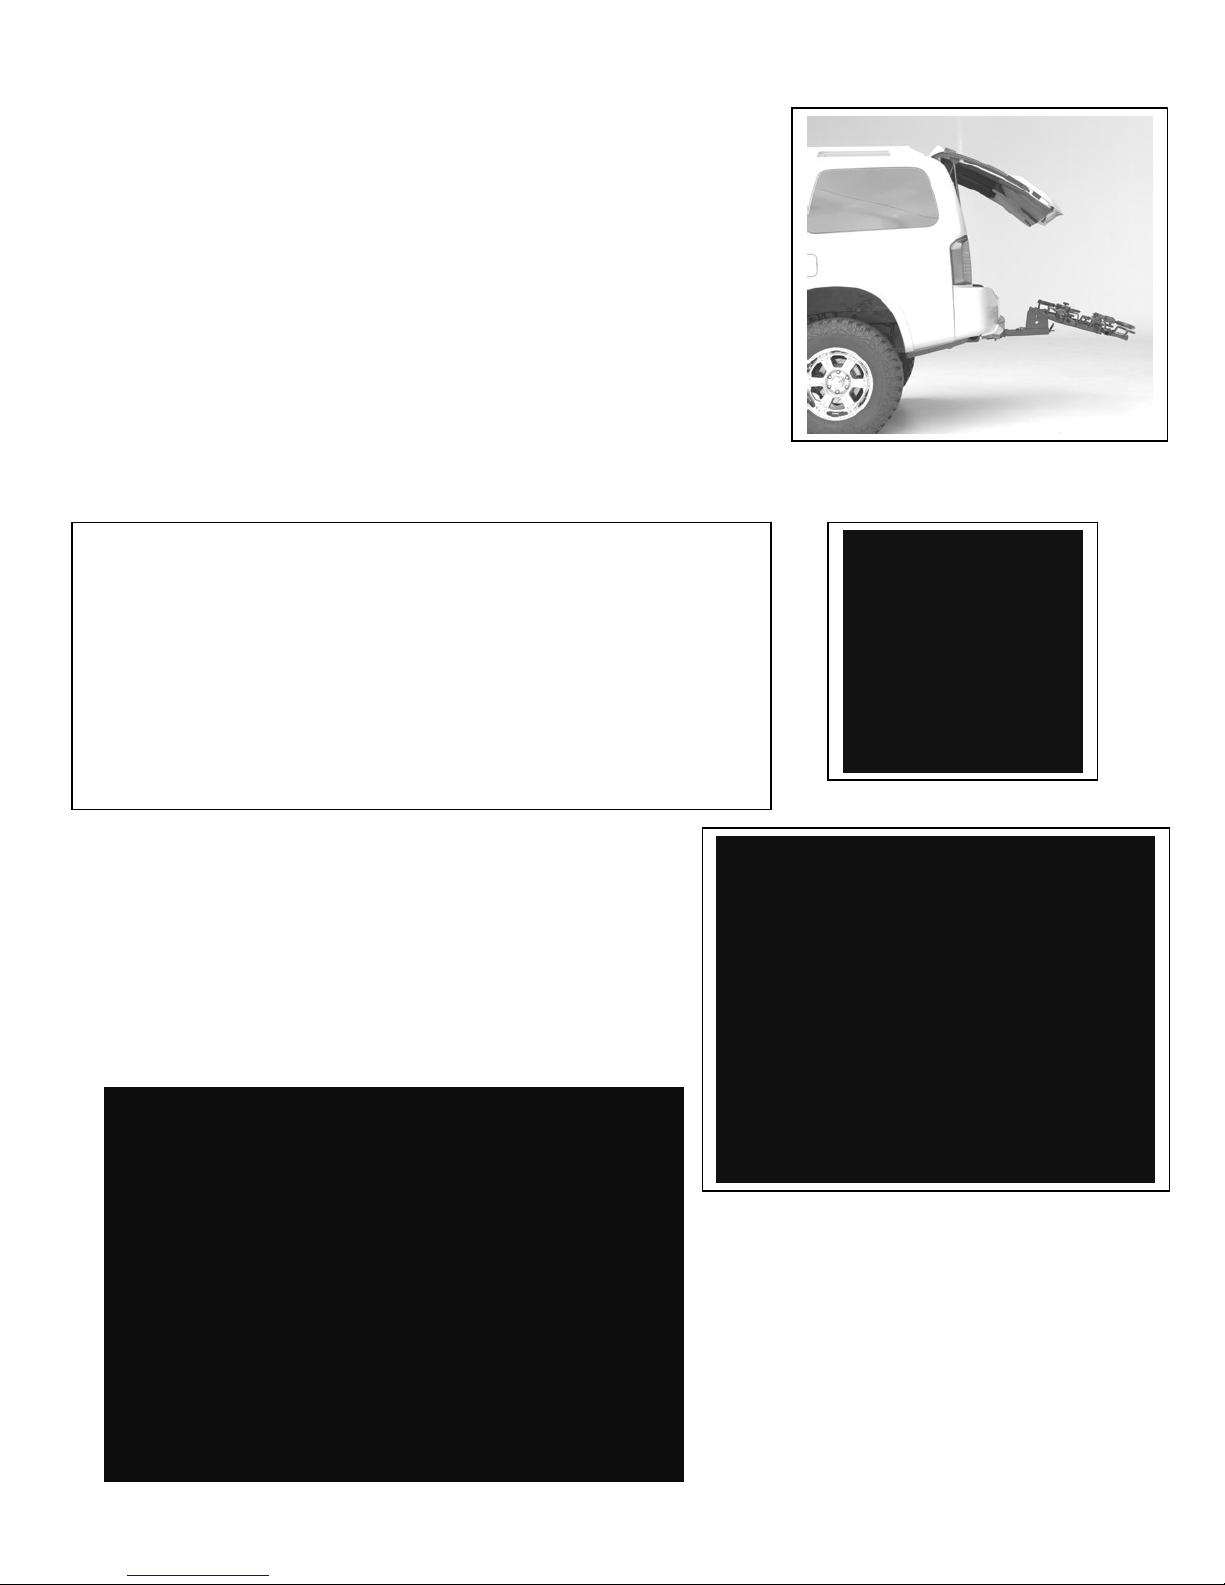
For easy access to the rear cargo door of your vehicle, the rack can
7: Using the ‘Flat Hook”
may not fit as conveniently as the “flat hook”. To replace
8: Small Wheel Adapter
holder, then position the bottom section directly below it.
Insert the bolts and lightly tighten using the included 5mm
be tilted down: First fold down vertical post as described earlier.
Next refer to Fig. 10a: Remove pin H5 from receiver tube bracket
and gently lower the main beam down so it is resting on the welded
stop.
For some types of bikes, recumbents and 3 wheelers, the standard
curved hook
the curved hook for the flat hook, remove the knob and carriage bolt
from the clamp. Slide out the curved hook, and then install the flat
hook. Align the holes of the clamp with the hole in the flat hook, then
re-install the carriage bolt and knob. See Fig. 11
Fig. 11
For bikes with 16” wheels, use the “small wheel” adapter
to prevent the wheel from falling through the wheel
holder. Place the upper section on top of the wheel
hex wrench. Slide the wheel adapter to the desired
position then tighten all 4 bolts securely. See Fig. 12
Fig. 12
Set-up for one bike using flat hook
and small wheel adapter
4
Page 5
9:
Installing bikes on the rack
When carrying two bikes, the first bike mounted should be on the
The bikes should always be positioned so that the lowest point on
slide wheel holders along the wheel support tube so that they are
inside (between the post and vehicle).
the bike frame’s top tube is close to the vertical post.
In most instances, the bike handlebars should be staggered (first
bike’s handlebars on passenger side, second bike’s handlebars
on driver side, etc. If one or both bikes are recumbents, try to
balance the weight distribution. This may require that both
handlebars are on the same side.
1. Lower the vertical post as described earlier.
2. To adjust the first bike’s wheels trays, loosen the knobs and
positioned directly beneath each wheel.
Tighten knobs securely. Rotate the bike’s pedals so that the
vertical post can be raised and secured. Slide the hook down
onto the frame. Tighten knob securely. Use the Velcro straps on
the wheel holder to secure the wheels to the wheel holders.
3. Adjust the wheel holders of the second bike and mount
to the rack in the same procedure as described above.
4. Be sure that the hooks are well supported on the bike’s
frame and the knobs securely pushing down on the bike’s
frame.
Tips for carrying woman’s bikes and bikes with slanted top
tubes: Adjust the wheel trays so that the hook will rest in
the bike frame’s top tube and seat tube.
Rack will hold 2 regular or 2 recumbent two wheeled bikes
(or one of each).
Page 6

10: Trike Adapter
Note: Rack will hold 1 adult trike or
. Install bolt and nut onto end of short trike bar.
the 2 axels) on your trike. This will correspond to
Fig. 17
Fig. 16
Fig. 13a
1 recumbent trike. When carrying a trike,
DO NOT attempt to carry additional bike(s).
Installation Procedure:
A. Remove all wheel holders except the
driver’s side outer wheel holder (Fig. 13a).
B. Slide the long trike bar onto the passenger
side of the rack as shown in fig.14. Snug up
set screws (Fig. 14a) but do not tighten.
C. Slide short trike bars onto ends of the long
trike bar tube as shown in fig. 14. Install wheel
holders onto short trike bar as shown in Fig.15.
D. Slide wheel holders onto short trike bars as
indicated in Fig. 14 and Fig. 15. Tighten knob
securely.
E
Fig. 13
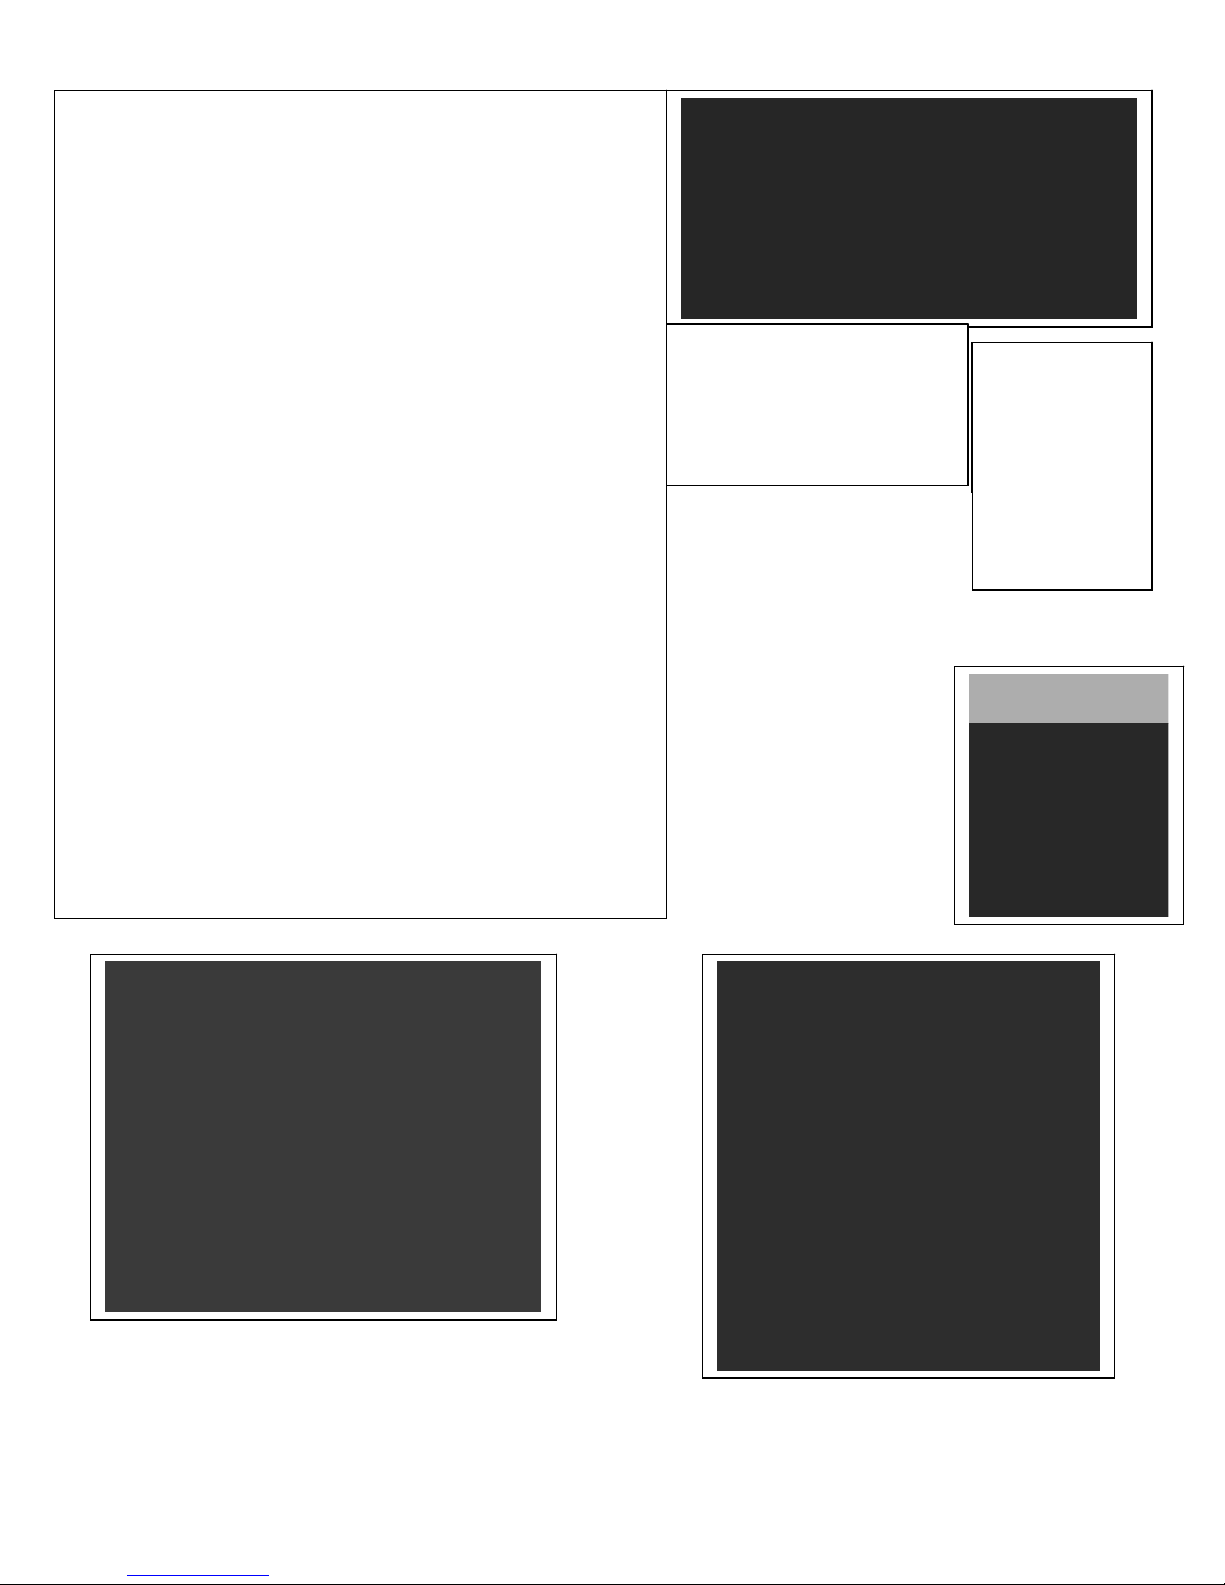
Measuring and set-up:
F. Measure the distance between the wheels
(Dimension A, Fig. 16, 17) and adjust the
distance between the short trike bars
accordingly. Tighten set screws (Fig. 15a).
G. Measure the wheelbase (distance between
Dimension C on Fig. 16,17.
H. Most of the weight on recumbents are in the
rear wheels, so it is very important that you
attempt to position the rear wheels as close to
the center of the rack as possible. This will
correspond to dimension B in Fig. 16, 17).
However, be careful to not allow the front wheel
to extend beyond the side view mirror.
Fig. 14
Fig. 14a
Fig. 15a
Fig. 15
Fig. 15b
Page 7
H. Continued
would be to place the front edge of your front
wheel at the end of the driver’s side of the car.
Take your “C” measurement and slide the long
trike bar along the wheel support tube so as to
Note: If you have a 16” front
and slide both the front wheel holder and long
wheels to the wheel holders.
. Red Safety flag: If your bike protrudes more
. Extra Tie down strap: For extra bike holding
Special notes for carrying adult bikes
wheel base for adult trikes, the “B” distance
the rack to be as close to the base assembly as
wheel holders.
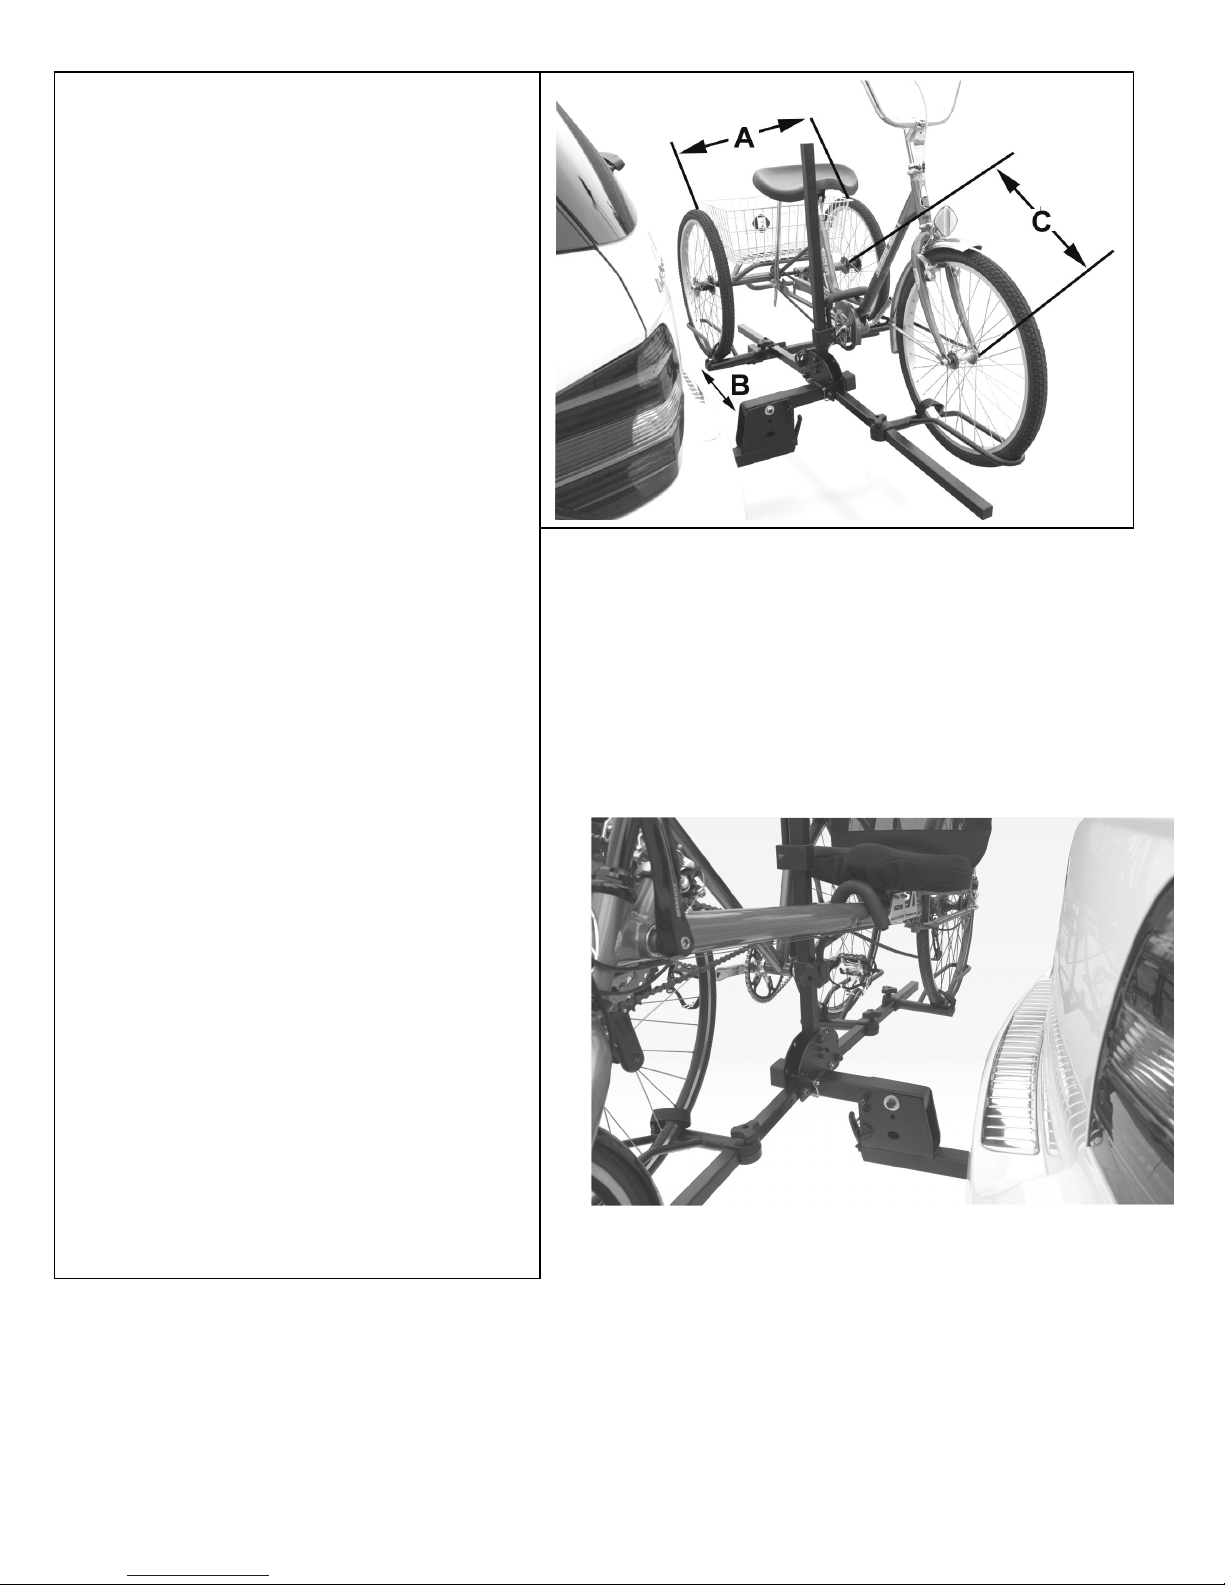
For Trike recumbents as shown on the
previous page (Fig. 17), a good way to start
Position and tighten your front wheel holder.
obtain the “C” dimension. Snug up the set
screws (Fig. 14a).
wheel, install the small wheel adapter!
Install the bike onto the rack. If it feels to
“heavy” in on the rear wheel, remove the bike
trike adapter a little to the left. However, be
careful to not allow the front wheel to extend
beyond the side view mirror.
If you have a lightweight, short wheel base
trike and there is no weight balance problem,
you can slide the wheel holder and long trike
bar to the right so it is more centered.
I. Securing the bike to the rack: Once you
have found the desired/correct position,
tighten the set screws on the long trike bar
and all knobs. Use either the flat or curved
frame hook, and slide the hook down the
vertical post onto the frame of the bike.
Tighten the knob securely. Use the Velcro
straps on the wheel holders to secure the
Due to awkward weight distribution and short
during setup will be very small (almost as small
as possible). This will allow the heaviest part of
possible.
J
than 36” from the rear of your vehicle, attach
the red safety flag to the bike.
K
security (especially for heavy trikes or when
carrying two recumbents), use the tie down
strap. Simply place the looped end onto the
vertical post below one or both clamps, wrap
the strap around the bike(s), then fasten the
loose strap end to the buckle. Pull lose strap
end to tighten.
In setup above, note position of frame clamp is close to
the recumbent’s seat and use of Velcro wheel straps on
Page 8
The SUNLITE recumbent hitch rack is distributed by J&B Importers, Miami FL
ffective from the
defect in materials or workmanship; or 3.) Damages resulting from improper installation on vehicle or attachment
8
Double check before driving off:
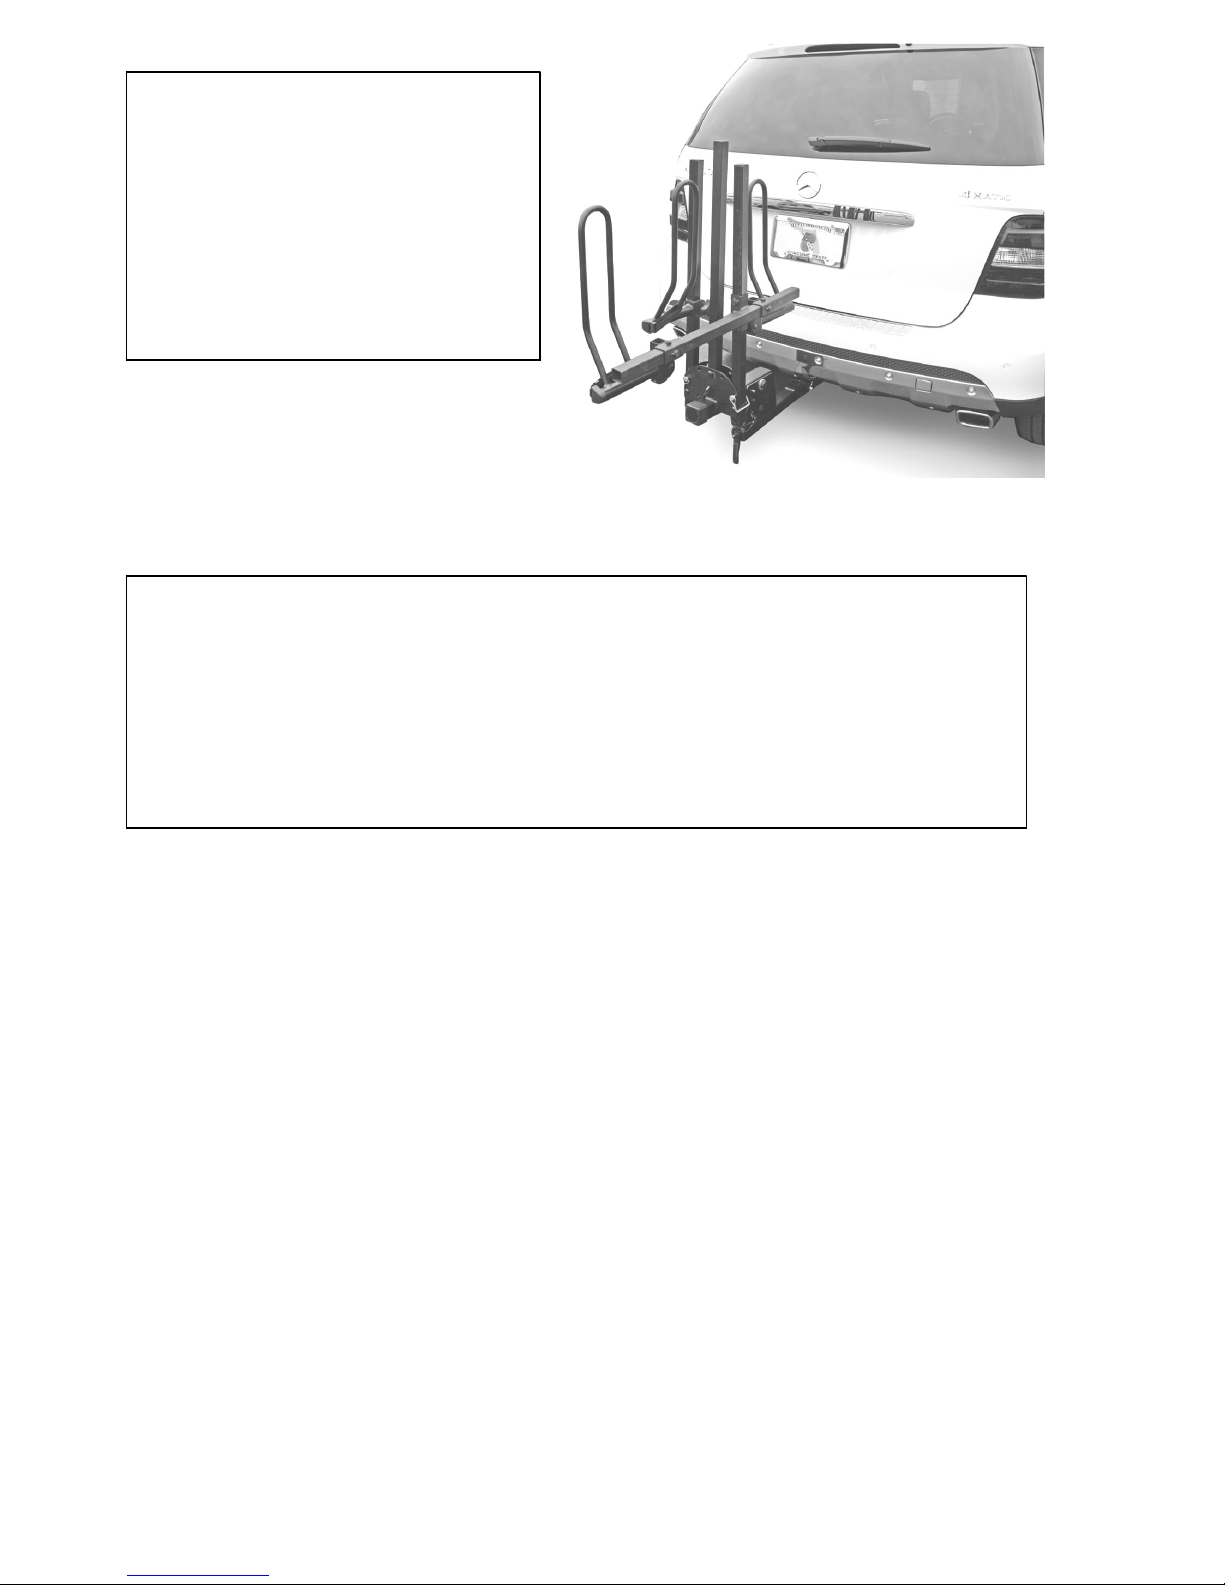
L. Fold Together Feature
For on-vehicle storage when using
rotated to the side as an alternative way of
The trike adapter, fold the rack together in
the same procedure as
Described in section 5, fig. 10:
The rack’s wheel support tubes can be
folding up the racks. Simply remove pins,
rotate the wheel tube so it is pointing
upwards, align holes and re-insert the pin.
Knobs are tight on all wheel trays and frame hooks
All retaining pins are properly inserted and secure
Wheel straps are fastened
Hitch pin is secure and hitch pin clip is installed
Extra strap or flag installed if necessary
Drive slowly on bumpy or dirt roads
Warranty:
This rack is warranted for a period of one year against defects in materials and workmanship, e
date of purchase to the original purchaser. The manufacturer will repair or replace any defective parts due to
materials or workmanship. The manufacturer of this product shall not extend the warranty to: 1.) Any failure or
malfunction of the product do to any of or modifications to the product; or 2.) Damages not attributable to a
of bicycles on rack. Consequential or Incidental Damages: The manufacturer shall not be liable for any
consequential or incidental damages in connection with the purchase, use or handling of this bike rack.
Purchaser’s Rights: Some states do not allow the exclusion or limitation of consequential or incidental
damages and the above limitation may not apply to you. This warranty gives you specific legal rights and you
have other rights, which vary from state to state.
Made For SUNLITE by Hollywood Racks
For all customer service and warranty questions,
please contact Hollywood Racks directly
12812 S. Spring St. Los Angeles, CA 90061
Tel (310) 516-8600 (800) 747-4085 FAX (310)516-8955
www.hollywoodracks.com email: [email protected]
Customer Service Hours: M-F 8:00AM to 3:00 PM PST
Made in Taiwan
 Loading...