

Page 1

Instructions for Use
Controller Specifi cations
®
Helios 7 TM
8 Light - 240 Volt Lighting Controller
Easy Guide
1. Must be installed by a certifi ed electrician.
2. Connect 240 volt power to the 3 screws under the protective
cover. (See ‘Instructions for Operation’ section).
3. Replace protective cover with screws provided.
4. Securely mount your Helios 7, with hardware provided, near
the ballasts to be operated. It should be placed away from
water, mist, spray, etc.
5. Plug your 240 volt ballasts into the multi-tap outlets on the
left and right side of the controller.
6. Adjust the analog timer to the current time of day. Set your
timing pattern by pushing the ‘time trippers’ towards the
center of the dial.
7. Your Helios 7 will now control your ballasts at the desired
settings until the power is defeated.
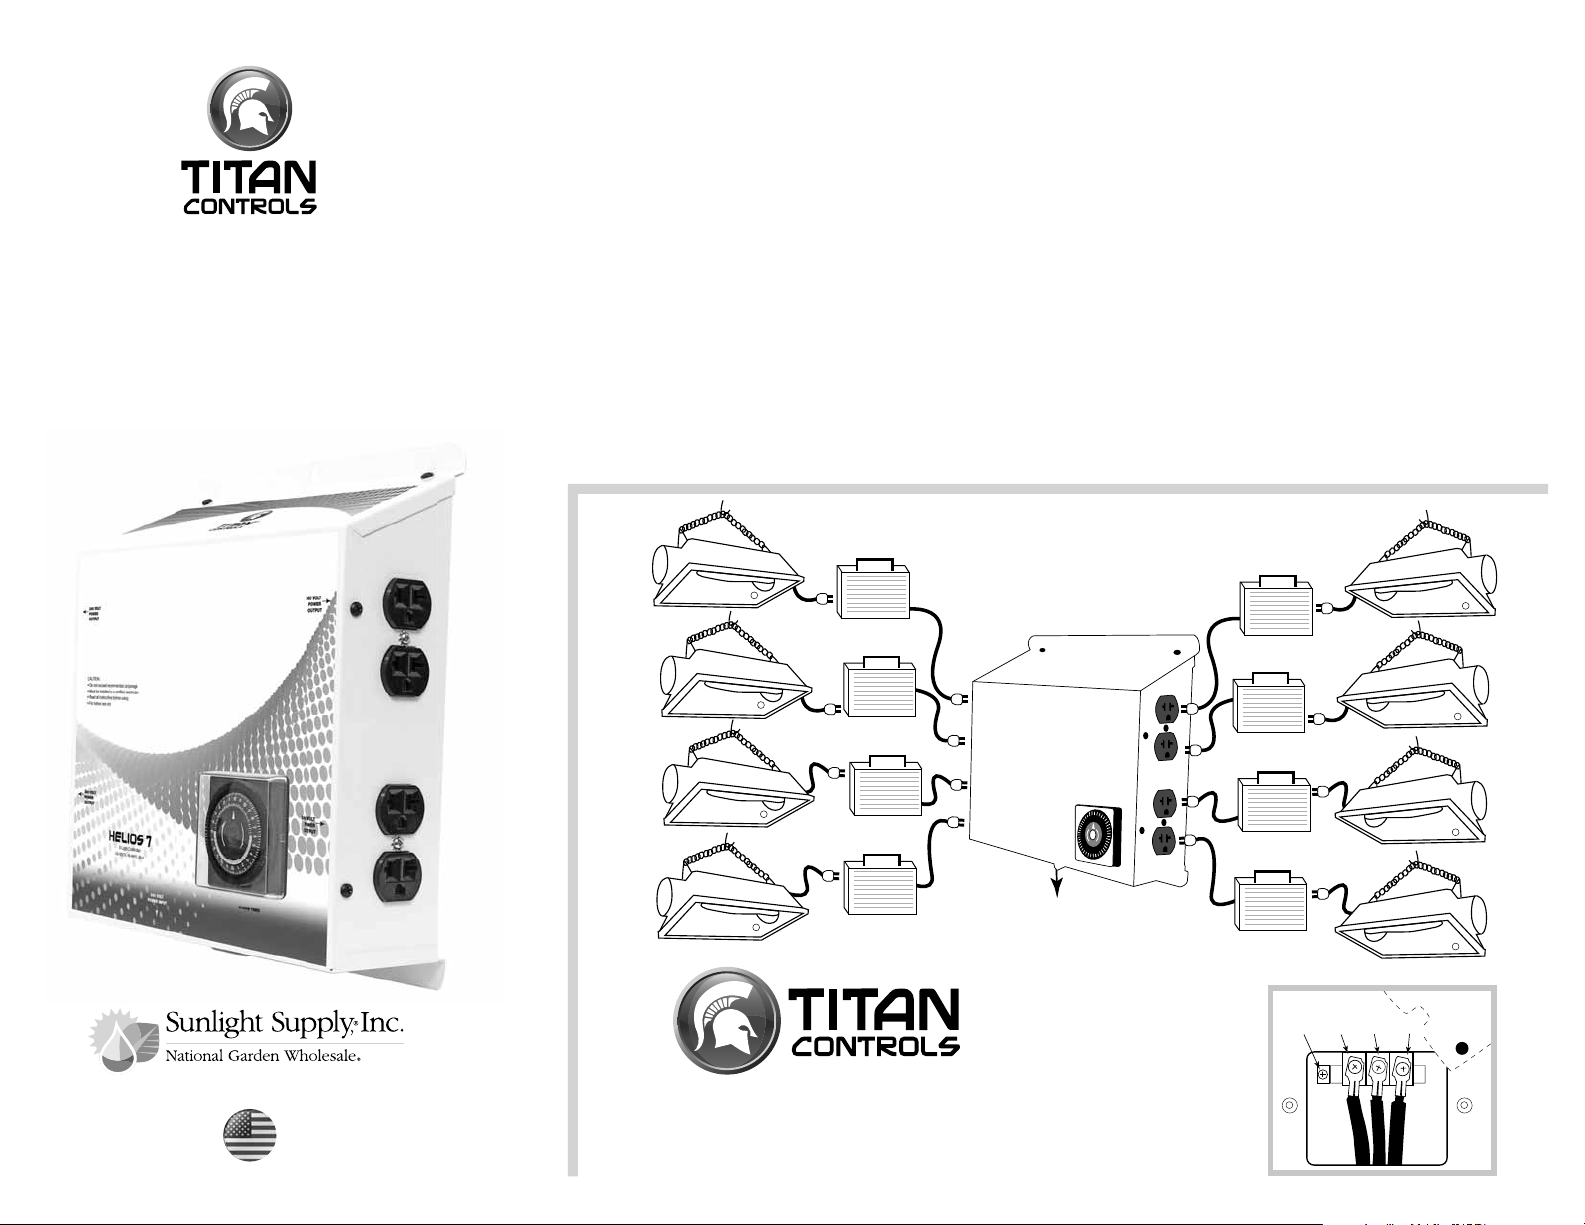
Controlling a light bank
Sun System
R
to 240 Volt Ballast
Size: 13"H x 11"W x 4"D
Weight: 10 lbs.
Voltage Input: 240 volts
Voltage Output: 240 volts
Maximum Amperage: 40 amps
Maximum Wattage: 8000 Watts
Hertz: 60 Hz
Time Switch: 24 hour analog timer
Operating Temperature: 40° to 125° F | 5° to 52° C
Storage Temperature: 32° to 135° F | 0° to 57° C
Sun System
to 240 Volt Ballast
R
VANCOUVER, WASHINGTON U.S.A.
Sun System
Sun System
Sun System
Ground
R
to 240 Volt Ballast
R
to 240 Volt Ballast
R
to 240 Volt Ballast
Helios 7
240 Volt
24 HR Timer
to 50 Amp
Power Source
to 240 Volt Ballast
to 240 Volt Ballast
to 240 Volt Ballast
Sun System
Sun System
Sun System
R
R
R
®
Neutral
Hot
Hot
Wiring
diagram
www.titancontrols.net
For technical assistance call us at
1-888-80-Titan or 1-888-808-4826.
Page 2
®
Helios 7 TM
Controlador de iluminación
de 240 voltios para 8 luces
Guía sencilla
Instrucciones de uso
1. Por favor, consulte a un electricista autorizado antes de proceder a
la instalación de Helios 7. ¡El alto voltaje puede ser peligroso!
2. Conecte la alimentación de 240 voltios a los 3 tornillos que están
debajo de la cubierta protectora. (Vea la sección “Instrucciones de
funcionamiento”).
3. Coloque de vuelta la cubierta protectora con los tornillos
suministrados.
4. Instale fi rmemente su Helios 7, con los accesorios proporcionados,
cerca del balastro que se pondrá en funcionamiento. Se debe
colocar alejado del agua, atomizadores, rociadores, etc.
5. Conecte los balastros de 240 voltios en los tomacorrientes de
multitomas que se encuentran a la derecha y a la izquierda del
controlador.
6. Ajuste el temporizador analógico a la hora actual del día. Ajuste
su patrón de tiempo colocando las ‘agujitas temporizadoras’
hacia el centro del dial.
7. A partir de ahora, el Helios 7 controlará sus balastros de acuerdo
con los valores deseados hasta que se interrumpa la alimentación.
Controlling a light bank
Sun System
R
al balastro de
240 voltios
Especifi caciones
del controlador
Tamaño: 13 pulgadas de alto x 11 pulgadas
de ancho x 4 pulgadas de profundidad
Peso: 10 libras
Entrada de voltaje: 240 voltios
Salida de voltaje: 240 voltios
Amperaje máximo: 40 amperios
Vatiaje máximo: 8,000 vatios
Frecuencia: 60 Hz
Interruptor de tiempo: temporizador analógico de 24 horas
Temperatura de funcionamiento: 40º a 125º F | 5º a 52º C
Temperatura de almacenamiento: 32º a 135º F | 0º a 57º C
R
al balastro de
240 voltios
Sun System
VANCOUVER, WASHINGTON U.S.A.
Sun System
Sun System
Sun System
R
al balastro de
240 voltios
R
R
al balastro de
240 voltios
al balastro de
240 voltios
®
www.titancontrols.net
Para obtener asistencia técnica, llámenos al
1-888-80-Titan o 1-888-808-4826.
Helios 7
240 Volt
24 horas
Temporizador
a 50 amperios
Fuente de
alimentación
eléctrica
al balastro de
240 voltios
al balastro de
240 voltios
al balastro de
240 voltios
Diagrama del
cableado
Tierra
Caliente
Sun System
Sun System
Sun System
Neutral
R
R
R
Caliente
 Loading...