

Page 1

INSTRUCTIONS – REV. A
®
Apollo 2
Cycle Timer with Photocell
Easy Guide
P
h
o
t
o
c
e
l
l
z
H
0
6
/
s
p
m
A
5
1
/
s
t
l
o
V
0
2
1
A
po
ll
o
2
D
a
y
/
N
ig
h
t
C
y
c
le
T
im
e
r
P
h
o
t
o
c
e
l
l
z
H
0
6
/
s
p
m
A
5
1
/
s
t
l
o
V
0
2
1
A
p
o
llo
2
D
a
y
/
N
ig
h
t
C
y
c
le
T
im
e
r
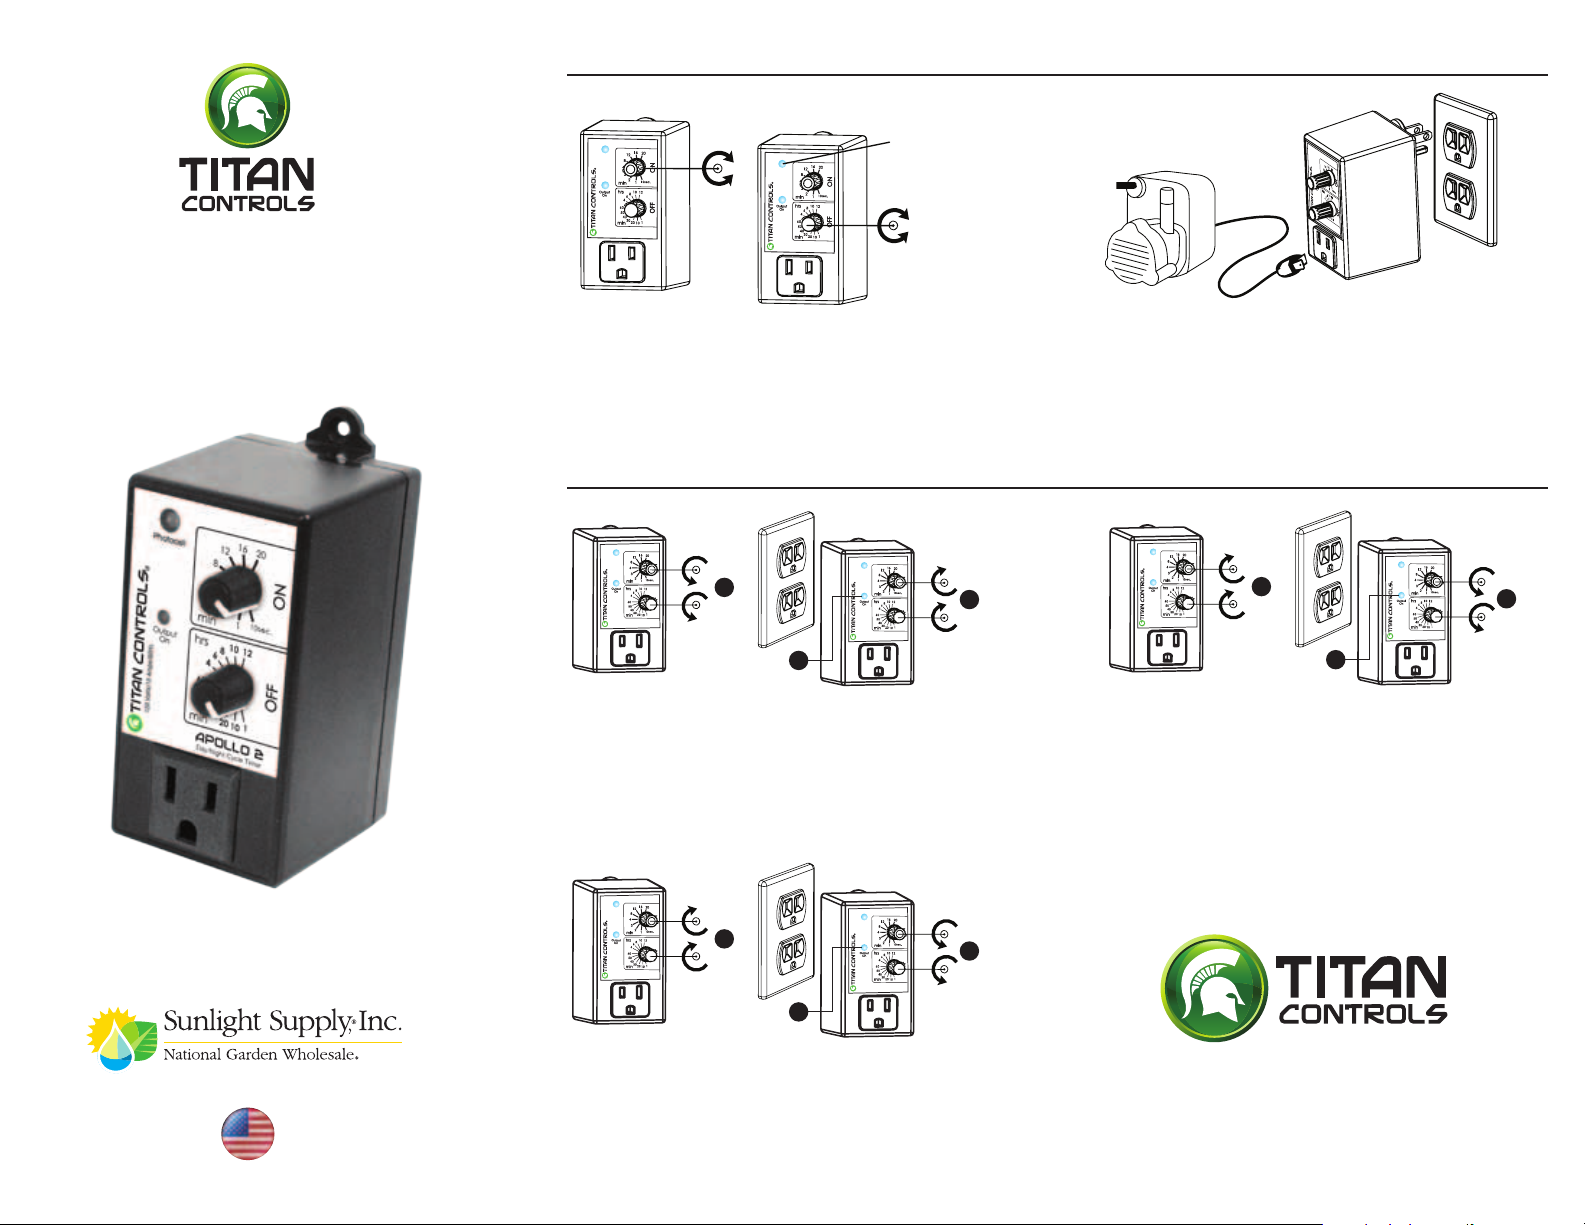
Step 1
Set values for ON time & OFF time
ON Time: Duration for which equipment will run
OFF Time: Duration in between ON times
OPTIONAL SETTINGS
P
h
o
t
o
c
e
l
l
z
H
0
6
/
s
p
m
A
5
1
/
s
t
l
o
V
0
2
1
A
p
o
l
l
o
2
Day/Night Cycle Timer
A
C
Light sensor
(photocell): see
Optional settings
P
h
o
t
o
c
e
l
l
z
H
0
6
/
s
p
m
A
5
1
/
s
t
l
o
V
0
2
1
A
p
o
l
l
o
2
Day/Night Cycle Timer
P
h
o
P
h
o
t
o
t
c
e
l
l
o
c
e
l
l
z
H
0
6
z
/
s
H
p
0
6
m
/
A
s
p
5
1
m
/
s
A
t
l
5
o
1
V
/
s
0
t
2
l
1
o
V
0
2
1
Apo
llo
2
A
p
D
a
y
/
N
ig
h
t
C
y
c
le
T
im
e
r
o
D
a
y
l
/
N
l
i
g
h
o
t
C
y
c
2
l
e
T
i
m
e
r
Step 2
Plug into 120VAC outlet Connect equipment to be controlled
Installation is now complete
P
h
o
t
o
c
e
l
l
z
H
0
6
/
s
p
m
A
B
5
1
/
s
t
l
o
V
0
2
1
A
p
o
l
l
o
2
Day/Night Cycle Timer
A
C
P
h
o
t
o
c
e
l
l
z
H
0
6
/
s
p
m
A
5
1
/
s
t
l
o
V
0
2
1
A
p
o
l
l
o
2
Day/Night Cycle Timer
B
Note: This unit has been set to perform day only control. For
night only or 24-hour control, refer to ‘Optional’ settings.
VANCOUVER, WASHINGTON U.S.A.
Change to ‘24-hour’ control
A. Set both values to minimum
B. Plug in, then set both values to maximum within 5 seconds
C. Output light turns on or off according to actual setting
D. Follow instructions as shown in Step 1 & 2
P
h
o
t
o
c
e
l
l
z
H
0
6
/
s
p
m
A
5
1
/
s
t
l
o
V
0
2
1
A
p
o
l
l
o
2
Day/Night Cycle Timer
A
P
h
o
t
o
c
e
l
l
z
H
0
6
/
s
p
m
A
5
1
/
s
t
l
o
V
0
2
1
A
p
o
l
l
o
2
Day/Night Cycle Timer
B
C
Change to ‘night only’ control
A. Set both values to maximum
B. Plug in, then set bottom value to minimum, followed by top value to
minumum within 5 seconds
C. Output light turns on or off according to actual setting
D. Follow instructions as shown in Step 1 & 2
Change to ‘day only’ control
A. Set both values to maximum
B. Plug in, then set top value to minimum followed by bottom
value to minimum within 5 seconds
C. Output light turns on or off according to actual setting
D. Follow instructions as shown in Step 1 & 2
®
www.titancontrols.net
For technical assistance call us at
1-888-80-Titan or 1-888-808-4826.
Page 2
®
Apollo 2
Temporizador de ciclos con celda fotoeléctrica
Guía sencilla
INSTRUCCIONES - REV. A
Sensor de luz
(celda fotoeléctrica):
P
h
o
t
o
c
e
l
l
z
H
0
6
/
s
p
m
A
5
1
/
s
t
l
o
V
0
2
1
A
po
ll
o
2
D
a
y
/
N
ig
h
t
C
y
c
le
T
im
e
r
P
h
o
t
o
c
e
l
l
z
H
0
6
/
s
p
m
A
5
1
/
s
t
l
o
V
0
2
1
A
p
o
llo
2
D
a
y
/
N
ig
h
t
C
y
c
le
T
im
e
r
consulte la sección
de Conguraciones
opcionales
Paso 1
Fije los valores para el tiempo de actividad (ON) y de inactividad (OFF)
Tiempo de actividad (ON): Duración del funcionamiento del equipo
Tiempo de inactividad (OFF): Duración entre los tiempos de actividad
CONFIGURACIONES OPCIONALES
P
h
o
t
o
c
e
l
l
z
H
0
6
/
s
p
m
A
5
1
/
s
t
l
o
V
0
2
1
A
p
o
l
l
o
2
Day/Night Cycle Timer
A
C
P
h
o
t
o
c
e
l
l
z
H
0
6
/
s
p
m
A
5
1
/
s
t
l
o
V
0
2
1
A
p
o
l
l
o
2
Day/Night Cycle Timer
B
P
h
o
P
h
o
t
o
t
c
e
l
l
o
c
e
l
l
z
H
0
6
z
/
s
H
p
0
6
m
/
A
s
p
5
1
m
/
s
A
t
l
5
o
1
V
/
s
0
t
2
l
1
o
V
0
2
1
Apo
llo
2
A
p
D
a
y
/
N
ig
h
t
C
y
c
le
T
im
e
r
o
D
a
y
l
/
N
l
i
g
h
o
t
C
y
c
2
l
e
T
i
m
e
r
Paso 2
Enchufe a un tomacorriente de 120 VAC Conecte el equipo
que se va a controlar
La instalación se ha completado
P
h
o
t
o
c
e
l
l
z
H
0
6
/
s
p
m
A
5
1
/
s
t
l
o
V
0
2
1
A
p
o
l
l
o
2
Day/Night Cycle Timer
A
C
P
h
o
t
o
c
e
l
l
z
H
0
6
/
s
p
m
A
5
1
/
s
t
l
o
V
0
2
1
A
p
o
l
l
o
2
Day/Night Cycle Timer
B
Nota: Esta unidad ha sido configurada para funcionar como control durante el día únicamente. Para obtener información sobre
el control durante la noche únicamente o sobre el control las 24
horas, consulte la sección de Configuraciones “opcionales”.
VANCOUVER, WASHINGTON U.S.A.
Cambio a control durante “24 horas”
A. Fije ambos valores al mínimo
B. Enchufe, luego je ambos valores al máximo en
los 5 segundos siguientes
C. La luz de salida se enciende o se apaga conforme
a la conguración real
D. Siga las instrucciones descritas en el Paso 1 y 2
P
h
o
t
o
c
e
l
l
z
H
0
6
/
s
p
m
A
5
1
/
s
t
l
o
V
0
2
1
A
p
o
l
l
o
2
Day/Night Cycle Timer
A
P
h
o
t
o
c
e
l
l
z
H
0
6
/
s
p
m
A
5
1
/
s
t
l
o
V
0
2
1
A
p
o
l
l
o
2
Day/Night Cycle Timer
B
C
Cambio a control durante la “noche únicamente”
A. Fije ambos valores al maximo
B. Enchufe, luego coloque el valor más bajo al mínimo y el valor
más alto al mínimo en los 5 segundos siguientes
C. La luz de salida se enciende o se apaga conforme
a la conguración real
D. Siga las instrucciones descritas en el Paso 1 y 2
Cambio a control durante el “día únicamente”
A. Fije ambos valores al máximo
B. Enchufe, luego je el valor más alto al mínimo y el valor
más bajo al mínimo en los 5 segundos siguientes
C. La luz de salida se enciende o se apaga conforme
a la conguración real
D. Siga las instrucciones descritas en el Paso 1 y 2
®
www.titancontrols.net
Para obtener asistencia técnica, llámenos al
1-888-80-Titan o al 1-888-808-4826.
 Loading...