

Page 1
m P u l s e
®
USER
MANUAL
Page 2
2
Congratulations!
You are now the owner of an mPulse® sauna. With
Sunlighten infrared heat, you are empowered to improve
your quality of life. Just follow our assembly instructions
and sauna protocol to begin your wellness journey with
the very best in infrared therapy.
WARNING:
Do not use this sauna to treat any health problems
without consulting your physician. Sunlighten, Inc. does
not provide medical advice, education or treatment. Our
information should not be relied on in making decisions
about your health. Always consult your physician for
medical advice
www.sunlighten.com/contraindications
Our patented Solocarbon 3-in-1® is the only
sauna heater on the market to provide all
three infrared wavelengths in one place
and customizable to each user.
Page 3

3
TABLE OF CONTENTS
PRE-INSTALLATION
Specifications ................................................................................................. 4
Pre-Installation/Warnings ........................................................................... 6
OPERATING INSTRUCTIONS
Control Screen/Initial Setup ....................................................................... 7
Sauna Settings ............................................................................................... 8
Health Programs ............................................................................................ 11
Scheduling Sauna Sessions ......................................................................... 13
Media Apps ..................................................................................................... 14
Warm Up Time/Usage ................................................................................... 17
Sauna Protocol ............................................................................................... 17
Health/Safety ................................................................................................. 18
FAQ .......................................................................................................................... 19
TROUBLESHOOTING ................................................................................................................. 22
WARRANTY ................................................................................................................................... 24
A separate packet with assembly instructions is included with your sauna.
Page 4
4
MPULSE SERIES
SPECIFICATIONS
aSPIRE
Dimensions
(W x L x H)
43.6” x 41.6” x 78.6”
110.7 cm x 105.6 cm x 199.6 cm
Power 120v, 1820 watts, 20a
1440 watts continuous
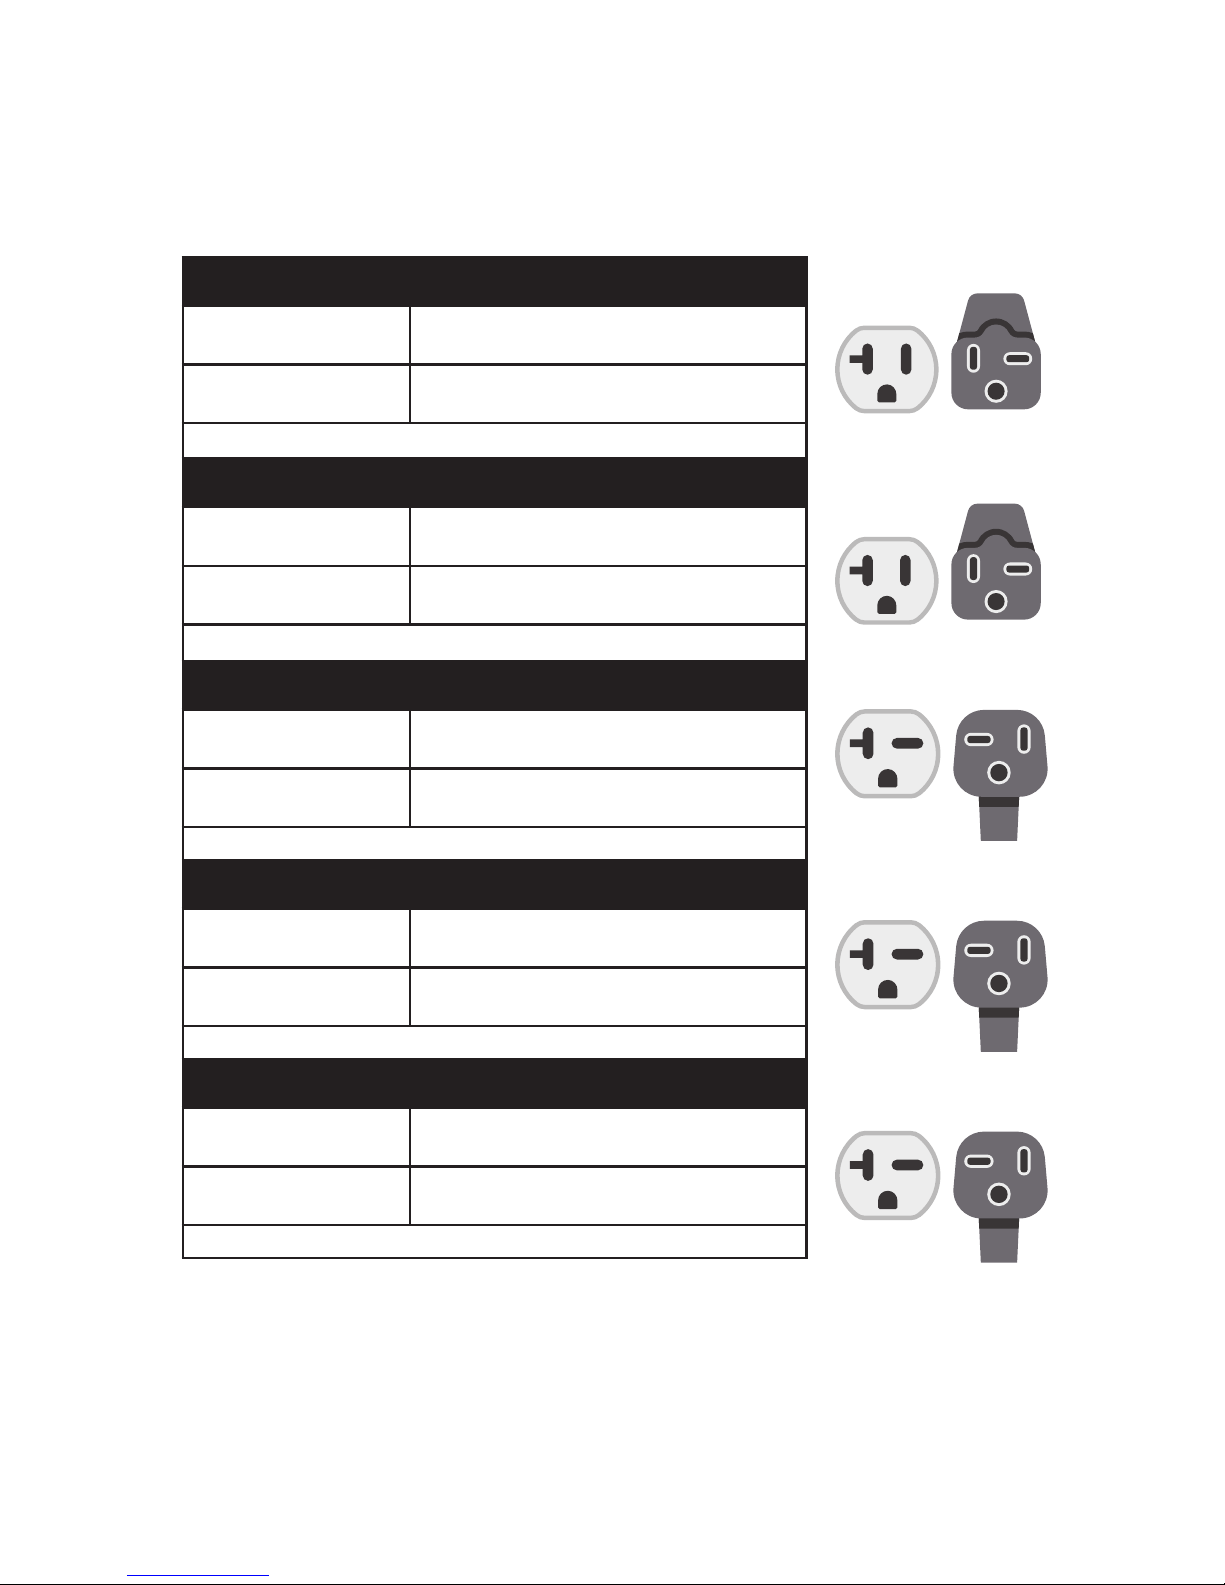
DEDICATED 120V 20A CIRCUIT REQUIRED. SEE 5-20R IMAGE ON RIGHT.
bELIEVE
Dimensions
(W x L x H)
51.7” x 47.6” x 78.6”
131.1 cm x 120.9 cm x 199.6 cm
Power 120v, 2540 watts, 20a
1920 watts continuous
DEDICATED 120V 20A CIRCUIT REQUIRED. SEE 5-20R IMAGE ON RIGHT.
cONQUER
Dimensions
(W x L x H)
70.6” x 47.6” x 78.6”
179.3 cm x 120.9 cm x 199.6 cm
Power 240v, 3840 watts, 20a
3072 watts continuous
DEDICATED 240V 20A CIRCUIT REQUIRED. SEE 6-20R IMAGE ON RIGHT. *
dISCOVER
Dimensions
(W x L x H)
70.6” x 70.6” x 78.6”
179.3 cm x 179.3 cm x 199.6 cm
Power 240v, 4860 watts, 20a
3072 watts continuous
DEDICATED 240V 20A CIRCUIT REQUIRED. SEE 6-20R IMAGE ON RIGHT. *
eMPOWER
Dimensions
(W x L x H)
85.6” x 70.6” x 78.6”
217.4 cm x 179.3 cm x 199.6 cm
Power 240v, 5200 watts, 20a
3072 watts continuous
DEDICATED 240V 20A CIRCUIT REQUIRED. SEE 6-20R IMAGE ON RIGHT. *
5-20R
USA / CAN
5-20R
USA / CAN
6-20R
USA / CAN
6-20R
USA / CAN
6-20R
USA / CAN
*FOR COMMERCIAL FACILITY: If only 208v is available, a Buck-
Boost transformer must be installed to provide the correct electrical
specications for the unit to operate.
Page 5

5
REGION VOLTAGE/AMPS EXTERIOR POWER CORD
Europe Aspire: 230V-7.5A
Believe: 230V-10A
Conquer: 230V-15A
Discover: 230V-18A
Empower: 230V-20A
Aspire: H07RN-F,250V-16A,Plug type: MT-32 or NS-13
Believe: H07RN-F,250V-16A,Plug type: MT-32 or NS-13
Conquer: H07RN-F,250V-16A,Plug type: MT-32 or NS-13
Discover: H07RN-F,250V-20A,No Plug
Empower: H07RN-F,250V-20A,No Plug
Singapore Aspire: 230V-7.5A
Believe: 230V-10A
Conquer: 230V-15A
Discover: 230V-18A
Empower: 230V-20A
Aspire: H07RN-F,250V-16A,Plug type: NS-17
Believe: H07RN-F,250V-16A,Plug type: NS-17
Conquer: H07RN-F,250V-16A,Plug type: NS-17
Discover: H07RN-F,250V-20A,Don’t have Plug
Empower: H07RN-F,250V-20A,Don’t have Plug
Australia Aspire: 240V-7.5A
Believe: 240V-10A
Conquer: 240V-15A
Discover: 240V-18A
Empower: 240V-20A
Aspire: H07RN-F,250V-16A,Plug type: XR-351
Believe: H07RN-F,250V-16A,Plug type: XR-351
Conquer: H07RN-F,250V-16A,Plug type: XR-351
Discover: H07RN-F,250V-20A,Don’t have Plug
Empower: H07RN-F,250V-20A,Don’t have Plug
INTERNATIONAL ELECTRICAL
SPECIFICATIONS
Page 6

6
WARNINGS &
DISCLOSURES
WARNING: READ BEFORE OPERATING
To reduce risk associated with hazardous voltage & re:
• Unplug the sauna from electrical outlet before storage or when not in use for
expanded periods of time
• Do not operate the sauna if its not on a dedicated electrical circuit, or has a damaged
power cord/plug
• If the sauna is not working properly or an odor persists, immediately unplug the sauna
• Do not leave the sauna unattended while heating for longer than the sauna’s pre-set
time periods
• Never cover holes or oor grate with towels, mats, garments, etc.
PRE-INSTALLATION
1. Have a certied electrician install a dedicated outlet for sauna.
Failure to do so will void all warranty.
2. Remember your sauna should be assembled by 2 or more people.
3. Do not place plumbing or plumbing xtures in the sauna.
4. Keep all liquids away from the heating panels and electronics.
5. Install sauna on a level surface.
6. Install sauna in an area that is dry and protected from the weather.
7. Keep ammable objects and corrosive chemical substances away
from the sauna.
8. Installation of the sauna in an area below standard room temperature
can increase warm up time
Page 7
7
OPERATING INSTRUCTIONS
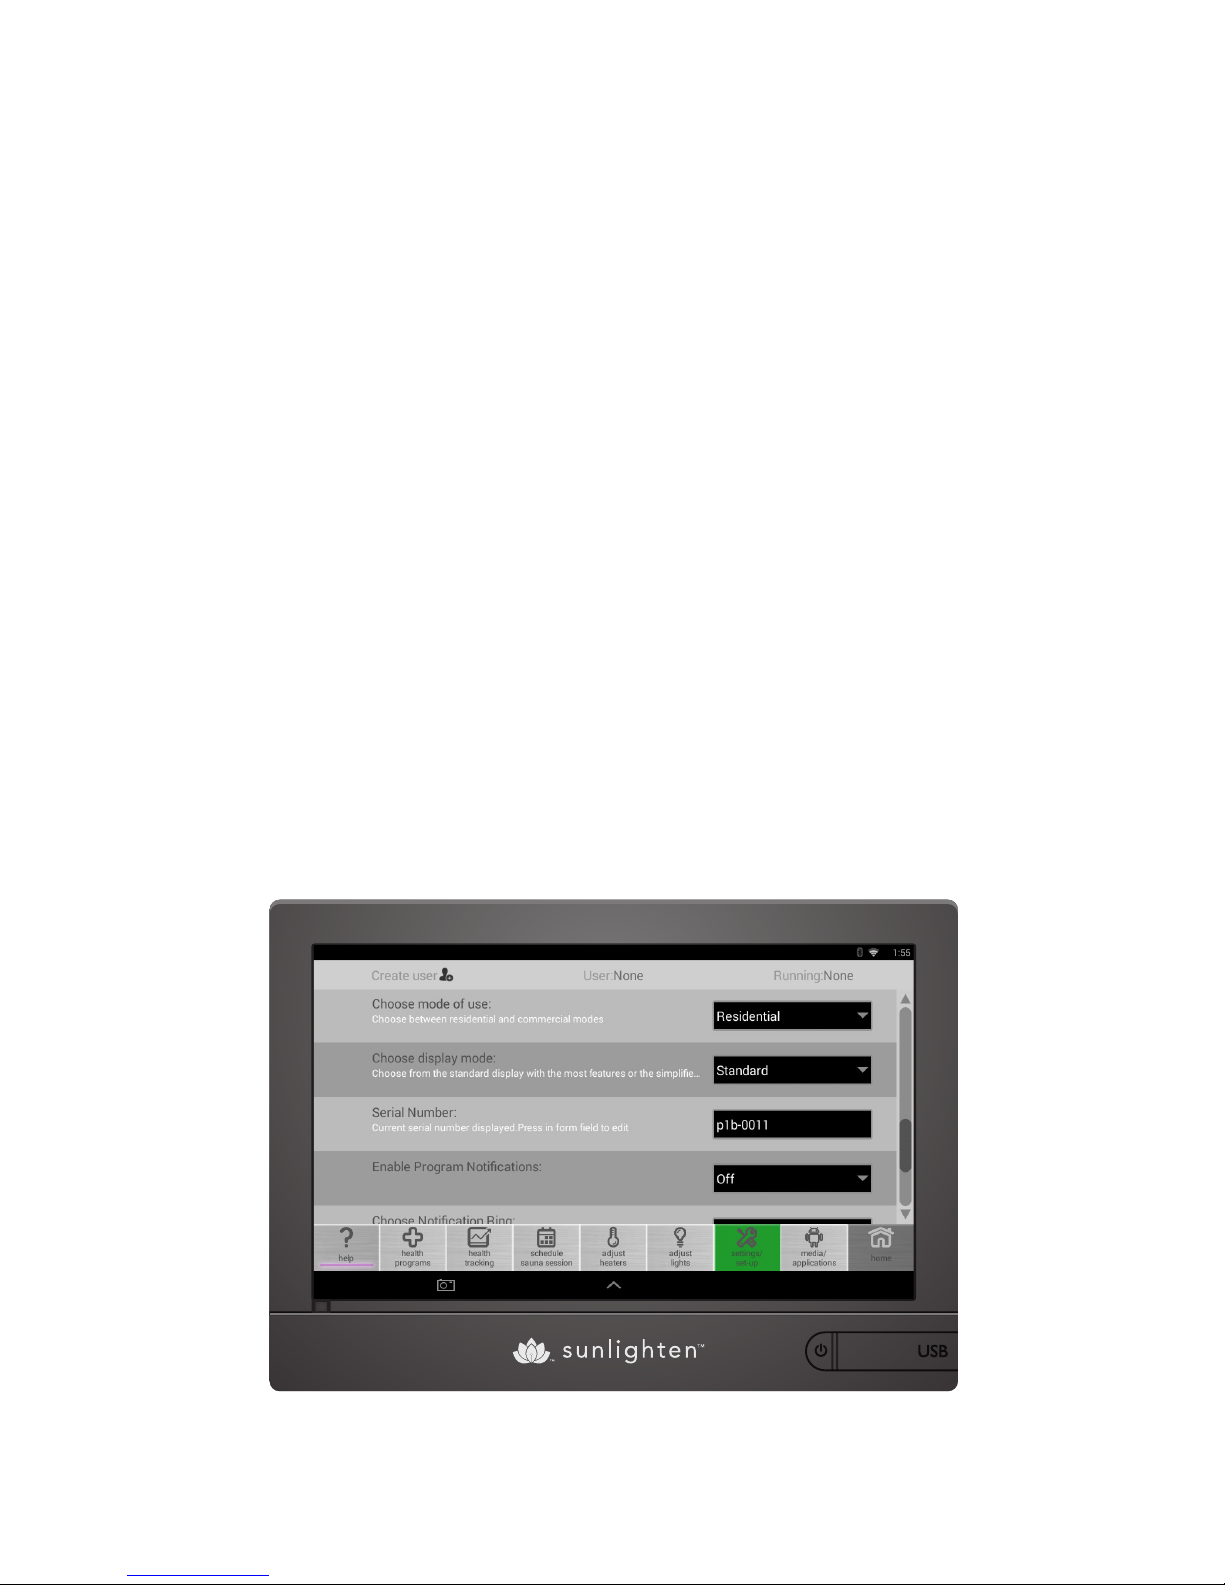
ANDROID CONTROL TABLET
1. Power ON/OFF
To turn On: Press and hold the power button in the lower right corner for 5 seconds,
until the screen turns on. The screen will be blank for a few seconds before the
Sunlighten logo appears.
If left on, the tablet will go into sleep mode and can be woken by quickly touching the power
button.
To turn O: Press and hold the power button for 1-2 seconds and select “shutdown” on the
screen to turn o.
2. Initial Set Up
Upon rst startup or a factory reset you will be prompted to congure initial settings:
• Temperature Unit Select: Fahrenheit or Celsius
• Language preference
• Usage Select: Residential or Commercial mode
• Serial Number: Located on the back of the oor panel of sauna. It is listed in
the following format: (P)(Model Size)(First Letter of Wood Type) – (Four Digit
Identier)
Page 8
8
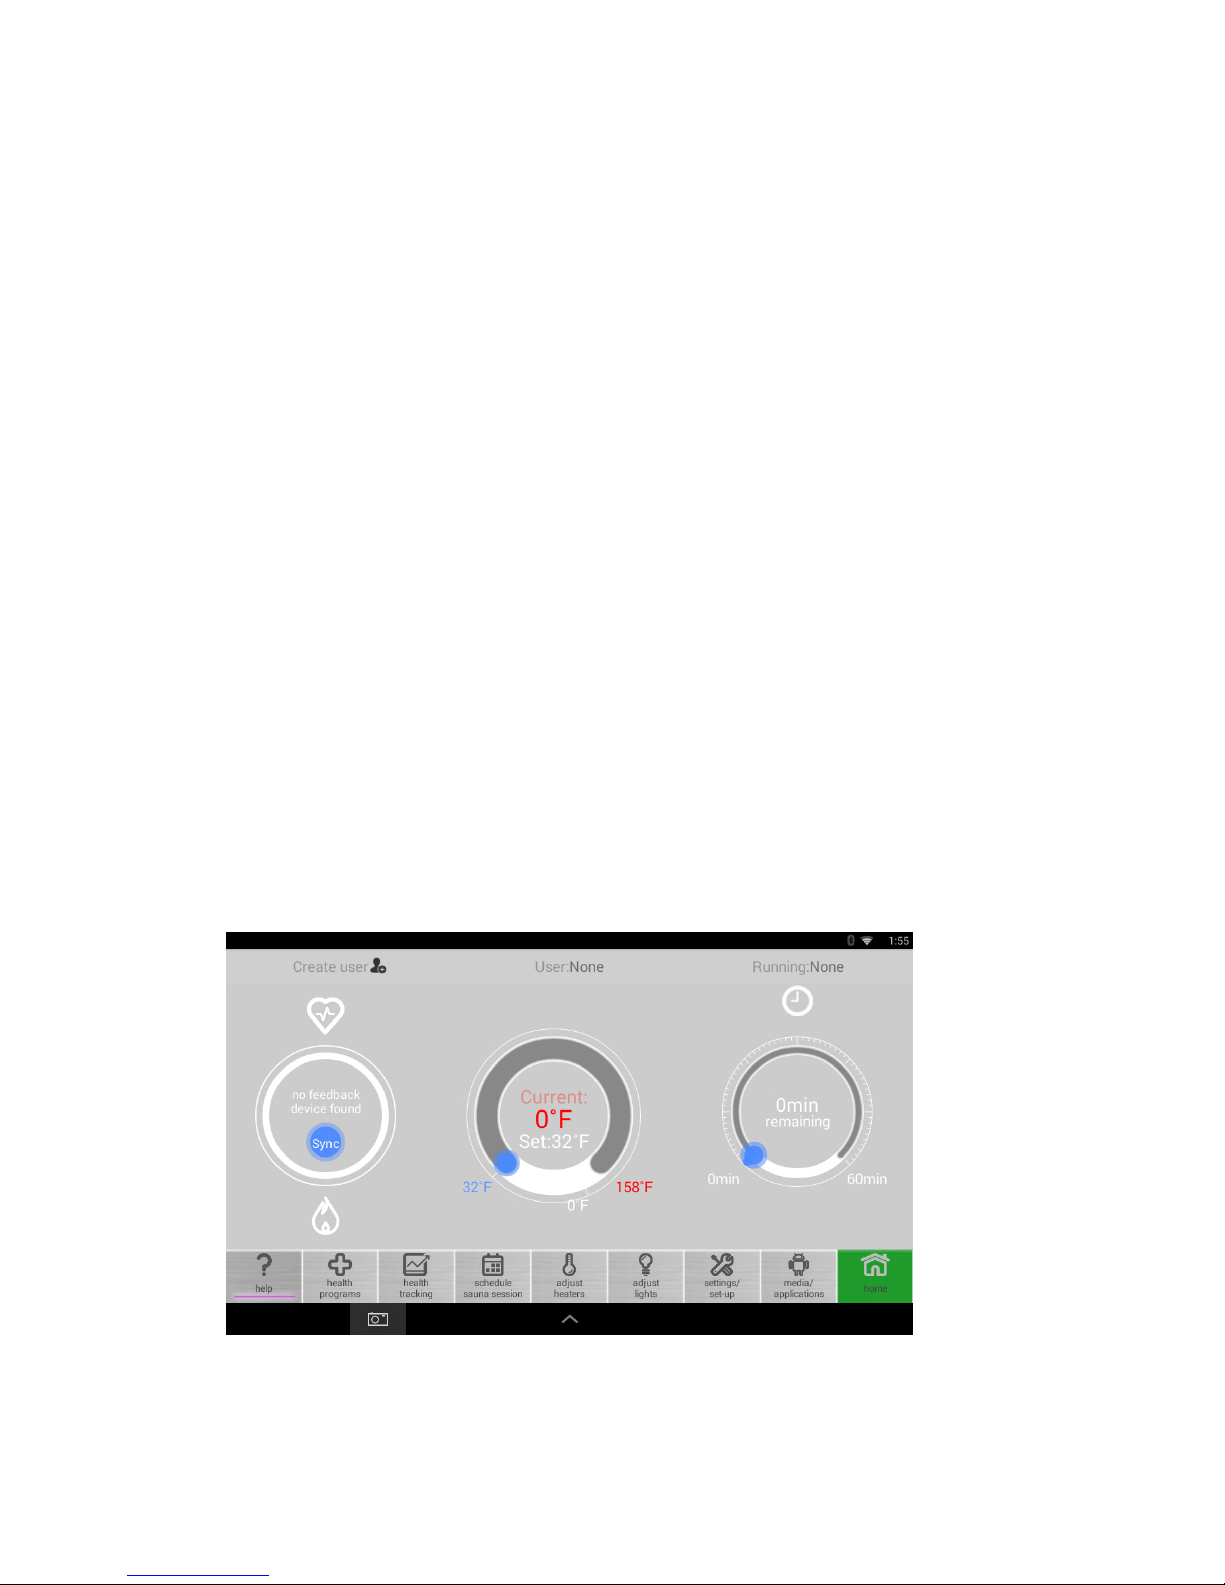
3. Settings/Setup
In the SETTINGS tab, you will be able to adjust initial setup options.
• Set up a wireless internet connection
• Download latest software update
• Watch basic usage tutorial
• Adjust screen brightness
• Select display mode (standard or simplied)
• Select residential/commercial mode
• Adjust Notication ring
• Enable end of program notication
4. Residential/Commercial Mode
In the Settings tab, you can change between Residential &Commercial modes.
Residential: Standard setting
Commercial: Allows for a preheat time of up to 8 hours. To lock/unlock the screen, tap
the screen 10 times and look for the pop-up conrmation above the toolbar. When
unlocking- tap the screen ten (10) times and wait for the unlocked message.
5. Display Mode
The control panel is equipped with two display modes that can be changed in
the settings tab.
Page 9
9
6. Duration/Temperature Settings
Standard: Rotate the time or temperature dials to your desired temperature.
Simplied: Use the arrow buttons to adjust to your desired time or temperature.
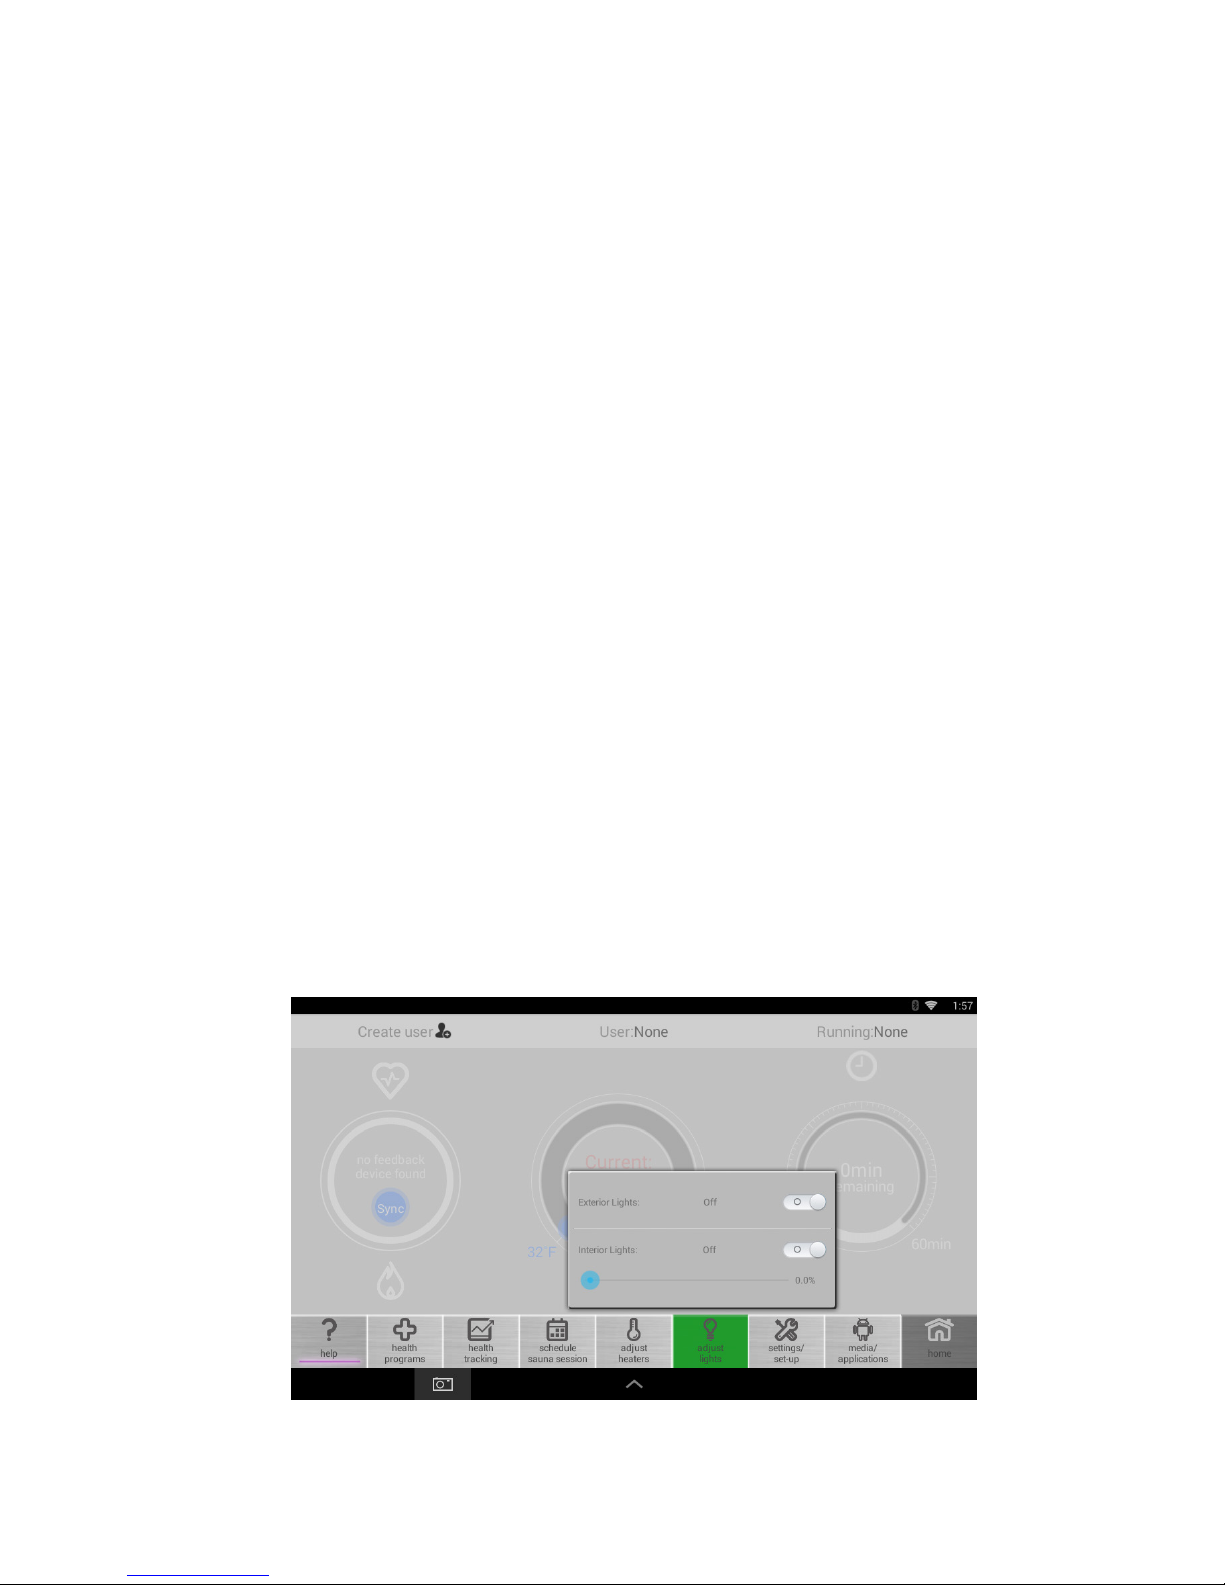
7. Adjust Lights
• Select Adjust Lights tab
• For exterior lights, select on/o
• For interior lights, use the slider to adjust the light intensity.
8. Wifi Connection
• Select the Settings/Set-Up tab
• Select “Set-up your wireless connection”
• In the list of Wi Networks, select your network and enter your password if required.
• When successfully connected it should show “Connected” under the network name.
9. Adjust Date/Time
• Select Settings/Setup tab.
• Select “Set-up your wireless connection”
• Scroll down the list on the left to Date and Time and select it.
• On the right, uncheck the Automatic Time Zone check box.
• Select “Set Time Zone” and choose the appropriate time zone for your region.
• This should correct the time, if the minutes are o, you can adjust them by unchecking the
automatic date and time.
Page 10
10
10. Update Software
There are two update methods. The easiest way to update your software is with
Wi enabled, go to Settings/Set-Up and select “Download the latest software
update”. If an update is available, a download prompt will appear. After
successful download follow the prompts to install the new version.
If Wi is not available, you can update using a USB storage device. You can
purchase USB drive at:
http://www.sunlighten.com/shop/mpulse-anywhere-access/
11. Sunlighten Software Reset
The Sunlighten Software Reset option does not erase application settings, those
application settings are saved on an internal memory card. For factory data reset
instructions visit sunlighten.com/customer-care
12. Create New User (Optional)
If you are tracking your progress with a biofeedback device, you should set up a
User prole. Your personal data can be used with a Bluetooth heart rate monitor
to accurately calculate calories burned. If you do not intend to track biofeedback,
you may continue as a Guest User.
• To create a New User:
• Select the Health Tracking tab
• Enter a user name, gender, date of birth, weight and height
• Select “next” to return to home screen. User name will appear in the top
left corner.
Page 11
11
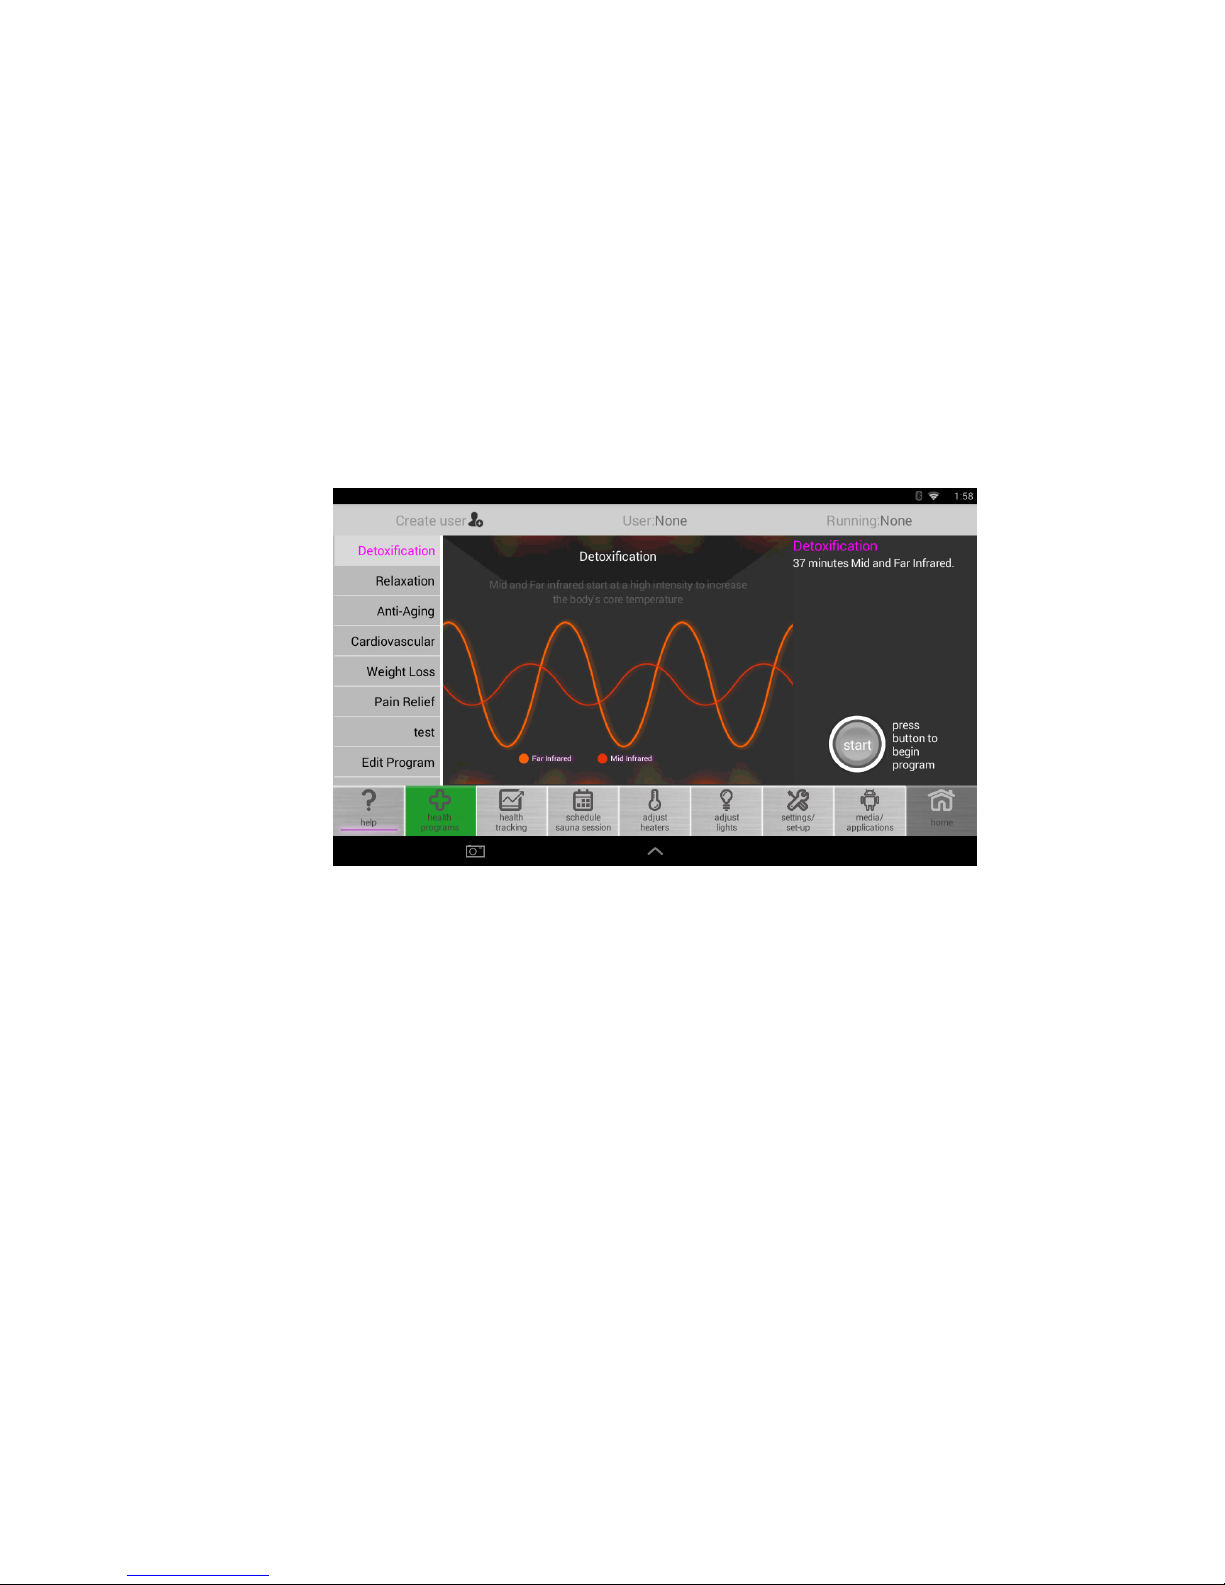
13. Health Programs
The wellness programs are designed to emit the optimal blend of infrared
wavelengths - based on 56 clinical studies - to achieve the desired result.
To begin a program:
• Select Health Program tab
• Select the desired program from left side menu
• Press start to begin preheating
• When it reaches the desired temperature, press start to begin program
NOTE: Once you begin a program, the duration and temperature are not adjustable as
they are pre-programmed to deliver the best result. Preset programs range between
115 - 130°F.
The pre-heat function allows you to begin the program at your desired
temperature. To stop a program, return to home screen. Adjust the temperature
for a prompt that allows you to cancel or continue.
Page 12

12
PROGRAM DURATION INFRARED USED
Detoxification 37 Minutes Far / Mid
Starts at a high intensity to increases the body’s core temperature then reduces to a low, comfortable intensity
level. IR combination improves vascular access flow to reach toxins at the cellular level.
Relaxation 40 Minutes Far / Mid / Near
Far, mid and near infrared rays induce deep relaxation as they relieve muscle tension at a low, comfortable
intensity promoting overall stress reduction with regular use.
Anti-Aging 30 Minutes Far / Near
A low, constant intensity level penetrates tissue to help with various skin concerns. Near IR LEDs improve
overall skin tone, elasticity and firmness promoting anti-aging benefits.
Cardiovascular 45 Minutes Far / Mid / Near
Starts at a high intensity to increase heart rate and cardiac output then lowers to sustain heart rate level.
Circulation increases to promote healthy blood pressure.
Weight Loss 30 Minutes Mid / Far
Starts at a high intensity to stimulate the cardiovascular system then reduces to a medium level. As the body
works to cool itself, there is an increase in heart rate, cardiac output & metabolic rate similar to exercise.
Pain Relief Pain Relief Far / Mid / Near
An IR blend provides natural pain relief by reducing inflammation and swelling while near IR LEDs penetrate
the tissue to promote cellular repair at a medium, constant intensity level.
Create Program Your Choice (1 Hr. Max) Your Choice
Gives you full control of each heater, allowing you to maximize the IR power, output and intensity of each
sauna session.
Preset Health Program Guide
Page 13
13
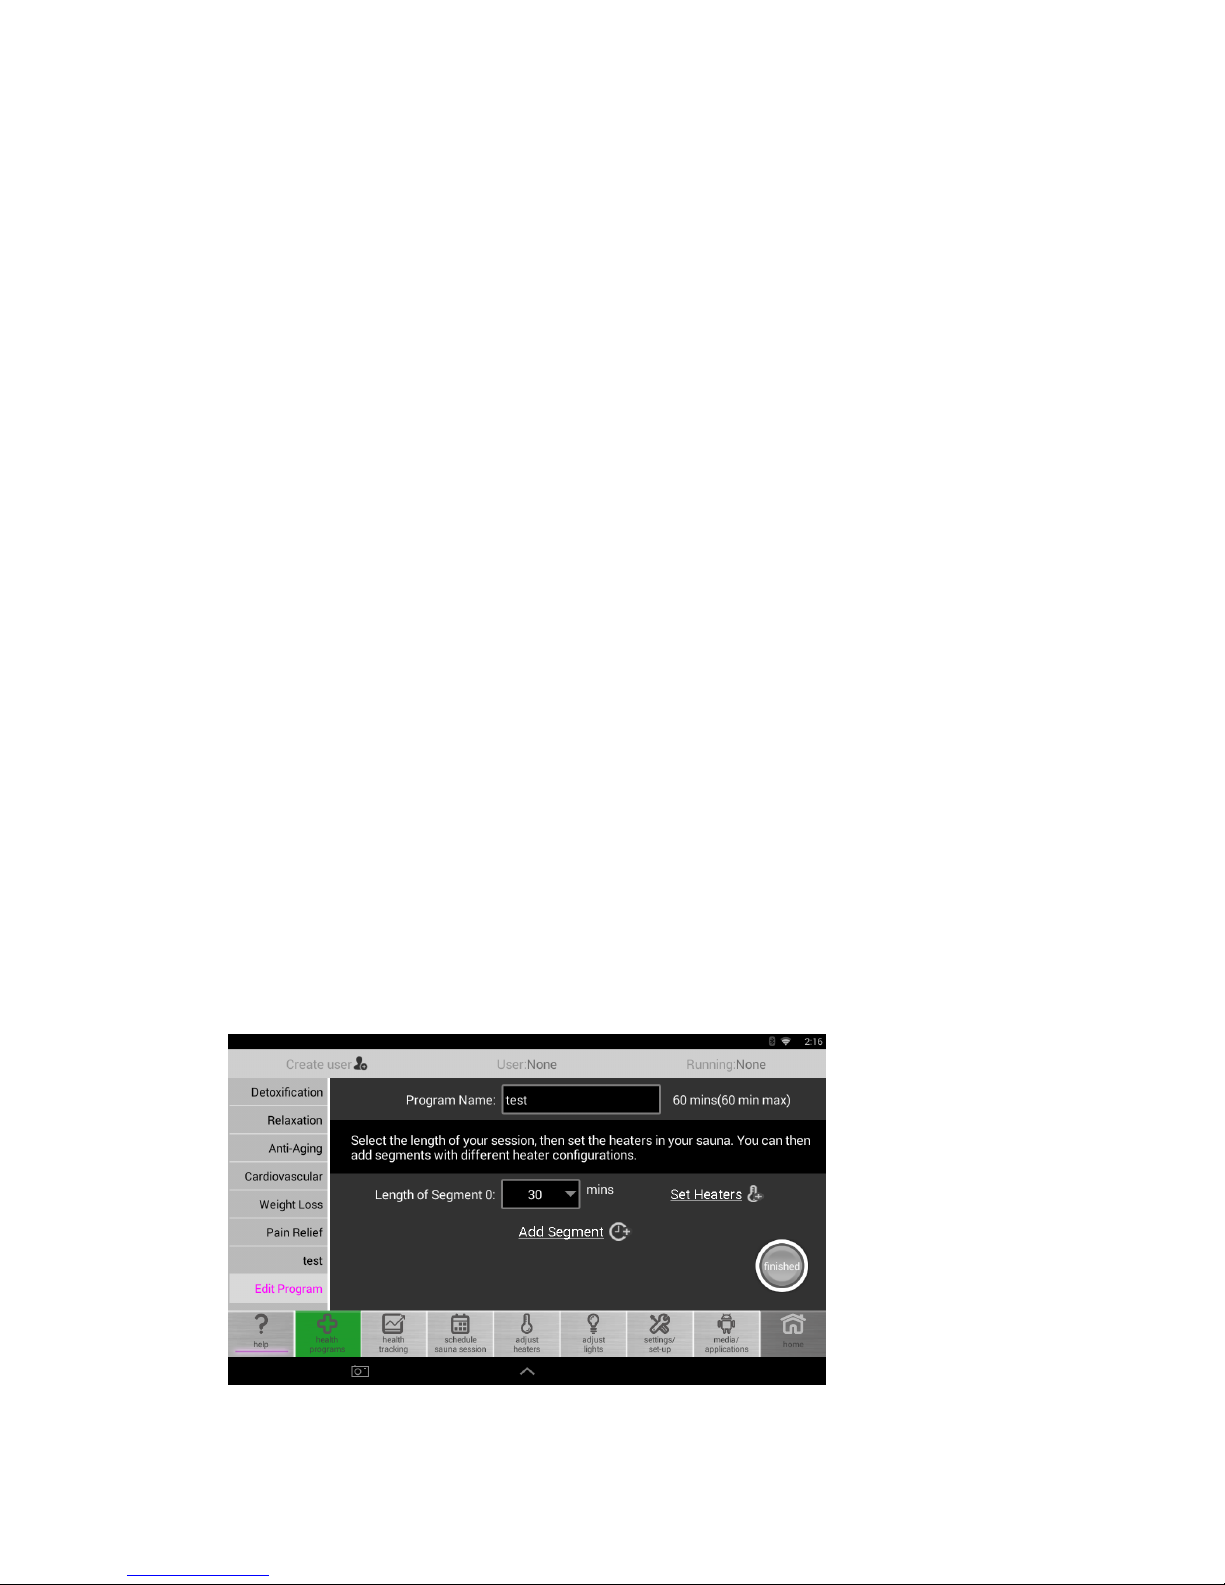
14. Create A Program
• Select Create Program
• Enter a name, duration and set heaters to desired output.
• Heaters can be set individually in segments adding up to 60 minutes
• The length of a segment indicates how long a heater setting will run
Edit or Delete a Custom Program: If you have one or more custom
programs, the Delete and Edit options will be available. Select Delete or
Edit, and a list of created programs will appear with corresponding delete
or edit buttons next to them.
Quick Infrared Guide for Customization:
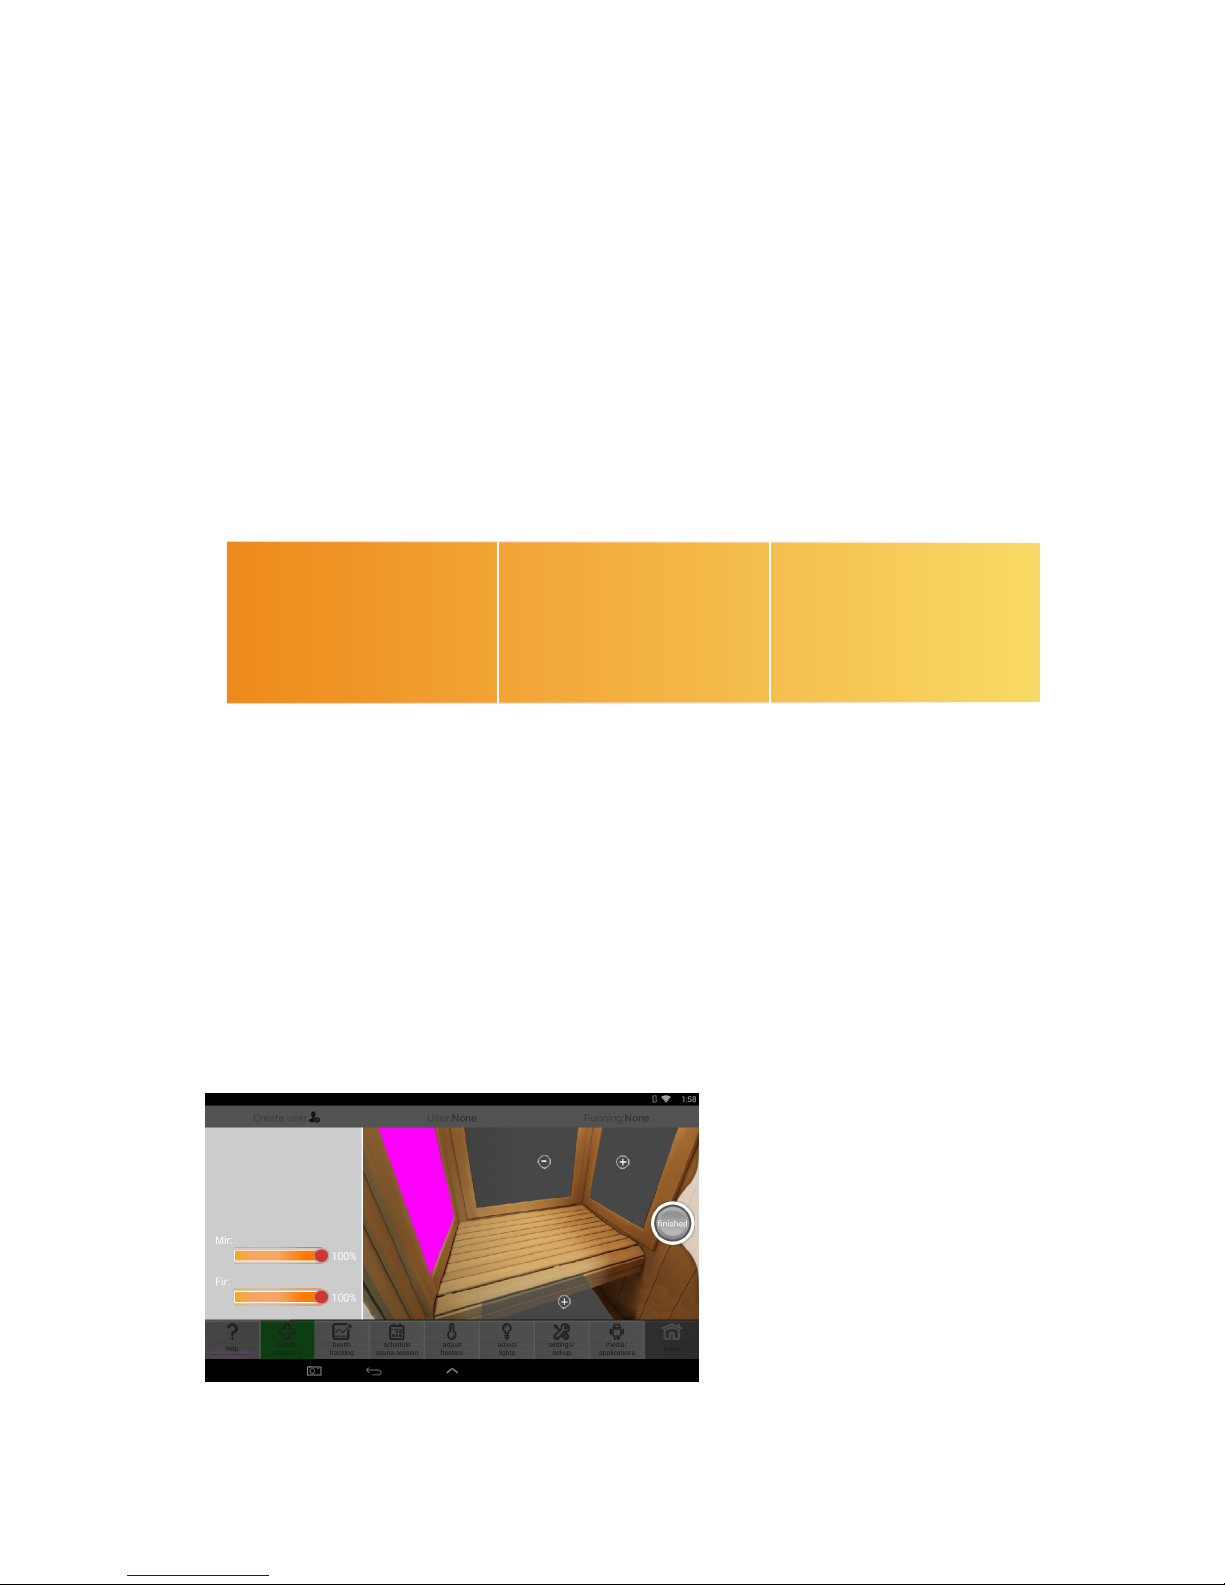
15. Adjust Heater Output
• Select Adjust Heaters tab
• Select the heater panel you wish to adjust (the panel being adjusted will be
pink to show which one is being adjusted)
• Press the +/- on the slider bars to adjust the level of Mid and Far infrared
emitted (oor heater is Far only)
• Press on/o to adjust Near infrared (not available on every heater panel)
• You can rotate the perspective in the sauna by swiping right or left
• When adjustments are complete, press “Finished” to save the settings
NOTE:
Adjusting the heaters during
a health program will stop
the program and switch to
a Custom Program with the
applied heater settings. You
will see the custom program
name in the top right corner.
Near Infrared
• Cell Health/Immunity
• Skin Purification
• Pain Relief
Far Infrared
• Weight Loss
• Detoxification
• Blood Pressure Reduction
Mid Infrared
• Pain Relief
• Improved Circulation
• Weight Loss
Page 14
14
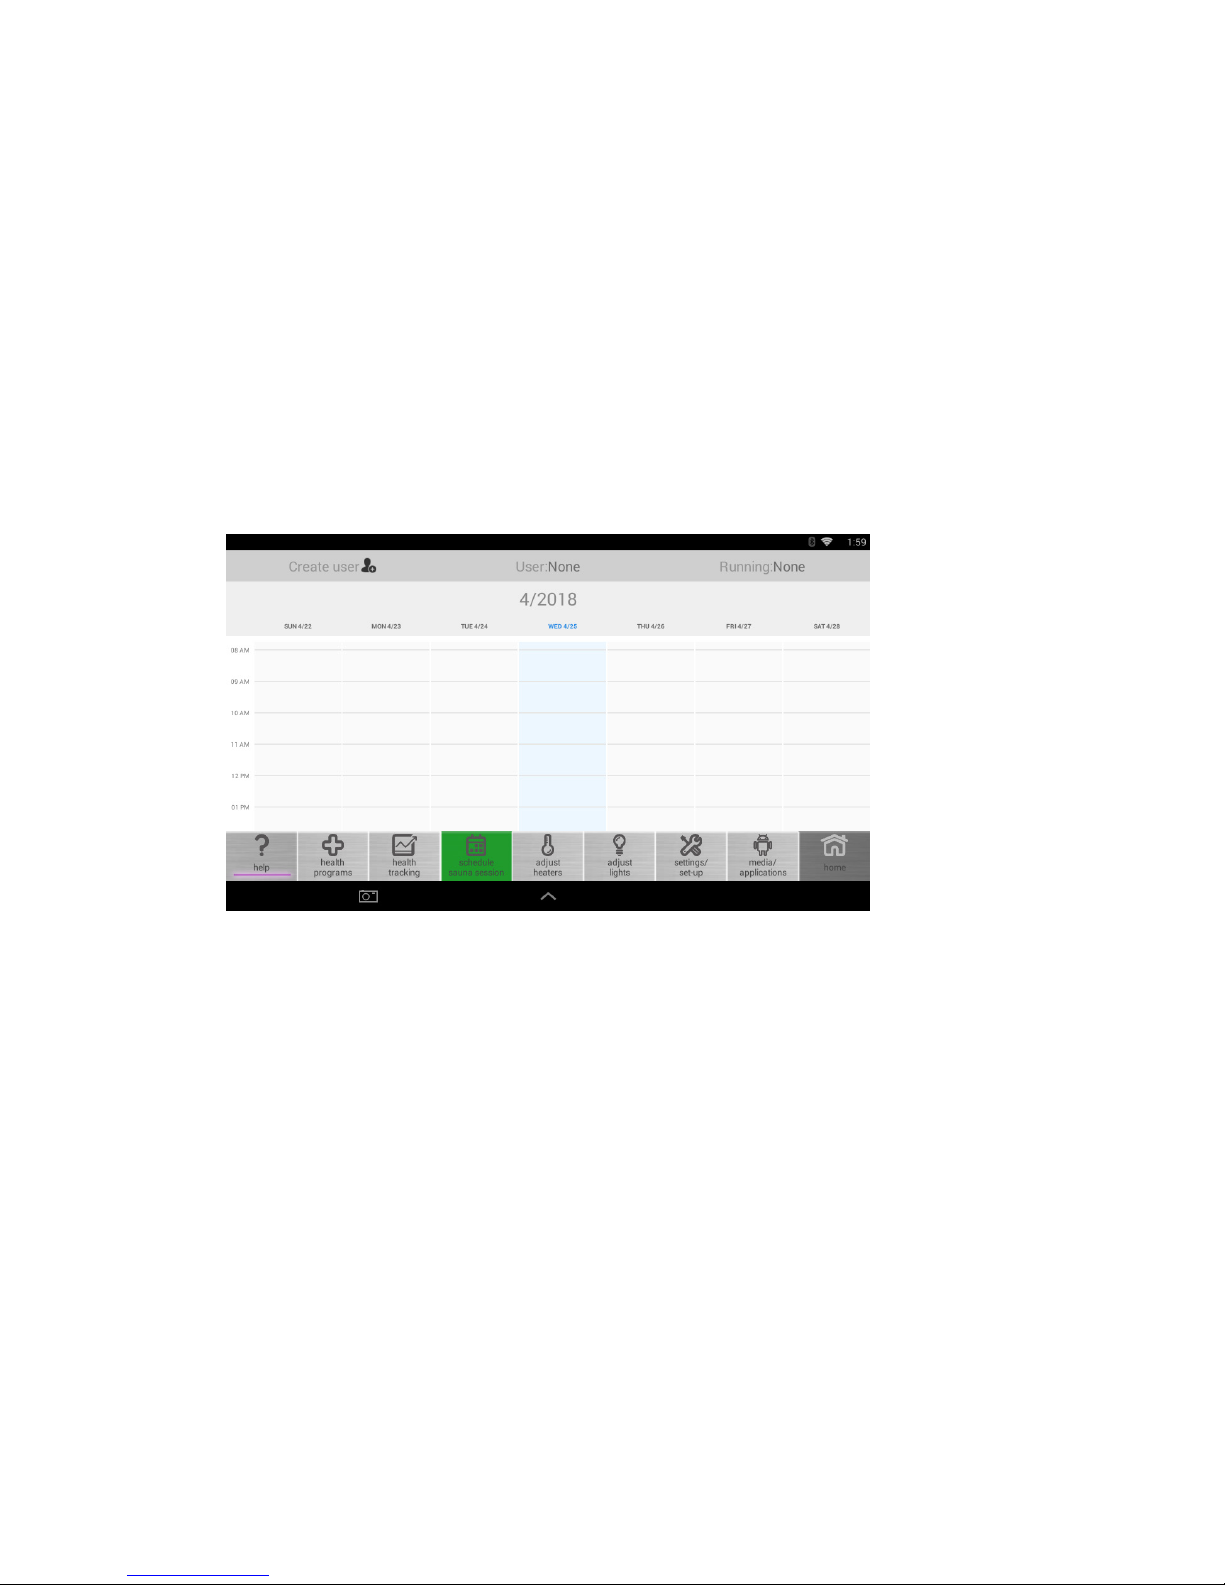
16. Schedule a Session
Use the Schedule feature to set a program to run automatically at a future time. The
Android panel can not be ‘Shutdown’ as the scheduler will not power on the tablet to
run a future program. Allow the screen to go in to low power mode, i.e., the screen is
blacked out but still has power to allow a future schedule to power on the tablet. Select
Health Program tab. Note: Date and time must be set for the schedule session to be
accurate.
• Select Schedule Sauna Session tab
• Select the time block on calendar screen
• On the next screen, select additional days for session to run
• Select program and duration
To edit a Sauna Schedule, select the scheduled session. Press and hold for 3
seconds for a prompt to modify schedule.
NOTE: Custom programs cannot be added in a sauna schedule.
Page 15
15
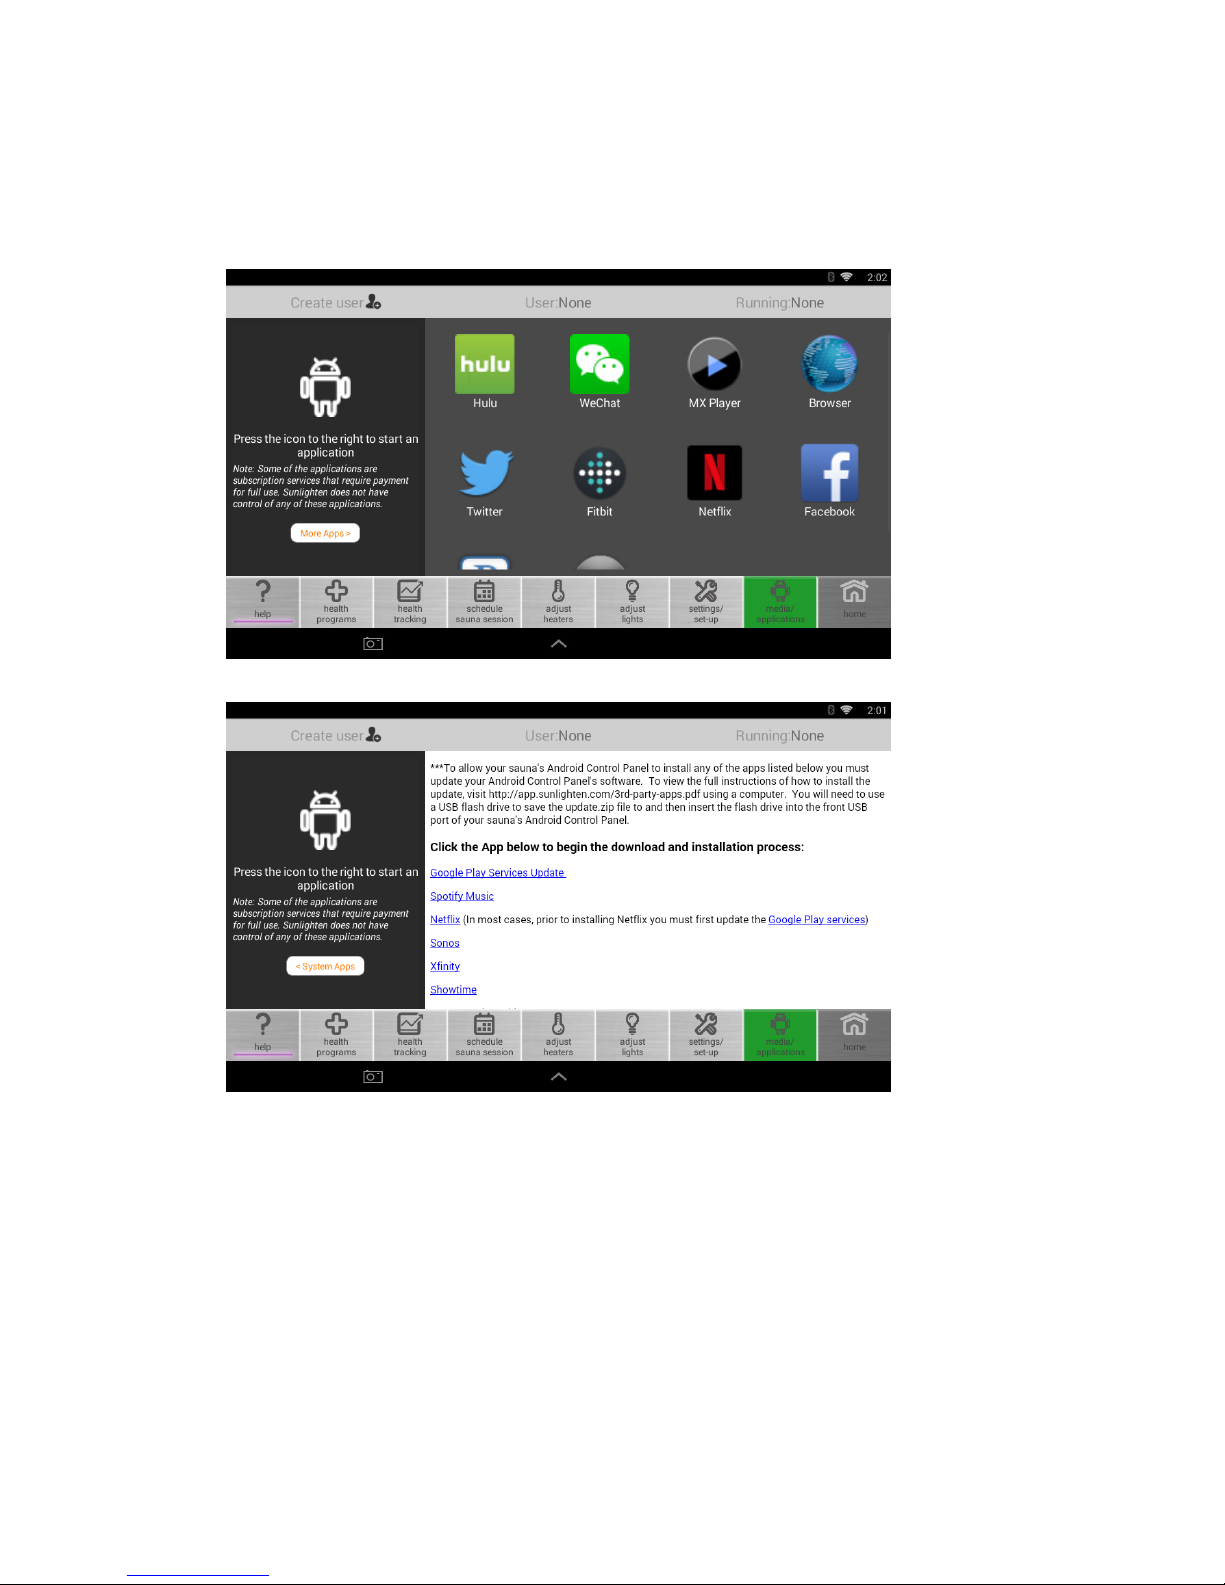
17. Media/Applications
Go to the Media/Applications tab to access Android apps.
1. The control panel must be set to Standard Mode to access this section.
2. The radio must be in “AUX” mode to have sound output from the running
application. Use the SRC on the stereo to set to R-Aux or Aux
3. With the latest Sunlighten App version on the ‘Settings and Setup Screen’
you will have the ability to download and install additional applications as
they are released for installation.
4. To keep the Sunlighten App running optimally, third-party apps not
included with software updates are not available at this time.
Page 16
16
18. How to Play a Movie from USB Flash Drive
Using the front USB port, plug in your USB ash drive and navigate to
Media/Applications button. Select MXPlayer from the list.
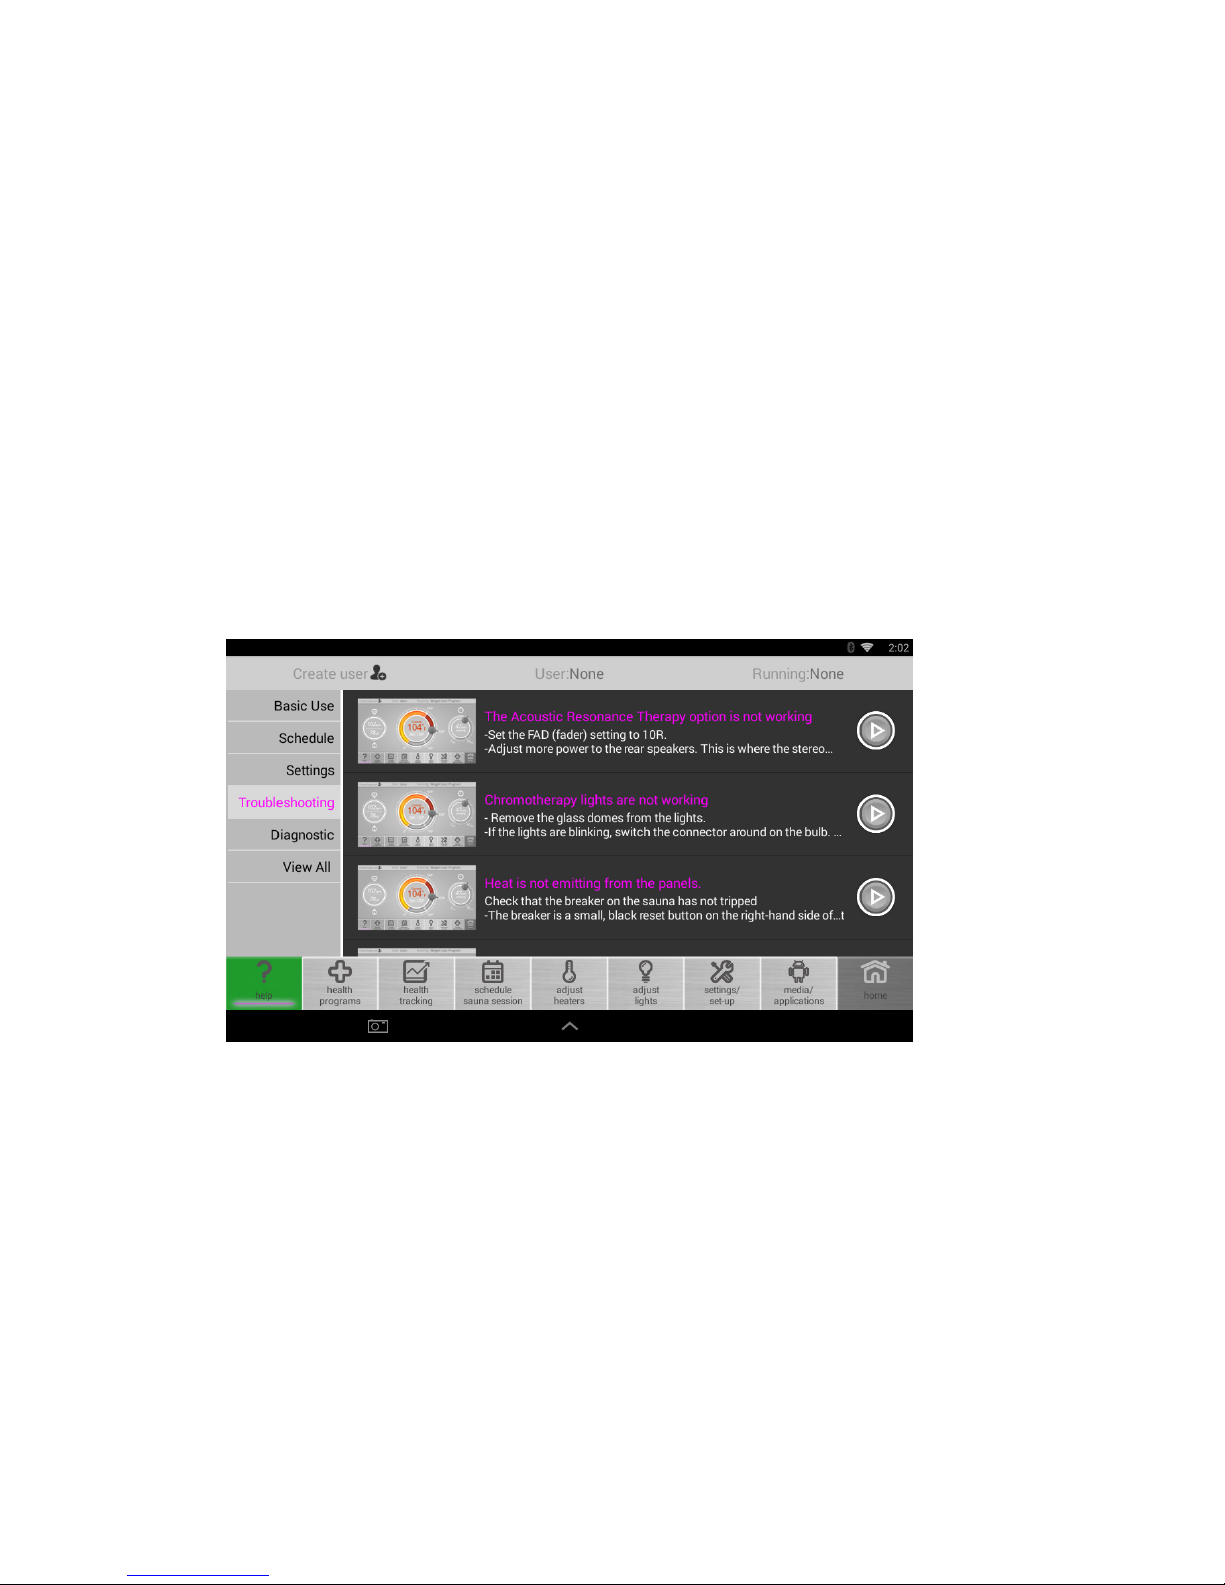
19. Help Menu
Visit this section for common FAQs for sauna use.
Note: Diagnostic Software will run quick - checks and will not stop. If an issue is
found it will produce an error message.
Page 17

17
WARM UP TIME &
USAGE GUIDELINES
Our saunas are based on the infrared wavelength and not cabin temperature. Set to the
desired temperature and allow the sauna to warm up for 45-60 minutes. The sauna heats up
at an average of 1 degree per minute . Follow these steps for proper warm up:
Step 1: Make sure your sauna is plugged into a dedicated circuit installed by your electrician.
Step 2: Set to the desired temperature and set time to 60 minutes.
Step 3: When turning sauna on for the rst time, ensure each heater is active after a
couple of minutes. If they are not, make sure connections are securely paired from their
initial wire feed coming from the power box under the bench.
Step 4: Never fully cover the oor grate and heater with any obstruction that will not
allow the heater to dissipate its heat.
NOTE: If your sauna is outside in an unheated garage, sun room, basement or patio, you
may require additional time to warm the sauna up depending upon the temperature of
the surrounding surface & room. REMEMBER, you are required to have an authorized
Sunlighten cover over your sauna if it is outside or exposed to the weather in order to
maintain your warranty.
TIPS FOR OPTIMAL USE
• Sauna requires a dedicated circuit and outlet for optimal performance. This
should be installed by a certied electrician before assembling.
• Use Sunlighten All Natural Cleaning Kit for periodic cleaning.
• If you have a floor heater, clean every 6 months for residential use, and every month for
commercial use. To clean, remove floor grate and vacuum out heater area.
Page 18

18
SAUNA PROTOCOL
Follow this quick guide for the optimal sauna experience.
PRE SAUNA SESSION
• Hydrate with at least 8 oz. of water to prepare your body for an increase in core
temperature.
• Pre-heat for approx. 45 minutes. Depending on room temperature, your sauna
will heat up a degree per minute.
• Use Bamboo Carbon Towels to absorb sweat during sessions.
SAUNA SESSIONS
• Begin your session when your sauna reaches 100°F.
• The optimal sauna experience occurs between 100° and 130°F.
• To get your body accustomed to infrared therapy, start with 10-15 minute
sessions at 100°F every other day.
• If comfortable with current settings, gradually increase towards 40 minute daily
sessions in the optimal temperature range.*
• Don’t be surprised if you don’t sweat during the rst few sessions.
• Sweating will increase with regular use, removing toxins and leaving you feeling
refreshed and rejuvenated.
• For added intensity, use Pure Sweat amplifying cream to increase sweating,
circulation and to boost results.
POST SAUNA SESSION
• Drink at least 24 oz. of water or electrolyte to rehydrate.
• Dry off with Bamboo Carbon Towel. Cool down naturally or with a refreshing shower.
• Every six months, clean wood and glass with our Natural Sauna Cleaning Kit.
Available at www.sunlighten.com/shop/
Page 19

19
FREQUENTLY ASKED QUESTIONS
ASSEMBLY
Can I assemble my sauna outdoors?
Yes, if you protect it with a Sunlighten canvas, sauna cover. If you place your sauna
outdoors without a Sunlighten cover, your warranty will be void. The sauna covers
are custom made and may not arrive until after you receive your sauna. Do not install
your sauna outdoors prior to receiving your cover. Doing so will void the warranty!
Check the sauna cover annually for normal wear and replace as needed. Sauna cover
manufacturer warranty is one year.
How much room is required around my sauna for setup & maintenance?
We recommend 4-12 inches of clearance around the back, sides and top of the sauna
to access plugs and for general maintenance. Leave at least 4 inches behind the unit
to allow the electronics to cool.
What surfaces can I set my sauna on?
You can set your sauna on tile, concrete, carpet, laminate or wood. Always have your
sauna feet installed. Remember to make sure that your sauna is level regardless of its
location for optimal use. If your sauna is placed outdoors, make sure there is adequate
drainage so that water cannot pool around the base of the sauna. If placed near or on
cool surfaces (like concrete and basement walls), warm-up can be impacted.
How do I install Chromotherapy and Acoustic Resonance Therapy?
Sauna accessories have separate user manuals. Refer to the appropriate manual:
http://www.sunlighten.com/customer-care/
How do I disassemble if I need to move the sauna?
Refer to assembly sheet and follow the steps in reverse.
USAGE
How long does it take for my sauna to warm up?
The controls are preset to 60 minutes at 158°F. However, the inside cabin temperature
is not intended to reach this. Our saunas are based on the infrared wavelength and not
cabin temperature. Allow the sauna to warm up for 45-60 minutes. The sauna heats
up at an average of 1 degree per minute. If located outside or in unheated garage,
additional warm-up time may be required. If you prefer the sauna hotter, let it warm
up longer.
(cont. on pg. 20)
Page 20

20
Can I use my sauna every day?
For most people, daily sauna use is okay after your body has become accustomed
to infrared therapy. Drink increased amounts of water to stay hydrated. Listen to your
body and stop your session if you feel any discomfort.
How long can I use it each day?
40 minutes is the recommended session length. See the sauna protocol on pg. 18.
What is the best temperature to use my sauna?
First, it is important to understand that health benets are a result of ecient infrared
emissivity, not air temperature. Sunlighten saunas are 95-99% emissive to deliver the
highest concentration of infrared. With that, the optimal sauna experience occurs
between 100-130°F. During your rst few sessions, start at a lower temperature of
100°F and gradually increase in later sessions. Everyone has dierent preferences and
tolerances for heat. The most important thing is to listen to your body. Keep in mind,
if you’re sweating at 115°F you’re getting the same benets as if sweating at 150°F.
What is the micron range of the heaters?
The design of a Solocarbon heater allows for most of the far infrared wavelength to be
near 9.4 microns, which is the level at which the human body absorbs infrared energy.
Can I touch the heaters?
No. The heaters will be hot, especially the mid-infrared section in the middle, so it is
not safe to touch heaters while on or recently on.
How much will the sauna cost to run a month?
The sauna runs on the same wattage as a blow dryer and will cost little to run monthly:
typically 15 to 35 cents per hour. This varies with the model and local utility cost. Your
utility company can help you understand a more exact per hour cost if needed.
Are the EMF levels safe?
Yes. Patented Solocarbon® panels are 100% quality controlled by Sunlighten to
ensure the safety and eectiveness of each individual heater.
What is the wattage, voltage, and amps of my sauna?
See electrical specications on page 4.
Why do you recommend using Bamboo Carbon towels?
Bamboo Carbon towels will make your sauna experience more comfortable and will
keep the sauna clean. Bamboo Carbon is anti-fungal and deodorizing, emits infrared
rays and is highly absorbent. Use on the bench, oor and backrests for optimum
comfort and cleanliness.
Bamboo Carbon towels can be purchased at www.sunlighten.com/shop.
Page 21

21
MAINTENANCE
How do I clean my sauna?
Sunlighten’s Natural Sauna Cleaner is made specically for use with your sauna. At least every
six months, dampen a cloth with Sunlighten All Natural Wood Cleaner. Clean glass door and
windows with Sunlighten All Natural Glass Cleaner. You may dust the outside of the sauna
with a dry dust cloth. Do not use chemical cleaners on your sauna. Light sandpaper can be
used to treat stains on the inside of the sauna. Sunlighten Natural Sauna Cleaning Kit can be
purchased at sunlighten.com/shop.
How do I care for the heater fabric?
The heater fabric remains as a covering over the heater panels. This is to protect the
heater surfaces from any scratches, etc. It is also there to prevent physical contact
between the skin and the heaters as the sauna is being used. To clean, wipe fabric with
slightly damp cloth. We recommend doing so at least once every six months. Only do
so when sauna is turned o.
Is it normal to see cracks in the wood?
Yes, wood is a living material that continues to respond to climate conditions, even
after being manufactured into a sauna. During normal operation, wood may crack
slightly due to changes in moisture level. These cracks may appear or disappear with
the changing seasons, but will not aect the structural integrity of the sauna. Our
saunas are shipped around the globe, and can experience slight blemishes, scratches,
or scus from the transit of this sauna. In most cases these blemishes on the exterior
of the room can be concealed by using a small amount of furniture polish, oil, or other
furniture treatment. The interior blemishes, scratches, or scus can be either left alone,
sanded, or combination of gluing and sanding. Please avoid any treatment containing,
benzene, or a high concentration of alcohol. However, if you detect major cracking
or damage that jeopardizes the functionality of your sauna, please submit pictures to
www.sunlighten.com/customer-care.
Page 22

22
ISSUE SOLUTION
An electrical component
is not working after
assembling
Check all connections - see pg. 11. A newly assembled unit with a nonfunctioning electrical component (control panel, heater panels, lights,
speakers) will most likely have a missed or loose connection.
Sauna does not power
ON
First, be sure to hold the Power button for 10 seconds to turn on. Confirm
that the voltage & amperage coming from the outlet is correct for your
model (see pg. 4). Check that the outlet is on a dedicated circuit. Once
voltage is verified at the outlet, check the voltage at these three points:
1. Exterior power cord before the receptacle in the base. If there is no
voltage the exterior power cord needs to be replaced.
2. If the exterior power cord is getting voltage check the voltage going
to the receptacle (to check, unscrew the 2 screws holding the receptacle
to the base. If there is no voltage reading at the receptacle, then the
receptacle needs to be replaced.
3. If voltage is going to the receptacle, check the voltage at the interior
power cord going to the power control box (PCB). If voltage is still reading
there the issue is most likely a faulty PCB. If there is no voltage reading at
the interior power cord, the interior power cord needs to be replaced.
Slow warmup time Ensure each wall panel is heating and that you have the CORRECT
electrical specs on a DEDICATED CIRCUIT - see pg 4. Check that the
temperature and time is turned all the way up. If those are correct:
1. Check if the breaker switch is tripped on the back right corner of the
(PCB). If the breaker is tripped, simply press the breaker switch button back
in to fix this issue. If the breaker switch keeps tripping, then replace the
breaker switch for the PCB.
2. Check for heat output from all heaters in the unit.
3. Verify wall & heater connections.
Heat is not coming from
all walls
Check that all connections are made at the base and corresponding panel
- see pg. 11.
Feedback from speakers
(high-pitched buzz) when
using sound from media
apps
The control panel is connected to the speakers through the stereo. If the
stereo volume is turned up past 25, it will cause a high-pitched interference through the speakers. Turn stereo volume down to 25 or lower. Adjust volume through the media app on the control panel.
Check wiring and separate within walls - make sure there is space between
wires to avoid feedback.
A.R.T. doesn’t work The Fader setting (front/back balance) must be adjusted in the stereo.
TROUBLESHOOTING GUIDE
For other troubleshooting questions, please contact customer care at 913.754.0831 x7.
Page 23

23
DIAGNOSTIC RESULT CODES
Error No. Cause/Solution
E1 The Control Panel cannot communicate with the Power Control Box. After
unplugging your sauna, remake the connection of the computer cable
(RS232) at the bottom of your front wall and the left side of the power
box. If the issue persists you can check the connection at the back of the
control panel.
E2 The serial number you entered during sauna setup does not match the
power control box that came with your sauna. Please go to Settings to
re-enter your serial number.
The first two characters will start with:
P1 (Aspire), P2 (Believe), P3 (Conquer), P4 (Discover), P6 (Empower)
The third character will start with:
B (Basswood), C (Cedar), E (Eucalyptus)
If you do not remember the last four numbers, type in 1234.
E3 The sauna you purchased is designed to use 120 or 240 volts of electricity.
The voltage you have supplied is too low or too high. Double check your
circuit to ensure that all parts installed are correct. This error encourages
optimal performance and protects the sauna from damage.
E6 One of the heater control units that provide your dynamic function is not
responding. These are located in the power box, which will need to be
replaced.
E7 Your lighting control unit is not responding. The primary cause of this issue
is a loose connection to your lighting control box. Check the flat 4 wire
connector that is between your main power control box and the lighting
control box.
ERROR CODES &
DIAGNOSTICS
Page 24

24
WARRANTY
US / CANADA
Residential:
Limited lifetime (7 years) on cabinetry and heaters; 3 years on controls; 1 year on stereo.*
Commercial:
5 years on cabinetry and heaters; 1 year on controls, bench, oor, backrest and stereo.*
*Limited Lifetime Warranty covers normal use for the lifetime of the product which is
defined as 7 years. Warranty is limited to replacement parts only and does not include
costs for crating of glass door or freight for parts shipped past 90 days from the date of
receipt of goods. The cost of labor and/or service technicians is not included.
Sunlighten warrants the sauna to be free of defects in material and workmanship.
This warranty extends only to the original retail or wholesale purchaser of the sauna and
terminated upon transfer of ownership. The sauna must be purchased and used within
one year of the manufactured date. Freight charges to and from the customer are the
responsibility of the customer. This includes freight charges for parts shipped to enable
the services of the sauna.
This warranty is void if the sauna has been altered, misused, abused or exposed to
water. Such instances shall include operation or maintenance of the sauna in deviation
to the published instructions, including operating on a non-dedicated circuit. The
warranty extends only to the manufacturing defects and does not cover the damages
resulting from mishandling of the product by the owner.
Sunlighten Corp. shall not be liable for the loss of use of the sauna or other incidental
or consequential damages. Under no circumstances shall Sunlighten Corp. or any of its
representatives be held liable for injury to any persons or damages to any properties.
Specifications are subject to change without notice.
ATTENTION:
Shipping damage must be notated on the Bill of Lading (BOL). Sunlighten must be
notified of any damage to your sauna within three (3) business days of signing the BOL.
Failure to notify Sunlighten within the established time frame will result in the owner
taking full responsibility for cost of ALL REPLACEMENT PARTS including shipping and
handling fees.
Page 25

25
The ETL Listed Mark is proof of product compliance (electrical,
gas and other safety standards) to North American safety
standards. Authorities Having Jurisdiction (AHJ’s) in 50 states
and Canada and retailers accept the ETL Listed Mark as proof
of product safety.
ETL SAFETY CERTIFIED
Page 26

26
Page 27

27
Page 28

version 09042018
US / CAN
7373 W. 107th St. | Overland Park, KS 66212
913.754.0831 | sunlighten.com
international [email protected] or contact your
local Sunlighten representative
 Loading...