

Page 1

TABLE OF CONTENTS
1
SAFETY FIRST
Notice on safety driving………………………………………… 3
Safety driving regulations.…………………………………….… 3
Protective suits...……………………………………….……………3
Modification………………………………………………...…… 3
Loads and accessory………………………………………...…... 3
SCOOTER
Front view of Scooter……………...…………………...…… 4
Left side view of Scooter………….…………………...…… 4
Right side view of Scooter……….…………………...…..… 4
Locations for the Code Numbers…….…………….……...…..… 5
CONTROLS AND INDICATORS
Using this manual……………………….…………………...…..… 6
Ignition switch……………………….………………….…...…..… 6
Key…………………….………………….……………….…..… 6
Meter….………………….………………….…………….…..… 6
Left handle………………….………………….…………….…..… 6
Right handle…..……………….………………….………….…..… 7
Cap of fuel tank....…………….………………….………….…..… 7
Kick start pedal….....………….………………….………….…..… 7
Rear footrest.…….....………….………………….………….…..… 8
Helmet hook..……....………….………………….………….…..… 8
Front luggage carrier.………….………………….………….…..… 8
Luggage cabinet...…………………………………..……………….8
Rear carrier rack..…………………………………..……………….8
OPERATIONS
Parking the motorcycle…….………………….………….…..… 8
Notice on use gasoline and engine oil…………….………….…..…8
Run in period of new motorcycle….…..………….………….…..…9
Inspection before driving….………………….………….…..… 10
Driving tips……………..….………………….………….…..… 10
Starting the engine.……..….………………….………….…..… 10
Starting to drive on..…………………………….………….…..… 11
Driving on a slope....…………………………….………….…..… 11
Braking and Parking.…..……………………….………….…..… 11
MAINTENANCE
Maintenance Chart..……….…………………….………….…..… 12
Engine oil dipstick.……….…………………….………….…..… 13
Oil replacement…...……….…………………….………….…..… 13
Gear oil replacement………....………………….………….…..… 14
Carburetor………...……….…………………….………….…..… 14
Throttle cable adjustment…....………………….………….…..… 14
Idle speed adjustment.…….…………………….………….…..… 14
Spark plug.……………..….…………………….………….…..… 15
Air cleaner..…..……………………………………………………15
How to clean the core of air cleaner….……………….……….…..15
Brake system……………………...….……………….……….…..16
Drain out the air from brake system…..…………….. .……….…..16
Replace brake pads………………..…..…………….. .……….…..17
Tires……..………………………...….……………….……….…..17
Tire pressure.……………………...….……………….……….…..17
Page 2

TABLE OF CONTENTS
2
Tread..…..…………………….…...….……………….……….…..17
Battery…..………………………...….……………….……….…...17
Fuse……..………………………...….……………….……….…..18
Lights…..………………………...….……………….……….…..18
Bulbs...…..………………………...….……………….……….…..18
Rear view mirror………………...….……………….……….…..18
Storage…..………………………...….……………….……….…..18
Recovery after storage.…………...….……………….……….…..18
Tools set……………....…………...….……………….……….…..19
TROUBLESHOOTING
General…..………………………...….……………….……….…..19
Engine.…..………………………...….……………….……….…..19
Vibration...………………………...….……………….……….…..20
Lubrication system………………...….……………….……….…..20
Electrical system...………………...….……………….……….…..20
Transmission.……………………...….……………….……….…..20
Brakes……...……………………...….……………….……….…..21
TECHNICAL SPECIFICATION
……………………...….……………….……….…..22
Page 3
SAFETY FIRST
Notice on safety driving
Safety must be seriously considered when driving a scooter. Do not
drive until you have fully understood the safety requirements and
have made a thorough inspection to the scooter.
Safety driving regulations
1. Inspection to the scooter must be made before driving in order to
prevent any accident or any damage to the components.
3
2. A driver must take a comprehensive test and obtain a driving
license from the traffic authority before he drives a scooter. Don’t
drive without a license, and never lend the scooter to anyone without
a driving license.
3. In order to avoid possible hurt from other vehicles, a driver should
wear bright and visible clothing. Strictly abide by the traffic rules and
never contend with other drivers.
4. Keep a distance from other motor vehicles. Don't dash in another
lane. Don't drive at a speed beyond that for the road condition there
and the speed limit.
5. Switch on the turning signal lights to attract attention when making
a turning or changing the lane. Special care should be taken when
driving through crosses, or the entry/exit of a parking lot, or on the
express lane. In a rainy day when the floor is slippery, care should be
taken and drive at reduced speed.
6. Driving with both hands applied to the handles and both feet to the
footrests. A passenger should catch the holders of rack tightly and
keep both of his feet on the footrests.
Protective suits
For the sake of safety, a driver must wear protective items like helmet,
gloves and mask or glasses, and the passenger must wear a helmet too.
The clothing should be sheath instead of loose to avoid its being
caught by the handlebars, kick-starter, footrests or the wheels. The
exhaust system turns hot when running, the driver and passenger
should wear trousers and shoes/boots that cover and protect their legs
and feet. Don't touch the hot exhaust pipe.
Modification
Warning: You must observe the vehicle regulations stipulated by
the state and local authorities, never privately modify or
disassembly the original scooter in order to avoid any accident.
Loads and accessory
Follow the skill as below is good for you load:
1. The total weight of rider, passenger and all of luggage should not
be over the maximum load of scooter: 175kg. The load of luggage
cabinet under seat should not be over 10kg, and the load of luggage
carrier should not be over 5 kg.
2. Should not carry some luggage that can block off taillight. Make
the size of luggage low, and let them close to the size of scooter. It is
not good for control if the far from size of scooter. The mass of
luggage should be distributed averagely of scooter double side, if not,
can break the stability of scooter.
3. Properly adjust the tire pressure according to the weight of loaded
goods and the driving conditions.
4. Luggage shall be firmly fixed to the vehicle a nd checke d re gularly.
Warning: When the scooter is in conditions of over loads, the
stability, natural ability and security of scooter will be affected. All
articles loaded cannot be extruding out of luggage rac k.
Page 4
SCOOTER
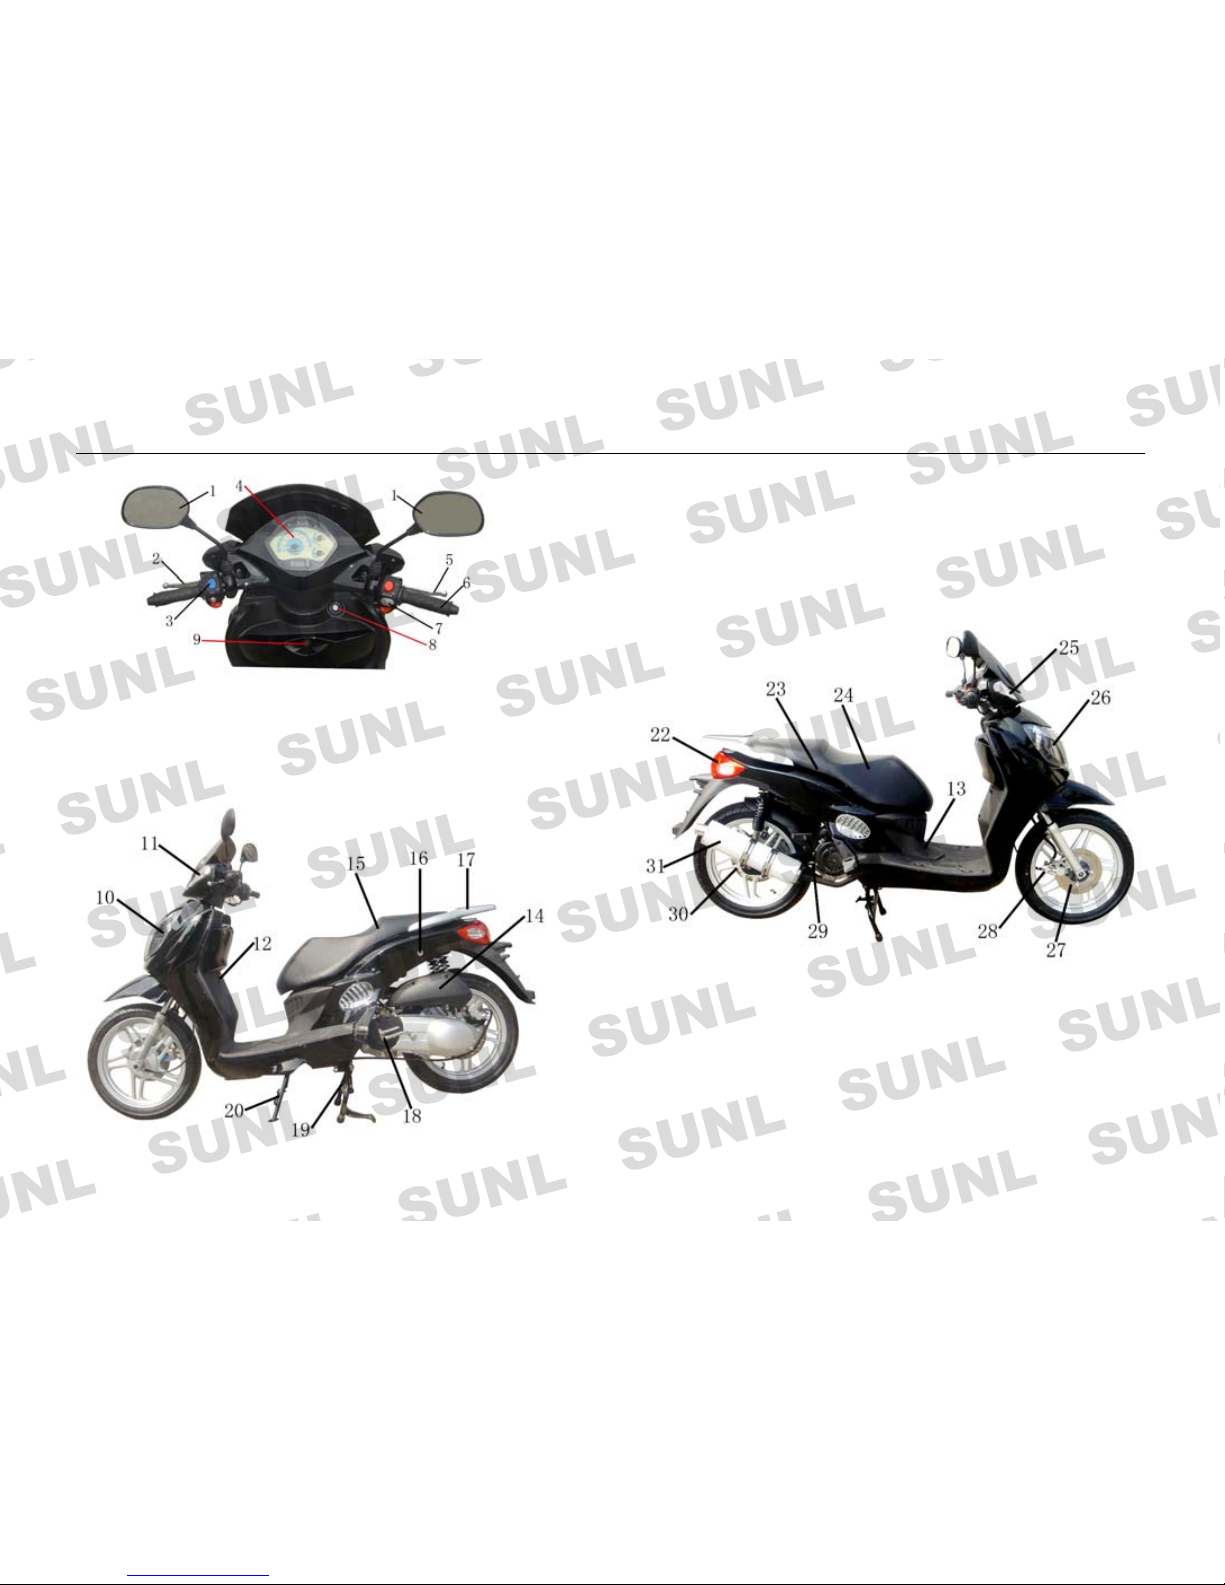
Front view
10 Headlight 14 Air filter 18 Kick-start pedal
11 Front turning light 15 Seat 19 Main stand
12 Helmet hook 16 Seat lock 20 Side stand
13 Battery 17 Rear carrier rack
Right side view
4
Left side view
1 Rear view mirror 4 Meter 7 Switch of left handle
2 Rear brake lever 5 Front brake lever 8 Ignition switch
3 Switch of left handle 6 Throttle control 9 Front luggage carrier
21 Exhaust Muffler 26 Position light
22 Taillight/Rear turning light 27 Front disc. brake
23 Cap of fuel tank 28 ABS
24 Luggage cabinet 29 Oil dipstick
25 Front turning light 30 Rear disc. brake
Page 5
SCOOTER
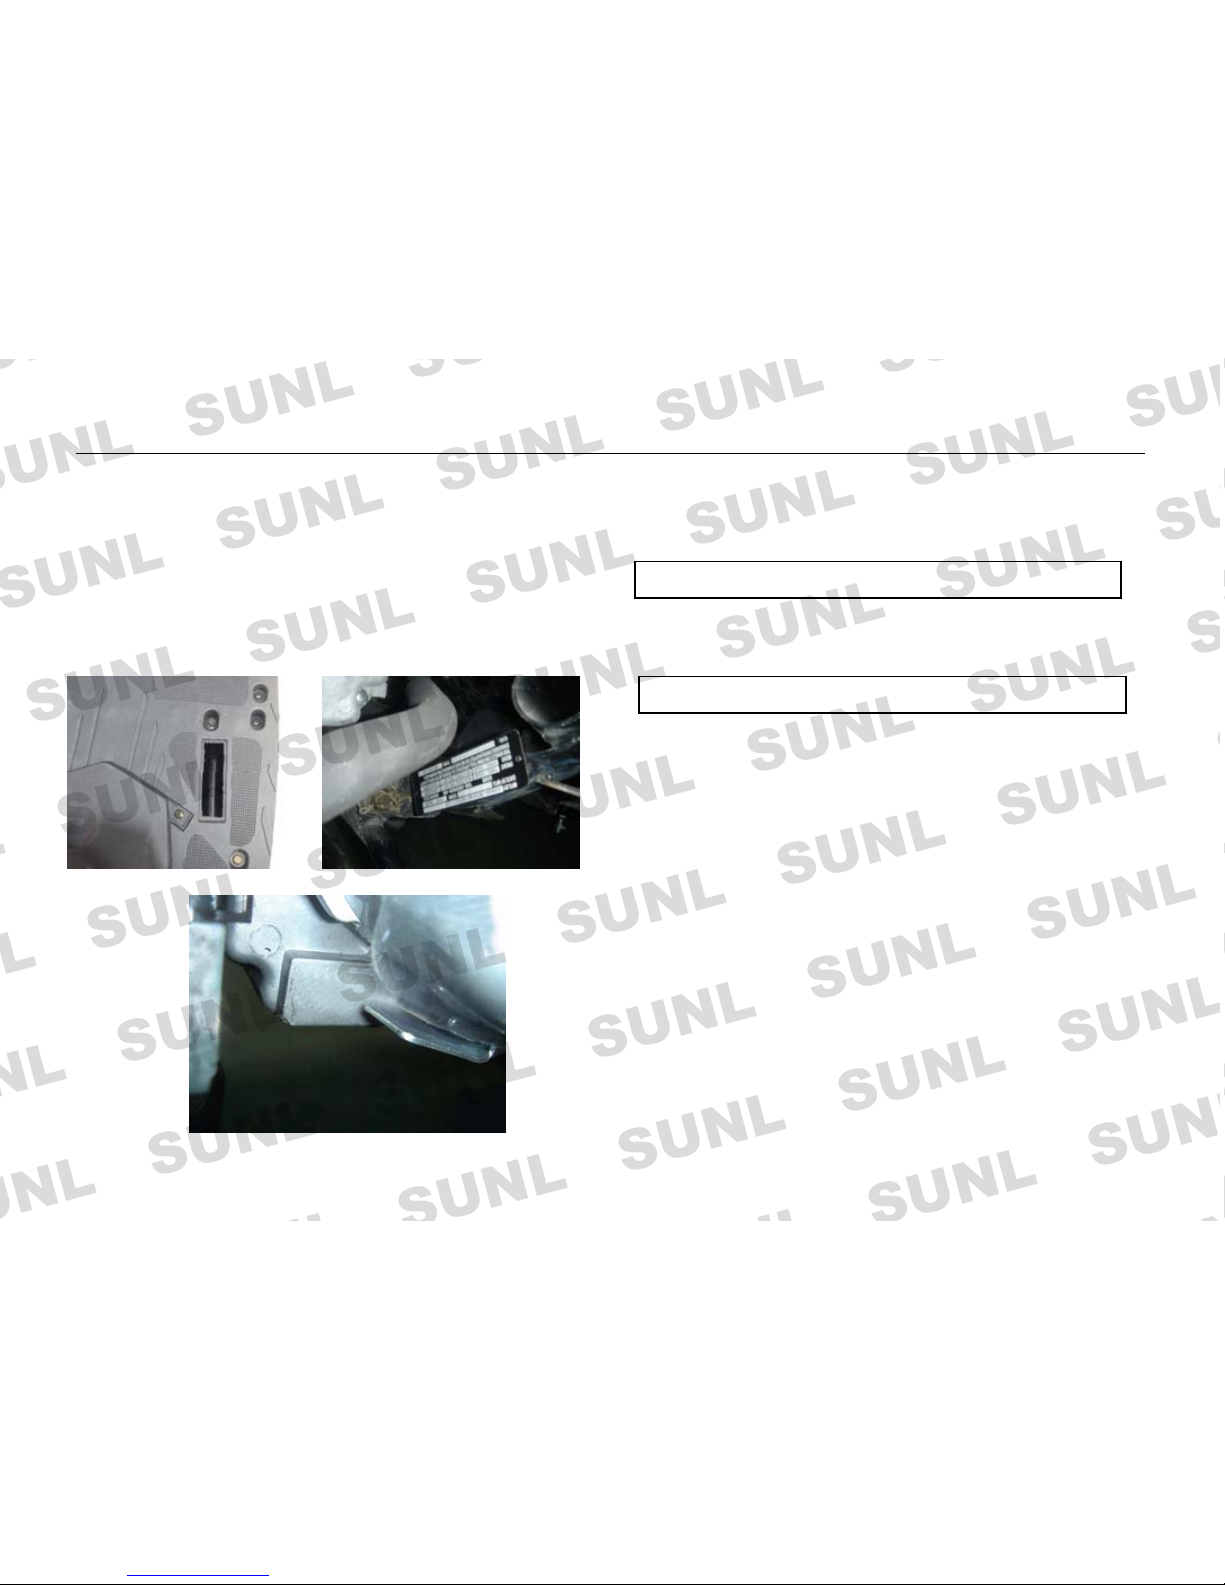
Locations for the Code Numbers Please write down the numbers in the following boxes for future
reference. The frame number and engine number are prepared for scooter
registration. Also these numbers will he lp the dealers of our company to
give you a better service when your scooter needs repairing or when it
is entrusted to them for a special service.
Frame number:
5
The frame number is pressed on the front frame under chassis number
cover, the engine number is pressed on the left side of the crankcase,
and the statutory inscription plate is installed on the lower right side of
frame.
Engine number:
Page 6
CONTROLS AND INDICATORS
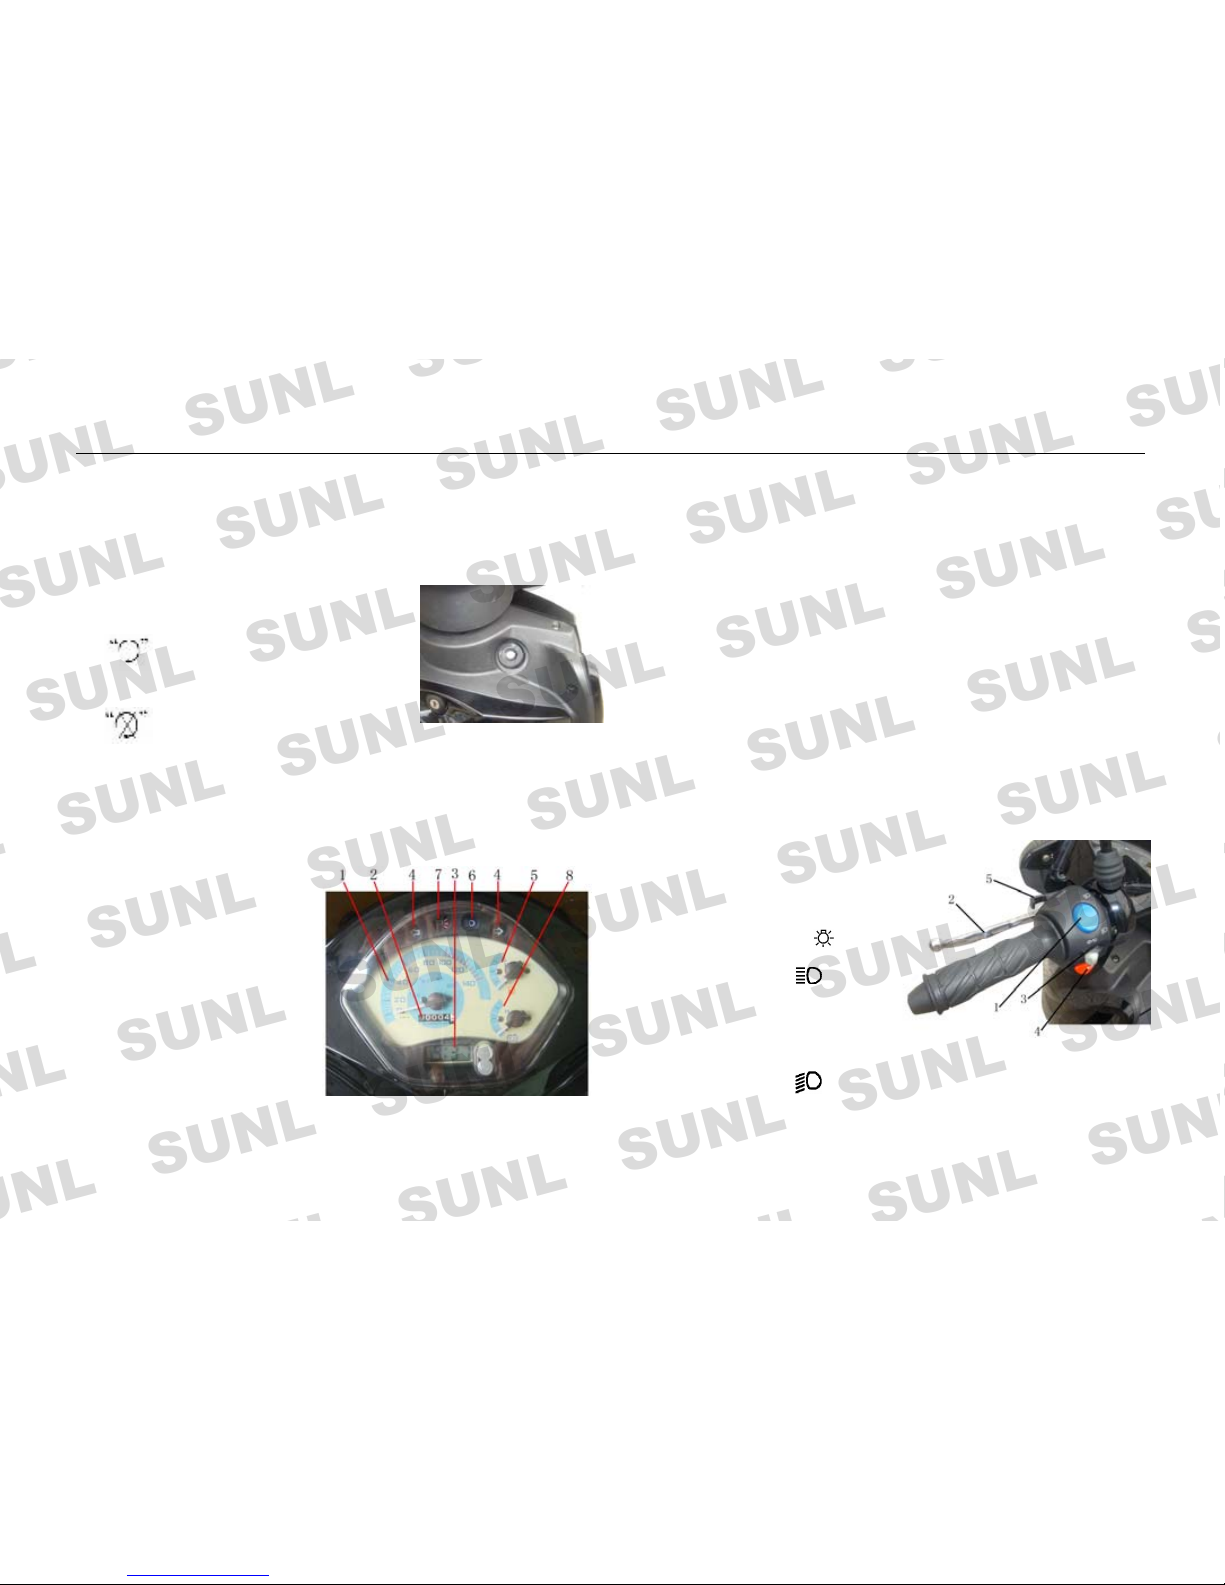
Turning indicator (4)
Using this manual
When the turning switch is on, turning indicator and turning light will
flash at the same time. Left one is for turning left indicator and right
one is for turning right indicator.
This document covers the 2006 151RS scooter. Unless otherwise noted,
illustrations and descriptions are functionally representative of the RS
model.
Fuel gauge (5)
Fuel gauge indicates how much petrol in the fuel tank. When the
indicator is in “F”, the fuel tank is full. When the needle goes to the red
area, the balance of gasoline is less than 1.5L and should go to the gas
station soon. This gauge activates only when the ignition switc h is on.
Ignition switch
There are three position of ignition switch
position: Circuit is turn on, and
engine can be started, key cannot
The high beam indicator ( 6)
be moved.
This indicator will be on when high beam of the headlight is used.
position: Circuit is turn off, and
brake indicator light (7)
engine cannot work, key can be moved out.
when the brake is used, the indicator light will shine
“LOCK” position: Lock the s teering stem, steering stem had been
voltage indictor she et(8)
turned to left, key can be move d out.
indicating the valtage of battery, when the clock point at red line, it
means that the voltage are not enough,and the battery should be
charged.
Key
There are two keys with s cooter, keep one of them carefully for false
key
Left handle
Dimmer switch of headlight “1”
Meter
When the head light switch on
Speedometer (1)
the right handlebar is at
Speedometer indicate the speed
position, turn dimmer switch to
of scooter, unit is km/h and mp/h.
position of high beam ,
Odometer (2)
the high beam of headlight will
Odometer notes the all distance
be turned on, at the same time
of this scooter after used.
the indicator on the meter will be turned on too; turn dimmer switch to
position of low beam , the low beam of the headlight will be turned
on.
electric clock (3)
two push-bottons on the upper,
adjusting hours and minutes respectively.
6
Page 7
CONTROLS AND INDICATORS
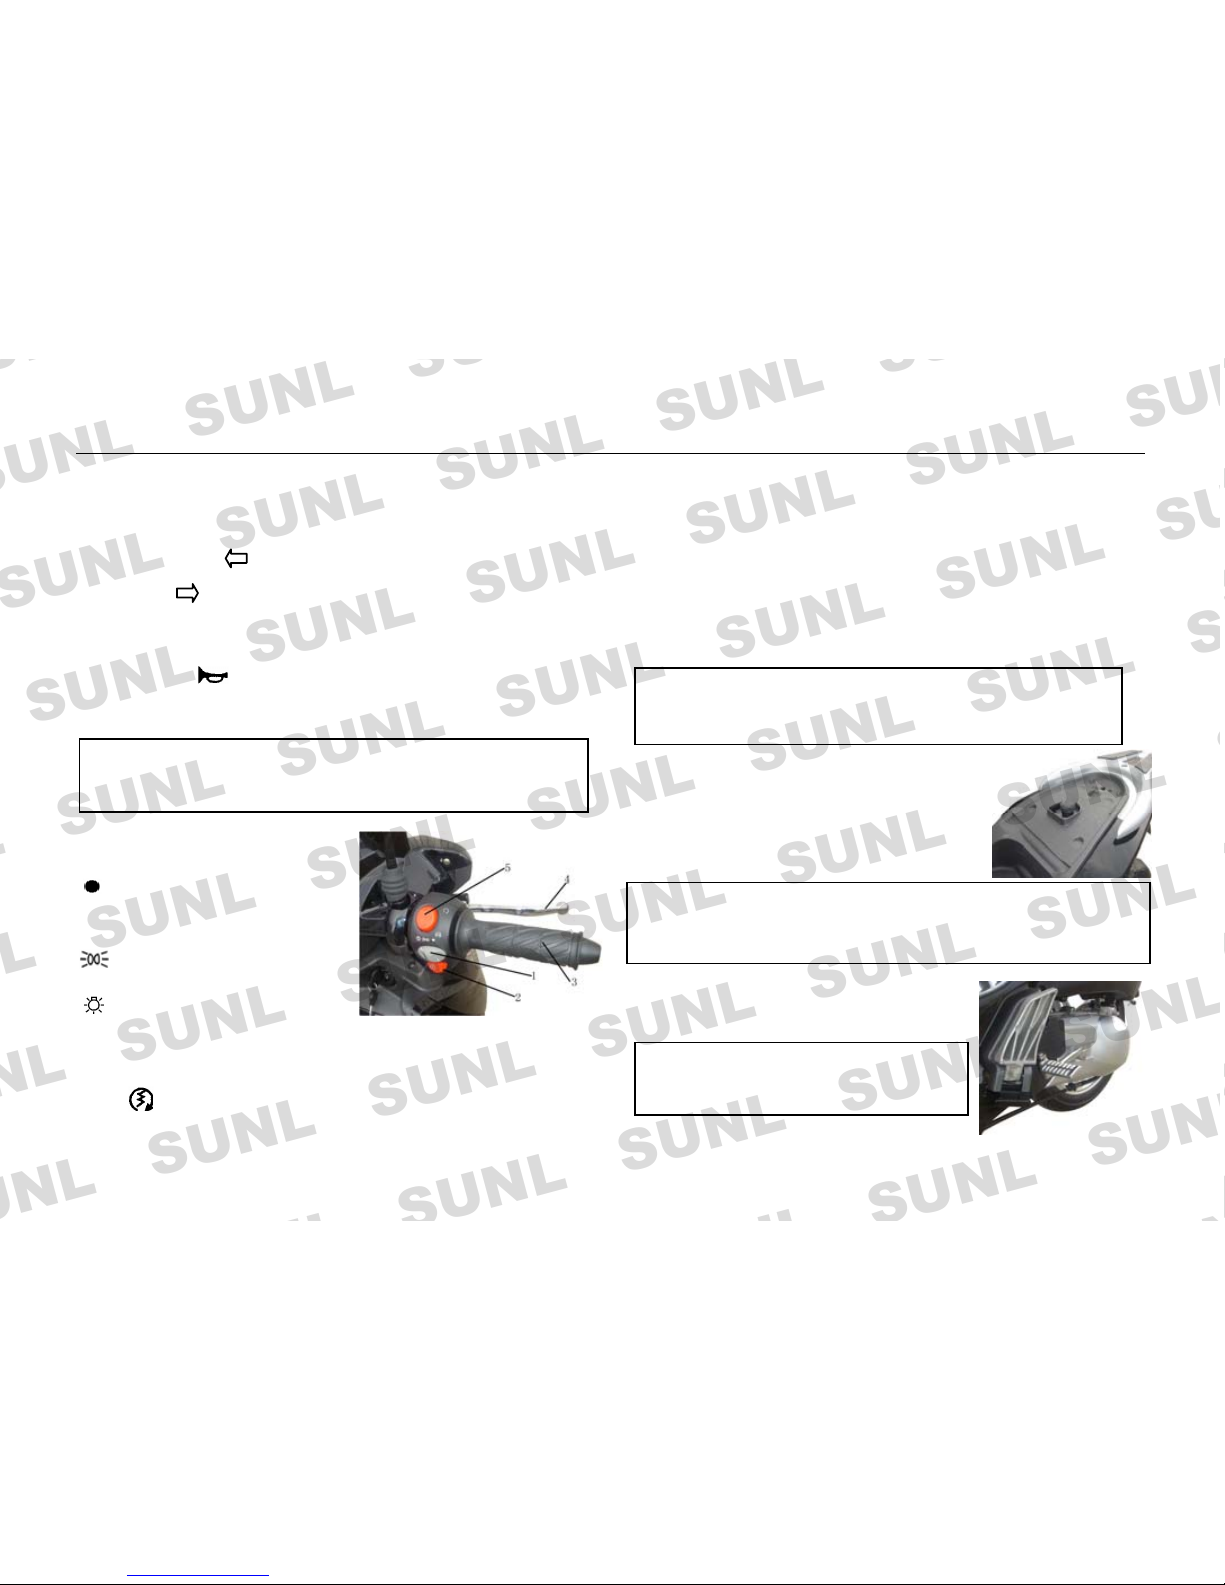
Lever of rear brake “2” Throttle controlle r “3”
When brake by the rear wheel brake, pull the lever to handle side
slowly, and the taillight will be turned on automatically.
Throttle controller can control the speed of scooter. Turn the throttle
control grip counterclockwise for acceleration; turn the throttle control
grip clockwise for deceleration. Switch of turn signal light “3”
Lever of front brake “4” Push the switch to left position, left turn signal light wink; push
the switch to ri ght position, right turn signal light wink. Press the
turn signal canceller button, which will turn off the turn signal light
from wink.
When brake by the front wheel brake, pull the lever to handle side
slowly, and the taillight will be turned on automatically.
Kill switch“5”
Horn button “4” It can be used to stop engine when the engine be running
7
Push the button , horn will hoot.
overtake switch “5”
when the scooters are overtaking or meeting ,please use this switch
Right handle
Switch of light “1”
Position: Headlight and rear
light turn off, for ride in
daytime.
Position: Position light, m eter
light and taillight turn on.
Position: Headlight, meter
light and rear light turn on, for ride in night.
Button of engine start “2”
When starting the engine, hold the lever of rear brake and push this
button in three seconds, the engine will be started.
Notice: When using th e electrical start button , it should not push
the button over 5 seconds once. When starting failed, please check
fuel support and starting circuit system.
Warning: When you change the driveway or turn, please turn on the
turn signal ligh t on time; after chan ge driveway or tur n, please turn
off the turn signal light on time.
Cap of fuel tank
The cap of fuel tank is under the se at. When open
the cap, turn clockwise and pull the cap up.
When close the cap, push the cap down and turn
counterclockwise until listen the lock sound.
Kick start pedal
There is a kick-start pedal on the le ft side of
the scooter . Start engine with this pedal by kick.
Warning: ●To avoid the danger, don't ov er fill the fuel and don't
let gasoline splash on the hot engine,.●To avoid fire during filling,
put the ignition switch to the "OFF" position, a nd turn the engine off.
Note: After start engine, you should check
the pedal has been back to the normal
p
osition or not.
Page 8
CONTROLS AND INDICATORS OPERATIONS
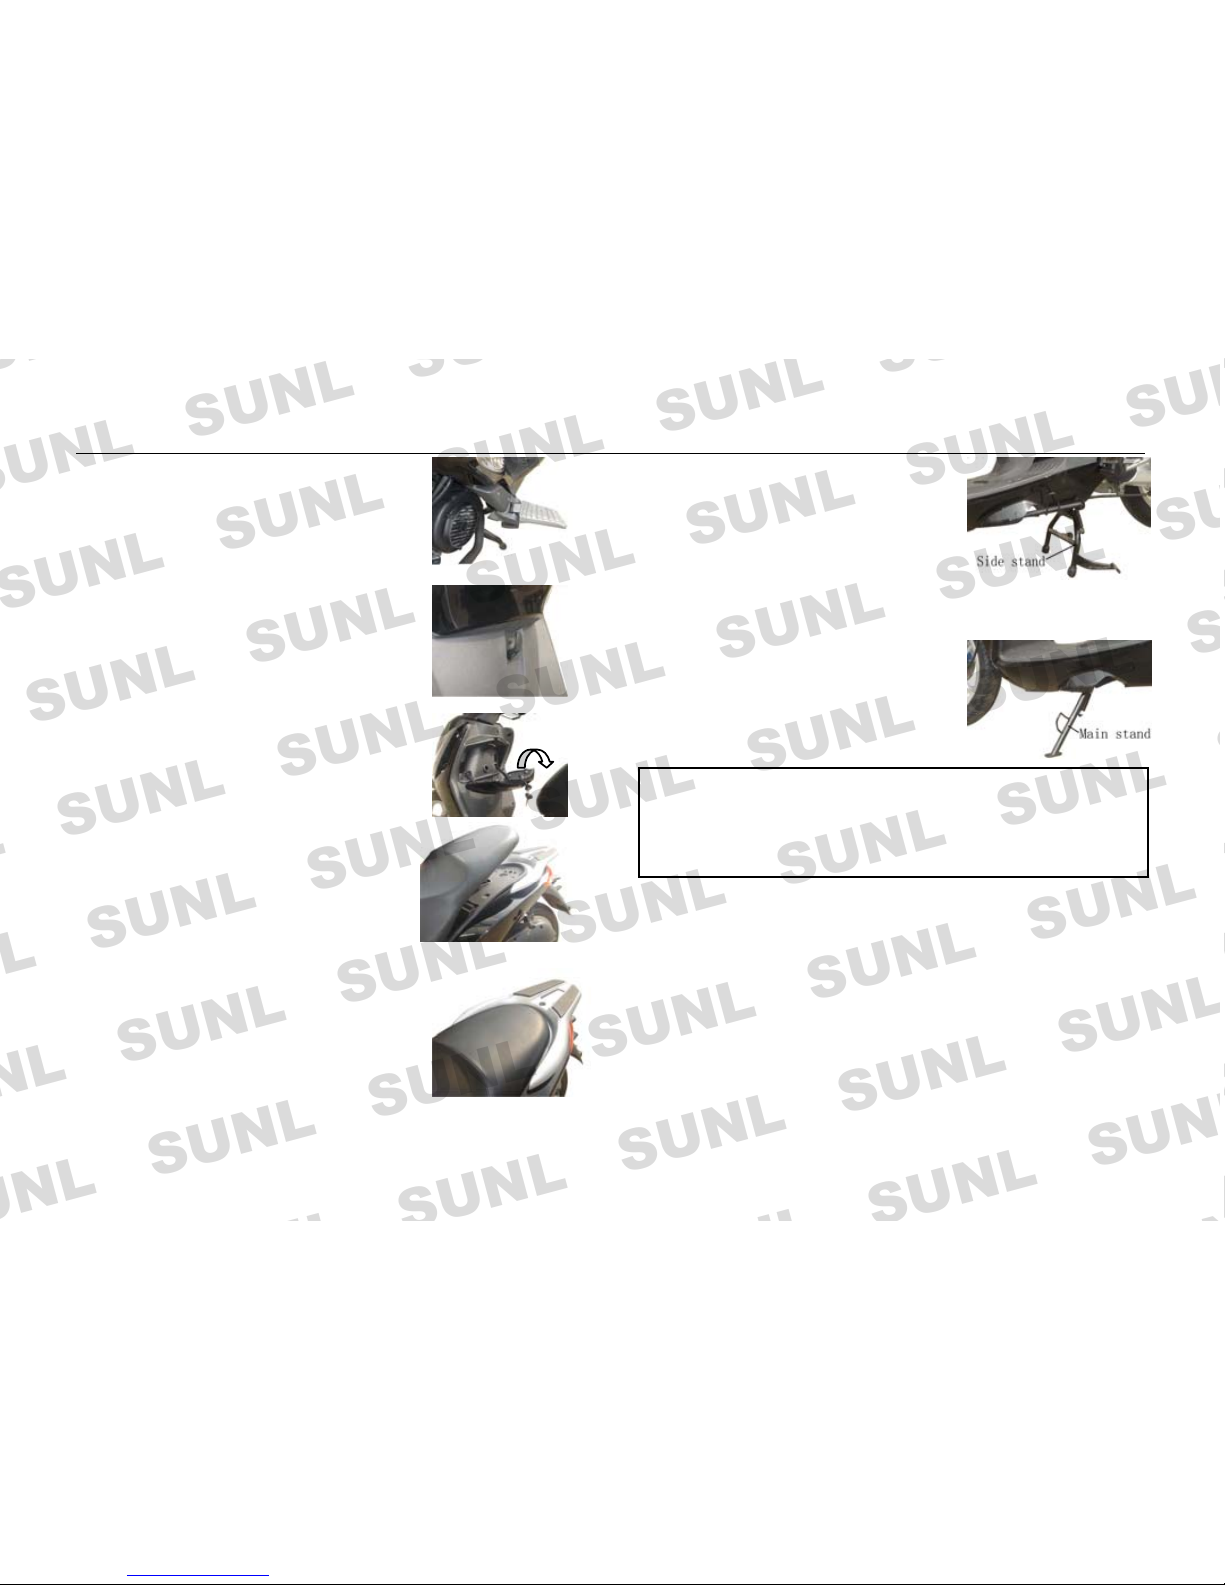
Rear footrest Parking the scooter
8
Both feet of passenger must be put on the rear This scooter can be parked with ma in stand or
footrests in the both sides of scooter. side stand.
When you use main stand parking the scooter,
Helmet hook use your foot step on the pedal of m ain stand,
Turn counterclockwise the hook, and hang put your left hand on the left handlebar, and
the helmet belt on the hook. your right hand to hold the handle under seat, pull the scooter backward
and upper, the n can parking with the main stand.
Front luggage carrier When you use side stand parking the scooter,
Tools and small luggage can be put in the front just step on the pedal of side stand, le t side
luggage carrier, which should not be over 1.5kg stand turn to the end unto the posit ion limit,
Turn key by c lockwise and pull the cover of front put the scooter slightly to the right side
luggage carrier, which can be opened. and to be sure the side stand touch the ground.
Luggage cabinet
Turn key by clockwise and pull up on the sea t ,
The luggage cabinet can be opened. Helmet,
luggage can be loaded inside. Since the cabinet
is close to engine, don’t put luggage that is easy
effected by heating, and should not be over
10.0kg. Push the seat down with some force
until you hear lock sound to close the luggage cabinet. Always check
the seat is fully locked by pulling up on the seat.
Rear carrier rack
Luggage can be loaded on rack. Keep luggage
not extrude out of luggage rac k, and should not be
over 3.0kg
Note: ●When you parking the scooter on the slope, should let the
head of scooter to the upper side of slope.
●Before start the eng ine, please check the side s tand back to the
normal position and no looseness happened.
Notice on use gasoline and engine oil
Gasoline
Better to use the lead free gasoline. The octane number of gasoline
should be over 90. If the engine got some sound like knocking, the
reason maybe is using unqualified RQ level fuel, should change it.
Using the lead free gasoline is good for the spark plug.
Engine oil
0.9L engine oil should be taken. Please use the engine oil special for
4-stroke (4T). Choose the SE level and SD level that sort by API.
Page 9
OPERATIONS
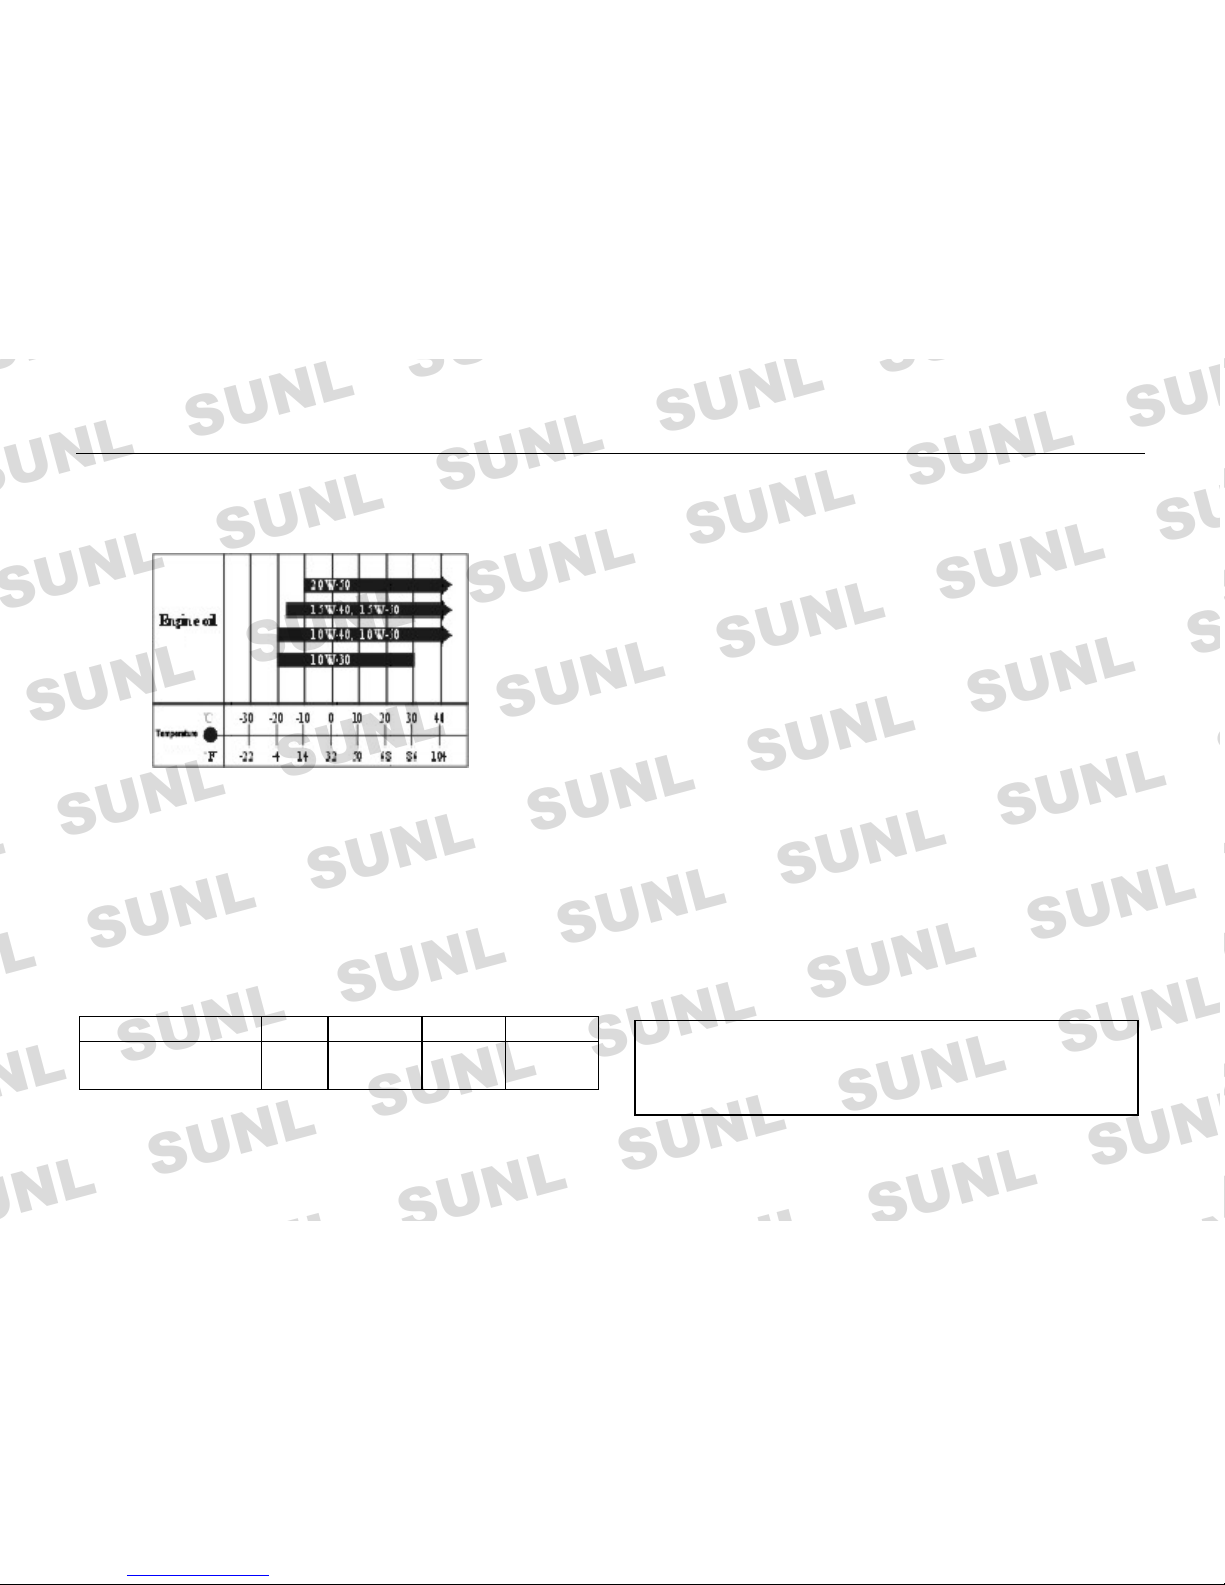
Change of rotate speed of engine Engine oil number: SAE10W-40 or SAE15W-40 is recommended, and
SAE10W-30 should be used if the temperature is below 5°C. If that
kind engine oil is not easy to be found, please choose the substitute
follow the parameter as below shows:
The rotate speed of the engine should be changed frequently, and not to
remain at one speed. This is good to the run in pe riod of new one: to get
average pressure for the components and cool them when pressure
reducing. By varying the speed frequently, put some applicable burthen
to each component and make them combined with each other. But don't
put too much burthen.
Avoid low rotate speed
The components will only be smooth because of whetting during low
rotate speed of engine. One should change different speed up the engine
within the maximum rotate speed. But within the first 1500Km for a
new scooter, don't rotate the throttle to maximum position, and don’t
rotate the throttle suddenly.
Cycle the engine oil before driving
Gear oil After started the engine in hot or cool situation, don't drive immediately,
let the engine has enough time for idle speed and let the engine oil
reach to each important part of the component inside the engine.
Please use SAE80W90 gear oil.
Run in period of new scooter First maintenance
A perfect run in period of a new scooter is very important to extend the
life of the scooter and exert perfect perfo rmance. The following is the
correct method during running in period of new one:
The maintenance within the first 1000Km is the most important job for
a scooter. After run in period of new one, all the engine parts and other
parts are combined well with each other. Then one should adjust well
the components, fasten the screw and change the used engine oil. Well
execution of the maintenance within the first 1000Km guarantees a
longer life and a better performance of the scooter .
Maximum rotate speed
Maximum rotate speed of the engine during the run in period of new
one should be as following:
9
Run in distance (Km) 0-150 151-300 301-800 801-1500
Speed of scooter
(Km/h)
30 40 50 60
The maximum speed should not be over 80km/h in the first 3000Km .
Note: The maintenance within the first 1000Km should be
executed accordingly to the checking and maintaining chapter,
and one should pay special attention to the words: "Warning" &
"
"
Page 10
OPERATIONS
Inspection before driving Driving tips
Inspection to the following items must be done before driving. One
should never neglect these inspections.
10
Items to be
inspected
Purpose of inspection
Steering handle
Check to ensure that is smooth;
Check to ensure that is flexible;
Check to ensure that is not shaky and loose.
Brakes
Check to ensure a pro per resistan ce for both
front and rear braking levers;
Check to ensure that there isn’t a ‘spongy’
feeling;
Check to ensure that there isn't any slippage.
Tires
Check to ensure that air pressure is proper;
Check to ensure that the tire tread is prope r;
Check to ensure if there are cracks or cuts
Fuel volume
Check to ensure that there is enough fuel for
the planned distance.
Lights
Check all lights, including headlight, meter
light, taillight, braking light, license plate
light, turning signal lights and position light.
Indicating
lights
Check turning indicating light, high beam
light and mobile indicating light.
Horn and
brake switch
Check to ensure that work properly.
Engine oil Check to ensure that the oil level is norma l.
Fuel throttle
Check to ensure a proper play for the
throttle cable and throttle grip;
Check to ensure the turning up is free and
the turning back down can be abruptl y back
down.
W
arning: If this is your first time to drive this type of scooter,
you are suggested to be practice in a safe and non-crowded field
until you are fully familiar with control and operation of this
motorcycle. One-hand driving is extremely dangerous. Keep
both hands firmly on the handlebars and both feet on the
footrests. Under no circumstance should both hands be removed
from the handlebars.
W
arning: Don’t reduce the speed when you are making a
cornering. Slow down to a safe speed before cornering.
When the road surface is wet or slippery, you must reduce
speed. Obey the speed limit and traffic regulations.
Starting the engine
Insert the key into the ignition switch and turn it clockwise to
position .
1. Electric-start
Fully pull in the brake lever, and press down the start button , the
engine will be started.
Notes: Release the start button immediately after starting is
successful, otherwise harm is done to the engine.
If the engine cannot be started after pressing the start button for 5
seconds, you should postpone it for 10 seconds before try it once
again.
If the engine can not be started even after pressing the start button 2
or 3 times, please turn the throttle grip up by 1/8 to 1/4 circle while
try it once again.
Don't keep the starting motor working constantly, which causes
battery power consumed too much and harm is done to the starting
motor.
Page 11

OPERATIONS
Driving on a slope 2.Start the e ngine by the kick-start pedal
When battery is low or start the engine in the first time, please start the
engine by the kick-start pedal.
1. When climbing a steep slope, the scooter may slow down as a result
of insufficient power. In this case, you should turn throttle grip toward
yourself to increase fuel for the forwarding power. (a) Turn the ignition switch to .
(b) Press down the kick-start pedal by your foot with force. 2. When driving down a steep slope, you may use the resistance by pull
the brake levers. Be carefully, use both brake levers at the same time.
11
W
arning: Never start the engine in a room that is of poor
ventilation or no ventilation at all. Never let the engine run
when there is no one taking care of it.
Braking and Parking
1. Turn the throttle grip away from yourself to close the throttle
completely.
Caution: Do not let the engine run at idle alone too long time if
you don't drive it away. Idling alone too long time is liable to
make the engine overheated and damage internal engine
components.
2. Simultaneously apply the front and rear brakes evenly.
3. Before stopping, take your braking distance carefully. It takes two
times of braking distance in the rainy or snow weather.
4. Turn ignition key to position to shut the engine down, and turn the
handlebar left, also push and turn ignition key to “LOCK” position to
lock the steering stem for safety. Remove the ignition key from the
switch.
Starting to drive on
Turn the throttle grip toward yourself and release the brake lever
gradually at the same time, then the scooter will start moving forward.
The speed can be adjusted by rotating the right handle grip (throttle
grip), which can be accelerated by turning the throttle grip toward
yourself slowly and can be decelerated by returning the throttle grip
clockwise quickly.
Warning: The fast the speed, the longer the braking distance. Be
sure you have sufficient braking distance from the vehicle or object
ahead of you so that you can stop the scooter safely.
Inexperienced drivers tend to use the rear brake only. This will
quicken the wear of brake devices and increase the braking distance.
Before you start to drive on, please give the starting signal by turning
signal light wink and be sure safety to drive on.
Using only the front or the rear brake is dangerous. It is liable to
result in a skidding and loss of control. Applying the brakes gently
and with great care when driving on a wet or slippery road. Abrupt
braking on a slippery or uneven road is extremely dangerous. It is
likely to result in loss of control of the scooter.
Caution: You should never increase the speed to one that is
indicated by the red zone in the tachometer that pu t yourself in
risk. Don’t rotating the throttle grip suddenly that will causes the
scooter jump suddenly.
Page 12
MAINTENANCE
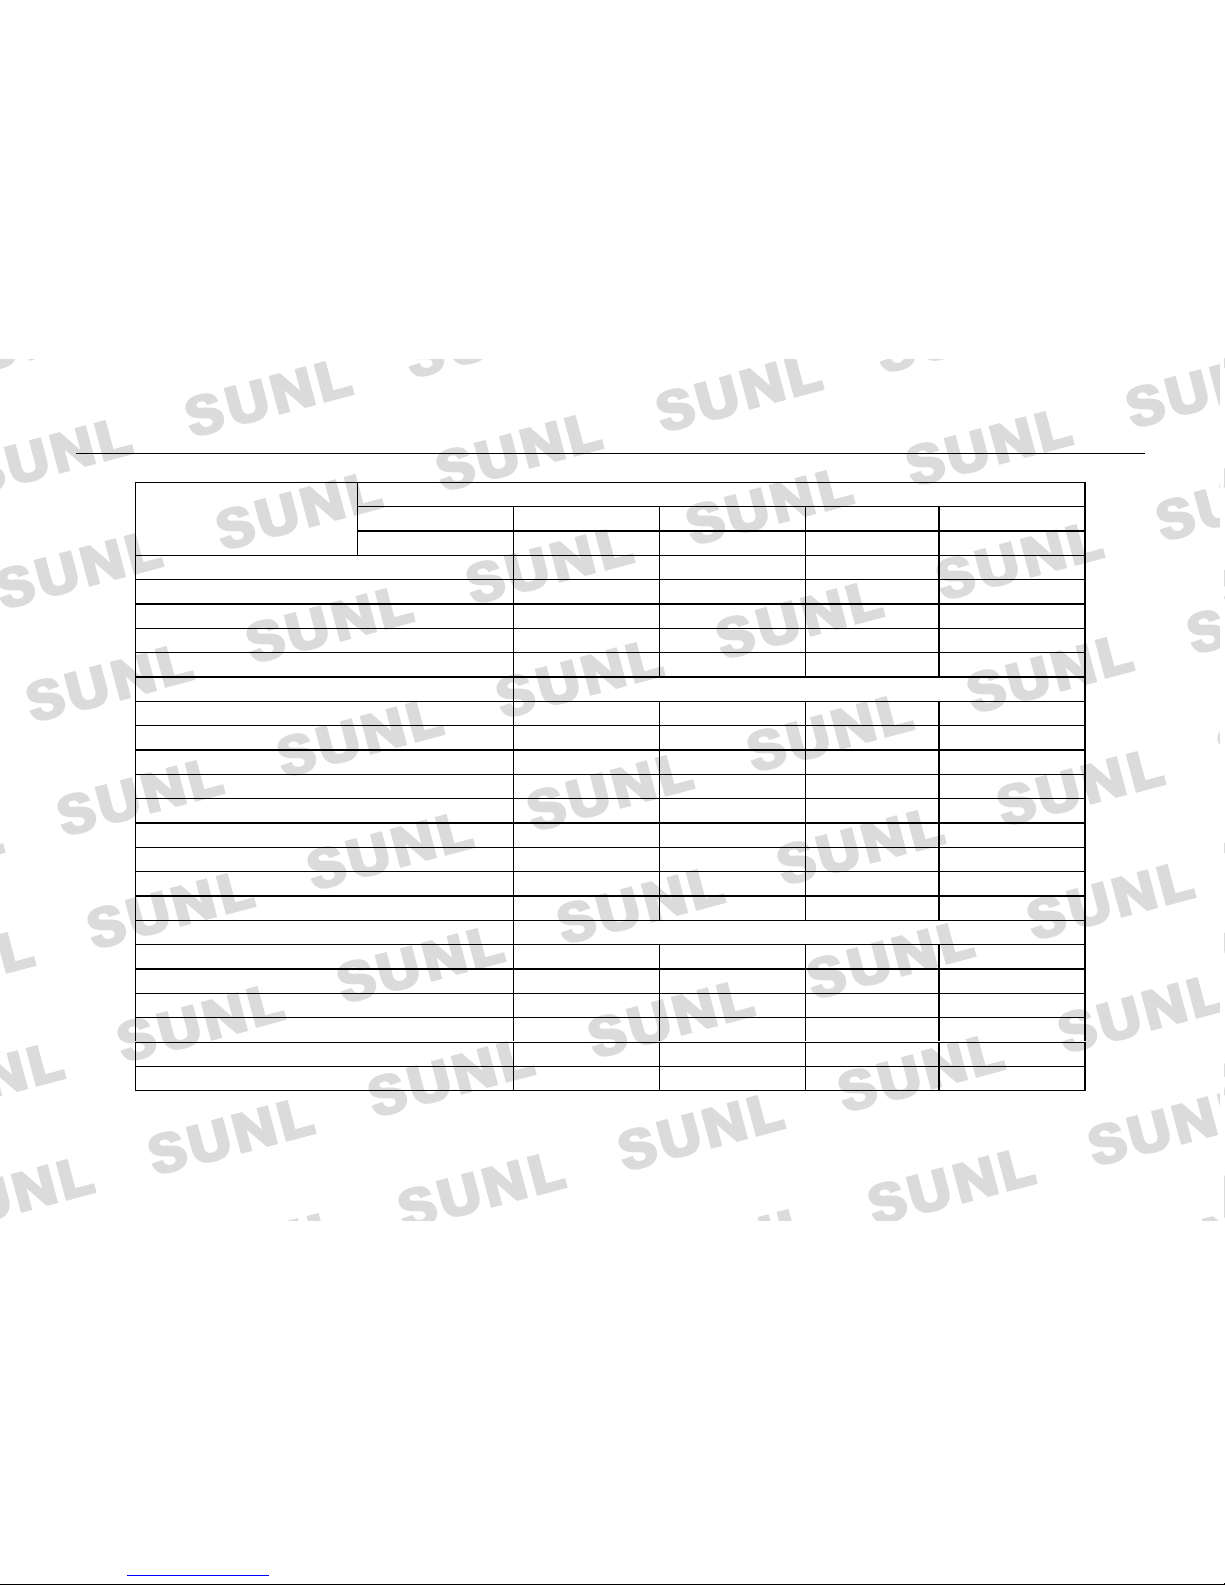
Maintenance Chart
Interval
Note: I = Inspect, C = Clean, R = Replace, T = Adjust
Km 1500 3000 6000 10000
Item
Months 1 3 6 12
*Battery I I I I
*Exhaust pipe bolts, cylinder head nuts T T T T
*Driven belt I I I I
*Brake system -- I, T I I, T
*Brake pads -- -- I I
Hydraulic braking liquid hose Replace every four year
Steering handle -- I, T I I, T
Fuel hose and fuel filter -- -- I I, R
Bolts and nuts in the motorcycle T T T T
Front fork and rear shock absorber -- I I I
Clutch -- I I I
Engine oil and oil filter R R R, C R, C
Carburetor -- I I, C I, C
I I, T I, T I, T
Throttle control cable
*Valve clearance, Engine -- -- I I
Engine oil
Replace every 1000Km
Front shock absorb cushion oil
-- -- I R
Air cleaner and paper-filter core C C R R
Spark plug -- I I, C I, C
Spring of main stand/side stand I I I I
Tires I I I I
Lights
I I I I
12
Page 13
MAINTENANCE
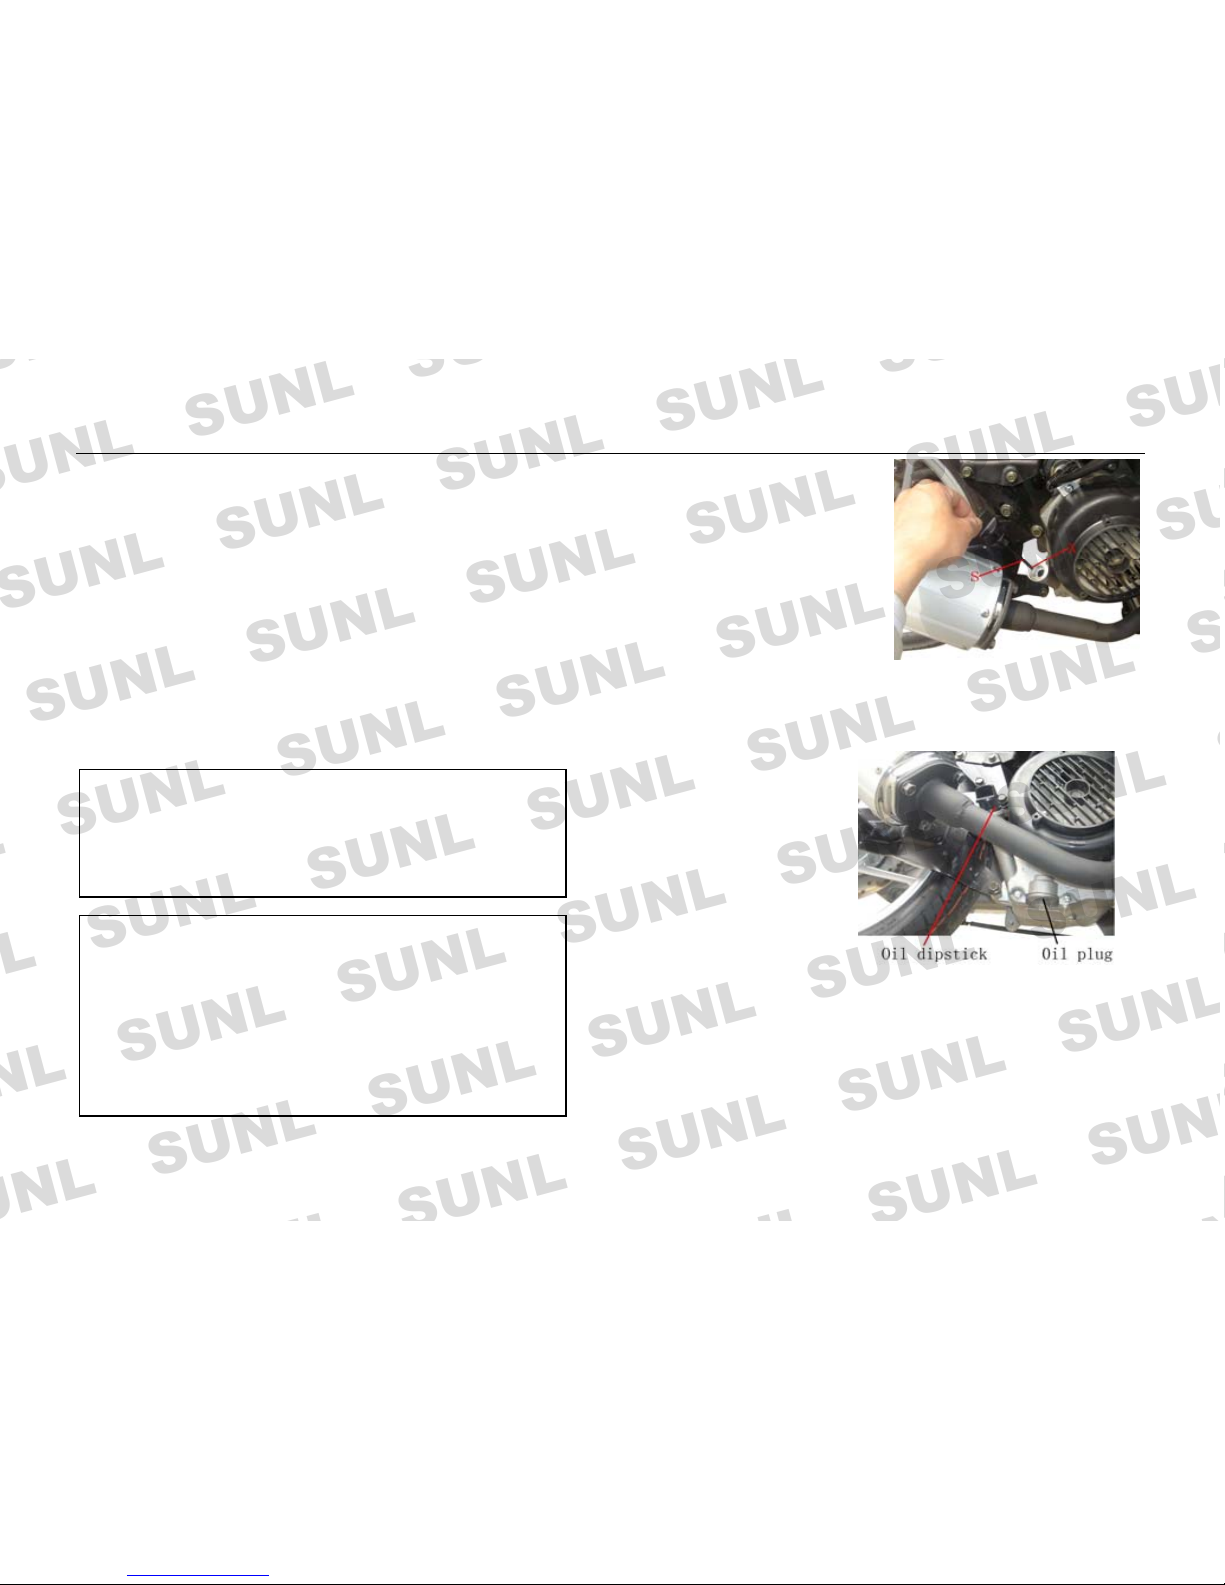
Engine oil dipstick
The above form lists the maintenance to be done after a certain
kilometers or months during which the scooter is used. At the end of
each period, inspection, testing, lubrication and maintenance should
be given following the desc ribed procedures.
Check the oil level before driving
to ensure the oil level is maintained
If your scooter has been used under an awful circumstances, for
instance, your have turned the throttle to its full for a long time while
running it through a windy and dusty region, you should give a
special inspection to it after this running in order to maintain its
reliability. Your dealer can provide you with further guide to this
maintenance. Steering components, shock absorber and wheel axles
are key items that are required for special techniques and careful
service. For maximum safety, you are suggested to entrust this job to
the qualified servicemen from the dealer's.
between the 'S' and 'X' marks.
The oil inspection window is on the
right side of the engine. To check
the oil level of engine, the scooter
has to be placed on an even ground,
let the cap of the oil dipstick touch
the mouth but don't tighten the cap in. The oil level should be
maintained between the upper limit 'S' and the lower limit 'X'. If
necessary, refuel suitable oil up to the 'S' position.
Oil replacement
Warning: A careful maintenance should be given to a new scooter
after it has meshed well and has run 1000km. This will ensure
your scooter to be superior in performance and reliable in safety.
Do make a careful periodic maintenance according to the
instructions in this manual.
Stand the scooter on flat
surface by using the main
stand. Drain all the used oil
before the engine is fully
cooled.
1. Remove the oil dipstick
Caution: Periodical in spection may reveal that one or more parts
need to be replaced. Whenever replacing is made, it is
recommended that you use genuine replacement parts or their
equivalent. If you are an expert or one that does the repairing by
yourself, you should trust those items on the Maintenance Form
marked with “*” to the authorized dealers or the experienced
servicemen. Your may perform the unmarked items by yourself
following the instruction in the relevant section.
and clean it with cloth.
2. Put a basin under the
engine and remove the oil plug to drain the used oil.
3. Reinstall the oil plug, paying attention to the tightness.
4. Refuel about 0.9L of the recommended fresh oil and start the
engine. Stop the engine after running it for 1 minute and recheck the
oil level. If the requirement isn't met, plea se fill in more oil.
- 13 -
Page 14
MAINTENANCE
Gear oil replacement
Throttle cable adjustment
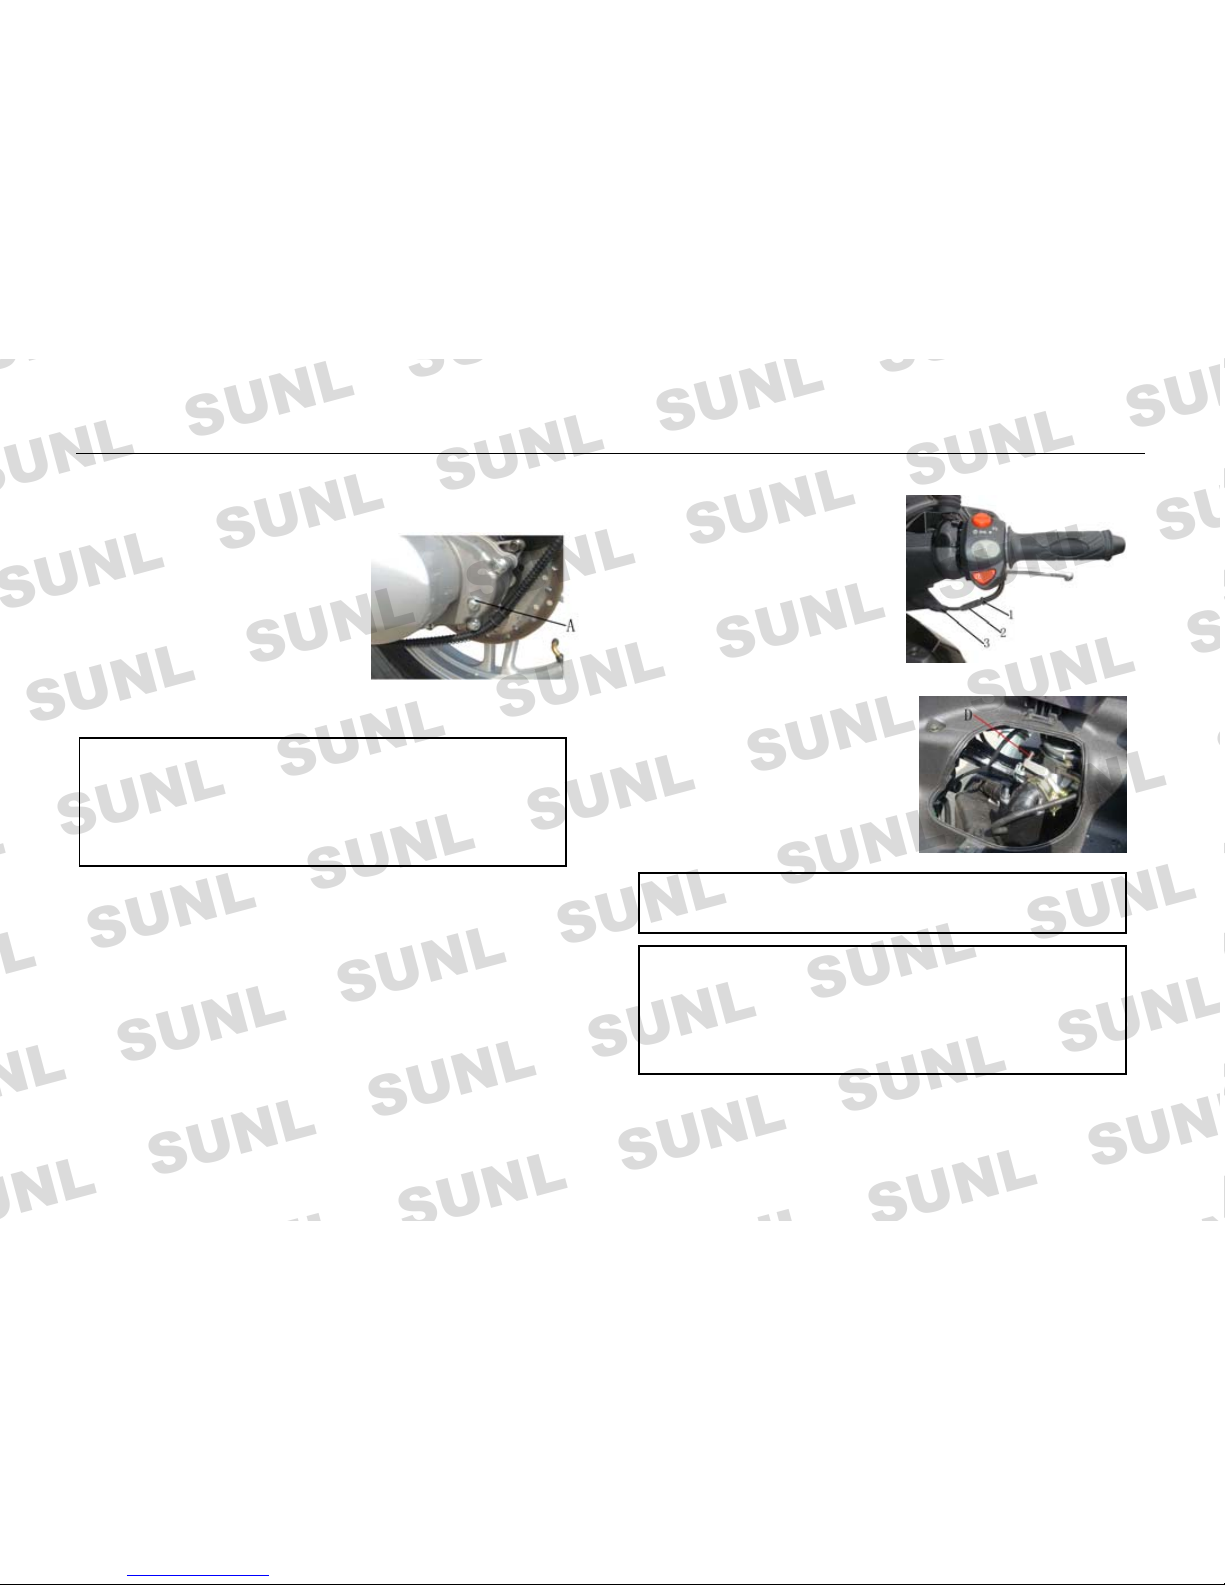
Gear oil needs to be replaced every 3,000Km or half a year,
whichever comes first. Alwa ys use SAE80W90 gear oil.
(1) Stand the scooter on flat surface
by using the main stand with
a pre-heated engine.
(2) Remove the gear oil drain
screw “A” to drain the used gear oil
into a container. Clean the gear oil
drain screw and reinstall the screw “A”.
(3) Remove the gear oil filling screw “A” to fill with about 110ml
gear oil, and then reinstall the screw “A”
Carburetor
Good carburetor ensures the engine to work well. It is adjusted as the
best before engine delivered from the factory, so don't adjust it
casually. The carburetor is to be adjusted in two places, i.g. the
throttle cable adjustment and the idle speed adjustment. After the
initial 1,000km and every 6,000 km after that, they could be
adjusted.
1. Loosen the lock screw “1”.
2. Turn the adjusting nut “2” to make
the free play of the cable between
0.5 and 1.00mm.
3.Tighten the lock screw after
adjustment, and covered by the rubber
cover “3” for throttle adjusting nut
and lock screw.
Idle speed adjustment
1. Start the engine and keep it running
until it is fully warmed up.
2. With the engine warmed up, set fre e
Warning: Always ch eck the gear o il level befo re and after driving
long distance. Always use the specified gear oil and don’t mix
with other gear oils. Make sure that gear oil drain screw is
tightened after being reinstalled. Be carefully when draining the
g
ear oil from a pre-heated engine, which may be very hot.
the throttle grip and adjust the idle
speed screw “D” to set the idle speed
between 1,400rpm and 1,600rpm.
Caution: Adjust the idle speed of the engine when it is fully
warmed up.
Warning: After the throttle cable is adjusted, check the movement
of the throttle control grip. No increase in the idle speed of the
engine should be resulted in because of the adjustment and the
throttle control grip should be able to return to the close position
automatically.
- 14 -
Page 15
MAINTENANCE
Spark plug
Air cleaner
1. After the initial 1,000 km and every Air cleaner is located under the seat and in the front of luggage
cabinet. The core of air cleaner for this scooter is made of filter
paper and sponge. If it is blocked, the resistance of air intake is
increased but the output power is decreased, and also fuel
consumption will be increased. For this reason, t he core should be
inspected and cleaned following the procedures below after every
3,000Km. Clean and r eplace the core more f requently if th e scooter
is used in the dusty circumstances. Don't wait until the time for
maintenance is actually due.
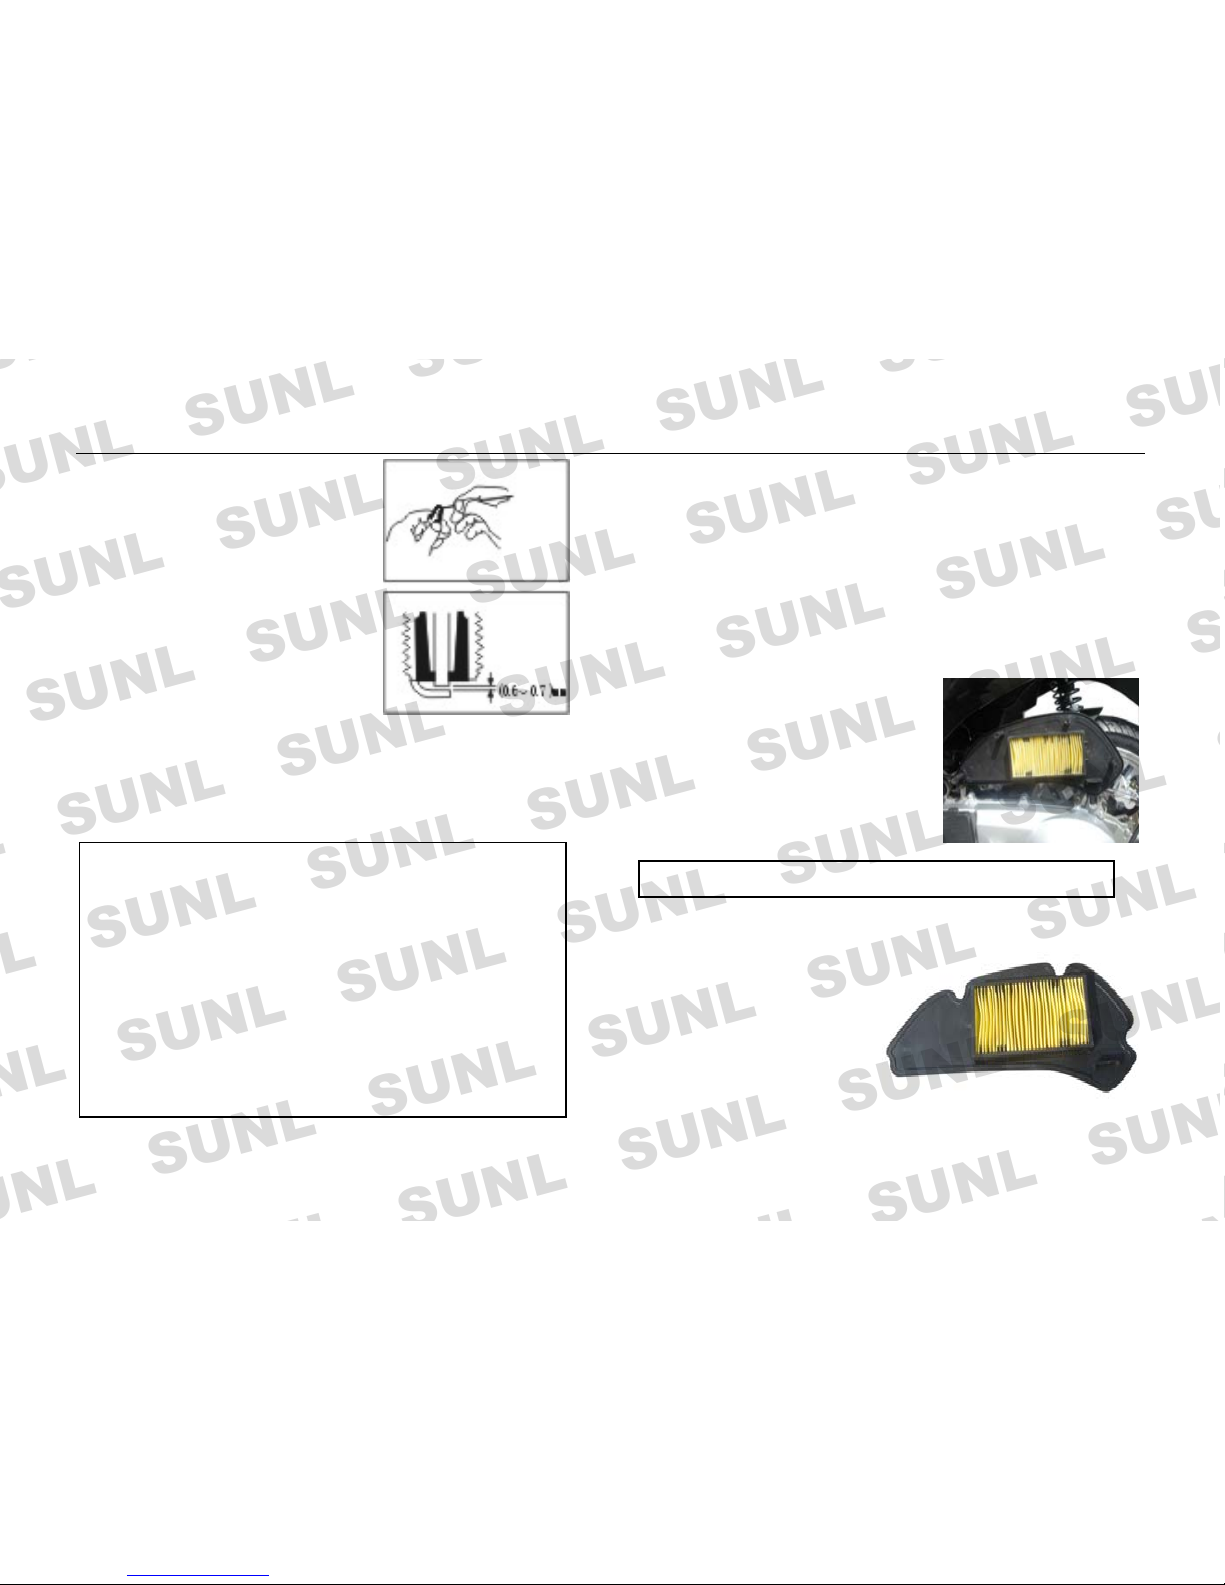
3,000 km after that, clean the carbon
deposit on the spark plug with a wire
brush or a plug cleaner and readjust
the gap to 0.6-0.7mm with a thic kness
gauge.
2. Replace the spark plug with a new
one after every 6,000 km.
3. At the same time as you are cleaning
the carbon deposit on the spar k plug,
you should observe the color on the porcelain tip of the spark plug,
Light gray or brown color should be the color for a spark plug that
works properly under this circum stance.
Standard spark plug:
NGK, type A7TC or type A7RTC.
Its disassembling order:
1. Open and pull up on the seat.
2. Loosen the screws of the top cover of air
cleaner, and take off the paper-filter c ore.
3. Loosen the screws on the inside fence,
open the fence and take off the sponges in
front of air intake pipe.
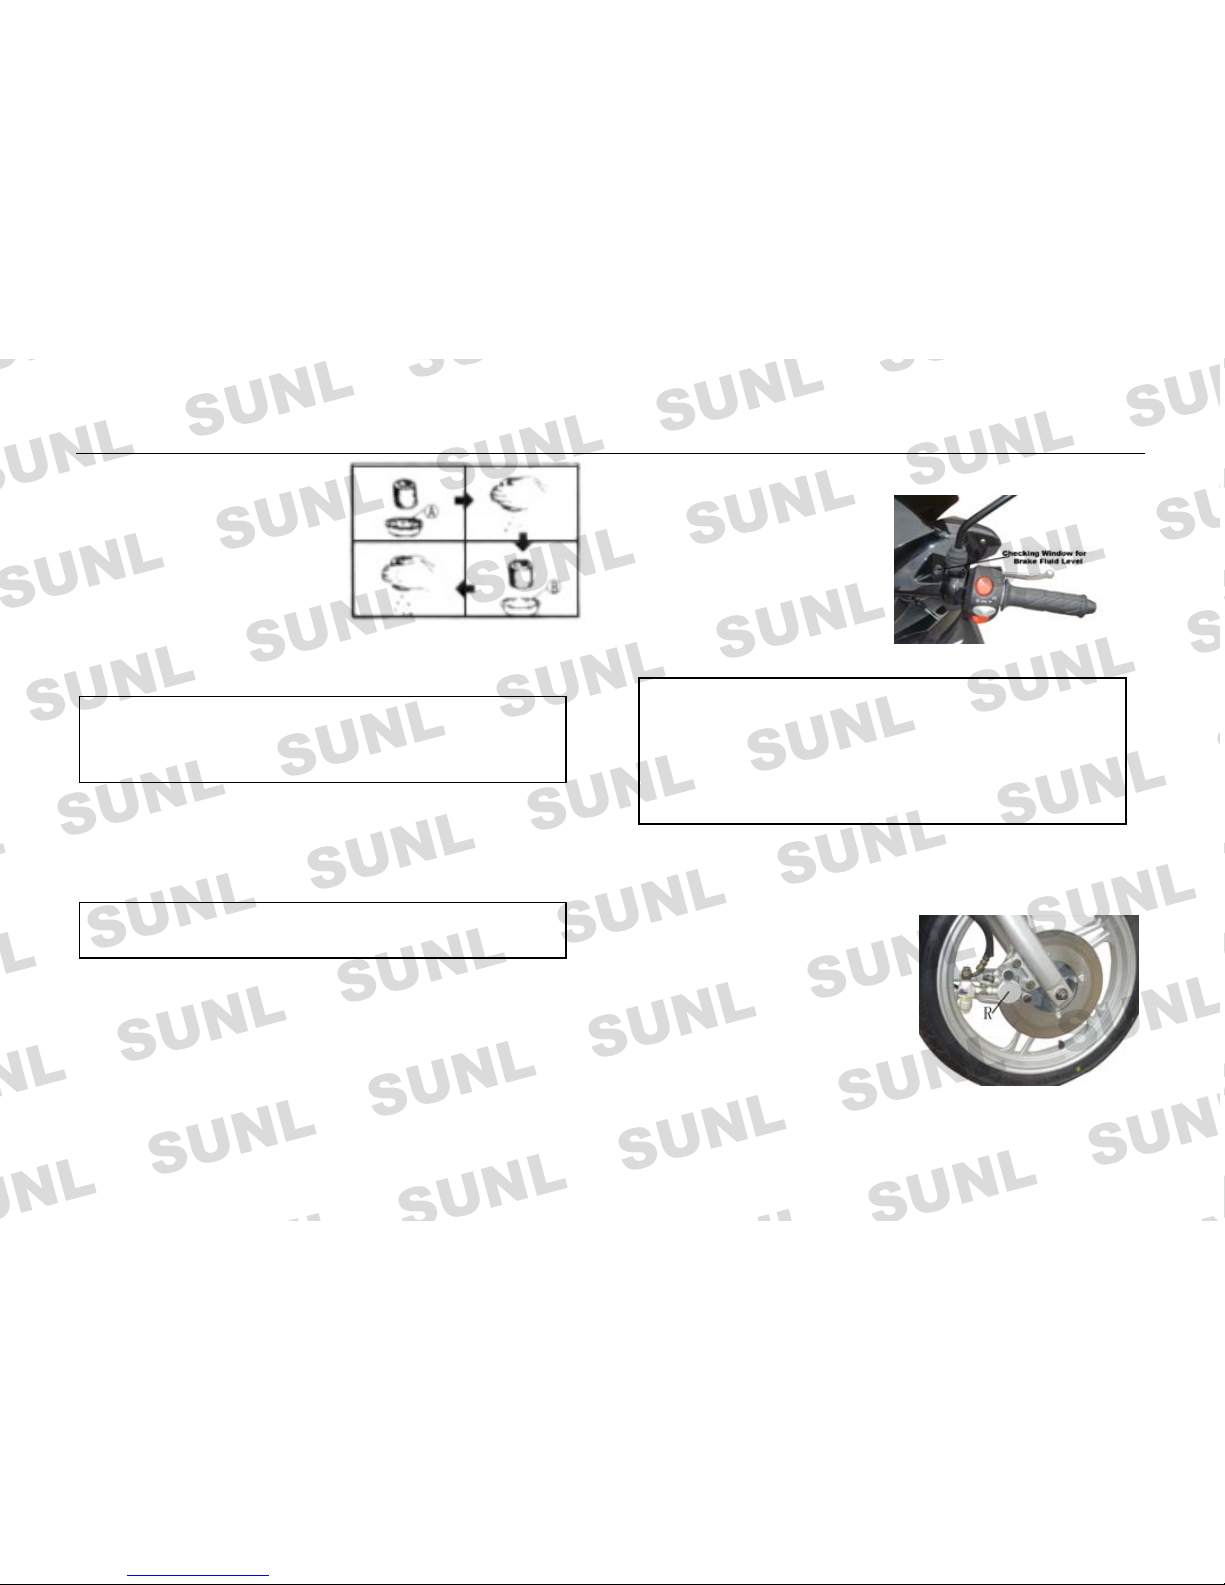
How to clean the core of air cleaner
1. Use high pressure air to blow
and clean the paper-filter core.
2. Pour the non-inflammable
detergent into a basin of proper
size container and immerse the
sponges into detergent for
cleaning.
Caution: Never start engine until core of air cleaner is assembled.
Caution:
●Spark plug used in this scooter is chosen with care and is good
for most of the working conditions. If the color of the spark plug is
different from that of the standard one, it's better that you have a
discussion with the dealer before replacing it with a plug of
different heat resistance. Because unsuitable sparks plug will
seriously damage the engine.
●Spark plug should not be tighten excessively or tightened when
the treads are not properly engaged in case treads on crankcase
cover be damaged. When removing the spark plug, make sure not
to allow any dirt into the engine through the plughole.
- 15 -
Page 16
MAINTENANCE
3. Press the sponge to squeeze the
detergent out of it by the palms.
Never twist it in case it is broken.
4. Immerse the sponge into engine oil
and then squeeze the oil out of it but
keep it lightly oil immersed.
5. Assemble and fix the air cleaner in
a reversed order against the
disassemble order that mentioned
above. Make sure to fix it properly and keep it well sealed.
Brake system
Disc brakes are appl ied to the front and rear wheel of this scooter.
The brakes should be inspected after the initial 1,000km and each
3,000km after that.
Check the front/rear disc brake lever for res istance when squeezed.
If there is resistance when squeezed, that shows the disc brake
system is working normally. If there is lose of resistance when
squeezed, that shows the disc brake system function lost.
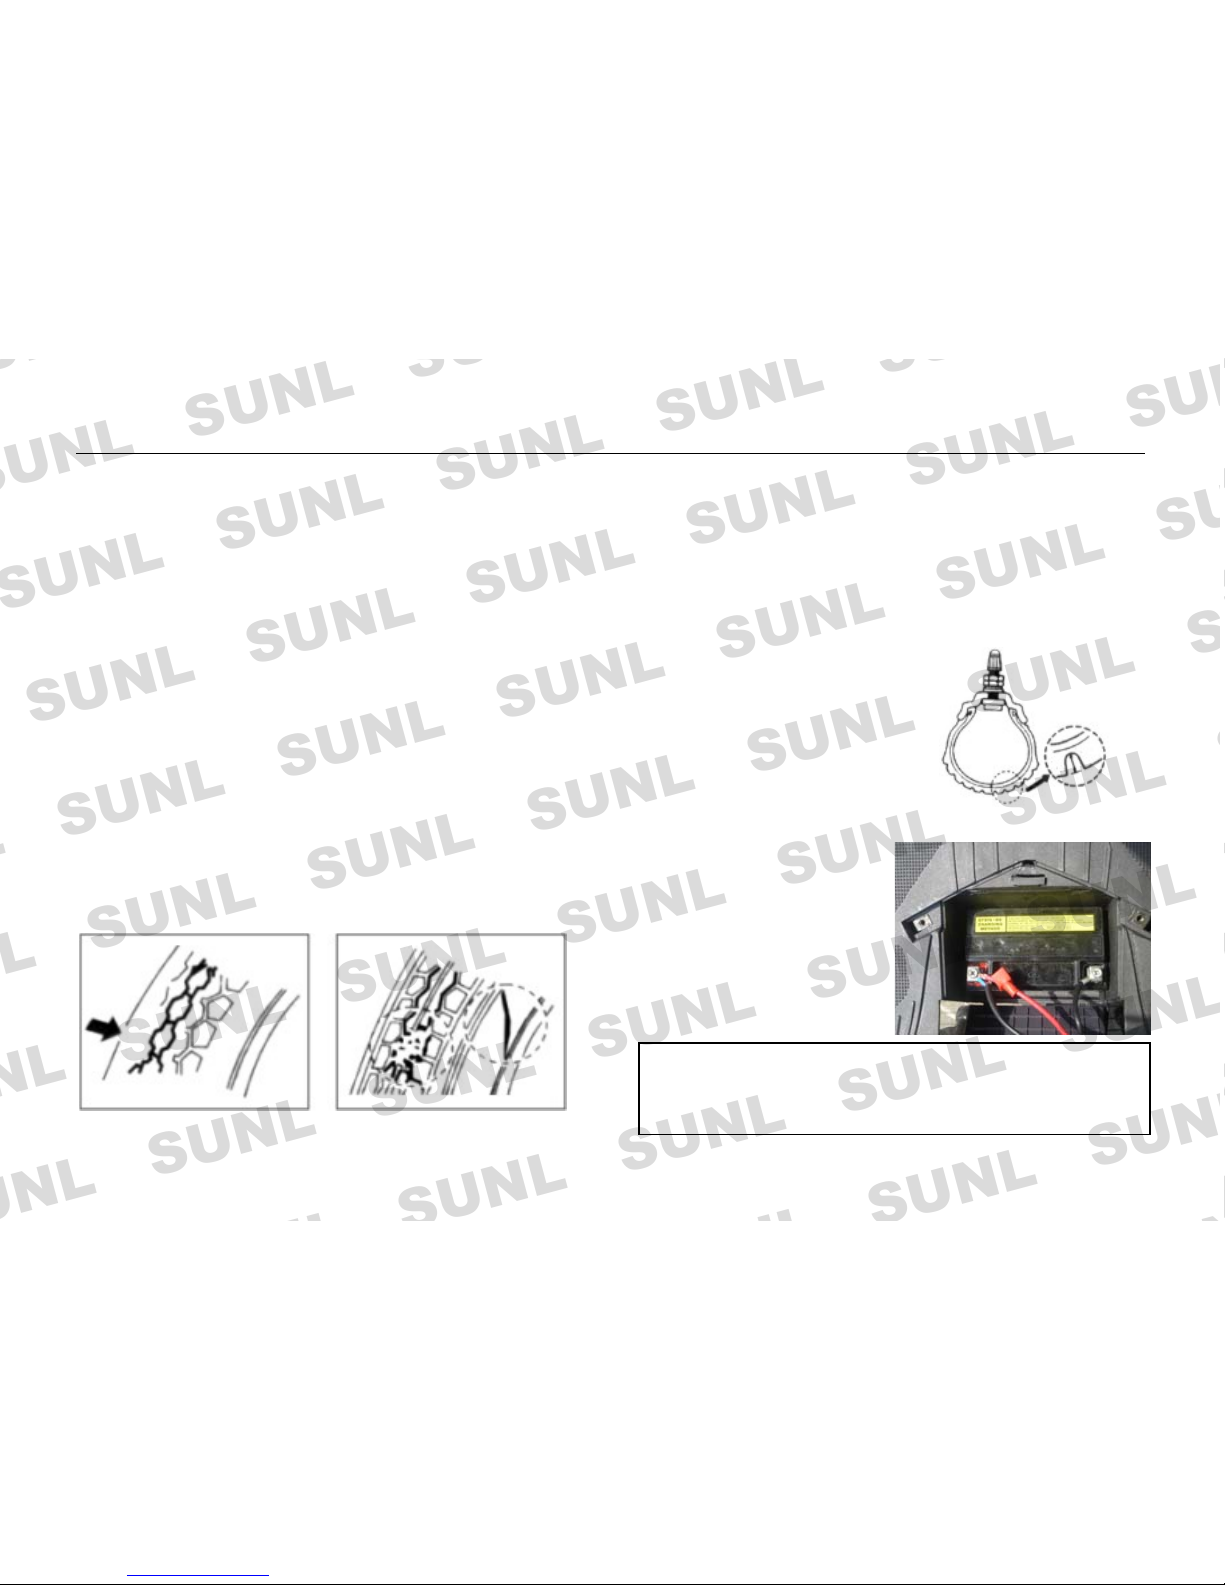
Filling brake fluid to top brake fluid tank.
The top brake fluid tank is also called as hydraulic cylinder comp.
When brake fluid is les s or no in the disc brake sys tem, that brake
will be not working any more.
Check the brake fluid level of top
brake fluid tank by the brake
fluid level checking window on
the handlebars. If there is no
brake fluid, loosen two screws
on the cover of top brake fluid
tank and open the cover to fill the bra ke fluid.
Drain out the air from brake system
Disc brake system is not working and the brake lever is lost of
resistance when there is air in the
brake system.
1. Try to squeeze the brake lever,
and hold on the brake lever when
feeling the resistance.
2. Loosen the drain air out screw “R”
on the caliper counterclockwise, and
drain out air from the brake system.
3. Reinstall that screw “R” tightly after air had drained out, loosen
A. on-inflammable detergent
B. engine oil
W
arning: Only use DOT3 type brake fluid to this scooter. Don’t
mix with other types of brake fluid since that will damage the
scooter brake system. Onl y use fresh brake f luid since the us ed
brake fluid often included with water and air, which will also
damage the brake system. If filling the brake fluid too often,
there may be leak in the brake system, check hydraulic hose and
take the scooter to service shop soon.
Caution: If there is break in the core, it should be replaced wit h
new one. Never use easy-inflammable fuel (gasoline etc.) as
cleaning detergent.
W
arning: Brakes are important component directly related to
the safety of the rider. It must be properly adjusted.
- 16 -
Page 17
MAINTENANCE
Tire pressure
the brake lever accordingly.
4. Repeat step 1 to step 3, until the resistan ce is large enough when
squeezing the brake lever.
Insufficient tire p ressure quickens wear to tires and strongly af fects
the riding stability. Insufficient pressure causes difficult steering
control but excessive i nflation leads to less contact area of the t ire
with the ground so as to slip and lose control. Keep tire pressure
within the required range. Adjust tire pressure when the tire is in a
cold state, which is 200kpa/225kpa for front/rear tire.
5. Cover the drain air out screw “R” with dust-proof cap after brake
system adjustment finished.
Replace brake pads
When howling sound comes from brake disc plate, or some concave
nicks shown on th e brake disc plate, the brake pads in side caliper
must be replaced at once.
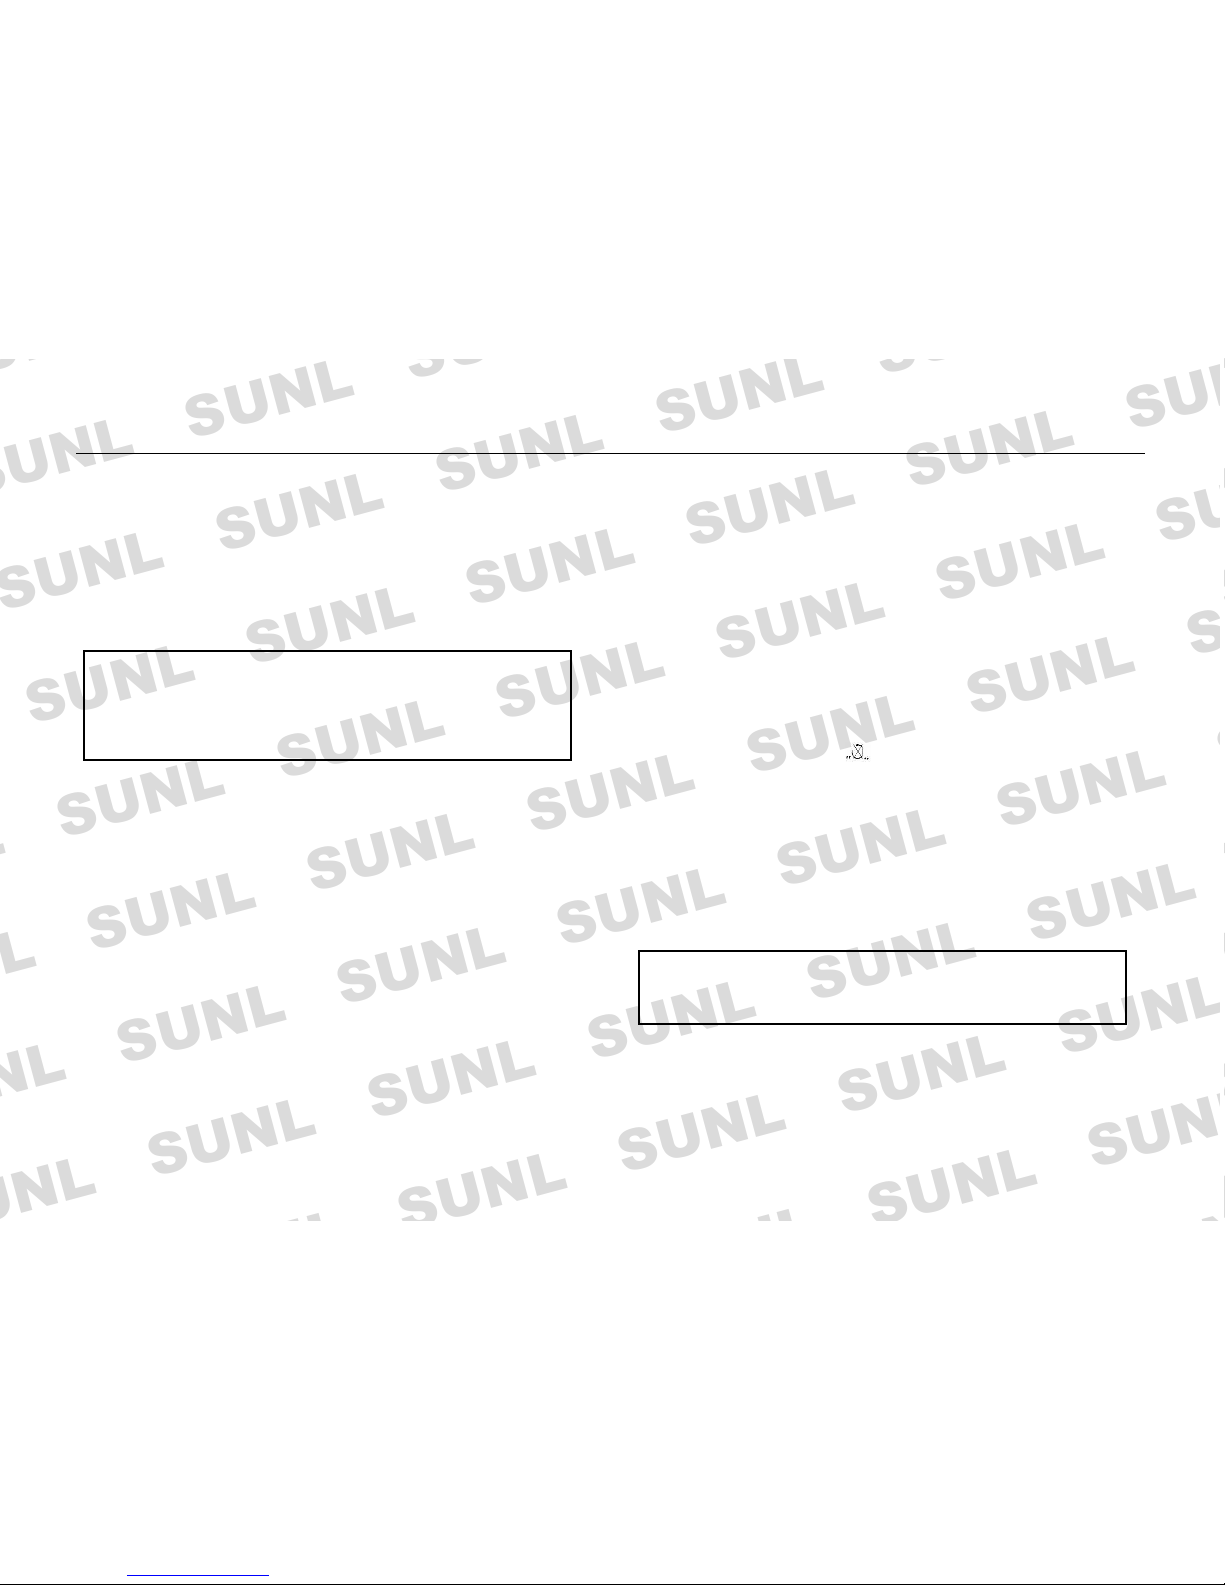
Tread
Both pads must be rep laced at t he same t ime, even o nly one i s worn
to the limit.
Tires
Check the tire pressure and tread depth when applying periodic
maintenance in a view to maintain maximum safety performance and
longer service time. Gi ve i rr egul ar ch ecks to t hem ap art fr om rou ti ne
servicing. Carefully check to escape fro m nail or glass on the tires.
Always replace tires when there is visible damage, such as brok en
tread or gashes in the tire wall.
Driving a scooter with excessively
worn tires decreases riding stability and
leads to loss of control. Replace the front
tire when its tread depth decreases to
less than 1.6mm and the rear tire
when its tread depth is less than 2mm.
Specifications of tires (front/rear) used in this scooter is 130/60-13
Battery
Maintenance free battery is used
for this scooter. Battery is installed
under rubber mat.
Clean the terminal pole by metal
brush when there is white powder
on that. Fixing the bolt on term inal
pole tightly and is also lubrica ted.
W
arning: When connecting the wires to the poles of the battery, make
sure to connect the positive and negative poles properly. The red wire
is for positive pole, the black for the negative. A wrong connection
will damage the charging system and the battery itself.
- 17 -
Page 18
MAINTENANCE
Rear view mirror
If the scooter will not be ridden for a long time, the battery should be
removed and place at a cold, dark and well ventilated space. The
battery should be fully charge d before returning to the scooter.
Seating on the driving seat of scooter, be sure all back and side
objects can be seen clearl y. Clean dir ty on the mirr or and replace th e
broken parts.
Fuse
Storage The fuse cartridge is put beside the battery by the strap. The rated
current for the fuse is 15 ampere. When there is a sudden flameout or
circuit failure, check fuse first.
Following the instruction below to maintain your scooter in good
condition if you want to keep it for long-time storage.
1. Replace the engine oil.
Caution: Pay attention to select a fuse with a correct rating of
current. Do not use aluminum or iron wire as substitute. If the
fuse often burns within a short time of running, it indicates
something is wrong with the electrical system. Contact a local
dealer to inspect it soon.
2. Discharge all the fuel in the fuel tank and the carburetor. Fill
anti-rust oil into the fuel tank.
3. Take off the spark plug and fill 15-20ml of pure engine oil into
the cylinder. Turn the key to position. Kick the starting pedal for
several times and then put the spark plug back, keeping its wire
touching the ground.
Lights
1. Turn ignition switch on, and hold squeeze the front/rear brake
lever, be sure the stop light will be on.
4. Uninstall the battery and store it in a ventilating place, and is
suggested to charge once a month.
2. Turn ignition switch on, and push the turning signal light button,
be sure the front/rear turning lights is working normally.
5. Clean the scooter and apply anti-rust oil to the iron parts.
6. Inflate the tire and stand up the scooter, keep the wheels away
from the ground. 3. Check the headlight and position light working normally.
4. Check the indicating light on meter working normally. 7. Put cover on the scooter.
5. Clean dirty on the covers of all lights and replace the broken parts.
Bulbs
Ratings of all bulbs are as listed in the Specification Parameters. Use
bulbs of same ratings when replaci ng. Different ratings may cause an
overload to the wiring system and an earlier failure of the bulbs.
W
arning: Keep the fuel away from s moke or fire an d flame out
the engine while discharging or refilling. If the scooter will be
stored over half a month, should discharge fuel in carburetor.
Recovery after storage
1. Take off the cover and wipe the body. Replace engine oil if the
scooter has been stored for over four months.
- 18 -
Page 19

MAINTENANCE TROUBLESHOOTING
Engine 2. Charge the battery and reinstall it.
Starter does not operate or does not turn engine over 3. Discharge the anti-rust oil in the fuel tank and refill the fuel.
4. Conduct pre-driving inspection and check its performance at low
speed.
1. Ignition key switch not set to position.
2. Discharged battery or loose or corroded connections.
Engine turns over but does not start
Tools set 1. Fuel tank is empty.
For your convenience in maintenance, we provide one set of tools for
you. They are put inside the front luggage carrier of the scooter with the
following details:
2. Fuel supply valve or filter c l ogged.
3. Discharged battery or loose or broken terminal connections.
4. Fouled spark plugs.
1. Tool bag; 2. Double-end spanner; 5. Loose or shorting spark plug c ables or connections.
3. Double-end screwdriver; 4. Socket for spark plug. 6. Loose or corroded wire or cable connection(s) at coil or battery.
7. Engine flooded with fuel as a result of over-enriching.
8. Engine oil too heavy (winter operation).
Starts hard
General 1. Spark plug in bad condition or have improper gap or are partially
fouled. The following checklist of possible operating troubles and their
probable causes will be helpful in keeping your scooter in good
operating condition. More than one of these conditions may be causing
the trouble and all should be carefully checked.
2. Spark plug cables in bad condition and leaking.
3. Battery nearly discharged.
4. Loose wire or cable connection(s) at one of the battery terminals or
at coil.
W
arning: The troubleshooting section of this User’s Manual is
intended solely as a guide to diagnosing problems. Carefully
read the appropriate sections of this manual before performing
any work. Repair and maintenance operations not listed in this
manual, should be performed by your dealer. Lack of regular
maintenance affects the safe operation of your scooter and may
lead to personal injury.
5. Water or dirt in fuel system and c arburetor.
6. Carburetor is not adjusted correctly.
7. Engine oil too heavy (winter operation).
8. Ignition is not timed properly. See dealer or service.
9. Engine’s idle speed is not set pro perly. See dealer or service.
10. Engine’s cylinder inside is less pressure. See dealer or service.
- 19 -
Page 20

TROUBLESHOOTING
Starts but runs irregularly or misses 6. CVT wears and tears. See dealer or service.
1. Spark plug in bad condition or partially fouled.
Vibration 2. Spark plug cables in bad condition and leaking.
3. Spark plug gap too close or to wide. 1. Stabilizer links worn or loose. See dealer or service.
4. Battery nearly discharged. 2. Tie bar (engine isolation) mounts loose. See dealer or service.
5. Damaged wire or loose connection at battery terminals or coils. 3. Broken frame. See dealer or service.
6. Intermittent short circuit due to damaged wire insulation. 4. Wheels and/or tires are damaged. See dealer or service.
7. Water or dirt in fuel system, filter or carburetor.
Lubrication system 8. Fuel tank vent system plugged. See dealer.
9. Air cleaner is clogged. 1. Oil tank empty.
10. Exhaust muffler is c logged. 2. Engine leaks oil from cases, push rods, hoses
Pre-ignition or Detonation (K nocks or Pings) a) Loose parts, See dealer or service.
1. Incorrect fuel. b) Imperfect seal at gaskets, push rod cover, wash ers, etc. See
dealer or service. 2. Incorrect spark plug.
Overheats
Electrical system 1. Low speed for long time.
Generator does not charge 2. Insufficient oil supplying or oil not circulating.
3. Heavy carbon deposit from “lugging” engine. See dealer or service. 1. Module not grounded. See dealer or service.
4. Ignition timing retarded. See dealer or service. 2. Engine ground strap loose or broken. Se e dealer or service.
5. Clutch skid. See dealer or service. 3. Loose or broken wires in charging circuit. See dealer or service.
Generator charge rate is below normal 6. Detent clip. See dealer or service.
Engine abnormal noise 1. Wea k battery.
1. Engine’s valve gap over standard, rock arm or camshaft wear and
tear. See dealer or service.
2. Excessive use of add-on accessories.
3. Loose or corroded connections.
2. Cylinder and piston wear and tear. See dealer or service. 4. Extensi ve periods of idling or low speed ridi ng.
3. Piston pin and rod wear and tear. See dea l er or service.
Transmission 4. Needle bearing and rod wear and tear. See dealer or service.
5. Camshaft bearing, cam wear and tear. See dealer or service. 1. Belt worn out or broken. See dealer and service.
- 20 -
Page 21
TROUBLESHOOTING
Brakes
1. Brake lever lose resi stance. There is no brake fl uid in the hydraulic
hose and brake fluid tank. See dealer or service.
2. Brakes fade because of air inside brake system. Drain air out from
the brake system. See dealer or service.
3. Brakes fade because of heat build up. Excessive braking or brake
dragging, See dealer or service.
4. Brake pads badly worn out or warped. See dealer or service.
Caution: Consult the local dealer b efore making a check and
repair. If your scooter is still under warranty, you must consult
the dealer before making the repair by yourself, for an
unauthorized repair ing will deprive you of some items covered
by the warranty.
- 21 -
Page 22
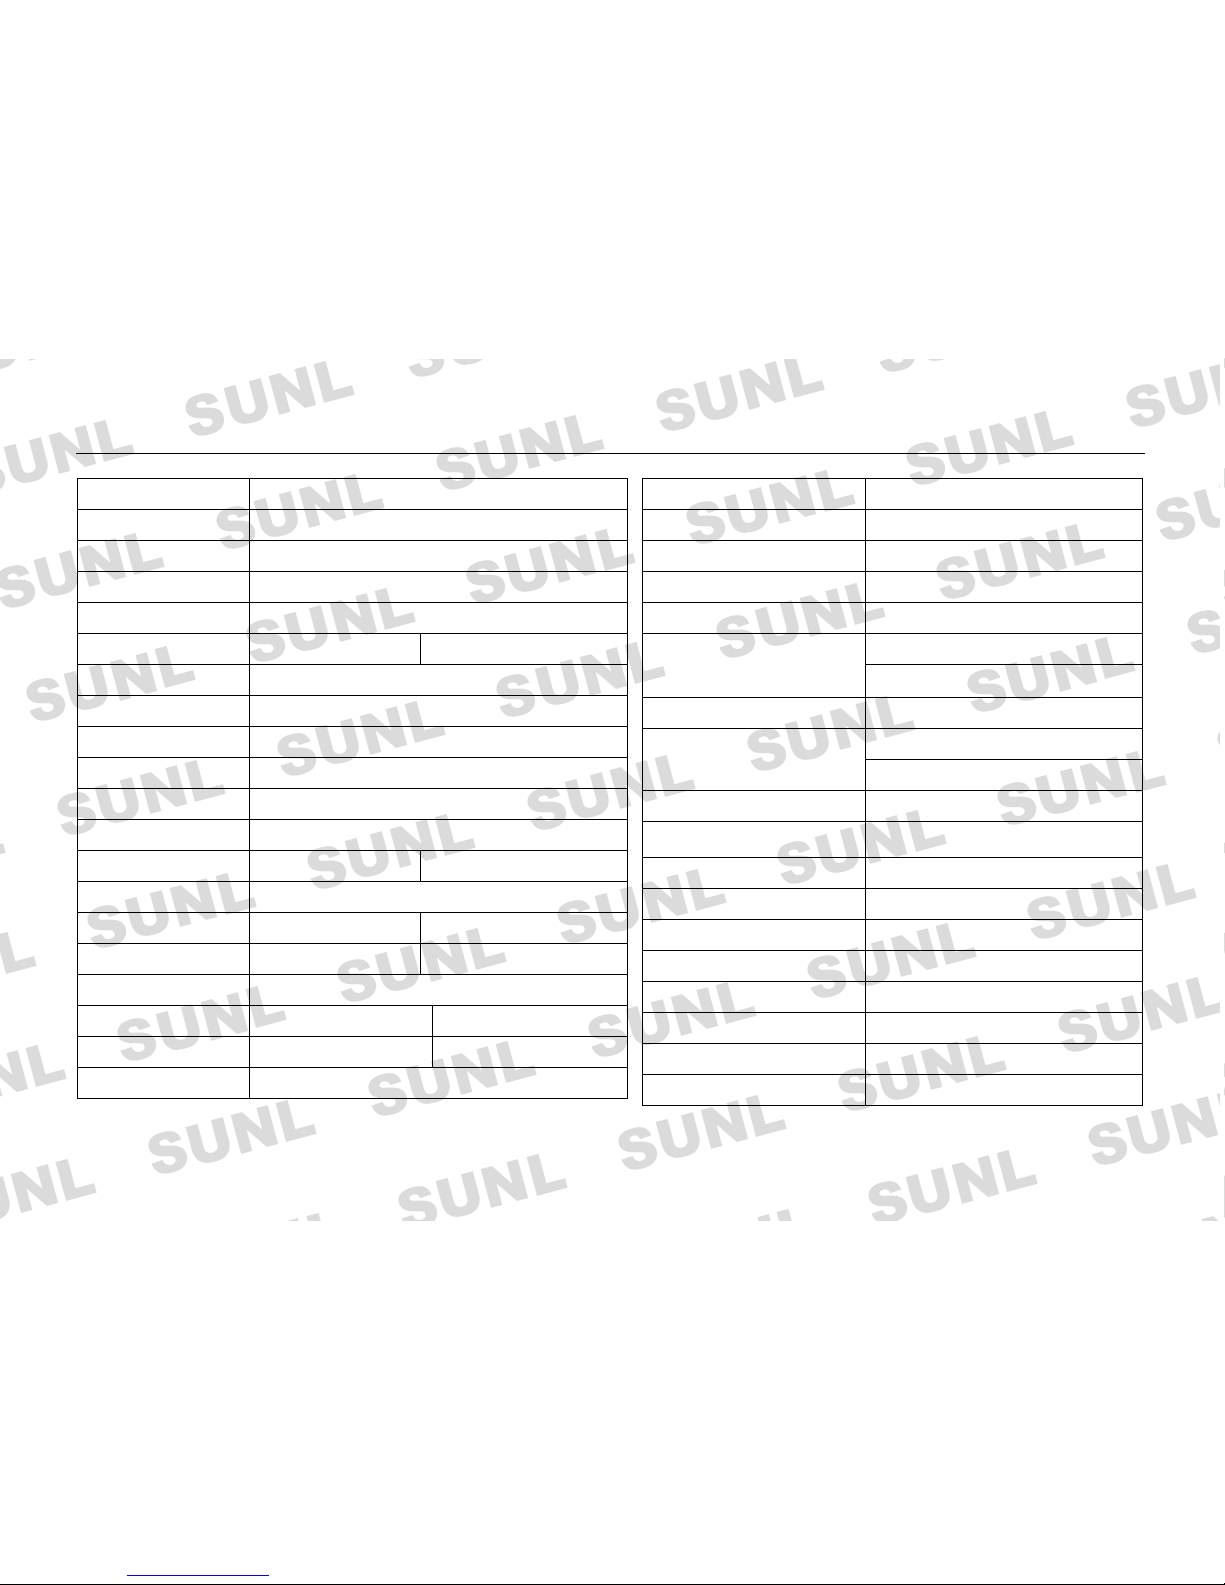
TECHNICAL SPECIFICATION
- 22 -
Item Specification Item Specification
Size (L × W × H) 2180mm×730mm×1300mm Lubrica te method Pressure & splash
Wheelbase 1500mm Starting method Electrical start / kick start
Net weight 125kg Spark plug type A7TC or A7RTC
Max. load 175kg Clutch type Dry and automatic
Max. speed ≥80Km/h(125) ≥95Km/h(150) Front wheel 100/80-16
Tire model/air pressure
Max. slope ≥21° Rear wheel 110/80-16
Min clearance 170mm
Brake type Front: Disc; Rear: Disc
Max. driven noise ≤77 dB(A)
Front: Spring liquid flex
Shock absorb method
Fuel tank capacity 9 L
Rear: Spring oil damp
Oil tank capa city 0.9L
Headlight 12V 35W/35W
Engine oil type SAE 15W-40
Position light 12V 3W
Engine model 152QMI (125) 157QMJ (150)
Turning signal light 12V 5W / 21W
Engine type Single cylinder , air cool, 4-stroke
Taillight / bra ke light 12V 5W / 21W
Bore × stroke 52.4mm×57.8mm(125) 57.4mm×57.8mm(150)
Meter light 12V 3W
Cylinder work capacity 124.9ml (125) 119.5ml (150)
Far beam indicator 12V 3W
Compression ratio 9.0 : 1
Turning signal indicator 12V 3W
Max. power / rotate speed 5.8kw / 7500(r/min)(125) 7.0 kw / 7500(r/min)(150)
Mobile indicator 12V 3W
Max. torque / rotate speed 7.8N.m / 5500(r/min)(125) 9.0N.m / 5500(r/min)(150)
Fuse 15A
Ignition method C.D.I
Battery 12V7AH
Page 23

- 1 -
 Loading...