

Page 1

© 2017 by Snow Joe®, LLC
All rights reserved. Original instructions.
SAVE THESE INSTRUCTIONS
A Division of Snow Joe®, LLC
OPERATOR’S MANUAL
Model LJ602E Form No. SJ-LJ602E-880E-M
R
ELECTRIC LOG SPLITTER
15-AMP | HYDRAULIC | 5-TON
IMPORTANT!
Safety Instructions
All Operators Must Read These
Instructions Before Use
Always follow these safety guidelines. Failure to do so may
result in serious bodily injury or death.
General Safety Warnings!
When using the log splitter, basic safety precautions should
always be followed to reduce the risk of re, electric shock,
and personal injury, including the following:
mWARNING! The use of any other accessory or
attachment might increase the risk of injury.
TRAINING
Before using the log splitter, take the time to familiarize
yourself with the controls, especially how to stop the log
splitter in an emergency. Only individuals who have read these
instructions and have a thorough understanding of these
instructions shall operate the log splitter. Never allow children
to operate the log splitter.
Retain this manual for future reference and reread it at the start
of each log splitting season.
1. Read, understand, and follow all instructions on the
log splitter and in the manual(s) before attempting to
assemble and operate. Save this manual for reference and
ordering replacement parts.
2. Never allow children under 18 years old to operate this
machine. Children 18 years old and over should be
trained and supervised by an adult who understands the
operation of the log splitter.
3. Never allow an untrained individual to operate the log
splitter.
4. Understand the function of all the controls and their
proper operation. Know how to stop the machine in case
of emergency.
PREPARATION
Work Area
1. Plan your log splitting pattern to avoid discharge of
material toward people, pets, and property. Thrown
objects can cause serious personal injury.
2. Always inspect the area where the log splitter is to
be used. Ensure the surface the machine is on is
23.6 inch – 29.5 inch (60 cm – 75 cm) high, stable, level
and free from overhanging items such as limbs, wires etc.
3. All visitors: children, adults, and pets, should be kept at a
distance from working area, at least 16.5 ft. (5 m) from the
log splitter while it is in operation. Stop the log splitter if
people or pets enter the discharge area.
4. Always observe the surface conditions to avoid slipping,
falling, and unexpected objects.
5. Avoid Dangerous Environments – Don’t use appliances in
damp or wet locations. Do not operate the log splitter in
the rain or wet conditions.
6. Operation of the log splitter where temperatures are
below 41ºF (5ºC) or above 104ºF (40ºC), at a high altitude
and/or high humidity may result in a malfunction of the
machine. Do not use the log splitter in poor environmental
conditions.
7. Ensure electrical conditions meet requirements (see
Electric Safety).
8. Do not use the machine where gasoline, natural gas or
other ammable vapors are present. The electric motor
may spark and cause an explosion or re.
Protective Clothing
1. Thrown objects can cause serious injury to the eyes and
exposed body. Always wear safety glasses or eye shields
during operation and while performing an adjustment or
repair. Always use face or dust mask if operation is dusty.
2. Use of rubber gloves and substantial footwear is
recommended when working outdoors. Wear protective
hair covering to contain long hair.
3. Always operate wearing adequate protective garments.
Dress Properly – Do not wear jewelry or other loose
clothing, which could become entangled in moving parts.
Wear footwear that provides protection for the feet and
ensures sure footing.
4. Always use ear protection if the noise level exceeds 85
dB. Observe any noise prevention regulations and laws.
5. Inspect the log splitter for worn, missing or damaged
parts and safety labels. See maintenance section for
detailed instructions.
6. Use the Right Appliance – Do not use this appliance for
any job except that for which it is intended.
1
Page 2

Wood Condition
1. Do not split oversized logs (max. log diameter: 10 inch,
max log length: 20.5 inch). Do not attempt to split “hard”
wood that requires more than 5 seconds to split.
2. Ensure the log is free from items that may be projected or
cause damage to the machine (ie.: nails, wire).
3. Ensure the end of the log is cut square and all branches
have been cut ush.
OPERATION
Operator Requirements
1. Only one person shall operate the log splitter. All other
individuals and animals shall maintain a safe distance
during operation (see safety warning in Preparation).
2. Always operate the machine in a standing position and in
a location that is not in the path of projected debris. The
location of the machine should provide safe footing and
balance for the operator.
3. Do not operate the machine while under the inuence of
alcohol, drugs or physically, mentally fatigued. Always be
alert and watch what you are doing!
4. Contact with the moving parts can amputate body parts.
Do not put any part of your body near moving parts.
Workload Requirements
1. Never exceed the operating capacity of the log splitter.
2. Always split the log in the direction of the grain. Do not
place a log across the log splitter.
3. Never split more than one log at a time.
4. Do not load a log when the ram is moving.
Log Splitting
1. Remove any keys and adjusting wrenches before turning
the machine ON.
2. Do not use accessories or attachments that are not
recommended in this manual.
3. Place the log on the log retention brackets. Do not hold or
secure the log with your hands.
4. Do not split wood that takes more than 5 seconds to split.
Doing so will apply excessive pressure on the ram cylinder
and damage the machine.
5. Do not push/force the log onto blade. Always let the blade
initiate splitting the log.
6. If the log moves during operation, stop and reset.
7. If a log is jammed do not request assistance of a second
person. Ensure the machine power is disconnected and
built up pressure released before attempting to release
log.
8. Ensure the machine is turned OFF when not in use. If the
machine is left unattended then disconnect power to the
machine.
MAINTENANCE AND STORAGE
1. Maintain or replace safety and instruction labels. Ensure
safety guards are in place.
2. Disconnect the power and ensure built up pressure has
been released from the tool before cleaning, repairing, or
inspecting the log splitter.
3. For best operation keep the blade sharp, moving parts
lubricated and the machine cleaned.
4. Always check for damaged or worn parts, alignment of
moving parts, and tightness of bolts and screws before
each use.
5. Replace oil as specied in the Maintenance section.
Follow all local regulations and laws concerning disposal
of waste oil.
6. Qualied mechanics and electricians must carry out
repairs.
7. When not in use, always store the machine in a secure
location that children cannot access. Store the machine
in a dry environment. The machine can be transported or
stored in the ambient temperature between 77ºF – 131ºF
(25ºC – 55ºC).
Electrical Safety
1. Ground fault circuit interrupter (GFCI) protection should
be provided on the circuit(s) or outlet(s) to be used for the
log splitter. Receptacles are available having built-in GFCI
protection and may be used for this measure of safety.
2. To reduce the risk of electric shock, this appliance has
a polarized plug (i.e. one blade is wider than the other).
Use this appliance only with a polarized, UL-listed (CSA
certied in Canada) extension cord recommended for
outdoor use. The appliance plug will t into a polarized
extension cord only one way.
If the appliance plug does not t fully into the extension
cord, reverse the plug. If the plug still does not t, obtain
a correct polarized extension cord. A polarized extension
cord will require the use of a polarized wall outlet. The
extension cord plug will t into the polarized wall outlet
only one way. If the plug does not t fully into the wall
outlet, reverse the plug. If the plug still does not t,
contact a qualied electrician to install the proper wall
outlet. Do not modify the appliance plug, extension cord
receptacle, or extension cord plug in any way.
3. To prevent electric shock, use only with an extension cord
suitable for outdoor use, such as SW, SOW, STW, STOW,
SJTW, or SJTOW.
Before use, check that the extension cord is in good
condition. When using an extension cord, make sure to
use one heavy enough to carry the current your product
will draw. For lengths less than 50 feet, a No. 14 AWG
extension cord should be used. An undersized cord will
cause a drop in line voltage resulting in loss of power and
overheating.
2
Page 3

m WARNING m
Electric shock may cause SEVERE INJURY or
DEATH. Heed these warnings:
• Do not allow any part of the log splitter to make
contact with water while it is in operation. If the
appliance becomes wet while turned o, wipe dry
before starting.
• Use only a UL-, CSA-, or ETL-rated extension cord for
outdoor, all-weather use, such as the Snow Joe
Sun Joe
with lighted end (Model PJEXT50-B). Visit snowjoe.
com to purchase this extension cord online or, to order
by phone, call 1-866-SNOWJOE (1-866-766-9563).
• Do not use an extension cord over 100 ft (30 m).
• Do not touch the appliance or its plug with wet hands
or while standing in water. Wearing rubber boots
oers some protection.
®
SJTW-A 14-gauge 50-foot extension cord
EXTENSION CORD CHART
®
+
Extension Cord
Length
Wire Gauge (A.W.G.):
4. To prevent the appliance cord from disconnecting from
the extension cord during operation, make a knot with the
two cords as shown in Table 1.
Table 1. Method of Securing Extension Cord
Cord set
(A) Tie cord as shown
(B) Connect plug and receptacle
5. Do not abuse the cord. Never pull the log splitter by the
cord or yank the cord to disconnect it from the receptacle.
Keep the cord away from heat, oil, and sharp edges.
Up to 50 ft
(15 m)
14 12
+50 ft - 100 ft
(+15 m - 30 m)
Appliance cord
3
Page 4

Safety Symbols
The following table depicts and describes safety symbols that may appear on this product. Read, understand, and follow all
instructions on the machine before attempting to assemble and operate.
Symbols SymbolsDescriptions Descriptions
To reduce the risk of injury, user
must read instruction manual.
Wear heavy-duty gloves and
steel-toed boots when using the
machine and handling debris.
WARNING! Do not expose or
operate the unit in rain or wet
conditions. Keep dry.
Moving parts can crush and cut
hands and ngers. Keep hands
clear of the ram plate, wedge, and
logs while splitting.
Disconnect the mains plug if the
cord is damaged or entangled.
SAFETY ALERT – Indicates a
precaution, a warning, or a danger.
Wear eye and hearing protection. For
protection against injury, wear ear
defenders and safety goggles.
Keep bystanders and children
a safe distance away.
WARNING! Always be aware of
the movement of the log splitter.
Keep you hands away from splits
and cracks which open in the log. Do
not remove jammed logs with you
hands.
4
Page 5

Know Your Electric Log Splitter
Read the owner’s manual and safety instructions carefully before operating the log splitter. Compare the illustration below
to the log splitter in order to become familiar with the location of the various controls and adjustments. Save this manual for
future reference.
13
15
14
THE OTHER SIDE
1 2
11
12
10
9
1. Log pusher
2. Log rail
3. Splitting wedge
4. Bleed screw
16
5. Oil drain bolt
6. Lifting handle
7. Supporting leg
8. Log retaining plates
8
3
4
5
6
7
9. Motor
10. Appliance cord
11. On/O switch
12. Switch box
13. Rear wheels
14. Hydraulic control lever
15 Control lever guard
16. Max. pressure limit screw
Technical Data
Rated Voltage 120 V AC 60 Hz 1500 W
Splitting Force (Max) 5 ton
Ram Force/ 5 ton
Continuous Force
Material Steel
Log Length (Max) 20.5 in. (52 cm)
Log Diameter (Max) 10 in. (25.4 cm)
Wedge 5 in. (12.8 cm)
Beam 5.5 in. (14 cm)
Hydraulic Cylinder Size 29.7 in. x 2.3 in.
(Length x Diameter) (75.5 cm x 5.9 cm)
Hydraulic Rod Size 30.2 in. x 1.2 in.
(Length x Diameter) (76.8 cm x 3 cm)
Hydraulic Capacity 1.1 gal (4.2 l)
Wheel Size 6 in. (15.2 cm)
Weight 92.6 lbs (42 kg)
5
Page 6
Unpacking
Carton Contents
• Electric log splitter
• Lifting handle
• Supporting leg
• Bolts, nuts and washers (4 sets)
• Manuals and registration card
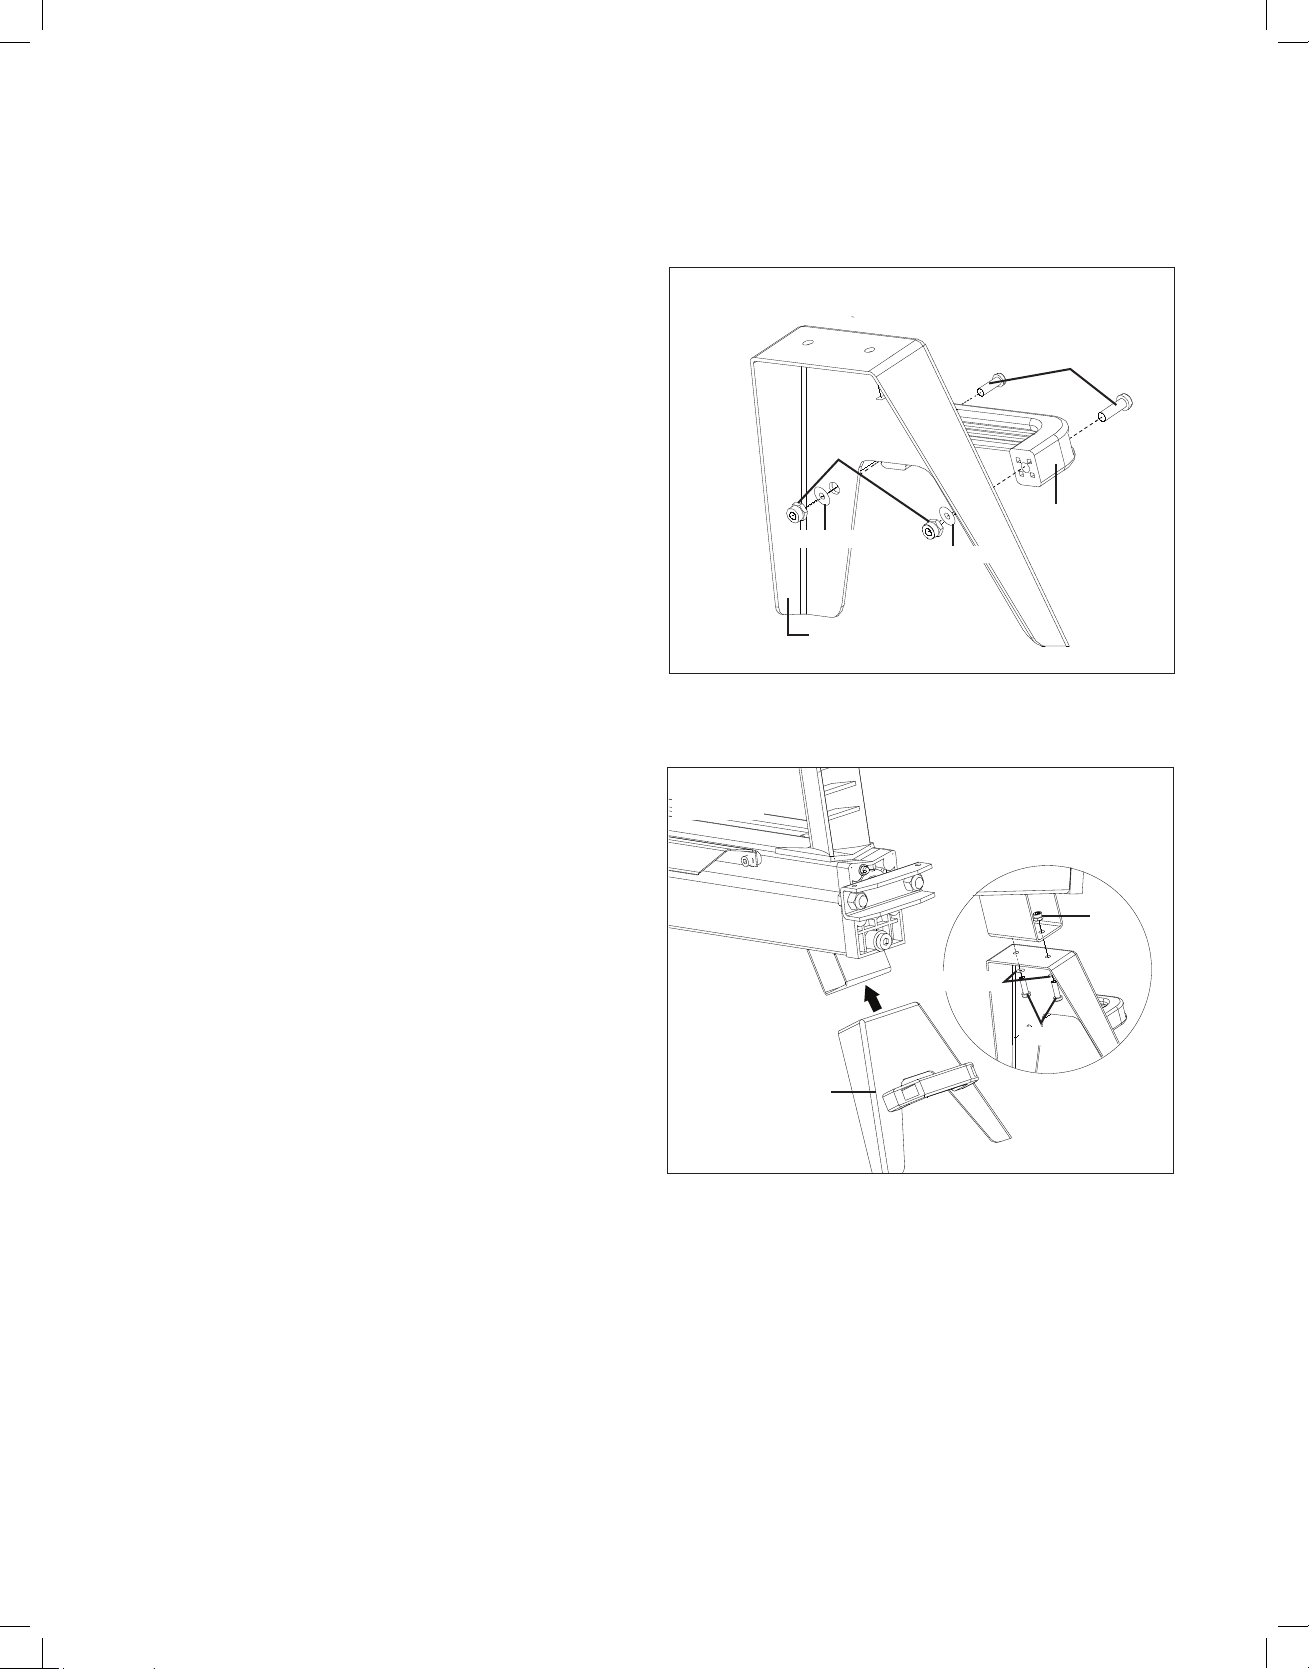
1. Place the lifting handle on the supporting leg, x them
together with the provided bolts, nuts and washers.
Tighten securely (Fig. 1).
Fig. 1
Bolts
1. Carefully remove the log splitter and check to see that all
of the above items are supplied.
2. Inspect the product carefully to make sure no breakage
or damage occurred during shipping. If you nd damaged
or missing parts, DO NOT return the unit to the store.
Please call the Snow Joe® + Sun Joe® customer service
department at 1-866-SNOWJOE (1-866-766-9563).
NOTE: Do not discard the shipping carton and packaging
material until you are ready to use your new electric log
splitter. The packaging is made of recyclable materials.
Properly dispose of these materials in accordance with
local regulations.
IMPORTANT! The equipment and packaging material are not
toys. Do not let children play with plastic bags, foils, or small
parts. These items can be swallowed and pose a suocation
risk!
Assembly
mWARNING! Do not connect to the power supply
until assembly is complete. Failure to comply could result in
accidental starting and serious personal injury.
mWARNING! The product must be fully assembled
before operation. Do not use a product that is only partially
assembled or assembled with damaged parts.
NOTE: Before using the log splitter, follow these instructions to
assemble the lifting handle and the supporting leg.
Nuts
Lifting handle
Washer
Supporting leg
2. Attach the leg with handle assembly on the bottom of the
log splitter, secure with the other 2 sets of bolts, nuts and
washers. Tighten securely (Fig. 2).
Fig. 2
Leg with handle
assembly
Washer
Nut
Washers
Bolts
6
Page 7
Operation
mWARNING! Before using the log splitter, review the
instructions below and all safety information. Failure to follow
these instructions may result in property damage or injury to
the operator or bystanders.
mWARNING! Before the initial operation, the bleed screw
should be adjusted to allow air to go in and out of the oil tank.
(loosen three to four turns). Airow should be detectable during
operation. To avoid leaking oil close the bleed screw when
moving the machine.
Important! Failure to open the bleed screw during operation
will result in permanent damage to the log splitter.
mWARNING! Do not adjust the max. pressure limiting
screw. This was set at the factory so the log splitter works
under the maximum pressure limit of 5 tons. Tampering
with the screw will result in hydraulic pump failure. Only a
professional mechanic shall adjust the max. pressure limiting
screw.
Splitting Operation
Follow these instructions to operate the log splitter:
1. Ensure all logs meet the proper size requirements
[(max log diameter: 10 in. (25.4 cm); max log length:
20.5 in. (52 cm)].
IMPORTANT! Logs vary in hardness and structure. Small
logs with knots or harder wood may be more dicult to
split. Larger logs with less hardness may not be dicult to
split. Do not force the log splitter if the log fails to split on
the rst attempt.
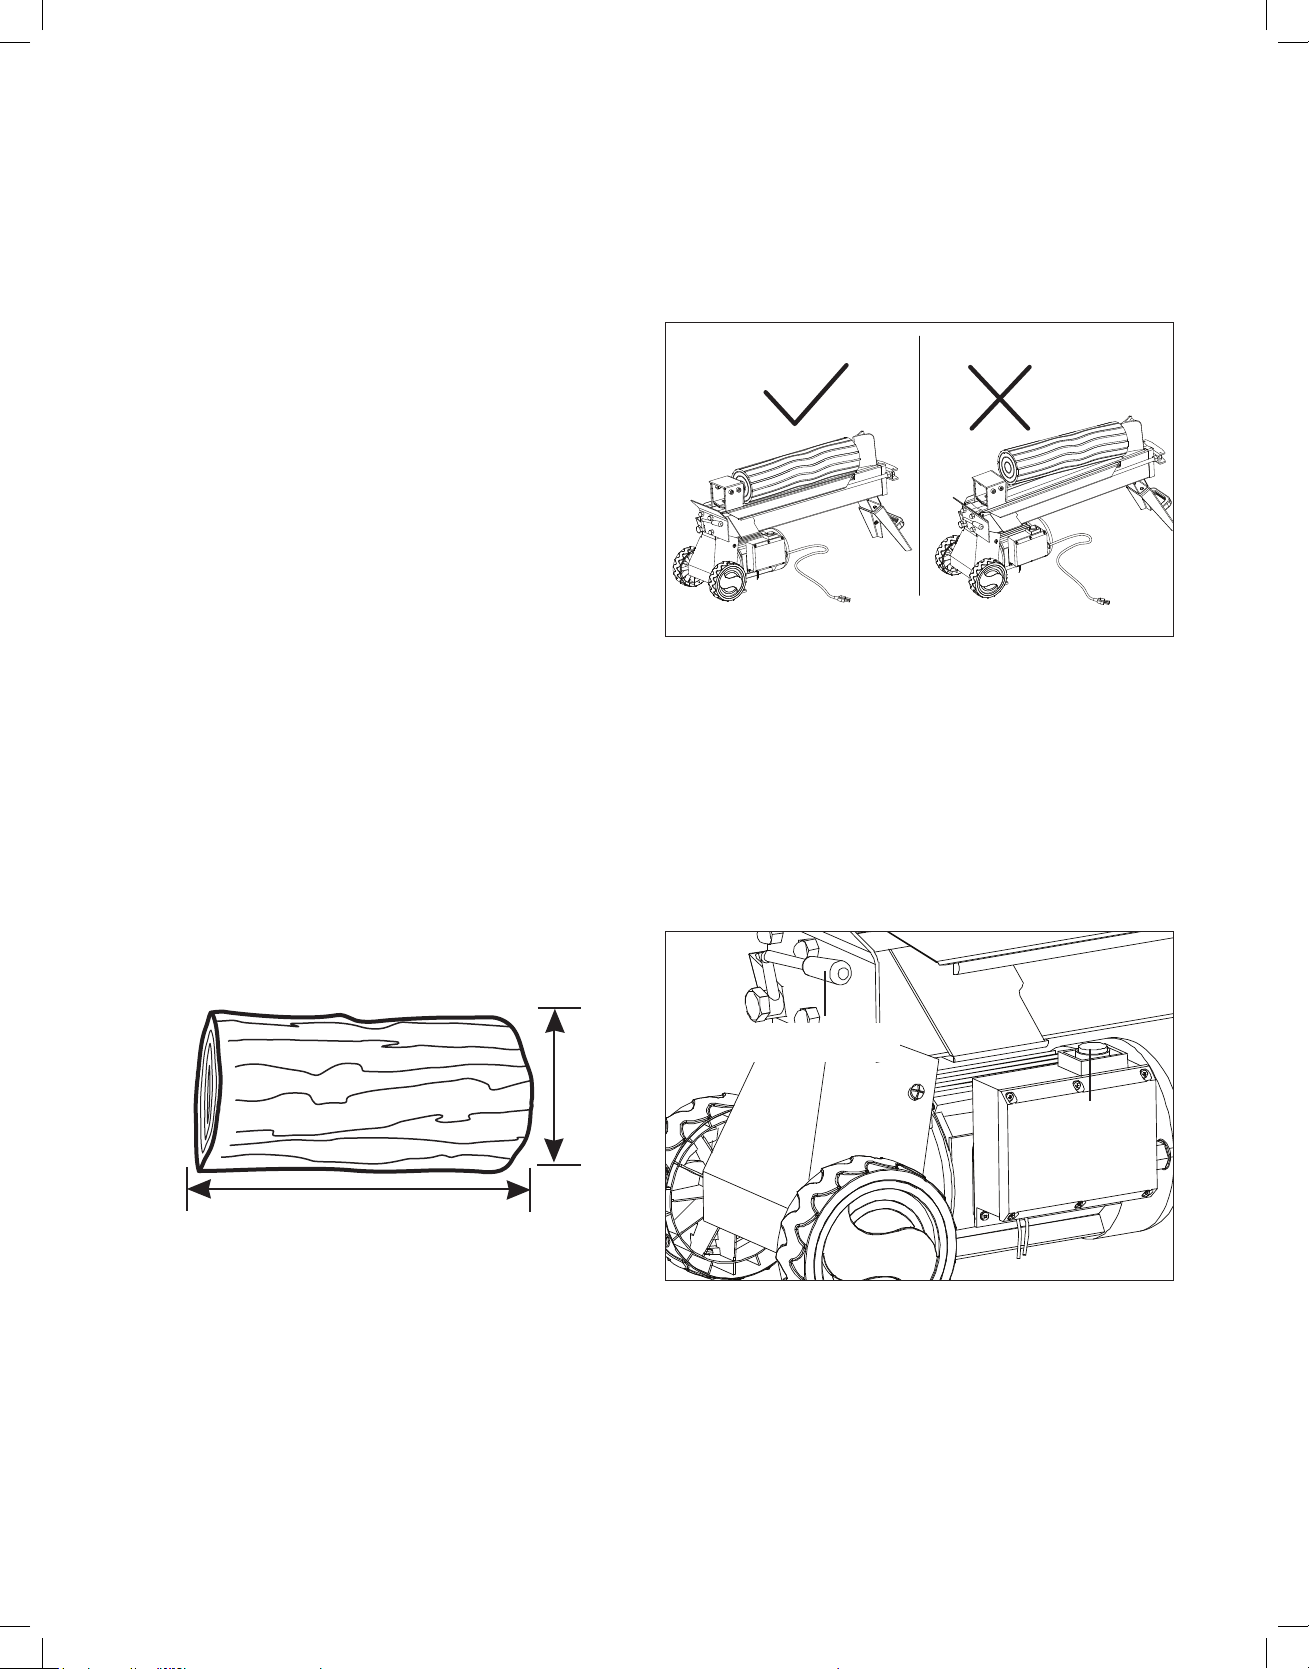
mWARNING! Always set logs rmly on the log retaining
plates and the log rail. Make sure logs will not twist, rock or
slip while being split. Do not force the blade by splitting the
log on the upper part. This will break the blade or damage the
machine (Fig. 3).
Fig. 3
mWARNING! Never load or unload logs while the log
pusher is moving.
6. Plug the appliance cord into an appropriate power outlet.
7. Engage the log pusher by using your left hand to push the
hydraulic control lever and your right hand to push the
On/O switch (Fig. 4).
NOTE: This log splitter is equipped with ZHB control
system, which requires both the On/O switch and the
hydraulic control lever to be engaged simultaneously to
start the machine.
Fig. 4
10 in. (25.4 cm)
20.5 in. (52 cm)
2. When loading or positioning a log, always handle the bark
side; never handle the ends. Never place your hands or
body parts between the log and the splitter.
3. Make sure all moving parts is completely stop. Never load
or unload logs while the log pusher is moving.
4. Check that bleed Screw is open.
5. Load the log lengthwise into the unit between the wedge
and the log pusher. Be sure that the split will be along the
grain. Check to make sure the log is xed stably.
Hydraulic control
lever
On/O switch
8. The log pusher will move forward and the log will be split
by the splitting wedge.
mWARNING! If the log cannot be split within 5 seconds,
do not engage the log pusher any more, otherwise the log
splitter will be damaged. For extremely hard logs, rotate it by
90° to see if it can be split in a dierent direction. If the log
still cannot be split, its hardness exceeds the capacity of the
machine and thus that log should be discarded to protect the
log splitter.
7
Page 8

mWARNING! Break log in the direction of its growing
grain. Do not place log across the log splitter for splitting. It
may be dangerous and may seriously damage the machine.
mWARNING! Do not attempt to split 2 log pieces at the
same time. A piece may y up and cause personal injury.
mWARNING! Accidents occur when there is more than
one person involved in loading and operating the log splitter;
only one person should operate the splitter. If a second person
is assisting in loading the splitter, NEVER allow an assistant to
hold the log in place while the operator is using the unit.
9. Release both the hydraulic control lever and the On/O
switch, the log pusher will move to the original position.
Wait until the wood pusher completely stops, and remove
the split log.
Fig. 6
Maintenance
Removing A Jammed Log
If the log gets stuck on the wedge base, or the wedge
becomes embedded in the log and will not completely split or
separate from the log, follow the directions below to remove
the log.
m WARNING! Do not attempt to remove the jammed
log with your hands or knock it o. It may cause serious injury
or damage to the machine.
1. Release both the hydraulic control lever and the On/O
switch.
2. After the log pusher moves back and completely stops
at its starting position, insert a wedge wood under the
jammed log (Fig. 5).
Fig. 5
Wedged wood
3. Start the log splitter to push the wedge wood to go
completely under the jammed one.
4. Repeat above instructions 2 - 3 with a sharper sloped
wooden wedge as needed until the log is free.
mWARNING! Do not try to knock the jammed log o. It
will damage the machine or may launch the log and cause an
accident or injury (Fig. 6).
mWARNING! Always disconnect the power and ensure
built up pressure has been released from the tool before
cleaning, repairing, or inspecting the log splitter.
General
• Periodically apply a light coat of rust resistant oil, such as
3-in-1 oil or WD-40, to the springs to keep them in proper
working order.
• Periodically check all fasteners for tightness.
• Annually clean and lightly lubricate parts.
• Use a glossy enamel spray paint to touch up scratched or
worn painted metal surfaces.
• Never exceed the load capacity rating of 5 tons; it will
damage the log splitter and void the manufacturer's
warranty.
• Periodically sharpen the wedge. Use a ne tooth le, take
o burrs and smooth rough sections of the cutting edge.
IMPORTANT! If a part needs replacement, only use parts
that are specically recommended by the manufacturer.
Replacement parts that do not meet these specications
may result in a safety hazard, may compromise the tool's
performance, and will void the manufacturer's warranty.
Replacing the Hydraulic Oil
After every 150 hours of use, the hydraulic oil needs to
be replaced. The following hydraulic oils or equivalent are
recommend for the log splitter’s hydraulic transmission
system.
• SHELL Tellus 22
• MOBIL DTE 11
• ARAL Vitam GF 22
• BP Energol HLP-HM 22
To replace the hydraulic oil, follow the instructions below.
1. Turn o and unplug the log splitter. Make sure all moving
parts have come to a complete stop.
2. Unscrew to remove the oil drain bolt with dipstick (Fig. 7).
8
Page 9

Fig. 7
Oil drain bolt
with dipstick
3. Turn the log splitter and let it stand on the supporting leg
to drain the hydraulic oil o (Fig. 8).
5. Clean the oil drain bolt before thread them back. Make
sure it is tightened to avoid leakage before place the log
splitter horizontally.
Storage
• Before storing, make sure the log splitter is clean and dry.
Such upkeep is necessary to ensure years of trouble-free
performance.
• Lightly lubricate all metal surfaces before storing.
• Store the machine in a secure location that children
cannot access. Store the machine in a dry environment.
The machine can be transported or stored in the ambient
temperature between 77ºF – 131ºF (25ºC – 55ºC).
• Examine the log splitter thoroughly for worn, loose, or
damaged parts. Should you need to repair or replace a
part, contact an authorized Snow Joe® + Sun Joe® dealer
or call the Snow Joe® + Sun Joe® customer service center
at 1-866-SNOWJOE (1-866-766-9563) for assistance.
Fig. 8
Supporting leg
4. Turn the log splitter and let it stand on the rear wheels,
and rell the hydraulic oil into the hole behind the oil drain
bolt with dipstick (Fig. 9).
Fig. 9
Rell oil here
Service + Support
If your Sun Joe® LJ602E electric log splitter requires service or
maintenance, please call 1-866-SNOWJOE (1-866-766-9563)
for assistance.
Model + Serial Numbers
When contacting the company or reordering parts, you will
need to provide the model and serial numbers of your product.
These are found on the decal axed to the housing or handle
of your log splitter. Copy these numbers into the space
provided below.
Record the following numbers from the housing or handle of your
new product:
L J 6 0 2 E
Model #:
Serial #:
Rear wheel
9
Page 10

Troubleshooting
Problem Possible Causes
Motor does not run
The machine fails to
split logs
The log pusher moves
jerkily, generating
unusual noise or
vibrating a lot
• Overload protection device
disengaged to protect the log
splitter from being damaged
• Log is improperly positioned.
• The sizes or hardness of the
log exceeds the capacity of the
machine
• Wedge cutting edge is blunt
• Oil leaks
• Unauthorized adjustment was
made on Max. Pressure Limiting
Screw. Lower max pressure rating
was set.
• Lack of hydraulic oil and
excessive air in the hydraulic
system.
Recommended Remedy
• Contact a qualied electrician for opening
the switch box to engage the overload
protection device inside.
• Reload the log
• Reduce the log size
• Locate leak(s) and call the Snow Joe
Sun Joe
®
customer service department at
1-866-SNOWJOE (1-866-766-9563).
®
• Call the Snow Joe
+ Sun Joe® customer
service department at 1-866-SNOWJOE
(1-866-766-9563).
• Check oil level. Rell the hydraulic oil
if needed.
®
+
Oil leaks around the
ram or from other
points.
• Air sealed in hydraulic system
while operating.
• Bleed screw is not tightened
before moving the log splitter.
• Oil drain bolt with dipstick is
not tightened.
• Hydraulic control valve
assembly and/or seal(s) is
• Loosen bleed screw by 3 ~ 4 rotations before
operating the log splitter.
• Tighten the bleed screw up before moving the
log splitter.
• Tighten the oil drain bolt with dipstick.
®
• Call the Snow Joe
+ Sun Joe® customer
service department at 1-866-SNOWJOE
(1-866-766-9563).
worn.
Only a company specialist may be able to correct faults that cannot be rectied with the aid of this table. Please call the
Snow Joe® + Sun Joe® customer service center at 1-866-SNOWJOE (1-866-766-9563).
10
Page 11

Optional Accessories
mWARNING! ALWAYS use only authorized Snow Joe
replacement parts or accessories that are not intended for use with this tool. Contact Snow Joe® + Sun Joe® if you are unsure
whether it is safe to use a particular replacement part or accessory with your tool. The use of any other attachment or accessory
can be dangerous and could cause injury or mechanical damage.
®
+ Sun Joe® replacement parts and accessories. NEVER use
ModelAccessories Item
1
Snow Joe® + Sun Joe® SJTW-A 14-gauge
50-foot extension cord with lighted end
NOTE: Accessories are subject to change without any obligation on the part of Snow Joe® + Sun Joe® to provide notice of such
changes. Accessories can be ordered online at snowjoe.com or via phone by contacting the Snow Joe® + Sun Joe® customer
service center at 1-866-SNOWJOE (1-866-766-9563).
PJEXT50-B
11
Page 12

NOTES
12
Page 13

NOTES
13
Page 14

NOTES
14
Page 15

SNOW JOE® + SUN JOE® CUSTOMER PROMISE
ABOVE ALL ELSE, Snow Joe® + Sun Joe® are dedicated to you, our customer. We strive to make your experience as pleasant
as possible. Unfortunately, there are times when a product does not work or breaks under normal operating conditions. We
think it’s important that you know what you can expect from us. That’s why we created the Snow Joe® + Sun Joe® promise.
OUR PROMISE: Snow Joe® + Sun Joe® warrant new products for two years from the date of purchase. If your product does
not work, or there’s an issue with a specic part, we will x this by either sending you a free replacement part or by sending
you a new or comparable product at no charge. How cool is that! Before you know it, you’ll be back in action cutting,
sawing, mowing, washing and…?
PRODUCT REGISTRATION:
Snow Joe®, LLC (“Snow Joe® + Sun Joe®”) strongly encourages
you to register your purchase. You can register online at
snowjoe.com/ProductRegistration, or by printing and mailing
in a registration card available online from our website, or
calling our Customer Service Department at 1-866-SNOWJOE
(1-866-766-9563), or by e-mailing us at help@snowjoe.com.
Failure to register your product purchase will not diminish your
warranty rights. However, registering your purchase will allow
Snow Joe® + Sun Joe® to better serve you with any of your
customer service needs.
WHO CAN SEEK WARRANTY COVERAGE?
This Warranty is extended by Snow Joe® + Sun Joe® to the owner
of this Machine (a “Machine” consists of a product powered by
a motor) for residential and personal household use only. This
Warranty does not apply to products used for commercial, rental
or re-sale purposes. Should ownership of this machine change
during the 2-year period, please update the Machine’s owner
information at snowjoe.com/ProductRegistration.
WHAT IS COVERED?
Snow Joe® + Sun Joe® warrants to the owner that if this Machine
fails within 2 years from the date of purchase due to a defect in
material or workmanship or as a result of normal wear and tear
from ordinary household use, Snow Joe® + Sun Joe® will send a
replacement part or product, as needed, free of charge and with
free shipping to the original purchaser.
If, in Snow Joe® + Sun Joe®’s sole discretion, the failed Machine
cannot be repaired with a part, Snow Joe® + Sun Joe® will elect to
either (A) send a new Machine at no charge and with free shipping
or (B) refund the full purchase price to the owner.
WHAT IS NOT COVERED?
This Warranty does not apply to the Machines that have been used
commercially or in non-household applications. This Warranty
does not cover cosmetic changes that do not aect performance.
This Warranty is only valid if the Machine is used and maintained
in accordance with the instructions, warnings and safeguards
contained in the owner’s manual. Snow Joe® + Sun Joe® will not
be responsible for the cost of any unauthorized warranty repairs.
This warranty does not cover any cost or expense incurred by
the purchaser in providing substitute equipment or service during
reasonable periods of malfunction or non-use of this product
while waiting for a replacement part or unit under this warranty.
Wearing parts like belts, augers, chains and tines are not covered
under this warranty, and can be purchased at snowjoe.com or
by calling 1-866-SNOWJOE (1-866-766-9563). Batteries are
covered in full for 90-days from the date of purchase.
Repair, replacement or refund of the purchase price are the
exclusive remedies of purchaser and the sole liability of Snow Joe®
+ Sun Joe® under this warranty. No employee or representative
of Snow Joe® + Sun Joe® is authorized to make any additional
warranty or any modication to this warranty which may be
binding upon Snow Joe® + Sun Joe®. Accordingly, purchaser
should not rely upon any additional statements made by any
employee or representative of Snow Joe® + Sun Joe®. In no event,
whether based on contract, indemnity, warranty, tort (including
negligence), strict liability or otherwise, shall Snow Joe® +
Sun Joe® be liable for any special, indirect, incidental, or
consequential damages, including, without limitation, loss of
prot or revenue.
Some states do not allow limits on warranties. In such states, the
above limitations may not apply to you.
Outside the USA, other warranties may apply.
15
Page 16

snowjoe.com
mWARNING! This product or its power cord contains chemicals, including lead, known to the State
of California to cause cancer and birth defects or other reproductive harm. Wash hands after handling.
For more information go to www.P65Warnings.ca.gov.
mWARNING! Some dust created by power sanding, sawing, grinding, drilling, and other construction activities
contains chemicals known [to the State of California] to cause cancer, birth defects, or other reproductive harm.
Some examples of these chemicals are:
• lead from lead-based paints,
• crystalline silica from bricks and cement and other masonry products, and
• arsenic and chromium from chemically-treated lumber.
Your risk from these exposures varies, depending on how often you do this type of work. To reduce
your exposure to these chemicals: work in a well ventilated area, and work with approved safety
equipment, such as those dust masks that are specically designed to lter out microscopic particles.
For more information go to www.P65Warnings.ca.gov.
 Loading...