

Page 1

OPERATOR’S MANUAL
A Division of Snow Joe
®
, LLC Model 24V-MJ14C Form No. SJ-24V-MJ14C-880E-MR2
EN
R
CORDLESS LAWN MOWER
24-VOLT MAX* | 4.0 Ah | 14-INCH
IMPORTANT!
Safety Instructions
All Operators Must Read These
Instructions Before Use
Always follow these safety guidelines. Failure to do so may
result in serious bodily injury or death.
General Safety WARNINGS!
When using this cordless lawn mower, basic safety
precautions should always be followed to reduce the risk of
re, electric shock and personal injury. These precautions
include:
mWARNING! Do not operate without the entire grass
catcher, discharge guard, rear guard or other safety protective
devices in place and in proper working order.
mWARNING! The use of any other accessory or
attachment might increase the risk of injury.
mWARNING! To reduce the risk of injury, inspect the
catcher assembly frequently and replace with recommended
replacement if there are signs of wear or deterioration.
Before using the mower, take the time to familiarize yourself
with the controls, especially how to stop the mower in
an emergency. The only individuals who should use the
mower are those who have a thorough understanding of the
instructions and who know how to operate the machine.
Children should never be allowed access to the mower.
Retain this manual for future reference and reread it at the start
of each mowing season.
mWARNING! Contact with moving parts may cause
entanglement, dismemberment or other serious bodily
injury. Always keep body parts (i.e. hands, feet) a safe
distance away from moving parts. Ensure all covers and
guards are securely in place before use.
Hot surfaces (i.e. the motor) may ignite ammable or
combustible items and cause a re or explosion, which
can result in serious bodily injury. Keep the mower a safe
distance away from ammable or combustible items until
surfaces that are hot have completely cooled. Do not store
the mower near ammable or combustible items.
A damaged blade or worn blade nut may break o the
mower assembly and cause serious injury. Replace the
damaged blade or blade nut before using the mower.
1. Avoid dangerous conditions – Do not use the mower in
the rain or when the grass is damp or wet.
2. Keep children, bystanders and pets away – Always
keep children and spectators a safe distance away from
the mower during operation and as the machine cools.
3. Dress properly – Always wear personal safety gear (i.e.
glasses, rubber gloves, protective footwear and dust
masks) and proper clothing when using the mower. Loose
clothing, long hair or jewelry may get caught in the moving
parts.
4. Use the right appliance – Do not use the lawn mower
for any applications other than those for which it was
intended.
5. Do not force the lawn mower – It will perform better with
less likelihood of personal or mechanical injury if it is used
at the rate for which it was designed.
6. Do not overreach – Keep proper footing and balance at
all times.
7. Stay alert – Always be alert and watch what you are
doing. Use common sense. Do not operate the lawn
mower when you are tired or under the inuence of
alcohol or drugs.
8. Disconnect the lawn mower – Turn OFF and remove
safety key when the mower is not in use, before servicing
it, when changing accessories and when performing any
other maintenance task.
9. Store idle lawn mower indoors – When not in use,
the lawn mower should be stored indoors in a dry, locked
place out of the reach of children.
10. Maintain the lawn mower with care – Keep cutting
edges sharp and clean for best and safest performance.
11. Use personal protective equipment. Always wear eye
protection – Protective equipment such as safety glasses,
a dusk mask, non-skid safety shoes, a hard hat, and
hearing protection, when used for appropriate conditions,
will reduce the possibility of personal injuries.
© 2021 by Snow Joe®, LLC
All rights reserved. Original instructions.
SAVE THESE INSTRUCTIONS
1
Page 2

12. Avoid unintentional starting – Ensure the switch is in
the OFF position before insert the safety key, or before
picking up or carrying the tool. Carrying power tools with
your nger on the switch or charging power tools with the
switch ON can lead to accidents.
13. Remove any adjusting key or wrench before starting
the power tool – A wrench or a key left attached to a
rotating part of the power tool may result in personal injury.
14. Keep cutting blades sharp and clean – Properly
maintained cutting blades with sharp edges are less likely
to bind and are easier to control.
15. Keep all parts of the body away from the cutting blade
– Do not remove cut material or hold material to be cut
when blades are moving. Make sure the switch is o when
clearing jammed material. A moment of inattention while
operating the product may result in serious personal injury.
16. If the lawn mower strikes a foreign object, follow these
steps:
i) Stop the lawn mower by releasing the start/stop switch
bar lever.
ii) Remove the safety key.
iii) Inspect for damage.
iv) Repair any damage before restarting and operating
the lawn mower.
17. Only use identical replacement blades and
other genuine parts.
18. Keep guards in place and in proper working order.
Electrical Safety
1. If the battery charger cable is damaged, please call the
Snow Joe
1-866-SNOWJOE (1-866-766-9563).
2. If charging the power tool in a damp location is
unavoidable, use a residual current device (RCD)
protected power supply. The using of an RCD reduces the
risk of electric shock.
3. Avoid body contact with earthed or grounded surfaces
such as pipes, radiators, ranges and refrigerators. There is
an increased risk of electric shock if your body is earthed
or grounded.
4. Do not expose power tools to rain or wet conditions.
Water entering a power tool will increase the risk of
electric shock.
5. Do not abuse the charging cord. Never use the cord
for carrying, pulling or unplugging the charger. Keep
cord away from heat, oil, sharp edges or moving parts.
Damaged or entangled cords increase the risk of electric
shock.
6. Battery charger is for indoor use only. Do not charge lawn
mower in rain, or in wet locations.
®
+ Sun Joe® customer service center at
Battery & Charger
Safety Instructions
We pay a great deal of attention to the design of every battery
pack to ensure that we supply you with batteries that are safe,
durable and have a high energy density. The battery cells have
a wide range of safety devices. Each individual cell is initially
formatted and its electrical characteristic curves are recorded.
This data is then used exclusively to be able to assemble the
best possible battery packs.
Despite all the safety precautions, caution must always be
exercised when handling batteries. The following points must
be obeyed at all times to ensure safe use. Safe use can only
be guaranteed if undamaged cells are used. Incorrect handling
of the battery pack can cause cell damage.
IMPORTANT! Analyses conrm that incorrect use and poor
care of high-performance batteries are the main factors
responsible for personal and/or product damage.
mWARNING! Use only approved replacement batteries;
other batteries may damage the power tool and cause it to
malfunction, which can lead to serious personal injury.
mWARNING! Do not use a battery pack or appliance that
is damaged or modied. Damaged or modied batteries may
exhibit unpredictable behavior resulting in re, explosion or risk
of injury.
Do not modify or attempt to repair the appliance or the battery
pack except as indicated in the instructions for use and care.
Have your battery pack serviced by a qualied repair person
using only identical replacement parts. This will ensure that the
safety of the battery pack is maintained.
mCAUTION! To reduce the risk of injury, charge the
iON+ 24V lithium-ion battery pack only in its designated
iON+ 24V lithium-ion charger. Other types of chargers present
risk of re, personal injury and damage. Do not wire a battery
pack to a power supply plug or car cigarette lighter. Such
misuse will permanently disable or damage the battery pack.
• Avoid dangerous environments – Do not charge the
battery pack in rain, snow or in damp or wet locations.
Do not use the battery pack or charger in the presence of
explosive atmospheres (gaseous fumes, dust or ammable
materials) because sparks may be generated when inserting
or removing the battery pack, which could lead to a re.
• Charge in a well-ventilated area – Do not block the
charger vents. Keep them clear to allow for proper
ventilation. Do not allow smoking or open ames near a
charging battery pack. Vented gases may explode.
NOTE: The safe temperature range for the battery is 41°F
(5°C) to 105°F (40.5°C). Do not charge the battery outside in
freezing weather; charge it at room temperature.
• Maintain charger cord – When unplugging the charger,
pull the plug, not the cord, from the receptacle to reduce
2
Page 3

the risk of damage to the electrical plug and cord.
Never carry the charger by its cord or yank it by the cord
to disconnect it from the receptacle. Keep the cord away
from heat, oil and sharp edges. Make sure the cord will not
be stepped on, tripped over or subjected to damage or
stress when the charger is in use. Do not use the charger
with a damaged cord or plug. Replace a damaged charger
immediately.
• Do not use an extension cord unless it is absolutely
necessary – Using the wrong, damaged or improperly
wired extension cord poses a risk of re and electric shock.
If an extension cord must be used, plug the charger into a
properly wired 16 gauge or larger extension cord with the
female plug matching the male plug on the charger. Make
sure that the extension cord is in good electrical condition.
• Use only recommended attachments – Use of an
attachment not recommended or sold by the battery
charger or battery pack manufacturer may result in risk of
re, electric shock or personal injury.
• Unplug charger when not in use – Make sure to remove
battery packs from unplugged chargers.
mWARNING! To reduce the risk of electric shock,
always unplug the charger before performing any cleaning
or maintenance. Do not allow water to ow into the charger.
Use a Ground Fault Circuit Interrupter (GFCI) to reduce shock
hazards.
• Do not burn or incinerate battery packs – Battery packs
may explode, causing personal injury or damage. Toxic
fumes and materials are created when battery packs are
burned.
• Do not crush, drop or damage battery packs – Do not
use the battery pack or charger if they have sustained a
sharp blow, been dropped, run over or have been damaged
in any way (i.e. pierced with a nail, hit with a hammer,
stepped on, etc.).
• Do not disassemble – Incorrect reassembly may pose
a serious risk of electric shock, re or exposure to toxic
battery chemicals. If the battery or charger are damaged,
contact an authorized Snow Joe
call the Snow Joe
1-866-SNOWJOE (1-866-766-9563) for assistance.
• Battery chemicals cause serious burns – Never let a
damaged battery pack contact the skin, eyes or mouth. If a
damaged battery pack leaks battery chemicals, use rubber
or neoprene gloves to safely dispose of it. If skin is exposed
to battery uids, wash the aected area with soap and
water and rinse with vinegar. If eyes are exposed to battery
chemicals, immediately ush with water for
20 minutes and seek medical attention. Remove and
dispose of contaminated clothing.
• Do not short circuit – A battery pack will short circuit if
a metal object makes a connection between the positive
and negative contacts on the battery pack. Do not place a
battery pack near anything that may cause a short circuit,
such as paperclips, coins, keys, screws, nails and other
metallic objects. A short-circuited battery pack poses a risk
®
+ Sun Joe® customer service center at
®
+ Sun Joe® dealer or
of re and severe personal injury.
• Store your battery pack and charger in a cool, dry
place – Do not store the battery pack or charger where
temperatures may exceed 105ºF (40.5ºC), such as in direct
sunlight or inside a vehicle or metal building during the
summer.
Information about the battery
1. The battery pack supplied with your cordless power tool is
only partially charged. The battery pack has to be charged
completely before you use the tool for the rst time.
2. For optimum battery performance, avoid low discharge
cycles by charging the battery pack frequently.
3. Store the battery pack in a cool place, ideally at 59°F
(15°C) and charged to at least 40%.
4. Lithium-ion batteries are subject to a natural aging
process. The battery pack must be replaced at the latest
when its capacity falls to just 80% of its capacity when
new. Weakened cells in an aged battery pack are no
longer capable of meeting the high power requirements
needed for the proper operation of your cordless spray
washer, and therefore pose a safety risk.
5. Do not throw battery packs into an open re as this poses
a risk of explosion.
6. Do not ignite the battery pack or expose it to re.
7. Do not exhaustively discharge batteries. Exhaustive
discharge will damage the battery cells. The most
common cause of exhaustive discharge is lengthy storage
or non-use of partially discharged batteries. Stop working
as soon as the performance of the battery falls noticeably
or the electronic protection system triggers. Place the
battery pack in storage only after it has been fully charged.
8. Protect batteries and the tool from overloads. Overloads
will quickly result in overheating and cell damage inside
the battery housing even if this overheating is not
apparent externally.
9. Avoid damage and shocks. Immediately replace batteries
that have been dropped from a height of more than
3 feet (1 meter) or those that have been exposed to violent
shocks, even if the housing of the battery pack appears to
be undamaged. The battery cells inside the battery may
have suered serious damage. In such instances, please
read the waste disposal information for proper battery
disposal.
10. If the battery pack suers overloading and overheating,
the integrated protective cuto will switch o the
equipment for safety reasons.
IMPORTANT! Do not press the ON/OFF switch any more
if the protective cut-o has been activated. This may
damage the battery pack.
11. Use only original battery packs. The use of other batteries
poses a re risk and may result in injuries or an explosion.
3
Page 4

Information about the charger and the
charging process
1. Please check the data marked on the rating plate of the
battery charger. Be sure to connect the battery charger
to a power supply with the voltage marked on the rating
plate. Never connect it to a dierent mains voltage.
2. Protect the battery charger and its cord from damage.
Keep the charger and its cord away from heat, oil and
sharp edges. Have damaged cords repaired without delay
by a qualied technician at an authorized Snow Joe
Sun Joe
customer service center at 1-866-SNOWJOE
(1-866-766-9563).
3. Electrical plugs must match the outlet. Never modify
the plug in any way. Do not use any adapter plugs with
grounded appliances. Unmodied plugs and matching
outlets will reduce the risk of electric shock.
4. Keep the battery charger, battery pack(s) and the cordless
tool out of the reach of children.
5. Do not use the supplied battery charger to charge other
cordless tools.
6. During periods of heavy use, the battery pack will become
warm. Allow the battery pack to cool to room temperature
before inserting it into the charger to recharge.
7. Do not overcharge batteries. Do not exceed the maximum
charging times. These charging times only apply to
discharged batteries. Frequent insertion of a charged or
partially charged battery pack will result in overcharging
and cell damage. Do not leave batteries in the charger for
days on end.
8. Never use or charge batteries if you suspect that it has
been more than 12 months since the last time they were
charged. There is a high probability that the battery pack
has already suered dangerous damage (exhaustive
discharge).
9. Charging batteries at a temperature below 41°F (5°C) will
cause chemical damage to the cells and may cause a re.
10. Do not use batteries that have been exposed to heat
during the charging process, as the battery cells may have
suered dangerous damage.
11. Do not use batteries that have suered curvature or
deformation during the charging process or those that
exhibit other atypical symptoms (gassing, hissing,
cracking, etc.).
12. Never fully discharge the battery pack (maximum
recommended depth of discharge is 80%). A complete
discharge of the battery pack will lead to premature aging
of the battery cells.
®
dealer or call the Snow Joe® + Sun Joe®
®
+
Protection from environmental inuences
1. Wear suitable work clothes. Wear safety goggles.
2. Protect your cordless tool and the battery charger from
moisture and rain. Moisture and rain can cause dangerous
cell damage.
3. Do not use the cordless tool or the battery charger near
vapors and ammable liquids.
4. Use the battery charger and cordless tools only in dry
conditions and at an ambient temperature of 41 – 105°F
(5 – 40.5°C).
5. Do not keep the battery charger in places where the
temperature is liable to reach over 104°F (40°C). In
particular, do not leave the battery charger in a car that is
parked in the sunshine.
6. Protect batteries from overheating. Overloads,
overcharging and exposure to direct sunlight will result
in overheating and cell damage. Never charge or work
with batteries that have been overheated – replace them
immediately, if possible.
7. Store the charger and your cordless tool only in dry
locations with an ambient temperature of 41-105°F
(5-40.5°C). Store your lithium-ion battery pack in a cool,
dry place at a temperature of 50-68°F (10-20°C). Protect
the battery pack, charger and cordless tool from humidity
and direct sunlight. Only place fully charged batteries in
storage (charged to at least 40%).
8. Prevent the lithium-ion battery pack from freezing. Battery
packs that were stored below 32°F (0°C) for more than 60
minutes must be discarded.
9. When handling batteries, be wary of electrostatic charge.
Electrostatic discharges can damage the electronic
protection system and the battery cells. Avoid electrostatic
charging and never touch the battery poles.
IMPORTANT!
Safety Instructions for Walk-Behind
Mowers
General Operation
• Read, understand and follow all instructions on the
machine and in the manual(s) before starting.
• Do not put hands or feet near or under the machine.
Always stay clear of the discharge opening.
• Only responsible adults who are familiar with the
instructions should be allowed to operate this machine.
• Clear the mowing area of foreign objects such as rocks,
wire, toys and other miscellaneous articles, which could
be picked up and thrown by the blade. Stay behind the
handle when the engine (motor) is running.
4
Page 5

• Make sure that the mowing area is clear of bystanders
before starting the machine. Stop the machine if anyone
enters the area.
• Do not operate the machine barefooted or while wearing
sandals. Always wear substantial footwear.
• Always look down and behind before and while moving
backward with the mower.
• Never direct discharged material toward anyone. Avoid
discharging material against a wall or other obstruction.
• Do not operate the machine without the entire grass
catcher, discharge guard, rear guard or other safety
protective devices in place and in proper working order.
• Never leave a running machine unattended.
• Stop the engine (motor) and wait until the blade comes to
a complete stop before cleaning the machine, removing
the grass catcher or unclogging the discharge guard.
• Operate the machine only in daylight or in good articial
light.
• Do not operate the machine when you are tired or under
the inuence of alcohol or drugs.
• Never operate the mower in wet grass. Always be sure of
your footing; walk, never run, with the mower.
• If the machine should start to vibrate abnormally, stop
the engine (motor) and immediately check the machine
to ascertain the cause. Vibration is generally a signal of
trouble.
• Keep blades sharp.
• Keep hands and feet away from the cutting area.
• Always wear eye protection when operating the machine.
• Objects struck by the lawn mower blade can cause severe
injuries. The mowing area should always be carefully
examined and cleared of all objects prior to each mowing.
Slope Operation
Slopes are major factors related to slip and fall accidents,
which can result in severe injury. Operation on all slopes
requires extra caution. If you feel uneasy on a slope, do not
mow it.
• Mow across the face of slopes; never mow slopes
following an up and down traverse. Exercise extreme
caution when changing direction on a slope.
• Watch for holes, ruts, bumps, rocks or other hidden
objects. These may cause an unexpected slip or fall.
• Do not mow on wet grass or excessively steep slopes.
Poor footing could cause a slip and fall accident.
• Do not mow near drop os, ditches or embankments. You
could lose your footing or balance.
Children
Tragic accidents can occur if the operator is not alert to the
presence of children. Children are often attracted to the
machine and the mowing activity. Never assume that children
will remain where you last saw them.
• Keep children out of the mowing area and under the
watchful care of a responsible adult other than the
operator.
• Stay alert and turn the mower o if a child enters the area.
• Never let children operate the machine.
• Use extra care when approaching blind corners, shrubs,
trees or other objects that may block your view of a child.
Service
• Stop the machine and disconnect the safety key before
servicing, cleaning, or removing grass from the lawn
mower.
• Keep all nuts and bolts tight.
• Never tamper with safety devices. Regularly check to
ensure these devices are in place and in proper working
order.
• Keep the mower free from grass, leaves or other debris
buildup.
• If you strike a foreign object, stop and inspect the
machine. Repair, if necessary, before restarting.
• Never make any adjustments or repairs with the engine
(motor) running. Always plug out the safety key before
adjusting, cleaning or repairing.
• Check the grass bag components and the discharge
guard frequently and replace with manufacturer’s
recommended parts when necessary.
• Mower blades are sharp. Wrap the blade or wear gloves,
and use extra caution when servicing them.
• Maintain or replace safety and instruction labels, as
necessary.
• If your power tool requires service, contact an authorized
Snow Joe
Sun Joe
(1-866-766-9563). Only identical replacement parts should
be utilized for repairs. This will ensure that the safety of
the power tool is maintained.
• If the battery charger cable is damaged, it must be
immediately replaced to avoid a hazard. Contact the
Snow Joe
1-866-SNOWJOE (1-866-766-9563) for assistance.
®
+ Sun Joe® dealer or call the Snow Joe® +
®
customer service center at 1-866-SNOWJOE
®
+ Sun Joe® customer service center at
5
Page 6

Safety Symbols
The following table depicts and describes safety symbols that may appear on this product. Read, understand and follow all
instructions on the machine before attempting to assemble and operate.
Symbols SymbolsDescriptions Descriptions
DANGER! Rotating blades. Keep
hands and feet away.
Safety Alert. Caution.
To reduce the risk of injury, user
must read instruction manual.
WARNING! Do not expose or
operate the unit in rain or wet
conditions. Keep dry.
Slip on slope hazard – Use extra
caution when mowing on slopes to
prevent slip and fall accidents.
Thrown objects and rotating
blade can cause severe injury.
Keep bystanders and children a safe
distance away.
Wear eye and hearing protection. For
protection against injury, wear ear
defenders and safety goggles.
Wear protective gloves and
non-slip footwear when using the
machine and handling debris.
Severing of toes or ngers by
rotary mower blade.
Keep bystanders a safe distance
away from the work area.
Blades continue to rotate after
machine is switched o.
Rotating blades, keep hands and
feet away from the opening while
the machine is running.
Indoor use only. Only use battery charger indoors.
6
WARNING! Always turn the machine
OFF and remove the safety key
before conducting inspection,
cleaning and maintenance.
Look behind when backing up with
the lawn mower.
Page 7
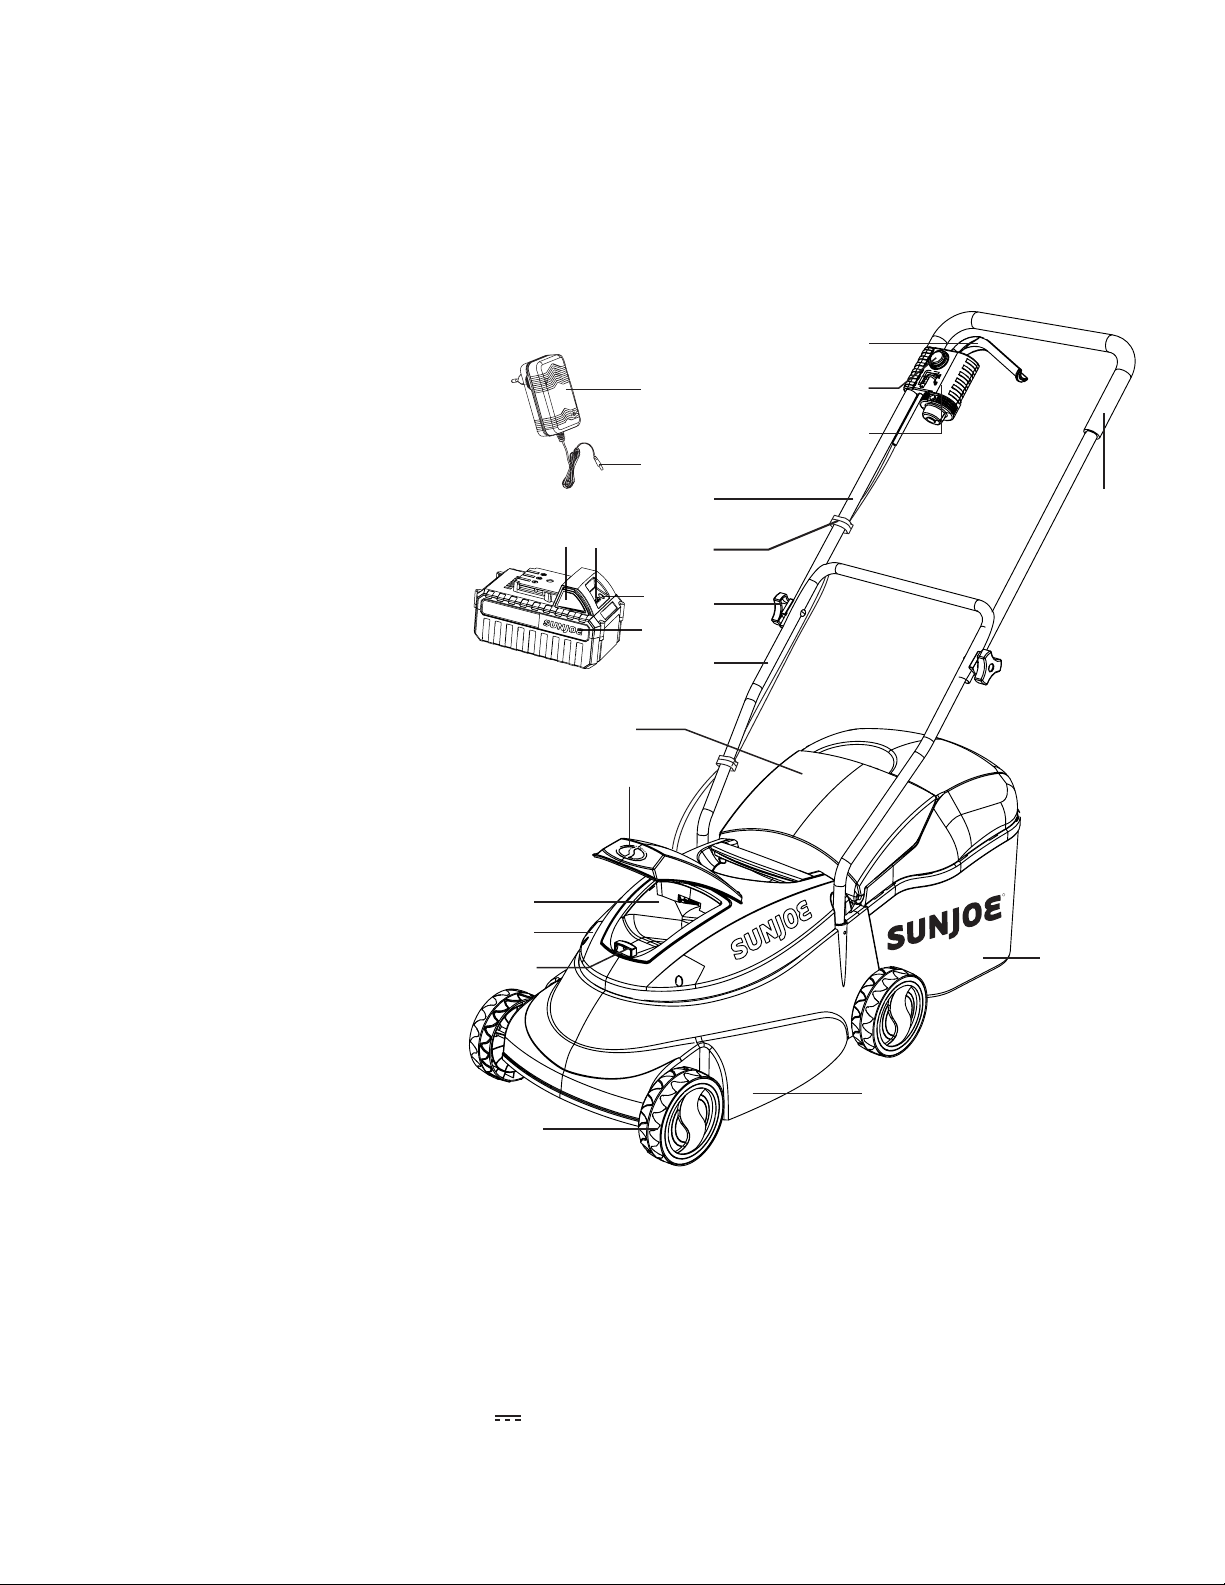
Know Your Cordless Lawn Mower
Read the owner’s manual and safety instructions carefully before operating the mower. Compare the illustration below
to the mower in order to become familiar with the location of the various controls and adjustments. Save this manual for
future reference.
1. Switch lever
2. Safety lock button
3. Switch box
4. Upper handle frame
5. Cable clips (2)
6. Upper handle knobs, washers and
bolts (2)
7. Lower handle frame
8. Ejector ap
9. Battery compartment cover
10. Battery compartment
11. Top cover
12. Safety key
13. Wheels (4)
14. Mower deck
15. Grass collection bag
16. Soft grip
17. iON+ 24V lithium-ion charger
(24VCHRG-AC)
18. Charger plug
19. Push lock button
20. Battery level indicator
21. Push button for battery indicator
22. iON+ 24V lithium-ion battery
(24VBAT)
10
11
12
19 20
1
17
18
4
5
21
6
22
7
8
9
2
3
16
R
15
14
13
Technical Data
Motor ............................................................... 600 W Brushless
Battery Voltage* ........................................................... 24V D.C.
Battery Capacity .............................................................. 4.0 Ah
Battery Runtime Max .... 30 min (cuts up to 1720 sq ft of grass)
Charger Input ................................................... 100 – 240 V AC,
50 – 60 Hz, 50 W
Charger Output .................................. 25.2 V DC,
Charge Time Max .................................................. 2 hrs 40 min
*Initial no-load voltage, when fully charged, peaks at 24 volts; nominal voltage under typical load is 21.6 volts.
1400 mA
No Load Speed .......................................................... 3000 rpm
Cutting Width .................................................... 14 in. (35.6 cm)
Cutting Height ............................................... 1.18 in. to 2.52 in.
Grass Bag Capacity .............................................10.6 gal (40 L)
Wheel Size .......................................................... 5.5 in. (14 cm)
Net Weight ...................................................... 23.1 lbs (10.5 kg)
7
(30 mm to 64 mm)
Page 8
Unpacking
Carton Contents
• Cordless lawn mower
• Grass collection bag
• Grass collection bag support rod
• Upper handle frame
• Upper handle knob, washer and bolt (2)
• Lower handle frame
• Lower handle screws (2)
• Spanner
• Cable clips (2)
• iON+ 24V lithium-ion battery
• iON+ 24V lithium-ion charger
• Manual with registration card
1. Carefully remove the lawn mower and check to see that all
of the above items are supplied.
2. Inspect the product carefully to make sure no breakage or
damage occurred during shipping.
NOTE: Do not discard the shipping carton and packaging
material until you are ready to use your new cordless lawn
mower. The packaging is made of recyclable materials.
Properly dispose of these materials in accordance with
local regulations.
IMPORTANT! The equipment and packaging material are not
toys. Do not let children play with plastic bags, foils, or small
parts. These items can be swallowed and pose a suocation
risk!
Battery Pack Operation
The equipment is powered by a lithium-ion battery. The battery
pack is completely sealed and maintenance free.
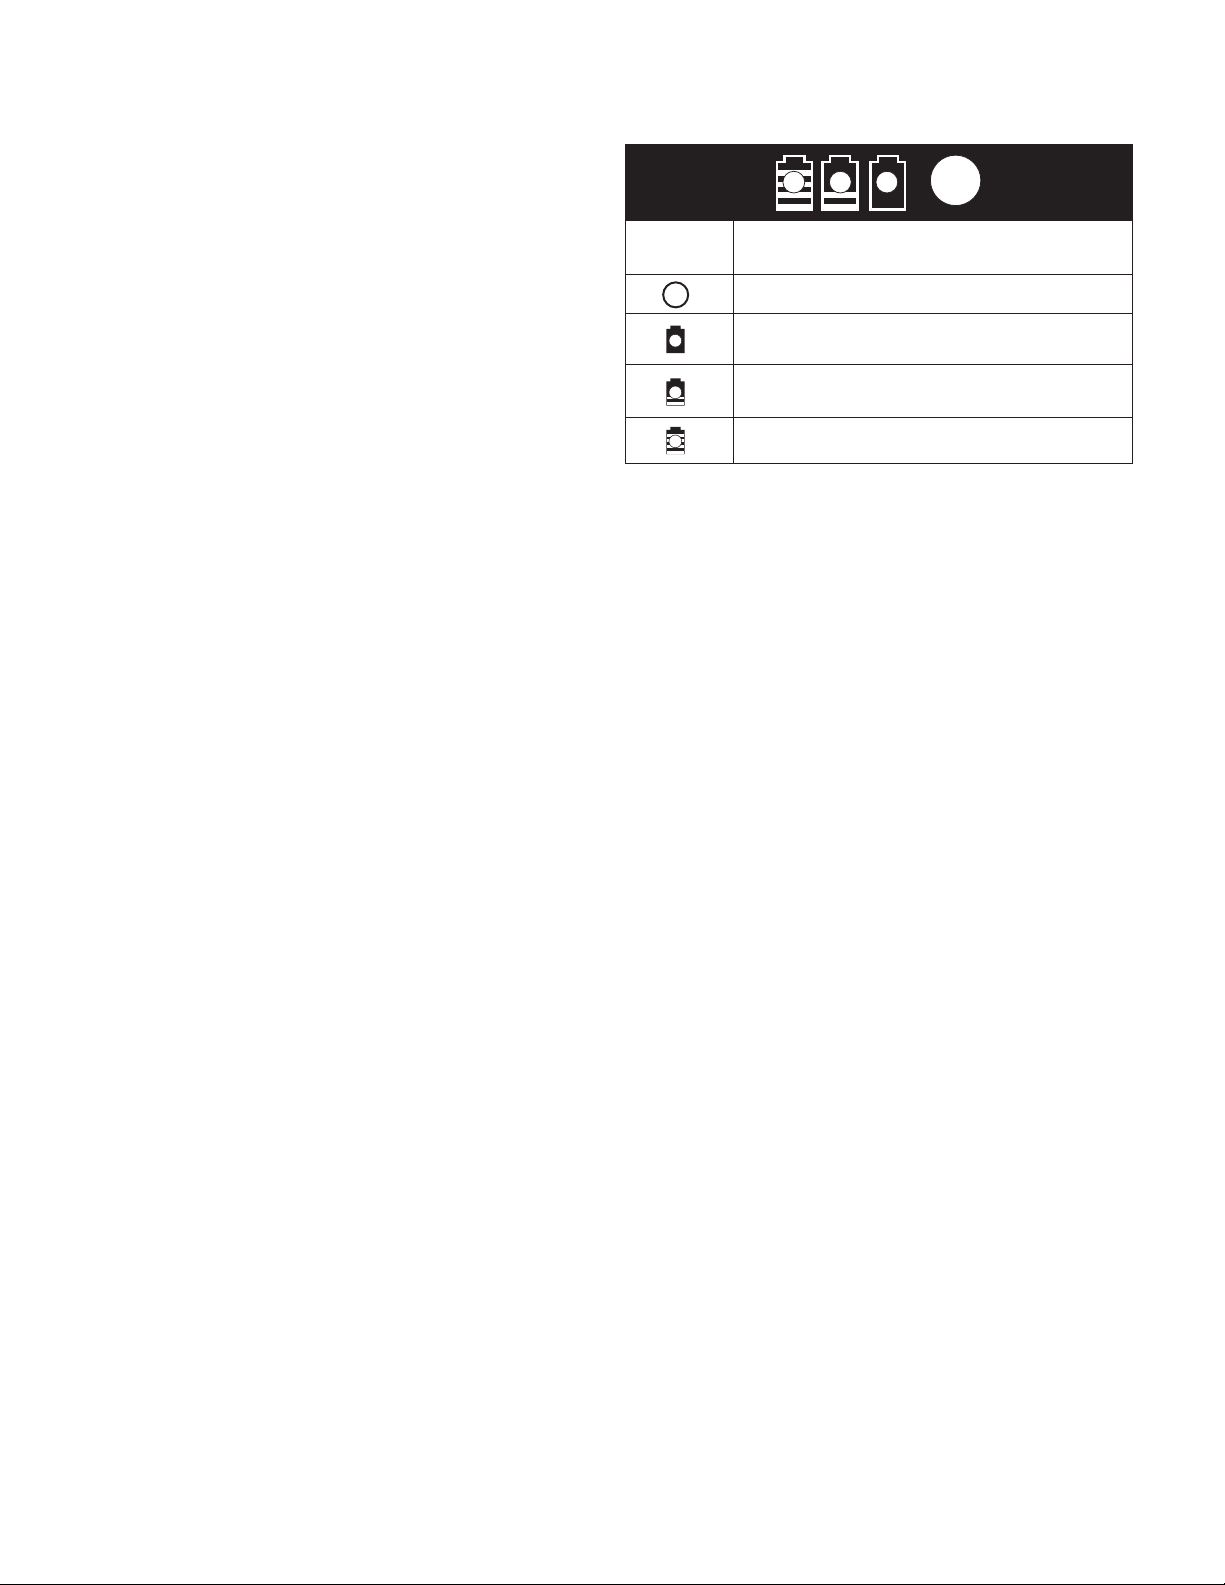
Battery Charge Level Indicator
The battery pack is equipped with a push button for checking
the charge level. Simply press the push button to read o the
battery charge level from the LEDs of the battery indicator:
• All 3 level monitoring LEDs are lit: Battery charge level
is high.
• 2 level monitoring LEDs are lit: Battery charge level is
decreasing. Stop work as soon as possible.
• 1 level monitoring LED is lit: Battery is at. Stop work
IMMEDIATELY and charge the battery. Otherwise the
battery’s service life will be greatly shortened.
Light IndicatorsLights
Charge level button
The battery is at 30% capacity
and requires charging
The battery is at 60% capacity
and requires charging soon
The battery is at full capacity
NOTE: If the charge level button does not appear to be
working, insert the charger and charge as needed.
NOTE: Immediately after using the battery pack, the charge
level button may display a lower charge than it will if checked
a few minutes later. The battery cells “recover” some of their
charge after resting.
Charger Operation
m
WARNING! Charge only iON+ 24V lithium-ion battery
packs with its compatible iON+ 24V lithium-ion battery charger.
Other types of batteries may cause personal injury and damage.
To reduce the risk of electric shock, do not allow water to ow
into the charger's AC/DC plug.
When to Charge the iON+ 24VBAT
Lithium-Ion Battery
NOTE: The iON+ 24VBAT lithium-ion battery pack do not
develop a "memory" when charged after only a partial
discharge. Therefore, it is not necessary to run down the
battery pack before inserting the charger plug.
• Use the battery indicator lights to determine when to charge
your iON+ 24VBAT lithium-ion battery pack.
• You can "top-o" your battery pack's charge before starting
a big job or after a long day of use.
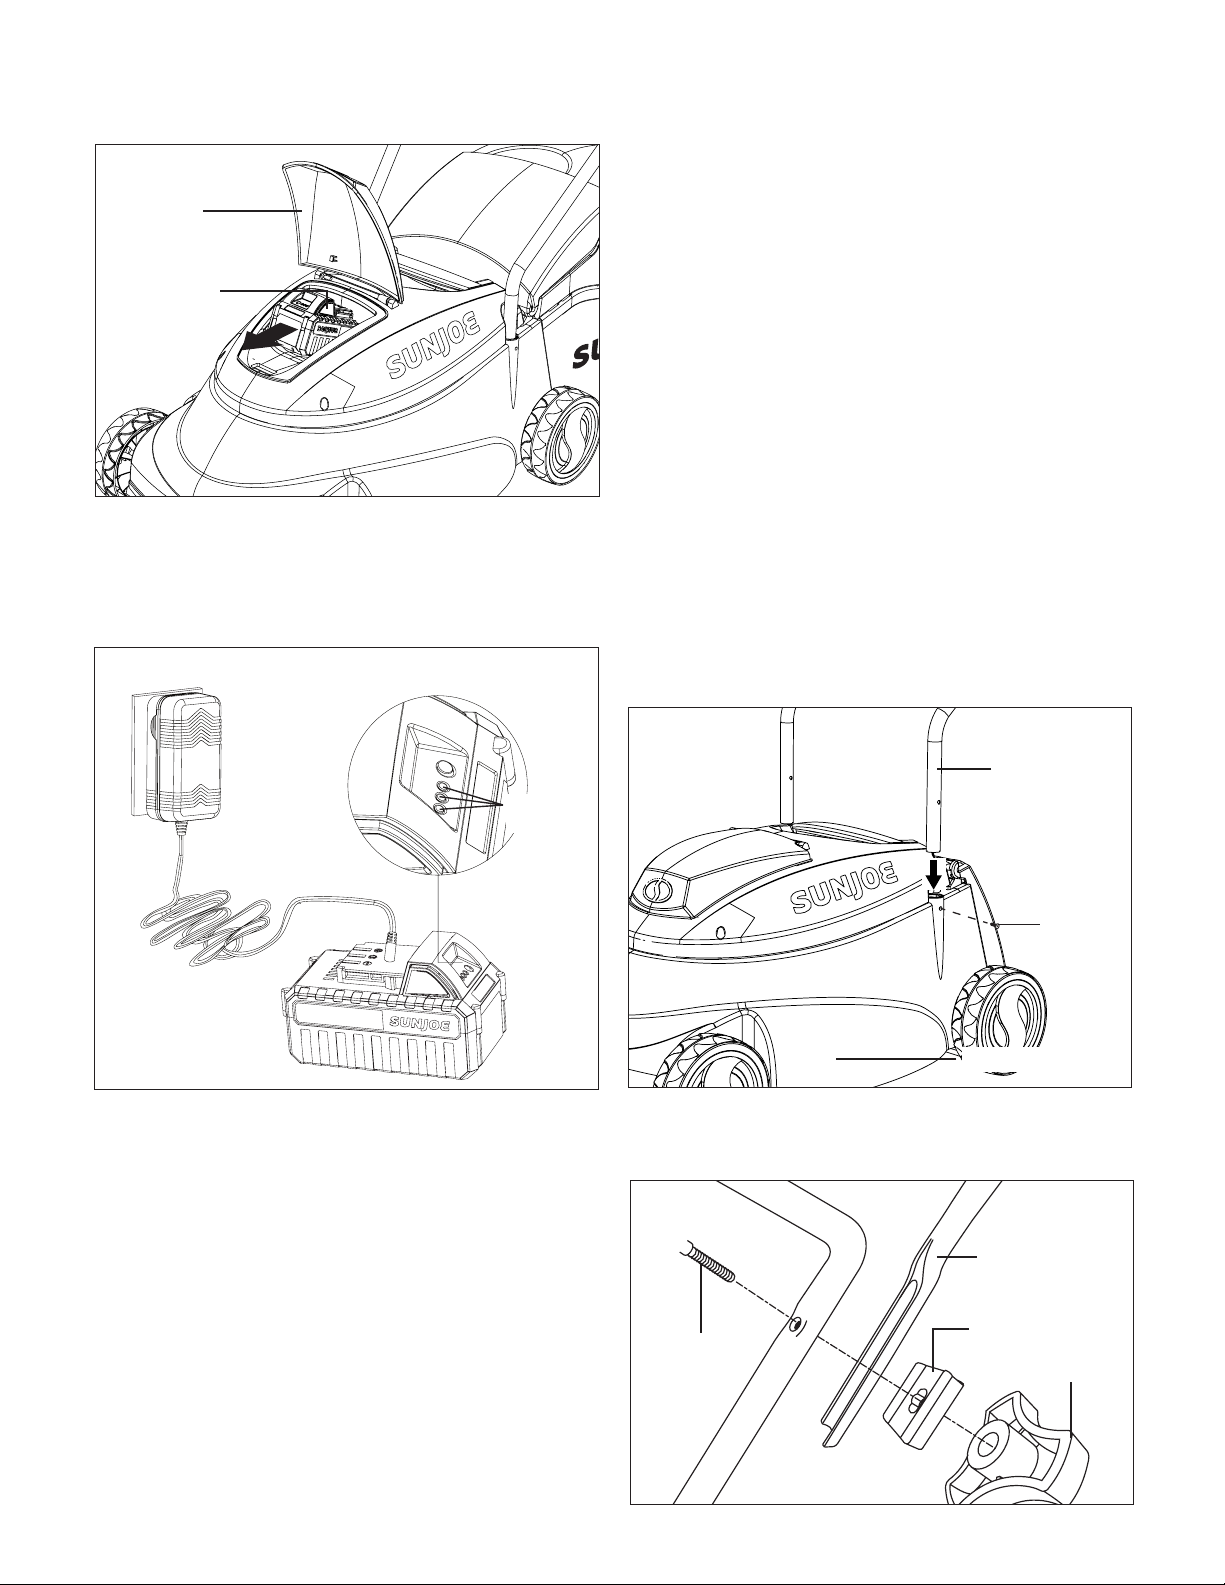
Charging the Battery
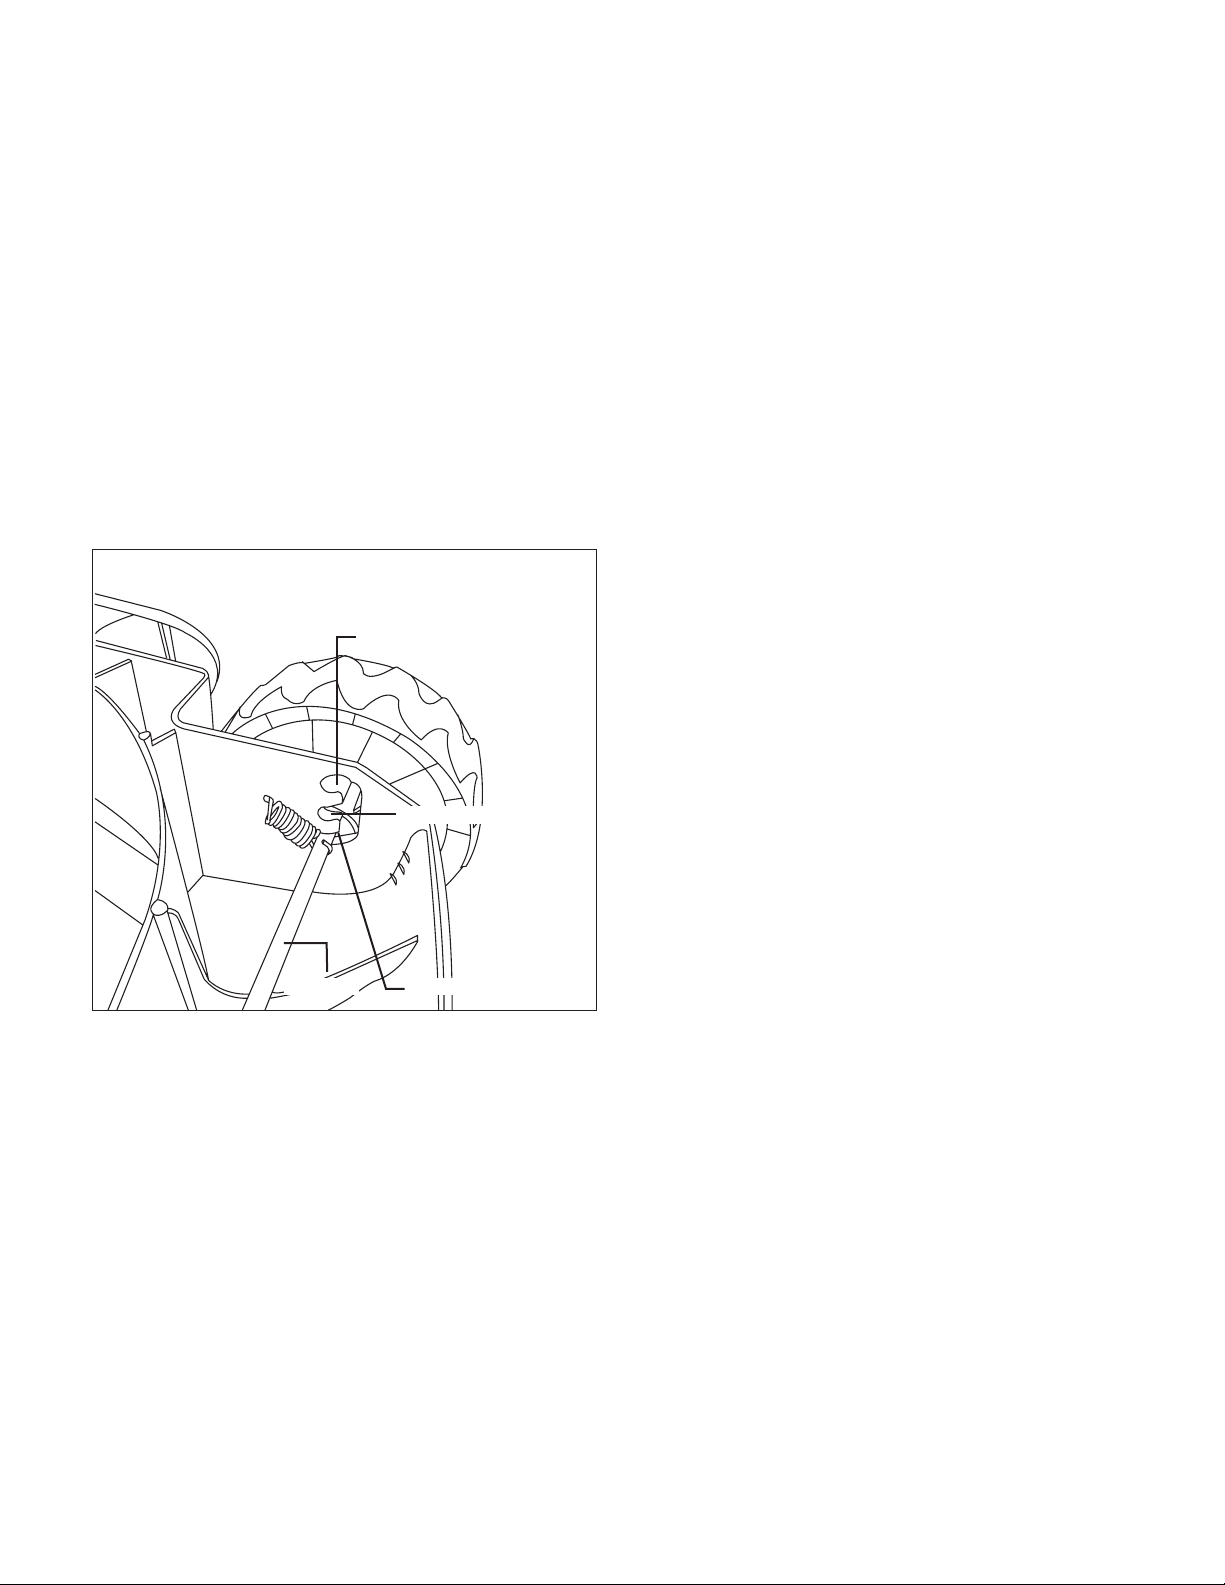
1. Open the battery compartment cover, and push the push
lock button on the battery to pull the battery out from the
battery compartment (Fig. 1).
8
Page 9
R
Fig. 1
Battery
compartment
cover
Push lock
button
2. Check that the mains voltage is the same as that marked
on the rating plate of the battery charger. Then, plug the
charger adapter into an appropriate AC power outlet.
Connect the charger plug into the charge socket of the
battery to start charging (Fig. 2).
Fig. 2
Battery
indicators
IMPORTANT! Never allow the battery pack to become fully
discharged as this will cause irreversible damage to the battery.
Assembly
m
WARNING! Do not insert the safety key until assembly
is complete. Failure to comply could result in accidental
starting and serious personal injury.
mWARNING! Before performing any maintenance, make
sure the key is removed from the unit. Failure to heed this
warning could result in serious personal injury.
mWARNING! The product must be fully assembled
before operation. Do not use a product that is only partially
assembled or assembled with damaged parts.
NOTE: Before using the mower, follow these instructions to
assemble the handle and grass bag.
Handle Assembly
1. Fit the lower handle frame into the two holes in the
machine body and fasten the handle on both sides with
the screws provided (Fig. 3).
Fig. 3
Lower handle
frame
3. The battery will take approximately 2 hours 40 mins
to charge. The battery indicator LEDs will twinkle and
illuminate one by one during the charging process.
Unplug the charger immediately when the 3 LEDs are all
illuminated.
mCAUTION! FIRE HAZARD. When disconnecting the
charger from the battery, be sure to unplug the charger from
the outlet rst, then disconnect the charger from the battery.
mWARNING! This charger does not automatically turn o
when the battery is fully charged. Please take care not to leave
the battery plugged into the charger. Switch o or unplug the
charger at the mains when charging is complete.
4. Timely recharging of the battery will help prolong the
battery's life. You must recharge the battery pack when
you notice a drop in the equipment's power.
Screw
Machine body
2. Join the upper handle frame to the lower handle frame
using the knob, washer and bolt provided (Fig. 4). Repeat
on the opposite side.
Fig. 4
Upper handle
Washer
Bolt
Knob
9
Page 10

NOTE: The upper handle is equipped with two sets of
holes on each side of the frame, however, only one set is
necessary to secure to the lower handle (Fig. 5). Simply
select your preferred height, and secure as shown (Fig. 4).
Fig. 5
Upper handle frame
Fig. 7
Protective
plastic
straps
Support rod
R
Shorter handle
setting
Longer handle
setting
3. Secure the power cable to the lawn mower by using the
cable clips.
Grass Collection Bag Assembly + Fitting
1. Fit the support rod into the holes in the plastic cover.
The bend of the support rod should face the rear of the
machine (Fig. 6).
Fig. 6
Plastic
cover
R
3. Lift the ejector ap with one hand. With the other hand,
hold the grass collection bag by the handle and hook it in
from above (Fig. 8).
Fig. 8
Ejector ap
R
Grass collection
bag
4. Release the ejector ap to secure the grass collection bag
in position (Fig. 9).
Fig. 9
Support rod
2. Place the protective plastic straps onto the support rod
(Fig. 7).
Ejector ap
R
Grass
collection
bag
10
Page 11
Operation
This lawn mower is intended for private residential use to cut
grass in small lawns and gardens. This lawn mower is not
intended to cut grass in public parks, playing elds, farms or
forests. Do not use this lawn mower for any application other
than that for which it is intended.
Fig. 12
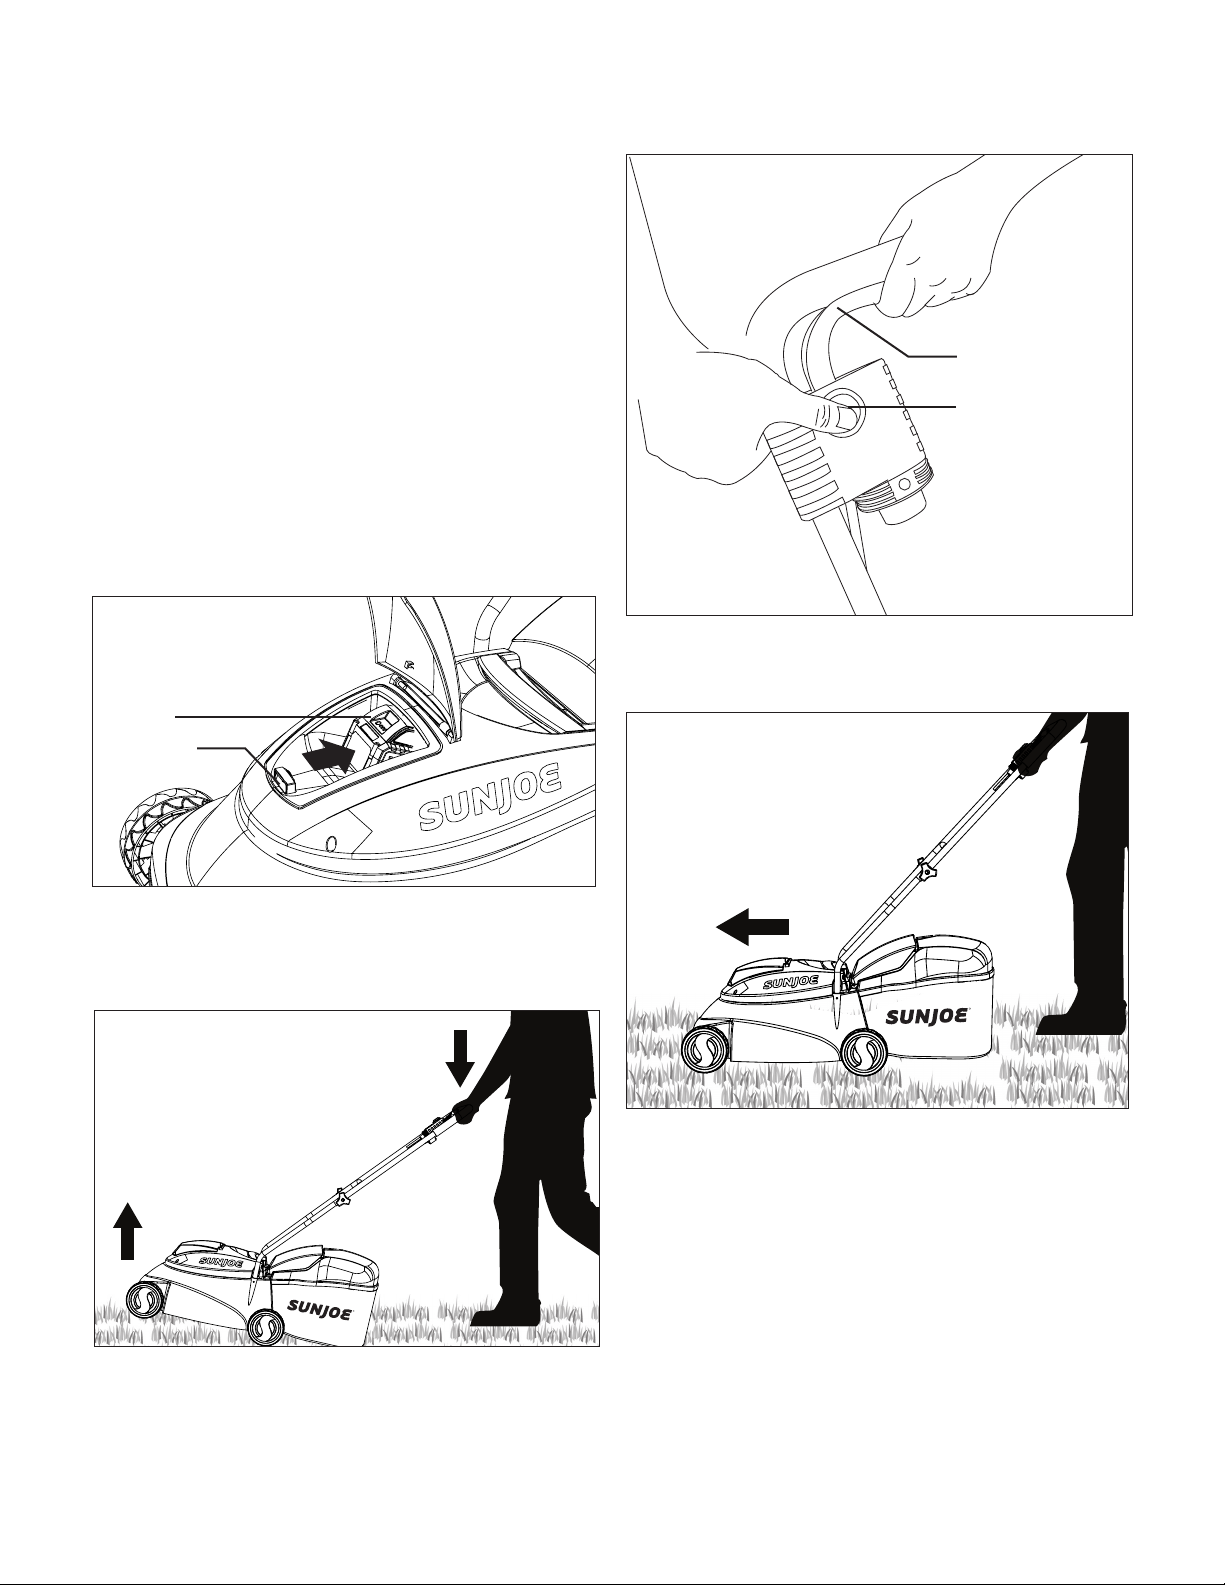
Starting + Stopping
mWARNING! Before switching on the mower, make sure
that it is not in contact with any foreign objects. Keep your
hands and feet a safe distance away from the rotating mower
blade and the ejector opening. Failure to comply with these
warnings can result in severe personal injury.
IMPORTANT: Do not start the mower in tall grass.
1. Before starting the unit, make sure the battery and the
safety key are inserted in their slots properly (Fig. 10).
Fig. 10
Battery
Safety key
2. Before starting the lawn mower, hold the handle assembly
with both hands and tilt the handle downward to slightly
raise the front of the lawn mower. This will reduce the risk
of lawn damage during start-up (Fig. 11).
Switch lever
Safety lock
button
4. Once the machine powers on, release the safety lock
button and proceed with operation, gently lowering the
mower down into the cutting position (Fig. 13).
Fig. 13
R
Fig. 11
R
3. To start the cordless lawn mower, press and hold the
safety lock button while pulling the switch lever toward
you (Fig. 12).
5. To stop the mower, release the switch lever.
mWARNING! The mower blade will continue to rotate for
a brief period after the unit has been switched o. Do not tilt or
carry the unit while the motor is still running and do not touch
the blade while it is still rotating. Failure to comply could result
in severe personal injury.
11
Page 12
Adjusting the Cutting Height
Follow these instructions to adjust the cutting height of the
lawn mower.
mWARNING! Before making these adjustments,
disconnect the power supply to the mower by plugging
out the safety key from the slot, and wait until the rotating
blade has come to a complete standstill. Wearing gloves is
recommended due to the close proximity of the cutting blade.
ALWAYS FOLLOW ALL SAFETY PRECAUTIONS AND
RECOMMENDATIONS LISTED PREVIOUSLY IN THIS
MANUAL.
1. Power o and remove the safety key from the slot.
2. Remove and empty the grass collection bag.
3. Place the lawn mower on its side.
Fig. 14
High setting
Medium setting
Low settingRod axle
4. The wheel axles can be placed into 3 dierent cutting
heights: low (will cut grass the shortest), medium, and high
(Fig. 14).
3-Position Height Adjustment:
1. Low: 1.18 in. (30 mm)
2. Medium: 1.93 in. (49 mm)
3. High: 2.52 in. (64 mm)
The cutting height tolerance is +/- 5 mm (+/- 0.2 in.).
5. Move all four wheels to the desired cutting height by
pulling back on the rod axle and setting it to the desired
position. Make sure all four wheels are at the same cutting
height position.
NOTE: Set the mower to the highest cutting height when
mowing on uneven ground or in tall weeds.
6. Place the lawn mower back on to its wheels and reattach
the grass collection bag.
7. Insert the safety key into the slot and resume normal use.
Mowing Tips
mWARNING! Inspect the area prior to mowing and
remove all the stones, sticks, wires and other foreign objects
that could be picked up and thrown by the rotating blade.
Failure to comply not only will damage the mower blade, but
can also lead to serious personal injury.
• Be sure to check the mowing blade periodically for signs
of wear and sharpen it at least once per year, as described
in the maintenance section.
NOTE: A sharp blade will greatly enhance the performance
of the mower, especially when cutting tall blades of grass.
• When cutting thick grass, reduce your walking speed
in order to allow for a more eective cut and a proper
discharge of the clippings. For a healthy lawn, always cut
o one-third or less from the total length of the grass. The
average lawn should be approximately 1.5 to 2 in. (3.8 to
5 cm) long during cool months, and more than 2 in. (5 cm)
long during hot months. If there is growth, the lawn should
be cut in the fall.
• The lawn will look better if it is always cut to the same
height and in alternate directions.
• When crossing any gravelled surfaces, release the switch
bar lever to turn o the mower. The stones can be picked
up and thrown by the rotating blade.
• Set the mower to the highest cutting height when mowing
on uneven ground or in tall weeds.
mWARNING! If you strike a foreign object, stop the motor
and remove the safety key. Thoroughly inspect the mower and
repair any damage before resuming work.
• IMPORTANT! Never open the ejector ap when the grass
collection bag has been detached (to be emptied) and the
motor is still running. A rotating blade can cause serious
injuries!
• Always carefully fasten the ejector ap and grass
collection bag. Switch o the motor before emptying the
grass collection bag. Always ensure that a safe distance
(provided by the length of the long handles) is maintained
between the user and the mower housing. Be especially
careful when mowing and changing direction on slopes
and inclines.
• Maintain a solid footing and wear sturdy, non-slip footwear
and long trousers. Always mow across an incline (not up
and down).
• For safety reasons, the lawn mower may not be used to
mow inclines with gradients exceeding 15 degrees.
• Use special caution when backing up and pulling the lawn
mower towards you as such maneuvering of the machine
poses a tripping hazard.
12
Page 13
Maintenance + Care
m
WARNING! Before cleaning, repairing or inspecting
the mower, disconnect the power supply by plugging out the
safety key and verify that all moving parts have come to a
complete stop.
General
• Always keep the mower clean and free of grass, dirt or
other debris.
• Keep the handles dry, clean and free of oil and grease.
• After each cutting session, remove accumulated grass
clippings and debris using either a dry cloth or handbrush.
You may also clean the equipment with a damp cloth and
some soft, non-abrasive soap. Do not use cleaning agents
or harsh solvents as they may damage the equipment's
plastic components. Make sure that no water penetrates
the equipment's interior as intake of water can destroy the
switch/plug mechanism and the electric motor.
• Do not clean the lawn mower with running water,
particularly with high-pressure water.
• Check all nuts, bolts and screws for proper tightness
before each use.
• Frequently inspect the grass collection bag assembly for
signs of wear and replace immediately with a genuine part
if damage is found.
• Replace excessively worn or damaged parts immediately.
• To maximize your mower's longevity, all screwed parts,
including the wheels and axles, should be cleaned and
lubricated. There are no parts inside the equipment which
require additional maintenance or lubrication.
mWARNING! An excessively vibrating mower indicates
that the blade is not properly balanced or has become
deformed from striking an object. In this case, the blade must
be repaired or replaced. Please follow the proper maintenance
procedures for blade care.
Blade Replacement
IMPORTANT: Only use original replacement parts specied
for this mower. The use of parts that do not meet the original
equipment specications may lead to improper performance of
the lawn mower, may compromise operator safety.
1. Disconnect the safety key to the mower.
2. Turn the mower on its side to expose the underside of the
blade housing.
3. Use a cloth to grip the blade or wear heavy-duty gloves.
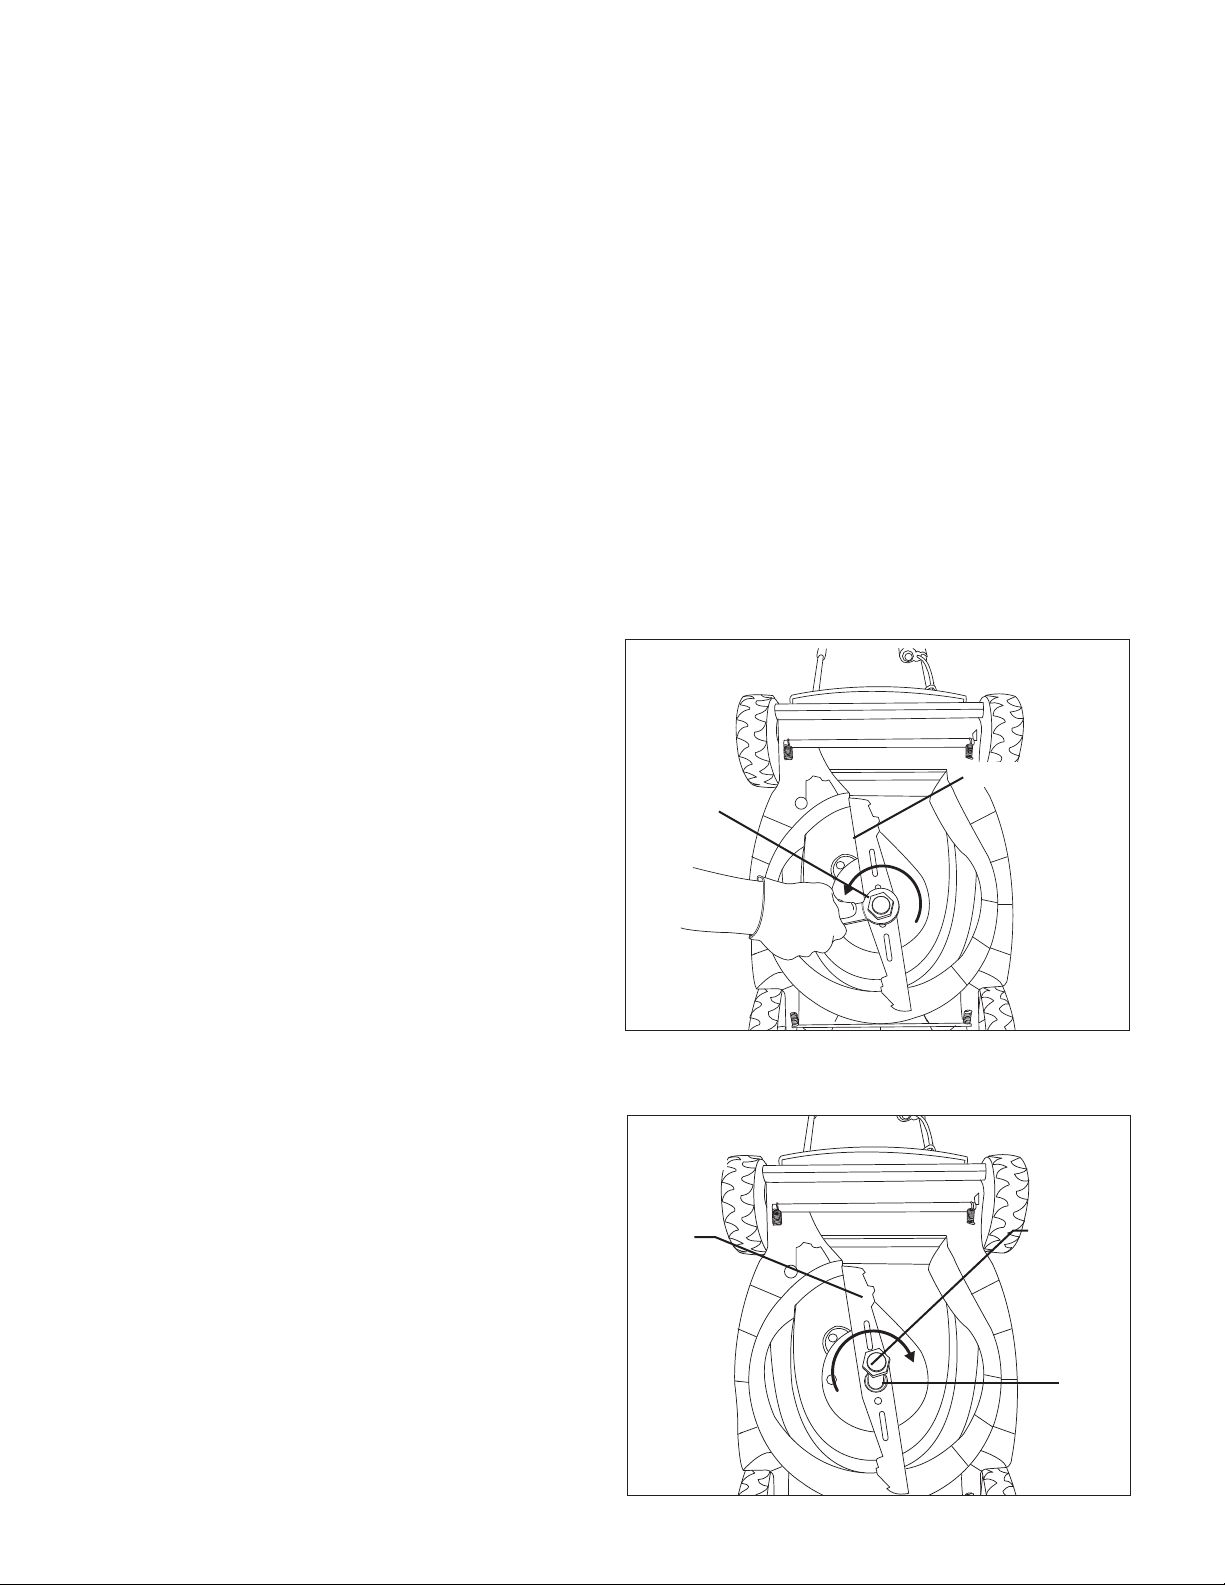
4. Using the spanner provided, remove the bolt and
the washer securing the blade by turning the bolt
counterclockwise, then carefully remove the blade
(Fig. 15).
Fig. 15
Blade
Spanner
Blade Maintenance
IMPORTANT: The mower blade is sharp and can cause severe
personal injury if handled incorrectly. Wrap the blade or wear
protective gloves, and use extra caution when handling.
The steel blade is designed to provide a ne cut in long or
tough grass. Deterioration in the quality of cut indicates blade
wear or damage. Follow these steps to determine if the blade
needs to be resharpened or replaced:
1. Disconnect the power supply to the mower by removing
the safety key.
2. Turn the mower on its side to expose the underside of the
blade housing.
3. Check the blade.
a. If the blade is blunt or has minor wear, then resharpen.
b. If the blade shows signs of major wear or damage (i.e.
gouged, bent), replace.
5. Fit the new blade, the washer and the bolt back on
following the same steps in reverse order (Fig. 16).
Fig. 16
Blade
13
Bolt
Washer
Page 14
Storage
Follow the steps below to prepare the lawn mower for storage:
1. Remove the safety key from the slot.
2. Clean the mower with a damp cloth or hand brush.
3. Inspect the mower carefully for worn, loose or damaged
parts. Check connections and screws and tighten if
necessary. Pay special attention to the mower blade and
replace/sharpen if it shows signs of wear. Refer to the
Maintenance and Care section.
4. Store the mower indoors in a dry, clean and cool area
out of the reach of children. Do not store the unit next to
corrosive materials, such as fertilizer and rock salt.
5. Do not cover the lawn mower with a solid plastic sheet.
Plastic coverings trap moisture around the mower, which
can damage the unit.
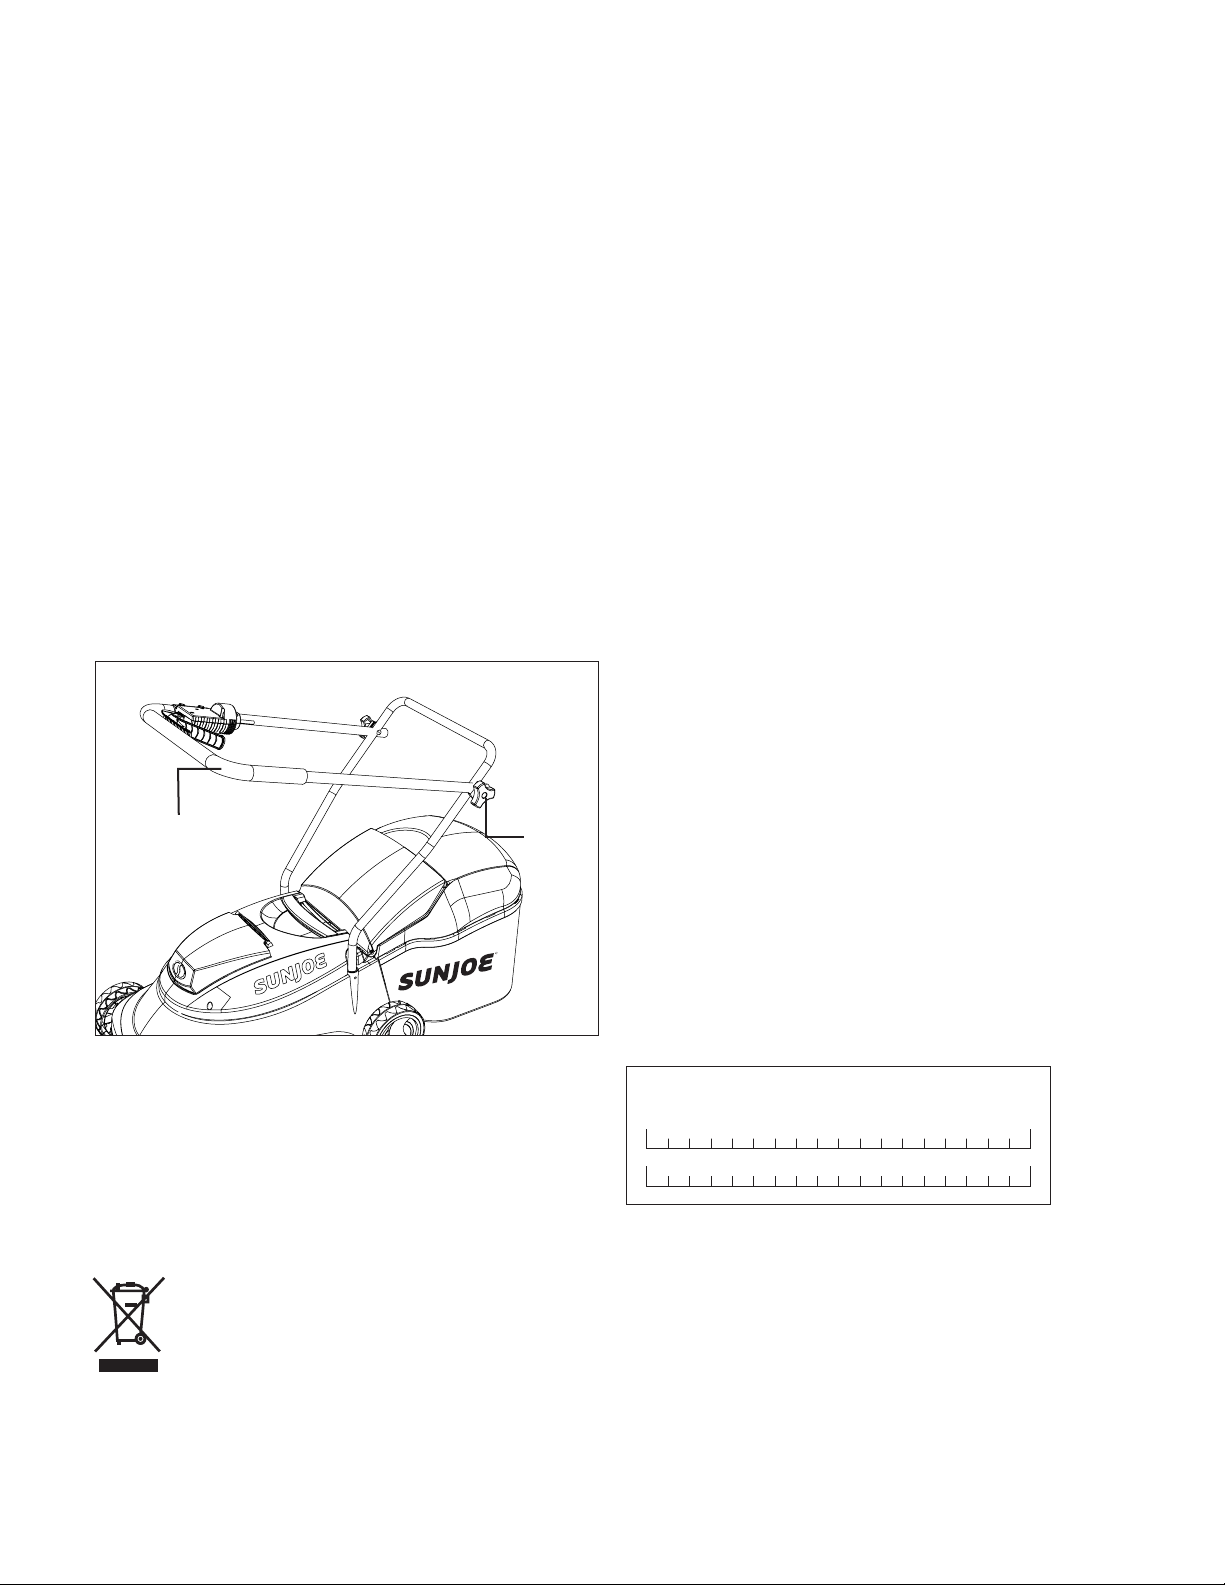
6. The handle on your lawn mower can be folded for
compact storage. Start by loosening the handle knobs on
each side of the upper handle and fold down the upper
handle (Fig. 17).
Fig. 17
mCAUTION! Even discharged battery packs contain
some energy. Before disposing, use electrical tape to cover
the terminals to prevent the battery pack from shorting, which
could cause a re or explosion.
mWARNING! To reduce the risk of injury or explosion,
never burn or incinerate a battery pack even if it is damaged,
dead or completely discharged. When burned, toxic fumes
and materials are emitted into the surrounding atmosphere.
1. Batteries vary according to device. Consult your manual
for specic information.
2. Install only new batteries of the same type in your product
(where applicable).
3. Failure to insert batteries in the correct polarity, as
indicated in the battery compartment or manual, may
shorten the life of the batteries or cause batteries to leak.
4. Do not mix old and new batteries.
5. Do not mix Alkaline, Standard (Carbon-Zinc) or
Rechargeable (Nickel Cadmium, Nickel Metal Hydride, or
Lithium-Ion) batteries.
6. Do not dispose of batteries in re.
7. Batteries should be recycled or disposed of as per state
and local guidelines.
Upper handle
Upper
handle
knob
R
Disposal
Recycling + Disposal
The product comes in a package that protects it against
damage during shipping. Keep the package until you are
sure that all parts have been delivered and the product is
functioning properly. Recycle the package afterwards or keep
it for long-term storage.
WEEE symbol. Waste electrical products should not
be disposed of with household waste. Please
recycle where facilities exist. Check with your local
authority or local store for recycling regulations.
Service + Support
If your Sun Joe® 24V-MJ14C cordless lawn mower requires
service or maintenance, please call 1-866-SNOWJOE
(1-866-766-9563) for assistance.
Model + Serial Numbers
When contacting the company or reordering parts, you will
need to provide the model and serial numbers of your product.
These are found on the decal axed to the housing or handle
of your mower. Copy these numbers into the space provided
below.
Record the following numbers from the housing or handle of your
new product:
2 4 V - M J 1 4 C
Model #:
Serial #:
Battery Caution + Disposal
Always dispose of your battery pack according to federal,
state, and local regulations. Contact a recycling agency in your
area for recycling locations.
14
Page 15

24VCHRG-AC
Federal Communications Commission
(FCC)
mWARNING! Any changes or modications to this
unit not expressly approved by the party responsible for
compliance could void the user's authority to operate the
equipment.
Class B device:
NOTE: This equipment has been tested and found to comply
with the limits for a Class B digital device, pursuant to part 15
of the FCC Rules.
These limits are designed to provide reasonable protection
against harmful interference in a residential installation.
This equipment generates, uses and can radiate radio
frequency energy and, if not installed and used in accordance
with the instructions, may cause harmful interference to radio
communications.
However, there is no guarantee that interference will not occur
in a particular installation.
If this equipment does cause harmful interference to radio or
television reception, which can be determined by turning the
equipment o and on, the user is encouraged to try to correct
the interference by one or more of the following measures:
• Reorient or relocate the receiving antenna.
• Increase the separation between the equipment and
receiver.
• Connect the equipment into an outlet on a circuit dierent
from that to which the receiver is connected.
• Consult the dealer or an experienced radio/TV technician
for help.
15
Page 16

Troubleshooting
• Remove the safety key before carrying out maintenance on the machine or when checking that its parts are
in proper working order.
• To avoid unnecessary hassles, consult the following table before contacting a qualied repair person with any mechanical
issues.
Fault Possible Cause Remedy
Mower fails to start
Mower stops while
mowing
The mower cannot
cut grass evenly
The mower cannot mulch
properly
a) The safety key is not inserted
b) The motor/blade control is
disengaged
c) The battery is at
d) The mower deck is clogged with
grass or debris
e) The grass is too tall
a) The battery is at
b) The grass is too tall
c) The mower deck is clogged with
grass or debris
d) The machine is overload and
switched o by the overload
protection system
a) The lawn is rough or uneven
b) The blade is not sharp enough
a) The mower deck is clogged with
grass or debris
b) The grass is too wet
c) The grass is too tall
d) The blade is not sharp enough
a) Insert the safety key
b) Press safety lock button rst ,then the
switch lever.
c) Charge the battery
d) Clean the mower deck. Make sure the
blade is free to move
e) Set the mower to a high cutting
height. Lift the front wheels slightly by
pressing down on the handle bar.
a) Charge the battery
b) Reset the cutting height
c) Clean the mower deck. Make sure the
blade is free to move
d) Cool down the machine for 5 mins. Wait
for the overload protection to reset the
machine
a) Adjust cutting height
b) Sharpen or replace the blade
a) Clean the mower deck. Make sure the
blade is free to move
b) Wait until the grass is dry
c) Adjust the cutting height to the high
position to mow for the rst time, and
mow again at the desired height setting
d) Sharpen or replace the blade
The mower is dicult to push
The mower is vibrating at high
speed
a) The grass is too tall to cut
b) The blade or the mower rear is
dragged by heavy grass
a) The motor shaft is bent
b) The blade is unbalanced
c) The blade screw is loosen
16
a) Adjust cutting height higher
a) Stop the motor, remove the safety key,
and inspect the damage. Cottact with a
qualied repair person.
b) Balance the blade by grinding each
cutting edge equally or replace a new one
c) Tighten the blade bolt
Page 17
Optional Accessories
m
WARNING! ALWAYS use only authorized Snow Joe
replacement parts or accessories that are not intended for use with this tool. Contact Snow Joe
whether it is safe to use a particular replacement part or accessory with your tool. The use of any other attachment or accessory
can be dangerous and could cause injury or mechanical damage.
®
+ Sun Joe® replacement parts and accessories. NEVER use
®
+ Sun Joe® if you are unsure
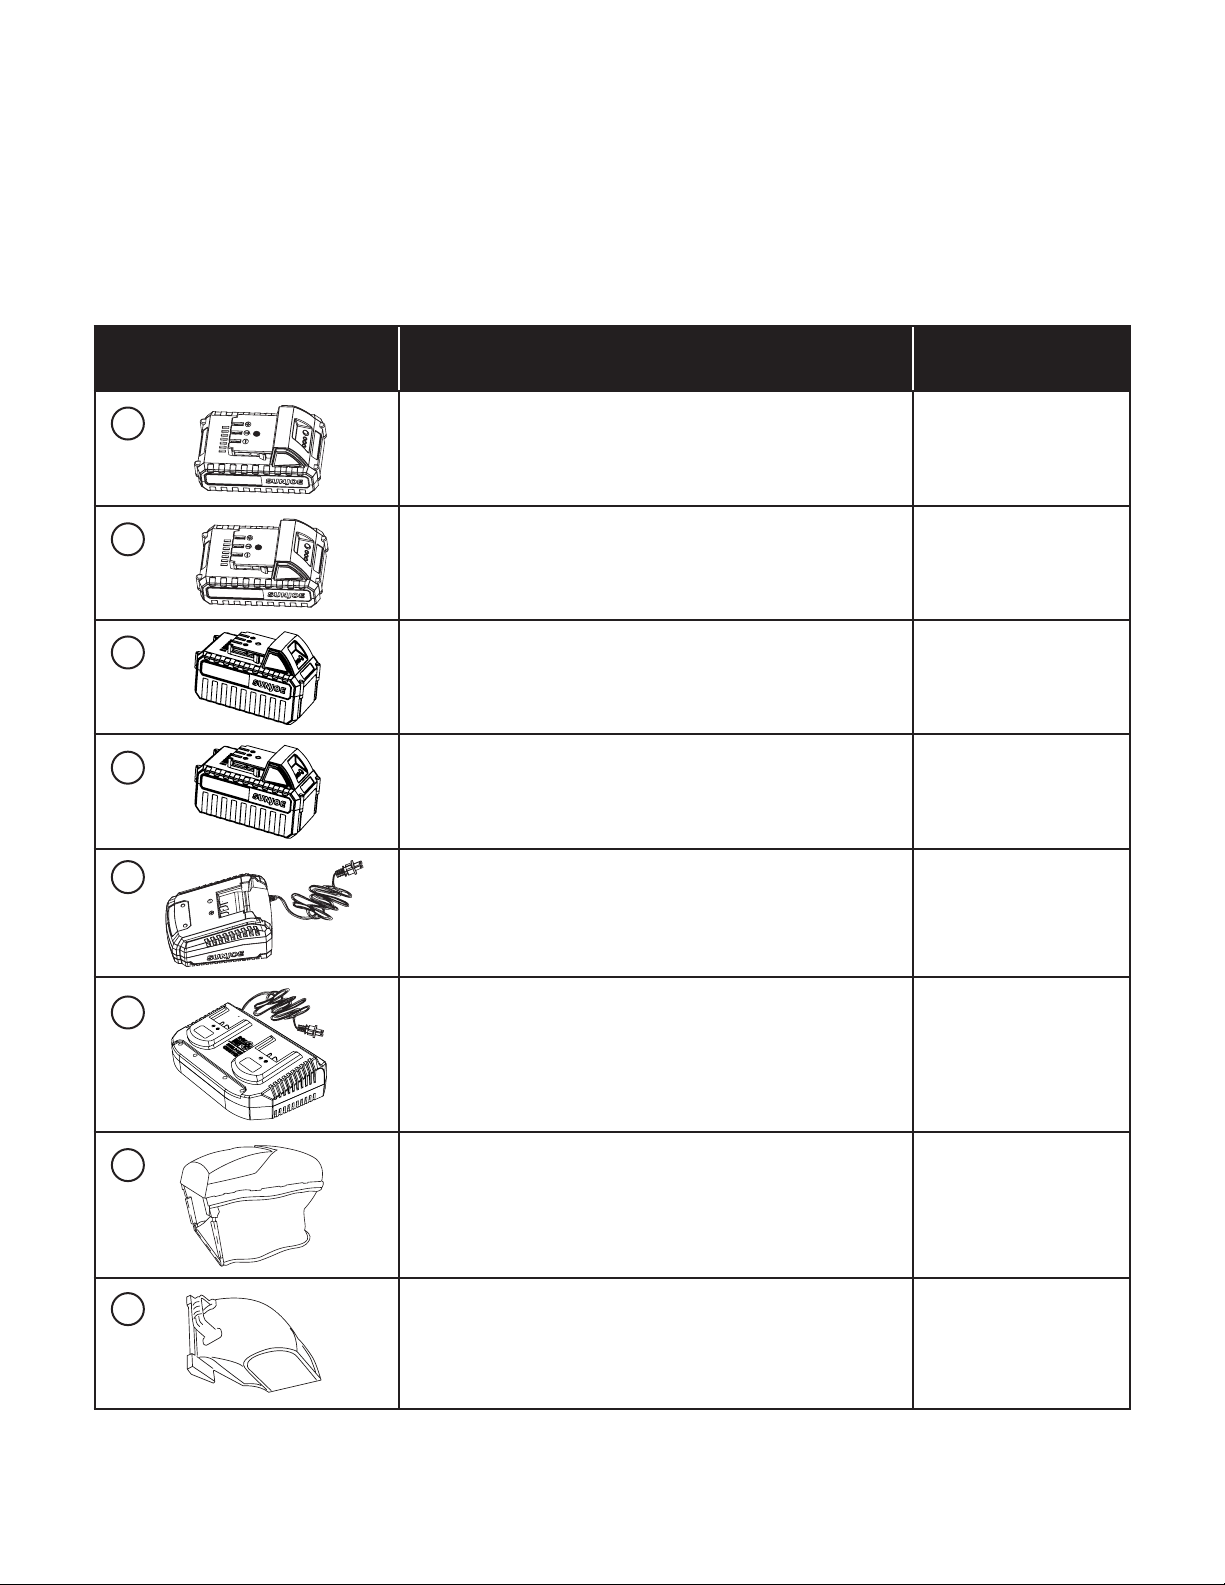
Accessories Item Model
1
2
3
4
iON+ 24V 2.0 Ah Lithium-Ion Battery
Battery Runtime Max: 15 mins (cuts up to 860 sq ft of grass)
iON+ 24V 2.5 Ah Lithium-Ion Battery
Battery Runtime Max: 20 mins (cuts up to 1075 sq ft of grass)
iON+ 24V 4.0 Ah Lithium-Ion Battery
Battery Runtime Max: 30 mins (cuts up to 1720 sq ft of grass)
iON+ 24V 5.0 Ah Lithium-Ion Battery
Battery Runtime Max: 40 mins (cuts up to 2150 sq ft of grass)
24VBAT-LTE
24VBAT-LT
24VBAT
24VBAT-XR
5
iON+ 24V Lithium-Ion Battery Quick Charger 24VCHRG-QC
6
iON+ 24V Lithium-Ion Battery Dual Port Charger 24VCHRG-DPC
7
10.6-gallon (40 L) grass collection bag MJ401E-10
8
Lawn mower side-discharge chute accessory MJ401E-DCA
NOTE: Accessories are subject to change without any obligation on the part of Snow Joe
changes. Accessories can be ordered online at sunjoe.com or via phone by contacting the Snow Joe
service center at 1-866-SNOWJOE (1-866-766-9563).
®
+ Sun Joe® to provide notice of such
17
®
+ Sun Joe® customer
Page 18

SNOW JOE® + SUN JOE® CUSTOMER PROMISE
ABOVE ALL ELSE, Snow Joe, LLC (“Snow Joe”) is dedicated to you, our customer. We strive to make your experience as pleasant as
®
possible. Unfortunately, there are times when a Snow Joe
, Sun Joe®, or Aqua Joe® product (“Product”) does not work or breaks under
normal operating conditions. We think it’s important that you know what you can expect from us. That’s why we have a Limited Warranty
(“Warranty”) for our Products.
OUR WARRANTY:
Snow Joe
warrants new, genuine, powered and non-powered Products to be free from defects in material or workmanship when used
for ordinary household use for a period of two years from the date of purchase by the original, end-user purchaser when purchased
from Snow Joe or from one of Snow Joe’s authorized sellers with proof of purchase. Because Snow Joe is unable to control the quality
of its Products sold by unauthorized sellers, unless otherwise prohibited by law, this Warranty does not cover Products purchased from
unauthorized sellers. If your Product does not work or there’s an issue with a specic part that is covered by the terms of this Warranty,
Snow Joe will elect to either (1) send you a free replacement part, (2) replace the Product with a new or comparable product at no
charge, or (3) repair the Product. How cool is that!
This Warranty gives you specific legal rights, and you may also have other rights which vary from State to State.
PRODUCT REGISTRATION:
Snow Joe strongly encourages you to register your Product. You can register online at snowjoe.com/register, or by printing and
mailing in a registration card available online from our website, or calling our Customer Service Department at 1-866-SNOWJOE
(1-866-766-9563), or by e-mailing us at help@snowjoe.com. Failure to register your Product will not diminish your warranty
rights. However, registering your Product will allow Snow Joe to better serve you with any of your customer service needs.
WHO CAN SEEK LIMITED WARRANTY COVERAGE:
This Warranty is extended by Snow Joe to the original purchaser and original owner of the Product.
WHAT IS NOT COVERED?
This Warranty does not apply if the Product has been used commercially or for non-household or rental applications. This Warranty also
does not apply if the Product was purchased from an unauthorized seller. This Warranty also does not cover cosmetic changes that do
not aect performance. Wearing parts like belts, augers, chains and tines are not covered under this Warranty, and can be purchased
at snowjoe.com or by calling 1-866-SNOWJOE (1-866-766-9563).
18EN19
R4_01282020
Page 19

Page 20

Page 21

MANUAL DEL OPERADOR
Una división de Snow Joe
®
, LLC Modelo 24V-MJ14C Forma Nº SJ-24V-MJ14C-880S-MR2
SP
R
PODADORA DE CÉSPED INALÁMBRICA
24-VOLT MÁX* | 4.0 Ah |35.6 CM
¡IMPORTANTE!
Instrucciones de seguridad
Todos los operadores deberán leer
estas instrucciones antes del uso
Obedezca siempre estas normas de seguridad. No hacerlo
podría resultar en lesiones corporales severas o incluso la
muerte.
¡ADVERTENCIAS generales de
seguridad!
Usted debe tomar precauciones básicas de seguridad siempre
que use esta podadora de césped inalámbrica para reducir
riesgos de incendio, choque eléctrico y lesiones personales.
Estas precauciones incluyen:
m ¡ADVERTENCIA! No la opere sin todo el recolector
de césped, protector contra descargas, protector posterior u
otro dispositivo protector de seguridad instalados en su lugar
y funcionando apropiadamente.
m ¡ADVERTENCIA! El uso de cualquier otro accesorio o
acoplamiento podría aumentar el riesgo de lesiones.
m ¡ADVERTENCIA! Para reducir el riesgo de lesiones,
inspeccione frecuentemente el ensamblado colector y
reemplácelo con las partes recomendadas si es que presenta
señales de desgaste o deterioro.
Antes de usar la podadora, tómese el tiempo para
familiarizarse con los controles y, sobre todo, con la forma
de detener la podadora en caso de emergencia. Las únicas
personas que deben usar la podadora son aquellas que
tengan un entendimiento completo de las instrucciones y
sepan cómo operar la máquina. Los niños nunca deben tener
acceso a la podadora.
Conserve este manual para futuras referencias, y vuélvalo a
leer al inicio de cada temporada de podado.
m ¡ADVERTENCIA! El contacto con las partes
móviles puede causar enredos, mutilaciones u otras
lesiones corporales severas. Mantenga siempre las partes
del cuerpo (p. ej., manos y pies) a una distancia segura de
las partes móviles de la máquina. Asegúrese de que todos
los protectores y cubiertas estén colocados de forma
correcta y segura antes del uso.
Las supercies calientes (p. ej., el motor) pueden
encender objetos inamables o combustibles y causar
un incendio o explosión que cause lesiones corporales
severas. Mantenga la podadora a una distancia segura
lejos de objetos inamables o combustibles hasta que
las supercies que estén calientes se hayan enfriado por
completo. No almacene la podadora cerca de objetos
inamables o combustibles.
Una cuchilla dañada o tuerca de cuchilla gastada puede
desprenderse del ensamblado de la podadora y causar
severas lesiones. Reemplace la cuchilla dañada o tuerca
de cuchilla gastada antes de usar la podadora.
1. Evite entornos peligrosos: no use la podadora bajo la
lluvia, ni cuando el césped esté húmedo o mojado.
2. Mantenga alejados a niños, espectadores y mascotas:
mantenga siempre a los niños, espectadores y mascotas
a una distancia segura de la podadora mientras está en
funcionamiento y mientras se esté enfriando.
3. Vístase apropiadamente: utilice siempre equipos de
protección personal (p. ej., gafas, guantes de hule,
calzado protector y máscara antipolvo) y una vestimenta
adecuada al usar la podadora. Las vestimentas holgadas,
el pelo largo o la joyería pueden engancharse en las
partes móviles.
4. Use el artefacto correcto: no use la podadora de césped
para cualquier aplicación distinta a una de aquellas para
las cuales fue diseñada.
5. No fuerce la podadora de césped: tendrá un mejor
funcionamiento con menos probabilidades de lesiones
personales o fallas mecánicas si es usada a la velocidad
para la cual fue diseñada.
6. No se extralimite: mantenga con sus pies un balance y
posición adecuados todo el tiempo.
7. Manténgase alerta: esté siempre alerta y vea lo que está
haciendo. Utilice su sentido común. No opere la podadora
de césped si usted está cansado o bajo la inuencia del
alcohol u otras drogas.
©2021 Snow Joe®, LLC
Derechos reservados. Instrucciones originales.
GUARDE ESTAS INSTRUCCIONES
21
Page 22

8. Desconecte la podadora de césped: APAGUE Y RETIRE
LA LLAVE DE SEGURIDAD cuando la podadora no
esté siendo usada, antes de ser reparada, al cambiarle
accesorios o al realizarle cualquier otro trabajo de
mantenimiento.
9. Guarde la podadora de césped inactiva bajo techo:
cuando no esté siendo usada, la podadora de césped
debe guardarse bajo techo y en un lugar seco, bajo llave y
fuera del alcance de los niños.
10. Cuide su podadora de césped: mantenga las
cuchillas aladas y limpias para un mejor y más seguro
funcionamiento.
11. Use equipos de protección personal. Emplee siempre
protección ocular: al ser usados en situaciones
apropiadas, los equipos protectores tales como gafas de
seguridad, máscara antipolvo, zapatos antideslizantes,
casco o protección auditiva, reducirán las probabilidades
de lesiones personales.
12. Evite encendidos accidentales: asegúrese de que
el interruptor esté en la posición de APAGADO antes
de insertar la llave de seguridad o antes de levantar o
transportar la podadora de césped inalámbrica. Llevar
herramientas eléctricas con su dedo sobre el interruptor o
cargarlas con el interruptor en la posición de ENCENDIDO
puede provocar accidentes.
13. Retire cualquier llave de ajuste o inglesa antes de
encender la herramienta: una llave inglesa o de otro tipo
conectada a una parte giratoria de la podadora de césped
inalámbrica podría causar lesiones personales.
14. Mantenga las cuchillas limpias y aladas: las cuchillas
de corte mantenidas adecuadamente, con bordes
alados, tienen menos probabilidades de atascarse y son
más fáciles de controlar.
15. Mantenga todas las partes del cuerpo alejadas
de la cuchilla de corte: no retire material cortado ni
sujete el material a ser cortado cuando las cuchillas
estén moviéndose. Asegúrese de que el interruptor
esté apagado al retirar material atascado. Un momento
de distracción durante el uso de este producto podría
ocasionar lesiones personales severas.
16. Si la podadora de césped golpea un objeto extraño, siga
estas instrucciones:
i) Detenga la podadora soltando la palanca interruptora
de arranque/parada;
ii) Retire la llave de seguridad;
iii) Inspeccione la unidad en busca de daños; y
iv) Repare cualquier daño antes de volver a encender la
podadora de césped.
17. Solo use cuchillas de repuesto idénticas y otras partes
genuinas.
18. Mantenga los protectores en su lugar y funcionando
apropiadamente.
Seguridad eléctrica
1. Si el cable del cargador de batería está dañado,
comuníquese con la central de servicio al cliente
Snow Joe
(1-866-766-9563).
2. Si cargar la podadora de césped inalámbrica en una
ubicación mojada es inevitable, utilice una fuente de
alimentación protegida por un dispositivo de corriente
residual (residual current device o RCD por sus siglas en
inglés). El uso de un RCD reduce el riesgo de un choque
eléctrico.
3. Evite que su cuerpo haga contacto con supercies
puestas a tierra tales como tuberías, radiadores, cocinas
eléctricas y refrigeradoras. Hay un mayor riesgo de un
choque eléctrico si su cuerpo está puesto a tierra.
4. No exponga artefactos a batería bajo la lluvia o bajo
condiciones mojadas. El agua que entre a una podadora
de césped inalámbrica incrementará el riesgo de
choque eléctrico.
5. No maltrate el cable para carga. Nunca use el cable
para transportar, jalar o desenchufar el cargador.
Mantenga el cable alejado del calor, aceite, bordes
alados o partes en movimiento. Los cables dañados o
enredados aumentan el riesgo de choques eléctricos.
6. El cargador de batería solo es para uso en interiores. No
cargue la batería de la podadora inalámbrica bajo la lluvia
o en lugares mojados.
®
+ Sun Joe® llamando al 1-866-SNOWJOE
Instrucciones de seguridad
para la batería y el cargador
Prestamos mucha atención al diseño de cada batería para
garantizar la producción de baterías seguras y durables, con
una alta densidad de energía. Las celdas de la batería tienen
una amplia gama de dispositivos de seguridad. Cada celda
individual es inicialmente formateada y se registran sus curvas
eléctricas características. Estos datos son luego usados
exclusivamente para poder ensamblar las mejores baterías
posibles.
Independientemente de todas las precauciones de seguridad,
se debe tener mucho cuidado al manipular las baterías.
Las siguientes instrucciones deben ser obedecidas en todo
momento para garantizar un uso seguro. Un uso seguro solo
puede ser garantizado si se usan celdas libres de daños. Una
manipulación incorrecta de la batería puede causar daños en
las celdas.
¡IMPORTANTE! Los análisis han conrmado que el uso
incorrecto y el cuidado deciente de baterías de alto
rendimiento son las causas principales de lesiones personales
y/o daños al producto.
22
Page 23

m ¡ADVERTENCIA! Use solo baterías de repuesto
aprobadas. Otras baterías pueden dañar la podadora de
césped y provocar un desperfecto que pueda causar lesiones
personales severas.
m ¡ADVERTENCIA! No use una batería o artefacto que
hayan sido dañados o modicados. Las baterías dañadas o
modicadas pueden reaccionar impredeciblemente, causando
un incendio, explosión, o riesgo de lesiones.
No modique ni intente reparar el artefacto o la batería, a
menos que lo haga según lo indicado en las instrucciones de
uso y cuidado.
Su batería deberá ser reparada por una persona calicada
usando únicamente partes de repuesto originales. Esto
mantendrá la seguridad de la batería.
m ¡PRECAUCIÓN! Para reducir el riesgo de lesiones,
cargue la batería de iones de litio iON+ de 24 V solo con su
cargador de baterías de iones de litio designado, el iON+ de
24 V. Otros tipos de cargadores presentan riesgos de incendio,
lesiones personales y daños. No conecte una batería a un
tomacorriente doméstico ni encendedor de cigarrillos en
su vehículo. Dicho uso indebido dañará o deshabilitará
permanentemente la batería.
• Evite entornos peligrosos: no cargue la batería bajo la
lluvia o nieve, ni en entornos húmedos o mojados. No use
la batería ni el cargador en atmósferas explosivas (gases,
polvo o materiales inamables), ya que se pueden generar
chispas al insertar o retirar la batería, provocando un
incendio.
• Cárguela en un área bien ventilada: no bloquee los
conductos de ventilación del cargador. Manténgalos
despejados para permitir una ventilación adecuada. No
permita que se fume o haya llamas abiertas cerca de una
batería siendo cargada. Los gases presentes pueden
explotar.
NOTA: el rango seguro de temperaturas para la batería
es de 41°F (5°C) a 105°F (40.5°C). No cargue la batería
en exteriores con temperaturas congelantes. Cárguela a
temperatura ambiente en interiores.
• Cuide el cable del cargador: al desenchufar el cargador
tire del enchufe, no del cable, para desconectarlo del
tomacorriente y así evitar el riesgo de daños al enchufe
y cable de alimentación. Nunca transporte el cargador
colgado de su cable, ni tire del cable para desconectarlo
del receptáculo. Mantenga el cable alejado del calor,
aceites y bordes alados. Asegúrese de que el cable no
sea pisado, que la gente no se tropiece con éste, ni que
esté sujeto a daños o tensiones mientras el cargador esté
siendo usado. No use el cargador con un cable o enchufe
dañado. Reemplace un cargador dañado inmediatamente.
• No use un cable de extensión a menos que sea
absolutamente necesario: usar un cable de extensión
incorrecto, dañado o conectado de forma inapropiada
puede causar un incendio o choque eléctrico. Si se debe
usar un cable de extensión, enchufe el cargador a un
cable de extensión de calibre 16 o mayor con el enchufe
hembra encajando perfectamente en el enchufe macho
del cargador. Verique que el cable de extensión esté en
buenas condiciones.
• Use solo accesorios recomendados: el uso de un
accesorio que no sea recomendado ni vendido por el
fabricante de la batería o cargador de batería puede resultar
en un choque eléctrico, incendio o lesiones personales.
• Desenchufe el cargador cuando no esté siendo usado:
asegúrese de retirar las baterías de los cargadores
desenchufados.
m ¡ADVERTENCIA! Para reducir el riesgo de un choque
eléctrico, desenchufe siempre el cargador antes de llevar a
cabo cualquier tarea de limpieza o mantenimiento. No permita
que el agua uya dentro del cargador. Use un interruptor de
circuito por falla a tierra (GFCI) para reducir el riesgo de un
choque eléctrico.
• No queme ni incinere baterías: las baterías pueden
explotar, causando lesiones personales o daños. Las
baterías generan sustancias y humos tóxicos al ser
quemadas.
• No triture, deje caer ni dañe las baterías: no use la
batería ni el cargador si han sido severamente golpeados,
se han dejado caer, se han aplastado, o han sido dañados
de cualquier forma (como por ejemplo perforados con un
clavo, golpeados con un martillo, pisados, etc.).
• No los desarme: el reensamblado incorrecto puede
representar un riesgo severo de choque eléctrico,
fuego o exposición a químicos tóxicos de la batería. Si
la batería o el cargador están dañados, contacte a un
concesionario autorizado Snow Joe
a la central de servicio al cliente Snow Joe
1-866-SNOWJOE (1-866-766-9563) para obtener ayuda.
• Los químicos de la batería causan quemaduras severas:
nunca deje que una batería dañada haga contacto con
la piel, ojos o boca. Si una batería dañada deja escapar
sustancias químicas, use guantes de hule o neopreno para
deshacerse de ella de forma segura. Si la piel es expuesta
a los uidos de la batería, lave el área afectada con jabón
y agua, y enjuague con vinagre. Si los ojos son expuestos
a los químicos, enjuáguelos inmediatamente con agua
durante 20 minutos y busque atención médica. Quítese y
deshágase de las vestimentas contaminadas.
• No provoque un cortocircuito: una batería puede hacer
cortocircuito si un objeto metálico hace conexión entre los
contactos positivo y negativo de la batería. No coloque
una batería cerca de objetos que puedan causar un
cortocircuito tales como monedas, sujetapapeles, tornillos,
clavos, llaves y otros objetos metálicos. Una batería
cortocircuitada representa un riesgo de incendio y lesiones
personales severas.
• Guarde su batería y cargador en un lugar fresco y seco:
no guarde la batería o cargador donde las temperaturas
puedan exceder los 105ºF (40.5ºC), como bajo la luz directa
del sol o dentro de un vehículo o construcción metálica
durante el verano.
®
+ Sun Joe® o llame
®
+ Sun Joe® al
23
Page 24

Información sobre la batería
1. La batería suministrada con su podadora de césped
inalámbrica está cargada solo parcialmente. La batería
tiene que ser cargada por completo antes de que usted
use la podadora por primera vez.
2. Para un óptimo rendimiento de la batería, evite ciclos de
descarga baja cargando frecuentemente la batería.
3. Guarde la batería en un lugar fresco, de preferencia a 59°F
(15°C) y cargada al menos a un 40%.
4. Las baterías de iones de litio están sujetas a un proceso
natural de desgaste. La batería debe ser reemplazada
a más tardar cuando su capacidad caiga a un 80% de
su capacidad inicial, cuando estaba nueva. Las celdas
debilitadas en una batería gastada no son capaces de
cumplir con los requisitos de alta potencia necesarios
para la operación adecuada de su podadora de césped
inalámbrica, por lo tanto representan un riesgo de
seguridad.
5. No arroje las baterías al fuego abierto ya que esto
representa un riesgo de explosión.
6. No incendie la batería ni la exponga al fuego.
7. No descargue las baterías exhaustivamente. Una
descarga exhaustiva dañará las celdas de la batería.
La causa más común de descarga exhaustiva es
el almacenamiento prolongado o la falta de uso de
baterías parcialmente descargadas. Deje de trabajar
tan pronto como el rendimiento de la batería caiga
considerablemente o se active el sistema de protección
electrónico. Almacene la batería únicamente luego de
haberla cargado por completo.
8. Proteja las baterías y la herramienta contra
sobrecargas. Las sobrecargas causarán rápidamente
un sobrecalentamiento y daños a las celdas dentro
del compartimiento de la batería, incluso si este
sobrecalentamiento no es aparente por fuera.
9. Evite daños y golpes. Reemplace inmediatamente las
baterías que se hayan caído desde una altura de más de
3 pies (1 m) o aquellas que hayan sido expuestas a golpes
violentos, incluso si la carcasa de la batería aparenta no
tener daños. Las celdas dentro de la batería pueden haber
sufrido daños severos. En dichos casos, lea la información
de eliminación para deshacerse apropiadamente de la
batería.
10. Si la batería sufre una sobrecarga y sobrecalentamiento,
el sistema interruptor de protección integrado apagará el
equipo por motivos de seguridad.
¡IMPORTANTE! No presione más el interruptor de
ENCENDIDO/APAGADO si el interruptor de protección se
ha activado. Esto puede dañar la batería.
11. Use únicamente baterías originales. El uso de otras
baterías representa un riesgo de incendio y puede resultar
en lesiones personales o una explosión.
Información sobre el cargador y el proceso
de carga
1. Verique los datos registrados en la placa de
especicaciones del cargador de batería. Asegúrese
de conectar el cargador de batería a una fuente de
alimentación que tenga el voltaje indicado en la placa
de especicaciones. Nunca lo conecte a una fuente de
alimentación con voltaje distinto al indicado.
2. Proteja el cargador de batería y su cable. Mantenga el
cargador y su cable alejados del calor, grasas, aceites
y bordes alados. Haga reparar sin demora los cables
dañados por un técnico calicado en un concesionario
autorizado Snow Joe
el centro de servicio al cliente Snow Joe
llamando al 1-866-SNOWJOE (1-866-766-9563).
3. Los enchufes eléctricos deben caber en los
tomacorrientes. Nunca modique el enchufe de ninguna
manera. No use ningún enchufe adaptador con artefactos
que tengan conexión a tierra. El uso de enchufes no
modicados y tomacorrientes equivalentes reducirá el
riesgo de un choque eléctrico.
4. Mantenga el cargador de batería, la(s) batería(s) y la
herramienta inalámbrica fuera del alcance de los niños.
5. No use el cargador de batería suministrado para cargar
baterías de otras herramientas inalámbricas.
6. Durante periodos de trabajo pesado, la batería se
calentará. Permita que la batería se enfríe a temperatura
ambiente antes de insertarla en el cargador para su
recarga.
7. No sobrecargue las baterías. No exceda los tiempos
máximos de carga. Estos tiempos de carga solo se
aplican a baterías descargadas. La inserción frecuente de
una batería cargada o parcialmente cargada resultará en
una sobrecarga y daños a las celdas. No deje las baterías
en el cargador por días enteros.
8. Nunca use o cargue las baterías si sospecha que han
pasado más de doce (12) meses desde la última vez
que fueron cargadas. Existe una alta probabilidad de
que la batería ya haya sufrido un daño severo (descarga
exhaustiva).
9. Cargar baterías a una temperatura menor de 41°F (5°C)
causará daños químicos a las celdas y puede provocar un
incendio.
10. No use baterías que hayan sido expuestas al calor
durante el proceso de carga, ya que las celdas de la
batería pueden haber sufrido daños severos.
11. No use baterías que se hayan curvado o deformado
durante el proceso de carga, ni aquellas que muestren
otros síntomas atípicos como liberación de gases,
zumbidos, resquebrajaduras, etc.
12. Nunca descargue por completo la batería (se recomienda
una profundidad de descarga de un 80%). Una descarga
completa de la batería causará un envejecimiento
prematuro de las celdas de la batería.
®
+ Sun Joe®, o comuníquese con
®
+ Sun Joe®
24
Page 25

Protección contra inuencias del entorno
1. Use ropa de trabajo adecuada. Use gafas protectoras.
2. Proteja su herramienta inalámbrica y el cargador de
batería contra la humedad y la lluvia. La humedad y la
lluvia pueden causar peligrosos daños a las celdas.
3. No use la herramienta inalámbrica ni el cargador de
batería cerca de vapores o líquidos inamables.
4. Use el cargador de batería y la herramienta inalámbrica
solo en entornos secos y a una temperatura ambiente de
entre 41°F (5°C) y 105°F (40.5°C)
5. No coloque la batería en lugares donde la temperatura
pueda alcanzar más de 104°F (40°C). Especialmente,
no deje el cargador de batería en un auto que esté
estacionado bajo la luz directa del sol.
6. Proteja las baterías contra el sobrecalentamiento. Las
sobrecargas, exceso de carga y exposición a la luz directa
del sol darán como resultado un sobrecalentamiento y
daños a las celdas. Nunca cargue ni trabaje con baterías
que hayan estado sobrecalentadas. De ser posible,
reemplácelas inmediatamente.
7. Guarde el cargador de batería y su herramienta
inalámbrica solo en entornos secos y a una temperatura
ambiente de entre 41°F (5°C) y 105°F (40.5°C). Guarde su
batería de iones de litio en un lugar fresco y seco, a una
temperatura ambiente de entre 50°F (10°C) y 68°F (20°C).
Proteja la batería, el cargador y la herramienta inalámbrica
contra la humedad y la luz directa del sol. Solo almacene
baterías cargadas por completo (por lo menos hasta en un
40%).
8. Evite que la batería de iones de litio se congele. Las
baterías almacenadas a temperaturas menores de 32°F
(0°C) por más de una hora deben ser desechadas.
9. Al manipular baterías, tenga cuidado con las descargas
electrostáticas. Las descargas electrostáticas pueden
dañar el sistema electrónico de protección y las celdas
de la batería. Evite las descargas electrostáticas y nunca
toque los polos de la batería.
¡IMPORTANTE!
Instrucciones de seguridad para
• Retire del área a podar objetos extraños como rocas,
alambres, juguetes y otros objetos que pueden ser
recogidos y arrojados por las cuchillas. Manténgase
detrás del mango cuando el motor esté funcionando.
• Asegúrese de que el área a podar esté libre de
transeúntes antes de encender la máquina. Detenga la
máquina si alguien entra al área.
• No opere la máquina descalzo o usando sandalias. Use
siempre calzado protector.
• Antes y durante el movimiento en reversa de la podadora,
siempre mire hacia abajo y hacia atrás.
• Nunca arroje material directamente hacia nadie. Evite
arrojar material contra paredes u otras obstrucciones.
• No opere la máquina sin todo el receptor de césped,
protector contra descargas, protector posterior u otro
dispositivo de seguridad en su lugar y funcionando
apropiadamente.
• Nunca deje sin atender una máquina encendida.
• Detenga el motor y espere a que las cuchillas se hayan
detenido por completo antes de limpiar la máquina, retirar
el receptor de césped o desatascar el protector contra
descargas.
• Opere la máquina solo bajo luz diurna o luz articial
apropiada.
• No opere la máquina si usted está cansado o bajo la
inuencia del alcohol o las drogas.
• Nunca opere la podadora de césped sobre césped
mojado. Esté siempre atento a dónde esté pisando.
Camine, nunca corra, con la podadora.
• Si la máquina empieza a vibrar de manera anormal,
detenga el motor e inmediatamente inspeccione la
máquina para determinar la causa. Las vibraciones
generalmente son señales de problemas.
• Mantenga las cuchillas aladas.
• Mantenga las manos y los pies lejos del área de corte.
• Utilice siempre protección ocular al operar la máquina.
• Los objetos arrojados por la cuchilla de la podadora de
césped pueden causar lesiones personales severas.
Siempre se debe examinar cuidadosamente el área a
podar y retirar todos los objetos antes de cada poda.
podadoras de rodadura
Operación general
• Lea, entienda y siga todas las instrucciones en la máquina
y en el(los) manual(es) antes de empezar.
• No ponga sus manos o pies cerca o debajo de la
máquina. Manténgase siempre alejado de la abertura de
descarga.
• Solo personas adultas responsables y familiarizadas con
las instrucciones deberán estar autorizadas a operar esta
máquina.
25
Page 26

Trabajo en pendientes
Las pendientes son factores importantes relacionados a los
accidentes de resbalos y caídas, los cuales pueden resultar
en lesiones personales severas. La operación en todas las
pendientes requiere mucho cuidado. Si no se siente seguro en
una pendiente, no la pode.
• Pode el césped de forma lateral en la pendiente. Nunca
pode pendientes siguiendo una ruta trasversal de arriba a
abajo. Tenga mucho cuidado al cambiar de dirección en
una pendiente.
• Esté atento a hoyos, surcos, baches, rocas u otros
objetos ocultos. Estos pueden causar un inesperado
resbalón o caída.
• No pode sobre césped mojado o pendientes demasiado
inclinadas. Una mala postura puede causar un accidente
de resbalo y caída.
• No pode cerca de laderas, zanjas o terraplenes.
Usted puede perder su postura o equilibrio.
Niños
Pueden ocurrir accidentes trágicos si el operador no está
alerta de la presencia de niños. Los niños son generalmente
atraídos a la máquina y a la actividad de podado.
Nunca asuma que los niños permanecerán en donde usted los
vio por última vez.
• Mantenga a los niños lejos del área de poda y bajo la
estricta vigilancia de un adulto responsable que no sea el
operador.
• Esté siempre atento y apague la podadora si un niño entra
al área.
• Nunca deje que los niños operen la podadora.
• Tenga especial cuidado al acercarse a esquinas ciegas,
arbustos, árboles u otros objetos que puedan obstaculizar
la visualización de un niño.
• Verique frecuentemente los componentes de la bolsa
recolectora de césped y del protector contra descargas, y
reemplácelos con partes recomendadas por el fabricante
cuando sea necesario.
• La cuchilla de la podadora de césped está alada. Al
manipularla, envuélvala o use guantes. Tenga especial
cuidado al reparar la cuchilla.
• Conserve o reemplace las etiquetas de seguridad y de
instrucción, de ser necesario.
• Si su podadora de césped inalámbrica requiere servicio,
contacte a un distribuidor Snow Joe
Sun Joe
®
autorizado o comuníquese con la central
de servicio al cliente Snow Joe
®
+
®
+ Sun Joe® llamando
al 1-866-SNOWJOE (1-866-766-9563). Para las
reparaciones se deben utilizar únicamente partes de
repuesto idénticas. Esto mantendrá la seguridad de la
podadora de césped inalámbrica.
• Si el cable del cargador de la batería está dañado, deberá
ser reemplazado inmediatamente para evitar accidentes.
Comuníquese con la central de servicio al cliente
Snow Joe
®
+ Sun Joe® llamando al 1-866-SNOWJOE
(1-866-766-9563) para recibir asistencia.
Servicio
• Detenga la máquina y desconecte la llave de seguridad
antes de reparar, limpiar o remover recortes de césped de
la podadora.
• Mantenga ajustados todos los pernos y tuercas.
• Nunca manipule los dispositivos de seguridad.
Inspecciónelos regularmente para asegurarse de que
estén en su lugar y funcionando apropiadamente.
• Mantenga la podadora libre de césped, hojas y otras
acumulaciones de residuos.
• Si la máquina golpea un objeto extraño, deténgase e
inspeccione la máquina. Repárela, de ser necesario, antes
de empezar.
• Nunca efectúe ningún ajuste o reparación con el motor
encendido. Siempre desconecte la llave de seguridad
antes de ajustar, limpiar o reparar la máquina.
26
Page 27

Símbolos de seguridad
La siguiente tabla muestra y describe los símbolos de seguridad que pueden aparecer en este producto. Lea, comprenda y siga
todas las instrucciones de la máquina antes de intentar ensamblarla y operarla.
Símbolo SímboloDescripción Descripción
¡PELIGRO! Cuchillas giratorias.
Mantenga los pies y manos
alejados.
Alerta de seguridad. Precaución.
Para reducir el riesgo de lesiones,
el usuario debe leer el manual de
instrucciones.
¡ADVERTENCIA! No exponga
ni opere la unidad en la lluvia o
entornos mojados. Manténgala
seca.
Peligro de resbalo en pendientes:
tenga extremo cuidado al podar
en pendientes para evitar resbalar
y caer.
Los objetos arrojados y la
cuchilla giratoria pueden causar
lesiones personales severas.
Mantenga a los transeúntes y niños
alejados a una distancia segura.
Use protección para sus ojos y oídos.
Para evitar lesiones, use protectores
para los oídos y gafas de seguridad.
Use guantes protectores y
calzado no deslizante al operar
esta máquina y al manipular
desechos.
Amputación de dedos de pies o
manos por cuchilla giratoria de
podadora de césped.
Mantenga a los espectadores a
una distancia segura del área de
trabajo.
Las cuchillas continúan girando
luego de que la máquina se haya
apagado.
Cuchilla giratoria: mantenga
las manos y pies alejados de la
abertura mientras la máquina
esté funcionando.
Solo para uso en interiores. Utilice el cargador de batería solamente en interiores.
¡ADVERTENCIA! Siempre APAGUE
la máquina y retire la llave de
seguridad antes de llevar a cabo
tareas de inspección, limpieza o
mantenimiento.
Mire hacia atrás cuando retroceda
con la podadora de césped.
27
Page 28

Conozca su podadora de césped inalámbrica
Lea detenidamente el manual del operador y las instrucciones de seguridad antes de operar la podadora de césped inalámbrica.
Compare la ilustración debajo con la podadora para familiarizarse con las ubicaciones de los diversos controles y ajustes.
Conserve este manual para futuras referencias.
1. Palanca interruptora
2. Botón de trabado de seguridad
3. Caja de interruptor
4. Estructura de mango superior
5. Clips de cable (x2)
6. Perilla, arandela y perno de
mango superior (x2)
7. Estructura de mango inferior
8. Compuerta eyectora
9. Tapa de compartimiento de batería
10. Compartimiento de batería
11. Cubierta superior
12. Llave de seguridad
13. Rueda (x4)
14. Plataforma de podado
15. Bolsa recolectora de césped
16. Empuñadura suave
17. Cargador rápido de baterías de
iones de litio de 24 V (24VCHRG-AC)
18. Conector de cargador
19. Botón pulsador de trabado
20. Indicador de nivel de batería
21. Botón pulsador para indicador
de batería
22. Batería de iones de litio iON+ de
24 V (24VBAT) con exclusiva
®
tecnología EcoSharp
.
10
11
12
13
19
20
17
18
4
5
6
21
22
7
8
9
1
2
3
16
R
15
14
Technical Data
Motor ......................................................... 600 W sin escobillas
Voltaje de batería* ...................................................... 24 V D.C.
Capacidad de la batería .................................................. 4.0 Ah
Tiempo de corte máximo ............................................... 30 min
.................................................. (corta hasta 160 m
2
de césped)
Entrada de cargador ......................................... 100 – 240 V AC,
.........................................................................50 – 60 Hz, 50 W
Salida de cargador ............................. 25.2 V DC,
*Voltaje inicial sin carga, al ser cargada por completo alcanza un pico de 24 V; un voltaje nominal bajo carga típica es 21.6 V.
1400 mA
Tiempo de carga máximo ...................................... 2 hrs 40 min
Velocidad sin carga .................................................. 3,000 RPM
Ancho de corte ................................................ 14 plg (35.6 cm)
Altura de corte ............................................. 1.18 plg a 2.52 plg
........................................................................ (30 mm a 64 mm)
Capacidad de bolsa recolectora ..........................10.6 gal (40 L)
Tamaño de rueda ............................................... 5.5 plg (14 cm)
Peso Neto ........................................................ 23.1 lb (10.5 kg)
28
Page 29

Desembalaje
Contenido del paquete
• Podadora de césped inalámbrica
• Bolsa recolectora de césped
• Vara de soporte de bolsa recolectora de césped
• Estructura de mango superior
• Perilla, arandela y perno de mango superior (x2)
• Estructura del mango inferior
• Tornillos de mango inferior (x2)
• Llave
• Clips de cable (x2)
• Batería de iones de litio iON+ de 24 V
• Cargador rápido de batería de iones de litio iON+ de 24 V
• Manual con tarjeta de registro
1. Retire cuidadosamente la podadora de césped y
compruebe que todos los artículos anteriores estén
suministrados.
2. Inspeccione cuidadosamente el producto para asegurarse
de que no ocurrió ningún daño o ruptura durante el
transporte.
NOTA: no se deshaga de la caja de transporte ni de los
materiales de embalaje hasta que usted esté listo para
usar su podadora de césped inalámbrica. El empaquetado
está hecho de materiales reciclables. Deshágase de
materiales en conformidad con los reglamentos locales.
¡IMPORTANTE! La podadora y sus materiales de embalaje no
son juguetes. No permita que los niños jueguen con bolsas
plásticas, láminas o partes pequeñas. ¡Estos objetos pueden
ser tragados y representan un riesgo de asxia!
Operación de la batería
La unidad es alimentada con una batería de iones de litio.
La batería está completamente sellada y no requiere de
mantenimiento.
Indicador de nivel de carga de la batería
La batería tiene un botón para comprobar su nivel de carga.
Simplemente presione el botón para leer el nivel de carga de la
batería en los LED indicadores de la batería:
• Tres LED indicadores de nivel están encendidos: el nivel
de carga de la batería es elevado.
• Dos LED indicadores de nivel están encendidos: el nivel
de carga de la batería está disminuyendo. Deje de trabajar
tan pronto como sea posible.
• Un LED indicador de nivel está encendido: la batería está
baja. Deje de trabajar INMEDIATAMENTE y cargue la
batería. De otro modo, la vida útil de la batería se reducirá
en gran medida.
SignicadoLuz
Botón de nivel de carga.
La batería está cargada a un 30% y
requiere ser cargada de inmediato.
La batería está cargada a un 60% y
requiere ser cargada pronto.
La batería está cargada por completo.
NOTA: si el botón de nivel de carga no parece funcionar,
inserte el conector del cargador y cargue según se requiera.
NOTA: inmediatamente luego del uso de la batería, el botón de
nivel de carga puede mostrar una carga más baja que la que
se mostrará algunos minutos después. Las celdas de la batería
“recuperan” parte de su carga luego de permanecer inactivas.
Operación del cargador
m ¡ADVERTENCIA! Cargue la batería de iones de
litio iON+ de 24 V solo con su cargador de iones de litio
compatible iON+ de 24 V. Otros tipos de baterías pueden
causar lesiones personales y daños materiales. Para reducir
el riesgo de choque eléctrico, no permita que entre agua a la
conexión CA/CC del cargador.
Cuándo cargar la batería de iones de
litio iON+ 24VBAT
NOTA: las baterías de iones de litio iON+ 24VBAT no crean una
“memoria” al ser cargadas luego de una descarga parcial. Por
tanto, no hay necesidad de agotar la batería antes de insertar
el conector del cargador.
• Use las luces indicadoras de carga de batería para
determinar cuándo cargar su batería de iones de litio
iON+ 24VBAT.
• Usted puede cargar por completo su batería antes de
empezar un trabajo grande, o luego de un uso prolongado.
Carga de la batería
1. Abra la cubierta del compartimiento de la batería,
y empuje el botón pulsador de trabado en la batería para
sacar la batería de su compartimiento (Fig. 1).
29
Page 30

R
Fig. 1
Tapa de
compartimiento
de batería
Botón
pulsador de
trabado
2. Compruebe que el voltaje de la red sea el mismo que el
indicado en la placa de especicaciones del cargador de
la batería. Luego, enchufe el adaptador del cargador en
un tomacorriente CA apropiado. Conecte el conector del
cargador en el receptáculo de carga de la batería para
empezar a cargarla (Fig. 2).
Fig. 2
4. Una recarga oportuna de la batería ayudará a prolongar
la vida útil de la batería. Usted debe recargar la batería
cuando note una caída en la potencia del equipo.
¡IMPORTANTE! Nunca permita que la batería se descargue
por completo ya que esto causará un daño irreversible a la
batería.
Ensamblado
m
¡ADVERTENCIA! No inserte la llave de seguridad
hasta que el ensamblado haya sido completado. El
incumplimiento de esta advertencia puede resultar en un
encendido accidental y lesiones personales severas.
m ¡ADVERTENCIA! Antes de realizar cualquier tarea de
mantenimiento, asegúrese de que la llave haya sido retirada
de la unidad. No seguir esta advertencia puede resultar en
lesiones personales severas.
m ¡ADVERTENCIA! El producto debe estar
completamente ensamblado antes de su operación. No use un
producto que esté parcialmente ensamblado, o ensamblado
con partes dañadas.
NOTA: antes de usar la podadora siga estas instrucciones
para ensamblar el mango y la bolsa recolectora de césped.
Indicadores
de batería
3. La batería tomará aproximadamente 2 hrs 40 min en
cargarse. Las luces LED indicadoras de la batería
parpadearán y se iluminarán una a una durante el proceso
de carga. Desconecte el cargador inmediatamente cuando
las tres luces LED estén todas iluminadas.
m ¡PRECAUCIÓN! PELIGRO DE INCENDIO. Al
desconectar el cargador de la batería, asegúrese de
desenchufar primero el cargador del tomacorriente, y luego
desconecte el cargador de la batería.
Ensamblado de mango
1. Coloque la estructura de mango inferior dentro de los dos
oricios en el cuerpo de la máquina y ajuste el mango en
ambos lados con los tornillos proporcionados (Fig. 3).
Fig. 3
2. Junte la estructura de mango superior a la estructura
de mango inferior usando la perilla, arandela y perno
suministrados (Fig. 4). Repita en el lado opuesto.
Estructura
de mango
inferior
Tornillo
Cuerpo de la
máquina
m ¡ADVERTENCIA! Este cargador no se apaga de
forma automática cuando la batería está completamente
cargada. Tenga cuidado de no dejar la batería conectada al
cargador. Apague o desenchufe el cargador del tomacorriente
cuando la carga haya sido completada.
30
Page 31

Fig. 4
Fig. 6
Estructura de
mango superior
Arandela
Perno
Perilla
NOTA: la estructura de mango superior viene con
dos oricios en cada lado (Fig. 3); sin embargo, solo
se necesita un oricio en cada lado para asegurar la
estructura de mango inferior. Simplemente seleccione su
altura preferida, y asegure tal como se muestra (Fig. 5).
Fig. 5
Estructura de
mango superior
Cubierta
plástica
R
Vara de soporte
2. Coloque las tiras protectoras de plástico sobre la vara de
soporte (Fig. 7).
Fig. 7
Tiras
R
protectoras
de plástico
Vara de soporte
Para mango
más bajo
Para mango
más alto
3. Asegure el cable de alimentación al cuerpo de la
podadora de césped usando los clips para cable.
Ensamblado y colocación de la bolsa
recolectora para césped
1. Coloque la vara de soporte dentro de los oricios en la
cubierta plástica. El codo de la vara de soporte debe
encarar la parte trasera de la máquina (Fig. 6).
3. Levante la compuerta de descarga con una mano. Con la
otra mano, sostenga la bolsa recolectora de césped por
su mango y engánchela desde arriba (Fig. 8).
Fig. 8
Compuerta eyectora
R
Bolsa recolectora
de césped
4. Suelte la compuerta de descarga para asegurar la bolsa
recolectora de césped en su sitio (Fig. 9).
31
Page 32

Fig. 9
Compuerta
eyectora
Fig. 11
R
Bolsa
recolectora
de césped
Operación
Esta podadora de césped está diseñada para el corte de
césped en jardines y patios pequeños. Esta podadora de
césped no está destinada para cortar césped de parques
públicos, campos de juego, granjas o bosques. No use esta
podadora para ninguna aplicación distinta a las aplicaciones
para la que ha sido diseñada.
Arranque y parada
m ¡ADVERTENCIA! Antes de encender la podadora,
asegúrese de que no haga contacto con ningún objeto
extraño. Mantenga sus manos y pies a una distancia segura de
la cuchilla giratoria y de la abertura del eyector. No obedecer
estas advertencias podría causar lesiones personales severas.
IMPORTANTE: no encienda la podadora sobre césped alto.
1. Antes de encender la unidad, asegúrese de que la batería
y la llave de seguridad estén insertadas correctamente en
sus ranuras (Fig. 10).
Fig. 10
R
3. Para encender la podadora de césped inalámbrica,
presione y sujete el botón de trabado de seguridad
mientras jala la palanca interruptora hacia usted (Fig. 12).
Fig. 12
Palanca
interruptora
Botón de
trabado de
seguridad
4. Una vez que la máquina se encienda, suelte el botón de
trabado de seguridad y proceda con la operación, bajando
cuidadosamente la podadora a la posición de corte
(Fig. 13).
Batería
Llave de
seguridad
2. Antes de encender la podadora de césped, sujete el
ensamblado del mango con ambas manos e incline el
mango hacia abajo para levantar levemente el frente de la
podadora de césped. Esto reducirá el riesgo de daños al
césped durante el encendido (Fig. 11).
Fig. 13
R
32
Page 33

5. Para detener la podadora, suelte la palanca interruptora.
m ¡ADVERTENCIA! La cuchilla podadora continuará
girando por un breve periodo luego de que la unidad haya
sido apagada. No incline ni transporte la unidad mientras el
motor esté aún funcionando, ni toque la cuchilla cuando aún
esté girando. No obedecer esta advertencia puede resultar en
lesiones personales severas.
Ajuste de la altura de corte
Siga estas instrucciones para ajustar la altura de corte de la
podadora de césped.
5. Mueva las cuatro ruedas a la altura de corte deseada
jalando hacia atrás cada eje y colocándolos en la posición
deseada. Asegúrese de que las cuatro ruedas estén en la
misma posición de altura de corte.
NOTA: ajuste la podadora a la mayor altura de corte al
podar en terreno disparejo o con maleza.
6. Vuelva a colocar la podadora sobre sus ruedas, y vuelva a
instalar la bolsa recolectora de césped.
7. Inserte la llave de seguridad en su ranura y vuelva a usar
la máquina con normalidad.
Consejos para la poda
m ¡ADVERTENCIA! Antes de realizar estos ajustes,
desconecte la fuente de alimentación hacia la podadora
retirando la llave de seguridad de la ranura, y espere hasta que
las cuchillas giratorias se hayan detenido por completo. Se
recomienda usar guantes debido a la proximidad de la cuchilla
de corte.
OBEDEZCA SIEMPRE TODAS LAS PRECAUCIONES Y
RECOMENDACIONES DE SEGURIDAD MENCIONADAS
PREVIAMENTE EN ESTE MANUAL.
1. Apague la máquina y retire la llave de seguridad de la
ranura.
2. Retire y vacíe la bolsa recolectora de césped.
3. Recueste la podadora de césped en un lado.
Fig. 14
Posición alta
Posición
intermedia
m ¡ADVERTENCIA! Inspeccione el área antes del
podado y retire todas las piedras, palos, alambres y otros
objetos extraños que puedan ser recogidos y lanzados por
la cuchilla giratoria. No hacerlo no solo dañará la cuchilla de
la podadora sino también puede causar severas lesiones
personales.
• Asegúrese de inspeccionar periódicamente la cuchilla
podadora para ver si hay señales de desgaste, y afílela
al menos una vez por año, tal como se describe en la
sección de mantenimiento.
NOTA: una cuchilla alada mejorará de manera
signicativa el rendimiento de la podadora, especialmente
al cortar hojas altas de césped.
• Al cortar césped grueso, reduzca su velocidad de
caminata para permitir un corte más efectivo y una
descarga apropiada del césped cortado. Para un césped
saludable, corte siempre un tercio o menos de la longitud
total del césped. El césped en promedio deberá tener de
1.5 plg (3.8 cm) a 2 plg (5 cm) de largo durante los meses
fríos, y más de 2 plg (5 cm) de largo durante los meses
calurosos. Si hay crecimiento, el césped deberá ser
cortado en el otoño.
• El césped se verá mejor si es siempre cortado a la misma
altura y en direcciones alternas.
• Al cruzar cualquier supercie con grava, suelte la palanca
interruptora para apagar la podadora. Las piedras pueden
ser recogidas y lanzadas por la cuchilla giratoria.
• Al podar en terreno disparejo o con maleza, ajuste la
podadora a su mayor altura de corte.
Posición bajaEje
4. Los ejes de las ruedas pueden ser colocados en 3
diferentes alturas de corte: baja (cortará el césped lo más
corto), media y alta (Fig. 14).
Ajuste de altura de tres posiciones:
1. Baja: 1.18 plg (30 mm)
2. Media: 1.93 plg (49 mm)
3. Alta: 2.52 plg (64 mm)
La tolerancia de altura de corte es ±0.2 plg (±0.5 mm).
m ¡ADVERTENCIA! Si la máquina golpea un objeto
extraño, detenga el motor y desenchufe el cable de
alimentación. Inspeccione minuciosamente la podadora y,
de encontrar daños, repárela antes de volver a trabajar.
• ¡IMPORTANTE! Nunca abra la compuerta eyectora
cuando la bolsa haya sido retirada para ser vaciada y el
motor aún esté funcionando. ¡Una cuchilla giratoria puede
causar severas lesiones!
33
Page 34

• Siempre ajuste cuidadosamente la compuerta eyectora y
la bolsa recolectora de césped. Apague el motor antes de
vaciar la bolsa recolectora de césped. Asegúrese de que
siempre se mantenga una distancia segura (proporcionada
por la longitud de los mangos largos) entre el usuario y la
carcasa de la podadora. Tenga especial cuidado al podar
y cambiar de dirección en pendientes.
• Mantenga con sus pies una posición rme y use calzado
resistente y antideslizante, y pantalones largos. Siempre
pode a lo largo de una pendiente (no hacia arriba y abajo).
• Por motivos de seguridad, la podadora no puede ser
usada para podar pendientes cuyas gradientes excedan
15°.
• Tenga especial cuidado al retroceder y jalar la podadora
hacia usted, ya que dicha maniobra con la máquina puede
hacerle tropezar.
Cuidado y mantenimiento
m
¡ADVERTENCIA! Antes de la limpieza, reparación
o inspección de la podadora, desconéctela de la fuente de
alimentación retirando la llave de seguridad, y compruebe que
todas las partes móviles se hayan detenido por completo.
General
• Mantenga siempre la podadora limpia y libre de césped,
tierra y otros residuos.
• Mantenga los mangos secos, limpios y sin aceites o
grasas.
• Luego de cada sesión de podado, retire los recortes
de césped y residuos acumulados usando un paño
seco o cepillo de mano. Usted puede también limpiar el
equipo con un paño mojado y algo de detergente suave
y no abrasivo. No use agentes de limpieza o solventes
agresivos ya que pueden dañar los componentes
plásticos en la podadora de césped. Asegúrese de que
no entre agua al interior de la podadora de césped, ya
que el agua puede destruir el mecanismo interruptor y de
conexión, así como el motor eléctrico.
• No limpie la podadora de césped con agua corriente,
particularmente con agua a alta presión.
• Compruebe que todas las tuercas, pernos y tornillos estén
ajustados apropiadamente antes de cada uso.
• Inspeccione frecuentemente el ensamblado de la
bolsa recolectora de césped para ver si hay señales de
desgaste. Reemplace inmediatamente una parte dañada
con una genuina si se encuentran daños.
• Reemplace inmediatamente las partes gastadas en
exceso o dañadas.
• Para maximizar el ciclo de vida útil de su podadora,
todas las partes atornilladas, incluyendo ruedas y ejes,
deben ser limpiadas y lubricadas. No hay partes dentro
del equipo que requieran mantenimiento o lubricación
adicional.
Mantenimiento de la cuchilla
IMPORTANTE: la cuchilla podadora es alada y puede causar
severas lesiones personales si es manipulada incorrectamente.
Envuelva la cuchilla o use guantes, y tenga especial cuidado al
manipularla.
La cuchilla de acero está diseñada para proporcionar un corte
no en césped alto o difícil. El deterioro en la calidad de corte
indica desgaste o daño de la cuchilla. Siga estos pasos para
determinar si la cuchilla necesita ser realada o reemplazada:
1. Desconecte la podadora de la fuente de alimentación
mediante el retiro de la llave de seguridad.
2. Voltee la podadora sobre uno de sus lados para exponer
la parte inferior del alojamiento de la cuchilla.
3. Inspeccione la cuchilla.
a. Si la cuchilla está desalada o tiene algo de desgaste,
reafílela.
b. Si la cuchilla muestra señales de desgaste severo o
daños (es decir, está abollada o doblada), reemplácela.
m ¡ADVERTENCIA! Una podadora que vibre en exceso
indica que la cuchilla no está balanceada adecuadamente
o se ha deformado debido a que golpeó un objeto. En este
caso, la cuchilla debe ser reparada o reemplazada. Siga los
procedimientos adecuados de mantenimiento para el cuidado
de la cuchilla.
Reemplazo de cuchilla
IMPORTANTE: use solo partes de repuesto originales
especicadas para esta podadora. El uso de partes que no
cumplan con las especicaciones del equipo original puede
provocar un funcionamiento incorrecto de la podadora de
césped y comprometer la seguridad del operador.
1. Retire la llave de seguridad de la podadora de césped.
2. Voltee la podadora sobre uno de sus lados para exponer
la parte inferior del alojamiento de la cuchilla.
3. Use un paño para sujetar la cuchilla, o use guantes de alta
resistencia.
4. Usando la llave incluida, retire el perno y la arandela
que aseguran la cuchilla girando el perno en sentido
antihorario, y luego retire cuidadosamente la cuchilla
(Fig. 15).
34
Page 35

Fig. 15
Cuchilla
Llave
5. Coloque la nueva cuchilla, la arandela y el perno de
vuelta, siguiendo los mismos pasos pero en orden inverso
(Fig. 16).
3. Inspeccione la podadora de césped cuidadosamente para
detectar partes gastadas, sueltas o dañadas. Verique las
conexiones y tornillos, y ajústelos de ser necesario. Preste
especial atención a la cuchilla podadora y reemplácela
o reafílela si presenta señales de desgaste. Consulte la
sección de mantenimiento y cuidado.
4. Guarde la podadora en interiores en un área seca, limpia
y fría fuera del alcance de los niños. No guarde la unidad
cerca de materiales corrosivos tales como fertilizantes y
sal de roca.
5. No cubra la podadora de césped con una cubierta sólida
de plástico. Las cubiertas de plástico atrapan humedad
alrededor de la podadora, la cual puede corroerse.
6. El mango de su podadora puede ser plegado para un
almacenamiento compacto. Empiece aojando las perillas
del mango en cada lado del mango superior, y pliéguelo
(Fig. 17).
Fig. 17
Fig. 16
Cuchilla
Perno
Arandela
Almacenamiento
Siga los pasos a continuación con el n de preparar la
podadora de césped para su almacenamiento:
1. Retire la llave de seguridad de la ranura.
2. Limpie la podadora con un paño mojado o cepillo de
mano.
Mango superior
Perilla de
mango
superior
R
Eliminación
Reciclaje y eliminación
El producto viene en un empaquetado que lo protege contra
daños durante el transporte. Conserve el empaquetado hasta
que usted esté seguro de que todas las partes hayan venido
en este y que el producto esté funcionando adecuadamente.
Luego, recicle el empaquetado o consérvelo para un
almacenamiento a largo plazo.
Símbolo WEEE. Los productos eléctricos no deben
ser desechados en la basura doméstica. Recíclelos
donde hayan instalaciones adecuadas. Consulte con
las autoridades locales o tienda local para saber
sobre las normas de reciclaje.
35
Page 36

Precaución y eliminación de
24VCHRG-AC
la batería
Deshágase de su batería de acuerdo con los reglamentos
federales, estatales y locales. Para encontrar lugares de
reciclaje, comuníquese con un servicio de reciclaje en su
localidad.
m ¡PRECAUCIÓN! Incluso las baterías descargadas
contienen algo de energía. Antes de deshacerse de éstas, use
cinta aislante para cubrir los terminales y evitar que la batería
haga cortocircuito, lo cual puede causar una explosión o
incendio.
m ¡ADVERTENCIA! Para reducir el riesgo de lesiones
personales o explosión, nunca queme ni incinere una
batería incluso si está dañada, inservible o completamente
descargada. Al ser quemada, los humos y materiales tóxicos
son emitidos a la atmósfera circundante.
1. Las baterías varían de acuerdo al dispositivo. Consulte su
manual para obtener la información especíca.
2. Instale solo nuevas baterías del mismo tipo en su
producto (donde corresponda).
3. No insertar las baterías con la polaridad correcta, tal
como se indica en el compartimiento de la batería o en el
manual, puede reducir el ciclo de vida útil de las baterías
o causar fugas en las baterías.
4. No combine baterías nuevas con antiguas.
5. No combine baterías alcalinas, estándar (de zinc-carbono)
o recargables (de níquel-cadmio, de níquel-hidruro
metálico o de iones de litio).
6. No arroje las baterías al fuego.
7. Las baterías deben ser recicladas o desechadas según los
reglamentos locales y estatales.
Servicio y soporte
Si su podadora de césped inalámbrica 24V-MJ14C de
Sun Joe
1-866-SNOWJOE (1-866-766-9563) para obtener ayuda.
®
requiere servicio o mantenimiento, llame al
Federal Communications Commission
(Comisión Federal de Comunicaciones o
FCC):
m ¡ADVERTENCIA! Cualquier cambio o modicación
a esta unidad no aprobado expresamente por la parte
responsable por el cumplimiento puede hacer que el usuario
pierda el derecho de utilizar el equipo.
Dispositivo Clase B:
NOTA: este equipo ha sido probado y cumple con los límites
de la Clase B de dispositivos digitales, de acuerdo con la
Parte 15 de las normas de la FCC.
Estos límites están diseñados para proporcionar protección
razonable contra interferencias dañinas en una instalación
residencial.
Este equipo genera, usa y puede irradiar energía de
radiofrecuencia y, si no se instala y utiliza de acuerdo con las
instrucciones, puede provocar interferencias perjudiciales en
las comunicaciones radiofónicas.
No obstante, no hay garantía alguna de que no se produzcan
interferencias en una instalación concreta.
Si este equipo llegara a causar una interferencia perjudicial
para la recepción de radio o televisión (la cual se puede
determinar apagando y encendiendo el equipo), se
recomienda que el usuario trate de corregir la interferencia
tomando una o más de las siguientes medidas:
• Reorientar o reubicar la antena receptora.
• Aumentar la distancia entre el equipo y el receptor.
• Conectar el equipo a un tomacorriente correspondiente
a un circuito diferente de aquel al que está conectado el
receptor.
• Consultar a un comerciante o a un técnico experimentado
de radio y televisión.
Modelo y número de serie
Al contactar a la empresa o al ordenar partes de repuesto,
usted necesitará proveer el modelo y el número de serie de
su producto. Estos se encuentran en la etiqueta pegada a la
carcasa o mango de su podadora. Copie estos números en el
espacio proporcionado a continuación.
Registre los siguientes números que se encuentran en la carcasa
o mango de su nuevo producto:
2 4 V - M J 1 4 C
Modelo:
Nº de serie:
36
Page 37

Solución de problemas
• Retire la llave de seguridad antes de llevar a cabo tareas de mantenimiento en la máquina o vericar que sus partes estén
funcionando correctamente.
• Para evitar complicaciones innecesarias, revise la siguiente tabla antes de ponerse en contacto con un técnico calicado por
cualquier problema mecánico.
Falla Causa posible Solución
La podadora no enciende
La podadora se detiene
mientras poda
La podadora no puede cortar
césped de forma pareja
La podadora no puede triturar
adecuadamente
a) La llave de seguridad no está
insertada.
b) El control del motor/cuchilla está
desactivado.
c) La batería está baja.
d) La plataforma de podado está
obstruida con césped o residuos.
e) El césped es demasiado alto.
a) La batería está baja.
b) El césped es demasiado alto.
c) La plataforma de podado está obstruida
con césped o residuos.
d) La máquina está sobrecargada, y el
sistema de protección contra sobrecargas
la ha apagado.
a) El césped está grueso o disparejo.
b) La cuchilla no está lo sucientemente
alada.
a) La plataforma de podado está obstruida
con césped o residuos.
b) El césped está demasiado mojado.
c) El césped es demasiado alto.
d) La cuchilla no está lo sucientemente
alada.
a) Inserte la llave de seguridad.
b) Presione primero el botón de trabado de
seguridad, y luego la palanca interruptora.
c) Cargue la batería.
d) Limpie la plataforma de podado. Asegúrese de
que la cuchilla se mueva libremente.
e) Congure la podadora a una altura mayor de
corte. Levante levemente las ruedas frontales
empujando hacia abajo el manillar.
a) Cargue la batería.
b) Restablezca la altura de corte.
c) Limpie la plataforma de podado. Asegúrese
de que la cuchilla se mueva libremente.
d) Deje que la máquina se enfríe por cinco
minutos. Espere a que la protección contra
sobrecargas restablezca la máquina.
a) Ajuste la altura de corte.
b) Ale o reemplace la cuchilla.
a) Limpie la plataforma de podado. Asegúrese de
que la cuchilla se mueva libremente.
b) Espere a que el césped se seque.
c) Ajuste la altura de corte a la posición más alta
para podar por primera vez, y vuelva a podar a
la altura deseada.
d) Ale o reemplace la cuchilla.
La podadora es difícil de
empujar
La podadora vibra a altas
velocidades
a) El césped es demasiado alto para ser
cortado.
b) La cuchilla o la parte trasera de la podadora
arrastran césped acumulado.
a) El eje del motor está doblado.
b) La cuchilla está desbalanceada.
c) El tornillo de la cuchilla está aojado.
37
a) Incremente la altura de corte.
a) Detenga el motor, retire la llave de seguridad,
e inspeccione los daños. Comuníquese con un
técnico calicado.
b) Balancee la cuchilla alando cada borde de
corte equitativamente, o reemplácela con una
nueva.
c) Ajuste el perno de cuchilla.
Page 38

Accesorios opcionales
m
¡ADVERTENCIA! USE SIEMPRE solo partes de repuesto y accesorios Snow Joe
repuesto o accesorios que no estén destinados para su uso con esta herramienta. Comuníquese con Snow Joe
tiene dudas sobre si es seguro usar una parte de repuesto o accesorio en particular con su herramienta. El uso de cualquier otro
accesorio o parte puede ser peligroso y causar lesiones personales o daños mecánicos.
®
+ Sun Joe®. Nunca use partes de
®
+ Sun Joe® si
Accessories Item Model
1
2
3
4
Batería de iones de litio iON+ de 24 V y 2.0 Ah
Tiempo máximo de duración de batería: 15 min (corta hasta 80 m2 de césped)
Batería de iones de litio iON+ de 24 V y 2.5 Ah
Tiempo máximo de duración de batería: 20 min (corta hasta 100 m2 de césped)
Batería de iones de litio iON+ de 24 V y 4.0 Ah
Tiempo máximo de duración de batería: 30 min (corta hasta 160 m2 de césped)
Batería de iones de litio iON+ de 24 V y 5.0 Ah
Tiempo máximo de duración de batería: 40 min (corta hasta 200 m2 de césped)
24VBAT-LTE
24VBAT-LT
24VBAT
24VBAT-XR
5
Cargador rápido de batería de iones de litio
iON+ de 24 V
24VCHRG-QC
6
Cargador de dos puertos de baterías de iones
de litio iON+ de 24 V
24VCHRG-DPC
7
Bolsa recolectora de césped de 10.6 gal (40 L) MJ401E-10
8
Accesorio de conducto de descarga lateral de
podadora de césped
NOTA: los accesorios están sujetos a cambios sin obligación alguna por parte de Snow Joe
dichos cambios. Los accesorios pueden ser pedidos en línea en sunjoe.com o vía telefónica llamando a la central de servicio al
cliente Snow Joe
®
+ Sun Joe® al 1-866-SNOWJOE (1-866-766-9563).
®
+ Sun Joe® de noticar sobre
MJ401E-DCA
38
Page 39

LA PROMESA DE SNOW JOE® + SUN JOE® AL CLIENTE
SP
POR SOBRE TODO, en Snow Joe, LLC (“Snow Joe”) estamos dedicados a usted, nuestro cliente. Nos esforzamos por hacer
®
que su experiencia sea lo más placentera posible. Desafortunadamente, hay veces en que un producto Snow Joe
®
o Aqua Joe
(el “Producto”) no funciona o sufre un desperfecto bajo condiciones normales de operación. Creemos que es importante
, Sun Joe®,
que usted sepa que puede conar en nosotros. Es por eso que tenemos esta Garantía Limitada (la “Garantía”) para nuestros Productos.
NUESTRA GARANTÍA:
Snow Joe
garantiza que sus Productos motorizados y no motorizados, nuevos y genuinos, están libres de defectos materiales o de
mano de obra al ser usados en tareas domésticas normales durante un periodo de dos (2) años a partir de la fecha de compra por parte
del comprador original y usuario nal, cuando este último los compra a través de Snow Joe o un vendedor autorizado por Snow Joe y
ha obtenido un comprobante de compra. Ya que Snow Joe no puede controlar la calidad de sus Productos vendidos por vendedores
no autorizados, a menos que la ley lo prohíba esta Garantía no cubre Productos adquiridos a través de vendedores no autorizados.
Si su Producto no funciona, o hay un problema con una parte especíca que está cubierta por los términos de esta Garantía, Snow
Joe elegirá entre: (1) enviarle una parte de repuesto gratuita; (2) reemplazar el Producto con uno nuevo o similar sin costo alguno; o (3)
reparar el Producto. ¡Un excelente soporte!
Esta Garantía le da derechos legales específicos, y usted puede también tener otros derechos según el Estado.
REGISTRO DEL PRODUCTO:
Snow Joe le recomienda enfáticamente registrar su Producto. Usted puede registrar su Producto en línea visitando
snowjoe.com/register, imprimiendo y enviando por correo una tarjeta de registro disponible en línea en nuestro sitio
Web, llamando a nuestra central de servicio al cliente al 1-866-SNOWJOE (1-866-766-9563), o enviándonos un e-mail a
help@snowjoe.com. Si usted no registra su Producto sus derechos de garantía no disminuirán; sin embargo, registrar su Producto
permitirá que Snow Joe le pueda atender mejor si usted tiene alguna necesidad como cliente.
¿QUIÉN PUEDE SOLICITAR COBERTURA DE GARANTÍA LIMITADA?
Esta Garantía es otorgada por Snow Joe al comprador original y propietario original del Producto.
¿QUÉ NO ESTÁ CUBIERTO?
Esta Garantía no se aplica si el Producto ha sido usado de forma comercial o en aplicaciones no domésticas o de alquiler. Esta Garantía
tampoco se aplica si el Producto fue adquirido desde un vendedor no autorizado. Esta garantía tampoco cubre cambios cosméticos
que no afecten el funcionamiento del Producto. Las partes desgastables como correas, brocas y cuchillas no están cubiertas por esta
Garantía, y pueden ser compradas visitando snowjoe.com o llamando al 1-866-SNOWJOE (1-866-766-9563).
39
R4_01282020
Page 40

Page 41

MANUEL D’UTILISATION
Une division de Snow Joe
®
, LLC Modèle 24V-MJ14C Formulaire n° SJ-24V-MJ14C-880F-MR2
FR
R
TONDEUSE À GAZON SANS CORDON
24-VOLT MAX.* | 4,0 Ah | 35,6 cm
IMPORTANT!
Consignes de sécurité
Tous les utilisateurs doivent lire
ces consignes avant d’utiliser la
machine.
Suivez toujours ces consignes de sécurité. Ne pas s’y
conformer peut entraîner de graves blessures pouvant même
être fatales.
AVERTISSEMENTS d’ordre général
en matière de sécurité!
Quand vous utilisez cette tondeuse à gazon sans cordon,
les précautions de sécurité de base doivent toujours être
suivies pour réduire le risque d’incendie, d’électrocution ou
de blessure corporelle. Parmi ces précautions gurent les
avertissements suivants :
mAVERTISSEMENT! Ne pas utiliser sans que le sac
à herbe complet, le déecteur de protection de décharge, la
protection arrière ou d’autres dispositifs de protection et de
sécurité soient en place et en bon ordre de marche.
mAVERTISSEMENT! L’utilisation de tout autre
accessoire ou pièce attachée pourrait augmenter le risque de
blessure.
mAVERTISSEMENT! Pour réduire le risque de blessure,
inspecter fréquemment l’ensemble sac à herbe et le remplacer
par une pièce recommandée s’il présente des signes d’usure
ou de détérioration.
Avant d’utiliser la tondeuse, prenez le temps de vous
familiariser avec les commandes, spécialement la façon
d’arrêter la tondeuse en cas d’urgence. Les seules personnes
qui devraient utiliser la tondeuse sont celles qui comprennent
parfaitement les instructions et qui savent comment utiliser la
machine. Les enfants ne devraient jamais être autorisés à avoir
accès à la tondeuse.
Conservez ce manuel pour le consulter éventuellement dans
le futur et relisez-le au début de chaque saison de tonte de
pelouses.
mAVERTISSEMENT! Tout contact avec des pièces
mobiles peut être cause d’un happement, de mutilation ou
d’autres blessures graves. Toujours maintenir les parties
du corps (c.-à-d., les mains, les pieds) à bonne distance
des pièces mobiles. Avant utilisation de la machine,
s’assurer que tous les éléments couvrants et dispositifs de
protection sont bien en place.
Les surfaces chaudes (c.-à-d., le moteur) peuvent
enammer des éléments inammables ou combustibles et
déclencher un incendie ou une explosion, ce qui peut être
à l’origine de graves blessures corporelles. Maintenir la
tondeuse à bonne distance des éléments inammables ou
combustibles tant que les surfaces qui sont chaudes n’ont
pas complètement refroidi. Ne pas remiser la tondeuse à
proximité d’éléments inammables ou combustibles.
Une lame endommagée ou un écrou de lame usé peut
briser l’ensemble tondeuse et entraîner de graves
blessures. Remplacer la lame ou l’écrou de lame
endommagé avant d’utiliser la tondeuse.
1. Éviter les situations dangereuses – N’utilisez pas la
tondeuse sous la pluie ou quand l’herbe est trempée ou
humide.
2. Maintenir à l’écart les enfants, les spectateurs et les
animaux familiers – Tenez toujours les enfants et les
spectateurs à bonne distance de la tondeuse pendant son
utilisation et le refroidissement du moteur.
3. S’habiller en conséquence – Portez toujours un
équipement de protection individuelle (c.-à-d., des
lunettes, des gants en caoutchouc, des chaussures de
protection et un masque protecteur contre la poussière)
et des vêtements appropriés quand vous utilisez la
tondeuse. Les vêtements amples, les cheveux longs ou
les bijoux peuvent se prendre dans les pièces mobiles.
4. Utiliser une machine adaptée au travail à faire –
N’utilisez pas la tondeuse à gazon pour un travail autre
que celui auquel elle est destinée.
5. Ne pas forcer la tondeuse à gazon – Elle fonctionnera
mieux, sera moins dangereuse et moins susceptible de
tomber en panne si elle est utilisée au régime pour lequel
elle a été conçue.
6. Ne pas s’arc-bouter – Restez en permanence sur les
deux pieds pour ne pas perdre l’équilibre.
© 2021 by Snow Joe®, LLC
Tous droits réservés. Instructions d’origine.
CONSERVER CES INSTRUCTIONS
41
Page 42

7. Rester vigilant – Soyez toujours à l’aût et surveillez ce
que vous faites. Faites preuve de bon sens. N’utilisez pas
la tondeuse à gazon quand vous êtes fatigué ou si vous
avez consommé de l’alcool ou de la drogue.
8. Désactiver l’alimentation électrique de la tondeuse à
gazon – Arrêtez la machine et retirez la clé de sécurité
lorsque vous ne l’utilisez pas, avant d’intervenir dessus,
lorsque vous changez d’accessoire ou eectuez toute
autre tâche d’entretien.
9. Remiser la tondeuse à gazon à l’intérieur quand elle
n’est pas utilisée – Si vous ne l’utilisez pas, la tondeuse
à gazon doit être remisée à l’intérieur dans un endroit sec,
sous clé et hors de portée des enfants.
10. Entretenir soigneusement la tondeuse à gazon – Pour
qu’ils puissent être utilisés au mieux de leur rendement et
sans danger, maintenez les tranchants autés et propres.
11. Utiliser un équipement de protection individuel.
Toujours porter des lunettes de protection –
Les équipements de protection, par exemple des lunettes
de sécurité, un masque protecteur contre la poussière,
des chaussures de sécurité antidérapantes, un casque de
protection ou une protection de l’ouïe, utilisés dans les
conditions appropriées, réduiront le risque de se blesser.
12. Prévenir les démarrages accidentels – Avant d’insérer
la clé de sécurité, ou avant de saisir la machine ou la
transporter, assurez-vous que l’interrupteur est sur
la position d’arrêt. Transporter un outil électrique en
maintenant le doigt sur l’interrupteur ou le recharger
quand l’interrupteur est sur la position de marche peut
être source d’accidents.
13. Retirer toute clavette de calage ou autre clé avant
de mettre en marche la machine électrique – Toute
clé qui reste attachée à une
électrique peut blesser.
14. Maintenir le tranchant de la lame bien auté et propre
– Les lames bien entretenues, au tranchant auté, sont
moins susceptibles de se gripper et sont plus faciles à
contrôler.
15. Maintenir toutes les parties du corps éloignées de la
lame – Lorsque la lame est en mouvement, ne retirez pas
ce qui est déjà tondu et ne tenez pas ce qui va être tondu.
Si vous essayez de décoincer la lame, assurez-vous que
l’interrupteur est fermé. Lorsque vous utilisez la machine,
un moment d’inattention peut se traduire par de graves
blessures.
16. Si la tondeuse à gazon heurte quoi que ce soit, suivez ces
étapes :
i) Arrêtez la tondeuse à gazon en relâchant le levier-
interrupteur.
ii) Retirez la clé de sécurité.
iii) Inspectez la machine pour vérier qu’elle n’est pas
endommagée.
iv) Réparez tout dommage avant de redémarrer et
d’utiliser à nouveau la tondeuse à gazon.
pièce tournante de machine
17. Utilisez uniquement des lames de rechange identiques et
des pièces d’origine.
18. Maintenez les dispositifs de sécurité en place et en bon
ordre de marche.
Sécurité électrique
1. Si le câble du chargeur de batterie est endommagé,
veuillez appeler le service clientèle Snow Joe
au 1-866-SNOWJOE (1-866-766-9563).
2. S’il vous est impossible d’éviter de recharger la machine
dans un endroit humide, utilisez une source d’alimentation
électrique protégée par un dispositif diérentiel à courant
résiduel. Ce type de dispositif de protection réduit le
risque d’électrocution.
3. Évitez tout contact du corps avec tout ce qui est mis à
la terre, p. ex., tuyaux, radiateurs, fourneaux de cuisine
et réfrigérateurs. Il y a un risque accru d’électrocution si
votre corps est relié à la terre.
4. N’utilisez pas les outils ou machines électriques sous
la pluie ou par forte humidité. L’eau qui pénètre dans
un outil ou une machine électrique augmente le risque
d’électrocution.
5. Ne malmenez pas le cordon du chargeur. N’utilisez
jamais le cordon pour transporter, tirer ou débrancher le
chargeur. Maintenez le cordon éloigné de la chaleur, de
l’huile, d’arêtes tranchantes ou de pièces mobiles. Les
cordons endommagés ou entortillés augmentent le risque
d’électrocution.
6. Le chargeur de batterie est conçu pour être utilisé
uniquement à l’intérieur. Ne chargez pas la tondeuse à
gazon sous la pluie ou dans les endroits humides.
®
+ Sun Joe®
Consignes de sécurité
concernant la batterie et le
chargeur
Nous avons consacré beaucoup de temps à la conception de
chaque bloc-piles an de nous assurer de vous fournir des
batteries qui peuvent être utilisées sans danger, sont robustes
et ont une énergie volumique élevée. Les cellules de la batterie
sont dotées d’un large éventail de dispositifs de sécurité.
Chaque cellule individuelle est initialement formatée et ses
courbes électriques caractéristiques sont enregistrées.
Ces données sont ensuite utilisées exclusivement pour pouvoir
assembler les meilleurs blocs-piles possible.
Malgré toutes ces mesures de précaution, il faut toujours faire
preuve de prudence lors de la manipulation de batteries.
Pour utiliser sans danger les batteries, les points suivants
doivent être observés en permanence. L’utilisation sans
danger peut uniquement être garantie si les cellules sont
intactes. Toute manipulation inappropriée d’un bloc-piles peut
endommager les cellules.
42
Page 43

IMPORTANT! Les analyses conrment que la mauvaise
utilisation de batteries à haut rendement et un entretien
laissant à désirer sont les principaux facteurs responsables de
dommages corporels et/ou matériels.
mAVERTISSEMENT! Utiliser uniquement des batteries
de rechange homologuées. D’autres types de batteries
peuvent endommager la machine électrique et empêcher
son bon fonctionnement, ce qui peut entraîner de graves
dommages corporels.
mAVERTISSEMENT! Ne pas utiliser une machine
ou un bloc-piles endommagé ou modié. Les batteries
endommagées ou modiées peuvent se comporter de manière
imprévisible et provoquer un incendie ou une explosion ou
présenter un risque de blessure.
Ne modiez pas la machine ou le bloc-piles ou n’essayez
pas de les réparer, sauf précisions contraires concernant leur
utilisation ou leur entretien.
Faites réparer ou entretenir votre bloc-piles par un réparateur
qualié utilisant uniquement des pièces de rechange
identiques. C’est à ce prix que la sécurité du bloc-piles sera
préservée.
mMISE EN GARDE! Pour réduire le risque de blessures,
charger le bloc-piles au lithium-ion iON+ 24 V uniquement
à l’aide du chargeur au lithium-ion spéciquement prévu
à cet eet. Les autres types de chargeurs présentent des
risques d’incendie et de dommages corporels et matériels.
Ne brancher aucun bloc-piles sur le secteur ou sur l’allumecigare d’une voiture. Le bloc-piles serait dénitivement et
irrémédiablement endommagé.
• Éviter les endroits dangereux – Ne chargez pas le bloc-
piles sous la pluie, sous la neige ou dans les endroits
humides. N’utilisez pas le bloc-piles ou le chargeur quand
l’atmosphère est explosive (euents gazeux, poussière ou
matières inammables), des étincelles pouvant se produire
lors de l’insertion ou la dépose du bloc-piles, ce qui pourrait
provoquer un incendie.
• Charger dans un endroit bien ventilé – N’obstruez pas
les fentes d’aération du chargeur. Dégagez le voisinage
immédiat du chargeur pour qu’il soit bien ventilé. Interdisez
de fumer et n’autorisez la présence d’aucune amme nue
à proximité d’un bloc-piles se chargeant. Le gaz dispersé
dans l’atmosphère peut exploser.
REMARQUE : la plage de sécurité de températures pour
la batterie se situe entre 5 °C et 40,5 °C. Ne chargez pas la
batterie à l’extérieur quand il gèle, chargez-la à température
ambiante.
• Prendre soin du cordon du chargeur – Quand vous
débranchez le chargeur, pour éviter d’endommager la che
électrique et le cordon, tirez sur la che dans la prise et non
sur le cordon. Ne tirez jamais le chargeur par le cordon et
ne tirez pas brusquement sur le cordon pour le retirer de la
prise. Maintenez le cordon éloigné de la chaleur, de l’huile
et des arêtes tranchantes. Pendant l’utilisation du chargeur,
assurez-vous que personne ne marche sur le cordon,
ne trébuche dessus et qu’il ne peut être ni endommagé
ni soumis à des tensions ou des pressions. N’utilisez pas
le chargeur si sa che ou son cordon est endommagé.
Remplacez immédiatement tout chargeur endommagé.
• Ne pas utiliser de rallonge électrique, sauf nécessité
absolue – L’utilisation d’une rallonge électrique mal
adaptée, endommagée ou mal branchée présente des
risques d’incendie et d’électrocution. S’il s’avère nécessaire
d’utiliser une rallonge électrique, branchez le chargeur dans
une rallonge électrique de calibre 16 ou plus gros,
la che femelle correspondant à la che mâle sur le
chargeur. Vériez que la rallonge électrique est en bon état.
• Utiliser uniquement les accessoires recommandés –
L’utilisation d’un accessoire non recommandé ou vendu
par le fabricant du chargeur de batterie ou du bloc-piles
présente des risques d’incendie, d’électrocution ou de
blessures.
• Débrancher le chargeur quand il n’est pas utilisé –
Assurez-vous de retirer le bloc-piles quand le chargeur est
débranché.
mAVERTISSEMENT! Pour réduire le risque
d’électrocution, toujours débrancher le chargeur avant
d’eectuer un nettoyage ou un entretien. Ne pas laisser d’eau
couler dans le chargeur. Pour réduire le risque d’électrocution,
utiliser un disjoncteur diérentiel de fuite de terre (DDFT).
• Ne pas brûler ou incinérer les blocs-piles – Les blocs-
piles peuvent exploser et entraîner des dommages
corporels ou matériels. Des vapeurs et des particules
toxiques se dégagent des blocs-piles qui brûlent.
• Ne pas écraser, faire tomber ou endommager les
blocs-piles – N’utilisez pas le bloc-piles ou le chargeur s’il
a reçu un coup brutal, s’il est tombé, s’il a été écrasé ou
endommagé d’une façon ou d’une autre (c.-à-d., percé par
un clou, frappé d’un coup de marteau, foulé au pied, etc.).
• Ne pas démonter – Un remontage mal eectué peut
poser un risque important d’électrocution, d’incendie ou
d’exposition aux produits chimiques toxiques de la batterie.
Si la batterie ou le chargeur est endommagé, veuillez
communiquer avec un revendeur Snow Joe
agréé ou appeler le service clientèle Snow Joe
au 1-866-SNOWJOE (1-866-766-9563) pour de l’aide.
• Les produits chimiques de la batterie peuvent
occasionner de graves brûlures – Ne laissez jamais un
bloc-piles endommagé entrer en contact avec la peau, les
yeux ou la bouche. Si un bloc-piles endommagé laisse fuir
des produits chimiques, utilisez des gants en caoutchouc
ou en néoprène pour les éliminer sans danger. Si la peau
est entrée en contact avec des uides de batterie, lavez la
zone aectée à l’eau et au savon et rincez au vinaigre. Si les
yeux sont entrés en contact avec des produits chimiques
de batterie, rincez immédiatement à grande eau pendant
20 minutes et consultez un médecin. Retirez les vêtements
contaminés et jetez-les.
®
+ Sun Joe®
®
+ Sun Joe®
43
Page 44

• Ne pas provoquer de court-circuit – Un court-circuit se
produira si un objet en métal relie les contacts positif et
négatif du bloc-piles. Ne placez aucun bloc-piles près de
tout ce qui peut provoquer un court-circuit, par exemple un
trombone, une pièce de monnaie, une clé, une vis, un clou
ou tout autre objet métallique. Un bloc-piles en court-circuit
présente un risque d’incendie et peut blesser gravement.
• Ranger le bloc-piles et son chargeur dans un endroit
frais et sec – Ne rangez pas le bloc-piles ou le chargeur
quand la température peut être supérieure à 40,5 °C, par
exemple directement sous les rayons du soleil, à l’intérieur
d’un véhicule ou dans un cabanon en métal pendant l’été.
Renseignements sur la batterie
1. Le bloc-piles fourni avec votre machine électrique sans
cordon n’est que partiellement chargé. Le bloc-piles doit
être complètement chargé avant d’utiliser la machine pour
la première fois.
2. Pour que la batterie fonctionne de manière optimale,
évitez d’attendre que le bloc-piles soit presque déchargé
et chargez-le fréquemment.
3. Rangez le bloc-piles dans un endroit frais, idéalement à
15 °C et chargé au moins à 40 %.
4. Les batteries au lithium-ion s’usent naturellement avec le
temps. Le bloc-piles doit être remplacé au plus tard quand
sa capacité chute à 80 % de sa capacité d’origine, neuf.
Les cellules aaiblies dans un bloc-piles usé ne peuvent
plus produire la forte intensité exigée pour que votre
tondeuse à gazon sans cordon fonctionne normalement,
ce qui présente un risque pour la sécurité.
5. Ne jetez pas les blocs-piles dans un feu nu, ils pourraient
exploser.
6. Ne mettez pas le feu aux blocs-piles et ne les exposez
pas à une amme.
7.
Ne déchargez pas les batteries jusqu’à leur épuisement.
Toute décharge jusqu’à épuisement de la batterie
endommagera ses cellules. Le rangement prolongé et la
non-utilisation de batteries partiellement déchargées sont
les causes les plus communes de décharge de batterie
jusqu’à épuisement. Arrêtez votre travail dès que vous
remarquez que la puissance de la batterie chute ou dès
que le système de protection électronique se déclenche.
Rangez le bloc-piles uniquement s’il est à charge complète.
8. Protégez la batterie et la machine contre les surcharges.
Les surcharges donneront rapidement lieu à une
surchaue et endommageront les cellules à l’intérieur du
compartiment de batterie, même si cette surchaue n’est
pas visible de l’extérieur.
9. Évitez d’endommager la batterie et de la soumettre à
des chocs. Remplacez immédiatement les batteries
qui sont tombées d’une hauteur supérieure à 1 m ou
celles qui ont été soumises à des chocs violents, même
si le boîtier du bloc-piles ne semble pas endommagé.
Les cellules à l’intérieur de la batterie peuvent avoir été
gravement endommagées. Dans ce cas, veuillez lire les
renseignements sur l’élimination des déchets en ce qui
concerne les batteries.
10. Si un bloc-piles soure d’une surcharge ou d’une
surchaue, le coupe-circuit de protection intégré coupe le
moteur de la machine pour des raisons de sécurité.
IMPORTANT! N’appuyez plus sur l’interrupteur marche-
arrêt si le coupe-circuit de protection a été activé.
Ceci pourrait endommager le bloc-piles.
11. Utilisez uniquement des blocs-piles d’origine. L’utilisation
d’autres batteries présente un risque d’incendie et pourrait
provoquer des blessures ou une explosion.
Renseignements sur le chargeur et sur le
processus de charge
1. Veuillez vérier les données marquées sur la plaque
signalétique du chargeur de batterie. Veillez à brancher
le chargeur de batterie sur une source d’alimentation
correspondant à la tension indiquée sur la plaque
signalétique. Ne le branchez jamais sur une tension de
secteur diérente.
2. Protégez le chargeur de batterie et son cordon pour éviter
de les endommager. Maintenez le chargeur et son cordon
éloignés de la chaleur, de l’huile et des arêtes tranchantes.
Faites réparer sans délai les cordons endommagés par un
technicien qualié chez un revendeur Snow Joe
Sun Joe
Snow Joe
®
agréé ou appelez le service à la clientèle
®
+ Sun Joe® au 1-866-SNOWJOE
(1-866-766-9563).
3. Les ches électriques doivent correspondre à la prise.
N’apportez aucune modication, quelle qu’elle soit, à la
che. N’utilisez pas de che d’adaptation avec les outils
ou machines mis à la terre. Des ches non modiées
et des prises correspondantes réduiront le risque
d’électrocution.
4. Maintenez hors de portée des enfants le chargeur de
batterie, le ou les blocs-piles et l’outil ou la machine sans
cordon.
5. N’utilisez pas le chargeur de batterie qui est fourni pour
charger d’autres outils ou machines sans cordon.
6. Le bloc-piles devient chaud après une utilisation
prolongée. Laissez le bloc-piles se refroidir à la
température ambiante avant de l’insérer dans le chargeur
pour le recharger.
7. Ne chargez pas trop la batterie. Ne dépassez pas le temps
maximal de charge. Ces temps de charge ne s’appliquent
qu’aux batteries déchargées. L’insertion fréquente d’un
bloc-piles chargé ou partiellement chargé provoquera
une surcharge et endommagera les cellules. Ne laissez
pas la batterie dans le chargeur pendant plusieurs jours
consécutifs.
8. N’utilisez ou ne chargez jamais une batterie si vous
soupçonnez qu’il y a plus de 12 mois qu’elle a été chargée
pour la dernière fois. Il est extrêmement probable que
le bloc-piles soit déjà dangereusement endommagé
(décharge jusqu’à épuisement complet).
9. Si vous chargez une batterie à une température inférieure
à 5 °C, vous endommagez les produits chimiques des
cellules, ce qui peut provoquer un incendie.
®
+
44
Page 45

10. N’utilisez pas les batteries qui ont été exposées à la
chaleur pendant leur charge, car les cellules de batterie
peuvent avoir été dangereusement endommagées.
11. N’utilisez pas les batteries qui se sont bombées ou ont
subi des déformations pendant le processus de charge,
ni celles présentant d’autres symptômes atypiques
(échappement de gaz, siement, ssures, etc.).
12. Ne déchargez jamais complètement un bloc-piles (le
niveau maximal de décharge est de 80 %). La décharge
totale du bloc-piles entraînera le vieillissement prématuré
des cellules de la batterie.
Protection contre les inuences
environnementales
1. Portez des vêtements de travail adaptés. Portez des
lunettes de sécurité.
2. Protégez votre machine sans cordon et le chargeur de
batterie contre l’humidité et la pluie. L’humidité et la pluie
peuvent endommager dangereusement les cellules.
3. N’utilisez pas la machine sans cordon ou le chargeur de
batterie près de vapeurs ou de liquides inammables.
4. Utilisez le chargeur de batterie et les outils ou machines
sans cordon uniquement en milieu sec et à une
température ambiante comprise entre 5 et 40,5 °C.
5. Ne conservez pas le chargeur de batterie dans les
endroits où la température est susceptible d’être
supérieure à 40 °C. Ne laissez surtout pas le chargeur de
batterie dans une voiture qui stationne au soleil.
6. Protégez les batteries contre les surcharges. Les
surcharges et l’exposition directe aux rayons du
soleil entraînent une surchaue des cellules et les
endommagent. Ne chargez ou n’utilisez jamais de
batteries qui ont surchaué : au besoin, remplacez-les
immédiatement.
7. Rangez le chargeur et votre machine sans cordon
uniquement dans un endroit sec où la température
ambiante est comprise entre 5 °C et 40,5 °C.
Rangez votre bloc-piles au lithium-ion dans un endroit
frais et sec à une température comprise entre 10 et 20 °C.
Protégez le bloc-piles, le chargeur et la machine sans
cordon contre l’humidité et les rayons du soleil. Rangez
uniquement les batteries à charge complète (chargées au
minimum à 40 %).
8. Empêchez le bloc-piles au lithium-ion de geler. Les blocs-
piles qui ont été stockés à des températures inférieures à
0 °C pendant plus de 60 minutes doivent être éliminés.
9. Quand vous manipulez une batterie, prenez garde aux
décharges électrostatiques, elles peuvent endommager
le système de protection électronique et les cellules de
batterie. Évitez de produire des charges électrostatiques
et ne touchez jamais les pôles de batterie.
IMPORTANT!
Consignes de sécurité pour les
tondeuses poussées
Généralités concernant l’utilisation
• Avant de démarrer, lisez, comprenez et suivez toutes les
instructions sur la machine et dans le ou les manuels.
• Ne mettez ni les mains ni les pieds sous la machine.
Tenez-vous toujours à l’écart de l’ouverture d’éjection.
• Seuls les adultes responsables et familiarisés avec
les instructions devraient être autorisés à utiliser cette
machine.
• Débarrassez la zone à tondre de tout corps étranger, par
exemple les roches, ls, jouets et autres éléments divers,
susceptibles d’être ramassés et projetés par la lame.
Restez derrière le guidon pendant que le moteur tourne.
• Avant de démarrer la machine, assurez-vous qu’il n’y a
plus aucun spectateur dans la zone à tondre. Arrêtez la
machine si quelqu’un pénètre dans la zone à tondre.
• N’utilisez pas la machine pieds nus ou si vous portez des
sandales. Portez toujours des chaussures susamment
montantes.
• Regardez toujours vers le bas et l’arrière quand vous
utilisez la tondeuse à reculons.
• Ne dirigez jamais les matières rejetées en direction d'une
personne. Évitez de diriger les matières rejetées contre un
mur ou tout autre obstacle.
• N’utilisez pas la machine sans que la totalité du sac
à herbe, le déecteur de protection de décharge, la
protection arrière ou les autres dispositifs de sécurité
soient en place et en bon ordre de marche.
• Ne laissez jamais sans surveillance une machine dont le
moteur tourne.
• Arrêtez le moteur et attendez jusqu’à ce que la lame
s’arrête complètement avant de nettoyer la machine, de
retirer le sac à herbe ou de déboucher le déecteur de
protection de décharge.
• Utilisez la machine uniquement à la lumière du jour ou
sous un bon éclairage articiel.
• N’utilisez pas la machine quand vous êtes fatigué ou si
vous avez consommé de l’alcool ou de la drogue.
45
Page 46

• N’utilisez jamais la tondeuse dans de l’herbe humide.
Assurez toujours vos pas; marchez, ne courez jamais
quand vous utilisez la tondeuse.
• Si la machine commence à vibrer d’une manière
anormale, arrêtez le moteur et inspectez immédiatement
la machine pour rechercher ce qui est à l’origine des
vibrations. Les vibrations sont généralement des signes
précurseurs d’un problème.
• Maintenez la lame autée.
• Gardez les mains et les pieds à bonne distance de
l’ensemble de coupe.
• Portez toujours des lunettes de protection quand vous
utilisez la machine.
• Tout ce qui est heurté par la lame de la tondeuse à gazon
peut provoquer de graves blessures. Avant chaque tonte
de pelouse, la zone à tondre doit toujours être inspectée
attentivement et débarrassée de tout corps étranger.
Utilisation sur terrain pentu
Les terrains pentus sont la cause majeure d’accidents dus à
des glissades ou à des chutes et des graves blessures qu’ils
peuvent entraîner. L’utilisation d’une tondeuse sur terrain
pentu exige une extrême vigilance. Si vous ne vous sentez pas
à l’aise sur un terrain pentu, ne le tondez pas.
• Tondez en travers de la pente, jamais en montant ou
en descendant. Faites preuve d’une extrême prudence
quand vous changez de direction sur un terrain pentu.
• Faites attention aux trous, aux ornières, aux bosses,
aux roches et à tout ce qui peut être caché. Ils peuvent
vous faire glisser ou tomber sans prévenir.
• Ne tondez pas de l’herbe mouillée ou des pelouses
excessivement pentues. Si vous êtes instable sur vos
deux pieds, vous risquez de glisser ou de tomber.
• Ne tondez pas à proximité d’à-pics, de fossés ou de talus.
Vous pourriez perdre l’équilibre.
Enfants
Des accidents tragiques peuvent se produire si l’utilisateur
ne fait pas attention à la présence d’enfants. Les enfants font
souvent preuve d’une grande curiosité à l’égard de la machine
et de l’opération de tonte elle-même. Ne supposez jamais que
les enfants resteront là où vous les avez vus pour la dernière
fois.
• Maintenez les enfants à l’écart de la zone à tondre et sous
la stricte surveillance d’un adulte responsable autre que
l’utilisateur.
• Soyez vigilant et arrêtez la tondeuse si un enfant pénètre
dans la zone de travail.
• Ne laissez jamais un enfant utiliser la machine.
• Redoublez d’attention en approchant les coins aveugles,
les buissons, les arbres ou tout ce qui pourrait vous
empêcher de voir un enfant.
Entretien et réparation
• Avant d’entretenir ou de réparer la tondeuse à gazon,
de la nettoyer ou de retirer l’herbe accumulée dessous,
désactivez l’alimentation électrique de la machine en
retirant la clé de sécurité.
• Maintenez serrés tous les écrous et boulons.
• Ne traquez jamais les dispositifs de sécurité. Faites
des vérications régulières pour vous assurer que ces
dispositifs sont en place et en bon ordre de marche.
• Débarrassez la tondeuse de toute accumulation d’herbe,
feuilles ou autres débris.
• Si vous heurtez un corps étranger, arrêtez le moteur
et inspectez la machine. Réparez au besoin avant de
redémarrer.
• N’eectuez jamais de réglages ou de réparations lorsque
le moteur tourne. Débranchez toujours votre tondeuse
électrique avant de la régler, de la nettoyer ou de la
réparer.
• Inspectez fréquemment les composants du sac à herbe
et le déecteur de protection d’éjection et, au besoin,
remplacez-les par des pièces recommandées par le
fabricant.
• La lame de la tondeuse est autée. Enveloppez la lame ou
portez des gants et faites preuve d’une extrême prudence
quand vous la réparez.
• Maintenez visibles les étiquettes de sécurité et
d’instructions ou, le cas échéant, remplacez-les.
• Si votre machine électrique nécessite d’être réparée,
communiquez avec un revendeur Snow Joe
agréé ou appelez le service clientèle Snow Joe
Sun Joe
®
au 1-866-SNOWJOE (1-866-766-9563).
Pour les réparations, il faut uniquement utiliser des pièces
de rechange identiques. C’est à ce prix que la sécurité de
la machine électrique sera préservée.
• Si le câble du chargeur de batterie est endommagé,
il doit être immédiatement remplacé pour éviter tout
danger. Communiquez avec le service clientèle
Snow Joe
®
+ Sun Joe® en appelant le 1-866-SNOWJOE
(1-866-766-9563) pour de l’aide.
®
+ Sun Joe®
®
+
46
Page 47

Symboles de sécurité
Le tableau suivant décrit et explique les symboles de sécurité pouvant être marqués sur cette machine. Avant de procéder à son
assemblage et de l’utiliser, lisez, comprenez et suivez toutes les instructions sur cette machine.
Symboles SymbolesDescriptions Descriptions
DANGER! Lames rotatives.
Garder mains et pieds à
distance.
Alerte de sécurité. Mise en garde.
Pour réduire le risque de blessure,
l’utilisateur doit lire le manuel
d’utilisation.
AVERTISSEMENT! Ne pas
utiliser la machine sous la pluie
où par forte humidité. Garder la
machine au sec.
Risque de glissade sur terrain
pentu - Pour éviter toute glissade
ou chute accidentelle, faire preuve
d’une extrême prudence en
tondant sur des pentes.
La projection d’objets et la lame
rotative peuvent provoquer de
graves blessures.
Maintenir les spectateurs et les
enfants à une distance de sécurité
susante.
Porter une protection oculaire et une
protection de l’ouïe. Pour éviter de
se blesser, porter des protecteurs
d’oreilles et des lunettes de sécurité.
Porter des gants de protection et des
chaussures antidérapantes pour utiliser
la machine et manipuler les débris.
Sectionnement des orteils ou
des doigts par la lame rotative de
la tondeuse.
Maintenir les spectateurs à bonne
distance de la zone de travail.
Les lames continuent de tourner
après avoir coupé le moteur de la
machine.
Lame rotative : tenir les mains et
les pieds éloignés de l’ouverture
quand la machine est en marche.
Utilisation uniquement à l’intérieur. Utiliser uniquement le chargeur de batterie à l’intérieur.
AVERTISSEMENT! Toujours arrêter
la machine et retirer la clé de
sécurité avant toute inspection, tout
nettoyage ou tout entretien.
Regardez vers l’arrière quand vous
utilisez la tondeuse à reculons.
47
Page 48

Apprenez à mieux connaître votre tondeuse à gazon sans
cordon
Avant d’utiliser la tondeuse, lisez attentivement le manuel d’utilisation et les consignes de sécurité. Comparez l’illustration ci-
dessous avec votre tondeuse an de vous familiariser avec l’emplacement des diérents réglages et commandes. Conservez ce
manuel pour pouvoir le consulter dans le futur.
1. Levier-interrupteur
2. Bouton-poussoir de sécurité
3. Boîtier d’interrupteurs
4. Cadre supérieur de guidon
5. Serre-câble (2)
6. Bouton, boulon et rondelle de cadre
supérieur de guidon (2)
7. Cadre inférieur de guidon
8. Volet d’éjection
9. Couvercle de compartiment à batterie
10. Compartiment à batterie
11. Couvercle supérieur
12. Clé de sécurité
13. Roue (4)
14. Plateau de coupe
15. Sac à herbe
16. Partie rembourrée du guidon
17. Chargeur rapide de batterie
au lithium-ion 24 V (24VCHRG-AC)
18. Fiche de chargeur
19. Bouton-poussoir de verrouillage
20. Témoin de charge de batterie
21. Bouton-poussoir pour témoin de
charge de batterie
22. Batterie au lithium-ion iON+ 24V
(24VBAT) présentant la technologie
exclusive EcoSharp
®
10
11
12
13
19
20
17
18
4
5
6
21
22
7
8
9
Données techniques
Moteur ....................................................... Sans balais 600 W
Tension de batterie* .................................................... 24 VCC
Capacité de la batterie ................................................. 4,0 Ah
Autonomie max. de tonte ........................................... 30 min
(coupe jusqu'à 160 m² d’herbe)
Entrée du chargeur ....................................... 100 – 240 V AC,
50 – 60 Hz, 50 W
Sortie du chargeur ............................. 25.2 VCC 1400 mA
*Tension initiale à vide; grimpe à 24 volts une fois à charge complète; la tension nominale sous charge typique est de 21,6 volts.
Temps de charge max. ........................................ 2 hr 40 min
Régime à vide ..................................................... 3 000 tr/min
Largeur de coupe ...................................................... 35,6 cm
Hauteur de coupe ...................................De 30 mm à 64 mm
Contenance du sac à herbe ............................................. 40 l
Dimension des roues ................................................... 14 cm
Poids Net .....................................................................10,5 kg
1
2
3
16
R
15
14
48
Page 49

Déballage
Contenu de la caisse
• Tondeuse à gazon sans cordon
• Sac à herbe
• Tige-support de sac à herbe
• Cadre supérieur de guidon
• Bouton, boulon et rondelle de cadre supérieur de guidon (2)
• Cadre inférieur de guidon
• Vis de cadre inférieur de guidon (2)
• Grande clé de serrage
• Serre-câble (2)
• Batterie au lithium-ion iON+ 24V
• Chargeur rapide de batterie au lithium-ion iON+ 24 V
• Manuel et carte d’enregistrement
1. Retirez soigneusement la tondeuse à gazon de la caisse et
inspectez-la pour vérier que tous les éléments énumérés
ci-dessus sont fournis.
2. Inspectez soigneusement le contenu pour vous assurer
qu’aucun élément ne s’est cassé ou n’a été endommagé
pendant le transport.
REMARQUE : ne jetez pas la caisse d’expédition et
l’emballage tant que vous n’êtes pas prêt à utiliser votre
nouvelle tondeuse à gazon sans cordon. L’emballage est
fabriqué dans des matériaux recyclables. Éliminez ces
matériaux de façon appropriée et conformément aux
réglementations locales.
IMPORTANT! Le produit et son emballage ne sont pas des
jouets. Ne laissez pas les enfants jouer avec les sacs en
plastique, les feuilles métalliques ou les petites pièces.
Ces éléments peuvent être avalés et risquent de provoquer
une suocation!
Utilisation du bloc-piles
La machine est alimentée par une batterie au lithium-ion.
Le bloc-piles est entièrement scellé et sans entretien.
Témoins de charge de batterie
Le bloc-piles est équipé d’un bouton-poussoir pour vérier le
niveau de charge. Appuyez simplement sur le bouton-poussoir
pour lire le niveau de charge de la batterie à l’aide des témoins
de charge :
• Les témoins de charge sont tous les trois allumés :
le niveau de charge de batterie est élevé.
• Deux témoins de charge sont allumés : le niveau de
charge de batterie diminue. Arrêtez votre travail dès que
possible.
• Un témoin de charge est allumé : la batterie est épuisée.
Arrêtez IMMÉDIATEMENT votre travail et chargez
la batterie. Sinon, la durée de vie de la batterie sera
considérablement raccourcie.
Indications de chargeTémoins
Bouton de niveau de charge
La batterie est à 30 % de sa capacité et
nécessite d’être chargée
La batterie est à 60 % de sa capacité et
nécessite d’être chargée bientôt
La batterie est à charge complète
REMARQUE : si le bouton de niveau de charge ne semble pas
fonctionner, insérez le chargeur et chargez au besoin.
REMARQUE : immédiatement après avoir utilisé le bloc-piles,
le bouton de niveau de charge peut acher une charge plus
faible que si la vérication avait eu lieu quelques minutes plus
tard. Les cellules de la batterie « récupèrent » une partie de
leur charge après une période de repos.
Utilisation du chargeur
mAVERTISSEMENT! Charger uniquement des blocs-
piles au lithium-ion iON+ 24 V dans les chargeurs de batterie
au lithium-ion iON+ 24 V compatibles. Les autres types de
batteries peuvent être à l’origine de dommages corporels et
matériels. Pour réduire le risque d’électrocution, ne laissez pas
d’eau couler dans la che du chargeur CA/CC.
Quand charger la batterie au lithiumion iON+ 24VBAT
REMARQUE : les blocs-piles au lithium-ion iON+ 24VBAT
ne présentent pas « d’eet mémoire » quand ils sont chargés
après une simple décharge partielle. C’est pourquoi il n’est
pas nécessaire d’épuiser le bloc-piles avant d’insérer la che
du chargeur.
• Utilisez les témoins indicateurs de batterie pour
déterminer quand charger votre bloc-piles au lithium-ion
iON+ 24VBAT.
• Vous pouvez « compléter » la charge du bloc-piles avant
de démarrer un gros travail ou après une longue journée
d’utilisation.
Comment charger la batterie
1. Pour retirer la batterie de son compartiment, ouvrez le
couvercle du compartiment à batterie et appuyez sur le
bouton-poussoir de verrouillage sur la batterie (Fig. 1).
49
Page 50

R
Fig. 1
Couvercle de
compartiment à
batterie
IMPORTANT! Ne laissez jamais le bloc-piles se décharger
complètement, car ceci endommagerait irrémédiablement la
batterie.
Assemblage
Boutonpoussoir de
verrouillage
2. Vériez que la tension de secteur est la même que celle
marquée sur la plaque signalétique du chargeur de
batterie. Branchez ensuite l’adaptateur de chargeur dans
une prise de secteur appropriée. Pour commencer à
charger, branchez la che du chargeur dans la prise de
charge de la batterie (Fig. 2).
Fig. 2
Témoins
de charge
de batterie
m
AVERTISSEMENT! Ne pas insérer la clé de sécurité
tant que l’assemblage n’est pas terminé. Ne pas tenir compte
de cet avertissement peut entraîner un démarrage accidentel
et de graves blessures.
mAVERTISSEMENT! Avant d’eectuer le moindre
entretien, s’assurer que la clé est retirée de la machine. Toute
personne ne tenant pas compte de cet avertissement s’expose
à de graves blessures.
mAVERTISSEMENT! La machine doit être
complètement assemblée avant de pouvoir l’utiliser. Ne pas
utiliser une machine qui n’est que partiellement assemblée ou
assemblée avec des pièces endommagées.
REMARQUE : avant d’utiliser la tondeuse, suivez ces
instructions pour assembler le guidon et le sac à herbe.
Assemblage du guidon
1. Enfoncez le cadre inférieur de guidon dans les deux trous
du châssis de la machine et attachez le guidon des deux
côtés à l’aide des vis fournies (Fig. 3).
Fig. 3
Cadre
inférieur de
guidon
3. Il faut environ 2 h 40 min pour charger la batterie. Les
témoins de charge de batterie scintilleront et s’allumeront
un par un pendant le processus de charge. Débranchez
immédiatement le chargeur lorsque les témoins de charge
sont tous les trois allumés.
mMISE EN GARDE! RISQUE D’INCENDIE. S’assurer de
débrancher d’abord le chargeur de la prise, puis débrancher le
chargeur de la batterie.
mAVERTISSEMENT! Ce chargeur ne s’éteint pas
automatiquement quand la batterie est à charge complète.
Veiller à ne pas laisser la batterie branchée dans le chargeur.
Éteindre le chargeur ou le débrancher du secteur une fois que
la batterie est à charge complète.
4.
Recharger la batterie au moment opportun prolongera la durée
de vie de la batterie. Vous devez recharger le bloc-piles quand
vous remarquez une chute de puissance de la machine.
Vis
Châssis de la
machine
2. Attachez le cadre supérieur de guidon au cadre inférieur
de guidon à l’aide du bouton, de la rondelle et du boulon
fournis (Fig. 4). Répétez l’opération de l’autre côté.
50
Page 51

Fig. 4
Cadre
supérieur de
guidon
Rondelle
Boulon
Bouton
REMARQUE : deux trous sont pratiqués de chaque côté
du cadre supérieur de guidon; toutefois, un seul trou
est nécessaire de chaque côté pour l’attacher au cadre
inférieur de guidon (Fig. 5). Choisissez simplement votre
hauteur préférée et attachez les deux cadres comme
l’indique la Fig. 4.
Fig. 5
Cadre supérieur de
guidon
Fig. 6
Couvercle
en plastique
R
Tige-support
2. Attachez les bandes de protection en plastique sur la tige-
support (Fig. 7).
Fig. 7
Bandes de
R
protection
en plastique
Réglage de
guidon le plus
court
Réglage de
guidon le plus
long
3. Attachez le cordon d’alimentation à la tondeuse à gazon à
l'aide des serre-câbles.
Assemblage et pose du sac à herbe
1. Faites rentrer la tige-support dans les trous du couvercle
en plastique. La partie incurvée de la tige de support doit
être tournée vers l’arrière de la machine (Fig. 6).
Tige-support
3. D’une main, relevez le volet d’éjection. De l’autre, tenez le
sac à herbe par la poignée et accrochez-le par le dessus
(Fig. 8).
Fig. 8
Volet d’éjection
R
Sac à herbe
4. Relâchez le volet d’éjection pour que le sac à herbe reste
attaché (Fig. 9).
51
Page 52

Fig. 9
Volet
d’éjection
Fig. 11
R
Sac à herbe
Utilisation
Cette tondeuse à gazon est destinée à un usage résidentiel
privé consistant à tondre les pelouses de petite supercie dans
les jardins. Cette tondeuse n’est pas adaptée pour tondre le
gazon dans les parcs publics, les terrains de jeu, les fermes ou
les forêts. N’utilisez pas cette tondeuse à gazon pour un travail
autre que celui auquel elle est destinée.
Démarrage et arrêt
mAVERTISSEMENT! Avant de démarrer la tondeuse,
vérier qu’elle n’est en contact avec aucun corps étranger.
Maintenir les pieds et les mains à bonne distance de la lame
rotative de la tondeuse et de l’ouverture d’éjection. Toute
personne ne tenant pas compte de ces avertissements peut se
blesser gravement.
IMPORTANT : ne démarrez pas la tondeuse dans de l’herbe haute.
1. Avant de démarrer la machine, assurez-vous que la
batterie et la clé de sécurité sont insérées dans leur
logement respectif (Fig. 10).
Fig. 10
R
3. Pour démarrer la tondeuse à gazon sans cordon, appuyez
sur le bouton-poussoir de sécurité tout en tirant le levierinterrupteur vers vous (Fig. 12).
Fig. 12
Levier-interrupteur
Boutonpoussoir de
sécurité
4. Une fois que la machine tourne, relâchez le bouton-
poussoir de sécurité et abaissez doucement l’avant de la
tondeuse pour commencer à tondre (Fig. 13).
Batterie
Clé de
sécurité
2. Avant de démarrer la tondeuse à gazon, tenez le guidon
des deux mains et inclinez-le vers le bas pour lever
légèrement l’avant de la machine. Vous réduirez ainsi le
risque d’endommager la pelouse au démarrage (Fig. 11).
Fig. 13
R
5. Pour arrêter la tondeuse, relâchez le levier-interrupteur.
52
Page 53

mAVERTISSEMENT! La lame de la tondeuse continue
à tourner pendant un bref instant une fois que le moteur de
la machine a été coupé. Ne pas incliner ou transporter la
machine quand le moteur tourne encore et ne pas toucher la
lame pendant qu’elle est encore en rotation. Toute personne ne
tenant pas compte de cet avertissement s’expose à de graves
blessures.
REMARQUE : si vous tondez sur un terrain accidenté ou
plein de mauvaises herbes hautes, réglez la tondeuse sur
la hauteur de coupe la plus haute.
6. Remettez la tondeuse à gazon sur ses roues et attachez à
nouveau le sac à herbe.
7. Insérez la clé de sécurité dans la fente et reprenez la tonte.
Réglage de la hauteur de coupe
Suivez ces instructions pour régler la hauteur de coupe de la
tondeuse à gazon.
mAVERTISSEMENT! Avant de procéder à ces réglages,
désactiver l’alimentation électrique de la tondeuse en retirant
la clé de sécurité et attendre que la lame rotative se soit
complètement arrêtée. En raison de la présence toute proche
de la lame, il est recommandé de porter des gants.
TOUJOURS SUIVRE LES MESURES DE SÉCURITÉ ET LES
RECOMMANDATIONS ÉNUMÉRÉES PRÉCÉDEMMENT DANS
CE MANUEL.
1. Arrêtez la machine et retirez la clé de sécurité de la fente.
2. Retirez et videz le sac à herbe.
3. Placez la tondeuse à gazon sur son anc.
Fig. 14
Réglage haut
Réglage
intermédiaire
Conseils pour la tonte
mAVERTISSEMENT! Inspecter le terrain avant de
le tondre et retirer toutes les pierres, bâtons, ls et tout ce
qui peut être ramassé et projeté en l’air par la lame rotative.
Si vous ne tenez pas compte de cet avertissement, la lame
sera endommagée et de graves blessures corporelles sont à
redouter.
• Assurez-vous d’inspecter périodiquement la lame de tonte
pour vérier si elle présente des signes d’usure et autez-
la au moins une fois par an comme cela est décrit dans la
section sur l’entretien.
REMARQUE : une lame autée améliorera nettement le
rendement de la tondeuse, spécialement quand il faut
couper des herbes hautes.
• Quand vous tondez de l’herbe épaisse, réduisez votre
vitesse de progression pour vous permettre de tondre
plus ecacement et rejeter de façon appropriée l’herbe
coupée. Pour obtenir une pelouse saine, coupez toujours
un tiers ou moins de la hauteur totale de l’herbe. La
hauteur moyenne de l’herbe d’une pelouse doit se situer
approximativement entre 3,8 et 5 cm pendant la saison
froide et être supérieure à 5 cm pendant la saison chaude.
S’il y a repousse, la pelouse doit être tondue à l’automne.
• La pelouse aura un meilleur aspect si elle est toujours
coupée à la même hauteur et en croisant les directions.
• Quand vous traversez un revêtement de gravier,
relâchez le levier-interrupteur pour couper le moteur
de la tondeuse. Des pierres peuvent être ramassées et
projetées par la lame rotative.
• Réglez la tondeuse sur la hauteur de coupe maximale
quand vous tondez un terrain accidenté ou de mauvaises
herbes hautes.
Réglage basArbre
4. Les arbres de roue peuvent se régler à trois hauteurs
de coupe diérentes : bas (pour couper l’herbe au ras),
intermédiaire et haut (Fig. 14).
Les trois positions du réglage de la hauteur de coupe :
1. Bas : 30 mm
2. Intermédiaire : 49 mm
3. Haut : 64 mm
La tolérance de hauteur de coupe est de ± 5 mm.
5. Réglez les quatre roues sur la hauteur de coupe voulue
en tirant sur l’arbre et en le plaçant sur l’une des trois
positions. Vériez que les quatre roues sont toutes sur la
même position de hauteur de coupe.
mAVERTISSEMENT! Si la tondeuse heurte quoi que
ce soit, arrêter le moteur et retirer la clé de sécurité. Inspecter
soigneusement la tondeuse et réparer tout dommage avant de
reprendre le travail.
• IMPORTANT! N’ouvrez jamais le volet d’éjection lorsque
le sac à herbe a été détaché (pour être vidé) et lorsque le
moteur tourne toujours. La lame rotative peut provoquer
de graves blessures!
• Attachez toujours soigneusement le volet d’éjection et
le sac à herbe. Coupez le moteur avant de vider le sac à
herbe. Assurez-vous toujours qu’une distance de sécurité
susante (fournie par la longueur du cadre du guidon) est
maintenue entre l’utilisateur et le caisson de la tondeuse.
Soyez particulièrement vigilant quand vous tondez et
changez de direction sur une pente ou un plan incliné.
53
Page 54

• Gardez toujours un bon équilibre et portez des chaussures
robustes et antidérapantes ainsi que des pantalons
longs. Tondez toujours en travers de la pente (et non en
descendant et en montant).
• Pour des raisons de sécurité, la tondeuse à gazon ne peut
pas être utilisée pour tondre sur les plans inclinés dont la
pente est supérieure à 15 degrés.
• Faites preuve de précautions particulières quand vous
reculez et quand vous tirez la tondeuse à gazon vers vous,
car ce type de manœuvre risque de vous faire trébucher.
Soin et entretien
m
AVERTISSEMENT! Avant de nettoyer, réparer ou
inspecter la tondeuse, désactiver l’alimentation électrique de la
tondeuse en retirant la clé de sécurité et vérier que toutes les
pièces mobiles sont à l’arrêt complet.
Généralités
• Veillez à ce que la tondeuse soit toujours propre et qu’il
n’y ait ni herbe, saleté ou autres débris accumulés dessus.
• Maintenez le guidon sec, propre et exempt d’huile et de
graisse.
• Après chaque tonte, retirez l’herbe coupée et les débris
qui se sont accumulés à l’aide d’un chion sec ou d’une
brosse à main. Vous pouvez également nettoyer le
matériel à l’aide d’un chion humide et d’un savon doux
et non abrasif. N’utilisez ni agents nettoyants ni solvants
corrosifs, car ils peuvent endommager les pièces en
plastique de la machine. Assurez-vous qu’il n’y ait pas
d’eau qui pénètre à l’intérieur de la machine et qui puisse
détruire l’interrupteur et le moteur électrique.
• Ne nettoyez pas la tondeuse à gazon à l’eau courante et
bien évidemment pas à l’eau à haute pression.
• Avant chaque utilisation, vériez que tous les écrous,
boulons et vis sont correctement serrés.
• Inspectez fréquemment l’ensemble sac à herbe pour
déceler la présence éventuelle de signes d’usure et
remplacez immédiatement toute pièce endommagée par
une pièce d’origine.
• Remplacez immédiatement les composants
excessivement usés ou endommagés.
• Pour prolonger au maximum la durée de vie de votre
tondeuse, toutes les pièces vissées, y compris les roues
et les arbres, doivent être nettoyées et lubriées. Il n’y a
aucune pièce à l’intérieur de la machine qui nécessite un
entretien ou une lubrication supplémentaire.
indique que la lame est usée ou endommagée. Suivez ces
étapes pour déterminer si la lame nécessite d’être réautée ou
remplacée :
1. Désactivez l’alimentation électrique de la tondeuse en
retirant la clé de sécurité.
2. Retournez la tondeuse sur son anc pour pouvoir accéder
au dessous du carter de lame.
3. Vériez la lame.
a. Si la lame est émoussée ou présente une usure
mineure, réautez-la.
b. Si la lame présente des signes d’usure majeure ou est
gravement endommagée (c.-à-d., entaillée, recourbée),
remplacez-la.
mAVERTISSEMENT! Si la tondeuse vibre de manière
excessive, cela veut dire que la lame n’est pas bien équilibrée
ou qu’elle s’est déformée en heurtant quelque chose. Dans ce
cas, la lame doit être réparée ou remplacée. Veuillez suivre les
procédures d’entretien appropriées pour les lames.
Changement des lames
IMPORTANT : utilisez uniquement les pièces de rechange
spéciées pour cette tondeuse. L’utilisation de pièces qui ne
répondent pas aux spécications de la machine d’origine peut
être la cause d’un rendement anormal de la tondeuse à gazon
et peut compromettre la sécurité de l’utilisateur.
1. Retirez la clé de sécurité de la tondeuse.
2. Retournez la tondeuse sur son anc pour pouvoir accéder
au dessous du carter de lame.
3. Pour saisir la lame, utiliser un chion ou porter des gants
résistants.
4. À l’aide de la grande clé de serrage fournie, retirez le
boulon et la rondelle attachant la lame en tournant le
boulon dans le sens contraire des aiguilles d’une montre,
puis retirez avec précautions la lame (Fig. 15).
Fig. 15
Lame
Grande clé de serrage
Entretien des lames
IMPORTANT : la lame de tondeuse est acérée et peut
provoquer de graves blessures si elle est manipulée de
façon inappropriée. Envelopper la lame ou porter des gants
de protection et faire preuve d’une extrême prudence en la
manipulant.
La lame d’acier est conçue pour que la coupe de l’herbe haute
ou drue soit franche. La détérioration de la qualité de tonte
54
Page 55

5. Remontez la lame neuve, la rondelle et le boulon en
suivant en ordre inverse les mêmes étapes (Fig. 16).
Fig. 16
Fig. 17
Lame
Boulon
Rondelle
Rangement
Suivez les étapes ci-dessous pour préparer la tondeuse à
gazon avant son remisage :
1. Retirez la clé de sécurité de la fente.
2. Nettoyez la tondeuse à l’aide d’un chion mouillé ou
d’une brosse à main.
3. Inspectez soigneusement la tondeuse pour déceler la
présence éventuelle de pièces usées, desserrées ou
endommagées. Vériez les raccords et les vis et resserrez
au besoin. Prenez particulièrement soin de la lame de la
tondeuse et remplacez-la ou réautez-la si elle présente
des signes d’usure. Reportez-vous à la section Soin et
entretien.
4. Remisez la tondeuse à l’intérieur dans un endroit sec,
propre, frais et hors de portée des enfants. Ne remisez
pas la machine à proximité de matériaux corrosifs, par
exemple de l’engrais ou du chlorure de sodium.
5. Ne recouvrez pas la tondeuse à gazon d’une bâche
en plastique. Les couvertures en plastique retiennent
l’humidité autour de la machine, ce qui peut
l’endommager.
6. Le guidon de votre tondeuse à gazon peut se replier
complètement pour économiser de l’espace. Commencez
par desserrer les boutons de poignée de chaque côté
de la partie supérieure du guidon et repliez la partie
supérieure du guidon (Fig. 17).
Cadre supérieur
de guidon
Bouton
de cadre
supérieur
de
guidon
R
Élimination
Recyclage et élimination
La machine est livrée dans un emballage qui l’empêche d’être
endommagée pendant son expédition. Conservez l’emballage
jusqu’à ce que vous soyez sûr que toutes les pièces ont
été expédiées et que la machine fonctionne correctement.
Ensuite, recyclez l’emballage ou conservez-le pour le remisage
de longue durée.
Symbole DEEE. Les déchets d’équipements
électriques ne doivent pas être jetés avec les
déchets ménagers. Veuillez les recycler dans les
installations prévues à cet eet. Pour les
réglementations de recyclage, communiquez avec
les services publics locaux ou avec votre
revendeur.
Mise en garde concernant
les batteries et informations
sur leur élimination
Éliminez toujours les blocs-piles en vous conformant aux
réglementations fédérales, provinciales ou territoriales et
locales. Communiquez avec un organisme de recyclage de
votre région pour obtenir la liste des sites de recyclage.
mMISE EN GARDE! Même déchargé, un bloc-piles
emmagasine une certaine énergie. Avant de l’éliminer, utiliser
du ruban isolant pour couvrir les bornes et empêcher ainsi le
bloc-piles de provoquer un court-circuit, ce qui pourrait causer
un incendie ou une explosion.
55
Page 56

mAVERTISSEMENT! Pour réduire le risque de blessure
ou d’explosion, ne jamais brûler ou incinérer un bloc-piles,
même s’il est endommagé, mort ou complètement déchargé.
En brûlant, des vapeurs et des matières toxiques sont émises
dans l’atmosphère environnante.
1. Les batteries varient selon le type d’outils ou de machines.
Consulter le manuel pour des renseignements spéciques.
2. Le cas échéant, insérer uniquement des batteries neuves
de même type dans l’outil ou la machine.
3. Si, en l’insérant, la polarité de la batterie n’est pas
respectée, comme indiqué dans le compartiment à
batterie ou dans le manuel, sa durée de vie pourrait être
réduite ou elle pourrait fuir.
4. Ne pas mélanger des batteries anciennes et des neuves.
5. Ne pas mélanger des batteries alcalines, standard
(carbone/zinc) ou rechargeables (au nickel-cadmium,
au nickel-métal-hydrure ou au lithium-ion).
6. Ne jeter aucune batterie au feu.
7. Les batteries doivent être recyclées ou éliminées en
observant les directives provinciales ou territoriales et
locales.
Entretien, réparations et
assistance technique
Si votre tondeuse à gazon sans cordon Sun Joe® 24V-MJ14C
nécessite une intervention technique ou un entretien, veuillez
appeler le 1-866-SNOWJOE (1-866-766-9563) pour de l’aide.
Numéros de modèle et de
série
Lorsque vous communiquez avec l’entreprise pour
commander des pièces, vous devez fournir les numéros de
modèle et de série de votre machine. Ceux-ci se trouvent sur
l’étiquette autocollante apposée sur le caisson ou le guidon
de votre tondeuse. Copiez ces numéros dans l’espace réservé
ci-dessous.
24VCHRG-AC
FCC (Commission fédérale des
communications)
mAVERTISSEMENT! Toute modication ou tout
changement apporté à cet appareil et non approuvé par
la partie à qui incombe la responsabilité de sa conformité
pourrait annuler l’autorisation de l’utiliser.
Appareil de Classe B :
REMARQUE : ce matériel a été testé et il a été constaté
qu’il est conforme aux limites des appareils numériques de
Classe B, conformément à la Partie 15 des Règles de la FCC.
Ces limites sont conçues pour fournir une protection
raisonnable contre le brouillage préjudiciable dans une
installation résidentielle.
Ce matériel génère, utilise et peut rayonner une énergie
de fréquence radio et, s’il n’est pas installé et utilisé
conformément aux instructions, peut être à l’origine d’un
brouillage préjudiciable aux communications radio.
Toutefois, il n’est pas exclu que le brouillage aecte une
installation particulière.
Si cet appareil est à l’origine de brouillage préjudiciable à
la réception radio et télévision, ce qui peut être déterminé
en éteignant et en allumant l’appareil, l’utilisateur est invité
à supprimer le brouillage en prenant une ou plusieurs des
mesures suivantes :
• Réorienter ou repositionner l’antenne de réception.
• Augmenter la distance entre l’appareil et le récepteur.
• Brancher l’appareil dans la sortie d’un circuit diérent de
celui dans lequel le récepteur est branché.
• Pour de l’aide, consulter le revendeur ou un technicien
radio/télévision qualié.
Veuillez noter les numéros suivants sur le caisson ou le guidon
de votre nouvelle machine :
2 4 V - M J 1 4 C
N° de modèle :
N° de série :
56
Page 57

Dépannage
•
Retirez la clé de sécurité avant d’eectuer un entretien ou quand vous voulez vérier que ses pièces sont en bon ordre de marche.
• Pour éviter des ennuis inutiles, pour tous les problèmes mécaniques, consultez le tableau suivant avant de communiquer
avec un réparateur qualié.
Problème Cause possible Solution
La tondeuse ne
réussit pas à
démarrer
La tondeuse s’arrête
pendant la tonte
La tondeuse ne peut
pas couper l’herbe
régulièrement
a) La clé de sécurité n’est pas
insérée.
b) La commande du moteur ou de la
lame est débrayée.
c) la batterie est à plat.
d) Le plateau de coupe est bloqué
par de l’herbe ou des débris.
e) L’herbe est trop haute.
a) la batterie est à plat.
b) L’herbe est trop haute.
c) Le plateau de coupe est bloqué
par de l’herbe ou des débris.
d) La machine est en surcharge et le
système de protection contre les
surcharges a coupé le moteur.
a) Le terrain de la pelouse est accidenté
ou plein de mauvaises herbes.
b) La lame n’est pas assez autée.
a) Insérez la clé de sécurité.
b) Appuyez d’abord sur le bouton-
poussoir de sécurité, puis sur le levierinterrupteur.
c) Chargez la batterie.
d) Nettoyez le plateau de coupe.
Assurez-vous que la lame tourne
librement.
e) Réglez la tondeuse sur une hauteur
de coupe haute. Levez légèrement les
roues en appuyant sur le guidon vers
le bas.
a) Chargez la batterie.
b) Corrigez la hauteur de coupe.
c) Nettoyez le plateau de coupe. Assurez-
vous que la lame tourne librement.
d) Laissez refroidir la machine pendant
5 minutes. Patientez jusqu’à ce que la
protection contre les surcharges laisse
redémarrer la machine.
a) Réglez la hauteur de coupe.
b) Autez ou remplacez la lame.
La tondeuse ne peut pas
tondre correctement
La tondeuse est dicile à
pousser
La tondeuse vibre à vitesse
élevée
a) Le plateau de coupe est bloqué par
de l’herbe ou des débris.
b) L’herbe est trop humide.
c) L’herbe est trop haute.
d) La lame n’est pas assez autée.
a) L’herbe est trop haute pour la couper.
b) La lame ou l’arrière de la tondeuse
est retenu par de l’herbe haute.
a) L’arbre du moteur est voilé.
b) La lame n’est pas équilibrée.
c) L’écrou de la lame est desserré.
57
a) Nettoyez le plateau de coupe. Assurez-
vous que la lame tourne librement.
b) Attendez que l’herbe soit sèche.
c) Réglez la hauteur de coupe sur la position
haute pour tondre la première fois et
repassez la tondeuse après l’avoir réglée
à la hauteur de coupe voulue.
d) Autez ou remplacez la lame.
a) Réglez plus haut la hauteur
de coupe.
a) Arrêtez le moteur, retirez la clé de sécurité
et vériez si la machine est endommagée.
Communiquez avec un réparateur qualié.
b) Équilibrez la lame en meulant chaque
tranchant également ou remplacez la
lame par une nouvelle.
c) Serrez le boulon de lame.
Page 58

Accessoires en option
m
AVERTISSEMENT! TOUJOURS utiliser des pièces de rechange et des accessoires Snow Joe
NE JAMAIS utiliser des pièces de rechange ou des accessoires qui ne sont pas destinés à être utilisés avec cette machine.
Communiquez avec Snow Joe
particulier avec votre machine soit sans danger. L’utilisation de tout autre accessoire ou de toute autre pièce détachée peut être
dangereuse et pourrait provoquer des dommages corporels ou mécaniques.
®
+ Sun Joe® si vous n’êtes pas sûr que l’utilisation d’une pièce de rechange ou d’un accessoire
®
+ Sun Joe® homologués.
Accessories Item Model
1
2
3
4
Batterie au lithium-ion 2,0 Ah iON+ 24 V
Autonomie max. : 15 min (coupe jusqu'à 80 m² d’herbe)
Batterie au lithium-ion 2,5 Ah iON+ 24 V
Autonomie max. : 20 min (coupe jusqu'à 100 m² d’herbe)
Batterie au lithium-ion 4,0 Ah iON+ 24 V
Autonomie max. : 30 min (coupe jusqu'à 160 m² d’herbe)
Batterie au lithium-ion 5,0 Ah iON+ 24 V
Autonomie max. : 40 min (coupe jusqu'à 200 m² d’herbe)
24VBAT-LTE
24VBAT-LT
24VBAT
24VBAT-XR
5
Chargeur rapide de batterie au lithium-ion 24 V
24VCHRG-QC
6
Double chargeur de batterie au lithium-ion iON+ 24 V
24VCHRG-DPC
7
Sac à herbe de 40 l
MJ401E-10
8
Accessoire d’éjection latérale pour tondeuse à gazon
REMARQUE : les accessoires sont sous réserve de changements sans que Snow Joe
de donner un préavis desdits changements. Les accessoires peuvent être commandés en ligne sur le site sunjoe.com ou par
téléphone en appelant le service clientèle Snow Joe
®
+ Sun Joe® au 1-866-SNOWJOE (1-866-766-9563).
®
+ Sun Joe® soit pour autant tenue
MJ401E-DCA
58
Page 59

LA PROMESSE DE SNOW JOE® + SUN JOE® À SES CLIENTS
FR
Vous êtes notre client et Snow Joe, LLC (« Snow Joe ») SE MET EN QUATRE pour vous servir. Nous nous eorçons de vous rendre
®
l’utilisation de nos produits aussi plaisante que possible. Malheureusement, il peut arriver qu’un produit Snow Joe
, Sun Joe® ou
Aqua Joe (« Produit ») ne fonctionne pas ou se casse dans des conditions d’utilisation normales. Nous pensons qu’il est important que
vous sachiez ce que vous pouvez attendre de nous. C’est pourquoi nous avons une garantie limitée (« Garantie ») pour nos Produits.
NOTRE GARANTIE :
Snow Joe
déclare et garantit que les Produits neufs, d’origine, électriques ou non électriques sont exempts de vices de matière ou
de fabrication et, lorsqu’ils font l’objet d’une utilisation résidentielle et ménagère ordinaire, les garantit pendant une période de deux
ans à compter de la date d’achat au détail par l’acheteur primitif auprès de Snow Joe ou d’un des revendeurs agréés de Snow Joe,
preuve d’achat à l’appui. Étant donné que Snow Joe ne peut pas contrôler la qualité de ses Produits vendus par des revendeurs non
agréés, sauf stipulation contraire de la loi, la présente Garantie ne couvre pas les Produits achetés auprès de vendeurs non agréés. Si
votre Produit ne fonctionne pas ou si une pièce spécique couverte par les modalités de la présente Garantie fait l’objet d’un problème
quelconque, Snow Joe choisira (1) de vous envoyer une pièce de rechange gratuite, (2) de remplacer le Produit par un produit neuf ou
comparable, gratuitement, ou (3) de réparer le Produit. Génial, n’est-ce pas?
La présente Garantie vous donne des droits judiciaires spécifiques, et vous pouvez également avoir d’autres droits qui peuvent
varier d’une province ou d’un territoire à l’autre.
ENREGISTREMENT DU PRODUIT :
Snow Joe vous recommande vivement d’enregistrer votre Produit. Vous pouvez l’enregistrer en ligne sur le site
snowjoe.com/register, ou en imprimant et en envoyant par courrier une carte d’enregistrement oerte en ligne sur notre site Web, ou
par téléphone en appelant notre Service à la clientèle au 1-866-SNOWJOE (1-866-766-9563), ou encore en nous envoyant un courriel à
l’adresse help@snowjoe.com. Le fait de ne pas enregistrer l’achat de votre Produit n’a aucune conséquence sur vos droits concernant
la garantie. Toutefois, l’enregistrement de votre Produit permettra à Snow Joe de mieux répondre au moindre besoin que vous pourriez
avoir en matière de service à la clientèle.
QUI PEUT REVENDIQUER LA COUVERTURE DE LA GARANTIE?
La présente Garantie est étendue par Snow Joe à l’acheteur et propriétaire primitif du Produit.
QU’EST-CE QUI N’EST PAS COUVERT?
La présente Garantie ne s’applique pas si le Produit a été utilisé commercialement, pour des travaux non résidentiels ou s’il fait l’objet
d’une location. La présente Garantie ne s’applique pas non plus si le Produit a été acheté auprès d’un revendeur non agréé. La présente
garantie ne couvre pas non plus les changements cosmétiques qui n’aectent pas le rendement. Les pièces d’usure comme les
courroies, les tarières, les chaînes et les dents ne sont pas couvertes au titre de la présente Garantie et peuvent être achetées en ligne
sur le site snowjoe.com ou en appelant le 1-866-SNOWJOE (1-866-766-9563).
59
R4_01282020
Page 60

sunjoe.com
 Loading...