

SunGrabber
ABOVE GROUND
- SOLAR POOL HEATER -
TM
INSTALLATION AND OPERATION MANUAL
TABLE OF CONTENTS
How Does the SunGrabberTMSystem Work?...............................
Why is SunGrabberTMYour Best Choice?.....................................
What’s Needed to Install Your SunGrabberTM……………………..
Installing your SunGrabberTM………………..………………………
Heating Your Pool………….……………………………………...…
Page 2
Page 2
Page 3
Page 4 & 5
Page 6
Winterizing Your SunGrabberTM….…………....
Troubleshooting……..…………………….……..
Frequently Asked Questions……………….…..
Customer Support………….……………………
Warranty……………………..…………………...
Page 6
Page 6 & 7
Page 7
Page 7
Page 7
Congratulations!
You are about to install a SunGrabberTMAbove Ground Solar Pool Heater (AGP) - The best solar pool heater made! Based right
here in the U.S.A., the manufacturer of SunGrabberTMpioneered polymer solar pool heaters over 30 years ago, and today takes great
pride in being the largest and oldest manufacturer in the world. Backed by the longest and best warranty in the industry, your
SunGrabberTMis state-of-the-art in solar pool heating technology, and will provide years of FREE HEAT for your pool! In fact, when
sized and installed correctly, a SunGrabberTMwill raise your pool temperatures up to 10°F, and extend your swimming season.
Regular use of a solar blanket will enhance the performance of your new SunGrabberTMand allow you to enjoy a
warmer pool!
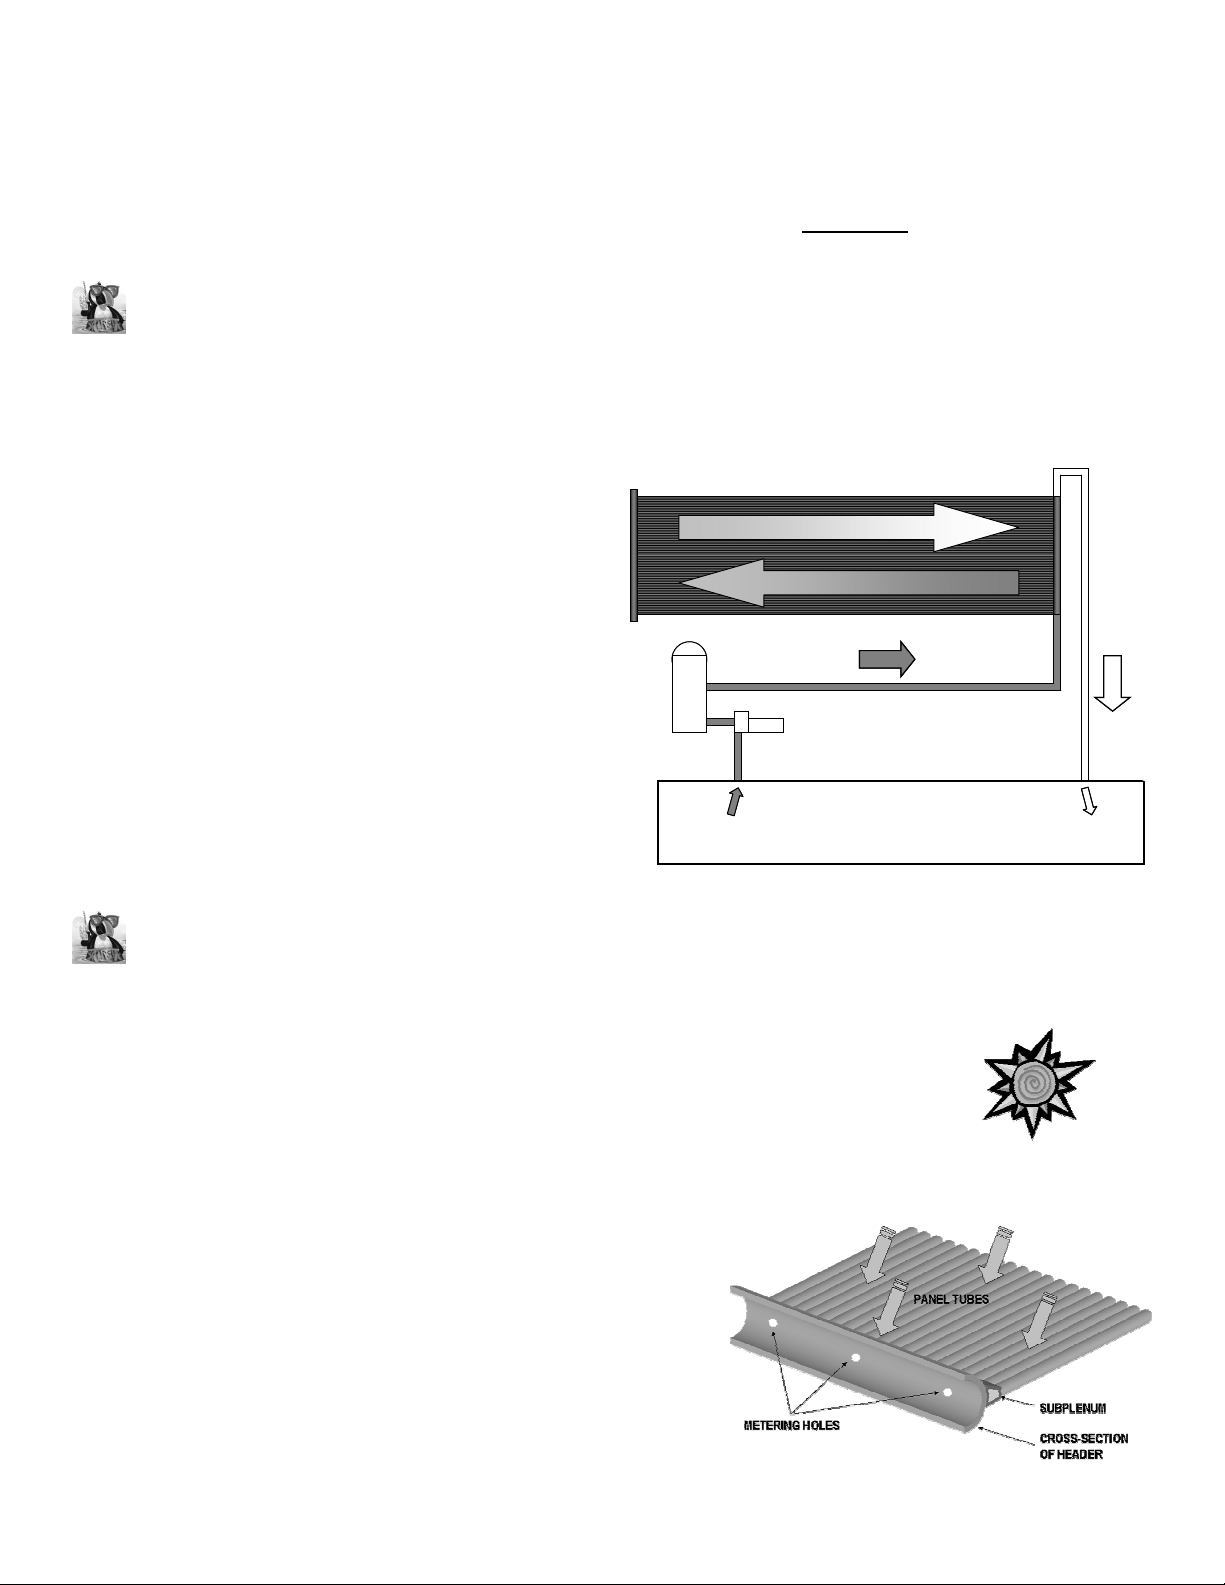
HOW DOES THE SUNGRABBERTMSYSTEM WORK?
The system is designed to be connected to your pool at one
PANEL “OUTLET”
end of the solar panel.
The “Inlet” accepts pool water directly from your pool pump
SOLAR HEAT
SOLAR HEAT
PANEL “OUTLET”
An integrated disc at the mid-point within the “Inlet/Oulet”
SOLAR HEAT
SOLAR HEAT
header automatically diverts the right amount of flow through
the solar panel.
Pool water moves through the solar panel picking up the
sun’s solar heat along the way.
FILTER AND
FILTER AND
PUMP
Warmed pool water is then returned back to the pool from
PUMP
the “Outlet” side of the panel.
SWIMMING POOL
During the day, solar heat is continually added each time
COOL WARM
COOL WARM
SWIMMING POOL
your pool water circulates through the solar panel.
If your pool water is too warm, circulate the pool water through the solar panel at night to cool your pool!
WHY IS SUNGRABBERTMYOUR BEST CHOICE?
SunGrabberTM’s patented tube-to-tube construction and water metering system provides even flow
and heating along the entire width and length of the solar panel. These features eliminate
inefficient hot spots associated with other solar brands.
PANEL “INLET”
PANEL “INLET”
COOL WATER TO
COOL WATER TO
SOLAR PANEL
SOLAR PANEL
WARM
WARM
WATER
WATER
TO POOL
TO POOL
1. Pool water enters the header and travels through the metering holes into the
subplenum without creating excessive additional backpressure on the pool pump.
2. The subplenum evenly distributes pool water simultaneously to every
panel tube.
3. The pool water then flows down the panel creating a fully-wetted surface
that is in touch with the sun’s solar heat.
4. A balanced fully-wetted surface optimizes transfer of the sun’s available
solar heat to your pool water.
2
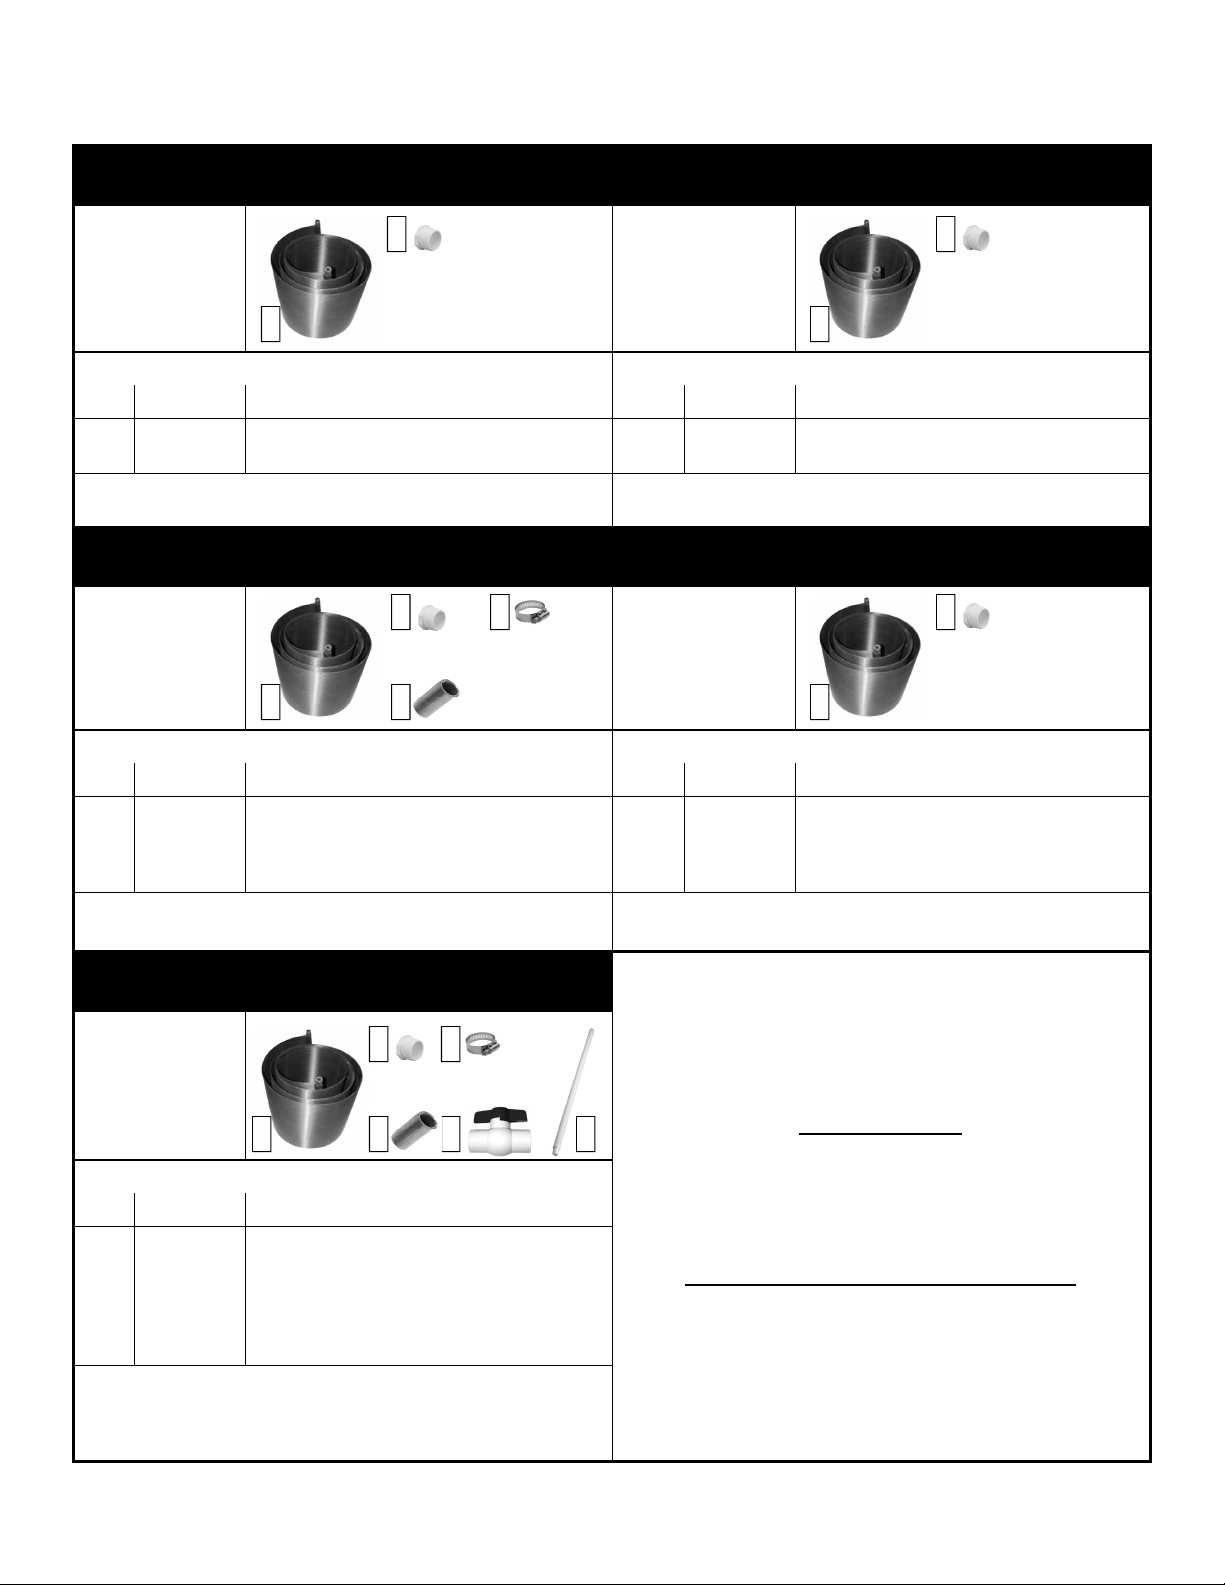
WHAT’S NEEDED TO INSTALL YOUR SUNGRABBERTM?
SunGrabber
TM
Product
AGP
(Compact)
Box Contents by Item
(Manual and Warranty Card Not Shown)
2
SunGrabber
Product
AGP “Jr”
40,000 BTU’s
TM
(Manual and Warranty Card Not Shown)
40,000 BTU’s
1
Box Contents Box Contents
Item Quantity Description Item Quantity Description
1
2
Additional Parts Required: (1) - Flexible 1 1/2” diameter pool hose,
(1) - 1 1/2” hose clamp and TeflonTMtape
SunGrabber
(Compact)
Product
AGP
1
2
2’ x 20’ above ground solar panel
1 1/2” PVC threaded plug
TM
Box Contents by Item
(Manual and Warranty Card Not Shown)
2 4
1
2
Additional Parts Required: (1) - Flexible 1 1/2” diameter pool hose,
(1) - 1 1/2” hose clamp and TeflonTMtape
SunGrabber
1
2
TM
Product
AGP
80,000 BTU’s
1
4’ x10’ above ground solar panel
1 1/2” PVC threaded plug
(Manual and Warranty Card Not Shown)
80,000 BTU’s
1
3
1
Box Contents by Item
2
Box Contents by Item
2
Box Contents Box Contents
Item Quantity Description Item Quantity Description
1
2
3
4
Additional Parts Required: (1) - Flexible 1 1/2” diameter pool hose,
(1) - 1 1/2” hose clamp and TeflonTMtape
SunGrabber
AGP “Ultra”
Product
2
4
1
2
2’ x 20’ above ground solar panel
1 1/2” PVC threaded plug
1 1/2” rubber coupler
1 1/2” hose clamp
TM
Box Contents by Item
(Manual and Warranty Card Not Shown)
1
2
Additional Parts Required: (1) - Flexible 1 1/2” diameter pool hose,
(1) - 1 1/2” hose clamp and TeflonTMtape
1
2
4’ x 20’ above ground solar panel
1 1/2” PVC threaded plug
The additional parts required may be purchased at your local pool
dealer or hardware store.
2 4
(Compact)
80,000 BTU’s
1 5 6
Box Contents
Item Quantity Description
1
2
3
4
5
6
Additonal Parts Required: (1) - 1 1/2” hose clamp
[optional for by-pass valve: (2) - 1 1/2” PVC TEE, (4) - 1 1/2” PVC hose
adapter, (1) - PVC Solvent Primer/Cement, and (1) - Flexible 1 1/2” diameter
pool hose]
2
4
1
2
1
2
2’ x 20’ above ground solar panel
1 1/2” PVC threaded plug
1 1/2” rubber coupler
1 1/2” hose clamp
1 1/2” ball valve (use optional)
1 1/2” x 6’ flexible pool hose
3
AVAILABLE SUNGRABBERTMACCESSORIES
TOOLS REQUIRED
flat screwdriver
1/4” socket driver
1/2” to 2” Panel Add-on Adapter Kit
Panel Add-on Kit
Roof/Rack Mounting Kit
Manual By-Pass Valve Kit
By-Pass Valve
Panel Repair Kit
3

INSTALLING YOUR SUNGRABBER
Your SunGrabberTMsystem is quite versatile in installation and operation. Locate the system where it will have the maximum
exposure to sunlight during the day, while keeping it out of foot traffic areas. Afternoon sun is better than morning sun.
Although SunGrabberTMsolar panels are extremely durable, you should never make it a practice of walking on them.
As long as your pool pump is of adequate
horsepower, you have the option of installing
the system on the ground next to your pool,
on your roof or shed, or on a rack. A 3/4 to 1
1/2 horsepower pump will generally handle
installations up to 30 feet away from the pool
equipment and one story high. If your pool
has a gas heater or heat pump, plumb your
solar system in between the filter and gas
heater/heat pump. You will see a reduction in
your monthly energy bill!
TM
Typical On-ground Installation
If you are mounting on a roof or rack, please contact your local dealer for our “Roof/Rack Mounting Kit.”
The optimum flow rate through a solar system is 4 to 8 gpm per panel. If your pool pump is larger than 1 horsepower,
and you are installing the solar system at ground level within 30 feet of the pool equipment, contact your local dealer
about ordering our “Manual By-pass Valve Kit” to regulate flow and maximize performance.
Step 1: Positioning the Solar Panels
Once you have found the optimal location for your system, be sure there are no rocks or other sharp objects lying on the ground that
could potentially puncture the solar panels. Turn the SunGrabberTMbox on its side and slide the solar panel(s) out. Position the
rolled up panel(s) so that they will unroll into the area you have chosen. Remove the shipping strap from the panel(s).
One panel products Two panel products
Gently unroll the panel(s). They may try to roll back up when released. If this happens, place a smooth object of no more than 15
pounds on each end of the panel(s) to hold them flat. After 30 minutes or so in the sun the panel(s) will stay flat.
Be sure to save the shipping strap for future use.
4

INSTALLING YOUR SUNGRABBERTM(CONTINUED)
Step 2: Connecting Hardware
Each panel requires installation of two 1 1/2” threaded plugs. Wrap the threads of each threaded plug with about three wraps of
TeflonTMtape and screw the plugs into the ends of the panels opposite the inlet/outlet pipe. Hand tighten only. NOTE: THE “INLET”
AND “OUTLET” ENDS ARE MARKED ON THE INLET/OUTLET PIPE.
Step 3: Connecting Panels [(Compact) only!]
1. Position the two panels side-by-side about 6” from each other, making sure that the inlet/
outlet ends of each panel are on the same side. Be sure the panels are positioned so that
the inlet/outlet ends are closest to your pump and filter.
2. Remove the caps that cover the inlet/outlet pipes on your solar panels.
3. In between the two panels, where the inlet/outlet pipes meet, push one end of the supplied
rubber coupler over the pipe opening marked “Outlet.” Be sure to push the coupler at least
an inch past the raised ribs of the “Outlet” adapter.
4. Slide the two 1 1/2” hose clamps over the coupler. Do not tighten. Push the other end of the
rubber coupler over the adjacent panel adapter marked “Inlet.” Be sure to push the coupler
at least an inch past the raised ribs. Slide the hose clamps into position at both ends of the
coupler, about 1/4” from either end, and tighten.
Step 4: Connecting System to the Pool
In this step you may use your existing hose if it’s long enough. If it is not, you will
need to use a length of hose to reach from the solar panel(s) to your pool filter.
1. Turn off your pool pump and block the inlet and outlet of your pool using the plugs supplied by
your pool manufacturer or a suitable alternative.
2. Unhook the hose from the pool inlet (where the hose connects to your pool after coming from
the filter). If you have a gas heater or heat pump, then unhook the hose from the gas heater/
heat pump inlet. NOTE: REFER TO TYPICAL ON-GROUND INSTALLATION SCHEMATIC
ON PAGE 4 FOR POOL INLET LOCATION.
1.
4.
3.
3. With the hose clamp in place over the solar panel’s “Inlet” adapter, push the hose onto the
“Inlet” adapter, being sure to slide it at least one inch past the raised ribs.Slide the hose clamp
into place and tighten. NOTE: YOU MAY NEED TO WARM THE HOSE END TO MAKE IT
MORE PLIABLE. THIS CAN BE ACCOMPLISHED BY PLACING IT IN HOT WATER FOR
SEVERAL SECONDS.
4. Slide a hose clamp over the 1 1/2” hose that will run from the panel to the pool inlet or gas
heater/heat pump inlet.
5. Push the hose onto the solar panel’s “Outlet” adapter at least one inch past the raised ribs.
Slide the hose clamp into place and tighten.
6. Attach the other end of the “Outlet” hose to the pool inlet or gas heater/heat pump inlet.Again
position the hose clamp and tighten.
7. Unblock the inlet and outlet of your pool.
8. Turn your pump on and check the hose clamps and plumbing for leaks. If there is a leak, you
may have to tighten the threaded plugs. If a leak is at a clamp you will need to loosen the hose
clamp, push the hose further onto the pipe and re-tighten the clamp.
5
5.
5.

HEATING YOUR POOL
When the system starts up you will notice tiny air bubbles flowing into your pool. This is the plumbing and solar panel(s) being purged
of any air. This is normal and should last a few minutes. To check the performance of the system, turn the pool pump off. Wait 10
minutes and feel the surface of the solar panel. It should be hot to the touch. Now turn the pool pump back on and feel the panel
getting cooler to the touch. The difference in temperature is FREE solar heat being added to your pool water!
Warning: If the panel is full of water and has been sitting in the sun without the pump running, the water can get very
hot. Hot water can cause burns, so be sure everyone is away from the pool inlet each time the system is turned on.
For best results, turn on your solar system whenever your solar panels are in the sun. Turn the solar system off at night or when it’s
raining to prevent cooling the pool. If your pool system has a timer, set it to operate from 9 a.m. until 5 p.m. This is the best solar
heating period. Using a solar blanket in addition to your solar pool heater will hold the warmth in the pool and help it heat more
quickly. It is particularly important to use the blanket at night or when it’s windy. If your pool becomes too warm during theseason,
turn the pump and solar on at night to help cool the pool.
WINTERIZING YOUR SUNGRABBER
Whether mounted on the ground, rack or roof, your solar panel(s) must be drained and stored before the first frost. If water is allowed
to freeze in the panel damage may occur. To winterize, perform the following steps.
1. Turn off pool pump.
2. Place plugs supplied with your pool in the pool inlet and outlet. Disconnect both hoses from the “Inlet” and “Outlet” adapters on
the solar panel(s). Disconnect the hose from the pool inlet. Connect the hose from the pump to the inlet on the pool and tighten
the hose clamps.
3. Remove the plugs from the inlet and the outlet of the pool, and check for leaks.
4. Remove both of the threaded plugs located at the end of the panel(s) opposite the “Inlet/Oulet” pipe. Roll the panel(s) and
secure using the original carrying strap. Tilt panel(s) until all the water drains.
5. Replace the original caps onto the panel adapters, and store the panel(s) in the garage or a shed until next spring.
Freeze damage is not covered under warranty.
TM
TROUBLESHOOTING
If you are having an issue with your SunGrabberTM, please review this section and the Frequently Asked Questions section that
follows. Usually a resolution can be found in these two sections. If your particular issue is not found, please visit us on the web at
www.sungrabber.com or contact our customer support department at 1-866-SUNGRAB (786-4722).
Issue: My system doesn’t seem to be working.
Resolution: Turn off your pool pump midday in bright sunlight. After 10 minutes have passed, feel the solar panel. It should be quite warm to the
touch. Turn your pool pump back on. Wait another 10 minutes and feel the solar panel again. It should be cooler to the touch. The difference in
temperature is the heat being added to your swimming pool and indicates that your system is functioning properly. Also, the water entering the
pool from the solar panel through the pool inlet should be warmer than the surrounding pool water.
Issue: My pool is not warm enough.
Resolution: Your system should be up and running for five days to reach optimum temperature. Be sure the system is turned off during the night,
or this will cool your pool. Be sure your solar system is getting sun the entire day or at least 4 to 6 hours preferable of afternoon sun. If your
system is tilted, be sure it is to the south or southwest with the “Inlet” at the bottom. If the “Inlet” is at the top, your system will not function.
6

TROUBSHOOTING (CONTINUED)
Issue: Flow from my pool inlet seems greatly reduced and filter pressure excessive.
Resolution: There will be some increase in backpressure on the filter and pump when the solar system is on. Please perform the following
checks:
1. Check to see that your filter is properly cleaned.
2. Check that the vinyl caps were removed from the inlet and outlet prior to installation. Also make sure your connections to the solar panel are
at the end labeled “Inlet/Outlet.”
3. If you have a 1 horsepower pump and the solar system is not elevated and is within 30 feet of the pool, you may need to install our “Manual
By-Pass Valve Kit” to regulate flow going through the panel. SunGrabberTMsystems function best at a flow rate of 4 to 8 gpm per panel.
FREQUENTLY ASKED QUESTIONS
The following questions are those asked most frequently by our SunGrabberTMcustomers. If you have a question or concern about
your SunGrabberTM, your answer may be found below.
Question: Should I use a solar pool cover with my solar system?
Answer: A solar pool cover prevents evaporation and heat loss, especially at night when the outside temperature is cooler. If you do not use one,
there is a good chance that the heat you added during the day will be lost at night.
Question: Can In-ground pool solar panels be used to heat my above ground pool?
Answer: Yes, although In-ground solar panel systems are much more expensive to buy and install. And as long as pool pump is of adequate
horsepower.
Questions: Can I add on more systems if I want my pool warmer?
Answer: Absolutely. The more panels—the warmer the pool! Your SunGrabberTM system’s modular design accepts additional panels very easily.
You will need to order our “Panel Add-on Kit” along with your next SunGrabberTMpurchase.
Question: Can I use my SunGrabberTMwith a gas heater or heat pump?
Answer: If you have a gas heater or heat pump installed on your pool currently, simply install your SunGrabberTMbetween the filter and the gas
heater/heat pump, and you will see a reduction in your monthly energy bill!
Question: I left my solar panel full of water through the winter and now some of the tubes are leaking. Can it be repaired?
Answer: Yes it can. You will need to order our “Panel Repair Kit” from your local dealer. It is very important that your SunGrabberTMis properly
winterized each year. (Reference the “Winterizing Your SunGrabberTM” section of this manual, page 6)
CUSTOMER SUPPORT
If your issue was not addressed in our Troubleshooting or Frequently Asked Questions sections, please visit us on the web at
www.sungrabber.com or contact our customer support department at 1-866-SUNGRAB (786-4722).
WARRANTY
Your SunGrabberTMis backed by a limited ten-year warranty.
7

SunGrabber
866-SUNGRAB • 866-786-4722
435 Otterson Drive
Chico, CA 95928
www.sungrabber.com
TM
 Loading...