

Page 1
For ongoing product improvement, this manual will be modified without prior notice.
STB370
Page 2

CONTENTS
Safety Precautions
What's in the box
Production overview
Functions of Button and Port
Remote controller instructions
Introduce
Turn on/off the cloud TV BOX
Connect to Networks
WI-FI
Wired Network Ethernet
Main menu overview
Internet TV program
Internetworld
Streaming
Manage the app in the Game and Education category
Browse
2
3
4
5
6
7
7
8
8
9
10
11
11
12
13
15
Upgrade the firmware of Cloud TV Box
Manage the Applications
Screen adjustment
AV Output
Keyboard User Guide
Language setting
Date & Time settings
Features
Specification
16
17
20
20
21
21
22
23
23
Page 3

Page 2
Safety Precautions
Safety Precautions
For advanced operations such as Dev tools, it is suggested to be operated by professional
engineers.
Images and screenshots used in this user manual may differ in appearance from the actual product.
Content in this user manual may differ from the product, or from software provided by service
providers or carriers, and is subject to change without prior notice
Keep your Cloud TV Box dry.
Do not use or store your Cloud TV Box in dusty, dirty areas.
Do not place your Cloud TV Box on slopes. If your Cloud TV Box falls, it can be damaged.
Do not place your Cloud TV Box in too hot or too cold areas.
Do not place your Cloud TV Box with metal objects such as keys and necklaces.
Do not place your Cloud TV Box near magnetic fields
Do not place your Cloud TV Box near or in heaters, microwaves, hot cooking equipment, or high
pressure containers.
Simply put, do not drop, throw, or sit on your Cloud TV Box, for obvious reasons.
Do not use your Cloud TV Box near other electronic devices.
Please do not use your Cloud TV Box in thundery days.
Keep your Could TV Box away from liquid substance.
Page 2
Page 4
What's in the box
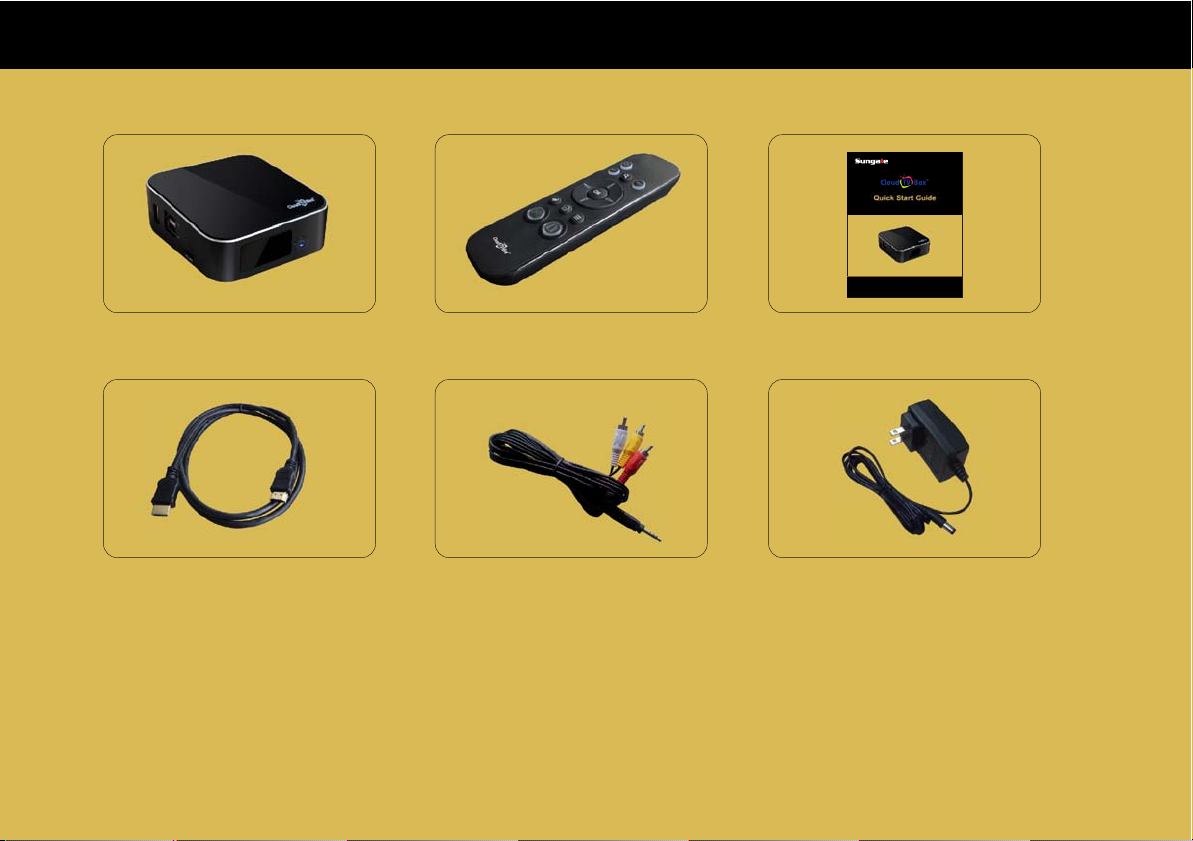
Here's what you should find inside the packing box:
Page 3
STB370
Cloud TV Box Remote Control
AV out cableHDMI cable
Quick Start Guide
AC adapter
Page 5

Production Overview
Cloud TV Box is not a smart TV, it is a Cloud TV.
Watch high quality TV programs absolutely free! No contract, no subscription, no fee.
The Six Key Points of Cloud TV Box:
Free Content: Cloud TV box has preloaded hundreds of TV contents, and you can watch the
content you like and latest videos from CNN, ABC, CBS, FOX, PBS, etc. absolutely for free.
No contract, no subscription fee.
User Interface: Keyboard, Motion Sensor Remote Control, and Mouse input available,
operation is super easy
Social Network: Facebook, Twitter, Skype available
Internet Browser: Surf the Internet freely
Education: You can download educations apps to learn with your kids
Game: You can download games to have fun with your family members
Page 4
Page 6
Production Overview
Functions of Button and Port
Page 5
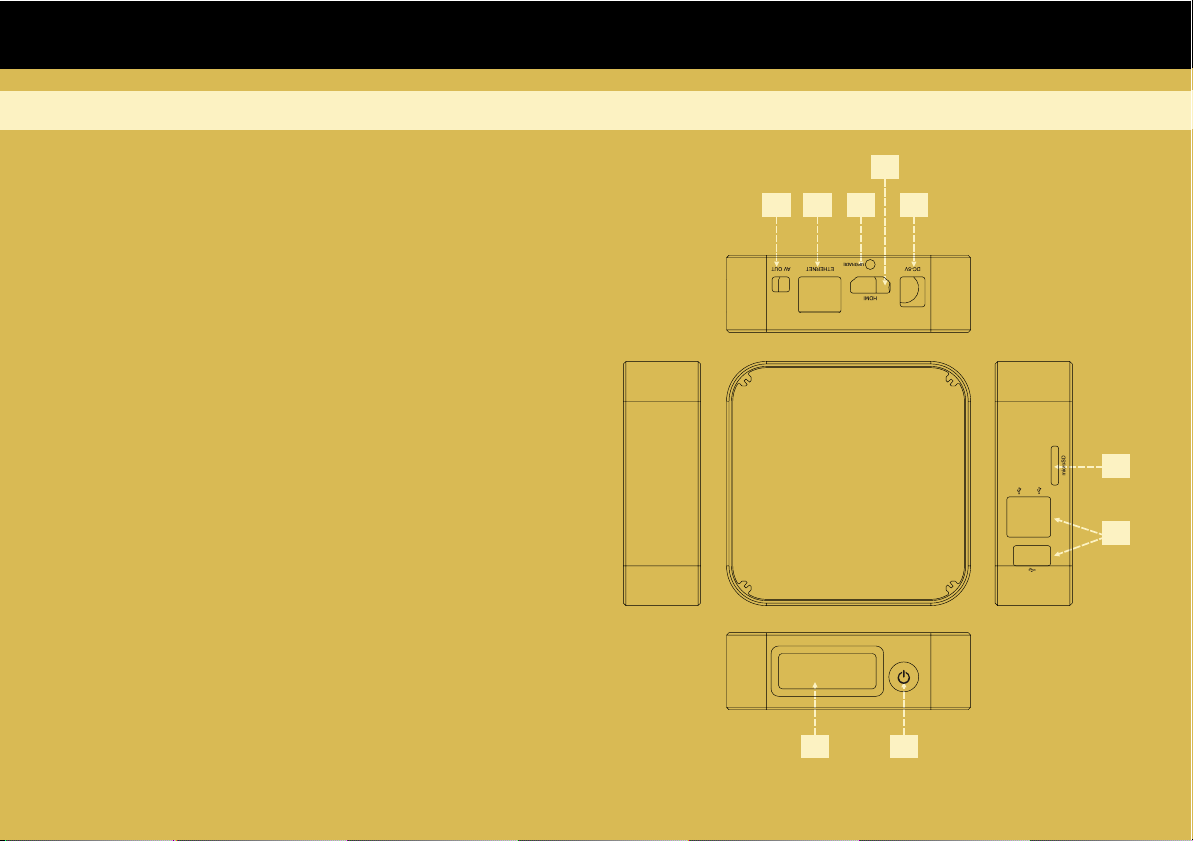
1. Remote control signal sensor.
2. Power:
Turn on /off the Cloud TV Box
3. USB port:
Connect USB mouse, USB keyboard,
USB device etc.
4. MicroSD card slot
5. DC IN:
Connect your Cloud TV Box to a AC adaptor
6. HDMI port:
Connect your Cloud TV Box to an HDTV with
an HDMI cable
7. Upgrade:
Press Upgrade button for upgrading the firmware
8. Ethernet port:
Connect your Cloud TV Box to a wired network
with an Ethernet cable (not included).
9. AV out port:
Connect your Cloud TV Box to a non-HDTV
6
5
9
7
8
4
3
1
2
Page 7
Production Overview
Remote controller instructions
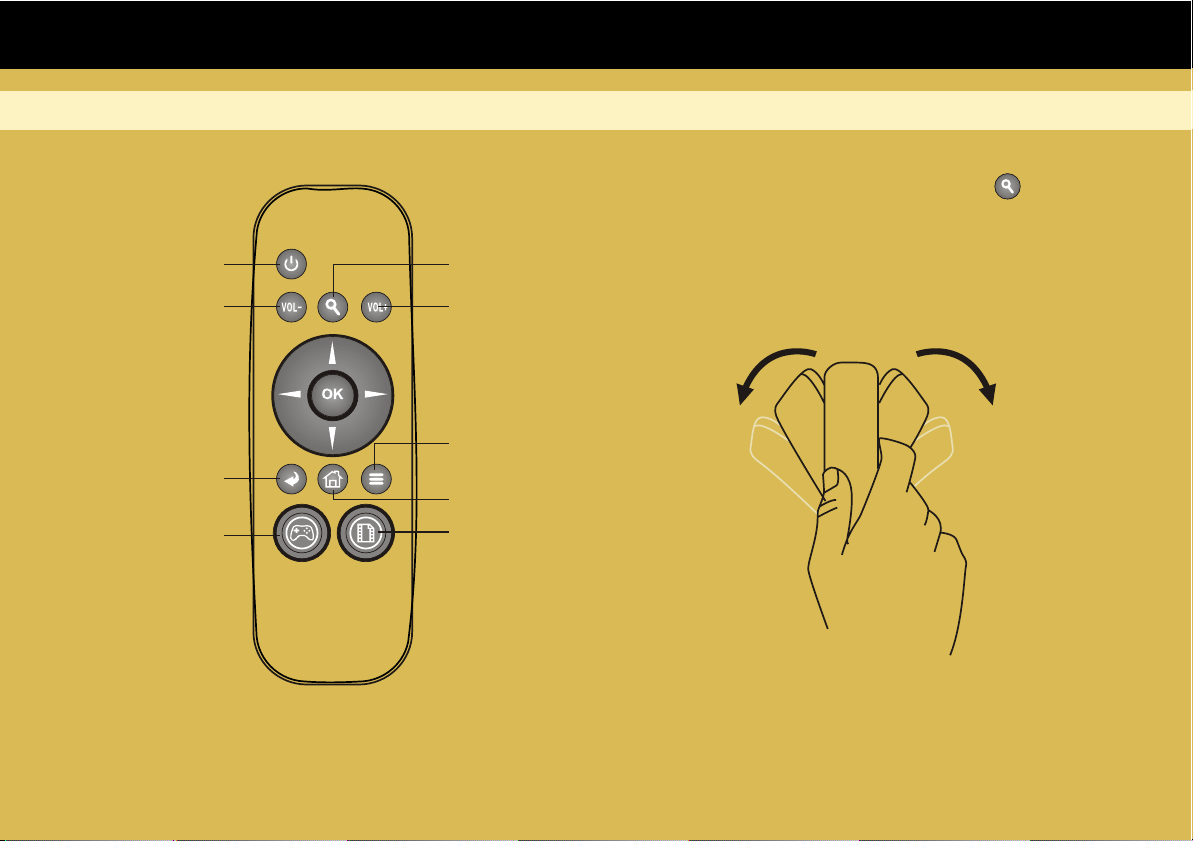
Power
Volume down
Return
Press to go the
game folder
Zoom
Volume up
Menu
Home page
Press to go the
Internet TV list
Page 6
Tips: Press and hold the “Zoom” ( ) key,
rotate left to zoom out, and rotate right to
zoom in. Note, zoom functions are only
available under certain websites or games,
not everywhere.
Page 8

Introduce
Page 7
Turn on/off the cloud TV BOX
1. Connect your Cloud TV box to your TV by HDMI cable or A/V out cable before you turn on
Cloud TV Box.
2. Power on: plug the power adapter to the power socket, then connect the power adapter to your
cloud TV box, then long press the power button on the cloud TV Box at least 3 seconds, the
indicator light is blue now, your Cloud TV box is starting.
3. Power off: Long press the power button on the Cloud TV box, and then show you a message
“Your Cloud TV Box will shut down”, click “OK” to turn off.
4. When the Cloud TV box is running, press the Power button on the remote controller to put your
Cloud TV Box into stand-by mode, when your Cloud TV Box is in stand-by mode, press Power
button again to start it.
5. LED Indicator light: when your Cloud TV is running, the indicator light is blue, and when your
cloud TV box is in stand-by mode, the indicator is red.
Page 9
Introduce
Page 8
Connect to Networks
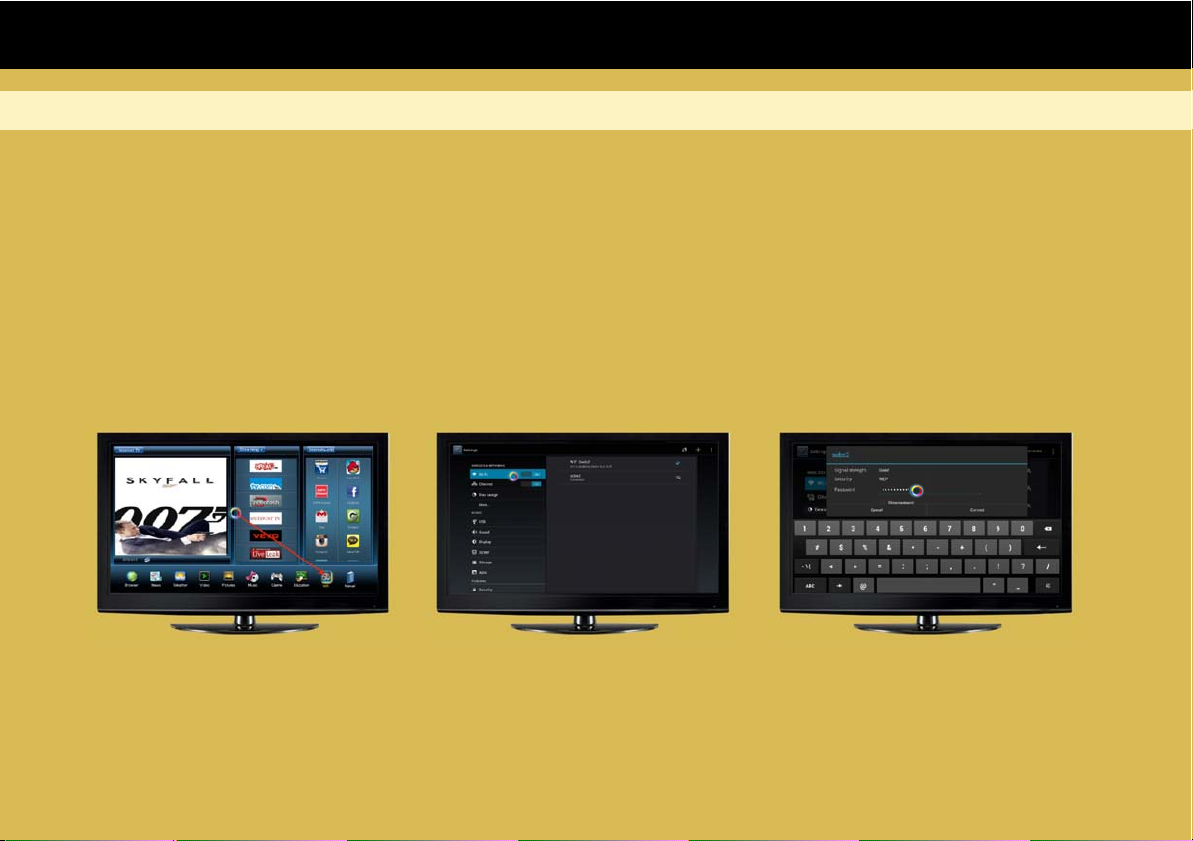
1. WI-FI :
For networked functions, such as Browser, Map, Email, YouTube, Facebook, Play Store…, you
need to link to internet firstly. Please operate as follow steps to setup your networks,
Starting from the main menu,
Move your hand to move the circle to point to the “Wi-Fi” icon on the low-right corner of the screen,
press “Ok” again, you will see Wi-Fi link interface, you will find all the wireless routers near your
home. Select your home router, input your router's password, press “Connect”, now, you are linked
to the Internet.
Page 10
Introduce
Page 9
Connect to Networks
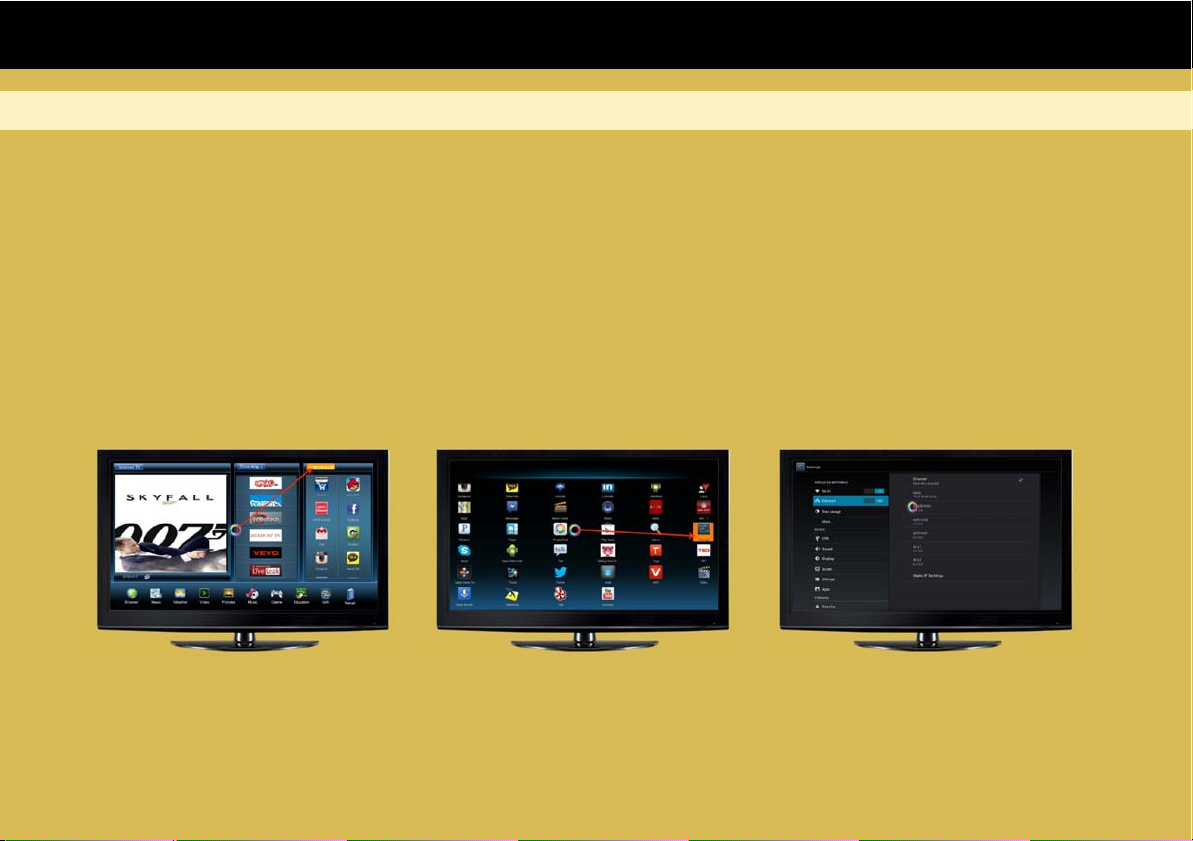
2. Wired Network Ethernet :
1). Plug the network cable into the Ethernet port of your Cloud TV Box.
2). When turn on the Cloud TV Box every time, you need to open the Ethernet, the step is as follows:
Starting from the main menu,
(1) Select the “Internetworld” on your Cloud TV Box's main page screen.
(2) Select Settings > Ethernet, slide the OFF icon to right side.
Page 11
Introduce
Main menu overview
Page 10
1
2
3
4
5
6
7
8
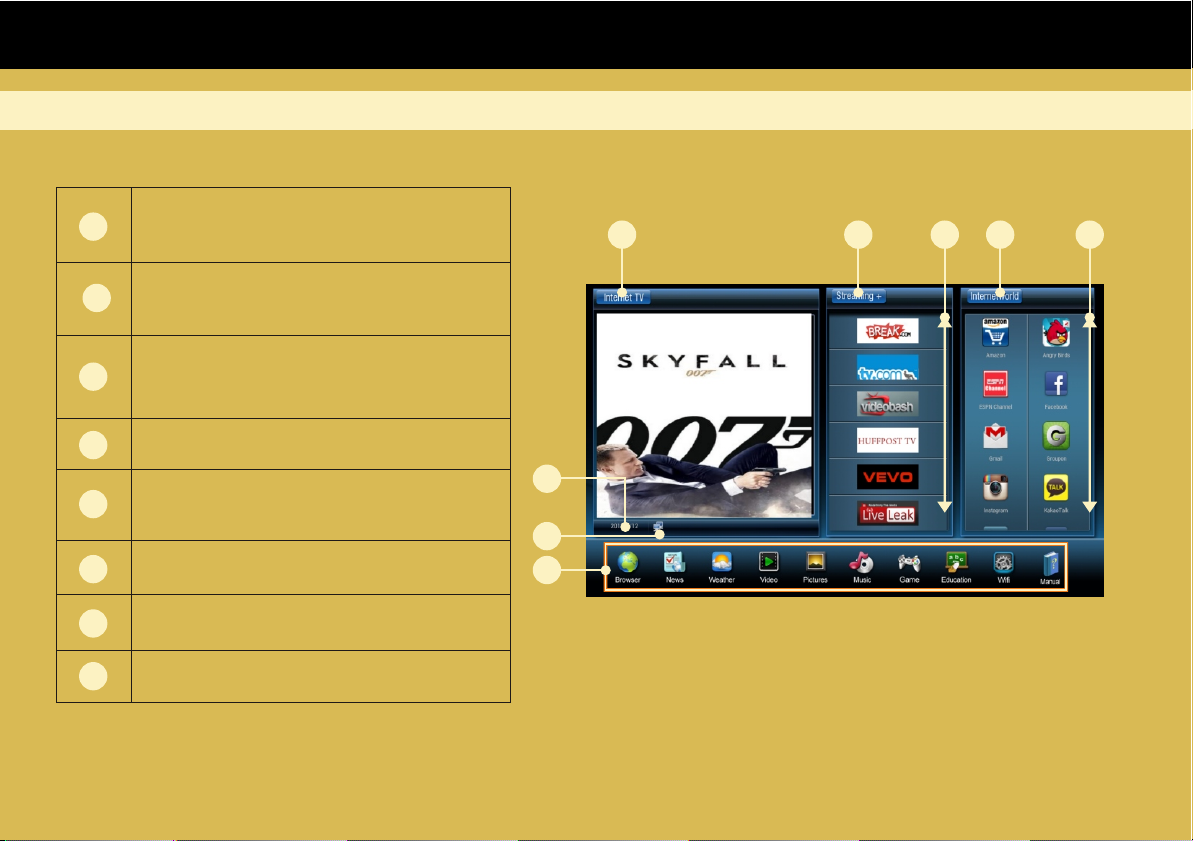
Select the button for Online
TV programs
Select the button to add more
Internet video sources
Move the cursor up and down
for more Internet video
Select the buttons for all APPs
Move the cursor up and down
for more APPs
Date
Show if the network is connected
For more functions
1
6
7
7
8
2
3
4
5
Page 12
Introduce
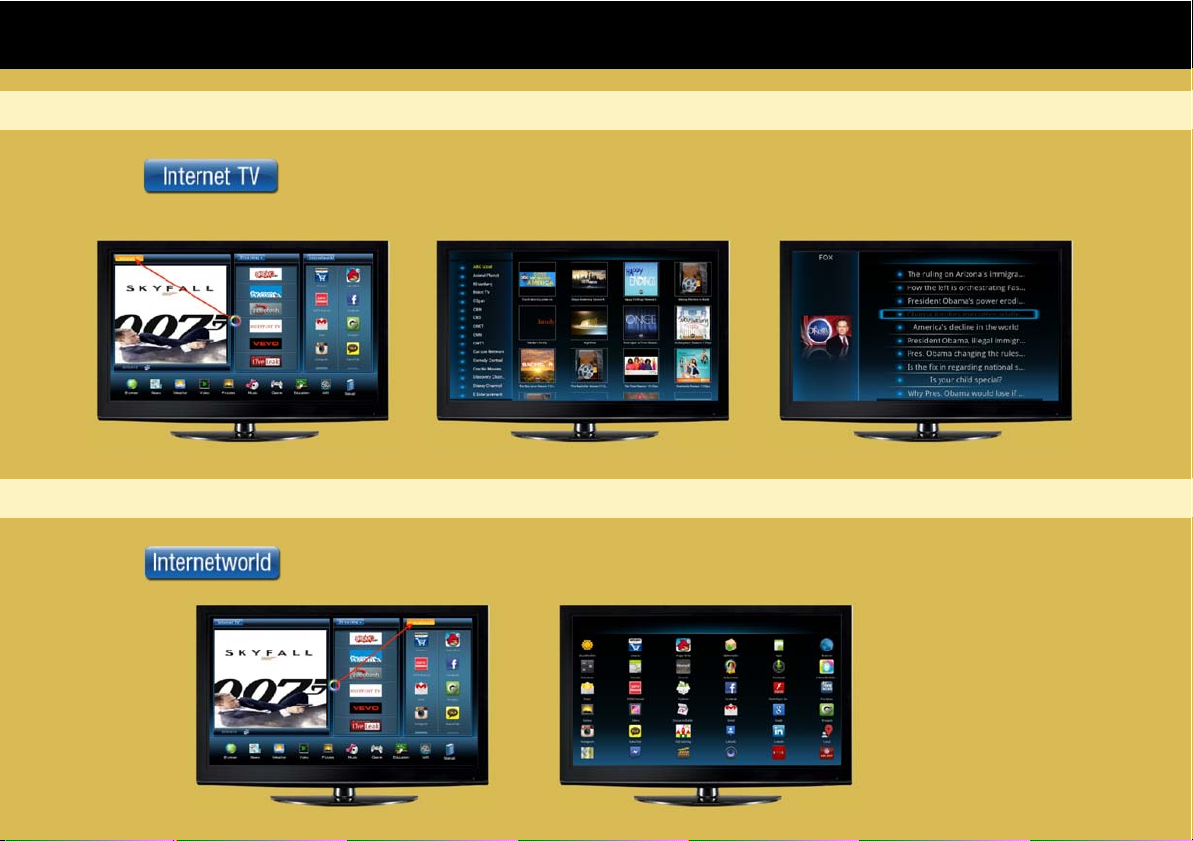
Internet TV program
Select “ ” in the main menu, and enter into online TV programs, there are many
programs for your choice.
Internetworld
Select “ ” in the main menu, and all apps display as the below:
Page 11
Page 13
Introduce
Page 12
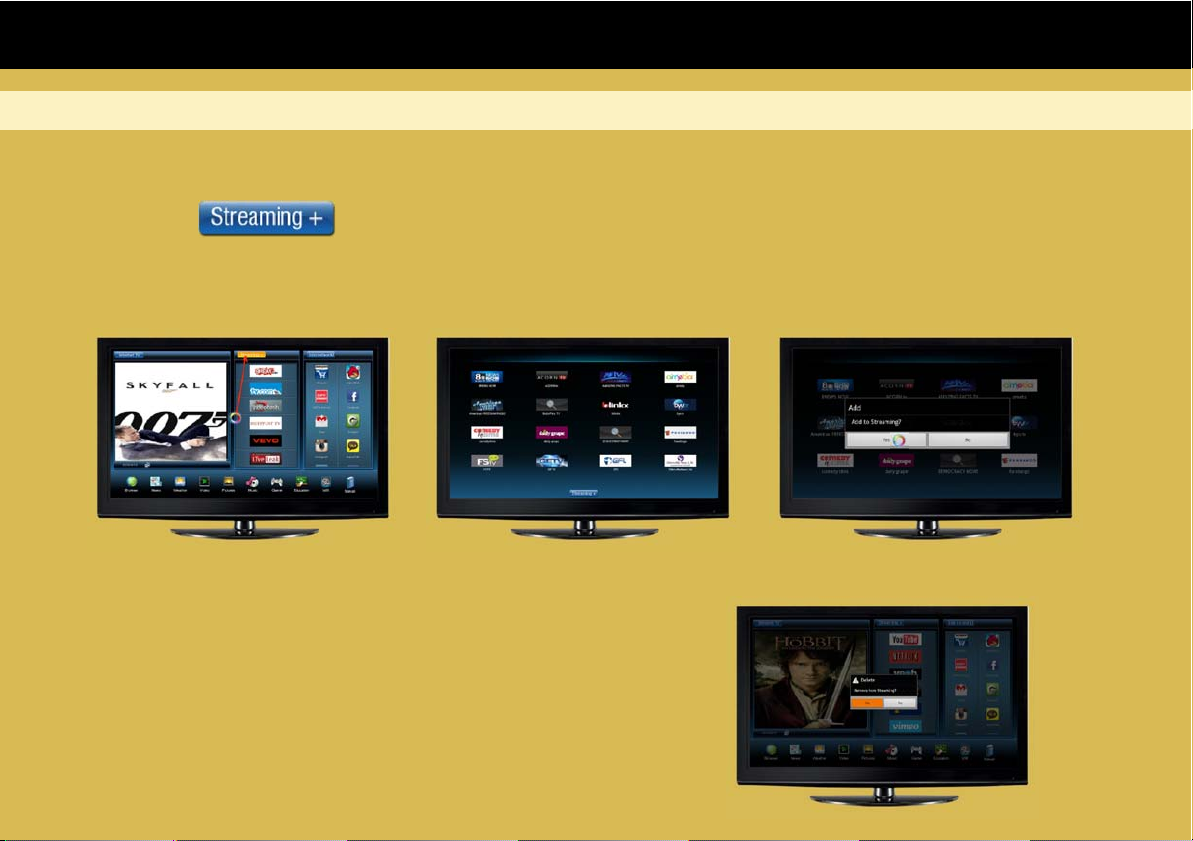
Streaming
1) Add more internet video sources to the streaming list
a. Select “ ” on the main menu, then you can see many internet video sources.
b. Select the video icon you want to add, then the screen will display as below, and press “yes”,
then add the video to the streaming list on the main menu successfully.
2) Delete the video sources from the streaming list in
the main menu
In the streaming list, select the video source you want to
delete, and hold on OK button on the remote controller
or the left mouse button, then the screen will display as
right, and press “yes”, then delete successfully.
Page 14
Introduce
Page 13
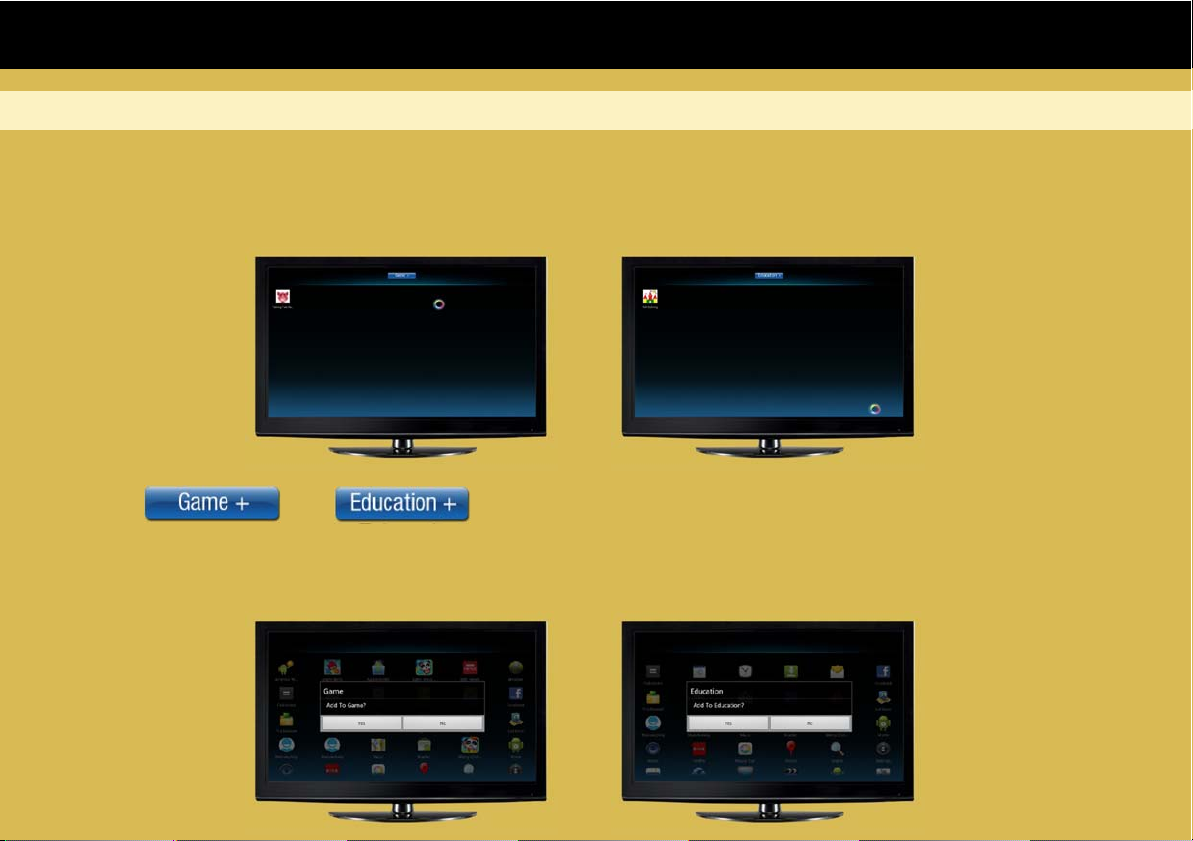
Manage the app in the Game and Education category
1) Add the Apps to the Games or Educations categories
Select the “Game” icon or “Education” icon in the bottom of the main menu, and enter into the
Game or Education as below.
Select “ ”or “ ” , and enter into the Apps list, and select the App you want
to add into the Game or the Education, hold on OK button on the remote controller or the left
button of the mouse, then the screen will display as below, and press “yes” ,confirm the add app to
the Game or Education categories.
Page 15
Introduce
Page 14
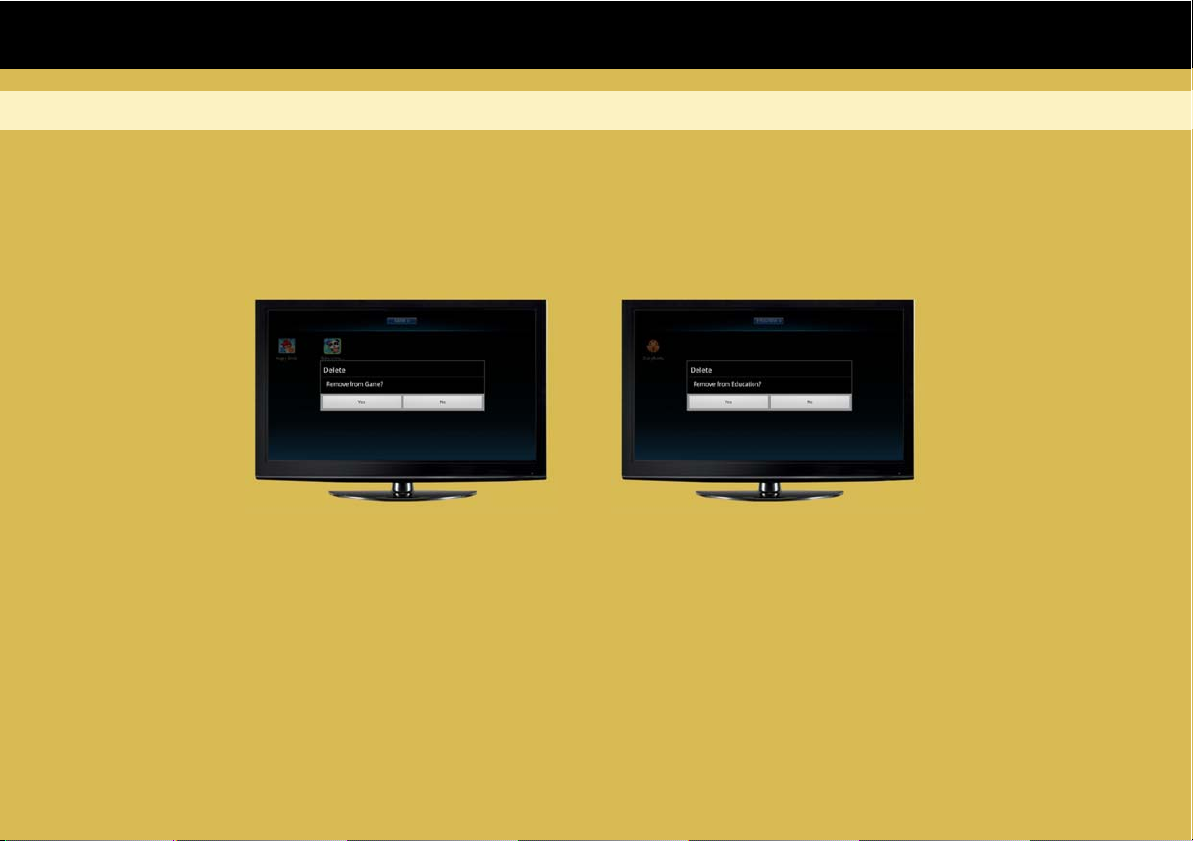
Manage the app in the Game and Education category
2) Delete App from the Game or Education category.
In the Game or Education list, select App you want to delete, and hold on OK button on the
remote controller or the left mouse button, then the screen will display as below, and select “yes”,
then delete successfully.
Page 16
Introduce
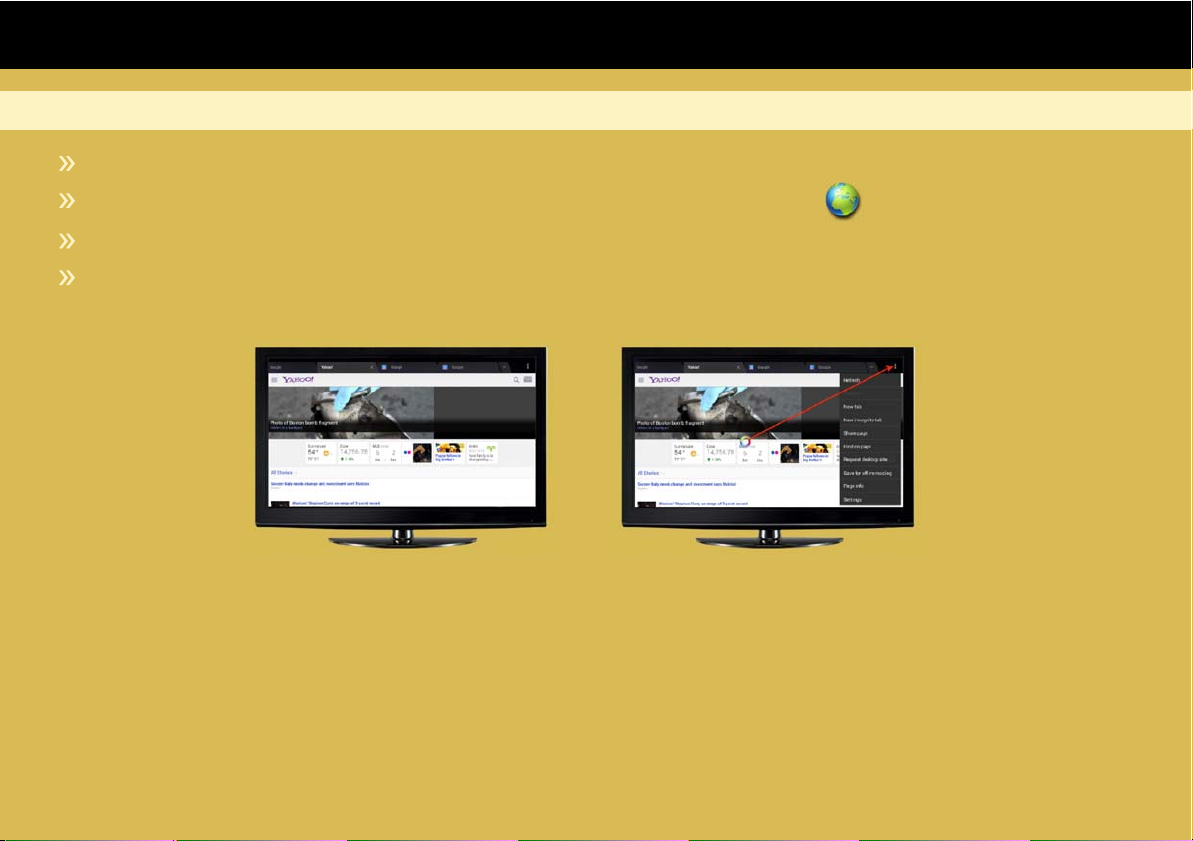
Browse
Use browser to view web pages and to search the information on the web.
After connecting to networks through WI-FI or Ethernet cable, select browser icon.
Press Return on the remote controller to close the browser and return to the home screen.
Press Menu on the remote controller to pop out the option menu, or select the menu icon on
the top right corner
1) Refresh the current Page
Press Menu on the remote controller and select Refresh, The webpage is refreshed.
Page 15
2) Go back among the web pages you have opened.
Press the Return button on the remote controller or the right mouse button.
3) Change Browse Settings
Press Menu and select Settings. You can set default zoom,set home page, privacy setting,
clear cache and history, clear all cookie data, etc.
Page 17
Introduce
Page 16
Upgrade the firmware of Cloud TV Box
Local upgrade through upgrade zip or upgrade zmg
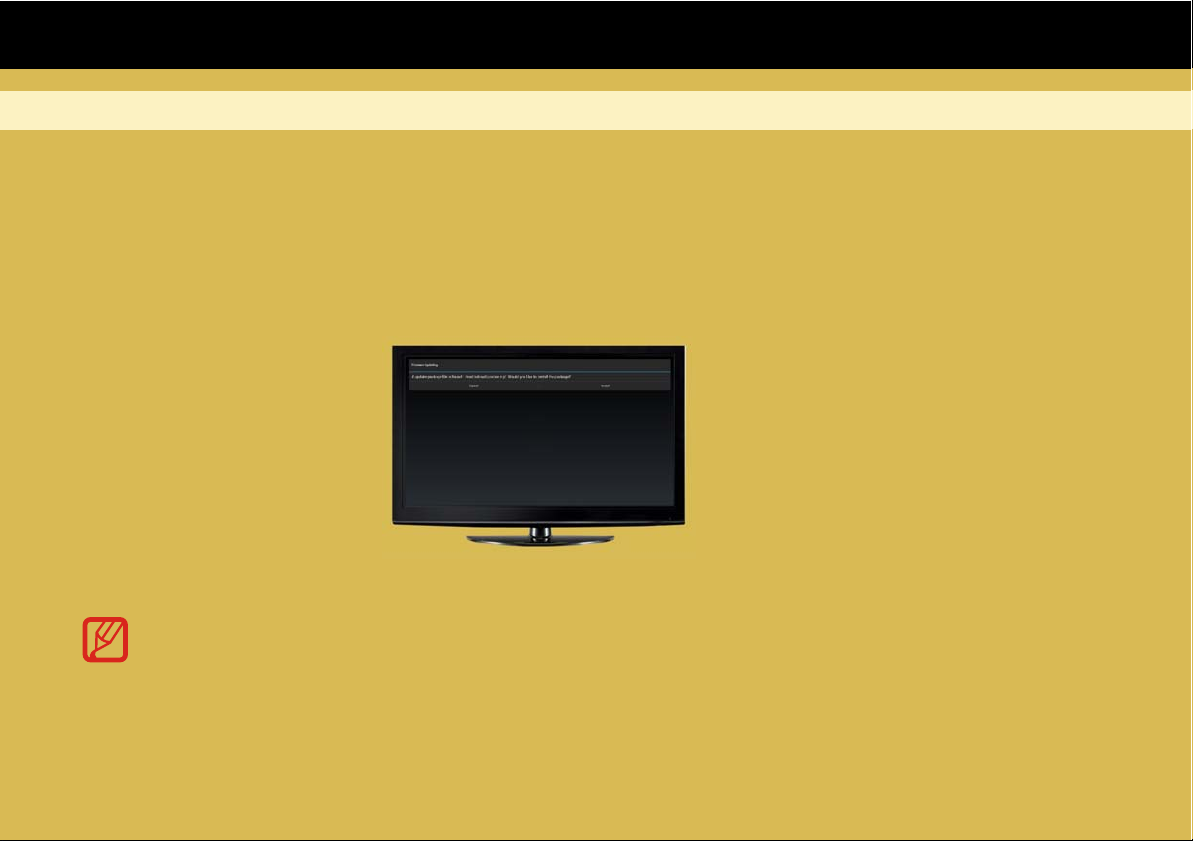
1. Copy the firmware in the SD card or Udisk, then insert the SD card or Udisk into your Cloud TV box.
2. Wait a few minutes, a prompt message will display, then select "install". then Cloud TV box will shut
down automatically for upgrade. after finish upgrade, the cloud TV box will turn on automatically.
Note: the Network upgrade is not available for the time being.
Page 18
Introduce
Page 17
Manage the Applications
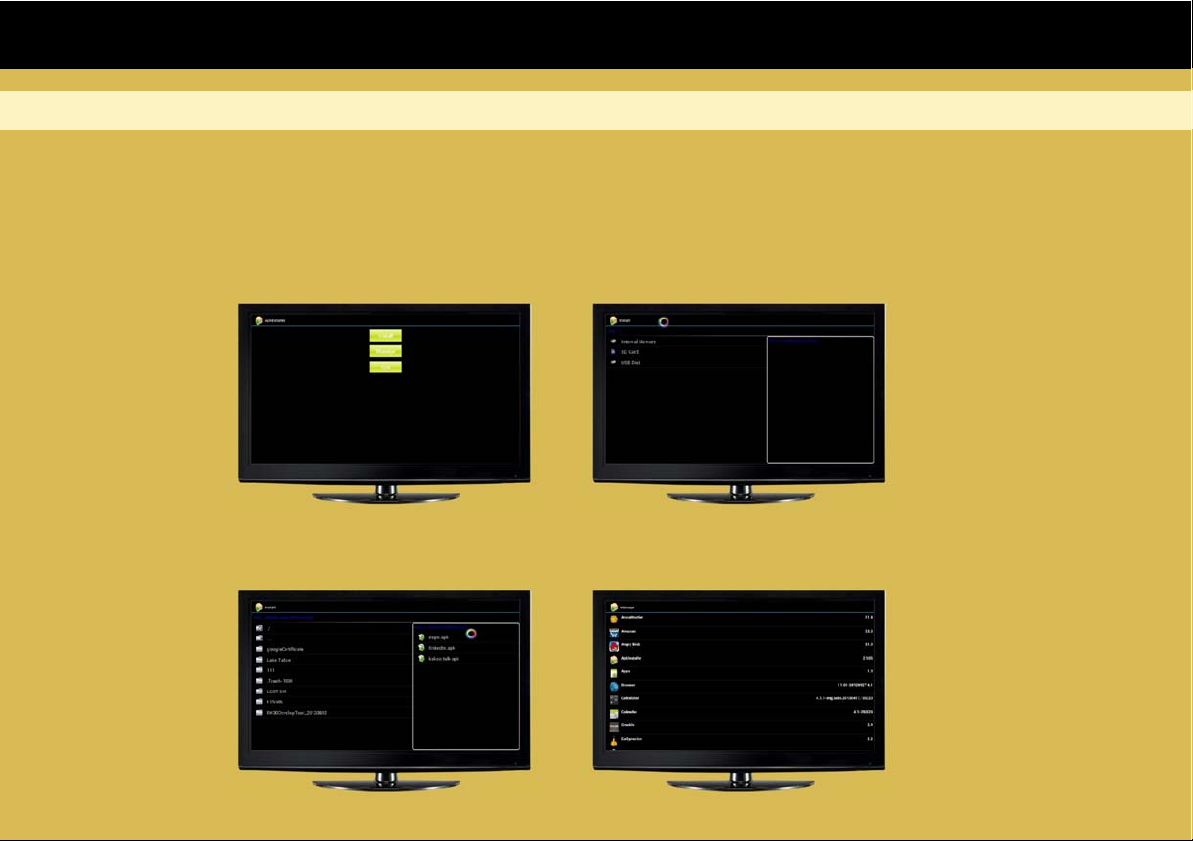
1. Install the App through APKinstaller
1) Copy the App you want to install in the SD card or Udisk, and insert the SD card or Udisk into your
Cloud TV Box.
2) Select the APKinstaller, then select "Install", then select SD card or USB disk.
3) The App list you can install will display.
Page 19
Introduce
Page 18
Manage the Applications
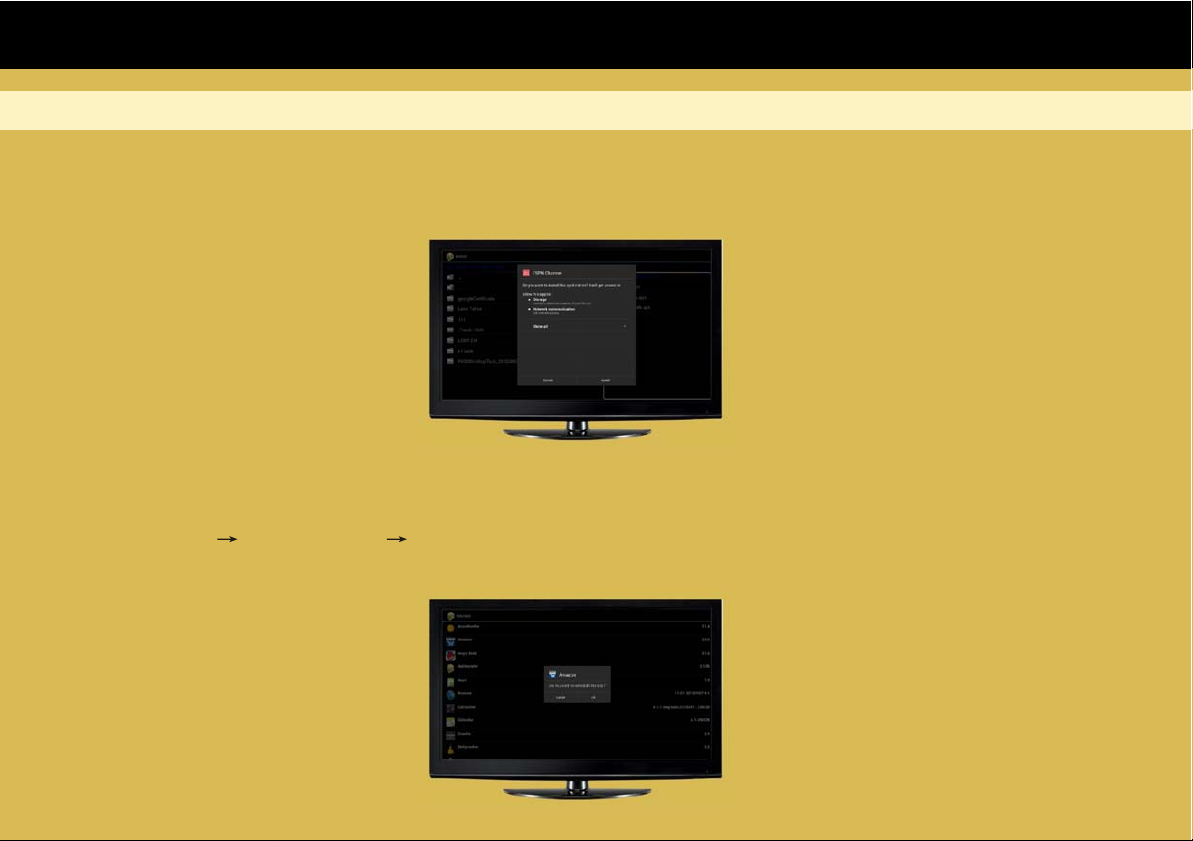
4) Select the app you want to install, the below prompt message will display, then select “install”,
the App will be installed.
2. Uninstall app
Go to “setting” “Applications” manage application, and select the app you want to uninstall,
then the below prompt message will display, and press “ok”, the app will be uninstalled.
Page 20
Introduce
Page 19
Manage the Applications
3. Download applications
From the Main menu select “All Apps” then select Android “Play store”
Log in your Google account. If you do not have an existing Google account, you will need to
complete this setup prior to downloading additional Apps
After a few minutes, it will enter into the interface of “Android Market Terms of Service”. Touch
“Accept” after reading if you accept the terms to enter Market. Then you can select to download
the Apps which you want to install in your Cloud TV Box.
Search for and Install your desired App.
Note: As the storage of the Cloud TV Box is limited, pls insert an SD card or USB to
the Cloud TV Box when you want to download and install more Apps.
4. Manage the applications
(1) Select Manage, you will enter into app list you can manage as below.
(1) Select the app you want to uninstall, and display as below, and select “OK”, the app will be
uninstalled.
Page 21
Introduce
Page 20
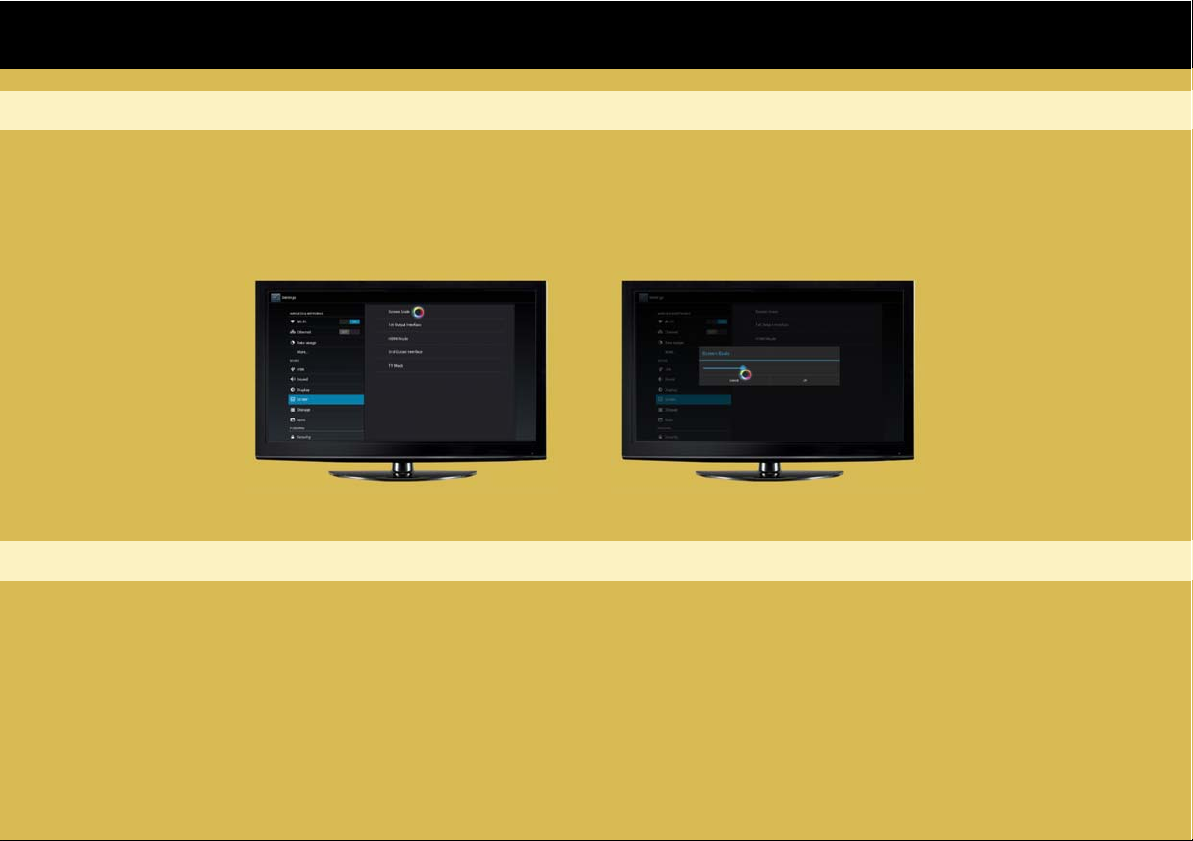
Screen adjustment
Steps to adjust screen as below:
In setting menu, select “Screen” button, then select “Screen Scale” to adjust the Screen scale.
AV Output
The default output of the TV Box is HDMI and AV OUT. If your TV does not have HDMI port, you
need to change the input signal of your TV set to AV mode.
Page 22
Introduce
Page 21
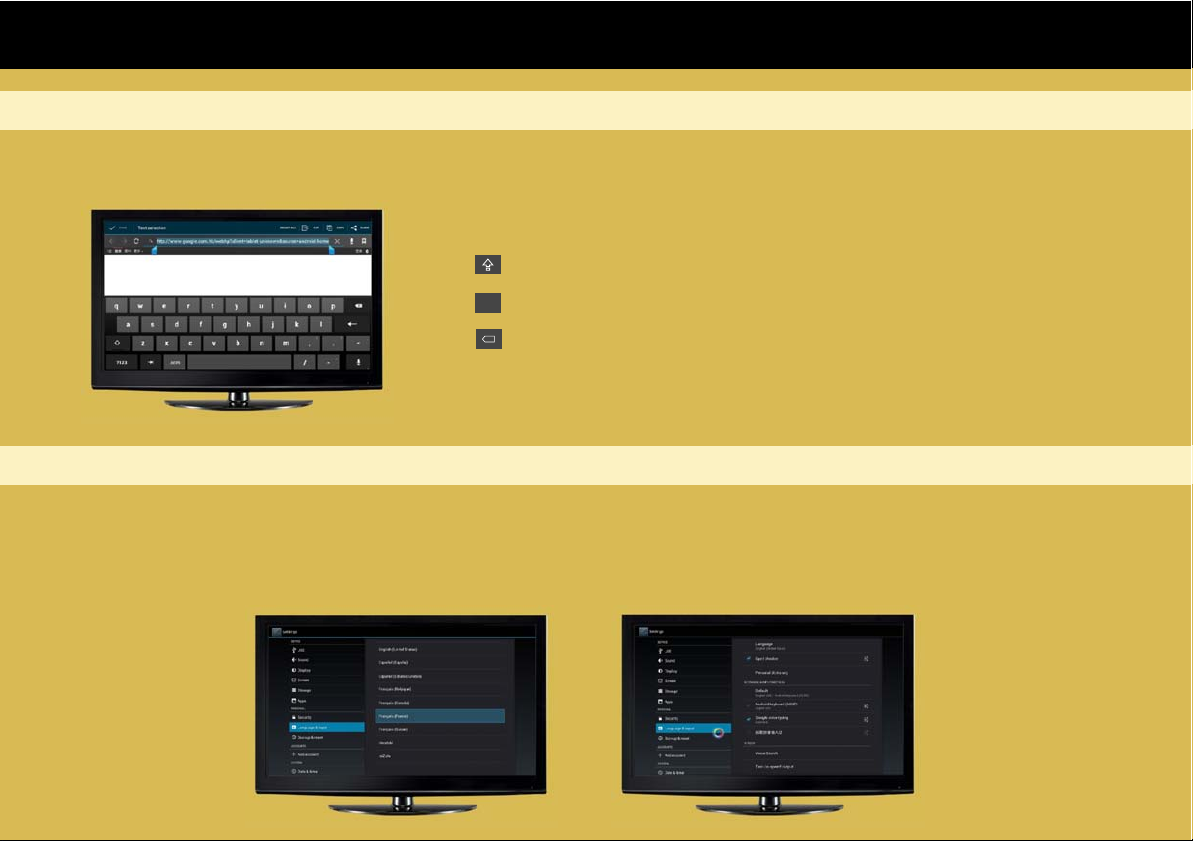
Keyboard User Guide
The keyboard will appear whenever the user taps on the blank area that requires data to be entered.
Tap ( ) to switch between lowercase letters and capital letters.
Tap ( ) to switch numbers and symbols.
Tap ( ) to delete date
?123
X
Language setting
On the Main menu touch “Internetworld” select “Settings” then scroll to select “language and
keyboard”, select “Select Language”, then scroll to select your required Language and touch.
Click the right mouse button or the return on the remote controller.
Page 23
Introduce
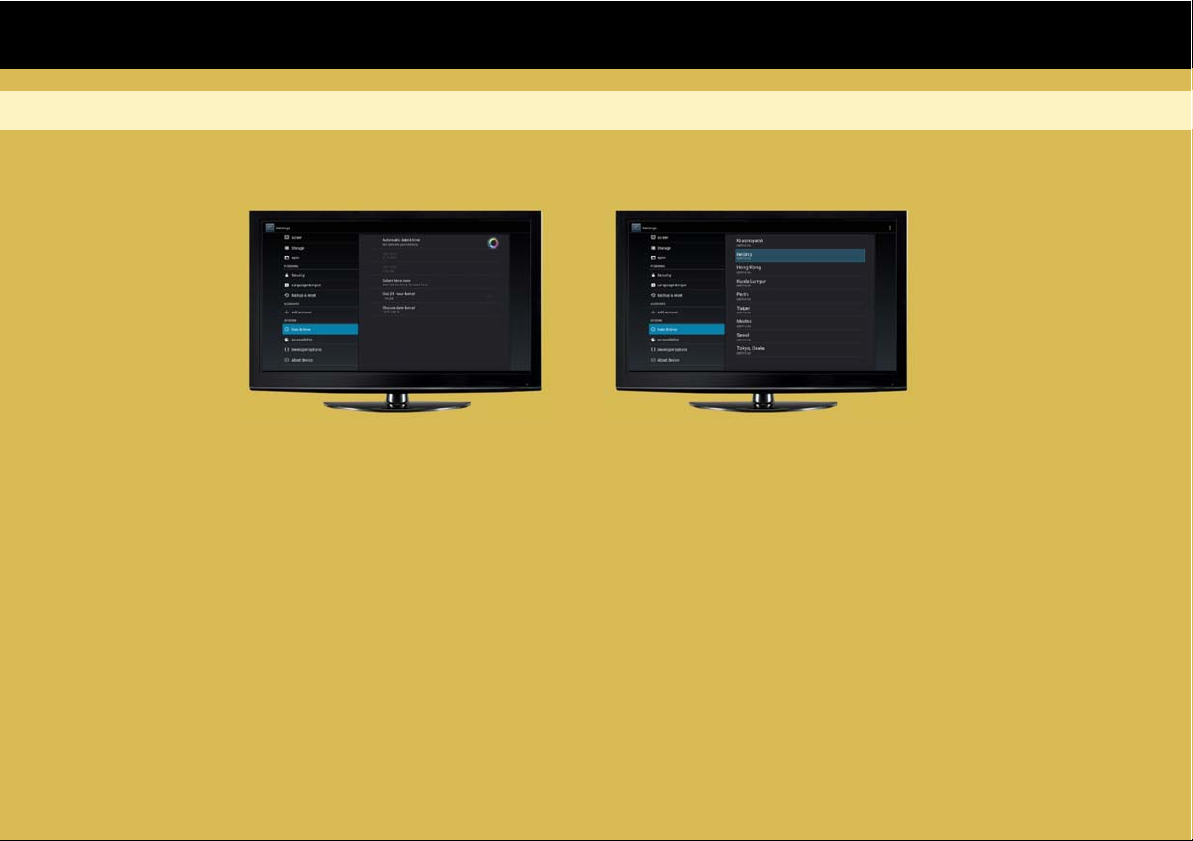
Date & Time settings
Use the Date & Time settings to set date, time zone, time, time format, date format.
Page 22
Page 24

Introduce
Features
Streaming TV and videos from the Internet
Preloaded TV stations and interesting videos
1080P gives you hi-resolution enjoyment
Full function Internet browser
Social Network on your TV (Facebook, Twitter, MSN, Skype, Email)
Education and Game apps are available
Specification
1.6 GHz (Dure cores)
Decoder: 1080P hardware video decoder
Output: HDMI, AV OUT
Internet: Ethernet
Wi-Fi: 802.11b/g/n
Built-in memory: 4GB
MicroSD card slot, up to 32GB
USB port, Ethernet jack
Power supply: AC 100~240V, DC 5V
Max Power Consumption: 3W
Product Dimension: 98x198x32mm
Page 23
 Loading...