

Page 1
PF1501
14
Page 2
Before Operation
2
3
3
Basic Operation
6
6
7
Connect to PC
7
8
Operating Instructions
Set-Up ....................................................................... 9
Selecting Which Media to View ................................. 9
Viewing Photos .......................................................... 9
Adjust Speed of Slideshow ........................................ 10
Adjust the Slide Transition Effect .............................. 10
Listen to Music ........................................................... 11
Music Play Mode ....................................................... 11
View Videos ............................................................... 12
Video Play Mode ........................................................ 12
Copy Files Between Memory Cards / Internal Memory 13
Delete Files From Memory Cards / Internal Memory 13
Change the Display Language .................................. 14
Set the Date and Time .............................................. 14
Set the Alarm ............................................................. 15
Setup Power On / Off Timer ...................................... 15
Display Mode Setup .................................................. 16
Color Setup ............................................................... 16
17
17
18
FCC and Safety information ......................................
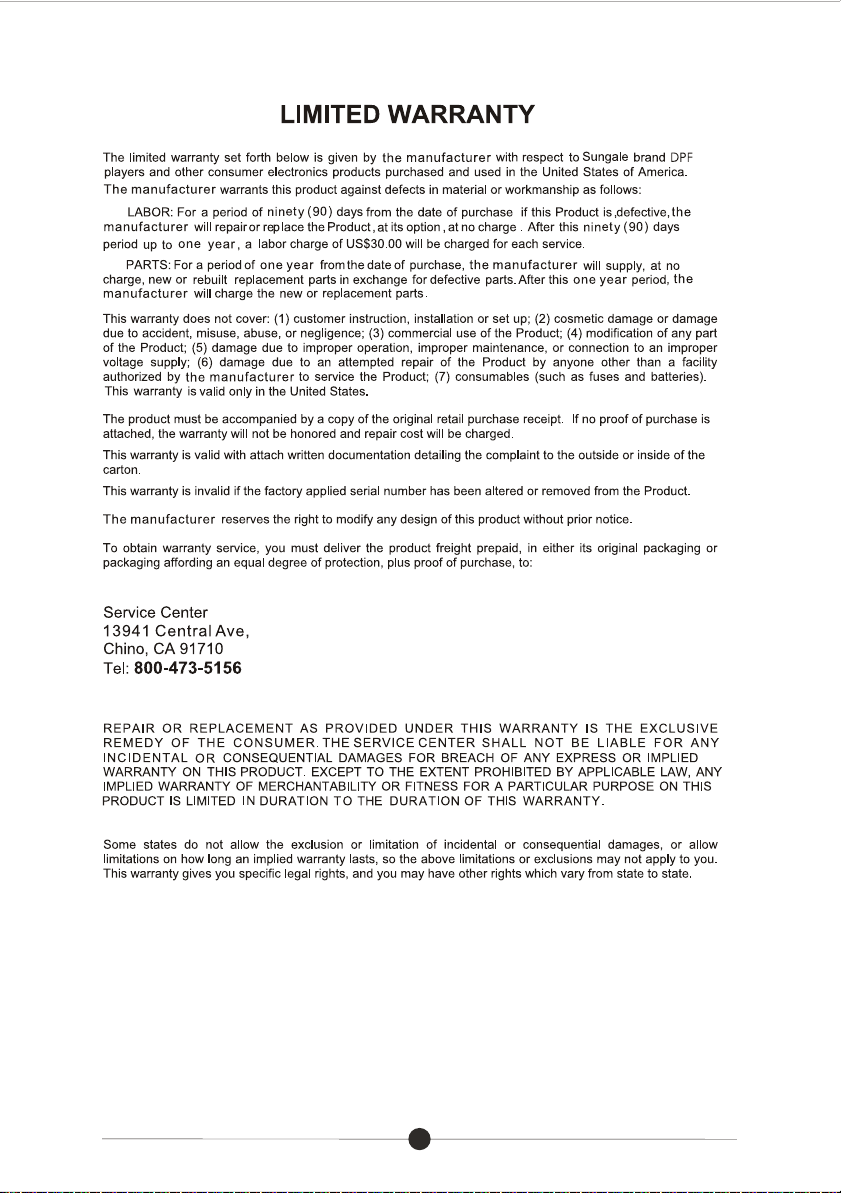
Limited Warranty .......................................................
19
20
Page 3
Page 4
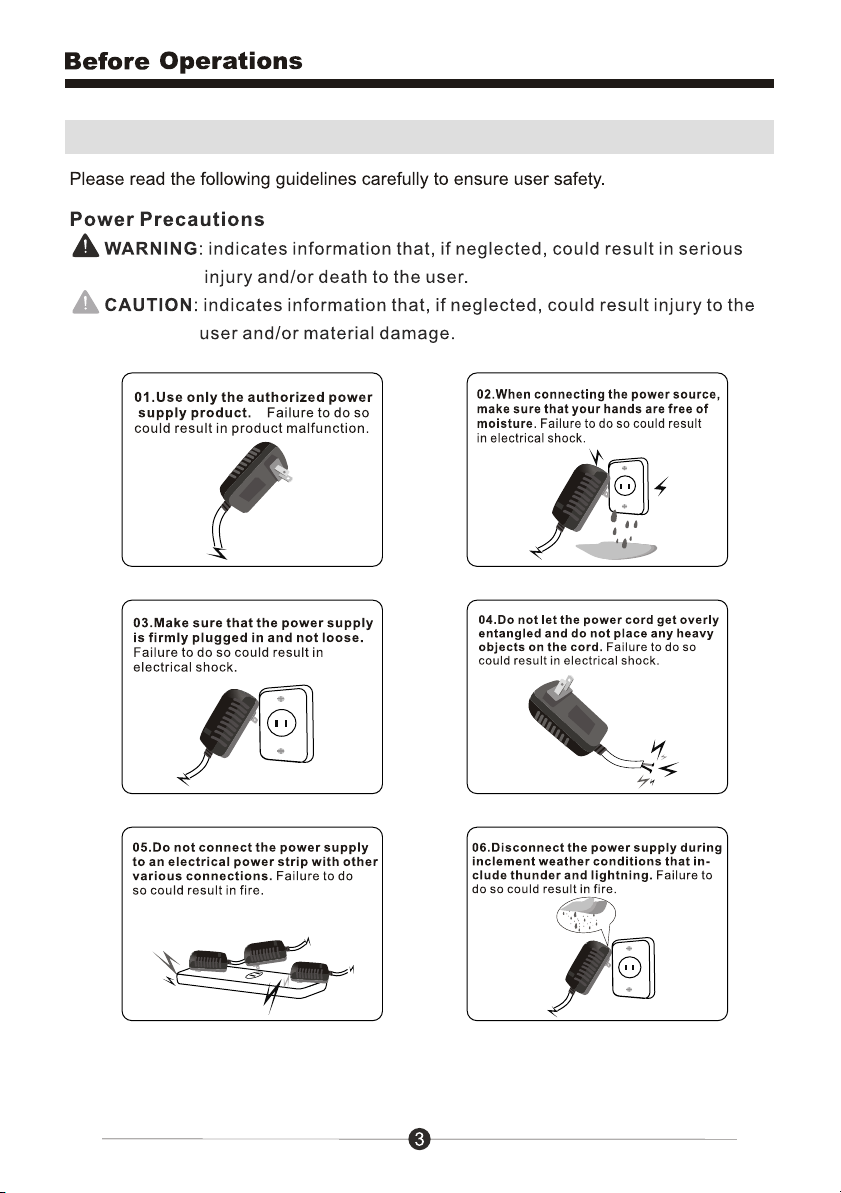
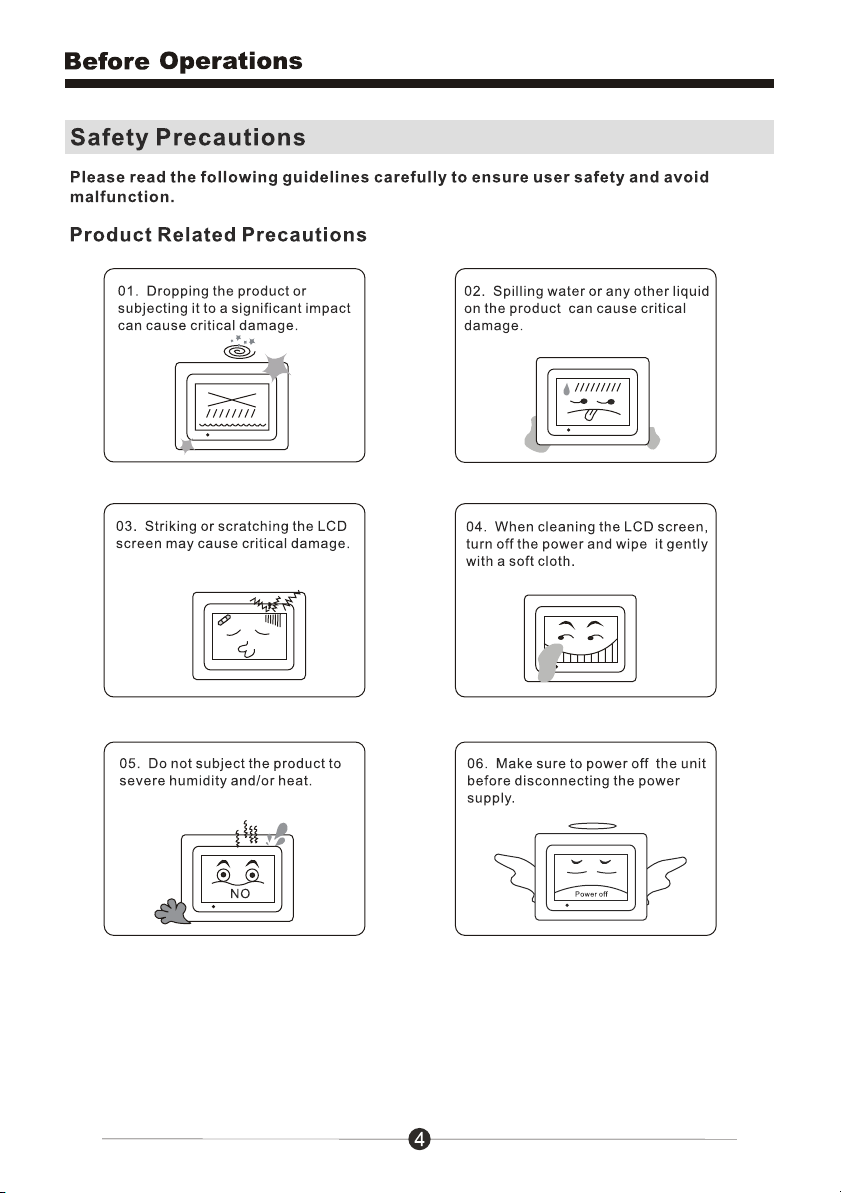
Safety Precautions
Page 5
Page 6
Page 7
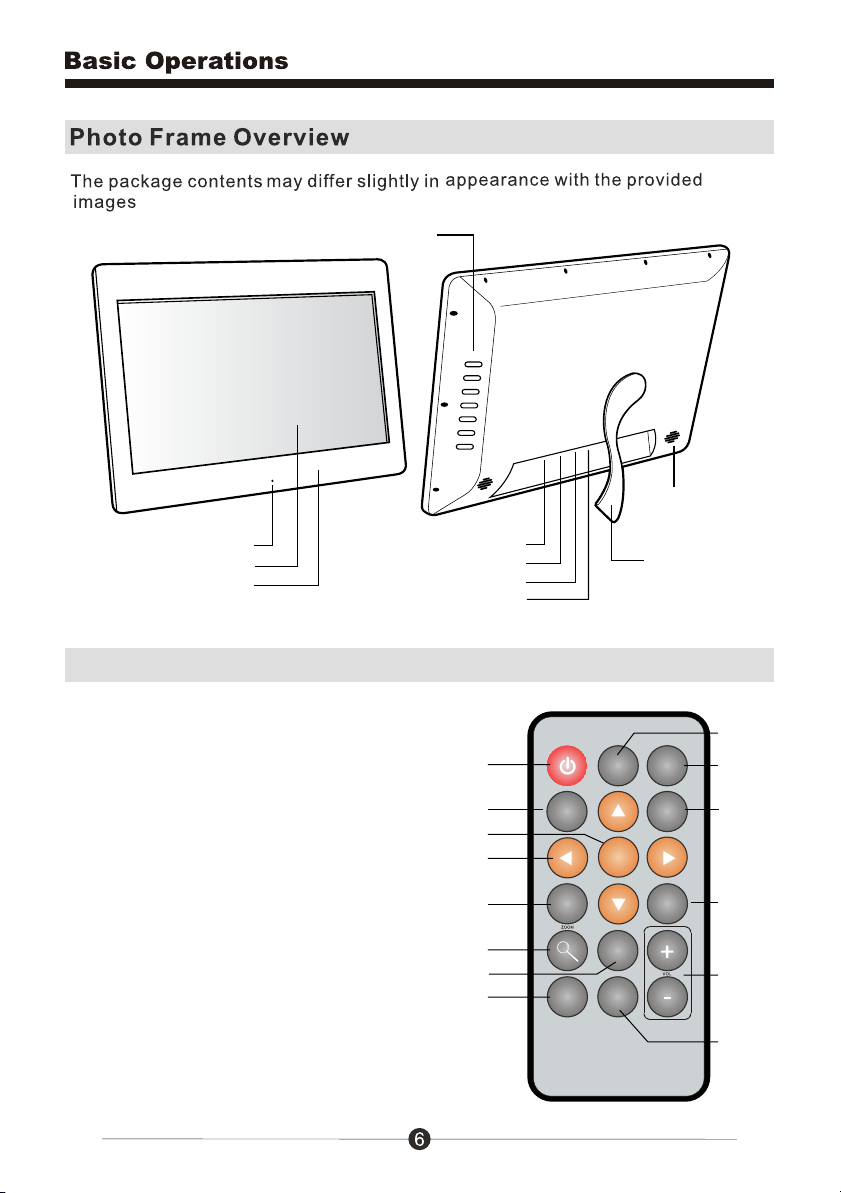
Menu Buttons
Speakers
LED
14” LCD Screen
Quality Glossy Black Frame
SD / SDHC Card Slot
Remote Control
1. Power On / Off
2. SlideShow
3. Enter
4. Up, Down, Left, Right Arrows -
Use arrow keys to navigate your way
throught various menus
5. Exit - Returns to the previous menu
6. Zoom
7. OSD - On Screen Display
8. View
9. Aspect Ratio - 16:9 / 4:3
10. Music
11. StepShow - Advance to next photo
12. Rotate
13. Volume + / Volume -
14. Menu - Takes you to the main menu
USB 2.0 Ports
Power Button
Power Adapter Port
1
2
3
4
5
7
8
SLIDE
SHOW
EXIT
VIEW
16:9/4:3
ENTER
OSD
MENU
Frame Stand
MUSIC
STEP
SHOW
ROTATE
9
10
11
12
13
14
Page 8
2
1
2. Plug in the power socket.
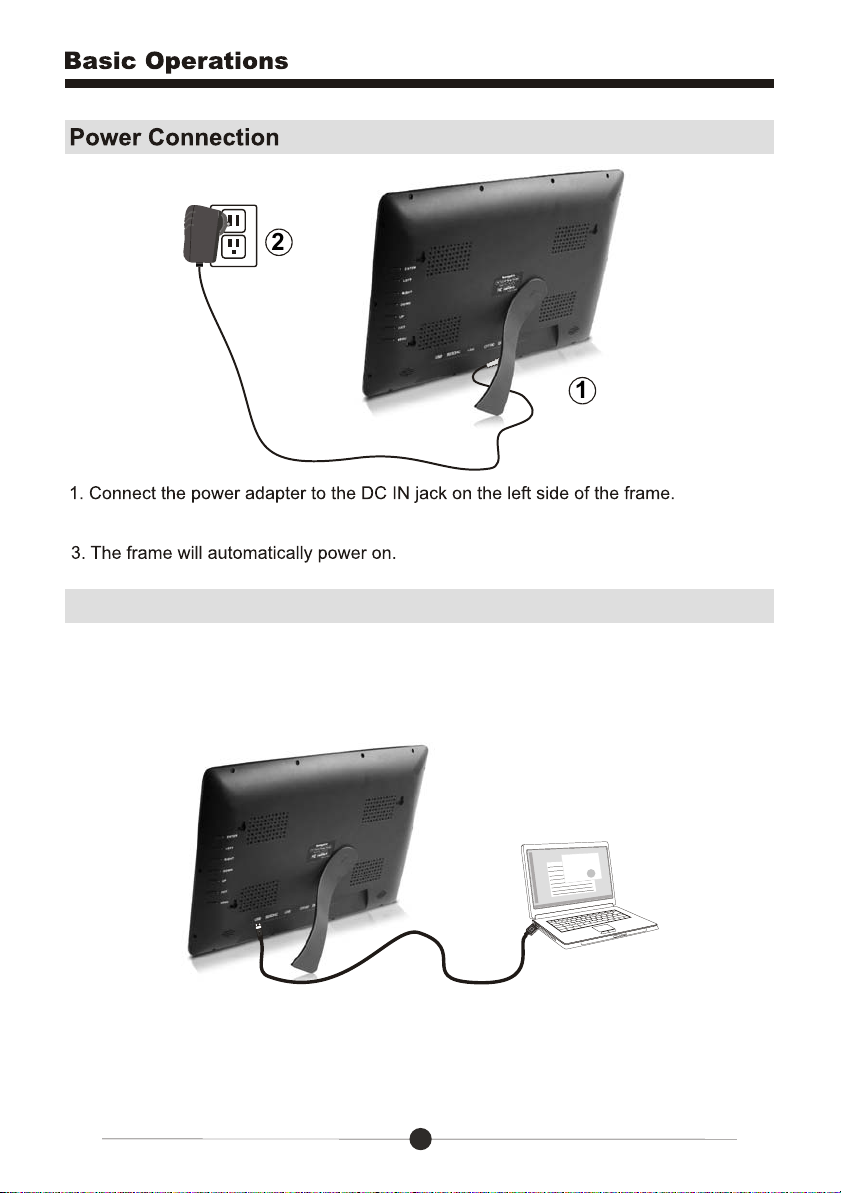
Connect to PC
Connect the device to computer with the USB cable. Copy and paste the files
to the storage of unit. After the file transferring, please safely remove hardware
from the PC. Then directly unplug the USB connection. Then find and enjoy the
files from the Memory menu.
Note: For the first time you connect this device to your computer, you might
be asked to install driver of your device so that it can be recognized by your
computer. Please follow the installation guide or contact your computer
service provider for help.
7
Page 9
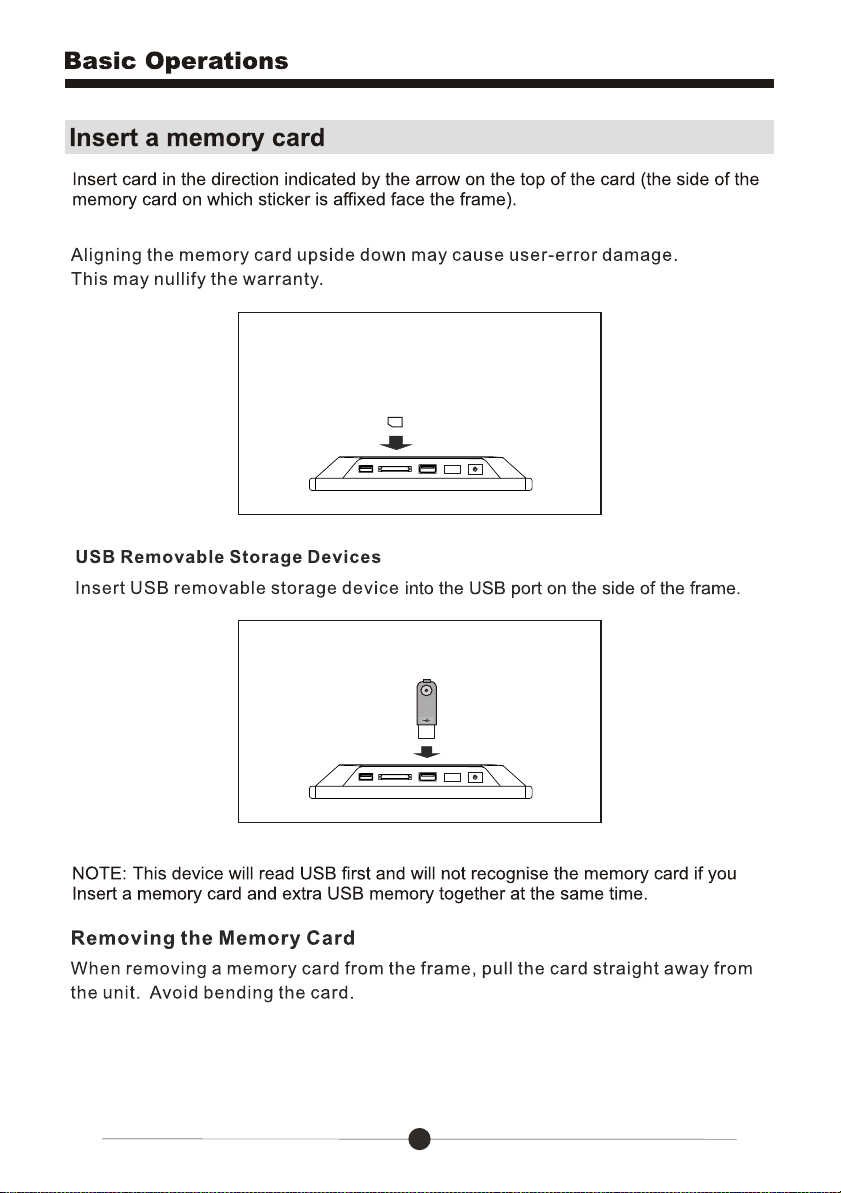
SD/SDHC card is compatible with this unit.
SD/SDHC
8
Page 10
Operating Instructions
Set-Up
STEP 1: Plug the power adapter in then turn the power switch on.
STEP 2: Please insert your memory card (SD / SDHC) at this time. You may
also insert a USB thumb / flash drive into the on-board USB 2.0 port which will
be detected automatically. Slideshow will start automatically when the card is
inserted. (The slideshow will start from the internal memory if no memory card
is detected)
Note: You must disconnect the USB cable from your computer after transferring. You
will not be able to scroll with the remote while the USB connection is established.
Selecting Which Media to View
Press the “Menu” button until you can view the media you have inserted into
your picture frame or the included memory in the main menu.
To create a custom slideshow with pictures in a particular order, please copy
one picture at a time to the memory card as the order is determined by the
time stamp of the file when it is copied.
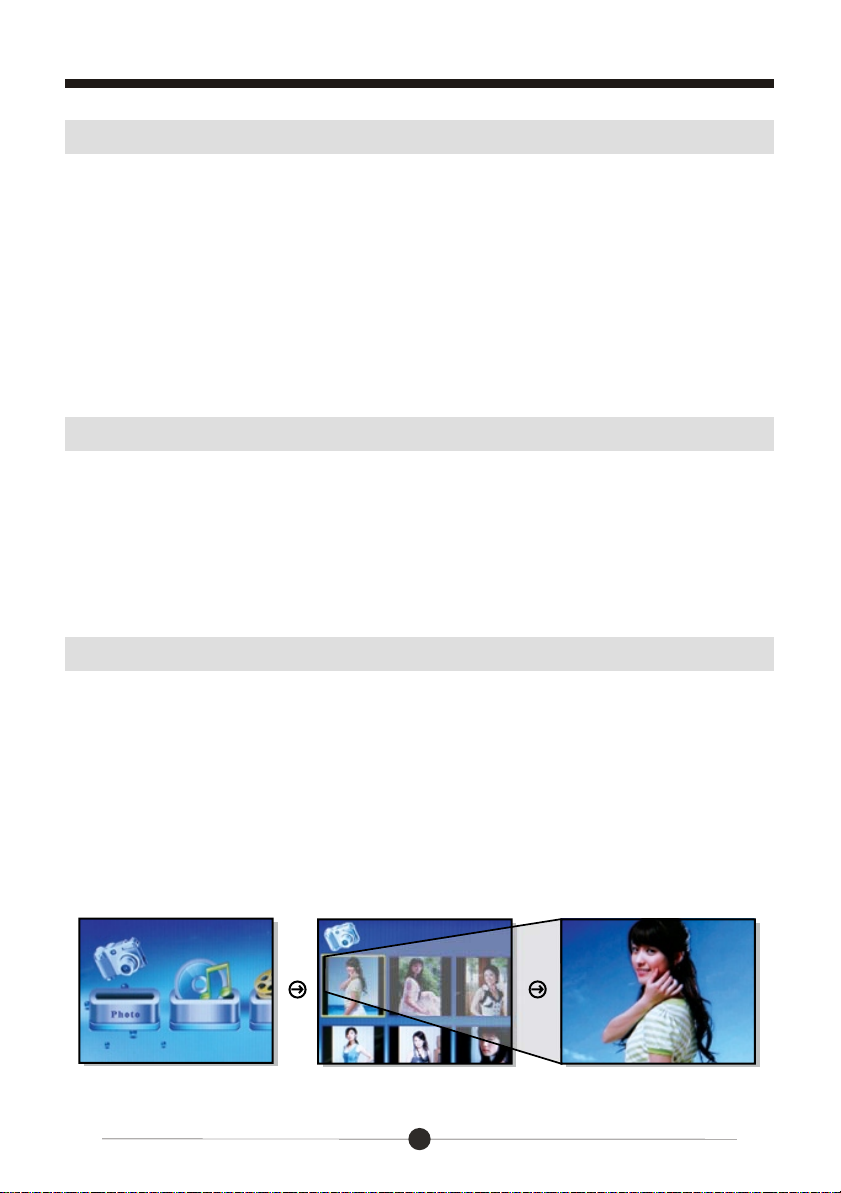
Viewing Photos
1. Select the “Photo” icon on the screen.
2. Select the photo you desire by using the up and down keys on your remote
control.
3. Once you have selected your photo press “Enter”.
4. You may zoom in on your photos by pressing the “Zoom” button on the
remote. You may also reposition the photo using the up, down, left and right
buttons on the remote once you zoom in for detailed viewing. You may also
rotate the picture by pressing the “Rotate” button on the remote.
5. You can also press the “OSD” button for more viewing options.
9
Page 11
Operating Instructions
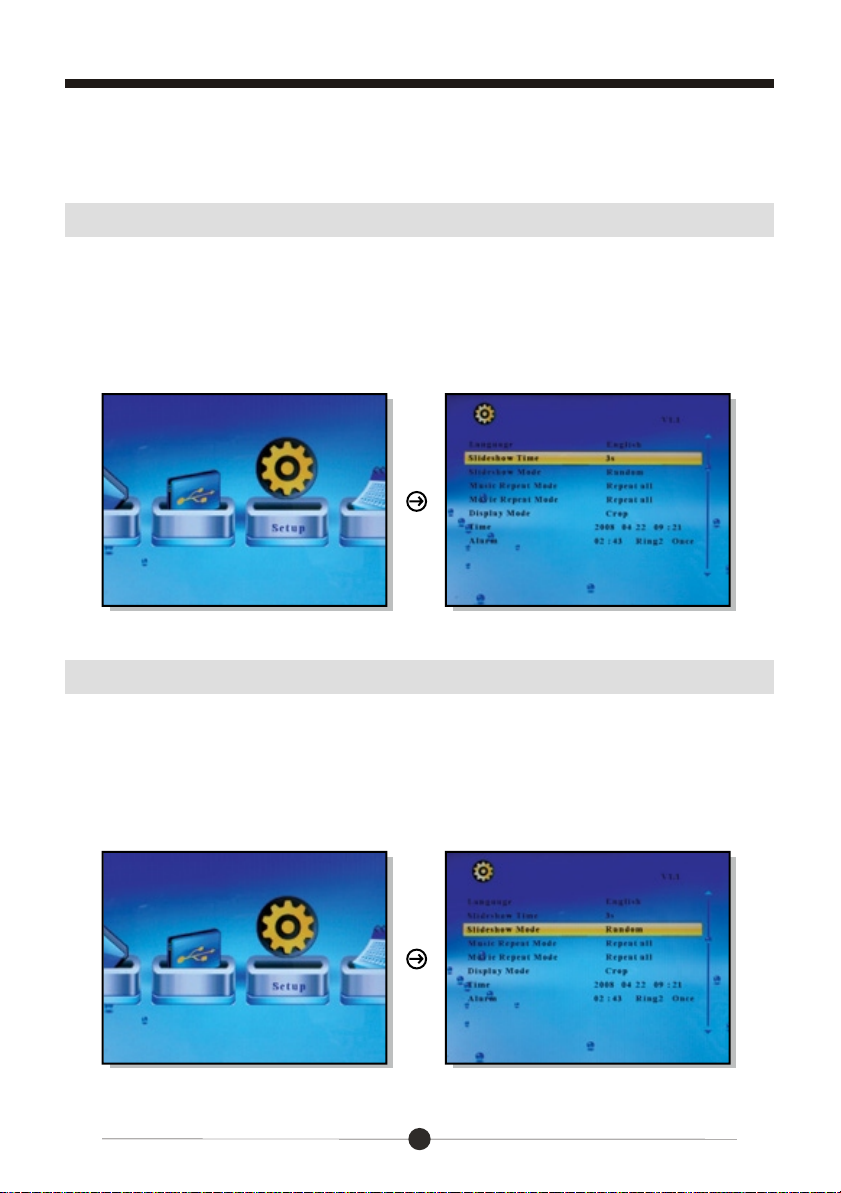
You may adjust your photo viewing options settings including: Speed interval
for slideshow, and multiple slide transition options by entering the “Setup”
menu from the main menu.
Adjust Speed of Slideshow
1. Select “Setup” and press “Enter” from the main menu.
2. Use the up or down key to select “Slideshow Time”.
3. Use the left or right key to select the time interval from 3sec to 1hour then
press “Enter”.
4. Press “Menu” to return to the main menu.
Adjust the Slide Transition Effect
1. Select “Setup” and press “Enter” from the main menu.
2. Use the up or down key to select “Slideshow Mode”.
3. Use the left or right key to select your desired slide transition effect then
press “Enter”.
4. Press “Menu” to return to the main menu.
10
Page 12
Operating Instructions
Listen to Music
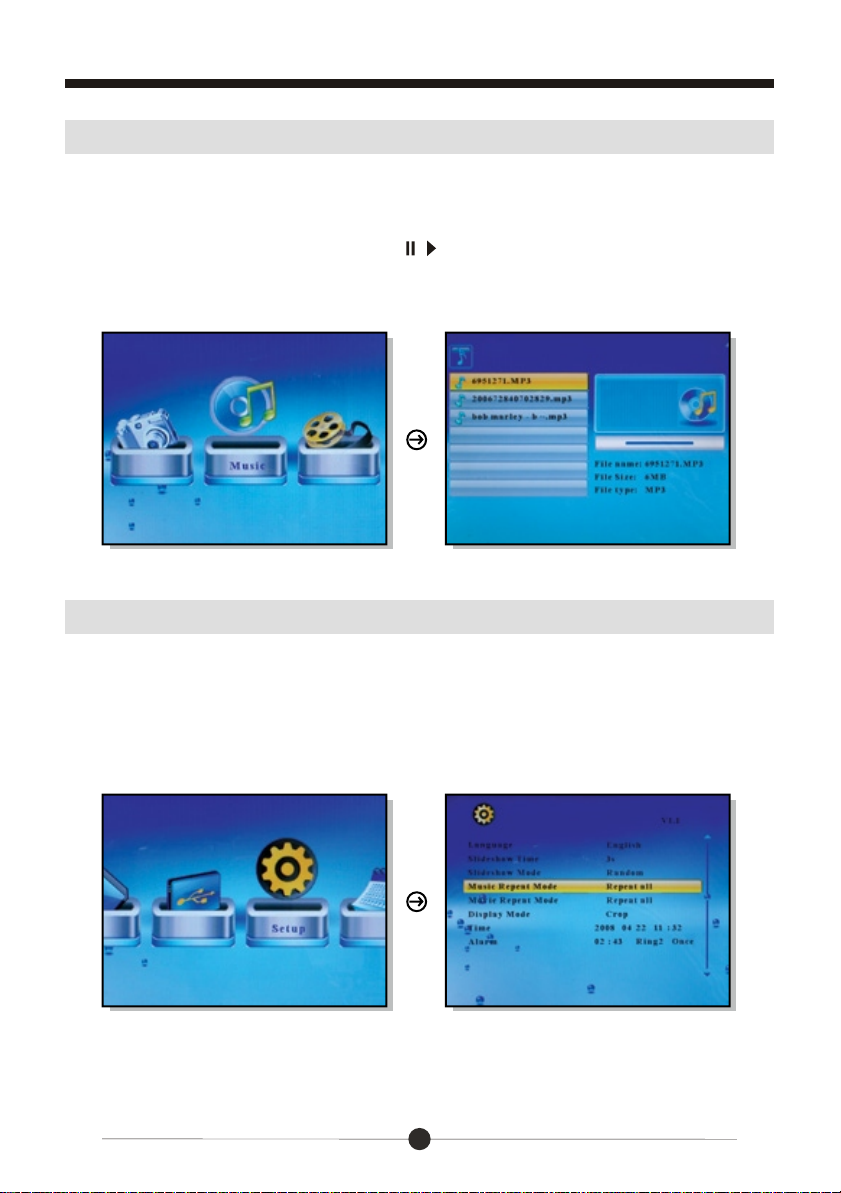
1. Select the “Music” icon on the screen.
2. A list of MP3 files stored on your media will appear on the screen. Use the
up and down keys on the remote control to select the desired song then
press “Enter”. You can press the “ / ” to pause / play.
3. The next song will play automatically on the song list. You may also select
another song using the up and down keys on your remote control.
Music Play Mode
1. Select “Setup” and press “Enter” from the main menu.
2. Use the up or down key to select “Music Repeat Mode”.
3. Use the left or right key to select “Repeat One”, “Repeat All” or
“Repeat Off” then press “Enter”.
4. Press “Menu” to return to the main menu.
11
Page 13
Operating Instructions
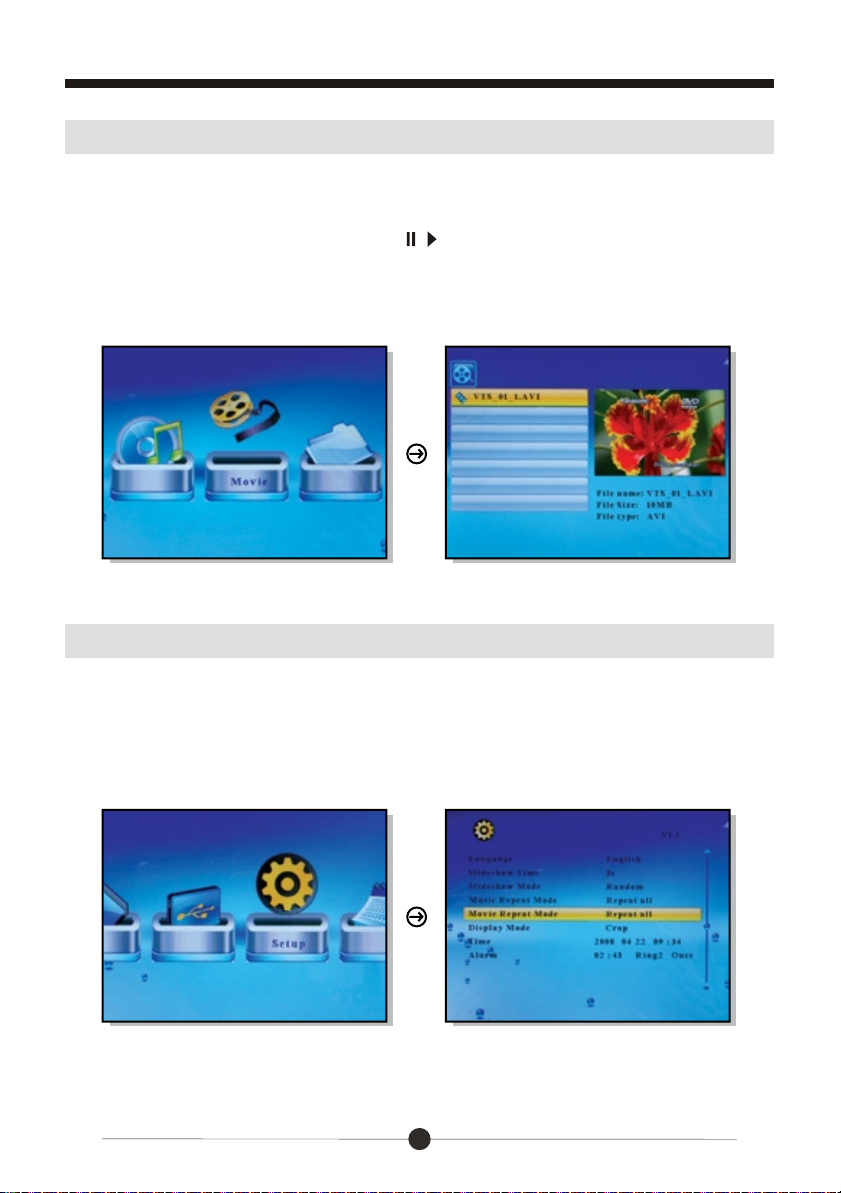
View Videos
1. Select the “Movie” icon on the screen.
2. A list of video files stored on your media will appear on the screen. Use the
up and down keys on the remote control to select the desired video then
press “Enter”. You can press the “ / ” to pause / play.
3. You may zoom in on the video by pressing the “Zoom” button on the remote.
4. The next video will play automatically on the list. You may also select another
video using the up and down keys on your remote control.
Video Play Mode
1. Select “Setup” and press “Enter” from the main menu.
2. Use the up or down key to select “Movie Repeat Mode”.
3. Use the left or right key to select “Repeat One”, “Repeat All” or
“Repeat Off” then press “Enter”.
4. Press “Menu” to return to the main menu.
12
Page 14
Operating Instructions
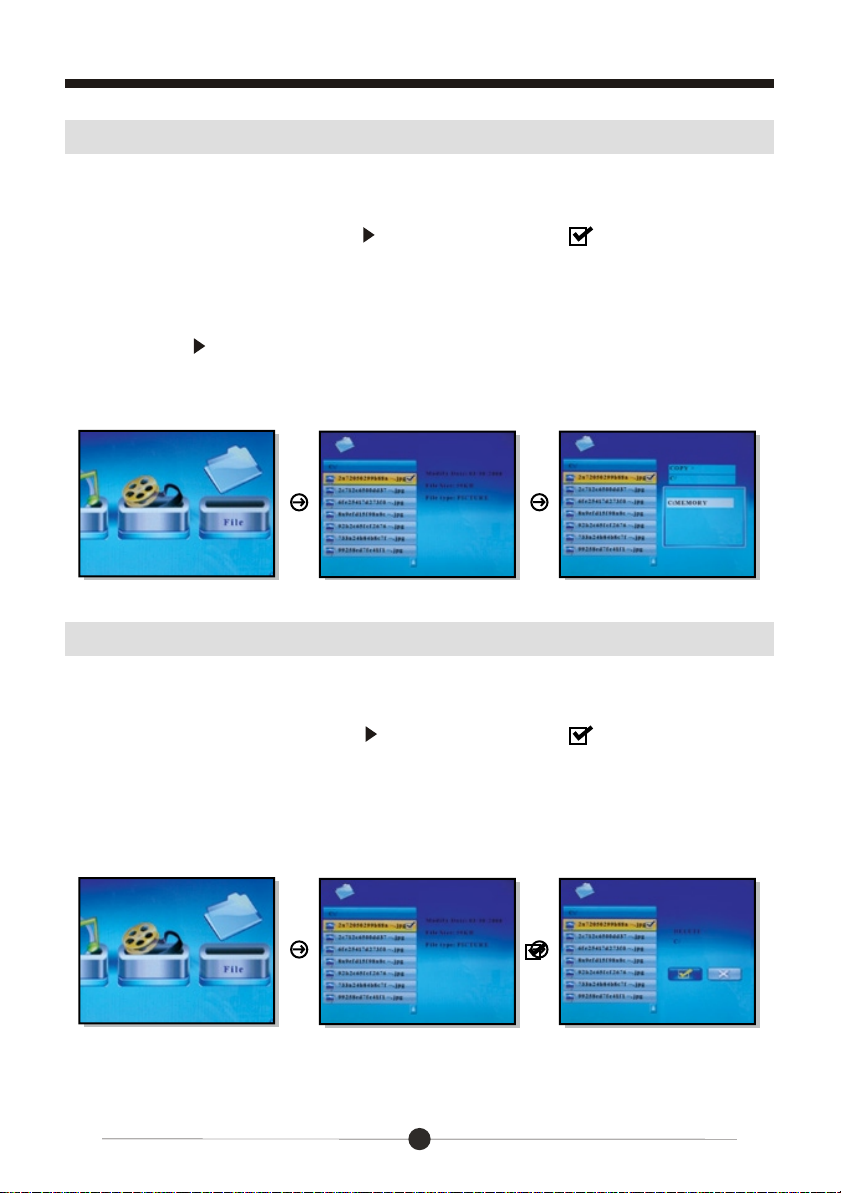
Copy Files Between Memory Cards / Internal Memory
1. Select the “File” icon on the screen.
2. Select the photo you want to copy using the up and down keys on your
remote control and press the “ ” key. You will see a next to the file
name.
3. Press the “OSD” button.
4. Select “Copy” and press “Enter” on the remote.
5. Select the memory card or internal memory that you want to copy to and
press the “ ” key.
6. Press the “Enter” key to start copy
7. Press the “Enter” key when you see “Finish” to exit.
“ ”
Delete Files From Memory Cards / Internal Memory
1. Select the “File” icon on the screen.
2. Select the photo you want to delete using the up and down keys on your
remote control and press the key. You will see a next to the file
name.
3. Press the “OSD” button.
4. Select “Delete” and press “Enter” on the remote.
5. Select the “check mark” and press the “Enter” key to delete the file.
6. Press the “Enter” key when you see “Finished” to exit.
“ ” “ ”
13
Page 15
Operating Instructions
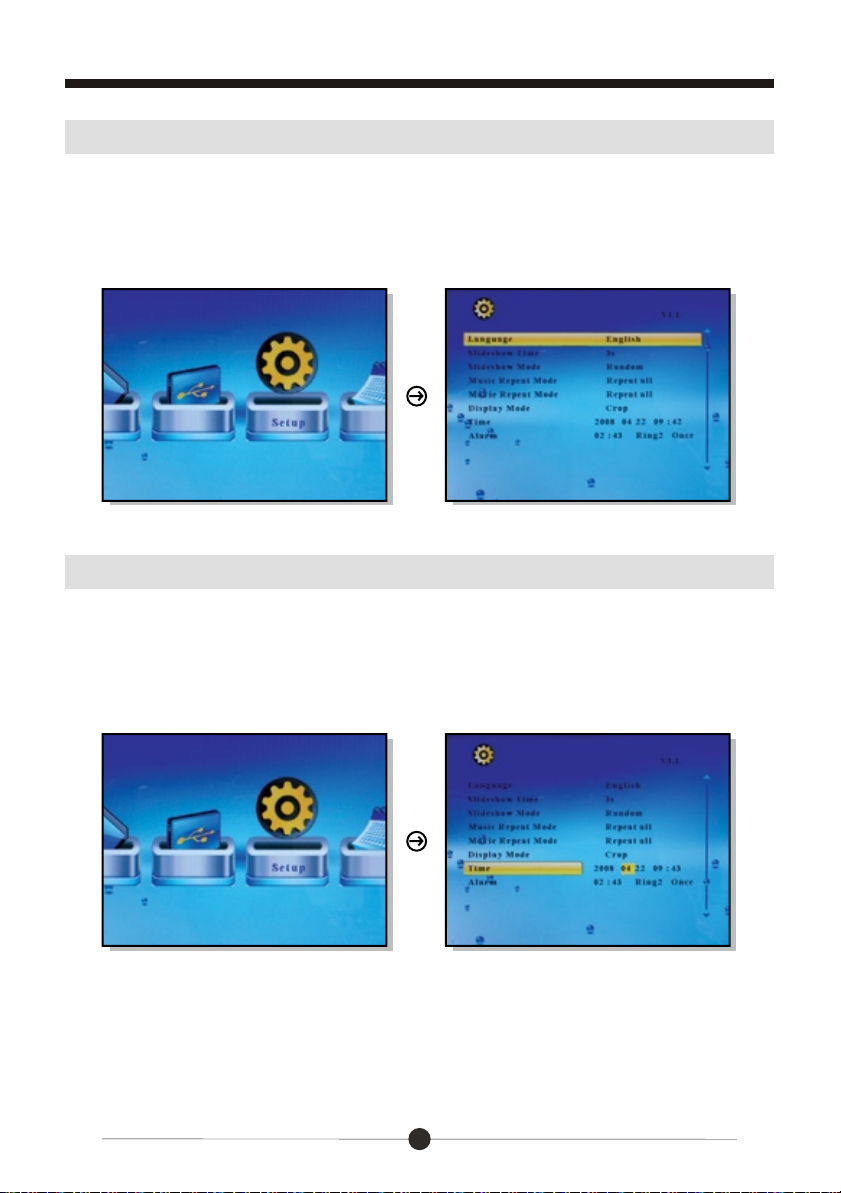
Change the Display Language
1. Select “Setup” and press “Enter” from the main menu.
2. Use the up or down key to select “Language”.
3. Use the left or right key to select the desired language then press “Enter”.
4. Press “Menu” to return to the main menu.
Set the Date and Time
1. Select “Setup” and press “Enter” from the main menu.
2. Use the up or down key to select “Time”.
3. Use the left or right key to select what you want to change and use the up
or down key to change to the correct value then press “Enter”.
4. Press “Menu” to return to the main menu.
14
Page 16
Operating Instructions
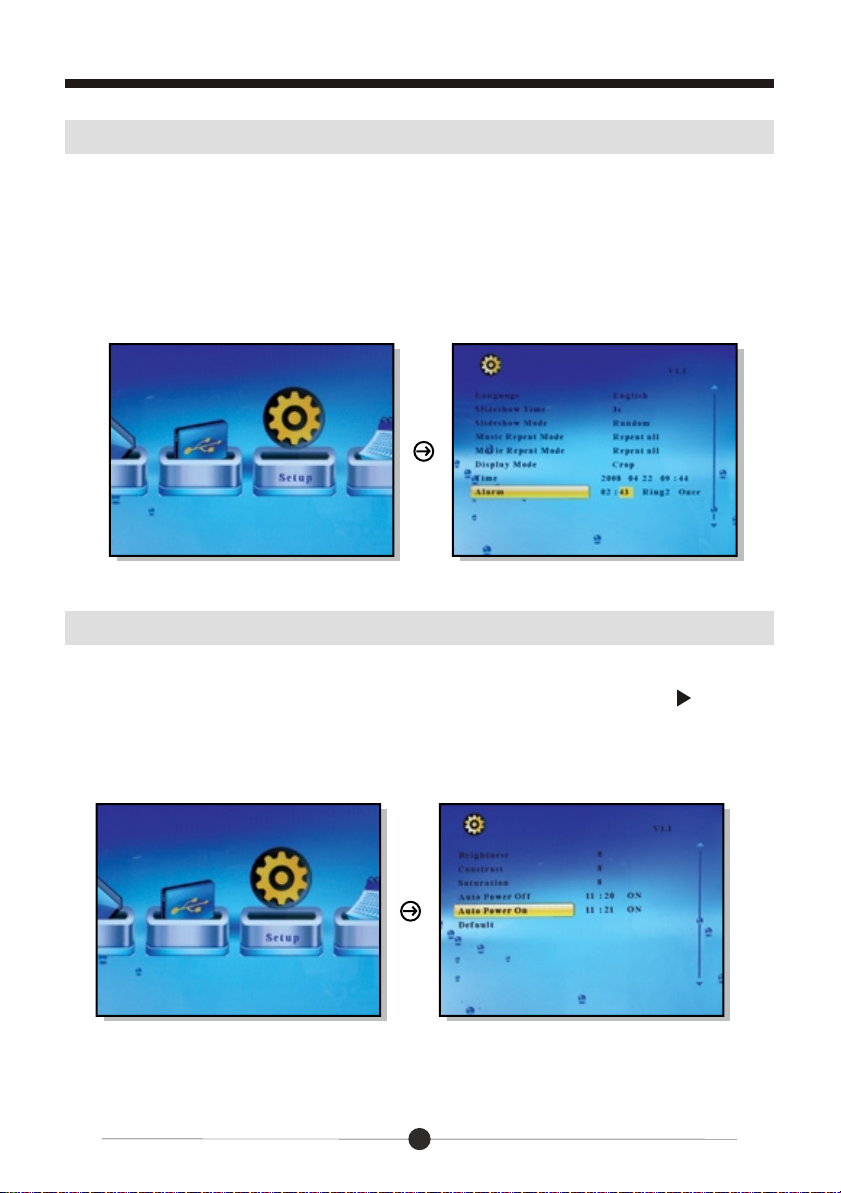
Set the Alarm
1. Select “Setup” and press “Enter” from the main menu.
2. Use the up or down key to select “Alarm”.
3. Use the left or right key to select what you want to change and use the up
or down key to change to the correct value then press “Enter”. The 1st
number is the hour follow by the minute. The next item is ring tone selection,
Ring1/Ring2. The last item is the alarm status “off”, “once”, “every”.
4. Press “Menu” to return to the main menu.
Setup Power On / Off Timer
1. Select “Setup” from the main menu and press “Enter” on the remote control.
2. Scroll to “Auto Power On” or “Auto Power Off” and press the “ ” button
on the remote control.
3. Use the up or down key to set the time in 24H format.
4. Use the up or down key to select “On” and press “Enter”.
15
Page 17
Operating Instructions
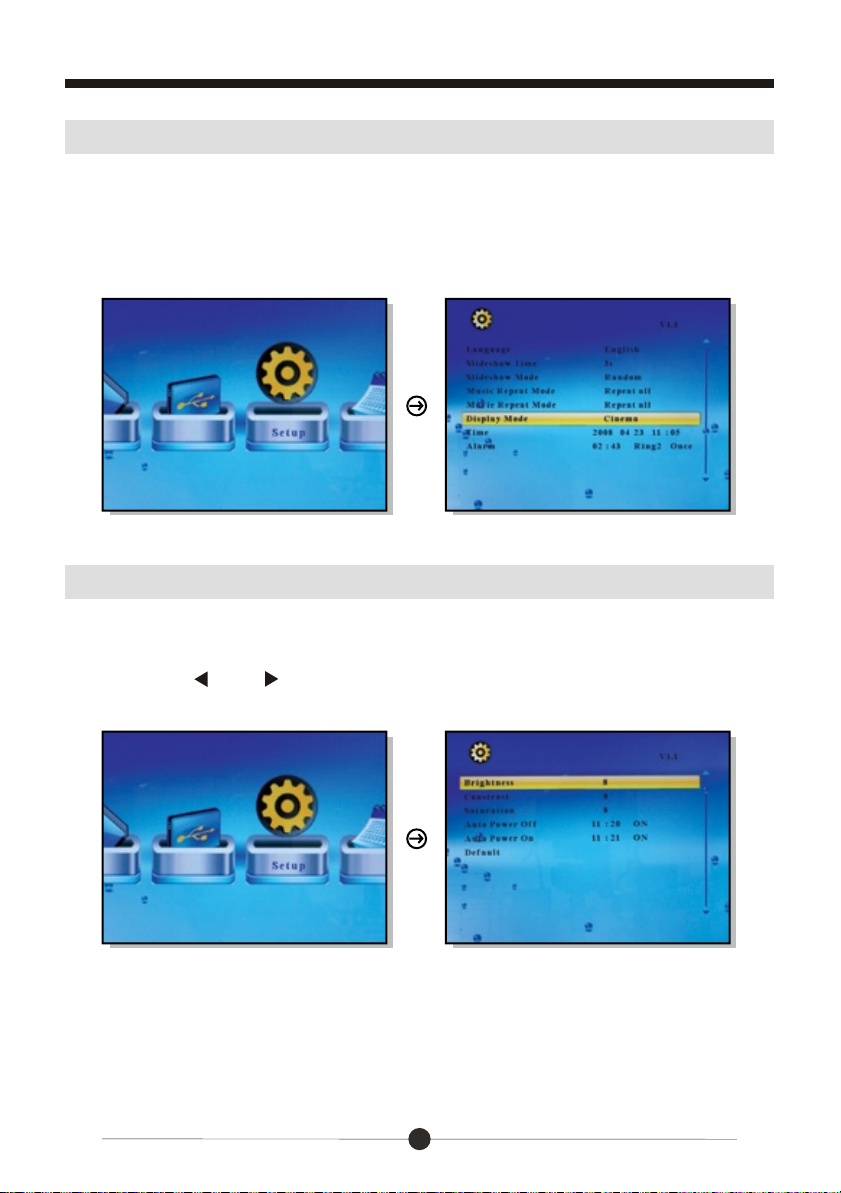
Display Mode Setup
1. Select “Setup” and press “Enter” from the main menu.
2. Use the up or down key to select “Display Mode”.
3. Use the left or right key to select “Cinema”, “Crop”, and “Stretch” then
press “Enter”.
4. Press “Menu” to return to the main menu.
Color Setup
1. Select “Setup” from the main menu and press “Enter” on the remote control.
2. Scroll to the desired option “Brightness”, “Contrast”, or “Saturation” and
press the “ ” or “ ” button on the remote control to select the desired level.
16
Page 18
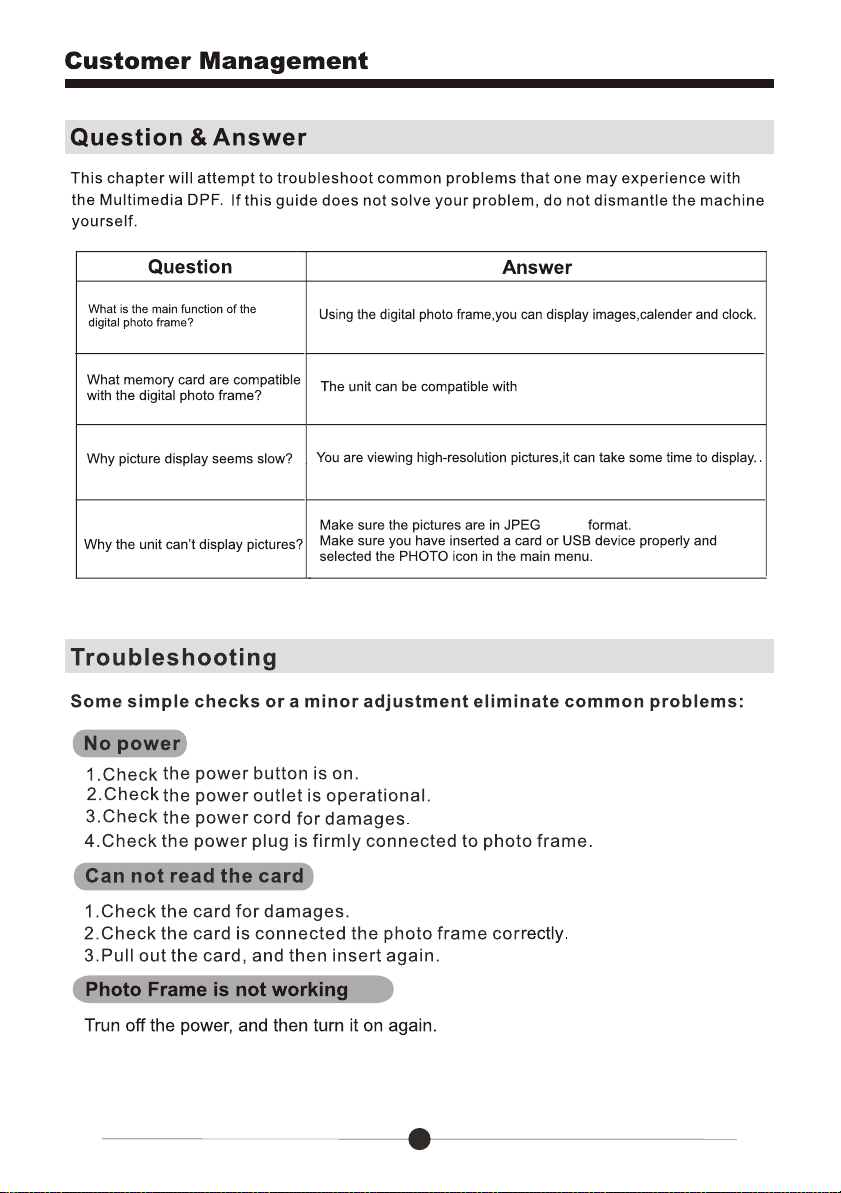
SD/SDHC card
, BMP
17
Page 19
TFT LCD type: Digital
Screen dimension: 14 inches (16:9)
Resolution: 1366x768 pixels
Photo file formats: JPEG, BMP
Audio player: WMA
Video player: AVI
Memory cards supports: SD/SDHC
USB connection: USB host
18
Page 20
19
Page 21
20
Page 22

 Loading...