

Page 1
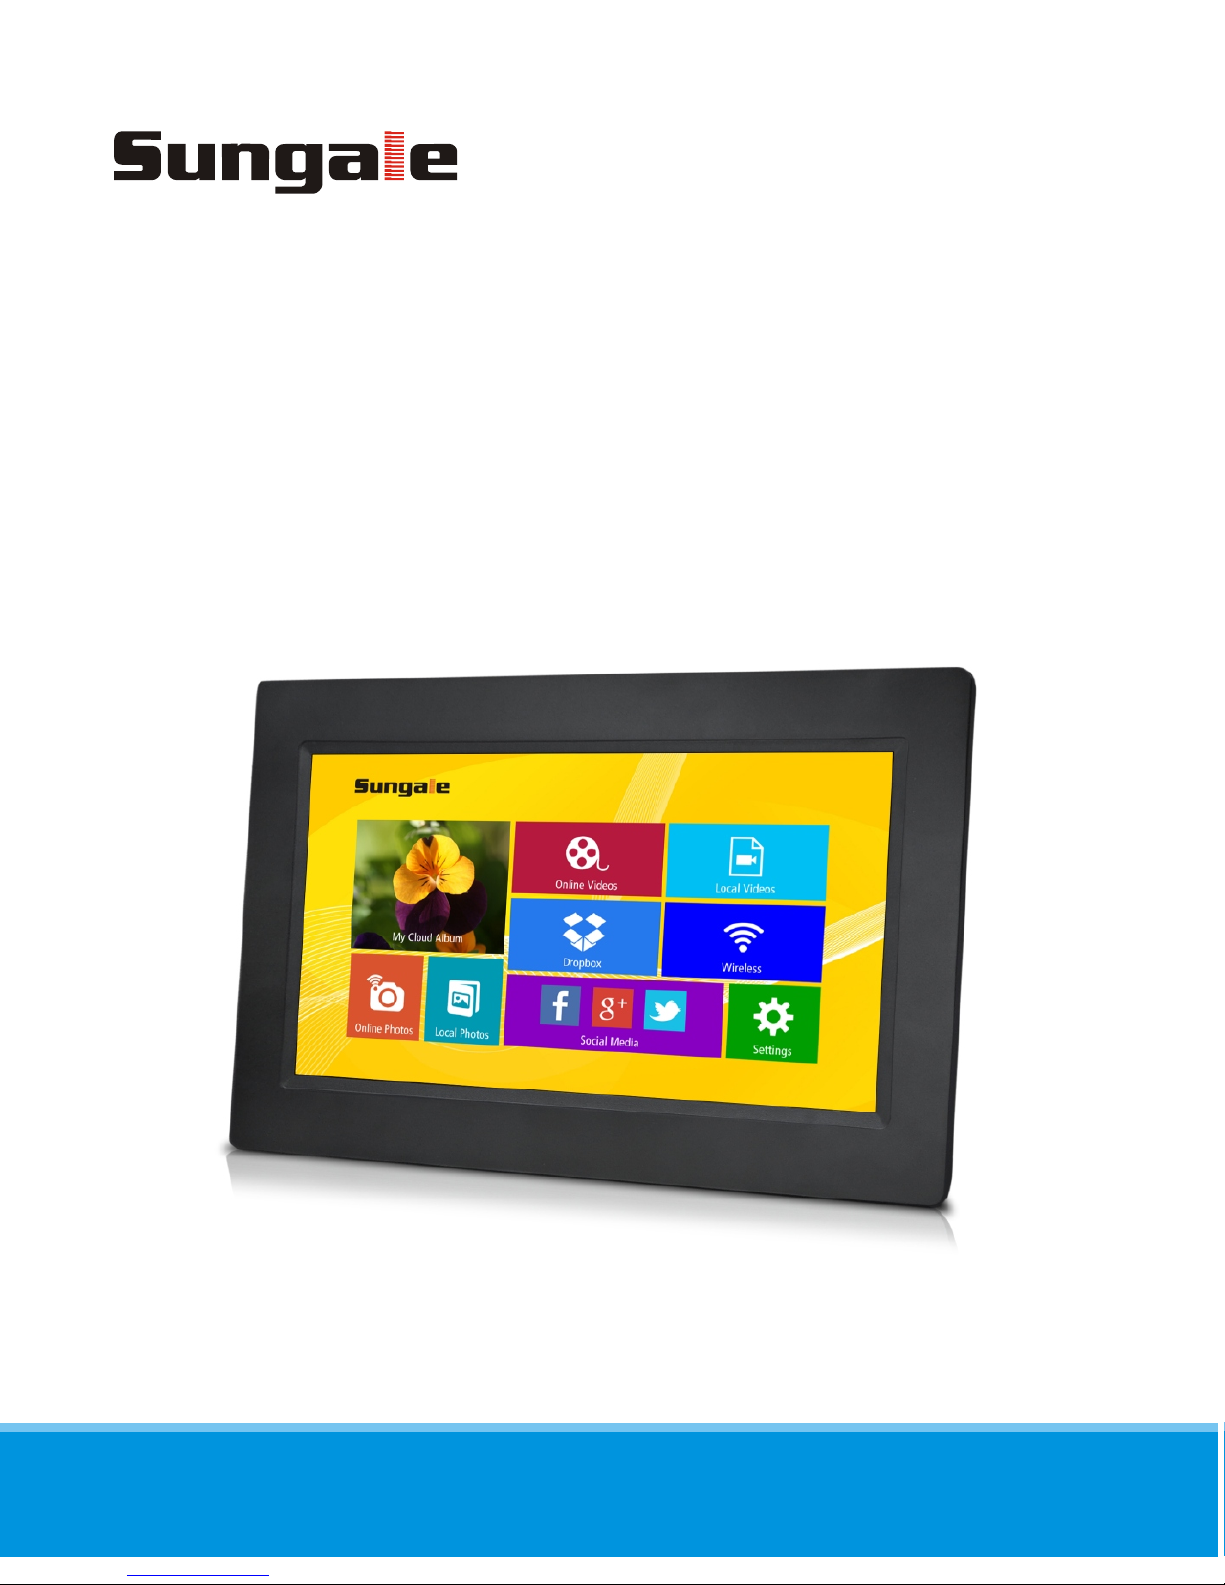
Cloud Frame
Quick Start Guide
MODEL: CPF1032
Page 2
Package Contents
Cloud Frame
Quick Start Guide
Power Adaptor
Stand
Limited Warranty
Instructions
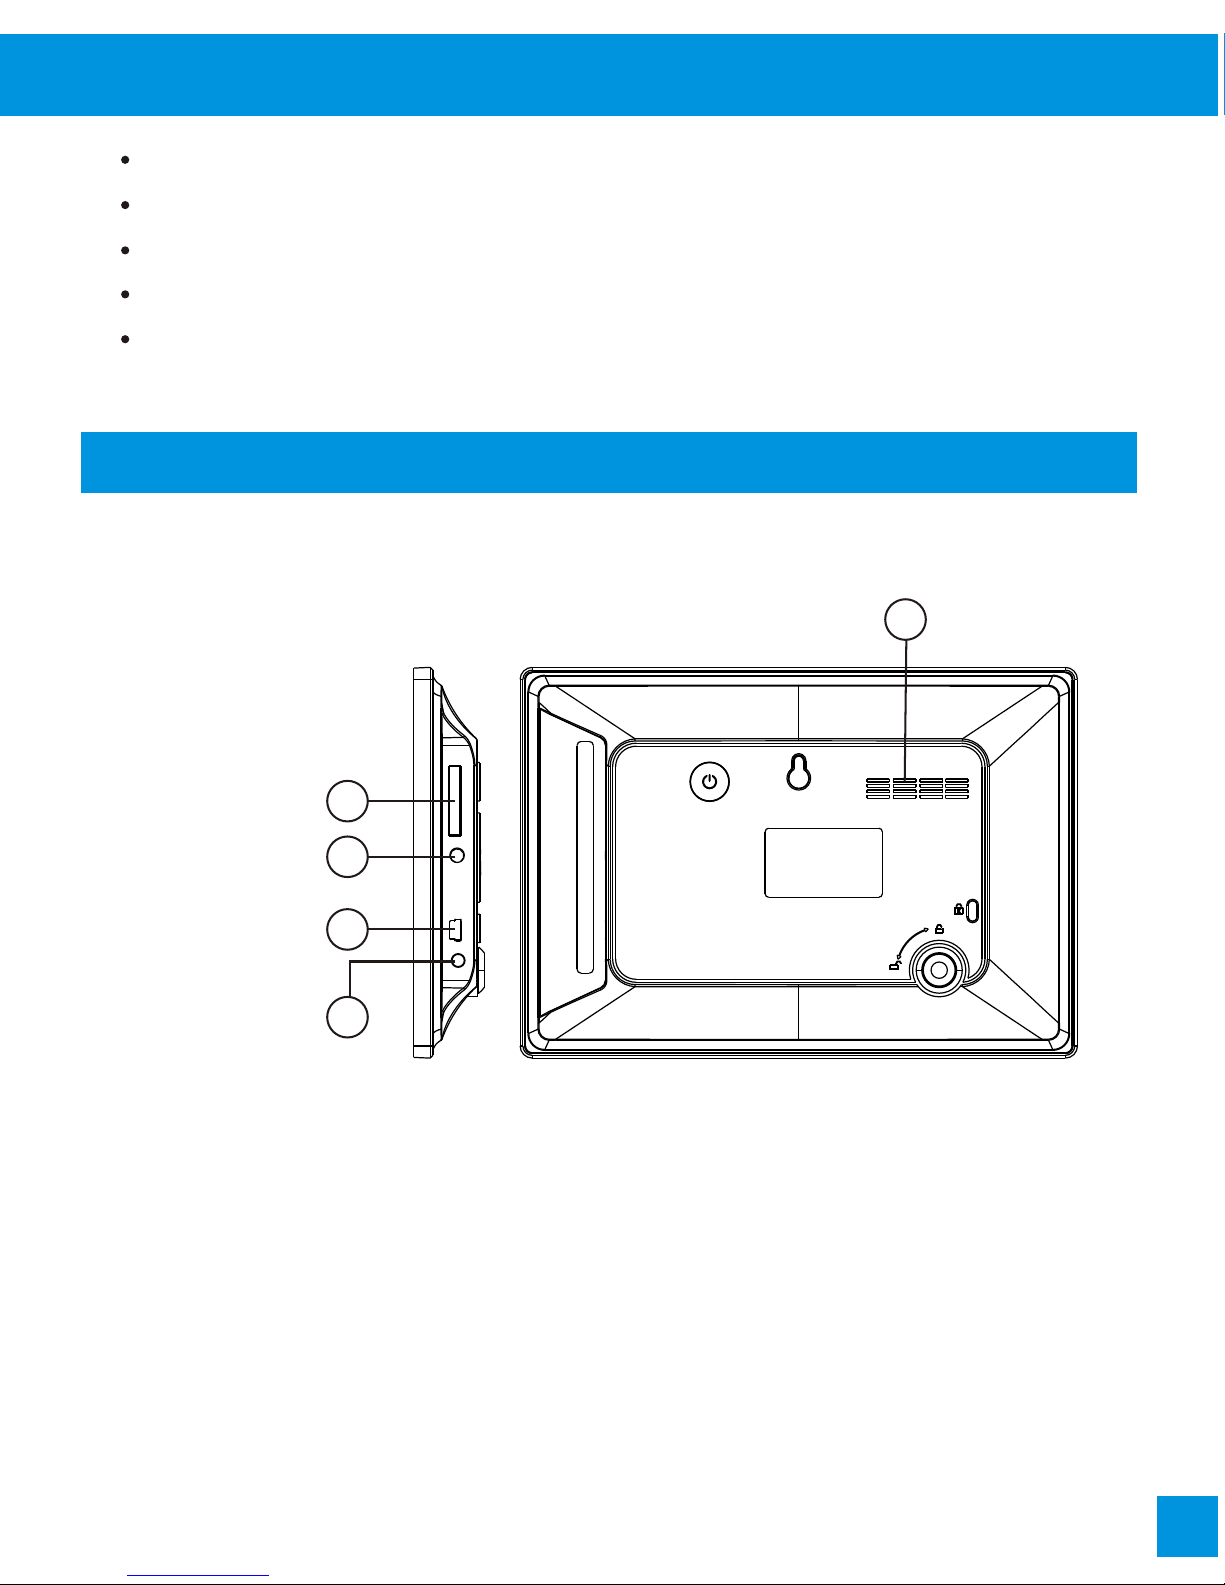
SD/SDHC slot
Mini USB OTG port
Earphone jack
DC-IN jack
Speaker
1
1. SD/SDHC card solt: Insert one of the SD/SDHC cards each time.
2. Earphone jack: Insert the earphone, then can enjoy your personal time.
3. Mini USB port: Connect this unit to your computer by USB cable, and read
U-disk by USB cable (not included).
4. 5V DC IN: Insert the power adaptor cord to connect the unit with power outlet.
5. Speaker
1
2
3
4
5
Page 3
2
Connect Power
Getting Started
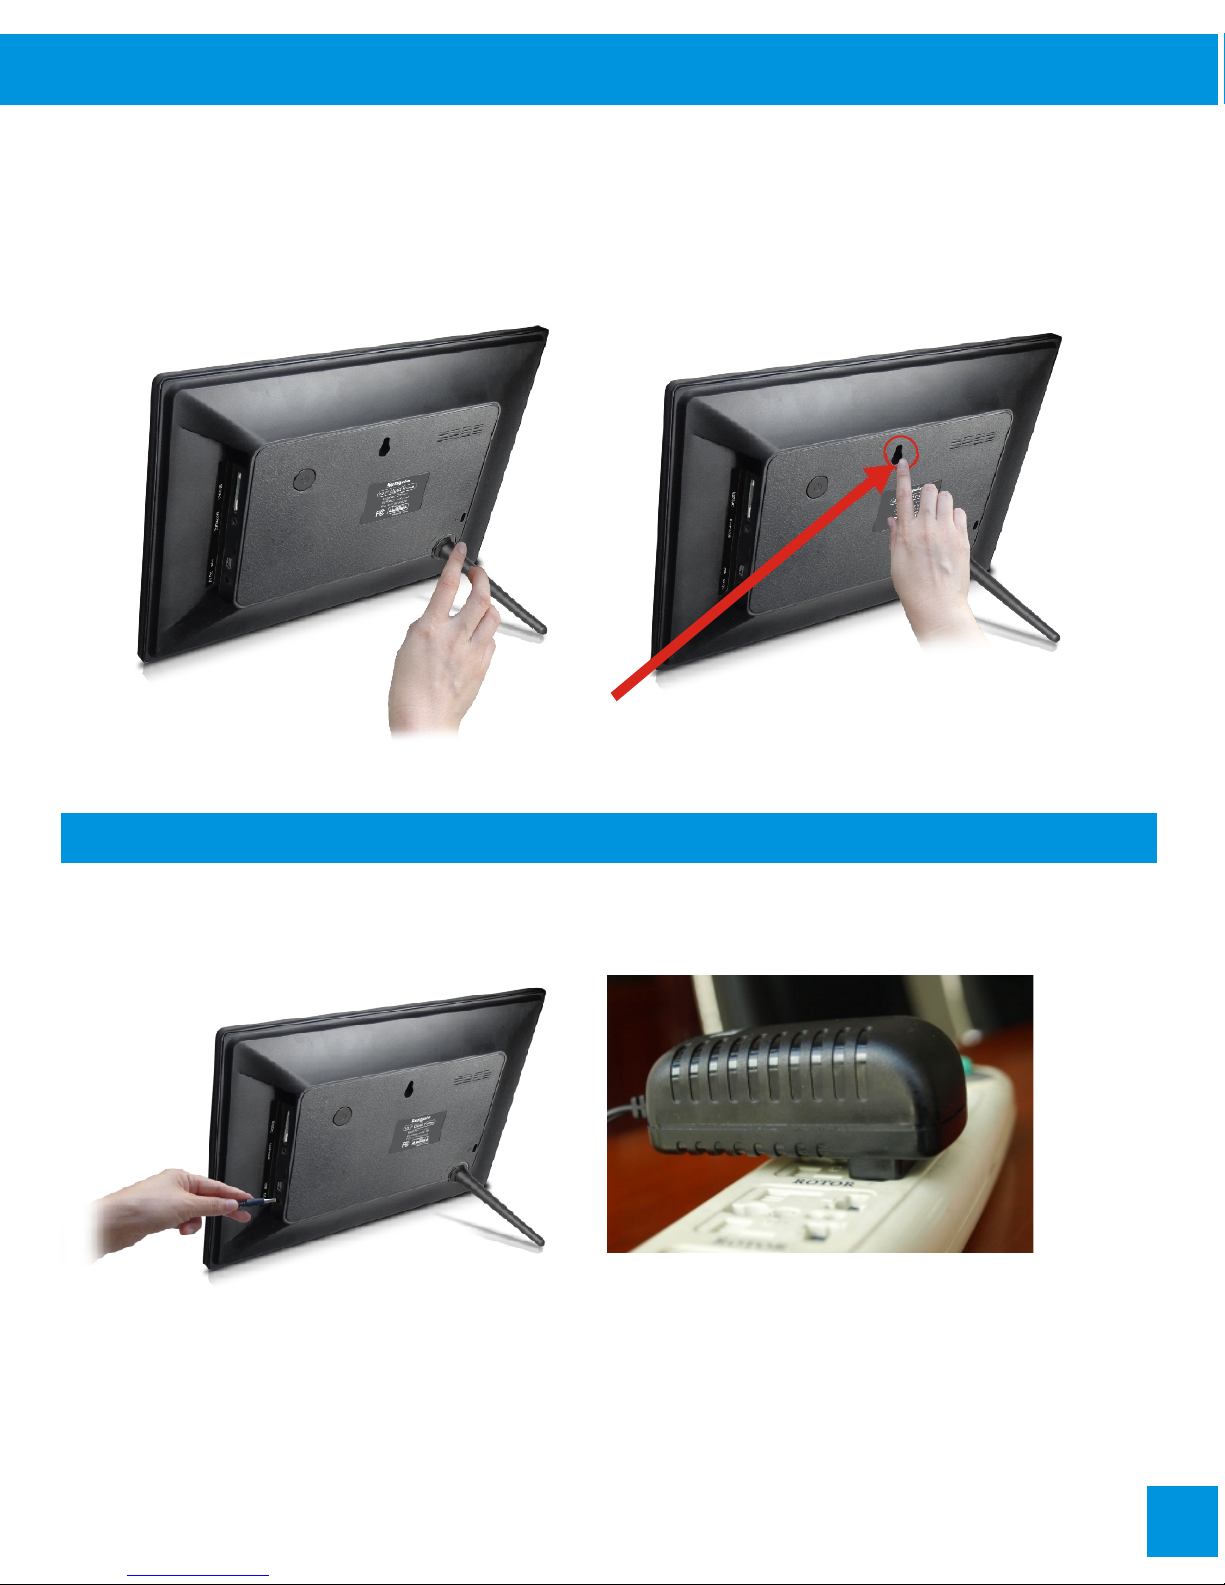
Sitting on top of a surface
hang on a wall
Your frame can either sit on the top of a surface with the stand or hang on the wall.
Wall mounting hole
Plug the Power Adaptor into the frame and also into a Power Outlet.
Page 4
Start-Up & Register
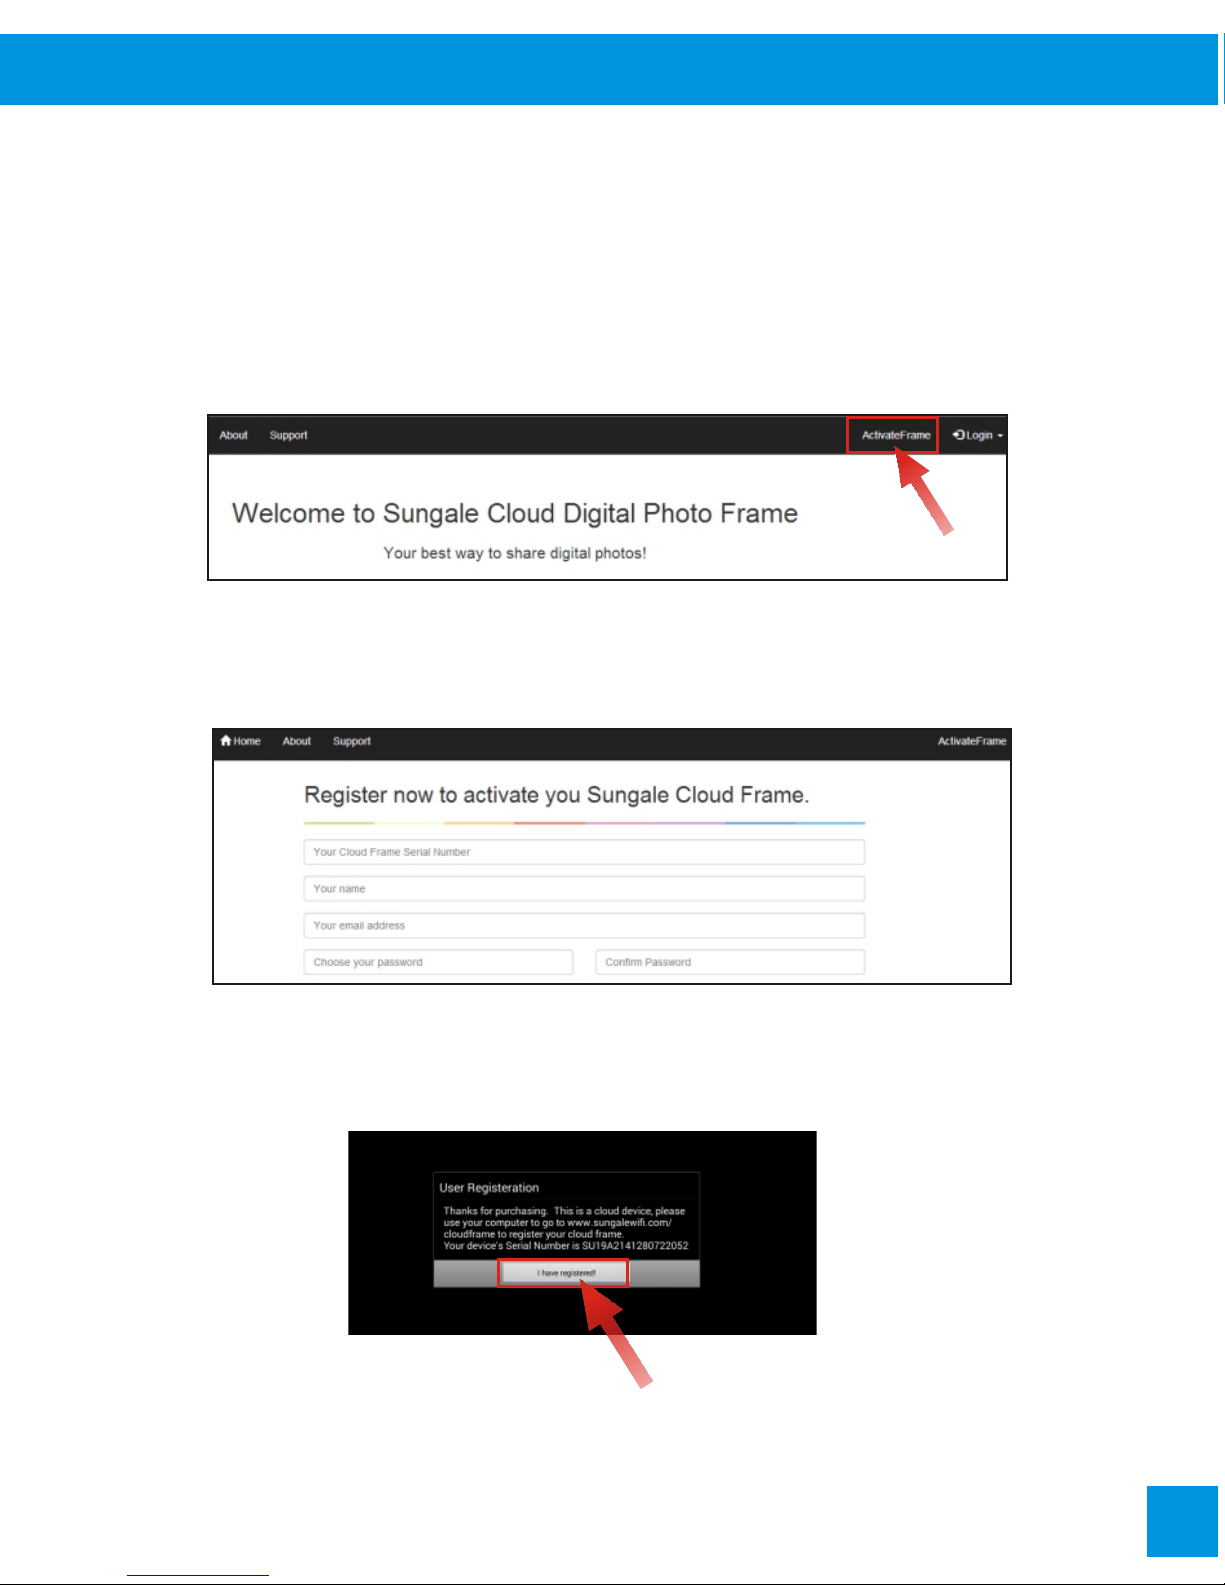
On first time start-up, you will need to register the Cloud Frame by going to the website
"http://cloudframe.sungale.com" on your computer, tablet or smart phone.
The Cloud Frame’s serial number will be displayed on the screen of the frame when
powered on.
From the website, click "ActivateFrame" to register accordingly.
You will be prompted to register the frame by providing the serial number from your
frame as well as some basic personal information.
After registering the frame on your computer, tablet or smart phone, click "I have
registered" on the frame.
3
Page 5
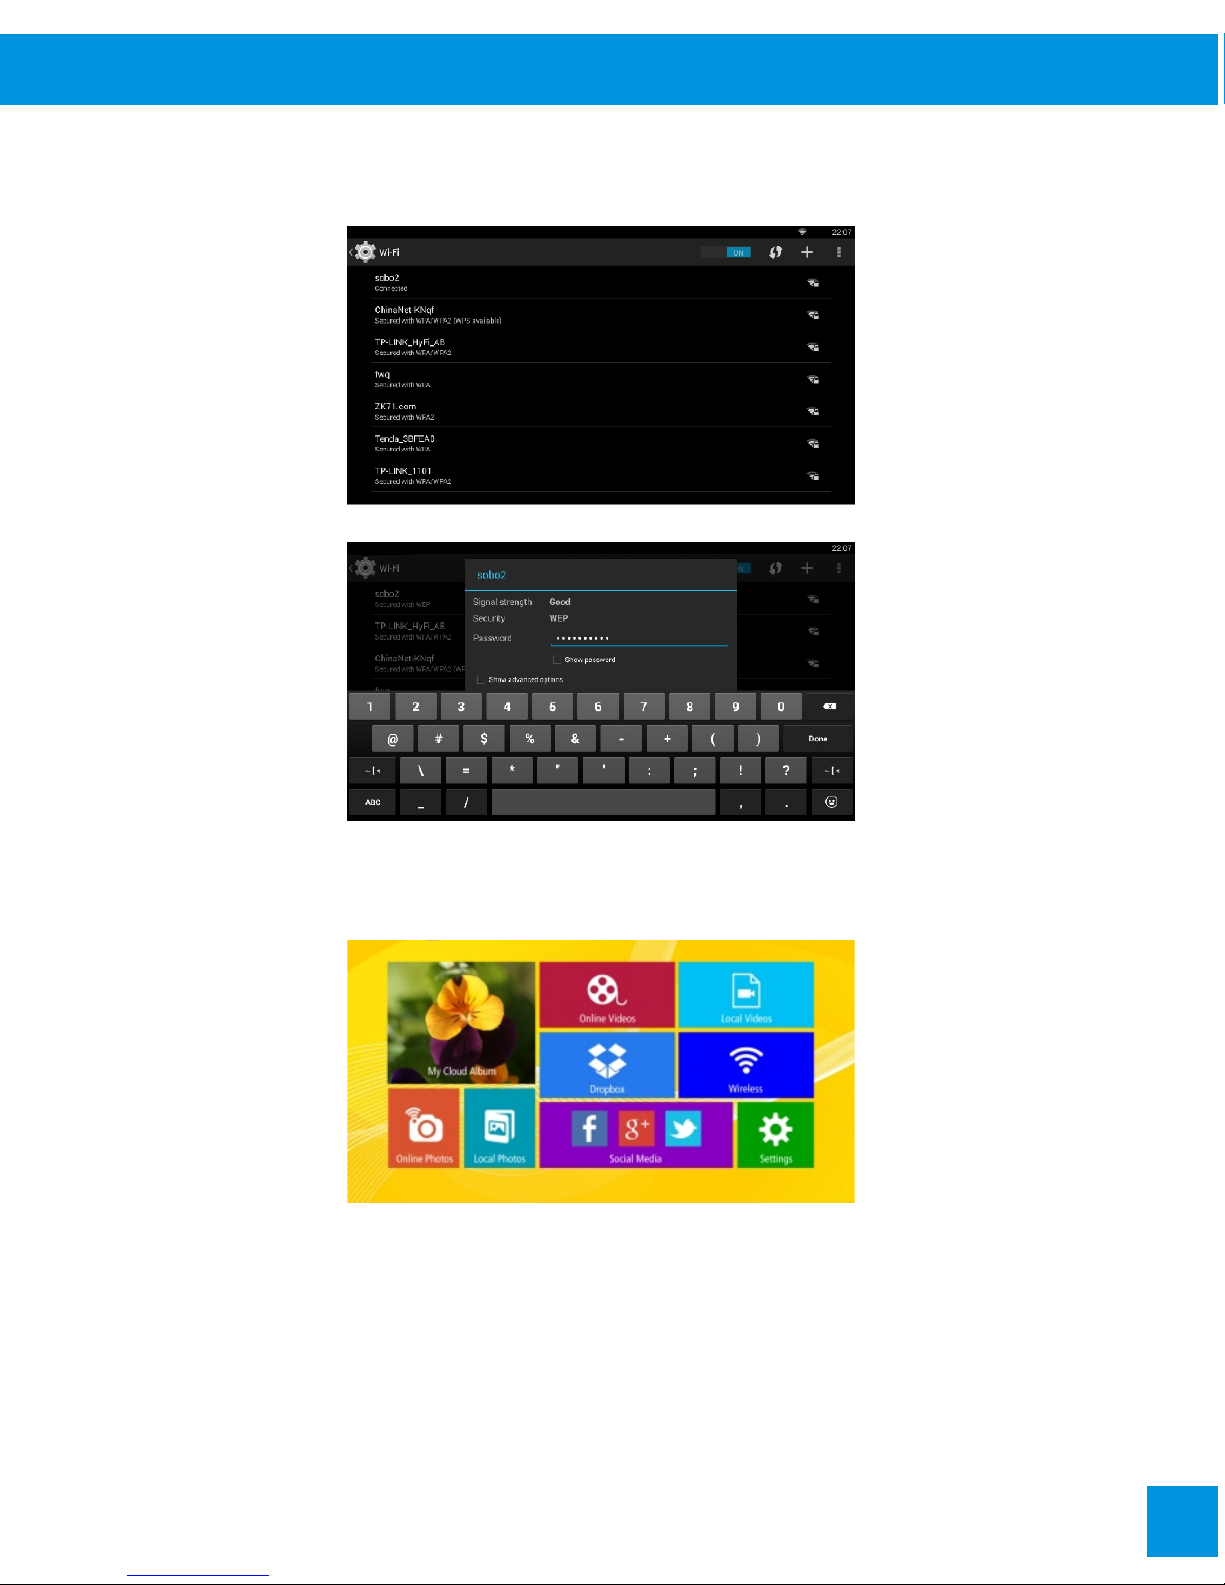
You will then be prompted to connect to your WiFi network. Follow the instructions by
selecting your network and inputting your password.
After connecting to your WiFi network, you will then be taken to the main screen.
After you have registered the frame, whenever you turn it on, it will go directly
to the main screen.
4
Start-Up & Register
Page 6
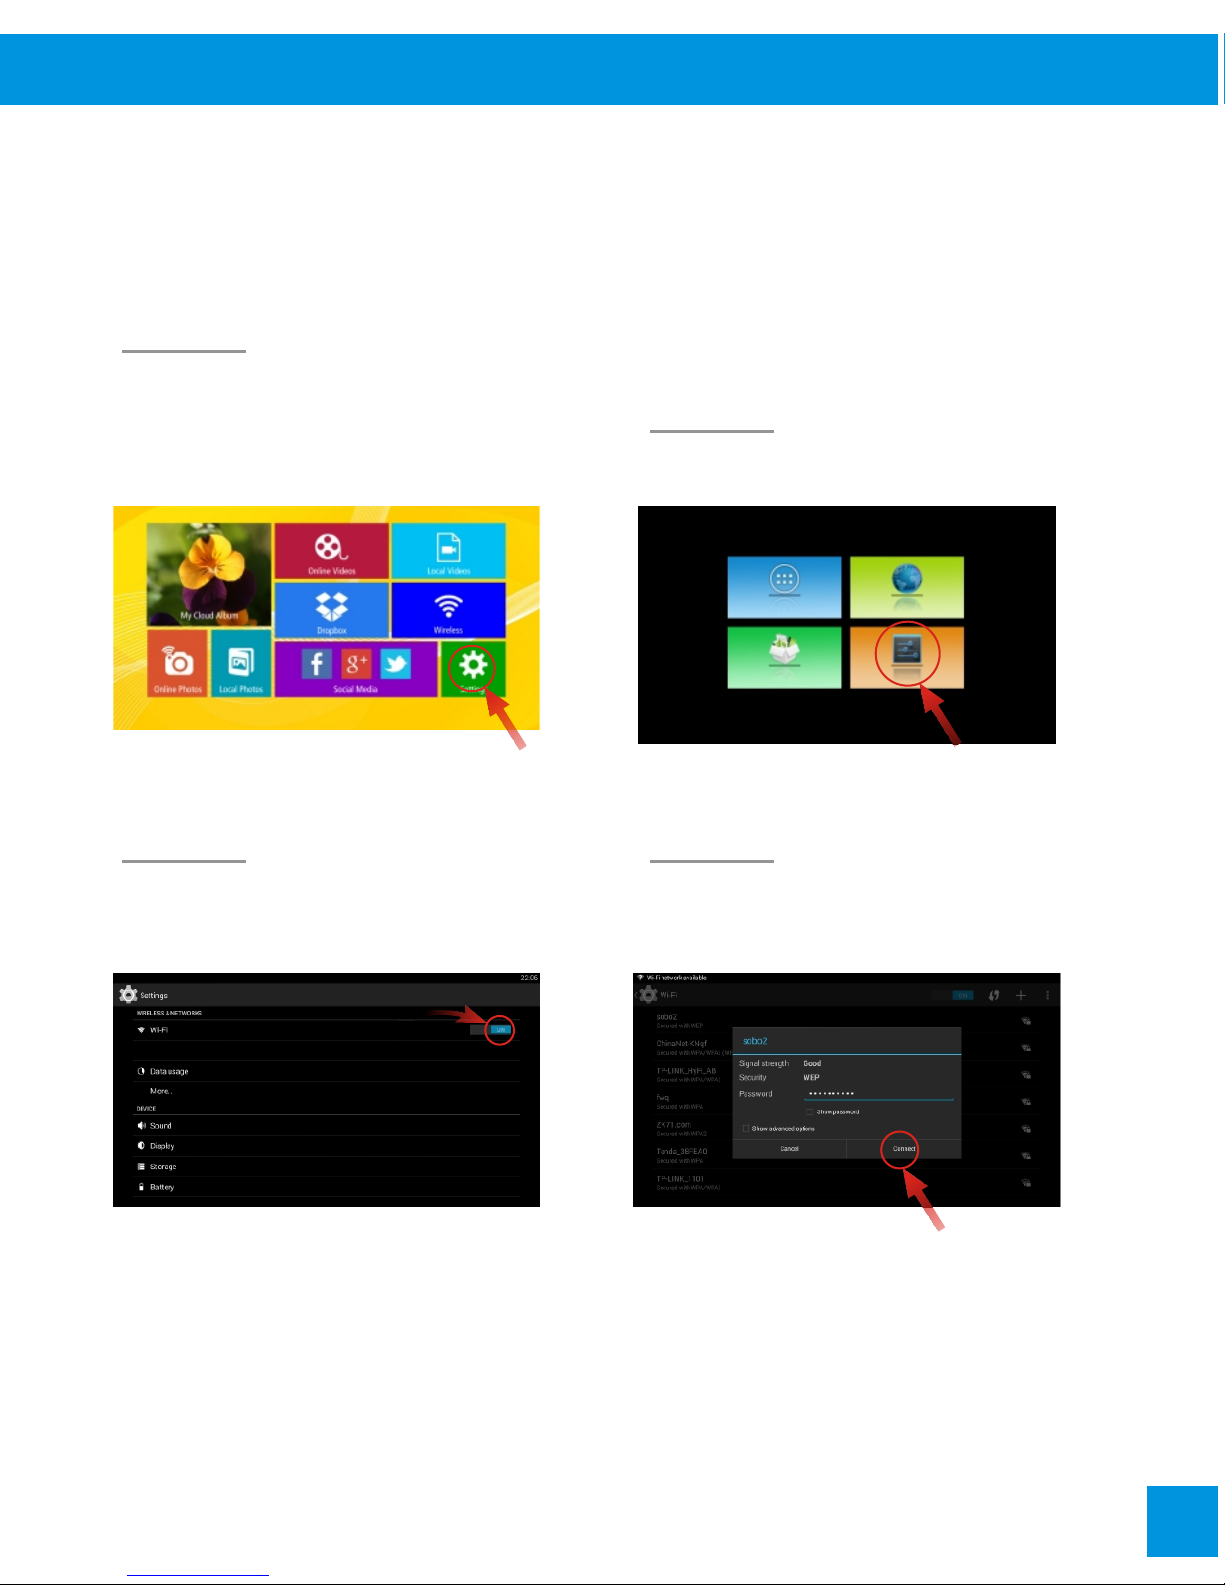
Select the WiFi button to the “ON”
position.
Select your network, put in your
password, and than select “connect”.
Step 3. Step 4.
WiFi Setup
Step 1.
Step 2.
Select the “SETTINGS” menu icon.
You should automatically be prompted to setup your WiFi connection during the frame
registration process, but if you ever need to connect to a new WiFi network, follow
below instructions:
To setup the WiFi Connection on your
photo frame, select “SETTINGS” from
the home screen.
Note: A WiFi internet connection is required in order to register and use your frame
as well as access the online features available.
5
Page 7
Step 1.
Step 2.
Step 3.
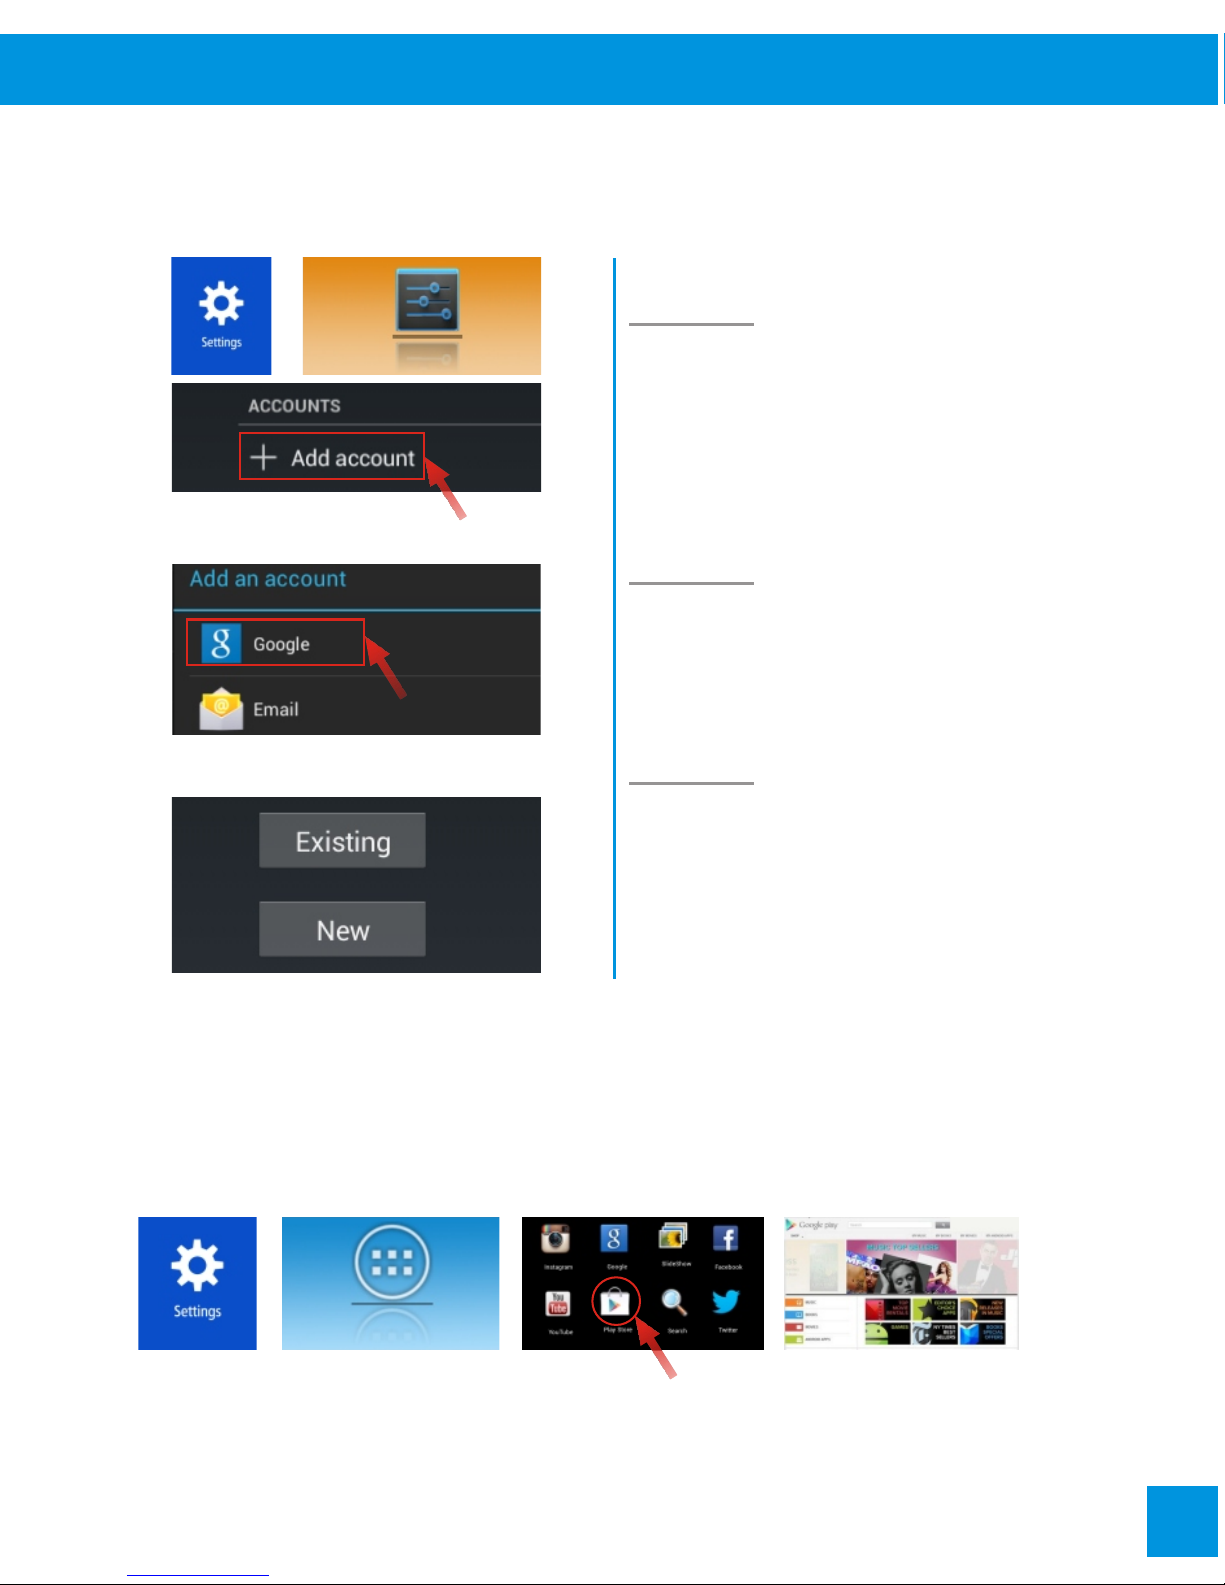
Go to the Settings menu, and scroll
down to “+Add account”, and select it.
Select “Google” under the add an
account menu.
Select “Existing” if you currently
have a gmail email account and
put in your email and password.
Select “New” to setup a gmail
email account.
Google Play Store
Online Features Part 1: Google Account
A Google Account will allow you to access the Google Play Store for APP downloads,
and Google applications.
Once you have setup your Google Account, you can access Play Store to download
and manage apps.
6
Page 8
Step 1:
Step 2:
Step 3:
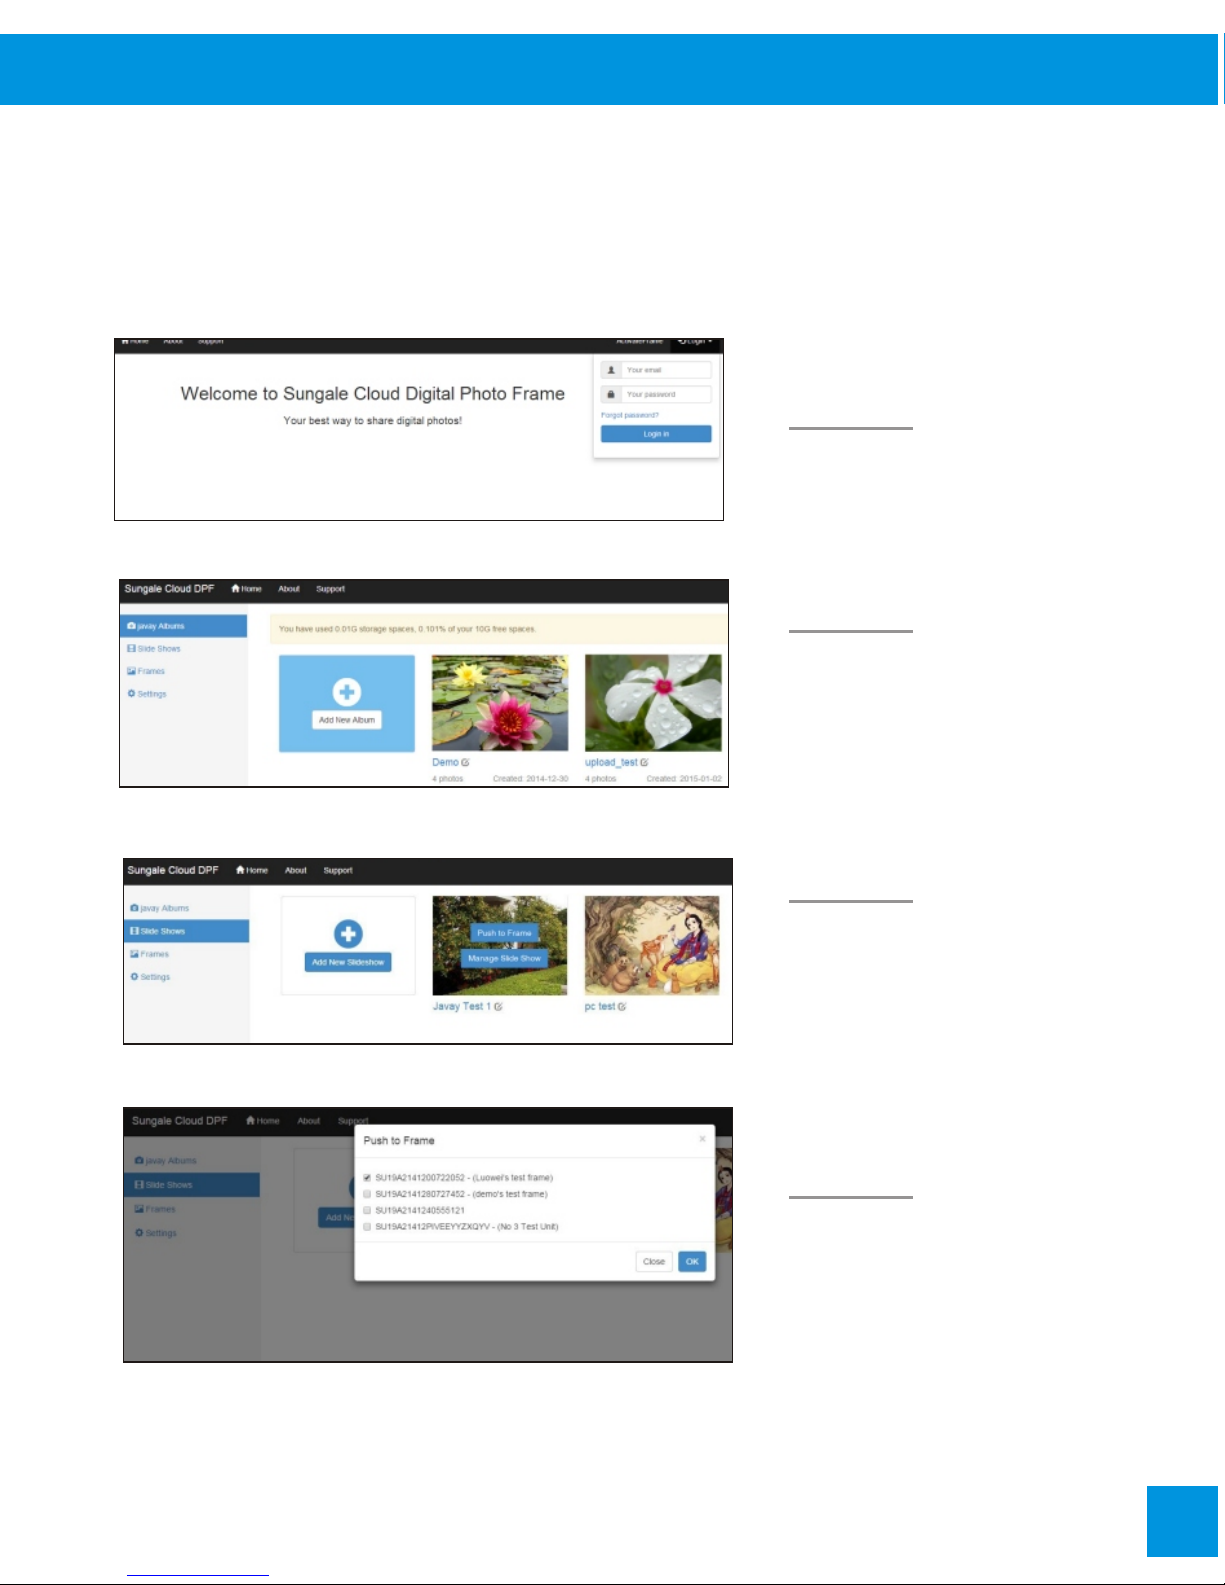
Login into your account
Step 4:
Online Features Part 2: My Cloud Album
The My Cloud Album tab gives you access to all the photos you have stored in your free
Cloud Frame storage. You must go back to the website "http://cloudframe.sungale.com"
to add photo albums and slide shows into this section.
Website required Steps:
7
Go to "ALBUMS" to create
albums and add photos by
selecting "Manage Album"
and clicking the cloud icon.
Go to "SLIDE SHOWS" to
add slideshows and go back
to "ALBUMS" to select "Push
Album to Slide Show".
Go back to "SLIDE SHOWS"
to select "Push to Frame"
and select desired frame.
Page 9
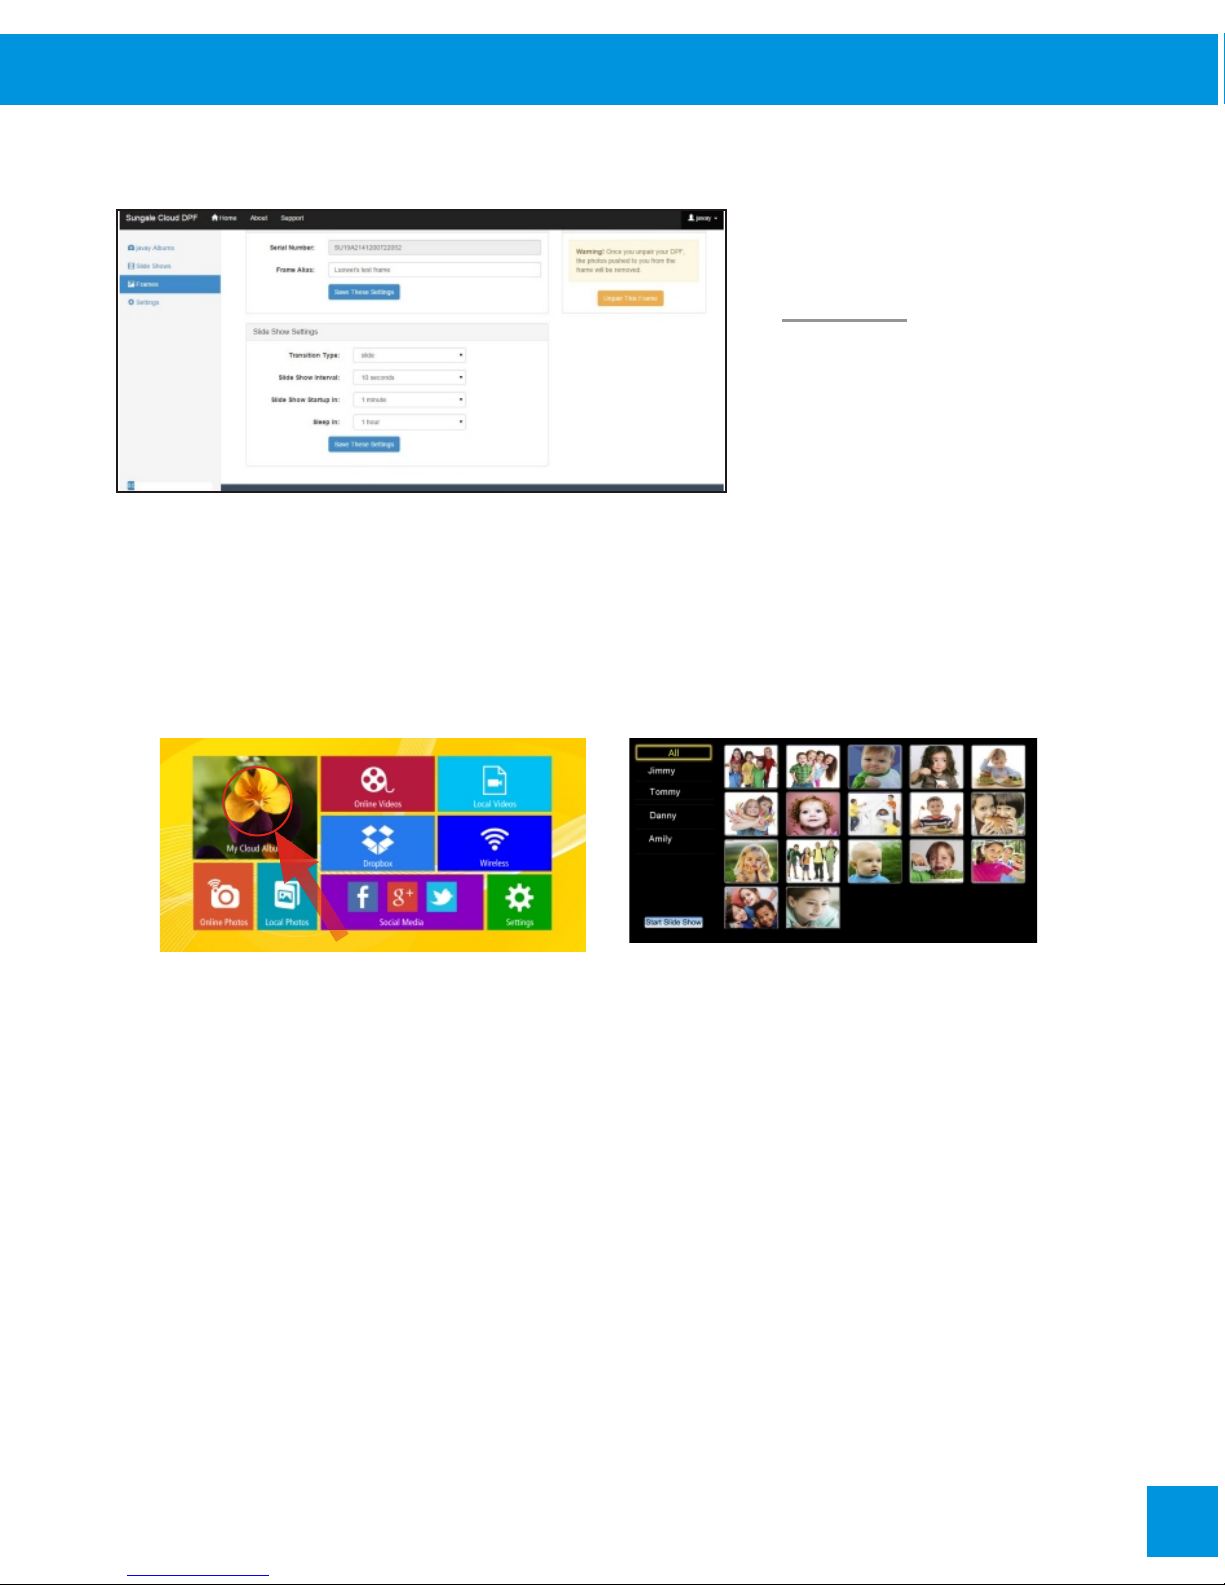
Step 5:
Online Features Part 2: My Cloud Album
Cloud Frame Steps:
To access and view these photos, select My Cloud Album. Select the album and photos
you wish to view.
Note: Photos in My Cloud Album will automatically play based on the settings you
have setup from the website.
Tip: For instructions on creating cloud albums and adjusting settings, log into your
account at "http://cloudframe.sungale.com" and select Support or Video Setup
Tutorial at the top of the page.
8
Go to "FRAME" to select
your frame and adjust
settings of the slideshow.
Page 10
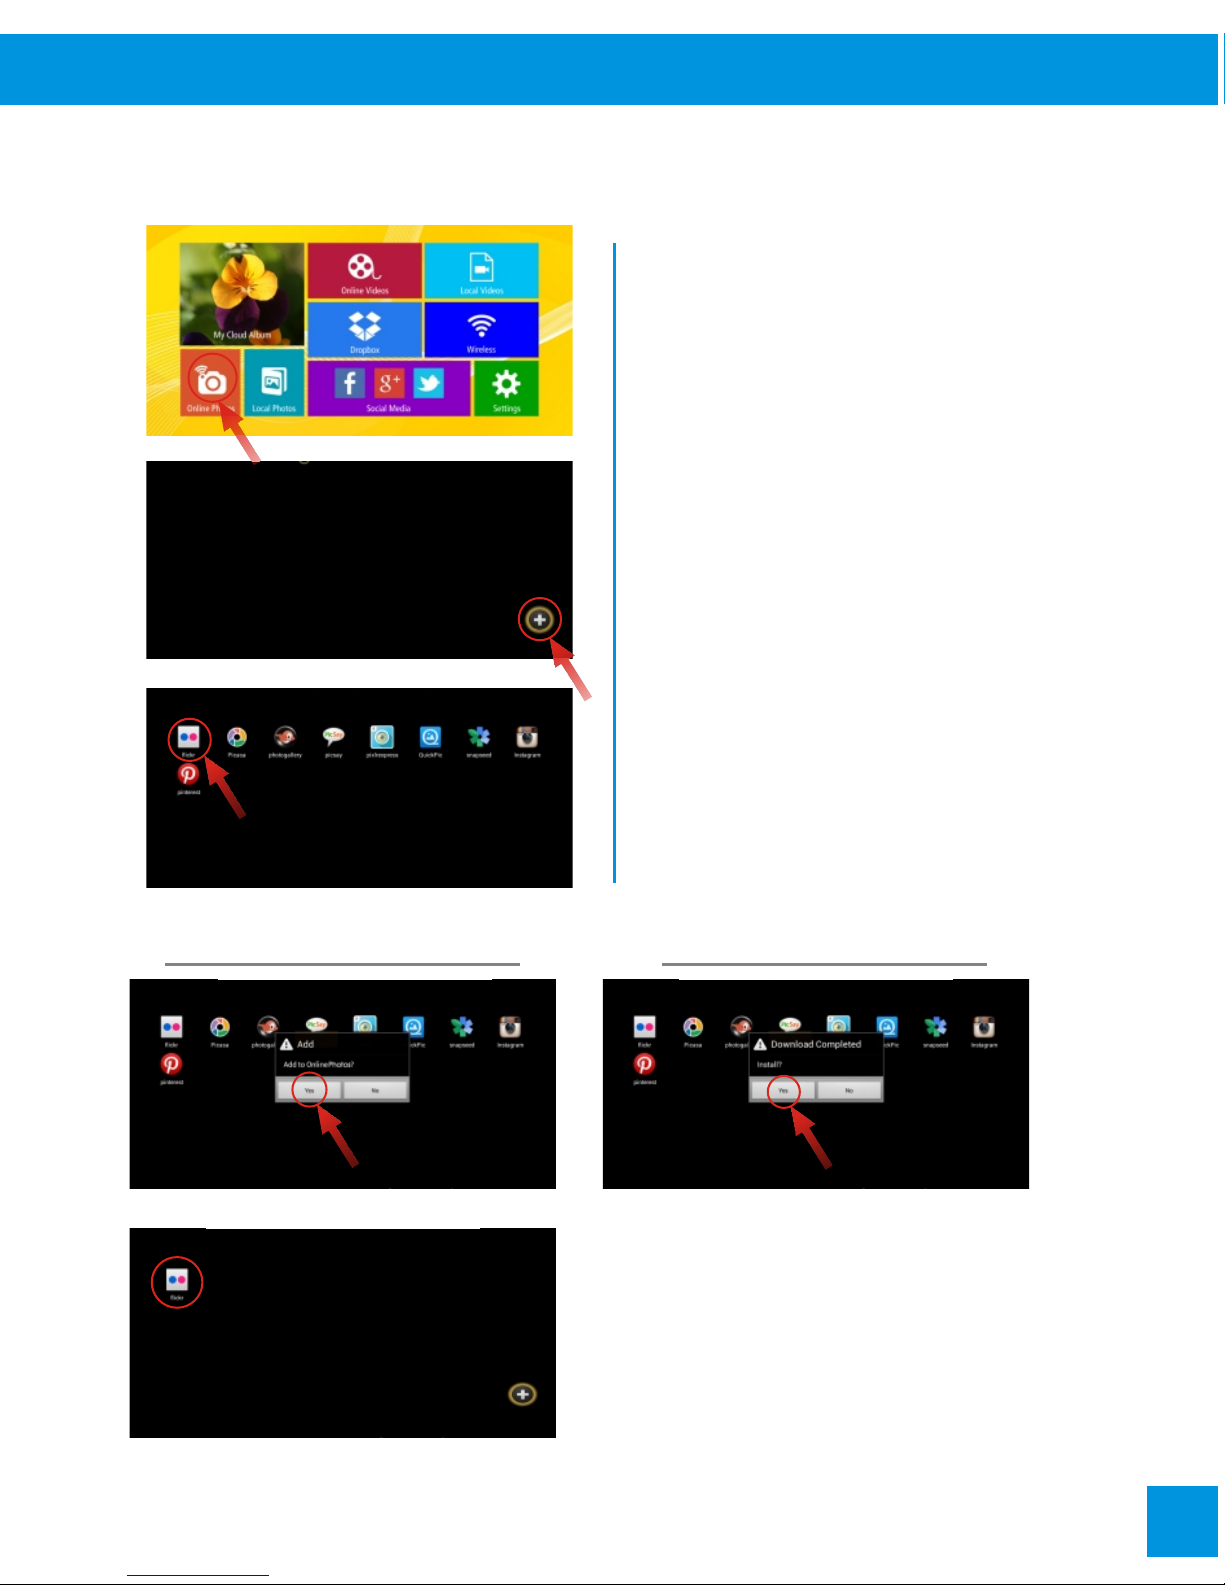
Select the “+” symbol in the lower
right corner to enter the online
storage back list.
Select “YES” to download
Select any Hub to install and
download to your frame.
Select “YES” to install
Online Features Part 3: Online Photos
The Online Photos tab gives you access to numerous online Photo Hubs.
To access these Photo Hubs select
Online Photos.
After the installation is complete, your Hub
will be available on the front screen. You
can now select and use it.
9
Page 11
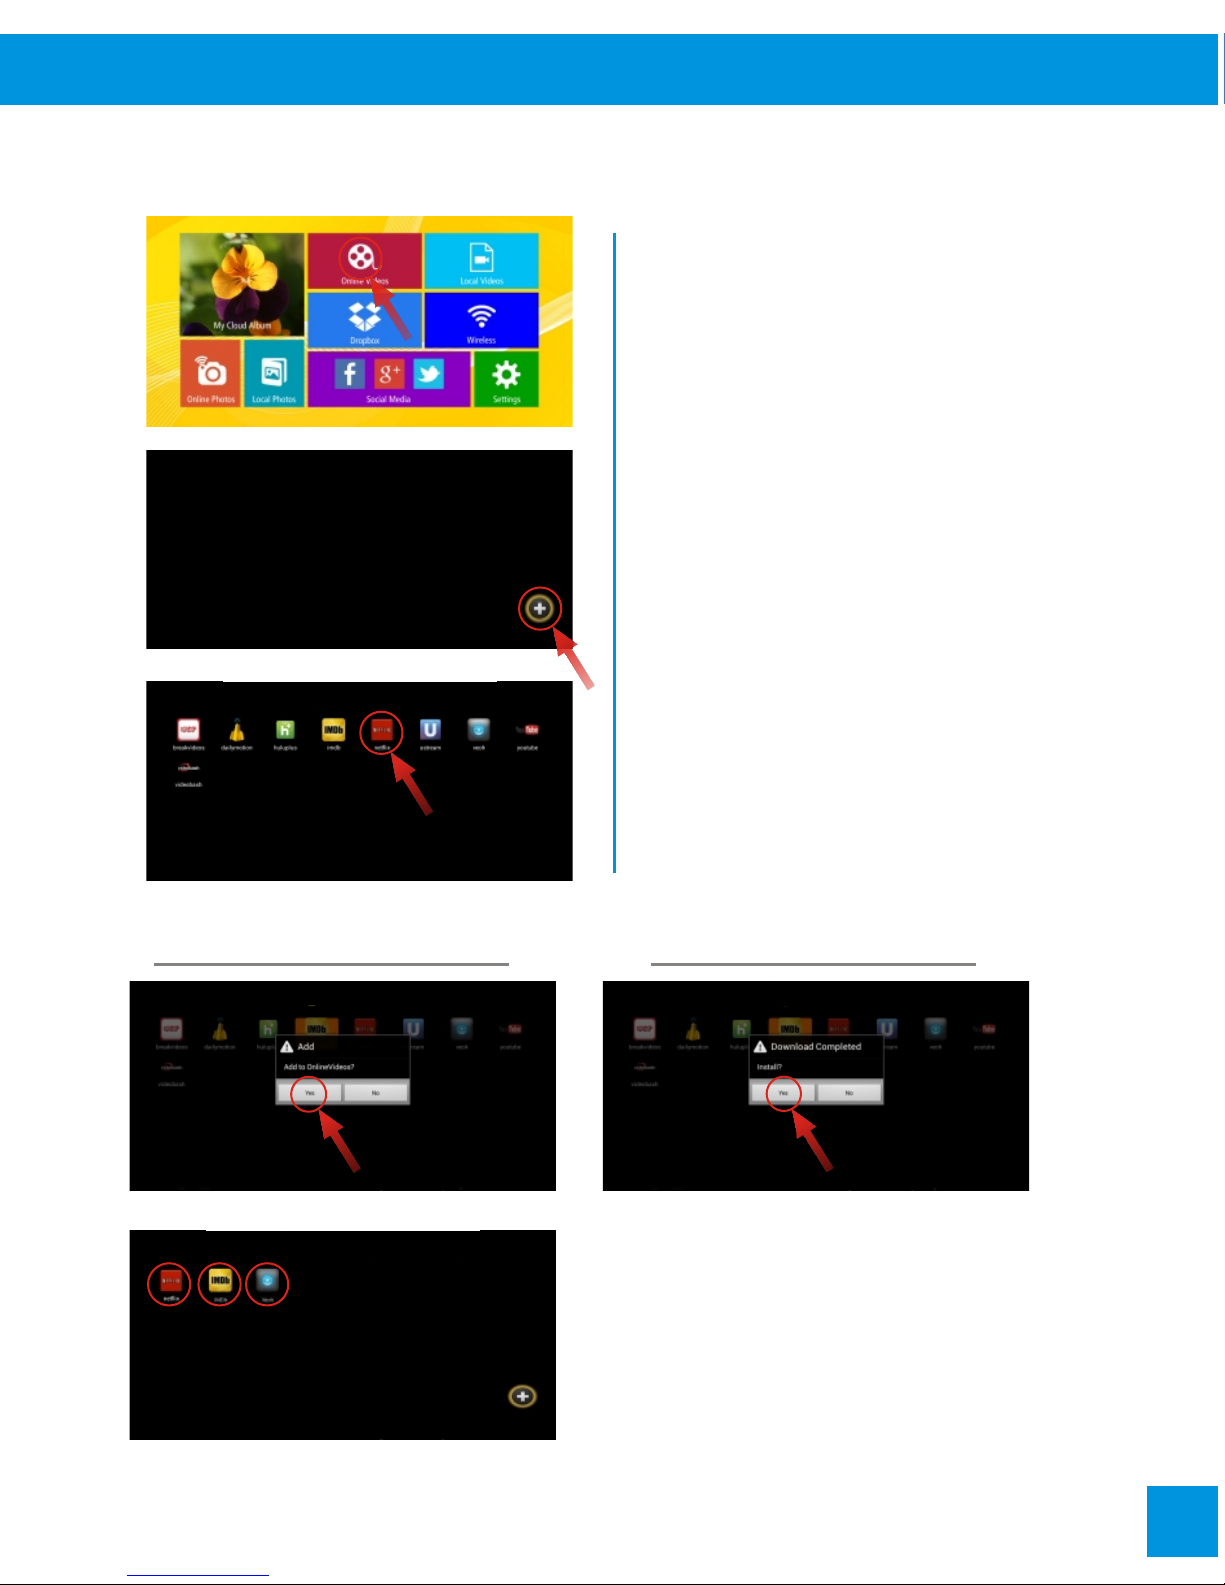
To access these Video Hubs
select Online Videos.
Select the “+” symbol in the lower
right corner to enter the online
storage back list.
Select any Hub to install and
download to your frame.
After the installation is complete, your
Hub will be available on the front
screen. You can now select and use it.
The Online Videos tab gives you access to a numerous amount of online Video Hubs.
Online Features Part 4: Online Videos
Select “YES” to download Select “YES” to install
10
Page 12
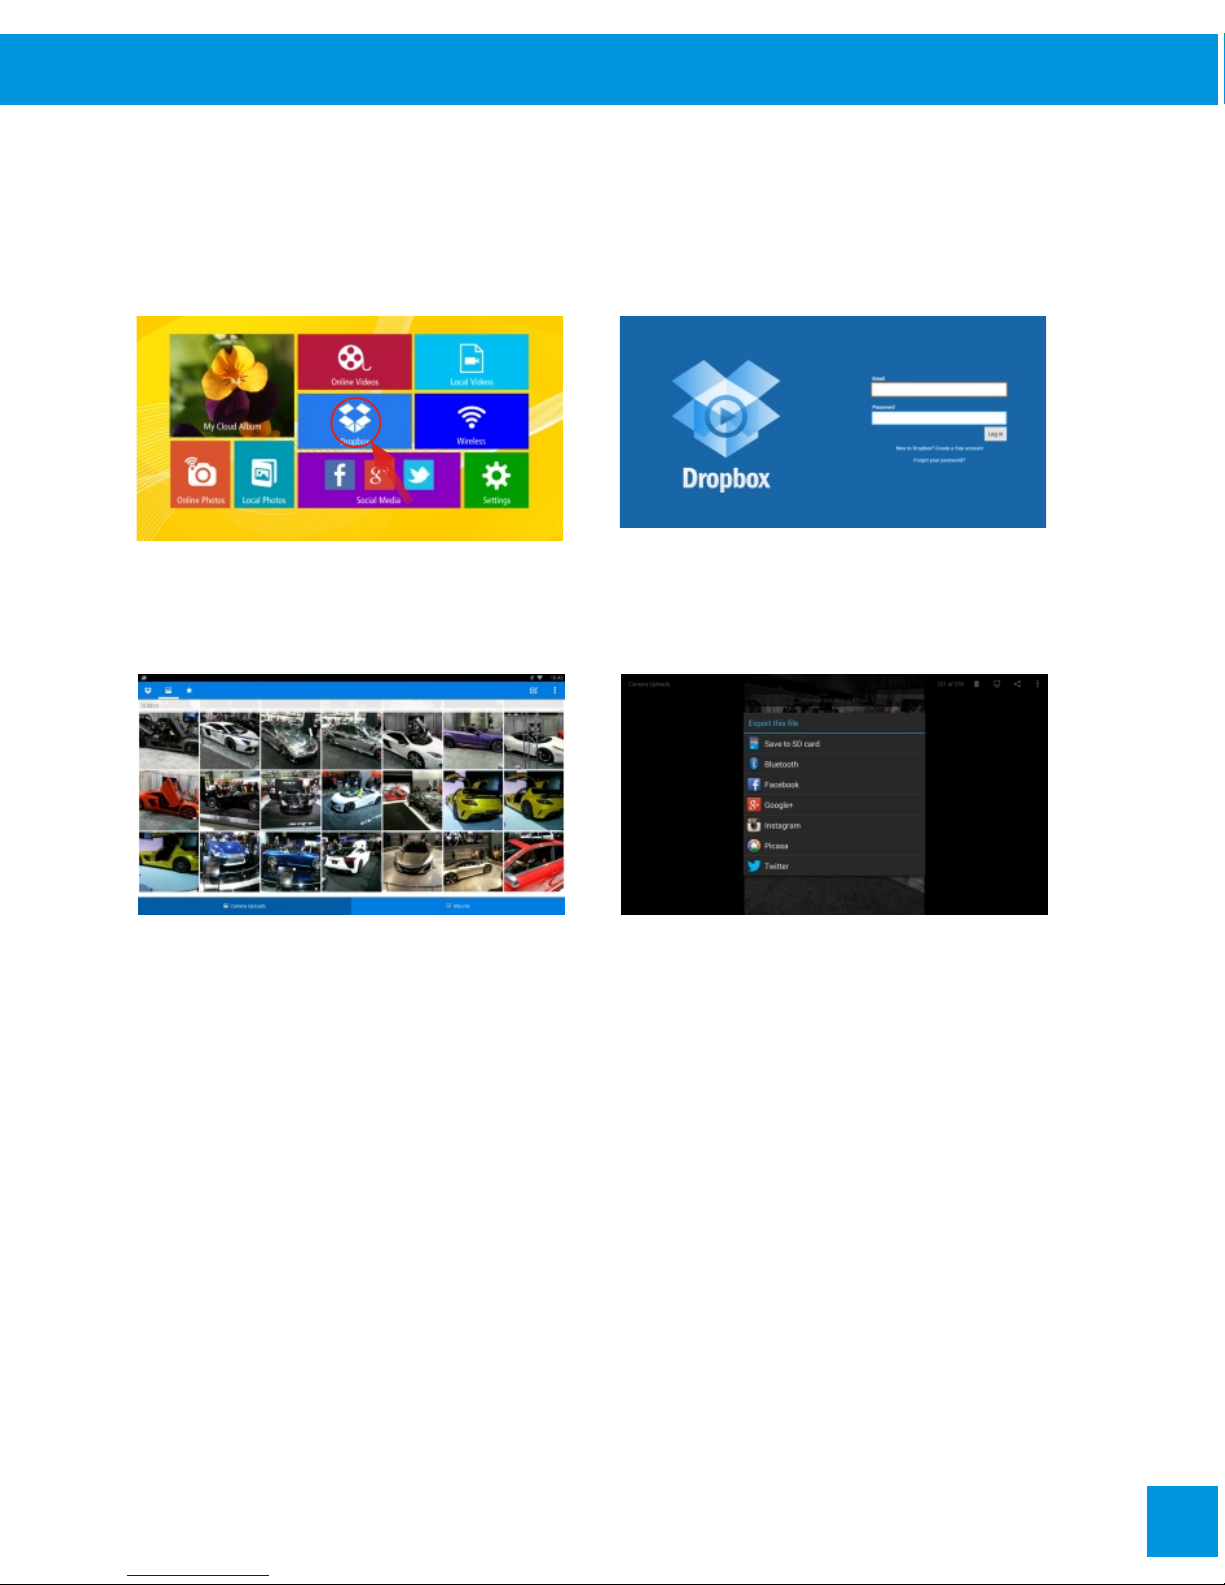
Online Features Part 5: Dropbox
Your frame has been pre-installed with Dropbox, a popular file sharing service right from
the home screen.
Select Dropbox from the home screen, and log into your Dropbox account.
Now you can browse and select the photos and videos you want to download into
your frame.
Note: Downloaded Pictures and Videos from Dropbox will be placed in the Local
Photos or Local Videos area of Frame depending on the file. You can only view files
from Dropbox and cannot run slideshows within the APP. You must first download into
local memory. See "Local Photos" for slideshow instructions.
Tip: By adjusting your Dropbox settings on your smart phone, you will automatically
be able to send any photo you take to your Dropbox account. This will offer an easy
way of downloading photos to your frame.
11
Page 13
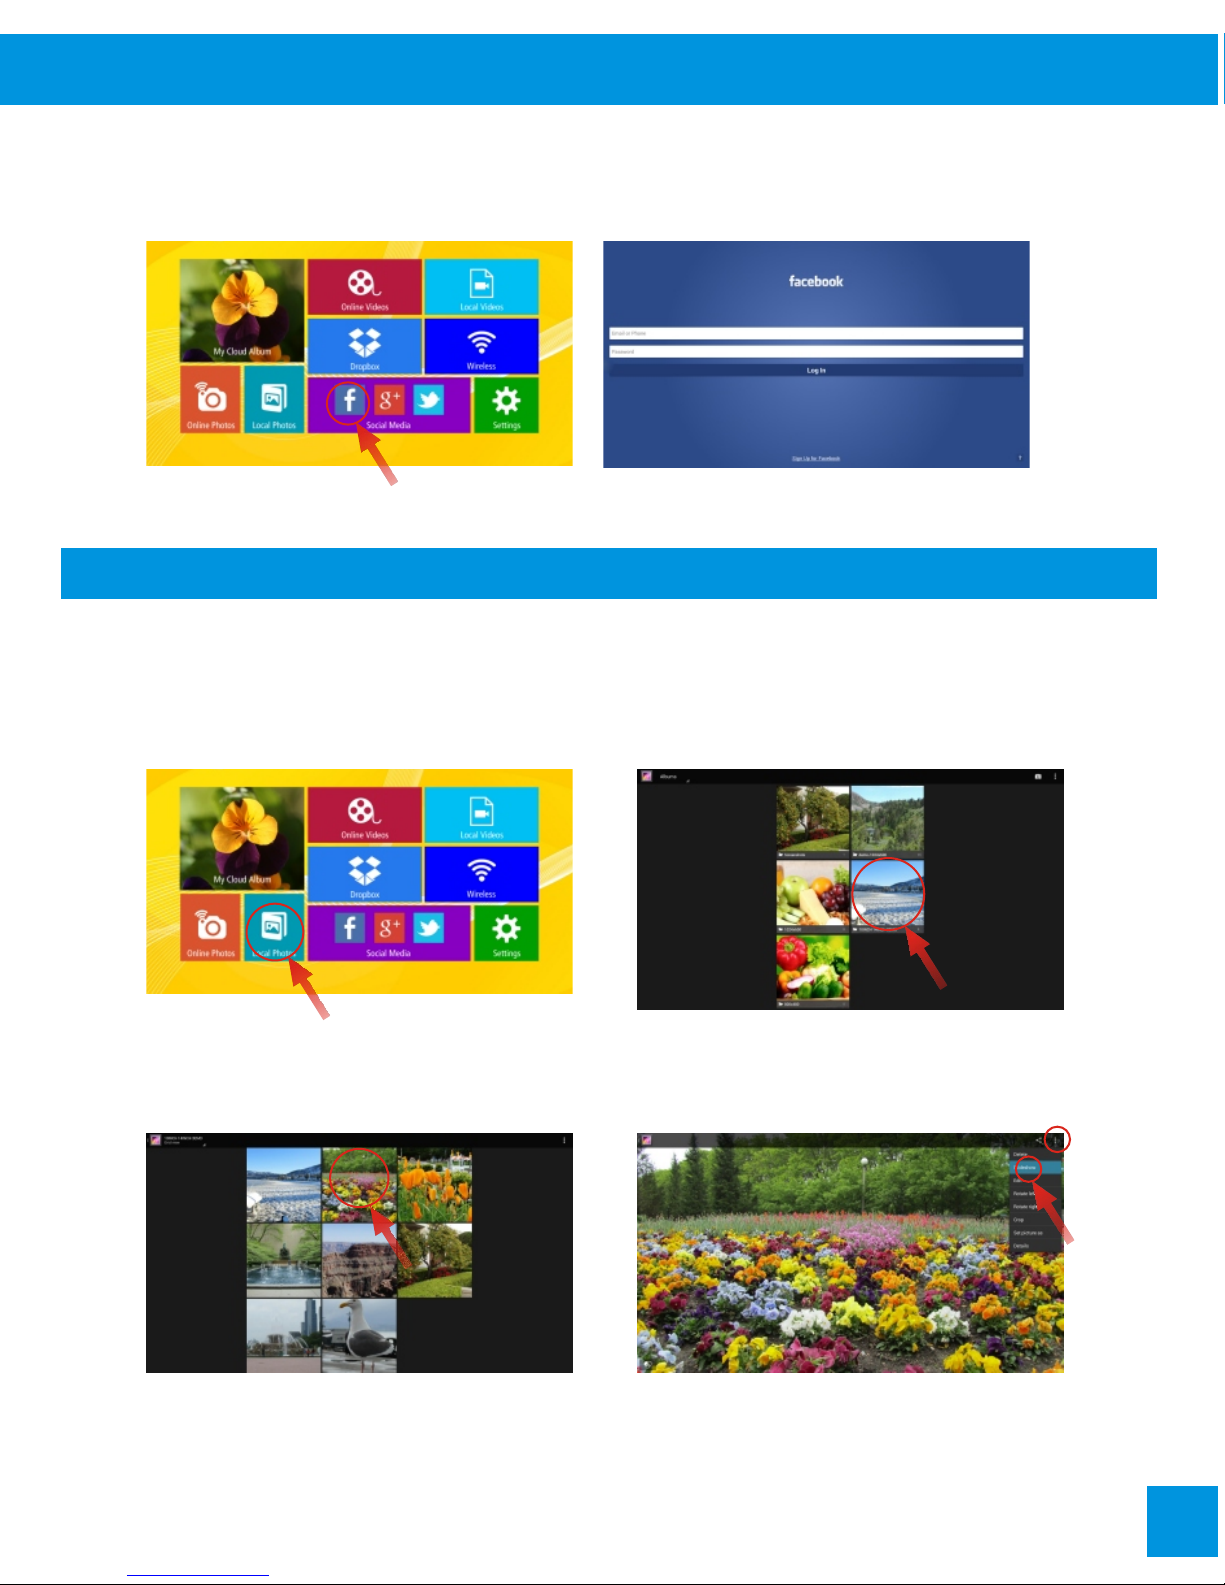
Local Features Part 1: Local Photos
Select the “Local Photos” icon.
Select an album
Online Features Part 6: Social Media
Your frame has been pre-installed with 3 popular Social Media buttons right from the
home screen. These include Facebook, Twitter and Google +.
Your frame comes with internal memory and also an SD card slot for additional memory
access.
All the pictures will load in that album and if selecting a picture, you can start a slideshow
by selecting the options, and then slideshow.
12
Page 14
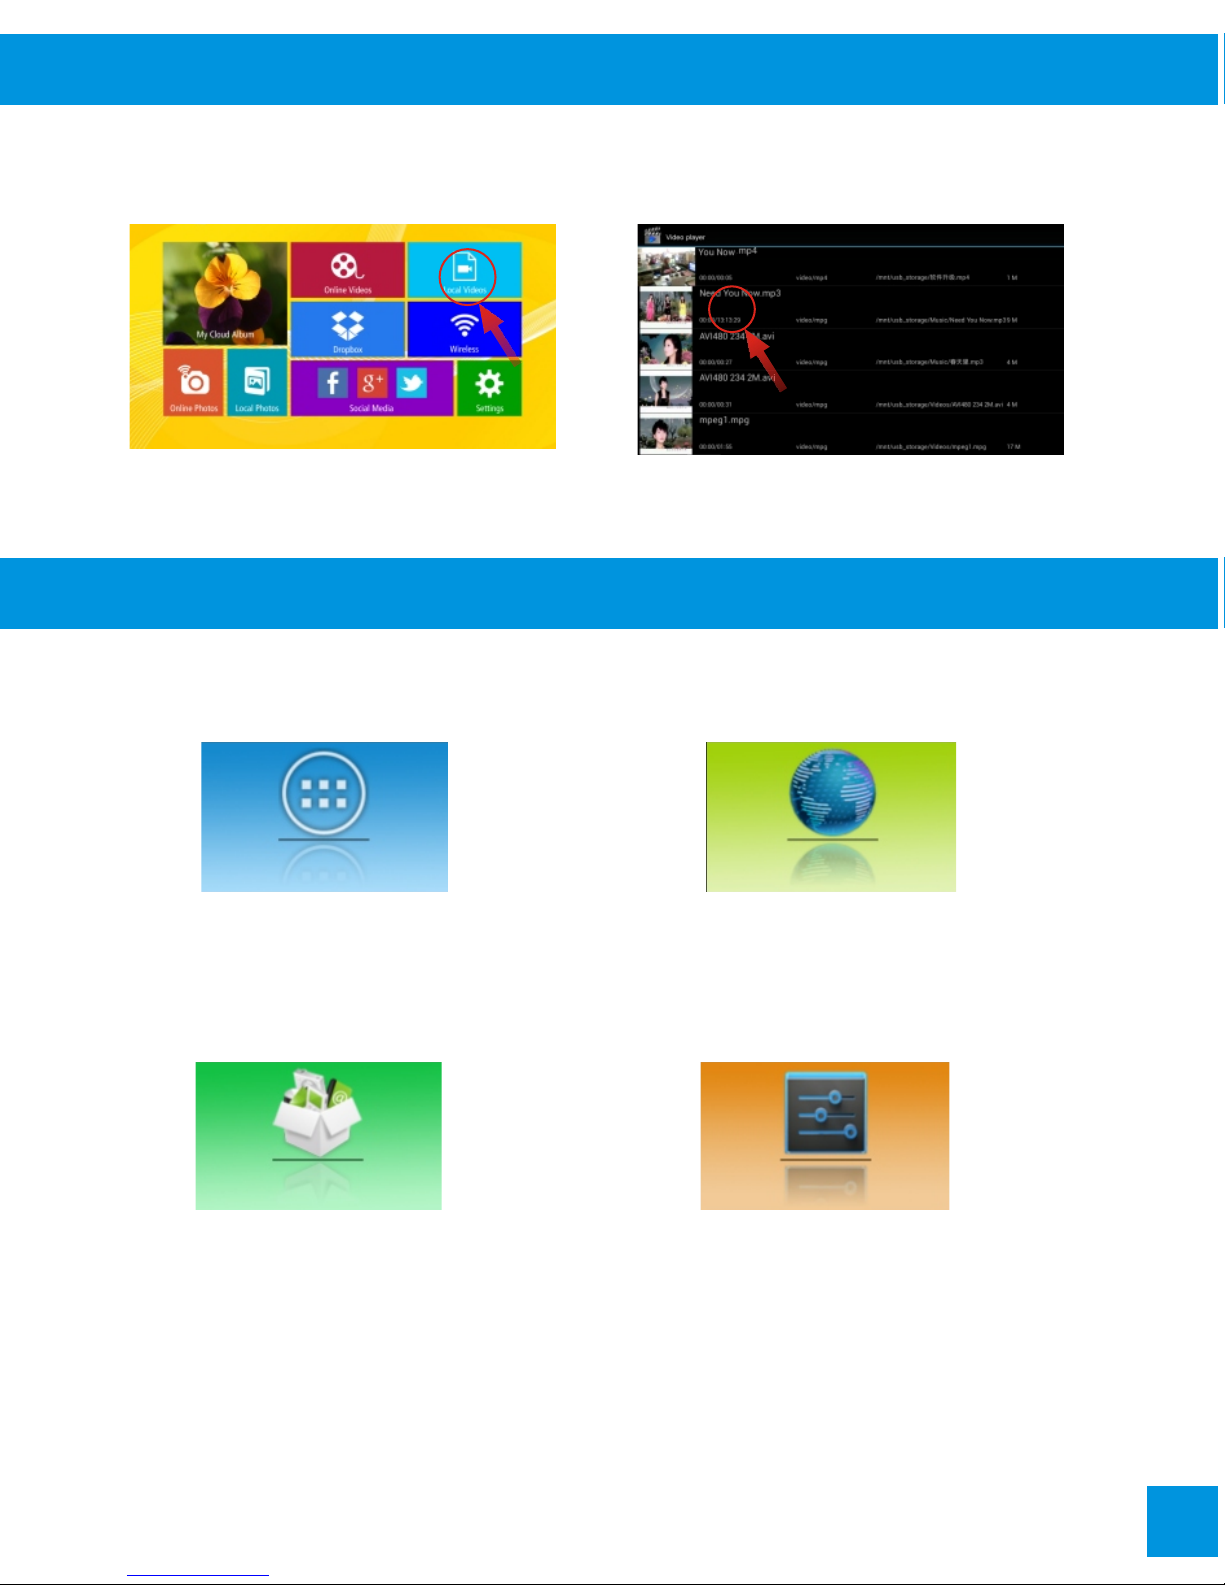
Select the “Local Videos” icon. Select the video you want to Play.
Local Features Part 2: Local Videos
13
APP Block Web Browser
Where your downloaded & installed
Apps and Google Play are located.
Where you can browse, surf
and search the internet.
File Directory
Settings Menu
Where you can search for
locally installed apps & files.
Where all your device settings
are located for your frame.
Settings Menu Overview
Page 15

Tips
Support
2. Contact Sungale Support team
1. Visit the support site.
For manual download, FAQs and more supports: www.sungale.com
Toll free number in the USA: 800-473-5156
Service email: [email protected]
For additional product video support, go to YouTube.com, and search
“SungaleProducts”, where you will find additional demo videos to help with
explaining the operation of your product.
For ongoing product improvement, this QSG is subject to modification without prior
notice.
14
In order to ease users’ selection, other logos and/or trademarks may appear on
this product. All other logos and/or trademarks are the property of their respective
owners.
 Loading...