

Page 1
User's Manual
For ongoing product improvement, this manual is subject to modification without prior notice.
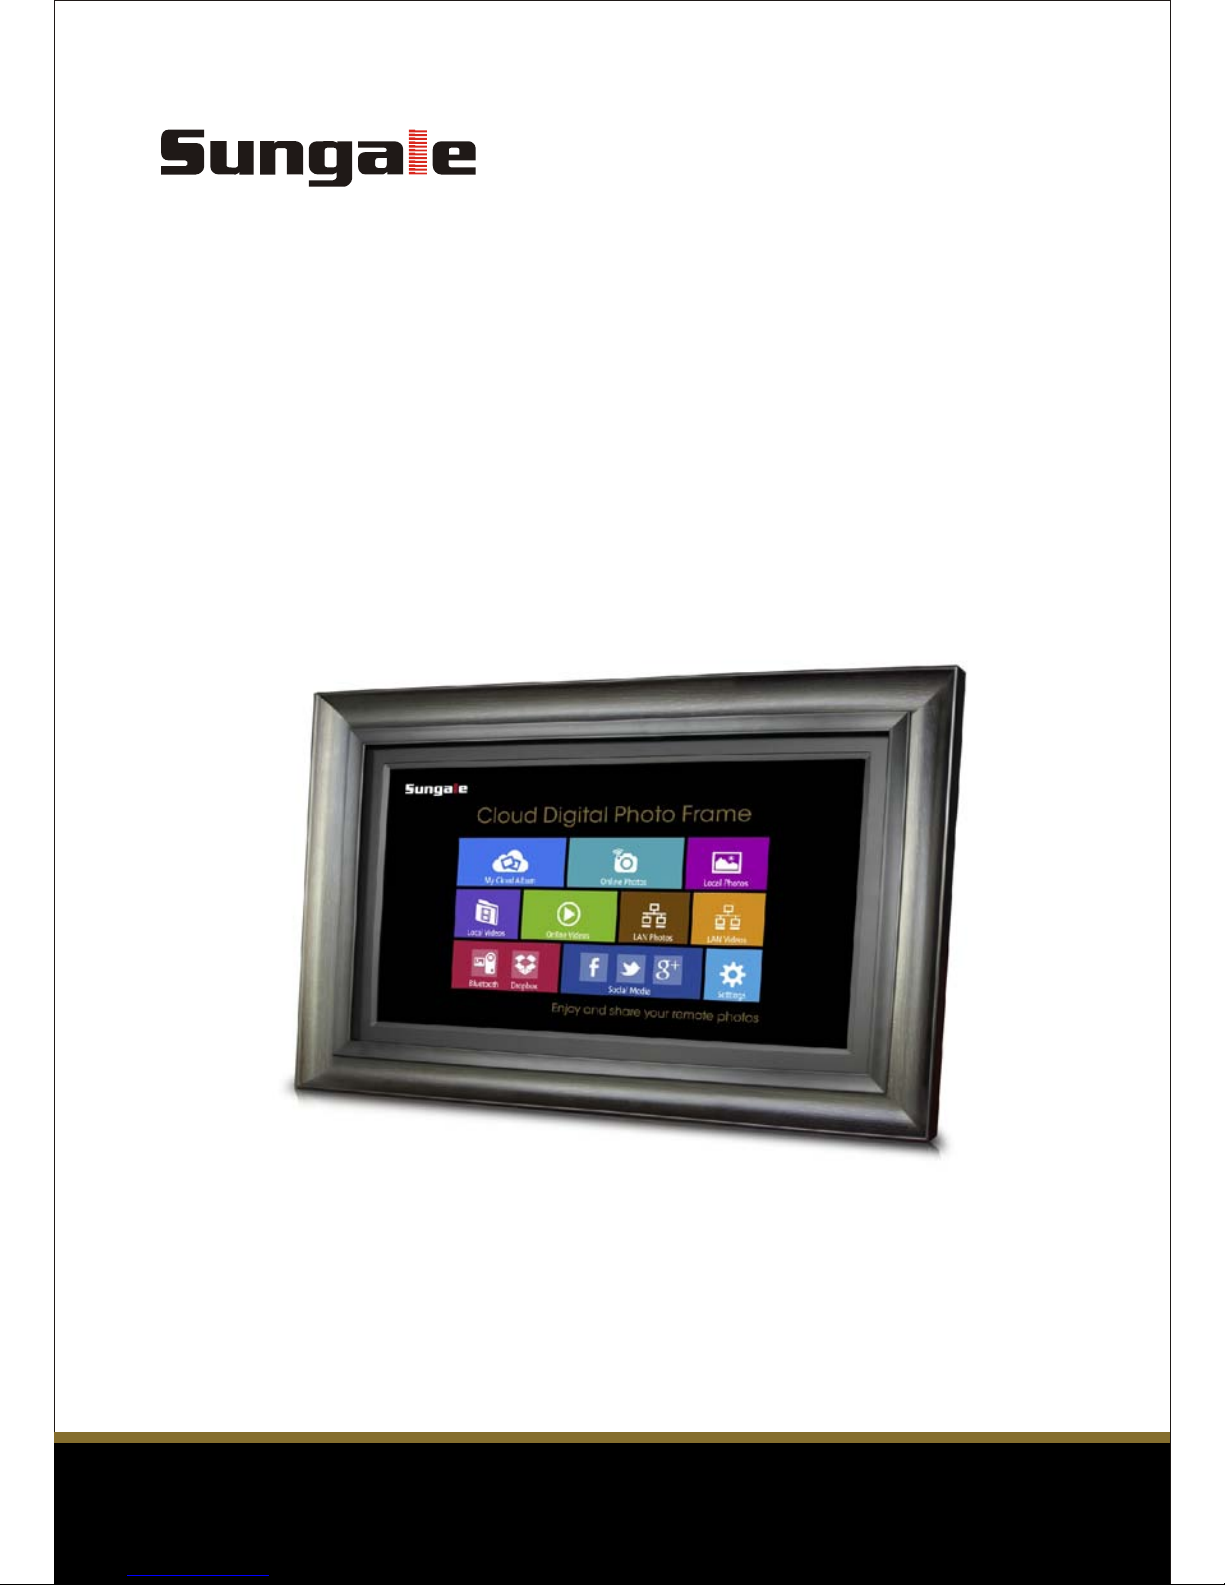
Cloud Digital Photo Frame
MODEL: CD1900WV
Page 2
Before Operation
Product Introduction
Safety Precautions
2
3
5
Package Contents
7
7
Basic Operation
Insert a memory card
8
Connect to the computer
9
9
11
Advanced Operation
12
13
14
12
18
18
Customer Management
Support
FAQs
Remote Control illustration
5
8
Getting Started
Connect Power
Start-Up & Navigation
Dual Interface
10
Status Icon Briefing
WiFi Setup
Google Account
Google Play Store
Online Photos
Online Videos
15
15
Social Media
LAN Photos & Videos
16
16
Local Photos
Local Videos
17
17
Blutetooth
Settings Menu Overview
18
Tips
Page 3
14" WiFi Digital Photo Frame, share your favorite photos and videos from the
internet with friends, family and places of business, and bring endless photo
and video storage with easy navigation to your home or business.
Features:
Specifications:
Display resolution : 1366x768pixels (16:9)
Display size: 19 inch LED
Internal memory: 8GB
Multimedia support: Photo / Video / Audio
Bluetooth: 4.0 Version
Built-in WiFi : 802.11 b/g/n
Remote: Motion sensor RC
Memory Card: SD/SDHC
Speakers: 2 x 2W
G-sensor: Yes
USB type: 1xMini USB OTG, 1x USB host
Power Adaptor: Input: 110~240V; Output: 12V, 2A
Product Introduction
Before Operation
2
Build up your own cloud albums, manage remote frames slide shows
Enjoy 10GB free cloud storage space.
View photos you stored in your cloud storage
View photos scattered in computers in your home LAN
View photos stored in you SD cards
Store your most precious photos in internal memory and display them
Share photos with your family and friends via internet
Support display multimedia
Dual interface, modern and traditional, for your selection
High resolution screen to show details of the photos
Motion sensor remote controller eases your internet surfing
Bluetooth transfer your photos from mobile devices to the frame
Wireless link to internet automatically
Page 4
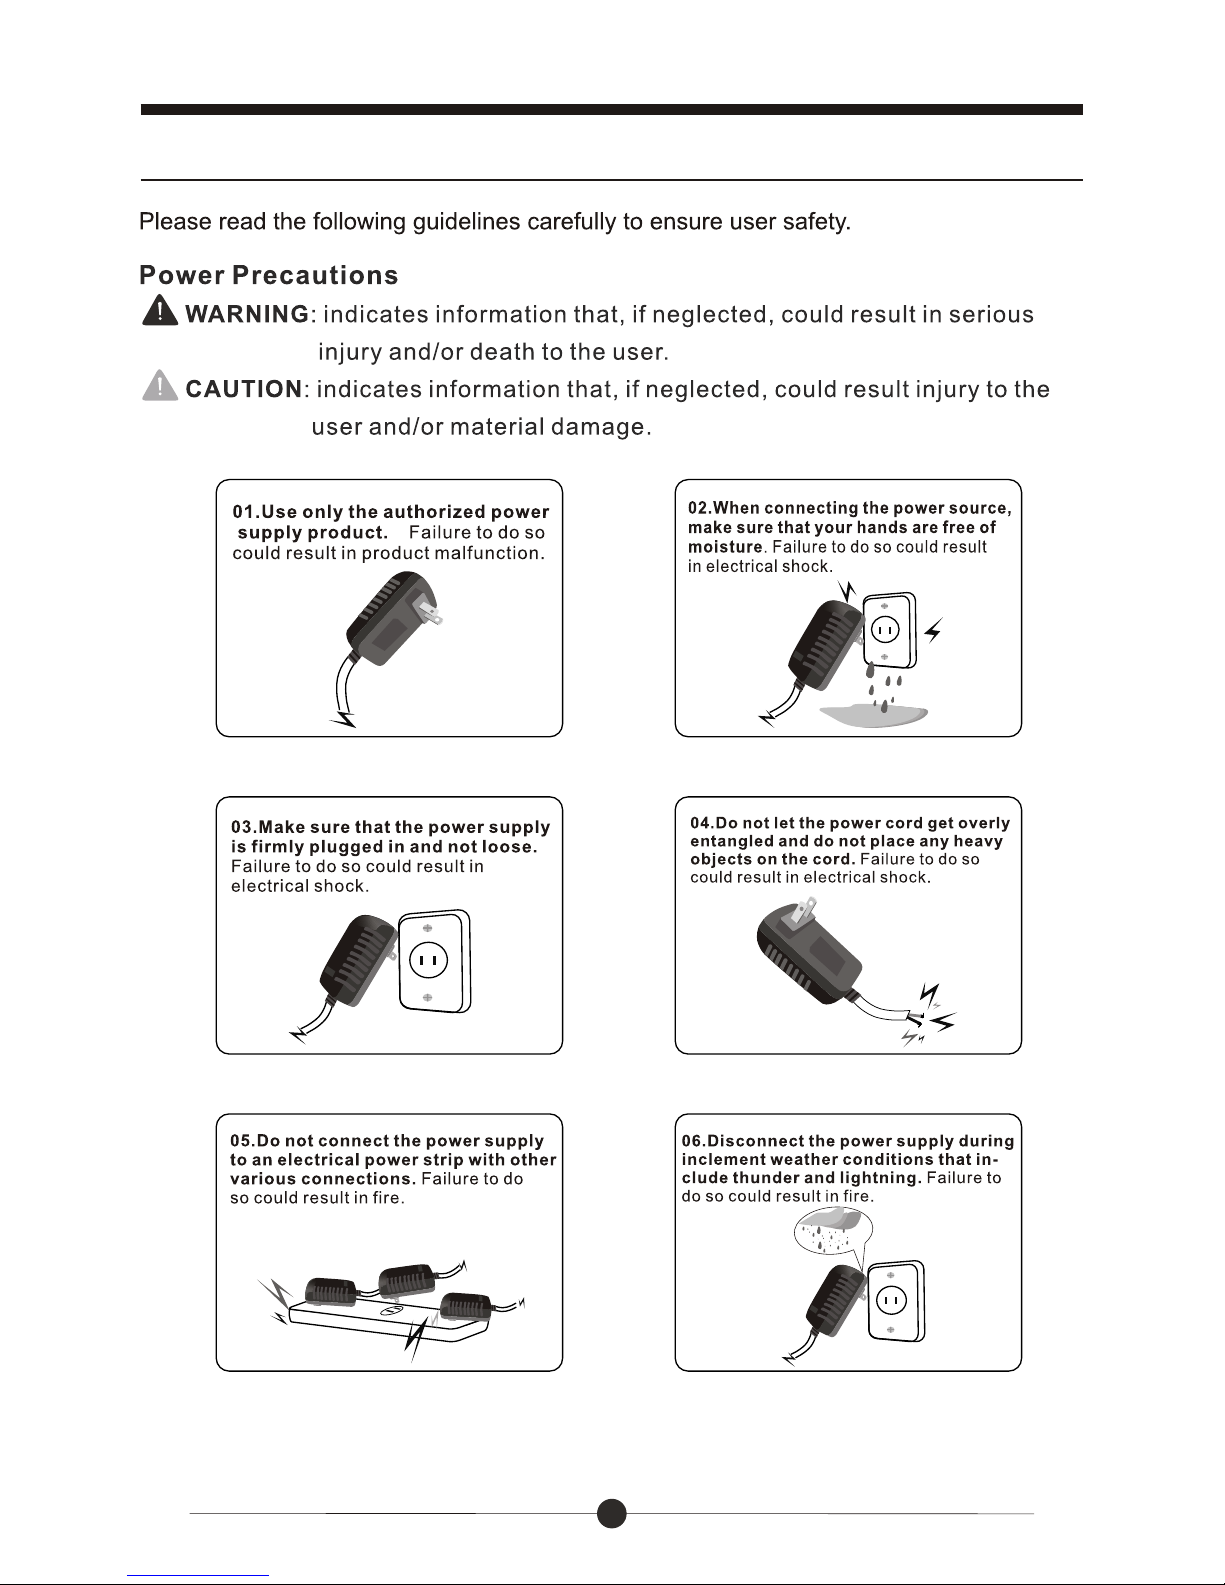
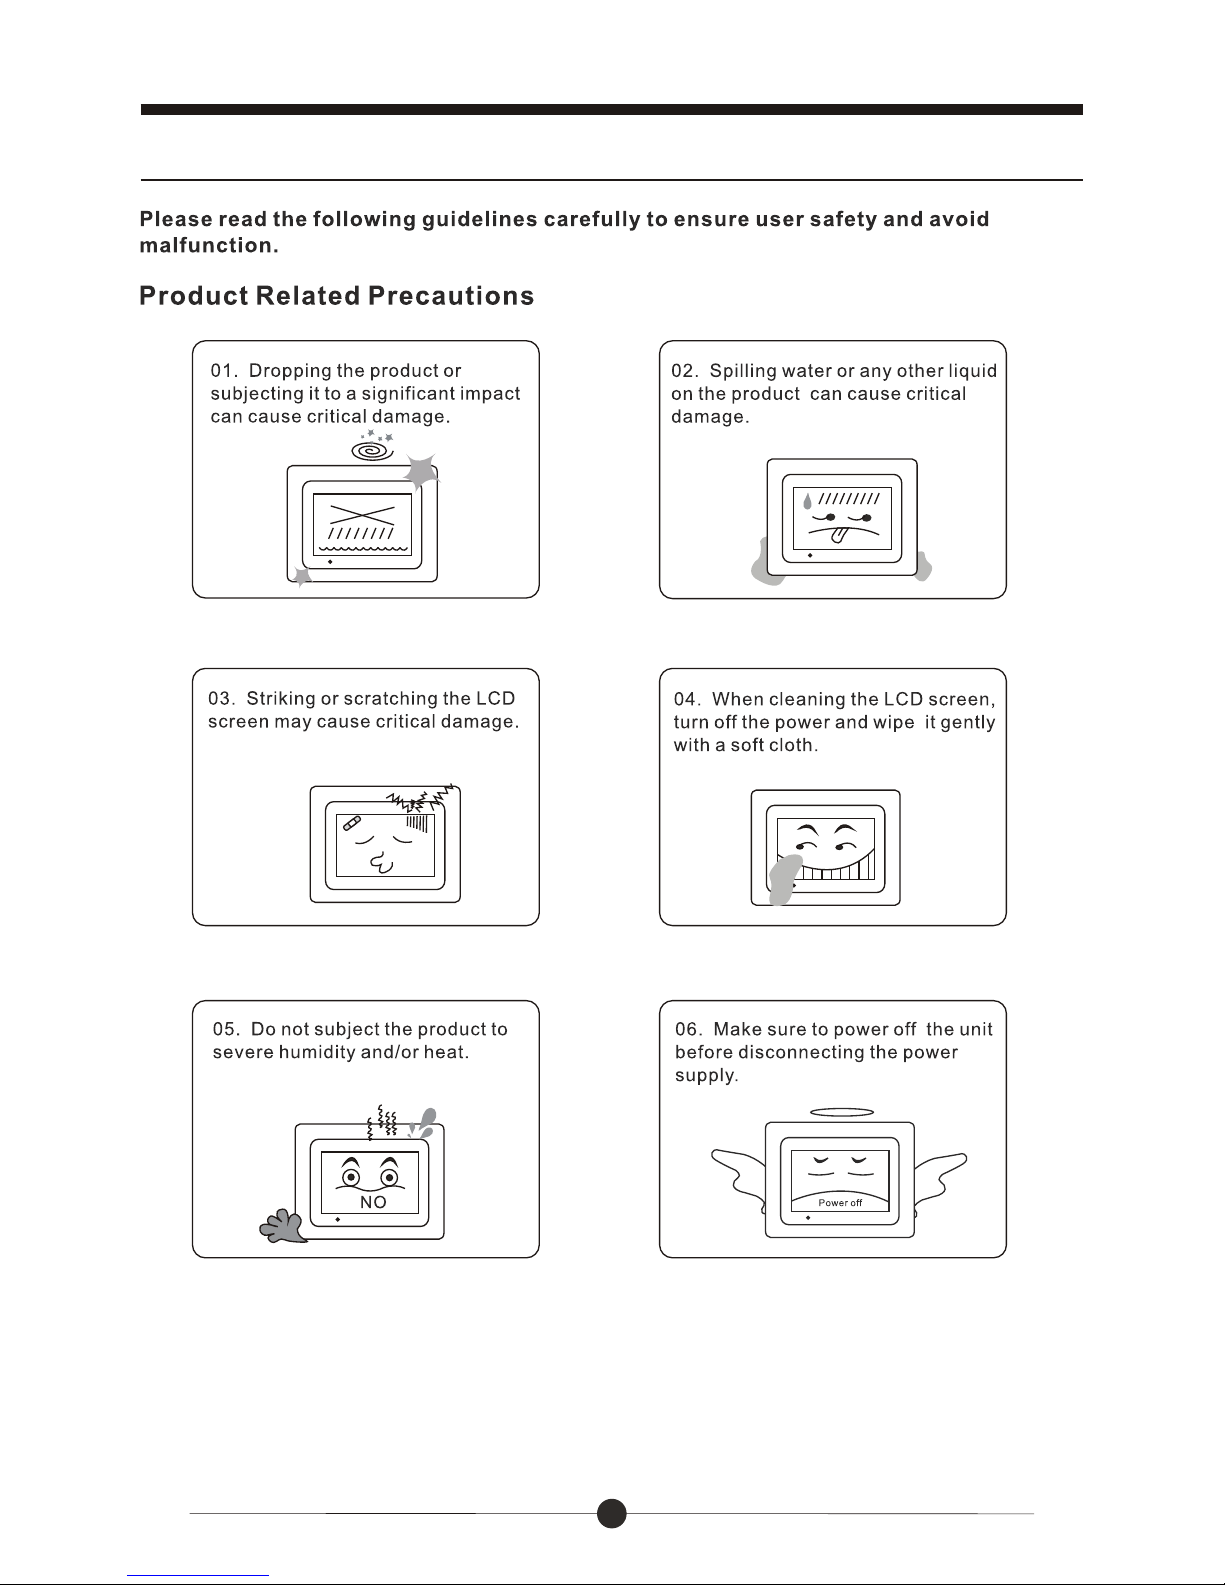
Safety Precautions
Before Operation
3
Page 5
Before Operation
Safety Precautions
4
Page 6
5
Before Operation
Package Contents
19” Cloud Digital Photo Frame
Quick Start Guide
Remote Control
Power Adaptor
Stand
Limited Warranty
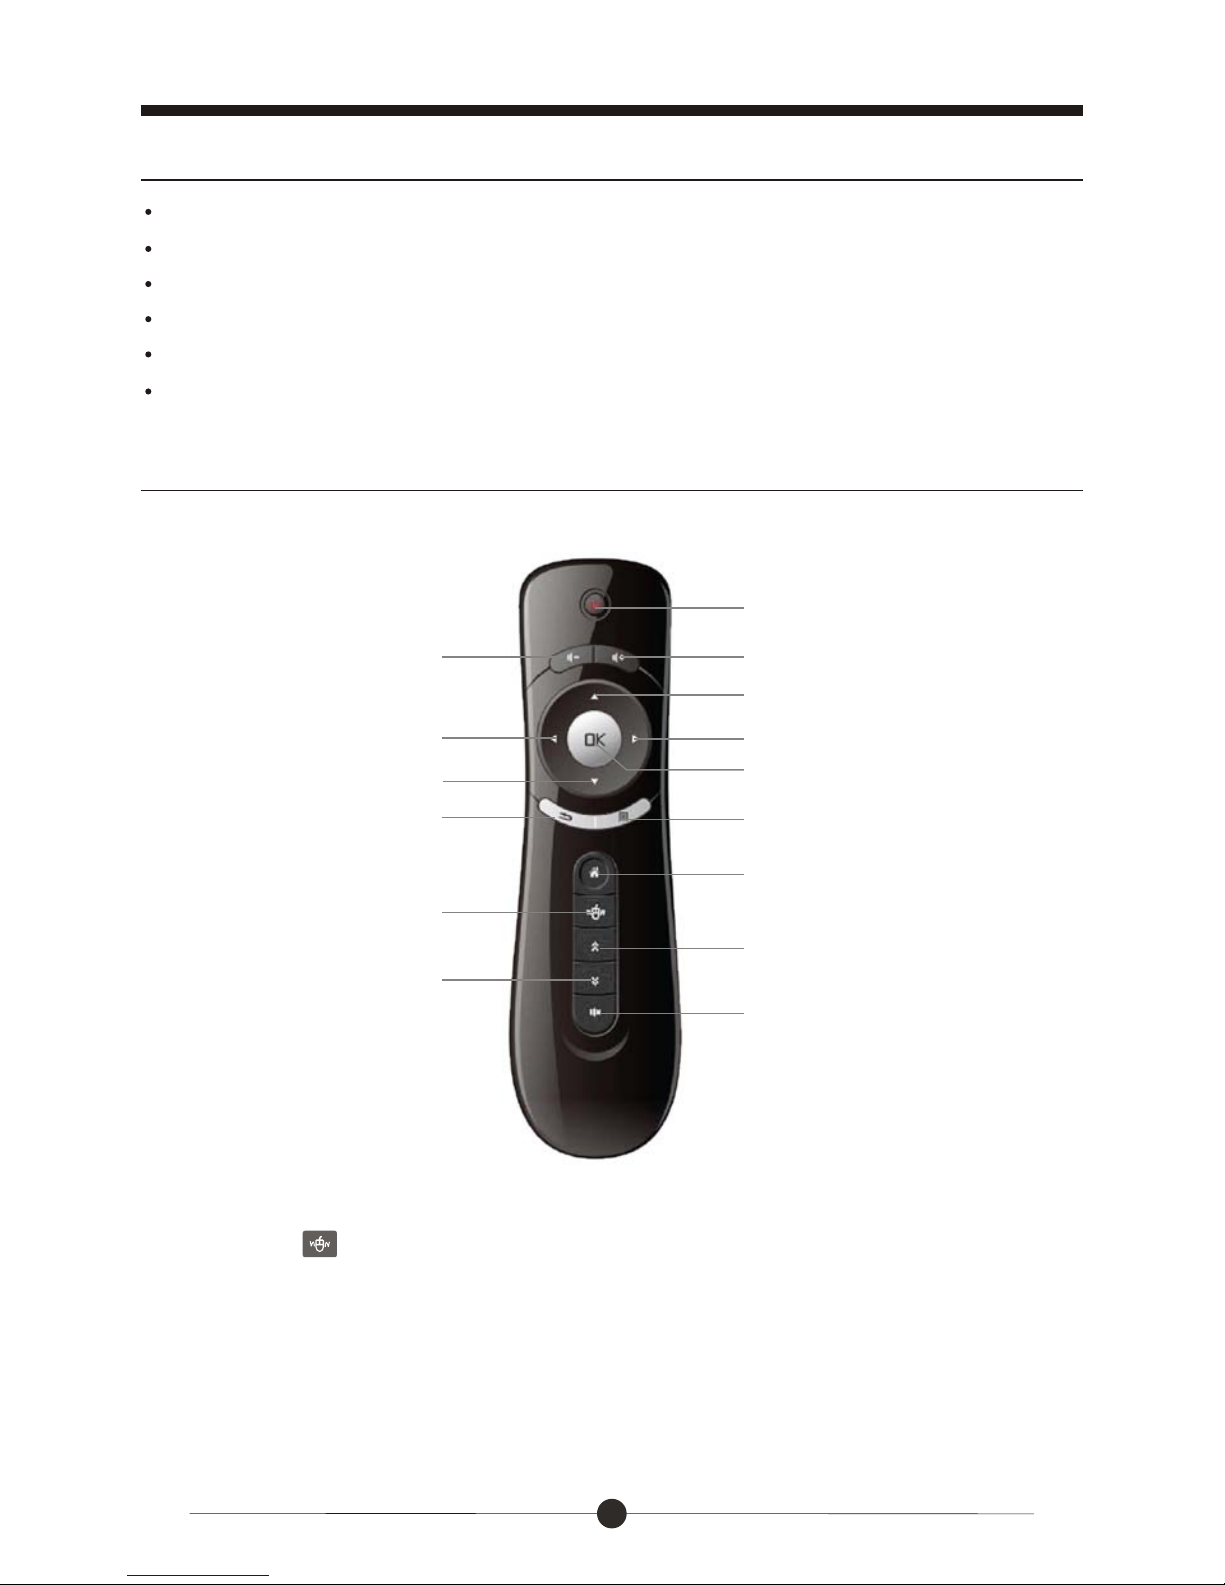
Remote Control
Standby
Volume Down Volume Up
Enter
Back
Home screen
Key Lock
Page up
Mute
Menu
Up (Direction key)
Down (Direction key)
Left (Direction key)
Right (Direction key)
Page down
Tip: Click the button to lock screen, and press again to unlock screen.
Note: Insert remote control receiver in the USB port before you use the
remote control.
Page 7
Before Operation
6
Motion Sensor Remote illustration
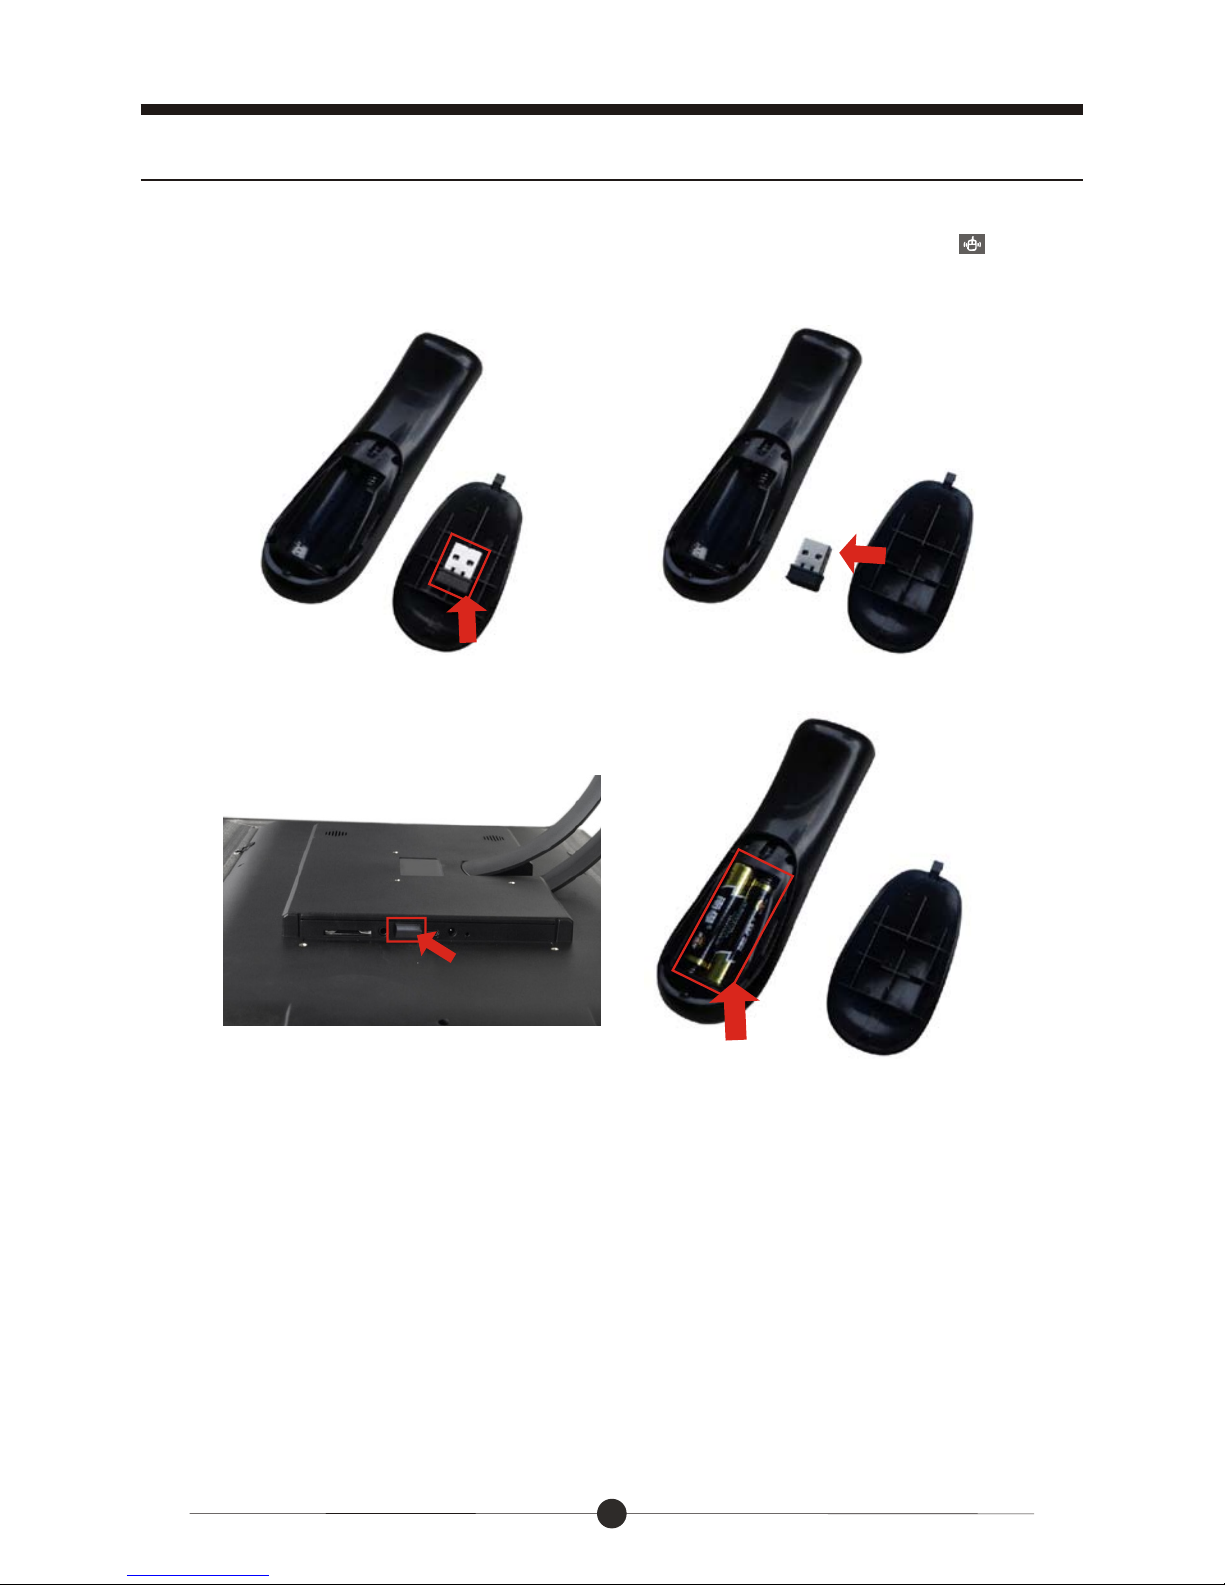
Open battery compartment, you will see a mini receiver, plug the mini receiver
into the USB port, put in batteries, close compartment. Then click the button
on the remote control, now, you can use your motion sensor remote.
The Mini receiver Take out the Mini receiver
Plug the mini receiver
into the USB port
Put in 2 AAA batteries into
the Remote Control
Page 8
Basic Operation
7
Getting Started
Connect Power
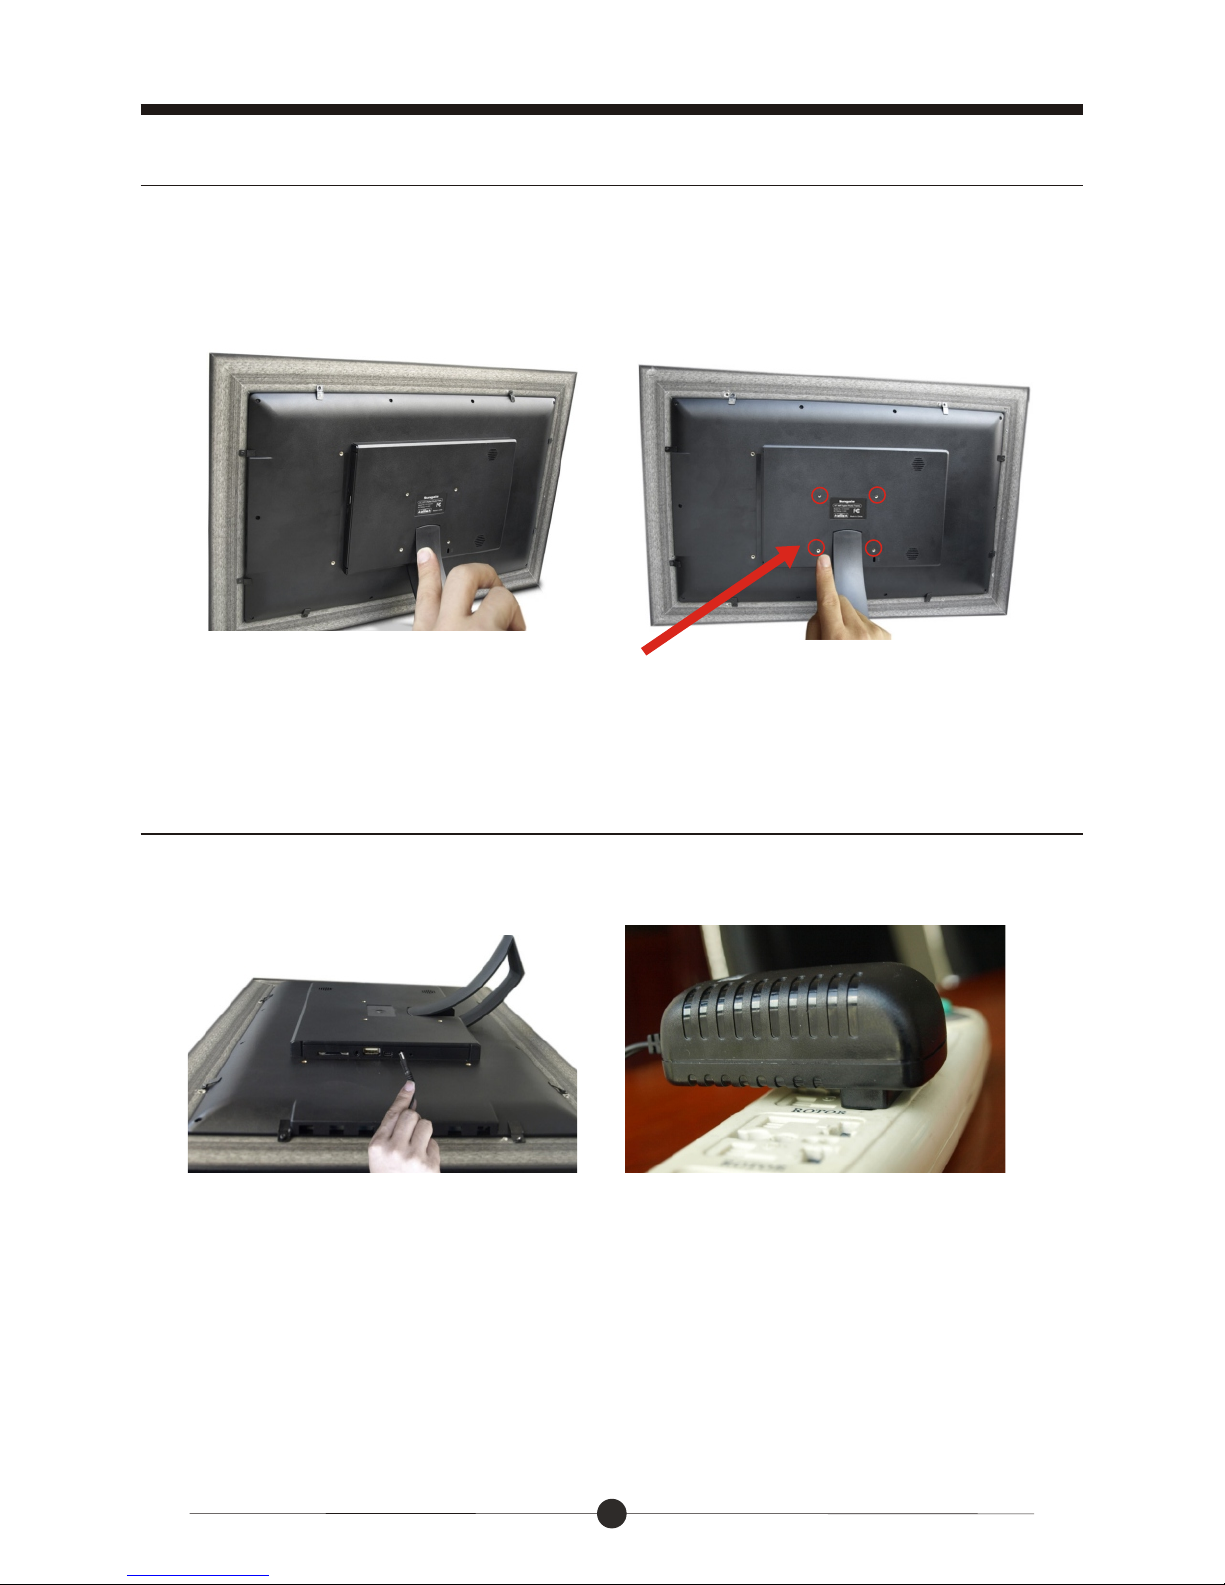
Your frame can either sit on the top of a surface with the stand or hang on the
wall with the optional support (not included)
Plug the Power Adaptor into the frame and also into a Power Outlet.
Wall mounting hole
(The wall mounting support is not included)
Sitting on top of a surface
hang on a wall
Page 9
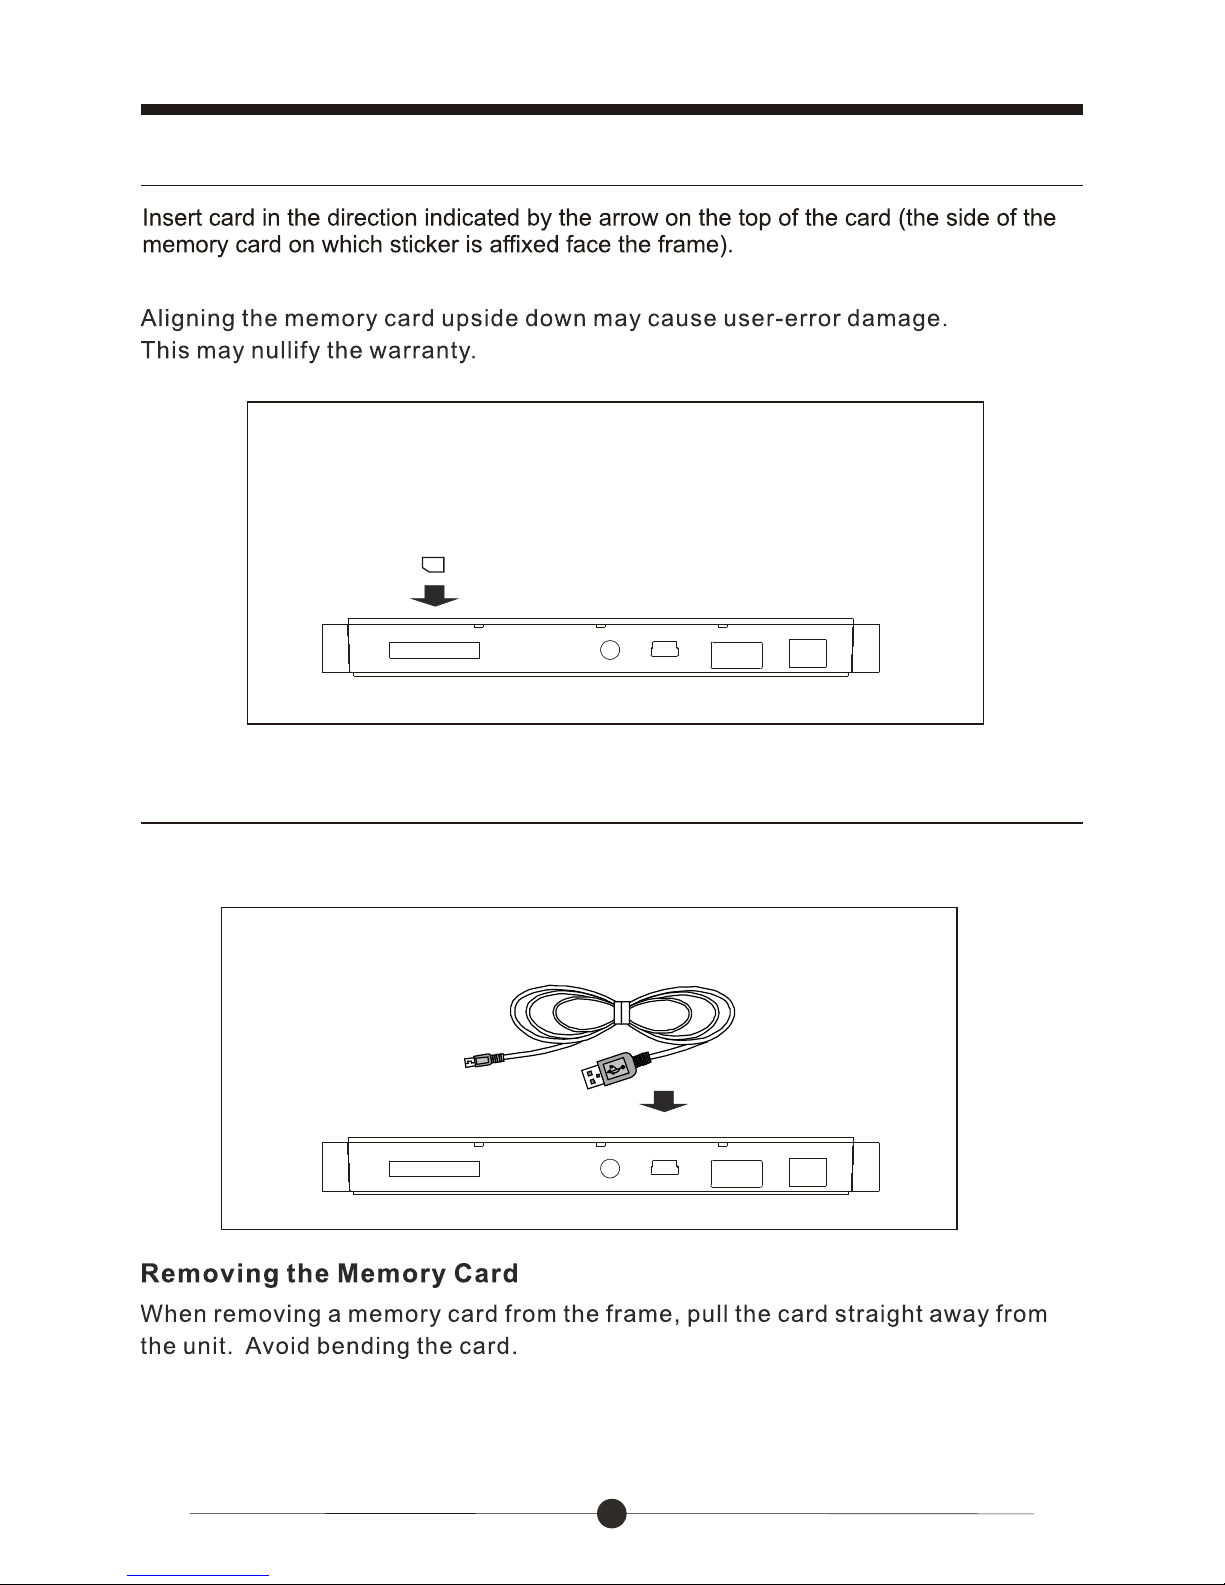
Use the USB cable, you can connect the Cloud DPF to the computer
Basic Operation
Connect the Cloud DPF to the computer
8
SD/SDHC card is compatible with this unit.
SD/SDHC
Insert a memory card
Page 10
9
Basic Operation
Start-Up & Navigation
Dual Interface
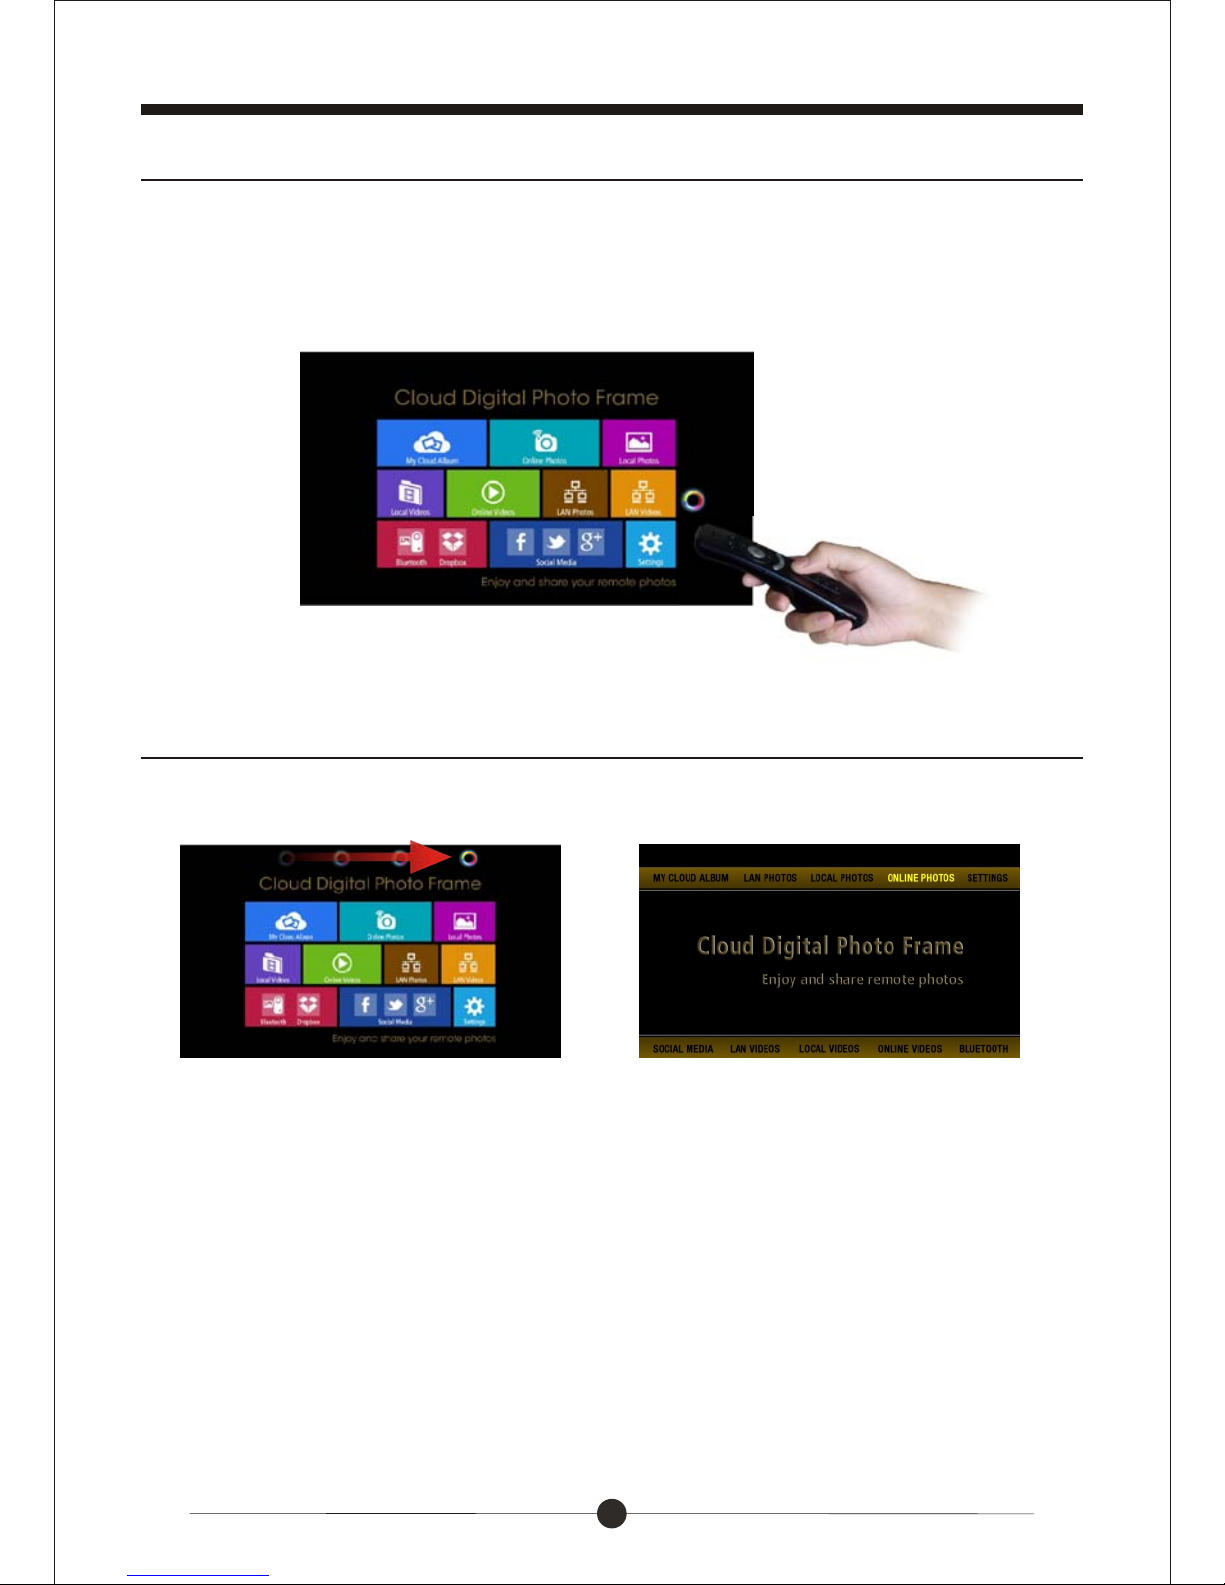
Your frame will automatically begin starting up once connected to power.
After 1 minute you will come to the home screen. You can use the Motion
Remote Control to navigate the menu.
To switch between interface, Hold the “OK” key to slash cursor on home screen.
Block Interface Traditional Interface
Home screen Interface
Page 11
Status Icon Briefing
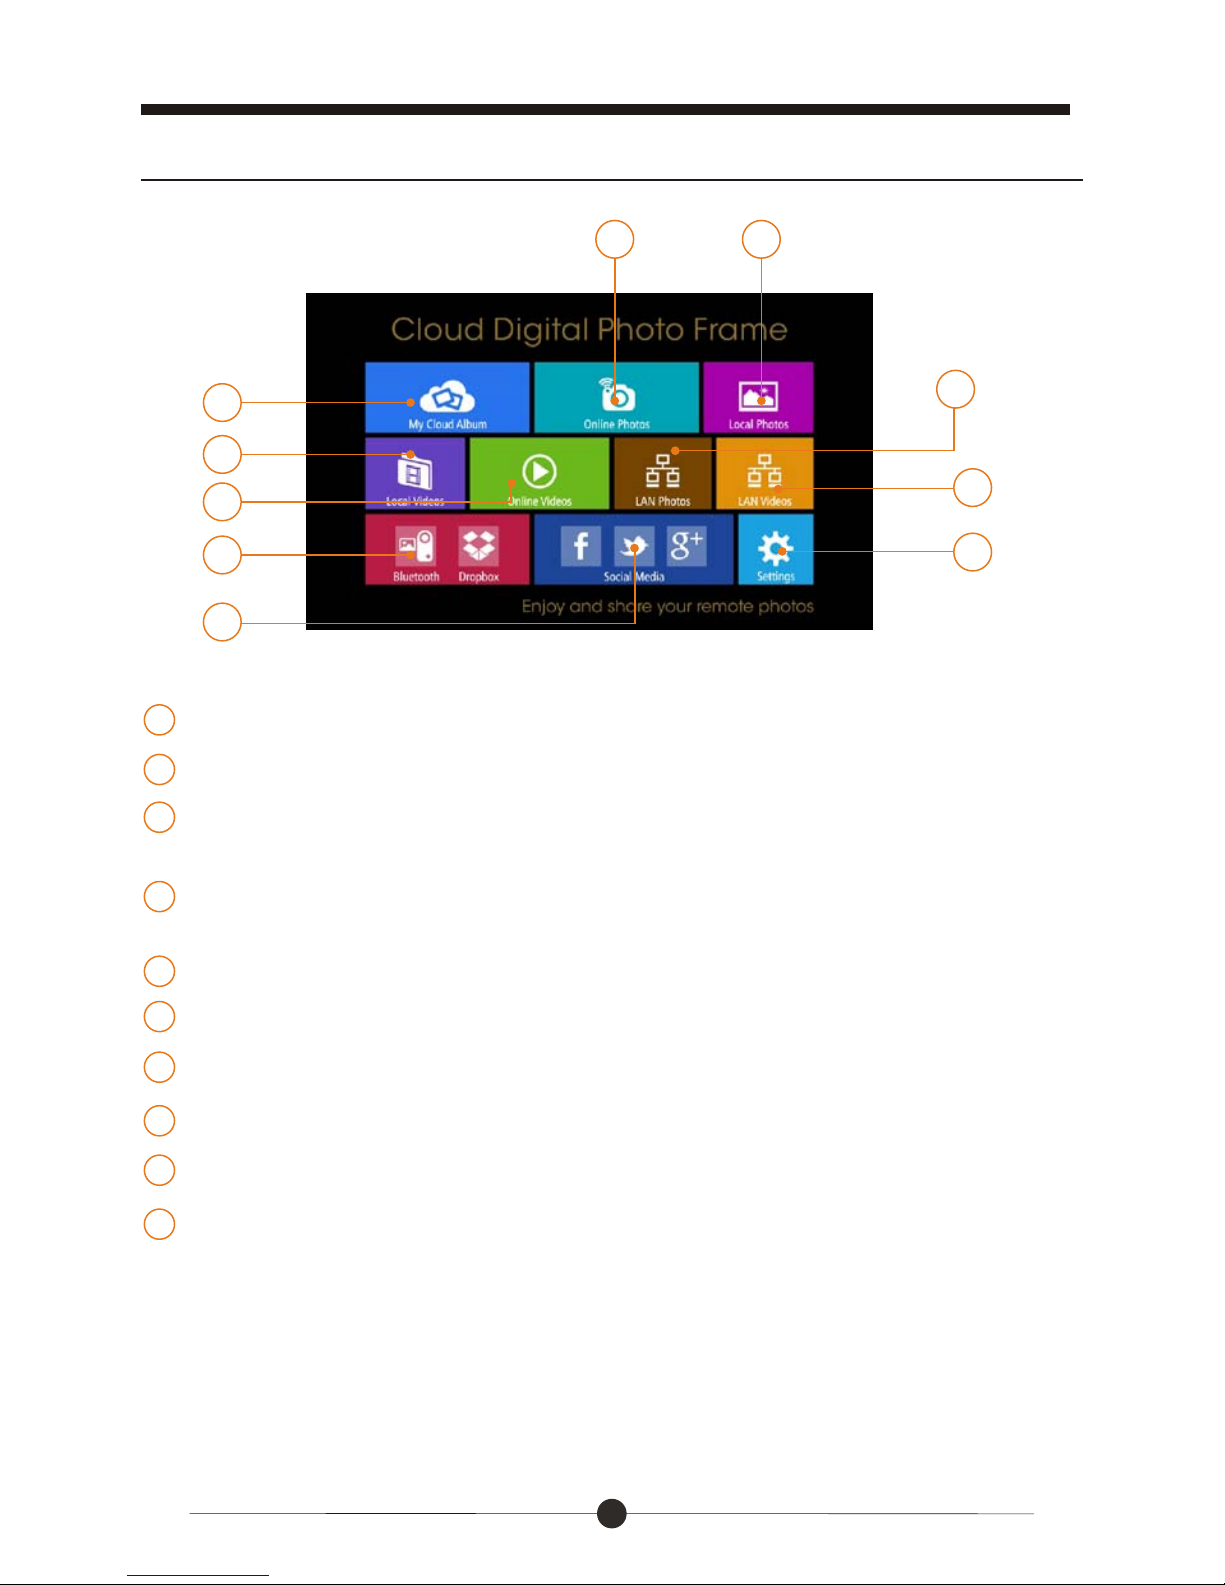
Social Media: reach to facebook, twitter or google play's login page.
Settings: Configure the unit.
Have four icons in this route: Browser, all Apps, Files, Settings.
Online Videos: to review or download videos from website.
Local Videos: Play or view the videos stored in internal memory, SD
card, U-Disk.
LAN Photos: to share or review the photos in local internet.
LAN Videos: to share or review the videos in local internet.
Local Photos: Display or review the photos stored in internal memory,
SD card, U-Disk.
Online Photos: to review or download photos from website.
Bluetooth: to connect with other DPF or mobile to share the pictures
10
Basic Operation
1
4
2 3
8
9
10
7
2
3
4
5
6
7
8
9
MY Cloud Album: to share or review the photos in cloud storage space.
1
5
6
10
Page 12
11
Advanced Operation
WiFi Setup
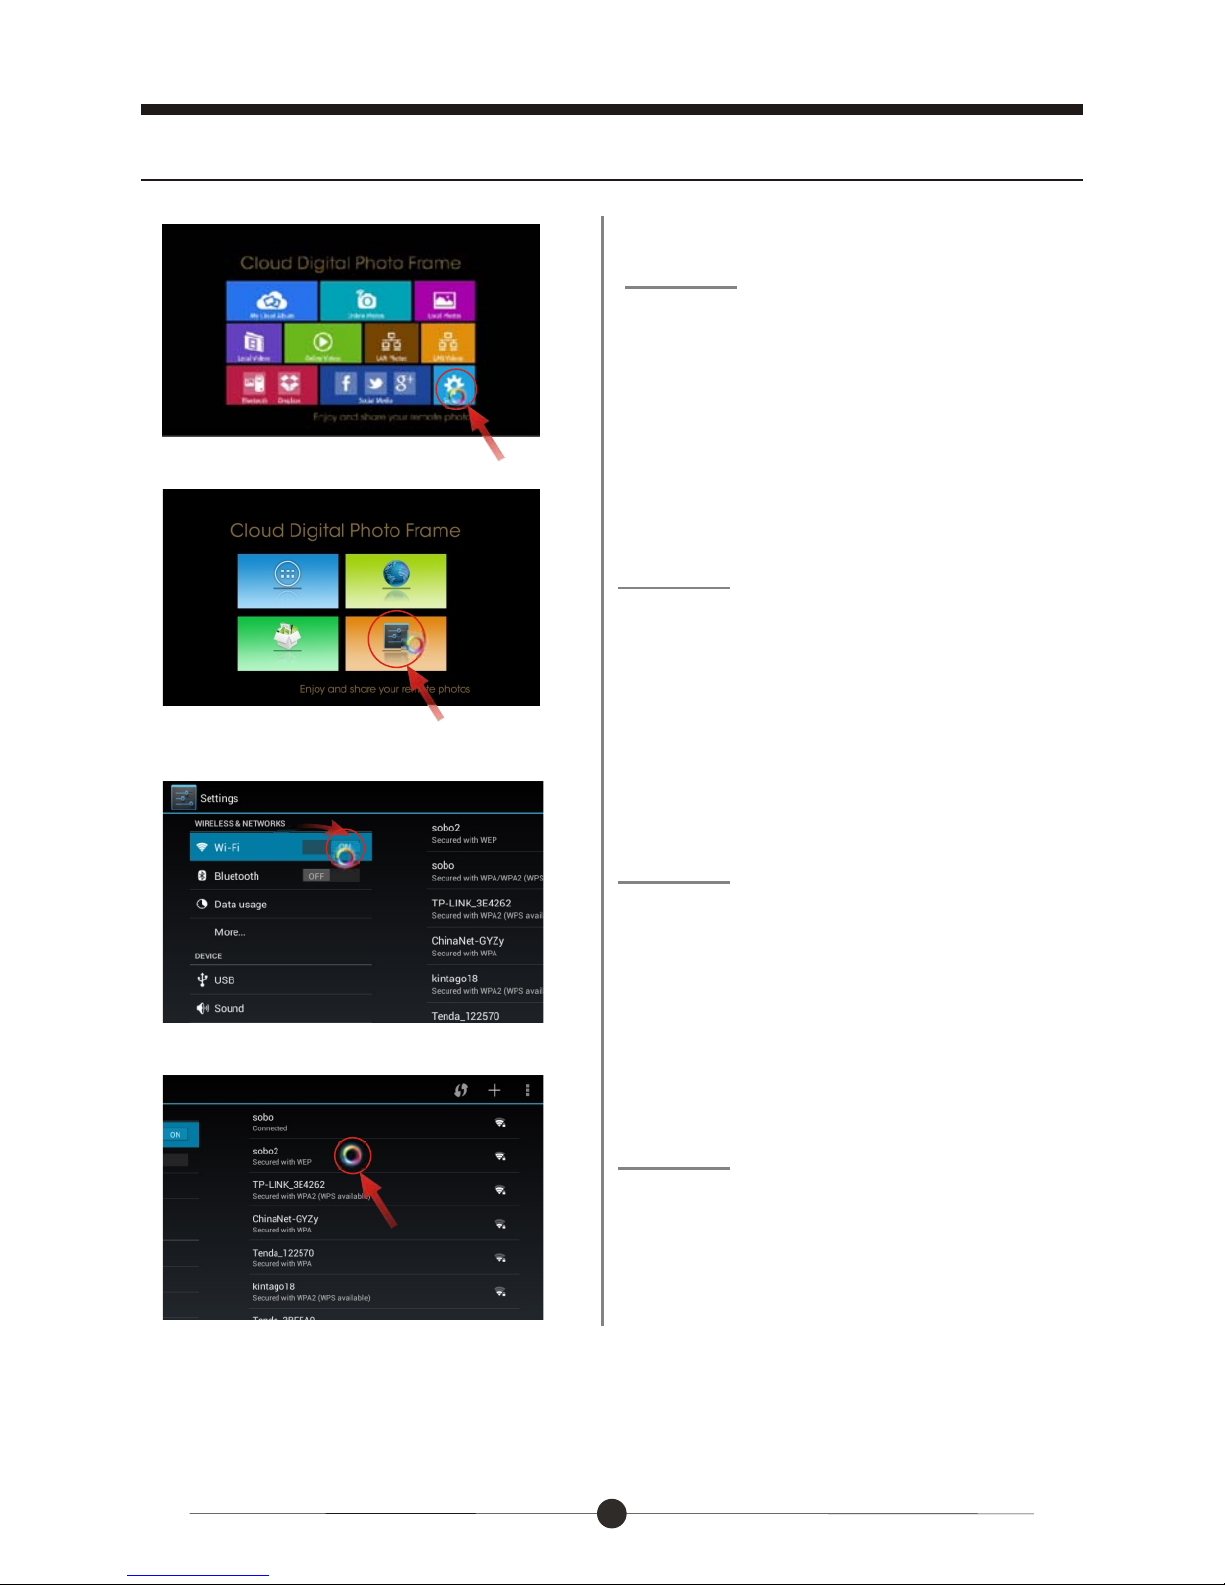
Step 2.
Select the “SETTINGS” menu icon.
Slide the WiFi button to the “ON”
position.
Select your network, put in your
password, and than click “connect”.
Note: In order to use the online featuresof this frame, you must connect your
frame to a WiFi internet connection.
Step 3.
Step 4.
Step 1.
To setup the WiFi Connection on your
photo frame, click “SETTINGS” from
the home screen. (Cont. Next page)
Page 13
Advanced Operation
12
Step 1.
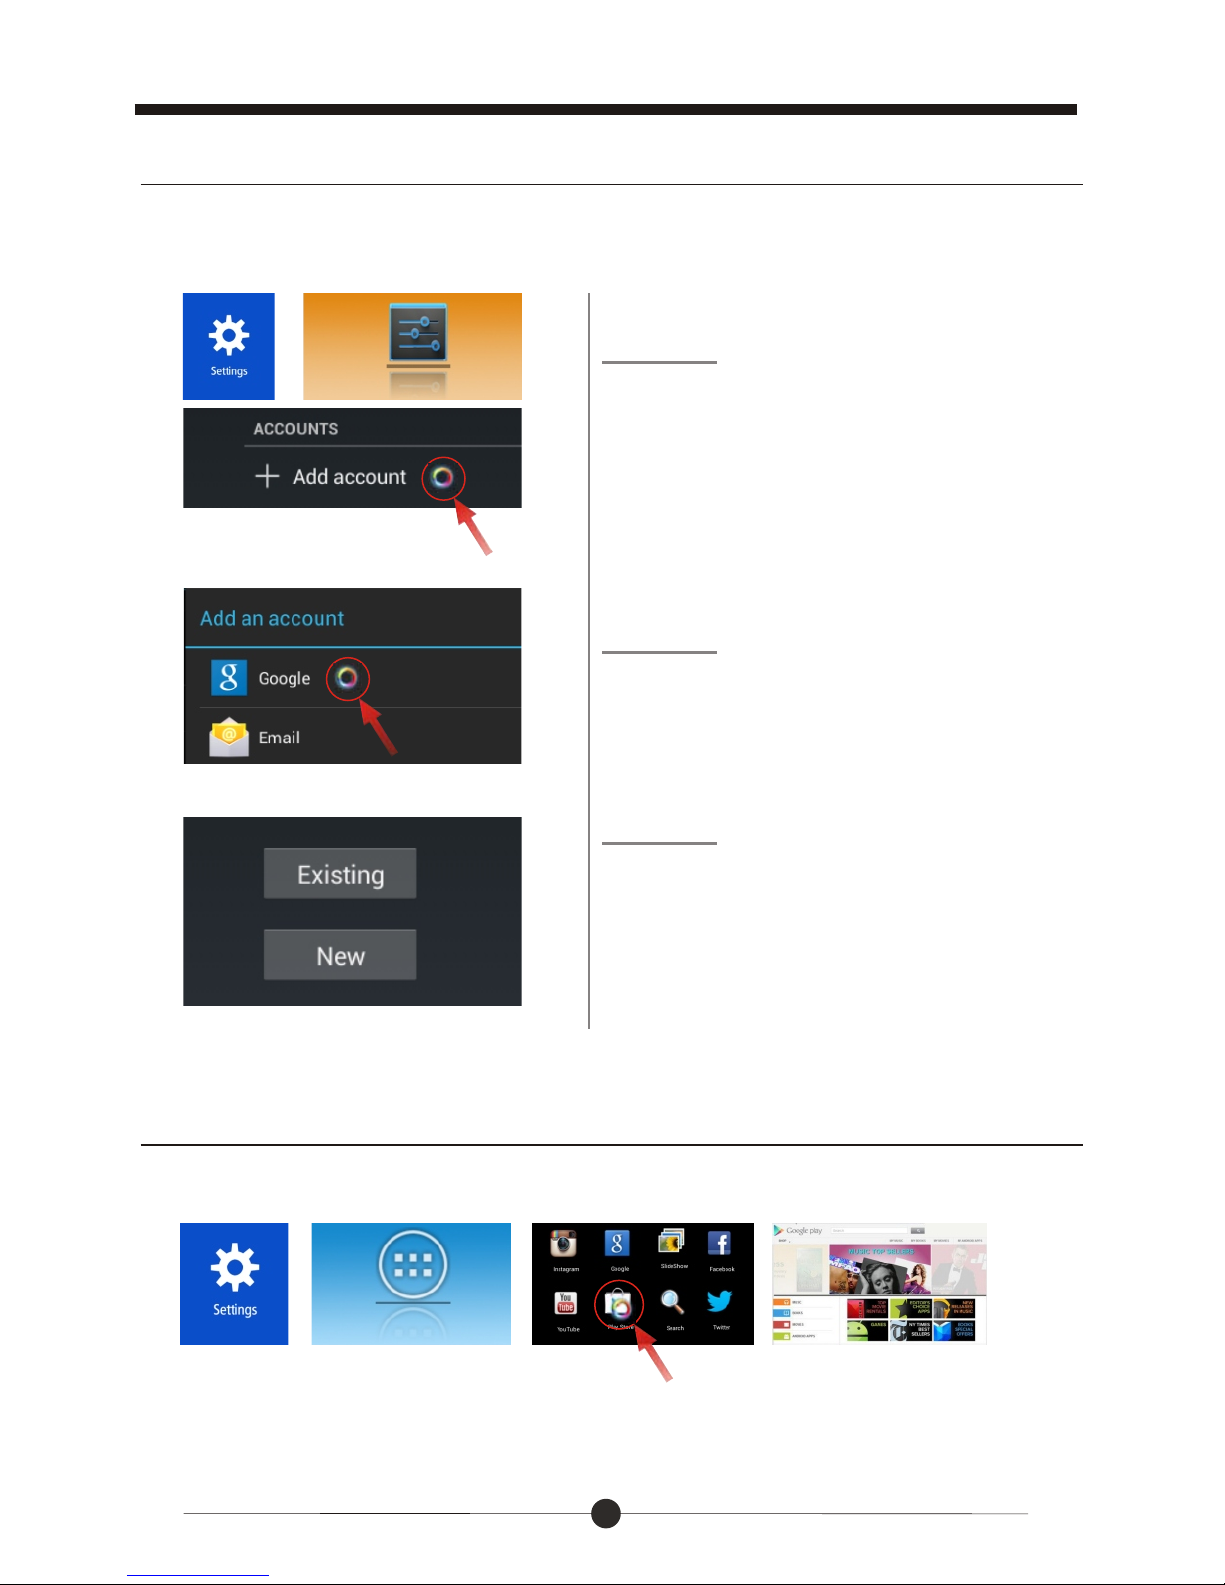
Online Account Setup Part 1: Google Account
A Google Account will allow you to access the Google Play Store for APP
downloads, and Google applications.
Step 2.
Step 3.
Go to the Settings menu, and scroll
down to “+Add account”, and click it.
Click “Google” under the add an
account menu.
Click “Existing” if you currently
have a gmail email account and
put in your email and password.
Click “New” to setup a gmail
email account.
Google Play Store
Once you have setup your Google Account, you can access Google Play.
Page 14
Advanced Operation
13
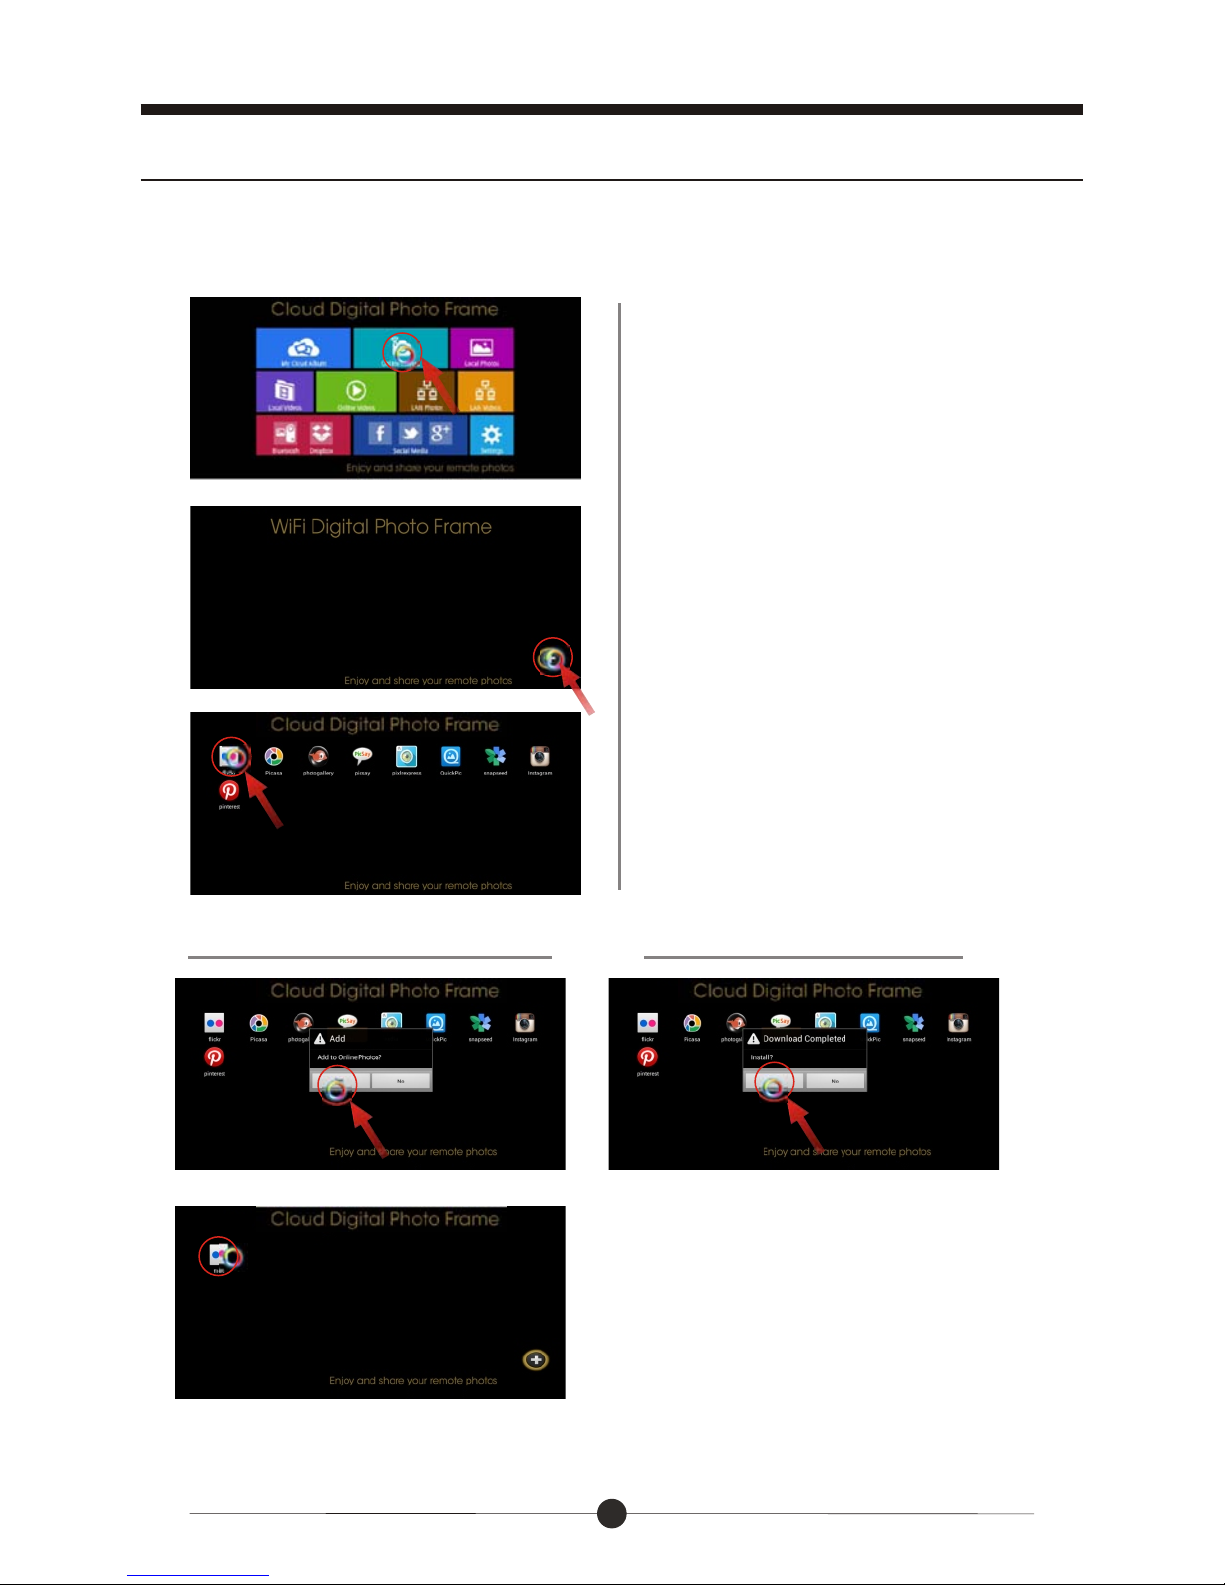
Online Account Setup Part 2: Online Photos
To access these Photo Hubs
select Online Photos.
Select the “+” symbol in the lower
right corner to enter the online
storage back list.
Select “YES” to download
The Online Photos tab gives you access to a numerous amount of online
Photo Hubs.
Select any Hub to install and
download to your frame.
Select “YES” to install
After the installation is complete, your
Hub will be available on the front
screen. You can now select and use it.
Page 15
14
Advanced Operation
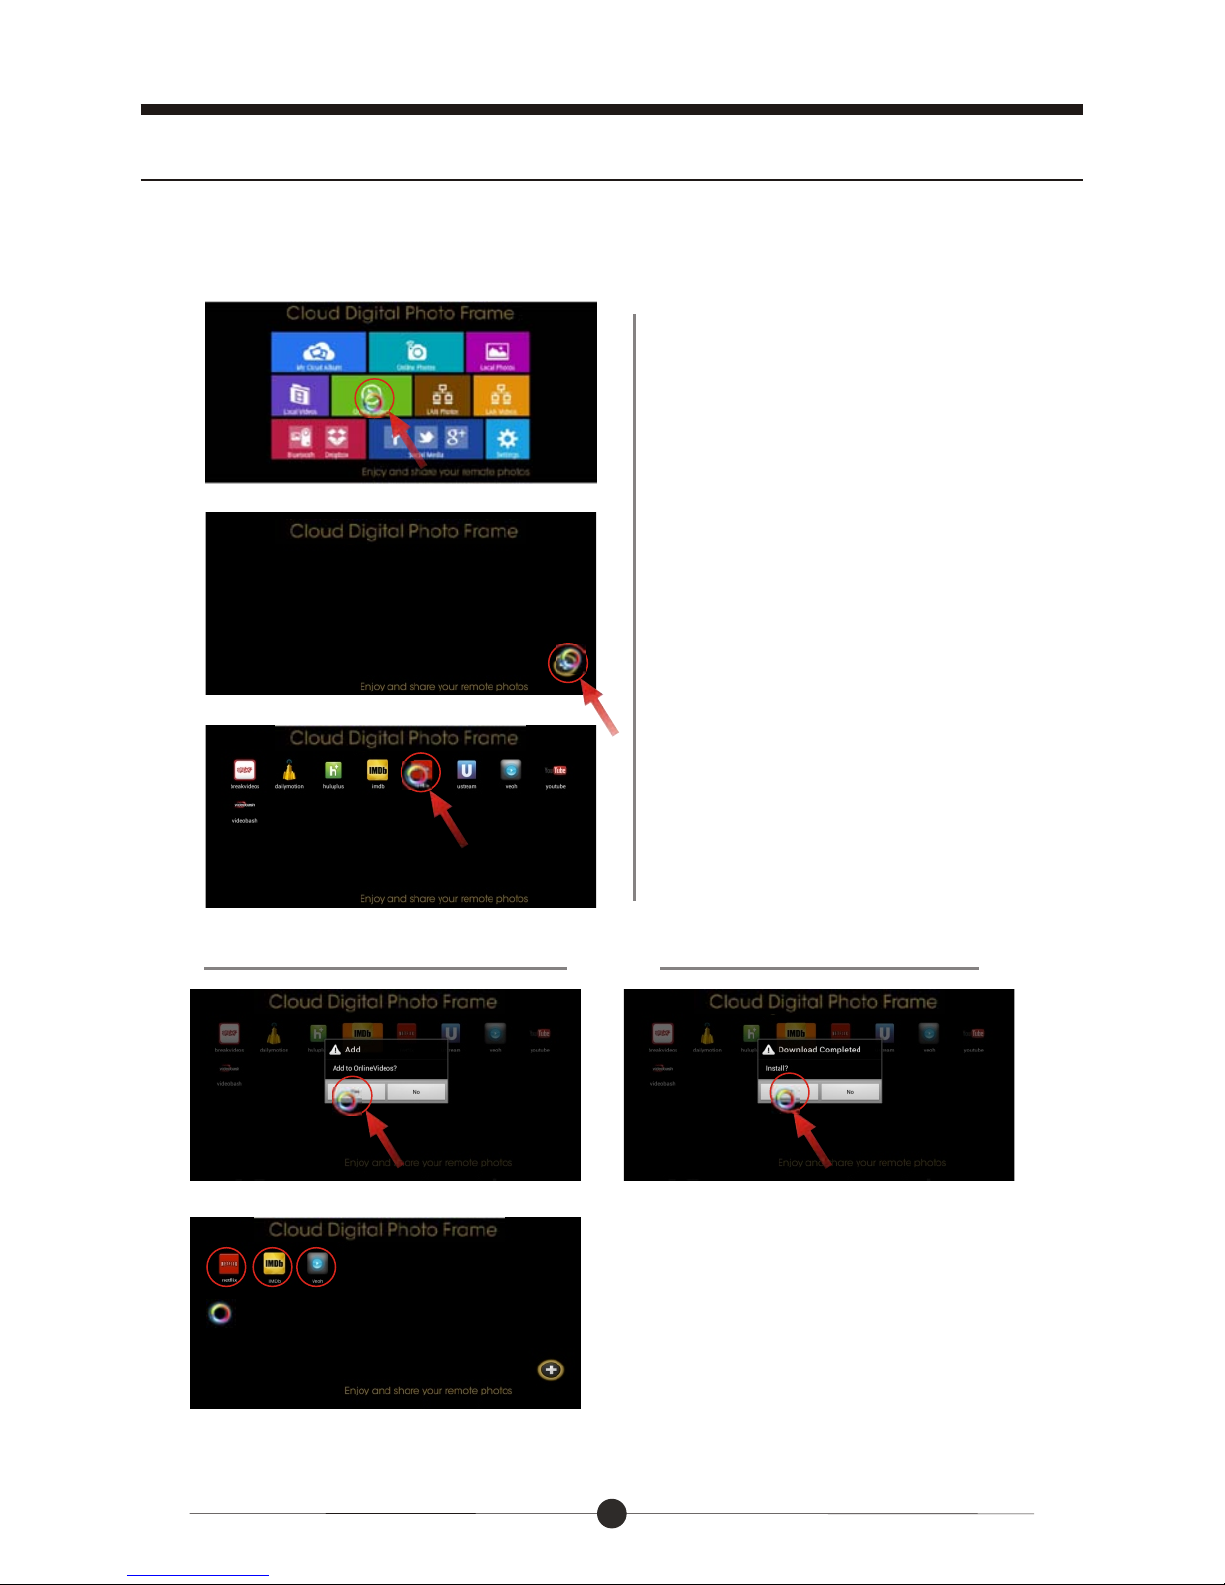
Online Account Setup Part 3: Online Videos
To access these Video Hubs
select Online Videos.
Select the “+” symbol in the lower
right corner to enter the online
storage back list.
Select “YES” to download
Select any Hub to install and
download to your frame.
Select “YES” to install
After the installation is complete, your
Hub will be available on the front
screen. You can now select and use it.
The Online Videos tab gives you access to a numerous amount of online
Video Hubs.
Page 16
15
Advanced Operation
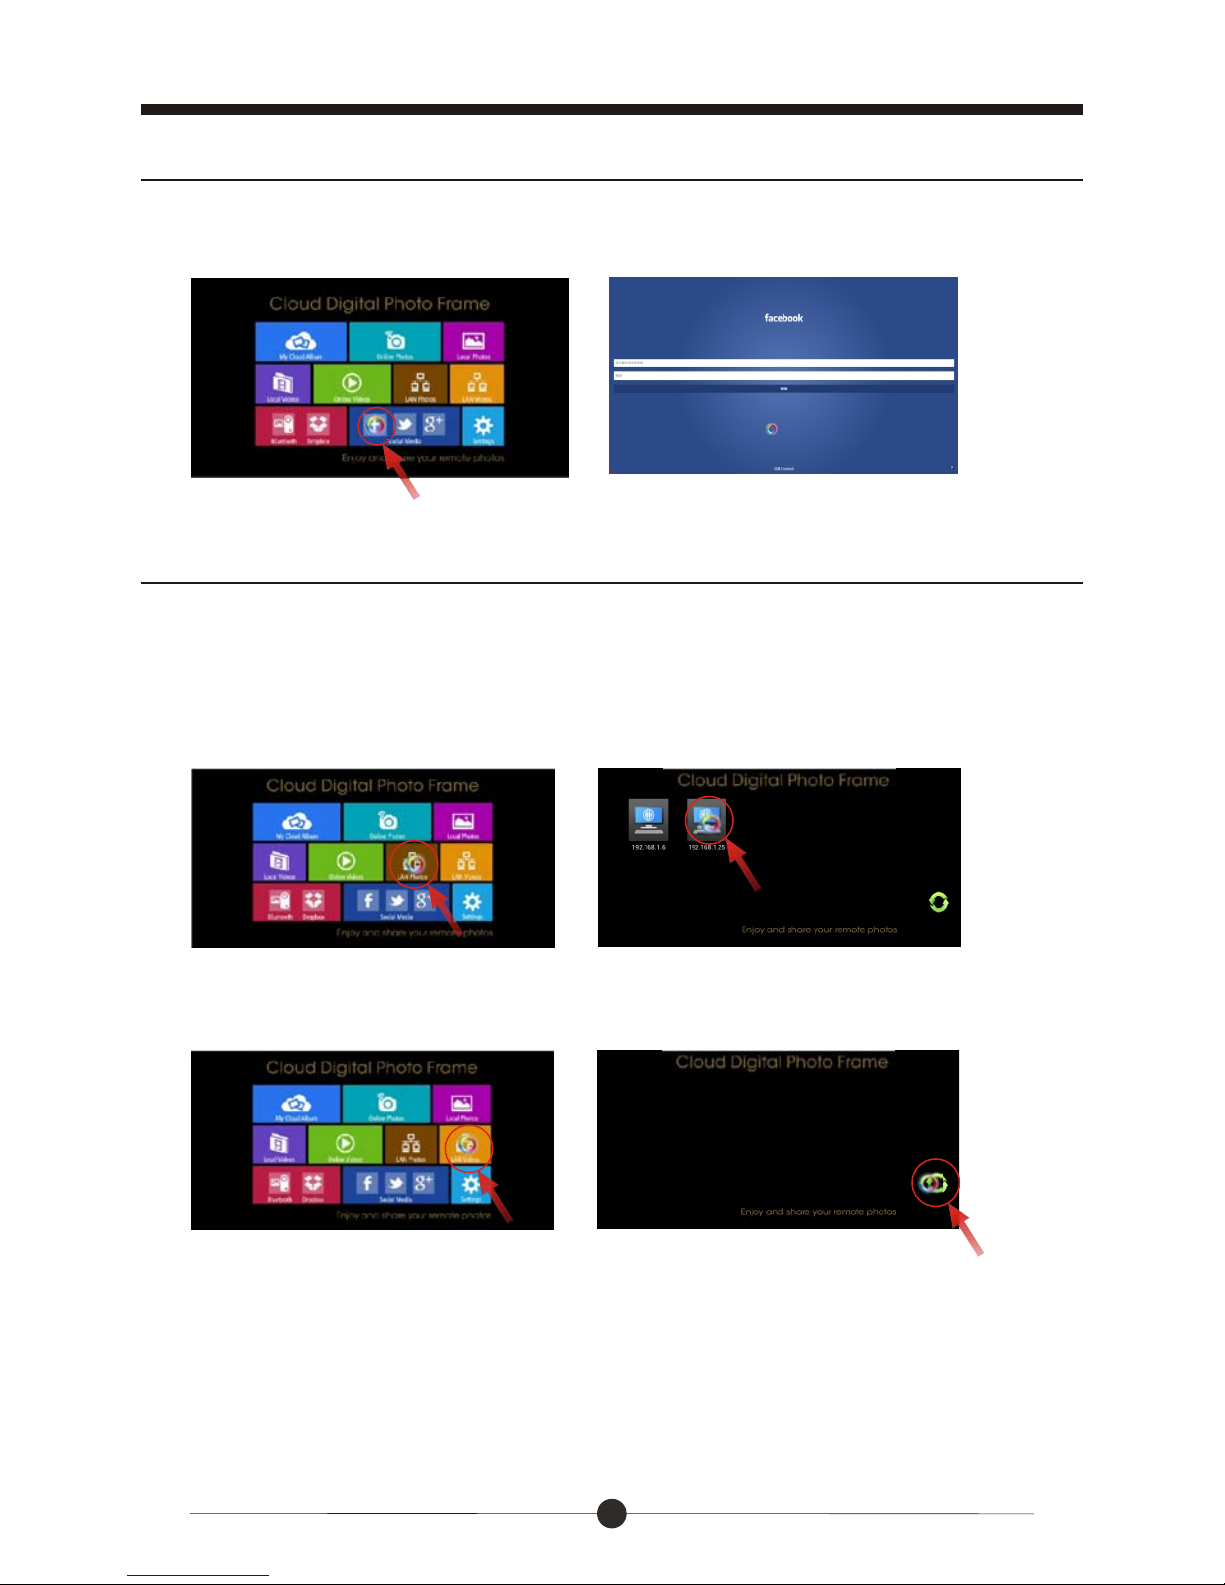
Online Account Setup Part 4: Social Media
LAN Photos & Videos
Your frame has been pre-installed with 3 popular Social Media buttons right
from the home screen. These include Facebook, Twitter and Google +.
Click the LAN Video or Photo icon and a search will automatically begin.
Select the device you want to browse files of.
If no device is discovered, click the “refresh” icon in the lower corner to
begin the search again.
Note: In some instances, you may have to turn off the firewall settings of a
specific folder in order to have it show up. This can be done in your
“Network Sharing Center”.
Your frame can access photos and videos that are available on a shared folder
or shared device within your own LAN (Local Area Network)
Page 17
16
Advanced Operation
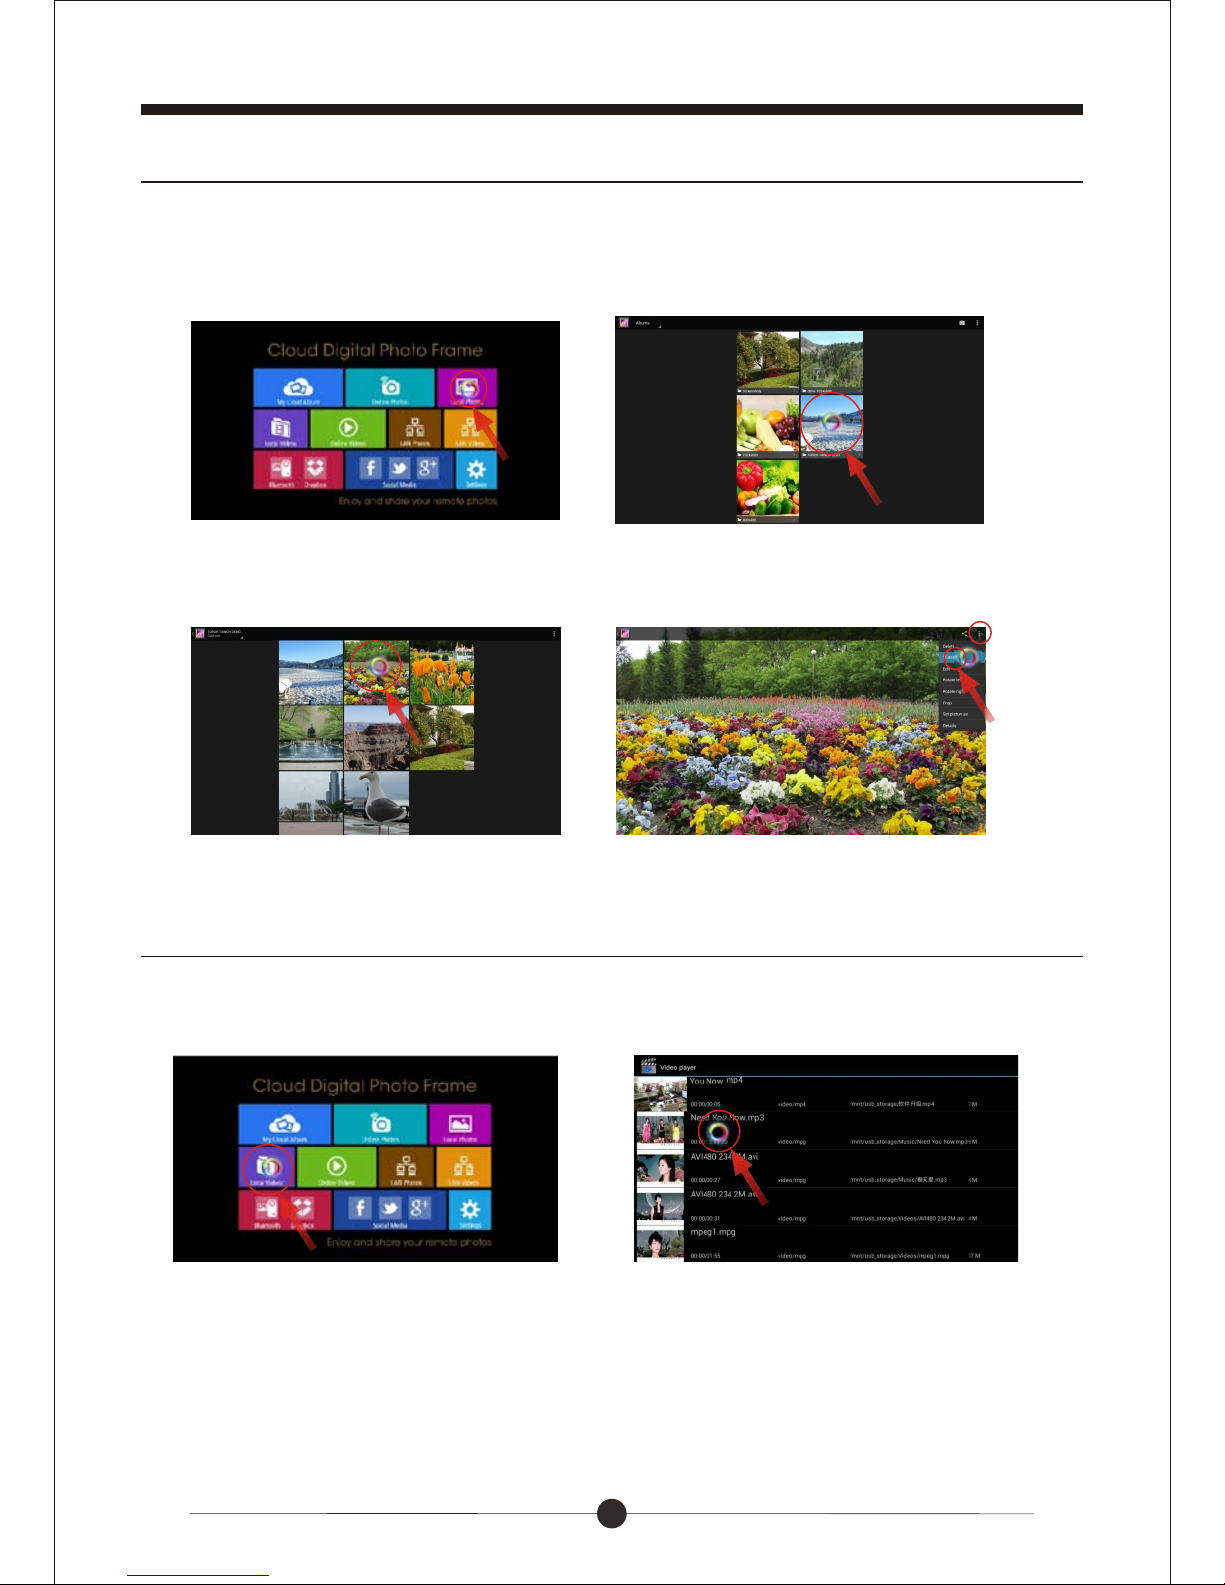
Local Features Part 1: Local Photos
Local Features Part 2: Local Videos
Your frame comes with internet memory and also an SD card slot to store
your photos on the frame itself.
All the pictures will load in that album and if selecting a picture, you can
start a slideshow by selecting the options, and than slideshow.
Select the “Local Photos ” icon. Select an album
Select the “Local Videos” icon.
Select the video you want to Play.
Page 18
17
Advanced Operation
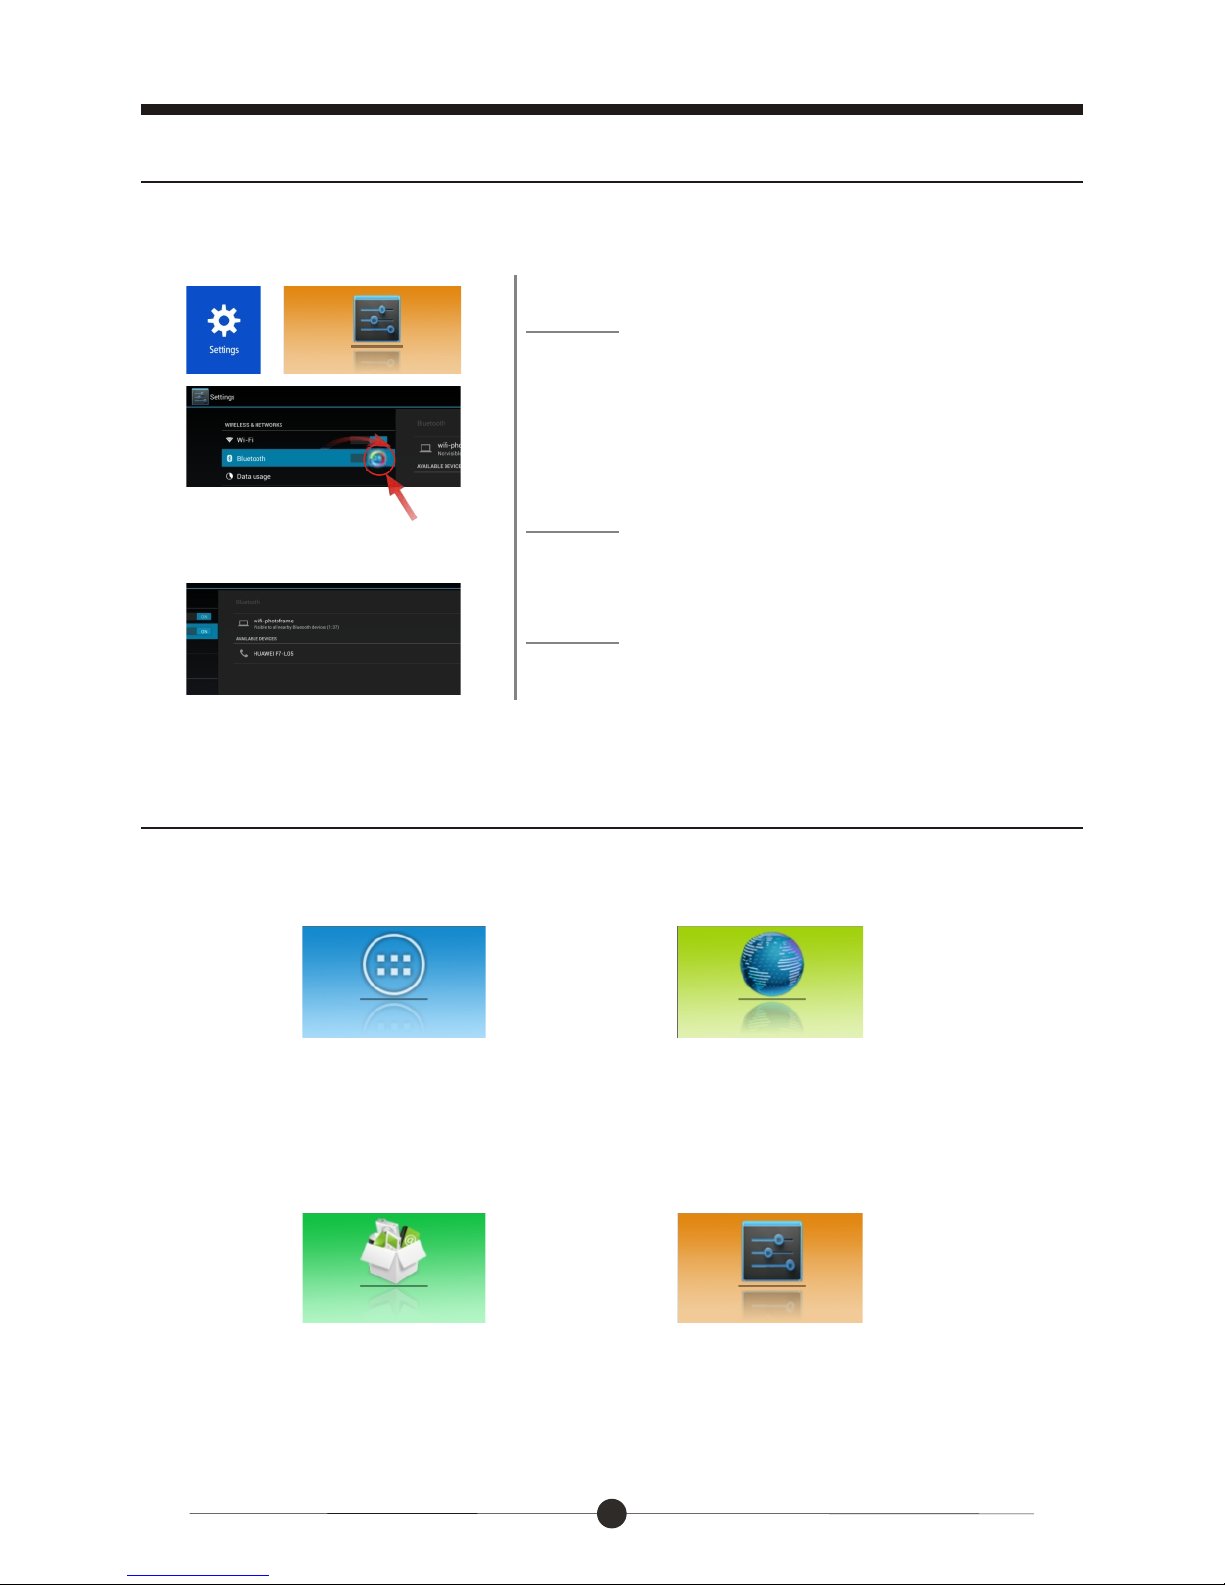
Local Features Part 3: Blutetooth
Step 1.
Step 2.
Step 3.
Turn on your frame’s bluetooth by going
into “SETTINGS”, the settings menu, and
turning “Bluetooth” to the ON position.
Turn Bluetooth on your device.
Search and Pair your device to the
frame.
You can send photos from your cell phone or tablet to the frame or send photos
from the frame to your device with the Bluetooth feature.
Settings Menu Overview
APP Block Web Browser
File Directory
Settings Menu
Where your downloaded & installed
Apps and Google Play are located.
Where you can browse, surf
and search the internet.
Where you can search for
locally installed apps & files.
Where all your device settings
are located for your frame.
Page 19

Customer Management
FAQs:
Q 1: Why can't I link to Wi-Fi?
A: Please check if you have turned on Wi-Fi. Go to “Setting” “Wireless &
Networks” Slide “off” to “on”.
Please check if you have input the right password of Wi-Fi router. For more
Wi-Fi related questions, please go to www.sungale.com and find Support
Wi-Fi related FAQ.
Q2: Why can’t I download applications from the Market?
A: Please check if you have registered a Google account; pls check if the
storage of DPF lack of space, in that case, you need to insert an SD card.
Q3: How to find more operations when running an application?
A: Click Menu icon on the top right corner.
18
2. Contact Sungale Support team
1. Visit the support site.
For manual download, FAQs and more supports: www.sungale.com
Toll free number in the USA: 800-473-5156
Service email: [email protected]
Support
To go to YouTube.com to search “SungaleProducts”, you will see product
demo videos, the videos give much easier way to know how to setup and
how to use the products.
Tips
Page 20
19
FCC and Safety Information
Page 21
20
 Loading...