

Page 1
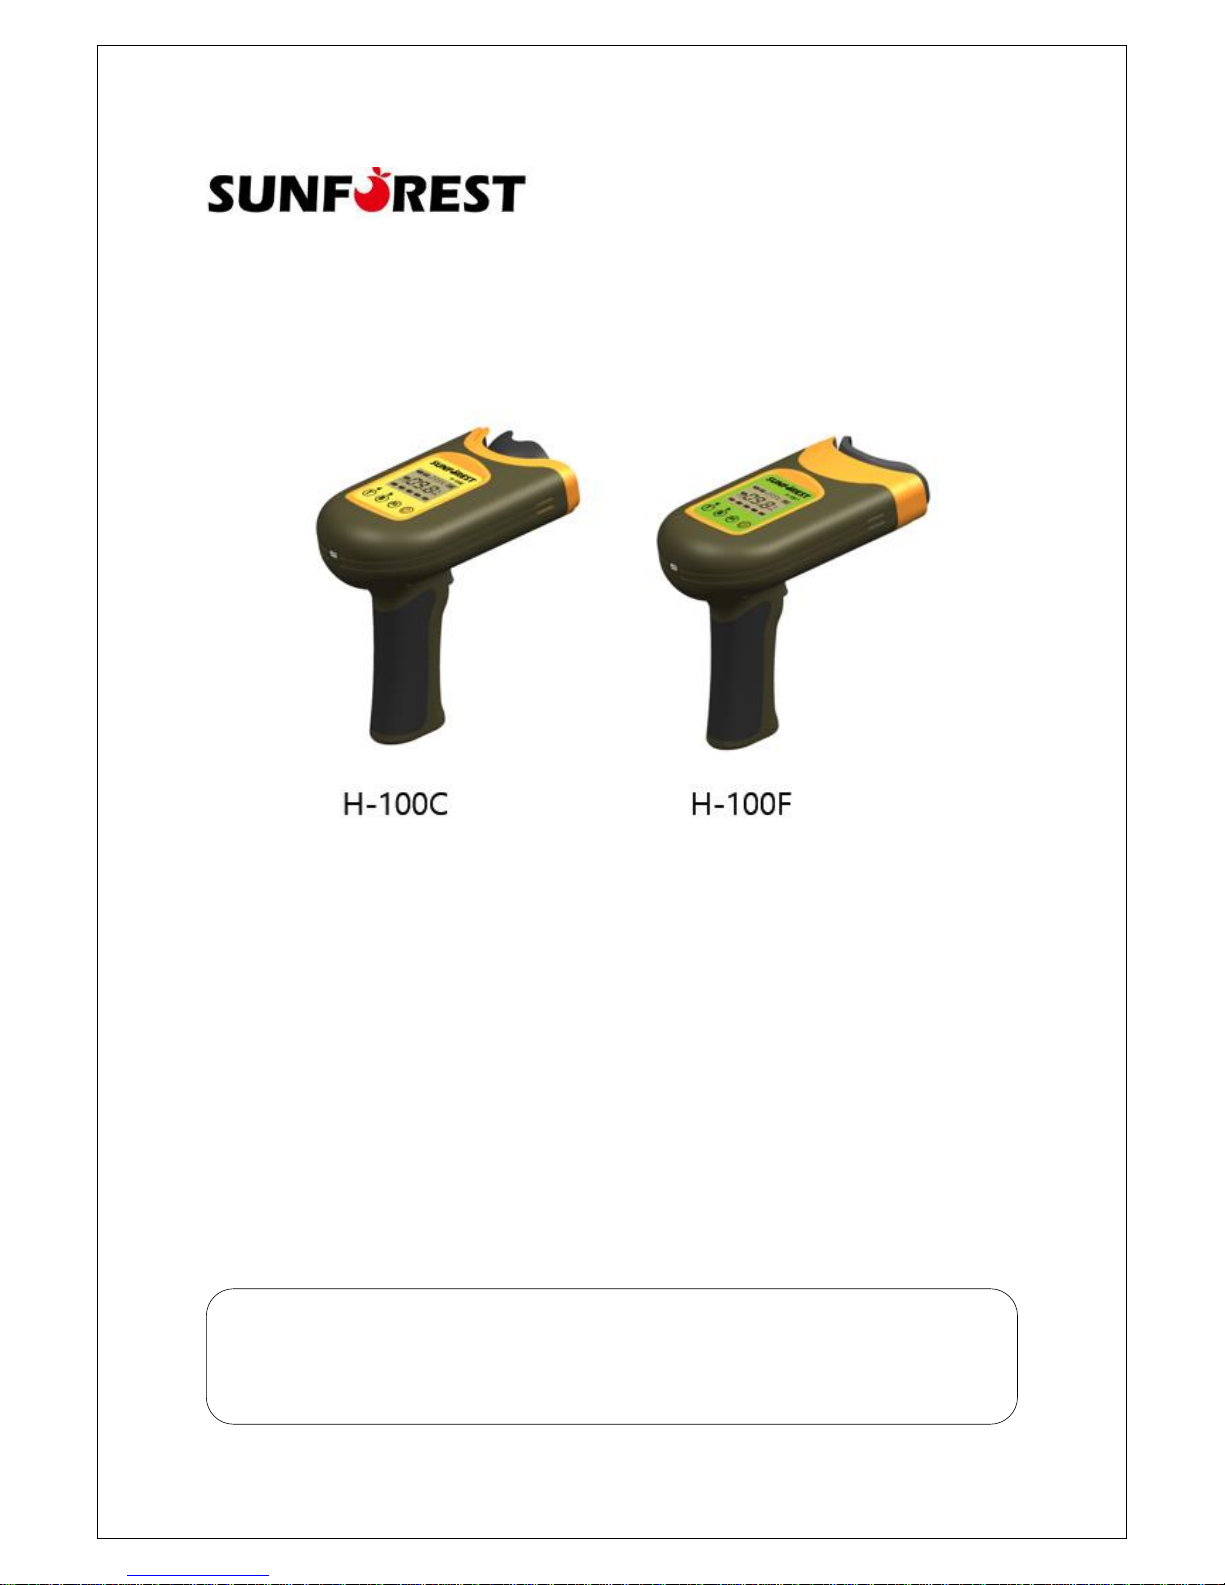
Portable Non-destructive Fruit Quality Meter H-100 series
User’s manual
Ver. 1.2.1
Before using the product, make sure to read the user’s manual correctly. After reading the
manual, make sure to place it where the user can easily find it. Product warranty is included in
the user’s manual.
Page 2
- 2 -
Precautions for safety
To safely and correctly use the product as well as prevent accidents and risks, the user must take
the following precautions for safety.
Caution Physical injury or damage on product may occur when the user doesn’t
comply with the directions.
1. The product is a measurement instrument made of very precise optical components. Dropping
the product or exposing it to impacts may damage the product or cause malfunctioning.
2. In case the product is damaged by unauthorized disassembling or exposure to impacts, free
repair service will not be given. Keep the serial number of the product and inform to service
representative for technical assistance if any required.
3. Dusts or impurities on the optical components of the measurement part may increase the error
of measurement. Check if the measurement part is dirty, and clean it before use.
4. To clean the optical components of the measurement part, moist a cotton swab with the alcohol
provided and air-dry before use.
5. Before measurement, remove the impurities (dusts, pesticides, fertilizers, etc.) and moist on the
surface of the fruit.
6. To clean the main body of the product, use smooth and dry cloth. Never use chemical so lvents
such as benzene or thinner.
7. When the product is wet, do not put it in a heating instrument (heater, microwave oven, etc.) to
dry it. When water gets into the product, contact the A/S center immediately and follow the
directions given.
8. Using chargers other than the one given with the product may reduce the life of the battery or
even cause fire. Make sure that the charger terminal on the bottom of the product handle doesn’t
contact with water or products with electric current flowing.
9. Impacting the LCD with sharp objects may cause scratches, cracks or malfunctioning.
10. Do not use the product in dusty environment, or places with excessive temperature or humidity.
11. When the product is not in use for a long time, be sure to fully charge the product, remove
dusts or impurities on the measurement part, put it in the storage case and keep it inside a cool
and dry indoor area.
12. When malfunctioning or abnormalities occur, do not try to solve the problem by yourself.
Instead, contact the A/S center and follow the directions given.
Page 3

- 3 -
Contents
Precautions for safety ------------------------------------------------------------ 2
Contents --------------------------------------------------------------------------- 3
Description of H-100F ------------------------------------------------------------ 4
Description of H-100C ------------------------------------------------------------ 5
Name and function : Buttons ---------------------------------------------------- 6
Name and function : LCD display ----------------------------------------------- 7
Display for Brix, DM, G.I and Browning level----------------------------------- 8
Name and function : Accessories ---------------------------------------------- 9-10
How to use the instrument
Battery charging -------------------------------------------------------------- 11
Instrument turn on and off -------------------------------------------------- 11
Measurement procedure --------------------------------------------------- 12
Initializing the instrument ---------------------------------------------------- 12
How to setup the measuring condition --------------------------------- 13-14
Smartphone interface via Bluetooth ----------------------------------------- 15
Zero set process by White Teflon built in the head cover ----------------- 16
How to place the fruit with the instrument ------------------------------- 16-17
Cleaning ----------------------------------------------------------------------- 17
PC interface -------------------------------------------------------------------- 18
Diagnosis of the instrument and troubleshooting ------------------------ 18-20
Appendix
Principle of measuring the sugar contents of fruit -------------------- 21-23
Specification of product ------------------------------------------------------------- 24
Package ------------------------------------------------------------------------------ 24
Page 4
- 4 -
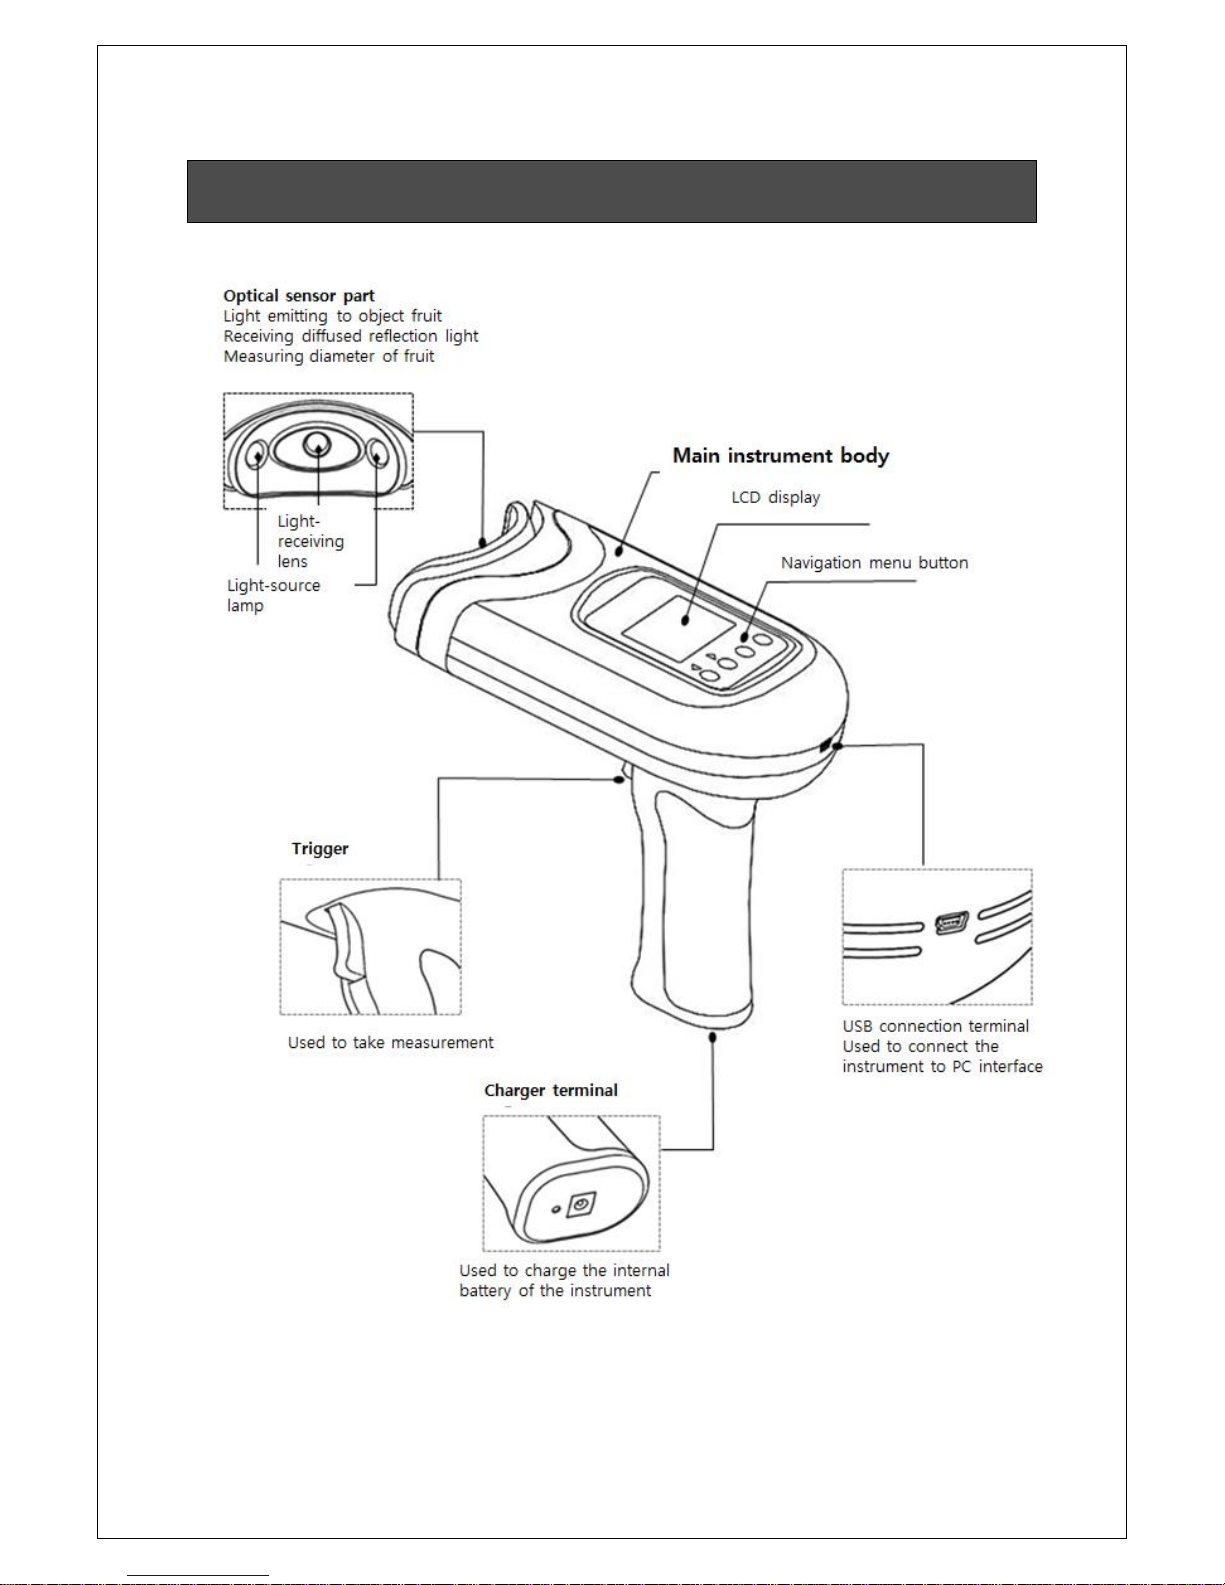
Description of H-100F
Page 5
- 5 -
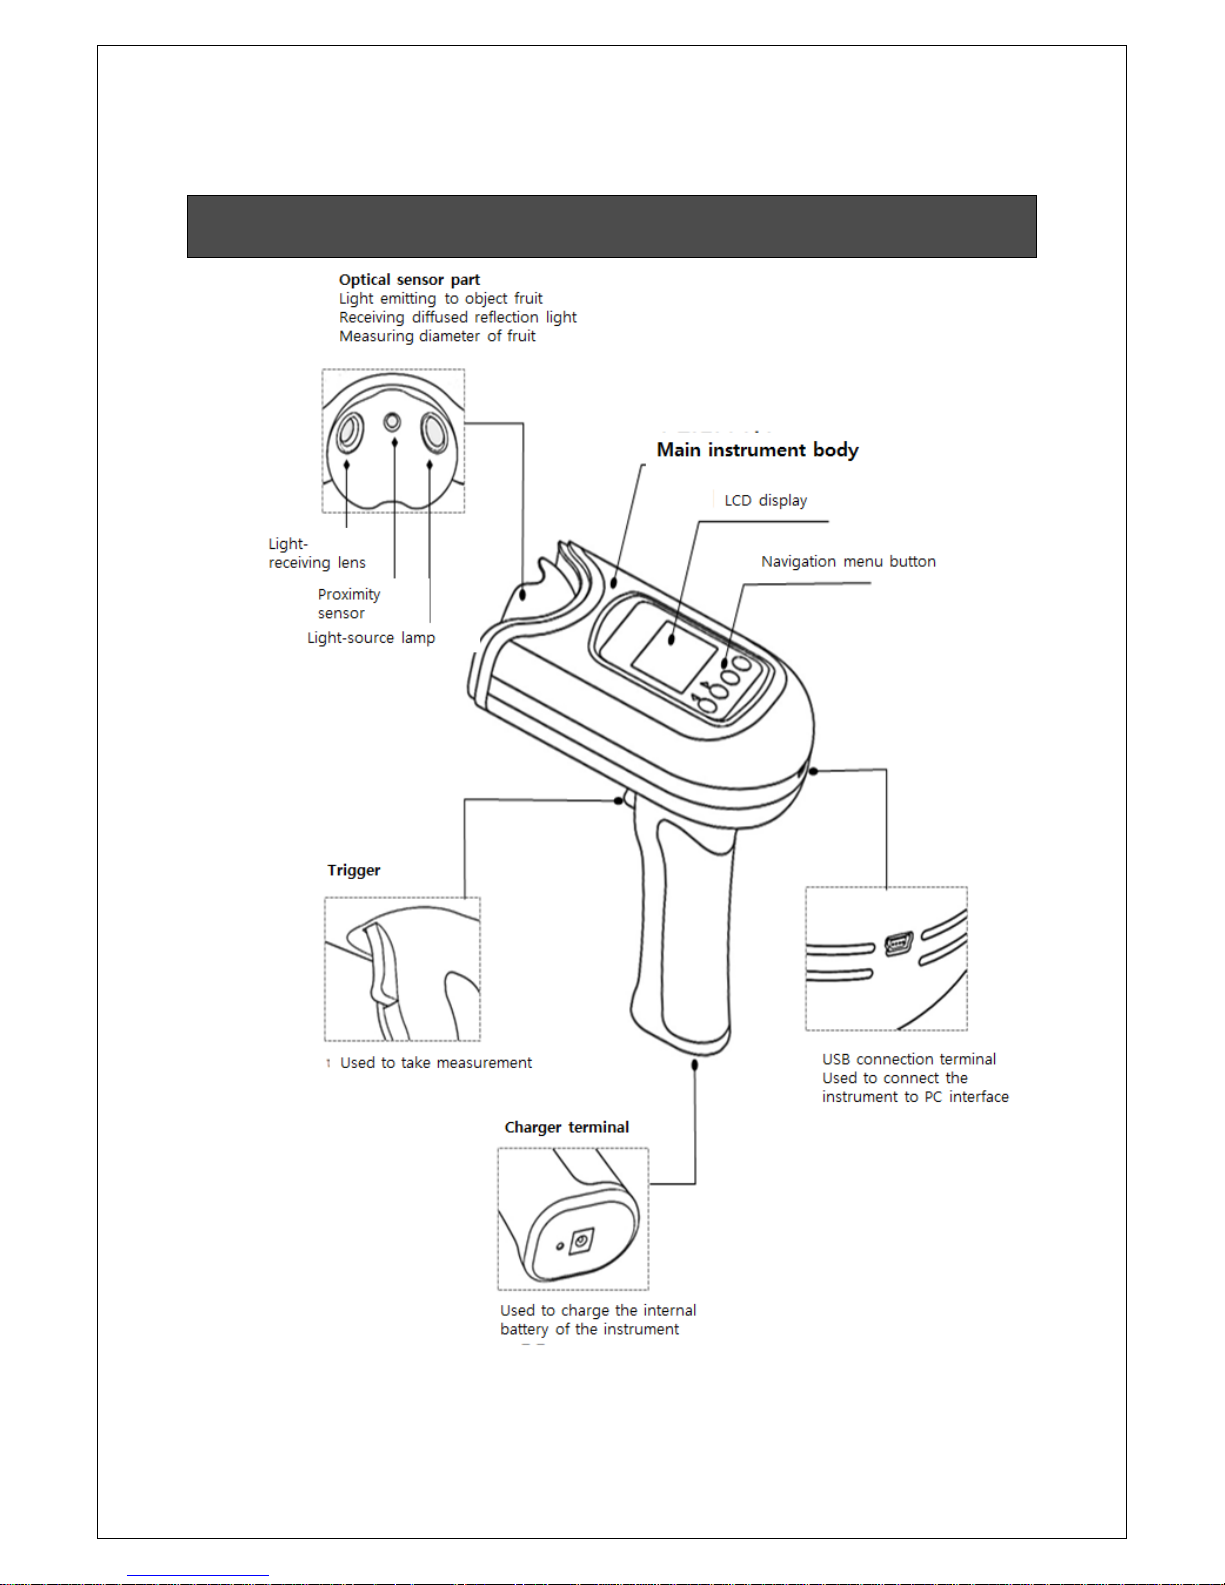
Description of H-100C
Page 6
- 6 -
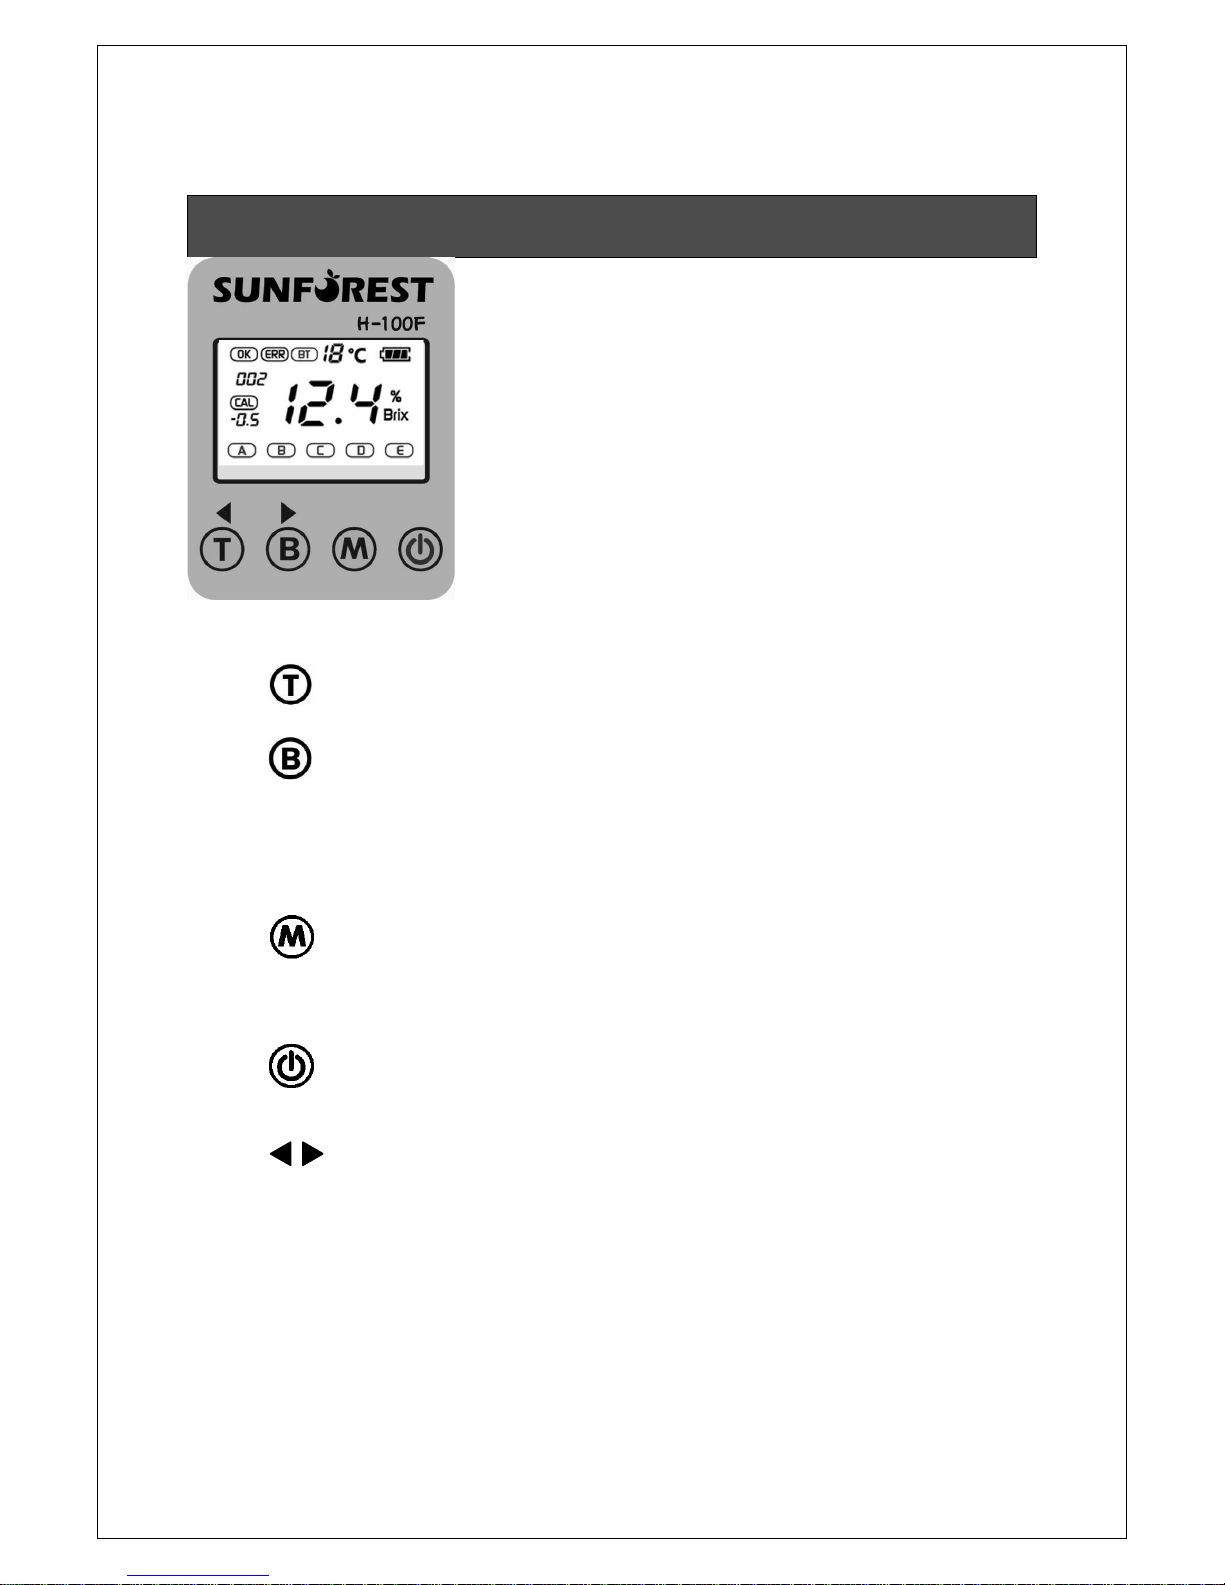
Name and function : Buttons
■ Description on navigation menu buttons
To be used to adjust calibration value (to be decreased by -0.1 scale)
To be used to adjust calibration value (to be increased by +0.1 scale)
Also used to activate Bluetooth interface with smartphone app.
(Smartphone gets download of data from the instrument by Bluetooth interface)
This key is also used to display Dry Matter ad Chlorophyll where applicable.
MODE Used to setup measuring conditions
(Deviation adjustment, Selection of Calibration Model, Display of saved measurements)
ON/OFF Used to turn on/off the instrument
DOWN/UP Used to adjust deviation value.
This key is also used to navigate backward or forward over measurement data
saved in the instrument.
Page 7
- 7 -
Name and function : LCD display
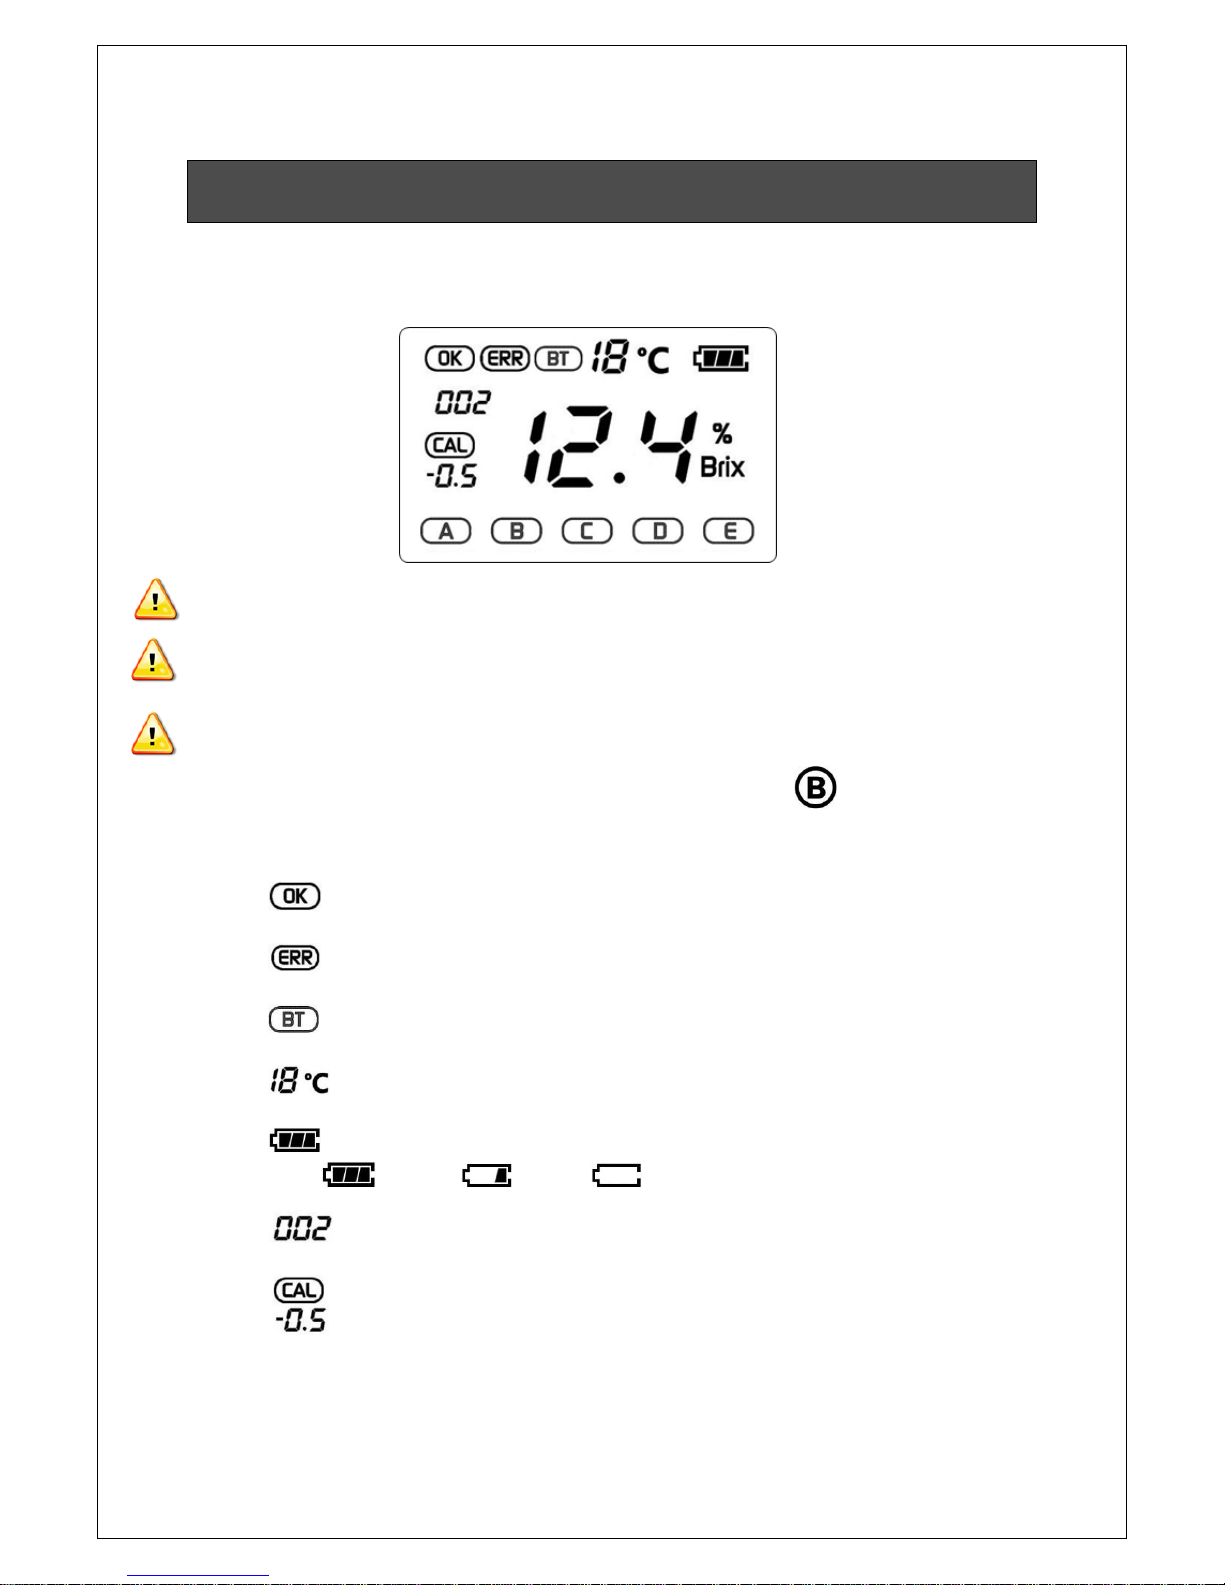
■ Description on LCD display
LCD display may be hardly seen under direct sunlight. Use it with sunlight protection.
To save battery consumption, LCD display and power of the instrument are automatically turned
off when the instrument is not used for a set period of time.
Measurement data to be displayed on LCD are Brix and temperature.
Dry Matter and Chlorophyll index are selectively displayed by clicking . Other index such as
created date, fruit type, coloring are supposed to be seen on smartphone or PC interface.
indicates the instrument is operating normally
indicates there is an error in operation of the instrument
indicates Bluetooth function is on operation
indicates instrument’s environment temperature
indicates the status of battery charging
: Enough : Short : Empty (Charging is required when the empty image blinks)
indicates the stock number of measurements
indicates the adjusted deviation value (Unit: Brix)
Page 8
- 8 -
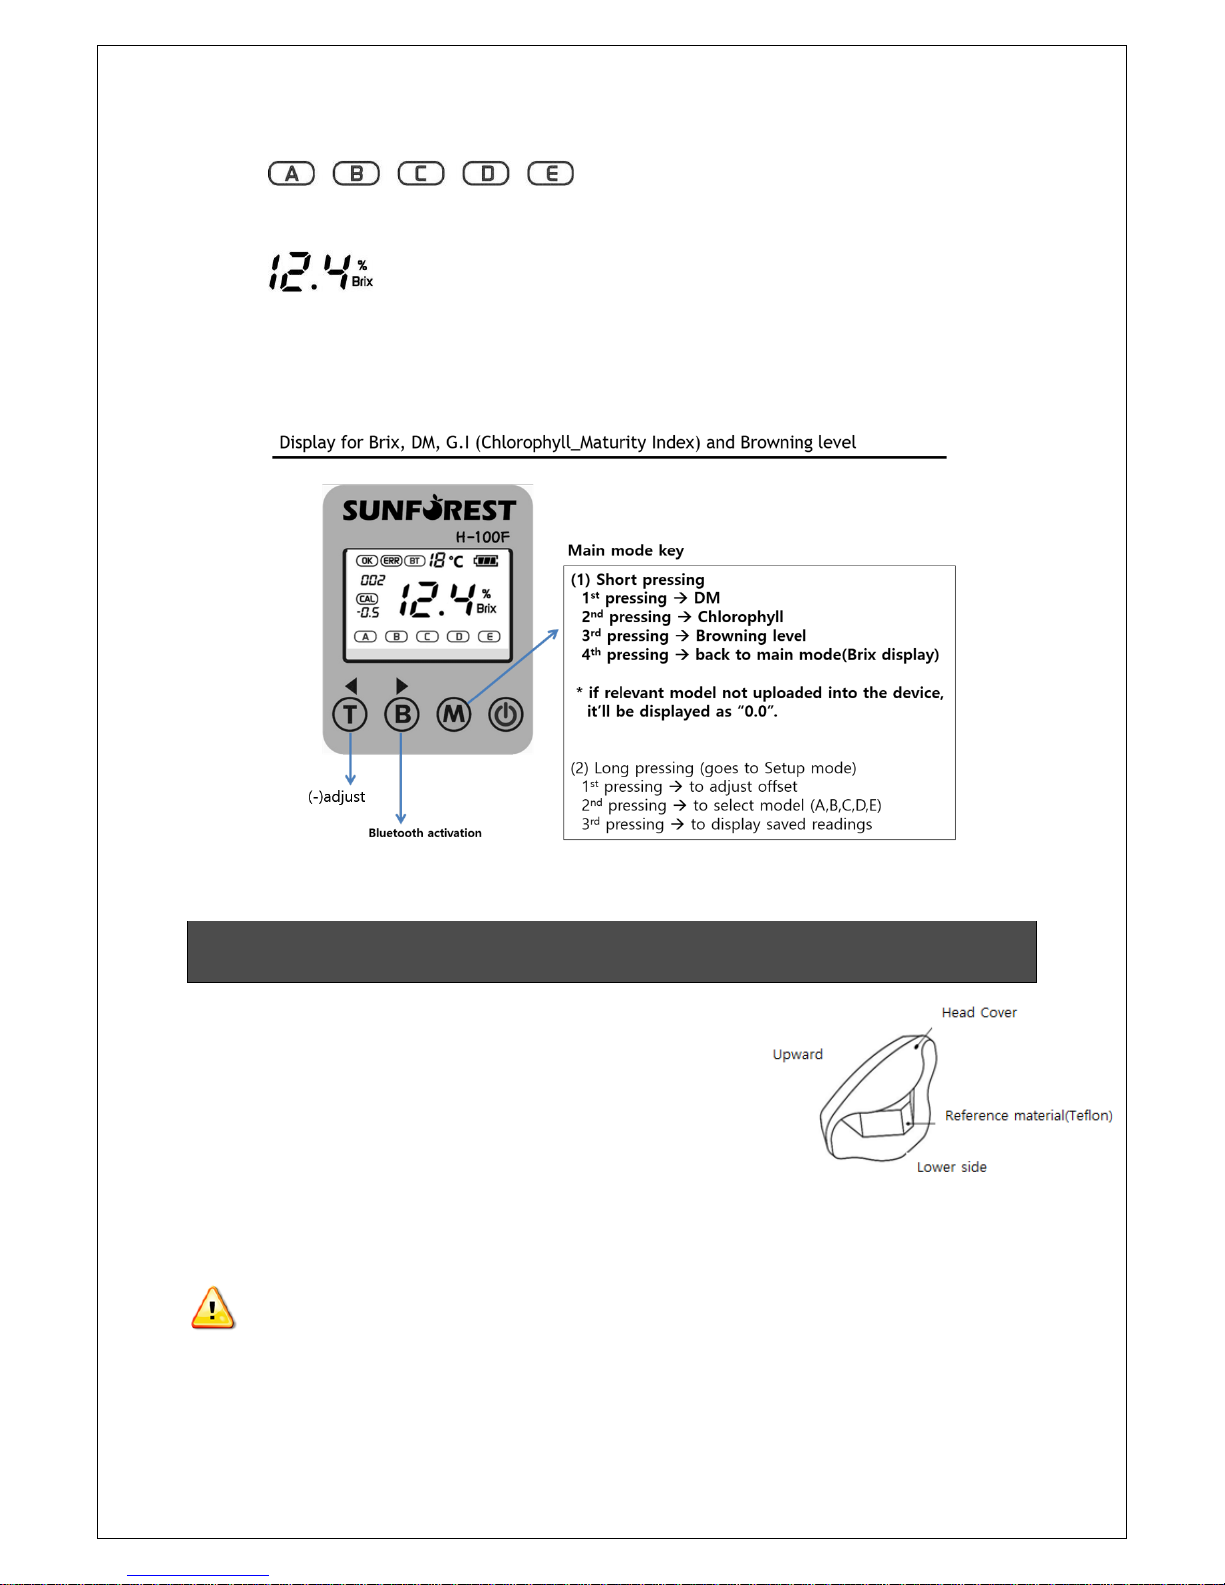
indicates the selection of calibration model
(Only the selected model is to be displayed on the screen)
indicates the measured value of Brix (or Dry Matter and Chlorophyll to be
optionally displayed, as the case may be).
Name and function : Accessories
■ Head-cover of the instrument
1. The head-cover is used to protect optical sensors of the
instrument.
2. It also works as a reference material providing a standard
value (zero set) to the instrument when initialized and
standardized.
3. When using it, be sure to get upward and lower side correctly
placed.
If the reference material (white Teflon) included in the head-cover is polluted, accuracy of
measurement may deteriorate. Do not touch it with bare hands, and keep it clean without
Page 9
- 9 -
impurities.
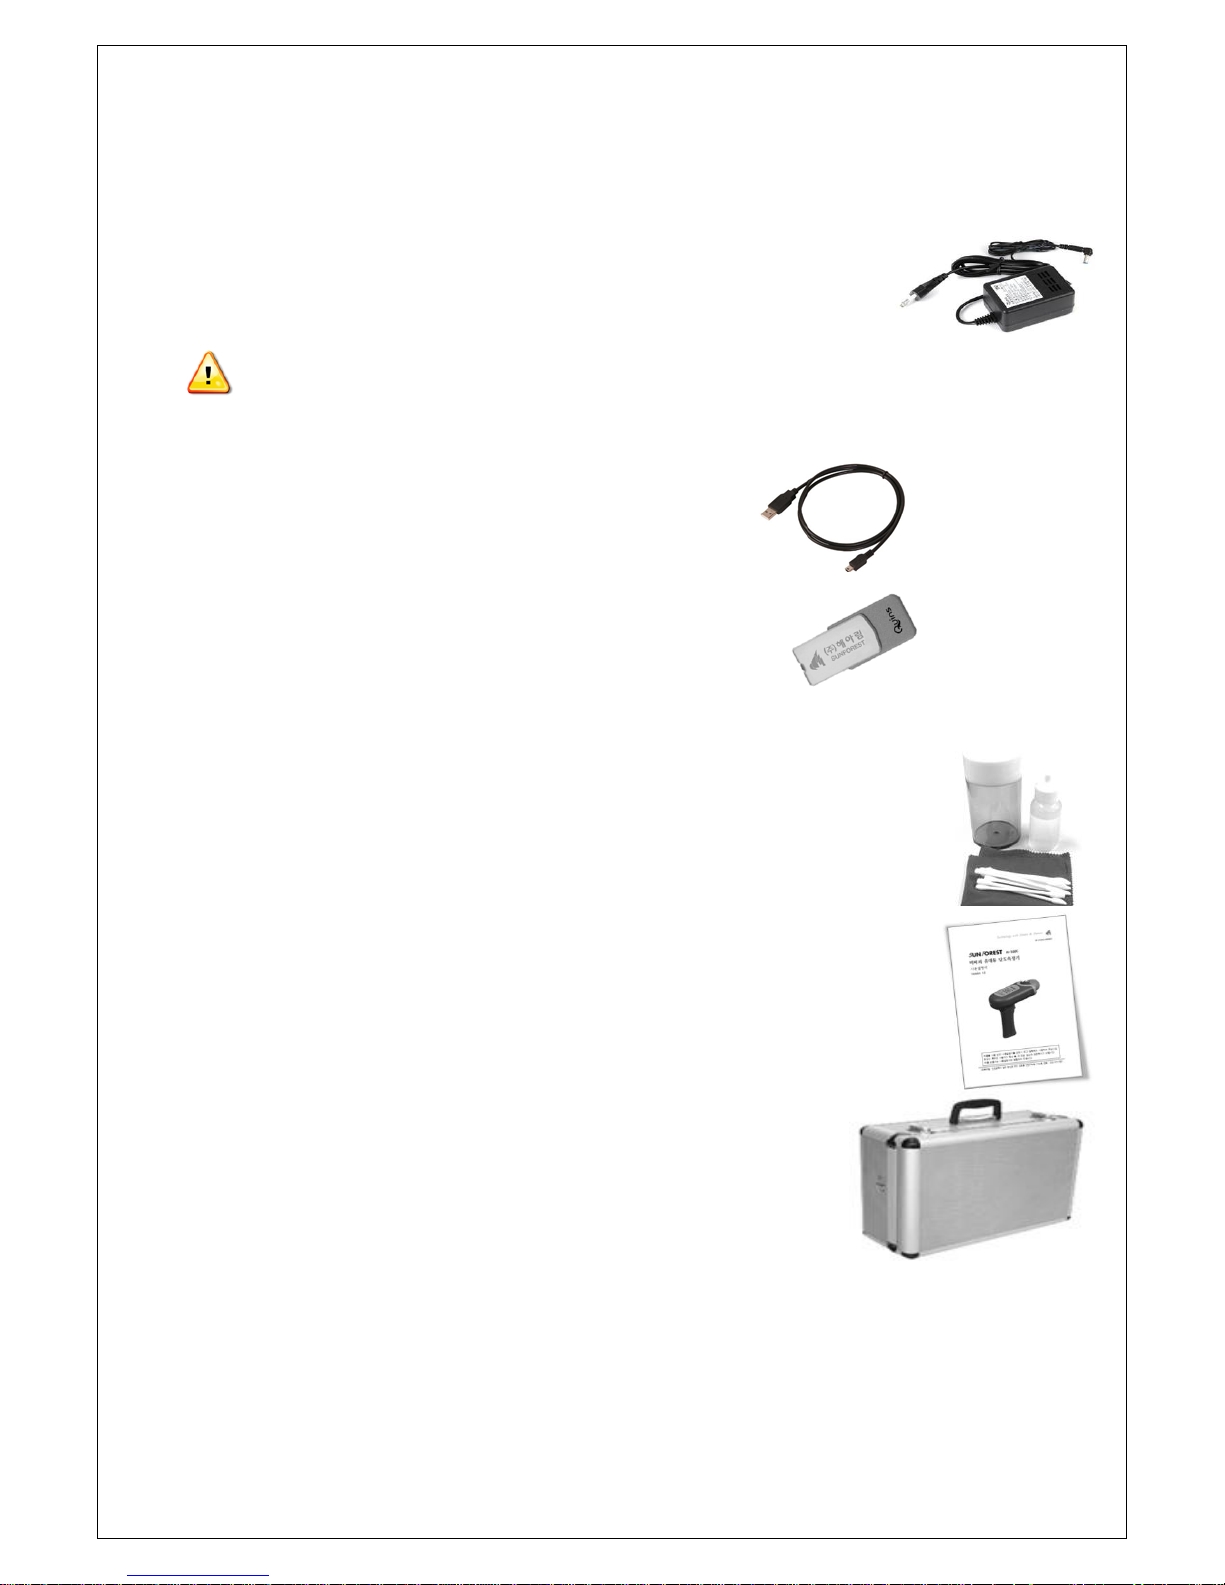
■ Power charger
1. To charge the battery of the instrument.
2. Rated power input: AC 90~264V, 57-63Hz. Rated power output: DC12V 1.5A
Keep the charger free from moist or heat. If the charger is not in use for a long time, pull
the power plug out.
■ mini-USB cable
It is used to interface the instrument with PC.
■ USB memory (4GB)
1. User's manual and PC program included in USB.
2. O/S support: Windows 10, 8, 7, XP, Vista,,
■ Cleaning kit
1. It contains stuffs necessary for cleaning the optical components of the instrument.
2. Cloth enclosed is used to clean LCD and the control buttons of the main body.
3. Soaked in alcohol, the cotton swab is used to clean optical components of
the sensor part.
■ User's manual
1. Keep the user's manual in the storage case.
2. For the latest version of User’s manual, you may refer to service representative.
3. Keep the product warranty included in the user's manual.
■ Storage case
1. Keep the instrument and accessories with the storage case.
2. When the instrument is not in use for a long time, clean it
thoroughly and put it inside the storage case, and keep it in a cool
dry indoor area.
3. Keep the serial no. on the label for further service reference.
Page 10
- 10 -
How to use the instrument
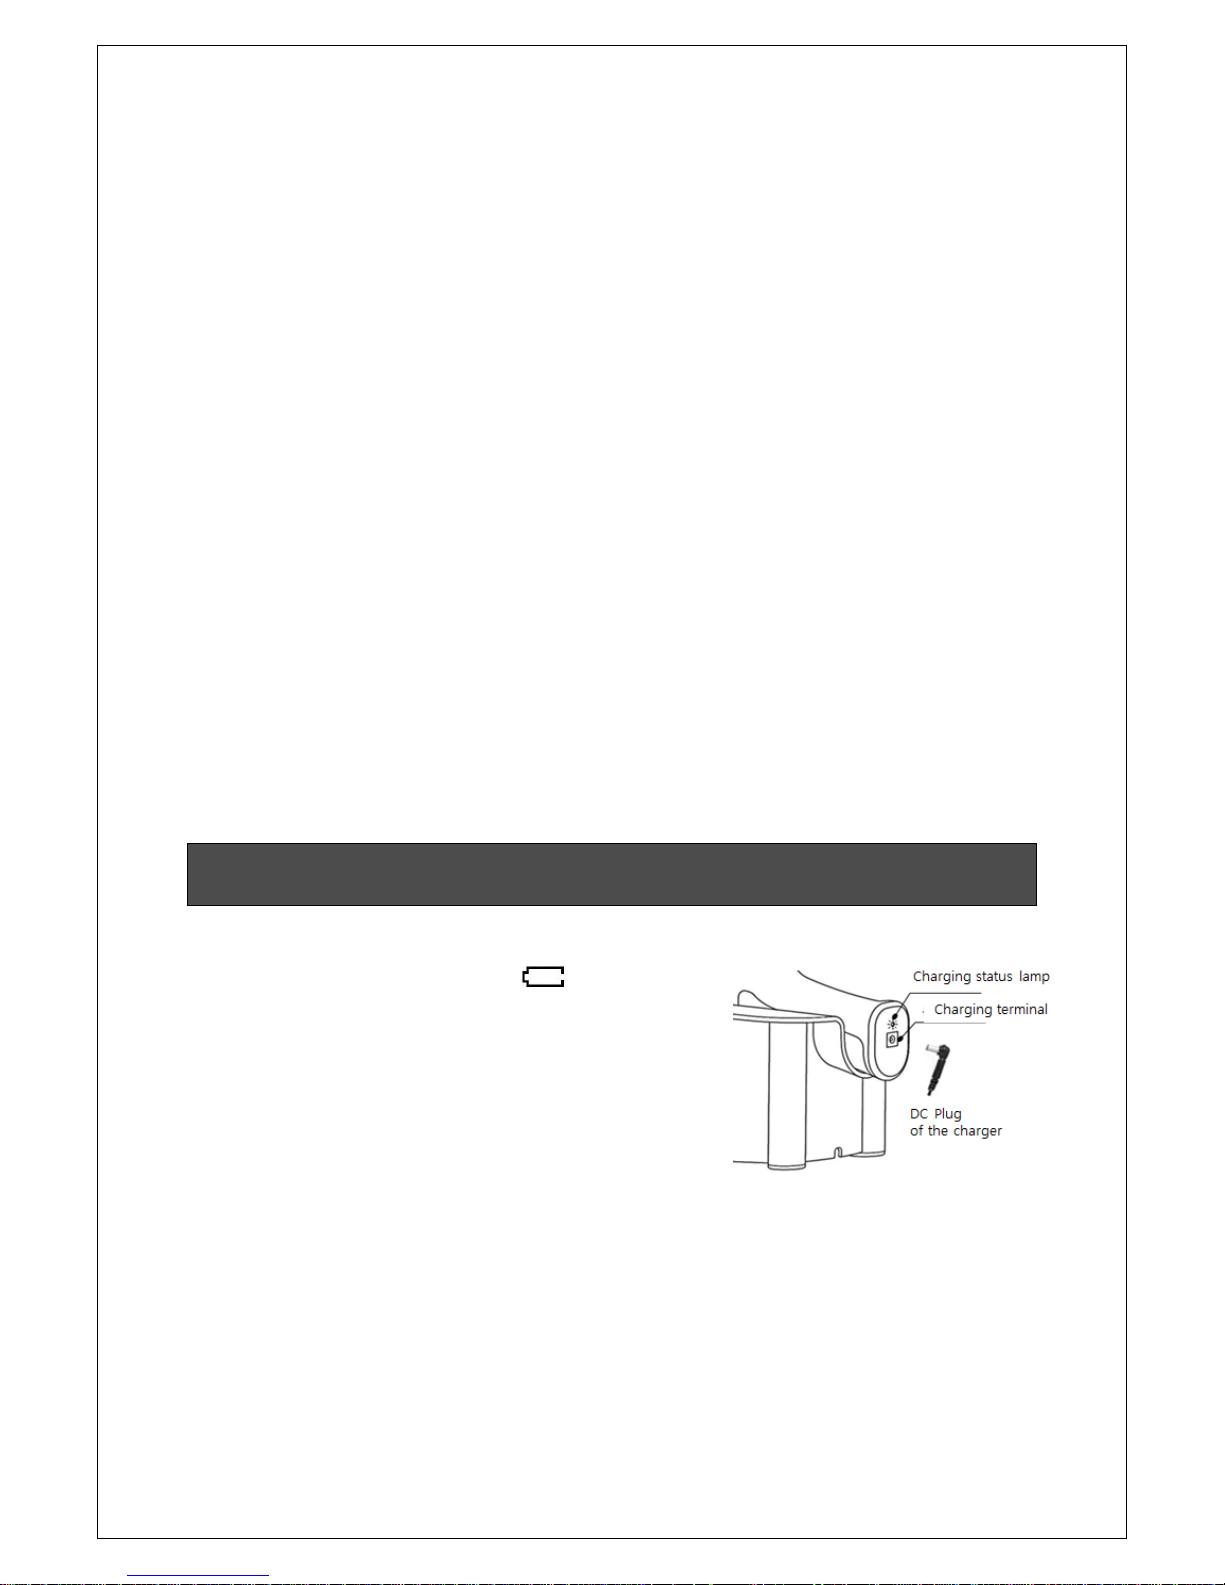
■ Battery charging
1. Fully charge the battery when the image blinks on
the LCD, or when storing the instrument for a long time
without use, or when the instrument initially used for the first
time.
2. Plug in the AC100~240V plug of the charger first, and then
connect the DC 12V plug with the charger terminal on the
bottom of the handle.
3. While charging, the charging LED turns red. When fully charged, the LED turns green.
4. The recommended charging time is about 4 hours. However, when the instrument being used
for the first time or when charging after excessive use, extend its charging time to longer than 5
hours.
5. It is normal to feel warm around the handle part during battery charging.
6. The instrument includes a protective circuit against surcharge, so the battery won’t be damaged
Page 11
- 11 -
even when the charging time exceeds extraordinary over time.
7. It is recommended to place the instrument on the desktop stand during battery charging.
Using a charger other than provided genuine charger may diminish battery life or cause
electrical damage to the instrument. Keep the charger terminal away from water or electricityflowing object.
When the charging LED lamp blinks or turned off, check if DC plug of the charger is
properly connected to the charging terminal.
■ Instrument Turn on and off
1. To turn on the instrument, press shortly.
2. To turn off the instrument, press for longer than 1 second.
When abnormal operation occurred during the use or if not able to turn on the instrument,
try to charge the instrument for about 30 minutes. Then, try to operate or turn on the instrument
again. If the problem continues, please contact authorized service representative.
For saving the battery and safety purpose, the instrument will be automatically turned off
when remaining battery capacity is running down.
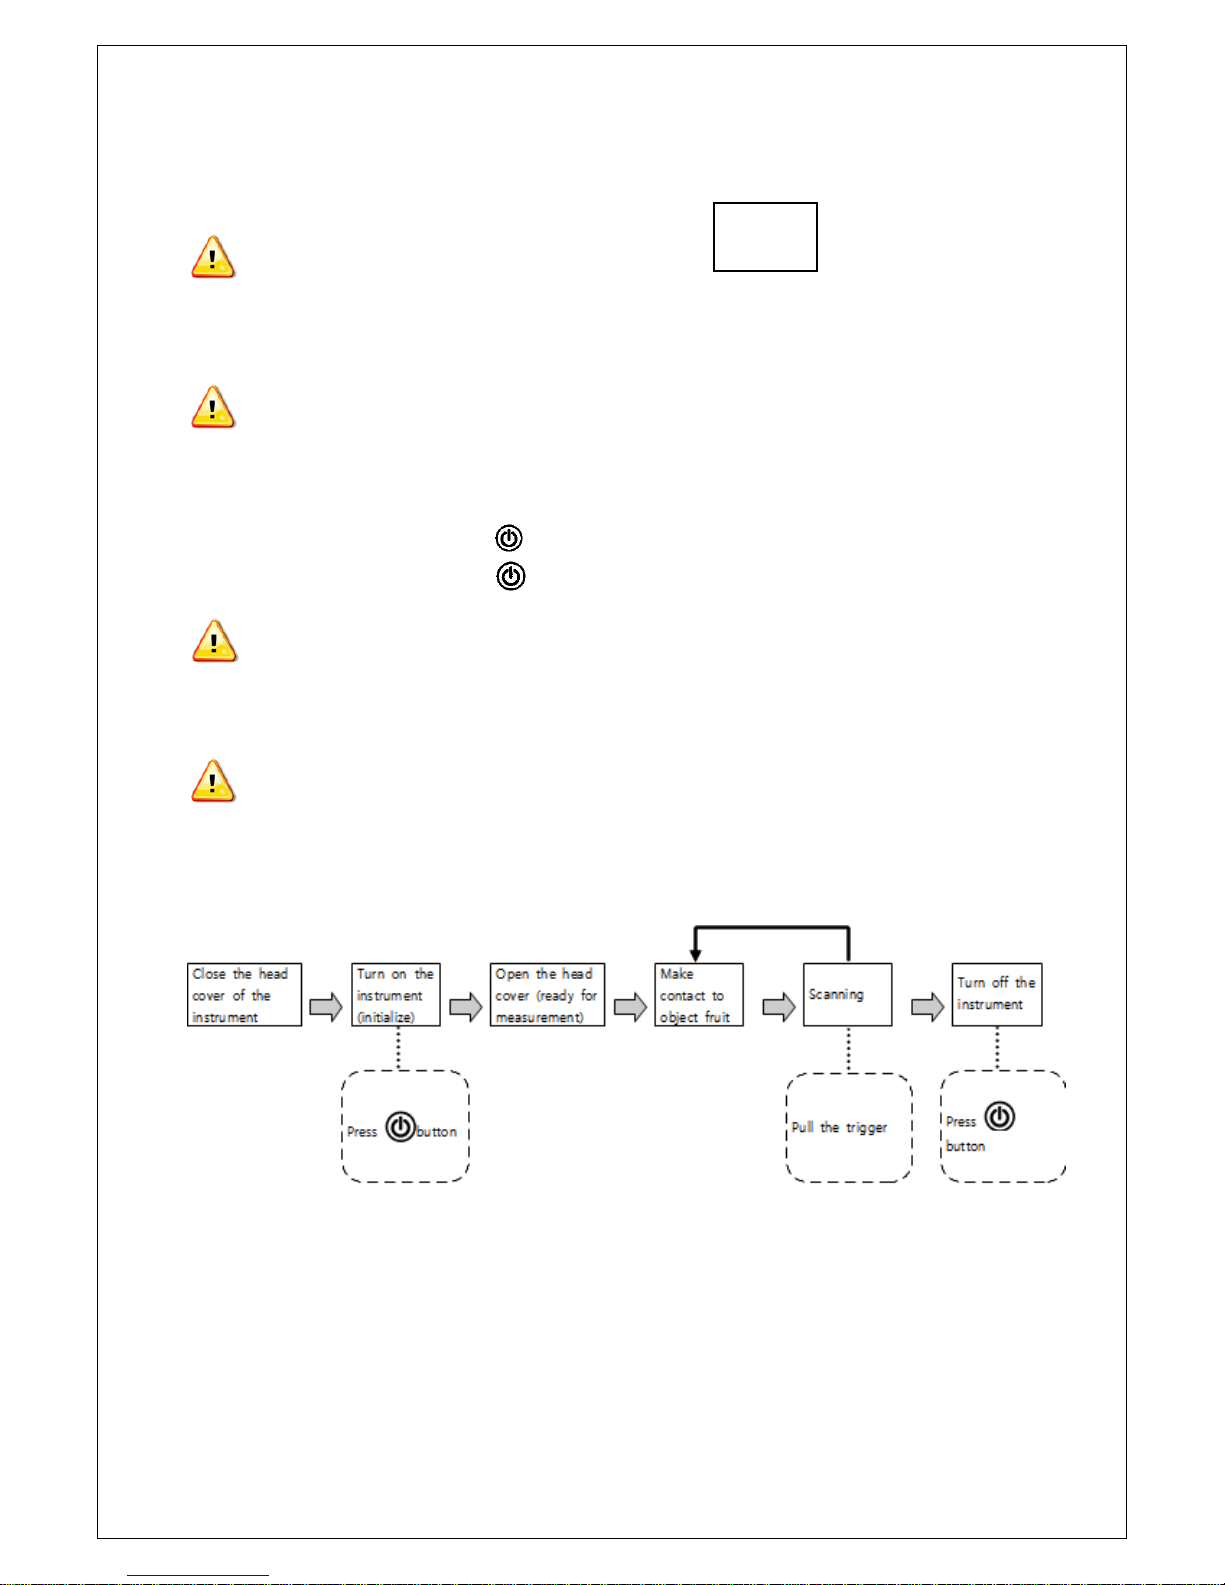
■ Measurement procedure
■ Initializing the instrument
1. Initializing process is conducted to diagnose the condition of the instrument and to scan the
reference material of the head cover, so that the instrument is set to zero(standard) and ready to
measure object fruit. Initialization of the instrument is automatically conducted when the power is
turned on.
Scan
continued
Page 12
- 12 -
2. Before conducting initialization, firmly close the head-cover to the optical sensor part. When
closing the head-cover, be sure to get the upper and lower parts correctly placed.
3. During initialization, make sure that the head cover to the measure part doesn't move.
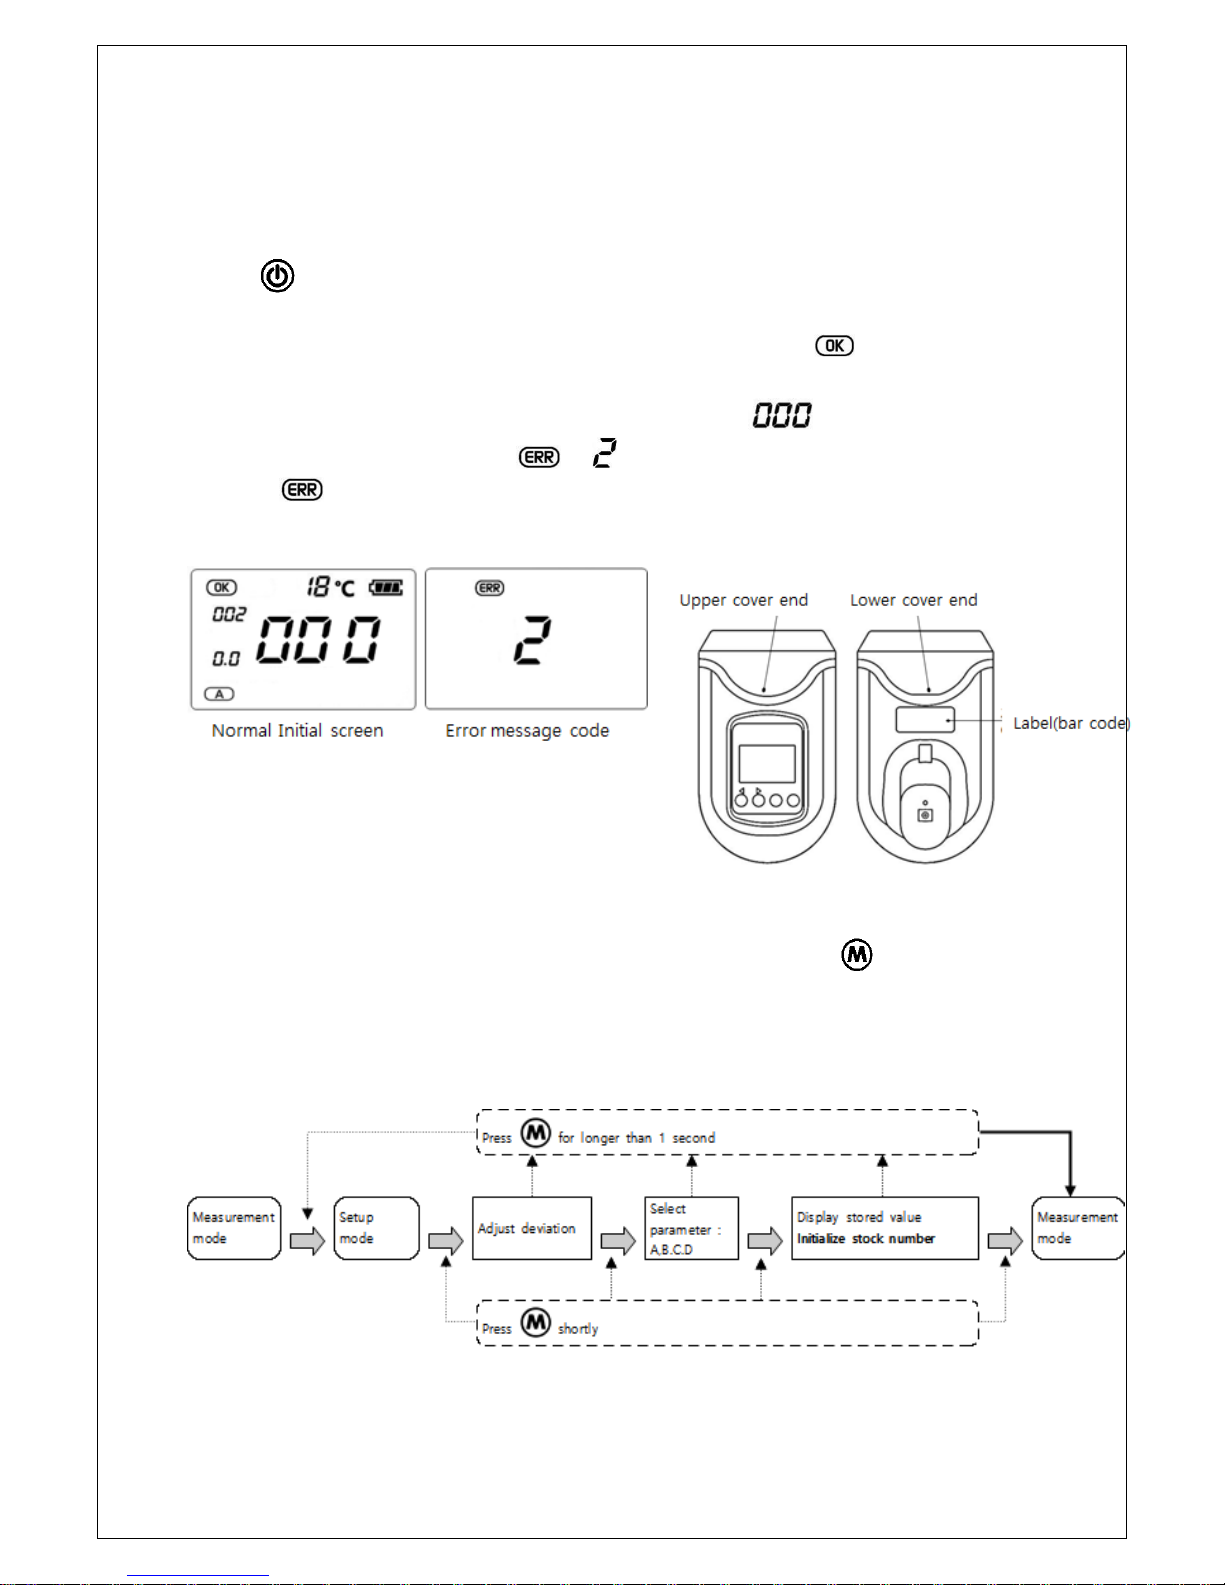
4. Press button, and then the LCD screen will show sequentially shifting number "5-4-3-2-1"
while initialized. Initialization takes about 5 seconds and ends with a 'beep' sound.
5. When initialization completed successfully, the LCD screen will show and turn into home
navigation menu. When initialized, data displayed on the home menu shows the most recently
used parameter, stock number and measurement value shows as . In case the initialization
improperly completed, an error code ( + ) will appear.
6. In case appears, see the troubleshooting or checkup methods described in this user's
manual and follow the instructions, or contact a service representative for checkup.
■ How to set up measuring condition
1. Measurement mode and Setup mode
The instrument changes from Measurement mode to Setup mode, when button is pressed
down for longer than 1 second.
In the setup mode, user can set up measuring conditions (adjustment of measurement deviation,
selection of calibration model) and find past measurement data and initialize stock number to zero.
Page 13
- 13 -
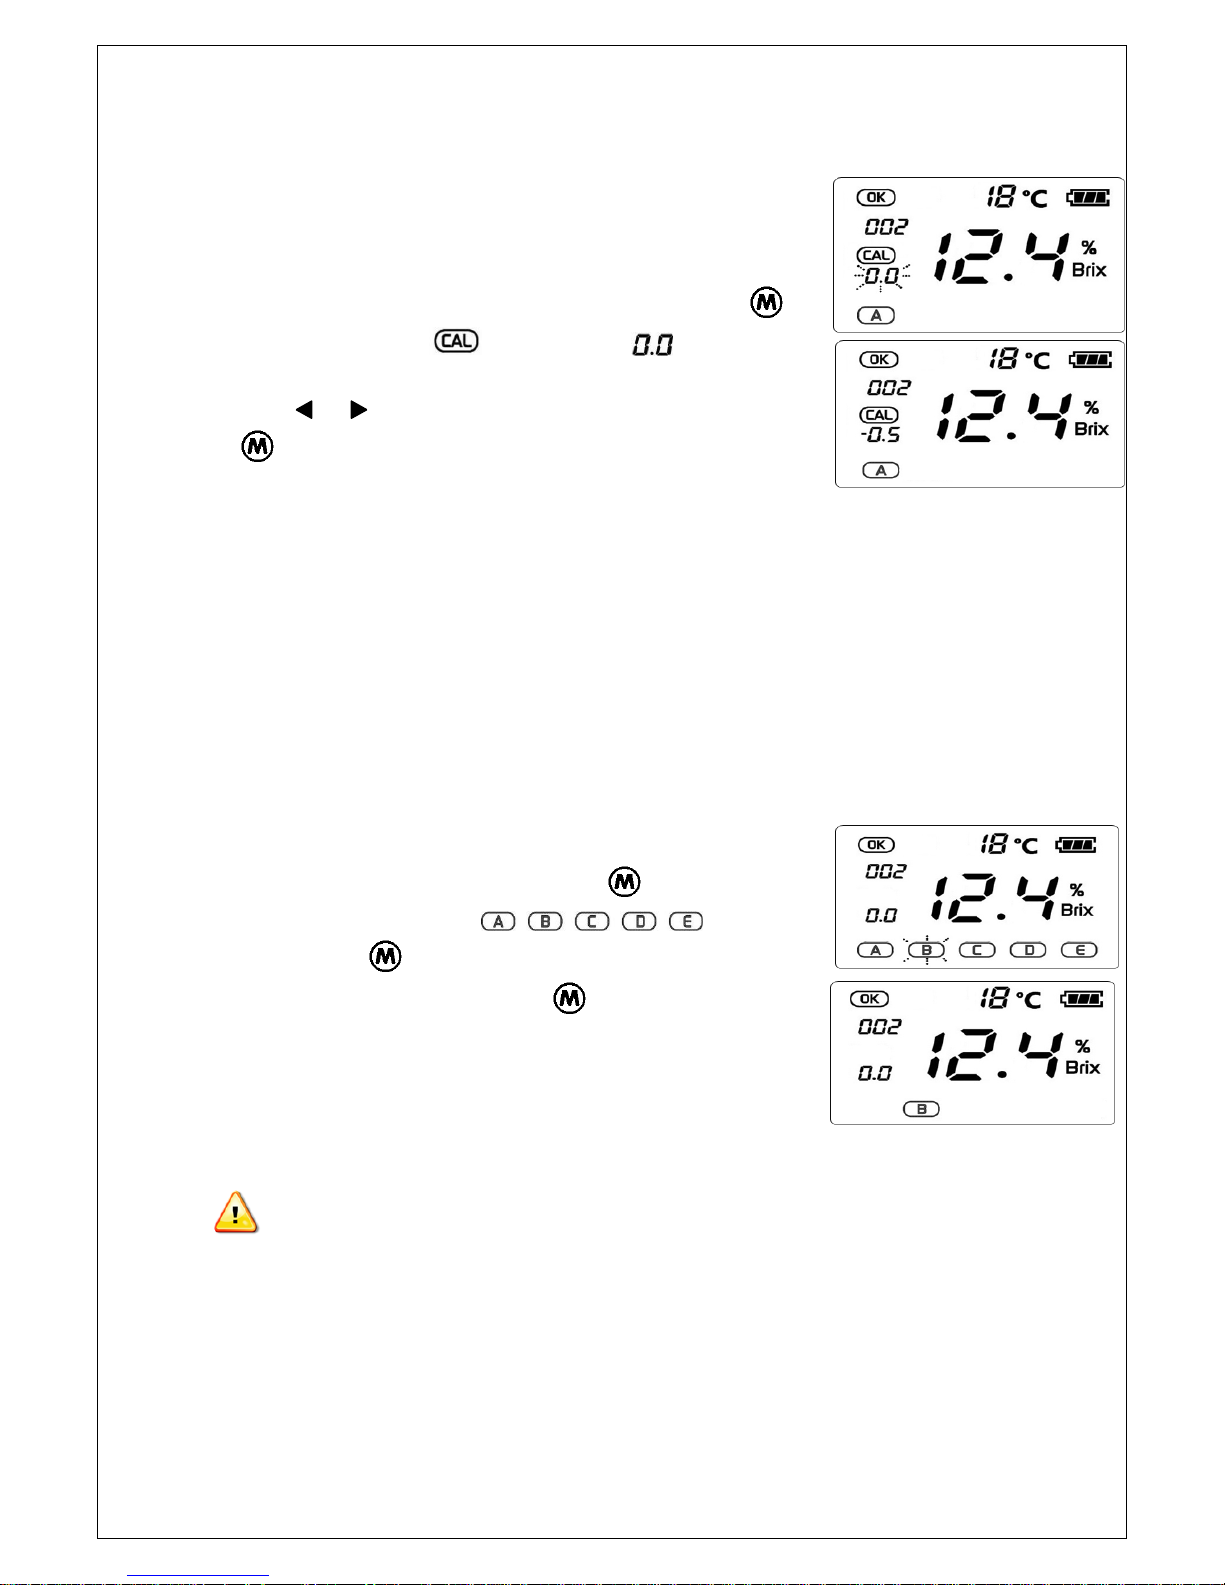
2. Correction of measurement deviation (offset adjustment)
With this function, user can adjust deviation between the value measured
by the instrument(nondestructive method) and the reference value
obtained from squeezed juice. In the measurement mode, press for
longer than 1 second, then will appear and blinks.
By pressing or , set the correction level of deviation as preferred.
Press for longer than 1 second to finish this process and return to
the measurement mode.
You may use this function, in case there is a constantly-flat-deviation between nondestructively
measured value and reference value (actual value reading by refractometer)
3. Selection of calibration model (parameters A,B,C,D,E)
The instrument can provide multiple calibration models for measuring
different object fruits. In the setup mode, press shortly to select the
desired calibration model among ..
Keep short-pressing to move on to desired model blinking. When
reached to desired model blinking, press for longer than 1 second
to confirm the model selected and return to the measurement mode.
When a new model selected, the instrument automatically goes power
off.
Turn on the instrument, then LCD will show the new model selected.
After the selection of a new calibration model, the instrument automatically turns off and
user turns on the instrument for initialization.
4. Displaying saved measurements and initializing stock number
Page 14
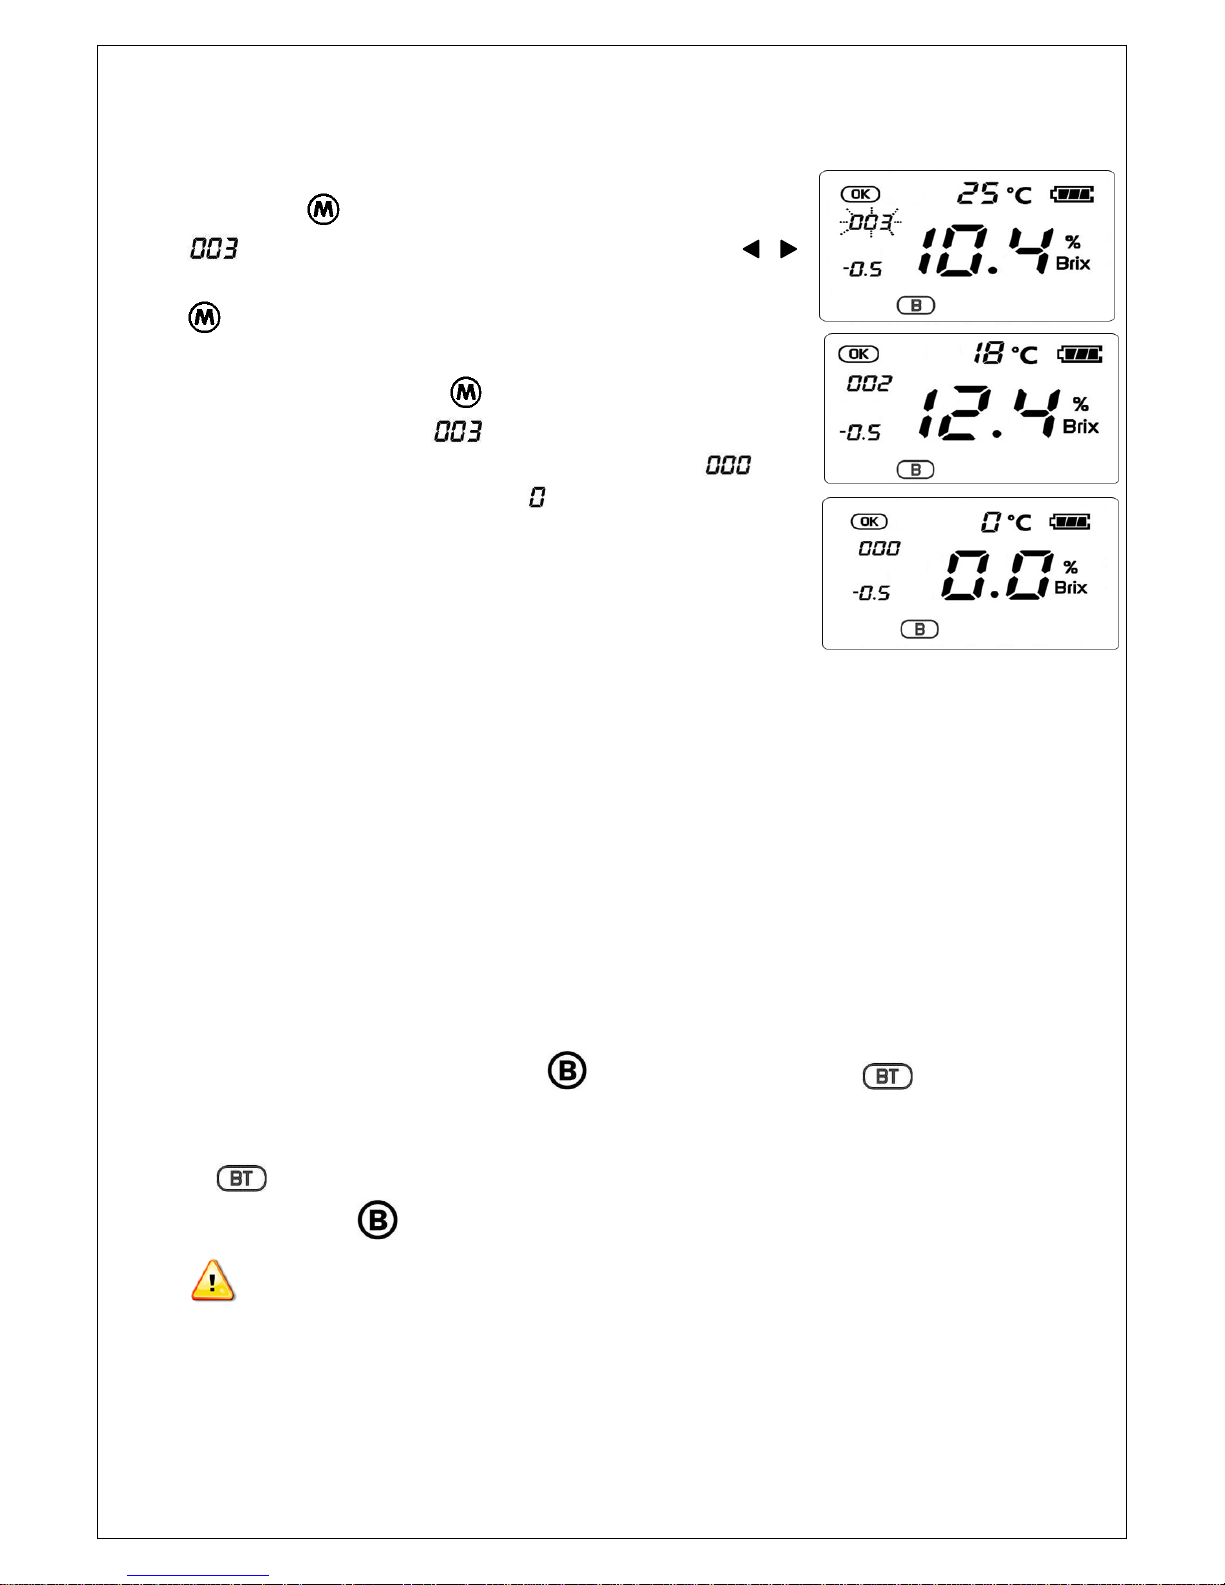
- 14 -
The instrument can save up to 1,000 readings (0~999). In the setup
mode, press shortly then stock number will blink (for example
). Then, select the preferred stock number by pressing .
For the number selected, the measured value will be displayed. Press
shortly to return to the home menu.
Meanwhile, if pressing down for longer than 1 second when the
number blinks (in this case ), all the saved measurements will be
deleted and the stock number will be initialized to . The
measurements will also be displayed as , and the instrument will return
to the home menu.
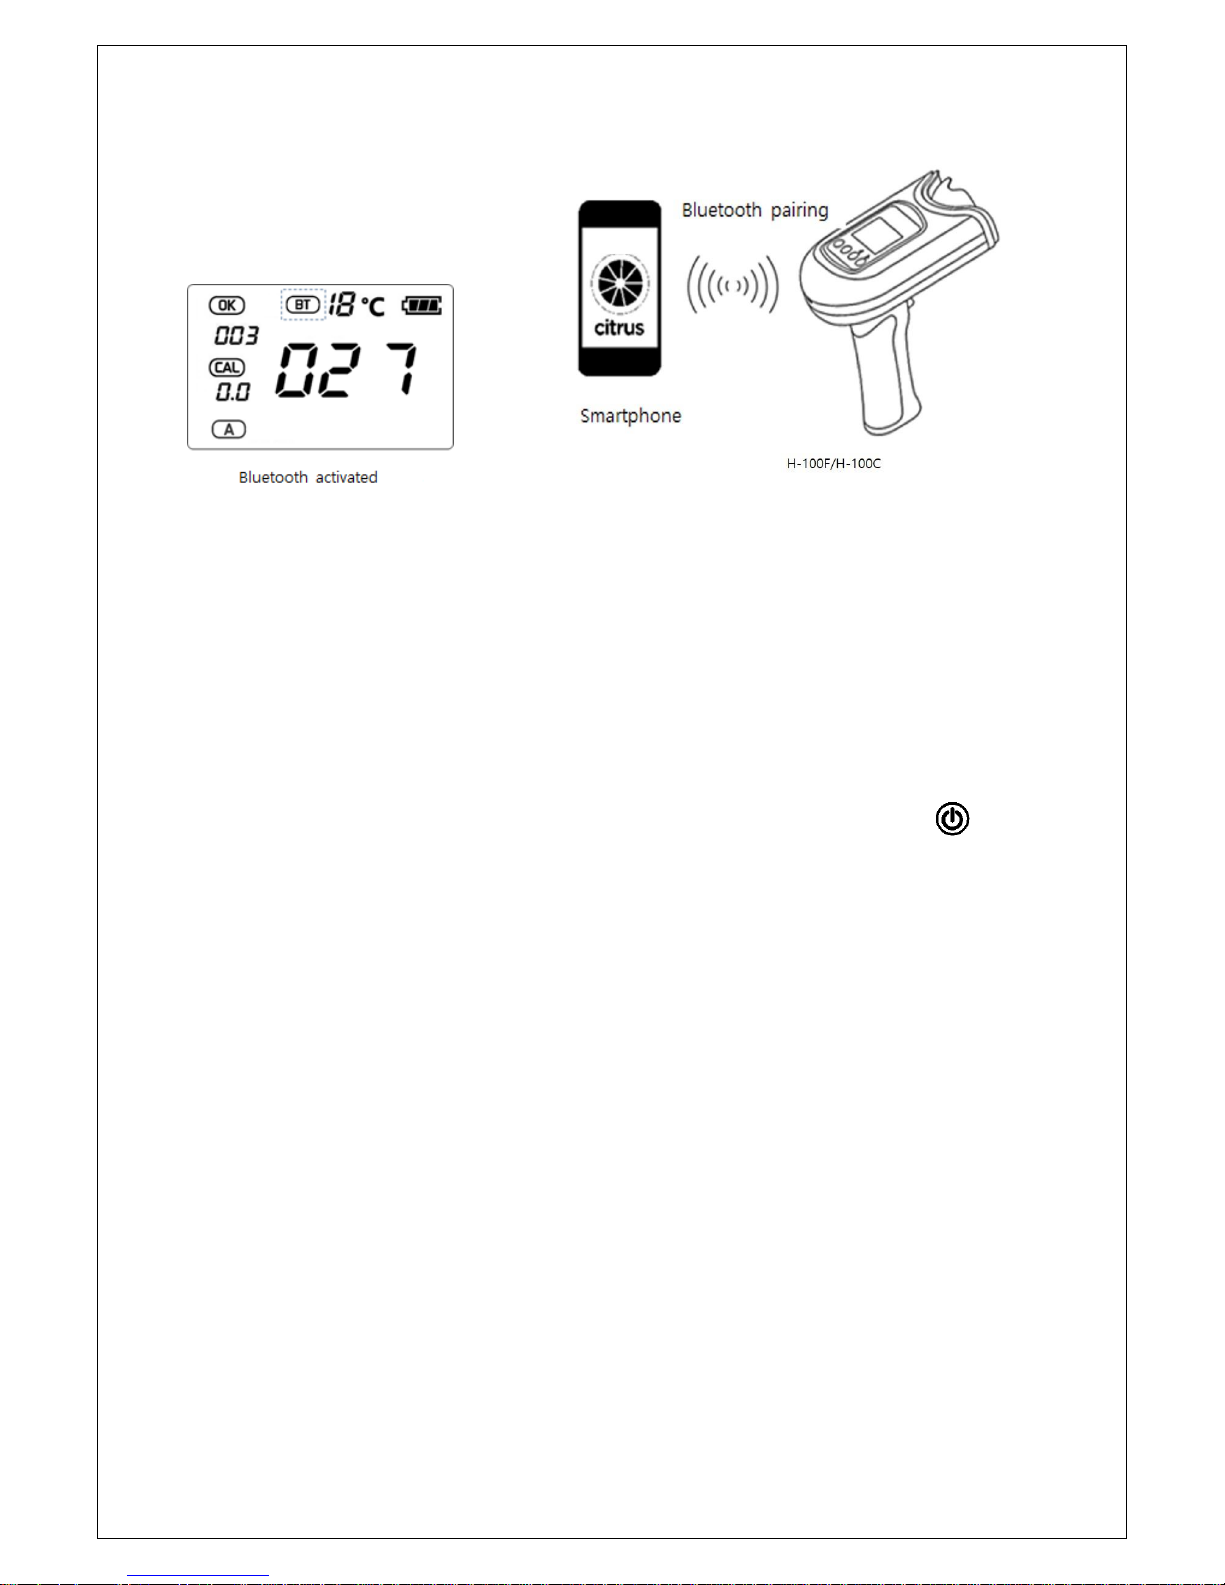
■ Smartphone interface via Bluetooth
1. User can get download of smarphone app. program at Google Play Store for interfacing with H-
100 instrument.
2. User can display instrument’s data onto smartphone app. via Bluetooth connection.
3. For more information about the installation and usage of smartphone app., refer to the Program
guide separately provided in the USB memory included in the product package.
4. To activate Bluetooth function, press longer than 1 second. Then, mark will be
appeared on the LCD which means Bluetooth activated. User should utilize smartphone app. after
Bluetooth pairing between smartphone and the instrument.
5. display on LCD screen goes off when there is no connection made from smartphone in
3 minutes. Press again or trigger for longer than 1 second to disable bluetooth function.
Generally Bluetooth operation consumes considerable battery power. It is recommended
to put Bluetooth function disabled if not used.
Page 15
- 15 -
■ Zero set process by White Teflon built in the head-cover
1. To measure the internal quality of the fruit, the reference material (White Teflon) must be scanned
first (zero set process).
2. When the power turns on, the instrument automatically scans the reference material (White Teflon)
during its initialization procedure.
3. User may have to scan the reference material manually, when there is a change in the
measurement model or when outside measurement conditions (temperature, etc) are altered
drastically.
4. To scan the reference material, close the head-cover to the instrument, and press button
for rebooting (power off and on).
5. Make sure that the head-cover (White Teflon) does not move out from the instrument until the
initialization completed.
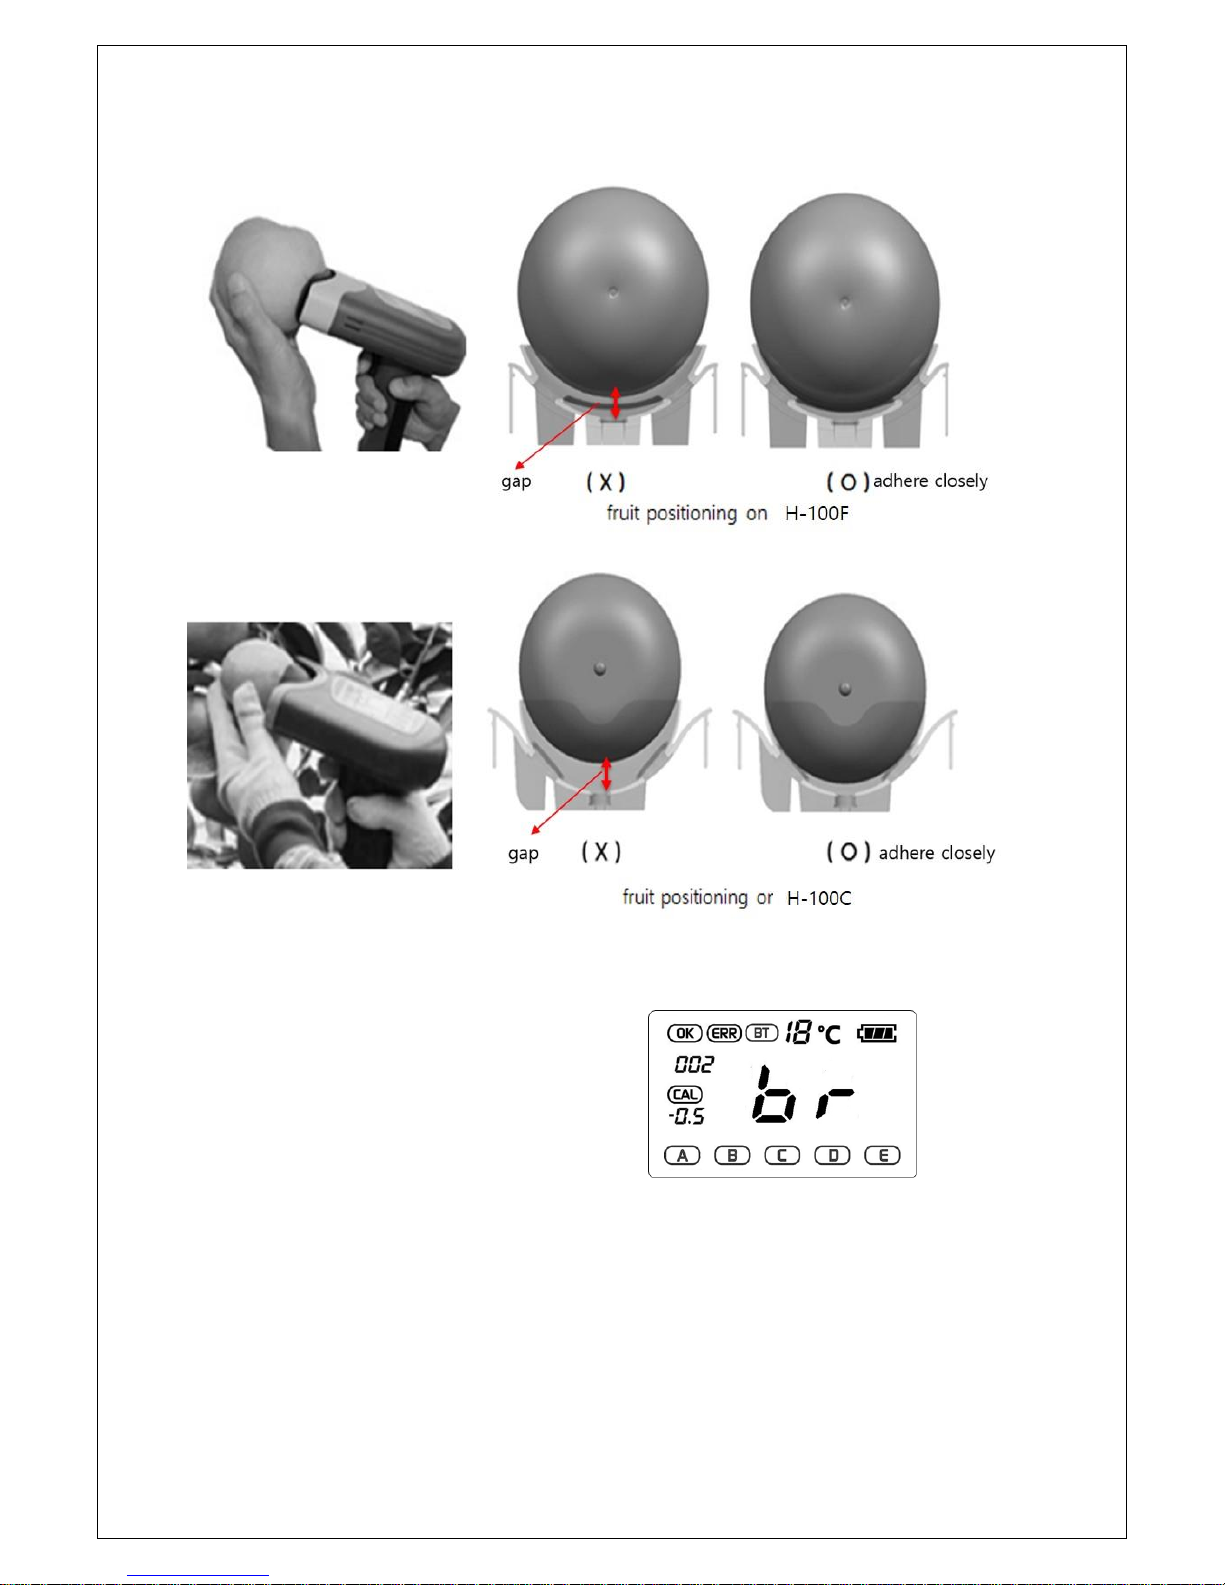
■ How to place the fruit with the instrument
1. Before taking a measurement, clean the object fruit thoroughly if its surface is excessively dirty
or dusty.
2. As shown in the picture below, grab the fruit and smoothly push it to the instrument, so that the
center part of the fruit adheres closely to inside rubber shield.
3. Press the trigger and keep applying a steady force to the fruit for about 2 seconds (until the
“beep - beep“ sound ends). Make sure that the fruit doesn't move during scanning.
4. The instrument structure has been designed to fit into a standard size of object fruit.
5. Hence measuring a fruit smaller than standard size, there may be a possibility that superfluous
light may leak into the optical sensor. In that case, try to move the measuring position and to
avoid such leakage during the measurement or user may have to wear a black glove to cover up a
possible light-leak.
Page 16
- 16 -
6. When a browning detected, in case of apple and pear application, a couple of beep sound occurs
and displays “ br “ on the LCD screen.
■ Cleaning
Page 17
- 17 -
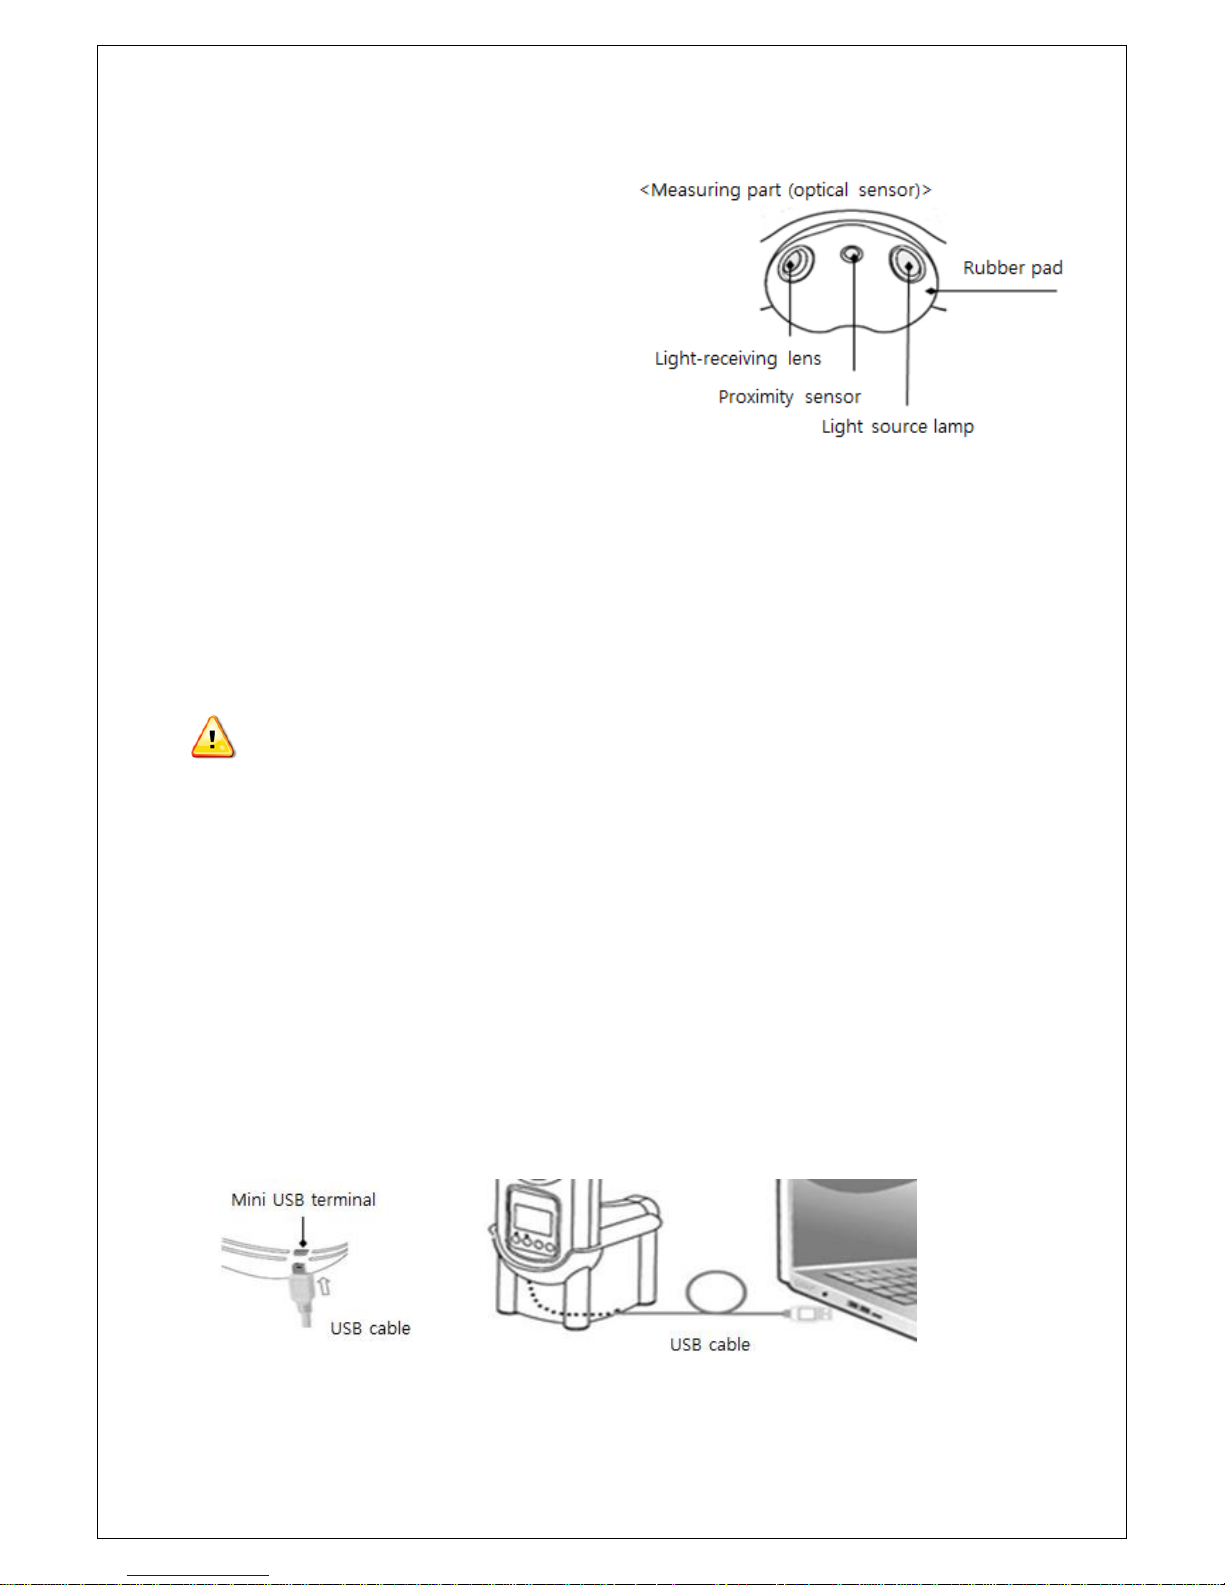
1. The optical part of the instrument must be kept
clean using the cotton swab or smooth cloth
included in the cleaning kit provided in the
product package.
2. To clean the instrument body and LCD display,
wipe softly with a smooth cloth.
3. To clean light-receiving lens, proximity sensor
and light source lamp, take a cotton swab soaked
with alcohol and wipe softly.
4. When measuring part is excessively dirty, take off the rubber pad from the instrument head, so
to clean it thoroughly.
5. The rubber pad can be separated from the main body and washed in water. After washing it,
dry it under a shade. When attaching the rubber head to the main body again, make sure it firmly
inserts into the rubber hole of the body.
When cleaning the measuring part, do not apply excessive force on the optical component.
Detaching/attaching the rubber head must follow the cleaning procedure instructed by authorized
service representative.
■ PC interface
1. An exclusive PC program (Admin Program) is included in provided USB memory.
2. The PC program is used to read the data stored in the instrument and save them as a csv file,
and is also used to renew or upload calibration model into the instrument.
3. To utilize the exclusive PC program, refer to user's manual included in USB memory.
4. First, connect the USB cable to USB terminal on the back of the instrument. Then, using the
connection hole of the stand and groove on the bottom, connect the USB cable and place the
instrument on the stand.
5. Connect USB cable to PC.
Page 18
- 18 -
■ Diagnosis of the instrument and Troubleshooting
The following is a brief description on how to diagnose and deal with various abnormal
situations that may occur while using the instrument. To resolve abnormalities swiftly,
please read and check the followings before making malfunctioning reports to the A/S
center or visiting service representative.
1. When power doesn't turn on
The power may not be turned on when the battery is empty or the instrument has been
automatically turned off during the use due to low battery. Charge the instrument for more than
30 minutes and try to turn on again. If it is turned on, charge sufficiently and then use the
instrument as usual.
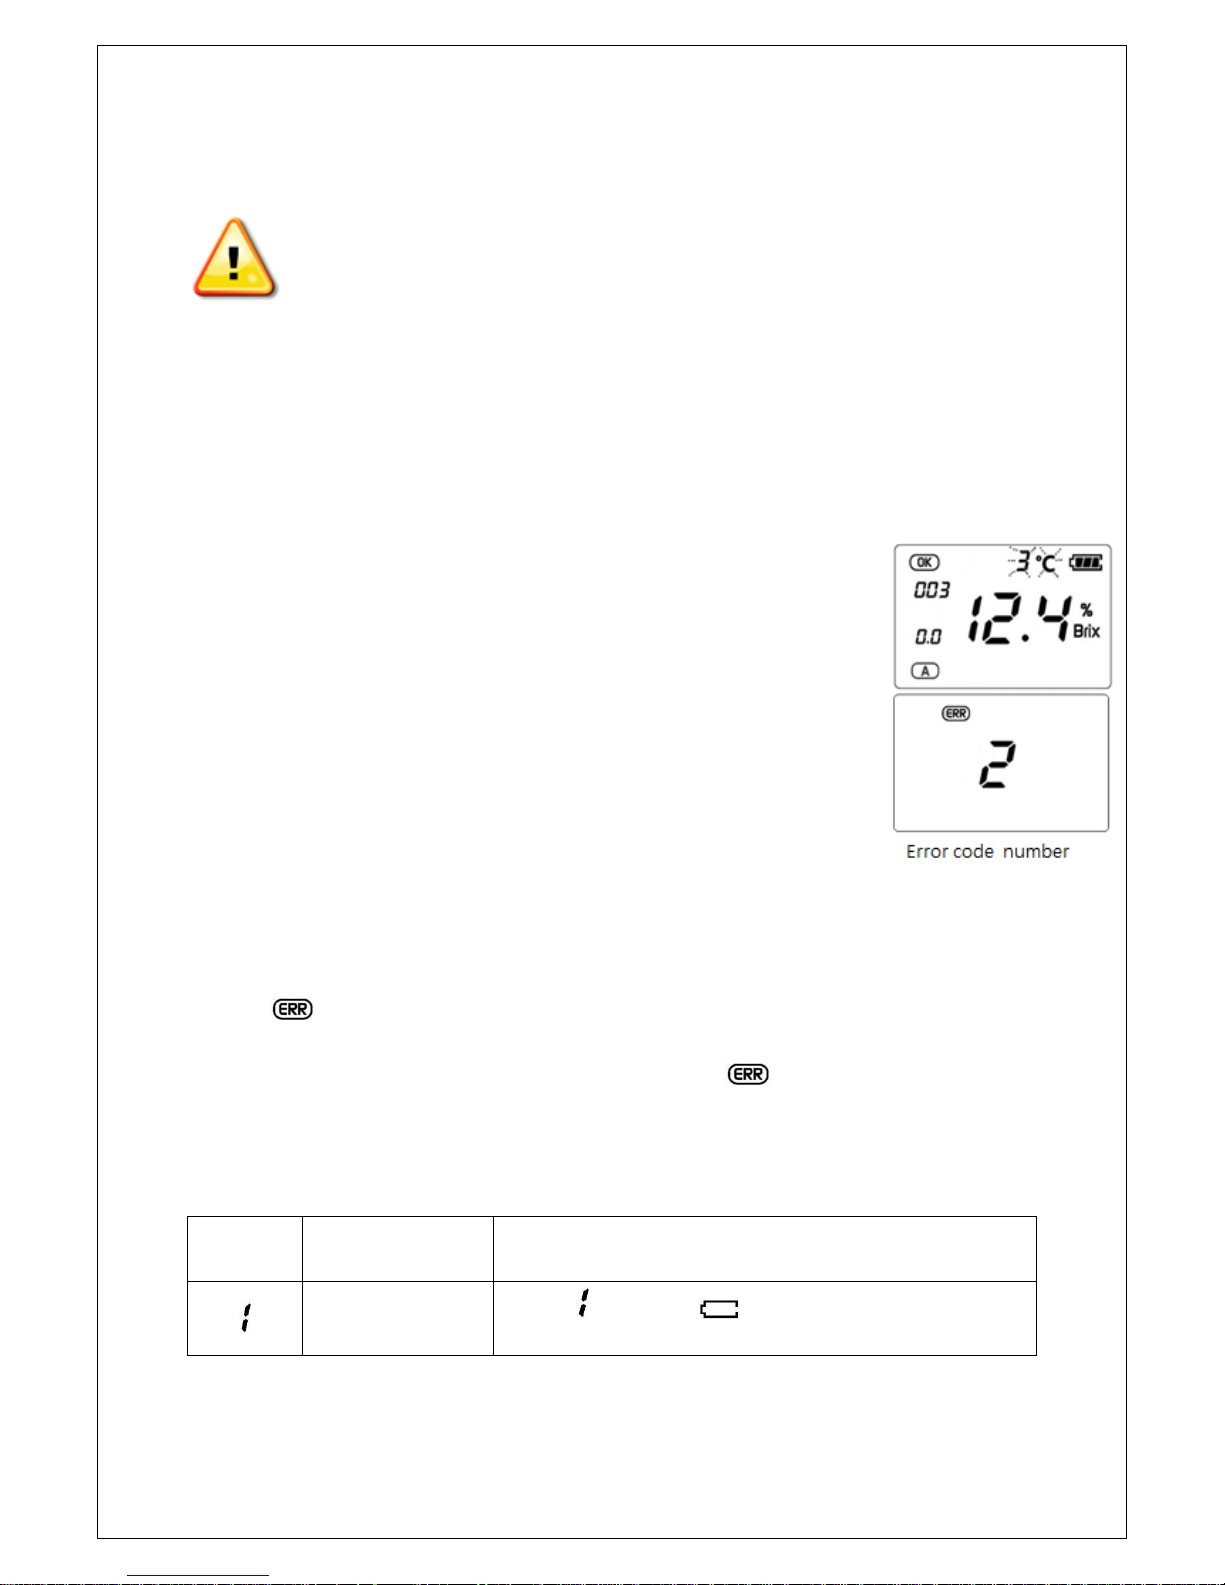
2. When the instrument is used beyond normal operation temperature
In case the instrument is used out of standard operating condition
(temperature : 5℃∼35℃, humidity : 85%RH), the measurement value may
slightly deviate from the guaranteed accuracy due to a reason that the
spectrometer sensor built in the instrument is influenced by temperature.
When the instrument is placed out of standard operating condition, the
temperature indicator on LCD display will be blinking. It is recommendable
to use the instrument within standard temperature range for accuracy
assurance.
3. When there is an abnormality during charging
In case charging status lamp is blinking or no light on, check if the charger’s plug connected to
charging terminal is properly inserted.
4. When is shown on LCD display
When the power is turned on, the instrument diagnoses itself through initialization. The instrument
also detects abnormalities during measurements, and shows and an error code on LCD in
case of any problem occurred. With the error code number, user may find out a countermeasure
from the list below. In case of consulting with A/S center, provide the error code number to deal
with the malfunctioning more swiftly.
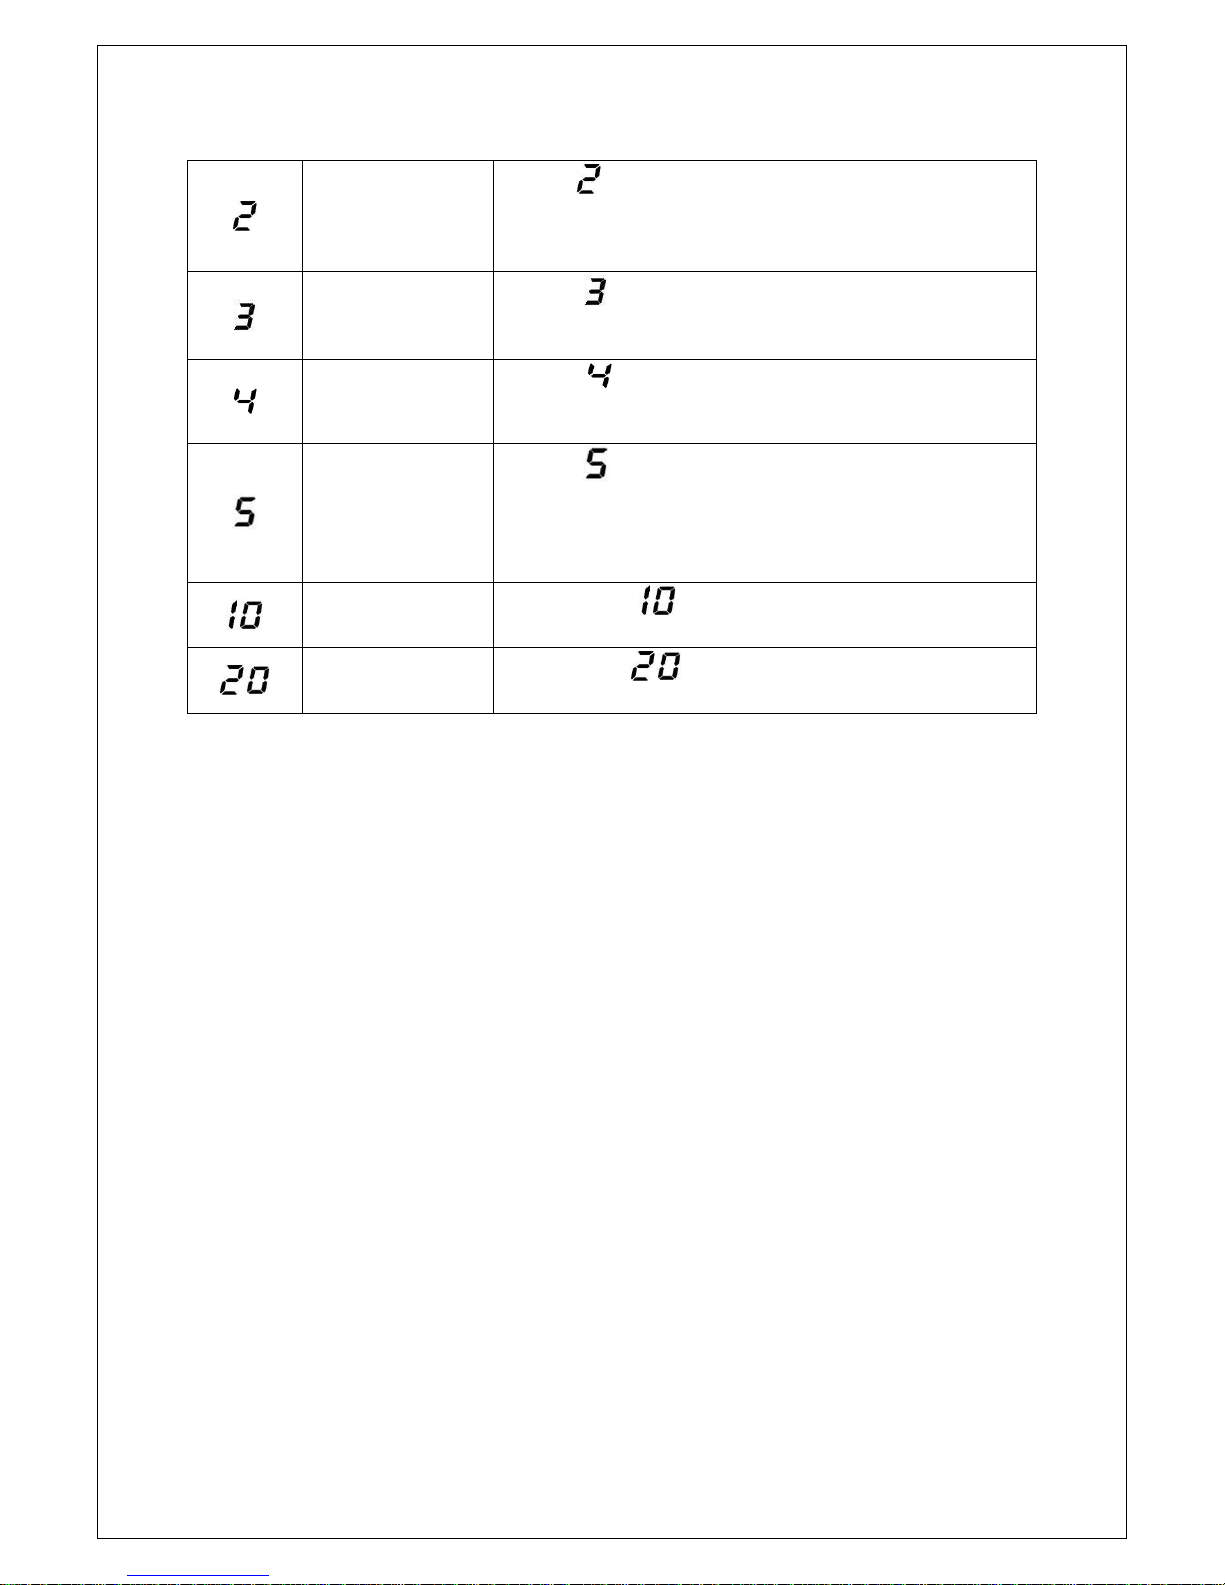
Error code
number
Error occurrence
Countermeasures
When initializing / when
measuring reference value /
when measuring Brix
Error code “ ” appears, when on the LCD blinks due to lack of battery power.
Charge the battery immediately.
Page 19
- 19 -
When initializing / when
measuring reference value
Error code “ ” appears, when the head-cover of measuring part is opened or when
the reference material(white Teflon) inside the cover is severely damaged. Make sure to
check the condition of the cover and see if it is properly closed to the instrument, and
restart booting (initialization)..
When measuring Brix
Error code “ ” appears, when measurement value deviates out of standard range
other than preset (5 ~ 25 Brix or adjustable). Make it sure if the calibration model is
suitably selected for relevant fruit, and take re-measurement.
When measuring Brix
Error code “ ” appears, when direct sun light or indoor lamps has excessively
infiltrated to the measuring part through inside/outside of object fruit. Block the direct
sun light or use it under protection of light incident..
When measuring Brix
Error code “ ” appears, when the size of object fruit is either so small or too big,
when the fruit is excessively rotten or damaged, when the surface is moist, or when the
object fruit is improperly placed on the measuring part of instrument. Check the status
of object fruit and make it sure the fruit is properly placed on the measurement part of
the instrument.
When initializing
When error code “ ” appears, the instrument can still be used to take
measurement, but need to contact A/S center.
When initializing
When error code “ ” appears, the instrument can not be used. Need to
contact A/S center immediately.
For abnormalities or malfunctioning other than the above descriptions, do not take countermeasures
at your discretion, but contact A/S center or service representative nearby your premises to get
technical support.
Page 20
- 20 -
Appendix: Principle of measuring the sugar contents of fruit
A nondestructive fruit quality measuring instrument predicts fruit’s ingredients by using the light of NIR (NearInfrared) wavelength band. A calibration model calculates fruit’s ingredients by analyzing the wavelength of
light which reflected from inside fruit. Since the conditions of fruit may differ for each type of fruit, variety of
fruit, and place/time of cultivation, different calibration model should be applied accordingly. For
nondestructive sugar contents measuring instrument, it is very necessary to understand the concept of
calibration model and the way of deviation correction.
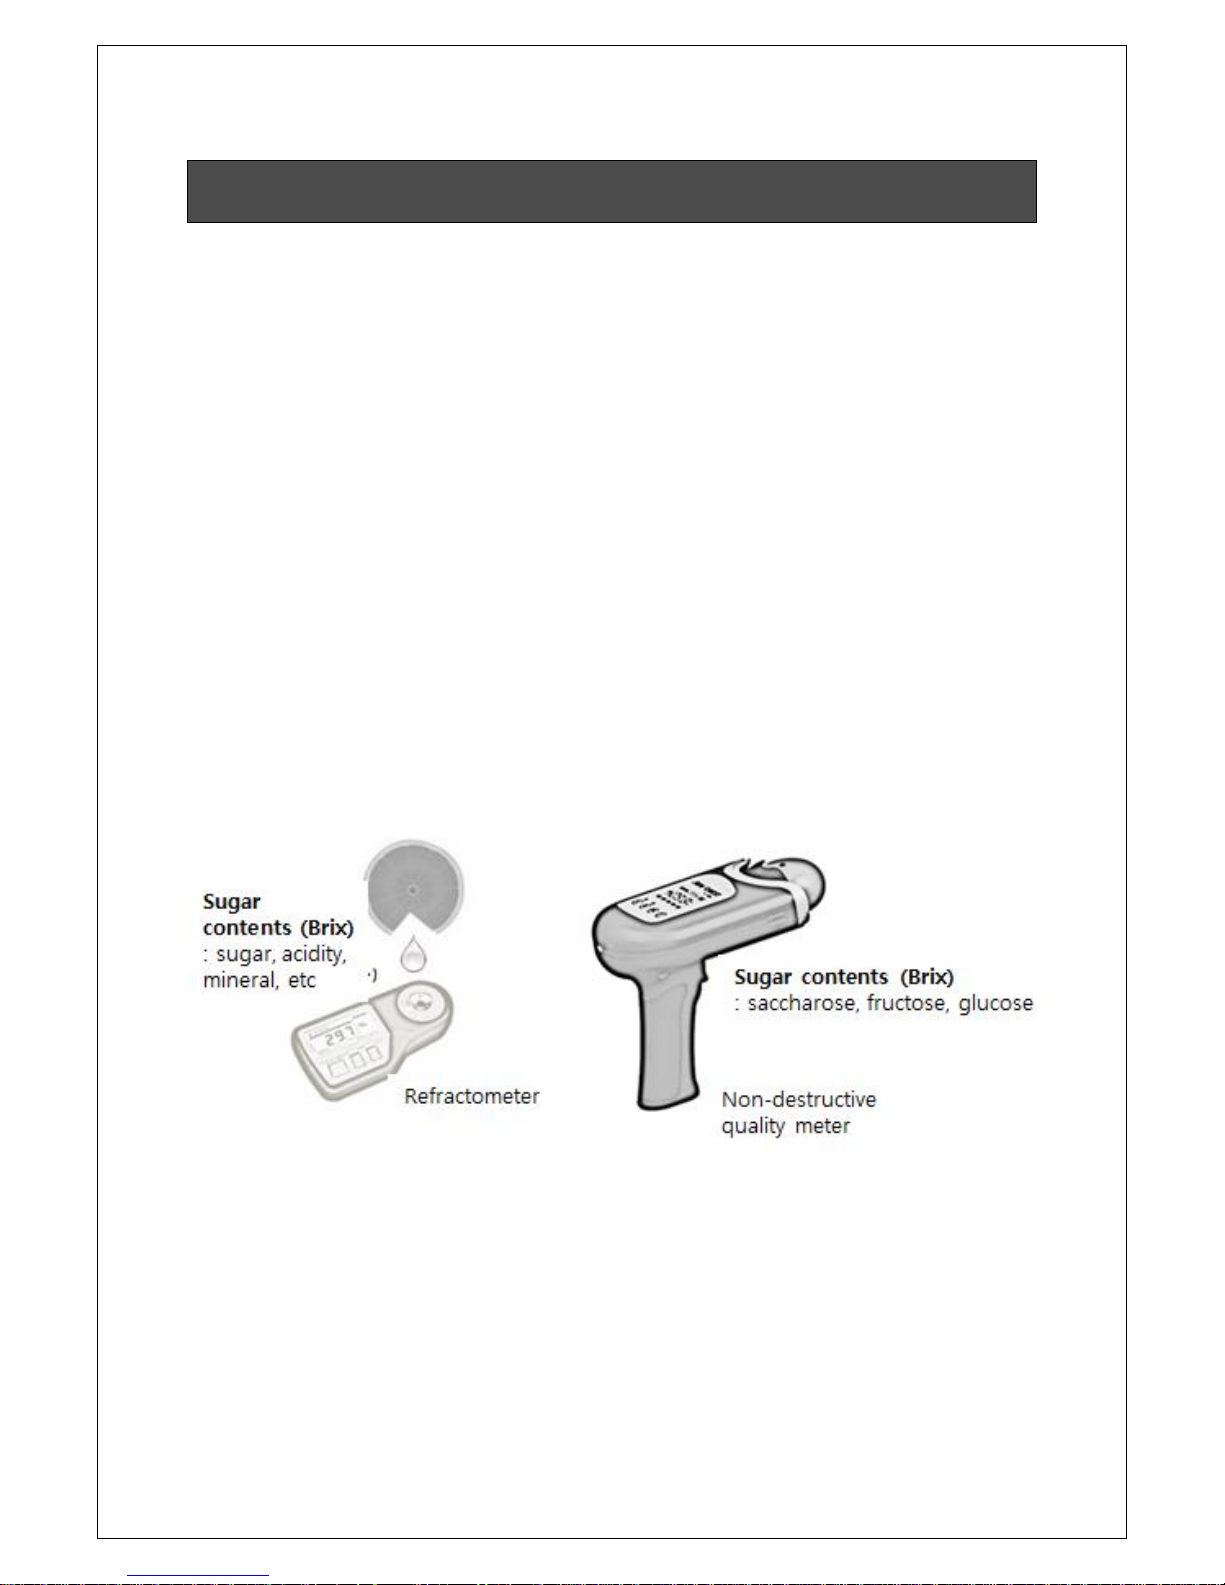
■ Difference between sugar amounts and sugar contents(Brix)
Sugar amounts or sugar (sweet-tasting ingredients) stand for the total amount of saccharose, fructose and
glucose, while sugar contents (Brix) stand for the total amount of all ingredients (sugar, acidity, minerals etc)
inside the juice except water. Strictly speaking, a refractometer which measures sugar contents is adjusted
based on saccharose, a type of sugar. For an example, a mandarin orange (Onzhu variety for example) with
10% sugar and 1% citric acid and another mandarine orange with 10% sugar and 1.5% citric acid might be
measured as 10.9 Brix and 11.3 Brix respectively using a refractometer. In other words, there may be a difference
in sugar contents based on the fact that sugar≠sugar contents, and also by the amount of citric acid. Although
the calibration model of nondestructive measuring instrument is created under the basis of measurement value
of refractometer, what the reflected wavelength of light means a reaction to sugar amounts. Therefore, an
error of about 0.1~0.5 Brix caused by the component of sugar and citric acid portion may affect to the standard
error of nondestructive measurement values. By the way, high sugar contents value measured by refractometer
does not always guarantee favorable sweetness. The quality of sweetness may be differed by the amount of
citric acid in fruit.
■ Area of measurement and juice extraction
Generally, partial section inside the fruit has different value of sugar contents. Thus, to measure the average
sugar contents of a single fruit, juice should be extracted from entire fruit. If juice partially extracted from a
fruit, it is very inappropriate to regard its measured value as if an average value of that fruit. When juice is
extracted from a relatively large area of a fruit, we can tell its sugar contents is approached to average value.
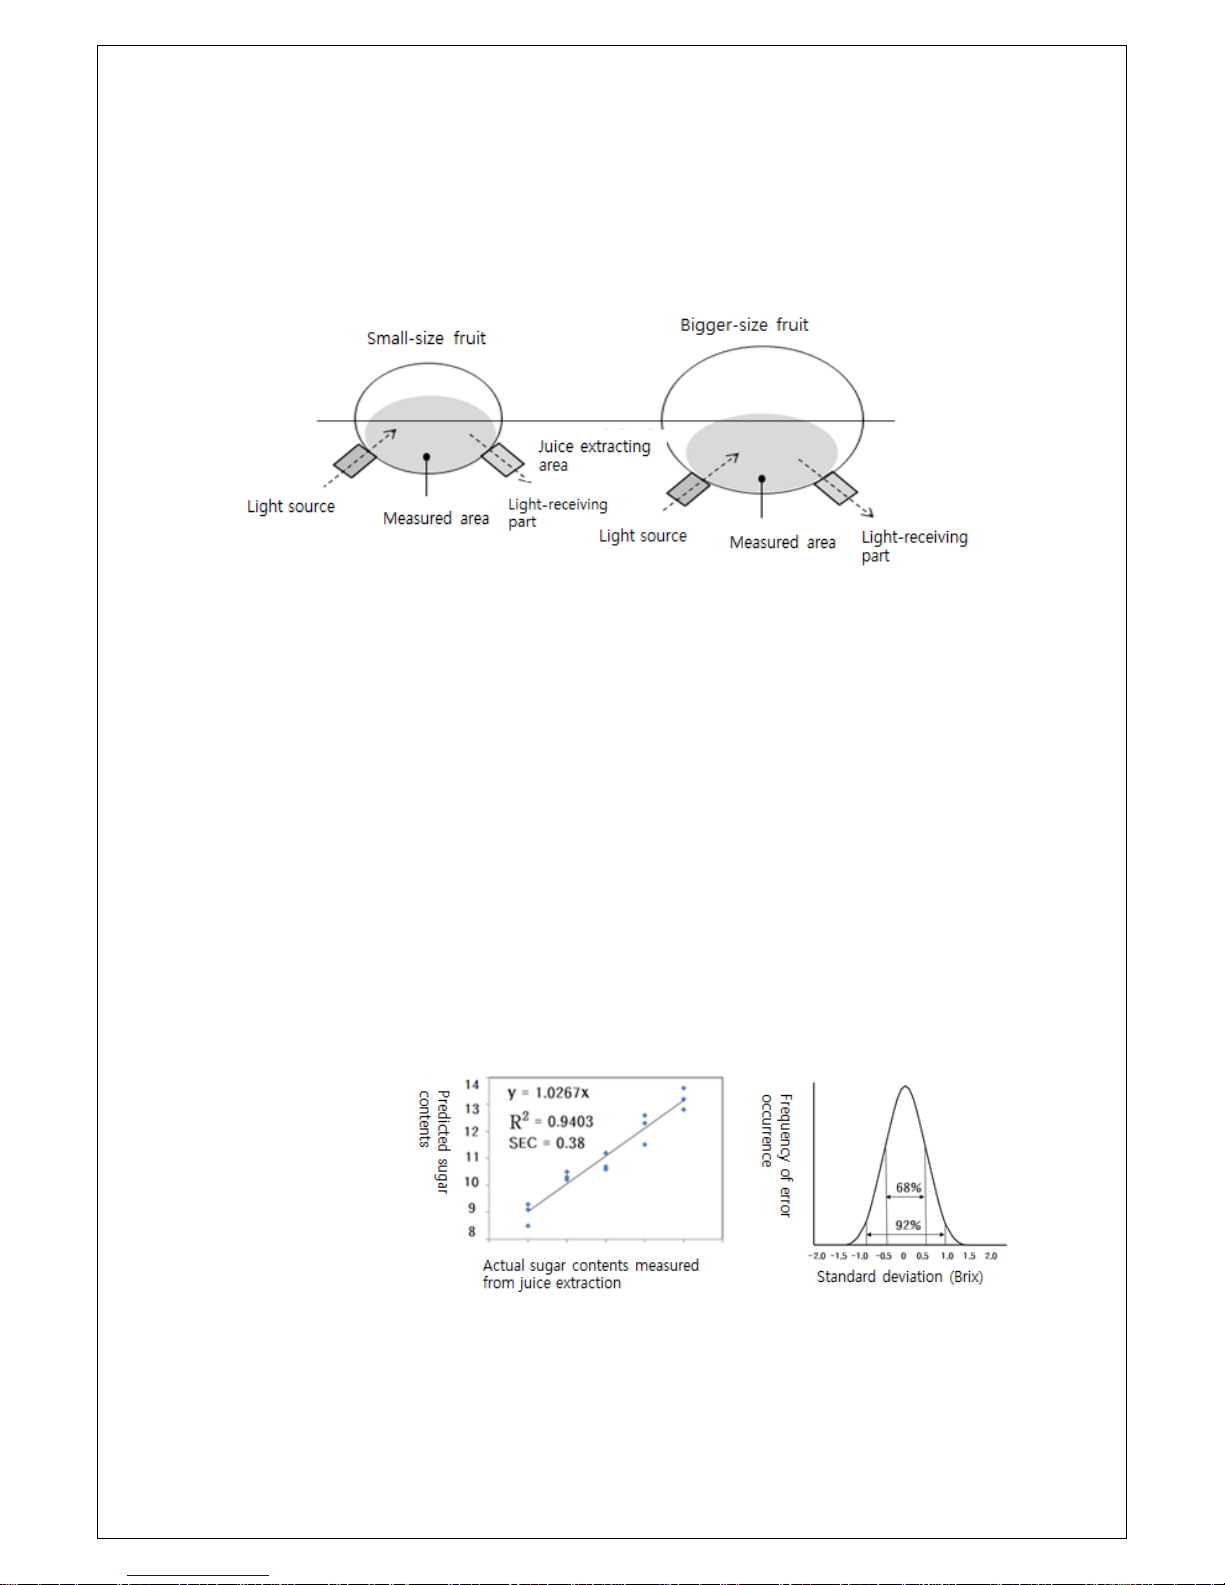
As shown on the below drawing, SUNFOREST H-100 series has large area of incident light covering half or one
Page 21
- 21 -
third of an entire fruit volume, which attributes to the achievement of average sugar contents value. Therefore,
measuring juice using a refractometer, extracted from the same size and area measured by the SUNFOREST
H-100 series instrument, shall provide more accurate comparison of sugar contents value.
■ Correlation coefficient and standard error of the calibration model
The predicting performance of a nondestructive measuring instrument can be evaluated by correlation
coefficient((R2) and standard error(SEC) of the calibration model.
The correlation coefficient indicates the level of co-relationship between the sugar contents predicted by
calibration model and actual sugar contents of extracted juice measured by refractometer. Bigger the
correlation coefficient of the calibration model, better the definiteness between high sugar contents and low
sugar contents. Thus we can tell the calibration model with bigger correlation coefficient is better optimized
to object fruit. The standard error is the statistic distribution of error range between sugar contents predicted
by calibration model and actual sugar contents measured from the juice extracted. A standard deviation of 0.5
Brix means that among the total number of measurement, about 68% can predict the sugar contents within
the error range of ±0.5 Brix. Thus, in some cases, a measurement error may have larger value than 0.5 Brix.
To create a calibration model with good correlation coefficient and useful standard error, it is
recommendable to make models collected from various range of sugar contents and considerable number
of fruit samples. The correlation coefficient and standard error should be made to be suitable for desired
purposes of instrument use ; make decision of harvesting time or selection of favorable fruit at post-harvest
And the calibration model should be created in consideration of the varieties of fruit and area/time of
cultivation.
Page 22
- 22 -
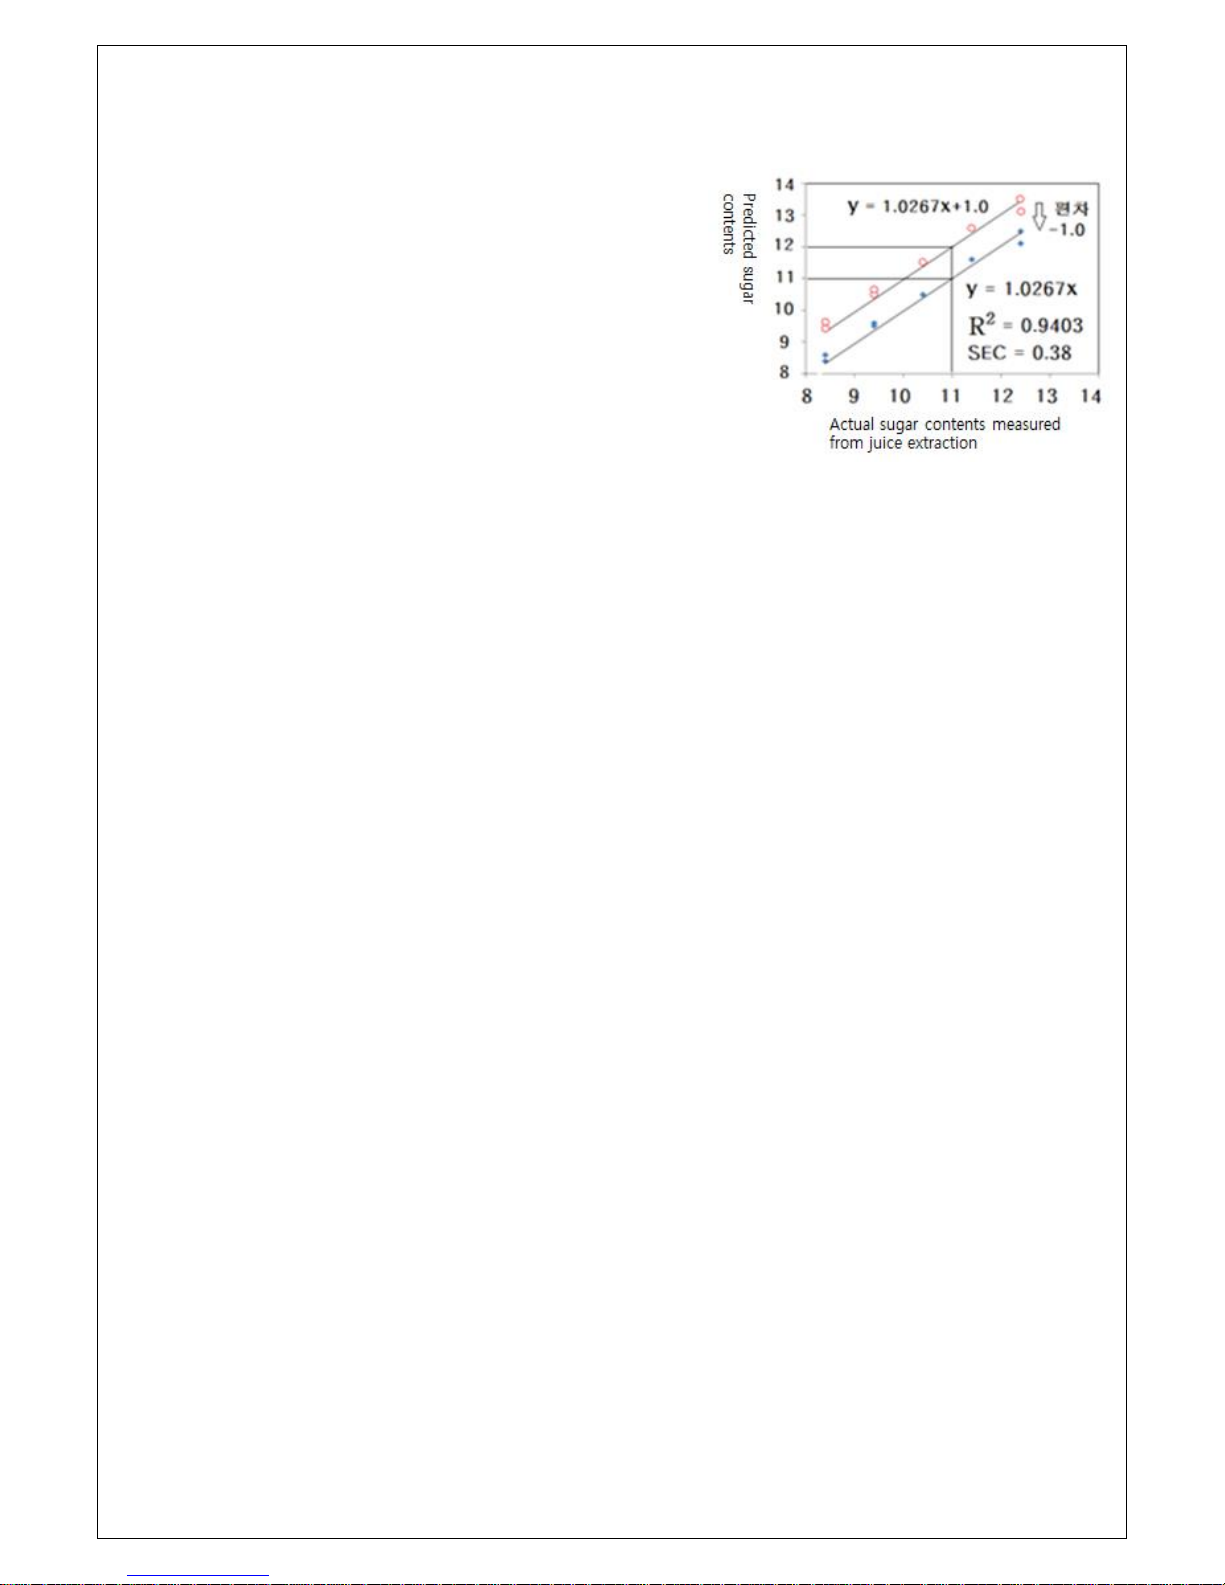
■ Correction of calibration model for sugar contents deviation
When measuring fruits that have differences in the variety of fruit,
area/time of cultivation, environment temperature, and so on, if
the same calibration model applied to the instrument, predicted
sugar contents value may have a deviation comparing with actual
value measured from juice extraction. Before the first use of the
instrument for measuring a certain fruit, it is recommended to do
deviation correction first adjusting to the value of actual sugar
contents measured from juice extraction.
Though SUNFOREST H-100 has built in auto-correction function for temperature compensation, the measured
value may has still a deviation due to different environment temperature and time of cultivation. Therefore, it
would be better to have a deviation correction for calibration model before using the instrument at a new
environment. Required number of samples to be used for deviation correction are over 3 pieces at least
collected at each range of sugar contents i.e. low, medium, and high level. Also the average value to be applied
should be born out of more than 3 times of measurement by H-100 instrument.
■ Creation of a new calibration model
Under severe differences in the variety of fruit and area/time of cultivation, existing calibration model may not
be simply adjusted by deviation correction and would be no longer suitable for a new environment. In this
case, a new calibration model must be newly created by the user program provided by USB memory included
in H-100 product package.
With the user program provided, the user can create their own calibration model without complicated
procedure. For the creation of calibration model, refer to the user manual included in USB memory.
Page 23
- 23 -
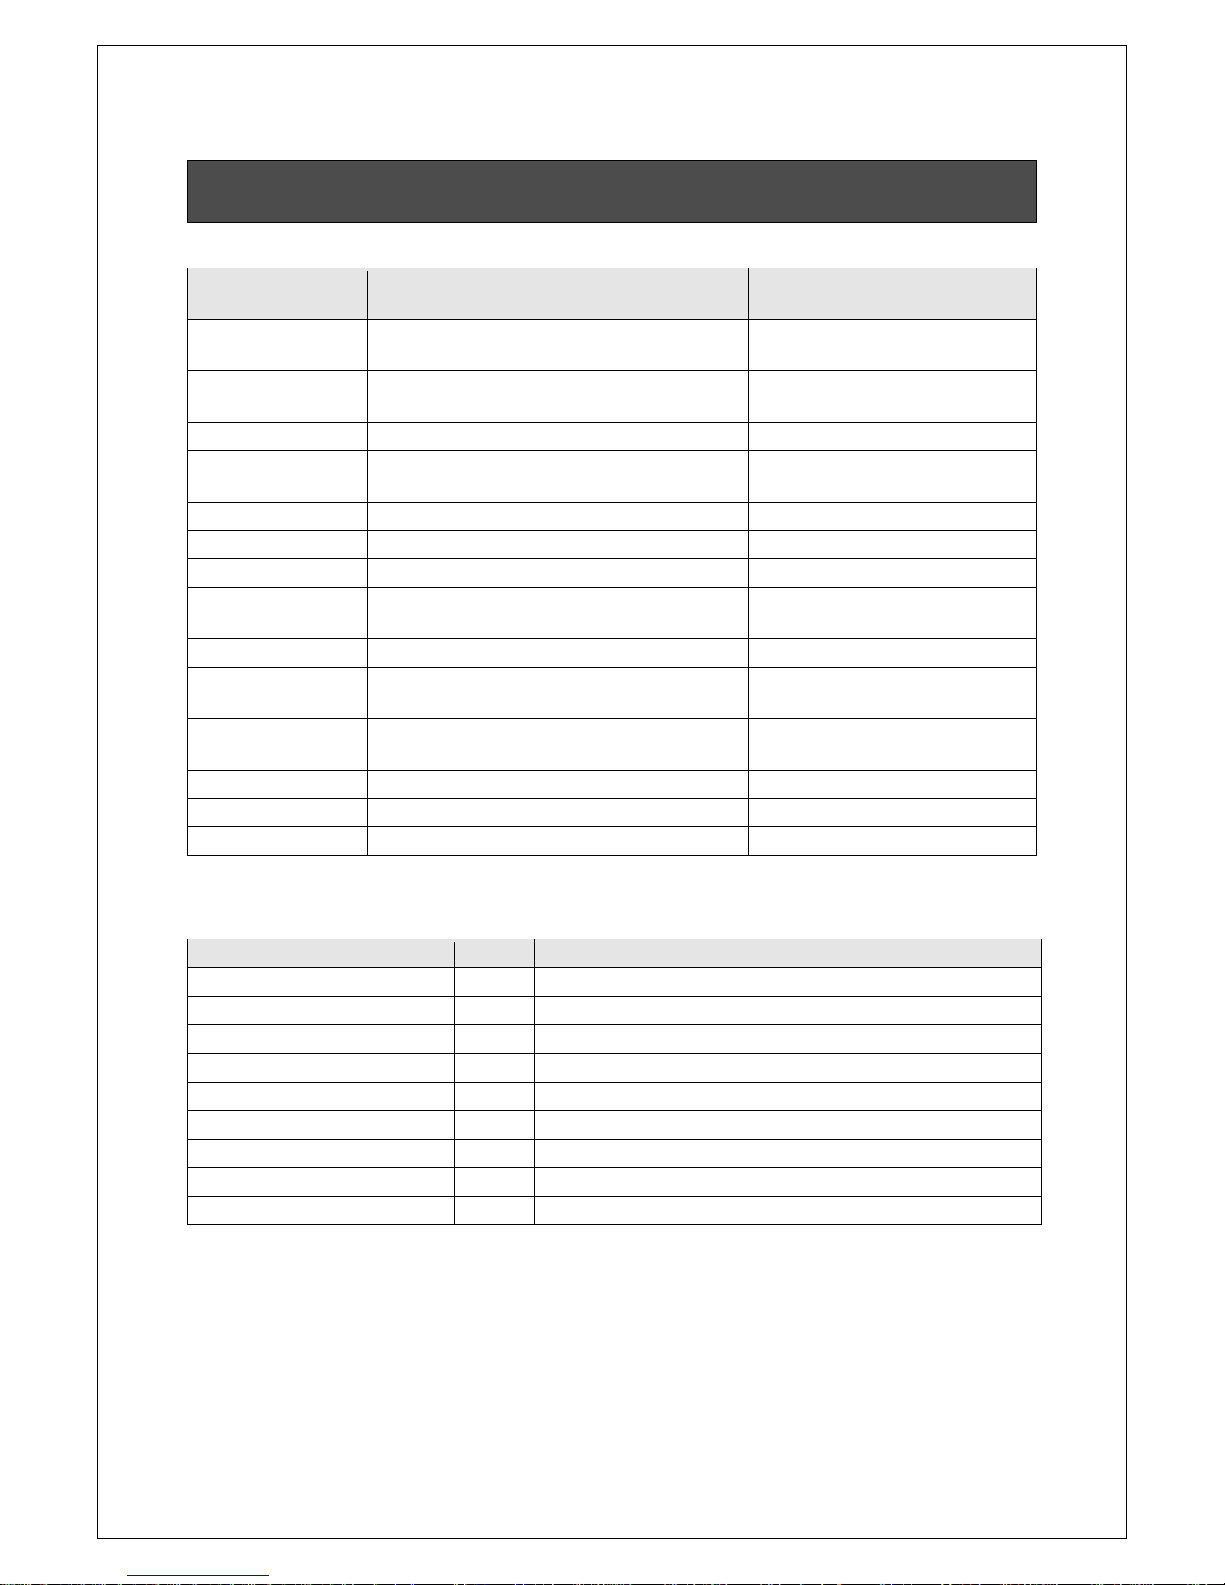
Specification of product
■ Specifications
item
Descriptions
Remarks
Name of product
Nondestructive portable sugar contents
measuring instrument
model
H-100F / H-100C
H-100F (apple, pear, peach, and orange)
H-100C (mandarin, kiwifruit)
Method of measurement
Semi-transmittance diffused reflection light
Spectral analysis of Near-Infrared
Measuring items
Brix (mandatory)
Dry Matter, Chlorophyll (optionally supported)
Measurement range
5 ~ 30 Brix % (sugar contents)
adjustable
Time for measurement
2.0 seconds
subject to type of object fruit
Number of measurement
Up to 1,000 readings can be saved in the device
Based on fully charged battery
Accuracy of measurement
Correlation coefficient R2 : above 0.85,
Standard Error (SEC) : less ±0.5 (Brix)
based on optimized calibration model
(subject to object fruit and measuring items)
Way of correction
Correcting slope and deviation
adjustable by a scale of 0.1 Brix
Interface
USB 2.0 (mini USB for PC)
Bluetooth 4.0 (for smartphone) - Only support LE mode
Operating environment
5℃∼35℃, 85 %RH
Guaranteed accuracy for spectrometer
operation
Battery
Lithium ion battery (2,600mAh)
Charger DC 12V/1.5A
Display method
TN LCD
Screen size: 45x30mm
Information of main body
112×160×173mm, 420g/460g, ABS resin
Including battery
* specifications are subject to change without prior notice.
■ Package
Article Number Unit
instrument 1 ea
Head cover for light source & scanner 1 ea
Charger 1 ea
mini USB cable 1 User’s manual, UT-5000 manager program, USB driver
USB memory (4GB) 1 Ea
Cleaning kit (Alcohol, cotton swab, cloth) 1 set
User's manual 1 in USB
Storage case 1 ea
Strap for storage case 1 ea
LE mode
Page 24
- 24 -
SUNFOREST CO., Ltd.
#507 Incheon IT Tower, 229 Gyeongin-ro, Nam-gu, Incheon 22106 Korea
Tel. 0082-32-719-7031 / Fax. 0082-32-719-7032
Email : [email protected]
 Loading...