

Page 1
8013ADELUXE/8013ABKDELUXE/8013ABLDELUXE Rev. A
7/3/14
MODEL 8013ADELUXE, 8013ABKDELUXE,
8013ABLDELUXE Rev. A SERVICE CART
GUARANTEED TO PERFORM
OPERATING MANUAL
Read and follow all instructions in User's Manual. It is the responsibility of the owner to make sure all personnel
read this manual prior to using the device. It is also the responsibility of the device owner to keep this manual intact
and in a convenient location for all to see and read. If the manual or product labels are lost or not legible, contact
Sunex Tools® for replacements. If the operator is not fluent in English, the product and safety instructions shall be
read and discussed with the operator in the operator's native language by the purchaser/owner or his designee,
making sure that the operator comprehends its contents.
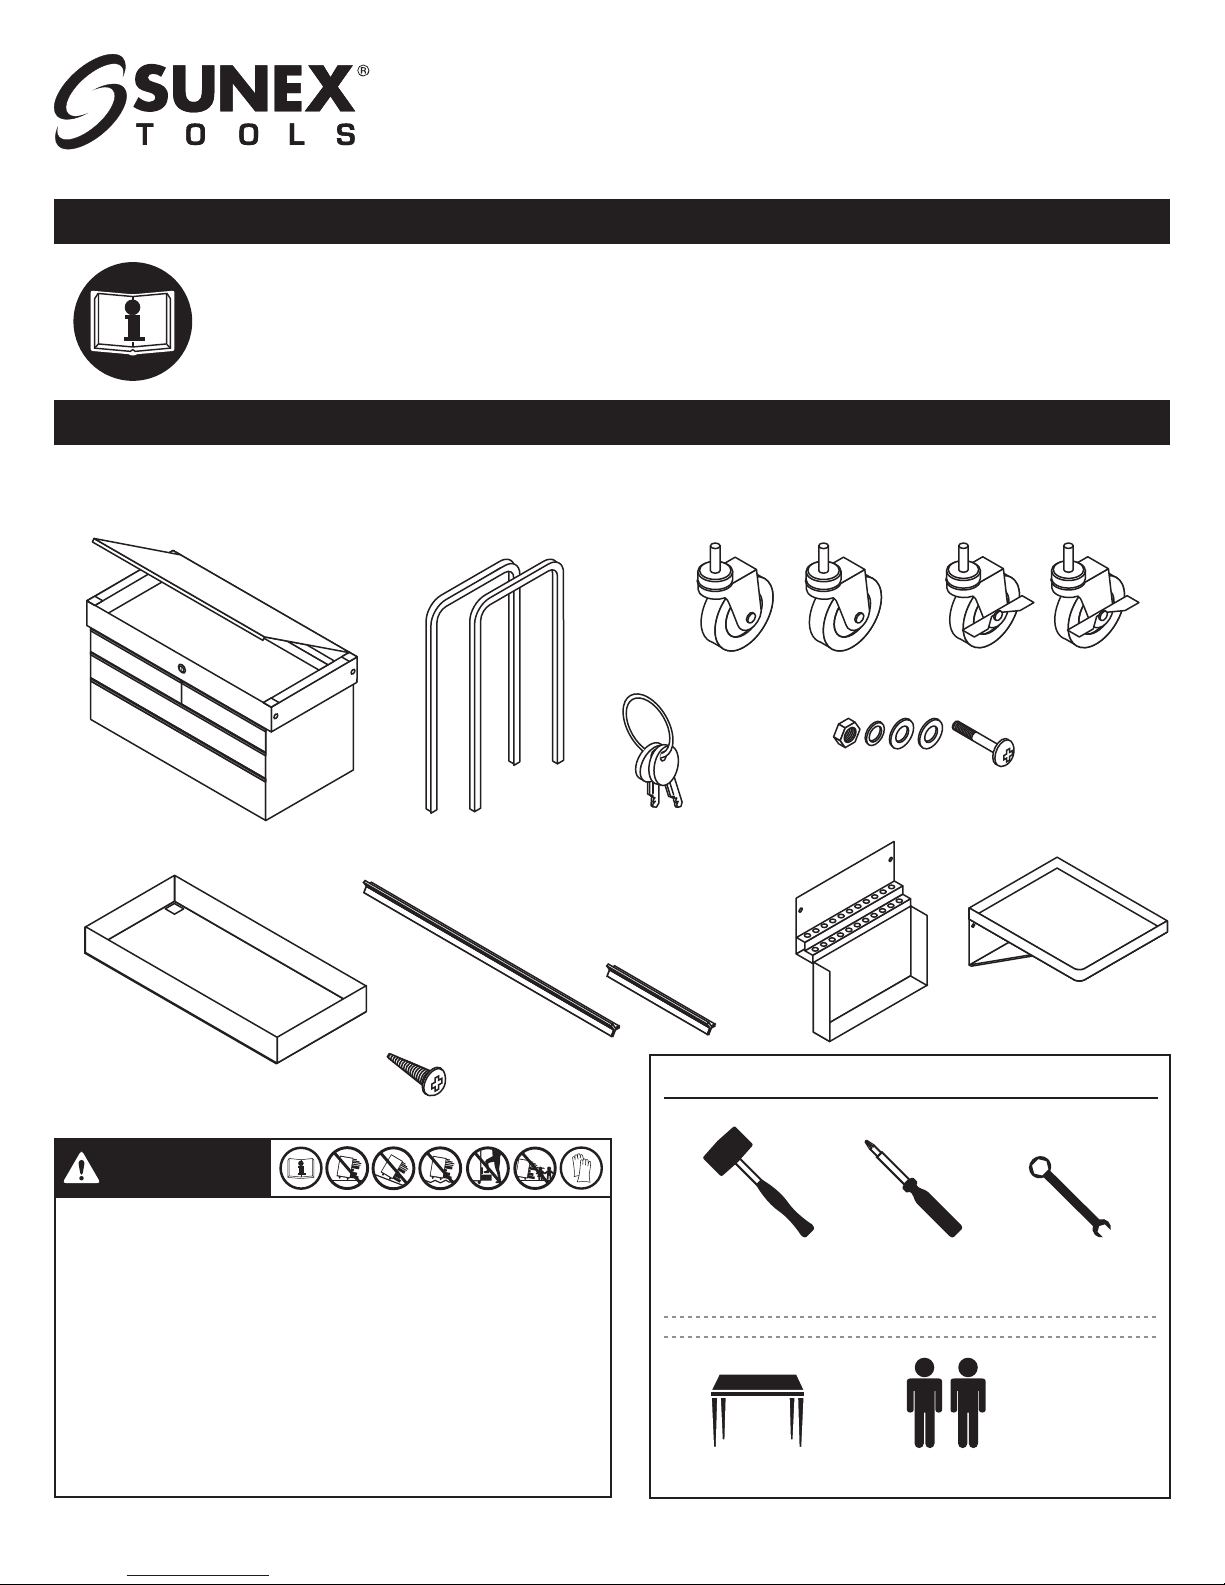
PARTS LIST
Examine box contents, then proceed with following instructions.
INCLUDES PRY BAR HOLDER AND SIDE WORK BENCH
WITH LOCKING TOP & DRAWERS
Bottom Tray
Chrome Legs (2)
(With Inserts Installed)
Long Drawer Handle (1)
Drawer Handle
Screws (14)
Keys
(Attached
to Legs)
Short Drawer Handles (4)
Locking Casters (2)Non-Locking Casters (2)Locking Drawer Assembly
M6x42 Bolts,
Nuts, & Washers
(8 Pcs. Each)
Pry Bar Holder
Side Work Bench
TOOLS NEEDED
WARNING
Read and follow all instructions in User's Manual. • Do not load
carts beyond rated capacity (350 lbs.). • Lock lid and drawers before
moving. • Apply brake on locking casters anytime cart is in place.
• Units can tip or fall causing damage or personal injury. • Cart is
designed to roll easily on flat surfaces and should not be used on
uneven or inclined surfaces. • Do not open more than one
loaded drawer at a time. •Do not stand on or step in drawers. • Keep
children away from unit. • Wear gloves when lifting edges. • This
product may contain one or more chemicals known to the State of
California to cause cancer and birth defects or other reproductive
harm. Wash hands thoroughly after handling. • Failure to heed these
warnings may result in personal injury and/or property damage.
Rubber Mallet
Table or Workbench
6mm WrenchPhillips Head
Screwdriver
2 People
© Copyright 2014, Sunex Tools
®
Page 2
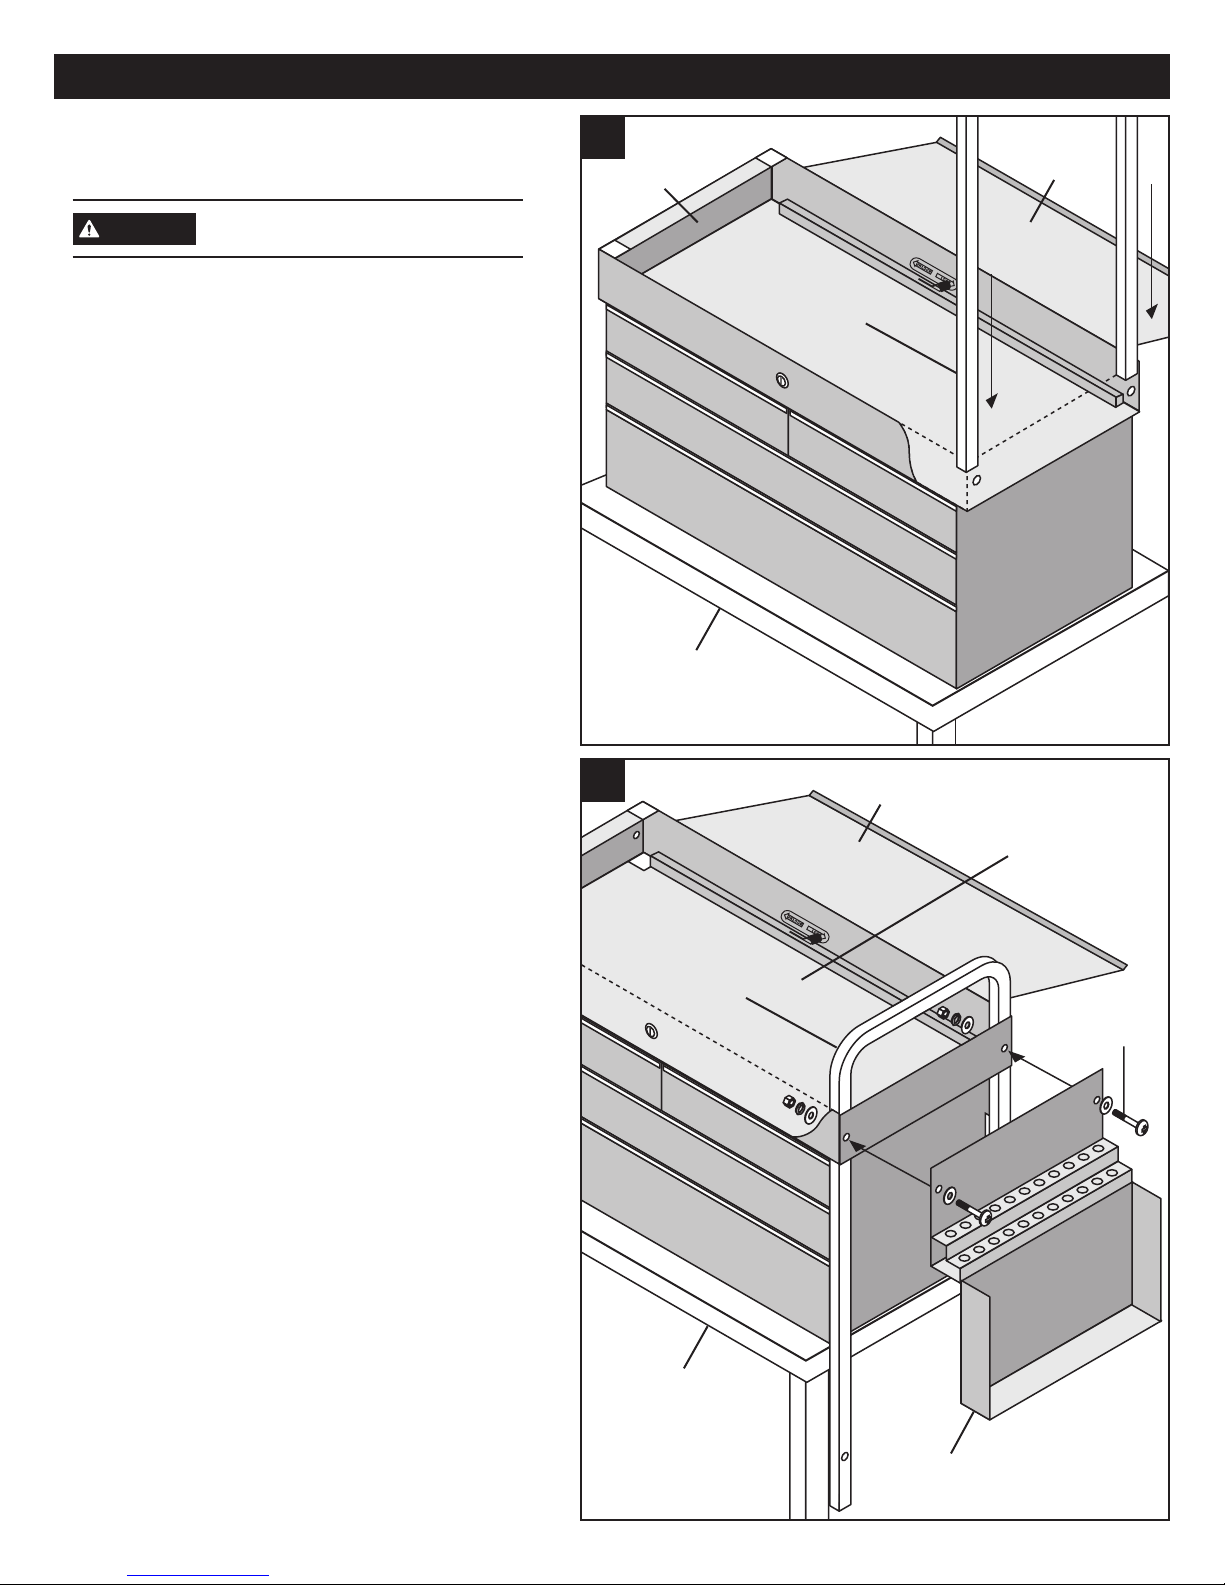
ASSEMBLY INSTRUCTIONS
NOTE
Do not fully tighten fasteners
until prompted.
Step 1: Assembly preparation.
Clear table top and set Locking Drawer Assembly
on table top, with lid facing up. Position the Locking
Drawer Assembly so that one end hangs off of the
table enough to allow the chrome legs to go through
the square holes. Insert one set of chrome legs
through the overhanging holes as shown in Figure 1.
Do not bolt legs to top.
1.
Locking
Drawer Assy.
Table or
workbench
Locking
Top
Chrome
Legs
Step 2: Connecting legs and side
accessory to drawer assembly
Choose one of the side accessories (Pry Bar Holder
or Side Work Bench - Figure 2 shows Pry Bar Holder)
for attachment to the overhanging end of the service
cart. Align the outermost bolt holes in the accessory
with the bolt holes in the end of the cart and with
the uppermost holes in the chrome legs. Position a
washer and insert a 6mm bolt through the washer,
bolt holes, and legs as shown. Secure bolts with
a flat washer, lock washer, and nut on inside of
Locking Drawer Assembly. Tighten bolts until parts
fit together firmly.
Repeat steps 1 and 2 for other end of cart,
using remaining side accessory.
2.
Locking
Top
Locking
Drawer Assy.
Chrome
Legs
6mm
Bolt
8013ADELUXE/8013ABKDELUXE/8013ABLDELUXE Rev. A
Table or
workbench
Pry Bar
Holder
2 7/3/14
Page 3

ASSEMBLY INSTRUCTIONS
Step 3: Connecting the bottom tray to the
chrome legs.
Lift the cart and place on top of the bottom tray with
chrome legs through the square leg-holes. Align bolt
holes in bottom tray with lower holes in legs and
insert a 6mm bolt through the washer, bolt holes,
and legs as shown. Repeat with all remaining holes
in bottom tray.
Step 4: IMPORTANT: Tighten all bolts.
At this point, all bolts should be tightened. Tighten
bolts opposite each other rather than tightening all
bolts on one side first so that cart remains aligned.
Avoid using excessive force when tightening bolts.
Over-tightening bolts can make drawers bind and
hinder their operation.
Step 5: Attaching handles to drawer faces.
Open the bottom drawer of the service cart. Align
the ends of the long handle with the edges of the
bottom drawer, so that the channel in the handle
covers all six holes in the front of the drawer.
Insert screws through each hole from inside the
drawer and into the drawer handle channel.
Tighten the screws. Repeat for all remaining
drawers using short handles.
3.
5.
Bottom
Tray
Chrome
Legs
6mm
Bolts
Do not allow the handles to over
NOTE
hang the ends of the drawer faces,
as they will interfere with the
operation of the drawer.
Step 6: Attaching casters.
With the provided keys, lock all drawers, the top, and
the Pry Bar Holder to prevent them from opening. Turn
the cart upside down, allowing it to rest on chrome leg
tops with the plastic inserts facing up.
Do not allow the Side Work
NOTE
Insert the stem of one caster into the hole in a plastic
insert. Using a rubber mallet, hammer the casters into
place until the stem is no longer visible. Repeat with
other casters.
NOTE
Bench to swing freely, as it may
be damaged or cause injury as
cart is turned upside down.
Ensure that both locking casters
are on same end of the cart.
Once casters are installed, stand cart upright.
Assembly is complete.
8013ADELUXE/8013ABKDELUXE/8013ABLDELUXE Rev. A
6.
3 7/3/14
Page 4

GUARANTEED TO PERFORM
PARTS BREAKDOWN
MODEL 8013ADELUXE, 8013ABKDELUXE,
8013ABLDELUXE REV. A SERVICE CART
WITH LOCKING TOP & DRAWERS
INCLUDES PRY BAR HOLDER AND SIDE WORK BENCH
7
ALSO AVAILABLE
Part # Description
RS3DHDL Short Chrome Drawer Handle
RS8006HDL Long Chrome Drawer Handle
RS8006HDLS Handle Screws (Set of 6)
RSRBSLIDEC2 Clip-On Roller Bearing Slide / pr.
8045RSLD Red Replacement Small Left Drawer
without Slides
8045BKSLD Black Replacement Small Left Drawer
without Slides
8045BLSLD Blue Replacement Small Left Drawer
without Slides
8045RSRD Red Replacement Small Right Drawer
without Slides
8045BKSRD Black Replacement Small Right Drawer
without Slides
8045BLSRD Blue Replacement Small Right Drawer
without Slides
8045R4D Red Replacement 4" Drawer
8045BK4D Black Replacement 4" Drawer
8045BL4D Blue Replacement 4" Drawer
8045R2D Red Replacement 2" Drawert
8045BK2D Black Replacement 2" Drawer
8045BL2D Blue Replacement 2" Drawer
8007 Red Replacement Third Shelf
8007BK Black Replacement Third Shelf
8007BL1 Blue Replacement Third Shelf
RS8013LM Locking Mechanism
RS8045LS 2-Piece Lock & Key Set, Keyed Alike
1110. EVA Foam for Trays / 10 pk.
1111. EVA Foam for Drawers / 10 pk.
8004SSM Rubber Liner for Side Shelf / 10 pk.
RSDECAL02 Black Decal for 8013ADELUXE
RSDECAL03 White Decal for 8013ABKDELUXE
and 8013ABLDELUXE
1
8
1
6
3
4
REPLACEMENT PARTS LIST
Item Part # # Req’d Description
1 RSSC7 2 Chrome Leg/ea.
2 RSSCPLW 2 Locking Caster/ea.
3 RSSCPW 2 Non-Locking Caster/ea.
4 RSSCPP1 1 Set of 4 Plastic Inserts
5 RS8013ADLXBK 1 Bolt Kit (Incl. 8 ea. of 6mm bolts,
nuts, washers and 14 screws)not shown
6 8011 1 Red Pry Bar Holder
8011BK Black Pry Bar Holder
8011BL Blue Pry Bar Holder
8013ADELUXE/8013ABKDELUXE/8013ABLDELUXE Rev. A
2
Item Part # # Req’d Description
7 8004 1 Red Side Work Bench
8004BK Black Side Work Bench
8004BL Blue Side Work Bench
8 8045RLT 1 Red Replacement Top
Lid with Lock
8045BKLT Black Replacement Top
Lid with Lock
8045BLLT Blue Replacement Top
Lid with Lock
4
Looking for storage & organizers? Visit our website.
 Loading...