

Page 1
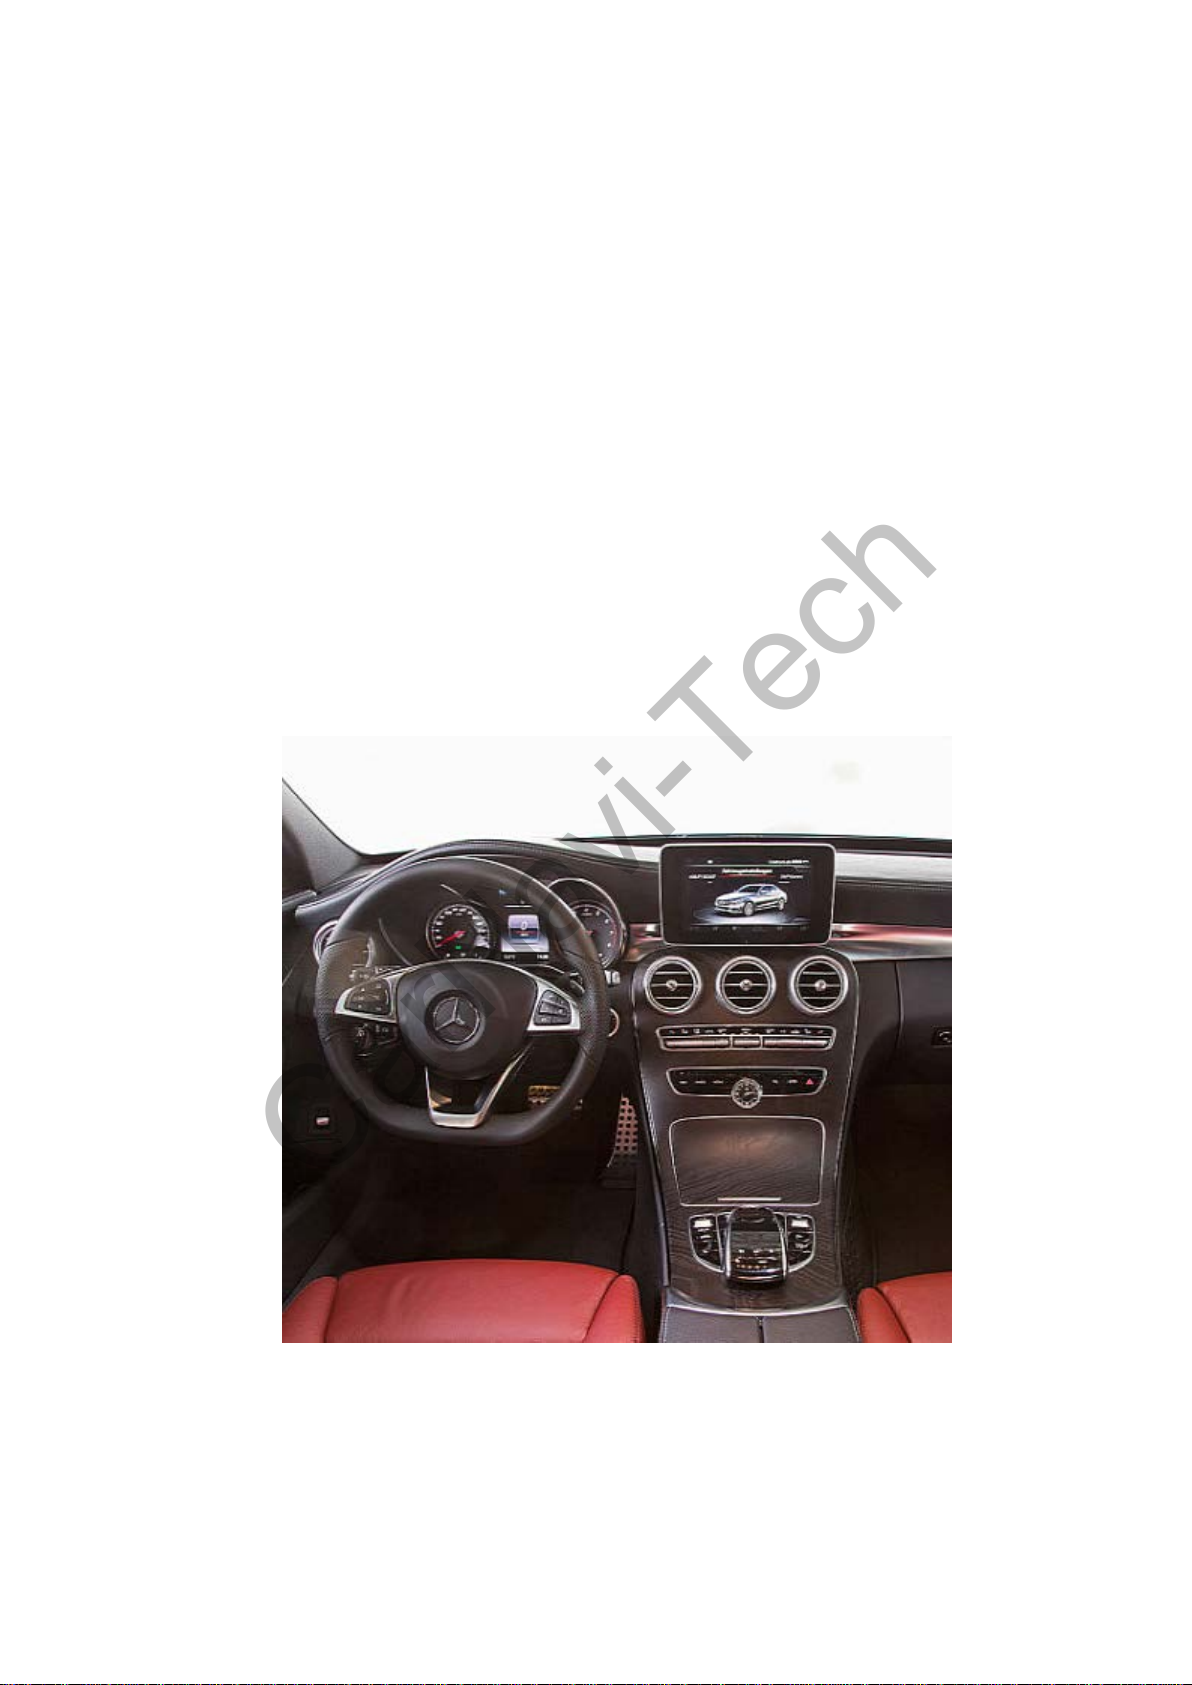
Mercedes-Benz Parking Assistant System Easy Operation Manual
CarNavi-Tech
——————————————————————————————————————————————————————————
Mercedes-Benz
M
ultimedia GPS system
with Capacitive touchpad
Easy Operation Manual
Model: SE-MB15(A/B/CLA/GLA/C/V/GLC/GLE-Class)
For ALL NTG5-Entry
NTG5-HU
NTG5S1
SUNE TECHNOLOGY ELECTRONIC CO.,LTD
No.9,Lane 606,Anping Rd,Tainan City
70849,TAIWAN
TEL:+88662292246 FAX:+88662288104
Http://www.sune-tech.com
Shop http://www.carnavi-tech.com
SKYPE:sune_tech or hsin_han99
Page 2
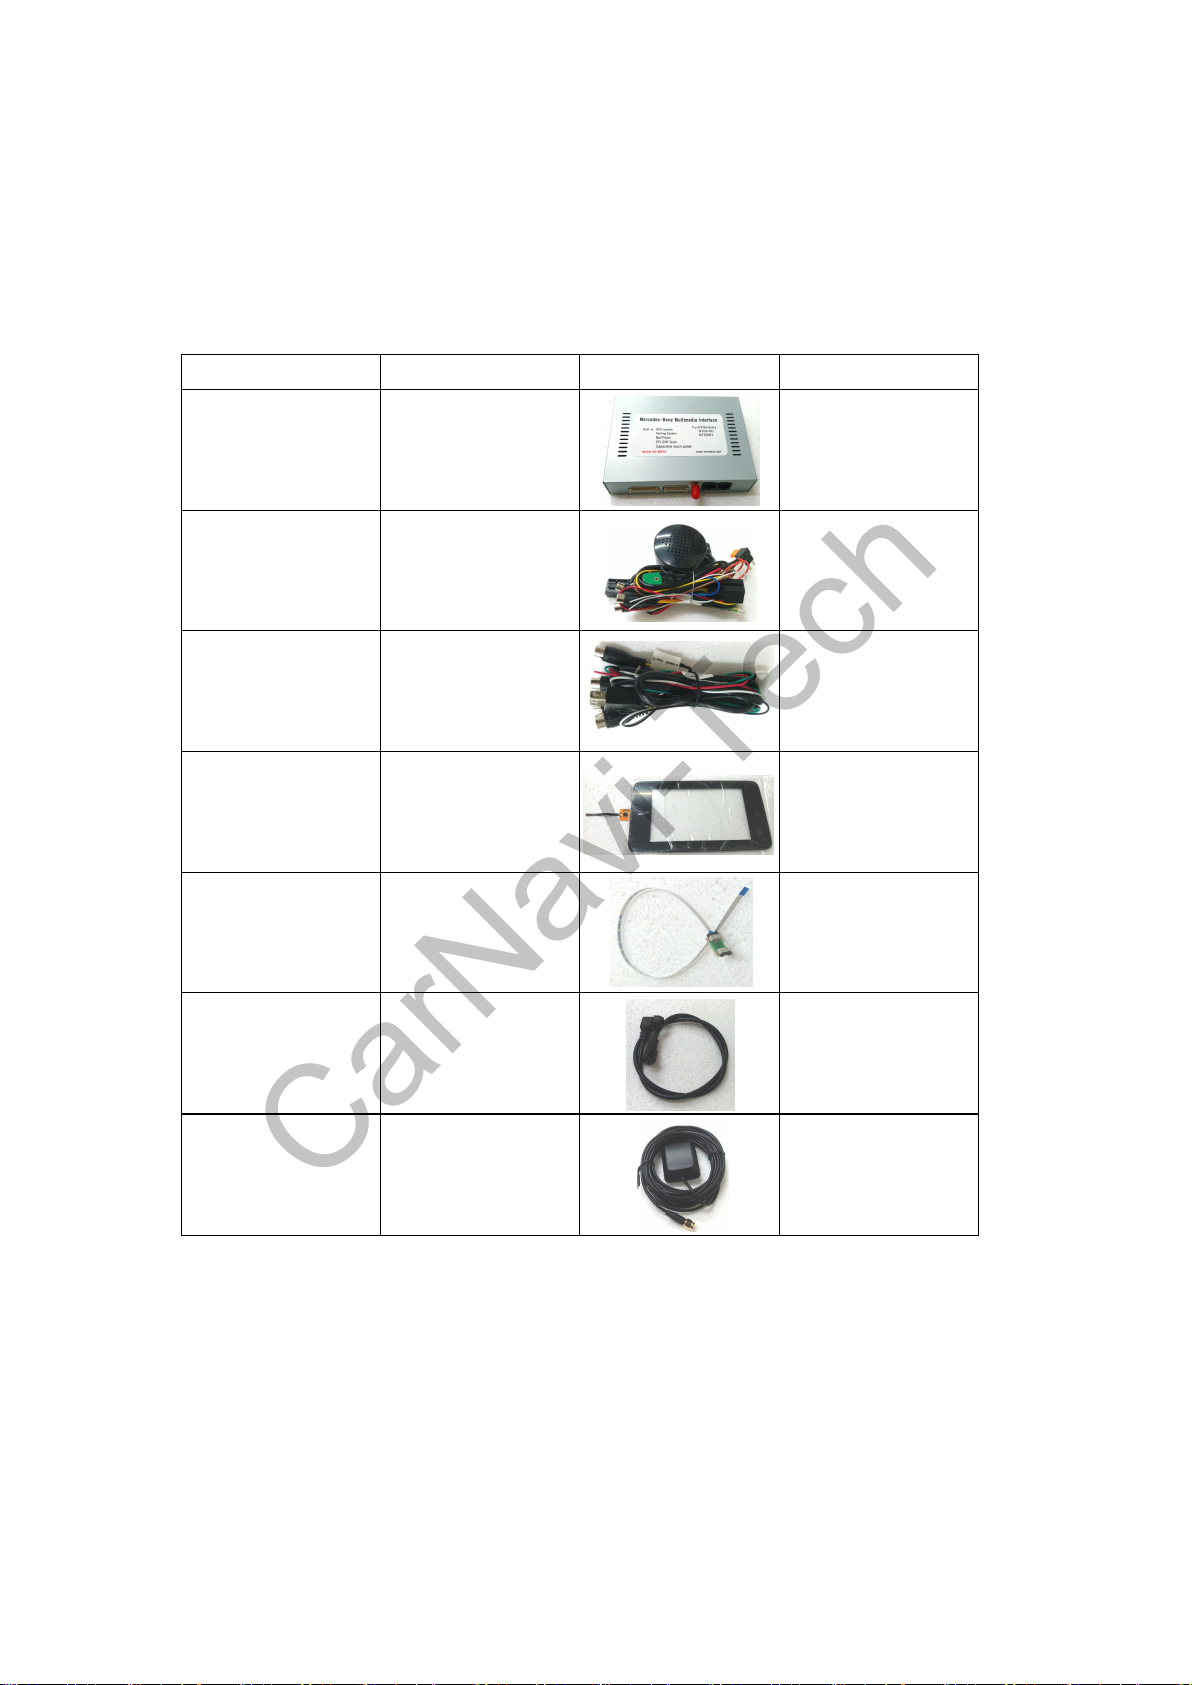
1、Products
CarNavi-Tech
This section describes the appearance of the company's products, physical picture, as well as our products
more special.
Thank you for using our SUNE TECHNOLOGY products, after you get the product, please carefully
check the open standard accessories listed below are complete
1.1.Accessory list
Sequence No. . Name
SE-MB15
1
2
3
4
5
Multimedia GPS
system
Original
Plug&Play
car power
adapter cable
video input cable 1
7inch Capacitive
touchpad
Touchpad
ribbon cable
Picture Amount
1
1
1
1
6
7
PS:Capacitive touchpad with 2 models,please make sure
your screen model than order right touchpad!!
LVDS video input 1
GPS Antenna 1
1.2.Features and Performance
products Model :SE-MB15 Multimedia GPS system for C-Class,B-class,CLA-class,A-Class,GLA-Class,
GLC-class ,GLE-class,V-class with NTG5 audio20 with 7inch system.
All features of this product is switched by the original car audio buttons or by touch
Mercedes-Benz Multimedia GPS System with capacitive touchpad .
1 x Rear camera input,1 x Front camera input and 2 x Video input
360 panorama function
Special harness Plug & Play 。
Smart parking system when you put "R" will show Rear camera,put"D" will show front camera
,More than 10KM speed reversing exit
Page 3
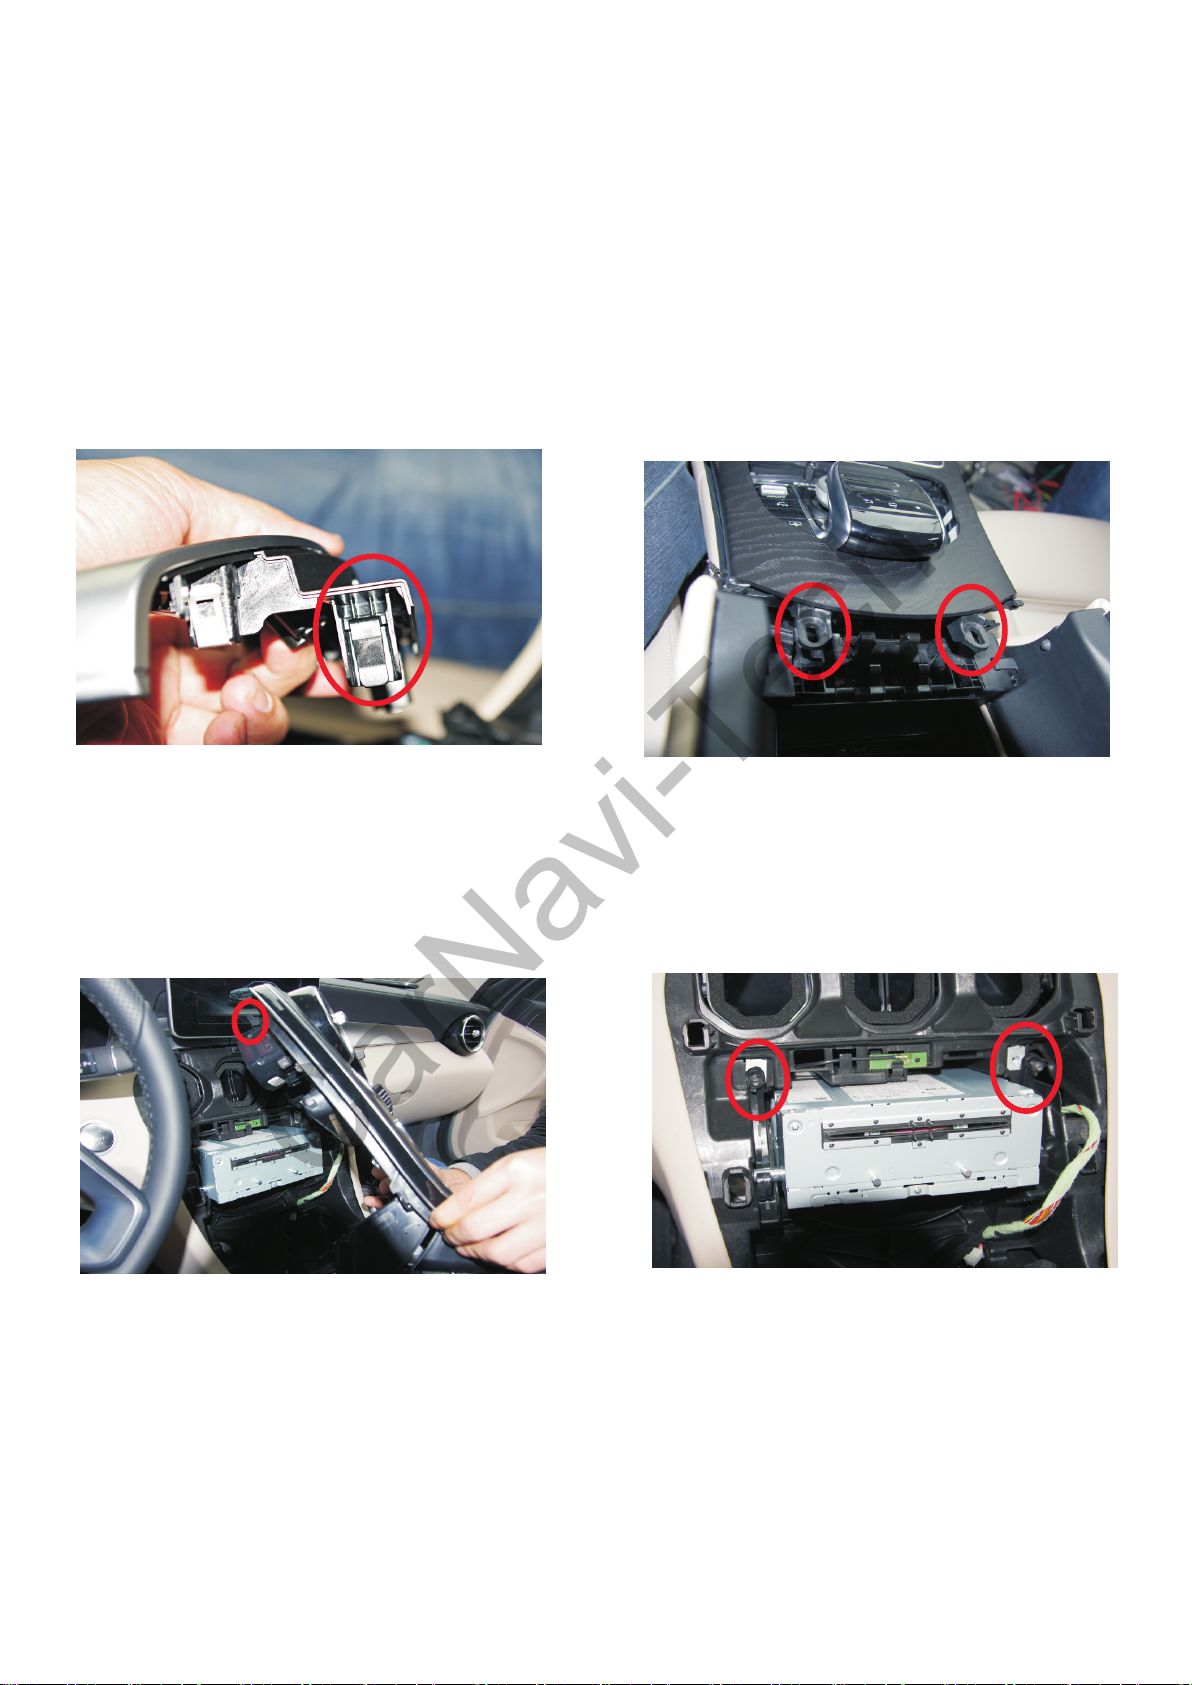
Installation(For W205/GLC/447)
CarNavi-Tech
1.How to remove Headunit
1.The center armrest side silver plaque with the
tools to remove, the two sides each a dark
button as shown above
3.The entire panel is dark fasten.Removed from
the handrail to the comand system,Note that the
bottom of the screen with two reverse snaps
2.Remove two screws apart and trim,
The whole panel can be removed, as
shown above
4.Remove two screws on the top of
comand,than can be removed
Page 4
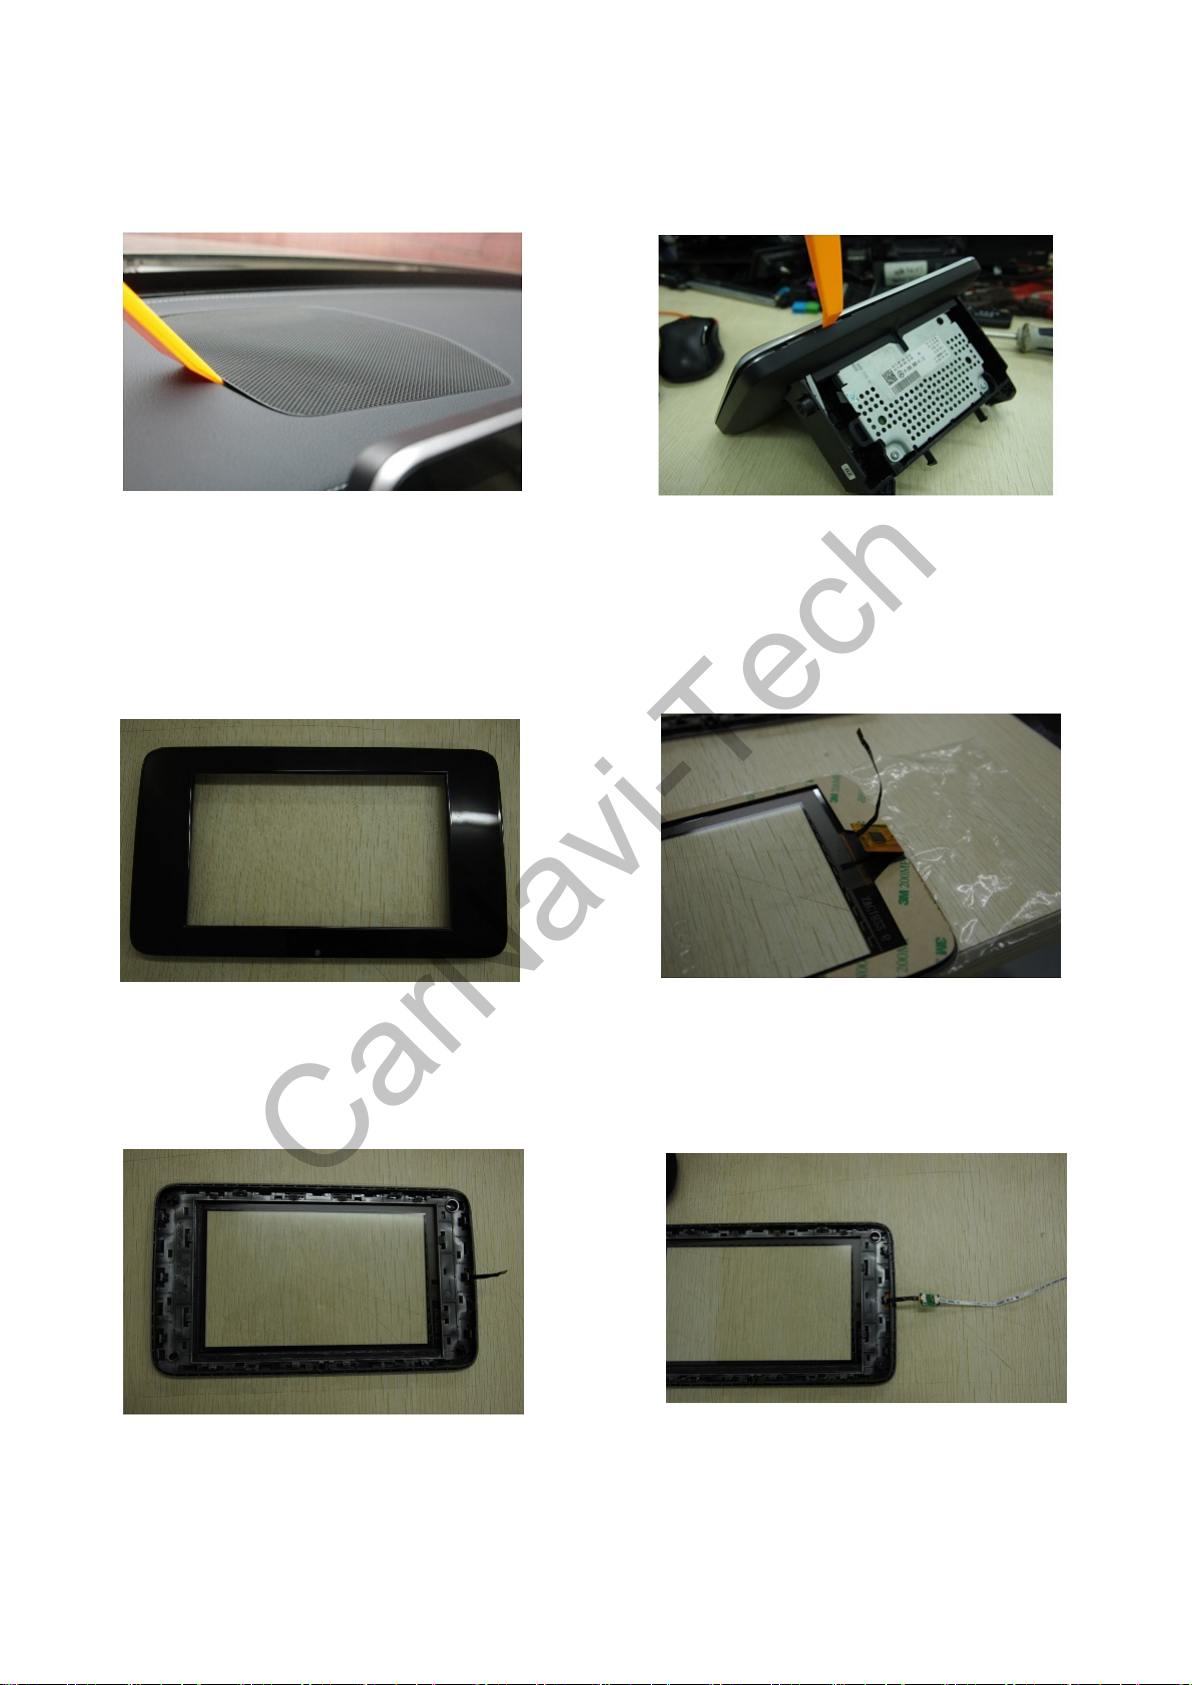
2.How to remove screen and install capacitive touchpad
CarNavi-Tech
1.Use special tool,remove speaker
cover than remove 2 of screws you
will take out monitor
3.Remove black front frame like this.
2.Carefully remove Chrome frame
than you can remove black frame
on chrome frame
4.The cable folded like photo
5.Carefully past capacitive on chrome
frame and make sure ribbon cable
direction
6.connection ting-long ribbon cable
Page 5
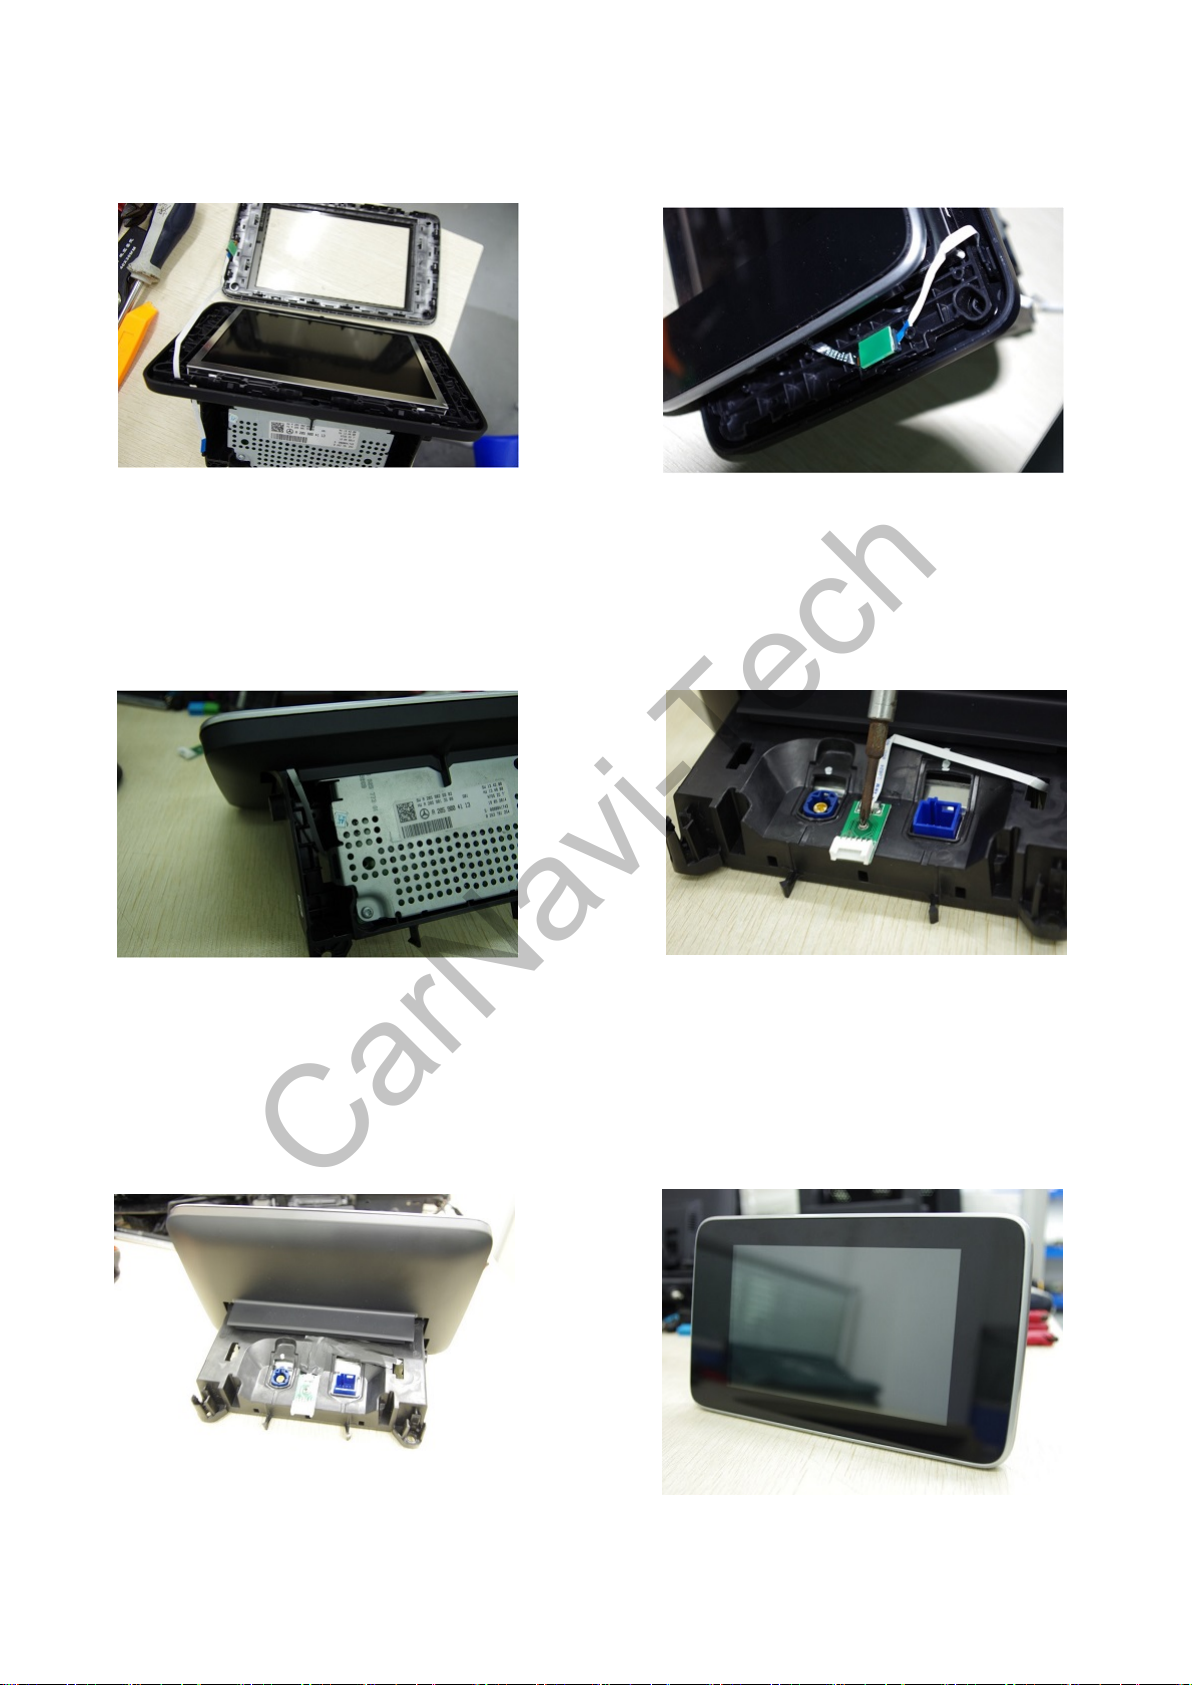
Insert into ting-long ribbon cable
CarNavi-Tech
7.
from front to back of screen
8.The small plate into the gap
9.Mounted on the front frame make
sure ribbon cable was back of screen
11.Finished back side
10.Fixed small plate
12.Front side
Page 6
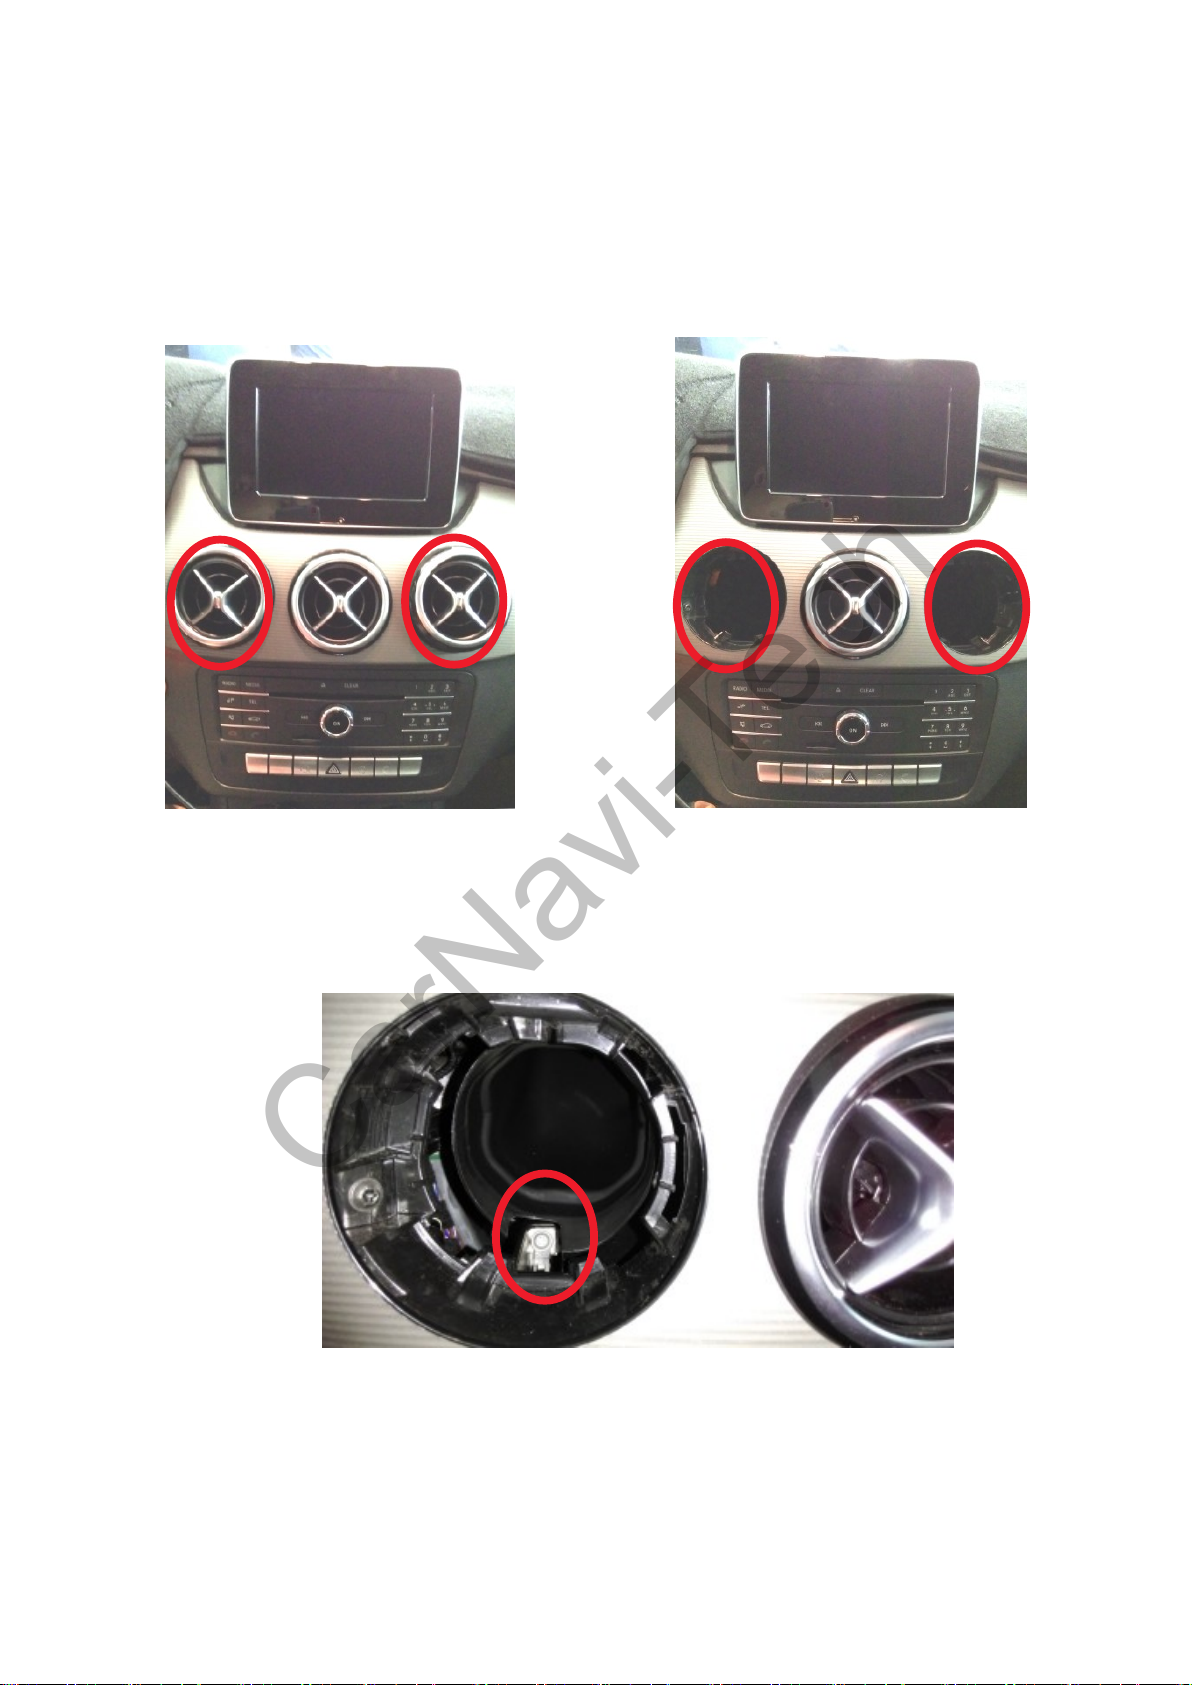
Installation(For A/B/CLA/GLA/GLE)
CarNavi-Tech
1.How to remove Headunit
1.Use tool remove Left and Right Airconditioning vent
3.Remove screws(Left and Right) than you can remove Audio system
2.Remove parts
Page 7
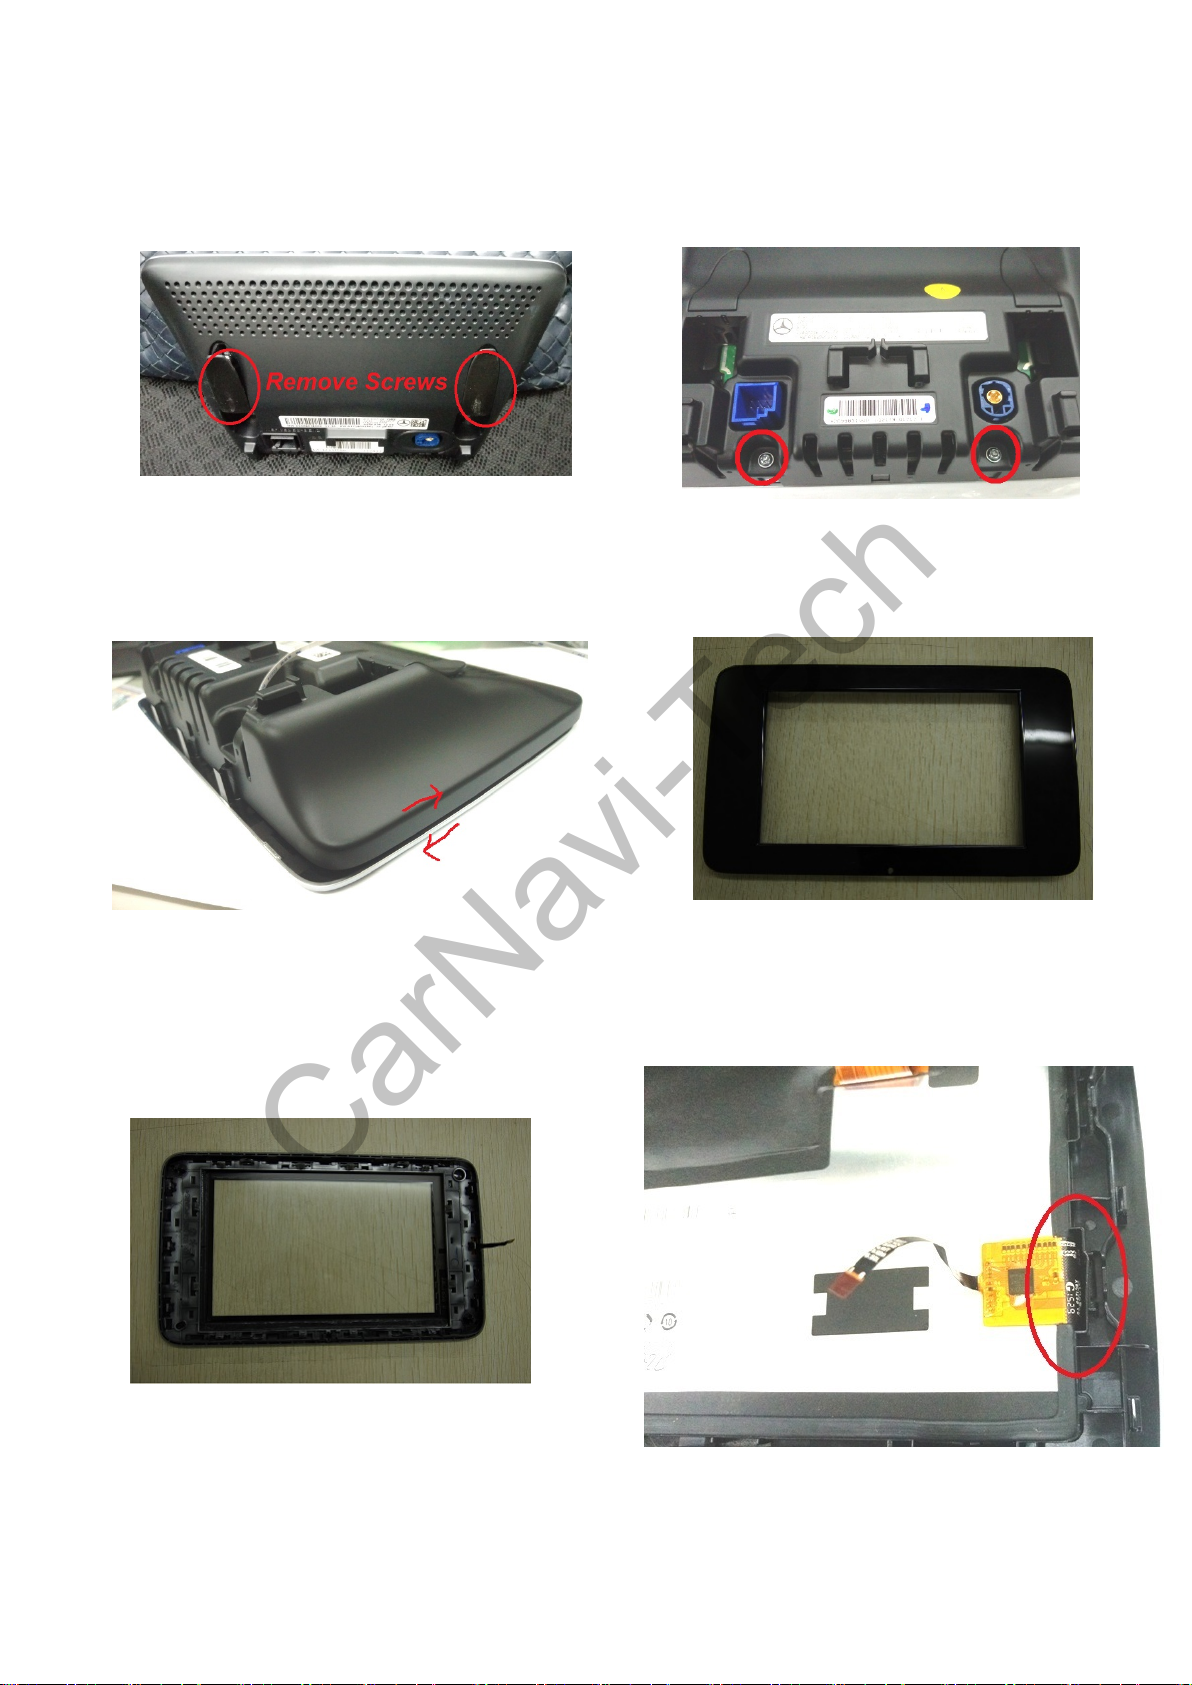
2.How to remove screen and install capacitive touchpad
CarNavi-Tech
1.Remove 2 of screws back of screen than
take out monitor
3.Remove front chrome frame,push it
different size than you can remove it
see red arrow
2.Remove buttom of 2 screws
4.Remove black front frame like this.
5.Carefully past capacitive on chrome
frame and make sure ribbon cable
direction
Carefully make sure brown ribbon cable From
6.
the front through to the back
Page 8
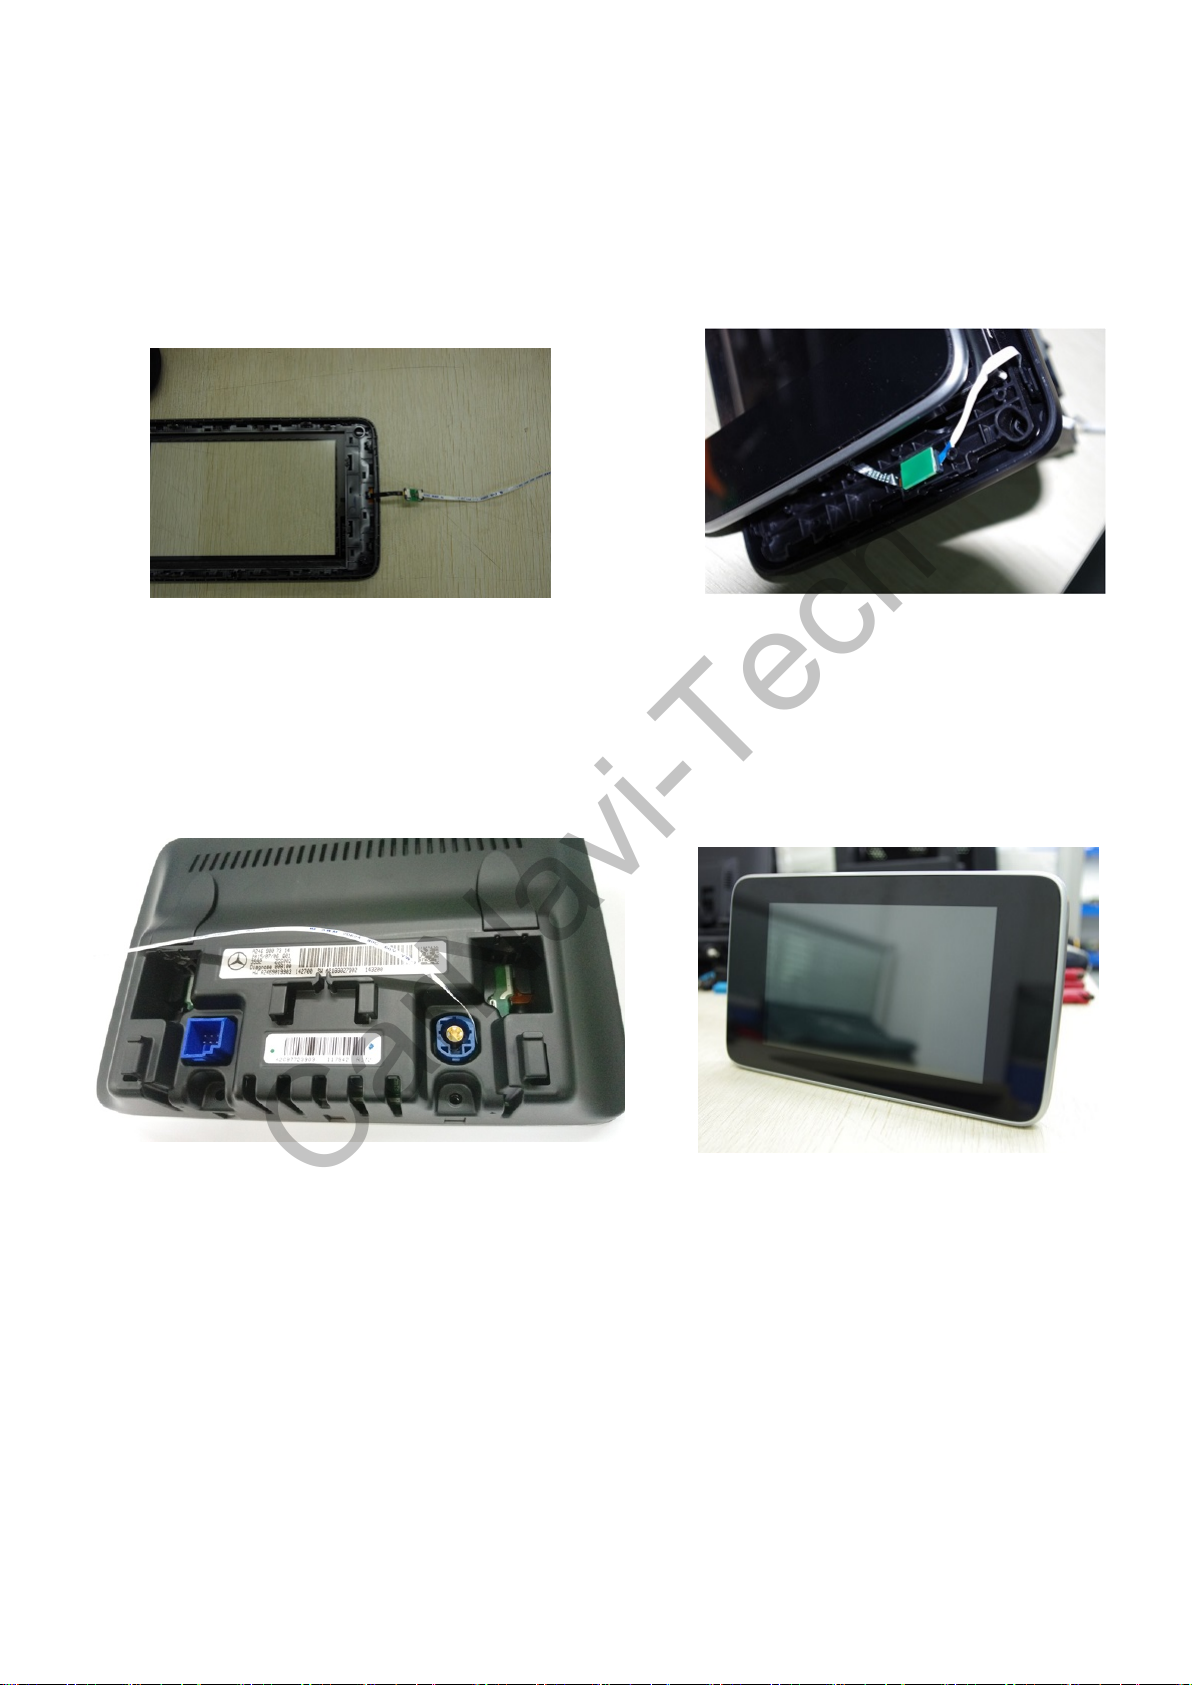
7.connection ting-long ribbon cable
CarNavi-Tech
8.The small plate into the gap
9.ribbon cable to back size
10.Front side
Page 9
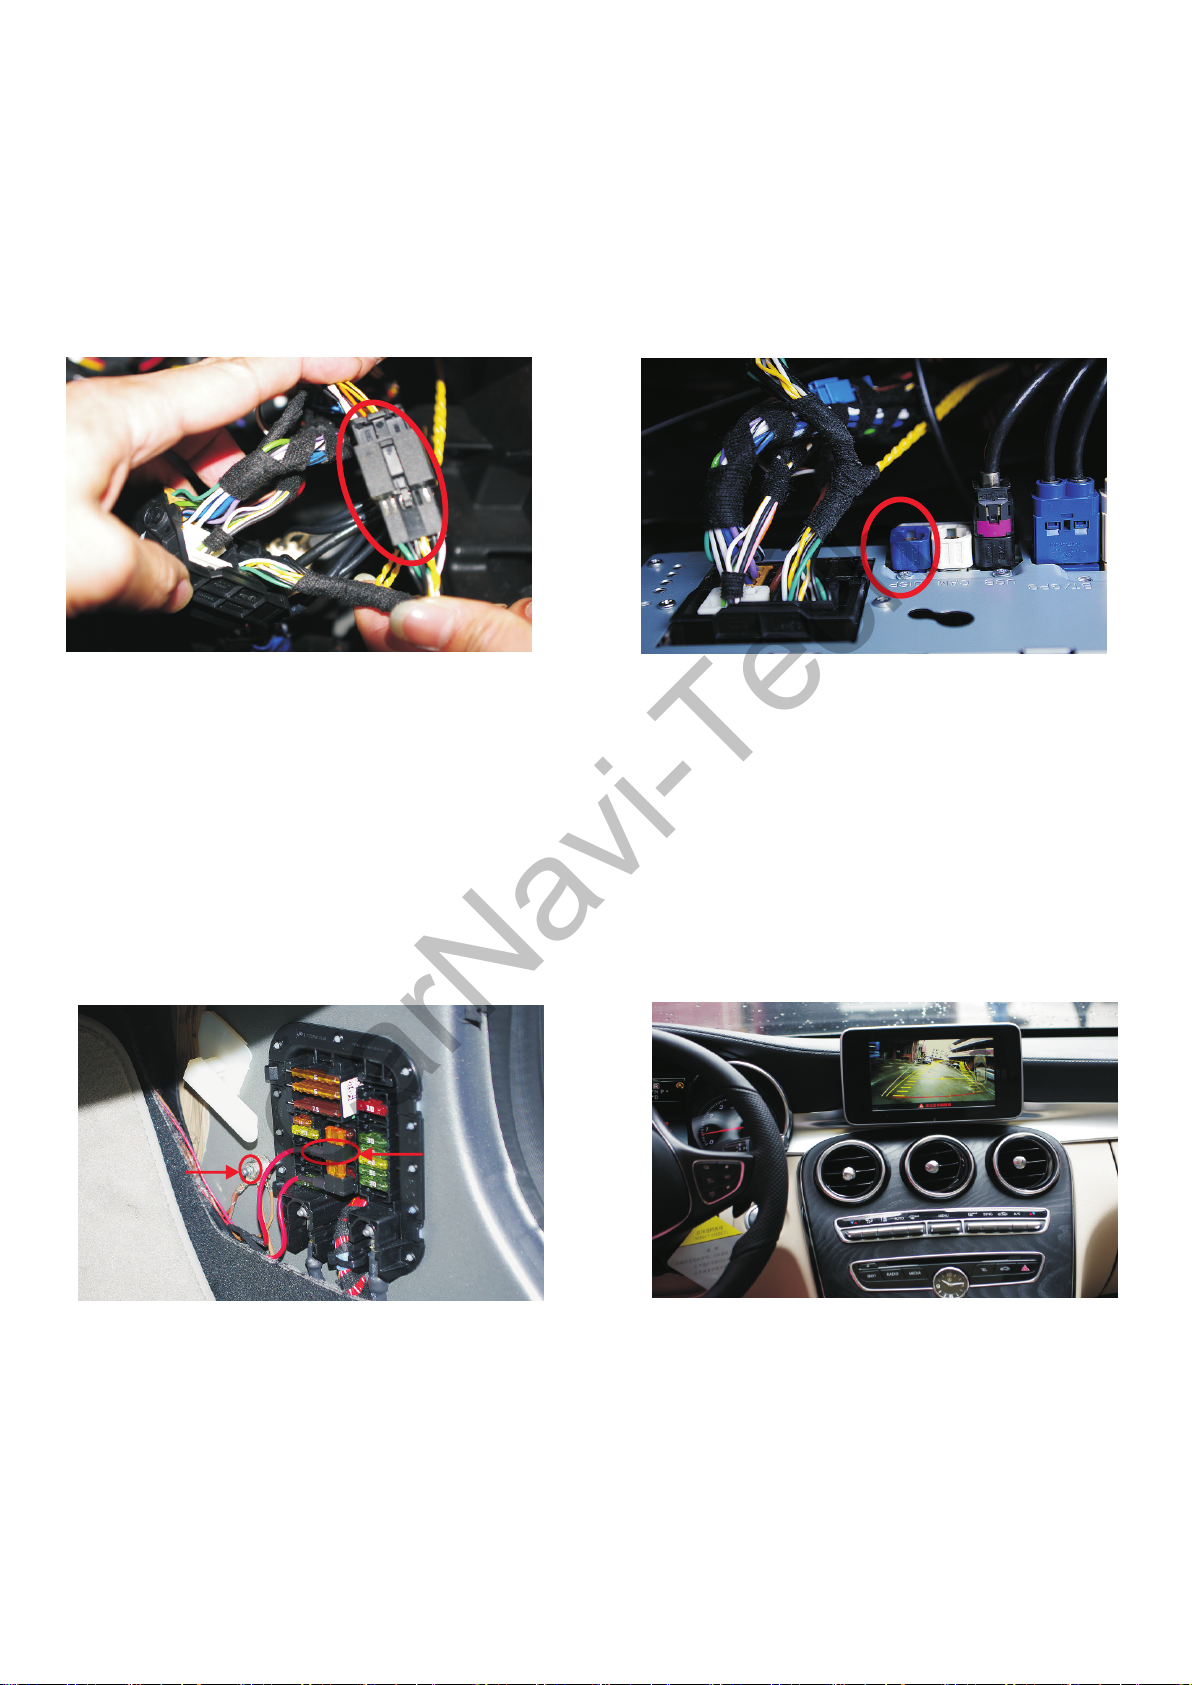
Installation
CarNavi-Tech
5.Please take away black connector than
plug into module Female connector than
module black male connector in original
connector
Power 12V
GND
6.Remove original blue LVDS than plug
into module LVDS-out connector,module
LVDS from module LVDS-in to comand
blue connector
7.you can connection module
power from front passenger
seat side door or headunit pin15
8.install module and camera than
check system working or not than
replace all accessories
Page 10
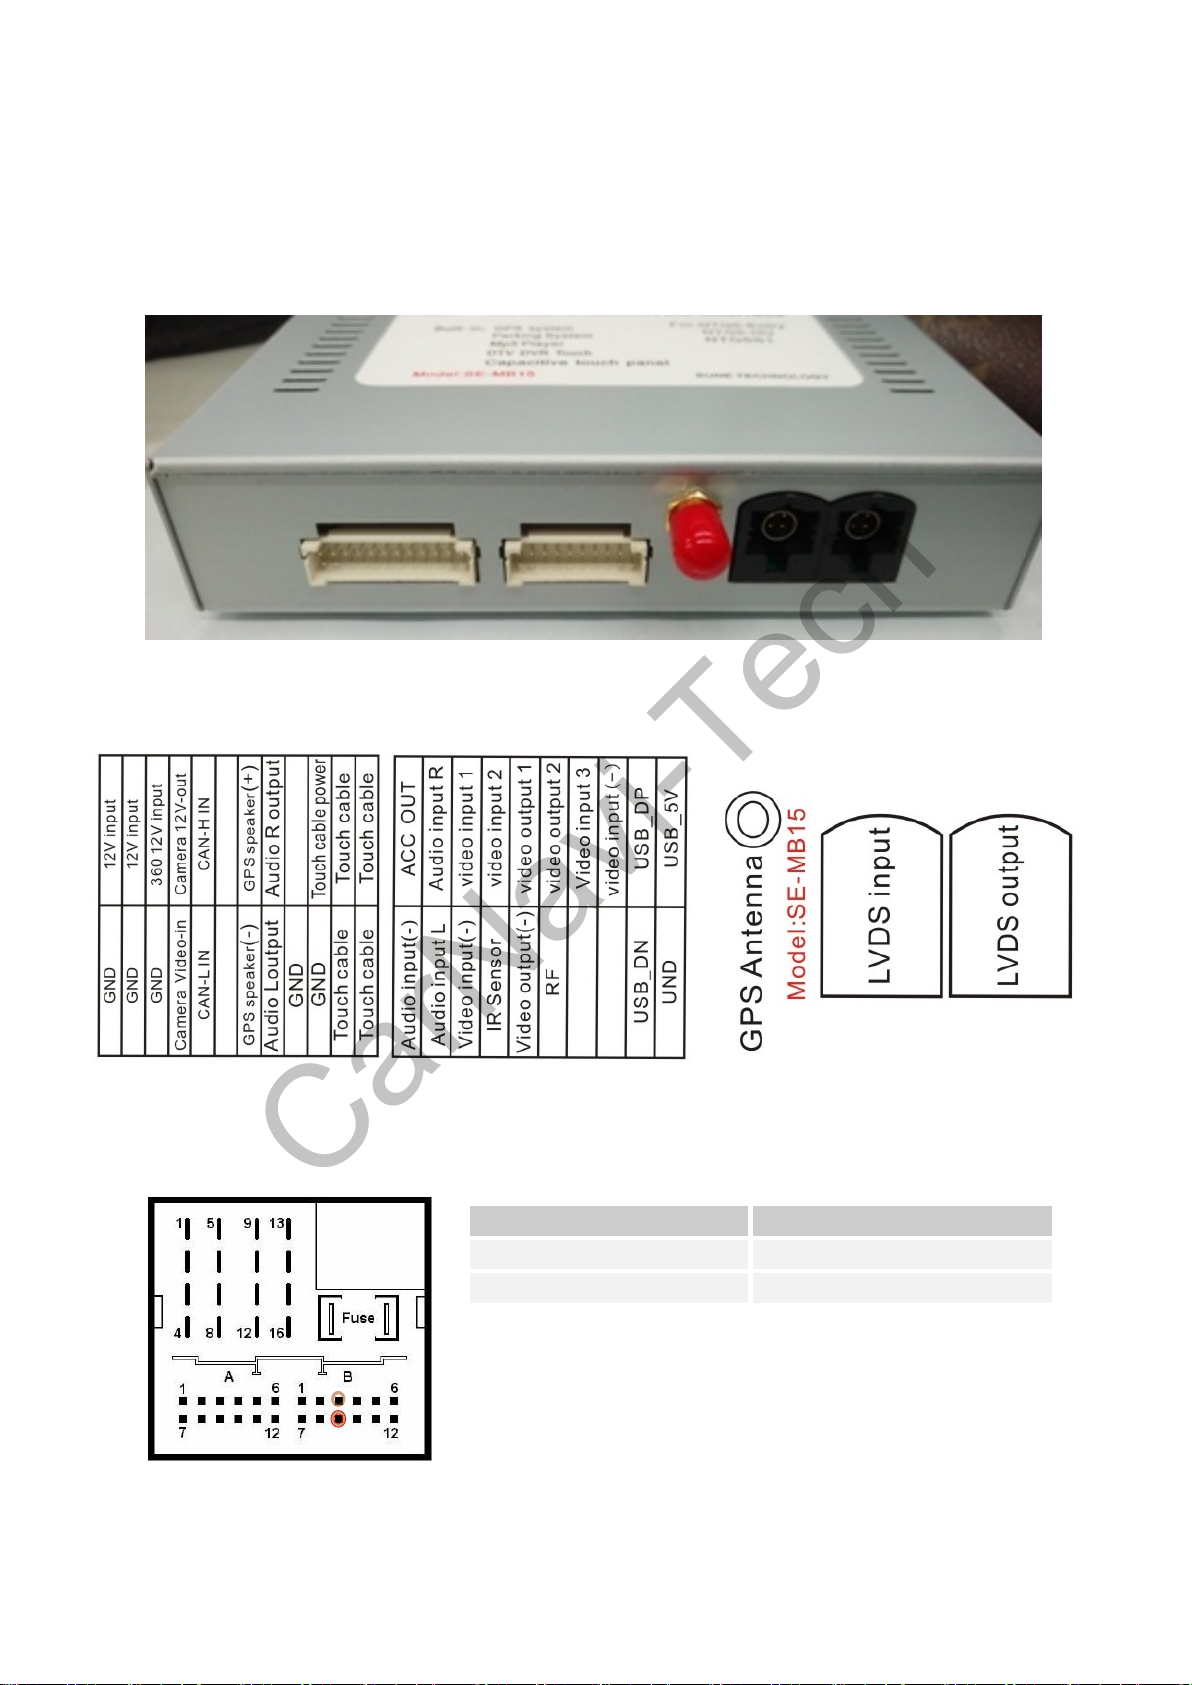
Diagram
CarNavi-Tech
Cable colour Assignment
●
Brown CAN LOW Pin 3
●● Brown/Red
No liability for vehicle wire colors and pin definition!
Possible changes by the vehicle manufacturer. The given
information must be verified by the installer.
CAN HIGH Pin 9
Page 11
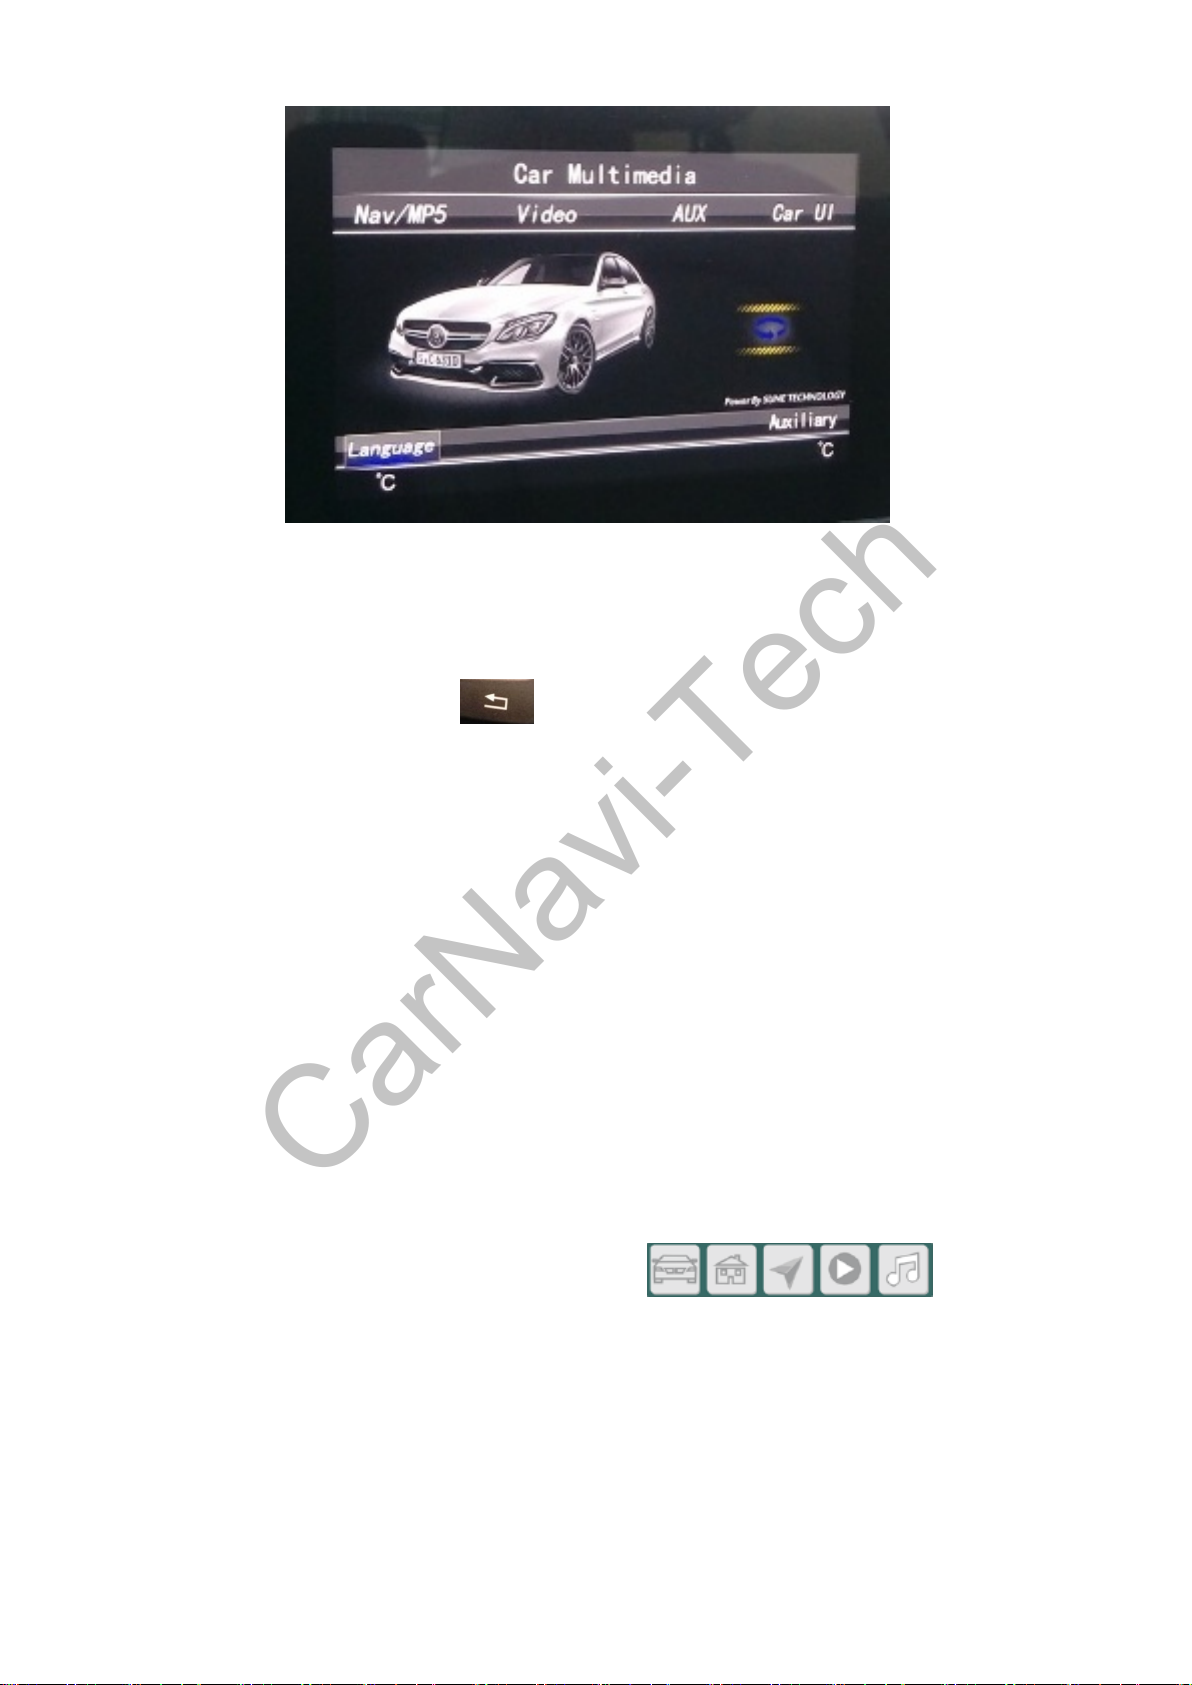
Function
CarNavi-Tech
on the original single-finger tap the touch screen (about 2 seconds) change to car Multimedia interface.In the
GPS screen, the two finger tap the touch screen (1-2 seconds) to display the Main menu screen, Quick button
operation: Return button on the steering wheel (can be changed according to customer demand other button)
1.
Short Press Return button :
1)
Click on the GPS / digital TV / video /OEM screen mutual Cycle or any circumstances return
the original picture (except reversing the screen)
2.
Long press on the Return button (more than 2 seconds):
1)
Under the screen when not in reverse long press on the Return button will switch to the reverse
camera and Front camera image (radar and parking line are not displayed),
3.
360 Reversing signal line(By voltage trigger to force open the camera screen function,Usually
connected to the reversing light),In Auxiliary after select (Voltage switch available )As long as
the input voltage is detected reversing screen will automatically switch(radar and parking line are
not displayed)
CAN reverse gear switch screens (R),In Auxiliary after Disable(Use Benz camera ) When put
4.
on "R",screen will change to aftermarket camera screen (radar and parking line will be
displayed),when put to "D" will show front camera(front camera option must enable),if
Enable(Use Benz camera ) screen will goto original camera.
(When you on Rear camera status the screen will Automatic withdrawal when Speed up to
10KM)
5.
The product support 7 inches Capacitive Touchpad for all Ntg5 system, you can choose it.
6.
There are five menu button on GPS screen:
Buttons respectively:Goto OEM screen、Goto main screen、Into the Gps、Video
player、Audio player,GPS program on the SD solt IGO TOMTOM ROUTE66
Play 720P video file format support:
MP4、3GP、MOV、AVI、DIVX、XVID、WMV、MPG
Play MP3 music file format support:MP3、WMA、WAV
navigation and MP5 / MP3 sound independent,do not worry about quality issues
7.
This product supports digital TV / Recorder / DVD player of IR (analog remote control) operation, you
can choose to set the in the Media (We support DVBT DVBT2 ISDBT and DVR.other country please
contact us)
、RM、
RMVB、FLV、MKV
Page 12
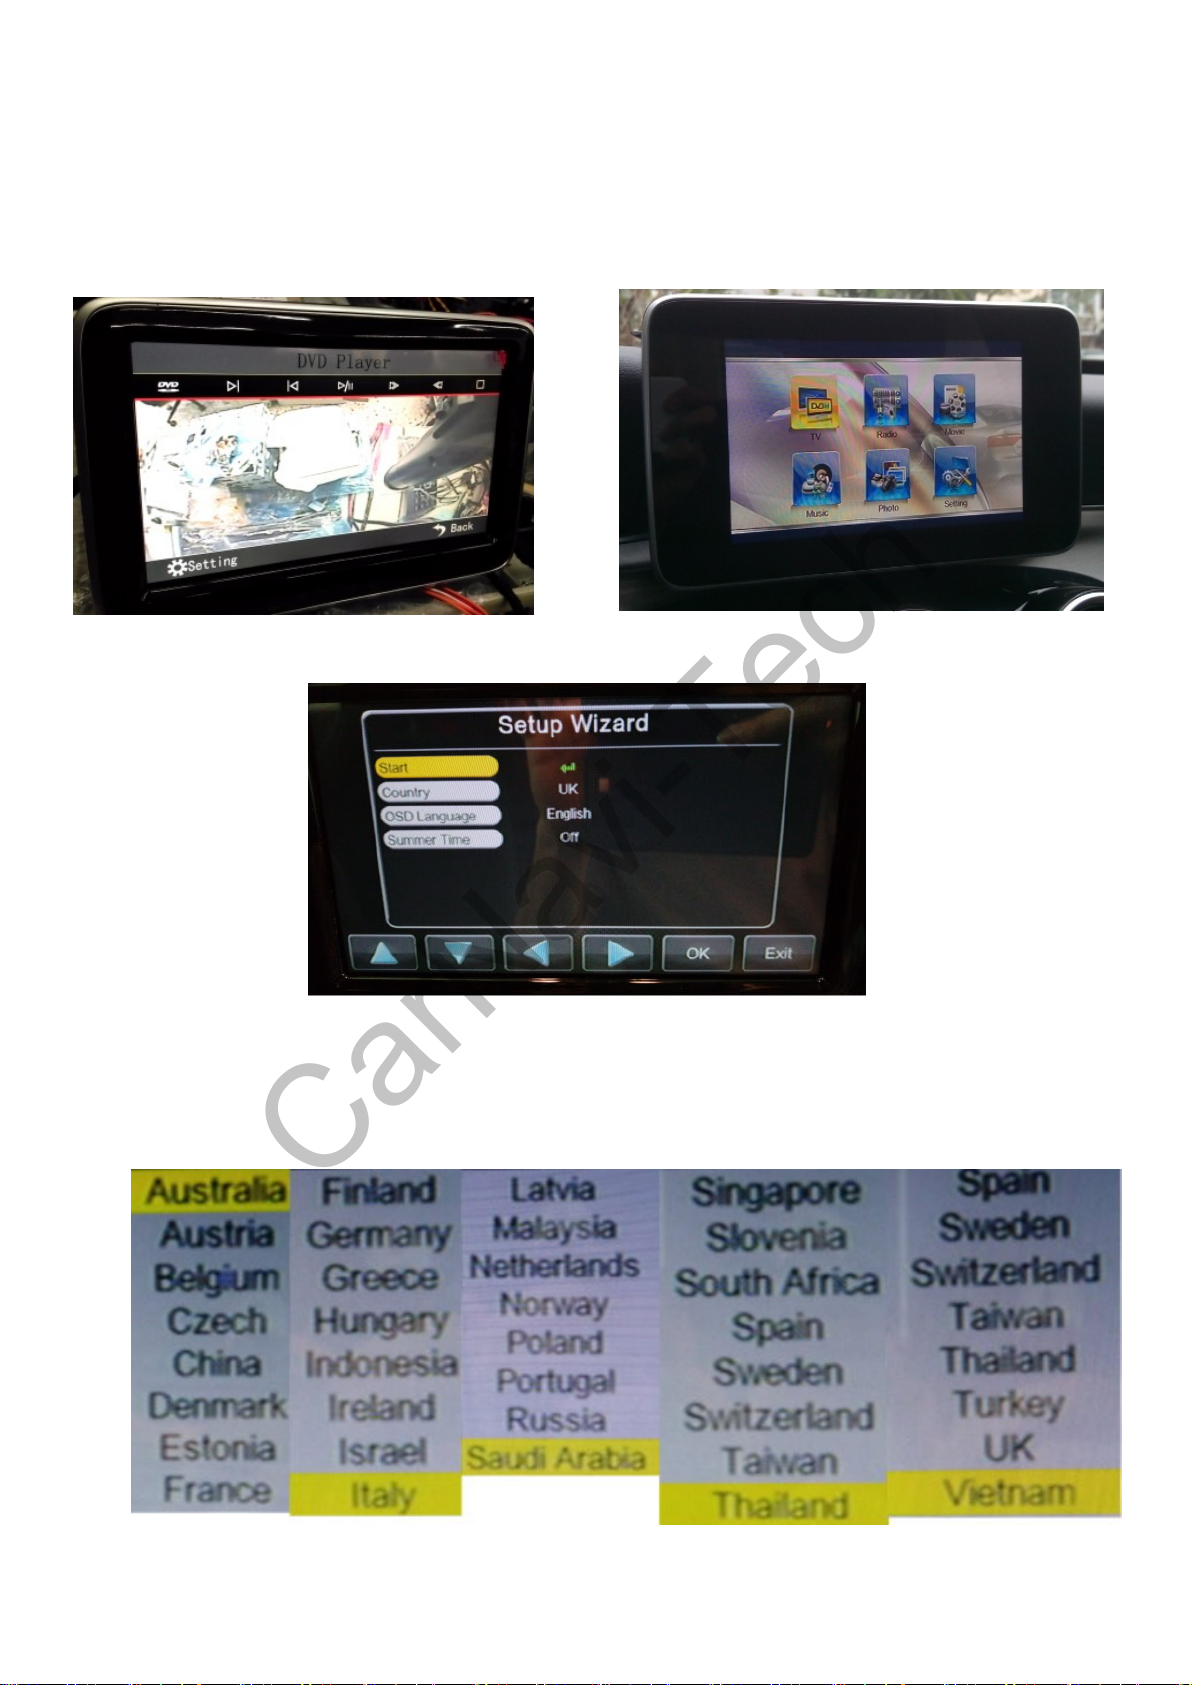
DTV,DVD Model selection
CarNavi-Tech
Factory IR touch code default :
DTV type(option)
DVD DVR type(option)
DVD input For touch code(option)
All function you can touch on
touch screen to control function
DTV input For touch code(option)
DTV input
We can support DVBT,DVBT2 and ISDBT
Page 13
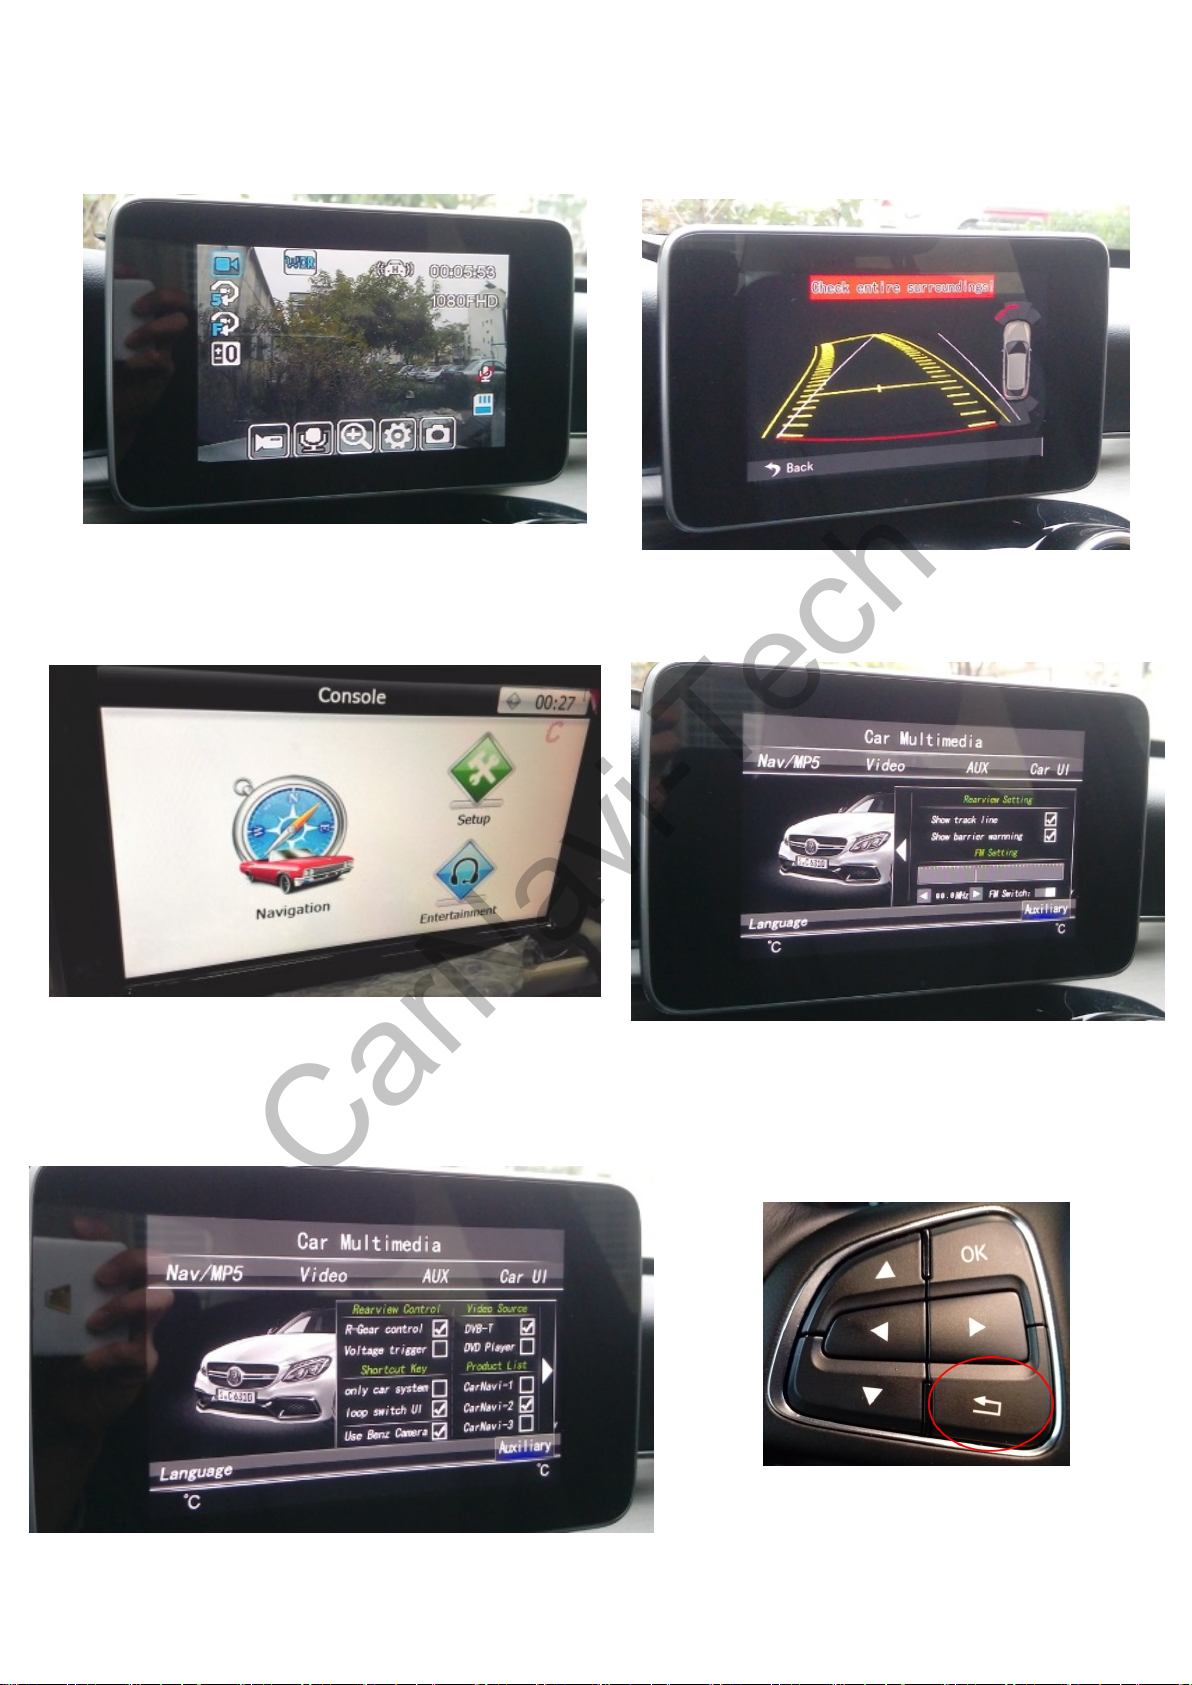
DVR input touch control
CarNavi-Tech
with multi language
Rear View camera
GPS system
Parking setting,FM Setting(built-in wirless
transfer can send DVD,DTV audio to car
system)
Switch mode button(shortcut button)
Page 14
Mercedes-Benz Parking Assistant System Installation Operating Instructions
CarNavi-Tech
——————————————————————————————————————————————————————————
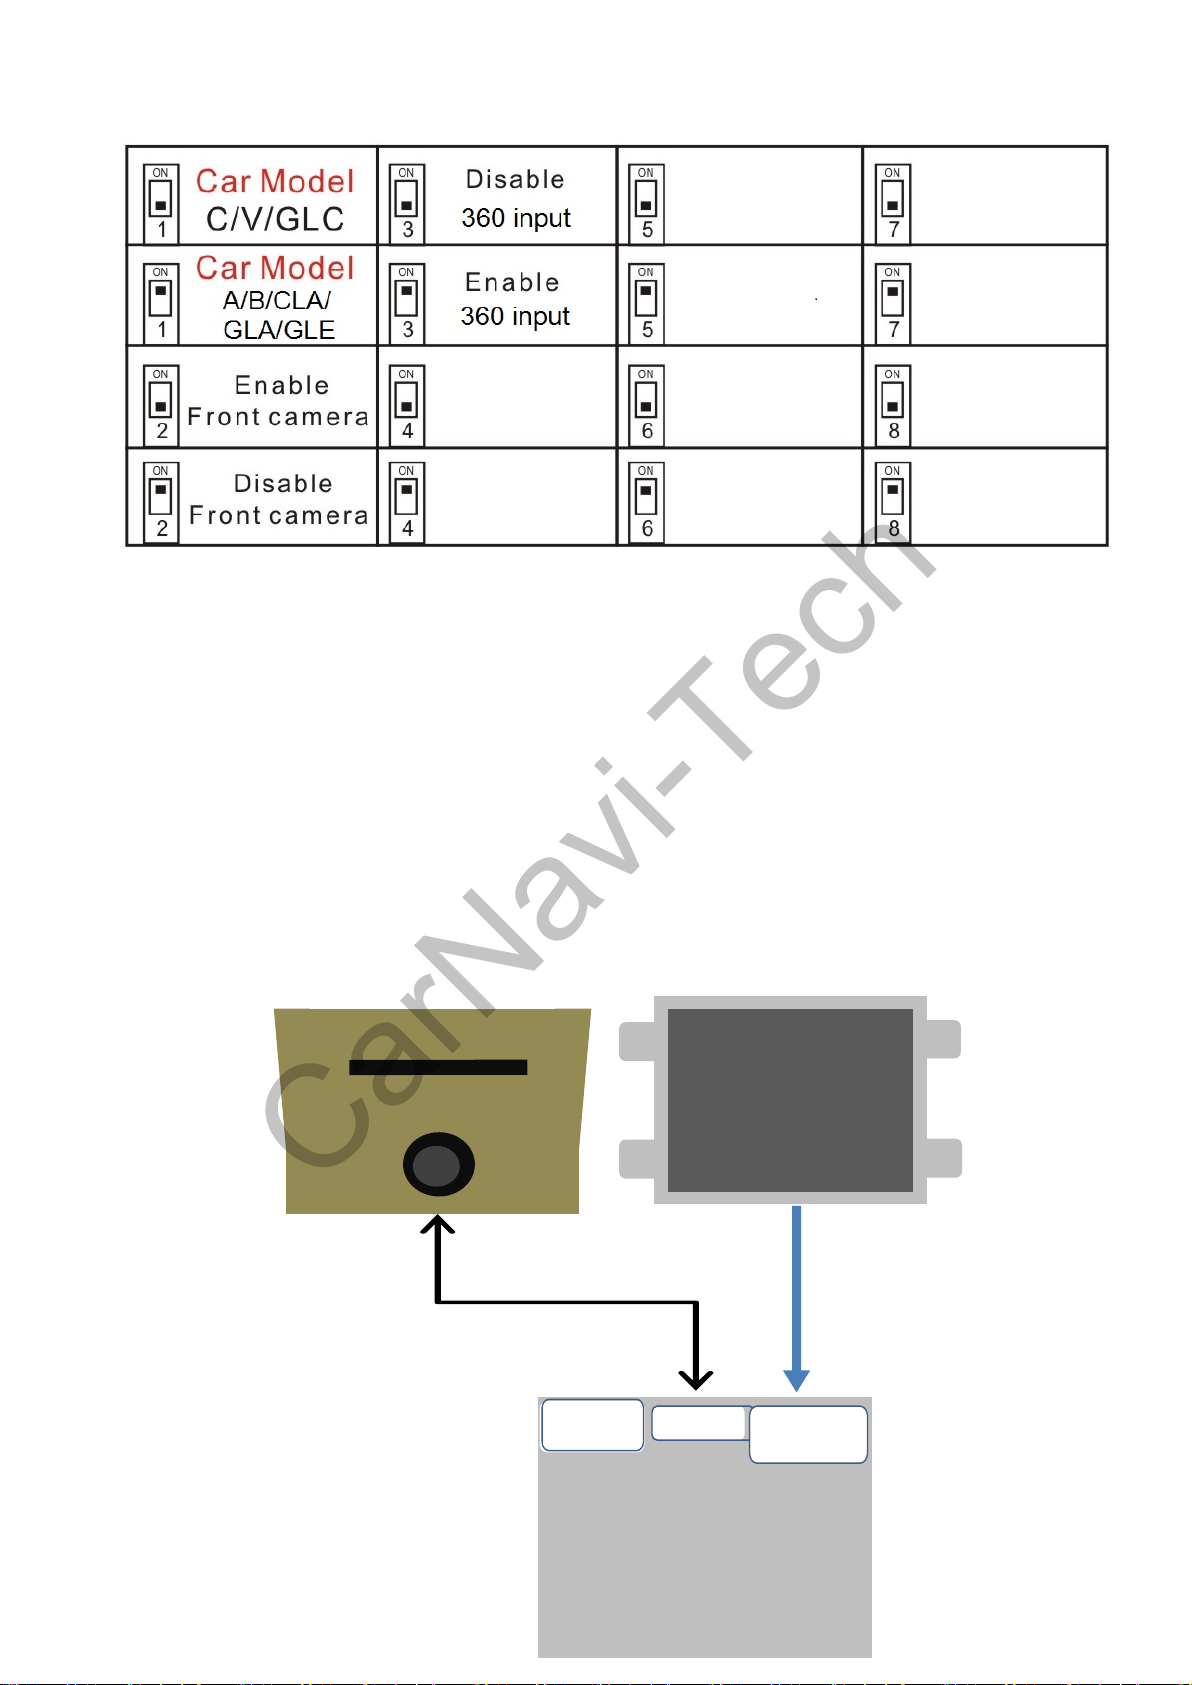
4、DIP Switch and Diagram Description
If your Mercedes-Benz car without parking sensor or with Manual transmission,it will
not auto change to camera video.
you must setting to follow:
1.turn Dip2 down off
2.
Blue wire connection 360 signal to back light(12V)
3.
Auxiliary "Voltage trigger" must enable
Note: Customers can function DIP switch status to select according to their
actual needs.
comand system
Monitor
Original LCD cable
Offered LCD cable
power
4
LVDS IN
Multimedia GPS system
SE-MB15
TO
LVDS OUT
 Loading...